
handmadecp
A Journey into Leather Craft
Est: OCT 15 2015
291 posts
Don't wanna be here? Send us removal request.
Last Seen Blogs

friendlyneighborhoodktbug
Your friendly, neighborhood ktbug

dellerino
M' Stuff

nessie-r
Nessie's Art

aneprinslo
Life of a journalist

radicalrealmcomics
RAD!
Note
Are based in UK? Robert
Hi Robert, Sorry for the long delay, Lifes been beating us up as a family. The answerto your question is YES, I'm in Manchester UK.
0 notes
Text
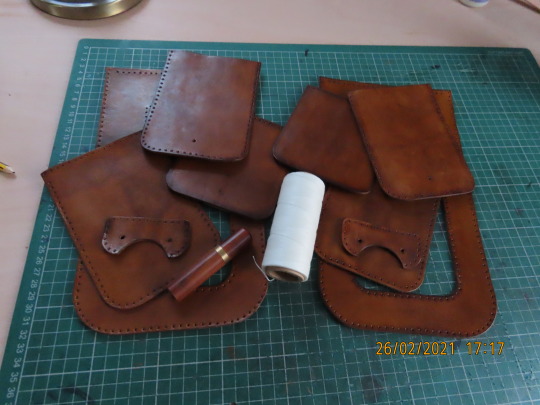
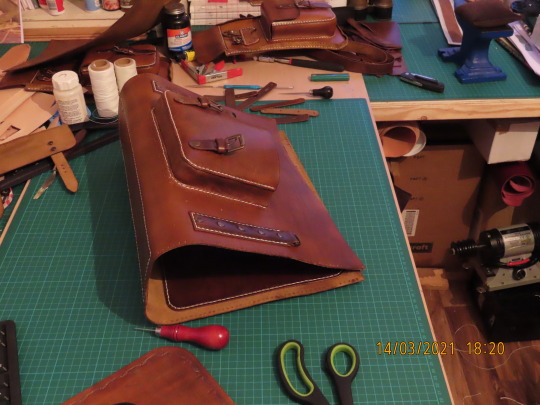
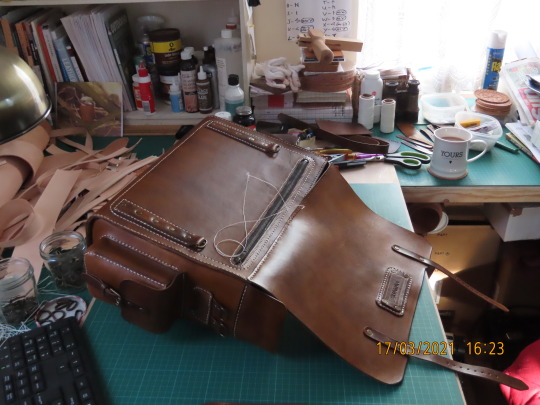
‘One minute bag’.
Hi guys, it’s been a cow of a few years here in the UK but we are back with a new Build along project. Again, the credit for the Pattern goes to Tony See at Diesel punk.Ro. The actual putting together is all li’l ole’ me. Let’s go.
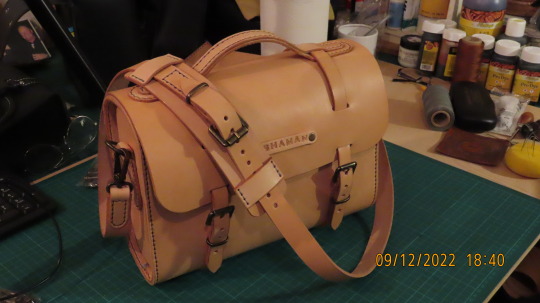
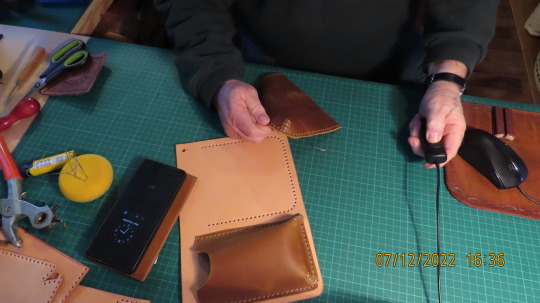
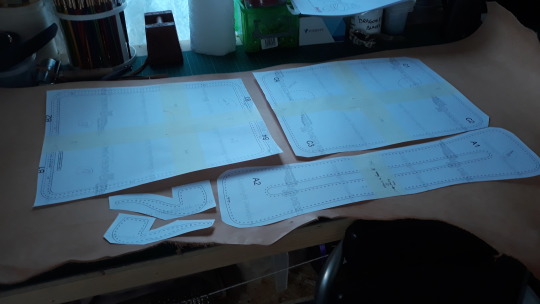
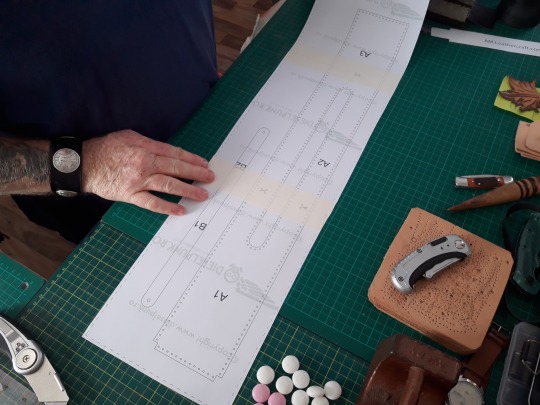
The project this time is this Lovely Satchel ( for UK residents) or Messenger style bag ( for our friends around the World.) Known sarcastically as the ‘One minute Bag’. Enjoy.

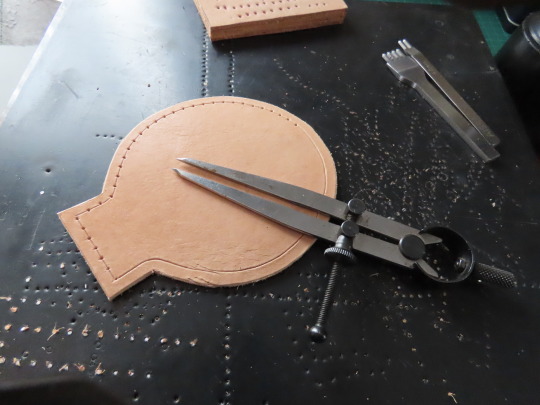
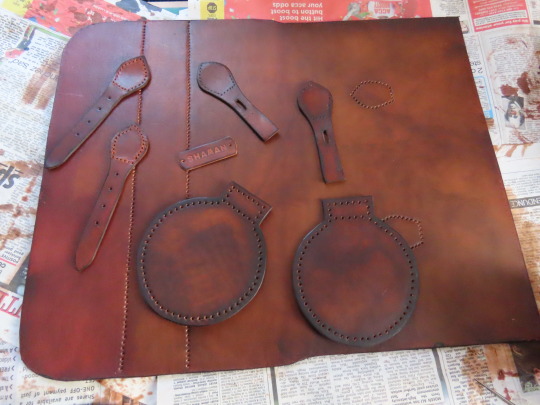
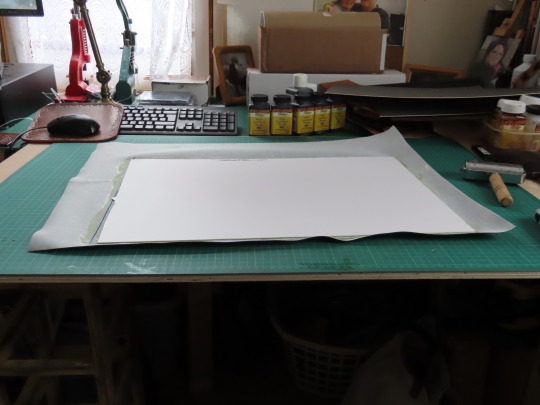
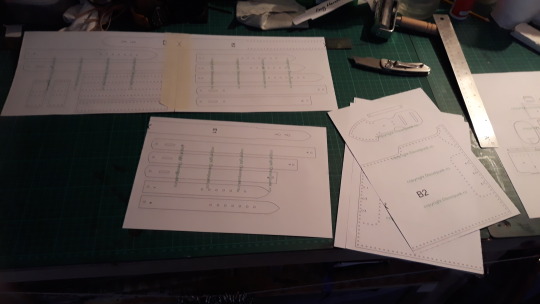
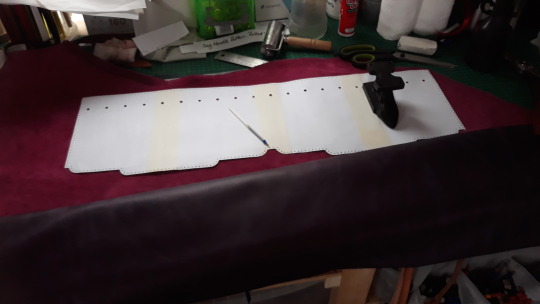
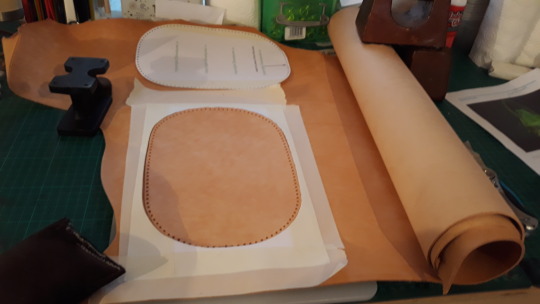
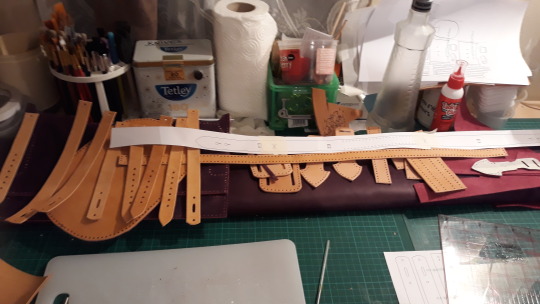
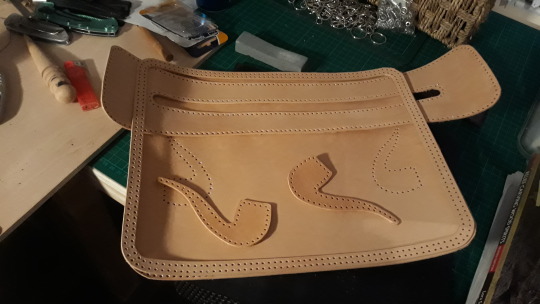
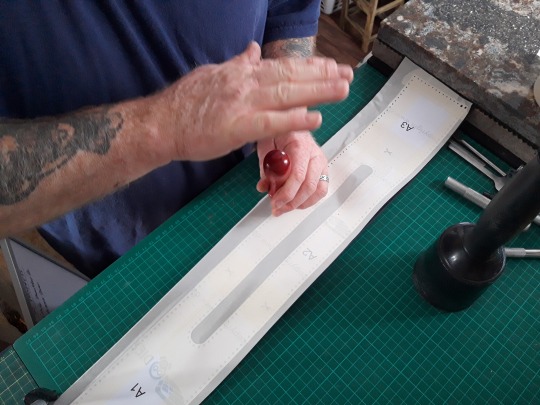
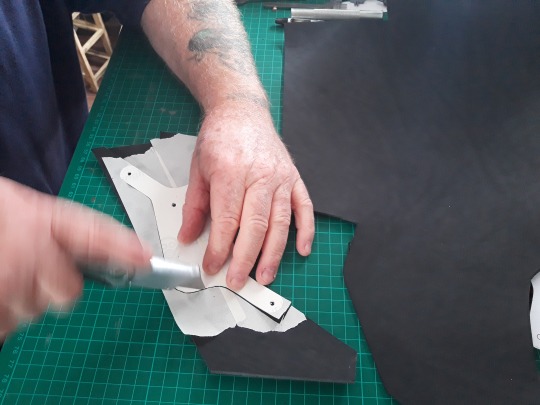
Pic 1. As always I purchased a Pattern from Dieselpunk.ro, printed it all out to the correct scale, cut it all out and then stuck each piece onto the Veg Tan leather using decorators tape, as shown here, which leaves very little mark when taken off. I like to sharpen my blades for a few times so they last a bit longer.
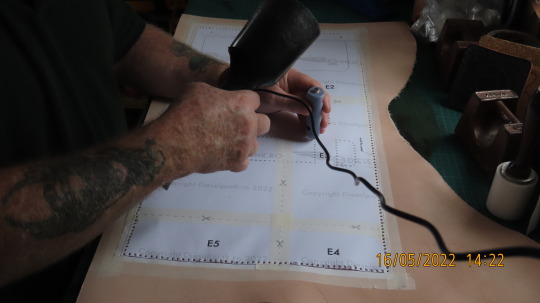
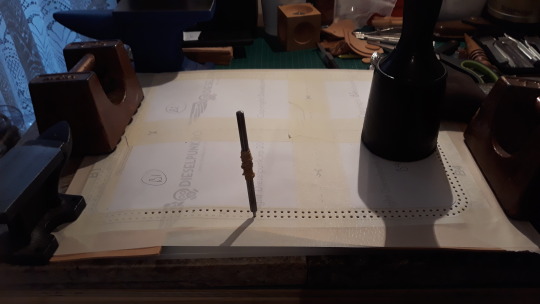
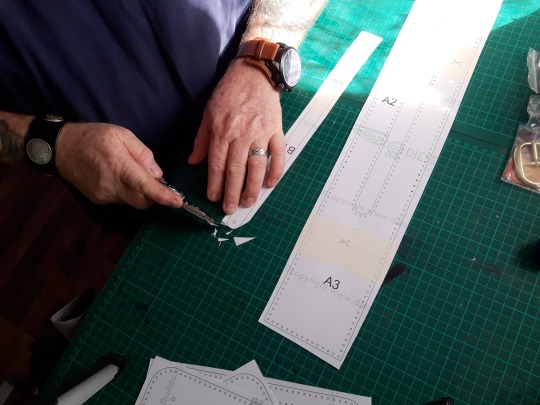
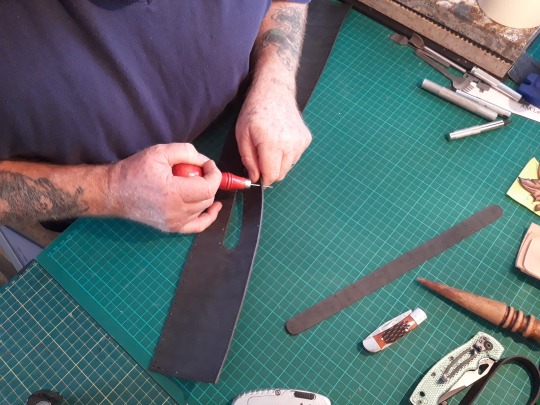
Pic 2. Next I used a 1mm single punch to make all the holes shown on the pattern, ignore what the wire is for, it’s just the wire for taking the photo..only got two hands though. I’m not going to show me cutting and punching all the pieces as the proceedure is the same for every piece.

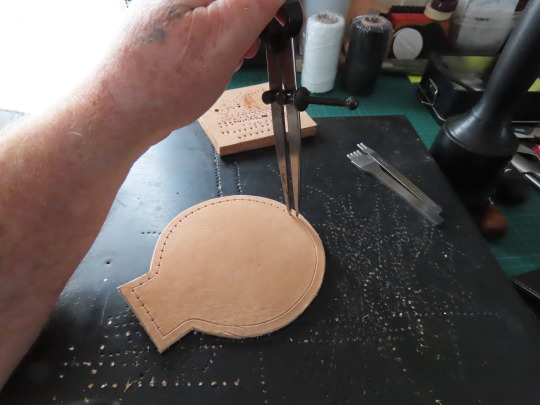
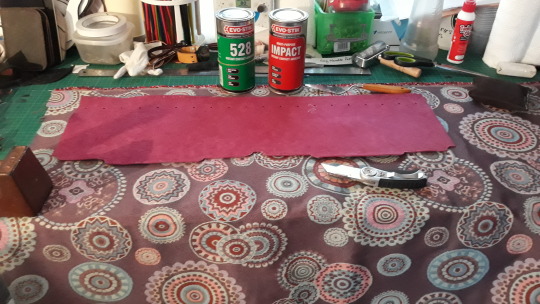
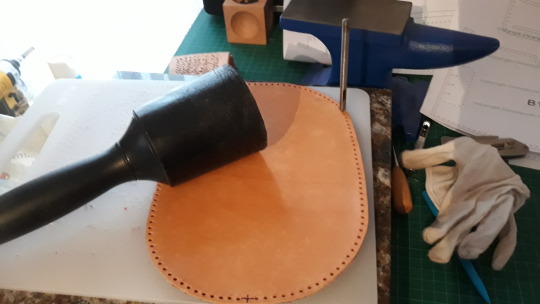
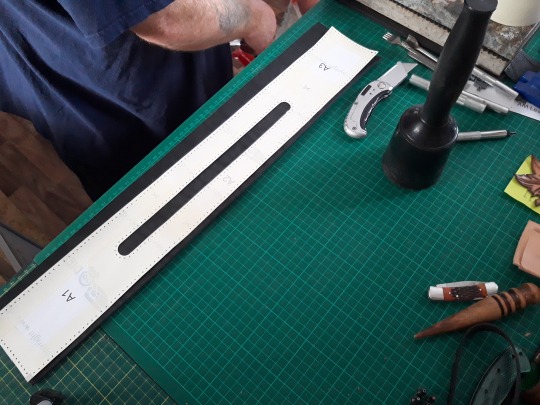
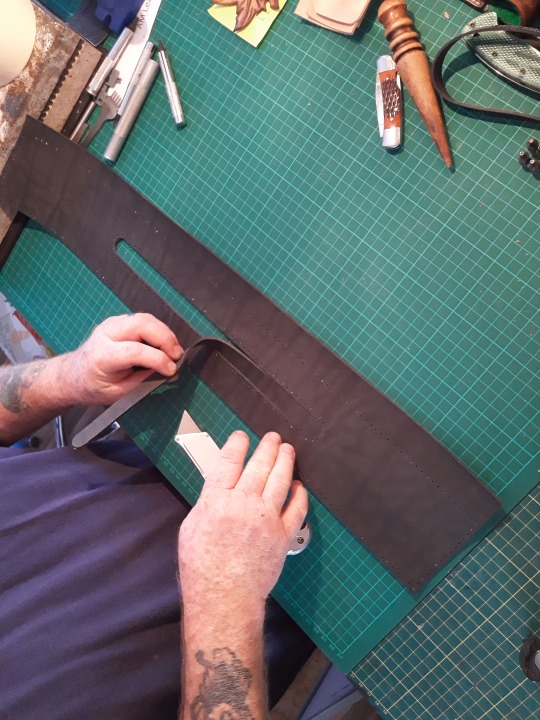
Pic 3 . Once the pieces are cut out I burnished the edges of them all using gum Tragacanth and the wood slicker.

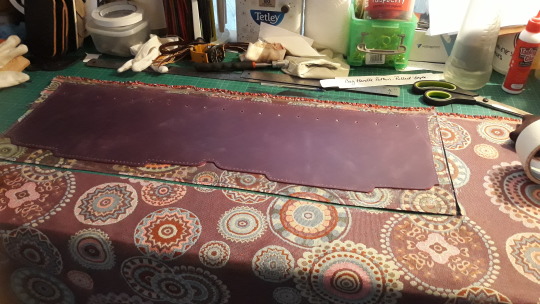
Pic 4.

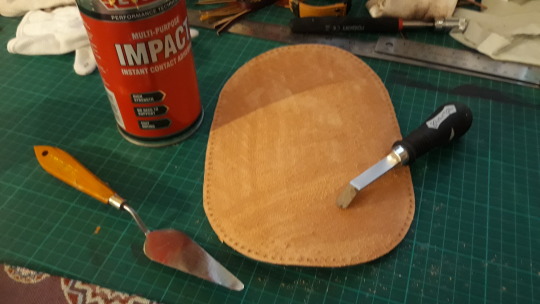
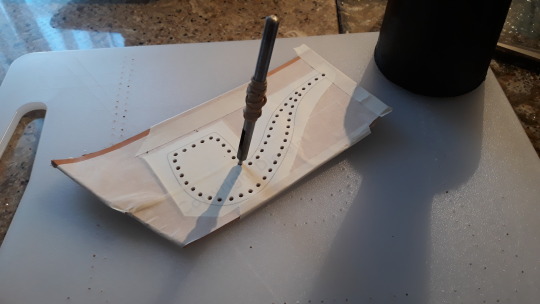
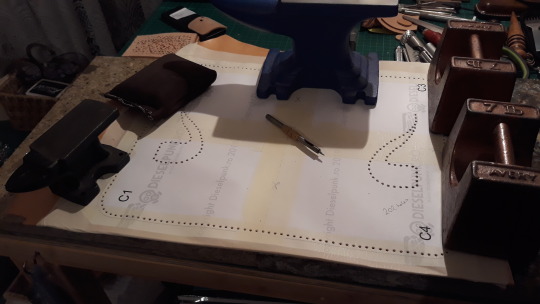
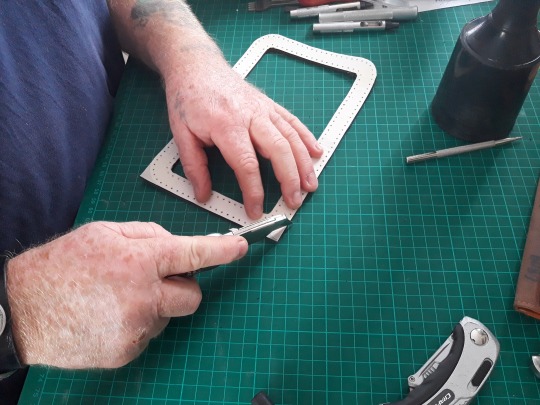
Pic5. Pics 4 + 5. On some of the pattern pieces there are a few ‘markers’ left by the maker, be careful to look for them and to carry the marks over to the leather...or you will have difficulty lining things up later. Check ‘every’ piece just incase.

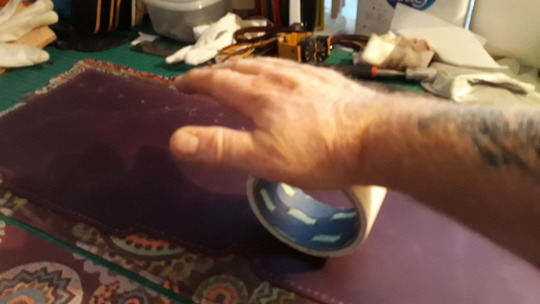
Pic 6
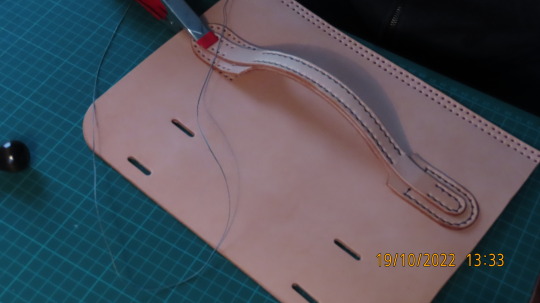
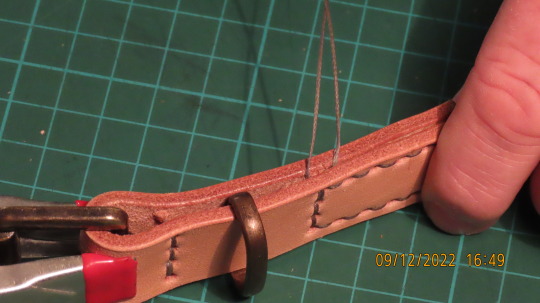
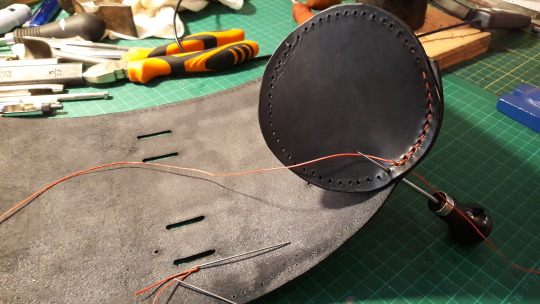
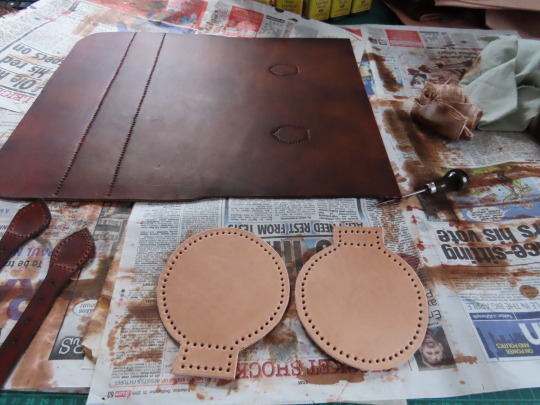
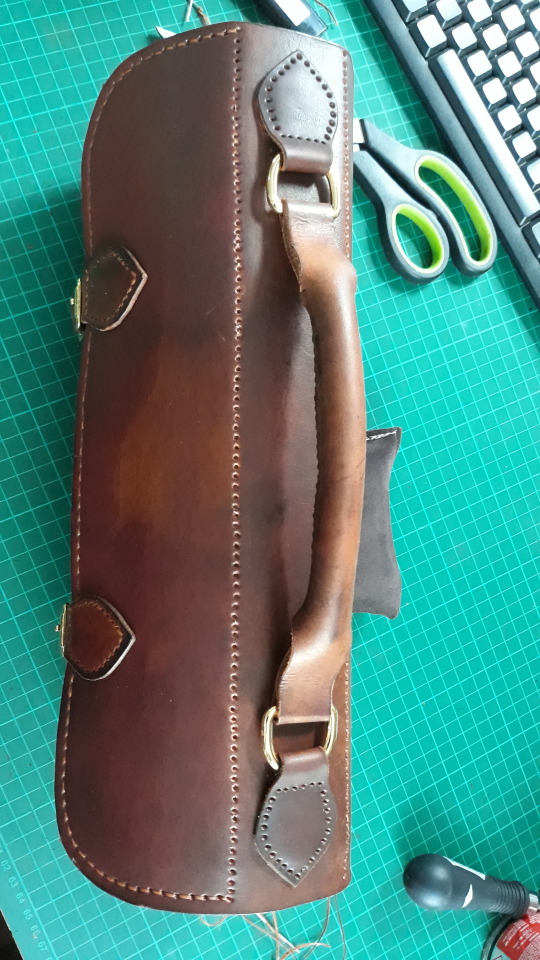
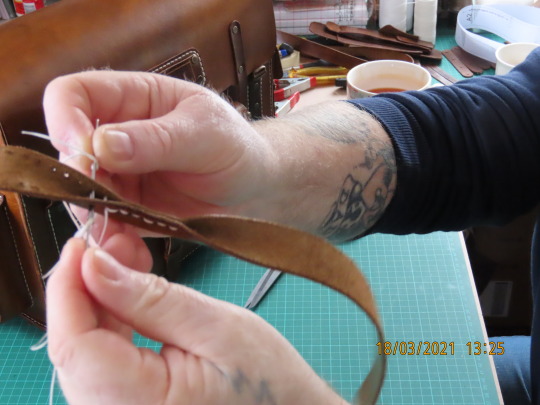
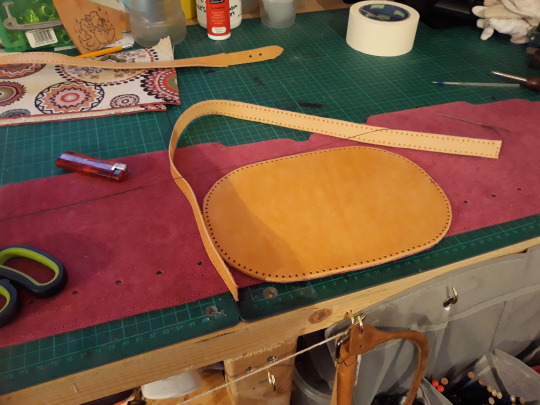
Pic 7. Pics 6 + 7 show the handle. This is very easy to make so I felt no need to show it in more detail, just stitch the relevant pieces together to achieve the handle shown here. Then, take the cut out section that has the corresponding holes for the handle and stitch it on. the larger section on the bottom of each end should be stitched first follwed after by the top piece, note how the bottom stitching is ‘underneath’ the top piece. The stitch used on this bag project was mostly the ‘locking saddle stitch’.
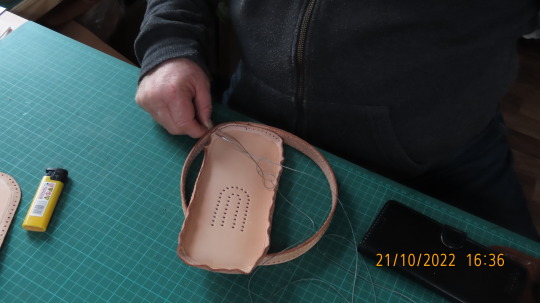
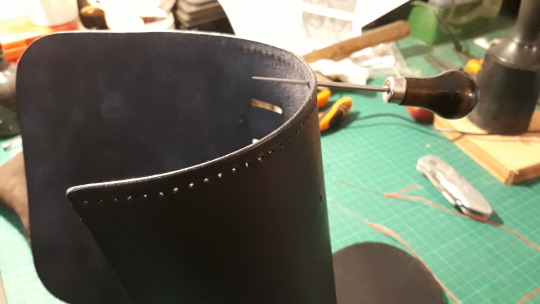
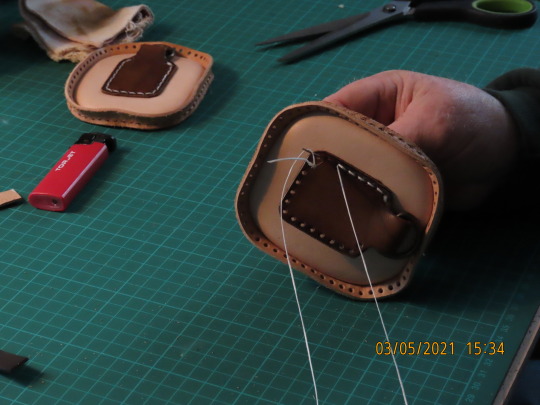
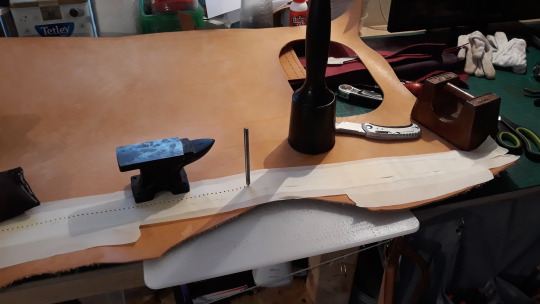
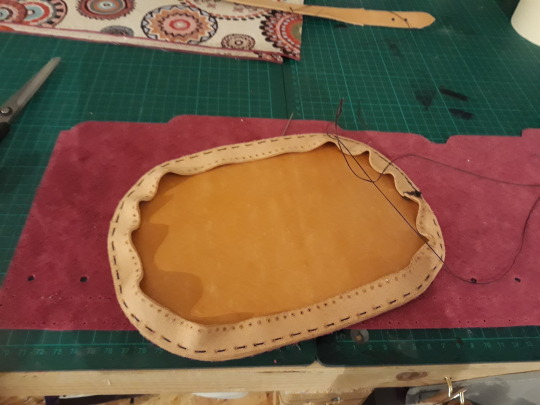
Pic 8. Take the ‘side / end ‘ pieces and skive around the edge to about half the thickness, because now we have to wet ( not soak ) the edges and using our fingers roughly bend up the edges as seen here and allow time to dry. then take the end piece ‘edge’ strip shown here and once ‘that’ is stitched so the ends meet making basically..a circle..for now, line up those markers I mentioned on both pieces and stitch all the way around.

Pic 9. Here are the finished end pieces, now they don’t look quite so rough. Again burnish any rough edges to make them smooth. Be careful to have them in the correct position BEFORE stitching because it sucks to have to unstitch and start again, Yup...I did that.

Pic 10. Take the pieces that will attach the D-ring and first stitch the thin section to the side piece as seen here..REMEMBER to put the D-ring over the thin end BEFORE stitching, again..it sucks to have to unstitch and start again. ( Yup..you guessed it, I did it again. That’s what tiredness does to you lol.)
Pic 11. D-rings attached.

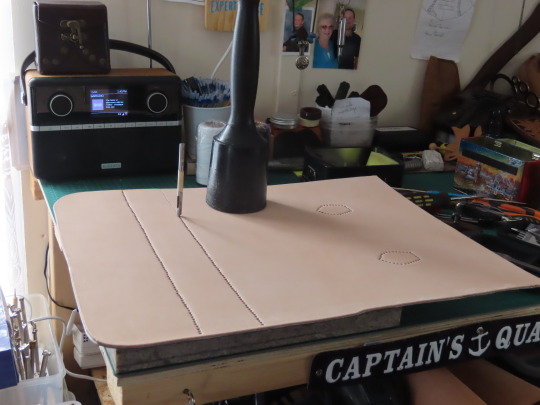
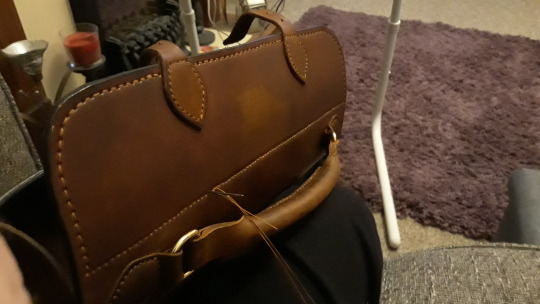
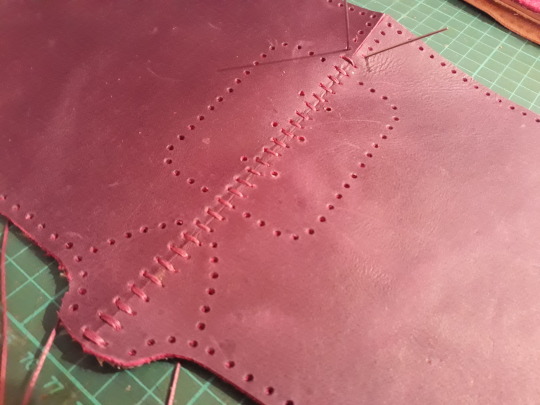
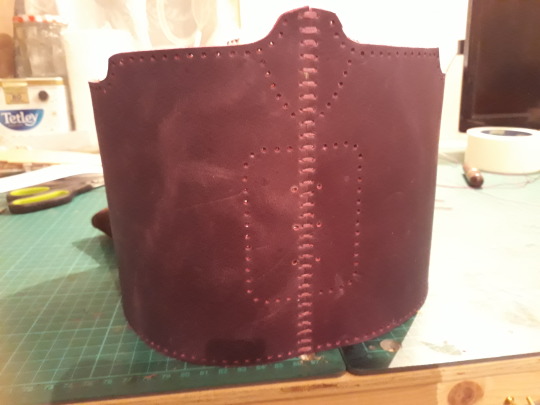
Pic 12. Take the main body section and the flap with the handle section. On the main body, bend into position and do a few stitches just to hold the pieces together..see where I’m pointing. These will be cut off and disgarded once your ‘actual’ stitchline meets it.
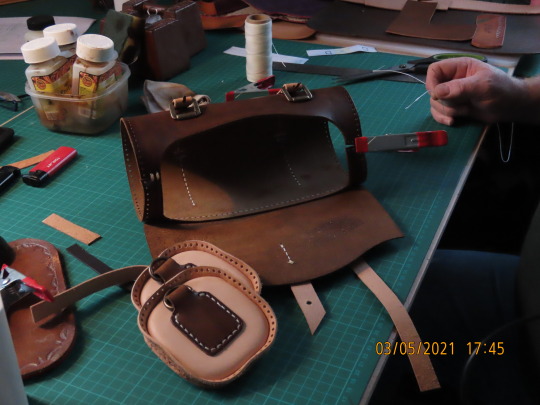
Pic 13. You can see the main body here has the straps attached, they’re stitched to the main body prior to ‘bending’ into final shape as are the base strenghtener piece and any other pieces needed for it. You can’t really go wrong as Tony at Dieselpunk.Ro. ( Ro. Means Romania. )..also makes a build along Video to go with each pattern which can be located through his channel on Youtube. The main ‘Flap’ section is now attached to the main body..again using the good ol’ Locking saddle stitch.
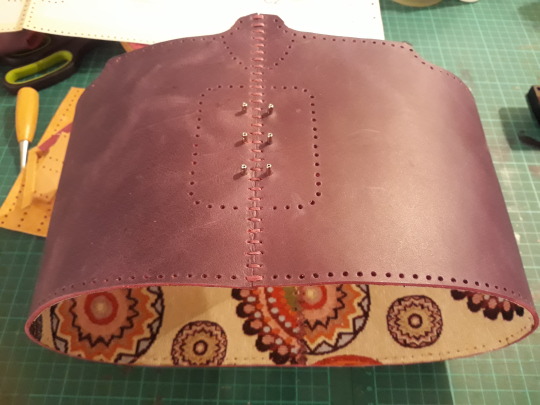
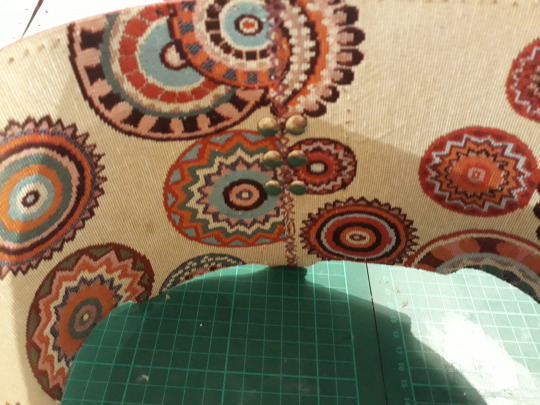
Pic 14. Look closely you can see two sam brown buttons, ..I realised I had them on upside down here so I changed them around, they are used to help hold the additional inside section in place later.

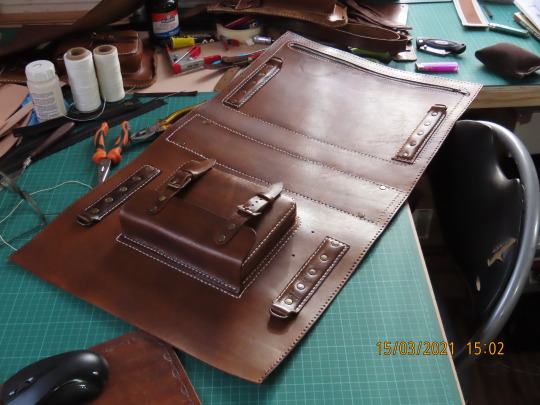
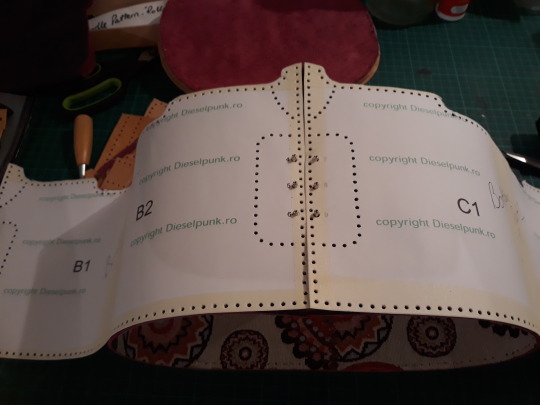
Pic 15. Here’s the view of the bottom strengthener piece and showing the strap positions. If you punched all your holes correctly you will have no problem seeing where each piece should go, plus you can use the Dieselpunk.Ro video on Youtube and also my own build along Youtube video on my ‘Shamancraftprojects’ channel. Btw..as I’m here, If you like watching people just riding around on motorbikes and chatting about all kinds of things, ( no long boring talks about STATS I promise....I ride bikes, I don’t ‘Read’ them lol), I also have another Youtube channel called ‘Some Ol’ Dude’ where you can follow me as I ride around enjoying my 3 motorbikes. I hope you’ll drop by and have a look. It’s just as it says..Just ‘Some Ol’ Dude’ (Me..lol ) riding his bikes. Ok, back to the ‘One minute Bag’...btw, you are probably realising The sarcasm Tony used when naming this Bag by now hahahaha but it’s great fun to make.
Pic 16.

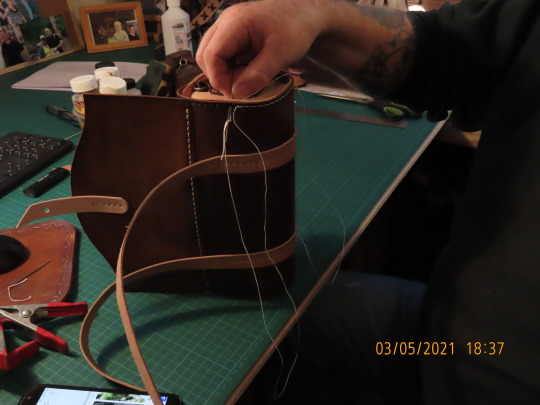
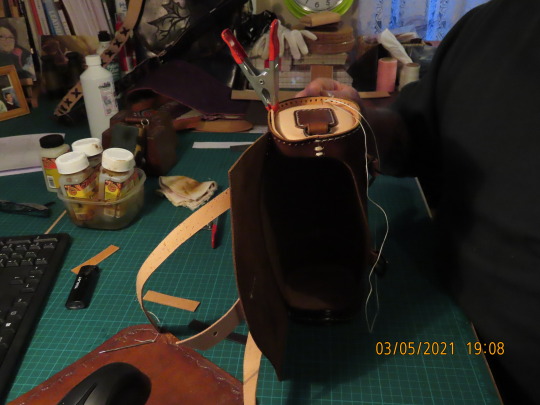
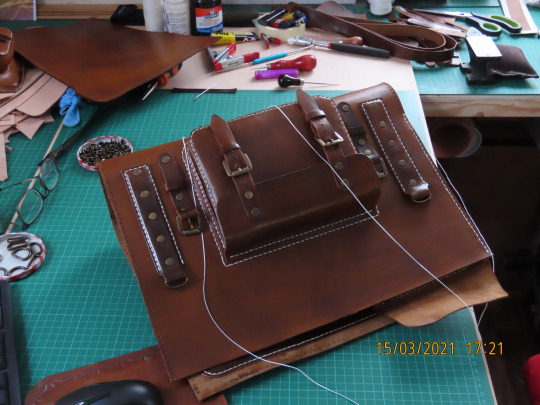
Pic 17. Pics 16 + 17 show me attaching the side panels, I used my awls to hold it in place whilst I got some stitching started the other end is already attached as you can see.
Pic 18. I used some chrome leather which was medium soft to cut out the inside pockets and stitched them to the inside panel as seen. Using the locking saddle stitch still. note the larger holes at the corners where it will attache to the Sam Brown buttons to hold it in the bag.
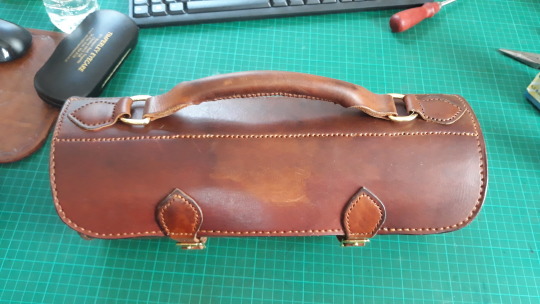
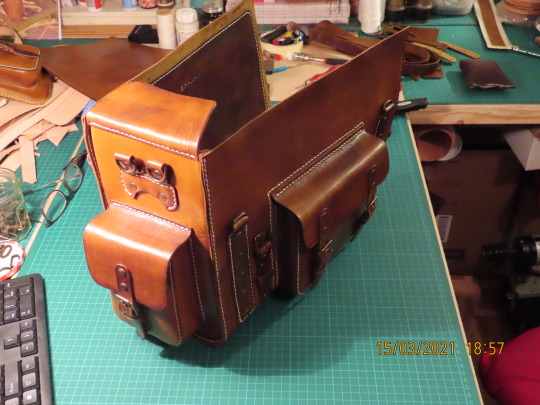
Pic 19. Once the bag itself is finished, just sand the edges where needed to give a nice smooth finish, using sand paper or a sanding machine. Be careful if using a sanding machine as you can catch your fingers and also because it takes just a moments inattention to ruin the edges of your project. Here you can see me finishing the straps. Believe me, by the time you’ve built the bag, these straps will be a piece of cake, just remember to attach D-rings and buckles before stitching.....errm, yes, I did forget hahaha. Hey, we all make mistakes, what counts is how you react to it and how you correct it..right??.
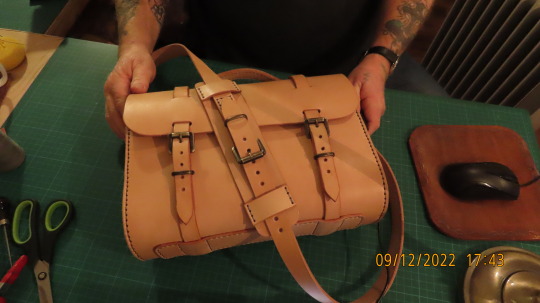
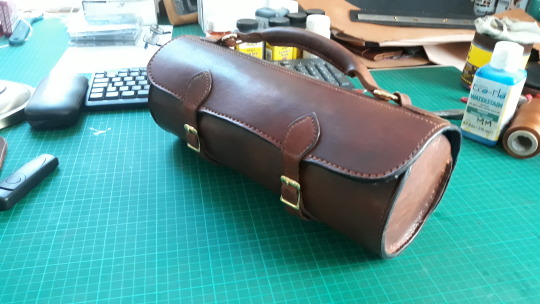
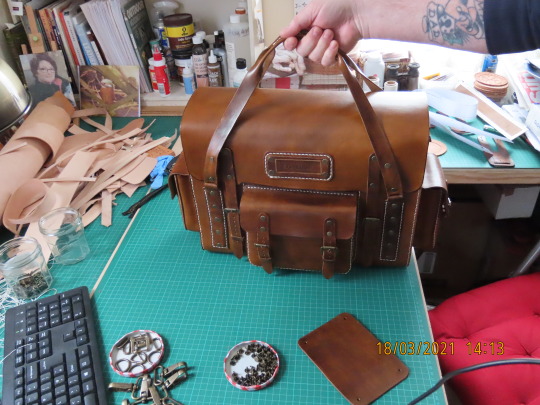
Pic 20. Annnnd VOILA!!. The ‘Sarcasticly’ named ‘One minute Bag’. Original idea and Pattern credit to Tony See at Dieselpink.Ro, please check him out he has some brilliant offers. What a lovely Bag this is and it was a lot of fun to make. You can find this and many other projects on my Blog ‘A Journey into Leathercraft’, look in the Archive. ( a.k.a. Beginners Journey into Leathercraft. )
Hope you enjoyed this one, sorry it’s been such a long time but as we all know the world has gone a bit mad over the past few years and sadly we lost a handful of relatives which took a time to get used to. Best wishes to all those who are still following me to this day Happy New Year to you and your families, keep well, till the next one, Bye for now.
15 notes
·
View notes
Text
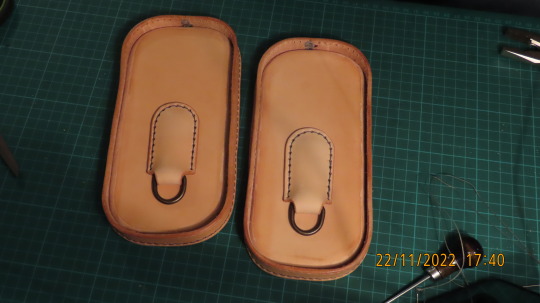
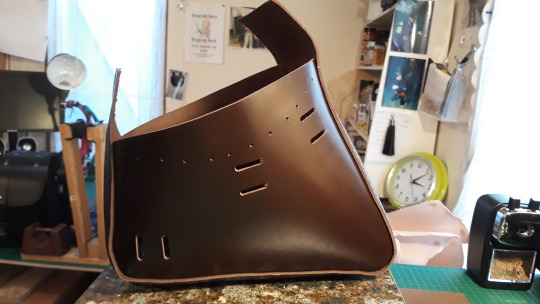
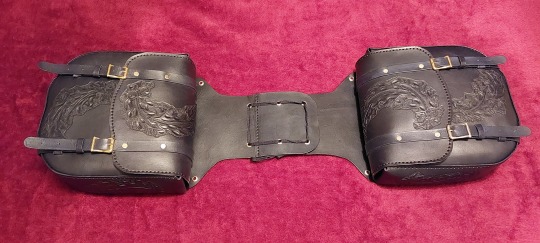
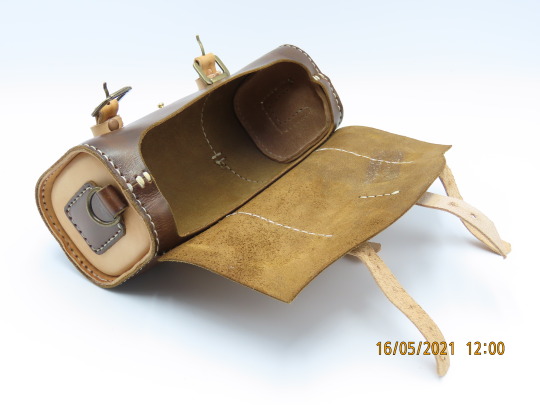
‘Angled’ Motorcycle Saddlebags.
Finally, I get the time to put up the build along pics for the angled Motorcycle bags I made for my Royal Enfield Interceptor. First I’d like to thank all those people out there who left nice messages regarding the loss of my parents. They were elderly, but it’s still a shock when it happens as I’m sure many of you are aware. So..Thank you guys, much appreciated. OK..time to move forward with only the happy memories and to put all that other grief business behind me and I do that by riding my motorcycles and making things out of leather and ‘THIS’ one was a really fun one especially as it was for ‘my own bike.

Ripping it apart..carefully.
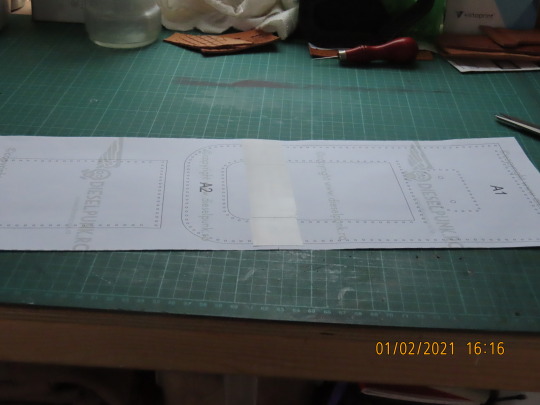
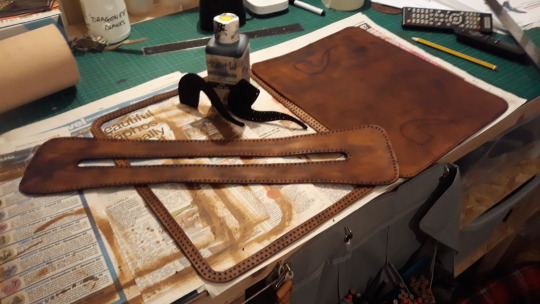
This time it’s not a pattern from Dieselpunk.ro, as he didn’t have one of these. I bought a “Leather” “Angled” motorcycle saddle bag set and ..guys, I gotta tell you...it’s ‘NOT’ leather just because it has a thin strip of leather so thin it could float on air...especially not if that is then just glued to a piece of card and then passed off as a Real leather bag...of ‘any’ description. which this set was guilty of. So as you can see, I pulled it apart and used ‘it’ as the pattern.
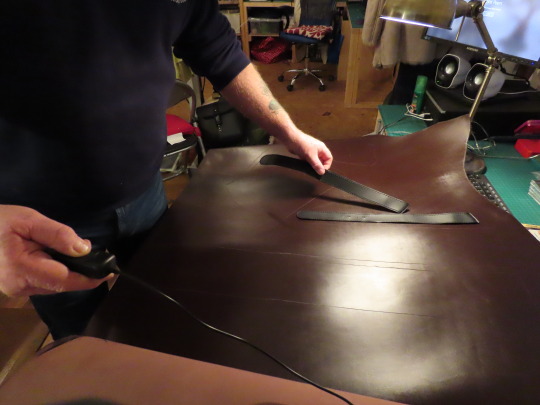
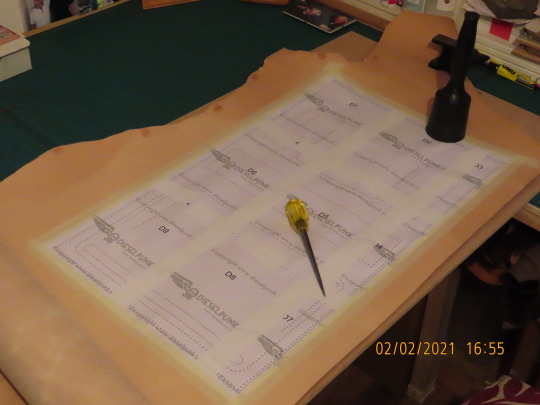
I chose a beautiful hide, factory dyed ‘Chocolate’ color and began to transfer all the pattern pieces onto it to cut out the required sections.

I did the same with all the other patterns until I had the required pieces cut from the ‘Chocolate’ leather and then punched the marked holes and slots where needed.
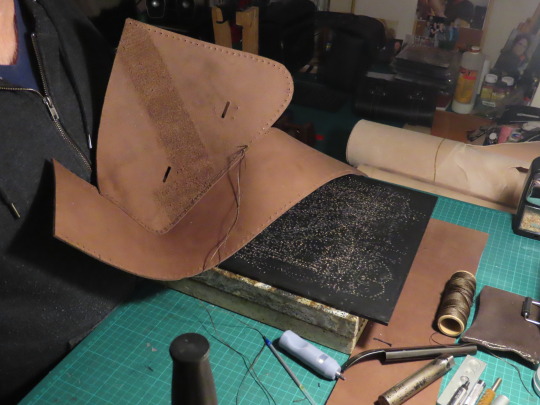
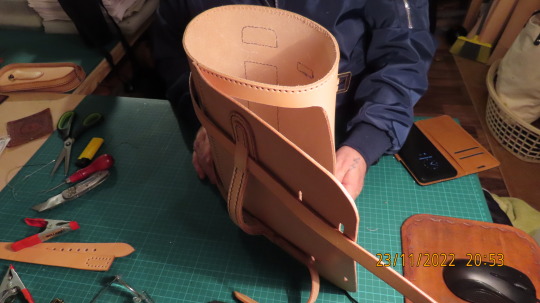
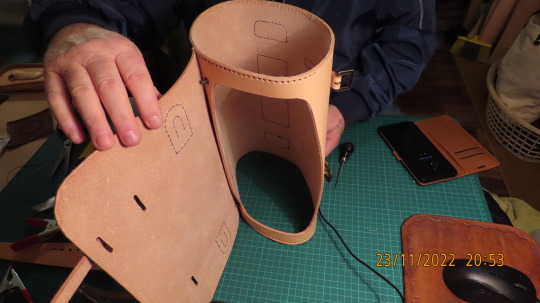
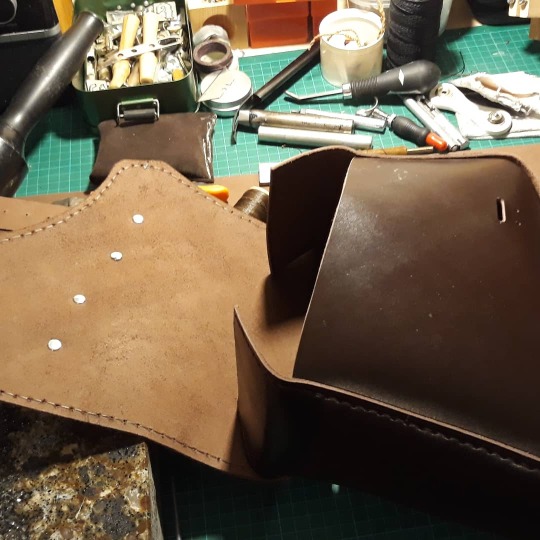
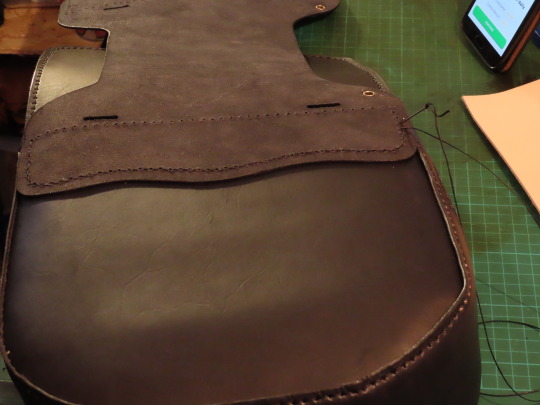
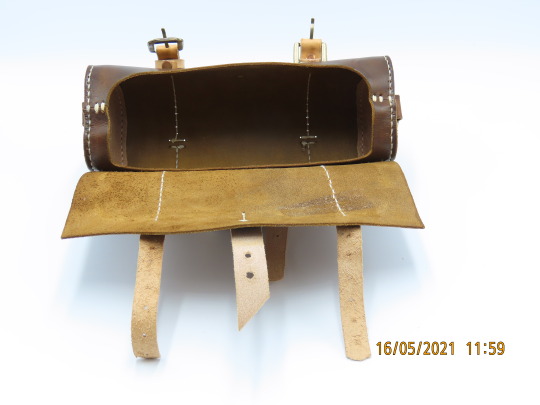
I started the build by stitching one edge of the front of the bag to one side of the Gusset ( The central piece ) as shown here. I used my ‘go to’ stitch, the saddle stitch as this would need to be strong. As you can see here I have left a short section of the gusset reaching above the edge of the bag, this will later be a little flap that folds in when the main front flap is closed and helps to prevent anything jumping out of the bag as it gets bumped around, there’ll be another on the other side by the time the stitching is done.
Here I’m about half way round, this is an outside view. These bags may seem complicated to a beginner, but after a bit of practice stitching and cutting ...and as long as you count the holes you need on each piece correctly, it’s not ‘that’ difficult.
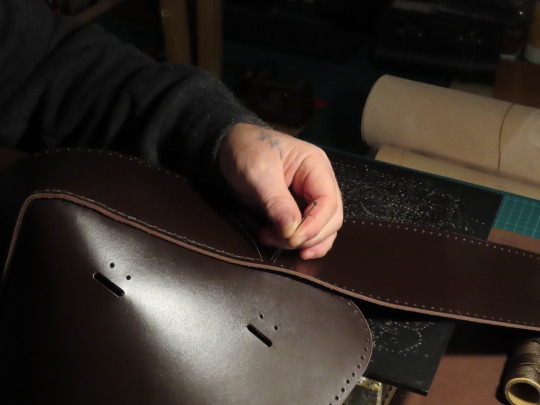
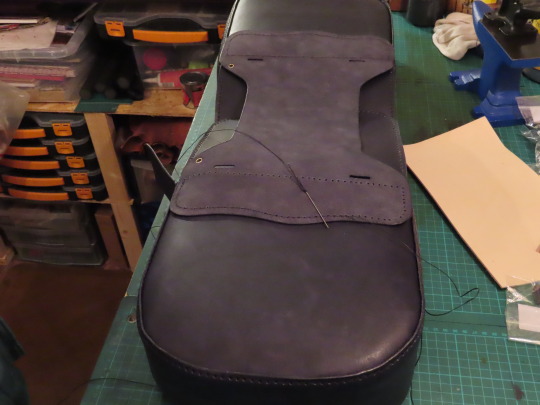
Here you can see me getting near to the end of this bit and crossing the needles ready to pull through. For those who are here for the first time and as the regulars amongst you will already know, watch how you cross your needles on the very first stitch then cross them exactly the same all the way around, this helps to give a more even straight line of stitches.
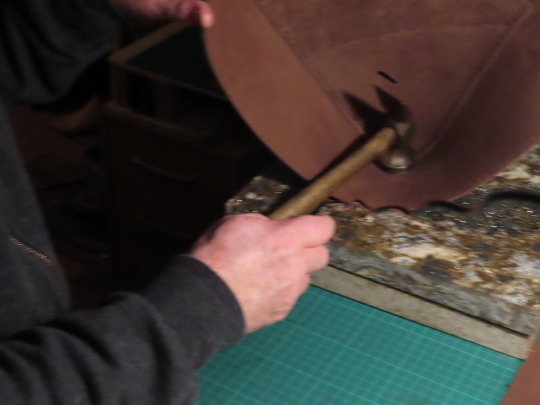
The first side is stitched on and here I’m using a cobblers hammer to flatten the stitching all along which helps to close up the holes and grip the thread even tighter. You don’t need any particular kind of hammer I just had that one lying nearby, any hammer will do as long as it can flatten the stitching.
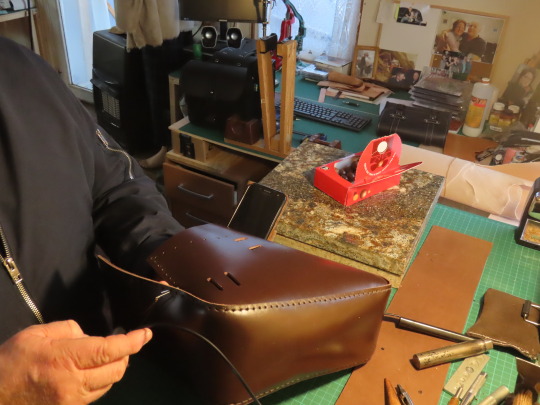
This pic shows it ‘after’ the flattening bit, it also helps to bring the shape of the bag into a smoother rounded look on the corners. you don’t need to hit too hard with the hammer..just gentle taps all along it. which I will do along every bit of stitching as i go along.
Make sure you stitch the correct section to it, the back section has more holes.

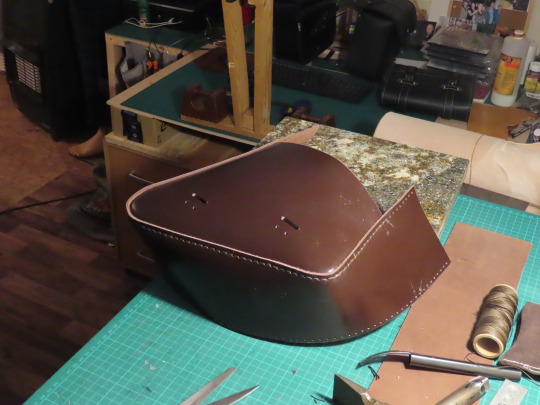
See how smooth and rounded it looks after the hammer touch.
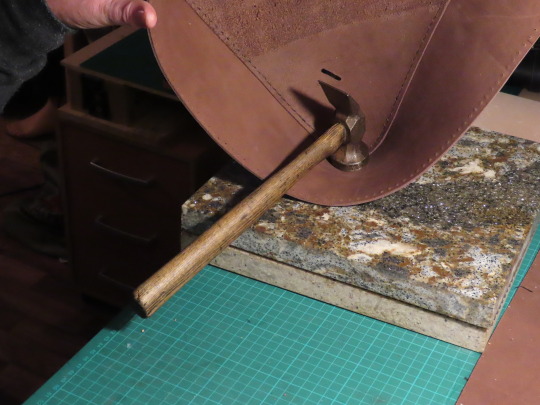
When you are tapping the stitch and you get to the corner, lift the bag as I’m doing here and move it around slowly , it helps to smooth the shape of the corner as it bends round.
Next I did the same to the other side ( The back ) and once done I had the main section of the bag together, note the flaps left loose at either end, many bags get made without these or people cut them off but these are important to prevent things from ‘bouncing’ / ‘slipping’ out..but hey...it’s ‘Your’ bag..it’s ‘your’ choice.

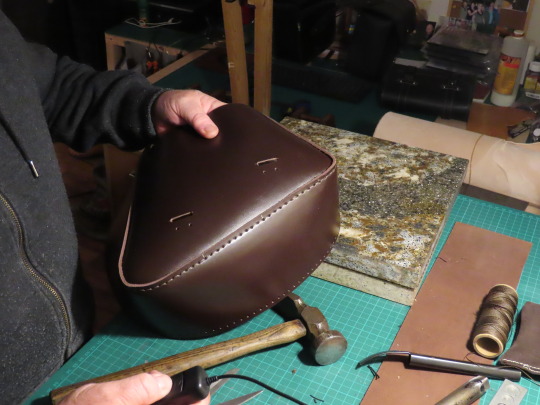
In these next two pics you can see I have stitched the ‘Flap’ onto the back section, it the 2nd pic you can see it’s pretty straight forward, if you remembered to copy ‘ALL’ of the hole marks from the pattern onto the leather then it will be self explanatory as to where it sits ‘exactly’.
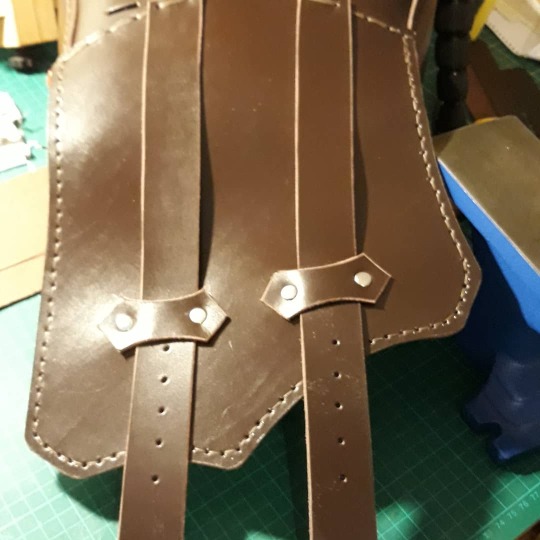
Here you can also see that I have added the strap holder pieces with a couple rivets each and you can just make out that the straps themselves are stitched into the exisiting stitch line for the Flap. Also, whilst stitching the flap on, make sure to continue the stitch around the edges of the flap..just for decorative purposes.
Inside view of the attached flap shows the decorative stitching around the edges and the rivets for the strap holder pieces.
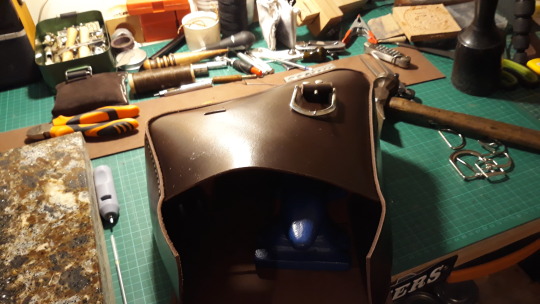

Next you just add some buckles to the front of the bags and that’s pretty much it. Don’t forget to add some kind of waterproofing before using them on your bike.

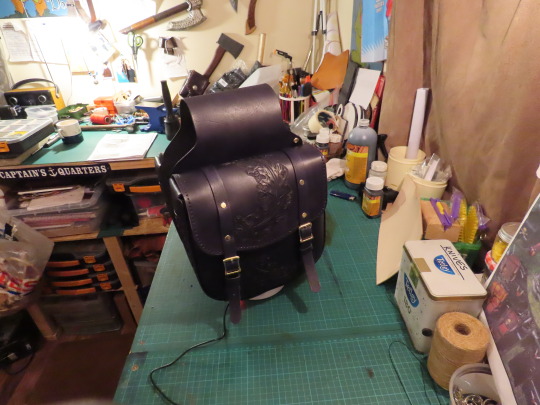
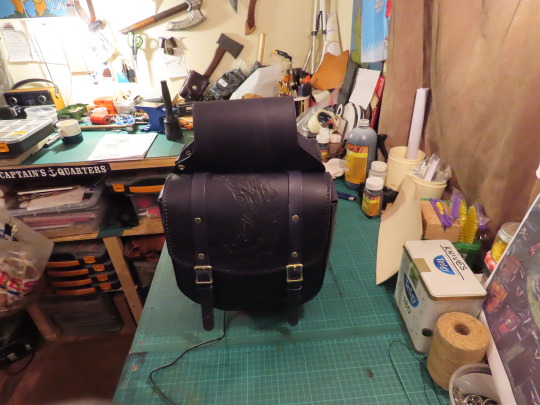
Here is The Original..in Black and the Chocolate brown one is the one I made from the pattern, I know which I prefer. This really is all there is to it and if you are thinking..”Well. that was quick...don’t forget..you have to make two and real life will ‘always’ get in the way of the fun stuff. I hope you enjoyed it, I can’t apologise any more for the delay, grief is a weird thing. But I’m getting back on track and looking forward to making lots more fun items as the year goes forward. Till then, stay crafty and as always watch this space. To all the people here for the first time, Hi, I’m Chris I live in England in the UK, I add a few build along pics for my projects from time to time and I also have a Blog called A Journey into Leathercraft which you can either click on my profile pic to go there or google it. I also have some build along videos on Youtube which I have recently started doing where you can see more in depth as I put things together you can find that by Googling ‘Shamancraft projects’ youtube. I’m a complete beginner with the videos so please don’t judge..I’m late 50′s so it’s a huge learning curve for me..but I’m getting better each time, so if you are just getting into leathercraft yourself why not drop by and have a look. If you do...and you like what you find please consider to like and subscribe. many thanks. Till next time guys.
0 notes
Text
Tooled and carved motorcycle Saddle Bags.
This is well over due I know but life has a really annoying way of getting in the way as I’m sure you are all aware in your own lives. Also, when I did actually do the blog and took 3 days to do it..I pressed the wrong thing at the end and deleted the lot...Yes, I know. So, this is the first chance I’ve had in a few weeks to try to put it up again. A Carved and tooled set of motorcycle saddle bags. If you just wanted to make the saddlebags as a first project I think this would be a good one , other than the carving and tooling..( which I would advise you to practice first before attempting it on your expensive piece of leather. )...the rest is quite easy if you follow the directions in the ‘Saddle bag Pattern pack’ from Tandy Leather.

This is the finished product, there will be a slight difference to the design by the time we get to the end picture, I’ll explain as we go along. To any newbies to this amazing world of leathercraft, I know it can seem a bit daunting..but you don’t have to do the carving and tooling until you know how, you can still make a nice set of saddlebags. Just follow the instructions on the patterns and hopefully I can show my own progress on here which you can follow on my Blog ‘A Journey into Leathercraft’ a.k.a. Beginners journey into Leathercraft.

This is the ‘Original’ Pattern from the pack.

The original has been transferred to Scrap papers I’ve just reversed them to re-use them, see below.

As always, first you have to Buy the Pattern ( the top pic ), this was a Pattern ‘Pack’ from Tandy Leather and you will get 3-4 different patterns for your money. I don’t get anything from Tandy for saying that..it’s just a good pattern pack. I use the patterns to make a ‘second’ set which I will then use, this prevents the original from getting destroyed in the build process, here I’ve used old printing paper that mistakes were made on ..we copy onto the reverse side and re-use them., I stuck all the pieces together to form the full patterns with decoraters paper tape, as seen here I have transferred the patterns to the leather and wet the area where I then transfered the Oak leaf and Acorns by drawing over the pattern with a ball point tool.

The dark patches are where the leather is still a bit damp after cutting + tooling, the details will be added as we go along. I always where the white gloves when I can as it prevents your nails from leaving marks as they drag along the surface of the leather which can leave a mess

More detail added, the idea is to not over do it, a less is more kinda thing.

All the pieces are now cut from the Veg tan leather and have the Oak leaves and Acorns carved and tooled ready for dying.
Hand Carving the Oak Leaves and Acorns onto the Gusset piece.

Here I’ve dyed all the pieces using a Black ‘Pro Dye’ which I like, as it gives a slight oiled look to the bags and a nice consistant coat. You can see I have cut out all the strap holes and punched all the stitch holes, once dried I’ll ‘buff’ the excess powder off the pieces and polish, then seal the dye with Resoline, before using Effax leather Balm on each piece to soften it. I like to do all that before assembly...even though I was very keen to begin the build, because if you do it after it’s built there will be areas you miss which won’t be water resistant..such as where the stitch lines are. Again..that’s my choice, ‘you do you’.

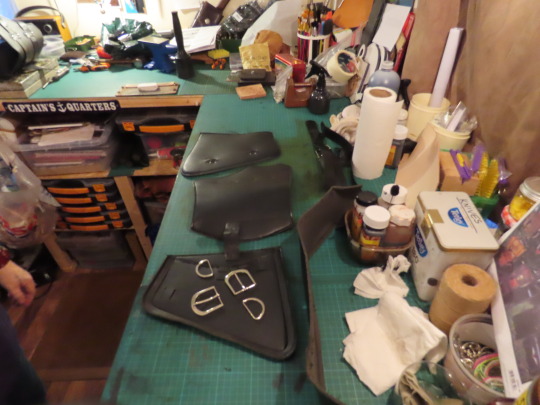
All pieces ready, holes have been punched, buckles have been attached, studs have been set and eyelets fitted, the only thing to do now is to put it all together. You can use whatever studs rivets, buckles etc that you choose I chose gold plate. The larger pieces with the six studs are the ‘Heat Shields’ that will be on the back of the bags.

And finally, I can put them all together.
First I hand stitched the gusset using a Saddle stitch, notice I’ve fitted the hoops for the straps.

All coming together nicely.

Inside view, the rivets are what hold the hoops in position.

Both front sections are now fitted to the gussets, ready to fit the back and flap sections.

Being careful to start the stitching on the correct holes, all the way through since the holes were first marked out I have kept a mark on the right holes so..if you remember that it can save you from a costly error later.
Once you get the first 5-6 inches stitched the whole job becomes much easier..
It should fold over nicely if you have stitched it correctly.
Stitching one of the saddle bags to the connecting strap, the edges have yet to be hammered lightly inside, this will flatten the stitching and help to close the stitch holes but at the same time it will bring the leather perfectly into shape and more rounded.

If you managed to stitch the correct ‘first’ holes, everything should line up properly when you close the flap.

Time for the other side to be fitted.
The same process as before, the usual saddle stitch and again if it’s all lined up correctly there should be no problem. It’s starting to look like saddle bags now.
Annnnd Voila

So, this was how I first ended the build with the joining strap as a whole piece, however, when I tried it for size on a motorcycle I had to make it adjustable so I cut it down the middle first, then I stitched an extension piece on either side then added some ‘eyelets’ and added a Lace. The point I’m trying to make is..if you make something that doesn’t quite meet your expectation...don’t worry, just re-assess and adjust. I still think this has come out really nice, I hope you agree.
The eyelets lace and extension pieces seen clearly and below shows the reverse side. As I said at the start, the heat shields are fitted at the back of the bags , they don’t tend to get very hot on the bikes especially with the wind cooling effect but I think it’s still a nice touch even just for looks.

That’s it for this build, I do have a lot going on in my life at the moment and it can sometimes take a while to do another, but I will put things up when I can. I hope you have enjoyed watching this come together, if you don’t know already I also have a few videos on Youtube..just enter Youtube Shamancraft Projects, only a few at the moment but I intend doing more. I also have many other photo build alongs on the blog. Thanks for dropping by for a look. Till next time, Stay Crafty and as always, Watch this space.
2 notes
·
View notes
Text
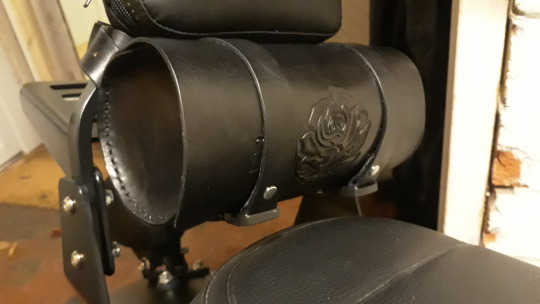
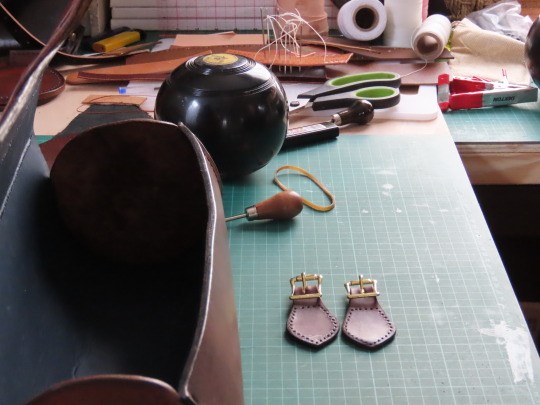
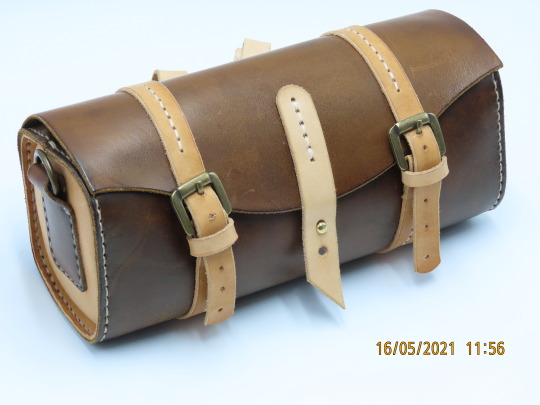
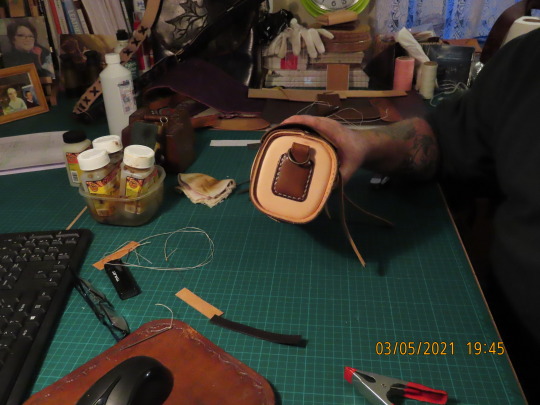
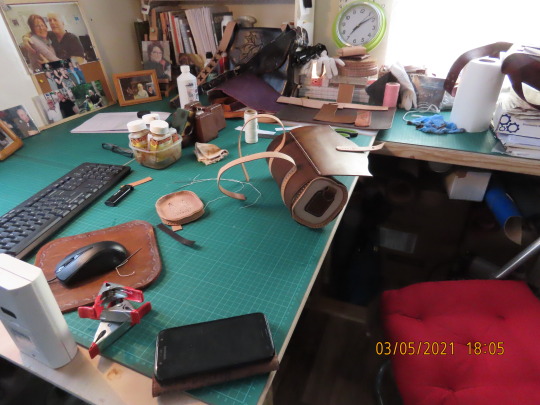
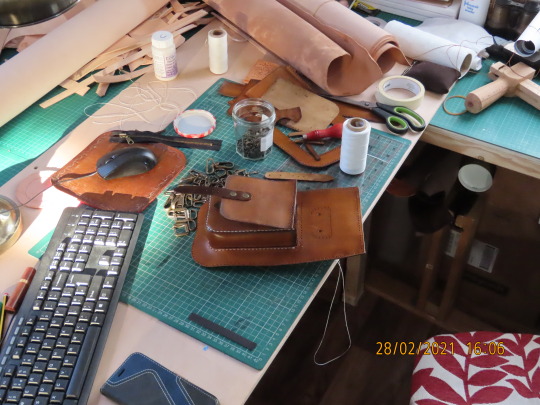
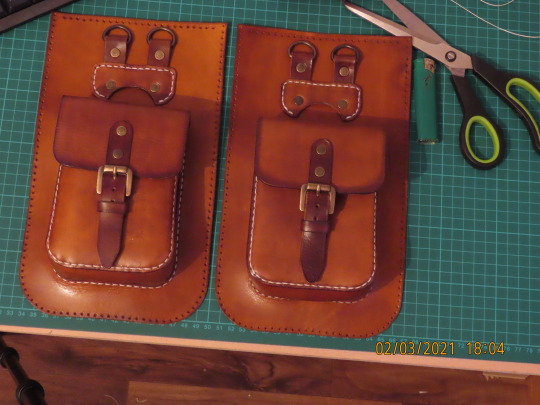
Motorbike Tool Pouch
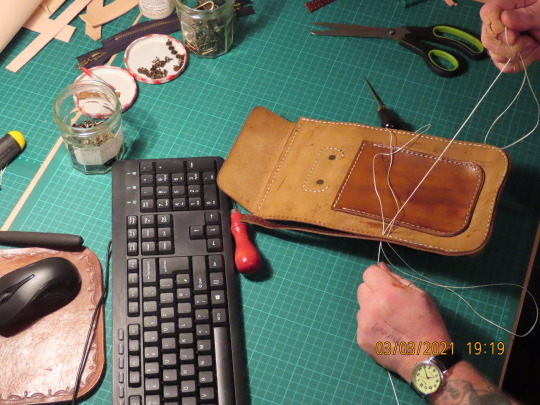
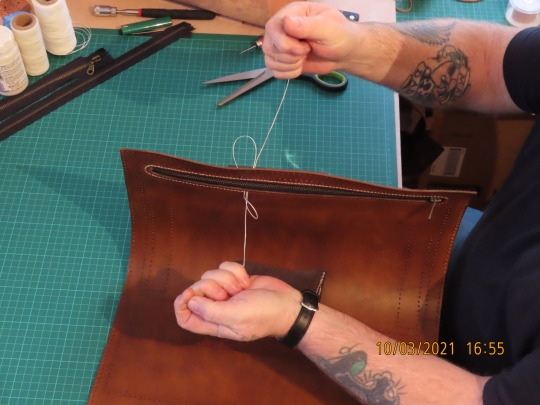
Hi Guys, this new project is a small one, easily achievable for new comers wanting a first project. My friend bought a tool pouch for her new motorbike, I wasn’t impressed by the terrible quality of it so I took it and stripped it into it’s parts then used them as a pattern to make her a better one and one for myself, using 100% Veg tan leather. Here’s some photo’s of how it went. These pics are a mixture of the two as I didn’t take many of the first pouch...mainly because this is the first project since my Mum passed and I wasn’t really in the head space when I began, but, the process on both is exactly the same so you will be able to see the process well enough. I have shown many times on other projects how I transfer the patterns to the leather so if you want to know about that particular point feel free to look in the archive of my blog ‘A Journey into Leathercraft’.
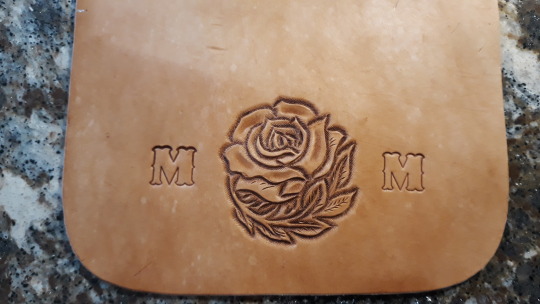
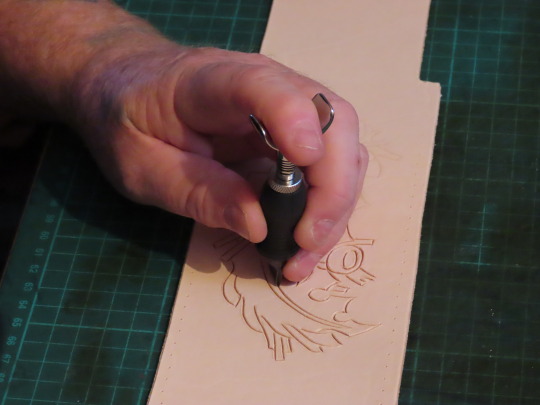
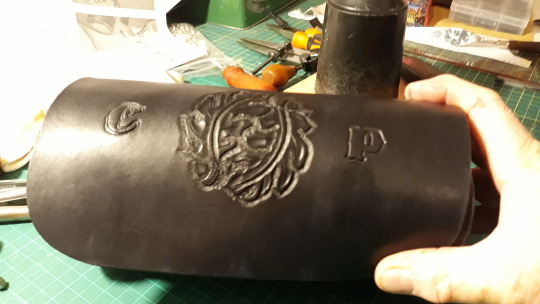
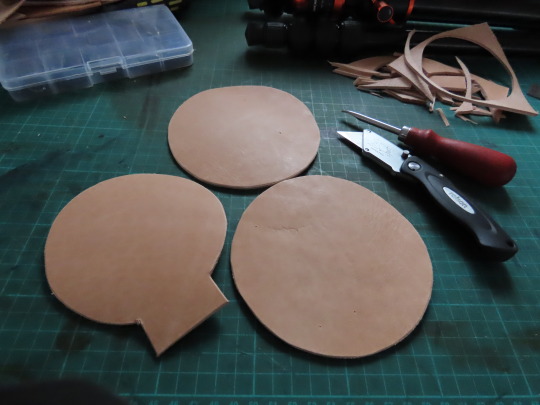
Pic 1a : After transferring the patterns from the Cr***y pouch to the Veg tan leather My friend chose a Rose to go on the front of hers and a couple of initial stamps so I traced, carved and tooled it for her and added the initials as shown, I chose Oak leaves and Acorns as you will see later.

Pic1b Shows up more with the different shadowing.

Pic 1c : here you can see that around the edges I have also transfered the stitch hole marks ready for punching and a few of the strap rivit holes.
Pic 2 : After all the tooling was done I dyed all the sections black using fiebings Pro dye, I personally like the extra oilyness of it and ..just my opinion but I feel it looks a little better. Here I am also using my awl to widen the stitch holes slightly because my 1.5 mm punch is temporarily misplaced so I used a smaller one and widened them this way....never letting a small issue like that stop the process lol.

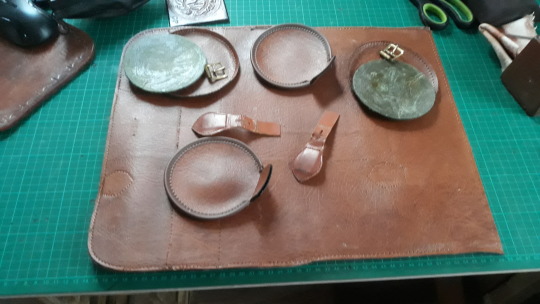
Pic 3 : I cut, punched, dyed and burnished the edges on all the straps, then I attached the buckles that were on the original..’Cr***y’ pouch.
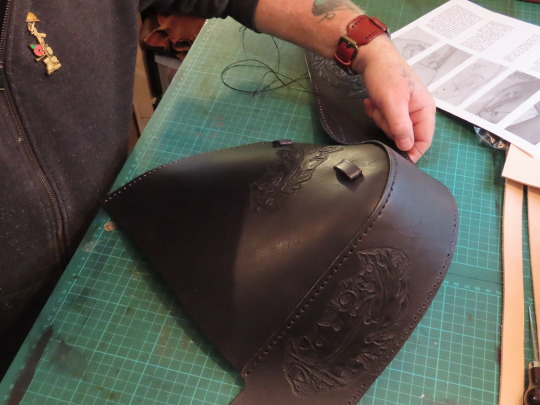
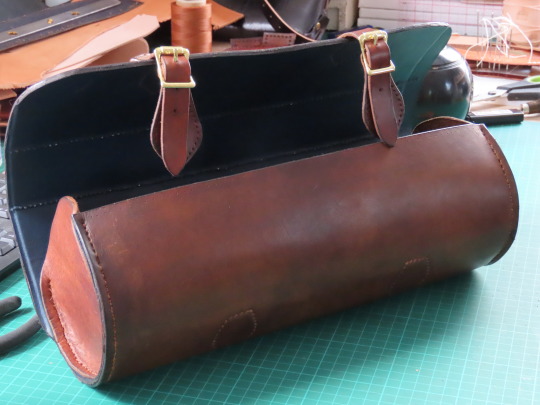
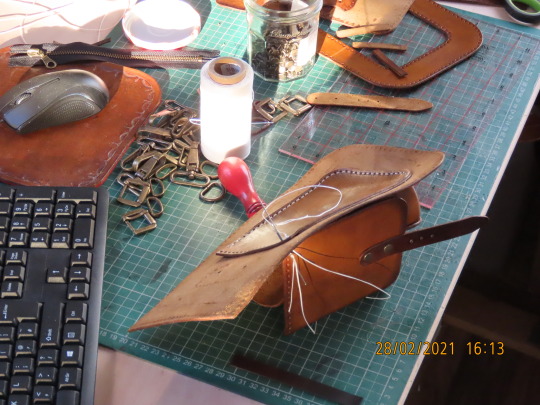
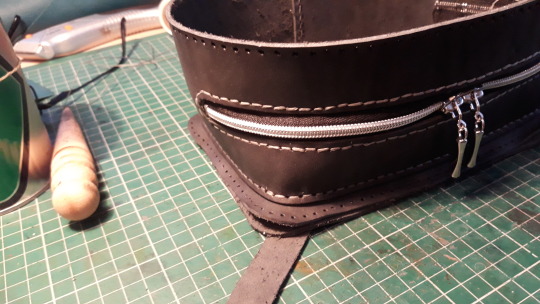
Pic 4 : Before you start your hole punching, mark them and double check you have the correct amount of holes to meet up on the other side as you stitch it around, this is an easy one as the holes carry on all around ..for stitching purposes so once the side piece ..shown here.. is stitched as high as you need to, you just carry the stitch around for ‘looks’ as you will see, then you can...if you want to..carry the stitch around the edges of the flap..for the same reason.

Pic 5 : Both end sections are now stitched in place, using the old faithful ‘Saddle Stitch’ Here you can also see the punched holes where the new straps will go.
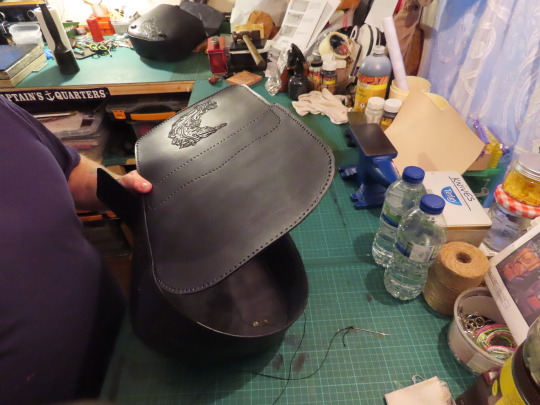
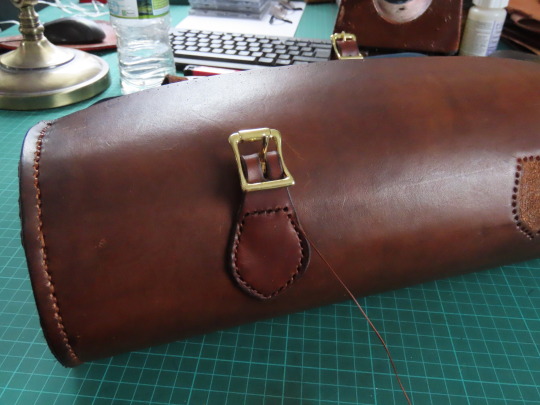
Pic 6 : This shows the design I chose for mine.
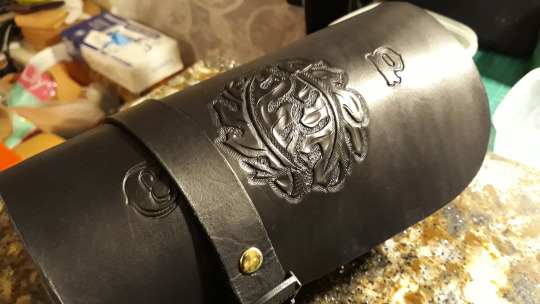
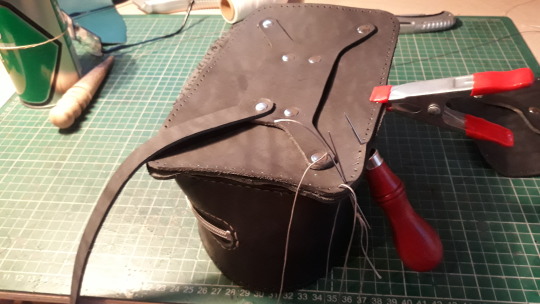
Pic 6a : Straps going on.

Pic 7 : Next I added the straps which really is a simple thing, nothing major. I used those plastic clips for closures as I think they just look the part on this particular project.

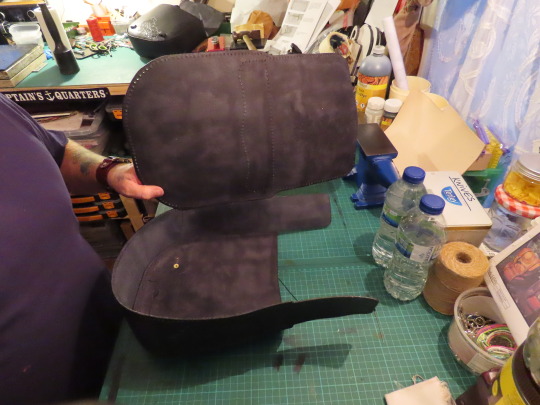
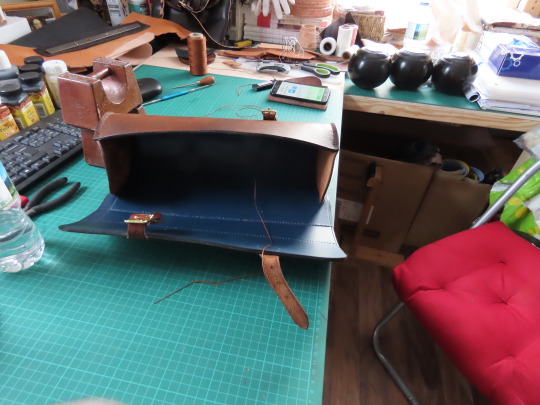
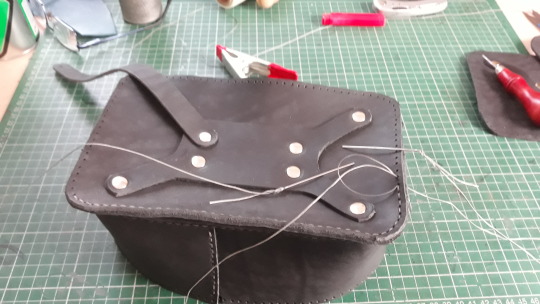
Pic 8 : Here you can see the straps threaded through from the inside.

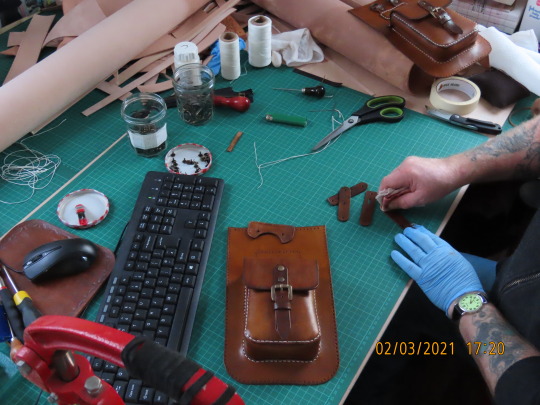
Pic 9 : I had a couple of brass plated buckles so I used those on the straps for connecting to the bike.
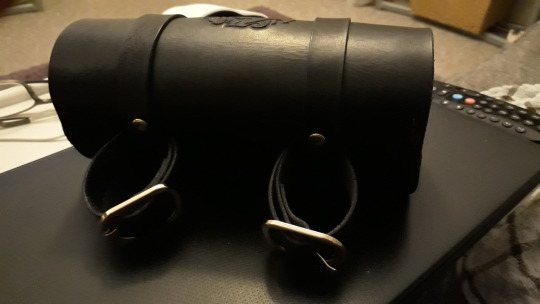
Pic 10 : other view.
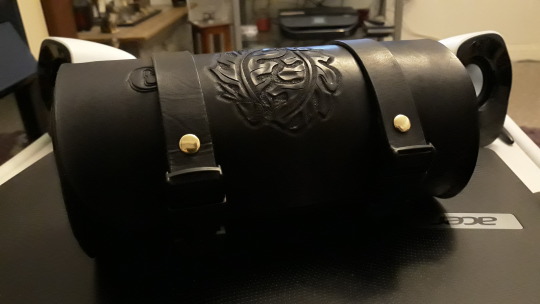
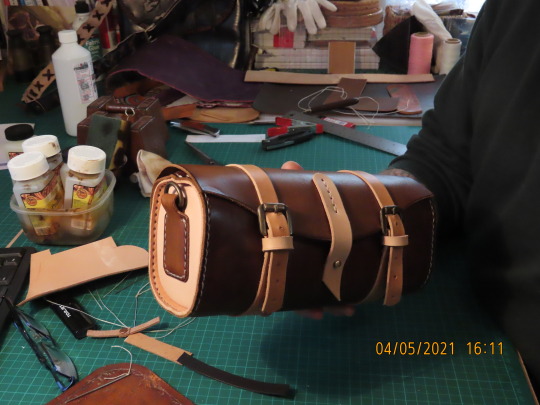
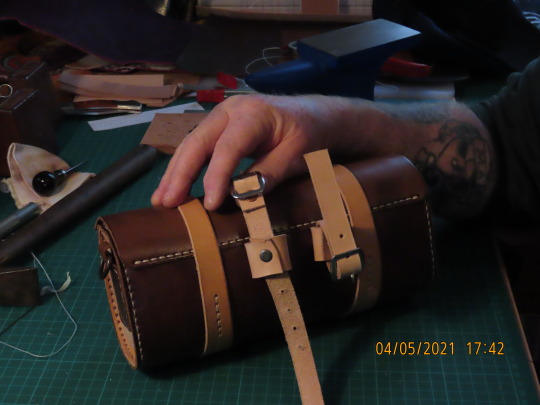
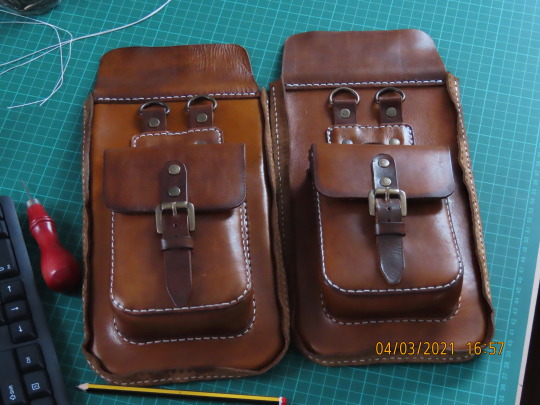
Pic 11 : All done, both pouches finished.
Pic12 : My friends new pouch, she’s happy with the better quality and loves the design.
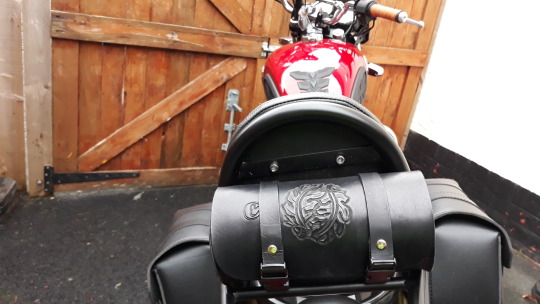
Pic13 : And this is ‘my’ new tool pouch. As I said it was an easy build this time, it was a nice project to get me back into the workshop and I had fun making them, they have been heavily waxed but there is a small dry bag inside because these are leather and are water resistant not waterproof. If they get a good soaking we just empty them, sit in a warm room to dry naturally and re apply more wax..and we are back in action. I hope you might give it a go yourself, you don’t really need a pattern to make these I just had it so I used it. More coming soon. For anyone who isn’t aware yet, I have a blog called ‘A Journey into Leathercraft’ there are many builds in the archive dating back to 2015 and my first ever project through to present day. I also have a little Youtube channel with a few clips and a few build alongs..it’s all new to me but I think they are interesting if you are just starting out..just google ‘Youtube ‘shamancraftprojects’ ( yes..no spaces.) Thanks to all those of you who have been following my projects for years and welcome and thanks to all the new ones. back soon, be safe, but most of all ..to all those makers..Stay Crafty.
#leather#leather goods#leather pouches#shamancraftprojects#A Journey into Leathercraft#Youtube shamancraftprojects#Folksy shaman Craft Projects
0 notes
Video
youtube
Hi Guys, Chris here from Shamancraftprojects, I’ve been putting ‘still’ photo build alongs on Tumblr for a few years now and I deccided it’s time to move forward so I’m doing a few videos now for youtube where you can watch me put some of my projects together, if that’s your thing I hope you’ll go over there and check it out, just put in ‘Youtube Shamancraftprojects’ and you’ll find the other vids I’ve already done. This is all new to me I’m learning as I go along so a few are just a few minutes long and no talking but as I’ve learned more there are vids where you can hear me explaining things as I go through the build. If you like them please consider likeing,subscribing and clicking the bell as this will help towards my doing more in the future and will also inform you automatically whenever I put a new video up. Many thanks.
2 notes
·
View notes
Text
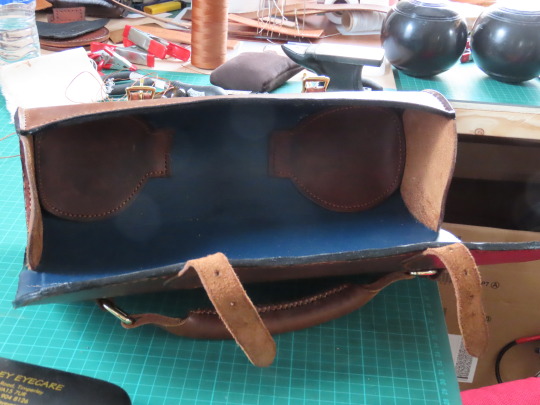
Crown Green Bowls bag build.
( Try saying that after a few drinks hahahahaha )
Hi Guys, real sorry for the long delay on this one, unfortunately real life hit us hard with the passing of our Mother which as I’m sure a lot of you can understand ..it takes it’s toll. However, we are getting back on track and I’m feeling the need to return to the leather. So, as promised, here is the bowls bag. Let’s get straight in.
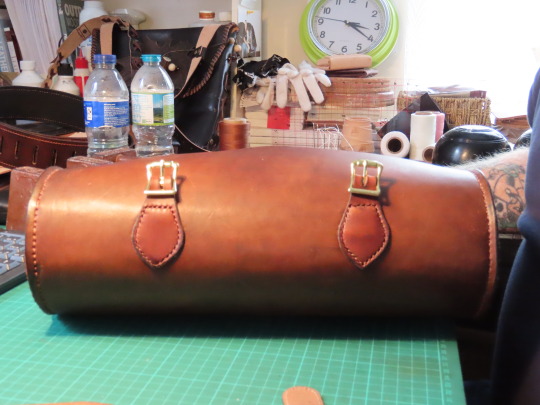
Pic 1 : This project came about as a request from a family member to fix a Bowls carry bag, turned out it was beyond repair so as a surprise I re-made one completely using the old pieces as the pattern.
Pic 2 : These are the two end sections and one of the inner ‘dividers’ just cut from new veg tan leather 1.5mm thick.
Pic 3 : using dividers I marked a line around the edge and then marked for the new holes.
Pic 4 : finishing the marking out, the same proceedure applies for marking all the holes on all the new pieces.

Pic 5 : next step was to punch all holes on all pieces using a 1.5mm single punch.
Pic 6 : When all the new pieces were cut out marked and punched, it was time to dye them, I chose a walnut color and gave it 3 coats.
Pic 7 : I cut out a new main body section, transfered all the holes marking with an awl then followed up with the 1.5mm single punch untill i had all the holes made.
Pic 8 : Now all the pieces are ready for the build.
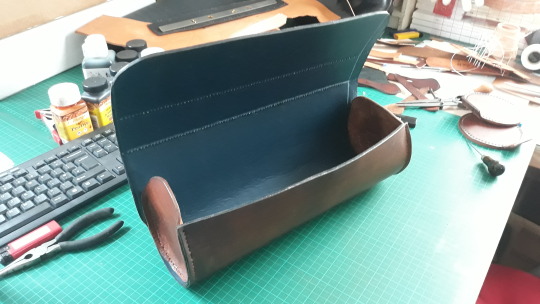
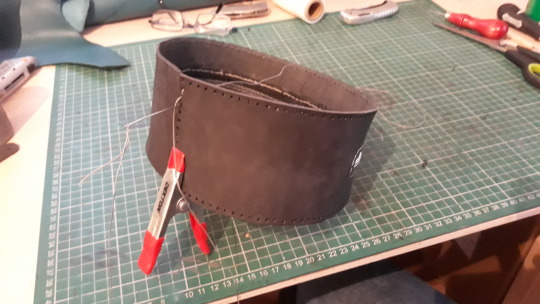
Pic 9 :The main body needs to be thickened up, so, as per the original, I cut a section of card in the shape of the main body and glued it to a nice blue vinyl sheet as shown here, this will eventually become the inner lining. Once dried I trimmed it round the edges glued it to the main body section and continued all holes through these new pieces.
Pic 10 : , I wet the whole thing with a water spray and slowly folded / rolled it and ‘convinced’ it to take the shape I needed, next the end sections were stitched in place using a saddle stitch then I fastened a strap around it to maintain the shape whilst it dried over night. ( I haven’t shown the stitching of these end sections as there are many projects on my blog at ‘Shamencraftprojects showing the procedure, feel free to drop by there and have a look.)
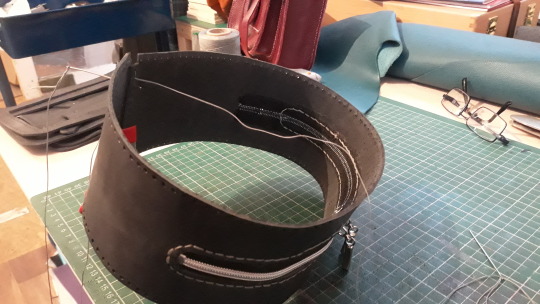
pic 11 : Next day the strap was removed and the case was now dry and holding its shape well.
Pic 12 : view of the inner blue vinyl liner.
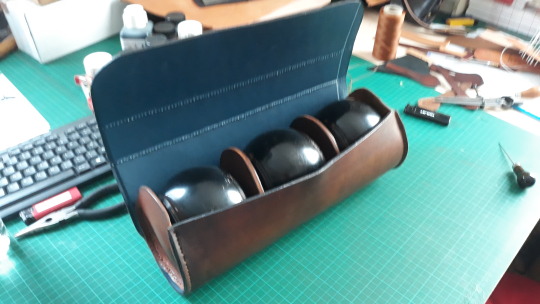
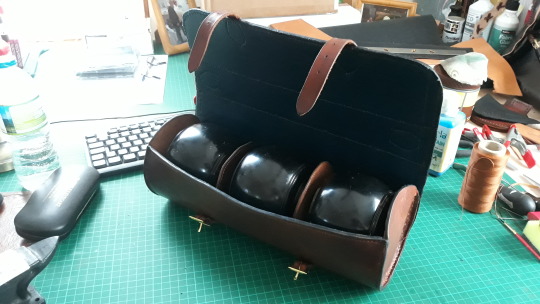
Pic 13 : I placed the Bowls in the case and slotted the dividers in between just to give it some time to stretch, for this I lightly sprayed the outside leather with water. ( As the inner vinyl is water proof ). Again..once dried completely the bowls had done their job and they now fitted in easily.

Pic 14 :I positioned the upper straps, marked lightly, ‘scratched / roughed the area they would sit and then glued them in place, here you see me using an awl to carry the holes through
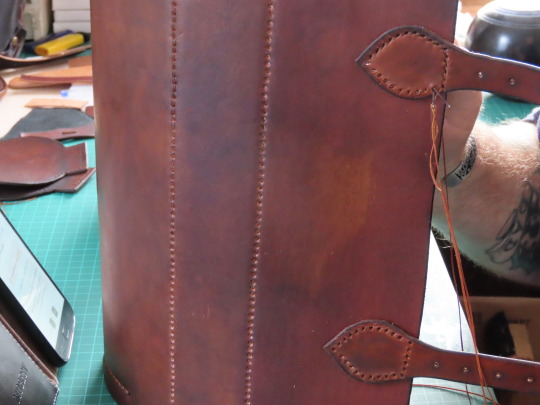
Pic 15 : Here I’m saddle stitching the upper straps to permanently fix them into place.

Pic 16 : The straps fixed in place.
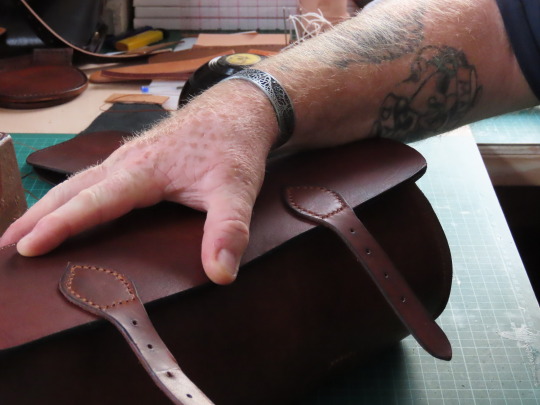
Pic 17 : Folding to see if everything is still lining up,...all ok.
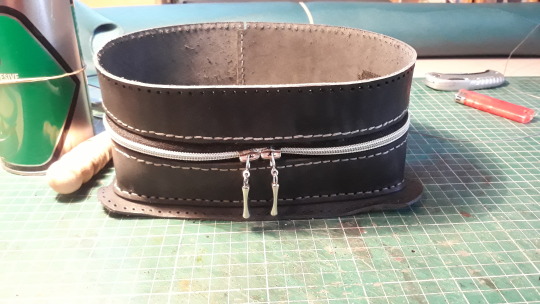
Pic 18 : Now for thelower buckle straps.
Pic19 : Buckles attached ready to close the case and mark their positions, I use the same tecnique to fit these straps as with the uppers.
Pic 20 : Once glued into place Icarry the holes through with an Awl and here I’m Saddle stitching it. I chose Gold colored buckles as I personally think it looks good with the dye color.
Pic 21 : view of the inside during stitching of the lower straps.
Pic 22 : All done, permanently fixed.
Pic 23 : The buckles and straps fit well together and are looking good. N ow for the handle.
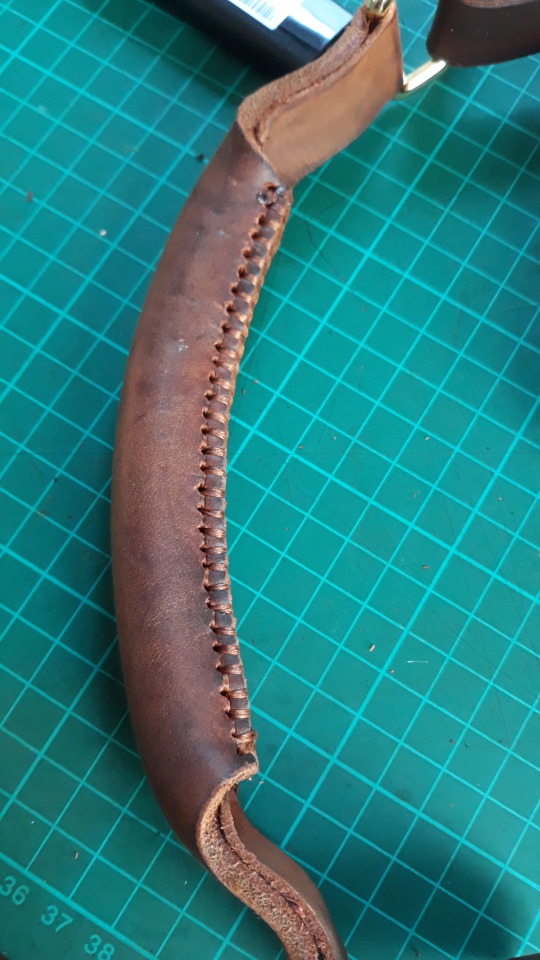
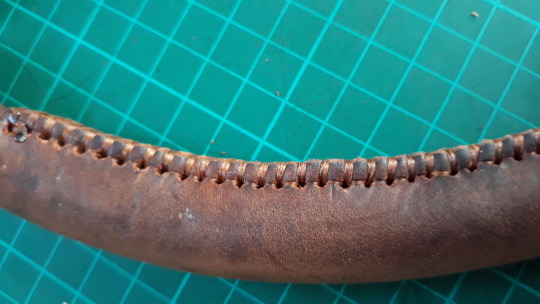
Pic 24 : I decided to make a handle from scratch. I folded a piece of leather then..using my own stitch, which is a basic saddle stitch, but after each saddle stitch you take the stitch over the top passing both needles across each other then move to the next and repeat. It holds the leather very well and you end up with a nice looking and very solid stitch, I folded extra end material over on itself to attach the connectors.
Pic 25 : side view.
Pic 26 : You can see here, I have punched stitch holes all around the edges and along the top, these are to hold the vinyl into place but are decorative too. I’ve glued the handle into position with decorative leather pieces to hold the D-rings.
Pic 26a : During the stitching along the top.
Pic 27 : Another angle.
Pic 27a : Here you can see the stitching around the edges and the handle in place. now for the inside.
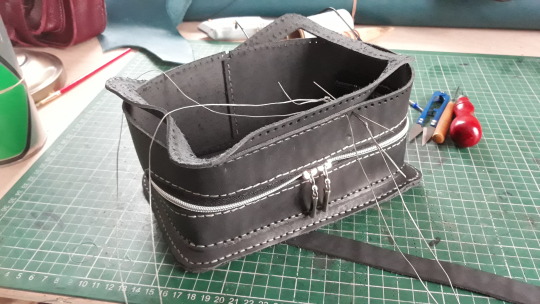
Pic 28 : You can see here the two ‘dividers’ stitched into the case and with decorative stitching around the edges. these can either lie flat as seen here or can be pulled up and placed between thebowls to protect them.

Pic 29 : this initials tag will be fitted later but this shows where it will go.
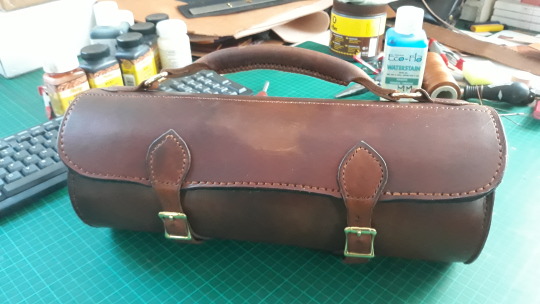
Pic 30 : All that remains to be done is to coat the whole thing in Effax leather balm and then buff to a shine,
Pic 31 : and Pic 32 : All done, one new useable and..even if I say so myself, a good looking leather bowls case.
Pic 32 : Well, I finally got to it, sorry about that, I hope you can understand, it’s been a very hard few years, we lost both my parents, two aunties and 2 cousins all close together, but leathercraft is a fantastic hobby for distracting the mind and I am so glad to be back, thanks for waiting. I have a new project starting in the next day or so..I am making a set of saddle bags hopefully to fit on my new motorbike, I will be making a video of the build as I go along and once done and edited I will put it up on youtube under Shamancraft projects so it would be great if you guys could check out my other vids..only a few at the moment but every like and subscribe etc helps me to build on it and each vid gets longer and better as I gain experience. thanks for your support. See you on the next one..watch this space and as always..Stay Crafty.
16 notes
·
View notes
Text
Update on Bowling Bag.
Hi Guys, To anyone waiting for the Bowls Bag build along, Sorry for the long wait guys but We’ve had a Bereavement in the family and it’s been hard to get ‘back to it’. I hope you understand. I ‘will’ be doing it so please keep looking now and then, I hope to have it done by mid August at latest if not sooner and hopefully to get back into things soon after.. Thanks.
1 note
·
View note
Text
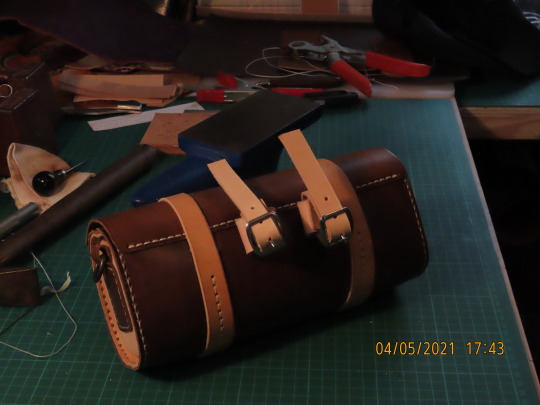
Bike Tool Pouch
Hi Guys, sorry it’s been a few weeks but life and Covid got in the way for a bit after the Large explorer bag. But I finally got some free time to sit down and make something. This time I purchased a pattern from Tony See at Dieselpunk.ro ( ‘ro’ standing for ‘Romania’..I think. ). The pattern is actually for a Bag with either carry handles or a shoulder strap, but I want the main body of this pattern to alter it into a Pouch / saddle bag for my bike to carry a few tools and maybe a spare inner tube etc and I gotta say....it has turned out great. See for yourself and join me in this short build along to see me put this lovely little pouch / saddle bag together. It’s a fairly easy build and I would recommend it to a more ‘adventurous’ beginner. As usual as I am hoping to peek the interest of a few of you to give it a go yourself I will add that Leather crafting can be expensive and can become addictive...in a good way. But Leather, especially in the UK is very expensive, so maybe pick a small project as your first one to keep costs down whilst you learn. That being said, this is an amazing hobby and very satisfying when your skill level increases and you start to see better results. I almost forgot, I have been getting into making videos of me building these projects and I show them on my new YOUTUBE Channel called Shamancraftprojects, I hope you will drop by for a look, My filming and editing skills will improve with time, but they are fun to watch. If you do would you please ‘Like’ Subscribe and click the Bell and click on ‘ALL’ so you will know when I put a new one up. Thanks. Ok,, lets get into it.
Pic 1: Turned out great, not very difficult to make and recommended for adventurous beginners. I keep getting asked How long it will take,...well, how long is a piece of string ? ..I took 3 days to make this but that’s with normal life getting in the way, so it all depends how long you can give it your attention for really. Let’s crack on.

Pic 2 : As always the patterns are printed out in ‘sections’ which have to be cut out and taped together to make the full pattern, this bit came in two halves which I’ve taped together across the middle with decorators paper tape. All other pieces are treated the same way and then any holes are punched out as per the markings. I have shown this many times in past projects so if you have any issues go check out my archive, I’m sure the information you want will be in there.

Pic 3 : I have used a Walnut water stain dye by fiebings, I use this color a lot, it’s one of my favourites and for me personally it gives leather the color most people expect leather to be..traditionally speaking that is, but feel free to dye your projects any color you wish it’s your project. Once all the patterns were transferred and the parts were cut out of the leather, I first hand stitched the top flap onto the main body as seen here using a saddle stitch.

Pic 4 : For all those out there who have followed my projects from the beginning, six years ago...wow time flies, firstly..thank you and please tell your friends,...anyyyhoooo..for all of you regulars you will remember that I enjoy hand stitching and the saddle stitch is my ‘go to’. My stitching has definitely improved thanks to practice and also to the advice given to me by many people..thanks guys if you are seeing this for all your help and free advice and from videos on youtube. Here you can see the stitching in a nice consistant line, if your stitching is ‘wobbly’ check when you do it how you cross your needles over on the first stitch, if your left needle goes behind the right needle keep doing that...and continue crossing them the same on every stitch. If your fingers hurt a lot, do four or five stitches lightly and ‘then’ pull tight...that’s approx five stitches for one pull...less stress than pulling on every stitch.
Pic 5 : Here I’ve cut a couple of the ‘skirt’ pieces ( just what I call them ) that will stitch to the end pieces to enable them to be connected to the main body as you will see later and also the front strap that will ‘pop’ over a ‘Sam Brown’. on the left are the two pieces that will eventually hold ‘D’ rings.

Pic 6 : On the main Pattern the straps are intended as carry handles as you will see if you watch the Build Tutorial Video put out by ‘Tony See’ at Dieselpunk.ro. But as I’m making it into a Tool Pouch I have used the part of the strap that will be stitched to the main body but I have cut it in half and shortened the strap to take a buckle. In this pic you see the strap cut in half and positioned ready for stitching after a buckle is fitted.
Pic 7 : if you zoom in you will see here that the strap was cut in half, however, since doing this I realise that cutting it isn’t necessary if you just remember to make one end shorter whilst leaving it longer on the other end so you can cut it to the required length later. Also here you can see the shorter ‘button’ strap is fitted. If you would like to see the build in more detail I have a four part build video with audio on Youtube ‘Shamancraftprojects’. titled ‘Bike Tool Pouch PT1, PT2, PT3, and PT4. I also have a shop now on ‘Folksy’ where I sell a lot of my projects, this one is for myself but I will be making more of these. I no longer have a shop on ETSY and for anyone wondering why, after being on it so long, they were taking 3/4s of my money on each sale and ripping me off in other smaller charges, seemed like more every week, so I’m now on ‘Folksy’. That being said..lets carry on.

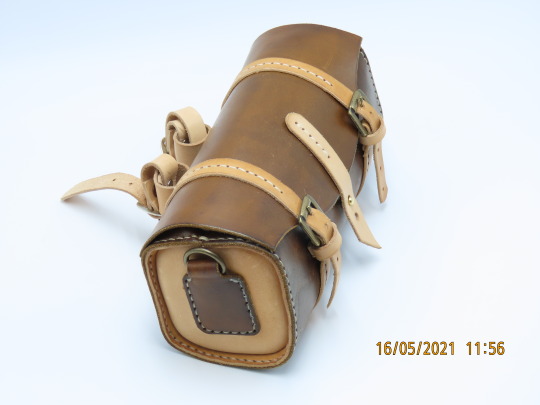
Pic 8 : Stitching the ‘D’ring holders and ‘skirts’ on to the end sections starting on the smaller underside piece then fold the top over and stitch the upper one ‘over’ the under one.
Pic 9 : Here is what I call the ‘skirt’ as it stitches around the edge of the end section on one side and then stitches to the main section on the other side, hence the two rows of holes.
Pic 10 : Here I am putting on the ‘Skirt’, (mainly because I can’t remember what it’s called hahaha ) ...onto the second of the two end sections. It’s a simple thing to do, you just find the center mark on the two pieces which are marked on the pattern, so make sure to look for them on your pattern and to mark them on your leather as these are the starting points for the stitching.
Pic 11 : Once the ‘skirt’ is attached the next step was to attach the ‘D’ ring holders on as seen here. I bought the ‘Kit’ of buckles,rivets etc from Dieselpunk.ro also.
Pic 12 : Next I attached the end pieces to the main body, I used a clip to hold the two edges together leaving the four holes I neded to stitch, as seen here on the main body one end is already done, the outside holes are to be stitched to the end sections.
Pic 13 : Here, I’m stitching an end section to the main body using the saddle stitch.
Pic 14 : Another view showing the outside stitching now incorporating the ‘left over’ outside holes as I go around the outside.
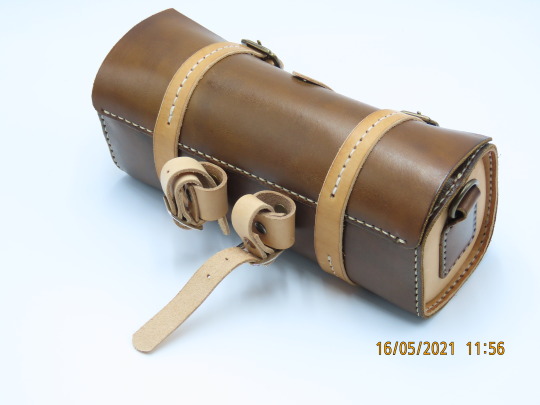
Pic 15 : Once done they should pull to shape like this.
Pic 16 : Now the buckles and ‘Sam Brown’ need fitting.

Pic 17 : The Buckles and Sam Brown are fitted, very easy to do even for a beginner and I think a Beginner ...once they can stitch, should be fine making this. ‘Stays will be fitted later to hold the straps better.
Pic 18 : Here I’ve fitted the ‘stays’. Now to make some straps to attach the bag to the Bike.
Pic 19 : As I’ve said, straps are no problem to make, I just cut two small ones and riveted them to the bag and then fitted buckles to them and riveted the straps to them as shown here.
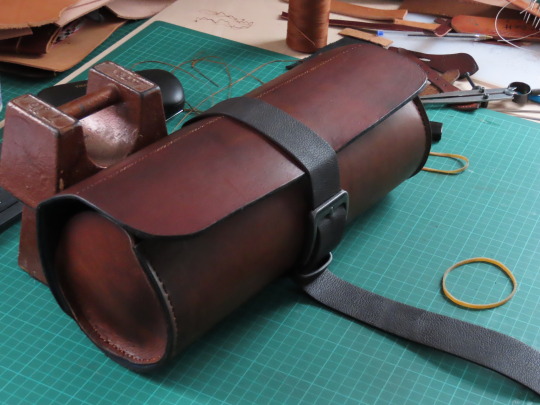
Pic 20 : Plenty of strap here to connect it to the frame of the Bike.
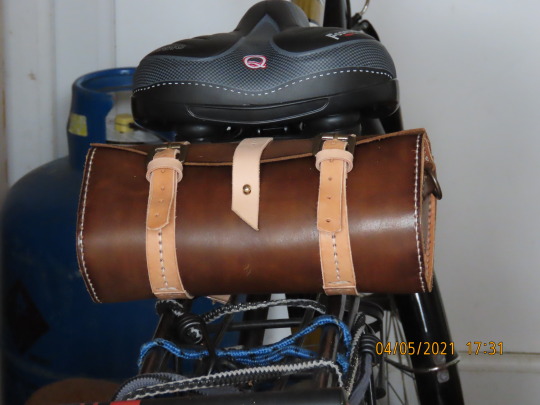
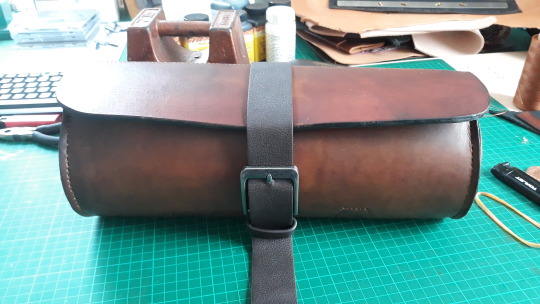
Pic 21 : Ta daaaa, I always wanted one of these on my bike to carry tools, spare inner tubes, puncture kit, gloves, hat etc. There’s more room than at first appears in this neat little bag. I recommend this project for beginners, but practice the saddle stitch first. You don’t have to use veg tan but I would recommend using a firm material that will last. I can re water proof this bag and treat it with balm now and again to keep it in good condition, I coated this in Effax Leather Balm. Hope you have enjoyed this small project, after the explorer bag I wanted a quick easy project and this fit the bill nicely. More to come, watch this space. I hope some of you will have a go yourself. ‘till next time...Stay Crafty, Stay Safe.


10 notes
·
View notes
Text
‘Explorer’ Bag.
Hi Guys, I finally managed to find the time to build the ‘Explorer’ Bag. It may have been my hands that put this together but all Credit for the Original Idea and the Pattern goes to ‘Tony See’ at Dieselpunkro. He makes some amazing patterns and sells them at very affordable prices. Ok, lets go. First I bought the pattern from Dieselpunkro, downloaded it, stuck all the pieces together as required and then cut out and stuck to the 6-7oz leather I chose to use ready to transfer from paper to leather. You don’t want a thin leather for this that will just fall/collapse it’s shape, but you also don’t want it so thick that it’s difficult to bend cut and stitch. I also chose a Veg Tan and dyed it myself, more on that later, but you can buy a factory ready dyed piece if you so choose.
Pic 1 : Stick all the pattern pieces together as required to create the ‘full’ patterns, I use Decorators white / Cream paper tape, it doesn’t mark the leather to any great degree when you take it off.
Pic 2 : The patterns come in several pieces, this main boddy section pattern was in about three pieces but just stick them together as shown on the instructional video on YT.

Pic 3 : Here is the main body section after the pattern is removed, the holes are punched through the patterns before removal.

Pic 4 : Here you have one of the side psections with Pattern stuck to the leather with decorators tape and I used a 1.5mm hole punch for the stitch holes and a larger one ( what ever you feel necessary for your rivets to fit ) where necessary.

Pic 5 : All the patterns are treated the same and eventually you will end up with a big pile of cut out and punched pieces as seen here, there were 64 pieces here, the most I’ve ever done.

Pic 6 : Here are the same pieces all dyed ready to start the build. I decided on a Nice walnut color by Fiebings, I achieved this particular look by rubbing harder in certain areas as it was drying and then it was down to a bit of luck. At this point I could not know what the final look would be, but from past experiences I had a ‘hopeful’ idea. Once dyed I coated in ‘Tan Kote’ and wiped it off before buffing to a shine, this also added darker areas here and there.
Pic 7 : I started by putting together a side pouch so seperated the pieces of the two. I used a waxed thread and a saddle stitch, which was the stitch I used on all of this bag.

Pic 8 : Somehow I forgot to take pics of the first stitching, which was adding the side to the front piece of a pouch, you can see it through the back piece I’m about to start stitching here. this pic shows me placing the front and side section ‘through’ the hole to stitch the inner edge of the side piece ‘inside, there will also be another piece of leather going over the hole at the back, that makes three layers of leather to stitch through, hence why your hole punching should be done carefully and slowly, if all in their correct place they will match up and make for a reatively ‘easy’ (ish) time of it.

Pic 9 : seen from the back, the stitching joing the three pieces, the front and side pieces now being attached to the side panel and attaching the ‘back’ panel to fully create the pouch, lots of stitching on this Project and you might find your fingers getting very sore, I have a little ‘thing’ I now do which cuts down the number of times I have to pull the thread tight thereby reducing the strain on my fingers considerably. I now stitch forwards four holes pulling them in..but loose after the fourth is in I then pull all four tight, I find It saves my fingers ...oh also, don’t pull so tight like you are trying to strangle it...with all those stitches....’it ‘will’ hold, believe me.
Pic 10 : The pouch is now attached to the actuall ‘side’ section, well...’one’ of them, remember you have to make two of them. You can see the ‘flap’ sitting on top waiting to be attached, if you zoom in you can see the holes in a line where it will attach to.

Pic 11 : Holding in position to test fit.
Pic 12 : Here you can see the process, it always seems, no matter how deep I sink the 1.5mm punch for the stitch holes I still have to push an ‘awl’ through each one to open enough to pass the two needles more easily.
Pic 13 : Ready for the next step, attaching the pices that will hold the D’rings for shoulder strap attachement and attaching the fasten strap and Buckle. Here I’m rubbing hard to darken at the ends, just my touch, if you are making one..it’s your project you go with your own ideas.
Pic 14 : Both side panels with pouches now ready to stitch the small inner flaps that will prevent things from falling out of the main bag.

Pic 15 : I attached the small inner flaps to each side pouch section using a Saddle stitch.

Pic 16 : I next stitched ( Yup...I said there was a lot . )...the ..errrm, not sure what this bit is called so just for the purpose of moving forward i’ll call it the ‘skirt’ piece...So, I stitched the ‘skirt’ piece to the outside of both side pouch sections as shown here.
Pic 17 : Ta daaa..looking great. Very impressed with how the color looks, I love the ‘aged’ look on leather.
Pic 18 : An extra pic to show it going all the way around and to prove it was my sore hands that did it..hahaha.

Pic 19 : Next I cut the zipper to the required length, glued it into place trying to keep the zip central and then punched stitch holes all around it. I have found, that after marking the hole for the zipper that once cut it leaves very little of the edge of the zipper to attache to the leather...it’s very close to the edge, so I now try to cut the zipper hole less wide than what the pattern says, I find it easier to attach it and punch the holes with more material under and around it. But you will find your own way with it as I have done, if my tip helps you then that’s great.
Pic 20 : As well as the contact cement I used to stick it in position I’m also using a saddle stitch and stitching around the zipper for extra strength.
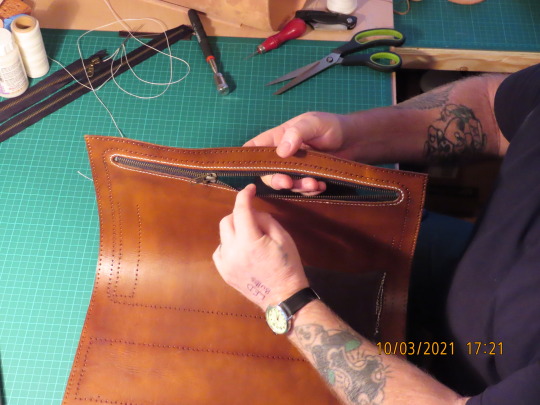
Pic 21 : Done, the zipper works fine.
Pic 22 : Now I’m attaching two of the ‘four’ Handle strap holders with D-rings., you can see the positions for the other two on the left.
Pic 23 : After adding my ‘Sharman’ mark to the inner back piece I stitched it in place to finish the creation of the zipper pocket.

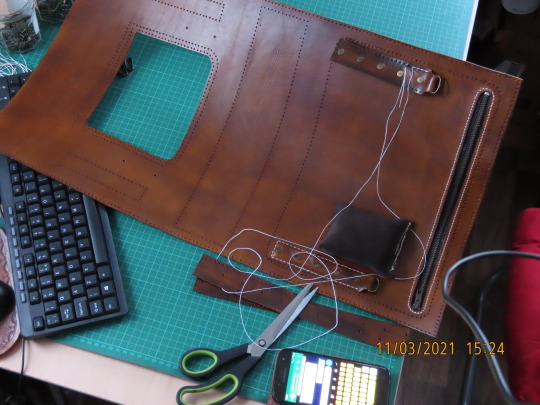
Pic 24 : Whilst stitching the back to the zipper pocket I had the other side flapping around everywhere so had to get creative and here’s how I resolved the problem, I tied string around the other flap and threw it over a beam in the work shop...worked a treat.

Pic 25 : All four bag handle connectors are now in position as seen here, stitched and rivetted. I’ve chosen to use the Antique rivets, buckles and D-rings for this project and it seems to suit it very well.

Pic 26 : Next I fitted the inner bottom strengthener piece.
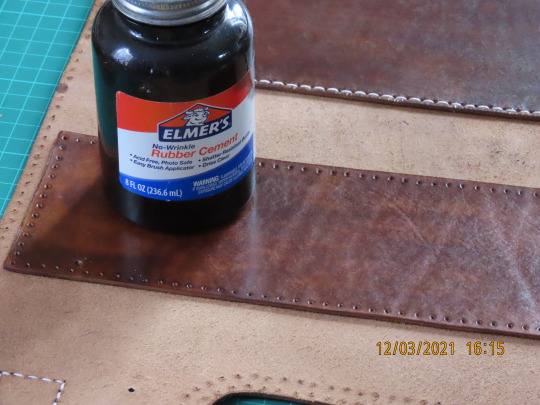
Pic 27 : I used Elmers rubber solution glue to stick the bottom strengthener into position so that I could adjust it if I needed to whilst stitching, as it turned out the holes had lined up really well and the job went smoothly.
Pic 28 : All stitched in,ready to move forward. Incase I didn’t mention it already I also dyed the flesh side of the leather, the walnut gives it a nice look I think.

Pic 29 : I added rivets too, there’s no chance of this coming off, it’s glued, stitched and rivetted with x4 antique rivets.

Pic 30 : Now I had to put together the outside pouch which will be on the front below the main flap, I did it the same as the side pouches, attached the side to one edge then attached the buckle systems as shown here, after that I stitched the other edge ‘through’ the hole and stitched it underneath to the inside edge at the same time attaching the back section which will finish the creation of the pouch.
Pic 31 : Attaching the pouch to the front of the main body section. The following pics from 32 to 39 are extras to show the stitching a bit closer.

Pic 32 : the reason to stitch the edge on the inside is to give a much smoother look along the edge when completed.
Pic 33 : having to use a stitch awl to widen each hole slightly, I stabbed muself more than a few times, so many that I had to wash my hands and coat in antiseptic cream each night. All that ontop of arthritis and carpul tunnel issues, sometimes it can be a little hard to manipulate the needles, but...if at first you don’t succeed ehy.

Pic 34 : you can see the three layers here the outer, the gusset tucked under and the flesh side of the ‘backing’ piece.

Pic 35 : showing the spike (Awl) that keeps stabbing me.

Pic 36 : Needles come through fine now.
Pic 37 : Another view of the whole thing. It’s starting to make me believe I can actually do this if I just keep going.
Pic 38 : Pouch attached.

Pic 39 : View of the bottom section now strengthened. I decided later to add some metal ‘Bag feet’..not part of the plan..but Didn’t want to do all this work just to have the bottom get scratched up without at least trying to prevent it. I’ll show that at the end.

Pic 40 : I then realised, I wasn’t quite done with that as the inside backing piece had an ‘outer’ line of stitches as well, as seen here, but if you are someone that gets frustrated easily I would find another hobby, by this point I had been making this for two weeks because real life kept getting in the way and stopping me, very frustrating but hey..what can ya do except suck it up and keep moving forward.

Pic 41 : People wonder why they have the holes so big..well the good thing is they allow two needles to pass through smoothly, if you are doing hundreds of stitches you really don’t want them getting snagged all the time, but anyway not to worry because once done I either lay it on an anvil if it will fit or put a small anvil under it inside on my hand..and tap with a carpenters hammer gently flattening all the thread and closing the holes a bit more. I always tell people, there will always be a point where you will think something bad about the job you are doing...don’t give up, keep going forward and you will be surprised at just how good it ‘ will’ look when ‘Everything’..all the polishing and treatments etc are completed. remember, until it’s fully completed it’s just a W.I.P. ..a work in progress so don’t judge it until it’s done.
Pic 42 : The front pouch fully attached.

Pic 43 : Here I have sat the side section in place whilst I begin to stitch it to the main body.

Pic 44 : Same thing ..another angle.
Pic 45 : attaching side panel..Other angle.
Pic 46 : First side panel attached fully to main body.
Pic 47 : Other side section ready to fit. The colors are not really as different as the lighting makes them look check out pic 48 for what it really looks like.

Pic 48 : halfway there.
Pic 49 : Clips come in very handy at times like this, the section itself is wanting to fall all the time, ..problem solved.

Pic 50 : Using the Awl to widen the hole, not fun when it catches you...but all part of the game.
Pic 51 : Done, both side sections now firmly attached and the whole thing is starting to come together.

Pic 52 : Now it needs the main flap, but that needs some work first.

Pic 53 : Different angle.

Pic 54 : View of the back and the zipper pocket.
Pic 55 : First I had to attach the closure straps using rivets (Double Cap, you can use single cap but I prefer double.) I also stamped the ‘Shaman’ Mark on the Leather label then riveted that to a back piece and stitched that to the front edge of the main flap as seen here, now..we’re ready.
Pic 56 : Again I used a saddle stitch for extra strength, once at the other end ..just because I wanted to...I came all the way back again, no real reason to do that, it’s perfectly fine without the extra, but I ‘m keeping this bag and I wanted it, so I did.

Pic 57 : main flap...Attached.

Pic 58 : Main flap rear view.

Pic 59 : Angle shot shows how well all the colors have matched.

Pic 60 : Now I have to make x2 bag handles.
Pic 61 : Using the saddle stitch. All you need to do here is stitch all the holes together pulling the two sides together as shown and make two of these.
Pic 62 : Connect the bag handles to the D-rings as seen here. I used rivets to fasten them on.

Pic 63 : I attached the clip end sections using rivits and stitching to the main shoulder strap at either end, then the clips were attached, again using rivets.

Pic 64 : Attach the shoulder strap to the side rings.

Pic 66 : As I said earlier, I attached ‘Metal bag feet’ to try to avoid damage to the base from dragging, might not stop everything but should help and looks good I think.

Pic 66 : And we are done. This took me four weeks in the end, but we’ve had a lot of ‘Life’ getting in the way. If I had nothing else to do but this I reckon I could do it in about a week to ten days. I wouldn’t recommend this particular project to a beginner mainly because of the expense, I wouldn’t practice on this one. But there are many more projects out there online and if it suits you to do so you could visit my Blog ‘A Journey into Leather Craft’ and check out my archive, you’ll see the things I’ve made from the very first knife sheath to this amazing bag. I can’t believe I made this, Just shows you never really know what you can do until you try. I look forward to the next project, hope you will come back and check out the next one. To all those who have followed my projects for a long time thank you, hope you enjoy them and hope I have inspired some of you to give it a go yourself. If you are new, thanks for stopping by for a look, hope you liked what you found and hope you will also come back for the next one, maybe tell your friends about my blog, I’d appreciate that. Until then, as always, stay safe and to all the makers out there, Stay Crafty.
#leather#leather craft#leather bags#hand made#hand made goods#posh bags#expensive bags#expensive goods#hell yeah
7 notes
·
View notes
Text
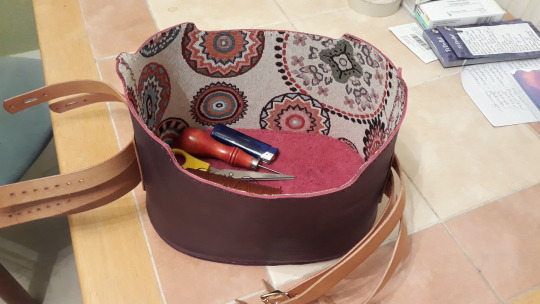
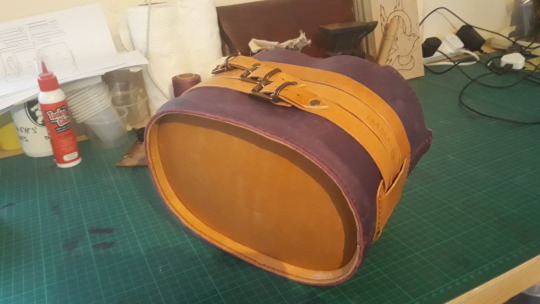
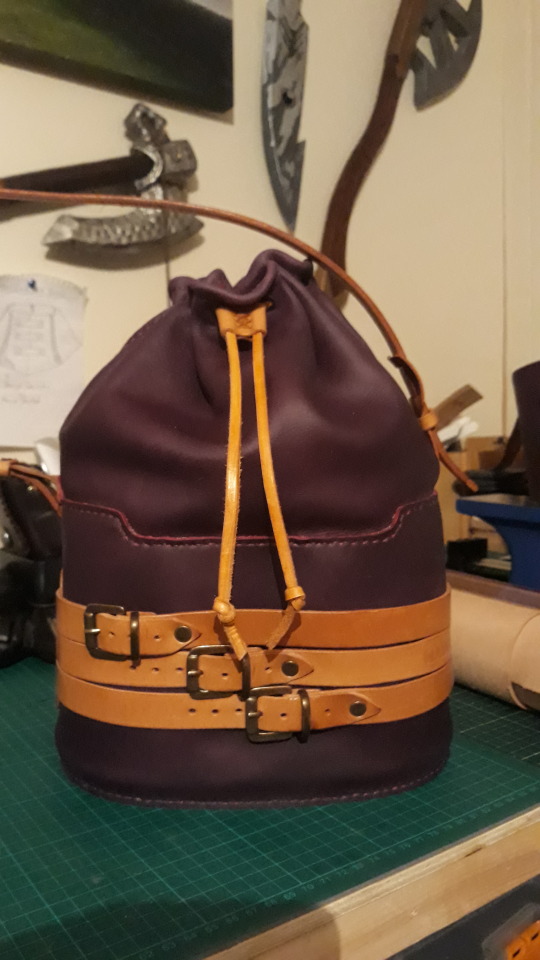
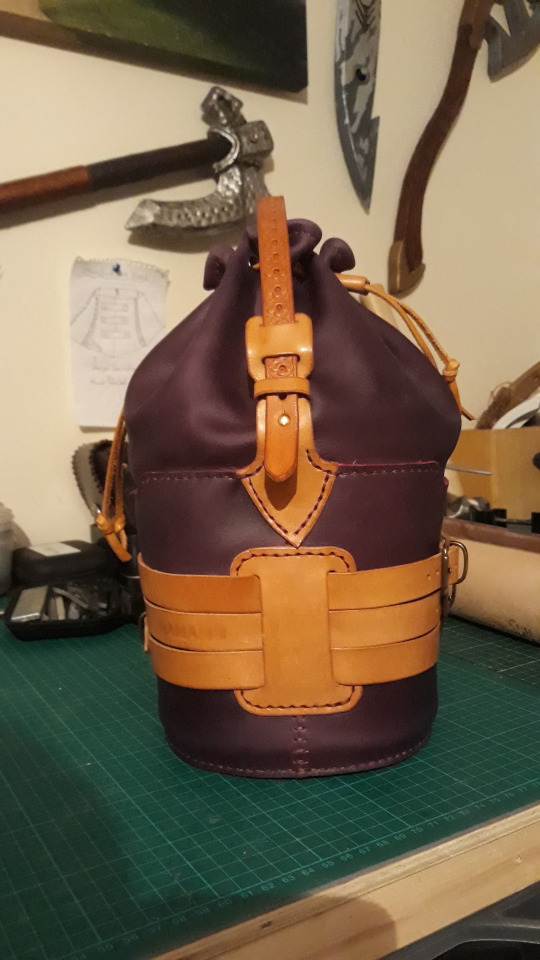
Bucket Bag Build Along Pics.
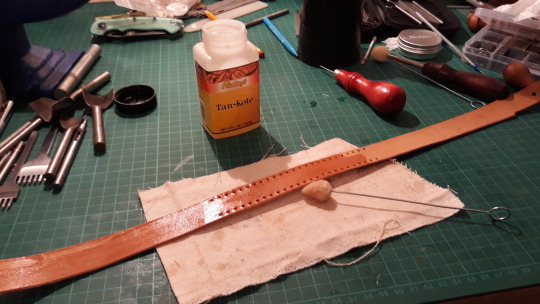
The Bucket Bag. Original idea and pattern from Dieselpunkro.

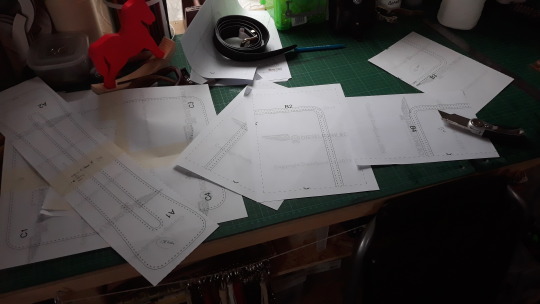
Pic 1 : At last, I have some me time to put the build along pics up for the Bucket bag. Firstly, Sorry for the long wait for any one that has been wondering where I’ve been but with life as it is for everyone these days lets just say ‘LIFE’ once again got in the way. So, moving on. Credit for the Original design and the Pattern goes to ‘Tony See’ of Dieselpunkro in Spain, find them on Y/Tube. The construction and any alterations from the original design is all me. Let’s start. Here I have bought the pattern from Dieselpunkro, downloaded it and printed.
Pic 2 : I cut out each pattern and I have punched the some of the holes, Some times I do it before taping to the leather and other times I find it’s easier to tape it down and ‘then’ do the smaller ones as sometimes the smaller ones are easier to do with the patterns taped down to the leather. I’m sure you’ll find your own way, as long as you make sure you’ve punched ‘all’ holes you’ll be ok. Also’ a very important point, look on the patterns for any holes marked as ‘stitching’ holes or ‘start here’ holes and keep marking them as you go along and eventually transfer them to the leather as these are the holes where you will begin the stitching and if you don’t mark then it’s a royal pain trying to figure it out...believe me...I’ve done it a few times. So check and double check.
Pic 3 : Patterns transferred to leather , here’s one of the sections that was ready, , shaped and all holes punched, needing a liner, here I’m about to cut some material for that. This is the ‘wrong’ side of the liner material. You can see the other side further on.
Pic 4 : I wasn’t aware of it at this point but i had cut a piece wrong, this turned out to be the bottom section of the bag and somehow I’ve managed to take my eye off the ball ( due to tiredness ) and I’ve punched holes around the edge of the ‘bottom’ hence why I thought it was the top, anyway...there’s another tip, this stuff is expensive, so don’t do it when you are tired, lesson learned and as luck would have it, this will work for another project I have lined up for 2021. Anyway, you get ‘warts and all’ on here as promised. you may notice the ‘change’ as we go along and now you will know why.
Pic 5 : I use anything to hand when glueing stuff together to press them down
Pic 6 : This is the pattern transfer tor the Veg Tan Leather bottom piece, this was one of those times when I punched the holes through the pattern and the leather in one go.
Pic 7 : sometimes you will find that the punched holes are a tad too small but it’s an easy fix, just a quick once round pass using a slighty..very slightly, bigger punch, Note at the bottom an ‘x,’ this is me keeping track of the ‘Start stitch here’ hole as mentioned earlier. the white gloves, as those long time followers will already know,... but just for those who may be new to my blog,..they are to prevent my nails dragging and marking the leather.
Pic 8 : On the inside I wanted to put a liner of the ‘softer’ material that will be used for the upper section of the bag, but so that you could see the lovely bright color of the ‘wrong’ side of it as you will see. first I had to rough up the whole area as shown here, I used an actual ‘rougher’ tool seen in the picture but you can use a knife edge or anything that will get the job done, this helps the glue to bond the two sections together better.

Pic 9 : Ok, so, those keen eyed amongst you will probably be wondering, why , if he has already glued a liner onto the base, is he now gluing another piece. Well I messed up twice on the day I was tired, I did eventually stop to avoid making more, this was me the next day putting the mistakes right. I realised I hadn’t used the soft leather ‘upside-down’ for the inside color / effect. It will all come clear at the end.

Pic 10 : When I first started this blog showing my little project builds I promised to show any and all mistakes, and I do, in the hope of saving you yourself some time, money and effort if you decide to have a go yourself. But now..I’m Back on track, new pieces cut for lower section and the correct liner is on and waiting to be trimmed.
Pic 11 : Next after the larger sections comes the straps and assorted leather sections, the process is the same just on a smaller scale, no big deal, but takes a lot of patience as there are lots of holes to punch, hundreds in fact. If you have no patience, this is not the hobby for you.
Pic 12 : Straps and assorted pieces done. Time to start the build.
Pic 13 : Here I’ve taken the thin ‘skirt’ section and using a rolling stitch with a waxed thread I stitched all around one way as seen here fixing it to the veg tan base and then went all the way back to fill the gaps as shown in Pic 14.
Pic 14 : Skirting stitched on ready to go the other way to comlete the stitching.
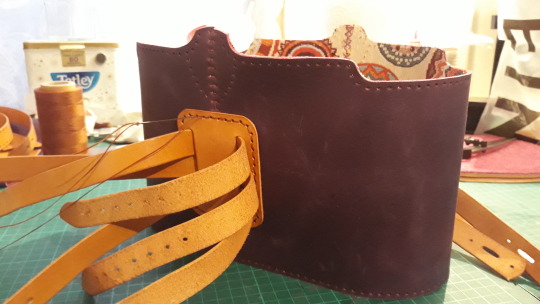
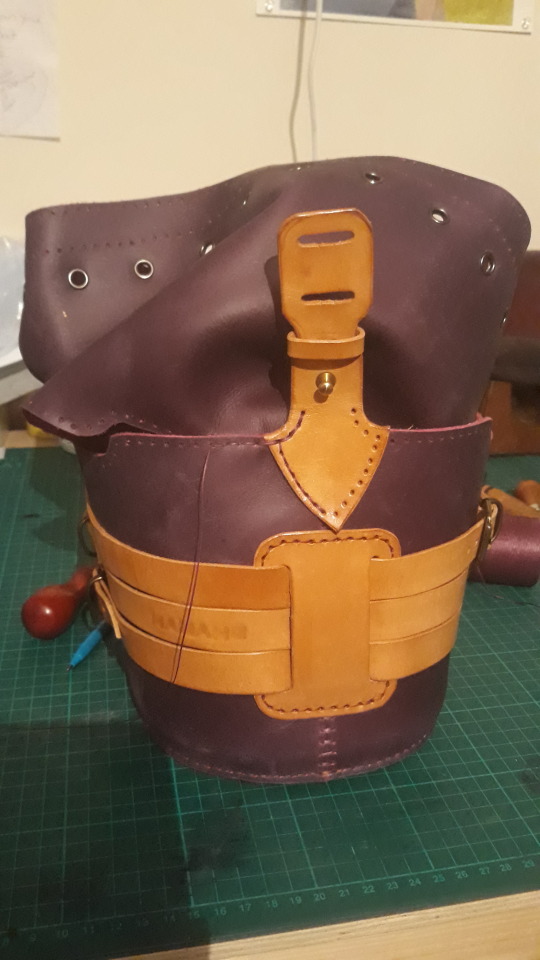
Pic 15 : Stitching the side pieces together using a cross over stitch to give this effect on the outside. I’ve used a waxed thread in Purple.
Pic 16 : Once both sides are done it made a nice shape and was quite sturdy already.
Pic 17 : Here you can see the rivets in position for the next step and you can now see the actual ‘right’ side of the liner.
Pic 18 : Here you see the pattern placed over the project to show how it’s coming together so precisely. The patterns from Dieselpunkro are not only great value for your money but they are very precise.
Pic 19 : You can see the inside showing the rivets. once the strap sections are fitted you won’t see the outside of the rivets and once done they will add to the strength of the whole structure.
Pic 20 : All the strapping has been treated with Tan Kote straight onto the straps, left to dry and then buffed up to a shine.( though in other circumstances I would wipe it off quickly, I am aiming to darken the color as will show later. )

Pic 21 : The strapping sections all put together and placed over the rivets.
Pic 22: Then using the purple thread again and a ‘Saddle’ stitch this time I have stitched the whole piece over the rivets following the pattern holes as always.
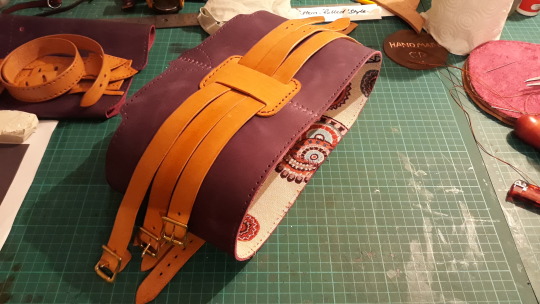
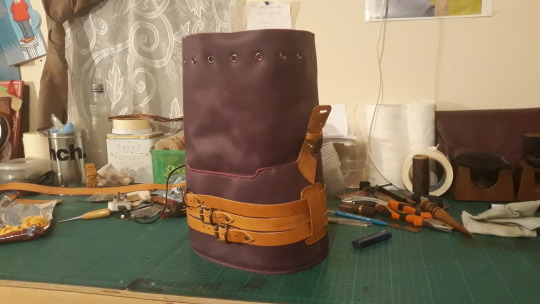
Pic 23 : Straps, Done. and used a few buckles lying around to ‘test’ fit, they are ‘not’ fitted yet as I want antique brass not shiny brass.
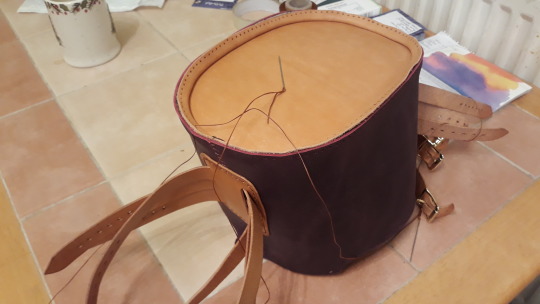
Pic 24 : Next I fit the bottom section as shown, thread the two needles used for a saddle stitch with the purple waxed thread and begin to stitch it to the main body of the bag.
Pic 25 : after the bottom is stitched on you can now see what I was saying about the nice color on the ‘wrong’ side of the soft leather I glued on as a liner.
Pic 26 : Showing the bottom section finished and looking very solid as the main body becomes even more solid now.

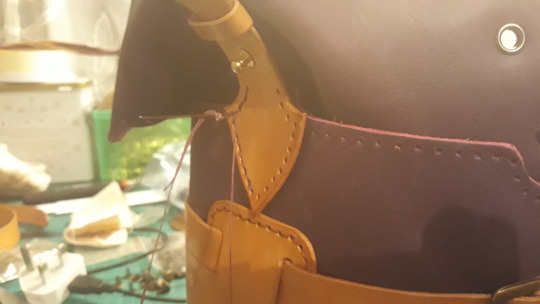
Pic 27 : These two side secions are part of the handle / strap section. I punched a small hole in each using the pattern marks and added a Chicago screw on each as seen here. and I have added a small ‘Stay’ strap around each using a stitch or two on the back to hold them together.
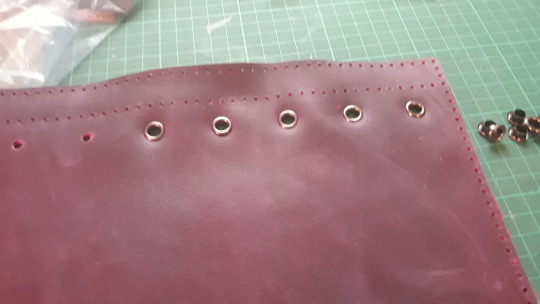
Pic 28 : This pic and pic 29 show me fitting the eyelets. I used some gunsmoke blue/grey colored ones.
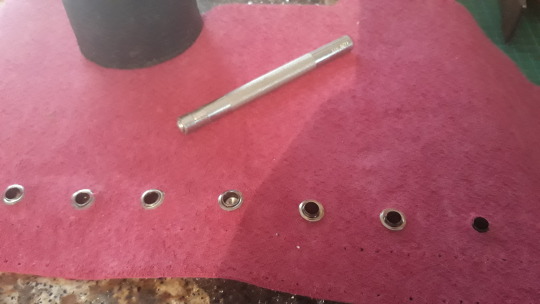
Pic 29 : The punch tool used to fit them.
Pic 30 : I fitted the antique brass buckles and used antique brass rivets to hold the straps permanently in place. I also fitted antique brass ‘Stays’ as seen in this pic. Note how the strap coloring is the same as the base, that was achieved by A) Using leather from the same roll and B) using the Tan Kote for the same amount of time on everything before buffing..which time wise in this case was just ..put it on and wait for it to dry completely, then buff it. It seems to have done the trick as you’ll soon see.
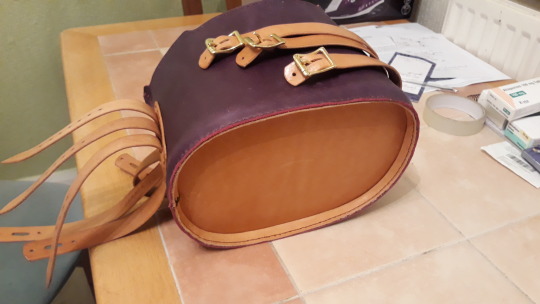
Pic 31 : the base is now done, time to add the upper section to it.
Pic 32 : First I attached the side pieces as shown here, I stitched them to the base using a saddle stitch and the usual Purple waxed thread a seen here, I did both sides the same way.
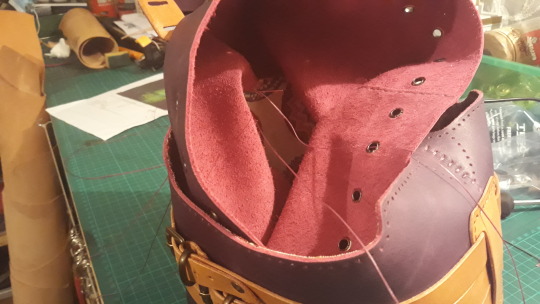
Pic 33 : You can see here the struggle to get to the stitch holes which could barely be seen on the inside due to the material used, but again this comes down to a lot of patience. It’s worth it at the end.
Pic 34 : You can see here that you have to start at the bottom of the strap section ( I know most of you have figured it out, but for anyone wondering..I mean the ‘pointy bit’ ). I came up with the stitch and right to the top, then I doubled that stitch back down till it met the ‘upper’ material being stitched on. Here if you look carefully I made a few passes back and forwards to give extra strength at these points, I then started along the edge joing the soft ‘upper’ section to the now solid ‘Base’ section as shown.
Pic 35 : Here you can see the upper is now stitched to the base. As I reached the far side I again had to stitch the ‘pointy’ bit, I joined onto it, went to the top as before and doubled it back down then carried it to the bottom around the point and back up the other side doing exactly the same again until I had joined back onto the upper and base sections and then carried on along the edge on the opposite side finishing off with a few back stitched, snipped it and used a lighter to melt the ends to secure it.

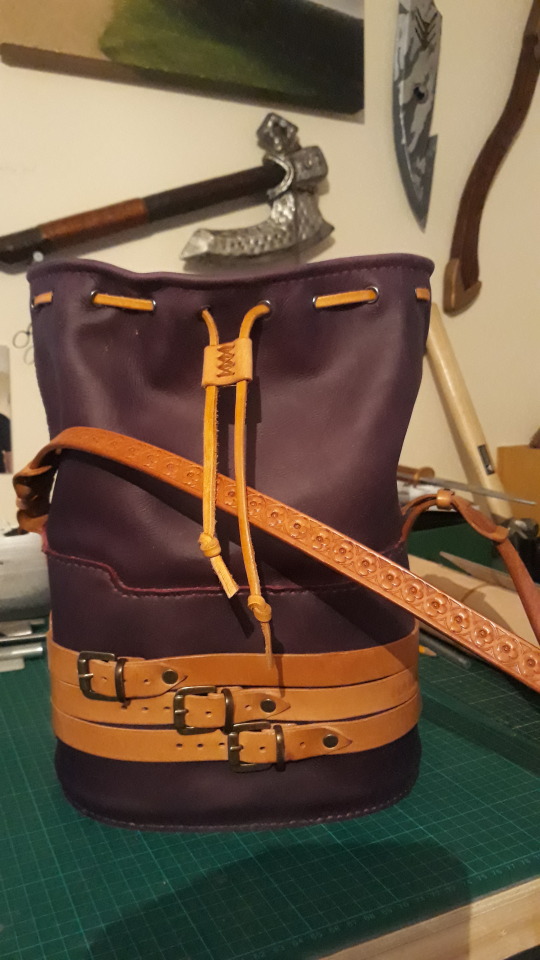
Pic 36 : Next I changed the main shoulder strap for my own design, I cut a normal strap a half inch wide, wet it ( ’Cased’ it ) and stamped a nice flower design on then stamped a center for each one. as seen here. I edged it all around and then used Tan Kote in the same way as before and allowed to dry rather than removing it, then buffed it to a shine, it came out the same color as the rest. Once it was complete I punched and slit the holes as shown on the patter , threaded the strap into place and connected it using the chicago screws pushed through the punched/slit holes.
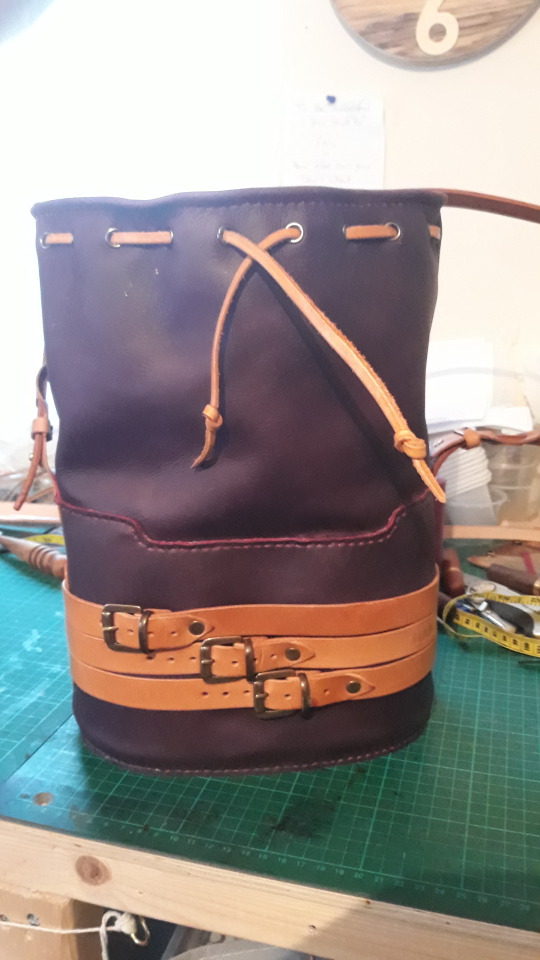
Pic 37 : I used leather off the same roll to cut a thin ‘tie’ piece for the ‘Pull-Tie’. I treated it the same way with the Tan Kote and achieved the same color again bringing together the whole look.
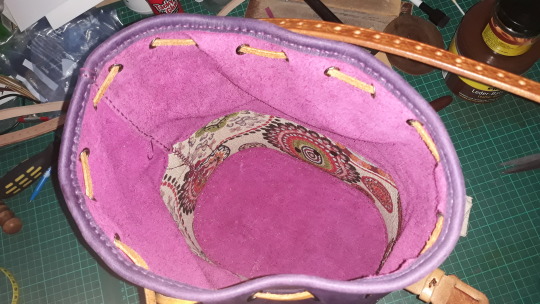
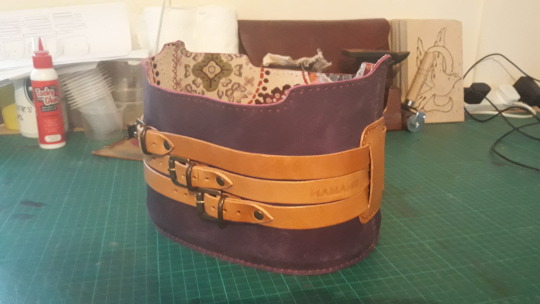
Pic 38 : A view of the inside of the Bucket bag. You can see now that re-doing the bottom was worth it as it now matches the top inside section. You can see the Pull tie threaded through the eyelets. One thing I almost forgot, see the top edge, I rolled it over and saddle stitched it all around to give a much tougher top edge.
Pic 39 : The finished bag, the only other things I did were to make the small leather piece that holds the pull tie pieces together as seen here, no big deal.
Pic 40 : And I cut the leather pull through into two pieces once threaded and once passed through the small leather ‘stay’ piece I knotted the ends and as you can see here..You now pull each side closed seperately, making for an easier closure.
Pic 41 : done.
And Voila, One Christmas Present Finished. That’s it guys, this was the last Project I did in 2020. I’m looking forward to starting new projects soon but I have a few things around the house to sort out first. I will probably get back to it around about mid February. Thank you to all those of you who have waited a long time to see this and didn’t unfollow me, I appreciate it, sometimes life just gets in the way as I’m sure you all know. I hope you will go check out Dieselpunkro you might be inspired if I haven’t quite inspired you enough hahaha. See you all again soon with another project and good luck with your own. Until then, stay safe and as always, ‘Stay crafty’.
8 notes
·
View notes
Text
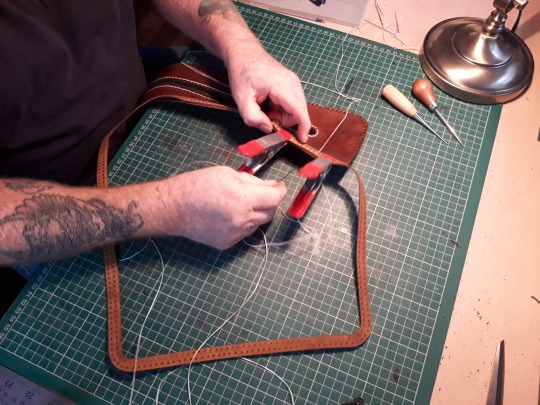
no’2 Dopp kit bag build along pics.
As promised, here are the build along pics for those people who..like myself, Geek out on seeing things being made and put together. Fill ya boots guys.

Pic 1 : First, if you fancy trying to make one of these yourself you’ll need to pay a visit to ‘Dieselpunkro’ and purchase the PDF pattern from them. Print the pattern out and then cut and stick the appropriate pieces together as you can see I did here, pretty straight forward so far. I use the decorators tape as you can still see the hole marks through it for punching.
Pic 2 : you can see some here that I’ve already stuck some pieces together to make the full pattern of certain sections.
Pic 3 : Placing the patterns on my chosen piece of leather to find the best ‘use’ of the leather to avoid too much waste. Some of the off cuts can be used for straps etc.

Pic 4 : Here you see the top section / gusset cut out and all the holes have been punched a 1.5mm punch seems big enough, not too small that you couldn’t pass two needles across each other through them and not too big that they won’t close up nicely once tapped gently with a hammer by the end of the project. For anyone just looking for the first time and not sure what I mean by that, Once you have stitched a section, it’s a good idea to then go around the stitching with a hammer and gently tap the stitching flat, this helps to close up the holes a bit..making it tighter around your stitch and to also lower the profile of the thread to help avoid snagging or tearing of it down the line. Hope that explains it.

Pic 5 : this is the main body section, I’ve cut the pattern and stuck it to the leather ready to cut the required piece to size and shape, the hole punching has just been done, In the picture is my 1.5mm ‘Single’ hole punch, you can use a stitch iron or a ‘several’ pronged punch just make sure the hole distance is the same as the pattern or it won’t align properly when you stitch it. I put an elastic band around it to make it thicker for grip.
Pic 6 : The ‘Skirt’ section that joins the other two pieces together.
Pic 7 : The ‘pipes’ Basically the same procedure for all the pieces.
Pic 8 :After all the dying is done the pipes are the first to be stitched on before the main build.
Pic 9 : All leather pieces ready for dye.

Pic 10 : I chose a Walnut ‘Pro Dye’ although you see a dauber here it proved to be taking too long so I swapped it for a sponge which covered the area much quicker.
Pic 11 : I chose Black for the ‘Pipe’ patterns. Don’t buff the leather too quickly, allow to dry naturally in a warm room, the buffing will be easier for it.

Pic 12 : I glued the zipper into position and then went again around the holes with the punch to also cut through the zipper tape.

Pic 13 : Once dried it’s ready for stitching , all stitching on this kit bag is saddle stitch to give it more strength.
Pic 13A. you really have to enjoy stitching to do this kind of work...’coz there are looooooooaaaads of them.
Pic 14 : Stitching done.
Pic 15 : I used a couple of clamps to hold the ‘skirt’ in position, this was a bit fiddly but if the holes are aligned correctly the bag will come together well. However...as those of you who saw my ‘Black Dopp kit bag’ will remember...it’s easy to get the wrong hole(s) and that will leave the bag twisted. ‘IF’ this happens I can only suggest you do what I did...take a deep breath...laugh it off, cut all the stitching...double check the pattern and instruction and find the ‘correct’ hole...and start again. there’s nothing else for it. so check the pattern carefully when at that stage and mark the required holes properly...don’t lose site of them when dying the leather. I used my ‘awl’ and made a tiny stab mark either side of the required holes. Before beginning any of the stitching would be a good time to remember the old saying..’Check twice, cut ( or do )..once.

Pic 16 : There’s no way to rush this if you want the hand stitched look, you need a lot of patience and tough fingers.
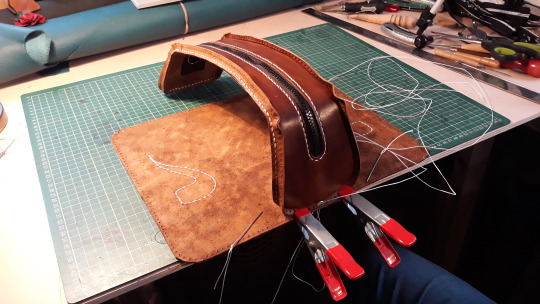
Pic 17 : The ‘skirt’ is attached, ready to attach to the main body. Again, we’re stitching here so I had to pay careful attention to the pattern marks to find the correct start point. I’m using the clamps again here , they’re great for holding things in position whilst you get the stitching going.

Pic 18 : Almost a full side and end now connected, with every stitch the bag took more shape. I used a White waxed thread which I personally think goes well with the other colors but if doing one for yourself..it’s your choice, give it a go it’s a great feeling seeing it coming together by your own hands.
Pic 19 : And apart from stitching the pipes on, which really you just do before the build, that’s about it. You just need to smooth off the edges with some kind of sand paper, then wet it and burnish it to make it nice and smooth. If you don’t understand burnishing you can google it and find videos showing you. It’s a simple thing to do.

Pic 20 : The final actual ‘build’ thing is to ...if you choose to, make a small leather pull tab to go on the zipper pull. Then finally I coated the whole thing in Effax Leather Balm which darkens the leather a bit as you can see in this final picture and it also softens the leather and helps to ‘fix’ the dye to the leather. If you don’t want to use the Leather balm you could use Resolene or leather sheene, and will buff to a nice shine, again..just allow to dry at room temperature..
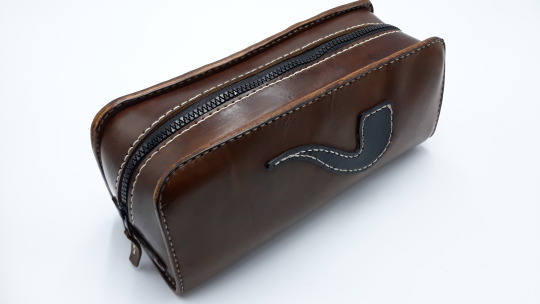
Pic 21 : finished.

Pic 22 : other view.
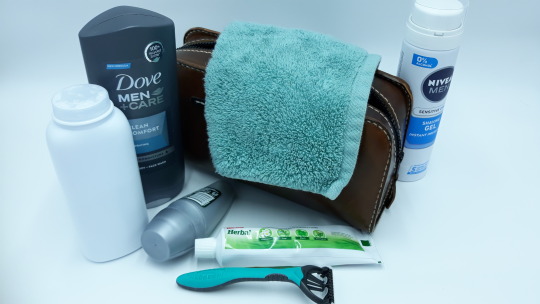
And voila, one fantastic, heavy duty large Wash kit or Tabacco and pipe kit...or whatever kit, or for whatever you desire.. bag. I had fun making this one, I hope it gives someone out there the idea to have ago yourself. I just have to put this on the Etsy shop now @handmadecp and it’s on to another project. Hope you geeked out as much as I did, take care, stay safe out there, see you on the next one. Till then, stay Crafty.
3 notes
·
View notes
Text
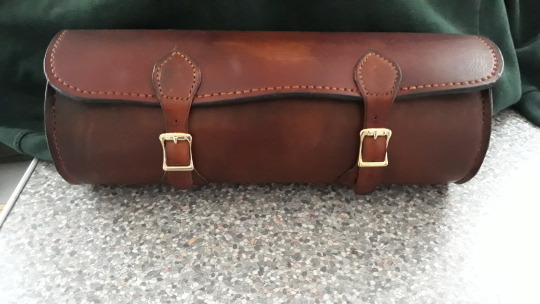
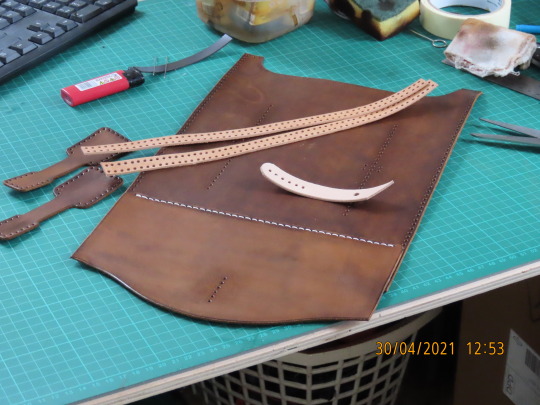
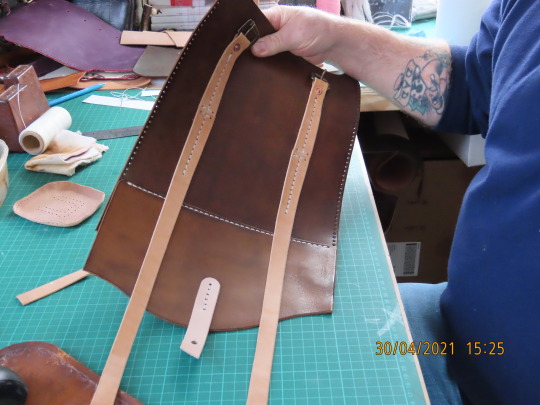
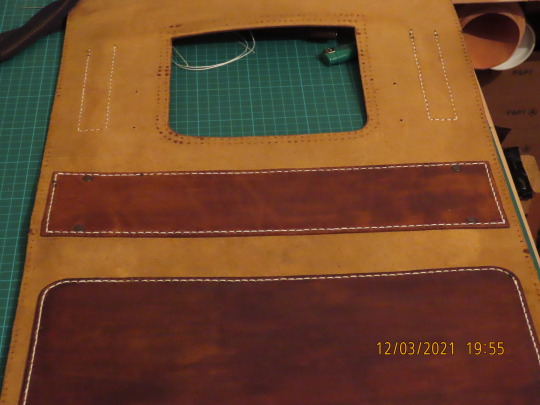
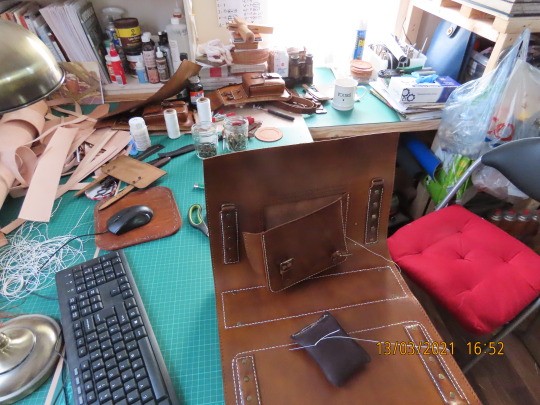
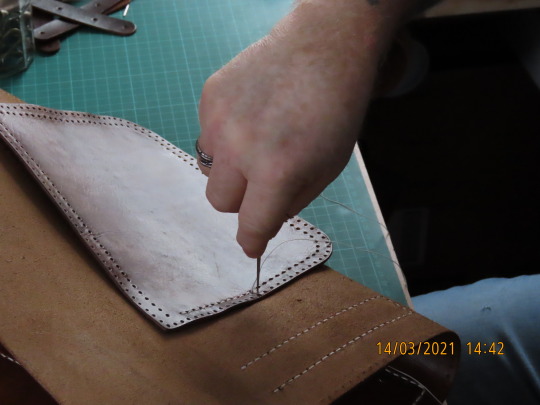
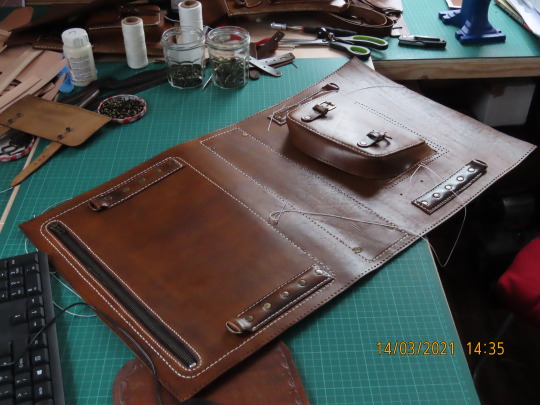
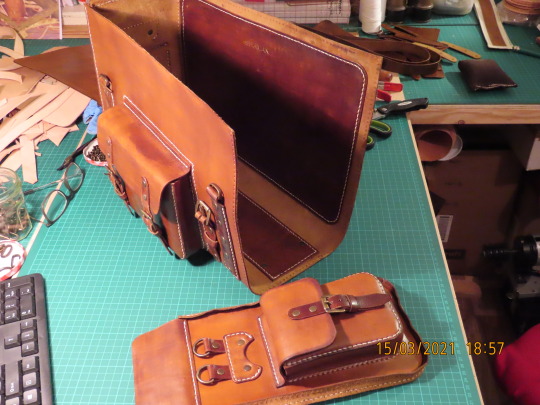
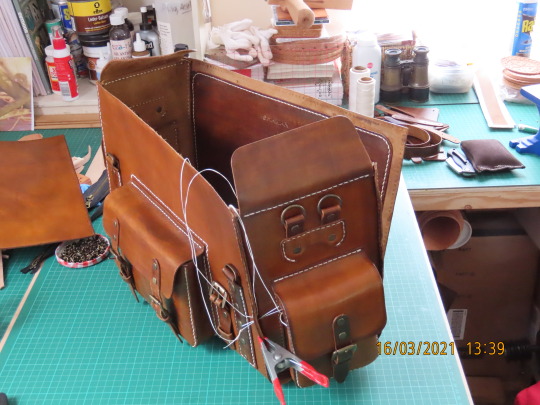
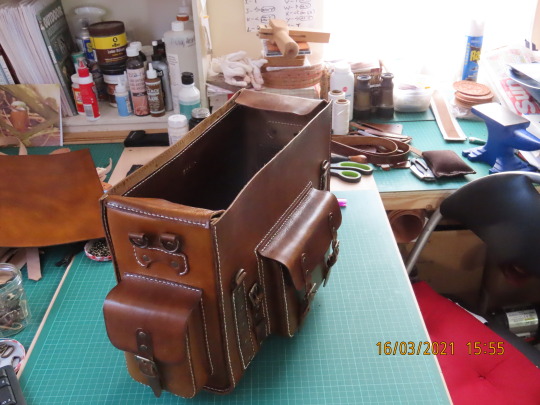
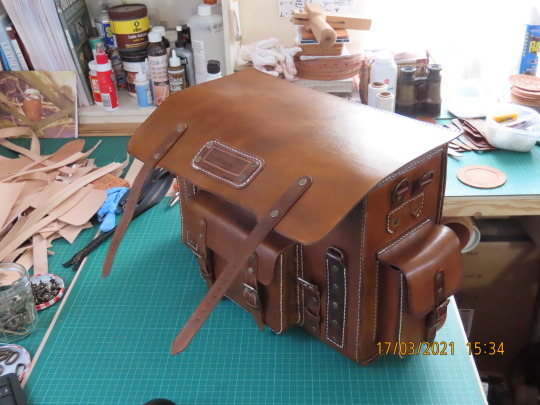
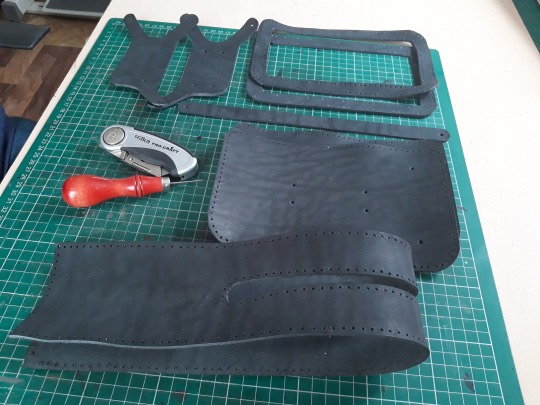
Update: Some information change to the small ‘satchel’ style Bag.

I’ve added a few things to this bag that were a bit of an after thought. I’ve attached D-rings tothe ends of the bag as well as the rear to offer two positions as I have found that some ladies like one annnd some like the other, so..voila, sorted. Also, on the front I have attached my makers Logo which was forgotten earlier and ‘yes’ to those eagle eyed ‘detail’ guys out there..you can see I corrected that I had forgotten also to stitch the front strap at the bottom.


0 notes
Photo

Dopp Kit bag. Made by me. Pattern and original design credit to Dieselpunkro. https://www.instagram.com/p/CGhtAqoJyku/?igshid=4z572nf4nmi4
2 notes
·
View notes
Text
Dopp Kit Bag: Finished...finally.
Hi guys, as promised here’s the other little project I was doing recently, unfortunately I had to wait quite some time for delivery of some items to finish it, all covid related problems with the couriers, but we got there at last..with a funny ( if slightly annoying ) lesson learned. So..lets get on.
I wanted some high quality leather so purchased a half shoulder from ‘BuyLeatheronline’ (Tuscany, Italy.).I got a small piece for now because of Cost, and Brexit negotiations...or lack of at the moment. I mention it only incase anyone in the UK is thinking of buying their first piece from abroad and you are not aware that the value of something you buy from abroad needs to be no more than a certain amount or else you will incurr customs charges. check it out first. I bought a lovely factory dyed ‘Black’ veg tanned shoulder 1.5 - 2mm thick which I find is a nice thickness for bags and book covers etc. Then I purchased the pattern from ‘Dieselpunkro (Spain) who make great patterns at reasonable prices and you can buy them on PDF download.

Pic 1 : Taping.

Pic 1 and Pic 1A : After printing off the Pattern you’ll need to tape some of the pieces together to make the ‘whole’ of certain pieces as I’m seen doing here. I use Decoraters Tape as it doesn’t mark the leather when peeled off, the only down side it that sometimes it doesn’t stick very well and can ‘slip’ when attached to the leather that you want to cut out and it’s a C*w to line up again so a little easy tip..once it’s all stuck..take a small piece of tape and wrap it over the edges here and there to help it stay in position.
Pic 2 : Here you seehow the patterns should be looking when done correctly.
Pic 3 : Then it’s time to cut the pattern pieces out

Pic 4 : Be careful to cut along the black lines rather than outside of or inside of.

Pic 5 :make sure you have good lighting..I turned my bench light on just after this pic was taken, I have a light behind me and one in front , that helps to cancel ‘some’ of the shadows created helping you to see the lines better...especially if you wear glasses when ‘staring’ can make your eyes ‘wobble’ just when you are cutting an important bit. ( Yeah...I said ‘eye wobble’...it’s a real thing.....it is hahahaha )

Pic 6 : So just keep cutting until all the patterns are cut out and have all of the required holes punched. I used a round punch 1-1.5mm I find it makes a hole big enough to pass two needles across each other but small enough to close with a hammer tap when done to make a neat finish.

Pic 7 :
Pic 8 :

Pic 9 : You see here how I’ve taped it down to the leather to transfer the patter to it, at this point the tape was holding so I just ‘cracked on’ with it but if you think it’s going to come loose...put small pieces over the edges to hold it in position. Here I’m punching holes with my stitch awl as I was waiting on the delivery that had my smaller round punch in it, this did the job but was a lot slower.
Pic 10 : Lay the patterns on the leather as seen here.
Pic 11 : stick it down. another good thing about decorators tape it that you can see the hole marks through it.

Pic 12 : If you don’t have any patience..pick another hobby, there are hundreds of holes to punch and it takes time and you should line the punch up with each hole mark carefully, the better you do here the straighter yours titching will be later, ( however..you are going to ‘wobble’ from time to time..it is Handmade after all, but try not to at least. You can use a stitch punch as long as the teeth gaps are the same measurements as the holes on the patterns or else it won’t line up.

Pic 13 : Then carefull cut out the middle hole for the Zipper, I do find that the zips only barely sit on the edge when glued so unless you can find really wide zippers try to cut the hole a bit narrower than the pattern, I found it helped.
Pic 14 : Cutting out the zipper hole.
Pic 15 : Using the stitch awl to make the holes a bit wider. ( This issue was resolved once my new punch arrived as it made the hole in one shot. )
Pic 16 :same process to transfer the smaller sections, be careful if there are two of something that you don’t cut two ‘right or left pieces’ ( yup, done that too )
Pic 17 : We now have all the pieces cut from leather and all the holes punched, time to build it.

Pic 18 : The zippers finally arrived, I decided on a double zip for this one but it’s your project so your choice, they fit as easily as any other zips.
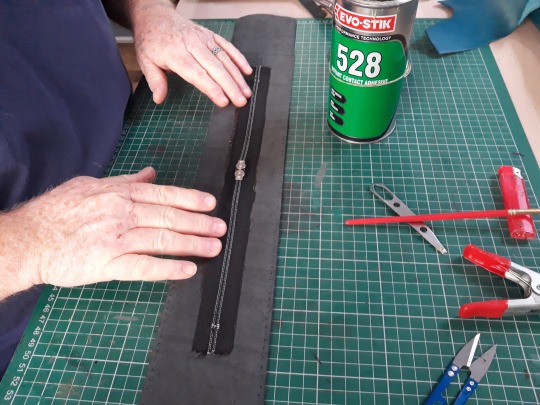
Pic 19 : I layed a line of 528 contact cement to fix the zipper in place ready for stitching. The 528 is really good..so good that if you use it as instructed..once it touches it is a sure bet it’s not coming apart, so until you are confident I’d choose a glue with a longer setting time incase you need to adjust position.
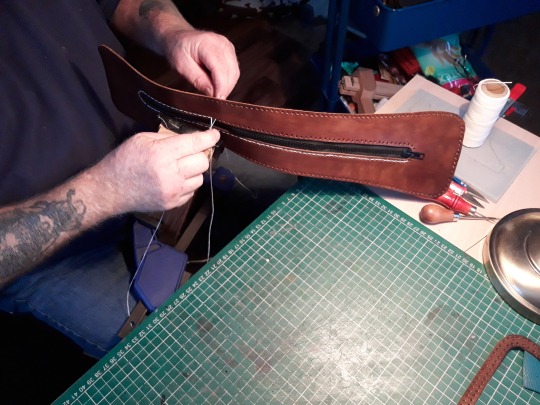
Pic 20 : Next I used a saddle stitch to attach it more permanently.

Pic 21 : I usually use a Stitch horse but this thing flopped around too much so had to do this ‘Old School’. So many projects on the go all at the same time.

Pic 22: Nearly there, takes a while so you need a lot of patience.
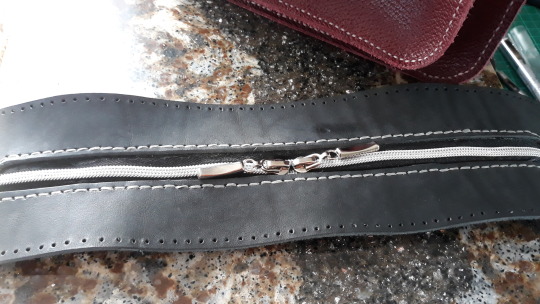
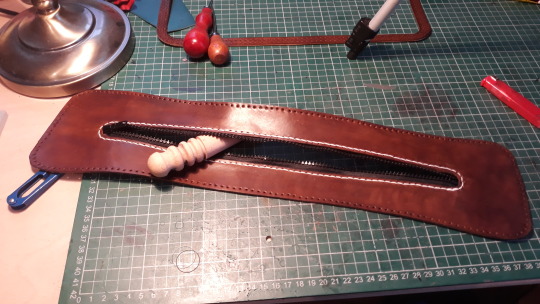
Pic 23 : Done.
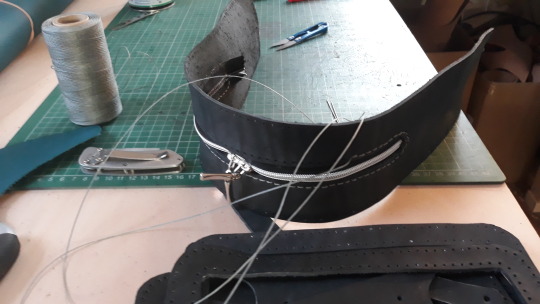
Pic 24 : I bent the zipper section back on itself as shown and used a clip to hold in place whilst I stitched it
Pic 25 : other view.
Pic 26 : attaching the outer ‘skirt’ that the actual side piece will later be attached to, here I’m just aligning the holes to mark them where I need them. The actual mis-alignement came later.
Pic 26A : a closer look at a ‘skirt’ being attached.
Pic 27 : close up. You can also see here the strap section which has been riveted to the side piece ..at one end using silver double cap rivets. I always use double cap unless the back will be hidden from view, It’s a personal thing I just think it looks better ir when you look inside the rivets look as good as on the outside. Again..if you are making one yourself, it’s your choice.

Pic 28 Here’s a view of the side section that I’m about to attach.
Pic 29 : You can see I am using the stitch awl as well as the clip to keep the holes lined up...or so I thought.
Pic 30 : Saddle stitched all the way round.
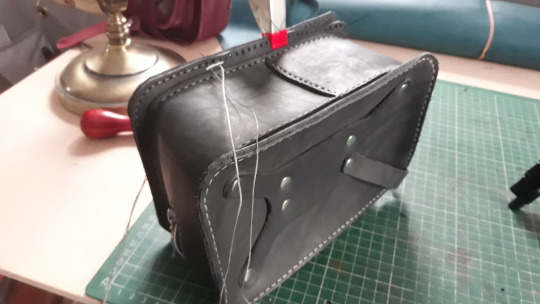
Pic 31 : First side on now side two, a repeat of the same.

Pic 32 : almost there, if you are thinking of trying some leather craft for the first time, be warned, the thread can cut right into your hand after a few hours, at the very least your fingers will be sore, you never see it on my pics but I ususally have plasters everywhere just to prevent it, after almost six years I have grown more used to it but it can still get sore after a few hundred stitches.

Pic 33 : Oops. it looks like I took my eye off the ball and mis-aligned a couple of holes at the beginning causing a twist in the body as seen here, nothing else for it but to carefully pick the stitches and re do it being a bit more precise. As I said earlier..an annoying Lesson but a good reminder to check twice before stitching. But..these things happen and even after a few hours of stitching it can go wrong. If you can take it as a lesson and just move ahead...go for it, because it’s going to happen at some point.

Pic 34 : It’s all feeling a bit ‘De ja vous’ at this point as I begin to correct the mistake.

Pic 34A : After unpicking the whole side and skirt, I first did the skirt again and then I realigned the side using half tooth picks to go around the edge and kept doing this until it aligned perfectly and ‘sat’ nice and flat. Then I started the stitching all over again. Lesson learned.
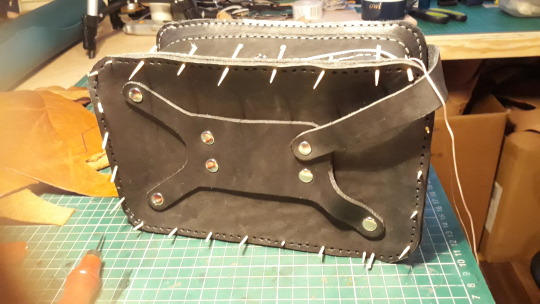
Pic 35 : from another angle.

Pic 36: continuing the stitch but being careful that each hole I marked after aligning meets up exactly as before.

Pic 37 : using the clip until it’s got enough stitch to hold it in place the rest of the way.

Pic 38 Anotherangle as I proceeded to adjust.:

Pic 39 : Almost there. ( Thank god hahahaha )
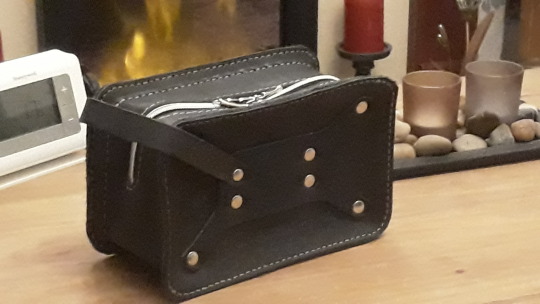
Pic 40 : And Voila..all straightened out, no more twist and looking the complete business. A beautiful Handmade Dopp kit bag. But I guess it can be used for many things. I’ll sell this on to someone that will appreciate the hard work that went into it and who also appreciates real 100% Leather goods. This can be found on my Etsy shop as from tomorrow. ( Please understand if any of my projects are not on Etsy when you look, it may be that they have been sold already and that this post has aged a bit.) Well guys I hope this has inspired some of you to give it a go yourself, this particular project is a little more advanced, I wouldn’t recommend a beginner to try this as this Leather is expensive and shouldn’t really be used to ‘learn’ on. But if you bought a cheaper quality leather to practice on then I guess you could make this..if you take it slow and follow Dieselpunkro’s instructional video which can be found on their website by the same name. Thanks for following my little projects I appreciate it, please tell your friends. There will be more projects to come this year, so as always, Watch this space ‘Stay Crafty’ and Stay safe everyone.
#wash kit#wash gear#mens wash#possibles bag#leather goods#just for him#just for her#unisex bag#handmade bag
3 notes
·
View notes
Text
Ladies small ‘Satchel’ style shoulderbag.
Hi guys, another little project from myself ‘@handmadecp’ here at the ‘Shaman’ Craft Projects Workshop in Manchester UK, the summer is slipping away and Autumn storms are upon us once again but I’m snug in my ‘toastie warm’ workshop and I have plenty to occupy my time. This is very similar to the Black Ladies shoulder bag previously shown which I did a complete build along for so there’s no point to me showing the same procedure, if you haven’t seen that yet you can find it in the Archive of my Blog which for anyone who still doesn’t know, has changed name slightly, It was previousley called ‘Beginners Journey into leather craft’ but after 6 years of learning this amazing craft I have changed it to ‘A Journey into Leather Craft’, I’m sure you can still find it with the old name too so there shouldn’t be a problem. This bag has a few different features so I thought you might like to see a few pictures at least. As you will see there is only one strap /magnet closer on this one and I’ve added a small slot pocket to the outside front. I used an amazing looking ‘Maroon’ colored chrome tan leather all the way from our friends at Weaver Leather Craft in the good old U.S of A. I hope you like it and if any one out there in this big old world is having a go yourself please feel free to drop me a message I’d love to see how you are getting on as I’ve said before I’m not a Professional this is mainly a hobby which makes me some pocket money from time to time, my biggest kick from all this is knowing that someone, somewhere else on this planet is getting use and enjoyment out of something that I made with my own two hands...doesn’t get any better than that. so don’t be shy I’d love to chat to anyone where ever in the world you might be. P.s. The eagle eyed amongst you may have noticed I haven’t finished the stitching on the bottom part of the ‘strap’ hahahaha...oh well you can’t get it right every time, it will give me something to do. More to come, hope everyone is keeping safe. Good luck with your own projects. till the next one, stay crafty.
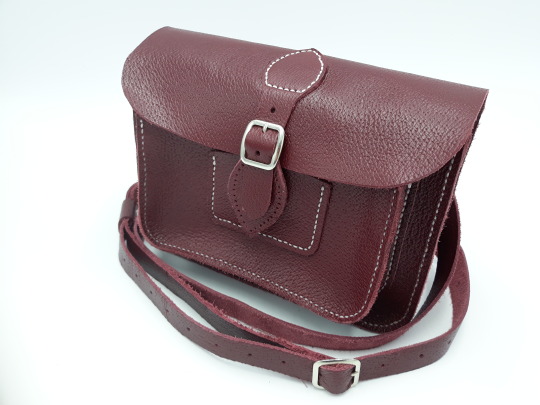

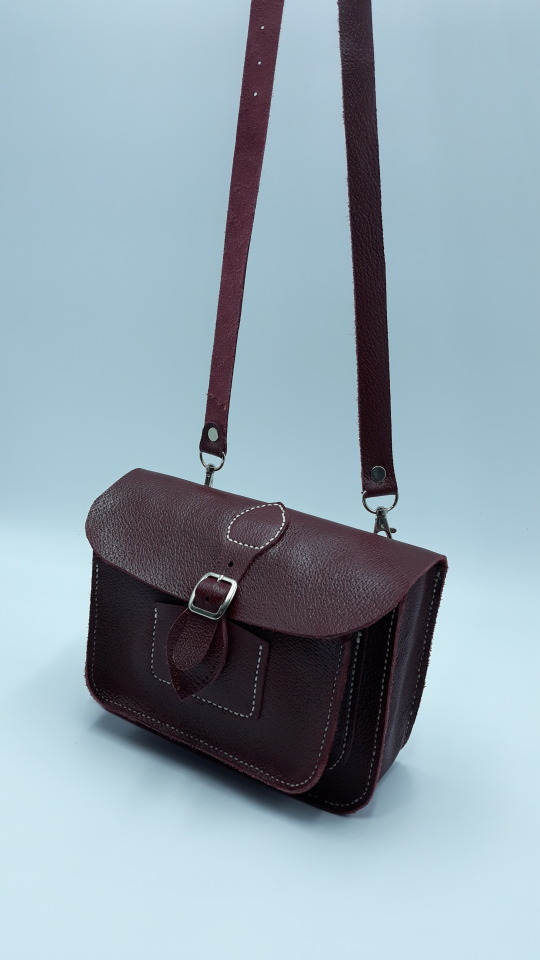
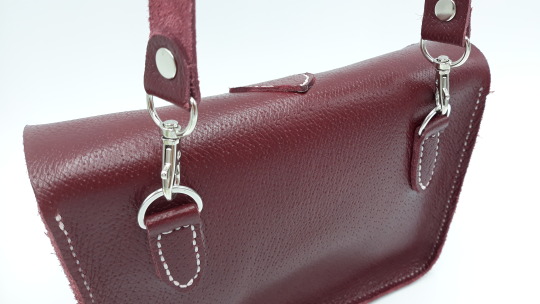


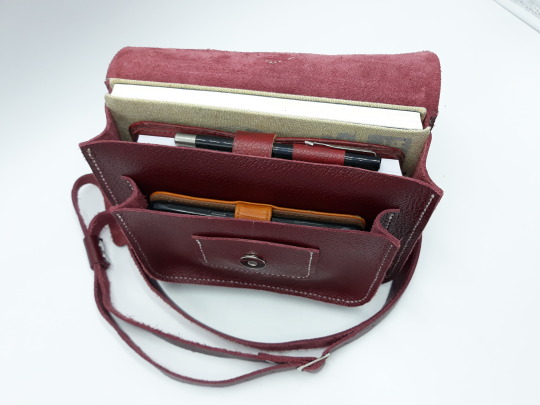
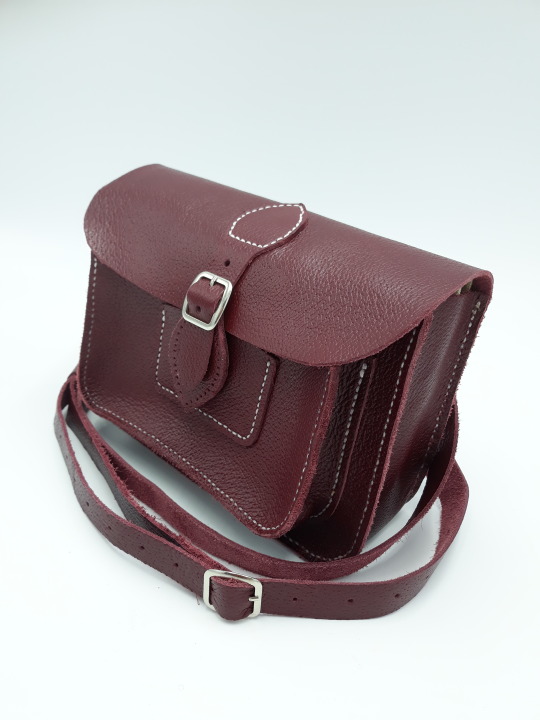
A couple of changes to this bag from the previous design, this one only has the one strap and a small slot pouch added onto the front. ( Yes..I have noticed the stitching isn’t finished on the strap....it soon will be hahaha.

Plenty of room inside and the stretchy nature of this leather allows for more, as it is here I could still have got more in it...depends what you need I guess. I love this color, it matches my note book that I made. ( build along on the blog in the archive.)
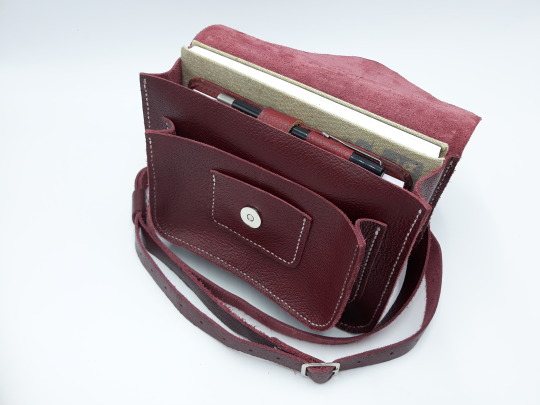

#Bags#Leather#Leather bags#Student bag#occasional bag#gifts#leather goods#satchel bag#handmade#red bag#quality leather#Kids bags#ladies bags#unisex bag
5 notes
·
View notes
Photo
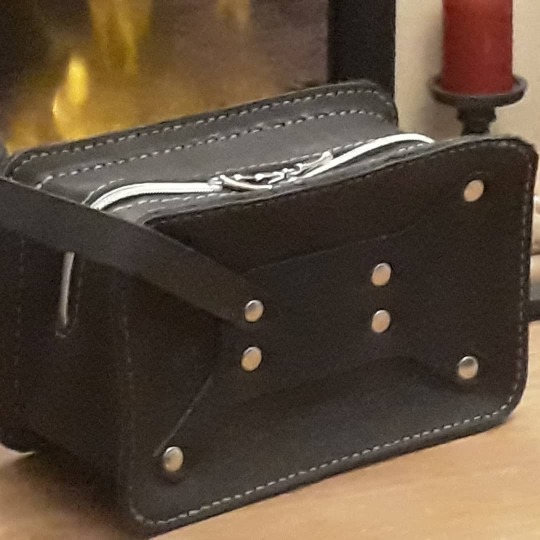
The new 'Dopp' bag available soon on Etsy @handmadecp. Full build along will be up on The blog 'A Journey into Leather Craft' within the next few days. I made this but all design and pattern credit goes to 'Dieselpunkro' thanks guys for amazing patterns at affordable prices. If you like leather Craft I recommend a visit to their site, you can catch their build along videos on YT. https://www.instagram.com/p/CFx_heTJCb2/?igshid=1bg6pog86awsq
1 note
·
View note