#easy tutorials
Text
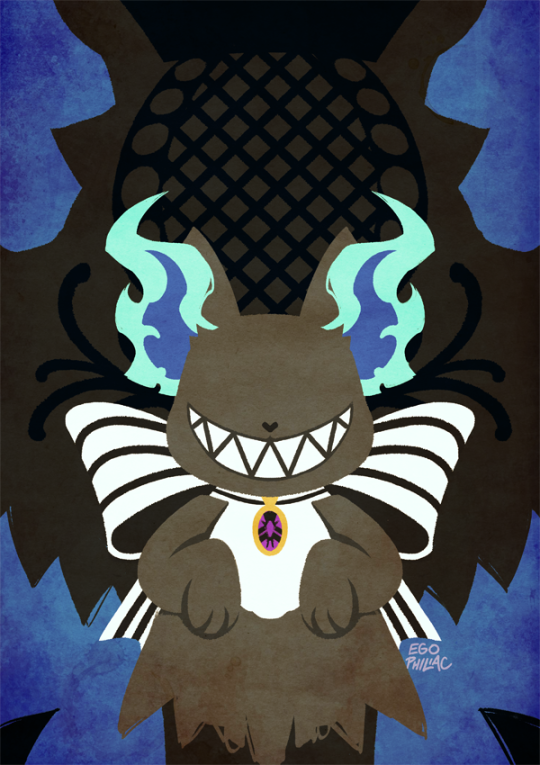
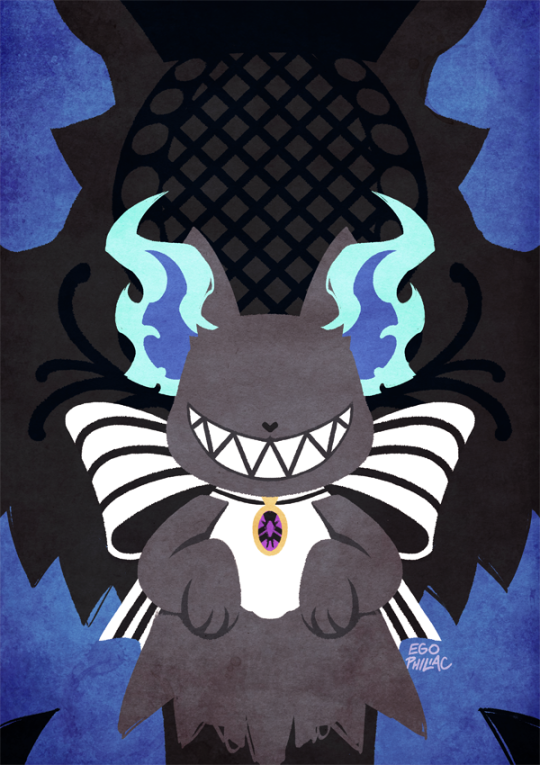
#asmr relax#asmr#oddly satisfying#diy#tutorial#do it yourself#tutorials#crafts#diy ideas#diy projects#easy diy#origami#video tutorial#craft#diy videos
106K notes
·
View notes
Text
🎮 HEY I WANNA MAKE A GAME! 🎮
Yeah I getcha. I was once like you. Pure and naive. Great news. I AM STILL PURE AND NAIVE, GAME DEV IS FUN! But where to start?
To start, here are a couple of entry level softwares you can use! source: I just made a game called In Stars and Time and people are asking me how to start making vidy gaems. Now, without further ado:
SOFTWARES AND ENGINES FOR PEOPLE WHO DON'T KNOW HOW TO CODE!!!
Ren'py (and also a link to it if you click here do it):
THE visual novel software. Comic artists, look no further
✨Pros: It's free! It's simple! It has great documentation! It has a bunch of plugins and UI stuff and assets for you to buy! It can be used even if you have LITERALLY no programming experience! (You'll just need to read the doc a bunch) You can also port your game to a BUNCH of consoles!
✨Cons: None really <3
Some games to look at: Doki Doki Literature Club, Bad End Theater, Butterfly Soup
Twine:
Great for text-based games! GREAT FOR WRITERS WHO DONT WANNA DRAW!!!!!!!!! (but you can draw if you want)
✨Pros: It's free! It's simple! It's versatile! It has great documentation! It can be used even if you have LITERALLY no programming experience! (You'll just need to read the doc a bunch)
✨Cons: You can add pictures, but it's a pain.
Some games to look at: The Uncle Who Works For Nintendo, Queers In love At The End of The World, Escape Velocity

Bitsy:
Little topdown games!
✨Pros: It's free! It's simple! It's (somewhat) intuitive! It has great documentation! It can be used even if you have LITERALLY no programming experience! You can make everything in it, from text to sprites to code! Those games sure are small!
✨Cons: Those games sure are small. This is to make THE simplest game. Barely any animation for your sprites, can barely fit a line of text in there. But honestly, the restrictions are refreshing!
Some games to look at: honestly I haven't played that many bitsy games because i am a fake gamer. The picture above is from Under A Star Called Sun though and that looks so pretty
RPGMaker:
To make RPGs! LIKE ME!!!!!
NOTE: I recommend getting the latest version if you can, but all have their pros and cons. You can get a better idea by looking at this post.
✨Pros: Literally everything you need to make an RPG. Has a tutorial inside the software itself that will teach you the basics. Pretty simple to understand, even if you have no coding experience! Also I made a post helping you out with RPGMaker right here!
✨Cons: Some stuff can be hard to figure out. Also, the latest version is expensive. Get it on sale!
Some games to look at: Yume Nikki, Hylics, In Stars and Time (hehe. I made it)
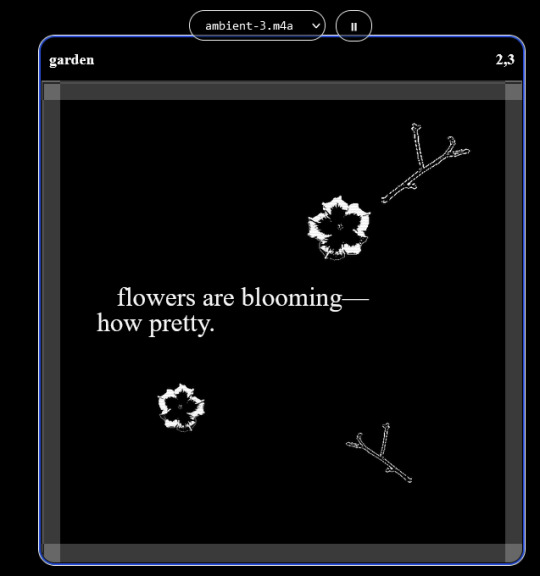
engine.lol:
collage worlds! it is relatively new so I don't know much about it, but it seems fascinating. picture is from Garden!
NOTE: There's a bunch of smaller engines to find out there. Just yesterday I found out there's an Idle Game Maker made by the Cookie Clicker creator. Isn't life wonderful?
✨more advice under the cut. this is Long ok✨
ENGINES I KNOW NOTHING ABOUT AND THEY SEEM HARD BUT ALSO GIVE IT A TRY I GUESS!!!! :
Unity and Unreal: I don't know anything about those! That looks hard to learn! But indie devs use them! It seems expensive! Follow your dreams though! Don't ask me how!
GameMaker: Wuh I just don't know anything about it either! I just know it's now free if your game is non-commercial (aka, you're not selling it), and Undertale was made on it! It seems good! You probably need some coding experience though!!!
Godot: Man I know even less about this one. Heard good things though!
BUNCHA RANDOM ADVICE!!!!
-Make something small first! Try making simple: a character is in a room, and exits the room. The character can look around, decide to take an item with them, can leave, and maybe the door is locked and you have to find the key. Figuring out how to code something like that, whether it is as a fully text-based game or as an RPGMaker map, should be a good start to figure out how your software of choice works!
-After that, if you have an idea, try first to make the simplest version of that idea. For my timeloop RPG, my simplest version was two rooms: first room you can walk in, second room with the King, where a cutscene automatically plays and the battle starts, you immediately die, and loop back to the first room, with the text from this point on reflecting this change. I think I also added a loop counter. This helped me figure out the most important thing: Can This Game Be Made? After that, the rest is just fun stuff.
So if you want to make a dating sim, try and figure out how to add choices, and how to have affection points go up and down depending on your choices! If you want to make a platformer, figure out how to make your character move and jump and how to create a simple level! If you just want to make a kinetic visual novel with no choices, figure out how to add text, and how to add portraits! You'll be surprised at how powerful you'll feel after having figured even those simple things out.
-If you have a programming problem or just get confused, never underestimate the power of asking Google! You most likely won't be the only person asking this question, and you will learn some useful tips! If you are powerful enough, you can even… Ask people??? On forums??? Not me though.
-Yeah I know you probably want to make Your Big Idea RIGHT NOW but please. Make a smaller prototype first. You need to get that experience. Trust me.
-If you are not a womanthing of many skills like me, you might realize you need help. Maybe you need an artist, or a programmer. So! Game jams on itch.io are a great way to get to work and meet other game devs that have different strengths! Or ask around! Maybe your artist friend secretly always wanted to draw for a game. Ask! Collaborate! Have fun!!!
I hope that was useful! If it was. Maybe. You'd like to buy me a coffee. Or maybe you could check out my comics and games. Or just my new critically acclaimed game In Stars and Time. If you want. Ok bye
#reference#gamedev#indie dev#game dev#tutorial#video game#ACTUAL GAME DEVS DO NOT INTERACT!!!1!!!!!#this is for people who are afraid of coding. do not come at me and say 'actually godot is easy if you just--' I JUST WILL NOT.#long post
27K notes
·
View notes
Text
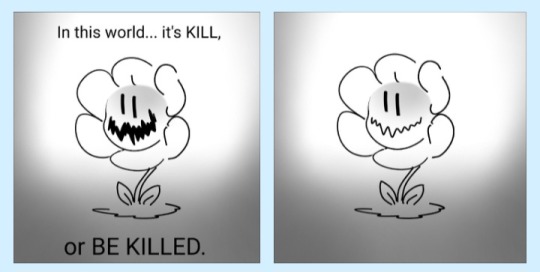
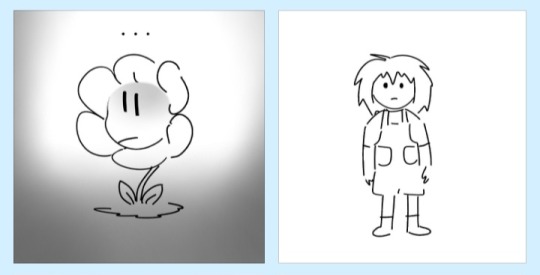
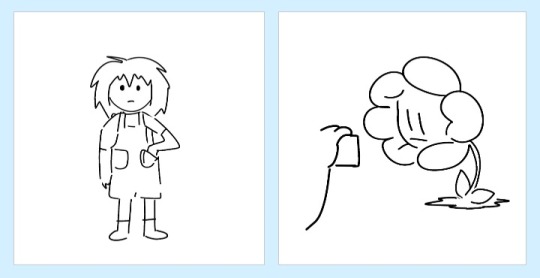
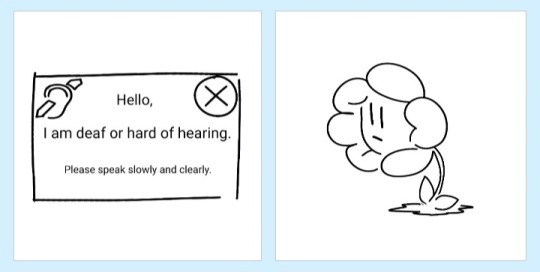
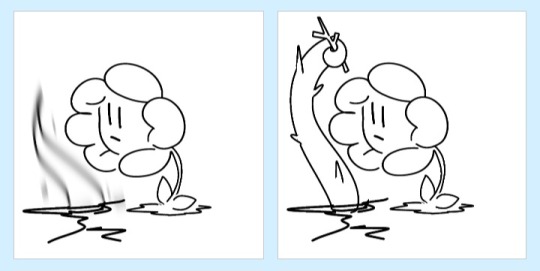
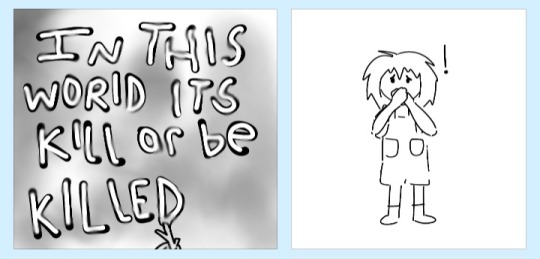
i think about this a lot. what if a deaf human fell down the mountain. would he make his threatening language accessible
#at least once a month i ponder#is he the type of guy to search for a language translator#or google “braille alphabet”#or look up “ASL easy tutorial fast”#to make sure his wrath is sent into the brains of everyone he stands before#undertale#flowey#charrator
42K notes
·
View notes
Text
Monogrammed Crochet Cup Cozie
Hi, Sweet Friends,
This week I have created several Crochet Drink/Coffee Cup Sleeves just to start off Creative Thursdays Before Christmas. If you have followed my blog over these many years, Thursdays are Creative Thursdays, however, starting in August, I make craft tutorials on Homemade Christmas Gifts. Most of these gifts are short-hour projects whereas others can have many days to assemble.…

View On WordPress
#Christmas#CJD.Sign#Creative Day Thursdays#crochet#crochet cup cozies#Crochet DIY#Crochet gifts#DIY#Easy tutorials#Homade Christmas Gifts#photography by CJD.Sign#sewing tutorials#tutorials
1 note
·
View note
Text
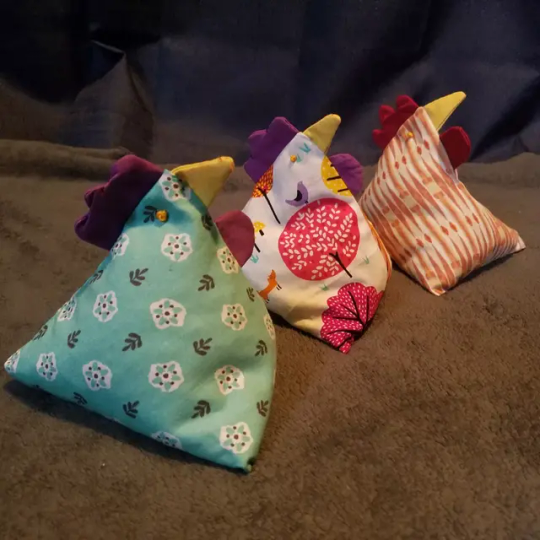

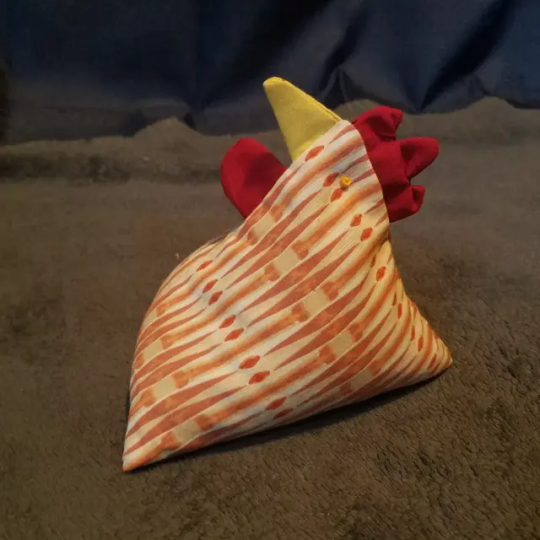
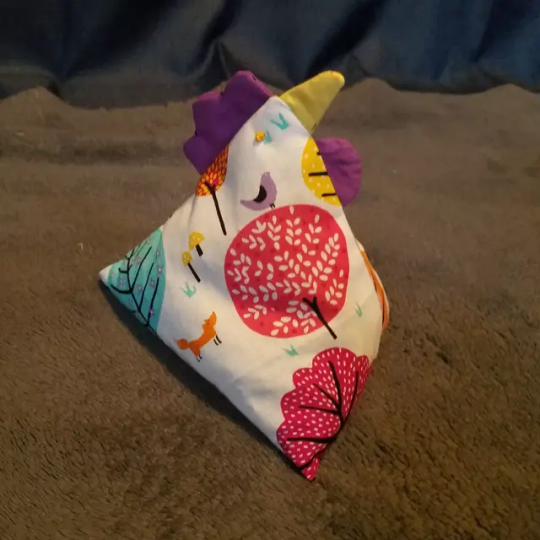
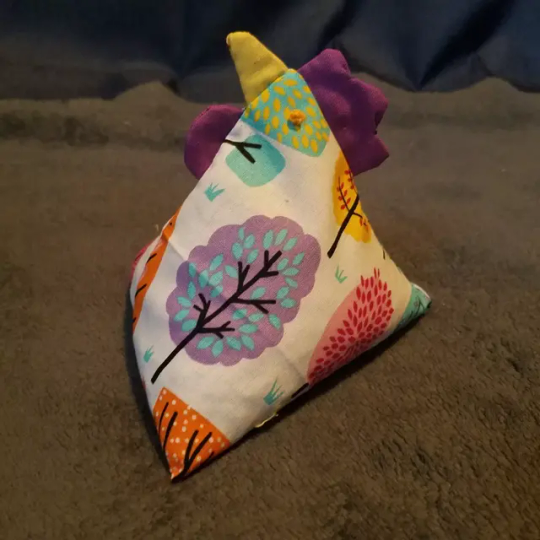
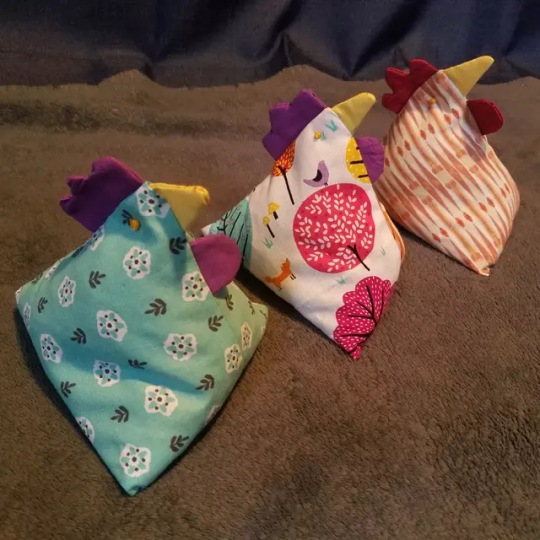
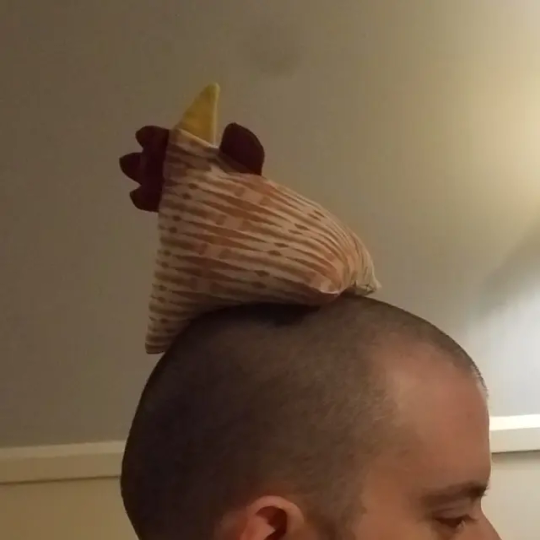
Forgot to post these simple little chicken hacky sacks/heat packs i made for my siblings for christmas. 100% cotton and filled with sunflower seeds (the chickens did NOT appreciate me borrowing from their stash but i was out of rice) so they can be heated up for hand warmers or to ease aches and pains
(or for balancing it on your head i guess)
#brother why#chickens#tiny fluffy dinosaurs#the BEST animals#chickenblr#sewing#hacky sacks#they are so easy to make#maybe I'll make a tutorial if i make some more#arts and crafts#textiles#makenna made a thing
1K notes
·
View notes
Text
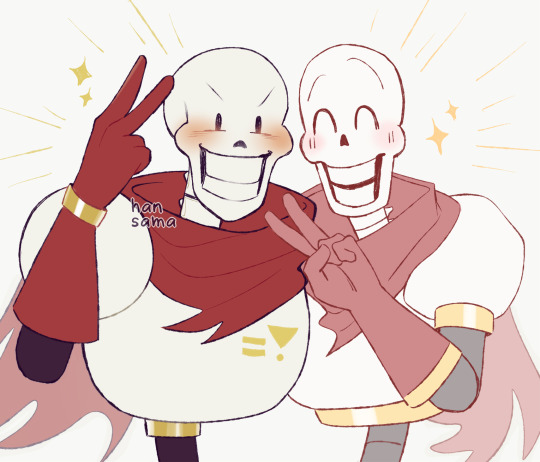
I tried to sketch Papyrus in both my art style and @skull-otaku xD
#undertale#papyrus#undertale papyrus#i was going to do a warm-up sketch#i remembered the papyrus tutorial skull-otaku made#so i did paps in both our styles xDDD#this was very spontaneous LOL#anyway the truth is i'm not sure if this really IS my style of drawing paps ASKDLHGLKDHG#I DON'T HAVE ONE?? X'DDD#but at least this is how i draw the head! i think!!!! x'DDDDD#also paps is still not easy for me to draw ==;;#he problem isn't with the head i think but rather with the body???#Also the mouth sometimes ASDGDJ#idk idk xDDDD#have a drawing of two papses!!!#they're cute!#i don't think i did Skull-otaku's art style justice but i tried my best x'DDD#their whole artstyle is nice i like their sans as well#also this made me realize how wide I draw pap's head in comparison to other artstyles x'DDDD#their paps head is very long/vertical/thin?? XDDDDD#it's really cute
1K notes
·
View notes
Note
hi! this is Insomniac Anon here!!! I noticed on some of ur artworks (specifically the unique magic posters), that u have a textured look to em, like paper or grain ... i wanted to ask how u get that effect? is it a brush, a filter, or like an overlay/png u use ... ? pls tell me!! ;v; I really like how the texture looks, so i wanted to know how 2 do it since ure a very big inspo 2 me LAWL ... I've been doing art practices in diff styles i find, so, i wanted to know a bit more how you do it :^D
thank you! :D :D :D it's usually photos/textures of paper that I've messed around with; I have a bunch of free/paid/ones I took myself. anytime I see good photos of paper I add it to the collection...it is my weakness. 😔
I mostly use Photoshop, but this should work in any program that supports blending modes (also I did this in like an hour to use as an example, please forgive it :')
image by itself before texturing:
with the texture pasted in (for this one I'm using this public domain one from Pexels):
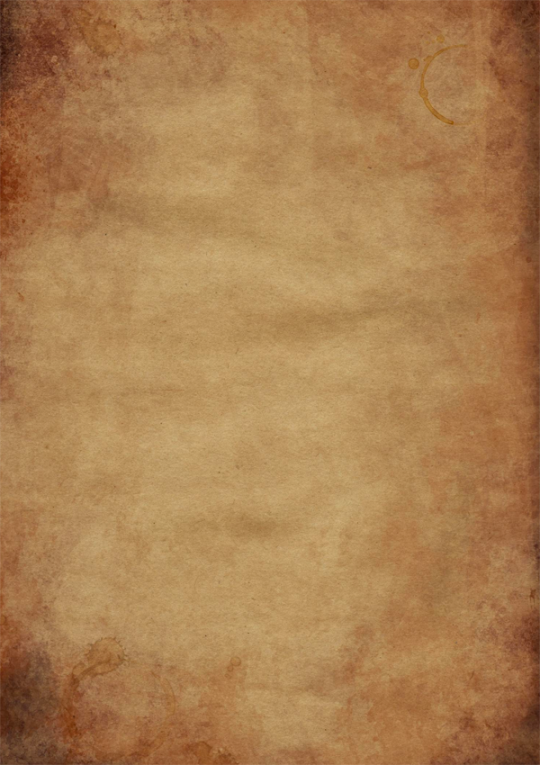
then mess around with the blending mode to see how it looks -- in this case I went with overlay, but soft light and hard light are usually good ones too, it really depends on the texture:
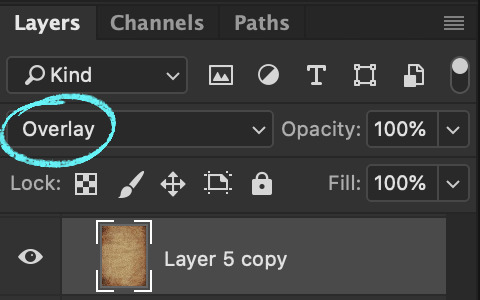
then with a bunch of messing around with opacity/colors/saturation/levels/adding in a bit more texture until I like how it looks:
et voilà, texture! (waves hands)
#art#twisted wonderland#it's a general tutorial i guess but just cause it's grim#usually i end up using a couple different papers on top of each other with bits masked out/levels super messed with and the like#it is super fun to just mess around with and throw things on and see how they look!#but it is also very easy to waaaay overdo so uhhhh exercise caution i guess. less is often more and all#once you start layering textures on there it's just difficult to stop#dangit art stop being so fun#(this also tends to screw with your colors and values a lot so always check and adjust as you go!)#(if you don't want any color influence at all you can just turn the saturation of the paper layer all the way down so it's pure grayscale)
355 notes
·
View notes
Text
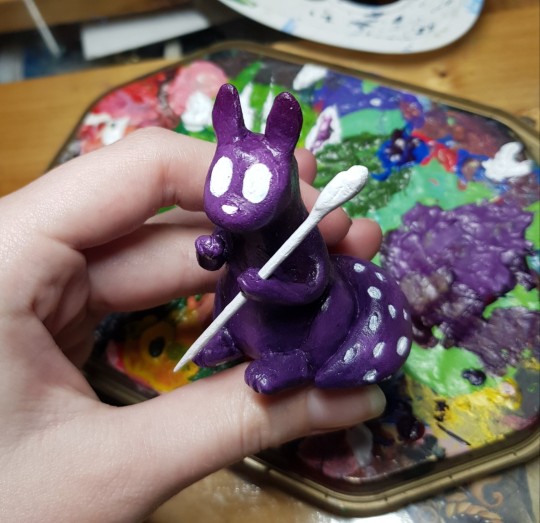
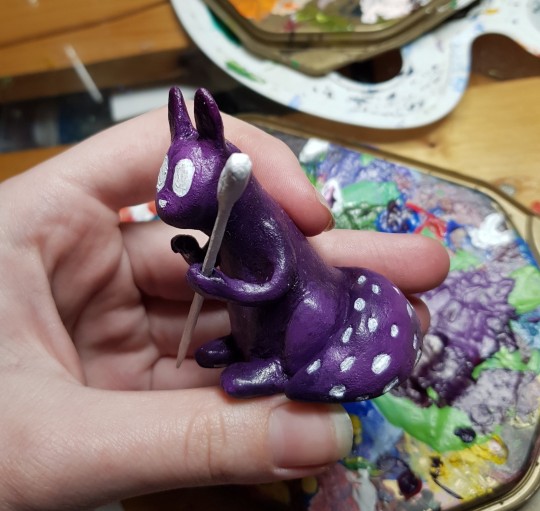
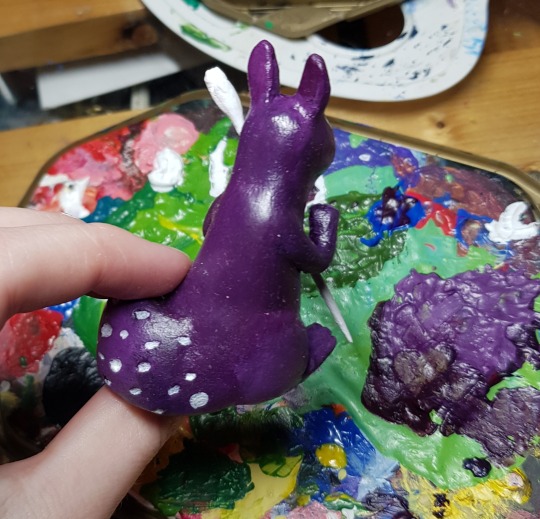
spearmaster is here too!
#he heh I made another one#sol makes things#spearmaster#rain world spearmaster#rw spearmaster#rain world downpour#rw downpour#slugcat#rain world#sculpture#art#my art#this figurine gave me a lot of trouble#the arm that holds the spear fell off when I was sanding#but overall I think spearmaster turned out decently#but seriously#it was not easy#i'll take better pics tomorrow#let me know if anyone wants a clay scug tutorial#rain world art#rw art#rw fanart#rain world fanart#spearmaster slugcat#spearmaster fanart
244 notes
·
View notes
Text

hi i'm learning how to make gifs
#o7 susan thank you for the tutorial it was very helpful#ITS SOOO EASY TOO i need more people to get into gif making we have like two and a half gif makers please please please please#my gifs#<- idk if this will be an actual tag maybe i'll get bored of it tomorrow
226 notes
·
View notes
Note
Bingbing is baby, can't he at least be w/ shizun?
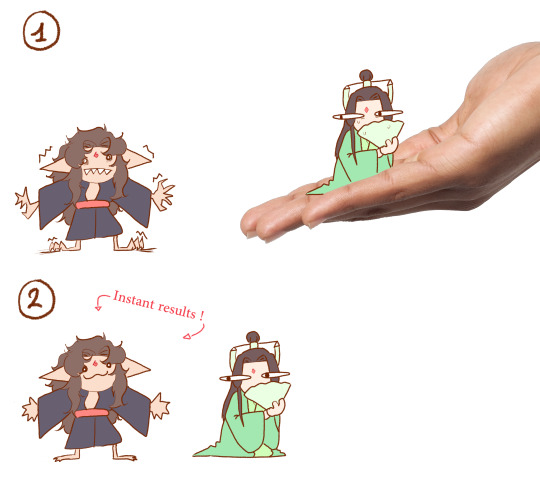
Reunited and tamed in the span of one gaze at the green thing
#svsss#luo binghe#shen qingqiu#svsss shitpost#tame your bingbong at home right now with this easy tutorial#well tame is a prety loose word#he'll punch your fingers like a train ticket with his teeny tiny sharp gremlin teeth if you try to approach green thing
456 notes
·
View notes
Note
Hello!! First your Tumblr and edits are so gorgeous! Second I was wondering if you were willing to share how you did the second gif of this edit please? Have a great day! (Or night)
https://www.tumblr.com/thereigning-lorelai/713794704750362624/usergif-1-year-celebrationshuffle-challenge?source=share
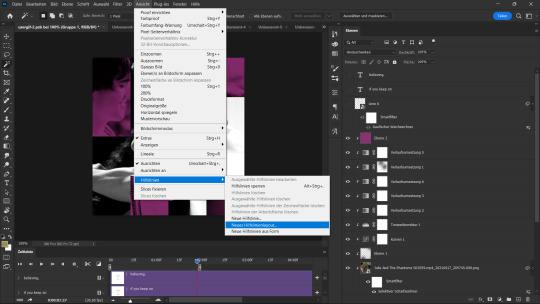
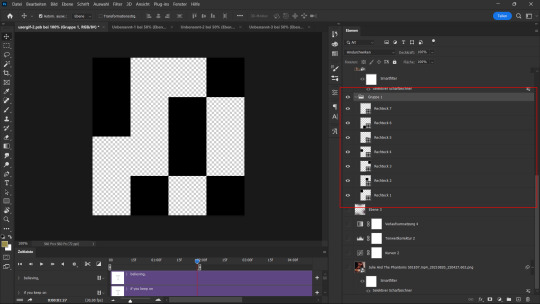
hi nonny, thanks for the nice words! really appreciated. ♥️ so, you're looking for this grid effect:

you're starting off with two gifs. i'd recommend choosing scenes that are not too close up because otherwise they'll overlap too much and you won't be able to delete enough parts to make the most of this effect.
so, here's my base gif that i just did in black and white with some minor purple brush strokes set to screen:

i then chose my second gif and coloured it with a purple gradient map and a purple colour fill set to multiply. the colouring of the gifs is entirely up to you and what you think looks best. so here's my second gif, still without the grid:
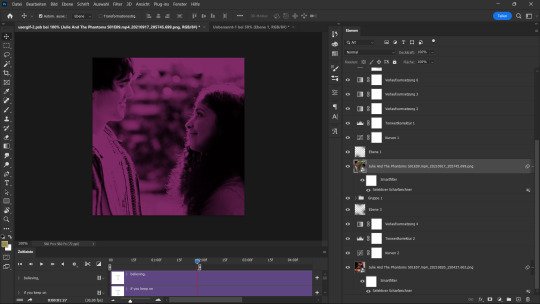
this is where the fun part starts - the grid layout. i created that with a new guide layout. this is a super neat tool in photoshop that helps you align shapes or selections on your image. the guide lines basically float over it and help you set up symmetric shapes or layouts. you can define how many columns and rows you want to have and then photoshop creates the guide layout for you. for this gif i chose 4 columns and 4 rows:

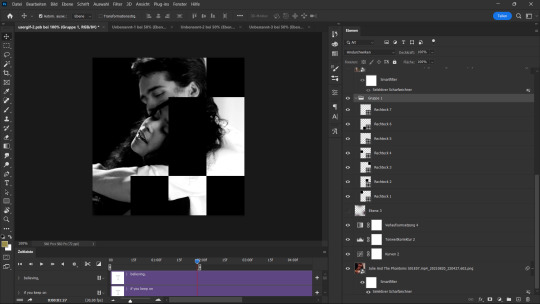
with this set up, i started creating the rectangles to make the purple gif visible on top of the black and white one. this is my final layout for my shapes:
you can move around the shapes to your liking and what works best with your gifs. i didn't want to cover too much of my base gif but also tried to make their faces in the top gif all be in the gif as much as possible.
this step is just a lot of moving around your shapes and seeing what looks good tbh.
i then grouped my shapes and clipped my top gif (including all layers for the colouring) to my shapes group:

looking good so far. the only thing missing are the lines for the grid. this is where your guide layout comes in again. i just reopened it and then traced the guide lines with my line tool to create the white grid overlay:
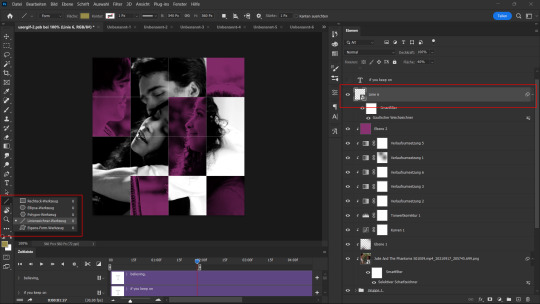
(for editing purposes i turned all of the line layers into a single smart object at the end. this is why you only see one layer for all the lines in this screenshot.)
finally, i used a gaussian blur (0,5 px radius, 100% fill for the filter, 40% fill for the overall layer) on the smart layer to make the lines a little bit smoother and softer looking. this is totally optional and again, up to what looks best to you.
added some text et voilà:
#asks#kind nonnies#usergif#*tutorial#hope this helps nonny#if you have any further questions just let me know#i'm not the best at explaining especially because i think my way won't be the most efficient or even logical#but that's how i did it and i think it's fairly easy to achieve
294 notes
·
View notes
Note
HOW DO YOU GET THE STRAW HAT BADGE???
Ok, I'll give a step-by-step tutorial to hopefully help you because it took me a hot minute to figure it out with Tumblr's new layout.
1. While on desktop, go to TumblrMart (it's on the left side of the dash, just beneath Settings) and click on that.
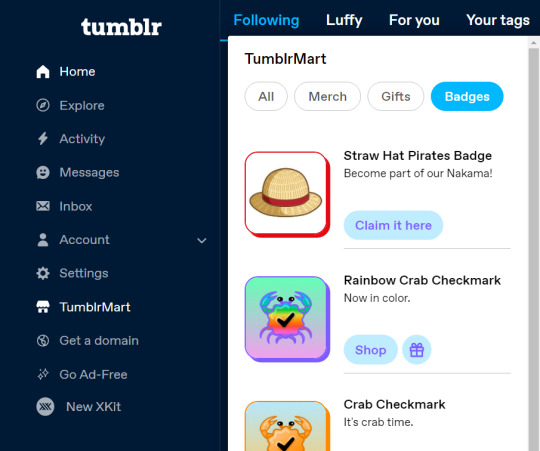
2. You can either go to Badges or just stick with All because it's thankfully right there. Click the "Claim it here" button. It's free and thankfully can be added to sideblogs. When you do this, you'll be taken to this window where you click the "Claim this badge for free" button.
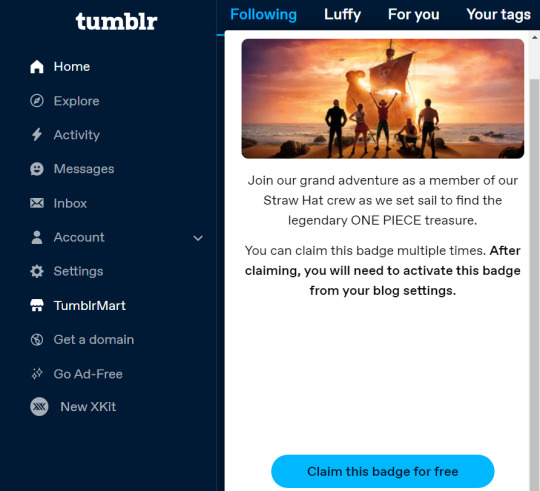
3. This will take you to the Edits page of your blog and you'll automatically be able to add it there. You can apparently collect multiple of the straw hat badges to add to your blog (I've heard up to 50), and they can be distributed to sideblogs too!
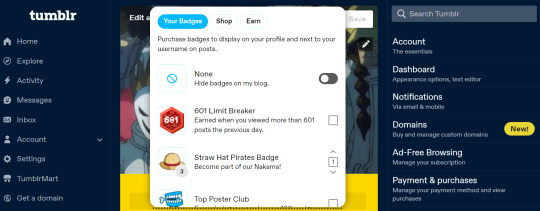
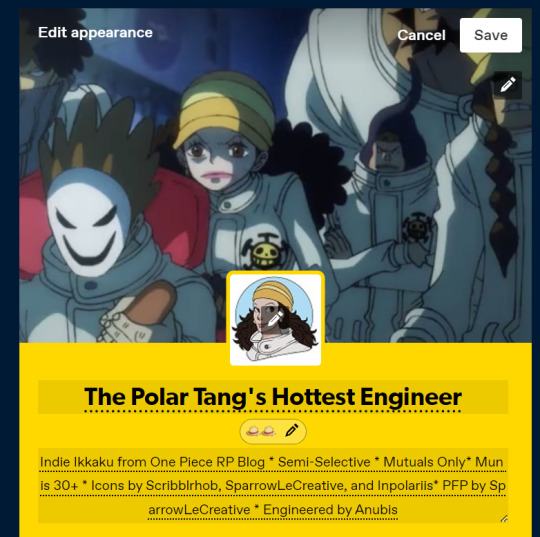
4. Hit save and you're good to go! If you get lost like I did the first time around, just go to your Edit Appearance page for your blog. There will be a little button under your icon that says Add Badges if you don't have any. You should be good to go!
#Time for Maintenance (OOC)#straw hat badge#straw hat badge tutorial#(figured I'd make it a tutorial with visuals to make it easy for anyone who might not know)#(visual aids definitely work better for me)#luffy#one piece#tumblr badge
364 notes
·
View notes
Note
Heya doc?... can't stay too long and uh kinda random, I know, but uhh.. how do you tie a tie?... kinda need to know for a thing coming up. Vielen Dank im Voraus!
there are a million different ways to tie a tie, but i think this way is probably the easiest if youve never tied one before!

#looks like im giving out tutorials today aheh#i tie them so often i hardly even think about it..#i actually went and tied and untied one of my own ties in front of a mirror a couple of times for this#theres other ways to tie them too but this ones easy i think#the doc is in#replies from the void#refs
73 notes
·
View notes
Text
Ok dbh has its (big) flaws but starting the game with such an intense life or death hostage situation, while the player isn’t even used to the game mechanics and lore, is so cunt
#other games have a tutorial thats easy unimportant to the story#meanwhile connor just got birthed and has to save a kid#love it#detroit become human#dbh
64 notes
·
View notes
Photo


and I know it's long gone, and there was nothing else I could do.
#the last of us#tlouedit#ellie williams#the last of us 2#gamingedit#naughtydogsource#dina tlou#ellie x dina#tlou2#tuserdi#dina nolastname#the last of us part 2#tusereva#all too well#taylor swift#hehe remember when i posted the last edit and said more were on the way??? i'm two years late but IM BACK BABY#gotta prep for hbo to tear my heart into pieces <3#thank you SO MUCH for the glitching tutorial!!! it was super easy to understand#mine#sun edits#making my debut into the search function of this hellsite and praying it works#dina my poor sweet beloved
545 notes
·
View notes
Text
btw if anyone wants a really quick and easy gif coloring method what ive been doing is
brightness/contrast -> don't change any of the dials just adjust the blending mode to screen, then adjust the opacity to 20-40%
curves -> use the white dropper to find the brightest point in the image and click that to adjust the curves (instead of changing the s curve). usually what i do is i want to bring out the blues and whites, so i make the "white point" something tinted yellow and it makes the image blue and white
gradient map -> black and white if you want contrast, brown and white if you want to color correction for peoples skin tones, adjust blending to soft light, adjust the opacity to whatever you want ive done everything from 20-100% opacity its a crapshoot
#ive been seeing people posting gif tutorials and i thought well if anyone wants a super easy coloring method i can share lol#i used to do like 5 or 6 coloring steps now i let curves take care of everythign i love it#amanda.doc
43 notes
·
View notes
Last Seen Blogs
delightful-69
Another random tumblr blog
0207mcsaszy
Untitled Life

tc44v
Sin título
rowiesims
rowie sims
kyleleeee
Kylelee