#foamsmith
Text

Vriska’s robot Arm made for my partner for Valentine’s Day. Cause nothing says I love you like “I want you to dress up as vriska”
#homestuck#homestuck cosplay#cosplay#hiveswap#foamsmith#cosplay props#hs cosplay#vriska serket#homestuck vriska#vriska fanart#vriska cosplay#Visguard works
136 notes
·
View notes
Text
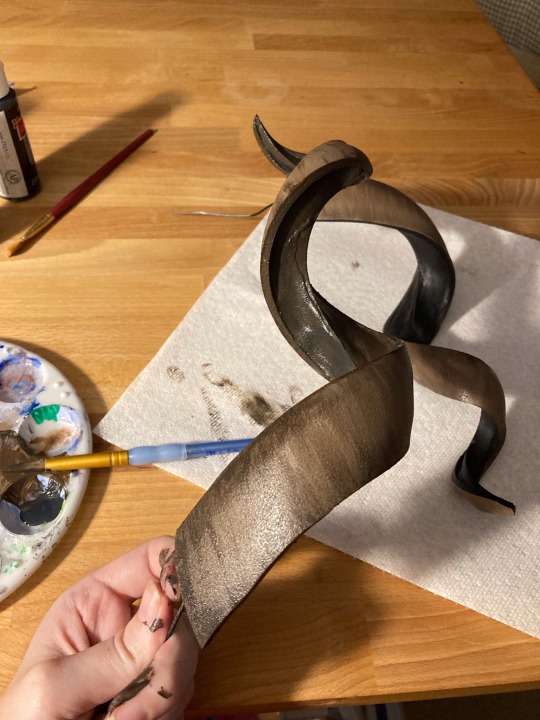
let's make fearne horns!
a step-by-step tutorial for making foam horns for cosplay
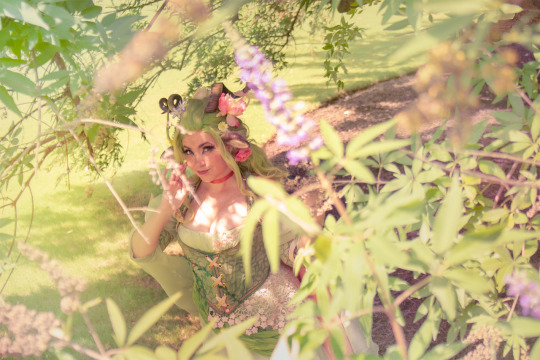
this was originally posted to twitter last year, but since twitter’s decided to ram itself through a brick wall repeatedly for some reason, i’m reposting here.
materials/supplies:
wire (the hardware store kind, not the flimsy jewelry kind. you want it bendable but sturdy enough to hold whatever size horns you’re making.)
craft foam/eva foam (thickness depends on project needs)
triangular foam dowel
tape or paper for patterning
barge cement (or other brand contact cement)
foam clay
plastidip spray
acrylic paints
gloss spray
heat gun
scissors
paint brushes
something to wrap horns around depending on curl needs
headband or something else to attach the horns to for wearing
the process:
1️⃣ pattern horn curl using tape or paper. mine is going to be a long triangle shape along it’s top face.
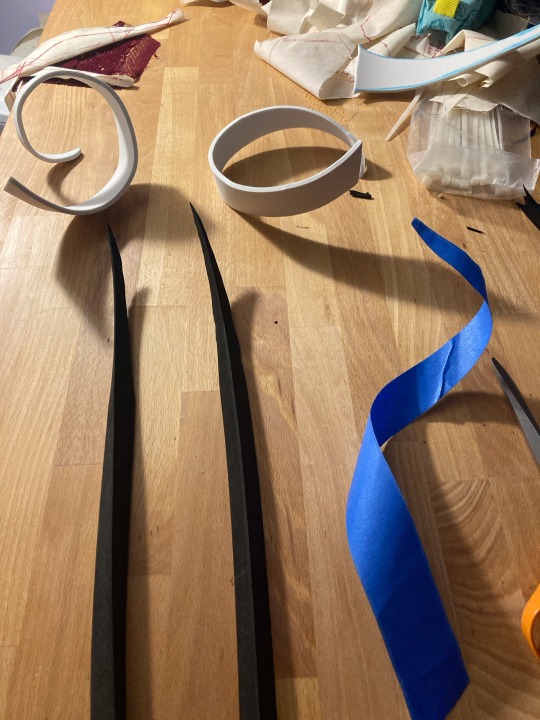
2️⃣ cut out of craft foam & trim/taper triangular foam dowel to match. cut wire to match this length plus a couple extra inches for attaching to a headband later on.
3️⃣ carve valley into dowel & glue wire into it using barge cement. tape is helpful for holding the wire down while it dries. be sure to follow glue instructions for use which usually requires good airflow/ventilation in the space! for me, that means opening the window, turning on a fan, and wearing a mask to avoid fumes.

4️⃣ glue foam dowels to craft foam.

5️⃣ spiral horns carefully around a cylinder, heat forming tips where wire can’t reach. the hardest part here is to get both sides even. (i think i used a wooden dowel or a curtain rod for my spirals??)

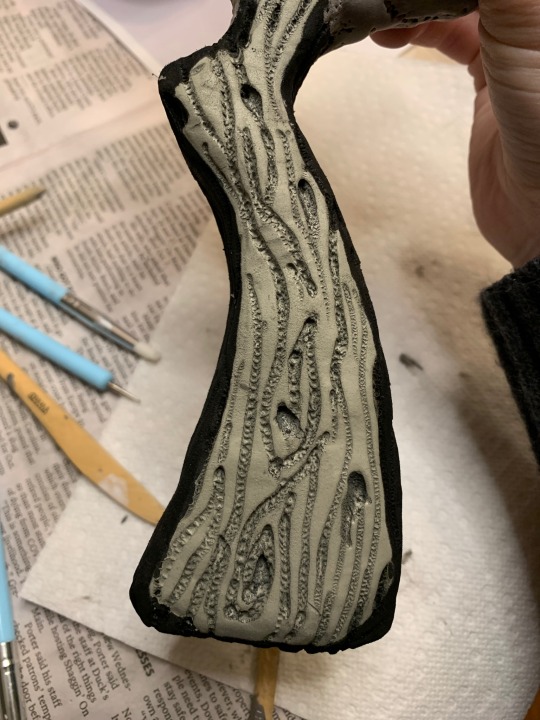
6️⃣ fill gaps between dowel & craft foam with foam clay, using finger + water to smooth it out. if you want to add any ridges or scars to your horns, do it once this part is dry and before the next step—but i wanted mine to be smooooth.

7️⃣ once dry (give it a couple days just in case), heat seal with a heat gun & spray with plastidip. do multiple coats to get all the angles because spirals are WEIRD!
8️⃣ paint with acrylics.
9️⃣ gloss spray!
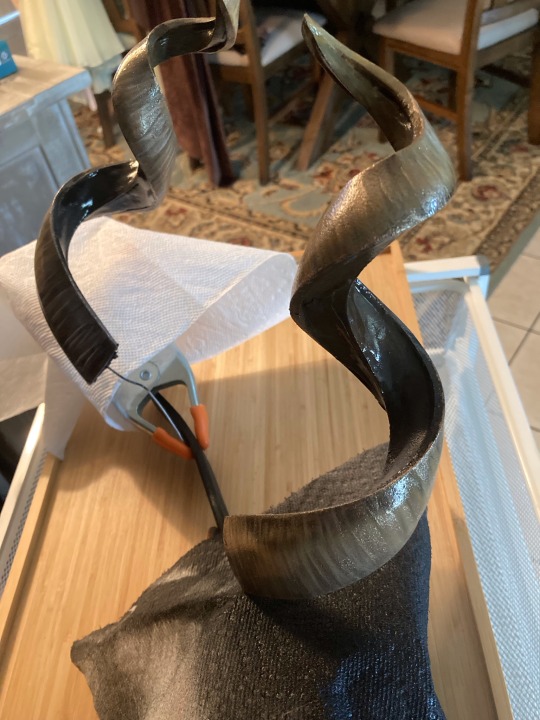
🔟 using the bit of wires sticking out, attach to a headband or wig to wear! mine actually poke through my wig and attach to a headband that sits inside the wig which fearne’s ears also attach to.

i hemmed and hawed over how to approach these originally because i know most folks would either 3d print them or do a proper full craft-foam pattern, but i’m crap at cutting craft foam and i hate sculpting digitally and ALSO don’t have a 3d printer. so i did it my way! and it was fun!! plus, the final horns are super lightweight which makes them great for wearing all day! the flexibility of the wire also allows them to have some pose-ability which can be nice for photos to make sure they’re visible.
185 notes
·
View notes
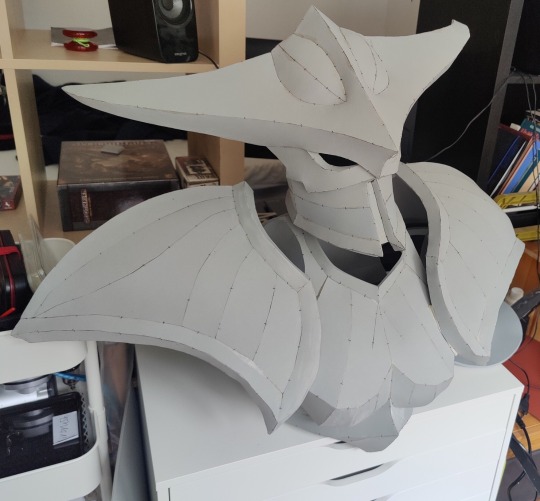
Photo
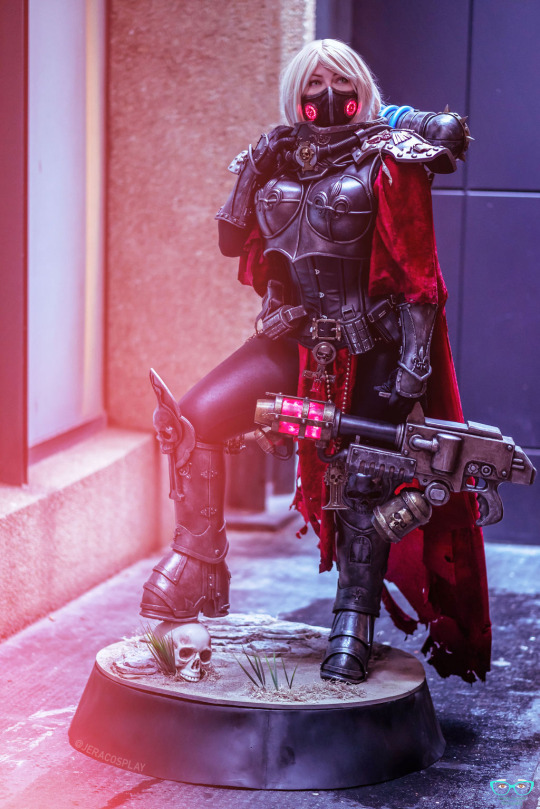
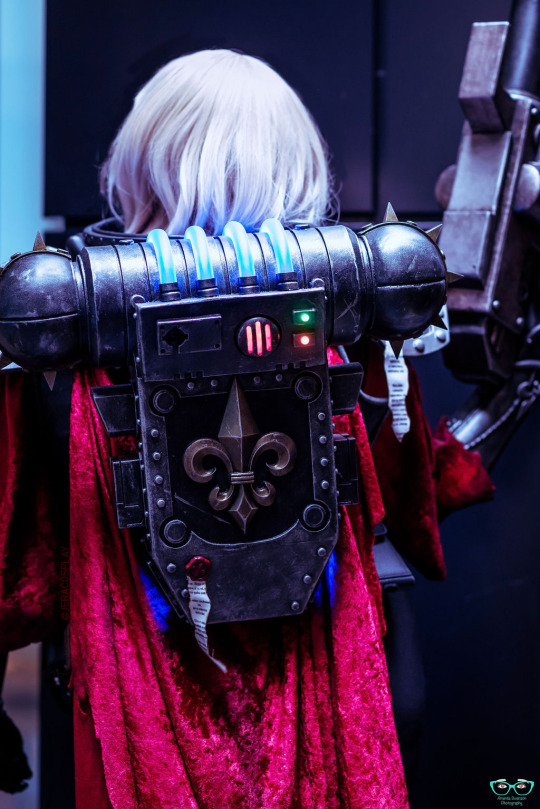
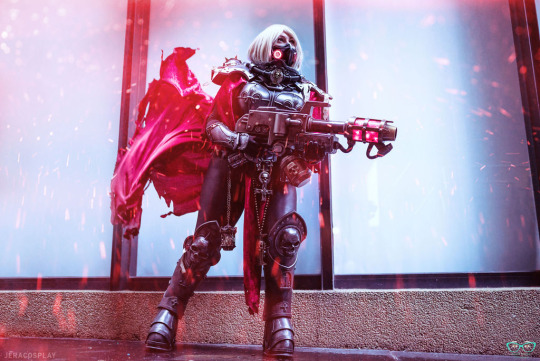
- 𝕳𝖊𝖗𝖊𝖙𝖎𝖈𝖘 𝖈𝖗𝖆𝖛𝖊 𝖙𝖍𝖊 𝖈𝖑𝖊𝖆𝖓𝖘𝖎𝖓𝖌 𝖋𝖎𝖗𝖊 𝖔𝖋 𝖆𝖇𝖘𝖔𝖑𝖚𝖙𝖎𝖔𝖓 -
My completed Sister of Battle "mini" debuted with a base at DragonCon this year! My first armor and foam prop build - entirely self patterned and constructed. I have even more I want to add and upgrade with this, but I love this cosplay so much and can’t wait to wear her again. Keep an eye out @momocon for me!
#sister of battle#adepta sororitas#warhammer#warhammercommunity#warhammer 40k#wh40k#40k cosplay#sister of battle cosplay#cosplayer#foam armor#eva foam#3d printing#mini painting#painting warhammer#foamsmith#prop maker#warhammer40k#nuns with guns#cosplay#cosplay photography#cosplay girls#gamesworkshop#dragoncon#momocon
703 notes
·
View notes
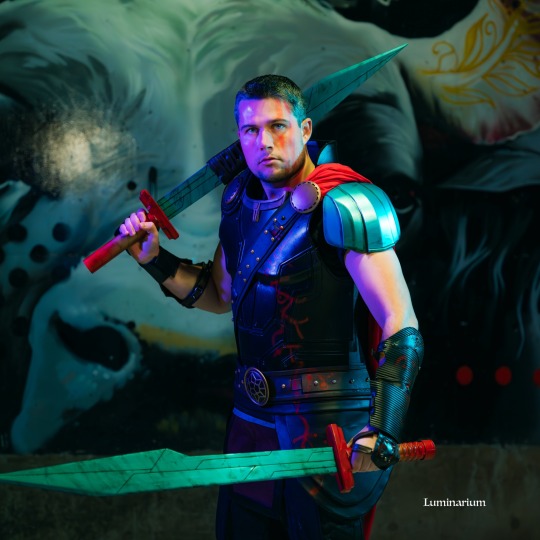
Text

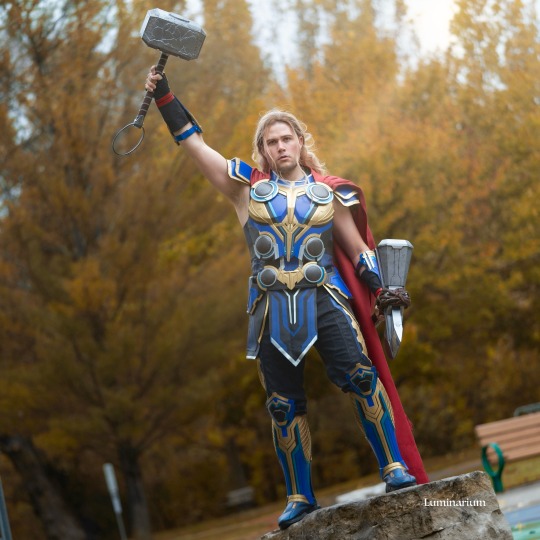


Hello Tumblr! I’m a cosplayer who mainly does Thor, but also does Captain America, Daredevil, Green Arrow, Obi-Wan, and more. I make some of my stuff and commission other parts, and will always give credit. Excited to share my stuff here!
First up, my Thor Love and Thunder suit. This base suit is by Simcosplay, with upgraded parts by Reedspropsplus. I love how it turned out.
Photos by MDQBriones.
#thor odinson#thor of asgard#avengers#thor#mcu#thor cosplay#marvel cosplay#cosplay#mcu cosplay#mcu thor#thor love and thunder#thor 4#chris hemsworth#taika waititi#marvel cinematic universe#foamsmith#3d printing
56 notes
·
View notes
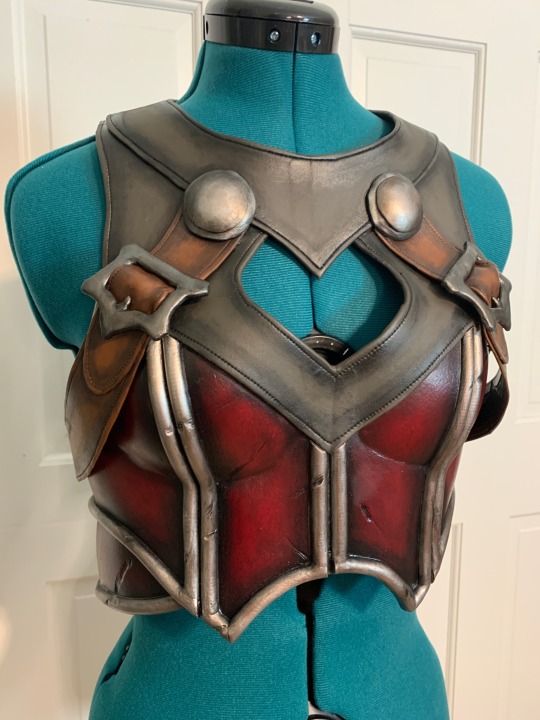
Text


Some WIP of my Maiev Shadowsong cosplay which i got to display at my art schools open house exhibition, it’s the biggest project I’ve ever worked on and seeing it come together little by little makes me so FKN excited to complete it and show it off!
Side note: I know many people might not know Maiev since she is kind of a niche character, but she was really inspiring to me back in the early 2000s where women in fantasy games where usually only allowed to be pretty and way overly sexualized and then Maiev was this fully armored gruff voiced badass, with huge shoulders THE BIGGEST in all of Warcraft 3, so yeah I’m way excited to finish what is essentially my dream cosplay and hopefully introduce some people to this character for the first time
#cosplay wip#cosplay armor#warcraft 3#warcraft elf#night elf#wow art#maiev shadowsong#foamsmith#heroes of the storm
100 notes
·
View notes
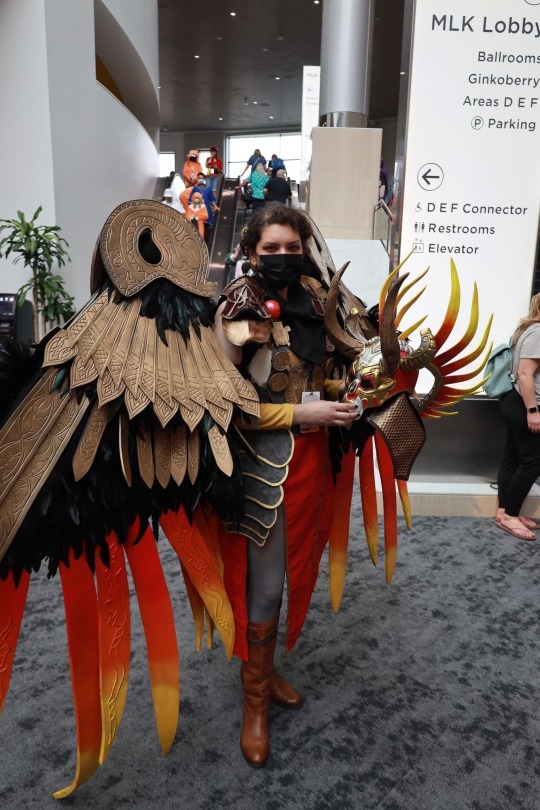
Photo
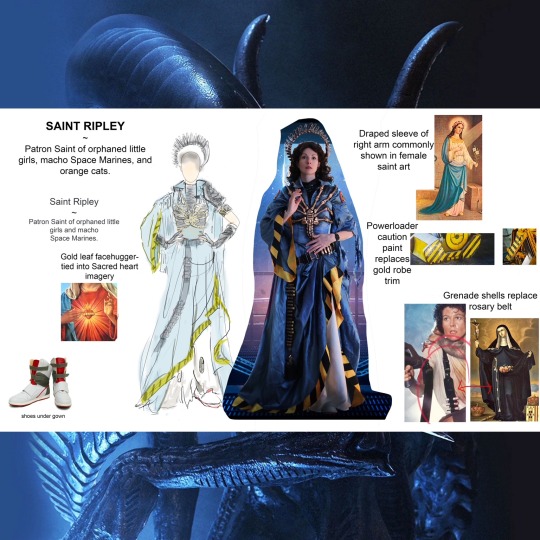
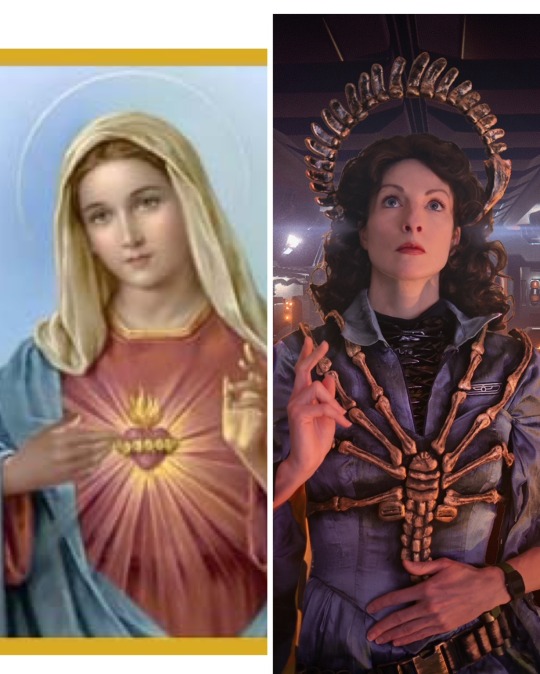
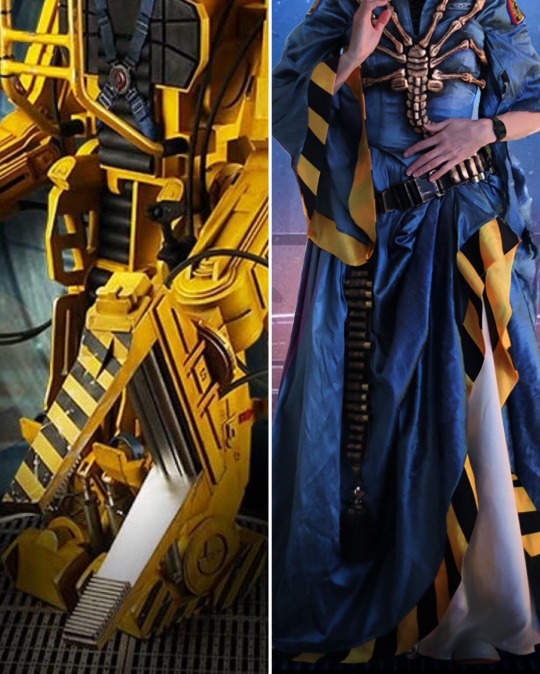
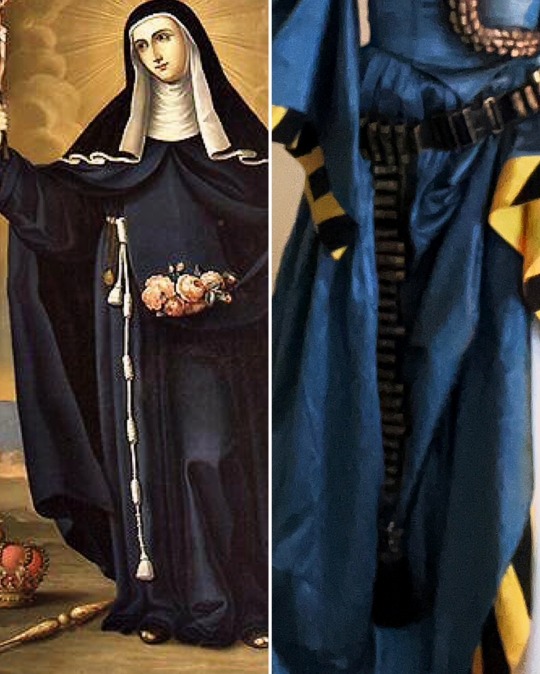

FINALLY!! Saint Ripleys Detail Breakdown!
I still have a few more images to go through of Ripley, but I finally had some time to get to my details!
Pic 1 shows the original sketch, you can see I had a lot more xenomorph garbage on the costume. I realized it made it overwhelming & messy. I do still have the back spines I made, but I don't think I'll be implementing them on this costume. Maybe another??
2: The Sacred Heart. I wanted the Face Hugger to sit where the Sacred Heart sits in such iconography, the legs being the 'rays".
3: An obvious detail: the Power Loader aesthetic used for the border on the robe, replacing the typical gold
4: The Cincture has been replaced with the M41-A Pulse Rifle ammo bandolier
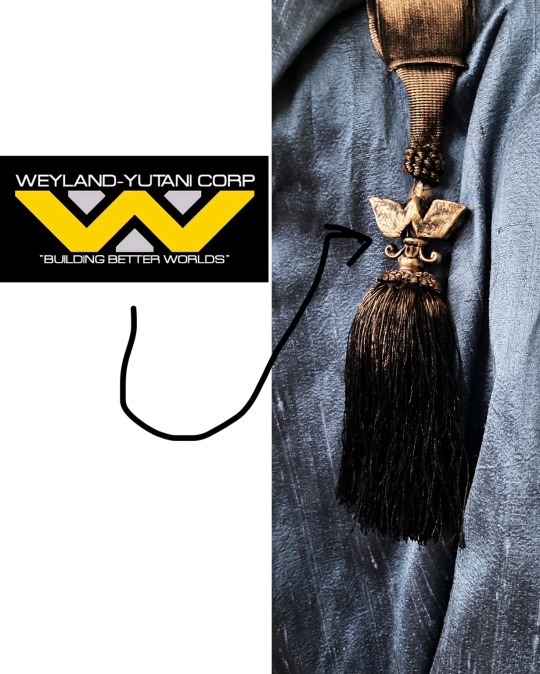
5: Hidden detail: the tassle at the end of the cincture has a hidden Weyland Yutani logo on it!
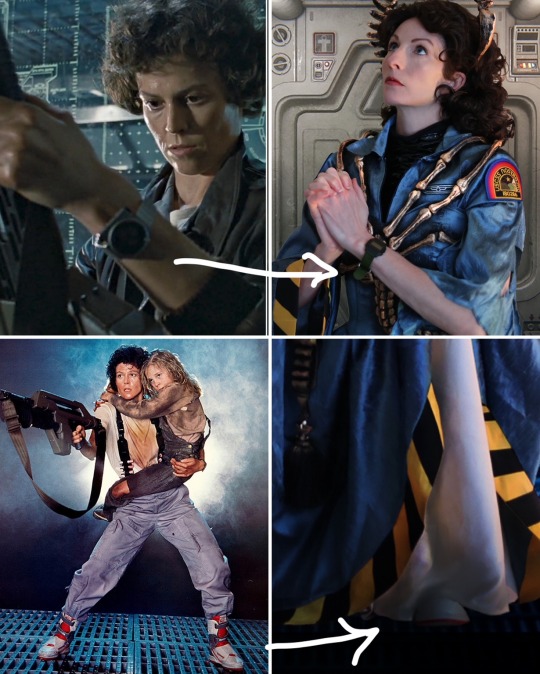
6: I incorporated both the tracker watch & of course, her shoes!
7: Finally: the halo is a Xenomorph Queen tail, gilded in gold.
The main body of the dress was a gorgeous silk I chose to match her blue jumpsuit, of course with the Nostromo patches on arm/chest!
I put so much thought and love into this costume, I wanted it to be a celebration of one of the characters that shaped me, growing up.
~
#ripley#saint ripley#ellen ripley#alien#alien movie#aliens#aliens movie#xenomorph#face hugger#saint#amazonmandy#foamcraft#foamsmith#seamstress#cosplay#alien cosplay#ripley cosplay#aliens cosplay#colonial marines#alien queen
154 notes
·
View notes
Text
EVA Foam Detailing
Since I’m currently working on a new panel for EVA foam detailing, sharing an abbreviated version of this so that I actually have some posts on my account. This is definitely not a complete list of every technique that could work, but these are ones that I have used before and found to be quite useful.
Sanding
This is probably the most well-known technique for detailing. A rotary tool is a must-have for working with EVA foam since it’s such a versatile tool. A basic sanding drum is great for beveling edges or carving in battle-damage and weathering. Grinding stone tips can smooth and even out sanding. Depending on how the tips are angled on the surface, you can create a hammered metal look, soft leather-like crinkles, or circles that look like screws or bolts. Sanding is also the single best way to clean up rough seams. Be sure to wear a respirator and eye protection when sanding since the foam will generate a LOT of dust. You will your workspace will get covered with dust.
Burning
A soldering iron or wood burning iron can be used for detailing. These hot tools can be used to engrave precise or geometric lines or can be used to create a feather texture. These can also be used to make more organic textures like wood grain. Very much like a rotary tool, a wood burning or soldering iron has endless possibilities only limited by creativity. The foam can be easily burned through, especially when it is a thinner sheet (1-3 mm). Burning foam creates very nasty fumes so be sure to work outside with a respirator on.
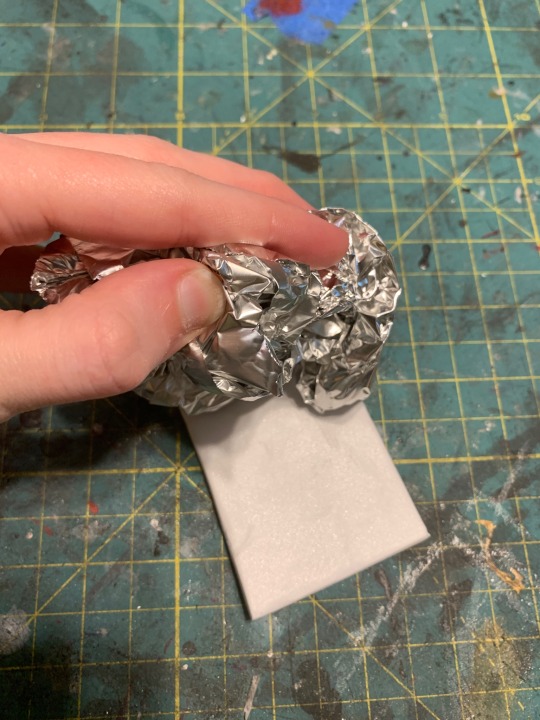
Heat stamping
This is a more subtle technique but can still be very useful. The most common application is using crumpled tin foil to make a leather texture. Once foam has been heated up evenly (using a heat gun), it can pick up the texture of anything pressed against it.
Google eyes
For a cheap and easy way to get rivets or bolts, try using googly eyes. Once these are painted over, they can blend in perfectly (just don’t shake the armor or prop because they will rattle). Though real rivets can be used (that is my next point), googly eyes are easy to install and are very easy to find in a variety of sizes. These can be glued down with pretty much any type of glue.

Metal hardware
If authenticity is the goal, eyelets and rivets can be installed into EVA foam. The key to these is leather hole punches. You can buy these either as a pack of hole punchers or as a single tool that operates a lot like a paper hole puncher. For real leather or fabric, these are normally hammered into the material to generate a hole. Because EVA foam is so soft, a twisting motion works better for cutting a hole without crushing the surface. Eyelets will require a bit of glue but rivets have two separate ends that snap together nicely without any adhesive. O rings and metal buckles can also help with making realistic-looking armor.

Foam clay
Foam clay is an obsession of mine, but I have to admit that it is a detailing material and only works for specific tasks. Foam clay is great for adding organic textures like bone, monster skin, etc. It can be free sculpted some, but is limited due to being such a soft clay. It sticks to EVA foam without any glue required. It can be sanded or burned once it is completely dry to add more texture. It can be used to fill deep gaps in seams. It can also be pressed into molds.

Pre-cut bevels and scales
With cosplay becoming more common and mainstream, specialty products are readily available. Bevels are pre-cut strips of foam that can be used as trim. They most often come as half-round or triangular though some shops may carry less common shapes like low profile triangles or trapezoids. Scales are another great pre-fabricated material that can be bought from cosplay supply shops. They are sometimes sold as individual scales in packs of 50-100 or as scales attached to a strip.
Primer manipulation
I just recently discovered this technique while making Gyurato’s blood sickles. When using a brush on primer that has a slower drying time, it can be manipulated while still wet. Pressing something like upholstery foam or a sponge into the primer can add additional rough texture. I also used plastic wrap to add creases and wrinkles to the surface of the dried foam clay. Another thing to keep in mind with primers is that the finish (satin, matte, gloss) can change out a paint looks. Picking the right sheen, like gloss when painting a metallic, can help with achieving the right effect.

Hopefully these tips give you some ideas for future projects.
238 notes
·
View notes
Text
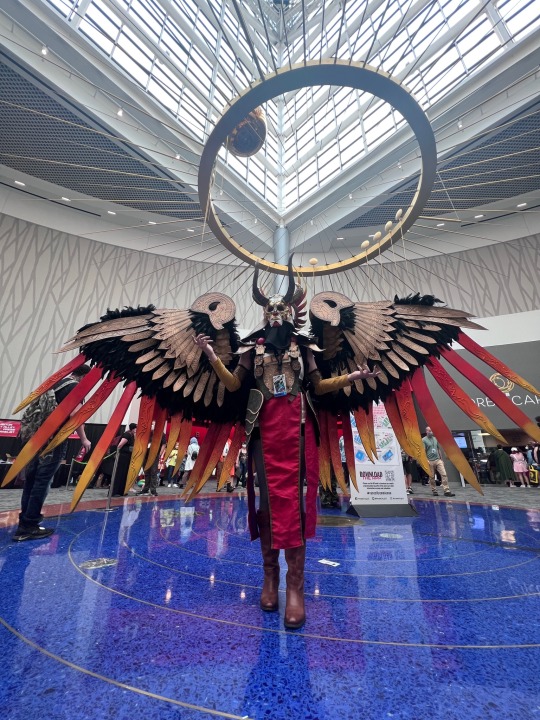


I never shared the end result of this enormous build, so here you have it: Valkyrie Gondul from God of War!
This costume was probably three month’s worth of solid work, the helmet being one of the pieces I worked on the longest. Every feather is hand-carved EVA foam with wood burned designs. The helmet is also EVA with foam clay sculptured details and carvings. The wing span is roughly 10ft and each wing is powered by its own motor allowing them to flex and collapse. The base of the wings were built based on a blueprint by Warhawk Studios (@war_hawk_studios_llc on IG), but the feathers, rigging, and adjusted motors and wiring were done by yours truly. They weigh about 30lbs.
I loved getting to wear this build! I’m really excited to continue to improve her, build her hammer, and do a real shoot. 🤘
#cosplay#video game cosplay#gaming#god of war cosplay#god of war#god of war ragnorak#Valkyrie#valkyrie cosplay#gondul#Gondul god of war#god of war valkyrie#valkyrie Gondul#articulating wings#cosplay wings#eva foam#foamsmith#GoW#GoW cosplay#Valhalla#norse mythology
233 notes
·
View notes
Text

Zandalari Troll scroll also had its final flourishes done.
#world of warcraft#blizzard#cosplay#zandalari#prop making#art#crafts#zandalari troll#zandalar troll#horde#warcraft horde#foamsmith#loa#wow#wow art#warcraft art#warcraftfanart
25 notes
·
View notes
Text
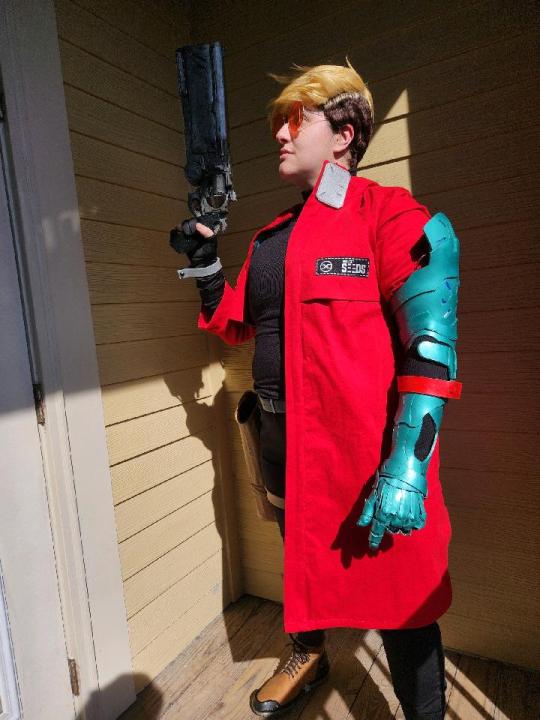
This is the first time I've put Vash on completely since starting the project 7 months ago. He has a few minor tweaks that need addressing before my next con in February, but damn if it ain't my favorite little plant boi come to life.
I'm so proud of all the work I did. The new skills I learned for this will follow me into future, more complex builds. I'll post some details at a later time to show you the process. For now, he is nearly complete!
#battlin kat cosplay#cosplay#my cosplay#trigun stampede#trigun stampede cosplay#trigun cosplay#vash the stampede#foamsmith
6 notes
·
View notes
Text
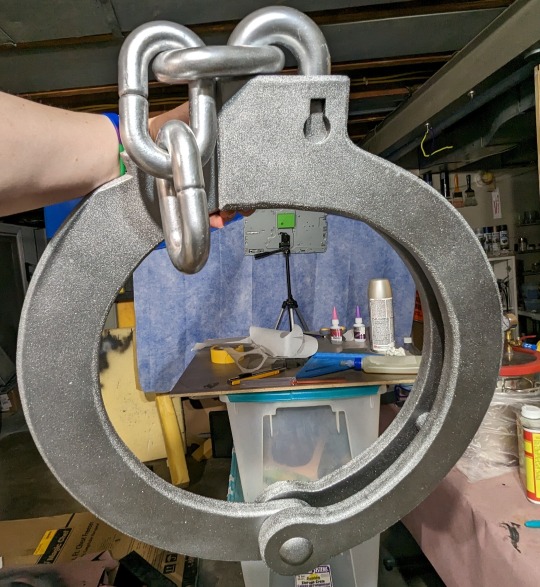


Bridget's giant Handcuff belt is done! It fits snugly around my waist and holds well! But if it ever loosens up I have a locking/ratcheting mechanism thought up for it I can add.
#bridget cosplay#daily bridget posting#Bridget's handcuff belt#Bridget#cosplay#EVA foam#foamsmith#3d printed#3d printing#almost functional#prop making#trans makers
24 notes
·
View notes
Text
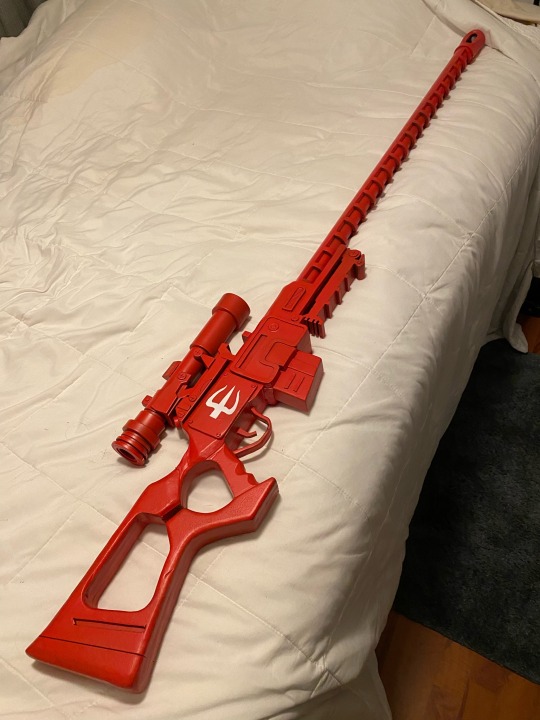

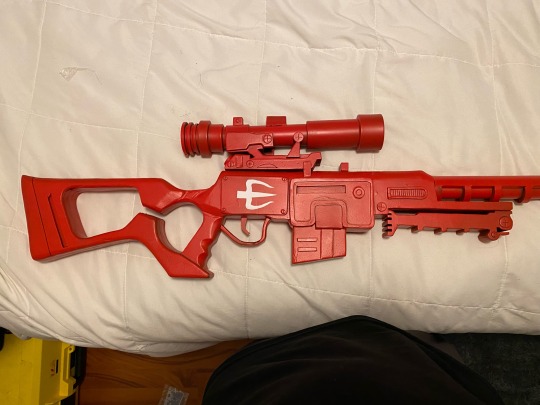

Crocker Corp Appearifier Rifle build from last year.
#homestuck#homestuck cosplay#cosplay#prop build#cosplay props#roxy lalonde cosplay#roxy lalonde#homestuck roxy#Crocker corp#foamsmith#maker#hiveswap#hs2#Visguard Works
118 notes
·
View notes
Note
Hi!! your Alecto cosplay is so cool and your sword looks FANTASTIC, did you make it? do you have any other pics with it?
thank you so much! that sword is my husband’s handiwork, originally made to go with my gremlin harrow look last holmat, but the process was pretty straightforward.
figure out the scale in comparison to me (who is very short) so that it’s long enough to look BIG but not so long it’ll drag on the floor if i put it on my back.
cut blade out of foam in two pieces (one for each side), carving a channel down the middle.
glue dowel rod down the length of the blade.
carve the blade down with a dremmel on the sides, but it doesn’t need to be terribly flat or sharp to read as a sword.
cover remaining dowel handle in foam for pommel and cross guard.
give it a couple layers of spray on plasti dip and then paint once dry. i think he did silver and then went back in with black for shading.
add painted highlights along edges for fake sharpness.
the whole sword is SUPER light and very con safe! he didn’t actually give it as heavy a coat of plastidip as i’d recommend just due to time, so it’s definitely gotten kind of beat up, esp at the tip. but like, it still looks cool even with it’s non-sharp tip lol.
here’s me right after getting into gremlin harrow for holiday matsuri brandishing my new sword:
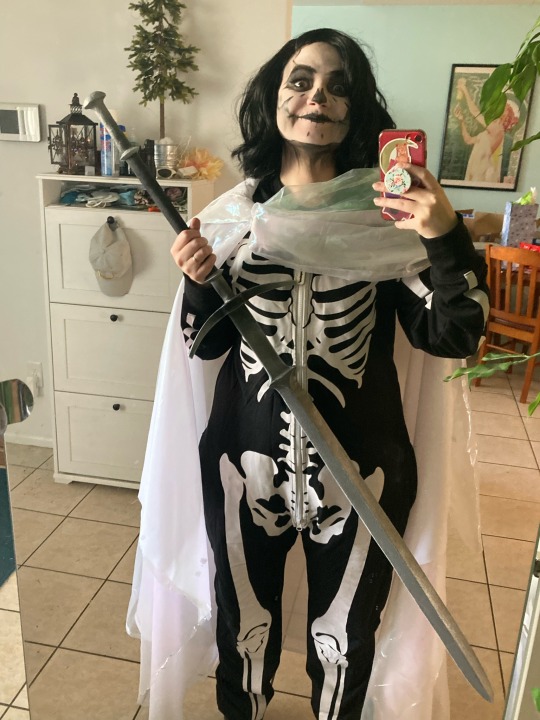
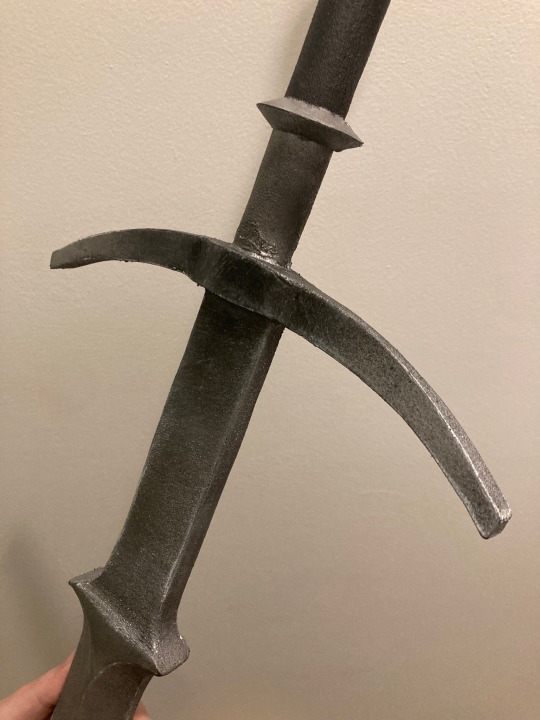
and here’s some closeups of its current state:


and i’ll have more photos of it later once we get to editing my alecto shoot from metrocon!
oh and follow my husband @shmaba if you like neat weapon designs. this sword is basic, but he did a whole bunch of cool ones for last swordtember!
23 notes
·
View notes
Text
instagram
#ask me anything#writeblr#booklr#cosplays#cosplayers#jjk#jujutsu kaisen#art#crafting#foamsmith#anime#anime cosplay#mei mei#books#marisaanntalks#writers#weeb#please follow#instagram#cosplayers of instagram#cosplayers of tumblr
8 notes
·
View notes
Text
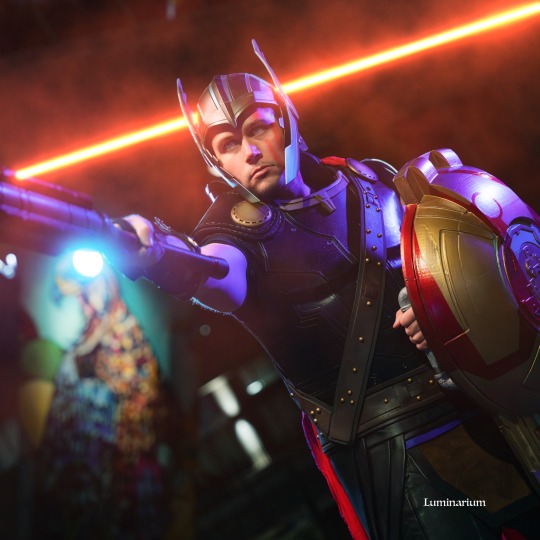
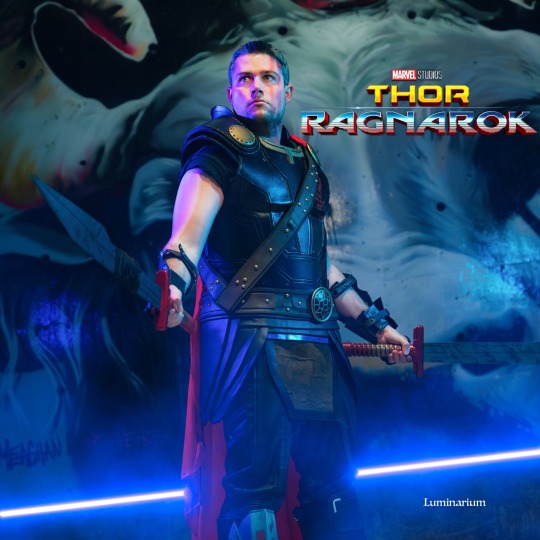
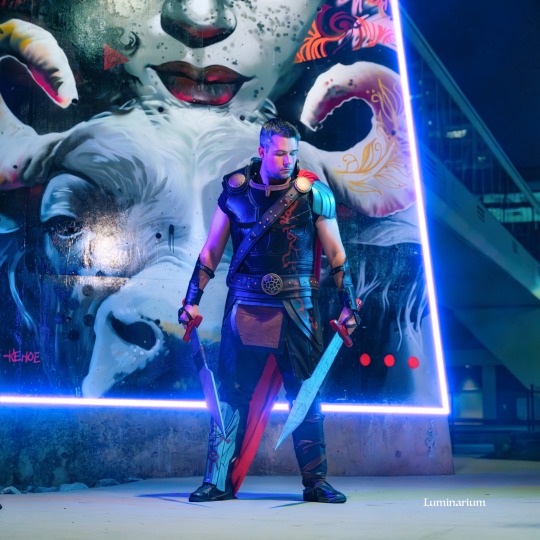
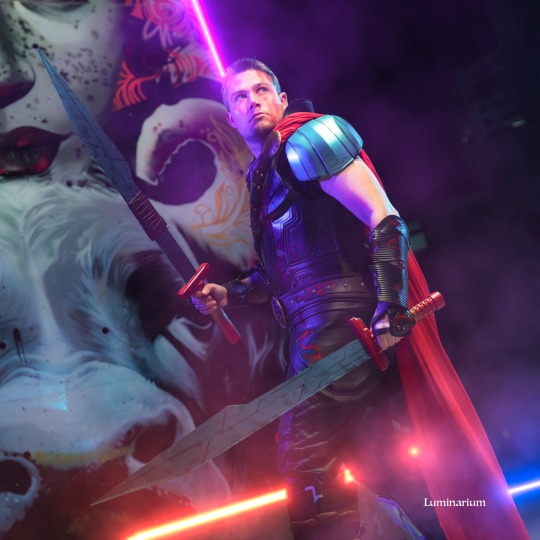

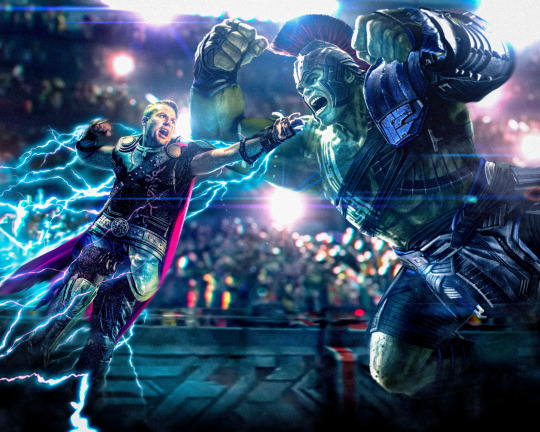
My photographer MDQBriones and I put together a Cyberpunk Thor: Ragnarok photoshoot, and I love these results!
Ragnarok was the thing that got me in to Thor. It’s no longer my favourite Thor thing, but it will always be what made me take a closer look at the character I am now hyperfixated on.
Suit is foam and 3d printed by Joelandprops and fitted and refurbished by me. Last edit is by pixelens.
#marvel cosplay#marvel cinematic universe#avengers#cosplay#cosplay photography#marvel#mcu#mcu thor#thor#thor cosplay#thor ragnarok#thor ragnorak#thor odinson#thor of asgard#thor 3#foamsmith#foam#3d#3d printing
19 notes
·
View notes
Text

I'm surprised I haven't posted this here yet but I finished my hylian shield this summer after like 3 years c:
7 notes
·
View notes
Last Seen Blogs
confidenceandparanoia
play nicely, or martin's hair gets it!

lions-ut-blog
Lion's undertale blog

hiroyukiyt
hiroyuki_yt
hiroyukiyt
hiroyuki_yt