#giffing tutorial
Text
Gif/Coloring Tutorial

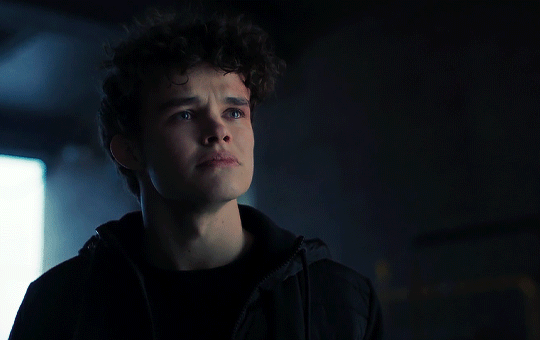
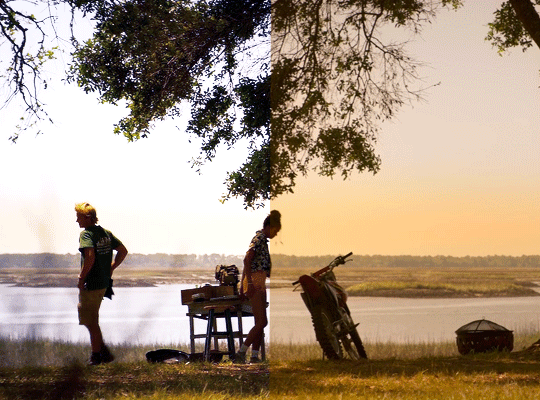
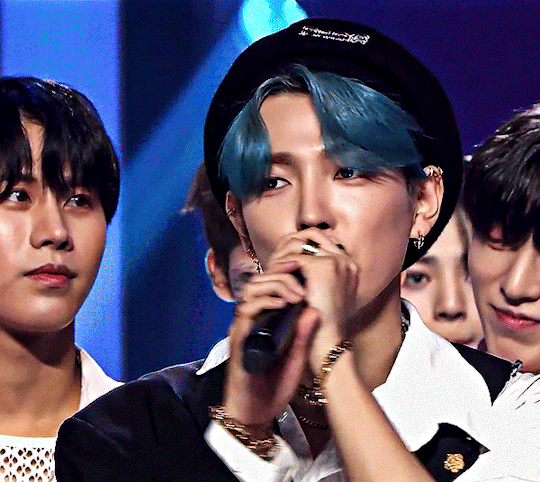
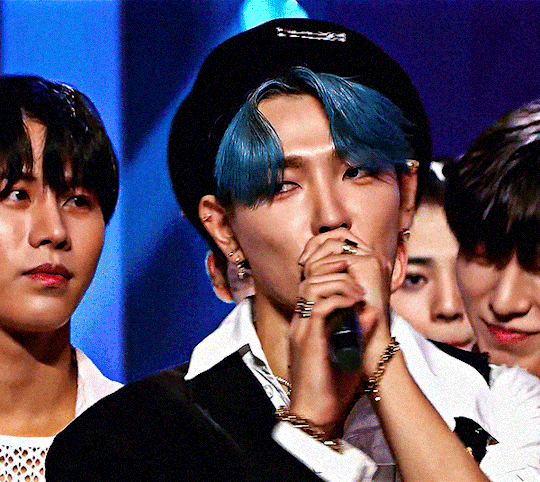
I was asked by @just-lost-inbetween-worlds how I make, specifically, my Titans gifs so I figured I’d just make a tutorial on the gif making and coloring since the show is SO blue and the process is the same for all of my gifs.
I did try and go into every step so it’s hopefully beginner friendly lol It did get a little long but I hope it helps!!
What you’ll need:
Clip of what you’re giffing (try using footage that’s 1080p or 4k, nothing below 720p)
Adobe Photoshop (I’m using 2022)
Step 1:
Open photoshop, click file > import video frames to layers

Use the cursors to trim the part you want to gif, make sure you have “make frame animation” selected

Step 2:
Group all of the frames you want to be a part of your gif. Click your first layer then crtl+shift+click your last layer

Step 3:
Delete the frames and layers you don’t want to be a part of your gif. Select the layers and click the little trash can at the very bottom of your layer panel. Do the same in your timeline
Step 4:
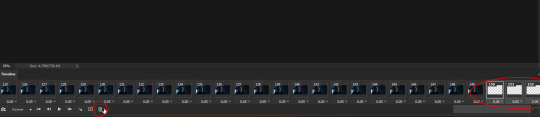
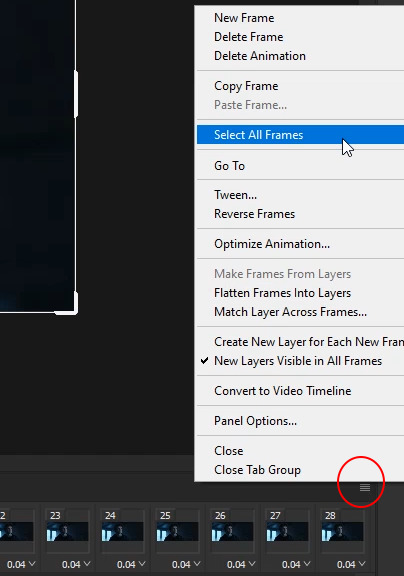
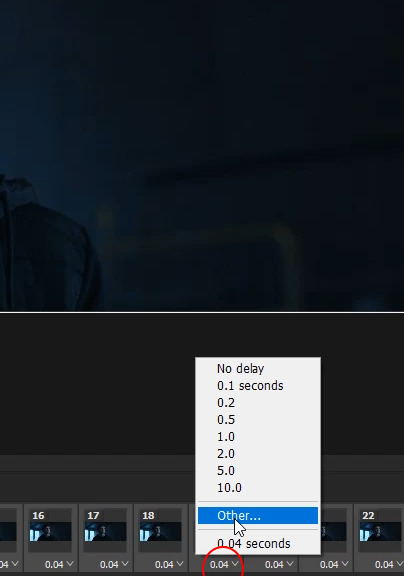
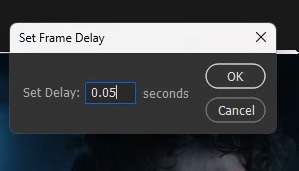
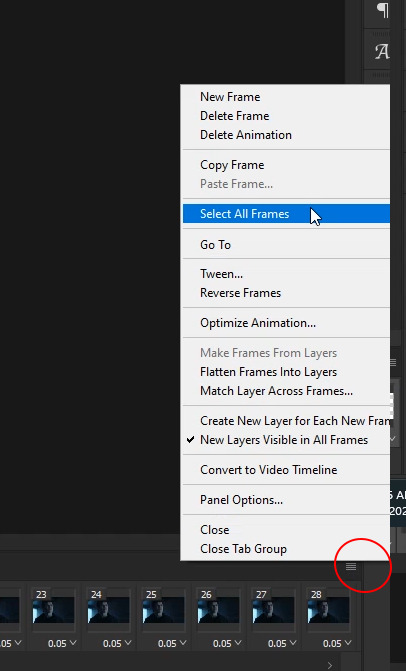
Click the hamburger stack at the right hand side of your timeline then click “select all frames”
Click one of the little arrows on one of your frames and change the speed to 0.05
Step 5:
Change the size of your canvas. Tumblr has specific dimensions for gifs. For 1 column gifs, the width should be 540px, for 2 column gifs the width should be 268px, and for three column gifs the width should be 177px on the outside gifs and 178px for the middle gifs.
My favorite dimensions are 540px by 340px but you can mess around with the height. The height of the gif does not matter


Step 6:
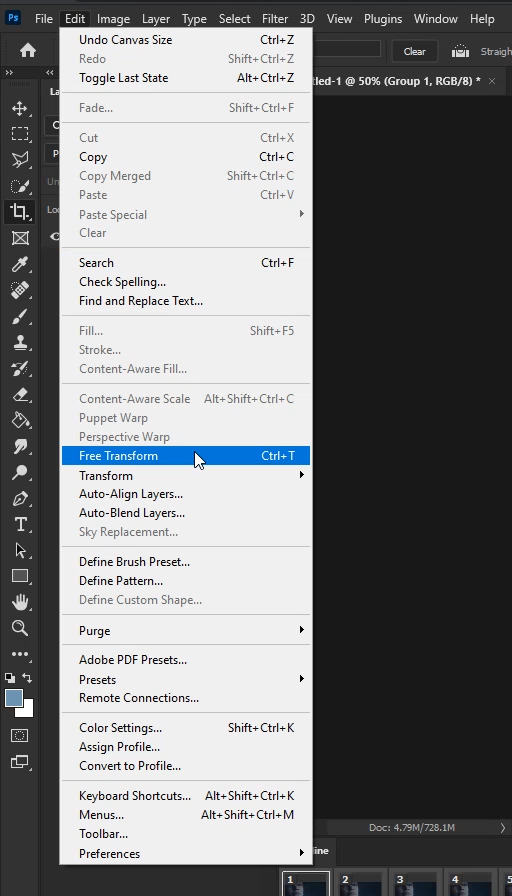
Select your group then go to edit > free transform. Use free transform to adjust your frames to fit your new canvas size

Step 7:
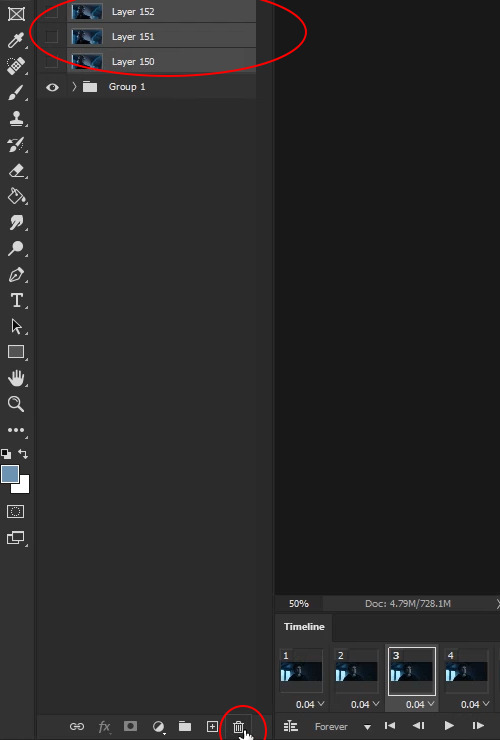
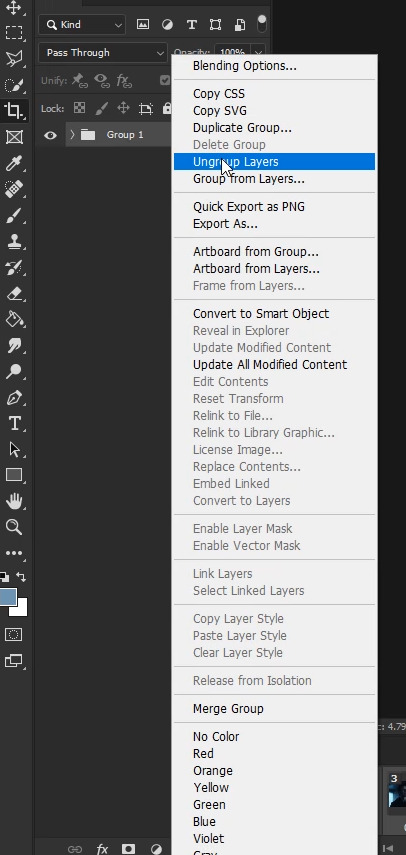
Click the hamburger stack and select all frames. Ungroup your layers by right clicking your group then “ungroup layers”. On the bottom left side of your timeline, click the little hamburger stack with a line through it to covert your timeline to frame animation. Just make sure all of your frames and layers are selected when you turn your timeline into frame animation


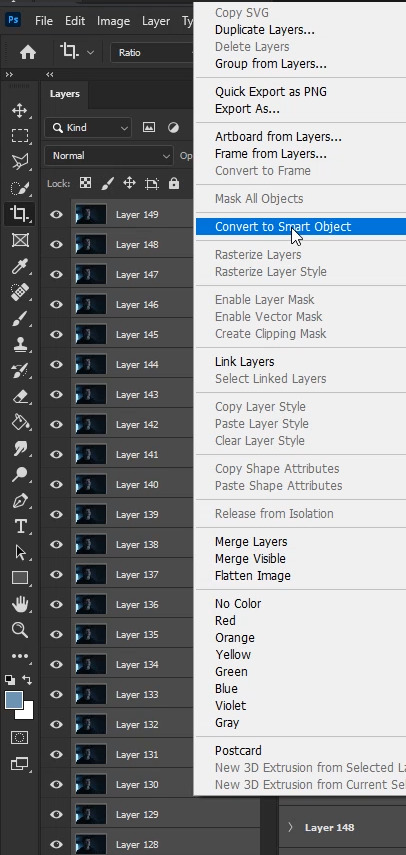
Step 8:
Select all of your layers and right click > “covert to smart object”
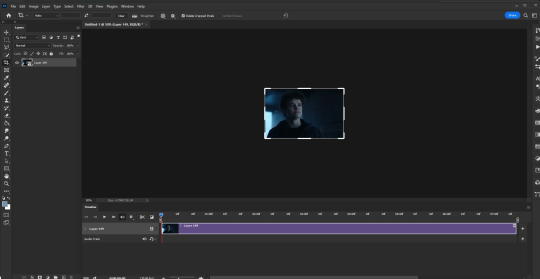
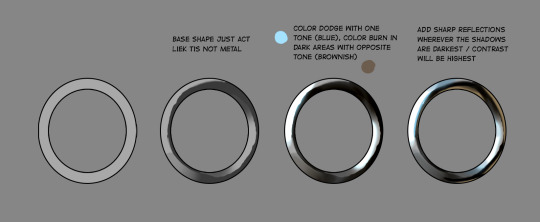
Your work space should look like this
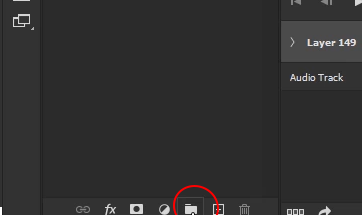
Step 9:
The coloring! Click the little folder at the very bottom of your layers panel
Step 10:
Click the adjustment layers option and select “Channel mixer”.
I really like channel mixer for scenes that are really blue and really yellow. It’s a quick way to reverse those filters. Channel Mixer works with contrasting colors. So, your blues go yellow, your greens go purple and your reds go blue. I highly recommend this tutorial by @zoyanazyalensky . It is amazing and they explain channel mixer worlds better than I ever could lol
For my gif, it’s really blue, so I go to the blue channel and bring the blue blues down a little
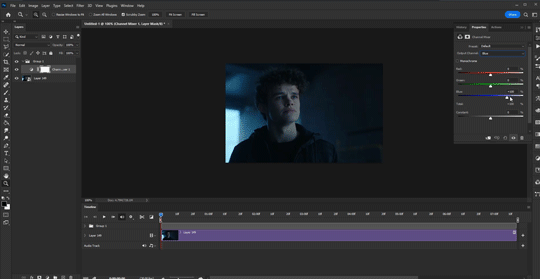
My gif starts going a little bit green so I open the green channel and bring the green greens down a little bit

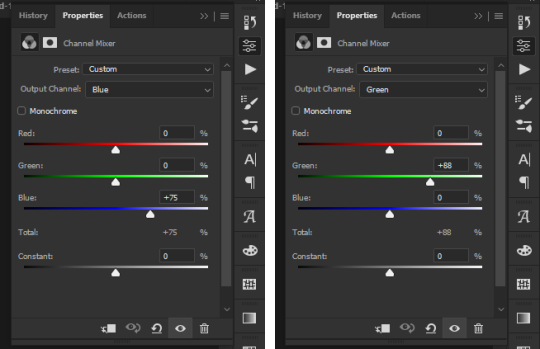
I just messed with the blue and green mixer until I was happy with it. My channel mixer settings ended up looking like this
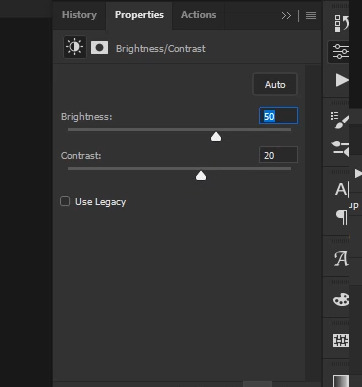
Step 11:
Click the adjustments layer option and select "Brightness/Contrast”
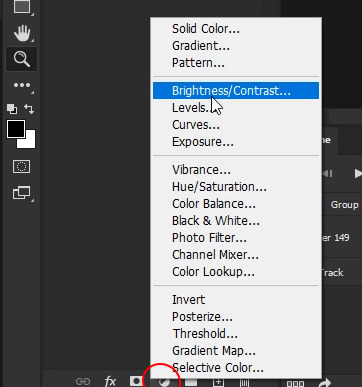
These are my brightness and contrast settings. Set these to whatever works best for your gif. Be careful not to brighten too much because your gif can go a bit grainy if you do
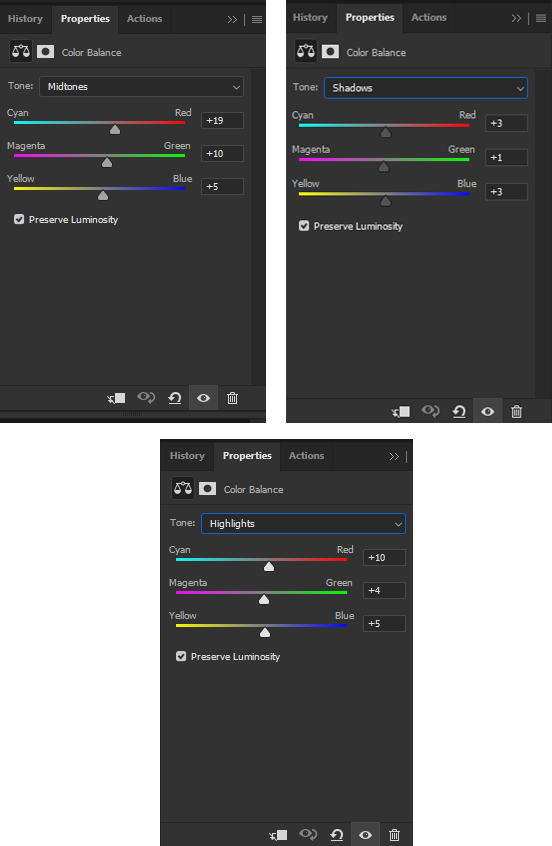
Step 12:
Click the adjustments layer option and select “Color Balance”
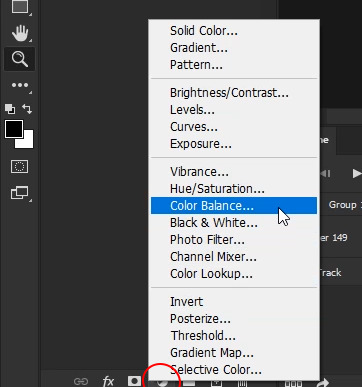
I love color balance. You can adjust a lot with it and it’s a great adjustment layer. For every gif, I start with midtones. For blue gifs like this one, I slide all of the sliders to the right and staircase them. There isn’t a specific number I set them to since every gif is different so I just slide them until I’m happy with them.
Next, click the drop down menu that says “midtones” and select “shadows”. For shadows, I also slide them just a little bit to the right.
Next, click the drop down menu and click “highlights”. Again, just move those a little bit to the right.
This is what mine looks like
For gifs that are more yellow, you’ll likely slide your sliders to the left instead of the right!!
This is what my gif looks like with Channel Mixer, Brightness/Contrast, and Color Balance

Step 13:
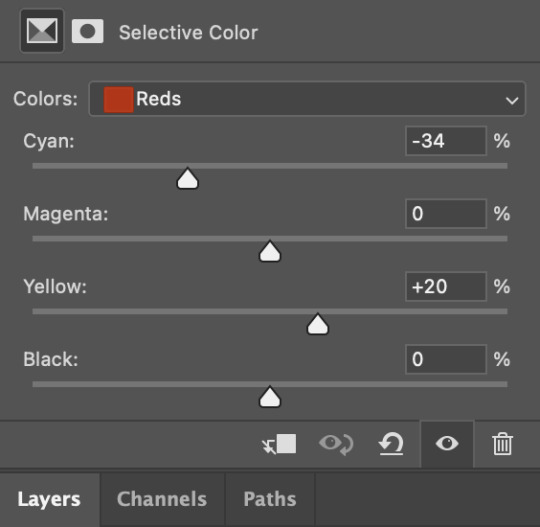
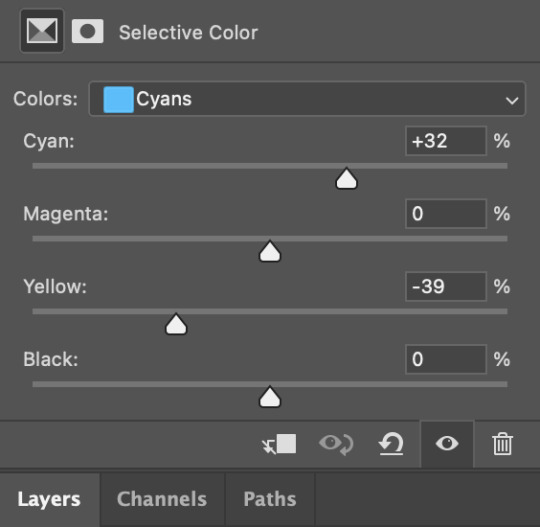
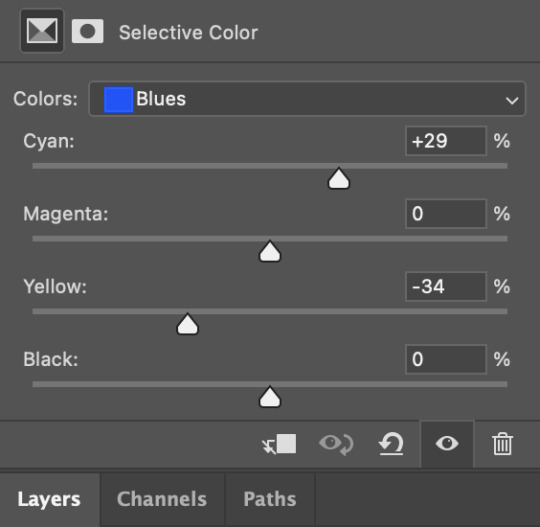
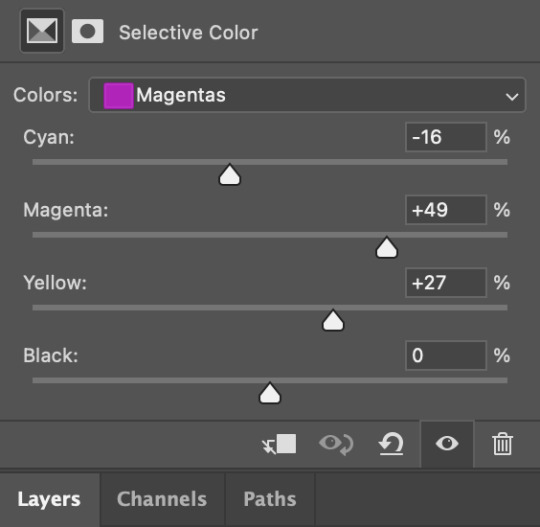
Click the adjustments layer option and select “Selective Color”
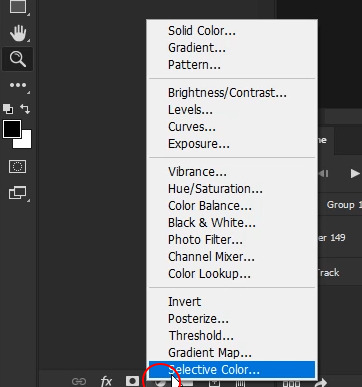
Selective color is great because it allows you to fine tune individual colors within your gif rather than changing the entire color of it. Selective color is really helpful when it comes to skin tones as well. There isn’t a specific way I do this lol I just slide the sliders left and right until I like what it looks like lol
This is what mine looks like
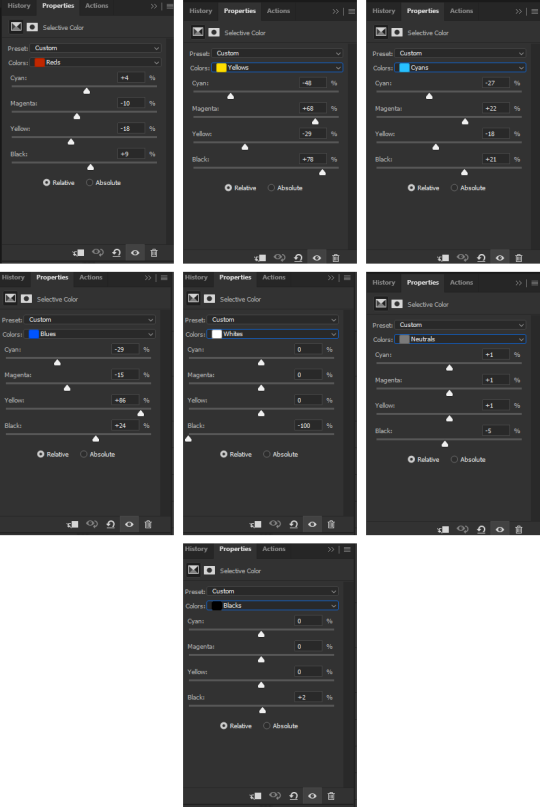
I almost allows brings the white blacks all the way to -100 and have the black blacks set to +1 to +3
Step 14:
Click the adjustments layer option and select "Vibrance”. I just upped the vibrance and saturation a bit since Jason’s skin was looking a little washed out.
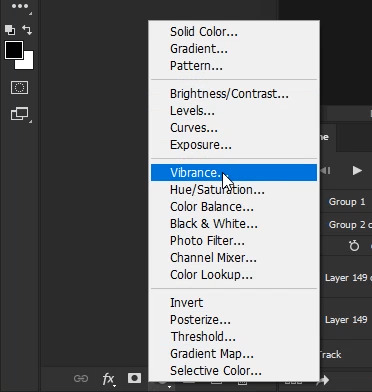
This is what mine look like

Step 15:
Add your sharpening!! Click your smart object then go to filter > sharpen > smart sharpen. I’m using sharpening by @anya-chalotra but I usually set the reduce noise to 7

Step 16:
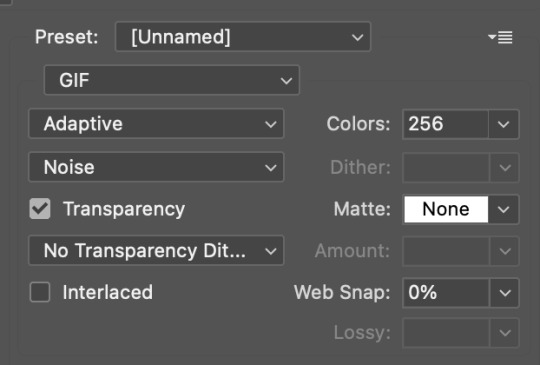
Export!! Go to file > export > save for web


Make sure your gif is under 10mb (red circle) because if it’s over 10, it won’t play on Tumblr.
Make sure your colors are set to 256 and your dither is 100% (green circle), the quality is set to “bicubic” (blue circle), and the looping is set to forever (pink circle). The yellow circle are my other settings. You can play around with those but I find adaptive and diffusion work best in most cases!!
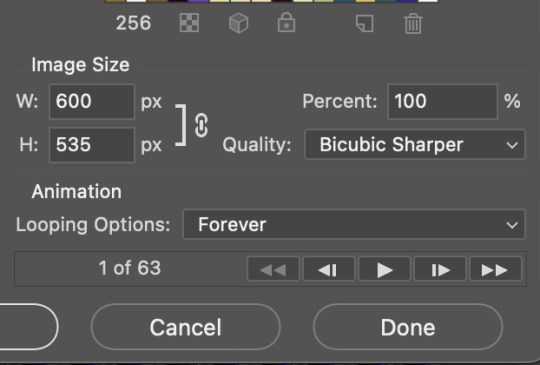
Step 17:
Photoshop will export your gif with a speed of 0.07 so now you need to fix that. Once your gif is saved, open your gif in Photoshop again. Select all of your frames and change the speed to 0.05. Then export it like above and save!!
And that’s it!! I hope this was at least somewhat helpful!! If you have any questions, feel free to send me an ask!!
Here are some other gifs I’ve done following these same steps


#tutorials#tutorial#gif tutorial#coloring tutorial#photoshop#adobe photoshop#photoshop tutorial#giffing tutorial#chaoticresources#completeresources#allresources#dailyresources#userautie#userzesty#userriel#userfaiths#tusernoor#my tutorials
160 notes
·
View notes
Text
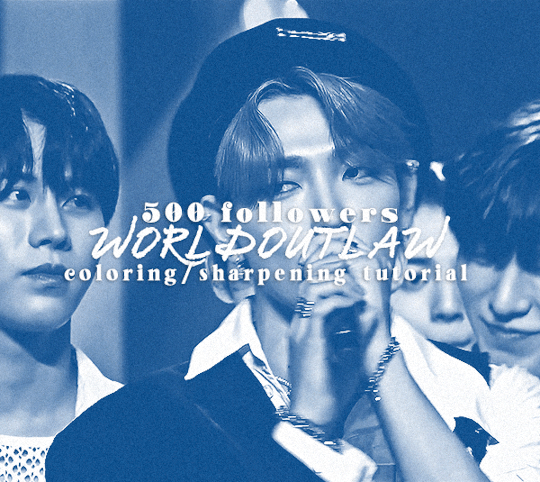
hi! it's theo aka user worldoutlaw and for 500 followers i wanted to share my coloring/sharpening process !
i've been getting a few notes recently complimenting my coloring and sharpening lately (ty all so much they make me smile every time) and i thought some people might be curious in my process so here we are ! :3
this is just coloring and sharpening so if you're looking for a general gif tutorial i suggest you check out usergif! now without futher ado let's start (color coded for my fellow adhders/neurodivergents who find reading hard)
i do most of my process through actions; of which i have several for different gif dimensions ie 540 width (typically for fancams where i keep the width of the file the same but change the height), 540 height (which i use the most for gifs like the above), and 850 height which i use for my sets that have side by side gifs like my pinned
actions make the beginning of making a gif a lot faster and especially save time when you're rushing to make comeback gifs lmao
after i've converted to the video timeline and selected all of my frames and converted them to a smart object, i apply userdramas's camera raw filter action which can help gifs look higher quality and create the illusion of skin texture when there isn't any
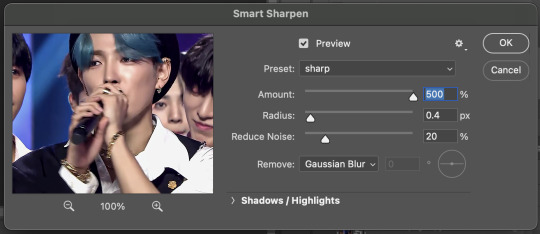
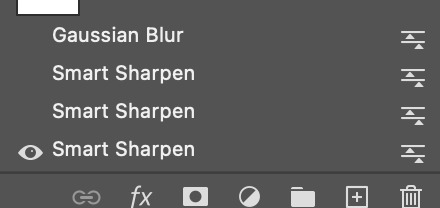
after this i convert the layer into a smart object again and apply my sharpening as follows (partly from anyataylorjoy's action pack)

smart sharpen 1:
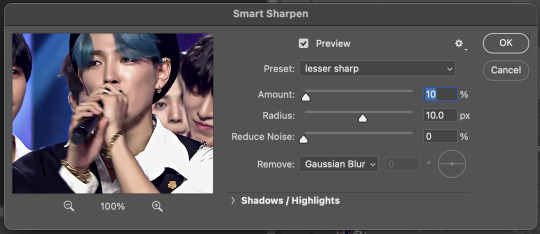
smart sharpen 2:
smart sharpen 3: (this one is optional)
smart sharpen 2 duplicated
gaussian blur:
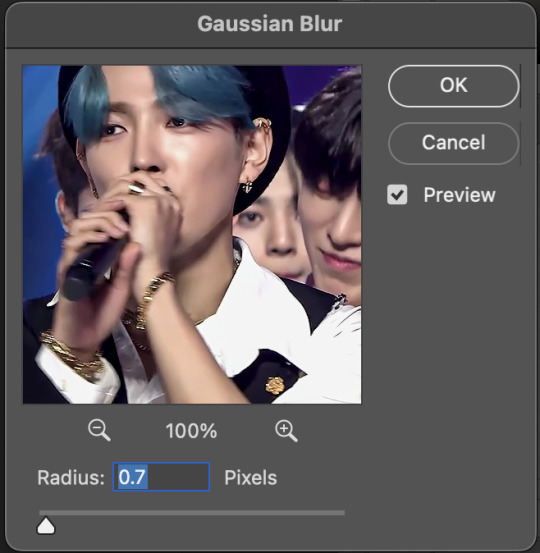
and i click this button on the far right to change the opacity of the blur (usually i set it around 10-30)
it may look funky but noise at the end will always fix it :p
after i sharpen i start on coloring!
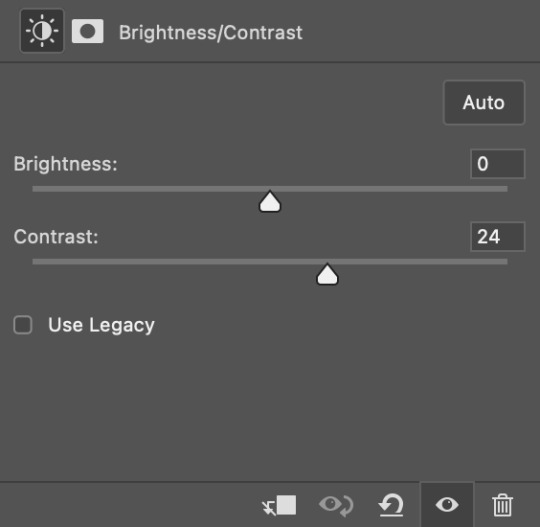
my coloring process starts with editing values with curves, brightness & contrast, and sometimes levels

this helps to achieve the high contrast look i really like on my gifs and below are my settings for this specific set
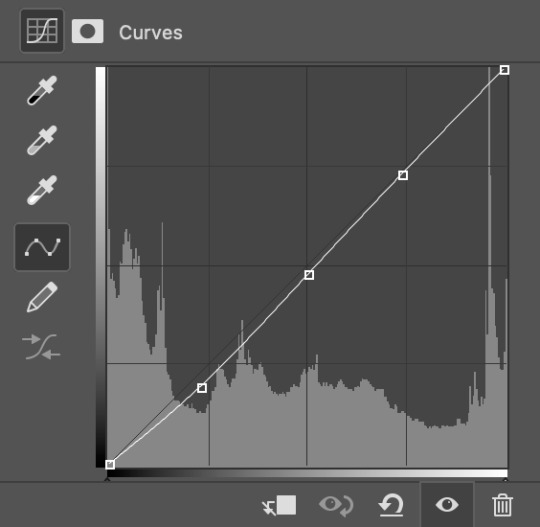
i find that the marker in the center of the curves graph can often help darken skin tones if the subject appears too light
after i have my values down i move on to the actual colors
i start with adding a selective color layer; adjusting the red values, followed by yellow, then black, white, and any other colors i would want prominent in the gif
for example, with this set i wanted the blues to look really nice so i increased the cyans and decreased the yellows to my liking
changing the black values adds to the dimension i like in my gifs; these are my settings


forgot magenta whoops
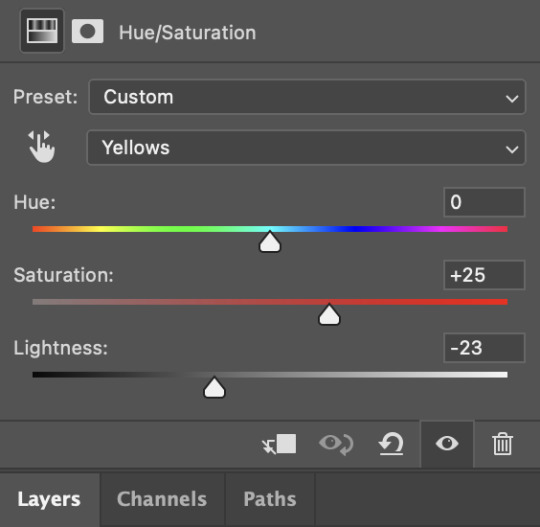
next i add a hue/sat layer where i mess with the red and yellow values which often adds extra help to skin tones (i also recently started using hue/sat on colors like the blues here)


now these gifs didn't need it thankfully, but if needed i will also do color balance and channel mixer layers
after all my coloring and sharpening is done and i'm satisfied with how a gif looks i will convert all layers to a smart object and add noise (typically 1.5-3)
then the gif is done and i save it! these are my save settings
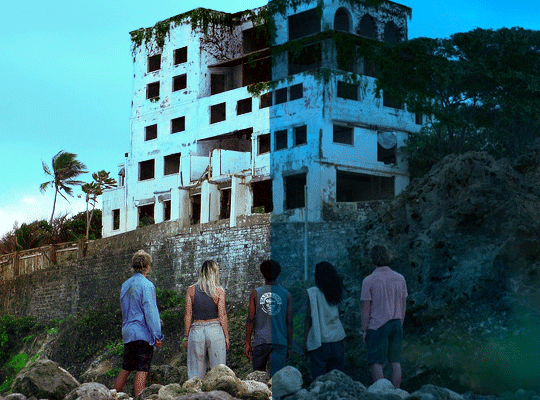
and that's how i turn this

into this!
hope y'all enjoyed and found this helpful and thank you again for 500<3333
some tags for fun and also to thank my supportive lovely mutuals @solojihyo @twiceland @97chwe @jeonwonwoo @sanchelinz @applejongho @hwanswerland @kyubins @minchanz @seonghwasblr @get-lit @jjongho @userwoosan @strhwaberries @dqmeron (ty for looking over this for me 🫶)
#theo.txt#*gifs#*tutorials#this was a relatively easy file to use but#hope it got the point across<3#i dont wanna tag too many people but if you weren't tagged still know i appreaciate you very very much#coloring tutorial#sharpening tutorial#gif tutorial#giffing tutorial#sharpen tutorial#color tutorial
85 notes
·
View notes
Note
Hi! Can I ask how you did the text in this post? It's beautiful! 64(.)media(.)tumblr(.)com/5e5d23e7809c6ee181ad52142050aa15/ac1a9f9dc72b17a7-9e/s540x810/262cc36a82324d0652af8e28f14e307cf465c756(.)gifv

ULTRAVIOLENCE GIF TUTORIAL
Here's a little tutorial on how I made the first gif in this set. It's pretty easy to make, but let me know if you need more help! Also apologies for the delay, i had computer issues!
Just a heads up before we start — the dimensions for this gif are 540x540px
FONT
There are two ways you can go about this:
Download the Ultraviolence font. After you've downloaded it, open it up in Photopea like you would with any file and it will show up in the list of fonts.
Use a pre-installed font in Photopea called Bebas Neue. This is the font I used when making this set. In order for it to resemble the original album font, though, I had to edit it.
The following is my process for making this gif using the second option. If you downloaded the Ultraviolence font, the steps below won't be necessary.
For the font you need to do some adjustments in the Character panel. Below is a screenshot of all the edits made to the text layer.
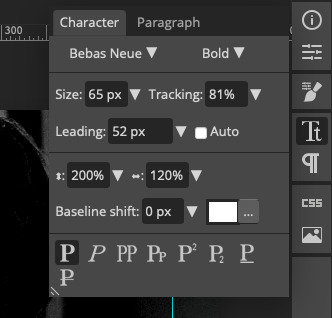
Essentially what you want to do is:
Set the font to bold. After you've selected Bebas Neue, do to the dropdown right next to it and select Bold.
Increase the tracking so that there is some space between the letters.
Make the text bolder by clicking on the first P at the bottom of the window (see screenshot). We've already selected the bold version of the font, but I personally want it even thicker, so I select this option.
Stretch out the text to make it taller. I set this to 200%
Stretch out the text to make it wider. I set this to 120%
I recommend putting the original album cover below the text layer so you can stretch the text as you go until it matches. The reason I'm not giving you exact numbers is that it will all depend on your text. Play around until you're happy!
BASE COLORING
I won't go too in depth here about how I color my gifs, but here is the gist of it:
Curves (auto, check the box that makes the scene brighter)
Gradient map (blend mode: saturation)
Gradient map (blend mode: soft light, lower opacity if too dark)
Selective color (adjust the whites, blacks and neutrals).
FINISHING TOUCHES
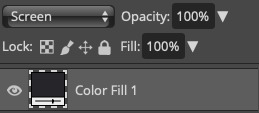
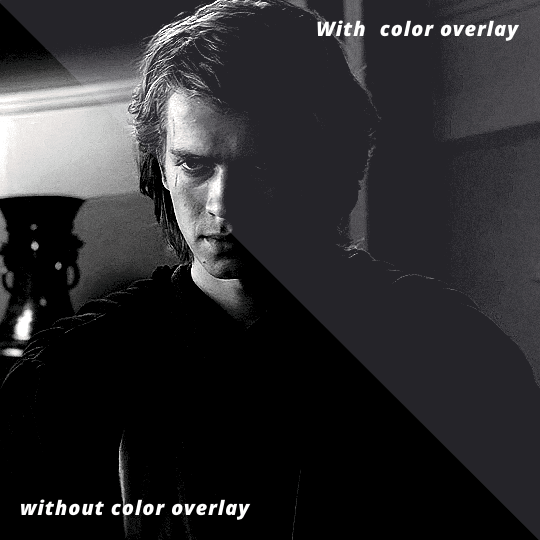
After you've done your base coloring, you can decide if you wanna add a color overlay to match it to the album cover. Make a new color overlay layer, type in #26252a in the popup window and then change the layer blend mode to screen.

Here's the difference between the two. In the original set I made, I didn't use a color overlay. Do whatever floats your speeder!
Lastly, you can't forget the explicit sticker! I like to use this one from Wikipedia
I hope this helps anyone out! Feel free to ask if anything is unclear <3 Sending lots of giffy love to you all!! 💜💜💜💜
#photopea#photopea tutorial#photopeablr#photoshop resources#usergif#usermaguire#gif tutorial#giffing tutorial#resources#gif resources#tutorial#this tutorial is v text heavy so there isn't a lot of examples#hope it's not too difficult to understand#it's v late so make sure to ask if you don't get anything and i'll try to explain better!
18 notes
·
View notes
Note
Do you have a tutorial on how to gif? It always takes me ages
Hiya, so I wrote this out a couple years ago
There are a few bits i've changed since then
I now do 270/150 as my final gif size rather than 270/170
Obviously me talking about the 3mb limit is now irrelevant
Rather than manually having to size down the gif to 275/155 after cropping, I just use the W x H x Resolution function while cropping which both crops and immediately sizes it down to your desired size
I've also slowly started to understand coloring so I do most of my own coloring these days
And lastly I do actually sharpen now, an old acquaintance made me a sharpening action and I use that! You should be able to find some fairly clear cut sharpening actions floating around. I still definitely warn of following some of the sharpening trends though, because it seems we get these weird trends in the giffing community. Like for a hot sec it was extremely oversharpened, and the next it's been almost this gaussian blurry almost double vision kinda deal, and IMO not a fan.
There was also a follow up question to the above linked tutorial about how i 'clip' my projects and you can find that here
Also not technically apart of the tutorial, but I generally find I gif faster while I watch something (or I used to listen to podcasts)! I find just purely giffing and having nothing else going on in the background I lose focus and muse all the time, but if I have half my screen set for photoshop and the other watching some procedural/something i've watched before/easy watching, I can BREEEEZE through some projects at light speed tbh!
As I said in the original tutorial, i'm completely self taught so i probably do some wackadoodle shit, but enjoy!!
15 notes
·
View notes
Note
Hi! Could you make a tutorial on how to make a gif that has good quality? If you do not mind
For 30fps (normal) gifs:
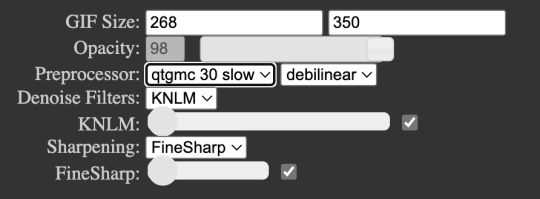
For ultra smooth 60fps (usually for ts files):
60fps is fantastic for short shots, such as live performances where the camera changes scenes every second or two. It gives you HD quality without the gif seeming too short.
Be aware that in order for the 60fps processor to work correctly, you either have to have a file that specifically states it’s 60fps or a .ts file (found on sites like twitter, kpop24hrs.com, etc).
Even if you process a normal .mp4 or .mov file with 60fps, it’ll just double every frame and you’ll end up with a weirdly slow gif. So just use .ts or 60fps videos okay?


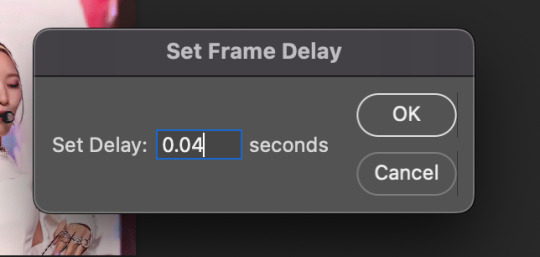
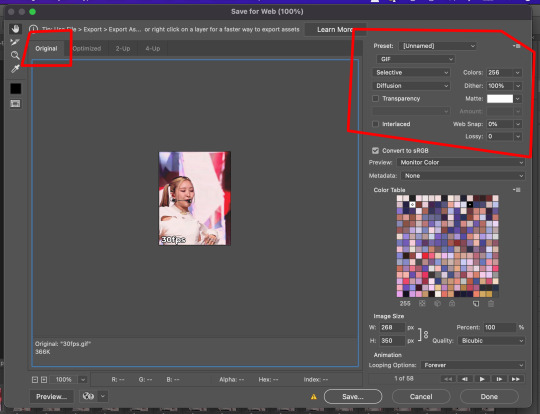
PS export settings for either 30fps or 60fps
These export settings stay the same for both. Most important thing you can do is set your gif to original, NOT optimized. Toggle between them and you’ll see why.
Final comparison
Here are two gifs of the same scene. Both gifs have 60 frames, and are using the settings above. You can see doing 30fps allows a longer scene, while using 60fps looks smoother. So it really just depends on your preference.


Hope this helps at least one person!
#ask#photoshop tutorial#gif tutorial#giffing tutorial#vaporsynth tutorial#vs tutorial#tutorial#gifs tutorial#ky*#photoshop#ps#ps tutorial
139 notes
·
View notes
Note
Hi Kenna! Could you please share your gif sharpening settings? Thank you!
hi! yes of course!
so... lowkey sad story- i lost my original sharpening settings when i set up my photoshop on my new laptop about a year ago. and the tutorial i got them from is gone bc the user deactivated. so- i kinda searched around to find what people do, and this is what i use now!
Smart Sharpen: (Custom)
Amount: 110%
Radius: 0.5 px
Reduce Noise: 11%
Remove: Gaussian Blur
i'll add that i usually also use High Pass on my gifs. i do high pass (if you're unfamiliar, it's in the other menu under filter), change the blending settings to overlay after adding it, and then do smart sharpen.
i hope this is helpful!
#sharpening#gif sharpening#smart sharpen#tutorial#giffing tutorial#rph#//idk how to tag things but !!! i hope this is helpful anon!#admin
6 notes
·
View notes
Text
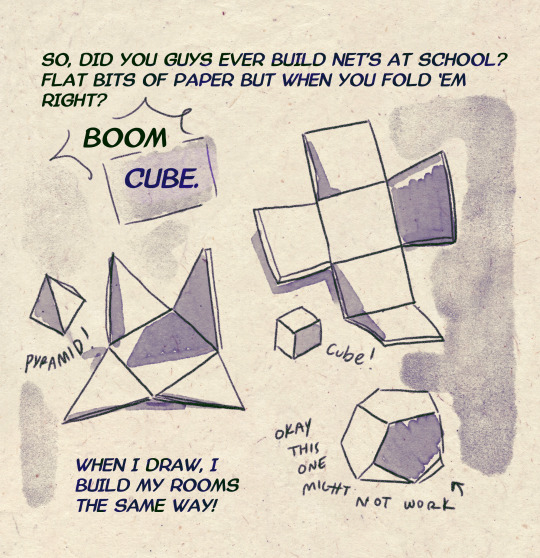
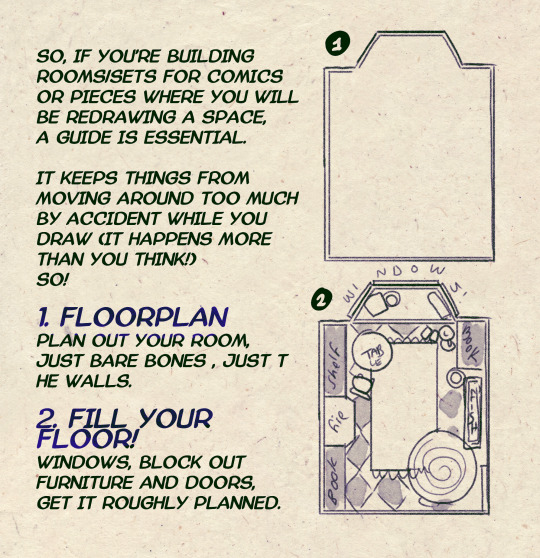
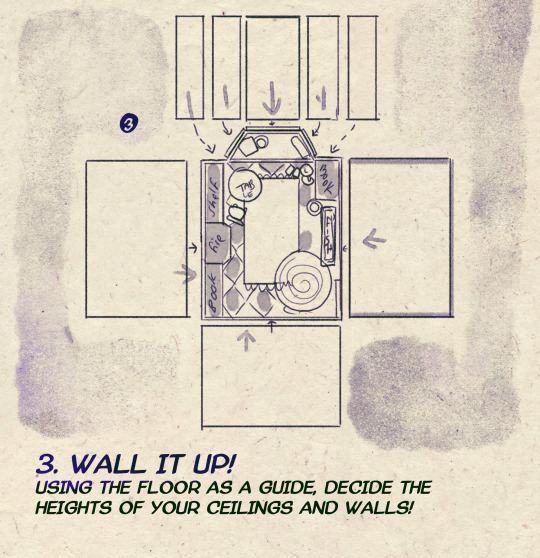


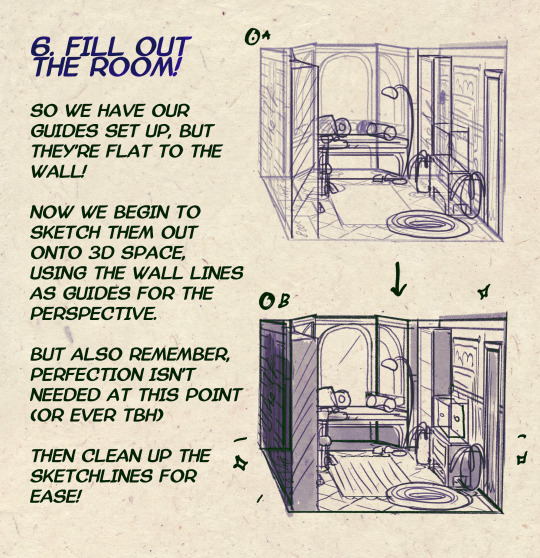

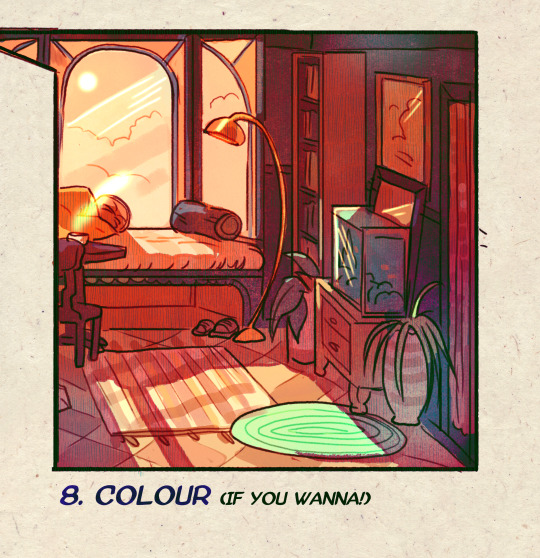
I made a Room Building tutorial! Lemme know if it helps! 🧡
Tip me here| Commission info here!
#anonbeadraws#digital#art tutorial#tutorial#room building#room design#illustration#gif#digital art#digital tutorial#art help#art resource#let me know if it helps!#tried to make it as simple as I could
35K notes
·
View notes
Photo

A little tutorial about how to draw pecs!
Many asked me in the past so I hope it can help many!
32K notes
·
View notes
Text


+bonus
This Barbie is... Evan Buckley
#be nice this is my first gifset that i made using photopea#and i saw like three tutorials only lmao#evan buckley#evan buck buckley#christopher diaz#buck and chris#911 fox#911 on fox#911 abc#911 on abc#911 edit#911 edits#911edit#my edits#my gifs
3K notes
·
View notes
Text

how 2 cloud
1K notes
·
View notes
Text


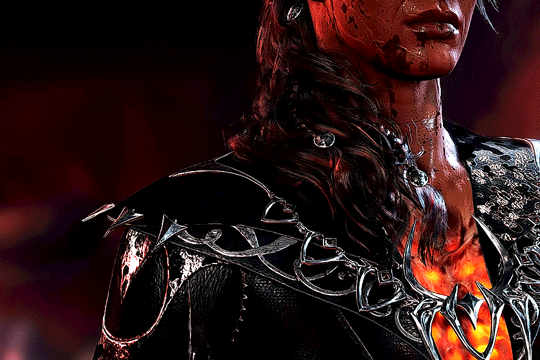
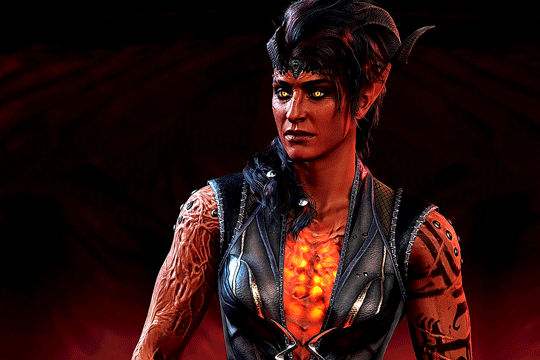
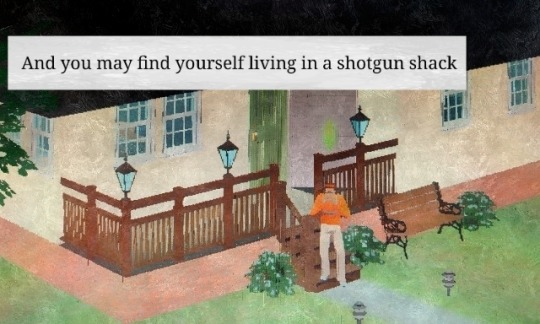
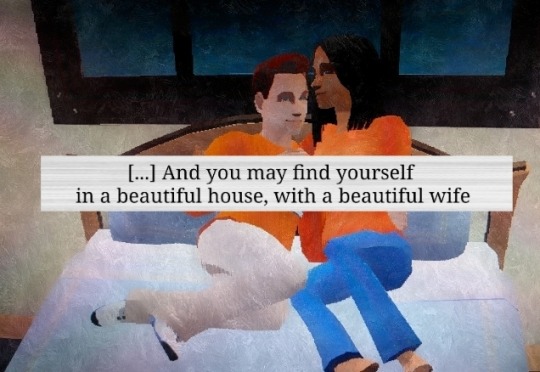
Baldur's Gate 3 - Karlach Cliffgate, The Infernal Heartthrob of the Avernus
#this is for anna and anthi my go-to karlach girlies#karlach#karlach cliffgate#bg3edit#baldur's gate 3#bg3#baldur's gate#gamingedit#videogameeedit#bg3 karlach#i cant get past the tutorial until i gif all of the companions in this good lighting#my edit
3K notes
·
View notes
Text
Tutorial: How to Embed Gifs (and get the one you actually want from the set)
There have probably been posts about this before, but since reposting is still a (deeply unfortunate) thing, I figured I'd give this a shot in case it's not a well known trick.
The tumblr Gif tool will allow you to embed gifs directly into your post without saving and re-uploading (reposting) someone else's work.
When you're building your post, just use the yellow GIF icon in the post builder:

You can search here by tag or keyword. If you happen to know one of the tags used on the original post you're looking for, that can narrow things down:
To narrow down to a SPECIFIC post, you can also paste the URL into the search field. This will pull up the very first gif in that set:
If you select that gif, it will pop into your post with a credit and link back to the OP (specifically back to the OPs post with that gif in it):
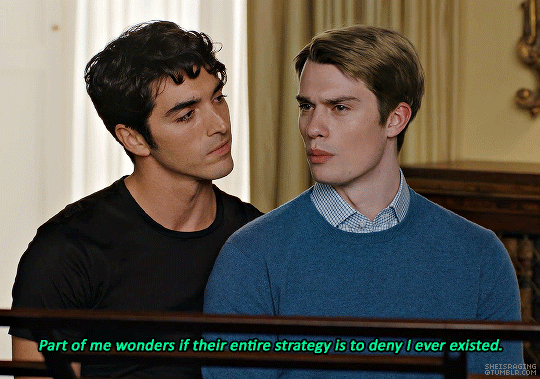
This is a properly attributed gif embed. The credit on the bottom right points back to the original post:*
Often, the first gif is not actually the one you want to embed, but there is a way to swap the image out for the one you want without losing the source attribution.
*It's helpful to put some reference text near your initial embed so you're able to swap the right image out later on. For this post, I'm going to use that short block right above the embedded gif as a reference.
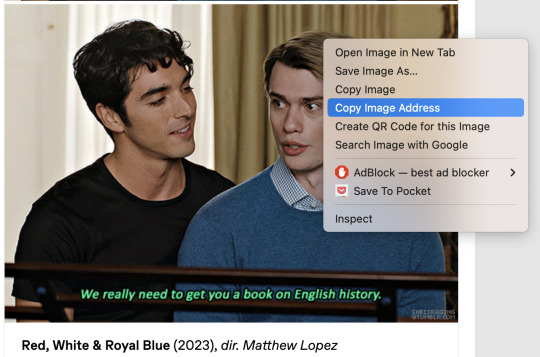
In another tab/window, go to the OPs post and find the actual gif you want to embed from their set. Right click the image and Copy Image Address:
Once you have the URL copied, go back to your post and scroll to the gear icon at the top:

Open that menu and in the dropdown, where it says Text Editor, swap Rich Text to HTML:

Your post will turn into a bunch of code once you do this. Don't worry, we will change it back.
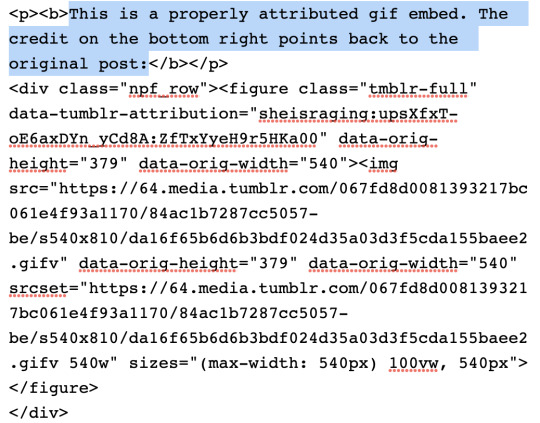
For this post, I put reference text above that first embedded gif so I could easily find the URLs I need once it becomes HTML. This is super helpful if you're embedding more than one gif. The reference text is highlighted below. This indicated the block that my currently embedded gif lives in:
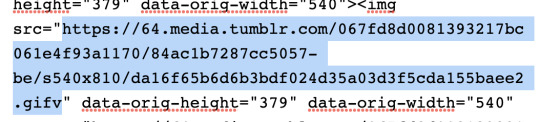
In order to swap the first gif out for one that's later in the set, you just need to replace the SRC gifv and SRCSET gifv URLs with the image address you copied:

Once you've pasted the image address into these spots, you can go back to the gear icon and switch the Text Editor back to Rich Text:

Your post should return to it's previous, glorious state, but instead of the first gif embedded, you should now see the one you actually want from the set. The credit and source attribution back to the OPs post should remain intact on the bottom right:

This might seem super complicated at first, but it's pretty straightforward once you've tried it, and also a lot less frustrating for gif makers to see this than seeing our stuff just get reposted.
Anyway... If you found the gifs outside of tumblr or you didn't make them yourself, don't save and re-upload (aka. repost) them to tumblr, 'cause someone probably stole them from here to begin with and that's not cool. Search the tags and find the ones you want. Reblog from gif makers. If you want to embed a single gif from a set, try to do it this way, or minimally, credit the person you took it from.
#tutorial#how to properly embed gifs#support gif makers#credit gif makers#rogerhealey#userbess#userhallie#userlolli
2K notes
·
View notes
Note
I was wondering can u do a tutorial on Sonic eyes and face?
Okay so, my process for drawing Sonic characters usually amounts to 'severely winging it', like so:
I draw a circle, I ignore the circle, you know how it is. I'm not sure I'd be super helpful trying to explain how I do it dfbfh
However!! I can redirect you to this really good tutorial by @tatck! A lot of the techniques in it are stuff I do as well!
#ask#my art#sonic#sth#sonic the hedgehog#amy rose#timelapse#speedpaint#gifs#gif#animated gifs#maybe I'll attempt to do a proper tutorial one day but rn? too tried fbff
479 notes
·
View notes
Text
Because you can't save progress on them, I feel like someone should write timeloop horror for Tutorial Joe and Tutorial Jane.


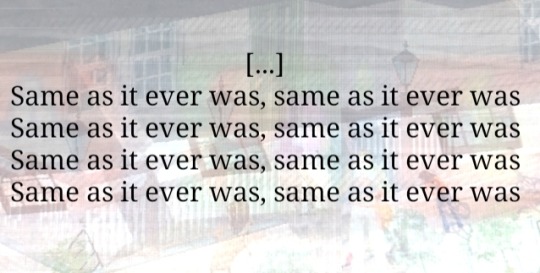
#tutorial joe#tutorial jane#ts2#the sims 2#sims#idk what this is okay <3#once in a lifetime#tw glitch#flashing tw#flashing gif tw#tw flashing gif#tw flashing#tw flickering#undescribed
506 notes
·
View notes
Text
slowly posting some old stuff from my ptreon that might be helpful
#ahumn what do i tag this as#tutorial#art tutorial#art#might post the step by steps I did or process gifs for older illustrations too I need to see how to make it work😵#sry i dont care to fix the typos I'm sure you knwo what I mean
864 notes
·
View notes
Text


jagged, crystalized and pixelated tumblr banner masks!
for the 2 anons that asked!
okay to repost, just dont claim as yours. and free to use (its what they were made for, duh!)
keep in mind gifs dont mesh well with translucent colors if youd like to use these with them :0
#🌫️ i know what you dread | creations#anonymous#carrd resources#rentry resources#rentry#web graphics#rentry tutorial#rentry inspo#rentry gif#rentry decor#rentry graphics#rentry template#image masks#edit resources#editing resources
447 notes
·
View notes
Last Seen Blogs

cpxiaonengshou
厕拍小能手

ask-pregame-shuuichi
kind of just existing

thesocialbooms-blog
The Social Booms
hotchs-bitch
Here’s what’s gonna happen
suntypes-blog
rerouting