#how to guide
Text
How to Make Friends
A more-or-less clear guide on social interactions
Growing up with heavy ADHD and generalized anxiety, it was always a bit hard for me to make friends and socialize. Despite my yearning for friendship, I was always "the quiet one" and "a loner", simply because I didn't know how to approach certain social situations, and it made any friendship I had extremely unstable (except for my sister @vive-le-quebec-flouffi, who was so extroverted and friendly it was literally impossible to escape her clutches of socialization)
As I grew older, I learned through a lot of trial and error what makes a good friendship.
Or, rather... what's the best way for someone to WANT to be your friend (without being superficial or hypocritical.)
Now, obviously, this doesn't work for everyone. But this is what I found helped me the most in social circles (especially online) and I hope it can help others too
LET'S BEGIN!
1 - Be yourself
Now that sounds very cliche and cringe, I know, but hear me out, because my opinion on this is not the same as all those feelgood inspirational movies and ads.
"Being yourself" isn't as simple as it seems. Because after all, what does "self" imply? If someone is, say, a criminal, would "be yourself" mean that they should embrace their sinful side?
No, obviously not.
"Be yourself" is a bit more nuanced, but I'll try to boil it down for you.
It just means "be unashamed of your qualities which you think are flaws". For example, "be yourself" would apply to someone who sees themselves as ugly, or maybe someone with an odd yet unharmful hobby, or a weird sense of fashion, or someone with say a handicap, a speech impediment. "Be yourself" is a sentence for the specific people who have genuine good in them, but are afraid to show it to others because they have been persecuted in the past, or are scared to be. It does NOT mean to accept genuine flaws. "Be yourself" does not include say violent anger issues, an addiction, a recent crime committed, or a generally unpleasant personality. Those are obviously not things to encourage. You can understand they may be a thing that happen to you, and accept it in your life, but that's different from being proud of it or encouraging it.
Speaking of personalities... let's talk about that
2 - Be kind
Now when some people hear that, they think it means "always smile no matter what, always look happy and positive, always agree with everyone just so you don't hurt their feelings, and never cause any drama", like you're Deku in My Hero Academia or Steven Universe in his titular show.
But that's... not quite that.
Obviously, kindness is something you use to help people feel better, to cheer up, and feel happy, and obviously to be kind, you need to have compassion, heart, empathy, and always put yourself in other people's shoes regardless of who they are. But it is not necessarily all-encompassing.
There's a rule that I think anyone learning kindness must learn. It's that sometimes, kindness means to be firm.
Not mean, of course. Not judgmental, not insensitive. Don't insult anyone, don't belittle or patronize anyone or make them feel inferior to you. That's still very rude and that's not what you want.
But what I mean is that sometimes, if you know that a person's actions towards something are wrong, especially if it's towards someone else, you must be able to point it out, and act accordingly. Don't just stand there and agree with them just because you don't want to hurt their feelings. You must still be able to know right from wrong. Kindness just means you won't be an ass about it, it doesn't mean to stay silent.
Hey, that brings me to point three!
3 - Show your own opinions
If there's one thing people hate just as much as meanness, it's those who stand by and do nothing about it.
Regardless of if you agree with them or not, if you say absolutely nothing when genuinely bad behaviour is happening, out of fear of "starting a fight", you are actively making the person who is being attacked feel alone.
I remember myself, when I was bullied in the first two grades of secondary school (11-13 years old for those who don't know) for "being ugly", I was told by my mother (who was friends with other kid's parents) that some of the kids "didn't hate me" and "didn't agree with the bullying". And I asked her "if they don't hate me, why won't they talk to me?" She never managed to answer that one. And it broke my heart, because outside of my sister, I had no one else.
Don't be like that. You may be scared of acting, but you know who would be grateful if you did act? The victims. And isn't their opinion of you much more important than the opinion of someone who acts with hatred and bigotry?
If you see someone suffering injustice, or even just hear someone who has a rather harmful opinion, don't be scared to tell them that you disagree. Obviously don't be an asshole about it, stay civil, but if you voice out your opinion, you will be seen as someone who stays true to their beliefs and is brave enough to stand up for them if the opportunity comes.
There's obviously much more that comes with social life (nonverbal cues, sense of humor, timing and mood), and I don't know everything (I'm just some random québécois girl on the internet). But I hope this was a bit more helpful. I did have fun writing this, at least. So I guess that's better than nothing!
#life hacks#tips#tips and tricks#useful#How to guide#How to#social media#social anxiety#anxitey#anxiété#adhd#actually adhd#adhd problems#neurodivergence#neurodivergent#neurodiversity#autism#autistic things#autistic adult#growing up autistic
454 notes
·
View notes
Link
Sewing is a very practical skill to learn, but if you don’t have anyone to teach you, the sheer volume of techniques out there can make getting started overwhelming. This is a good step-by-step guide to getting started.
1K notes
·
View notes
Text
Prep your body for quads before jumping in!
And a guide for how I train mine!
🦊 hi all! This post might be fairly long, but it is how I suggest preparing your body. So, if you're serious about quads, you should consider giving it a read! 🦊
Preparing your body is very important so you don't tear muscles, push yourself too far, or injure yourself. It's important to slowly ease into it and not jump right into it, because doing that will likely lead you to be stiff and sore. This will just go over the very beginning of preparing for quads, since I'm in the beginning of my journey. I'm also making up names for all of these since they aren't common workouts.
So, let's begin:
Warmup-> I won't go too into detail on this one, but stretch your arms and legs, do arm circles, shoulder shrugs, maybe some squats. Just move your body a bit to get the blood moving.
Bed hops-> sit at the edge of your bed (if it isn't too high!) and lean forward, catching yourself with your front paws on the floor. Then, use one paw to lift yourself back up, and do it again. I do ten times with my right paw picking me up, then ten times with my left paw picking me up. (Helps bicep muscles from picking you up, core muscles a bit, helps impact practice on your wrists)
Walk forward-> with both back paws planted on the ground, walk yourself forward on your fronts paws until you reach a plank position. Hold the plank position for a few seconds and walk back. I do this ten times and it gets my heart rate up. You can walk on plain hands or make the paw shape. (Trains biceps, core, a bit of legs, and gets your hands used to being walked on)
Walk back-> same thing but opposite. Plant your front paws down and walk your back paws down until you get into the plank and walk back up. I also do this ten times.
Fall and catch-> to start, sit on your knees and let yourself fall forward, catching yourself with your front paws. Eventually you can work up to standing and catching yourself. I suggest starting on carpet. If you do it on concrete and your hands get too scraped and bruised, take a break until it heals. (Trains the impact on your wrists, elbows, and shoulders, to prepare for jumps. Can train the skin of your hands to be tougher from the damage of falling on them.)
Hand and foot balance-> stand on all four paws or stand on knees and paws. Choose a pair (right hand, left foot or left hand, right foot) and lift them. Hold them straight for a few seconds to practice your balance. Switch between the two pairs a few times.
Step forward and back-> on all four paws, choose a pair (right hand, left foot or left hand, right foot) step forward with your hand and foot, but leave the other pair planted. Then, step back. I do this ten times, then switch pairs. You want to practice placing both paws down at the same time, so when you walk quads it looks smoother. (Trains arms, shoulders, core, legs, and can train your hands on harder surfaces if you do it on concrete)
After this, I sometimes walk in quads for a few minutes, but its still sloppy and clunky, so I keep practicing. I do these almost every day but make sure to give my body some days to heal if it feels more sore. You also want to make sure you eat enough protein to be able to have the energy to workout. You might have to eat more protein than you usually do if you aren't used to working out. Also be sure to drink a lot of water!!
This routine seems fairly simple but it does get my heart rate up and makes me sore, so it's definitely still a workout no matter how mild it seems. How long you follow it all depends on how fit you already are and how quick you feel you are ready to move on.
I'll make a second part when my body is ready to move on to more strenuous workouts! Thank you all for reading, and I hope this helps! 🦊🌸
#fox therian#therians#therianthropy#therian#theriotype#alterhuman#quads#quadrobics#workout#therian workout#therianthrope#therian shifts#guide#how to guide#weight loss tips#tips n tricks
51 notes
·
View notes
Text
General guide for image descriptions
What are image descriptions and why are they important?
Image Descriptions text following a picture explaining what’s in that picture. They are primarily for blind/visually impaired people with screen readers and visually impaired people who can read text but have issues with pictures.
They also help people who have trouble:
focusing on/understanding a picture
reading text on images (ex low contrast, weird fonts, etc)
getting images to load
Without image descriptions posts are not accessible to many people
How to make image descriptions in general
Do something to indicate you are starting a description
That way people know you’re describing the image and not commenting on it.
Describe the image
You want to be concise but also include all relevant details.
Indicate you’re ending the image description
That way people know that whatever is next is commentary etc and not part of the image description
I learned from example, so here are lots of examples to look at (it’s basically all the descriptions I reblog but didn’t make, so there’s a whole lot of different styles.
I am in the process of making a guide specific to tweets and tumblr tags/replies/posts that I will link on this post when they’re done I’m just very disabled.
Things not to do a
Bold, underline, or italicize words; use small text, all caps, fancy colors, fancy fonts
This makes it difficult for many people who need image descriptions to read them
In addition, all caps and gradient text tend to make screen readers say one letter at a time instead of reading out the words
Correct misspellings or grammar mistakes
We want to be as accurate to the image as possible.
If the spelling mistake is to the point a screen reader wouldn’t be able to read it, I recommend putting the actual word next to it.
If there’s just a wall of text, you can add paragraph breaks, commas or periods, etc, just put a note saying what you added
Sensor curse words etc
Feel free to add on
733 notes
·
View notes
Text


How to operate a financially succesful Haunted House! A Vintage How-To Guide!
460 notes
·
View notes
Text
Guess who got hired by an actual website to write Fate guides? Even if it isn't the best work I've done this feels nice
58 notes
·
View notes
Text
although i love it , december can be an extremely lonely time of year for people ! so i'm posting my annual reminder/instructions of a very simple , inexpensive way to connect with peopled who may feel forgotten during the holiday season .
one of the easiest ways to make a lonely stranger's holiday season special is by sending christmas and holiday cards , especially patients in hospitals and residents in nursing homes who may not have family anymore or contact with the outside world . this has been my tradition for over a decade , i'm always shocked to find that others don't realize it's something you can do or how to do it - there's many ways and places to send cards , but here's an easy how-to for these two .
HOLIDAY CARDS TO NURSING HOMES —
this is very special because i've been told for some elderly , lonely residents , they don't even realize the cards are coming from strangers sometimes and they think they're from a loved one . for those who realize they're from a stranger , they'll appreciate them very much too !
cards can be handmade or not . typically i'll write a couple sentences about winter , staying warm , having a good holiday season , "sending love" etc. things like that . and sign my first name . you can mail a singular card with a stamp or package of cards to any nursing home and just address it like this :
ATTN: Activities Director
to: any lonely resident/any resident (they wont really see the envelope)
#### street address
city, state, zipcode
if you're outside of the us , this system should work in your country too but obviously address it as you would there . if you don't know where to begin looking for nursing homes , just go to google maps , type in any city/town you want , and search "nursing homes" .
i always send mine completely random - i've been told they will all accept and be grateful . usually i hear nothing back but on rare occasions a staffer may mail a thank you note after christmas , just a heads up .
HOLIDAY CARDS TO HOSPITALS —
i don't do this as often so i don't know every rule ( like if you can just put "any resident" like with nursing homes ,) but !! there are lots of organizations you can mail cards to who will distribute it for you . here's a good one who works year round - you can send christmas/holiday cards or general ones throughout the year !
mail your card to :
Cards for Hospitalized Kids
7290 W. Devon Ave.
Chicago, IL 60631
this organization distributes the cards to patients , specifically children . they ask that you do not write "get better" "feel better" "get well soon" etc , as some patients are terminal and may never "get better" - this can be extremely upsetting . however , you may be encouraging such as "sending love" and "sending strength" ! also, do not include personal contact info ; only your first name/alias is needed . also , no glitter for these ones please . if you want more info on the organization , their site is here .
there are tons of ways to send cards and greetings to many different populations who really need a pick-me-up during this season , and info is readily available online . just wanted to share a quick couple ideas to spread cheer which impacts real people ! please spread the word , and don't forget to check on those you care about in your life because many people hurt and show no signs of it .
#holidays#christmas#christmas card exchange#psa#how to guide#please reblog if u can! lets get cards sent all over the world
36 notes
·
View notes
Text

22 notes
·
View notes
Text
Studying the Bible Effectively: A Beginner's Guide
Studying the Bible can seem daunting at first, but with the right approach and tools, it can allow so much spiritual growth!! Whether you're new to the faith or a seasoned believer, having a structured method can improve and ease your experience. Here's a straightforward guide to help you get started on your Bible study journey!
Choosing a Translation
One of the first decisions to make when studying the Bible is choosing a translation that suits your needs and preferences. There are several translations available, each with its own approach to translation. Here are the three categories they fall into.
1. Word for Word Translation: These translations, such as the King James Version (KJV) or English Standard Version (ESV), aim to follow the original texts as closely as possible, offering a literal rendering of the words and phrases. They are great for detailed study and analysis of the text.
2. Thought for Thought Translation: These translations prioritize clarity and readability, conveying the original meaning in modern language by updating language to be mor relevant to modern readers. They are ideal for easy comprehension, especially for beginners or those looking for a straightforward understanding.
3. Paraphrased Translation: These translations capture the essence or gist of the message rather than focusing on precise wording. They are often easier to understand and are suitable for new believers or younger children. However, they are most likely to stray from the original text and can sometimes be slightly inaccurate.
When I am reading to spend time with God (such as my daily reading) I use NLT, which is a thought for thought translation and therefore easier to understand. However, during bible study it is advisable to keep a word for word translation on hand (I use the KJV translation in the YouVersion bible app alongside a physical copy of the NLT).
Establishing a Study Routine
1. Prayer: Before sitting down to read, it's essential to prepare yourself spiritually and mentally. Begin your study session with a prayer, asking God to open your mind and heart to His word and guide you in your understanding.
2. Reading the Passage: Start by reading the passage without taking notes or annotating. Try to grasp the overall message and what God is communicating to you.
3. Annotation and Reflection: Read the passage again, this time making notes of any observations, questions, or insights that come to mind. Consider who is involved, what is happening, why, when, and how. Reflect on the message God is conveying through the text.
4. Consulting Study Tools: Dive deeper into the passage by using study tools such as Bible commentaries, online resources, or cross-referencing different translations. This helps gain a broader perspective and insight into the text. They often also include historical context and reasons for writing.
5. Application: Reflect on how the passage applies to your life. Identify one or two key messages and think about how you can incorporate them into your daily life. Is the scripture challenging you to change certain behaviours, draw closer to God, or strengthen your faith? Pray for guidance on how to apply these insights. Personally, I like to make an extra effort to apply these in the upcoming week.
Conclusion
Studying the Bible is not just about acquiring knowledge but also about cultivating a deeper relationship with God and living out His word in our lives. By choosing the right translation, establishing a study routine, and seeking guidance through prayer and study tools, you can embark on a fulfilling journey of spiritual growth and understanding. Remember, consistency and patience are key, so keep seeking God's wisdom as you delve into His word.
#christian bible#christian#christian blog#bible#bible study#guide#how to study#how to guide#christblr#christian faith#christianity#jesus christ#faith#bible verse#christian girl#christian theology#forhisgrace#christian living#pink aesthetic
14 notes
·
View notes
Photo


LIFE magazine published this guide for actors in 1942, but it may still come in handy today.
According to these romantic pictures from the magazine, there are some vital basic steps to follow to achieve the perfect clinch.
First, the how-to guide recommends that kissers should not stand too far apart - pointing out that actors doing this on stage look 'juvenile if they are so stand-offish'.
The next thing to remember is not to 'sprawl all over the chair' in a moment of heated passion. This is apparently considered ungraceful and is 'bad technique.'
Instead, the girl should avoid all danger of her sensible skirt riding up by sitting on the arm of a chair while the boy holds her.
He should do so 'firmly but lightly', the etiquette guide continues.
114 notes
·
View notes
Text
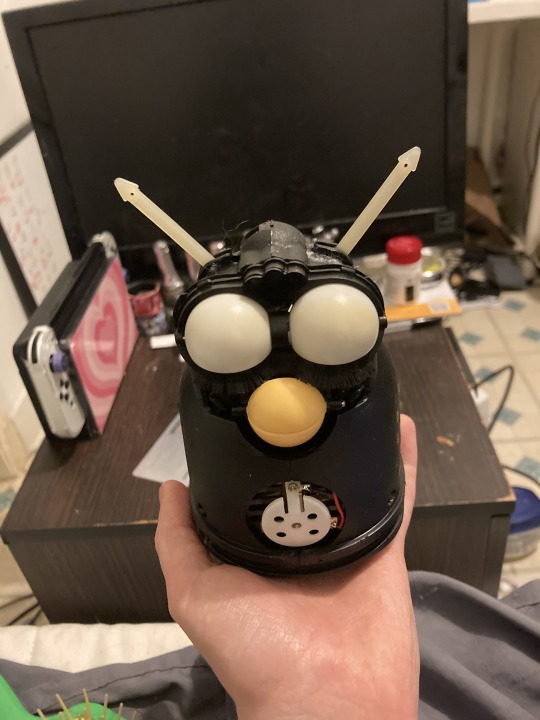
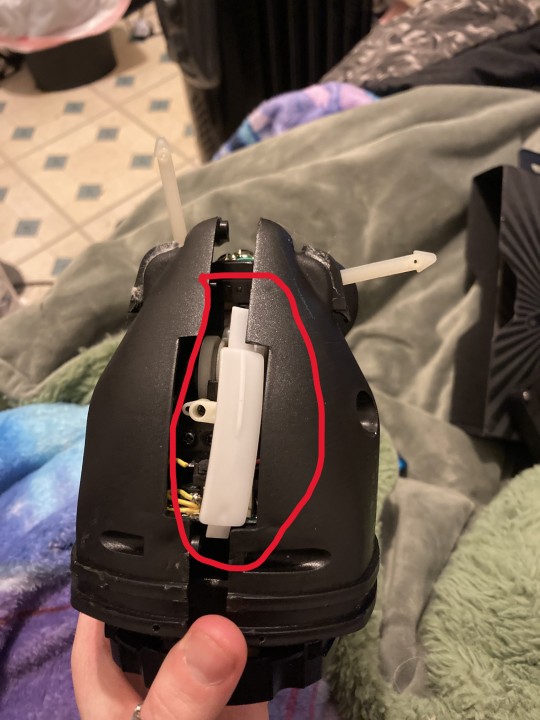
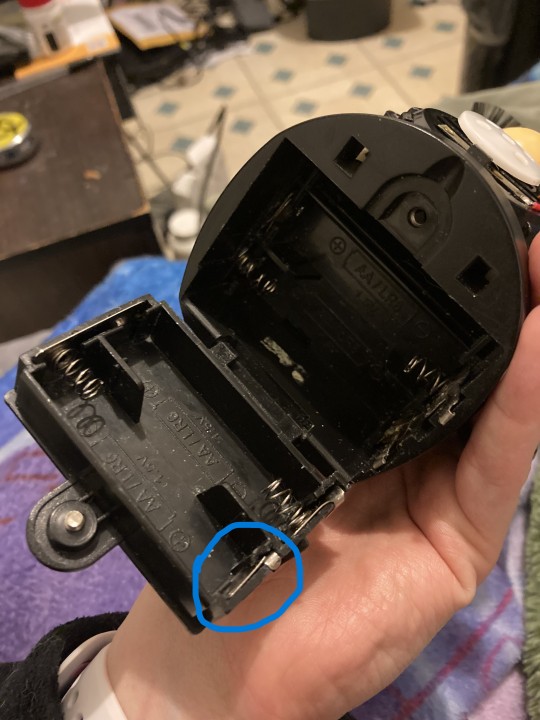
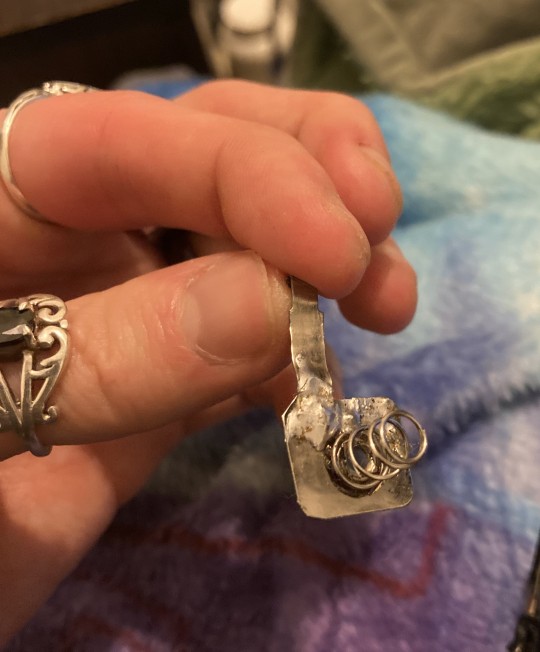
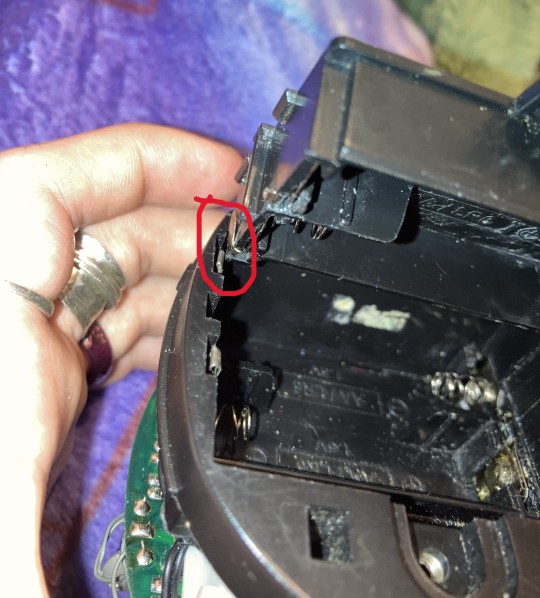
98' Furby Battery Contact Replacement/Repair Guide
What you'll need:
soldering iron, flux, 60/40 leaded solder, related safety equipment
size 1 bit Phillips-head screwdriver
needlenose pliers
new battery contacts (the little metal parts inside the battery compartment that touch the batteries) for AAs (the ones i ended up using i got on ebay and were called "Battery Spring Plate AA Battery Contact Nickel Plate 28mmx12mm for DIY 20 Pcs")
q-tips and very very thin/small disposable make up brushes (i found some marketed as stirrers for drinks or resin)
very thin/sharp pry tool or xacto (depends on how corroded the contacts are! you might not need this)
**If you're using this guide for other electronics: Pay attention to what each contact looks like and where it's placed. Take many pictures both close up and far away to help you later! The point is to try and recreate the contacts as exactly as possible. The most important part is that the batteries "contact" (touch) the metal. If there's multiple parts to the compartment (like on this furby) there should be metal connecting all the parts. This will become easier to understand as you read this guide.
This is xXToh-Loo the VoideaterXx! They've been hanging out on my work table while I worked up to changing their heavily corroded battery contacts.
I'm not gonna go over skinning them since there's so many guides/videos already online. I didnt think of doing this guide until after i finished so the pictures are of new/clean contacts. Sorry for any confusion this causes!
step 1. open the battery compartment
step 2. clean whatever you can. i have no pictures of this but i used a combination of scraping the corrosion off with my xacto and cleaning it up with isopropyl soaked q-tips. ive heard white vinegar works really well but ive never used it. if you use white vinegar be careful not to get it inside the rest of the furby! also wipe it down after with water. (making sure its VERY dry before putting batteries inside. use distilled if at all possible. your water may have sediments or metals that could interfere with the batteries)
step 3. bend up the metal that connects the top right side of the contacts. wiggle them until they detach from the compartment. used an exacto or something similar to help with this if they're really stuck. be patient! this might take a while.
****If they really won't budge dont give up! You might need to scrape along the inside edge of the metal [or where you think the metal should be if theyre really rusted/corroded] with your exacto until you dig out a lot of the rust/corrosion. Then try and stab it repeatedly almost like slicing a bagel along the whole side inbetween the metal and plastic. Be careful not to hurt the plastic. Wiggle the exacto side to side all along the edge to break it free.***
Remove and dispose of the old contacts.
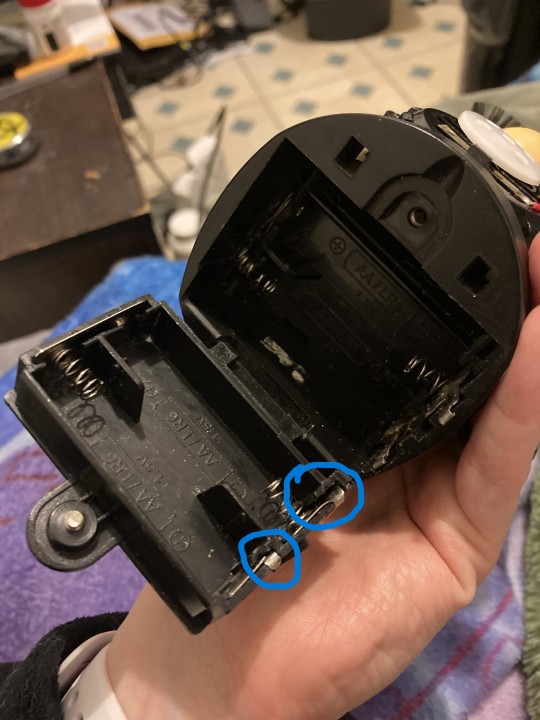
step 4. using the xacto and pliers do a similar thing to the other side. there are no metal flaps on this side so it requires more patience but keep going! i promise you'll get it out just be careful. once you get it detached from the back grip the spring with your pliers and pull it out that way.
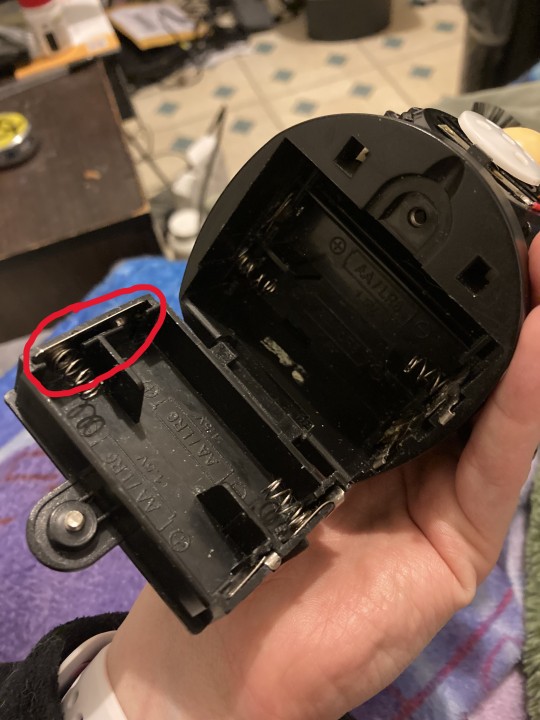
Step 5. Do the same for the inner right side of the battery compartments. These are unique in that they have a long metal part coming off of the contacts. Remember this for later. You may have to open the casing to remove this part? I cant exactly remember. Just be careful and slow. I go over taking the casing off later on.

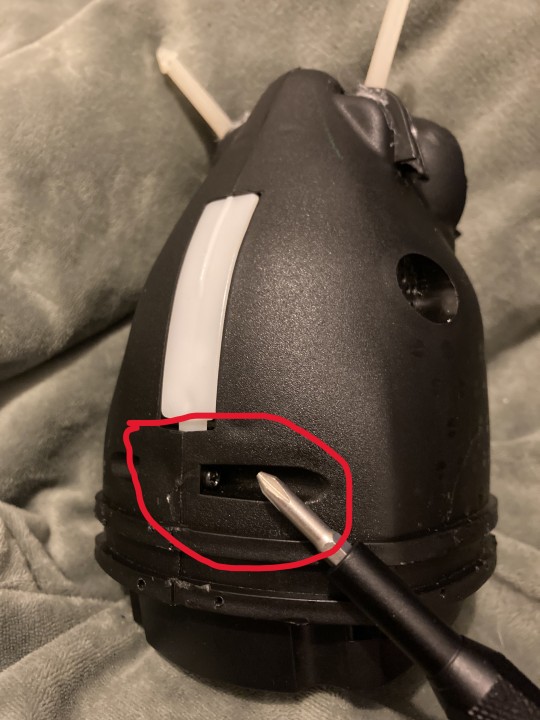
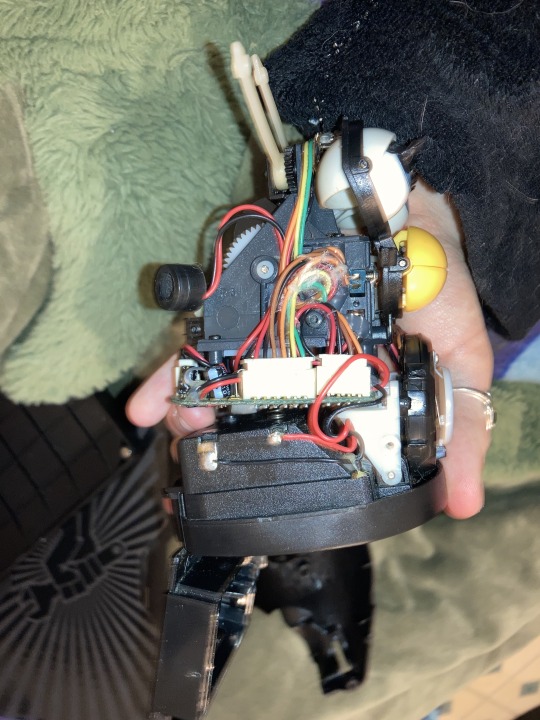
Ignore the rest of the contacts for now! Clean everything again to the best of your ability. It's time to take off the casing. There's six screws, two halves of the casing, and one back sensor button. Be careful taking the halves apart! There are speaker wires and I will detail how to do so.
Step 6. Take all six screws and the sensor button out. Keep them together!! They're small and rolly.


Step 7. Take off the casing. Start with the "pet" sensor facing you. Take off the Left casing completely. Crack the Right side a bit until you see the speaker. Grip both wires firmly. Tug it a little to get it out. It shouldn't take much pressure at all. Let the speaker hang and take off the Right casing.

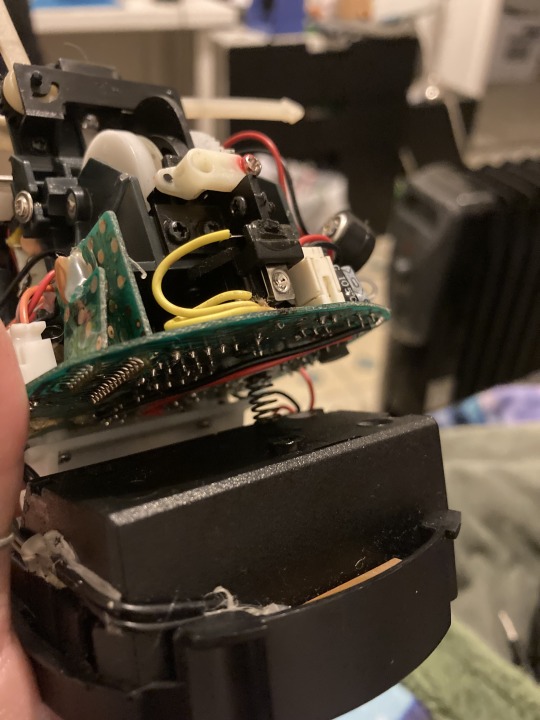
If you tilt your furby up you'll see this spring. be carful with it! mine fell out so you might want to consider taking it out and putting it with your screws.

Pretty much the whole rest of this guide involves soldering. It's annoying but not something that will risk any electronics being destroyed so it's actually a pretty good beginner project.
Step 8. Turn on your soldering iron. Get your safety gear on.
Step 9. Desolder the wires on the side of the contacts and remove the contacts. You might have to really work at these ones! These were the worst ones in mine in terms of corrosion. Make sure there's no corrosion left on the wires. Be careful not to damage the wires with the iron.
Step 10. Clean the compartment again and make sure to get any corrosion on the internals (if there is any! mine didnt have any)
Step 11. Cut the tab off of one of the sets of contacts you have. Keep it and put it aside. Put this in the top Left slot in the compartment. Make sure to put the spring in the - slot and the dome in the + slot.
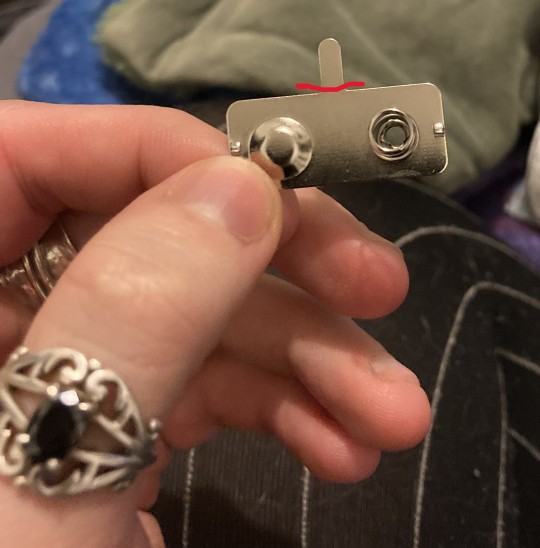
Step 12. Cut one of the contacts in half along the tab. Keep the tab on the spring side. Put it in the top Right slot in the - side. Bend the tab to secure it.


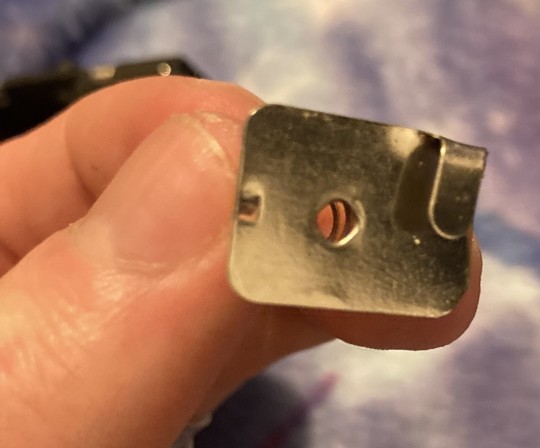
Step 13. Put the dome from the contacts you cut in half in the Left + slot. Put the tab BEHIND it and bend it to secure them. The domes on the contacts I got don't go out very far so I have to get creative.
Step 14. Cut two more contact sets in half. Cut a strip alll the way down the middle including the tab. Keep these strips for the next step.

Step 15. Solder one strip to the spring side a tabs width inside of the square. The strip should line up with the indent when placed into the compartment.
Step 16. Solder the second strip to the middle of the dome square. Solder another dome ontop of that to ensure the battery makes contact.


Step 17. Place these new contacts into the bottom right of the compartment.
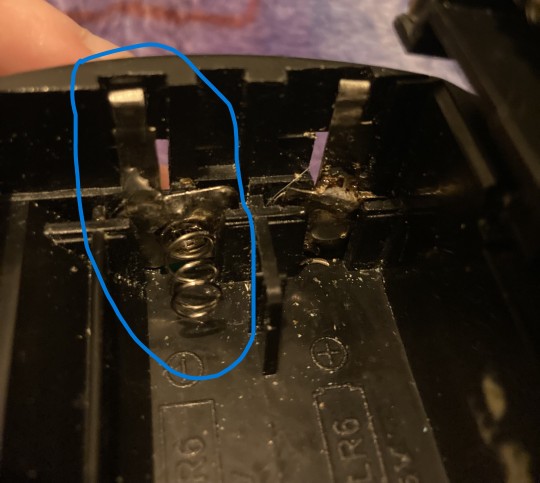
Step 18. Cut another contact in half. Cut another strip off the bottom of a full contact set and THEN cut that contact in half. Solder the strips into the middle of the full spring and dome squares. Place them into the bottom Left of the compartment making sure the strips are through the hole that goes to the internals of the furby.

Step 19. Bend and trim both strips on the inside of the furby. Solder the wires to the bent strips. (Step 9 has a good pic of what its supposed to look like) Shove the second cut dome square behind the soldered in one in the compartment to ensure battery contact.

Make sure the metal contacts touches all the batteries and both long metal ends in the bottom right touches both top right bent tabs when the compartment is closed. It should now work perfectly! Put some batteries in and have fun. : ]
10 notes
·
View notes
Text
Adding a volume slider to your Twine Sugarcube game
Since I made the first how-to add music guide, I realised that some might want to also add a volume slider as well. This is a really, really simple guide and covers the basics. You will be using javascript for this, I'm afraid, but I've kept it all very simple and easy to understand - you're simply copying and pasting code. The documentation and code can be found in the Sugarcube Documentation website.
I used this method for Crown of Exile and honestly, it's nothing fancy but it works perfectly fine, so if you're still new to coding and need a little help, hopefully this will help clear up any confusion 😊


149 notes
·
View notes
Text
59 notes
·
View notes
Text
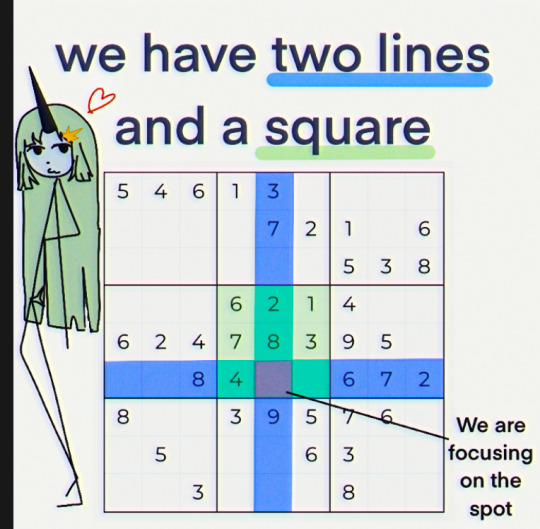
How to play sudoku
I made this recently as I quite enjoyed sudoku and learnt it and now teach it


#sudoku#digital art#oc art#art#artwork#my art#original art#shark oc#shark girl#cartoon#anime#how to play#how to guide#cute#funny#silly
4 notes
·
View notes
Text
I spent literally all day writing this guide on where the locker keys in Like a Dragon Gaiden are. It would mean a lot if you all used it and maybe gave it a reblog
#article#articles#journalism#how to guide#guides#guide#like a dragon gaiden#yakuza like a dragon#Yakzua
26 notes
·
View notes
Last Seen Blogs

sagmirwodieblumensind
Без названия

auroraproses
to live for the hope of it all

vpthanhvy
Thanh Vy

soggy-silly
Soggy Silly (Tumblr Edition)

mons7ers
…