#one of those beginners in youtube and simple ones
Text
Homemaking, gardening, and self-sufficiency resources that won't radicalize you into a hate group

It seems like self-sufficiency and homemaking skills are blowing up right now. With the COVID-19 pandemic and the current economic crisis, a lot of folks, especially young people, are looking to develop skills that will help them be a little bit less dependent on our consumerist economy. And I think that's generally a good thing. I think more of us should know how to cook a meal from scratch, grow our own vegetables, and mend our own clothes. Those are good skills to have.
Unfortunately, these "self-sufficiency" skills are often used as a recruiting tactic by white supremacists, TERFs, and other hate groups. They become a way to reconnect to or relive the "good old days," a romanticized (false) past before modern society and civil rights. And for a lot of people, these skills are inseparably connected to their politics and may even be used as a tool to indoctrinate new people.
In the spirit of building safe communities, here's a complete list of the safe resources I've found for learning homemaking, gardening, and related skills. Safe for me means queer- and trans-friendly, inclusive of different races and cultures, does not contain Christian preaching, and does not contain white supremacist or TERF dog whistles.
Homemaking/Housekeeping/Caring for your home:
Making It by Kelly Coyne and Erik Knutzen [book] (The big crunchy household DIY book; includes every level of self-sufficiency from making your own toothpaste and laundry soap to setting up raised beds to butchering a chicken. Authors are explicitly left-leaning.)
Safe and Sound: A Renter-Friendly Guide to Home Repair by Mercury Stardust [book] (A guide to simple home repair tasks, written with rentals in mind; very compassionate and accessible language.)
How To Keep House While Drowning by KC Davis [book] (The book about cleaning and housework for people who get overwhelmed by cleaning and housework, based on the premise that messiness is not a moral failing; disability and neurodivergence friendly; genuinely changed how I approach cleaning tasks.)
Gardening
Rebel Gardening by Alessandro Vitale [book] (Really great introduction to urban gardening; explicitly discusses renter-friendly garden designs in small spaces; lots of DIY solutions using recycled materials; note that the author lives in England, so check if plants are invasive in your area before putting them in the ground.)
Country/Rural Living:
Woodsqueer by Gretchen Legler [book] (Memoir of a lesbian who lives and works on a rural farm in Maine with her wife; does a good job of showing what it's like to be queer in a rural space; CW for mentions of domestic violence, infidelity/cheating, and internalized homophobia)
"Debunking the Off-Grid Fantasy" by Maggie Mae Fish [video essay] (Deconstructs the off-grid lifestyle and the myth of self-reliance)
Sewing/Mending:
Annika Victoria [YouTube channel] (No longer active, but their videos are still a great resource for anyone learning to sew; check out the beginner project playlist to start. This is where I learned a lot of what I know about sewing.)
Make, Sew, and Mend by Bernadette Banner [book] (A very thorough written introduction to hand-sewing, written by a clothing historian; lots of fun garment history facts; explicitly inclusive of BIPOC, queer, and trans sewists.)
Sustainability/Land Stewardship
Braiding Sweetgrass by Robin Wall Kimmerer [book] (Most of you have probably already read this one or had it recommended to you, but it really is that good; excellent example of how traditional animist beliefs -- in this case, indigenous American beliefs -- can exist in healthy symbiosis with science; more philosophy than how-to, but a great foundational resource.)
Wild Witchcraft by Rebecca Beyer [book] (This one is for my fellow witches; one of my favorite witchcraft books, and an excellent example of a place-based practice deeply rooted in the land.)
Avoiding the "Crunchy to Alt Right Pipeline"
Note: the "crunchy to alt-right pipeline" is a term used to describe how white supremacists and other far right groups use "crunchy" spaces (i.e., spaces dedicated to farming, homemaking, alternative medicine, simple living/slow living, etc.) to recruit and indoctrinate people into their movements. Knowing how this recruitment works can help you recognize it when you do encounter it and avoid being influenced by it.
"The Crunchy-to-Alt-Right Pipeline" by Kathleen Belew [magazine article] (Good, short introduction to this issue and its history.)
Sisters in Hate by Seyward Darby (I feel like I need to give a content warning: this book contains explicit descriptions of racism, white supremacy, and Neo Nazis, and it's a very difficult read, but it really is a great, in-depth breakdown of the role women play in the alt-right; also explicitly addresses the crunchy to alt-right pipeline.)
These are just the resources I've personally found helpful, so if anyone else has any they want to add, please, please do!
#homemaking#homemaking resources#gardening#urban gardening#self sufficiency#self sufficient living#sustainability#sustainable living#homesteading#nontrad homemaker#nontrad housewife#urban homesteading#solarpunk#cottagecore#kitchen witch#kitchen witchcraft#crunchy to alt right pipeline#book rec#book recommendations#resource#long post#mine#racism tw#racism mention#transphobia tw#transphobia mention
991 notes
·
View notes
Text
Free Witchcraft Resources for Beginners
A couple months ago I made a post shouting out the fact that witchcraft doesn’t require any money to get started (or to be practiced, for that matter), and I had a few people ask me about what they can do that’s free, especially as a beginner, so I wrote up this post. I was lost and broke when I was getting started with my craft, and it was really difficult to find tips for beginners that weren’t just “buy these things!” I’m hoping this will be useful for people who are looking for a place to begin.
So. You’re interested in witchcraft and would like to find out more. Maybe you keep seeing those “crystals/herbs/books/etc. beginner witches should have” posts, and you’re frustrated, because you want to begin your practice, but don’t have the money for those supplies. I was once in that spot, and even now that I’m five years into my practice, I have rarely purchased any of the supplies witchtok deems to be fundamental. Here are some places you can begin instead. Let’s get started!
Info continues below.
Foundations
By foundations, I’m referring to things that aren’t explicitly witchcraft, but that I have found very beneficial within my own practice.
1. Before anything, I recommend asking yourself a simple question: why do I want to practice witchcraft, and what do I hope to get out of it? You may not know for sure yet, and your answer will likely change over time, but having some intentions going in can be helpful when you’re in the early stages of research. When I was starting out, I felt very overwhelmed by the amount of info out there, so if you have a bit of an idea of what you’re specifically interested in, that can be helpful to get you going.
2. Meditation: not all witches meditate, but a lot of the skills you develop through meditation can be helpful within witchcraft. You can try out secular meditation (apps like Balance and Headspace, as well as Insight Timer—the former has a mix of secular and spiritual meditations), or you can find a witchcraft-specific guided meditation on YouTube. For neurodivergent folks out there, I recommend looking into active meditation, which I’ve found to be quite beneficial for myself.
For me, it’s always important to remain grounded when I’m doing any spiritual practice, and meditation is a good skill you can work on to help with that. I also find that having a background in meditation can be really helpful later down the line when/if you are attempting visualization and/or astral projection, witch’s flight, and so forth.
3. Journaling: another thing that isn’t specifically witchcraft-related, but is an important skill to harness, on my opinion. To me, it’s crucial to be in touch with what I’m feeling (especially when it comes to doing spellwork), and journaling is one great way to do that. If you’re stuck and don’t know where to begin, look up witchcraft (or general) journal prompts on here or somewhere else. A lot of the ones that come up will be shadow work, which can be intense, so only do what feels comfortable for you.
I’d also like to note that automatic writing/drawing is an entirely free option if you’re interested in communing with spirits or deities. Essentially it involves getting into a trance-like state (usually in a dark room only lit by candlelight or similar—this is to avoid distractions) with a piece of paper and pen, and you write or draw everything that comes to your head without thinking about it. And then you go back and see what sort of messages you may be receiving. It’s a bit hard to explain and I’m not very experienced in it myself, but it’s something worth looking into if it sounds interesting to you!
4. Look at what you have, instead of what you don’t: a lot of beginner witch resources will list specific items that you should have, without really explaining why. And without that knowledge of how/why having an item is important, you might find your Must Have crystal sitting unused on a shelf somewhere. So instead of focusing on the items you want or feel like you should have, look at what you do have. Are there plants or herbs in your house/yard that you feel drawn to? Do you have a collection of cool rocks and stones? How do these items make you feel?
For me, a large part of my craft is my belief in Animism (the belief that all living things have innate spiritual qualities, like a soul, spirit, or specific energy) and this can play into the way you interact with the natural world if it’s a belief you also subscribe to. Try and feel the presence of a plant to see if it gives you any specific feeling. It does? Great! Now you have a correspondance for that plant. And it’s even better than the correspondances you’ll get in a book because it’s based on your own personal connection and intuition. That’s what is most important.
5. When in doubt, use your intuition. You might find a source that says cinnamon should be used for protection. Another will say it should be used for abundance spells. What matters the most is what you think about an herb/plant/stone/colour, or whatever else you may utilize. I recommend to start keeping a list of what you associate these things with. It can take awhile to build up a personalized list, but once you have one, it’ll be a lot more useful than what a correspondances book says to do.
6. Scour your pantry and get cooking: are you wanting to try out a spell but you haven’t bought the ingredients? Look in your pantry. You may be surprised by how many commonly used witchcraft herbs you find in there. And if you have been starting to associate certain herbs or spices with specific feelings or energies, that’s a great way to get started with creating your own spell.
You can do a spell in many ways, but when I was starting out, one of my favourite ways was to incorporate a certain herb or spice into food I made. Say you’re making a soup and maybe you want a bit of protection, so you add some ground pepper with the intention of that pepper protecting you as you stir it into the soup. Same goes for any other ingredient you’d like to use. A little intention goes a long way!
7. Dedicate your actions, time, or energy: if you’re interested at all in working with deities, ancestors, and other spirits but don’t have the time/space to build an altar—or maybe you aren’t sure how involved you want to be with this part of witchcraft—you can devote an action to the entity. This can be simple. For example, when I worked with Apollo, I would use taking my meds and vitamins as an act of devotion to him. This is an offering. And offerings can be anything you want them to be. They don’t have to be expensive or fancy!
It’s also important to note that you do not need to work with deities or spirits to be a witch. You don’t even have to believe in them. Many witches are atheists or don’t work with any deities at all. But for those who are interested, simple offerings can be a good place to start.
8. Practice energy work: in my view, energy work is the most important skill to learn for your craft, since so many things build off of it. And with energy work, you don’t need to spend any amount of money on it. All you need is yourself, your intuition, and anything else—I mean that quite literally, you can practice feeling the energy of other people, pets, trees, buildings, foods, socks, your favourite pen, and whatever else you think of!
Once you get to know the energy of the things around you, you can more effectively utilize them as tools within your practice (this builds off of the intuition point I made earlier).
For example, as a child I lived in a house that was surrounded by cedar trees. It was a place where I felt very safe. To this day, when I see or smell a cedar tree, I feel safe and protected. You can read this any way you’d like—to me it’s both a spiritual and psychological phenomenon—but this is one example of sensing energy.
As a witch, you can practice that skill and use it to get to know the tools you’d like to use within your own craft (the things that connect to you personally, not what you’re told you should connect with). This isn’t an easy skill by any means, so if it doesn’t come naturally to you, that’s perfectly okay!
For more on this subject, I recommend two books: Braiding Sweetgrass by Robin Kimmerer (more on animism in particular) and Psychic Witch by May Auryn (lots of exercises to practice working with and sensing energy).
Where to Go for Learning
After you’ve thought a bit about some of the above, or skipped it altogether if it doesn’t suit you, you’re probably wanting some good resources that will actually tell you how to do the witchcraft thing. But before that, I want to reiterate again that this is your practice, and you should only do what you are interested in. So take what you want and leave what you don’t.
I’m going to point you in three primary directions for learning good information: books, podcasts, and YouTube.
But first, I want to issue a massive disclaimer for the YouTube information (and some books, for that matter). You should not have one sole source for your information. Books that have bibliographies are always the most trustworthy sources. And even though I trust the information coming from the YouTubers I’ll mention—especially because I’ve read similar information in several witchcraft books—don’t take their word at face-value. Be critical of what you’re told. Believe what you believe. This is a skill you’ll learn over time. It can be a bit overwhelming at first, but it will get easier to discern what’s good info vs. bad info, over time.
Before you get started, I highly recommend watching this helpful video by HearthWitch with info on how to vet your witchcraft sources: link.
Books
In my view, books are the Best source of information, period. Anyone can publish an article or video online, but not everyone can publish a book. So there tends to be a bit more reliable info in witchcraft books.
As far as knowing what book you should begin with, there are lots of lists out there for beginners, and I recommend just looking at one of those lists and picking what sounds interesting to you. Take what you like and leave what you don’t.
Most of the YouTubers I’ve listed below have videos recommending books for beginners.
If you’re interested in British folk witchcraft, I started out with Folk Witchcraft by Roger J. Horne and it was a brilliant beginners guide that I recommend to anyone who is interested in that branch of witchcraft.
As always, while you read witchcraft books, be critical of the information you are presented with. Unfortunately, lots of witchcraft books (especially the classic ones) can be rooted in concepts like bioessentialism, colonialism, and racism. My recommendation is to not take any author’s word as gospel and to use your critical thinking skills when reading witchcraft books.
Where I live, books are EXPENSIVE. And when you’re just starting out in your practice, you might not have the money or ability to go out and buy a book just yet. Maybe you’re still unsure if witchcraft is right for you. Or maybe you’re in the “broom closet.” Whatever the reason, here are some free places to find books.
1. The public library: a bit obvious, but a great resource to look at, because you never know what your library might have. Libraries are the best. And entirely free!
2. Library apps like Libby or Overdrive: especially helpful if you don’t want to bring home a physical witchcraft book, or if your branch doesn’t have any copies of what you’re looking for. You can also get some audiobooks on there.
3. Archive.org: aka the web archive. Entirely free and entirely legal, this works as an online library service where you can check out a book for a bit of time right from your computer. Sometimes you can download PDFs as well. I’ve found a lot of my favourite witchcraft books on there, so if you have a specific title in mind, search it there.
YouTube
First, as a bit of a caveat before recommending you to watch YouTube videos on witchcraft: in my view, books are the best source of information for any witch, as they are able to contain a large degree of nuanced and research-informed information. But books aren’t a simple solution for everyone, and I’ve learned a lot from informed YouTubers over the years (in fact, like many witches, I was first exposed to witchcraft via Harmony Nice on YouTube!).
I’m including a list here of witch YouTubers that I personally recommend because I have found that their content aligns with information I have read in books and other research-informed sources over the years, and because I find them to be generally reliable.
I want to note here that this list is rather biased, as I tend to watch witchcraft YouTubers whose practices mirror my own in some ways. So most of these practitioners have practices informed by European folk witchcraft, and are not very diverse as a result. If any practitioners have further recommendations to add on, especially for practitioners of colour and practices that are different from mine, please do so!
My recommendations:
ChaoticWitchAunt: folk witchcraft, specifically in the Italian tradition, some great beginner content, info on working with saints and spirits.
TheWitchOfWonderlust: death magic, spellwork, great beginner content, lots of excellent info on working with spirits.
HearthWitch: truly a well of information on British witchcraft, beginner videos on any topic you can think of, q&a livestreams, and there’s even a video on vetting witchcraft sources that I really recommend for beginners.
The Redheaded Witch: folk witchcraft and folklore, spirit and ancestor work, daily witchcraft ideas, some beginner videos.
TheGreenWitch: such an excellent resource for herbal/green witchcraft, videos on spellwork, ingredients, tools, and more.
Mintfaery: lots of beginner information, videos on working with the fae, nature witchcraft, and lots of fun witchy days in the life.
Ella Harrison: German folk witchcraft, great beginner resources, including some more niche traditional craft topics like witch’s ladders.
The Norse Witch: info on Norse witchcraft and Heathenry, Norse paganism, and some content about astrology.
simplywitched: lots of great everyday witchcraft content, pagan witchcraft, more vlog style.
Warrior Witch Nike: witchy book reviews, paganism, deity work, some astrology content.
Mhara Starling: the place to go for anyone interested in Welsh witchcraft and folk magic related to Wales.
Alwyn Oak: lots of witch’s guides, especially relating to sabbats (those popularized in Wicca), forest witchcraft, gorgeous videos.
Ivy The Occultist: chaos magick and lots of interviews with practitioners from a variety of paths/backgrounds.
Shadow Harvest: personal day in the life witchy content, some videos looking at working with dark goddesses and deity work in general.
Note: some of these YouTubers have written their own witchcraft books geared towards beginners, so if you enjoy their videos and want to learn more, check those out.
Podcasts
The Astrology Podcast: not specifically witchcraft, but if you want to learn about astrology in detail, this is an excellent place to begin. Link goes to YouTube.
Books and Broomsticks: all kinds of good info, especially pertaining to folk magic, witch guests invited on to share more about their own practice. Link goes to Spotify.
Southern Bramble: A Podcast of Crooked Ways: a variety of witchcraft related topics, interviews, and discussions, often revolving around folk magic and traditional craft—interviews show different traditions. Link goes to Spotify.
New World Witchery - The Search for American Traditional Witchcraft: what it says on the tin; various topics and conversations through an American traditional/folk magic lens by the author of the (amazing) book with the same name. Link goes to Spotify.
Salty Witches Podcast by Cat & Cauldron: traditional witchcraft through a modern lens, another podcast that has a wide variety of topics covered. Link goes to Spotify.
—
As always, if anyone has any additional (free!) resources to add onto these ones, please do so.
Good luck to all of the beginner witches who are embarking on their spiritual journeys, and I hope some of these tips have been helpful! :)
-Em
#been working on this post since october first which is just crazy…it took So Long#I searched everywhere for info like this when I was a beginner but all I found were lists of things to purchase#which isn’t helpful when you’re broke and living through a recession!#I hope this hopes someone out there <3#witchcraft resources#witchcraft 101#witchcraft info#beginner witchcraft#witchcraft#witchblr#beginner witch#folk witchcraft#baby witch#resources#my post
241 notes
·
View notes
Text
Useful links to Learn Finnish
~ Learning resources ~
# Apps #
Duolingo, a classic, it teaches you vocabulary and basic sentence structure
Drops, a great app to learn vocabulary, and it’s organized by subjects
Clozemaster, makes you fill sentences, slightly advanced
Memrise, good to learn vocabulary, includes textbooks vocabulary too
Mondly, teaches vocabulary and basic sentence structure
WordDive, seems like a comprehensive course (I haven’t tested this one)
# Textbooks #
Suomen Mestari, the book most Finnish classes use, is in Finnish only
Oma Suomi, a book for self-learning English speakers
# Websites #
The Finnish Teacher, easily approachable grammar lessons
Verbix, to find verb conjugations
Sanakirja, very complete dictionary and translator
Urbaani sanakirja, Finnish equivalent to Urban dictionnary
Uusi kielemme, a good vocabulary list divided by themes and levels
Finnish swear words on Wikipedia, essential!
# Video & audio lessons #
Finnish Pod, numerous audio and video lessons
Supisuomea-videot by Yle, videos with simple Finnish and subtitles
FSI courses, recordings of conversational Finnish
# Complete beginner resources #
A Taste of Finnish, reading, listening and grammar points
Kielet by Yle, lessons in Finnish with videos
Venla, for vocabulary, structures and grammar
Digital Dialects, games to learn Finnish
~ Listening resources ~
# Podcasts #
Opi Suomea!, a podcast in simple Finnish
Yle uutiset selkosuomeksi, a news podcast in easy Finnish
Auta Antti!, a podcast where the host answers listeners questions
# Music & Radio #
Radio Suomi Pop, only Finnish songs & Finnish speakers
Tunein, to access more Finnish radios
#vainsuomihitit, Spotify playlist with all the new Finnish hits
Suomen musiikki, my Finnish spotify playlist
Mirka Karoliina, Disney songs with Finnish subtitles and translations
# Movies & TV shows #
My Finnish movies masterlist (needs to be updated)
Yle Arena, legal streaming of Finnish shows & others with Finnish subtitles
Some American streaming services (Netflix, Disney+ etc) have things dubbed in Finnish (mostly cartoons and kid’s shows), but most of those are only available if you’re in Finland (or use a VPN)
# Youtubers #
Papananaama
KAKSI ÄITIÄ
maiju
~ Reading & Writing resources ~
# Reading #
Yle uutiset selkosuomeksi, news articles in easy Finnish
Oppiminen by Yle, various articles in easy Finnish
Free Finnish books, for advanced level
# Writing #
LangCorrect, write diary entries and get corrected by native Finnish speakers
~ Communities ~
# Finnblrs #
Tags on Tumblr: Finnish / Finnish langblr / Finnblr / Finnish language
This is Finnish
Suomen Kieli
Fennophile
Tealingual
Finn in training (mine)
# Others #
LearnFinnish on Reddit
Static page version of this post can be found here.
Older versions of this article can be found here and here.
303 notes
·
View notes
Note
This might be an odd or personal question, but could I ask how you started knitting and where you started as a beginner? Or what would you recommend? I’ve tried to join clubs and groups irl, but there’s so much drama and gossiping. When I said I didn’t want to take part in that aspect, they started ostracizing and gossiping about me. Any websites, yt channels or books you’d recommend for a beginner?
--
Haha.
My friend, this does not even register on the scale of deeply personal or odd questions people have sent me.
I've been trying to remember exactly how I started and why (like, even before this ask). I think it was on a family vacation to Scotland the summer before I started college. That would have been in 1999.
I taught myself from one of those awful 90s pamphlets with the line drawings. They're a nightmare compared to being able to see someone do the motions in person or even in a video. I had some awful plastic needles and no guidance on yarn and just knit with what I found at some shop there. Do not recommend!
I achieved what I wanted during college, which was to make a nice cable-knit sweater that I still wear, and then I got frustrated with crappy acrylic yarn and drifted away from knitting until a year or so ago.
The fact is, I basically didn't do beginner projects. I moved straight from making one rectangle to making grandiose sweaters or whatever else struck my fancy. (But if you want to know, I was using Viking Patterns for Knitting and a bunch of Alice Starmore books, all of which you can still buy.) I know plenty of people who did it this way, but you certainly don't have to.
And you definitely don't need to learn from a terrible 90s printed pamphlet!
Luckily, nowadays, you can find a tutorial on just about anything on Youtube. I enjoy watching the technical and historical types discuss quirks of knitting you might not think of without years of practice or research.
Roxanne Richardson is great, for example.
Look for somebody old, not wearing a lot of makeup, and not talking about their indie dyeing/yarn business and you'll avoid most of the clowns who learned to knit five minutes ago and now want to be knitfluencers.
When I want a super simple technique tutorial, I usually end up looking at either Nimble Needles or VeryPink Knits. I find her super annoying, but her tutorials are spot-on. Norman's voice is much more soothing and I just enjoy his presence more, but both of them have good ultra close-up shots of what they're doing (which lots of vloggers don't because it requires special equipment).
I'd just figure out what kind of finished products you want to use knitting for and then find patterns and tutorials geared towards those.
Cables are relatively easy. Stranded colorwork requires a fair amount of physical coordination and some people find it rather difficult at first.
Circular needles are far more popular than traditional straight ones for people starting today.
Cotton yarn is relatively less nice to knit with than wool for most people, but it tends to be the natural fiber available at a low price point from major retailers.
Picking up general tips like that by watching various youtubers will help you pick a project that won't be too painful to work on.
People who naturally knit loosely should consider grippy bamboo or wooden needles. People who naturally knit tightly should consider slippery metal ones.
My biggest piece of advice is that you're usually better off with something "hard" that you actually like rather than a "practice" project you don't care about, at least after you've made like one rectangle to practice doing a knit stitch at all.
--
Finding community can be hard, and yes, some crafting hobbies are infested with drama.
But if you just want to know how to knit, you're way better off with some video tutorials and a nice pattern you like.
134 notes
·
View notes
Text
The first day of my personalised week long Japanese language challenge is done.
1) Play an hour of a video game.
I may have played more than just an an hour of Stardew Valley. I couldn't help it, man. It's one of those games that when you start you can't stop and the next thing you know it's five days later, your wife's left you and you can't even remember your name anymore.
2) Read a chapter of a manga.
Read a few chapters of Chi's Sweet Home and it is by far one of the better manga out there to read for beginners. It's centered around a kitten and her family and the every day shenanigans they get up to. It's very easy to fellow and there aren't massive walls of text every other page like some series. I plan on reading more and making a more in depth post on it.
3) Watch a video on YouTube with no English subtitles.
I may have just watched a bunch of nursery rhyme videos. Honestly, not a bad way to learn. They're catchy and simple.
4) Read a graded reader/book aimed at young children.
One of my favourite graded reader sites is tadoku.org. They go from level zero to five with zero being the easiest. Today I decided to upgrade from zero to one and read a short story called Boku no Kazoku. It's about a teddy bear and his family and it was hecking adorable.
5) Make a post on HelloTalk.
Made a simple post saying I had school tomorrow and about how old I am (I'm a thirty year old student help) and no one has corrected it yet so I'm assuming it was right. People on HelloTalk are usually pretty quick about correcting mistakes. It's why I like it so much.
18 notes
·
View notes
Text
Explain the shift: Raven method
The raven method is one of the most popular methods for shifting.
Desclaimer: As a neurodivergent person, I find this method really difficult for me to do, but that might not be your case; you are your own person with your own mind. What might be difficult for me could not be the same for you until you try it.

Even though it is one of the most popular methods, I don't find it quite easy when it comes to beginners because it is one of those methods you have to "train" to do.
This method is strong because counting while relaxing the body ensures that the brain remains active while the body falls asleep. Thats why you have to take your time with this method because the body takes 15 to 20 minutes to fall asleep. Thats what I mean when I say this is a method you have to "train" for.
The Raven method is theoretically simple but difficult in practice. To use this method, you have to:
Put your script under your pillow and lay down in a strarfish position. If you don't find the position comfortable, find one that you are comfortable sitting in. especially because you have to stay in that position for a long time.
Start slowly counting to 100 or a higher number of your choice. For each number, say an affirmation, for example: "1, im shifting, 2, im in my DR," and so on until you reach your chosen number.
When you do this method, you have to take your time and try to relax your body and mind while you count. Let everything go and don't track the time. Focus on the affirmation and where you are going to be when you wake up (your DR). You can easily find some guided meditation for your first time doing this method on YouTube and Spotify!
As always, if you have any questions, I will be more than happy to answer them. Have a wonderful day or night!
#journal#manifestation#manifestation method#manifesting#shifting methods#manifesation#loa methods#spiritual development#explain the method#explained#the raven method#counting#shifting#shifting realities#shifting community#shifting stories#shifting motivation#reality shift#desired reality#shiftblr#shifting tips#reality shifter#reality shifting#neurodivergent#shiftinconsciousness#shifters#shift
33 notes
·
View notes
Note
hello! we hope this is ok to ask, it's totally fine if you don't answer- but we've recently become interested in satanism and demon work, but we know exactly nothing about it or where to start. we did some basic research with academic sources like wikipedia but have no idea where to go from there. we're hesitant to just dive in on our own because we know there are a lot of bad sources and groups to avoid but don't actually know what those things are.
anyways, we trust your opinion and recommendations so we wanted to ask if you had any suggestions on how to go about researching and learning about theistic satanism for an absolute beginner! recommended books or articles, groups to avoid, red flags, anything like that would be very appreciated 💚 thank you so much!
okay so, this may be a controversial opinion but in my opinion (KEY WORD OPINION) you actually shouldn't only stick to unproblematic and valid uwu authors, because i'll be honest (in terms of satanism and demonolatry), there ARE no pure and good authors out there. every author out there, especially if you're reading a text from a long time ago, is going to have something you disagree with. you need to practice some form of critical engagement, additionally, because engaging with a text critically and understanding why it is wrong is way more important than just shutting out the information altogether. you will not learn anything if you pretend that problematic texts do not exist. i'm not saying this to be harsh, but there is a reason we research a variety of texts and perspectives in high school english class. you need to continue that kind of method when researching anything.
now that is covered, i'll tell you what i have read personally. taking the above into consideration, there are no authors here that don't have something deeply wrong about their texts. i did read their works, and i came to my own conclusions on whether i'm going to dub them an authority on satanism, and i suggest you do the same. satanism is about knowledge and drawing your own, unique conclusions. just make sure what you do adopt doesn't throw any groups of people under the bus, because we're not here to read books and thoughtlessly believe whatever the book says, especially when the book can have misinformation, or offensive content. this is very common in satanism; as much as people love to treat it like it's revolutionary and all-accepting, it can be just as, or even more, discriminatory or outright hateful as christianity, especially in the texts.
the most easy-to-find material:
ars goetia > pretty basic info, but very handy and simple to read
the infernal gospel > probably my favourite book on this list
the complete book of demonolatry > i don't agree with the author, but i got this one in my early days before i knew anything about said author. it's got some useful information, but there's a lot of misinfo
book of the fallen > useful rituals if i remember correctly, i sold this book so i can't recheck
at satan's altar > also an interesting book
the goetia devils > has a lot of what i assume is upg... seems to conflict with what i've seen from other practitioners
the goetic hymns > second favourite book
the satanic philosopher > i found this one hard to read personally
esoterica > youtube channel with amazing information on demonolatry and its history, i suggest getting into this before doing anything else.
all of these websites.
and lastly, i also got like 50+ older texts i got as a bundle off etsy that i can't remember the names of. i wish i could give them to you, but i genuinely have lost every single text i got in the bundle due to me changing computers. i suggest looking on etsy for similar bundles on satanism and demonolatry if you want to get into the historical meat of things.
that being said, my actual last thing i want to say is not to get too entrenched into the theory. the texts are handy, sure! but the one thing i have found the most useful is by engaging with the community. most of my wealth of knowledge did NOT come from texts or media, it came from those around me talking about their experiences. if you want to learn, and i mean REALLY learn about demons and satan, get into the community hardcore and you will learn something new every day. talk to people, make friends, don't do this alone.
edit: okay one more thing. this does go against what i was saying to some degree but i do have a limit to that logic. avoid joy of satan. they're n/eonazis and come on this website regularly. avoid them, avoid them, avoid them.
#bun talks#theistic satanism#demonolatry#satanism#i wanted to write more but i'm admittedly on a time crunch :(
17 notes
·
View notes
Text
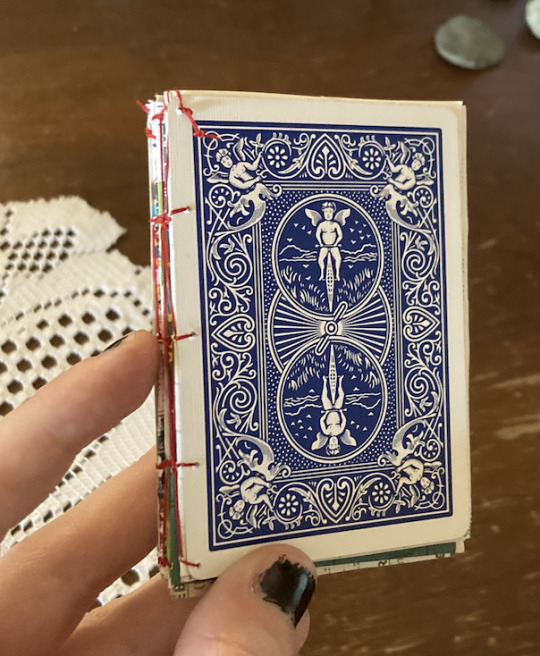
adventures in bookbinding: making the negret colophon playing card book!

it's diy girl summer and i am Bored. time to attempt a completely new craft with zero research except for like. 3 youtube videos!
so, to start off, i suppose i will ramble a wee bit about my plans/goals/reasoning. truth be told, i just really really like my blorbo who book binds and i think it would be very fun to become Just like him for real. therefore we will be embarking on a journey!! to become my blorbo and also find something crafty to do today. quick psa that this is not a real tutorial because i have absolutely zero experience, but more of a general guide and/or craft with me! let's do this in sectionssss!!
1 - the plan!!
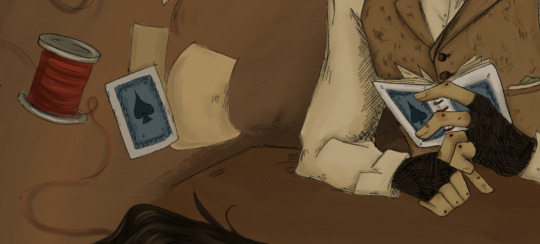
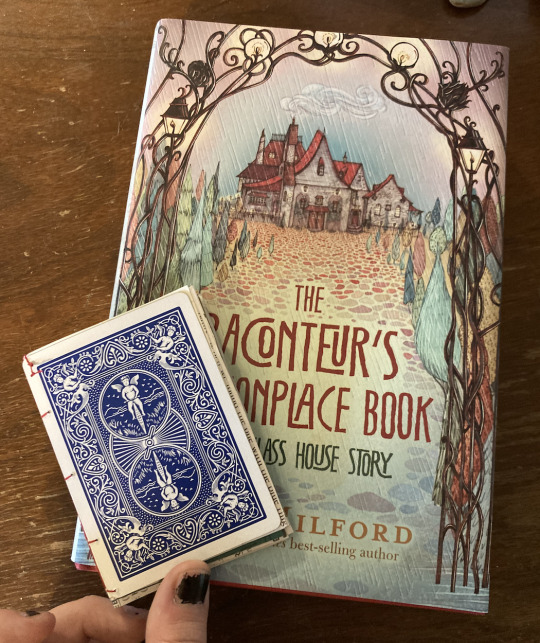
so for my first bookbinding project we are going to do something small, starting out by being silly and taking a page (lol) out of negret colophon's book (lol....) when he makes a tiny book and uses two playing cards as the covers. this will give me a little tiny trial run so i can learn the basic skills and use easily available materials around my house!! afterwards i think i'll sketch out a more ambitious journal idea - i have lots of fabric lying around that would work perfectly to cover a cardboard cover. wow, that's wordy! so! without further ado let's begin :) negret's little bookbinding project is described in the first chapter of raconteurs in this little excerpt here.
seems simple enough!! also the absolute perfect beginner project. it is tiny and the materials consist of Literally Anything. let's get groovy!!
2. materials!!

here's what we're working with:
playing cards! i found a deck lying around in a random drawer somewhere and chances are you have one laying around too. i chose the ace of spades and diamonds, because the text specifies a pair of aces but i couldn't find a matching pair, lol. i was also very tempted to choose one of the king cards as an homage to maisie's story later on (and because the king cards are absolutely gorgeous and detailed) but we're sticking to canon right now. we'll use the other cards for a future project.
needles!! a lot of the tutorials i see use very big or thick needles but i don't have those and this is also a very small project, not a huge journal, so any can work.
thread!! use whatever color you would like! at this point i was very indecisive because i have a lot of options and they're all quite pretty colors, but i settled on red later.
an assortment of papers!! use literally whatever you have lying around. for me, i managed to dig up the one scrap of newspaper in my house, since that's specifically listed, but most of my pages were from a book i sacrificed for an old art project, magazines and flyers, a lot of which were college mail because we're at that point in my life, lol. this is a recycling sort of project. choose anything! the more variety the better :)
i didn't display these in the photo, but if you have an awl, use an awl! i do not have one so i improvised, which i'll elaborate upon later. also, scissors! to cut the pages to scale. a ruler also came in handy :)
alright, now that we have all our tools in order, it's time to get into it :)
3. creating the pages!!
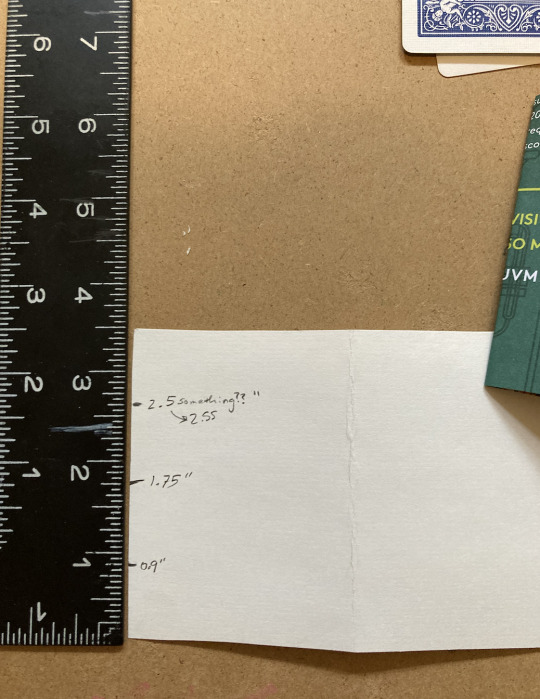
our first step is to measure our playing cards! you might not have to do this step because i'm fairly certain most cards are uniform in size/make, but check just in case, lol.


my cards measured to be 2.5" wide and 3.5" tall. i am no mathematician but using my singular brain cell i deduced that the papers should be twice the width of our cover, since those will fold to be the same size. so, using my Expert calculations, i made a little template cut from an index card measuring 3.5" x 5".

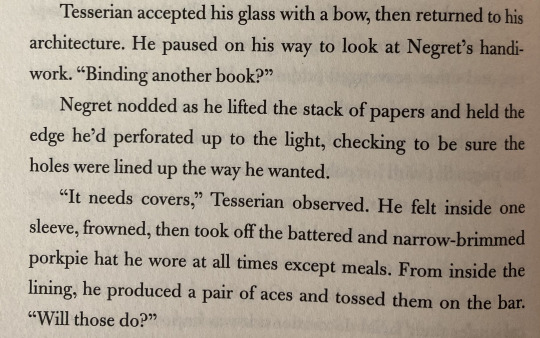
now we get to cutting!! using your various materials, cut out a bunch of papers to the size of your template. i just cut around it because i could not be bothered enough to waste time tracing, lol. i didn't go in with a plan, but i cut 16 papers to this size, which ended up being perfect. here are all my pages !! look at all the colors and textures!! the fun thing about the project being so small is that you can specifically cut the pages as the most interesting photos or sections, or you can even do it at angles too. as long as it ends up the right size, anything is fair game

now, we're going to make the papers into signatures! i just learned this word today lol. essentially, we will be grouping our papers and then folding those in half to become little mini books/pages. since i had 16 papers, i made 4 signatures with 4 pages each.
at this point i was tempted to go cut up more and make a fifth signature, but i decided against it since i didn't want the book to become too thick, and 4 sets with 4 papers each ended up being just about right. one of the tutorials i watched suggested that you group your signatures with paperclips or bobby pins, and at the time i waved off the suggestion but i totally agree now. i didn't have any clips to work with and i managed fine without them, but it definitely would have been easier if i had. so if you have them, use them! it'll make your life better lol. at this point you can stack your signatures together and itll look like a book!
oh yeah now we're cooking!!
4. preparing for binding!!
it was at this point in the process where i ventured out from knowing what i was doing to completely balling, but everything turned out okay and i'll walk you through it! our next step is to create the holes with which we will sew our signatures together. we're going to mark those off. once again i have zero clue how to do math but i managed to use my giant incredible smooth brain one more time to mark my template with a few equidistant points with which we can mark our signatures.
in case it's not clear, i kind of just counted the lines and then had to look up how much that was, but you can also just eyeball it if you're good enough. side note, i added two more holes after this, with one just below the very top and one just below the very bottom.

pardon my very unsightly nails, lol - here's how i used my template to mark the very center of each of my signature. you'll want to mark the point on the center line where you folded it while keeping the pages of each signature together. HOPEFULLY WITH A PAPERCLIP. and without further ado it's time for the stabbing!
now...here's where i got a little bit sacrilegious. you'll recall that earlier i mentioned how i don't have an awl in my possession yet? well, i managed to improvise a solution...

yes that is a sewing pin. IN MY DEFENSE it's all i had, and functionally it's basically the same as an awl! just on a much smaller scale. it worked out though - i imagine that if i'd been using thicker paper it would have posed a bit of a problem but for this project specifically, it was fine. do not kill me book binders. now it's time to get serious...
5. the binding
everyone stay calm! stay calm! it will be okay. i was lowkey intimidated by this part as this was Truly out of my depth of expertise, but i promise it's not that complicated. you're going to get your needle and thread now - i settled upon this gorgeous red color because it contrasted nicely with the playing cards, and there really wasn't much red in the papers i chose.
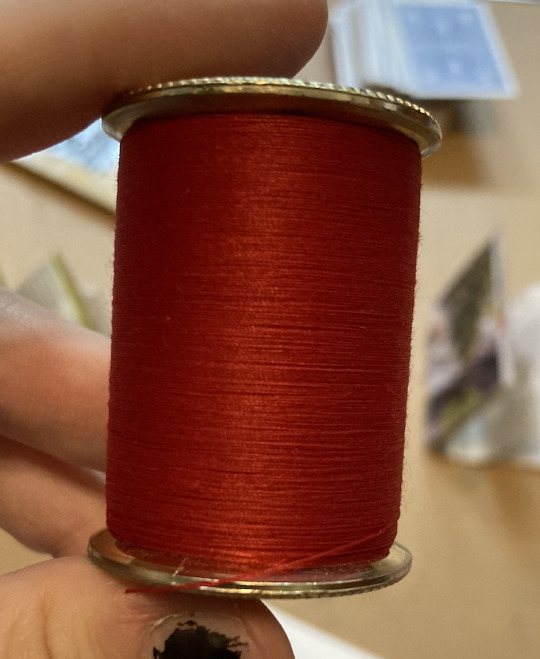
gorgeous!! tbh i always knew i'd go with the red because i've always envisioned the book with red thread anyways. like come on look at my very first drawing of negret WITH it. literally the exact same materials. i simply had to.
okay. now to the binding part. i don't have any real photos or insights or instructions for this whole stage because 1. i was deep in focus mode and 2. entirely relied on a tutorial for this part. here's the tutorial i used - massive shoutout to this lovely lady ! my spine didn't turn out nearly as neat as hers because i did not properly follow directions for the first bunch of knots (and i had to kind of improvise with the cover) but here's how it turned out!
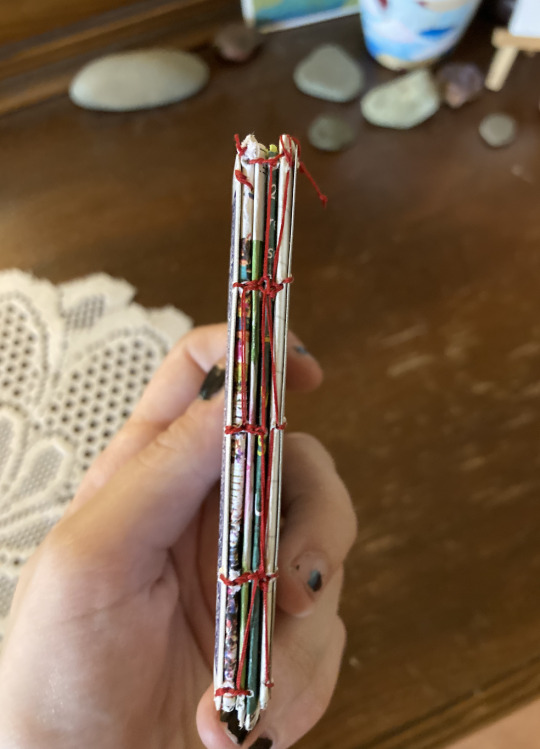
not too bad for my first book, lol. try not to stress out about it being perfect because this book is not supposed to be perfect! the imperfections give it character. worst case scenario, if you really mess up, your eclectic book is just a little more eclectic than intended. and that's never a crime :)
now the one problem i had to figure out on my own was how to attach the covers, since most tutorials explain how to attach actual big separate covers and not - essentially paper. i ended up just... attaching them as if they were another page or signature to the front and back. my holes on the covers were a few millimeters away from the edge, though, since there's no crease or fold to align them with. what i did was essentially do the first knots/stitching on the signature like the tutorial said, but for each hole i sewed through in the first/last signature, i also made an additional loop through the adjacent hole on the cover. you can kind of see how i passed my needle through like instructed and then took a little extra detour to stitch the card as well. in some places i ended up making new holes in the signature too that were closer to where the cards' holes lined up?? try not to do that but it worked and it looks fine so really whatever makes it attach and hold is perfect.
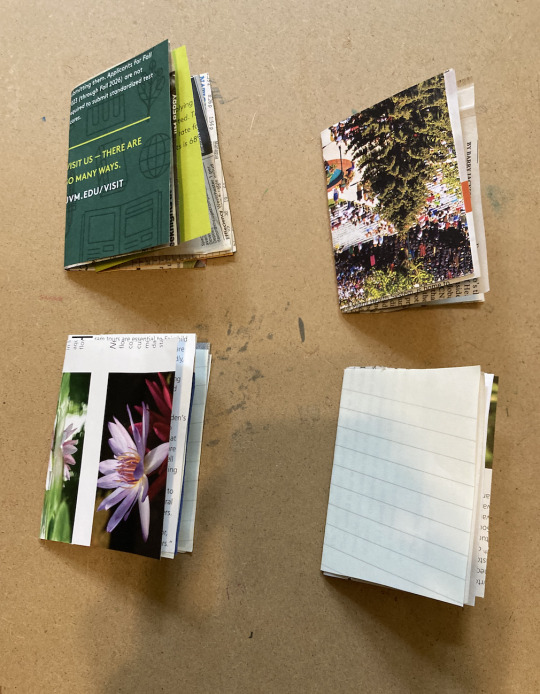
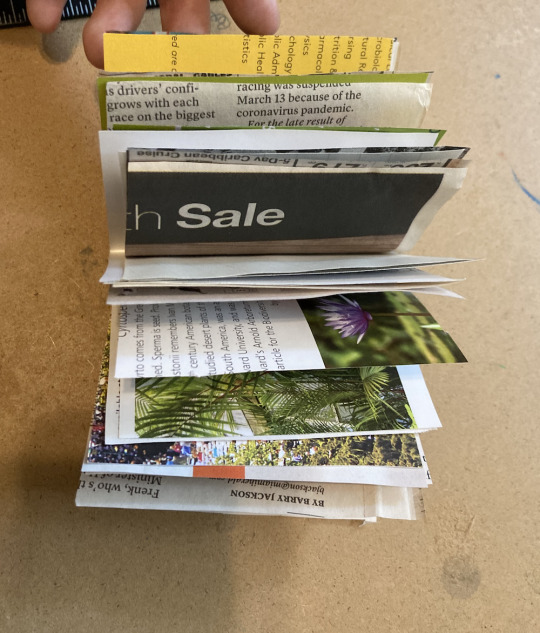
6. bask in your glory!!!
aaaand that's it!! you did it!! this was a ton of fun to work on and i absolutely loved making this little adventure into a new craft with something so near and dear to my heart. if you make one please be sure to tag me!! i would love love LOVE to see :) here's an additional picture of my little monster (+ next to the legend himself. art credit to me lol. look the books are twinning!!)

#the raconteurs commonplace book#raconteurs commonplace book#green glass house#nagspeake#roaming world#uhhhh#bookbinding#book binding#genuinely i dont know if those are separate words or not. either way LDJKGLHSDJG#crafts#crafting#arts and crafts#yippee this was actually so much fun#to quote alex of vfdiscord fame “the self blorbofication of quill”#it's too late i'm in too deep i'm literally him now#quill crafts
51 notes
·
View notes
Note
hi mycopal :) I'm enjoying your blog and admiring your set up, seems very hightech. I'm also reading about cultivating a local (Australian) psilocybin variety we often find in pine forests. Could you point me in the right direction for more info to get started with a simple at home set up for beginners? thanks again for your good work :)
Hello there mycopal! Thanks for reaching out! I appreciate your kind words :) I’m super proud of my lab area! It has taken two years to put together by saving 25-50 a paycheck lol!! Humorously my roommate doesn’t like that i commandeered a whole room … haha, but here we are ;) What mushy are you looking to cultivate? Pscilocybe Tampensis or P. subtropicalis maybe? :)
note: my opinions and advice are based on my own experience and studious research :) there are MANY ways to skin things with… skin… lol; as such, my way should work for most but may not and there are many other mycoeducators with varied approaches that offer great insight in their own right :) I have a few vids on youtube (still new to content creating there and working on adding more) if you wanna see more of what I do as I outline it below! At the end of this long winded MCX response I will provide supportive resources for your consideration in order they are addressed in this response.
🍄Tip: get some nasalpharyngeal swabs so you can actively swab and store mushroom genetics you find in the wild for later reararch ;)
Pretext: I live in a (technically) tropical area so what i do with my research areas may be different than you! I am not sure how much of what im about to detail has been considered by you… but if youve considered it then disregard :) i like to break things down like you’re new new new incase theres any detail to miss.
Introductory Answering your Q: Basically you have to consider a handful of generalized steps for cultivating any fungus; and find TEKs (ie: guides by other mycopal’s that have yielded them success) and make your own tek— I always say that the mycojourney is coming up with your own tek, cobbled together from current teks that speak to you and also are appropriate for your resource availability :) after you get through my response you’ll have homework of studying resources but also: finding TEKs for your specific strain you want to work with :)
My preferred supplies-
Genetics: Dont know about the laws and availability where you live, but formal vendors (like innoculatetheworld ; sporeworks) and informal mycoeducators (who sometimes vendor spores) like PGT and Boomershroomer; are the only spore sources I trust (outside of my own stock;).
Boomershroomer makes quality inflatable monotubs and if you order one of her tubs she sends genetics with it! A little ‘secret’ ;) to be aware of!
PGT has a shop online thats only open sometimes but has a cool collectible trading card system for his genetics (buy the card get the microscopy supply with the card).
ITW and SW are generally up 24/7 and are more formal vendors that also sell microscopy stuff.
I currently use and recommend using 6qt shoebox totes for grow container (the kind that you buy in 5-10 packs from Walmart that have gusseted lids that allow some air flow for ‘sneakers’ to be stored hehe). Note that you can use 12/24/48/72qt etc, but I have no experience with those and they require larger set ups with fans, humidifiers, etc. i prefer less is more :)
I always promote a company called Microppose :) they do amazing filters and just started their own monotub production I think :) my fave substrate is CocoBliss coconut coir pith, and I use lab grade nutritional additives like: gypsum, lime, malt extract, and yeast off amazon in various stages of my process. For grain bags, before I made my own, I only trust: spawnmagic.com ; for my grains I use Producers Pride: Whole Oats (like what is given to horses) from the feedstore :) a 50lb bag has lasted me two years, no lie. I dont use bags, but jars for grain: i use brand: Ball, glass mason jars for spawn containers prior to moving spawn into a tub with substrate. I use Aozita wide mouth masonjar plastic lids (off Amazon) for my jars as they can be modified with filters and then pressure cooked safely and come with rubber seals :)
Now to go into detail to answer your question:
Here we go-deep breath-: lets talk cultivation and research starting:
1. Genetics: (a) multi spore syringe (mss) (can be injected into a grow bag but isnt ideal and may not produce viable strains) (recomended to use mss on agar to isolate your own colonies), (b) spore print/swab (requires agar) or (c) liquid culture (LC) isolate syringe (best option for immediate injection-inoculation of grain containers/bags with best chance for healthy growth and fruiting without time and hassle of the steps I outline further :)
1a. If you are able to work with agar (either make your own or buy premade sterilized, one time use agar plates): then you will start your journey by MSS->Agar->Isolate separate germinating colonies off mss agar plate to new plates (those become your mother isolate plates for each specific strain isolate for whatever strain youre working with). The mother plate should become your cold storage, reference plate as you study growth and fruiting characteristics of the colonies you isolate :) at that pont: You can then use some excised pieces of the mother plate (if in a rush, or if able to wait, till gen1 plates (transfers from mother plate to new plates that become duplicate isolates of the mother plate)) to inoculate a jar or two and also inoculate other plates to continue to ‘run the mycelium out’ / ‘chase the mycelium’.
1b. If you are not able to do agar work then I strongly suggest you seek genetics that are LC syringe. Basically, LC syringes are when mycopal takes a 2nd gen+ plate and moves some of that mycelium to sterile sugar water and lets the mycelium grow out in that water till its all filled with reproduced mycelium and can be sucked up into syringes for better more assured propagation of genetics ;)
Side thought: Spore swabs and spore syringed are dice rolls :) [Spore germination discussion incl quote from TMC- https://at.tumblr.com/mycochaos/uscrybal-commented-on-a-comment-i-made-quoting/pjzr0c86nlyt]
2. Grain spawn: once you have genetics hammered out, next is grain spawn. Grain spawn can be … well, any grain. Really. Mushrooms can colonize and fruit off of wet cardbord… 💯🍄😂, so what “type” of spawn is more about whats available in your area imo. Youll need to sterilize any grain spawn, unless using a premade bag thats already sterilized or taking chances with uncle bens (or similar) rice baggies that arent sterilized but are arguably cleaner than grains scooped out of a bags of grains from a mill or feedstore.
2a. Grain bags: milo, millet, rye berries, corn kernals, rice, whole oats, really any grain or berry that has a husk can be used :) some species prefer specific grains most work on all kinds of grains with varying levels of efficiency. Some grains are more or less robust and some do better when moistened and or pressure cooked than others :) i make my own grain but exclusively use glass mason quart jars :)
2b. Grain jars: my preference. I have recent grai. Jar prep and creation reels/shorts on my instagram and some on this tumblr if you wanna see specifics :) generally I do 15psi, 10 minute venting, for 1.5 hours for my grain and I do not soak grains, only low boil them for 30 min to soften husks and extract some grain nutrients to then use that liquid ‘grain soak’ run off for agar nutrients :)
2c. Uncle Bens rice bags: i dont do this and dont have any good advice on it. I have a UB tek link or two at end for consideration and there is a whole reddit mushroom sub i think r/unclebens (?) for this
2d. All in one bags: i also do not use these and do not recommend them generally. If you have never had a flush and are literally first timing it, then all in one may work fine :) but as much of the process you can source or create yourself the cheaper and often better, imo!
3. Substrate & Spawn-to-bulk (S2B): many mycopals have their own substrate preferences, but for me I prefer shaved coconut coir pith. I generally do a coir block 650g, 500g vermiculite (from garden store), and 50g gypsum + 50g lime for my substrate. I do not sterilize it, but I do heat pasteurize my substrate for at least 12 hours. In an air tight, insulated cooler (like for sodas at a party). You can also cold pasteurize. I like how Boomershroomer and PGT do their sub and learned from them then tweaked it for my own preferences :)
When my jars are fully colonized and observably free from contam, I will S2B using a clean butter knife :) I kinda cut down into the grain in pizza slices then swirl the knife around as I let grains that spill out mix with my substrate and basically do 1qt spawn to 2qt of substrate, saving maybe 10-15% of the spawn and substrate till end to make a special psuedo casing layer once bulk of spawn and substrate are mixed and compacted. Then I do a last sprinkling of the remaining grain like a baby lasgana and cover that with substrate.
Casing layer explainer: A casing layer is a layer of material applied on top of the colonized substrate in mushroom cultivation. It can help improve yield, reduce certain types of surface contaminants, and maintain humidity around the fruiting bodies. In my experience, using an organic sphagnum peat moss mixed with lime powder and filtered water has produced successful tubs without the need for pasteurization or sterilization. Before I used that i just used left over substrate as a casing layer :) — While some species require a specific type of casing layer after substrate colonization, most do not require one. However, adding a casing layer can be beneficial for improving yield and humidity control.
There are different ways to apply a casing layer. Some people apply it as part of the spawn to bulk (S2B) process, while others apply it only after the substrate surface is fully colonized or slightly before pinning. Personally, I have used a casing layer when colonizing pasteurized wheat/rye straw to provide an even fruiting surface for mycelium. I have also experimented with an organic peat and lime dust casing layer (no pasteurization or sterilization), which has helped retain humidity and has not resulted in any contamination. Personally, I've worked some APEs in that past that had a casing layer applied in the same instance as the S2B occuring, essentially the compacted bits colonized faster than the looser casing layer. Where I always use casing layer, is if I use spawn to colonize pasteurized wheat/rye straw, if only to provide an even fruiting surface for the mycelium! But, even then... most cubensis can fruit solely on pasteurized straw, with no casing layer!
4. Colonization and Fruiting:
4a. Youll need to find a TEK based on whatever substrate container you settle on using :) what ive outlined so far is my own tek, using 6qt shoe boxes and the materials ive outlined above. The substrate chamber/container can be a flat container/tote or could be fruited out the top of a grain bag/all-in-one bag OR could fruit off the side of a bag (if its a species like Oyster mushies that prefer side fruiting). I personally use unmodified tubs and will leave lid on my tubs while colonizing and then take lid off and replace with cleaned, upside down, misted 6qt tub that rests on the edges of the right-side-up tub to create a mini climate that allows more passive air flow, allows light to filter in from high angles promoting fruits growing upwards towards the light. Light isnt needed until pinning, and is a secondary trigger to pinning but a primary factor in pigmentation of fruits and growth direction of fruits.
Colonization of most mushroom fruiting fungi is generally between 68-80F, every species and even some varieties within those species, may have specific temp needs. The way mycopals control for this is many things that I dont have to use fortunately :) ‘Martha Tents’ are something to consider. Some use heating pads and humidifiers depending on where they live and where they are compared to the sea💯. I dont have any experience with martha tents or doing more than using my home A/C, a closet, and a heppa room filter to control my temps in the closet and with lots of trial and error���. I now leave my home at 72F, my closet warms to about 74 with the door shut and a/c at that temp, so i let plates, jars and tubs colonize at 74F and then I will move the tubs to open closet with more air flow and is closer to 72F when I am moving to fruiting :) Ive tried to be clever in how I use my space… so i use wire racks and know higher up on the rack is hotter and less air flow whereas lower is cooler and often more air flow.
Something I havent really gone into yet in this response is about sterility, aseptic environments, personal and environmental hygiene. All important to condsider…
4a. Heres my explainer on that:
Strict aespetic and hygiene techniques are not 100% and even using fancy laminar flow is not 100% contamination free potentials! Common contaminant sources include airborne spores, dust, and environmental factors. Pets that roam around your cultivation area could carry spores on their fur or paws, which may be released when they move through your space. Additionally, some fungal contaminants, like Kahms yeast, can present in distinctive ways and there are dimorphic fungal molds that have one or more alternate morphologies, main dimorphism being mold with a secondary yeast form (whence the mold spores get into human lungs, for example with blastomycosis perhaps) as an alternative reproductive presentation within its life cycle (based on temperature and environmental variables). It's essential to understand that spores and other contaminant-genetic cells are incredibly tiny and (in the case of most spores) can suspend in the air, waiting for air currents, light, or vibrations to move them around. Wet spores and bacterial cells oftentimes require animal assistance or liquid splashing/spritzing/spraying to move around, but can often hitch rides of natural environmental variabes (currents of wind, water, dirt, etc). Humans also carry a range of bacteria and fungal organisms on their skin, which can contribute to localized environmental dust and potential contamination when working in hyper sterile or attempted hygienic environments while researching fungi :)
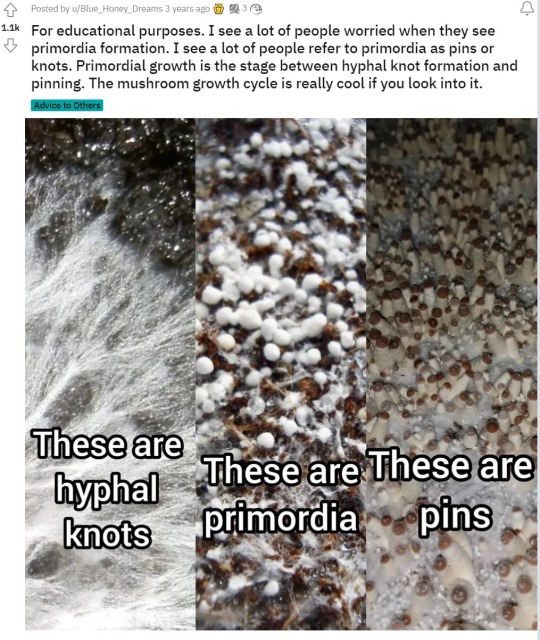
4b: Primordia, Pins and Fruiting: Pinning is a colony activity (that impacts all sides of your cake once colonized) that shifts metabolic processes of the mycelia to pinning and fruiting, this is why when you start getting heavy side pins you rarely get any flat-surface pins and fruits (all the energy goes into what pins form and fruit, first). Additionally, I believe my suggestions will be effective in controlling for environmental triggers to pinning, it is important to note that side pinning can also occur due to other factors such as genetics or substrate composition.
You can reduce the microclimate from being created that promotes side pins, during the process, by ensuring that the substrate is firmly compressed, once S2B occurs, and then sprinkled with a .25" casing layer of the same substrate material (or peat+lime casing). I press my base spawn+cvg mix firmly, and ensuring that the surface is even with least amount of inconsistently level substrate surface. This early compression, keeps the cake against the wall for as longer than doing little to no compression of your spawn+sub. You should ensure your colonizing mycelium isnt exposed to the same lighting you would for fruiting, but light is only a secondary trigger to pinning, FAE+Temp Drop+Humidity pooling/then drying are the primary triggers for pinning once colonization has completed.
5. Harvesting and Dehydrating: i twist and pull my fruits, some will cut at base, some will float their cake with water and then cut or twist and pull at that poimt :) harvesting is preferential imo. I dehydrate fruits 125F for 24 hours in Air Fryer o. Dehydrate mode :)
Resources and foundational TEKs:
Genetics: innoculatetheworld.com, sporeworks,com, boomershroomer.com, pgtmycology,com
Casing layer post w/screencaps: https://www.tumblr.com/mycochaotix/723941213220339712/mycochaos-oldacnt-plzfollownew-one-of-my
Growing gourmet (book): https://drive.google.com/file/d/1-CsyZenWzF8kHLviXM8pencZ4FAHDedh/view?usp=drivesdk
PF tek - Check this site out, gives a great layout of "PF TEK" and also BRF cakes as part of that TEK - https://www.fungifun.org/pmwiki.php/English/Pftek
HOw to make easy (cvg) bulk substrate (boomer shroomer): https://www.youtube.com/watch?v=7M6YHfaMyQ8&t=3s
how to make plates, slants, and LC - north spore - https://www.youtube.com/watch?v=a4bzQQkh71Q&t=487s
pgt LC basics - https://www.youtube.com/watch?v=gqwjUq31KgU&t=284s
Southwest mushrooms - mycelium grain spawn and LC - https://www.youtube.com/watch?v=rxlJJpu3O_g
How to sterilize equipment such as petri dishes - MIcrobehunter microscopy - https://www.youtube.com/watch?v=MVtEBtxkhGk
mycelium inoculation in the lab - southwest mushrooms - https://www.youtube.com/watch?v=Ng_Wq9PnEVI&t=560s
Mushroom Cultivation, how it should and shouldnt look: https://www.shroomery.org/forums/showflat.php/Number/17231150
Recognizing and dealing with contamination: https://www.shroomery.org/forums/showflat.php/Number/23130868
Sterilization vs Pasturization - http://www.differencebetween.net/science/difference-between-sterilization-and-pasteurization/
Mushrooms, Molds and Mycorrhizae: A Fungal Immersion Course Part 1 - https://www.youtube.com/watch?v=dD1IL2dBLQ8
Mushrooms, Molds and Mycorrhizae: A Fungal Immersion Course Part 2 - https://www.youtube.com/watch?v=_bam3tF_a7M
Mushrooms, Molds and Mycorrhizae: A Fungal Immersion Course Part 3 - https://www.youtube.com/watch?v=AiIUGGKjuwU
Mushrooms, Molds and Mycorrhizae: A Fungal Immersion Course Part 4 - https://www.youtube.com/watch?v=KLfwruf2xVA
Guide to Oysters, Gourmet, Freshcap - https://www.youtube.com/watch?v=EZAjz6bZjpg
Cooking Oyster mushrooms, TGS - https://www.youtube.com/watch?v=7qb2KF6kvhA
5 gallon bucket tek - oyster mushrooms - gourmet - https://www.youtube.com/watch?v=45b2t7fqhjA&t=60s
Mycophilia YT 'All About Aborts' discussion: https://www.youtube.com/watch?v=9C8x_32Saxg
Bacterial colony morphology - https://www.youtube.com/watch?v=4JZAFUPckUg
Mycelium morphology : how to select healthy mycelium when breeding mushrooms -- https://www.youtube.com/watch?v=leUpfsonVxc&t=1s
mycotrophic - agar xfers/sectoring off healthiest growth - https://www.youtube.com/watch?v=XMxGwkj9Wn4
DayTrippers Microscopy library of contam and healthy mycelium examples: https://www.reddit.com/r/ContamFam/comments/nnquol/microscopy_of_healthy_mycelium_and_contamination/
PH trich conversation pt 2 DT: https://www.reddit.ccom/r/ContamFam/comments/jldtuw/my_garden_of_contam_free_grow_it_is_all_about_the/
DayTrippers Trip Tips - apply PH casing layer to prevent trich: https://www.reddit.com/r/ContamFam/comments/m3unbr/daytrippers_trip_tips_video_tutorial_on_how_to/
Trich contamfam library: https://www.reddit.com/r/ContamFam/comments/115gyj2/trichoderma_the_green_monster/?utm_source=share&utm_medium=web2x&context=3
If FAE is a problem: not pinning, getting Cobweb, Stroma Overlay! “READ THIS”: https://www.reddit.com/r/ContamFam/comments/jur5ar/daytrippers_trip_tip_why_cant_i_get_this_if_fae/
DayTripper’s Trip Tips: Two cultivation tricks to solve common problems of insufficient Fresh Air Exchange and Overlay growth in monotubs: https://www.reddit.com/r/ContamFam/comments/10w1yxm/daytrippers_trip_tips_two_cultivation_tricks_to/?utm_source=share&utm_medium=web2x&context=3
#mycology#lgbtqia2s#magic mushies#microbiology#mold#60s psychedelia#lgbtqia#lgbtqia2s+#myc#enby#myco#fungi#fungusamongus#fungus#funthey#funthem#nb#non binary#psychedlia
13 notes
·
View notes
Note
Hello! Firstly, your art style is so adorable and warm. It's such a delight every time you post (especially Foggy, be still my heart). Thank you for the time and effort you put into creating them!
Secondly, I've been inspired by your art among others and decided to ask artists their tips for starting digital art. I have zero experience with art as a whole. I'm armed with a tablet and pen but have no idea how to teach myself to actually draw. I welcome any advice you may have, but don't feel pressured to answer! I hope it isn't rude to ask artists for advice, but if it is, please let me know!
Hi! It makes me so happy to know that there are people who like what I do! I'm so grateful that my drawings inspire you.
Especially Foggy. I have no idea when I'll stop drawing him. I love what I do and I believe that's the magic.
I'm honored that you asked me for artistic advice, I really am. But I'm sure that countless qualified artists can help you learn drawing techniques that will be extremely useful.
So feel free to ignore everything I'm going to say here.
I took art classes when I was younger; I studied techniques and I studied art history, etc. I forgot most of the technical part and will possibly never use it in an illustration. But those little pieces of advice, that human and simple part I never forgot, and that's what I'm going to tell you about.
First of all, have fun 💚
If you are making a happy and colorful drawing, imagine yourself there. Or if you are drawing something sad, feel the pain of what you are doing. Be it a sad character or even a dark and lifeless scene.
Be there. Your drawing is an extension of you. Your drawing is your friend.
Smile with them, Be afraid with them. You are there; this helps you visualize facial expressions and gestures.
Be generous 💚
Draw people you love. Gift people with your drawings. This helps you improve your art skills and besides, you will feel great making someone happy.
Don't be embarrassed if your drawing doesn't turn out as good as you'd like. Sometimes the simplest drawings are the ones that people like the most.
Draw every day💚
Even if just a few minutes a day. Make it your goal to learn how to draw hands, eyes, trees, etc... things you might find difficult to recreate. And every now and then redraw old drawings, so you can see where you've made progress or need to improve.
You can find lots of drawing tips and poses on Pinterest
Don't be afraid to try new things 💚
There are lots of tutorials on YouTube for beginner artists, check them out.
Procreate it's a great drawing program. There are many tutorials on YouTube teaching how to use it too. But always use your imagination. Be yourself, put your personality in your drawings. Don't be afraid to use colors that don't match each other. And again, have fun.
I wish you good luck and hope to see a lot of your art out there. (Especially Foggys, lots and lots of Foggys)
8 notes
·
View notes
Text
I think this book plagiarized my writing.
Disclaimer: Please do not harrass anyone because of this post. Please do not review bomb this author's books. The last thing I want is to sabotage another author's career or kick off a cyberbullying campaign. I am making this post to present my evidence and get the truth out there so readers can make informed decisions about the books they invest in, NOT as any sort of personal attack on this author.
In case you don't follow my blog: Hi, I'm Sam. I'm a queer, neurodivergent witch and author who writes books about witchcraft, paganism, and identity politics. I also read a lot of books about those topics because I enjoy hearing what other people have to say about them.
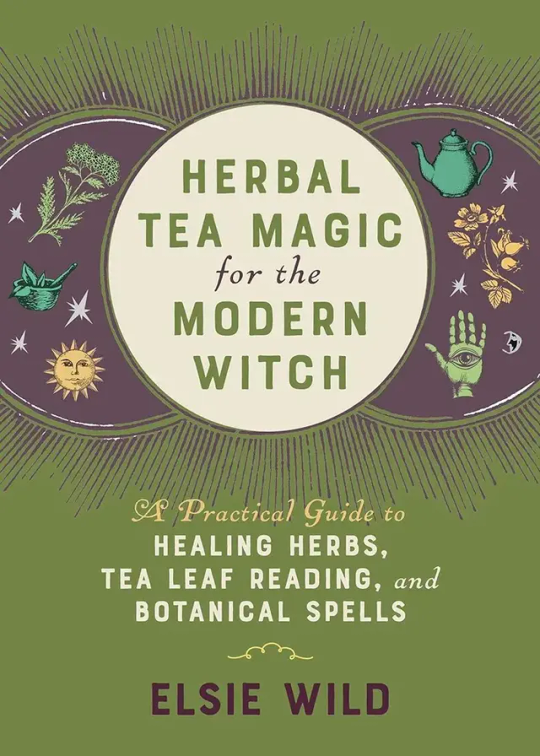
Recently, I was reading the book Herbal Tea Magic for the Modern Witch by Elsie Wild and realized what I was reading felt familiar. Like, really, really familiar. Like, "hey, isn't this my work?" familiar.
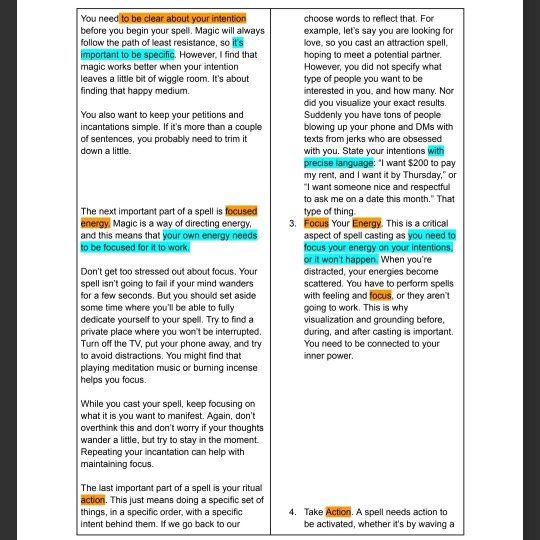
Herbal Tea Magic for the Modern Witch was published in November, 2021. It contains a section titled "The Four Components of a Spell," which is very, very similar to a blog post I made in April of 2020, titled "How to Cast Spells That Work." I also posted a video version of that blog post to YouTube at the same time. You can read the original blog post in full here.
Below is a table I made where I laid out my text and the excerpt from Elsie Wild's book side by side. Words and phrases highlighted in orange are identical across both texts. Words and phrases highlighted in blue are the same idea, but phrased slightly differently.


As far as I am aware, this four-part model for spellcrafting is my original creation. Although I was inspired by books on magic and spellcraft (especially Wicca For Beginners by Thea Sabin), this simplified model is one I created to make spellwork more simple and accessible for beginners.
I think there's too many similarities between the two texts to be a coincidence. To me with my journalism degree, this looks like paraphrasing plagiarism, a type of plagiarism where an author repeats someone else's ideas but changes the exact language to hide the similarity.
Wild does incorporate some of her own ideas as well, and I'm definitely not claiming that her entire book is plagiarized, but I believe the main idea of this specific passage is plagiarized from my blog.
Paraphrasing plagiarism is still plagiarism. This author may not have literally copied and pasted my work, but I think she is very much trying to pass off my ideas as her own.
All that being said, I have no reason to believe Elsie Wild plagiarized me on purpose. In 2020 and 2021, a lot of my content from Tumblr was stolen and reposted on other platforms, especially Instagram. I personally have come across several accounts that took screenshots of my blog, cropped out my username, and then posted my content without credit. There are probably many others I never caught. It's possible Wild saw my words on one of these accounts and had no idea who the original author was.
I have reached out both to Elsie Wild and to her publishing company, Ulysses Press, but as of this post I have not heard back from either. I really wish I could talk to someone who worked on this book to get more information, but it has now been several weeks with no response, so I decided to go public because I feel like people deserve to know about this.
Again, I am not trying to cancel Elsie Wild or her publisher, but I'll admit I'm hurt by the possibility of someone else taking credit for my ideas. I genuinely do hope any plagiarism was unintentional because the alternative is a full-time writer with an established career knowingly plagiarizing from online creators with smaller platforms.
If you'd like to help me out, you can do that by reblogging this post and/or buying my books. Helping spread the word about this is very, very much appreciated.
#plagiarism#plagiarizing#elsie wild#ulysses press#tea witch#tea magic#kitchen witch#kitchen witchcraft#green witch#green witchcraft#witch books#witchcraft books#witchcraft resources#witchy#witchblr#witch#long post#signal boost#mine#my writing#writblr#writers on tumblr#writerscommunity#witchcraft#wicca
141 notes
·
View notes
Text
Sweet Treats | Happy Valentine's Day!
Summary: Tomorrow is Valentine's Day and you want to make a nice gift for your crush! Luckily, you have a good friend willing to help you decorate the sweet treats!


WC: 2923
Tags: fluff, one shot, gn!reader, Ruggie Bucchi, Valentine's Day, baking cookies, decorating cookies, confessing feelings
© please do not copy and or repost my work as your own, my brain is massive and these are my thoughts.

You pressed play on the video, trying to watch it quietly so those around you wouldn’t hear the video and start asking questions. Hi everyone! In this tutorial, I will show you some simple ways to decorate cookies for Valentine’s Day. You quickly paused it and glanced around the room, seeing if anyone’s expressions had changed. The volume was a little bit louder than what you had anticipated. Everyone seemed to be studying or chatting with each other, so you figured no one had heard the video start.
You pressed play again, listening to the woman’s voice describe the many types of icing and decorating tools she would be using for the sugar cookies. You had your eye on someone in the class, but had never had enough confidence to make a move. But this time around, you were going to change that. You wanted to give them a nice gift, something you made with your own two hands. Something sweet to their liking, hoping they would reciprocate your feelings for them after you got them off your chest.
Making cookies was easy, but decorating them? That was a whole new ballgame. The designs you saw on the sugary sweets at stores were so intricate. You knew your cookies wouldn’t look as good, but maybe watching a few tutorials on YouTube would help boost your confidence and get your creativity going. The video you found was supposed to be for beginners, but even so you felt like you were in over your head. Your mind was filling with thoughts of anxiety and what ifs as you felt someone put their books down on your table and sit in the seat beside you.
You shuffled your phone in your hand, trying to pause the video before you started getting asked questions, but it was too late. “What is that? Cookies? Shishishi,” Ruggie said, giving a small chuckle as he sat down and put his arm across the back of your seat. He leaned in, almost as if he was going to watch the video with you. Why does he even care about a video for decorating cookies? “Yeah, I thought about making some cookies tonight… but I don’t really know how to decorate them, so I thought watching a video would help,” you said shyly. He nodded, gesturing for you to continue the video. Guess he is going to watch the video with you?
The two of you sat in your seats, watching the video tutorial go over how to decorate the cookies, showing a multitude of designs from hearts to diamonds to swirls and stripes. You could tell Ruggie’s eyes were lighting up watching the video. He looked like a kid walking into a candy store for the first time, seeing so many things that made him ecstatic. “Do you like cookies, Ruggie?” you asked as the video showed the compilation of decorated cookies at the end.
“Me? I mean, yeah, who doesn’t like cookies?” he said, looking at you with a grin. “Cookies come in so many flavors and you can basically do whatever you want with ‘em, kinda like donuts.” With the video over, you closed your phone and put it beside your books on the table. Ruggie was playing with his pencil, teetering it on his finger instead of using it to take notes. He took it and put the eraser end towards his lips, tapping it ever so slightly. “So you said you’re making these tonight?” he asked.
“Yes, I kinda wanted them ready for tomorrow. Since it’s Valentine’s Day, I just hope I can decorate them all and they look good,” you sighed, leaning forward onto the table. You crossed your arms and put your head into them, another sigh escaping your mouth. “Why not get help decorating them then?” Ruggie said, snapping his finger and moving his hand off the chair and onto the back of your shoulders.
You turned your head to look at him, his gentle smile seemed genuine. Maybe you should get help decorating, that would definitely help you out a lot. “Ya know what, I didn’t think of that. Hmm,” you sat up and started thinking about who would be best to ask for help. “Maybe I’ll see if Trey can help me, he would be super good at this.” Ruggie gave you a few blinks, staring back at you extremely confused. “You do realize… Trey probably has so many things he has to bake tonight for other people? I know Kalim has already asked for a cake, and even some Savanaclaw dudes have asked for him to make things. Maybe you shouldn’t ask him..” he said in a polite tone.
He was right, maybe asking Trey for help would be too much of a burden, but getting these cookies done for your crush was very important to you. “Ughhh,” you groaned. “Then who else can I ask? No one else in this stupid school would know how to do this, I may as well take my chances and ask Grim for help and just hope he doesn’t eat them all before tomorrow.” Ruggie shook his head at your words as he giggled. “Shishishi. Look, how about I help you? I’ve decorated cookies before, not for Valentine’s Day, but for some events that I had to work a catering job for. What’d ya say?”
Ruggie has decorated cookies before? You guessed that would make sense. He always had tricks up his sleeves from all the odd jobs he has done, baking cookies and decorating them was just another thing to check off on his “Jack of All Trades” list you had mentally been doing. “Okay, fine. You can help me decorate them, I’ll probably make all the cookies before you get to the dorm so we just have to decorate them all,” you said back to him.
As the rest of your free period continued, you two talked about the type of icings you would need, colors to get, possible sprinkles or other edible decorations for the cookies, etc. Ruggie seemed to know a lot more about decorating baked goods than what you had expected, which was fine in your mind. At least one of you would know what they were doing later.
┏━━━━━━━┓
later at Ramshackle
┗━━━━━━━┛
You were finishing placing the last cookies on the cooling racks when you heard knocking on the dorm’s door. You wiped your hands on your pants, leaving small finger prints of flour on the legs. Opening the door, Ruggie was on the outside of it, a bag in his hand. You cocked your head to the side looking at the bag, you didn’t ask him to bring anything for the cookies. “I brought a few extra things for the cookies, it’s just a few more things to use to decorate,” he said with his signature grin, his fangs staring back at you. “Oh, okay then. Works for me,” you said as you led him inside. Ruggie had never been inside Ramshackle before this, maybe just in the living room a time or two, but not actually walking through the dorm.
“I know it’s drabby, but I’m trying to make it look nicer, I swear,” you said as he trailed behind you. His eyes wandered across the room, looking at all the nooks and crannies in sight. “I don’t mind, shishishi. It just looks very … lived in,” he said with a slight giggle. That was a nice way of saying it was messy or disorganized looking, but he wasn’t wrong either way. Between school and baby sitting Grim, it’s not like you had much time at home to just sit and clean all day.
You both entered the kitchen, Ruggie placing his bag on the counter and pulling the decorating tools out as you watched. He pulled out small metal tools that had a little, round ball at the tip. It looked like one of the ones you had seen in the video earlier. He had brought more icing, just in case there wasn’t enough of a certain color, and more tips to use for frosting if either of you were making designs.
“Woah, that’s pretty cool. You just had that stuff laying around?” you asked in a playful tone. Part of you felt like he just went out and bought all this stuff, but knowing Ruggie he wouldn’t have just bought something to use one time. That would’ve been a waste of money. “Actually, yeah. We have stuff like this at our dorm, but no one uses it so it’s just hidden away in one of the drawers. I figured maybe we could use some of these things,” he said, pulling the last of the items out.
You felt one of the cookies, checking to make sure it wasn’t so warm the icing would melt. It was still slightly warm, but chilled enough to be able to do something with you hoped. “Ok, well, any ideas? Do you want to split the cookies to decorate?” you asked. You hadn’t really given thought to how you both would decorate. Maybe it would be fine for you to just do half the cookies and Ruggie do the other half. “I think we can split them. Are you giving all these to one person or to individual people?” he asked, his bangs loosely moving as he looked over at you.
“Uh, well.. I was going to give them all to.. a certain someone,” you said shyly. Ruggie perked his ears up and raised his brows. “Ohh, I see. So these are for your crush, hmm?” he said, giving you an is that so expression. You could feel yourself getting embarrassed, talking to Ruggie about your classroom crush was not what you wanted to do. “Here, take these and you decorate them. I will do this half,” you snappily said, basically tossing him a tray of cookies. He laughed at you under his breath as he grabbed the red icing to use.
It was quiet for a while as you two were decorating the cookies. You were so focused on making the designs you had seen in the video earlier in class, opening your phone every so often to reference the pictures you had screenshotted. Ruggie was doing excellent at decorating, his lines were smooth and clean. It was clear he had great hand-eye coordination and very steady hands. He acted like he was an amateur at this, but his cookies looked like ones you would see at a bakery. Maybe he’d give Trey’s family a run for their money.
The silence was broken with Ruggie’s curiosity. “So your crush, huh, you think he will like these cookies?” he asked quietly. You weren’t sure if you wanted to answer his questions, but you figured it would be a little rude to just ignore him. “I hope he does. I mean, I know they’re not fancy, but hopefully they are good enough,” you said as you made little red hearts on top of the white iced cookie.
“I bet he will! They smell amazing, I kinda want one for myself, shishishi. Is he in our class or what?” he asked, his tail was noticeably wagging behind him. His curiosity seemed to be getting the best of him. “Ruggie, you know what they say about curiosity?” you laughed as you put the icing down. “Yeah, yeah. It killed the cat. But I’m not a cat, I’m a hyena,” he said grinning back at you. “So… he is in our class then?” You nodded your head yes in response to his question as you looked at the counter, searching for the pink icing. Ruggie handed it to you when he noticed what you were looking for.
“Please don’t tell me it’s that one guy in there, he is so annoying,” he said as you took the icing from his hand. “Oh god, no. It’s not him,” you said quickly. Ruggie was right, that guy was annoying. He always asked you where his hug was at, standing there with his stupid red hair and red heart on his face. Ruggie was making white dots on the red iced cookie he was doing. He grabbed the small round tipped decorating tool and used it to turn the dots into small hearts. “Alright, so he’s in our class. What do you like about him?” he asked as his gaze turned to look up at you. “I guess you don’t have to answer that if you don’t want to, shishishi.”
“It’s fine,” you sighed. Maybe telling Ruggie about your crush would make you more confident tomorrow when you told your crush how you felt. “I think he’s really sweet, and he’s pretty funny.” You continued to make little designs on your cookie as Ruggie listened and decorated his own cookie. “I don’t know. It’s not like we talk to each other every day, but when I do talk to him.. It just feels like home. If that makes sense?” you said, giving Ruggie an unsure look.
Ruggie was staring back at you, his eyes sparkling as you turned to him. He quickly shifted his gaze as you turned around. “No, I know exactly what you mean, I think,” he said as he made a swirl design on his last cookie. “Are you going to tell him tomorrow how you feel when you give him these?”
“That is the plan, but I am so worried about what he will say. What if he doesn’t like the cookies? Or what if he doesn’t even like me back?” you said, talking with your hands and getting little droplets of icing on the counter. Ruggie was quick to grab paper towels as you kept talking, moving your hands around with every word you said. “Like seriously, I don’t know why I’m even doing this. He would be stupid to even like me.”
“Hey, don’t say that. I bet he would like you, I mean don’t count yourself out just yet. You haven’t even put yourself out there,” he said with a reassuring tone. Ruggie’s face looking at you seemed very sincere, maybe he was right. You do miss every shot you don’t take (Micheal Scott). “Hell, if he doesn’t take these cookies, I will.” You laughed at Ruggie’s words, he really was one of the nicest people to you in your class. You finished your last cookie and let them sit out to dry while Ruggie bagged up his stuff.
“Hey, since I helped out, would you care if I took one home with me? As a nice little treat?” he said, giving you puppy dog eyes in hopes you would say yes. “Of course, Ruggie. Take your pick,” you said to him. He grabbed one of the cookies, making sure he was holding it from the bottom to not ruin the icing. “Thanks, I’ll see you tomorrow,” he said with a grin as he made his way out the dorm door. Tomorrow. The big day for you. It was still early in the night, only about 9pm, but you decided to sleep now so you could be well rested and prepare yourself mentally for the next day.
┏━━━━━━━┓
Next day in free period
┗━━━━━━━┛
It was time. Time to find your crush in class and give him his Valentine’s Day gift. It was now or never. You sat in your seat, your mind trying to talk your body out of its own actions. You got up from your desk and took a long breath in and let it out slowly to calm yourself. You leaned down into your bag, the tin box of cookies tucked away safely. You grabbed them, no turning back now.
You walked across the room to the table on the opposite side, the other students laughing and chatting around the room with each other. No one was paying attention to you, it was normal for the students to get up and move around during free periods. It helped that it didn’t feel like all eyes were on you. You found your crush, offering the box to him as you gathered enough courage to speak.
“These are for you..,” you said, not wanting to make eye contact with the boy in front of you. Your gaze locked eyes with him as he spoke though. “For me?” Ruggie said, looking confused as he took the container. He opened it, seeing the cookies the two of you had decorated the night before. He looked up quickly, ears perked and his eyes once again starry. “You mean, I’m your crush?”
“Yes..,” you said quietly, fidgeting your fingers waiting for his response. His laugh took you by surprise as he pulled something out of his own bag. Another container, similar to the one you had. He must’ve gotten it from Sam’s as well you thought.
“I have something for you, too,” he said, as he handed you the container. You weren’t sure what to say, but it wasn’t uncommon for friends to get each other gifts for holidays so you just figured it was generic candies or what not. You opened the container, seeing the cookie Ruggie had taken last night as his treat for helping. He had taken it home to decorate more, adding the words “Will you be my valentine?” on it. Still shocked, you looked at him with your mouth open, not really sure what to say. He gave you a grin and laughed. “I told you he would like the cookies.. and you,” he said, his tail happily swishing back and forth in his seat.
#~.twst#ruggie x reader#ruggie bucchi twst#ruggie bucchi fanfic#valentine's day#ruggie twst#gn!reader x twst#gn!reader x ruggie#twst fanfic#disney twst x reader#disney twst fanfic#ruggie bucchi propaganda#rugbert bluecheese
45 notes
·
View notes
Note
How exactly does one get into tf2. Currently my knowledge comes from old man yaoi on my dash and half-remembered youtube videos from like 2015 but the guys intrigue me
Dead serious you should play the actual game if you're able to, I have a couple advice-giving posts that I'll try to rb either now or in the morning that are specifically aimed towards beginners who don't play a lot of online shooters and who are also bad at games like myself, and how to get into tf2 as a game in a way that will make online casual play rlly enjoyable (the gist of it is to spend a lot of time practicing in offline or private servers to get a decent grasp on the ropes of each class and to learn what playstyles suit you best before jumping straight into casual from training). You should also watch all the videos and read the comics and etc if ur into the characters, especially if you're going to be on Tumblr and don't want people to make fun of you. Those are both really easy to get into, tf2 characters are super simple and you'll understand them in no time
20 notes
·
View notes
Note
hey! I play acoustic guitar and I wanna start trying out electric but I also reeeally wanna get nerdy about types of guitars and gear and stuff, I find it very cool but I’m not entirely sure where to start. Do you have any book recommendations or anything like that? Also this is unrelated but I would kill to know exactly what gerard has got going on with their pedalboard cuz woah do they love that thing. Thanks and I love ur blog, hope you have a nice day!
hey so sorry this took me a bit to answer!! honestly my recommendation though would be to not go crazy with pedals to start out with. start with an affordable beginner's guitar, a headphone or mini amp, and maybe one effects pedal (i'd go with a simple overdrive or distortion one to start out with, they're your classic rock sound. or try to find a cheap practice amp with built-in effects and then you can forego pedals just to start out with - i have an older roland micro cube i got second hand for pretty cheap and it's really great and pretty versatile) and just get comfortable with playing electric first. first of all, you won't know what to do with the pedals until you're good at playing and they'll be wasted! but mainly, pedals are just really fucking expensive lol. it's not worth it unless you're a really committed player yk
also once again i'm definitely not an expert in any of this - i'm partly answering in this way because i don't have much gear myself and i think that's a better approach to learning that, like, sinking a whole lot of money into pedals when you don't know exactly what you're looking for or what sound/style you want (for reference i have two boss pedals and one digital multi-effects pedal, and that one i use so rarely, all of them second-hand). also learning + getting used to playing with pedals is like...a whole different skill set on top of just playing that should probably come after you get a decent grip on guitar itself. obviously you already play acoustic so you have a big headstart but playing electric is a pretty different approach, especially when you bring pedals into it. if you find yourself getting bored, sure, throw one in there to spice things up! but they're a pretty big investment sadly lol. if you just want to learn about them because you think they're super interesting, there are soooo many youtube channels out there dedicated specifically to that lmao. it's nerd central out there
and okay now if you're just asking about learning electric in general, my advice would be to find an online course that offers you some kind of structure - there's SO many resources out there for learning that it's actually overwhelming and one of the hardest parts is trying to figure out where to start and where to go next. i started out on fender play and it was pretty good (though it's aimed at people who have zero musical background so you may need to skip through some lessons), but i got a subscription when they were doing like. 70% off or something asdfkaljf, so you could keep an eye out to see if they do a new year's special or something relatively soon! otherwise if you can find a youtuber who does structured lessons in a sequential order i think that's your best bet - being dedicated to seeing through the boring parts of practice and not just jumping around and half-learning a bunch of out-of-context skills in any random order is the only way you can really get anywhere unfortunately ajsdkglaj. but honestly even the boring parts of practice are kind of fun especially if you're able to link whatever technique/scale you're learning to a song you enjoy. when i was teaching myself (like before i bit the bullet and started paying for lessons a few months ago lol) i would jump between the fender lessons and going through tabs of my chem songs to see if there were bits i could play with what i knew (playing along to those songs for the first time is the most exciting feeling in the world fr fr). and seeing the bits that i couldn't quite play but that didn't seem too hard really motivated me to keep going yk? anyway oh my god sorry this got so long AGAIN i'm not even sure if i properly answered your question LMAO.
oh but for the last part i will say that a really cool group of people is currently working on a zine showcasing mcr gear (including gerard's vocal pedalboard) over the years! it's a while off yet bc it requires a lot of research but it's gonna be awesome. gerard hasn't said much about his pedalboard yet but people who know way more than me are on it, hang tight B)
#answered#i'm so sorry would you believe this is me trying to be succinct#i hope you have a great day too!! and i hope you actually see this LOL sorry it took me a bit to answer
64 notes
·
View notes
Text
@stardrunk-stargazer !! Here you go :) Pick and chose whichever you prefer!
^ I have checked the links, and it is safe to download! All free and able to be printed out. Goes up to more advanced levels, and is made for young kids so is simple to understand. Easy to power through :)
The first book there I really like because it’s more technical and I love that shit. It’s written for adults, and is incredibly in depth theory wise. If you’re more so looking to learn to play straight off the bat then I don’t recommend this one
The second one feels odd to me because I wasn’t taught like that and its cluttered. It may work better for you, however!
The third link is broken, but goes to a blog that has random information
The fourth is not as in depth, and it won’t help much
The last is much better and a possibility. It seems to go through things slowly though :(
^ These lessons are more dry, but it gets the point across! All free and goes to advanced lessons :)
Onto youtube channels!!!
Simple, fun snippets. Not really lessons per se, but if you find yourself at a keyboard these are fun to do :)
This guy has a faaaar more comprihensive youtube channel! Live videos, beginner courses and tips and tricks! I recommend this one for certain.
Aaanyways, before this gets too long, here they are!! :)) I hope this helps somewhat. I have more if you need
9 notes
·
View notes
Note
Hello!
First of all, happy new year and congrats on 1000 followers!
I just want to say I love your blog, and it's one of my favourite blogs on tumblr. You're a very important part of the GO fandom, so keep being you :). Your work is amazing; and I really love your video edits (I confess I haven't found the time to read your fanfics yet but it's definitely on my list, I promise).
I've been kind of wanting to try gifmaking for a while, and I read your posts about video editing/gifmaking. If it's not too much trouble, would you be willing to share a few more tips? (Doesn't have to be that detailed, just a few simple tricks for beginners).
Thank you and have a nice day/night!
Oh Anon, you're a sweetie. Thank you!! I'm so pleased that this blog can bring joy to others. All of you are so lovely, it makes everything so much more fun!
I'll share whatever wisdom I can but I'm still a bit of a newbie really; I've only used Davinci Resolve for about 6 months~ or so, so if anyone else has any other tips, please add!!
1) I would recommend Davinci Resolve to anyone who wants to get into video editing as it's free & quite similar to Vegas Pro (which I do have, but personally I prefer Davinci).
2) If you want to make GIFs, I'd recommend creating a project using the settings I use here, then saving it as your 'template' so every time you want to make a new GIF, you don't have to re-do your settings because it'll be saved on that project.
3) You can create multiple tracks - I use this for overlaying audio (and turning off video on that track), or for adding text or effects generators. This is what my War of Hearts edit looks like in DaVinci:

I used track 3 & 4 for text
Track 2 for just audio (you can see I turned off video)
Track 1 was my 'main' video & audio track
Track A5 was my music
This is what The Book of Love looks like, you can see it was only 3 tracks (music, video, text)

4) The marker function. This is handy for leaving notes for yourself or sectioning things off while you work, but you can also render those markers to create 'chapters' automatically when you upload it to YouTube. Add a marker with the little blue button, then double click your market & name it. You can use different colours too.


When you render it, tick 'Chapters from Markers' and make sure the colour matches the markers you want to make into chapters, then export.

5) Get yourself some new fonts!! I downloaded free fonts from Google [link], installed them, restarted Davinci, and they were ready to use!
6) The 3rd tab. When you click on a clip, you'll get lots of options. PLAY WITH THEM. Just start changing settings & observe what it does. I cannot emphasis enough - just play with Davinci and see what happens. Don't aim to make it something, just aim to learn. Whack a clip down & start putting effects, zoom, cropping, etc on it.
You can colour the image on the 5th tab via colour wheels. Don't worry if it's silly! Again, just click around and see what happens! Here, I'll show you me playing with colours & effects:

honestly it looks like a meme with the text
7) Speaking of the 5th tab, I ONLY LEARNT THIS LAST WEEK WHICH IS EMBARRASING, but you can copy the colouring you've done to 1 clip onto other clips. Select the clips you want to colour, then scrollwheel click on the clip WITH the colourings you want.
8) Use your arrow keys on the keyboard (⬅️➡️⬇️⬆️) to move along your timeline. It's a lot easier to find the right frame, instead of using your mouse. Here's some basic keyboard shortcuts:
Cut: [Ctrl + X]
Copy: [Ctrl + C]
Undo: [Ctrl + Z]
Redo: [Ctrl + Shift + Z]
Paste: [Ctrl + V]
Select All: [Ctrl + A]
Play/pause [Space]
9) This seems obvious but I have lost hours of editing because I didn't do this. When you start a new project, SAVE IT (File>Save Project) as then it'll start autosaving the project.
10) I would heavily recommend watching some YouTube tutorials if you've never video edited before. I also started out with a pre-installed Windows 'Video Editor' (I think it's called Clipchamp now?) which is extremely basic, so it allowed me to learn without getting overwhelmed with all the bells and whistles that Davinci has. If DaVinci is too much right away, try something easier, but you might get frustrated as it's less control & options (only 1 track, limited colouring options, limited effects/transitions, can't view frame by frame, etc).
In summary: Play around with your editing software & see what happens. Watch edits, look at GIFs- observe how they edit as it might inspire you & help put some of your new skills/knowledge into context. If there's anything I can help with, just drop me a message! Good luck & happy editing ❤️
5 notes
·
View notes
Last Seen Blogs