
annsbites
Anns Bites
Sharing all the recipes and cooking tips that I've learned and love.
261 posts
Don't wanna be here? Send us removal request.
Last Seen Blogs

69suckitandsee69
ᦓꪖꪻꪊ᥅ꪀ

millieoswald6-blog
The Ketogenic Diet - Ultimate fat Reducing Diet

newtonpermetersquare
Science Memes

vanessaaquiloina
unna

Text
Peanut Butter Oreo Krispie Treats
Remember that scene in The Parent Trap where Hallie and Annie both discovered they like peanut butter and oreos together?? Well these krispie treats are my spin on that. This is probably one of my favorite recipes to date.

Ingredients: 1/2 cup unsalted butter
8 cups mini marshmallows (about 2 20oz bags. You will have some left over that you can throw in at the end so theres little marshmallow bombs)
2 tsp sea salt
5 cups Rice Krispies cereal
1/4 cup + 1/3 cup peanut butter (they will be used at different times), plus a little more for drizzling on the top
16 Oreos (chopped up coarsely), plus about 4 more (crushed into a fine powder, for the topping)
1. Lightly spray a 9x9 square pan with non stick spray, then line with wax paper, leaving a little hanging over each side for easy removal. Set aside.
2. In a large pot over medium heat, melt the butter. Stir it frequently to help it melt quicker. Once fully melted, turn the heat down to medium low and add the marshmallows and salt. Use a rubber spatula to constantly stir the mixture until the marshmallows are fully melted. You want to keep the marshmallows moving the whole time so they do not burn at all. Once the marshmallows are fully melted add in 1/4 cup peanut butter and stir until it is fully incorporated into the marshmallows. Remove from the heat.
3. Add in the cereal and chopped up Oreos. Quickly mix everything together. Add in the extra 1/3 cup peanut butter and quickly mix it through. It's okay if it does not fully melt, a few globs of peanut butter throughout will be tasty.
4. Transfer the mixture to the prepared pan and spread it out into an even layer. Allow the krispie treats to cool in the pan completely. Once cooled, remove from the pan and place on a cutting board. Melt a little extra peanut butter and drizzle it all over the top, then sprinkle with the crushed up Oreo. Cut into your desired shape and size and enjoy!
#annsbites#food#foodblog#cook#cooking#recipe#baking#no bake#no bake dessert#rice krispy treats#rice krispies#peanut butter#Oreo#peanut butter and Oreo#The Parent Trap#movie#dessert#sweet
12 notes
·
View notes
Text
Caramel Apple Cake
This cake is beyond amazing. I could have probably eaten the entire thing if i wanted to. Its sweet with a nice bite from the spices. And the caramel frosting is to die for. You will be making this all fall.

Ingredients : For the apples-2 large baking apples (I used gala apples)
4 tbsp unsalted butter
½ cup brown sugar
1 tsp cinnamon
1 tsp ground nutmeg
dash of salt
For the cake- ½ cup butter, softened
1 1/3 cups dark brown sugar
3 eggs
2 tsp vanilla extract
1 2/3 cups AP flour
¾ tsp baking powder
dash of salt
2 tsp cinnamon
2 tsp ground ginger
1 tsp fresh ground nutmeg
1/2 tsp pumpkin pie spice
For the frosting- 1 ½ sticks butter, softened
3 cups powdered sugar
8 ounces soft caramel candies (I use Wethers brand)
2 tbsp heavy cream
1 tsp vanilla extract
sea salt , to flake over the top
1. Make the apples: Melt the butter over medium heat in a large sauce pan. Once the butter is melted add in the apples, brown sugar, cinnamon, nutmeg, and salt. Stir well to coat the apples. Cook, stirring regularly, for about 6 minutes, until the apples begin to soften a little bit. You don't want them fully soft since they will continue to cook within the cake. Remove the pan from the heat and let cool completely.
2. Make the cake: Heat your oven to 350*. Grease a 10 inch cast iron skillet with a little bit of vegetable oil. Set aside. In the bowl of a stand mixer cream together the butter and sugar for 5 minutes, until it is very light and fluffy. Scrape down the sides and bottom as needed. One at a time add in the eggs, mixing until fully combined after adding each egg. Add in the vanilla and mix well. Scrape down the sides as needed.
3. In a separate bowl whisk together the flour, baking powder, salt, cinnamon, ginger, nutmeg, and pumpkin pie spice. Add the dry mixture into the wet, half at a time, and mix well until everything is just combined. Remove the bowl from the stand mixer and gently fold the apple mixture into the cake batter. Don’t drain off any of the liquid from the apples, pour it all in! Mix gently until combined.
4. Pour the batter into the cast iron skillet and make sure it is in one, even layer. Bake for 42 minutes, until the top is golden brown and a toothpick inserted in the middle comes out clean (a few small crumbs are okay) . Leave the cake in the skillet and let cool completely.
5. Make the frosting: In the bowl of a stand mixer (with the paddle attachment) beat the butter on medium high speed for 30 seconds. One cup at a time add in the powdered sugar, mixing on medium after each addition. Once all powdered sugar is added beat on medium high speed for 2 minutes.
6. While the butter and powdered sugar are being mixed add the soft caramels into a microwave safe glass measuring cup or bowl. Microwave in 20 second intervals, stirring after each interval. You want the caramels to be liquid, but not scalding hot. Once the caramels are fully melted and liquid, let cool for 30 seconds. Then pour the caramel into the butter mixture and mix on medium speed for 2 minutes. The mixture will look very separated and oily (due to the hot caramel and butter), but that is normal. Just keep letting it mix. Add the heavy cream and vanilla and mix on high speed for 3 minutes. The frosting will be very smooth and velvety.
7. Put the frosting on top of the COOLED cake and spread evenly all over the cake. Theres a lot of frosting so you can lay it on thick or save a little for leftovers. Top with some sea salt if desired. Then eat it all!!!
#annsbites#food#foodblog#cook#cooking#recipe#cake#dessert#fall baking#fall dessert#apple#apple cake#caramel apple#caramel apple cake#cast iron skillet#cast iron cake#cast iron baking#apples#fall
35 notes
·
View notes
Text
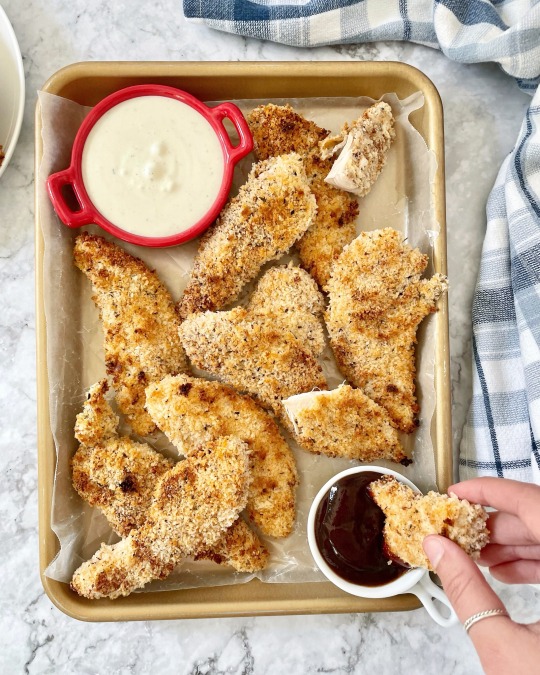
Oven Baked Chicken Tenders
These are going to be your new favorite snack/meal to make. They are so easy to make, packed with flavor and they are baked in the oven so theres no messy deep frying. Only hard part is choosing which sauce to dip them in.
Ingredients: 2 packs chicken breast tenders
2 cups AP Flour
4 large eggs
3 cups Panko breadcrumbs
½ cup fresh grated parmesan cheese (optional)
salt & pepper to taste
2 tbsp garlic powder
2 tbsp onion powder
2 tbsp smoked paprika
2 tbsp Italian seasoning
non stick cooking spray
1. Line a large baking sheet with foil, place a cooling rack on top of the foil (to keep the chicken elevated) and spray the rack generously with non stick spray. Set aside. Preheat your oven to 425*.
2. Open the chicken tender packages and season the chicken generously with salt and pepper. Place on your counter to start the assembly line. In a medium dish combine the flour, salt and pepper to taste, 1 tbsp garlic powder, 1 tbsp onion powder, and 1 tbsp smoked paprika. Combine with a fork and place on your counter next to your chicken. In another medium bowl combine the eggs and some salt and pepper. Use a fork to beat the eggs. Place the bowl next to the flour. In another medium bowl combine the panko breadcrumbs, the parmesan cheese, the remaining garlic powder, onion powder and smoked paprika, as well as the Italian seasoning. Use a clean fork to combine well and place the bowl next to the eggs. Place the prepared baking sheet next to the breadcrumbs bowl and now you have your assembly line.
3. Take a piece of chicken and coat it in the flour, shake off any excess flour. Then coat it in the egg, shaking off any excess egg. Then roll the chicken in the breadcrumb mixture, making sure to coat the whole piece evenly. Place on the prepared baking sheet. Continue this process (flour, egg, breadcrumb) with all of the pieces of chicken. Once all the pieces are placed on the baking sheet, wash your hands, then spray the tops of the chicken lightly with non stick spray.
4. Place the chicken in the oven and bake for 15 minutes. After 15 minutes, remove the pan from the oven and flip all of the chicken over. Place back in the oven and continue to cook for another 5-7 minutes, or until a thermometer inserted in the chicken reads 165*. If you would like them to be extra crispy you can broil them for 3-4 minutes, but be sure to watch them because they can burn quickly.
5. Remove from the oven and let cool for a few minutes. Serve with whatever sauce you like and eat up!
#annsbites#food#foodblog#cook#cooking#healthy snack#recipe#dinner#lunch#healthy recipe#chicken#chicken tenders#chicken tender#oven baked#chicken tendies
12 notes
·
View notes
Text
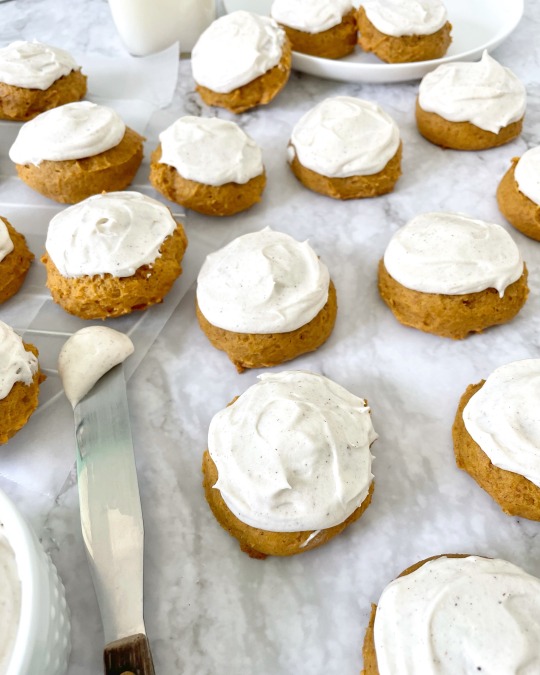
Pumpkin Cookies with Spiced Cream Cheese Frosting
These cookies are fall in a bite. They are super soft, filled with warm spices, and topped off with the silkiest cream cheese frosting. You won't be able to stop making or eating these.
Ingredients:
For the cookies- 1 1/2 cups canned pumpkin puree
3 cups AP flour
1 1/2 tsp baking powder
1 tsp baking soda
pinch of salt
2 tsp pumpkin pie spice
2 tsp ground cinnamon
1 tsp ground nutmeg
1 tsp ground ginger
3/4 cups (1 1/2 sticks) butter, softened
1 cup brown sugar
3/4 cups granulated sugar
1 large egg
2 tsp milk
1 tsp vanilla extract
For the frosting- 1 8oz block of cream cheese, softened
1/2 cup (1 stick) butter softened
2 1/2 cups powdered sugar
pinch of salt
1 tsp pumpkin pie spice ( you can do a little more, but it will turn the frosting brown)
1. Line a paper plate with some paper towels and spread the pumpkin puree over top, into a flat layer. Place one more paper towel over top and press it down lightly into the pumpkin. Allow the pumpkin to sit and the paper towels to absorb some moisture from pumpkin, about 20 minutes. Set aside.
2. Preheat your oven to 350*. Line a large baking sheet with parchment paper. This recipe makes about 42 cookies so you will need a large sheet and bake in batches. Set aside.
3. In a medium bowl whisk together the flour, baking powder, baking soda, salt, pumpkin pie spice, cinnamon, nutmeg, and ginger. Mix well. Set aside.
4. In the bowl of stand mixer fitted with paddle, beat the soft butter and both sugars together on high for 2 minutes. You want the mixture to be super smooth and creamy. Scrape down the sides and bottom as needed. Add in the egg and mix until combined. Add in the vanilla, milk, and the pumpkin puree. Mix on medium high until everything is fully combined. Scrape down the sides and mix again.
5. Add half of the dry ingredients to the wet and mix on low until just slightly combined. Add the other half and mix on low until everything is fully combined. You may need to scrape down the sides and mix a few times to get everything combined. The dough will be sticky.
6. Use a cookie scoop to scoop out the dough and place it on the prepared sheet. The cookies do not need to be super far apart from each other because they don't spread very much, but leave about 2 inches between each. Place in the oven and bake for 14 minutes, then rotate the pan 180* and bake for another 1 minute.
7. Remove the pan from the oven and place on a wire rack to cool for 5 minutes, then transfer to the wire rack to cool completely.
8. Once the cookies are fully cooled, it is time to make the frosting. Add the butter and cream cheese to a stand mixer fitted with the paddle and beat on high speed for 3 minutes. You want the mixture super smooth and airy. Scrape down the sides as needed. Turn the mixer onto low and slowly add in the powdered sugar, salt, and pumpkin pie spice. Once all the powdered sugar has been added, turn the mixer up to high speed and beat for 3-4 minutes. If you would like the frosting to be a little thicker, you can add another 1/2 cup of powdered sugar until you get your desired consistency.
9. Generously frost the cooled cookies with an offset spatula and enjoy the amazing fall flavors!
#annsbites#food#foodblog#cook#cooking#recipe#dessert#sweet#pumpkin#pumpkin spice#pumpkin pie spice#pumpkin cookie#pumpkin cookies#cookie#cookies#cream cheese frosting#fall#fall recipe#fall baking#baking#baked from scratch#pumpkin season#pumpkin time
34 notes
·
View notes
Text
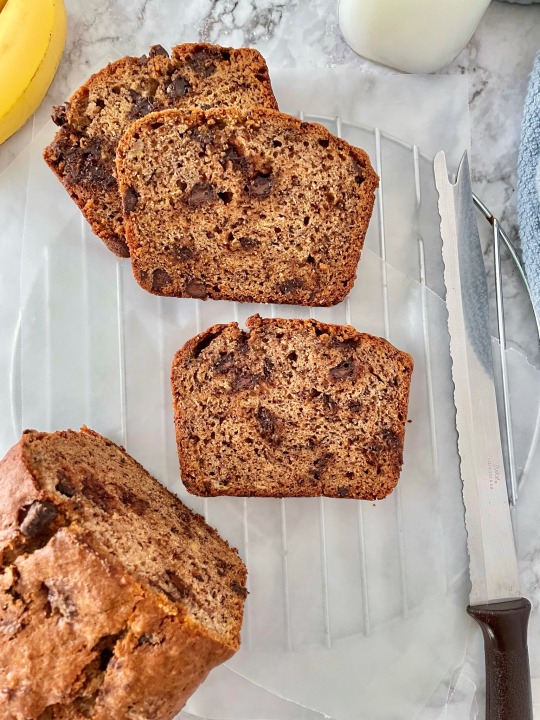
Chocolate Chunk Banana Bread
How do you make the best banana bread ever even better?? Throwing in some chocolate of course. In this recipe I use a chopped up chocolate bar, instead of chocolate chips, because the chocolate gets super gooey, melty, and oh so delicious.
Ingredients:
1 egg, slightly beaten
1 cup white or brown sugar (brown sugar will just make it a little darker)
¼ (1/2 stick) cup unsalted butter, melted
3 very ripe bananas, mashed well
1 tsp vanilla extract
1 ½ cups AP flour
2 tsp cinnamon
1 tsp baking soda
Pinch of salt
1 cup roughly chopped semi sweet chocolate (1 use 1 8oz Ghiraddelli semi sweet chocolate bar.)
1. Preheat the oven to 350*. Generously grease a loaf pan or line a muffin tin (makes 13-14 muffins so you’ll need 2 pans if you go the muffin route). Set the pan aside.
2. In a large bowl whisk together the egg, sugar, vanilla extract, and melted butter until incorporated completely. Add in the mashed bananas and mix throughly. There will be some lumps from the bananas and that’s okay. Set the bowl aside.
3. In a small bowl whisk together the flour, baking soda, cinnamon, and salt. Add the dry ingredients into the wet and use a rubber spatula to gently mix everything. Add in the chopped up chocolate and mix until just combined. You do not want to over mix. There will still be some chunks from the banana and that is okay. Pour into the greased pan and bake 50-60 minutes, or until the center is baked through. A toothpick should come out clean, apart from some melty chocolate. If you are making them as muffins, bake them for about 30-35 minutes.
4. Remove from the oven and let cool for 15 minutes, then remove the banana bread from the pan and let cool the rest of the way on a plate. Enjoy!
#annsbites#food#foodblog#cook#cooking#recipe#banana bread#banana#bread#chocolate chunk#chocolate#semi sweet chocolate#chocolate chip banana bread#sweet#baking#dessert#breakfast
0 notes
Text
Soft Peanut Butter Cookies
I recently discovered that I love the taste of peanut butter, but I hate the texture of it straight. So these super soft peanut butter cookies are perfect.

Ingredients: 1 1/2 cups AP flour
1/2 tsp baking soda
pinch of sea salt
1/2 cup (1 stick) butter, softened
3/4 cups brown sugar
1/4 cup granulated sugar
3/4 cups creamy peanut (such as skippy or jif. I know natural PB is better, but it won't work for this recipe.)
1 large egg
2 tsp vanilla extract
1. Preheat your oven to 350*. Line a large baking sheet with parchment paper and set aside.
2. In a medium sized bowl, whisk together the flour, baking soda, and salt. Mix well. Set aside.
3. In a large bowl cream together the butter, brown sugar, and granulated sugar with a hand held mixer on high. Cream for about 2 minutes, until super creamy, fluffy, and light in color. Scrape down the sides of the bowl as needed. Add in the peanut butter, egg, and vanilla extract and beat on medium high for 1 minute, until everything is fully combined. Scrape down the sides.
4. Add the dry ingredients into the wet and use a rubber spatula to gently mix everything together. You don't want any flour streaks. Use a large cookie scoop to scoop the dough, then roll it into a ball in your hands. Place on the prepared baking sheet, a few inches apart.
5. Once all the dough is rolled and on the sheet, use a fork to make to make the criss cross pattern on the top. Gently press the fork into the dough one way, gently remove it, and then repeat in the opposite direction. Repeat with all cookies.
6. Place the cookies in the oven and bake for 10 minutes. Then rotate the pan 180* and bake for 1 more minutes. Remove from the oven and place on a wire rack to cool for 5 minutes. Then remove from the pan and place directly on the wire rack. Best served slightly warm with a big glass of milk. Enjoy!
#annsbites#food#foodblog#cook#cooking#recipe#cookie#cookies#baking#baked from scratch#peanut butter#peanut butter cookie#peanut butter cookies#sweet#dessert
5 notes
·
View notes
Text
No Churn Chocolate Sorbet
No I did not eat this, but everyone that did said it was pure heaven. This sorbet is super rich and decadent and doesn't contain any dairy.

Ingredients: 2 1/4 cups water
1 cup granulated sugar
3/4 cups unsweetened cocoa powder
1 tsp sea salt
1/2 tsp ground cinnamon
6 ounces semisweet chocolate, roughly chopped (I use 1 1/2 semi sweet Ghiradelli chocolate bars)
1 tsp vanilla extract
1. Add the water, sugar, cocoa powder, salt, and cinnamon to a medium sauce pan over medium high heat. Whisk together very well until everything is combined and totally smooth. Allow the mixture to come to a boil and let it boil for 1 minute, whisking frequently.
2. Once the mixture has boiled, remove the pan from the heat. Add in the chopped chocolate and vanilla extract and allow to sit for 2 minutes. After the mixture has sat, stir everything together until the chocolate bar has fully melted and everything is super smooth.
3. Pour the mixture into a heat proof blender and allow to blend for 30 seconds. This ensures the sorbet will be super smooth once frozen. Pour into a glass loaf pan and place in the fridge for 2 hours, until the mixture is completely chilled.
4. After 2 hours in the fridge, cover the sorbet very tightly with plastic wrap and foil. Place in the freezer and allow to freeze for at least 8 hours, though I suggest overnight. When ready to eat, leave the sorbet out to soften for a few minutes before scooping. Enjoy!
#annsbites#food#foodblog#cook#cooking#recipe#dessert#sweet#dessert porn#food porn#chocolate#semi sweet chocolate#sorbet#chocolate sorbet#ice cream#no churn#chocolate lover
1 note
·
View note
Text
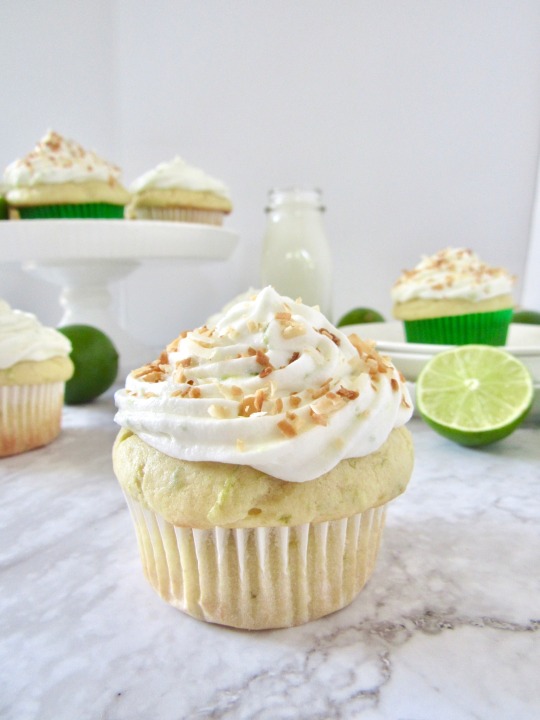
Coconut Lime Cupcakes
Coconut and lime are a match made in flavor heaven. These cupcakes have amazing coconut flavor, a nice zesty punch from the lime, and super smooth frosting. They taste just like summer.
Ingredients:
For the cupcakes - 1 3/4 cups AP flour
1 tsp baking powder
1/2 tsp baking soda
pinch of salt
1 cup sour cream (full fat)
1/2 cup (1 stick) butter, softened
1/2 cup granulated sugar
1/4 cup brown sugar
2 tbsp freshly squeezed lime juice
4 tbsp freshly grated lime zest
1 large egg + 1 egg yolk
1 1/3 cups toasted sweetened coconut flakes
For the frosting - 1/2 cup (1 stick) butter, softened
1 8oz block of cream cheese, softened
5 1/2 - 6 cups powdered sugar
pinch of salt
2 1/2 tbsp freshly squeezed lime juice
2 tbsp freshly grated lime zest
1/2 cup toasted sweetened coconut flakes
1. Preheat your oven to 350*. Line a cupcake pan with paper liners and set aside. This recipe makes 12 cupcakes.
2. In a medium bowl whisk together the AP flour, baking powder, baking soda, and salt. Mix until combined. Set aside.
3. In the bowl of a stand mixer fitted with the paddle, beat the butter on medium speed for 1 minutes. Until it is super creamy. Scrape down the sides and bottom. Add in the granulated sugar, brown sugar, and lime zest. Beat on medium for 45 seconds, until combined. Add in the egg and egg yolk and mix until just combined. Scrape down the sides as needed.
4. Turn the mixer down to low and add half of the dry ingredients. Mix for about 10 seconds. Then add half of the sour cream and mix until combined. Repeat with the remaining flour and sour cream. Mix until just combined. Leave the mixer on low and add in the lime juice and coconut flakes. Mix until just combined. You do not want to over mix.
5. Spoon the batter into the prepared cupcake pan. Fill each slot up about 3/4 of the way. You do not want them to overflow while they bake so don't fill up to the top. Place in the oven and bake for 16-18 minutes, until a toothpick inserted in the middle comes out dry/a few crumbs. Remove the pan from the oven and place on a wire cooling rack for 3 minutes, then remove the cupcakes from the pan and allow them to cool on the rack completely.
6. For the frosting - Once the cupcakes are completely cool, you can make the frosting. In the bowl of a stand mixer fitted with the paddle, beat the butter and cream cheese together over medium high speed for 1 minute, until super creamy. Scrape down the sides as needed. Turn the mixer down to low and slowly add in the powdered sugar, lime juice, and lime zest. Start off by only adding 5 cups of powdered sugar. Turn the mixer up to medium high and beat for 3 minutes. If the frosting seems too thin or runny, add more of the powdered sugar until you get a nice, thick consistency.
7. Frost the cooled cupcakes in whatever style you like. Right after each cupcake is frosted, sprinkle some more coconut flakes on top. As much as you like. Enjoy!
1 note
·
View note
Text
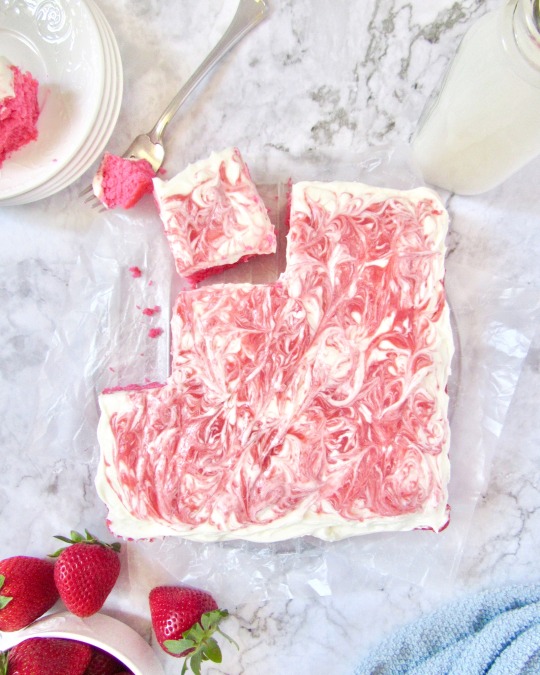
Roasted Strawberry Mini Cake
This cake is going to become your new summer obsession. The cake is light and fluffy, with a strong strawberry flavor. It's topped with ultra silky cream cheese frosting and even more strawberry goodness. It is everything a cake should be.
Ingredients: For the strawberry puree -
10-12 large strawberries, tops cut off
4 tsps brown sugar (more if the strawberries aren't very sweet)
1 tsp salt
2 tsp vanilla extract
cornstarch slurry (2 tbsp cornstarch mixed with 1 tbsp water)
For the cake -
1 1/4 cups AP flour
1 1/4 tsp baking powder
pinch pf salt
1/2 cup (1 stick) butter, softened
1 1/4 cups granulated sugar
2 tsp vanilla extract
1/3 cup milk
3 large egg whites
1/4 cup of the strawberry puree
1/8 tsp pink or red food coloring (optional)
For the frosting -
1 8oz block of cream cheese, softened
1/2 cup (1 stick) butter, softened
2 1/2 cups powdered sugar
1 tsp vanilla extract
pinch of salt
strawberry puree
1. For the strawberry puree - Preheat your oven to 350*. Line a loaf pan or a small roasting pan with foil and add the strawberries, brown sugar, salt, and vanilla extract to the pan. Toss everything together so the strawberries are coated. Place in the oven and roast for 20 minutes. The strawberries will be very fragrant and there will be a lot of juice in the pan. Remove the pan from the oven (leave the oven on at 350*) and pour everything into a large blender. Blend until the mixture is completely smooth. Measure out 1/4 cup of the mixture and set it aside. Pour the rest of the puree into a small sauce pan and place over medium heat. Add the cornstarch slurry to the pan and whisk together well. Allow the mixture to lightly simmer for 5 minutes, until thickened, whisking often. Remove from the heat and allow to cool.
2. For the cake - Lightly grease an 8x8 or 9x9 square baking pan. You can line it with parchment paper as well if desired. Set aside. In a medium bowl whisk together the flour, baking powder, and salt. Set aside.
3. In a small bowl, whisk together the milk, egg whites, and 1/4 cup of the strawberry puree. Whisk until everything is combined well. Set aside. In the bowl of a stand mixer fitted with the paddle, beat the butter on medium high speed for 30 seconds. Scrape down the sides and then add the granulated sugar and vanilla. Beat for about 3 minutes, until the mixture is super light and fluffy.
4. Turn the mixer down to low speed and alternate between adding the wet and dry ingredients to the butter mixture, starting with the dry and ending with the wet. Mix until the batter is smooth, but don't over mix. Remove the bowl from the stand mixer and If using the food coloring, add it to the batter and use a rubber spatula to gently mix it in.
5. Pour the batter into the prepared pan and spread it all the way to the edges, in one even layer. Place in the oven and bake 28-30 minutes. Until a toothpick inserted in the middle comes out clean or with a few dry crumbs. Place the pan on a cooling rack and let the cake cool in the pan for 15 minutes. Then remove the cake from the pan and let it cool completely.
6. For the frosting - Once the cake is completely cool, begin to make the frosting. In the bowl of a stand mixer fitted with the paddle, beat together the butter and cream cheese on medium high speed for 1 minute. You want it to be super fluffy and creamy. Add in the vanilla extract and salt and mix until combined. Turn the mixer down to low and slowly add in the powdered sugar. Once it is mostly combined (and won't fly everywhere) turn the mixer until medium high and beat for 2 minutes. Scrape down the sides and beat for another 2 minutes. This will help the frosting be super light and creamy.
7. Once the cake is totally cool, its time to frost. Use an offset spatula to spread the frosting all over the top of the cake. I did not frost the sides, but you can if you want. Add spoonfuls of the thickened strawberry puree on top of the frosting and use a toothpick or knife to swirl it all around in whatever pattern you would like.
8. Cut the cake into your desired shape and size. Enjoy with a big glass of milk!
#annsbites#food#foodblog#cook#cooking#recipe#yum#baking#sweet#dessert#cake#mini cake#sheet cake#strawberry#strawberry cake#cream cheese frosting#strawberries#roasted strawberries#baked from scratch
6 notes
·
View notes
Text
Fire Roasted Salsa
Chips and salsa are always a great idea. And they're an even better idea when the salsa is homemade. Roasting and charring the veggies gives the salsa a super rich, deep flavor that you will love.

Ingredients:
12-14 large, very ripe Roma tomatoes
2 large yellow onions, cut into quarters
6 cloves fresh garlic (don't chop them up)
3 large jalapeños, stems removed
1 serrano chili, stem removed
4 tbsp olive oil
3 tbsp cumin
3 tbsp onion powder
3 tbsp garlic powder
3 tbsp smoked paprika
2 tbsp chili powder
2 tbsp dried oregano
salt & pepper to taste
1 1/2 cups fresh cilantro
zest & juice from 2 large limes
**If you don't want your salsa super hot i suggest removing the seeds from the chilis. I like heat so I leave them in, but you can adjust it to what you like**
1. Preheat your oven to 425*. Line a very large baking sheet with foil. Place the tomatoes, onion, garlic, and one of the jalapeños on the baking sheet. Drizzle the olive oil all over the top of the veggies, then season them with the cumin, onion powder, garlic powder, smoked paprika, chili powder, dried oregano, and salt&pepper. Toss all of the veggies around so that they are coated in the oil and spices. Place in the oven and roast for 20 minutes. After 20 minutes use some tongs to move everything around and then roast for another 10 minutes. Remove from the oven and allow to cool slightly.
2. While the tomatoes are cooling, head outside to your grill/barbeque. Turn it on to high and allow it to heat up for a few minutes. Once hot, place the jalapeños and serrano chili directly over the flame, close the grill lid and allow to roast for 5 minutes. Then turn the chilis and roast for another 5 minutes. You want all sides to be nice and charred. Once charred, remove from the grill and bring them inside.
3. Once all the veggies are roasted and charred it's time to make the salsa. Add all of the veggies to a large blender or food processor (you may need to do this in two batches depending on how much your machine can hold) and blend/mix for just a few seconds. All the veggies will break down super quick. You want the salsa to be mostly smooth, but a few small chunks are fine. Add in the cilantro and blend it together for a few more seconds.
4. Transfer the salsa to a large bowl and add in the lime zest and juice. Use a spatula to mix it all together. Taste the salsa to see if it needs anymore seasoning. I like to refrigerate my salsa for at least 4 hours before serving, though overnight is best because the flavors really meld. Grab some chips and enjoy!
#annsbites#food#foodblog#cook#cooking#recipe#yum#appetizer#chips and salsa#tortilla chips#salsa#homemade salsa#fire roasted#fire roasted salsa#spicy#spicy food#spicy recipe#tomato#cilantro#jalapeños
4 notes
·
View notes
Text
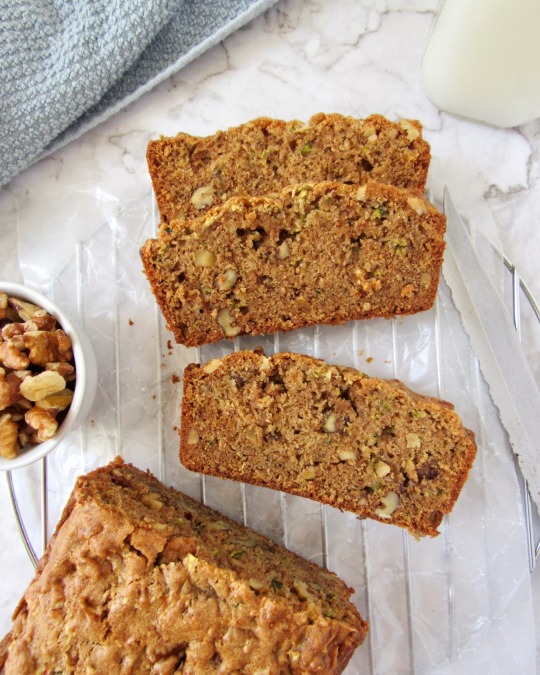
Zucchini Walnut Bread
Don’t worry, this does not taste anything like a zucchini. It tastes sweet and has some nice warmth from all the spices. The zucchini keeps the bread moist and soft and adds some nice texture. Plus since there’s vegetables in it, it’s healthy!
Ingredients:
1 ½ cup AP flour
½ tsp baking soda
½ tsp baking powder
1 tbsp cinnamon
½ tbsp nutmeg
1 tsp ground ginger
Dash of salt
1 cup chopped walnuts
½ cup vegetable oil
¾ light brown sugar
1 egg
Splash of vanilla
1 cup grated zucchini ( 1 medium zucchini)
1. Heat your oven to 350*. Spray a loaf pan generously and set aside.
2. In a large bowl, combine the flour, baking powder, baking soda, cinnamon, nutmeg, ginger, and salt. Whisk together until everything is combined. Set aside.
3. Grate your zucchini, lay it flat on a large cuttings board and blot/press down with a paper towel to get rid of some of the moisture. Do not ring it out in a towel.
In a medium sized bowl combine the oil, egg, sugar, vanilla, and zucchini. Whisk together until everything is combined.
4. Pour the wet ingredients into the dry and use a silicone spatula to gently mix everything together. Add in the walnuts and mix until they are evenly dispersed. Don’t over mix.
5. Pour the batter into the greased loaf pan and make sure it’s all one, even layer. Bake for 45-50 minutes. Until the top is golden brown and a knife/toothpick comes out of the center clean.
6. Let cool in the pan for 5 minutes, then transfer to a wire rack to cool completely. Enjoy this healthy veggie dish!
#annsbites#food#foodblog#cook#cooking#recipe#bread#yum#breakfast#dessert#sweet#zucchini#zucchini bread#walnuts#walnut#zucchini walnut bread#baking#baked from scratch#healthy#healthy recipe
1 note
·
View note
Text
Snickerdoodle Cookie Dough Ice Cream
This ice cream is absolutely insane, in the best way possible of course. It's no churn so it is super easy to make and it's so creamy you can't even tell it's not 'normal' ice cream. There's tons of cookie dough chunks and a dream cinnamon sugar swirl throughout. Pure perfection.

Ingredients:
For the ice cream - 1 14oz can sweetened condensed milk
2 cups very cold heavy cream
2 tsp vanilla extract
pinch of salt
For the cookie dough - 1/2 stick (4 tbsp) unsalted butter, softened
1/4 cup packed brown sugar
2 tbsp granulated sugar
1 tsp vanilla extract
2/3 cups AP flour
pinch of salt
2 tbsp cinnamon
1 tsp ground nutmeg
1 tbsp milk
For the cinnamon sugar swirl - 1 stick (8 tbsp) unsalted butter
1/2 cup brown sugar
1 1/2 tbsp cinnamon
2 tsp ground nutmeg
1 tbsp honey
2 tsp vanilla extract
pinch of salt
3-4 tbsp cornstarch
1. For the cinnamon sugar swirl - Add the butter to a medium sauce pan and heat over medium heat. Stir occasionally until the butter is fully melted. Once the butter has melted add the brown sugar, cinnamon, nutmeg, honey, vanilla extract, and salt. Whisk everything together very well, until smooth. Let the mixture simmer over medium heat for about 5 minutes, whisking every 30 seconds or so. In a cup or bowl combine 3 tbsp of cornstarch and 1 tbsp of water and mic until you get a slurry. Add the slurry to the cinnamon sugar mixture and whisk for 2 minutes straight. After 2 minutes, allow the mixture to simmer for 3 minutes. It should really start to thicken up, to a very thick jam consistency. Remove the pan from the heat and allow the mixture to cool fully. If it looks like its not super thick, you can add the additional tbsp of cornstarch. While the mixture cools some butter may separate and come to the top, just pour it off. Whisk the mixture occasionally while its cooling just make sure it has the right consistency. Set aside.
2. For the cookie dough - Preheat your oven to 350*. Line a large baking sheet with foil and spread the flour out on it evenly. Once the oven is up to temperature, bake the flour for 7 minutes. Remove from the oven and cool completely. Set aside. In a medium bowl use a hand mixer to beat together the butter and both sugars for 2 minutes, until the mixture is light and fluffy. Scrape down the sides as needed. Add the vanilla extract, salt, cinnamon, and nutmeg and mix for 1 minute. Add in the cooled baked flour and mix on low until just combined. The mixture will be very crumbly. Add in the milk and mix until combined and the dough has become similar to normal cookie dough texture. If it is still too dry you can add 1/2 tbsp of milk until the right texture is created. Use your hands to break up the dough into bite sized chunks and place on a large cutting board. I like to make some into to circular chunks (roll in your hands) and leave the rest random shapes. Set aside.
3. For the ice cream - Get out a 9 inch bread pan. You can line it with parchment paper if you would like. Set aside. Add the cold heavy cream to a large bowl and use a hand mixer on high speed to beat the cream until stiff peaks have formed, about 4-5 minutes. Add the sweetened condensed milk, vanilla, and salt to the cream and use a rubber spatula to gently fold everything together. Once combined, add the cookie dough chunks (reserve about 10 to place on the top) and gently mix together.
4. Pour half of the ice cream mixture into the prepared pan, then pour half of the cinnamon sugar mixture over the top and use a knife to swirl it through the ice cream. Pour the rest of the ice cream on top, then the rest of the cinnamon sugar mixture and swirl it through. Top with the reserved cookie dough chunks, pressing them into the mixture lightly. Cover tightly with foil and freeze for at least 6 hours, though over nigh is best.
5. Once the ice cream is set and ready to be eaten, leave it out for about 3 minutes before scooping. Grab a big bowl or cone and enjoy!
#annsbites#food#foodblog#cook#cooking#recipe#yum#dessert#sweet#ice cream#no churn#no churn ice cream#cookie dough#cookie dough ice cream#snickerdoodle#cinnamon sugar
2 notes
·
View notes
Text
Stuffed Shells
Want to step up your pasta night? These stuffed shells are your answer. They are super easy to make, have all the traditional spaghetti flavors, but feel super fancy since they are in a different form.

Ingredients:
1 box of jumbo shells ( I use Barilla), cooked according to the package
1 large onion, minced
3 cloves of garlic, minced
2 tbsp olive oil
2 tbsp butter
1 1/2 pounds fresh ground beef
1 tbsp Italian seasoning
1 tbsp dried oregano
1 tbsp smoked paprika
1 tbsp onion powder
1/2 tbsp red pepper flakes
salt&pepper to taste
1 1/2 jars of your favorite marinara sauce
2 cups freshly grated mozzarella cheese
fresh basil and parsley to top
1. Bring a large pot of heavily salted water to a boil. Once boiling, add the jumbo shells and cook according to the package instructions. I cooked mine for 9 minutes. Once cooked, strain and lay out on a large cutting board. Set aside. Pour about 1/2 a jar of marinara sauce into a 13x9 baking dish. Spread it out evenly along the bottom. Set aside.
2. Preheat your oven to 400*. In a large skillet, heat the olive oil and butter over medium heat. Once the butter is melted and warm, add the onion and garlic. Cook for 6 minutes, until the onion is softened, stirring frequently. Once the onion gas begun to soften, add in the ground beef. Season with the Italian seasoning, oregano, paprika, onion powder, red pepper flakes, and salt&pepper. Break it up with your spatula and mix everything together well. Cook for 7-8 minutes, until the meat is fully cooked fully cooked.
3. Once the meat is cooked, pour the remaining marinara sauce into the pan and mix everything together. I usually like to season the sauce again with some more salt&pepper and Italian seasoning. Let simmer for 3 minutes. Remove from the heat.
4. Time to assemble. Grab a shell, open it up and spoon a generous amount of the meat sauce into it. Place in the prepared baking dish, opening side up. Repeat with the remaining shells. My pan fit 3 rows of about 8 shells. Pour some of the excess sauce over the top of the shells (if it falls to the bottom/sides of the pan that is okay), then sprinkle with the mozzarella cheese. Be generous with the cheese.
5. Place in the oven and bake for 20 minutes. The cheese should be super melty/golden and the shells should be fully cooked. Remove from the oven and sprinkle some fresh basil and parsley over the top. Grab some bread and dig in!
1 note
·
View note
Text
White Chocolate Raspberry Blondies
These things are dangerous. You start eating one and then 30 mins later you realize you've eaten them all. They are tart, sweet, and super fudgy. They are also so easy to make, only one bowl needed.

Ingredients:
3/4 cup unsalted butter, melted
1 1/4 cups dark brown sugar
1 tsp vanilla extract
1 large egg
1 1/2 cups AP flour
8 oz (1 cup) roughly chopped white chocolate (I use the ghiradelli bars. Don't use white chocolate chips), plus more for topping
3/4 cup fresh raspberries, plus more for topping
1. Preheat your oven to 350*. Lightly spray a 9x9 square baking pan with non stick spray, then line with parchment paper. Leave some hanging over the sides for easy removal. Set aside.
2. In a large mixing bowl whisk together the melted butter and brown sugar. Mix well until combined and completely smooth. Add in the egg and vanilla extract and whisk until fully combined.
3. Add in the flour and use a rubber spatula until the ingredients are mostly combined. Some flour streaks are okay. Add in the white chocolate and raspberries and gently mix until just combined. The batter is pretty thick.
4. Pour the batter into the prepared pan and smooth out into one even layer. Press some more white chocolate and raspberries into the top. Place in the oven and bake for 30 minutes, until a toothpick comes out clean. Baking for 30 minutes will give a soft, very fudgy texture so if you like your blondies more cake like, bake for another 10 minutes.
5. Remove the pan from the oven and allow the blondies to cool in the pan completely. Once cooled, remove from the pan and cut into your desired shape and size. Enjoy!
#annsbites#food#foodblog#cook#cooking#recipe#yum#baking#sweet#dessert#blondie#blondies#raspberry#white chocolate#white chocolate raspberry#baked from scratch
5 notes
·
View notes
Text
Cheesy Herb Focaccia Bread
You might remember I posted a focaccia recipe a few months ago. It tasted good, but it was thin and crunchy, which is never what you want with focaccia. So I decided to retry the recipe and the results are amazing. Soft, fluffy and full of flavor. You’ll want to make this every day.

Ingredients:
2 ¼ tsp active dry yeast
1 tsp white sugar
1 ½ cup warm water (about 110*)
3 ¼ cup AP flour
1 tbsp dried basil + more for the topping
1 tbsp dried parsley + more for the topping
1 tbsp Italian seasoning
2 tbsp garlic powder
1 tbsp onion powder
2 tsp fresh ground pepper
2 tsp salt
¼ cup Extra Virgin Olive Oil
1 cup shredded parmesan cheese + more for the topping
1. Grease a 13x9 baking pan generously with high quality olive oil. Make sure the pan is exactly that size so you get a nice fluffy bread once it is baked. Set the pan aside.
2. In the bowl of a stand mixer fitted with the dough hook, combine the yeast, sugar, and warm water. Gently stir it, then let stand for 10 minutes. While the mixture stands, in a small bowl mix the flour, dried basil, dried parsley, Italian seasoning, garlic powder, onion powder, pepper, and salt. Add the ¼ cup olive oil to the yeast mixture, then add the dry ingredients. Mix on low speed until all the ingredients are just combined. Increase the speed to medium and knead the dough for 2-3 minutes. The dough should be soft and somewhat sticky. Scrape down the sides to make sure everything can combine. Add in the parmesan cheese and mix on low until just combined and the cheese is evenly distributed.
3. Spray your hands generously with non stick spray. Grab the dough and transfer it to the prepared baking dish. Use your hands to spread it out evenly to all the edges of the pan. If it pulls back a little from the edges that is okay, it will fill the pan when it rises. Use your finger tips to gently make small indents all over the dough (don’t press hard enough to go through). Cover tightly with plastic wrap and a warm kitchen towel and let it rise in a warm place for 1 hour.
4. With about 20 minutes left in the rising, preheat your oven to 350*. Once preheated, place the pan in the oven bake the focaccia for 20 minutes. After 20 minutes, remove from the oven and drizzle the top with a little more olive oil. Then sprinkle some more dried basil, dried parsley, and parmesan cheese evenly over the top. Place back in the oven and bake for another 5-6 minutes, until the cheese has browned. If it has not browned enough after that time you can turn the broiler on for a little, but make sure to really watch it.
5. Remove from the oven and let cool completely. Once cooled, remove from the pan and cut it into your desired size. Serve with some dipping sauce or just enjoy it all by itself!
#annsbites#food#foodblog#cook#cooking#recipe#bread#yum#bread making#bread baking#homemade bread#focaccia#focaccia bread#baked from scratch#baking
0 notes
Text
Ginger Key Lime Bars
These bars are so refreshing and creamy. You’ll never be able to put them down once you start eating them.

Ingredients:
For the crust-
1 (16 oz) box of cinnamon toast crunch cereal (or your favorite cereal)
12 tbsp unsalted butter, melted
2 tbsp dark brown sugar
2 tbsp freshly grated lime zest
2 tbsp ground ginger
½ tsp salt
For the filling-
5 cups sweetened condensed milk
1 cup low fat sour cream
1 ¼ cup freshly squeezed lime juice (about 12-14 limes, depends how juicy they are. I always grab a few extra to be safe)
4 tbsp fresh lime zest
2 tsp ground ginger
pinch of salt
1. Preheat your oven to 350*. Spray a oven safe 9x13 pan and set aside.
2. In a food processor or blender (all at once if you have a big one, or in batches if need be), combine the cereal, butter, sugar, ginger, lime zest, and salt. Pulse until the mixture is crumbly and all the same consistency. Transfer it into the baking dish and pack it down into one flat, even layer. Put in the oven and bake for 10 minutes.
3. While the crust bakes, in a large bowl combine the condensed milk, sour cream, lime juice, lime zest, and salt and whisk it all together until everything is combined and super smooth. It may take a minute or two for everything to come together, but it will. Take the crust out of the oven and pour the lime mixture over the top and make sure its evenly spread out. Put it back in the oven for 12 minutes.
4. Remove from the oven and allow to cool completely on a wire rack. You want it to cool to room temperature. Once fully cool and set, cover and refrigerate for at least 6 hours, though over night is best and highly suggested.
5. Cut up, serve, and enjoy!
#annsbites#food#foodblog#cook#cooking#recipe#yum#dessert#sweet#baking#pie#key lime pie#key lime#ginger#lime#pie bars#citrus#tart
3 notes
·
View notes
Text
Bagels
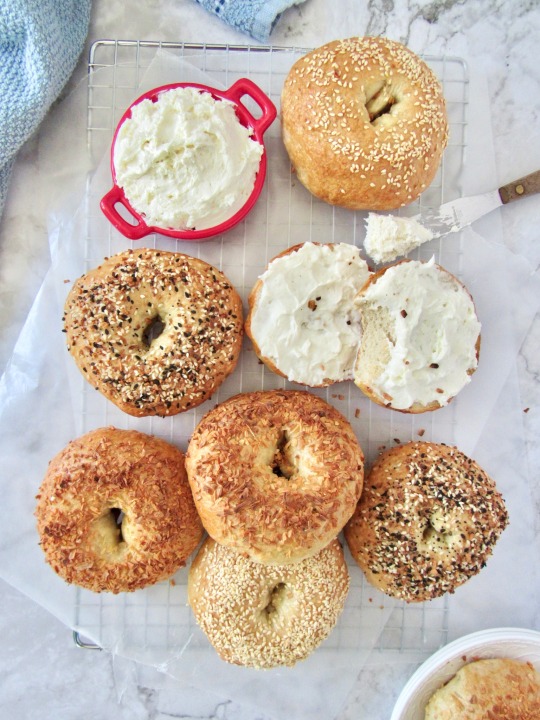
If you are like me, you love carbs. Especially bagels. Wether you smother them with cream cheese or stack them high with bacon, egg, and cheese, these homemade bagels could not be easier or tastier.
Ingredients:
For the dough- 1 ½ cups warm water (100*-110*)
2 ¾ tsp active dry yeast
4 cups bread flour (you must use bread flour, not AP), plus more for your work surface and your hands
1 tbsp brown sugar
pinch of salt
egg wash (1 egg beaten with 1 tbsp water)
For boiling- 2 quarts water
1/3 cup high quality honey
For the topping- (optional)
sesame seeds
dried onion
everything seasoning
sea salt
1. Add the warm water and the yeast to the bowl of a stand mixer fitted with a dough hook. Mix together lightly and let sit for 5 minutes. While the yeast rises, generously spray a large glass bowl with non stick spray. Set aside. Generously flour a large cutting board and set aside.
2. Add the flour, brown sugar, and salt to the yeast mixture. Beat on low speed for 2 minutes, until everything comes together. The dough will look pretty dry, but that is okay.
3. Turn the dough out onto the floured cutting board and lightly flour your hands. Knead the dough for 5 minutes, until it is nice and smooth. The dough is way too heavy for the stand mixer to knead for that long.
4. Form the dough into a ball and place in the greased bowl. Cover tightly with plastic wrap and allow to rise in a warm place for about 1 hour, until it has doubled in size.
5. While the dough is rising, line an extra large baking sheet with parchment paper or line 2 large baking sheets with parchment paper. When the the dough is done rising, add the 2 quarts of water to a large, heavy pot (I use a dutch oven), stir in the honey and bring to a boil over high heat. Once it has boiled, turn the heat down to medium high.
Once the dough has risen, turn it out onto a cutting board (not floured) and punch it gently to release air. Cut the dough into 8 equal sized pieces (doesn’t have to be perfect, just try your best). Form each piece into a ball, then press your finger through the center of the dough make about a 2 inch hole. Use your hands to shape it into a bagel shape. Place the bagels on the prepared baking sheets. Preheat your oven to 425*.
6. Once all the bagels have been formed, put 2 at a time into the boiling water and cook for 1 minute per side (2 mins total). Use a slotted spoon to remove the bagel, shake off excess water, and put it back on the baking sheet. Repeat until all the bagels have been boiled. Use a pastry brush to coat the tops and sides of all the bagels with the egg wash. Then sprinkle on your desired toppings (sesame seeds, onion, everything seasoning, salt) or just leave them plain.
7. Place the pan in the oven and bake for 22-25 minutes, rotating the pan halfway through. You want the tops and sides to be golden brown, but the bagel still soft and fluffy to the touch. Remove the bagels from the oven and let cool completely before cutting or sneaking a bite. Enjoy!
** Store the bagels in a plastic bag and seal it tightly. They will stay fresh at room temperature for a few days, in the fridge for 1 week, or in the freezer for up to a month (if they last that long).**
#annsbites#food#foodblog#cook#cooking#recipe#bread#yum#bagel#bagels#onion bagel#sesame seed bagel#everything bagel#everything but the bagel#baking#savory#savory baking#breakfast#brunch#cream cheese
10 notes
·
View notes