apple-salad
Fruit Salads
Thank you for visiting my blog! I mainly wear sweet & classic lolita fashion, or a combination of both. Sometimes I post longer form (and extra rambly) content about lolita.
436 posts
Don't wanna be here? Send us removal request.
Last Seen Blogs


Text


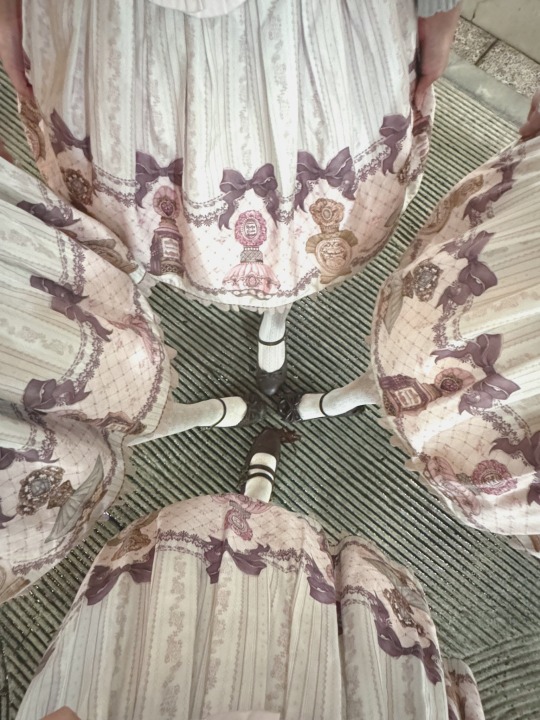

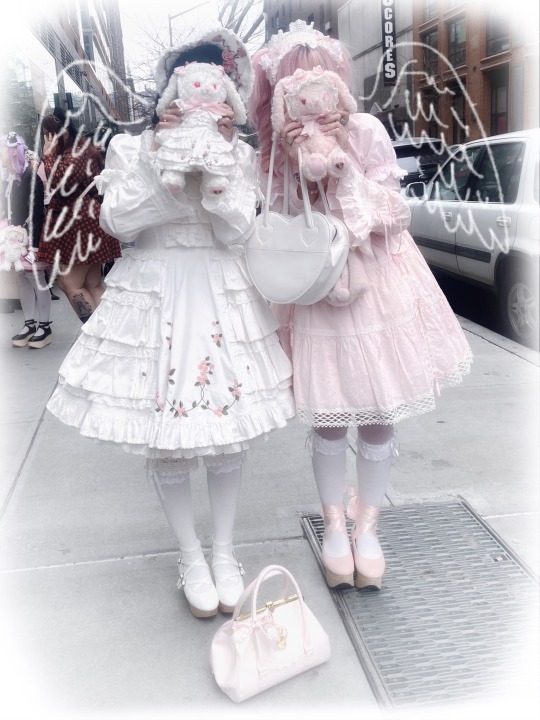
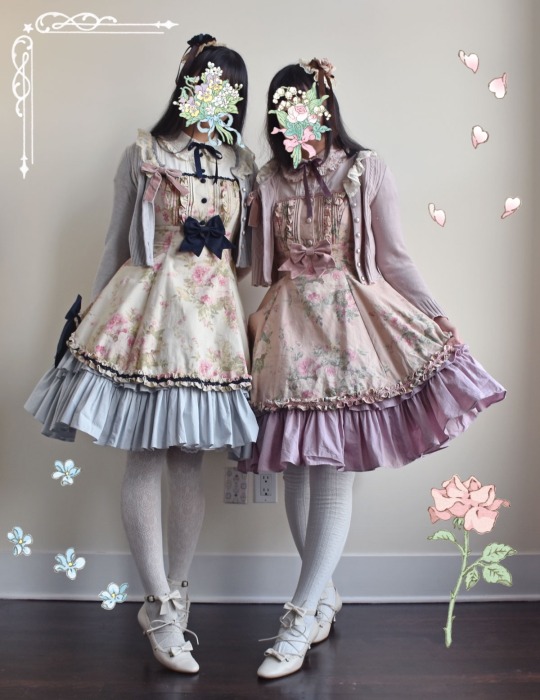
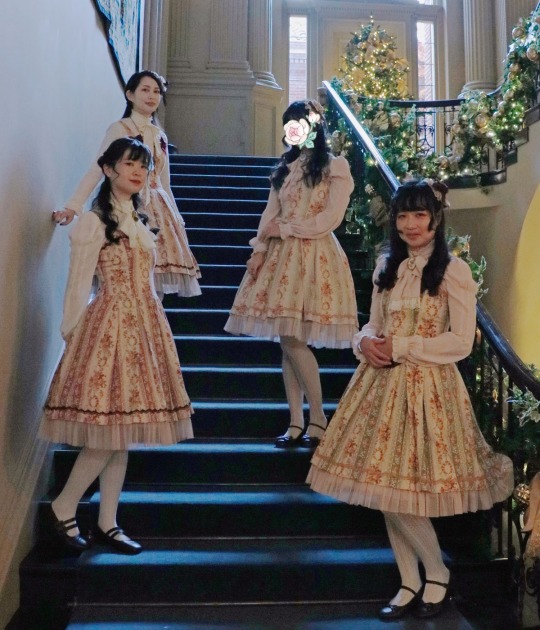
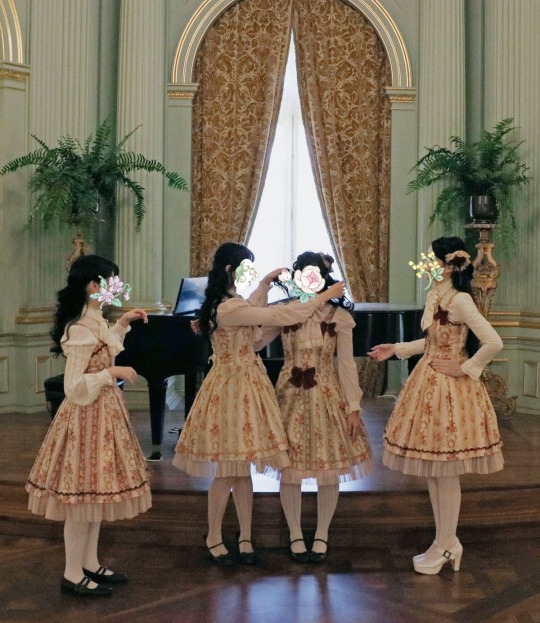
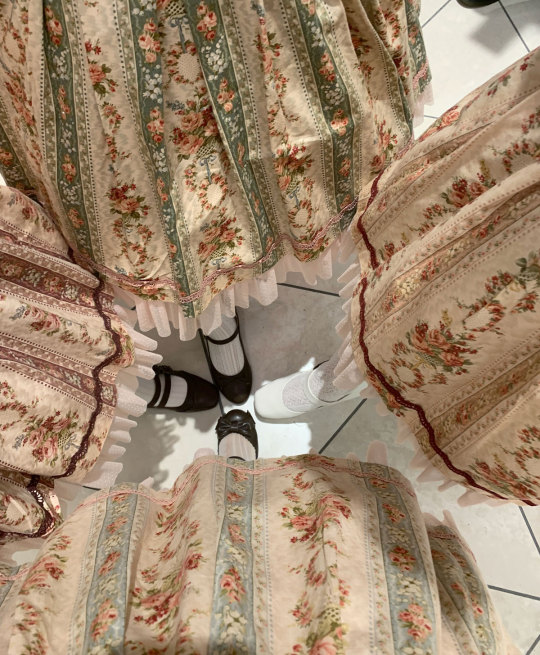
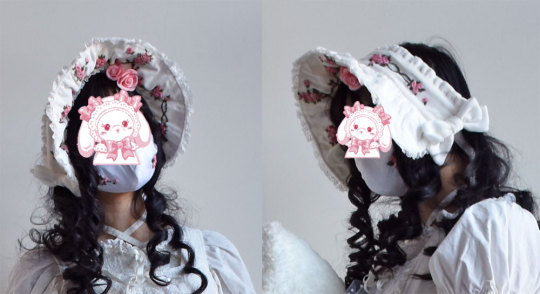
Perfume Bottle clones💐
Getting around to posting old content from Ursa Major trip. It's incredible that we all own the same colourway of Perfume Bottle JSK (although I think this is the most popular and common colour), AND they all have the detachable bow 😁
Thank you rabbitreverie, @petit-piaf, kayas.coords!
Last few pic is bonus arcade shenanigans. The seratonin when you get a plushie though 😭...
#lolita fashion#daily coordinate#classic lolita#mary magdalene#perfume bottle jsk#lolita twinning#lolita twins#twinning#baby the stars shine bright#btssb
31 notes
·
View notes
Text
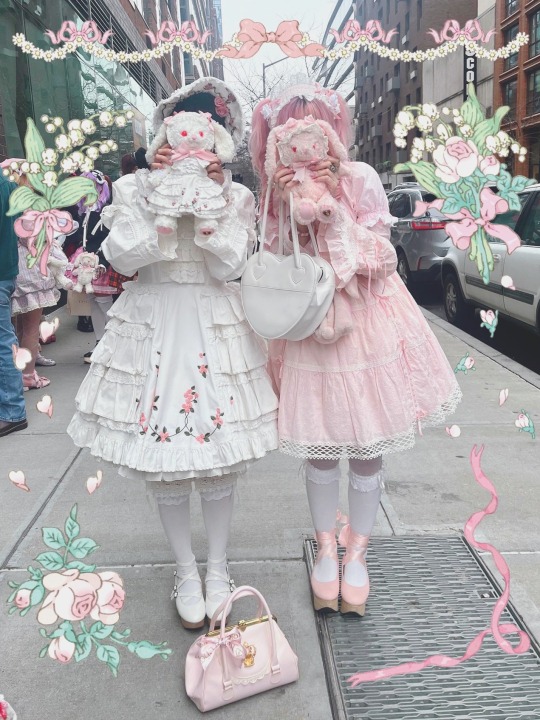


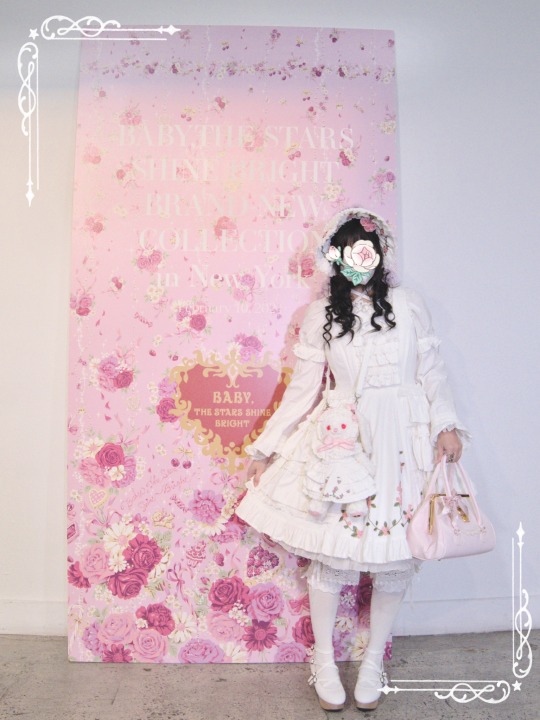


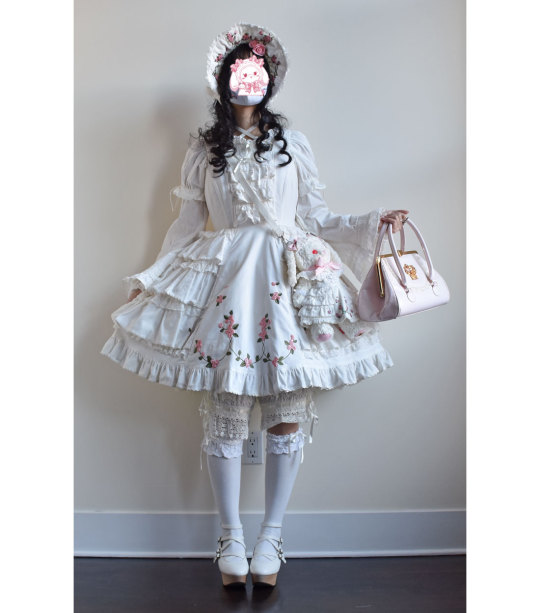
Finally posting some photos from the BtSSB NYFW show with friends!
Photo 1 with @usakumyalina!
Photo 2 with grimmfirefly (💖 Thank you for taking a photo with me who was also wearing Rose Ribbon Embroidery 🥰 accidental twinning!)
Photo 3+ with rabbitreverie and @petit-piaf!
I may have been a little too gratuitous with the stickers.
Everyone was so cute and really dressed up their best for the show!
I only talked to a few people and failed to recognize a lot of people I followed online, which I feel a bit regretful about...(of course, I think recognizing me would be much too difficult, haha). But it was so cool to see the community come together like this and I really liked seeing everyone's photo and video of the event (and sometimes me in the background😳)
I have so many more photos of this outfit I want to share but I'll probably do so slowly since I think everyone has had enough for now.
Coord breakdown: almost everything I'm wearing is from Baby, the Stars Shine Bright except for the socks (Angelic Pretty), and bonnet+kumya's dress (handmade). You can see a detailed breakdown here.
#lolita fashion#baby the stars shine bright#btssb#rose ribbon embroidery jsk#rose ribbon embroidery#daily coordinate#sweet lolita#oldschool lolita#old school lolita#btssb nyfw
166 notes
·
View notes
Text

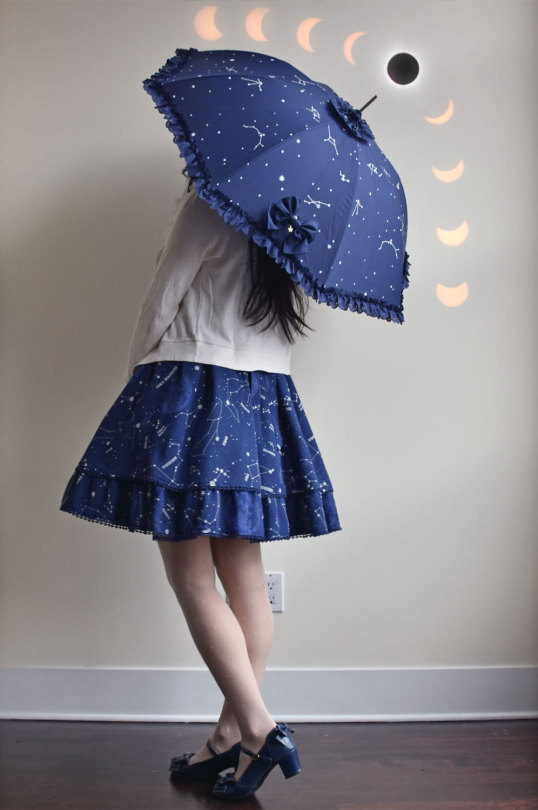

Coord of very little consequence to view the April 8 eclipse, and some eclipse thoughts...
I spent most of the day panicking and trying to make sure I wasn't forgetting anything, so I didn't have any groundbreaking coord plans but I knew I wanted to wear at least a dark colour. Cosmic, being one of my favourite celestial themed prints, seemed appropriate.
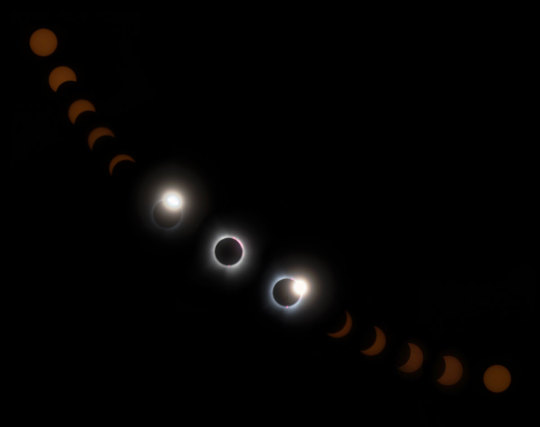
I only had my very old DSLR and a 140mm zoom lens, but I wanted to try taking pictures of the eclipse anyway. My photography ability and knowledge is very low, but I did my best with my limited camera navigation skill.
Unfortunately, as you can see here, 140mm isn't nearly enough to capture great detail of the sun and the pictures are somewhat low-res and blurry. I forgot to refocus several times and I think the images turned out even blurrier than they could have because of this.
My phone(s) did a mediocre job of capturing any partial eclipse, and even phone pictures taken during totality don't capture it well at all in my opinion, so I'm at least glad I have some camera photos with settings I could adjust manually.
The total eclipse in my area was a short ~90 seconds and I definitely went into panic mode trying to look at the eclipse with my eyes, take multiple exposures, and take some video and photo with my phone such that it was over before I knew it! I really tried to sit back and enjoy totality, but it really did feel like a shame how quickly it came and went.
This was my first time experiencing any kind of solar eclipse, and it was pretty amazing to see the day start off and proceed like any other yet also know that the moon would shortly be aligning over the sun. Such occurrences are truly an amazing celestial event, and totality itself is a completely unique and awe-inspiring experience. It became surprisingly cold!
Side note: check instagram for a quick video.
#lolita fashion#daily coordinate#sweet lolita#angelic pretty#cosmic jsk#angelic pretty cosmic#innocent world
44 notes
·
View notes
Note
I just read the post where you made the white embroidered dress for your bunny plushy. I’m super impressed with the craftsmanship!! I’m not in the Lolita subculture, so I even had to look up what JSK meant (at first I thought it was the name or brand of the bunny). I just wanted to let you know the dress turned out awesome. I hope people at the fashion event were suitable impressed! I bet you and your bunny were the most stylish :D
Oh gosh, thank you anon! You are too sweet. Points to you for looking up "JSK"!
I think because usakumya is at my hip it's not always the easiest in person to notice that it has clothes! But I'm so flattered and touched by every nice comment I've gotten about my work, my mistakes keep me humble but I also think it's a lovely aspect of lolita (or any fashion, really) to have or make items that are special to you. I love working hard on something physical and making items for my coords that are full of sentimentality! ❤
8 notes
·
View notes
Text
It's Anda and I!
Reblog because I just found Anda's account 💞
btssb <3
745 notes
·
View notes
Text


Twinning Délice Fleur (2011 release)!
A very simple coord but it's one of my personal favourite pieces so I was very happy to be able to twin it with rabbitreverie when she came to visit before the dress joined my wardrobe 😖
The ice outside was so slippery 😅 we slipped our way to a café afterwards🍰
All clothes Mary Magdalene except for socks (offbrand), shoes in the outdoor photo are also offbrand (? I don't know the brand of rabbitreverie's shoes but mine are Honey Cinnamon)
#lolita fashion#classic lolita#mary magdalene#daily coordinate#lolita twinning#twinning lolita#lolita twins#delice fleur op#delice fleur#delicefleur2011
141 notes
·
View notes
Text
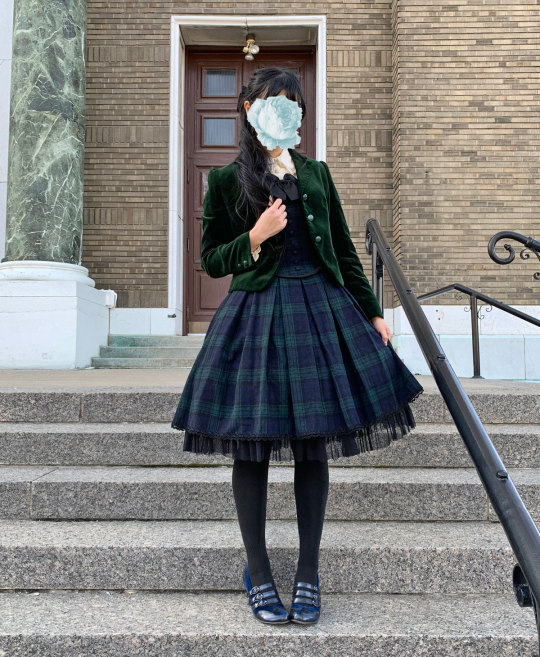
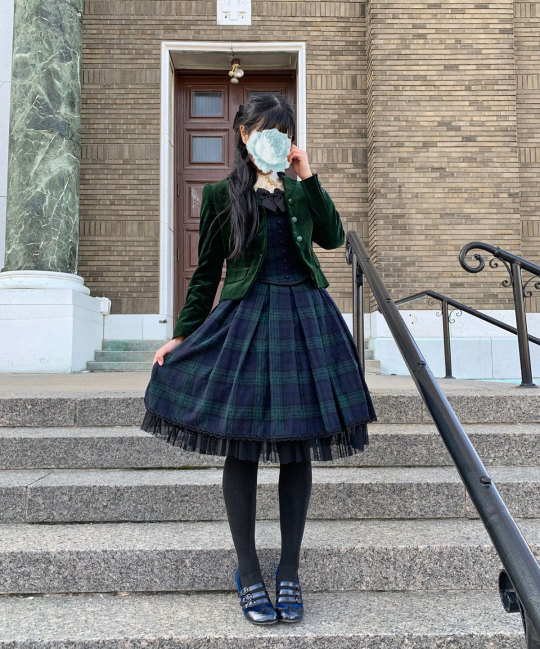
Casual outfit to meet vkeiprincesse and @fannyrosie for tea.
I'm a real sucker for green tartans and have a number of pieces with this kind of green/navy, but haven't posted many photos of me wearing them for whatever reason.
I'm also a big fan of the colour and unique cut of this Mary Magdalene JSK which was a former wishlist item of mine - and I am very glad to have been able to obtain it!
(Side note - does anyone else who owns this piece know what the snaps on the inside of the hem are for? I thought maybe they would be for positioning the separate underskirt portion just right but mine doesn't have any snaps...)
JSK (Bérengère JSK), blouse: Mary Magdalene
Jacket: Jane Marple
Shoes: Fluevog
Barrette (barely seen): Angelic Pretty
Socks: offbrand
#lolita fashion#classic lolita#daily coordinate#mary magdalene#berangere jsk#jane marple#fluevog#john fluevog#baroque ruben#angelic pretty
119 notes
·
View notes
Text


From Ursa Major day 3. rabbitreverie and I "twinned" Fée d'une Fleur/Soupir d'Ange with corsets. There are quite a few differences, but an attempt was made to keep the vibe similar!
I think the relaxing blue and pink tones contrast perfectly ☺
Some may recognize this is a recycled coord from around 2019, I really liked it so I rewore it 😅
(Therefore, you can see the coord breakdown on one of my old posts of the same outfit)
#lolita fashion#classic lolita#juliette et justine#daily coordinate#fluevog#john fluevog#queen transcendent elizabeth#baroque caravaggio#MR corset#antigones MR#krad lanrete#fee dune fleur#fee d'une fleur 2018#fee d'une fleur#soupir d'ange#victorian maiden#angelic pretty
104 notes
·
View notes
Text

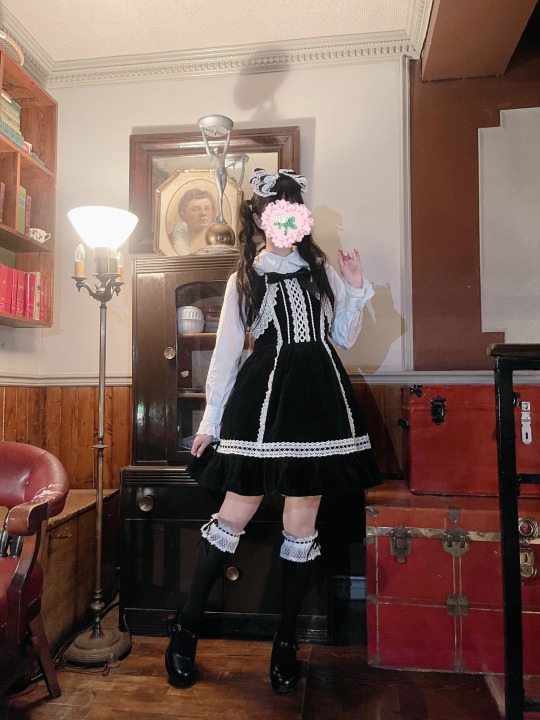
Black x white coords with eternal_frill and akabane.aiko 🖤🤍
Bonnet, rectangle headdress and headbow, the basic headwear of lolitas!
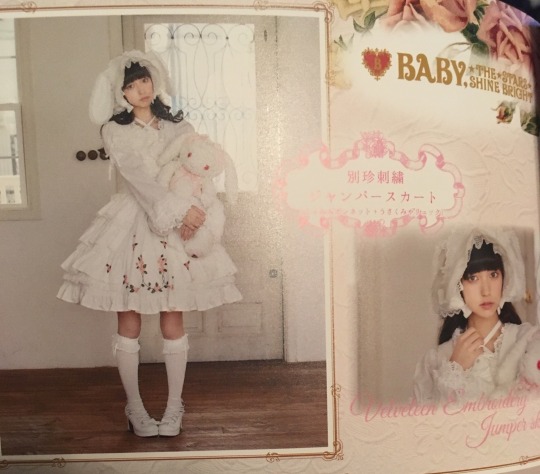
We went for a little tea outing and thought matching colour scheme would be cute. I basically never wear black & white style but had been holding on to this old velveteen BtSSB JSK (I think from 2001), PLUS apparently hoarding matching B✖︎W accessories for it, so now was the time.
Because I think this is a departure from what I usually wear I felt a little different, too! The skirt of the JSK is pretty narrow compared to modern lolita standards and a little shorter too, so somehow I felt it didn't stick out as much. The side ribbons are of course the type you have to keep tying yourself, so forgive the dangly strands.
I'm pretty sure the majority of the items we are all wearing are Baby, the Stars Shine Bright. My coord is all BABY except for the plush bag (Metamorphose Temps de Fille), the shoes (Queen Bee), and my jacket (Innocent World).
#lolita fashion#sweet lolita#oldschool lolita#old school lolita#baby the stars shine bright#daily coordinate#innocent world#metamorphose temps de fille#btssb#madeleine jsk#hawase doll
244 notes
·
View notes
Text

A girl and her doll🥀
From a shoot last fall! I borrowed @yuefii's Babydoll JSK and she is wearing Ginger Doll, so it was "doll" named main pieces all around! These two match well together with their mauve ribbons💕
I also really like the curls of Yue's wig, so pretty 🥺✨
📷: herbiecide
Almost all clothes Baby, the Stars Shine Bright except for Yue's blouse (Innocent World), our socks (Angelic Pretty), and Yue's shoes (Angelic Pretty)
#lolita fashion#baby the stars shine bright#btssb#daily coordinate#angelic pretty#sweet lolita#classic lolita#oldschool lolita#old school lolita#innocent world#kumakumya#ginger doll#babydoll jsk
112 notes
·
View notes
Text
Shenanigans in New York City, and a little Kamikaze Girls vibe!
I edited together this little vlog-ish type video with some of the footage we took the weekend we went to NYC for NYFW/BtSSB show.
While editing together the video for instagram, I noticed that the song had a lyrics option that I thought was really cute, however they were totally out of sync from the audio and I decided they were also rather distracting, so I didn't include them in that reel. However, I still exported the lyrics version (+ attempting to sync up the lyrics at least a little bit) so you can see it here.
Eternal thanks to @petit-piaf and rabbitreverie for accompanying me on this little adventure~
103 notes
·
View notes
Text
GRWM: Baby, the Stars Shine Bright NYFW Coord
For those curious about the item breakdown for this coord!
I actually rewore and filmed this after NYFW so I could take clearer video and photo at home, but the coord is exactly the same aside from me forgetting my wrist cuffs.
As you can see, the entirety of the coord is BtSSB with some secret AP socks, handmade bonnet and kumya JSK.
The "tying my own waist ties" thing was intended to see if I had any kindred spirits, but, uh, I think I just made a bunch of lolitas feel bad about their waist tying abilities on instagram. I forced myself to be able to do it, but even if you can't it's OK since lolitas are always willing to tie your waist ties for you!!
#lolita fashion#oldschool lolita#baby the stars shine bright#btssb#btssb nyfw#rose ribbon embroidery#grwm
200 notes
·
View notes
Text
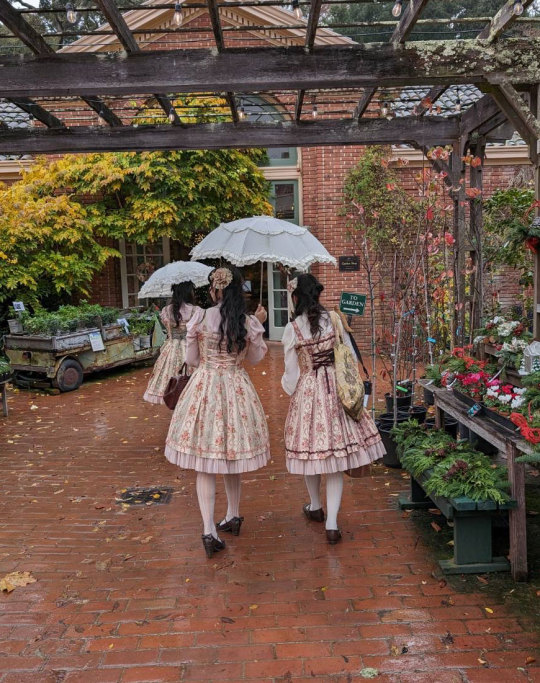

Twinning every colorway of Valeria!
📷: matthew_fto
I don't know why I shoved myself into centre position here, especially because of the sticker😂
Valeria is one of my favourite prints/pieces of all time and I'm overjoyed we could bring all 4 colourways together (I'm excluding the 2011 brown version because it's so different).
I didn't know Filoli would be decked out for the holidays and it was such a lovely estate, I couldn't have asked for somewhere better to take photos. Unfortunately it started raining hard by the afternoon, but we warmed up later!
I actually thought Filoli was some kind of lolita studio or special event because of the cute name, I was surprised it was in fact an estate/garden and an abbreviation of Fight/Love/Live.
This caption is getting long but it was so wonderful to hang out with fast friends @petit-piaf @ordovicienne, rabbitreverie, I never thought I'd be able to meet like-minded fashion enthusiasts from around the continent by posting my outfits online! The entire time is now a treasured memory 🥺
All clothes are Mary Magdalene except socks (assorted offbrand) and shoes (free choice... mine are BtSSB but unsure about others)
#lolita fashion#classic lolita#valeria jsk#mary magdalene jp#lolita twinning#lolita twins#daily coordinate#filoli#baby#the stars shine bright
121 notes
·
View notes
Note
I just found your blog but all I can say is you look absolutely stunning in your Lolita dresses I hope when I’m older and have enough money to wear these dresses and even make Lolita dresses too also what made you get into wearing Lolita in the first place?
Thank you for your kind message!
It's totally OK to get into lolita slowly ☺ There are a lot of affordable options these days, so I hope you are able to try out wearing it soon!
I've answered the question of how I started wearing lolita previously here! Classic lolita is what first caught my eye (I also started being really interested in lolita around when mature-sweet + classic was most popular) and will always remain my #1 love.
12 notes
·
View notes
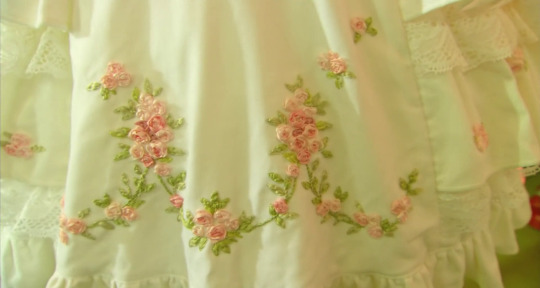
Text
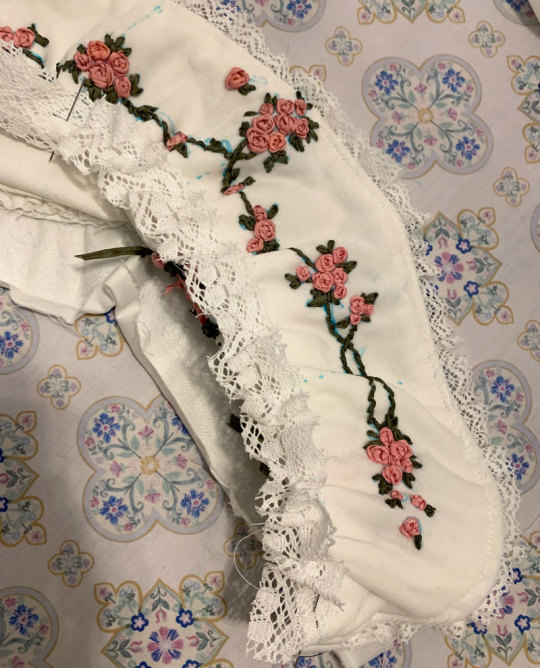
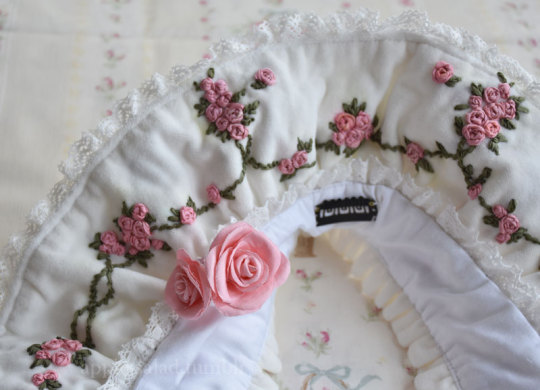
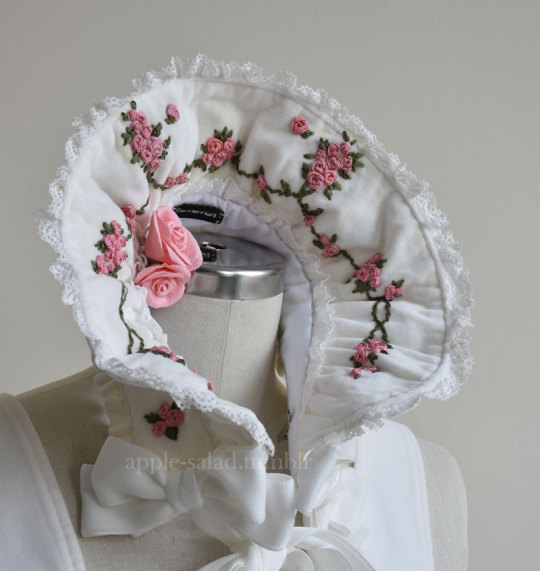
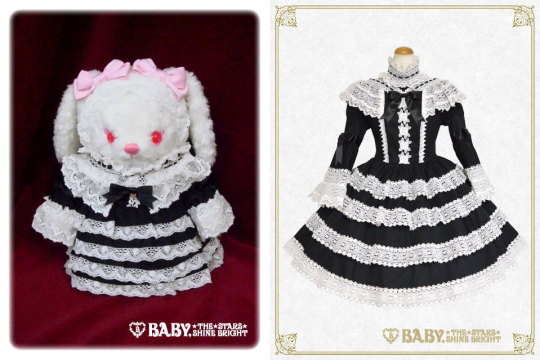
Rose Ribbon Embroidery "Mini" Projects (for BABY NYFW) Part 2: Embroidered Bonnet
I decided semi-last minute to attend BABY's fashion show at NYFW!
BABY had mentioned in their NYFW brand description that their newest collection would be a return to their origins, as well as presenting archival items.
You have to dress to impress for NYFW, right? So of course, I had to pull out all the stops and wear my Rose Ribbon Embroidery.
Also at the last minute, I decided to make a few extra complementing items...
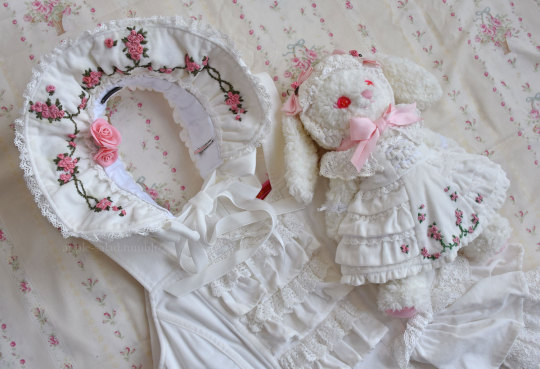
A matching RRE kumya JSK, and a bonnet.


What follows is more of a sew-along/journal rather than a tutorial or guide, mainly for my own memory's sake. But if you enjoy looking at my process (sometimes sloppy), I'm happy!
Also feel free to take a look at the more romantic process video I edited.
Part 1: Kumya JSK
Part 2: Bonnet (you are here)
This post will be my process pictures and notes for the bonnet, as well as a matching mask as a bonus.
I don't believe BABY released matching headwear for Rose Ribbon Embroidery, although I've seen an unknown velveteen headbow with rose lace sold with RRE before.
BABY usually coords RRE with the bunny ear bonnet since Ichigo wears it this way in Kamikaze Girls.
I do own this because I wanted to wear an Ichigo-like outfit at some point, but for this occasion I decided to do something different and make a "matching" embroidered bonnet.
I originally wanted to make a hard bonnet with a very defined brim that could show off the embroidery clearly as I don't really like soft bonnets, but when looking at existing BABY bonnets as a reference, it doesn't look like hard bonnets were a thing back in 2004 (and as it is, BABY rarely releases hard bonnets). So to keep with the oldschool theme, the bonnet is a soft one, although I later make some decisions to make it slightly more structured.
The next decision to make was full bonnet vs half bonnet. The bunny ear bonnet is a full bonnet and I think this is technically more "period accurate", but I am not a fan of how they look like a weird hood from the back so I opted for half (plus, that makes construction and patterning easier for me).
I still used my own bunny ear bonnet as a reference for approximate brim dimensions!
The kumya JSK was a little easier to carelessly sketch out and embroider since I was copying 1:1 from an existing design, but I felt I needed to do at least a bit more careful planning for the embroidery on this. I'm quite bad at creating embroidery designs from scratch, but with the mental image of the rose clusters and swags of vine, as well as referencing the embroidery from the film, I came up with this:

I wanted to emulate the embroidery style of the Momoko's (well, in reality likely the embroidery designer Onoe Megumi--unclear if she did the actual embroidery, but it's likely) embroidery, which I figured wouldn't be too difficult if I was also embroidering by hand.
For material, I am using the same velveteen I used for kumya's JSK. Not my first choice and I actually purchased some thicker looking 100% cotton velvet that I thought would be more similar to the original JSK material, but was worried it wouldn't arrive in time and wanted this project out of the way in case things went wrong/took longer than I expected (it did arrive about a week before the event, but it was totally wrong IRL so I'm glad I just went with this acceptable option). I also bought some more torchon lace, so I used that and another lace from my stash.
The colours of the embroidery in the film also seem to be quite different than BABY's dress. I'm not sure if the pink of the roses has faded over the years, but it has a slight salmon tone whereas the film's roses seem to be more of a pale cool/neutral pink (hard to tell with the yellow tint of the entire film) with some variegation. I love the colour scheme of the film's embroidery, but to keep things coordinated I try to opt for the same colours as the actual dress I have.
I only have white silk ribbon in the width I wanted, so I opted to attempt to dye it to match. Previously I have used alcohol markers to colour the embroidery afterwards, but I find the colour hard to control and it tends to bleed into the fabric. I've also tried colouring the ribbon with the marker before embroidering, but without heat setting the colour transfers onto the fabric as well (and it seems like trying to do so with the amount of ribbon I need would be a waste of ink).
I don't have a lot of experience with it, but since the ribbon is silk, acid dyeing seemed like the way to go.
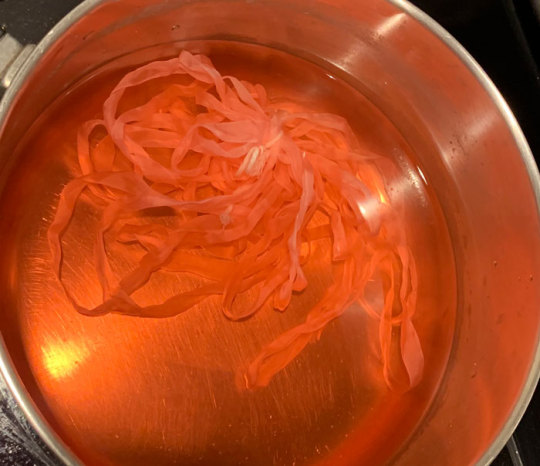
Very interesting photo of ribbon in pot (the pink ribbon gets eaten up by pinwheel roses much faster than I expected so this is the second batch I had to dye--not ideal as they are definitely slightly different in colour but it's not too noticeable). In total, I think I had to dye 3 batches of ribbon and 4 for the pink ribbon as I just barely ran out near the end, and they are all slightly different colours. Thankfully the undertone is the same so it's difficult to tell unless you are really comparing up close.
I thought I would take this opportunity to use the "peach" acid dye that I bought years ago for another project, but this ended up being a mistake as the colour was totally off (maybe the red dye was too expired). I ended up using my regular fiber reactive procion dyes (with heat/acid), because I have many more colours I could mix together, and that was much better. I really should have done this from the start as I wasted perfectly good silk ribbon by making it too dark/off for my purposes (I ended up overdyeing it in pink so it's a usable colour now, but not for this project).
The silk seems to take on dye extremely fast--even just heating up the dyebath will colour it. In some cases I removed the ribbon before adding any acid at all because I felt the ribbon was already getting too dark.
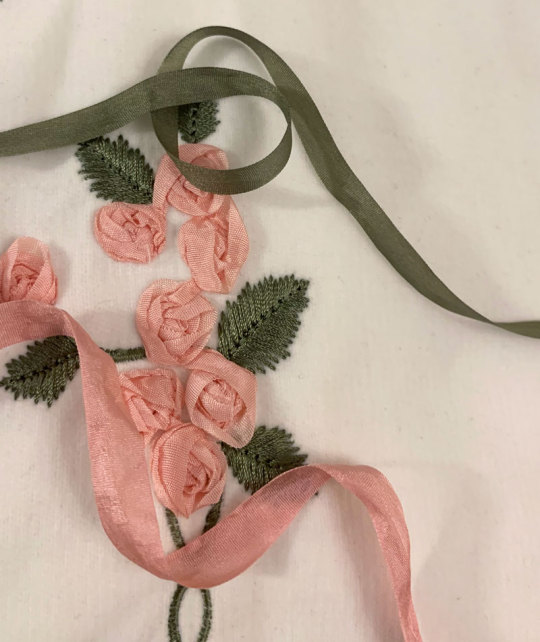
I managed to get a fairly usable mossy green colour for the leaves and vines, however the pink still ended up being a little off/dark compared to whatever BABY used. It's not too bad here as one strand of ribbon, but when many layers are on top of each other in a rose it seems pretty dark. While not ideal, I think it's still okay, especially considering the embroidery colours used in kumya's JSK match nothing else (many pinks will be going on in this coord).
After dyeing and drying, the ribbon is super wrinkled so I ironed it and wound it on some spare card so it's ready to use.
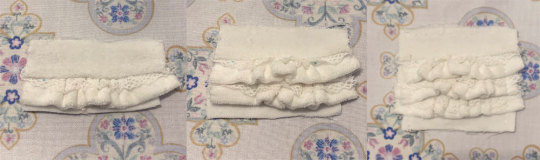
And now I can start the arduous process of embroidery.
Like before, I mainly use a combination of ordinary ribbon stitches, pinwheel roses, and french knot roses. However, this time I try harder to duplicate, or at least evoke the appearance of the embroidery of the film.
It's interesting how plain and somewhat boring the roses look on their own, especially with this monotone colouring. The varied colours of the film's embroidered roses are lovely, but I decided against it here because the BABY dress has monotone ribbon roses.
The roses definitely seem to just be pinwheel style which is very easy and doable, however I am a bit more confused about the leaves. They look like a number of straight stitches in various lengths and directions that fill in a leaf-like shape. I have no idea if this technique has a name and if there is a proper method for it, because I am a silly beginner who is very uneducated in embroidery.
Anyway I do my best and hopefully I got close enough. Ribbon embroidery is really all about the texture, which is really lovely to look at. Except I have trouble looking at my own work for too long because I start nitpicking all the mistakes I made...
Adding the green and leaves really helps the embroidery come to life.
I took even fewer pictures of the embroidery process than kumya's JSK this time because it's not that interesting. I was definitely getting sick of doing the same pinwheel over and over...
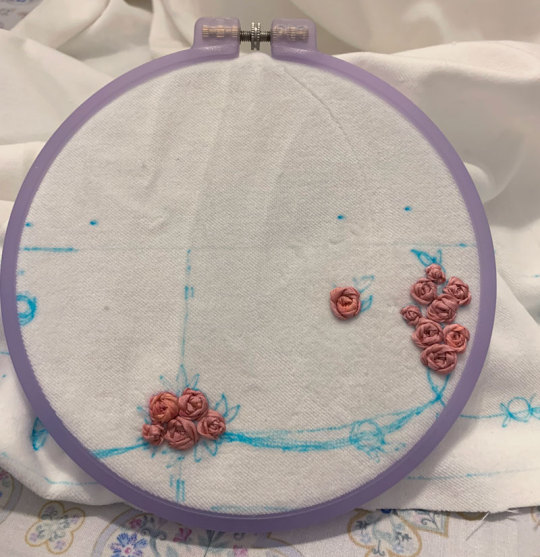
I stupidly decided that aside from embroidering the front of the brim, I also wanted a little bit of embroidery on the back of the brim for interest, as well as on the side.
The designs I drafted out for these two pieces is much simpler, but still, more work....
Almost ready for construction! Hopefully a lot faster with the handwork out of the way.
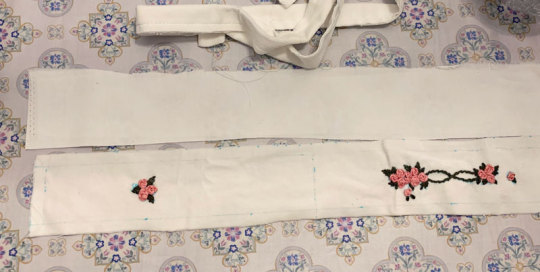
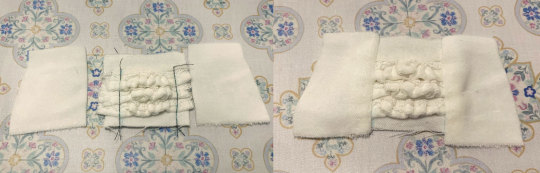
I iron on some interfacing onto the back brim panel and the bonnet band for slight extra stiffness.
The bottom part of the brim is plain cotton sateen because I was worried that the part that touches the head would get dirtier more quickly it if was velveteen.
I wanted some lace gathered around the brim and an extra velveteen ruffle on the back of the band, so I prepare that now. The lace is gathered with a single gathering thread and sewn down before sandwiching between the two brim panels.
Brim sewn and topstitched (and band is ready for attachment).
The upper flowers ended up a little closer to the top of the band then I intended, but I think it's okay.
Gathering brim and attaching it to band. Because the velvet fabric is so thick, the usual "sew one line of stitching with a wide stitch length" not only made the fabric incredibly difficult to gather, but the thin polyester thread also continually broke when trying to do so. Therefore, I opted for an alternative method I think I'd remember seeing in my sewing machine manual of all things--a zigzag carefully stitched over a central gathering thread. This worked much better, although I probably should have used a thicker/extra strong thread as the central gathering thread because it did break the second time I had to gather the brim due to a mistake.
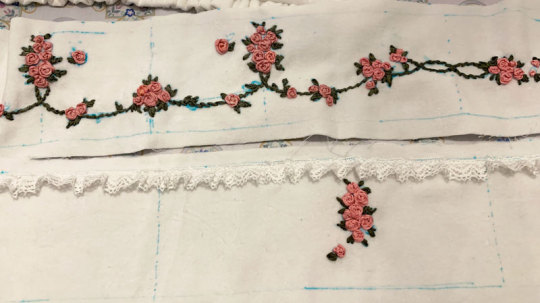
I also add a bit of lace to the inside of the brim. I think this adds some luxury and frilliness between the head and the bonnet's brim, so I wanted to add a small width. I probably could have used even more of the lace's width since it turned out very subtle when worn. But I still think it adds a small amount of interest to the innermost part of the brim and was worth adding.
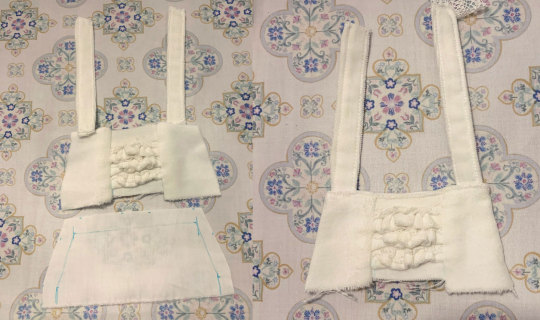
Unfortunately here after sewing on both brim parts I realize that I gathered both using an incorrectly marked centre line, so I had to rip it out and do it again ;_;
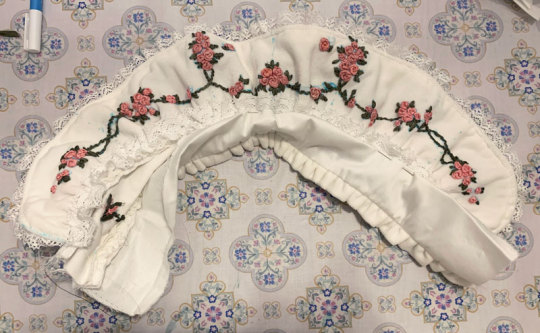
Next, I can carefully align and pin the bottom of the brim to the bonnet and sew it down. I tack this down by hand because I'm not skilled/accurate enough with a sewing machine to topstitch both sides nicely at once (look closely, and my messy stitching is quite visible...)

I also fold in the raw edges and finish the sides of the brim by hand, leaving some openings for ribbon ties.
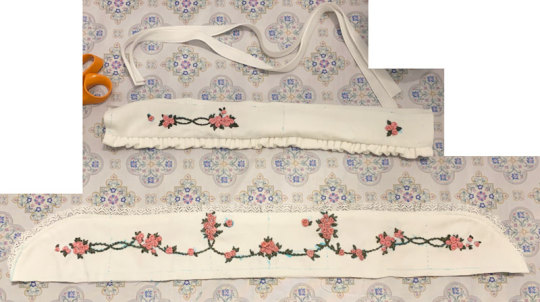
At this point I spray almost the whole bonnet with water to disperse and fade my markings. Unfortunately, some of the earlier batches of ribbon that I dyed (Can you tell the variance in the 3 dye batches I needed to do?) were probably not washed well after dying and seem to have bled into the fabric from the water...but hopefully it's not too noticeable.
Next I topstitched all around the brim and attached the ribbon ties.
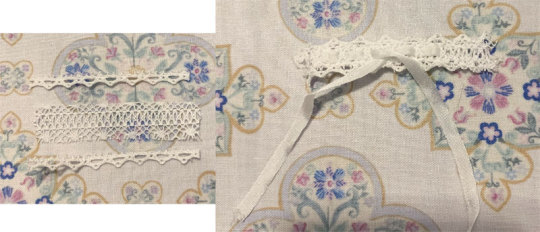
I bought some double sided velvet ribbon in my last minute supplies shipment and made some bows from it. I think the material is a little thick and petersham would have worked alright as well, but the consistent velvet material feels more luxurious, doesn't it? I also think as an added benefit (?) the ribbon being plush and double sided made the bows more puffy looking.
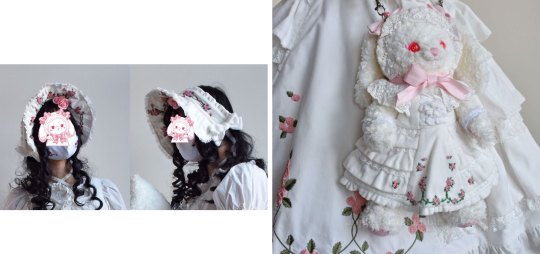
I add some clips to the sides and a toupee clip to the top for security. I opted for a toupee clips because I think it's really the way to go if you don't want the head item to move at all, no matter how thin or slippery your hair.
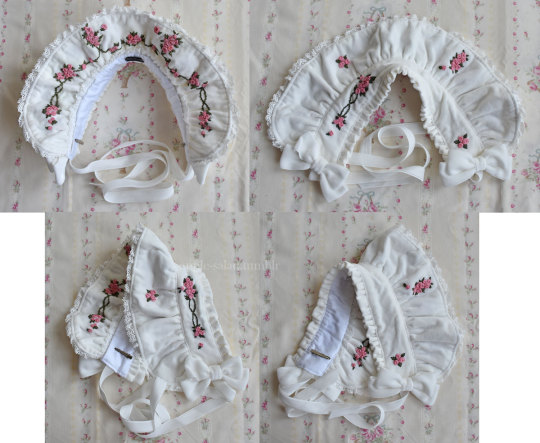
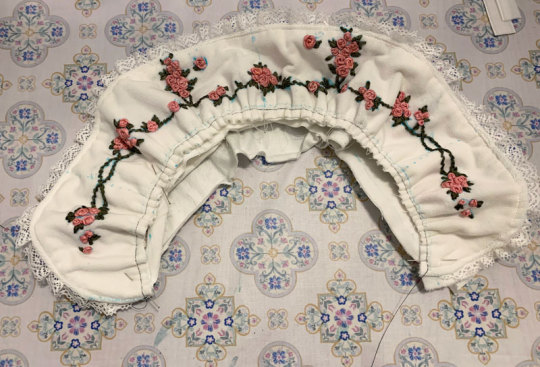
Finished.
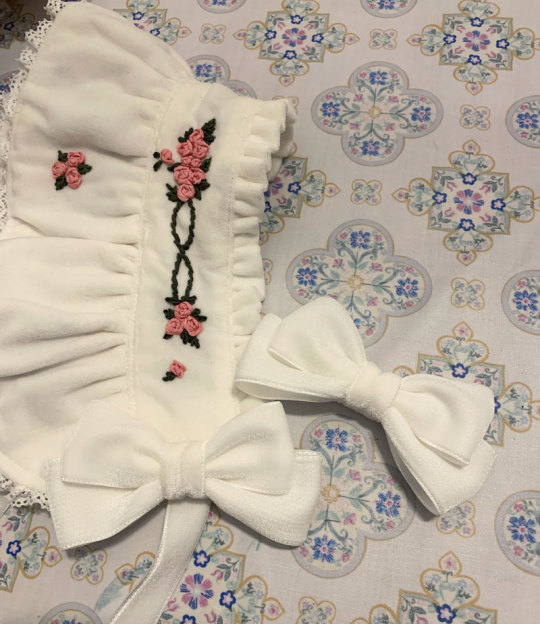
Bonus 1: rose accent pin
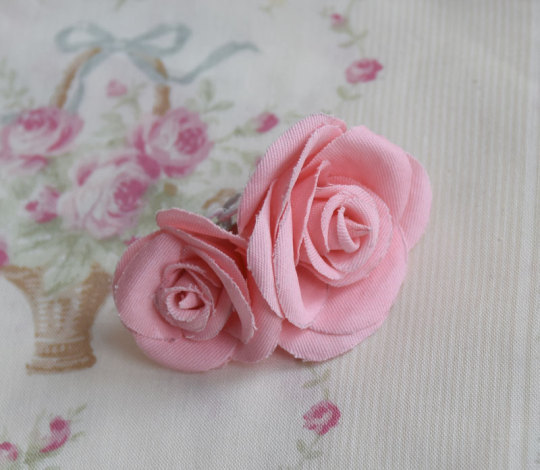
I was in a bit of a rush at this point as it was near the end of the week coming up to the show, so I didn't take any photos of the process here but the technique and templates I used were identical to my handmade faux rose rosettes I made for UM (and the bonus corsages). I have a post with all the details of this sitting in my drafts that I will post eventually, and I will update this post when that happens.
The brooch was just meant to add a bit of 3D faux flower accent to the bonnet, bringing in the rose motif even more. Partially inspired by the faux flowers BABY adds to their bonnets sometimes, like on Milk Tea Doll.
The fabric was "custom dyed" with the same fiber reactive dye I used for the silk. The fabric was further starched, cut out by hand, and shaped with flower iron tools before gluing together.
Bonus 2: matching embroidered mask
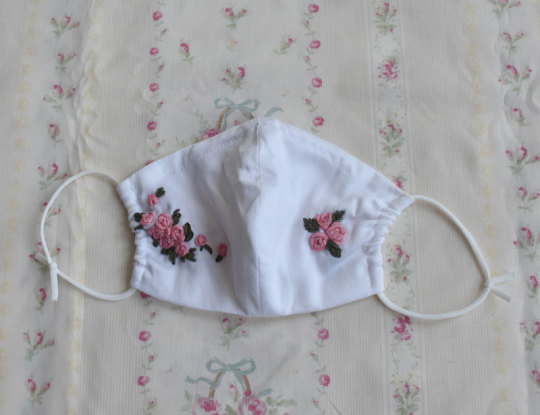
I wasn't sure about whether or not I wanted to wear a matching mask, but decided to do so for situations when I would want my face at least half-covered in public. I didn't really expect to be visible in fashion show pictures as someone in the back, but just in case. (I think this decision was worth it, although my makeup transferred all over the thing and in most pictures my face was even more unflattering. eh well)
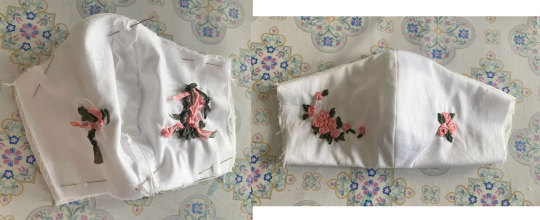
I forgot to take a lot of pictures of my process for this, but it's very uninteresting and not dissimilar from every other mask sewalong from 2020. I draft out a design similar to the bonnet motifs on both of my mask panels (cotton sateen), and embroider.
I should have embroidered closer to the centre of the mask because when worn the embroidery is not very visible/covered by my hair at the sides. What can I do since the panels were already cut though...oh well!
The lining material is some Japanese CLEANSE Ex fabric I had bought previously to make masks during the pandemic. It's supposed to be antibacterial and antiviral, as well as washable, but I have no idea how well supported those claims are.
Sew together normally on both upper and lower sides, turn inside out, add a channel for nose wire and side channels for elastic.
I also have some mask elastic on hand so I use that.
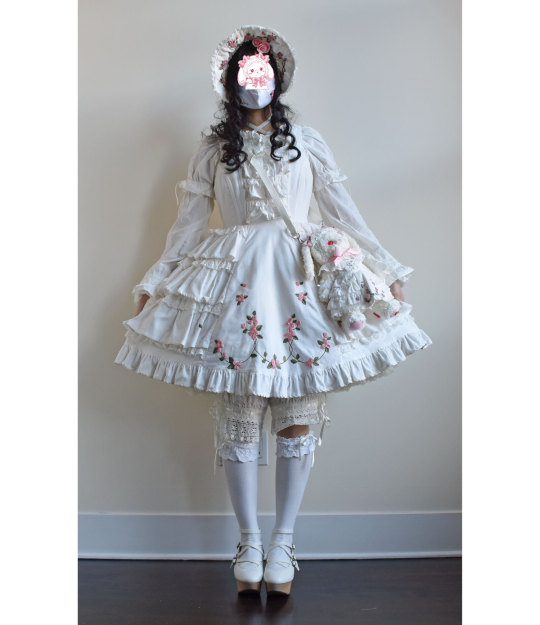
And the finished outfit again with all my items~
Thank you for reading! If you ever feel inspired to take up a similar project, such as the kumya JSK, I'd love to see it!
222 notes
·
View notes
Text
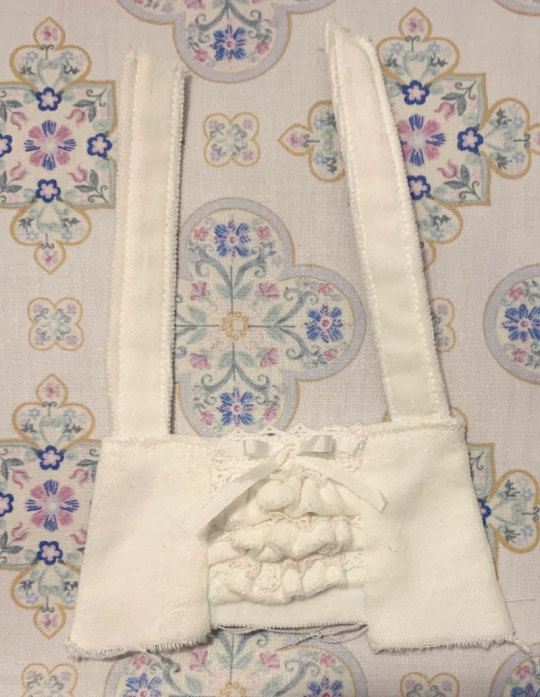
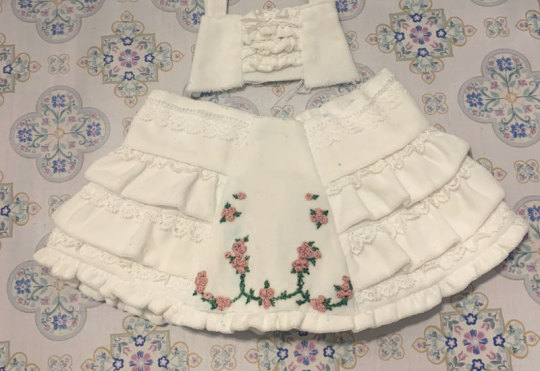
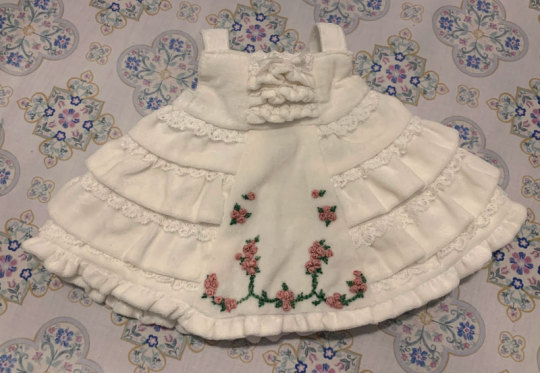
Rose Ribbon Embroidery "Mini" Projects (for BABY NYFW) Part 1: Kumya JSK
I decided semi-last minute to attend BABY's fashion show at NYFW!
BABY had mentioned in their NYFW brand description that their newest collection would be a return to their origins, as well as presenting archival items.
You have to dress to impress for NYFW, right? So of course, I had to pull out all the stops and wear my Rose Ribbon Embroidery.
Also at the last minute, I decided to make a few extra complementing items...
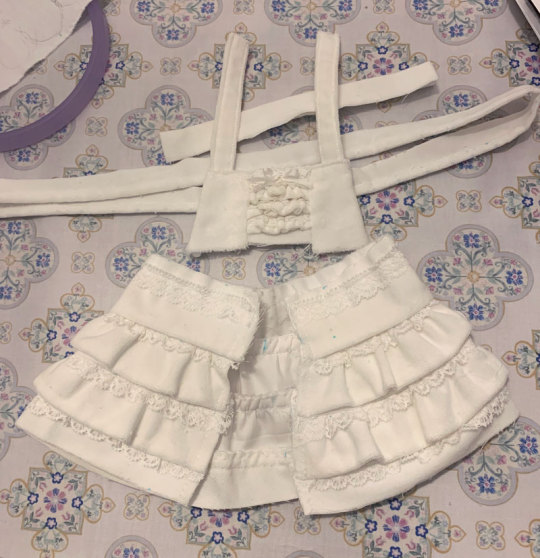
A matching RRE kumya JSK, and a bonnet.

What follows is more of a sew-along/journal rather than a tutorial or guide, mainly for my own memory's sake. But if you enjoy looking at my process (sometimes sloppy), I'm happy!
Also feel free to take a look at the more romantic process video I edited.
Part 1: Kumya JSK
Part 2: Bonnet
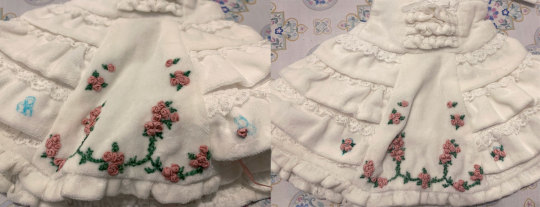
To make a matching kumya JSK, I first had to investigate the original dress a little! This I found actually very fascinating because I had never bothered to take a very careful look at the construction details of this JSK (it was, and still is always a precious item that I am afraid will get dusty or dirty if I look at it wrong...)
I actually even found a spot where it looks like the material was torn and someone roughly repaired it by hand (laugh). I have a feeling this was a factory mistake/fix (either from fabric manufacture or sewing) because it's hidden beneath some lace ruffle and I don't really think it's something that an owner would let happen, but who knows.
So here's a few details of RRE~
Many people don't know that RRE is made of velveteen! And further, there is sometimes a misconception that it came in a "cotton" and "velvet" version. As far as I know, there is only one version made out of cotton velveteen.
So the white can get dirty and attract dust super easily :')
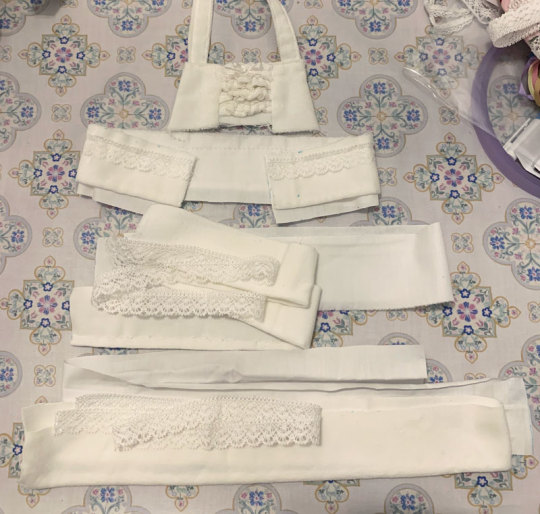
The bodice has a panel of 3 ruffles + upper "hashigo" (ladder) lace part with ribbon. It is also boned (BABY's crap boning with sharp edges and no channels, meh...) but obviously I can skip that for kumya.
The skirt has a trapezoidal embroidered panel, the star of the show, surrounded by 3 tiers of ruffles that extend all the way around the back. The last "tier" is not gathered and has a smaller ruffle all around the skirt.
While thinking about how to construct something similar in kumya-scale, I found it fascinating that the under-material the ruffles are attached to are cotton! Makes sense to reduce bulk, plus you can't tell when the ruffles cover it.
The density of ruffle starts out quite concentrated, and then reduces as the bottom ruffle is reached. The cotton under-material also seems to have less material gathered than the main velveteen ruffle. This also makes sense to not only reduce material usage but also because having a huge amount of gather on the bottom tier can make the skirt look too heavy.
Knowing this, I fussed out some semi-arbitrary ruffle multipliers for each tier (and lining) in my notebook. Very important to keep tabs on how many fabric strips I need and their exact widths!
Also since everything is in kumya-scale the gathering is generally reduced by a lot. Kumya doesn't need much to have a very full skirt, and with such tiny tiers the effect of the gathering can easily look like overkill. The kumya elizabeth OP gathered lace/tiers very lightly:
As reference dimensions for kumya, I have these two kumya dresses which I used lightly (mostly the sugar bouquet one because it's a JSK). I also have the babydoll kumya, but as it was out of commission for a while (on my christmas tree!😅) I didn't use it for checks at all.
The sugar bouquet "bodice" is about 3cm long. I decided to extend it one more cm to 4cm to make it easier for me to calculate for the ruffles and also leave enough space so the ruffles would be visible and not potentially buried.
I use a cotton velvet fabric and a mixture of cluny and torchon lace I have on hand. This velvet has a noticeable twill weave to it and is thinner than the velvet BABY usually uses, but the thinness is perfect for this purpose. I was originally going to just use cotton sateen but remembered I had this!
You can't see the weave from afar so I tolerate it. I wouldn't have wanted to use polyester velvet/suede-like/minky, I think.
Since the material is still a velvet and does have a thickness compared to cotton, I decided to roughly hem any ruffle edges by hand with a simple once-turned whip stitch. it kind of seals the raw edge and hems it at the same time. Note that this is not a great idea for something that would be worn and washed a lot, but this piece in this specific case won't be.
In general, when it comes to mistakes with this piece I mostly ignore them because it's kumya-scale and not only will most people not notice, but as stated above it's also not a piece that will be worn and washed often so quality of construction isn't much of a concern.
Mentally deconstructing and calculating the construction of the ruffle part was a bit of a pain. My lace was wider that I needed so I had to roughly mark out where it should be sewn into the ruffle, not always with great success.
I'm also not great with working at small scale...much respect to doll clothesmakers.
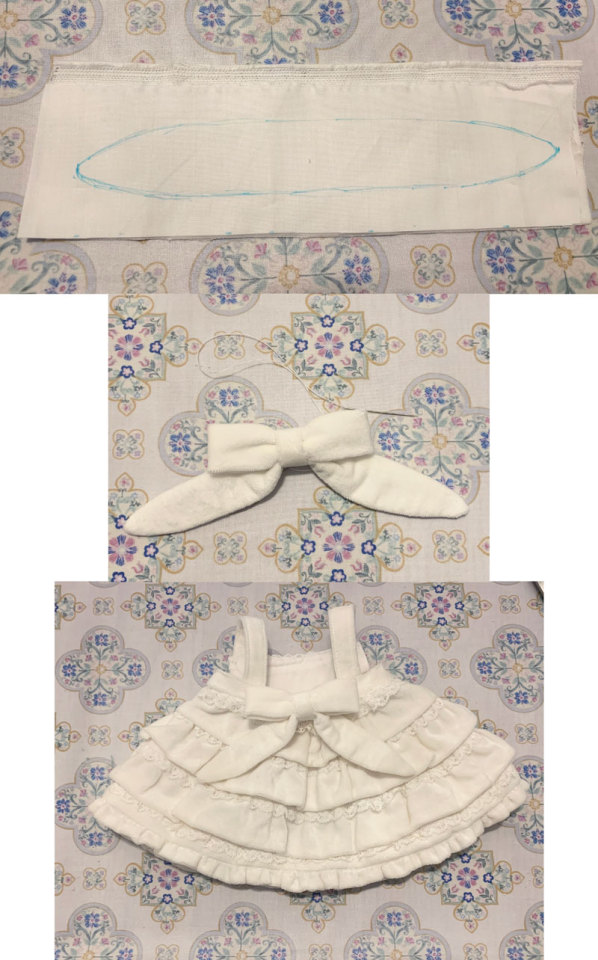
The bodice of the sugar bouquet kumya JSK is made from a front trapezoidal panel with a strip of fabric attached to the sides that extends all the way around the back, and the skirt attached to that. So I cut some slightly angular side panels to attach to my rectangular/square-ish front ruffle panel.
(I threadmarked approximately where I wanted the seam to go because I don't trust myself to attach the side panel in the right area/dimension otherwise with such a wonky panel)
Simple straps made from strips of fabric. I make these slightly thicker than a regular kumya JSK as well because I feel like RRE has thicker straps too (well, the entire construction of the bodice is a bit different, but ignoring that...)
And a facing layer of ordinary cotton is sewn to the front panel.
For the section of lace at the top, I frankenstein together 2 types of lace that I trimmed to look more like the lace used on the original JSK. It seems the original JSK also has this lace sewn through the lining layer, so the stitching is visible from the inside.
I use the thinnest ribbon I can find--some silk ribbon in this case. It actually works really well because silk ribbon is very thin/flimsy and can be tied and threaded in nicely with relative ease.
By the way, if you aren't aware already, a yarn needle works very well for threading ribbon through lace.
Bodice portion finished. This took way longer than I was hoping, an entire night. Hopefully the results are worth it.
Next I fuss out the skirt. At this point I am working out the calculations and investigations already mentioned previously. I did make a few mistakes and had to re-cut a couple tiers!
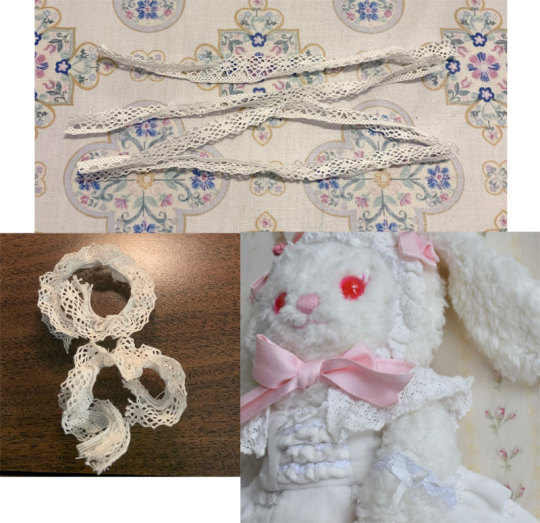
I use a different lace from the bodice for the tiers because I thought the shape of this one was closer to what was originally used (it's actually the bilateral ladder lace used for the bodice, but instead of cutting off the lace edges and using the thread-through part, it's just cut in half)

After hemming the ruffle, I attach the lace to the velveteen ruffle with a single gathering stitch (too lazy to use 2, and the thick material makes it hard to gather anyway). The under cotton layer is gathered separately and sandwiched between the cotton layer of the previous tier.
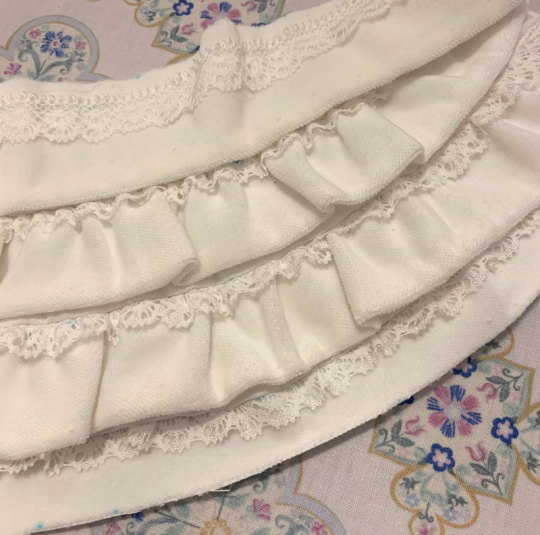
Coming along. I think the lace length for these ruffles is a bit off/uneven/less than ideal, but oh well, can't be bothered to fix it...
After the third tier, a non-gathered velveteen tier is attached with gathered lace.
I also prepare the bottom ruffle, but that will be attached to the completed skirt.
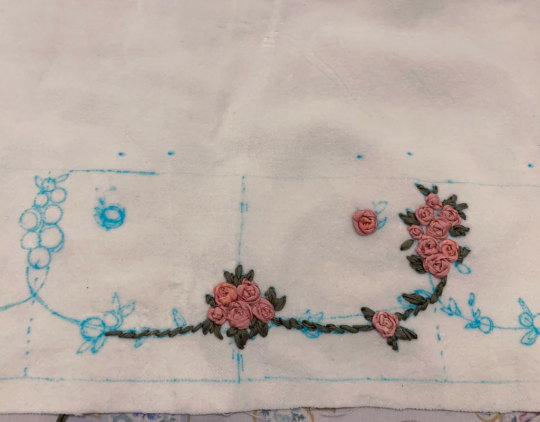
Next, the most exciting but also potentially the most taxing part must be done--the embroidery!
I know that the top of the embroidered panel is basically the same width as the bodice ruffle (referencing the original dress), but the width of the bottom is a bit arbitrary (about 3x the width of the top of the trapezoid)
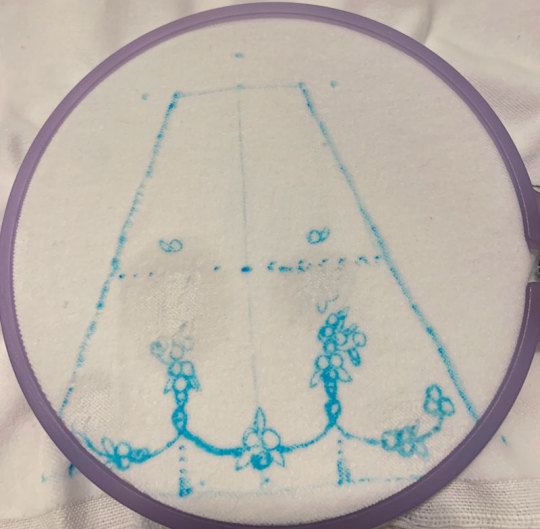
I mark out everything roughly with water soluble marker (the darker patches are where I messed up and used some water to erase, waiting for it to dry...)
The midlines of the panel as well as the 1/3 lines were marked because I 100% do not trust myself to make the embroidery symmetric without doing so. I'm a beginner and not nearly skilled enough in embroidery to freehand...
I carefully investigated the original embroidery and copied the locations of roses and leaves to my mini-panel. Once I have the general shape that I'm happy with, I start embroidering.
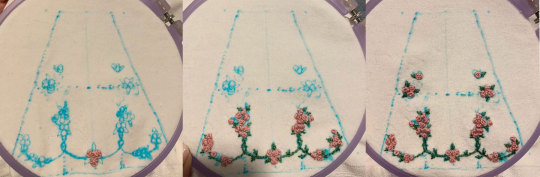
I didn't take too many progress photos of the embroidery, but I also don't think you need them. Because the scale was small, this took an entire evening/night which I think is not too long?
For the roses I use a combination of the "pinwheel" rose method and french knots (+ some additional plain stitches where I wanted more volume).
The nice thing about ribbon embroidery, I think, is that the ribbons add so much texture that even if it's a bit messy it looks very impressive anyways. Plus your mind will mentally interpret some random puffy ribbon lines as a flower anyways.
I use regular DMC 6-strand embroidery thread (split in half, so 3 strands used here) for the vines and leaves. Because I also suck at embroidery and have never embroidered a real project/learned real techniques I mostly kept the leaves simple and slightly abstract with 3 branchlike stitches. I think I currently can't fuss with making nice rounded miniature leaves without messing up every second stitch...
Finished.
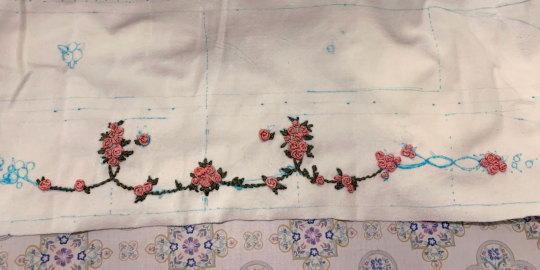
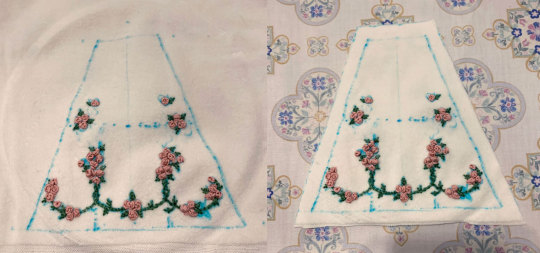
I spray water to remove the marker marks and let dry.
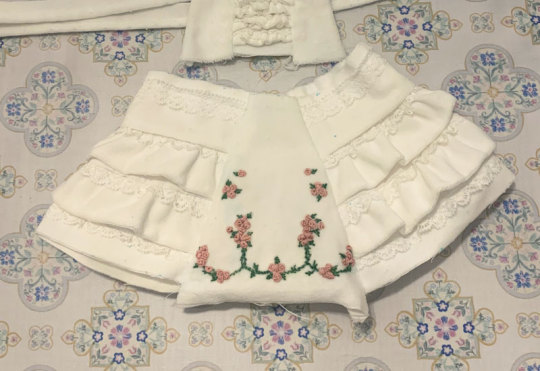
Attach embroidered panel to ruffles. I should have double checked where the panel was aligning with the ruffles on each side since it's uneven, but whatever.
Gather bottom ruffle and attach to skirt.
I attach the bodice strip to the front bodice panel as well, and sew the straps down.
I basted the front of the bodice to the skirt by hand because I wanted to make sure they were aligned. Because I messed up sewing the ruffle tiers to the embroidered panel and they are somewhat misaligned, I tried to adjust where the top of the skirt was sewn to the bodice to compensate, it didn't work that well but eh, it's alright.
Gather the skirt and sew to the bodice portion. This was very fiddly and I had to redo some parts several times because the lace wasn't getting sewn down properly. It's still not great but I'll fix any egregious parts by hand.
The gathering is also pretty uneven, but I'm ignoring it...
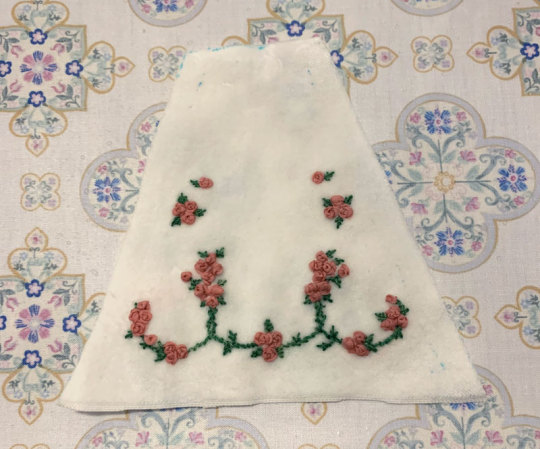
Looks almost done but not yet!
There is a tiny bit more embroidery on the edges of the middle ruffle tier. I marked approximately where I wanted the roses to be and roughly embroidered them (without a hoop because it's too complicated to figure out alignment before construction, although embroidery is always easier with one).
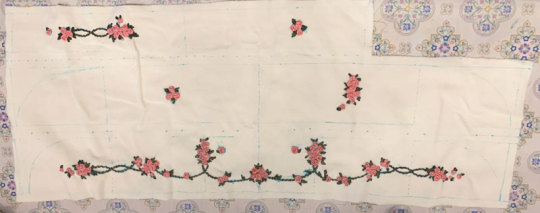
I also add a back ribbon to simulate waist ties, a detail I notice on a few other BABY kumya JSKs. The waist ties on RRE have a slightly rounded/pointed shape to them, so I freehand this shape for the bow "tails" (because I'm getting tired and lazy, I didn't really measure although I did check that the width was approximately the same throughout). The backside of the waist tie is another layer of cotton, which reduces bulk when turning the shape inside out (the backside of the original JSK is also just lining material). I also folded a long strip over itself and basted it down, creating a loose tube shape to use for the bow part.
It's pretty hard to create defined folds in the bow with such thick fabric, but I tried my best...at least it's likely the back will rarely be seen.
I gave the dress a final allover spray with water to hopefully erase any remaining soluble marker. Also, some interior hand finishing needed to be done (mainly tacking down some unruly seams)

And finally, actually finished. The embroidery thankfully turned out decent enough to distract from any weird spots of construction and so on. It looks quite remarkably like the actual dress, so goal achieved I think!
Extra contents:
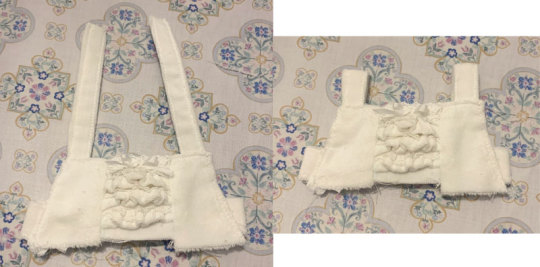
I make kumya little wrist cuffs because some of the kumya variations (such as babydoll kumya) come with them, and that's really cute.
BBD kumya seems to use a type of lace that's already elasticated, but I don't have that on hand so I just sew two pieces of the same lace used for the bodice ruffles together to make it bilateral and stitch on an additional elastic with a stretch stitch. And add on a little ribbon bow (I only have silk ribbon in this narrow width, but I think a ribbon with more body such as poly satin or cotton satin would work better)
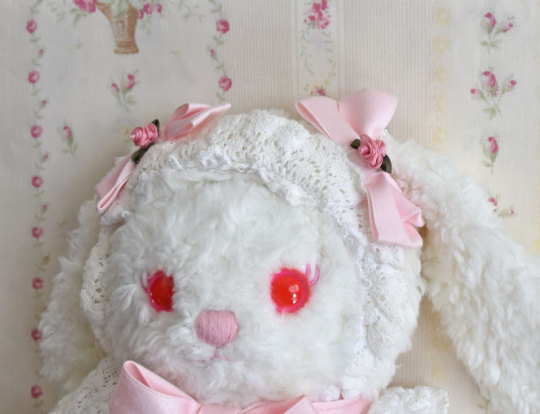
And I also make two of those little applique ribbon thingies (you can buy them cheaply from craft stores and so on, but whatever) and stitch them temporarily to kumya's bows for an extra accent.
I'm lazy so I use the bloomers that came with the hawase kumya set underneath (I'm sure making a similar pair of bloomers wouldn't be too much work but I have no idea if these are patterned with some kind of shaping/rise and I don't want to deal with that)
This is actually yuefii's kumya that I am still hoarding for whatever reason and has its eye and mouth fur already trimmed.
And now Usakumya is ready to see the runway :)
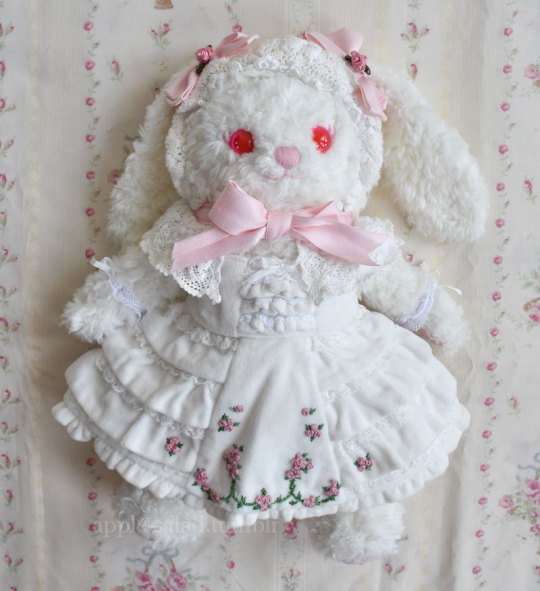
Part 2 (bonnet making) is here.
Thank you for reading! If you ever decide to take up a similar project, I'd love to see it!
196 notes
·
View notes
Text
Momoko, the Moon Shine Bright...
Channeling Kamikaze Girls' Momoko! I hand embroidered a few accessories to match Rose Ribbon Embroidery for the BtSSB NYFW show. This post is more of a process/homage type of video, but there is a lot more video and photos to come!
#sweet lolita#lolita fashion#oldschool lolita#baby the stars shine bright#btssb#shimotsuma monogatari#kamikaze girls#daily coordinate#victorian maiden#usakumya#rose ribbon embroidery#rose ribbon embroidery jsk#handmade#下妻物語
452 notes
·
View notes