Last Seen Blogs
calliekenz
callie ੈ✩

shokkysworld
desi love
ramen8008
Ramen

captainsilentwhisper
Nerdy dump

royalchinadelhi-blog
Royal China


Photo
Sunset Orange Golden Fizz (#f84643 to #d6f93e)
23 notes
·
View notes
Note
Can you recommend creator guides on typography? That one is going to be disastrous for me and I haven't made much improvements. Thank you
TYPOGRAPHY [FONT] STARTING GUIDE
[*not an exclusive list by any means, but a few resources to get you started*]
WHERE TO FIND FONTS:
fontsquirrel
dafont
1001freefonts
fontspace
urbanfonts
FONT RECS [one, two, three, four, five, six, seven, eight]
FONT PAIRING:
fontjoy - font pairing made simple
font pairing guide: part 1; part 2
TEXT EFFECTS:
various typography tutorials
looping scrolling text animation
twitching text animation
chalkboard effect
neon sign effect
inset effect
multiple strokes effect
watercolor effect
gradient 3D effect
3D effect
animated gif text
gradient see through text effect
gradient text effect
sliced text effect
various text effects
animated clipping text effect
floating stroke text effect
OTHER GENERAL RESOURCES:
@/completeresources
@/allresources
@/itsphotoshop
@/dailyresources
@/resourcemarket
3K notes
·
View notes


Photo

Some of my lovely friends asked to show how I do my blending, so here is a very long tutorial! I will explain how to:
Blend GIFs with lots of movement
Blend three or more GIFs on one canvas
You will need:
Any version of Photoshop with a timeline
Basic-intermediate knowledge of GIF making (including cropping, how to use adjustment layers for color correction, applying layer masks, and placing multiple GIFs on one canvas)
Since the way I blend depends on the footage I’m able to work with, I often end up going in a different direction than I first planned. So this isn’t a strict step-by-step guide that can be applied to everything you make. These are just some tips!
Read the rest under the cut.
Keep reading
2K notes
·
View notes
Text
Jazz Up Your Gif Headers
Learn how to add a ripped paper edge, an outward curve edge and an inward curve edge to your gif headers. Once you learn how to do these, you can jazz up your gif headers any way you want!
↓ LEARN HOW TO DO THESE UNDER THE CUT ↓
[1] Create your gif
Gif dimensions: 640px x 360px
Make the gif like you normally would, apply coloring, sharpen, etc. If you don’t know how to make gifs yet, click here for some great tutorials.
Assuming you’ve already converted into a Video Timeline and your layers into a Smart Object in your gif making process, let’s proceed.
[2] Make sure the playhead is at the start of the timeline
If your playhead isn’t at the start of the timeline, do this before adding new layers (which are the next steps) so the new layers will be aligned with your gif and coloring layers as demonstrated below:

[Option A] Apply the ripped paper texture
You can download the texture I used here, which I got from freepik. I've converted some of them into png files for those who don't have Adobe Illustrator.
[A1] Place the texture on your gif file then move it near the bottom edge of your gif. To place the texture, go to File > Place or Place Embedded...
NOTE: If you're using the texture I've provided, just resize it accordingly and skip the next step.
[A2] Select the Rectangle tool (shortcut key: U) and draw a shape on the top part of your gif that isn't covered by the texture.
NOTE: The size and color of the shape doesn't matter, as long as it doesn't cover the ripped edges part of the texture.
[A3] Group your texture and shape layers

To do this:
Select both layers
Click the "Create a group" button which looks like a folder at the bottom of the Layers window
Drag the group layer to the bottom. It should be below the gif layer now.
NOTE: If you're using the texture I've provided, just skip the group part and drag the layer to the bottom, below the gif layer.
[A4] Create Clipping Mask
To do this, right-click on your gif layer and find Create Clipping Mask.
After doing this, there should be an arrow icon "↴" on your gif layer pointing down to the group/pointing down to the texture layer you're using the texture I've provided.
[A5] Add a background color
To do this, add a Color Fill/Solid Color... layer as demonstrated below:

Select your preferred color. The color should be the same as your mobile theme's background color.
Next, Drag the group layer to the bottom the same way we did in [A3]. It should be below the group layer now/below the texture layer if you're using the texture I've provided.
Next you'll learn how to add a curved edge to your gif header.
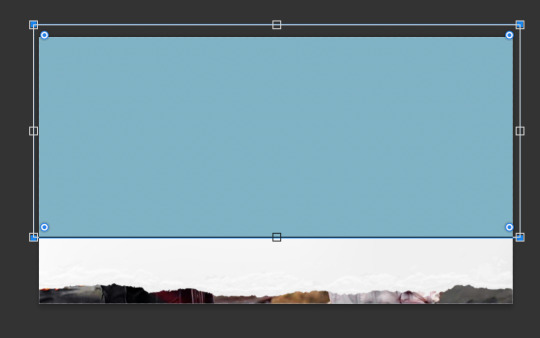
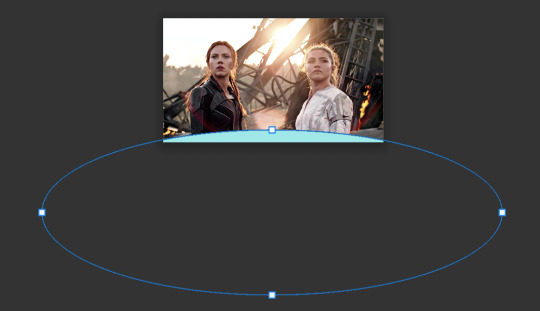
[Option B] Apply an outward curve edge
[B1] Select the Ellipse tool
If you can't find it, find the Rectangle tool first, do a long press on the button and this will come out:

NOTE: If you’re more comfortable/experienced with the pen tool, you can use that instead to create the shape.
[B2] Draw a shape over your gif like this:

NOTE: The color of the shape doesn't matter. You can resize, move and position the ellipse to your liking afterwards.
[B3] Drag the Ellipse layer to the bottom the same way we did in [A3]. It should be below the gif layer now.
[B4] Create Clipping Mask
To do this, right-click on your gif layer and find Create Clipping Mask.
After doing this, there should be an arrow icon "↴" on your gif layer pointing down to the Ellipse layer.
[B5] Add a background color
Do the same thing we did in [A5]. This layer should be below the Ellipse layer.
If you want your curve to go inwards...
[Option C] Apply an inward curve edge
[C1] Follow steps [B1] to [B2]
NOTE: If you’re more comfortable/experienced with the pen tool, you can skip this step and use the pen tool instead to create the shape then go directly to step C7.
I personally prefer the Ellipse tool because I want it to be a perfectly curved edge (with the even sides when I center it) 😂
[C2] Move the shape downwards and resize it to reach the corners.
[C3] Select the shape
To do this, Ctrl-click (Windows) / command-click (Mac) the thumbnail of the Ellipse layer which I've highlighted in blue below:

There should be marching ants/dashed lines around the shape on your gif now.
[C4] Add a Solid Color layer
To do this, check out [A5]. The marching ants should disappear after adding this layer.
[C5] Invert the layer mask
After the Solid Color layer's been added, you may notice that it has a layer mask. To invert it, make sure to select the layer mask thumbnail first then press command (Mac)/Ctrl (Windows) + i
[C6] Delete the Ellipse layer
We only needed this for the mask.
[C7] Drag the Color Fill layer to the bottom the same way we did in [A3]. It should be below the gif layer now.
[C8] Create Clipping Mask
To do this, right-click on your gif layer and find Create Clipping Mask.
After doing this, there should be an arrow icon "↴" on your gif layer pointing down to the Color Fill layer.
[C9] Add a background color
Do the same thing we did in [A5]. This layer should be below the Color Fill layer.
〰️
And there you have it! Three different gif headers. With the gif header knowledge you now have, you can use it to apply different shapes and textures to your gif header's edge :)
Please like/reblog if this has helped you and feel free to hit me up for any questions and concerns! ♥︎
807 notes
·
View notes
Photo

** Disclaimer ** - I am NOT a professional graphic designer, however I did work with many of them for different occasions and I have been designing my own things for over 10 years now. All the knowledge I have and share with you in this post was gathered by me over the course of 14 years.
I recently started my font series, where I shared my favourite fonts of different typefaces. People have been requesting to post my favourite font pairings and as much as I love to do that (and I also will, just scroll down to the end of the post to see them), I think it’s also important for you to understand, why they work together nicely and what you should look out for, if you plan on pairing typefaces yourself.
Keep reading
869 notes
·
View notes
Text
how to apply an action (e.g. a filter like sharpen) to all layers
I’m using CS5.1, but it should work for other versions as well.
IF YOU ARE GOING TO SEND ME A MESSAGE ASKING FOR HELP ABOUT THIS SCRIPT: Please describe your problem as well as you know how. Include/submit a screenshot of whatever error message you are encountering, and another screenshot of your actions tab, expanded like in the first image below. (One screenshot is fine, as long as it includes both.) This is always the first thing I ask people to do when they ask me for help, so hopefully skipping that step will save me some time and get you to a solution faster. Thank you!
Keep reading
5K notes
·
View notes
Text
how to gif - tutorial for beginners
this tutorial covers all the basics of giffing. it’s beginners friendly, it provides you with everything you need to know in order to create a gif.
bonus: simple basic vibrant coloring tutorial so you can color it as well
instructions are below the cut. enjoy :)
end result:
gif before coloring:

gif after coloring:
Keep reading
3K notes
·
View notes
Photo
GIF RESOURCES MASTERPOST
Hey all! In celebration of my one year gif-iversary, I have compiled a list of all the resources that I have personally found helpful in learning how to gif over the past year. I have laid this list out in very simple terms because I remember when I was first learning to gif, I didn’t fully understand certain terminology and stumbled on a lot of the most useful skills by accident. Hopefully these explanations are clear, and everyone can find what they need easily.
List of gif making resources under the cut:
Keep reading
1K notes
·
View notes
Photo
i was asked how i made the text animation (or twitching text, i think) in this post, so i thought i’d make a quick tutorial on how to make it. i’ll be covering how to simply make it twitch and how to use the effect to transition into other text.
i use photoshop cc 2014
basic knowledge on layers, smart filters, and timeline needed
if you found this helpful a like/reblog is appreciated :)
Keep reading
1K notes
·
View notes
Photo

Hi guys! I terminated my old blog @wylanjesper, where this tutorial was originally posted, so it’s no longer possible to access that version. An anon requested that I remake this tutorial for you guys so here I am again, with a few more tips I’ve picked up since I posted my original tutorial.
A somewhat-minimal knowledge of Photoshop adjustment layers is needed for this tutorial. We’re going to be going from this:

To this:
The full tutorial is under the cut!
Keep reading
692 notes
·
View notes
Photo

I was asked by @danslevy for a tutorial on this Umbrella Academy gifset, and I have tried to put together this explanation in quite some detail, hopefully it will be helpful!
Basic giffing and colouring are the only prerequisites for this tutorial, along with Photoshop and a little know-how about the timeline function (though I will be explaining that too). I will also link some sources for gif overlays at the end.
Keep reading
644 notes
·
View notes