
chuckasangplants
Chuck-A-Sang's PI
Blog based out of Charleston, WV
providing a helping hand by sharing knowledge of basic plant care.
Follow us instagram!
Bloom where you are planted ♥
6 posts
Don't wanna be here? Send us removal request.
Last Seen Blogs

my-linkss
Untitled

jeffmarshall
Jeff Marshall (VII) IMDb

sirsebby
seb/otto

kxnxgx98
Stupid Shit

tempurag-blog
Tempura G
Text
Air Layering Houseplants
Air layering is the method of propagating a plant from the stem that is still attached to the parent plant. The stem is wrapped with damp moss to encourage roots to form. Roots that form around the area can grow until they are well developed, and the new plant is severed from the parent plant by cutting it just below the roots and potting it up separately.
“Air layering propagation is a process that often occurs naturally. In the wild it happens when a low branch or stem touched the ground and takes root. Because it is an asexual process, the genetic material is directly transferred to the newly rooted stem, which may be cut away from the parent to start a new plant.”

What are some of the advantages of air layering plants?
Results in a good-sized plant in a matter of weeks instead of months or years.
There is a minimum of disturbance and no adverse effect to the mother plant.
During propagation, both the mother plant and the new plant continue to develop.
The new plant will have characteristics identical to the mother plant.
The success rate is high when using good-sized plants.
You can shorten the juvenile period of a plant (i.e., the time required for the plant to attain its fruit bearing stage). Additionally, the new plant tends to be stronger and more mature than those propagated by any other technique.
More rapid and stronger root growth reducing the period of propagation.
Valuable space and time in attending to rooting trays, etc. is saved.
Air layering plants requires a moist environment for aerial roots to form. Most plants can be air layered and, even if no rooting takes place, the original plant is not damaged by the process since you do not remove the cutting until it has produced roots.
Supplies you need:
Sphagnum moss
Plastic wrap
Garden twine
A sharp knife
Scissors for cutting string and plastic wrap
How to do it:
Remove any remaining leaves at the spot where you intend to do the air layering. You want to air layer around the stem or the internode of the plant preferably a leggy plant that you need to cut anyway.
With a knife, cut halfway into the stem (this is for woodier like plants).... I have also found for houseplants (specifically philodendron) you can use the internode without cutting it and just jump to step 6.
You can add rooting hormone to the incision you made. (optional)
Take the toothpick and gently insert the center of the toothpick horizontally into the cut so that it can hold open the incision while the roots are growing.
Cut off both ends of the toothpick.
Wrap the damp sphagnum moss around where you cut the stem or wrap directly on the internode and gently squeeze it into a ball so there is proper contact between the moss and the cut.
Wrap the moss with plastic wrap.
Secure the plastic wrap with garden twine.
Now, be patient.
I have had my plants root within three weeks. Just wait about this long before you check for progress. Make sure to keep the sphagnum moss moist during the growing process.
When you see roots growing through the moss through the plastic wrap then ITS READY! Cut the cutting off the plant and pot it up. TADA! FREE PLANT! The stem on your original plant should grow a new branch and your parent plant will be much fuller!
2 notes
·
View notes
Text
Maintaining Houseplant Pests
Aphids, Thrips, Mealybugs, Spider mites... The little guys who take over our plants and hold them hostage. We all hate them. In this post I will discuss what I have done to keep them at bay because let’s face it it’s just going to be something you’ll have to deal with.
Preventative Measures
Make sure you are buying from a trusted seller, and sometimes you can’t go by that either because even some of the best sellers will have them. Bugs happen.
Inspect your plant when you buy it and water it.
Quarantine your plant as soon as you get it home if you have the space to do so.
Make sure to keep your plant leaves clean. Spider mites like to breed in dry dusty areas. I make a mixture of Neem Oil, Castile Soap, Alcohol and water. I usually use equal parts of each and put it all in a spray bottle. I spray my plant leaves with this mixture once a week. Make sure to cover your pot in foil or saran wrap so the excess doesn’t get to the roots of your plant. Some may say that this way too much. Do what works for you. But be careful because If you have your plants under a grow light the oil on the leaves will burn your foilaage.
Weekly planty chores. I know life can get crazy but, the best preventative measure is to catch an infestation before it gets to the point where its an ultimate battle to the death. When you water your plants do a quick inspection of the leaves and soil. This will help you to catch them early meaning, you will be more successful in getting rid of them.
Beneficial Bugs.
I have used beneficial bugs a couple of times, but it was fairly expensive. The bugs themselves are relatively cheap but it’s the shipping rate that is high because you have to get them shipped overnight so they don’t die. I would recommend doing this three times a year because it does work. I like the idea of having little troops killing the enemy while I am sleeping.
I can understand the thought of having bugs in your house can be terrifying to some. But let’s face it, you have plants in your house... plants and bugs usually go hand in hand. Some myrmecophyte plants even have symbiotic relationships with bugs like Hoyas do with ants. Therefore, I feel it’s a risk you are already taking.
Green Lacewings are my favorite beneficial bug to use. I order the larvae aka aphid lions because I do not want bugs flying all over my house. They are generalist bugs so that means they’ll kill thrips, spider mites, aphids... etc. The larvae are so vicious they will cannibalize and eat each other if they don’t have enough food to eat. Once I introduce the larvae to my plants I never seen them again. They eventually die off once there isn’t anything left to eat.
Picture of adult Green Lacewing.

Make sure that you are not using any horticultural oils, neem... etc. when you introduce these bugs into your home. If are using these on a regular basis then make sure to give it a week or two before you introduce the bugs.
Diatomaceous Earth (Food Grade)
Diatomaceous earth is a non-toxic way to control pests. It is effective against all insect pests that crawl on plants because contact with the powder is extremely dehydrating. After watering the plants, I dust them with an applicator. This will help the powder stick to plant surfaces. I had an infestation of thrips last year and this is the only thing that quickly worked.
-R
0 notes
Text
What is the difference between sphagnum moss and peat moss?
Sphagnum moss and peat moss come from the same plant which is also known as sphagnum moss. Confusing right? Peat moss is actually dead, decayed plant matter of sphagnum moss that settles at the bottom of the sphagnum bogs. Sphagnum moss is the living plant that grows on top of the bog.
Sphagnum peat moss used it helps sandy soil hold moisture and helps clay soil loosen up and drain better. Peat moss is usually less expensive than sphagnum moss. Sphagnum moss is used to line pots to help retain soil moisture. The stuff you find in craft stores is sphagnum moss. Here you can find a really interesting article on moss and the myth of it being sterile.
0 notes
Text
Worm poop?
One thing to consider when repotting your plants is the kind of media you put them in. You want to make sure your soil is porous but water retentive. If your soil stays moist for too long it promotes disease, rot and mold.
Think about where the plant naturally grows ...on trees or on the ground floor.. Most philodendron are either epiphytic or hemiepiphytic. An epiphyte is an organism that grows on the surface of a plant gets its moisture and nutrients from the air, rain, water or from debris accumulating around it. A hemiepiphyte is one that is an epiphyte for part of its life and can begin life growing as a seed dropped on the ground and then find a host tree to climb. There are primary hemiephytes and secondary hemiephytes.
“Primary hemiepiphytes, the first type, begin their life when seeds germinate on the host tree, in the same way as true epiphytes, then go on to develop slowly until they reach sufficient age and size to begin developing long aerial roots which eventually reach the ground. Secondary hemieiphytes may be vines or appressed-climbers. Generally germination is in the soil and plants grow in a creeping fashion with long, slender internades until a suitable tree is located.” - This information and more about growing habits can be found here .
Basically, we want to mimic the stuff the plants grow on in the wild. Also keeping in mind your watering habits and what can help the plant stay moist and aerated.
As black boy plant joy says it's a "hit it and quit it" situation. He is hilarious. You can find his video on soil here.
The notion that plants can be “overwatered” doesn’t make sense to me because if you think about where most of these tropical plants live they get drenched with rain regularly. What is important is... is that the soil dries out quickly but retains moisture and the roots have access to oxygen.
Chuck-A-Sang's Chunky Soil Mix

I don't really measure how much of what I put in let's just say I use equal parts of everything except pumice. I use a lot of pumice.
Puimice / Perlite
It reduces water runoff and fertilization by increasing soil absorption in sandy soils. It also absorbs excess moisture so roots don't rot. Additionally, it improves aeration and stimulates the growth of mycorrhizae. permits the plant to obtain additional moisture and nutrients. Mycorrhizae is helpful fungi that forms a network of filaments that associate with plant roots and draw nutrients from the soil that the root system would not be able to access otherwise. Mycorrhizal fungi colonize the plant’s root system and develop a symbiotic association called “mycorrhiza”. This fungus-plant alliance stimulates plant growth and accelerates root development.
Horticultural Charcoal
Charcoal is antimicrobial and helps with any toxicities that can build up over many months in the potting mix. Charcoal is "activated" by processing at high temperatures making it super absorbent.
Orchid Bark
The chunky nature of the bark makes it fantastic at aerating soil, resisting compaction and providing drainage in a substrate mix. It also Increases water retention to a degree, which it turn helps to boost ambient humidity.
You can also add Coco coir because it has excellent water retention with dependable drainage and aeration in the root zone.
Worm castings (YES IT'S WORM POO!)
Worm castings contain helpful bacteria that can increase a plant's yield, protect both soil and plants from diseases, and help the soil retain moisture.
Diatomaceous earth (Food Grade)
Not only is this good as a preventative measure by keeping pests away it has the capacity to hold fertilzers and then release it to the roots.
Once I mix these things together and plant, I will top dress by adding a layer of sphagnum moss . This helps maintain the moisture in the soil.
If I do not have any of this stuff on hand I almost always have Wonder Soil which I found to be a great alternative that is super convenient. It is a little rich though.
1 note
·
View note
Text
Plant Mail!
First thing I will say is before you decide to get a new plant you should do your research on its growth habits, where it was sourced, and the climate of its natural environment. This will help give you an advantage when it comes to caring for the plant. Plants like aroids and anthurium are often imported from the tropics and have adapted to their old climate with higher humidity levels. These plants most likely are used to a lot of rain as well so they will be stressed out moving into a dryer climate. Not to mention what the plant went through in the shipping process.
After you receive your plant via mail or pick it up from the store, make sure to quarantine that plant for at least two weeks before you introduce it into your collection. This avoids introducing pests or diseases to your plants. You should double check the plant (if you can) before you buy it to make sure the plant is pest and disease free. However, aphids aren’t so easy to see at first and there could be eggs in the soil of a pest that haven’t hatched yet.
As a preventative measure I will spray my newly aquired plants with a horticultural oil or a neem oil. This really makes a difference. You can clean the leaves with castile soap and water if the leaves are dirty.
Now the thing everyone repeats when you get a new plant is ...
DO NOT REPOT!
A lot of people want to skip to this step because the plant is probably still in its nursery pot which is not as aesthetically pleasing as a fancy one you can exchange it with. If you find you are this person what you can do is get a cache pot. A cache pot is a decorative container you can place your pot in. Remember these pots usually do not have drainage holes so you must ensure that you let your plant completely drain after watering and make sure that the plant is getting enough air flow to its roots.
If the plant is rootbound, I would carefully consider repotting it. Having a rootbound plant does stunt its growth, which could be a good thing with huge Monsteras and if that is the case you can just trim the roots. Severely rootbound plants should be repotted.
DO NOT WATER
UNLESS the plant unless it is very very dry. Most likely before the seller ships the plant they have already watered it. All too often in big box stores the plants are watered by employees who are just doing their 9-5 job. They do not have a passion for plants. Thereflre, you will notice that most plants you can find in these kinds of stores are water logged. It is almost always one of two things, too dry or too wet. If the plant was delivered with out soil in sphagnum moss then obviously you would need to repot it.
DO NOT RUSH TO FERTILIZE!
When you get a new plant you need to ask when was last fertilized? If it has slow fertilizer in the soil… how long has it been there? If you are buying from a greenhouse you should assume that the plant has been fertilized and you should wait a couple of months. Most of the time plants that are to be sold are pumped with fertilizer speed up the growing process and to make sure the plant looks appealing. You do not want to over fertilize your plants because it most certainly die.
WHERE ARE THE ROOTS?
Ever repotted a new plant and notice that the plant has barely any roots? It is because a bunch got hacked off prior to shipping. Roots can heavy which makes shipping expensive. You must ensure you are being consistent with your watering cycles for the first new months. You also must be diligent in making sure that plant has a decent amount of light. Make sure the light is bright but not too hot. Light is important because it stimulates new growth in the plant. We will discuss lighting in depth in another post.
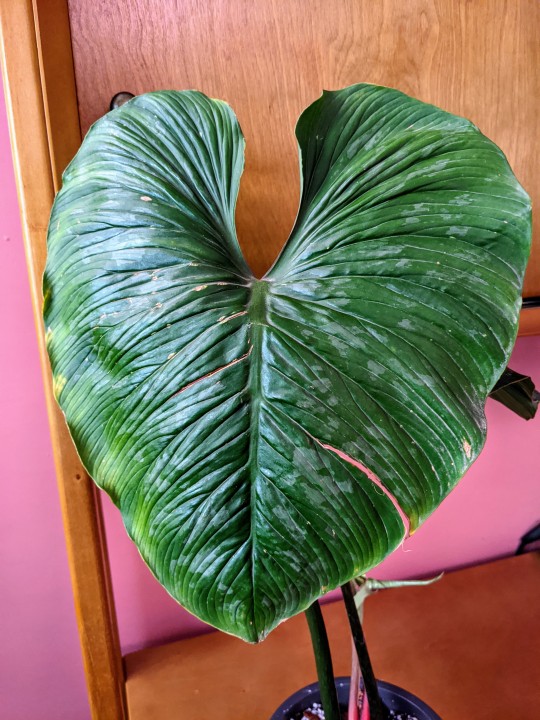
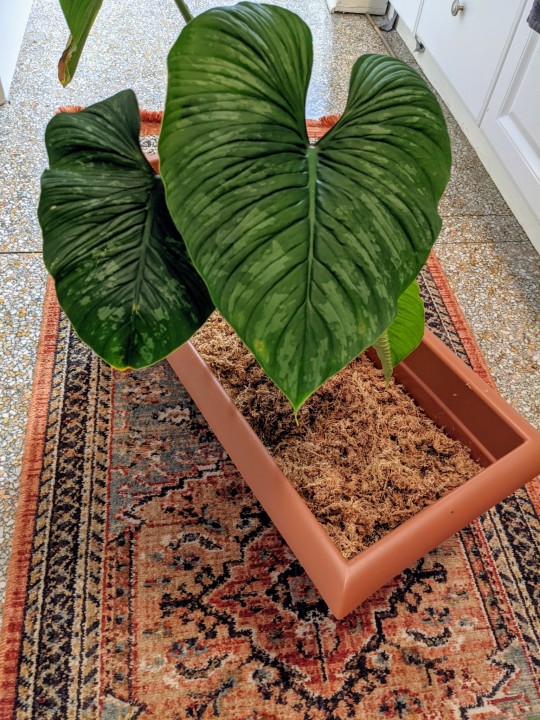
Another thing, anytime I have had a plant shipped to me I do not bet on the plant keeping the big, beautiful leaves it came with because most likely it will lose its “shipping leaves” due to it acclimating. Once your plant gets accustomed to your environment these leaves will be just as beautiful if not more because the plant has not been stressed. If the plant came with the not so nice the ugly leaf that will fall off anyway, so don’t stress it. I do not recommend cutting this leaf off.
Before/after of acclimation photos around 2 months apart. This is one of the "shipping leaves" it came with
A couple of months later a new leaf unfurling followed by its hardened state. The new leaf is much bigger than its previous shipping leaf.

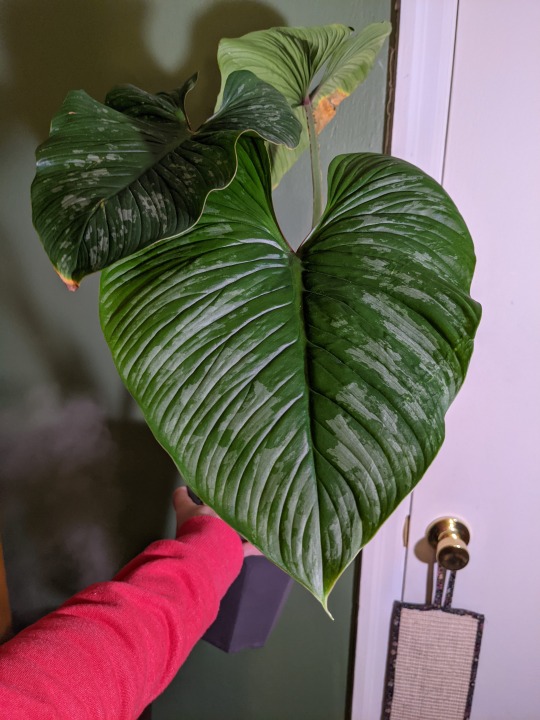
You will know that your plant is acclimating effectively if you see that it has start to develop new roots, and new leaves. When this happens, you can finally relax. If your plant has no signs of growth there is usually a problem. Do some digging (literally) and see what is up with its roots. If the roots seem fine and no other issues can be found.. it could just need more time to acclimate.
-Rian
7 notes
·
View notes
Text
Humidifiers aren’t always necessary
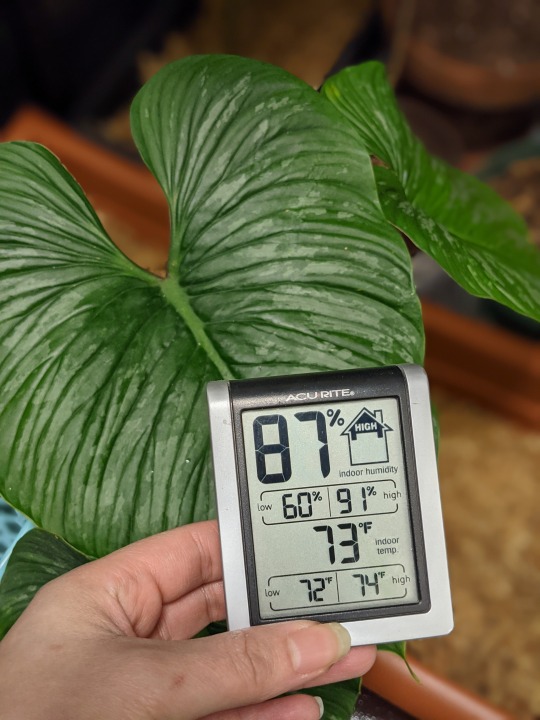
Almost everyone screams that you need high humidity when growing a plant indoors. Sure, high humidity is more desirable for tropical plant care, but it is not a requirement if you keep your plant hydrated. The biggest challenge of growing plants in lower humidity is understanding that the plant's roots can achieve a level of dryness that kills them, so you must make sure that you water them before they dry out.
Btw: I use four humidifiers around my house and I will do a separate post on those with reviews. Don't go out and spend a butt load of money if you don't have to. Let's continue...
What matters is that the humidity is mutable. When the humidity is high the plants need to transpire is less. Transpiration is the release of water from the plant leaves. (The amount of water lost by a plant also depends on its size and the amount of water absorbed at the roots). Transpiration accounts for most of the water loss by a plant by the leaves and young stems. So, if the plant is transpiring less then that means that it is pulling less water through its roots. To grow bigger leaves on your plant you need sufficient nutrient flow through the roots. If you can consistently keep the soil moist between waterings and follow a wet, moist, approaching dry cycle then you can count on consistent flow of water and nutrients through the plants.
Beyond low humidity other important things to keep in mind are ... air flow around the plant, active irrigation, using a potting media that is porous and allows a lot of water and oxygen to flow through maintaining the health of the roots. Rot and pathogens flourish if the conditions are poorly oxygenated and new plants are more susceptible to rot and stress-related issues. The goal is having a continuously moist and airy pot.
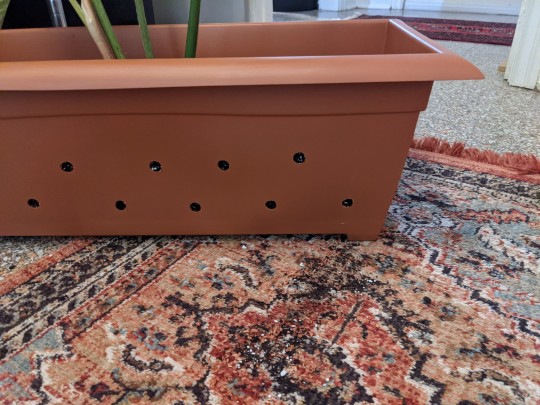
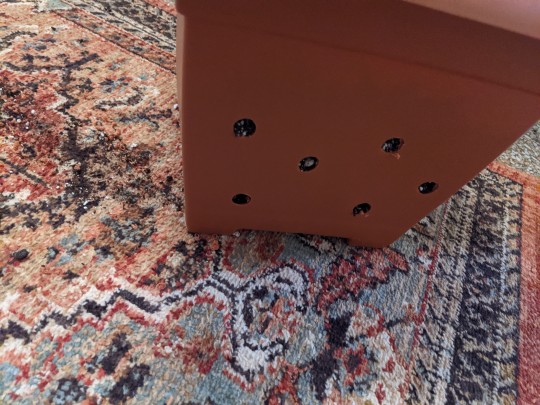
TIP: To make sure my plants have sufficient air flow around their roots, I make my own pots using plastic soup cups. Then, I drill holes around the cup and at the bottom and fill with my potting media. You can also just buy orchid pots but I feel those are extremely expensive when buying in bulk. Since the pots are clear you are also able to watch the root growth of the plant.

You can find the soup cups I use here. I have also done the same thing with plastic pots here is what I did for my creeping P. Mamei.
-Rian
4 notes
·
View notes