
csleko
Leko's Art N' Crap
He/Him. Art and stupid crap. Probably mostly stupid crap. For reblogs and memes and such, see Leko-Likes-Stuff.tumblr.com
1443 posts
Don't wanna be here? Send us removal request.
Last Seen Blogs

week-upon
Untitled

fokron
Fokron's Everything Blog


simple-gifts
Mercedes is the name and :D is the game

gastbat
GASTBAT
Text

Excited to announce the fulfillment of a lifelong dream: my own official Star Wars project! This is a character whose story NEEDS to be told, and I'm thrilled to get to be the one to do it!
Look forward to it next Spring!
2 notes
·
View notes
Text
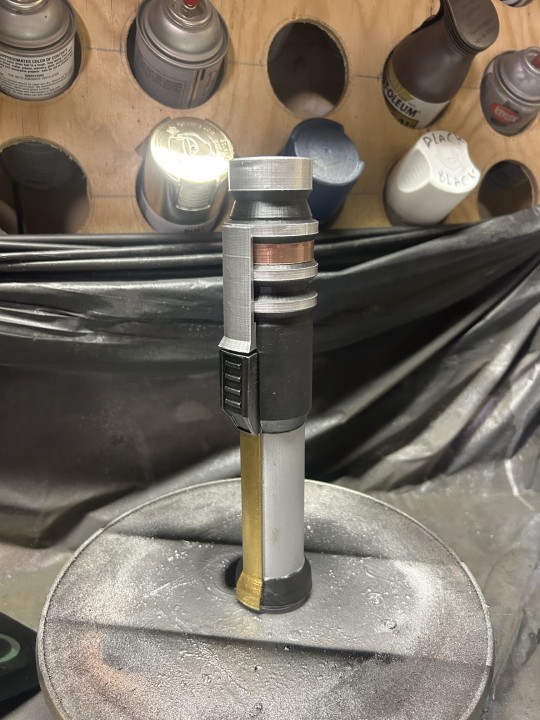
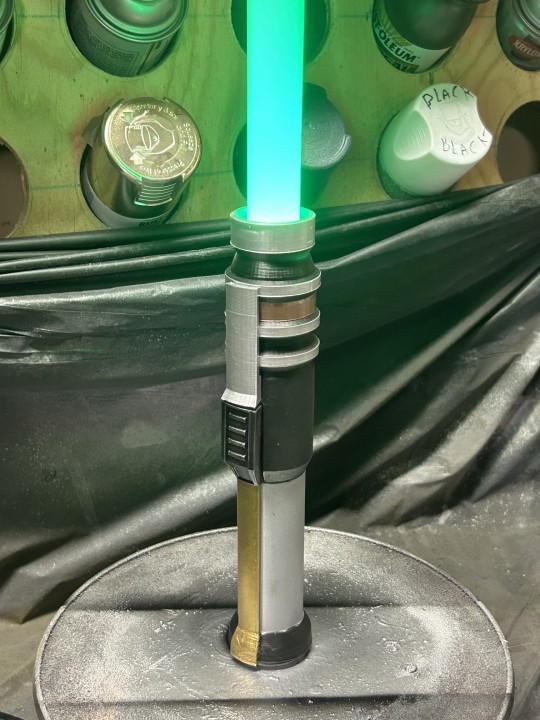
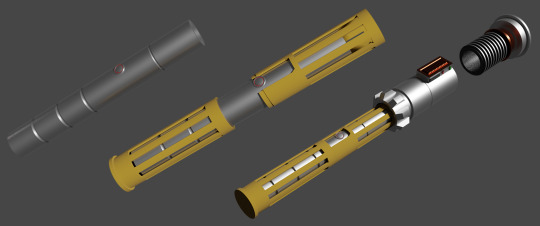
Kyle Katarn Lightsaber

This ended up being a lot more work than I had planned. I figured once I worked out the screw threading and could just attach the shell to the saber, making literally any outer hilt I wanted would be a breeze. Especially one as simple as Kyle Katarn's first lightsaber from Jedi Knight: Dark Forces 2.
And it WAS mostly still pretty easy. I broke the shell trying to get the pieces on, so I redesigned the top half to also not have the holes in it, and lengthened the slot section to give the two halves a little more contact when the time came to permanently adhere them. I ended up just using the soldering gun to weld them together because it didn't look like the epoxy was holding.
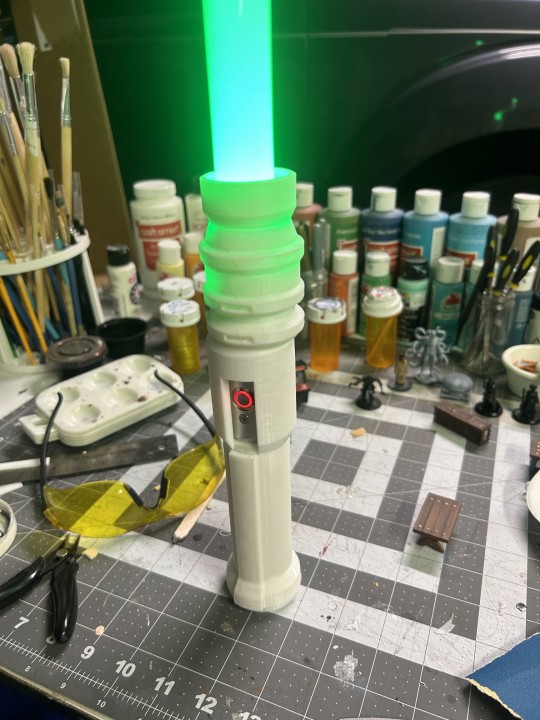
Aside from those minor hiccups, everything came out great, and worked as planned!

Except for one little issue...

The emitter for this saber is 3 different colors: silver, copper, and black. On the silver ringed parts, only the outer edges are actually silver, and they're black on top and bottom. And already having two layers of paint (copper on top of silver) trying to tape off these small areas would have messed up the paint that was already there.
So I resigned myself to trying to paint the black bits by hand. Immediate regret. Got black paint on the copper and silver. So I tried touching them up, and just ended up getting copper and silver on the black. I don't have the patience or precision for this. After going back and forth with this infuriating cycle for over and hour, I gave up and tried to sand everything off to start over, resulting in the above picture.
Then I had a better idea.

It still kind of involved starting over, but further back in the process. Instead of printing the emitter as one complete piece, I could split it into sections by color, and paint them individually. Everything would be the correct color, the paint wouldn't look like garbage, and I finally have a functional lightsaber to go with my Bryar pistol for my Kyle Katarn cosplay.
#star wars#3d model#blender#cosplay#prop#lightsaber#jedi knight#jedi#kyle katarn#dark forces#3d printing
3 notes
·
View notes
Text
Customizable lightsaber frame

Been eyeing a one of these relatively cheap lightsabers for a while, and finally pulled the trigger. This one got decent reviews with a lot of pictures including one showing that it was small enough to fit inside an actual official saber hilt. That was what sold me on it, because I knew it had a connector on the bottom so you could buy two and make a saber staff.

I figured if I could work out the size of the threading, I could print damn near anything I wanted to hook into it. Unfortunately, I couldn't figure it out. On top of that, making a screw with the exact measurements was a bit beyond me even if I had them. I'm looking into FreeCAD, so this could change in the future.
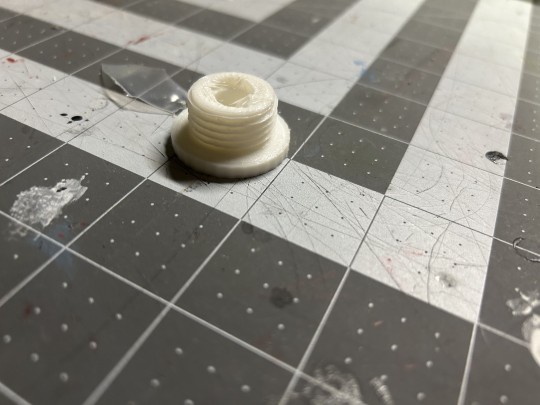
What I ended up doing was taking a screw piece from another model and adjusting the scaling until it looked about right. I quickly printed this test piece to see if this method was even close to workable, fully expecting to fail several times.


Well, hot damn! Nailed it on the first try! Who even needs CAD software? Apparently I'm a wizard at eyeballing it!

Next phase was to work out approximate measurements to make a sleeve that the saber hilt would screw into. This was a lot easier since I could just measure the diameter of the totally cylindrical hilt, and it's much less impressive that this little test pommel also fit on the first try. Notably, though, putting it on and taking it off a few times seemed to have worn down or broken the screw threads and I couldn't get it to stay on anymore. I made the screw piece *slightly* larger to hopefully help future prints hold on better.
OKAY. Now that all the guesswork and testing are out of the way, it's time to actually MAKE A THING.
Version 1! The plan: screw the bottom half onto the saber, line up the cutout of the top half with the saber button, glue the two halves together! This keeps the button from being covered up, and means I don't have to account for rotation of the whole frame while twisting it. This is also the main factor in designing it this way and not just making a whole saber hilt with the screw piece at the bottom.
With the saber handle pieces able to freely rotate around the frame, it's easier to ensure access to the button. (But actually not in the example above because I mostly just made Luke's saber to use for said example, and it doesn't actually have a cutout for the button.)
Unfortunately, version 1 didn't work too well. For some reason, the top half printed perfectly fine, but the bottom half ended up with some very minor layer shifting that was JUST enough to prevent the saber from fitting inside it. If it didn't have those holes, it probably would have printed properly. I only added them to save an inconsequential amount of filament, so filling them in isn't any great loss. Especially if it actually improves the structural integrity of the print overall.
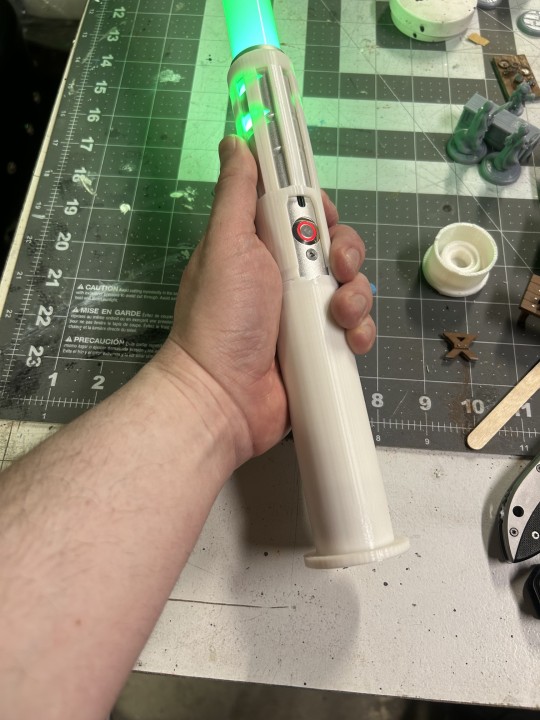
Version 2 is a success! The bottom half connected and holds strongly, and I was able to epoxy the top half firmly in place so that the cutout will always line up with the button.

The next phase is currently underway. If you can tell whose saber this is...you won't win anything, but I will think you're awesome.
(Hint: There are actually two acceptable answers, and the blade color matters.)
1 note
·
View note
Text

Been re-watching most of the X-Men movies, and this image planted itself in my brain and refused to leave until I committed it to pixels.
So here we are.
Based on a true story.
#Leko#3d model#3d render#blender#meme#comic#oc#xmen#NO AI#Fuck AI#Fuck NFTs#robot#sci fi#support human artists
4 notes
·
View notes

Text
I am going to finish and release Antimatterator THIS YEAR.
I SWEAR IT.
I'm starting to run out of excuses to not make the rest of the levels and call this blasted thing done already.
Added explanations for the tutorial levels. They only show up when the player enters the level and will not reappear after resetting a run.
Got another tracker working, so it can now tell if the player completed a level using fewer panels than provided. ("Less panels! Yay!" is just a placeholder and visual indicator that it's working properly.)
The counter for the related achievement will not actually update during the tutorial levels. (Because literally the first one demonstrates that it is possible.)
Fixed a bunch of layering issues.
Finally got an animation to play (mostly) correctly when an AM particle enters a collector.
Yeah, I've been wanting to have some kind of quick animation play when the particles enter a collector so they don't just blip out of existence, but for some reason that turned out to be annoyingly hard to figure out. I think it's partly because I was trying to give the animation to the collector object, and because it already had its "end of level" animation too, things got messy trying to add more to the mix.
Then, while I was doing those layering adjustments, it occurred to me that I could just do for the blue particles entering a collector what I did for red ones getting sucked into black holes. I even had four open frames on their sprite sheet because the antis don't have a "get sucked into a black hole" animation.
Then I ran into some issues getting the sprites to actually line up on the right spot while the animation played, but I eventually got that sorted. There's still some minor wonkiness that I THINK is happening because an anti enters a collector near the end of its animation loop, and the "gotcha" animation is starting at that same point in its animation. So I just need to find some way to make sure the whole animation plays every time, and not just sometimes.
I really am hoping to work on this game more consistently.
I'm thinking of implementing a totally in-game achievement system to make 100% sure all the trackers are working correctly, and have everything all set up for when I'm finally ready to pull the final lever and launch this thing onto Steam.
I swear on my compy's life that it WILL be done this year.
#game development#game maker#game design#antimatterator#pixel art#game maker studio#puzzle game#dr teranta#wip
6 notes
·
View notes
Text

I dunno. I made Strong Badia again, but realistic this time instead of cartoony cel-shadey like the other one. Found a fun way to cheat bushes/trees, but it works better when they're further away, Apparently alpha mapping + depth of field + Cycles = many weird triangles, but it's not too bad as long as you don't look too closely.
#3d model#3d render#cycles#blender#fanart#homestar runner#strong bad#strong badia#realistic#animation#NO AI
23 notes
·
View notes
Text
Space Fleet


Been wanting an excuse to use that sci-fi panel material again.
So I did this.
I love seeing ship designs based on random objects, and I've had this mechanical eraser that I've always thought already looked a bit ship-like already, so I based the big carrier loosely on that.
I just really like how much those textures add to otherwise pretty simple models.
#3d model#blender#3d render#spaceship#spacecraft#sci-fi#science fiction#starship#carrier#cruiser#space#no ai#fuck ai#fleet
7 notes
·
View notes
Text
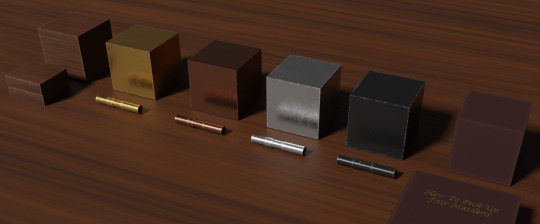
Steampunk Workshop
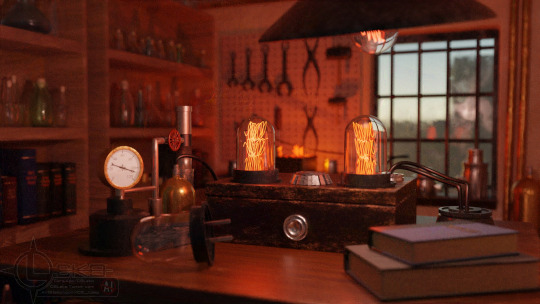
That stream I did a few days ago? If you didn't happen to see any of it, this is what I was working on. Or rather, this is the finished version of what I was working on because I didn't get quite as much done as I would have liked.
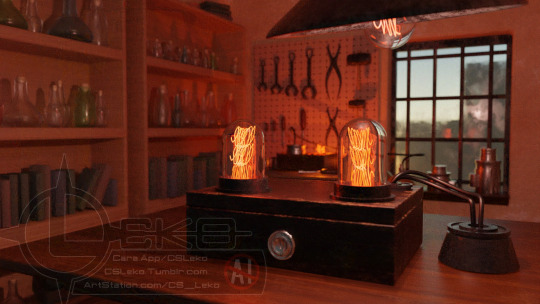
THIS is what I ended up with at the conclusion of the 8-hour stream, and I'm still quite proud of how far I did manage to get in that amount of time. The goal was to show that even an inexperienced amateur such as I was capable of making a decent quality piece of art in a relatively short timespan, so excuses like "we need it super fast, so we'll use AI instead of hiring a human artist" are absolute bullshit. I did this in 8 hours! A single work day! And it only took me another 4 to finish!
And there are professionals out there with far more experience than me who could do it much faster and produce an even better looking final product. You just have to be willing to pay them for the speed. The "good/fast/cheap" idea still applies, and you're not being clever by trying to use AI to get around it.
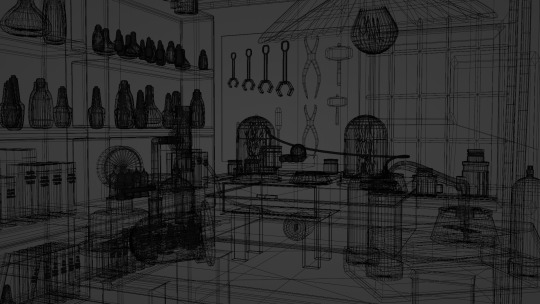
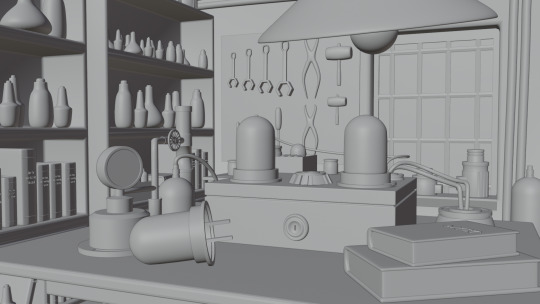
And hey, look! I can prove I did this with my own two hands even if I hadn't saved the stream that shows me working on it from turning the Default Cube into the tabletop all the way to fussing with getting the lightbulbs to look right!
Yes, an AI thief COULD get 5,000 of these in the time it took me to make the one, but you know what? I didn't NEED to make 5,000. I only needed to make the one. Everything in this shot was deliberately modeled, textured, placed, lit, and rendered in accordance with my intentions. If I don't like how something looks, I don't need to generate 100 more iterations hoping that one works. I MAKE it work by changing it myself.
But you know the absolute BEST part of creating any kind of art yourself? YOU CAN LEARN NEW THINGS WHILE DONG IT, AND USE WHAT YOU LEARN IN FUTURE PROJECTS.
AI can't do that.
AI can suck it.
#3d model#blender#3d render#steampunk#wotc#mtg#magic the gathering#wizards of the coast#no ai#anti ai#fuck ai#art#support human artists
33 notes
·
View notes
Text
ART STREAM BEGINS NOW.
Watch me show those AI twits how it's done!
twitch_live
#stream#live stream#art stream#3d model#3d render#blender#no ai#anti ai#fuck ai#wotc#magic the gathering#wizards of the coast
1 note
·
View note
Text
twitch_live
Stream will begin in approximately ONE HOUR. Watch me show these AI twits how real artists make real art.
#stream#twitch#art stream#fuck ai#anti ai#support human artists#no ai#wotc#wizards of the coast#magic the gathering#mtg
1 note
·
View note
Text
I'M GONNA ART STREAM AGAIN
TOMORROW. WEDNESDAY.
THAT'S JANUARY 10.
WHY?
In short: Wizards of the Coast got caught (again) using AI to create marketing stuff for some new Magic cards, then lied about it before finally admitting they "made a mistake" and removing the post from Twitter.
So I'm going to try to create the same sort of steampunk workshop scene they had some AI spit out, and do it BETTER. One goal is also to try and do it as quickly as possible, since the only true advantage AI has over humans is speed. If I, an inexperienced amateur, can complete this project in a typical 8-hour work day, then there it will completely eliminate any excuses for these multimillion-dollar companies not hiring real human professional artists to create material for them.
So join me tomorrow as I prove the superiority of human artists over the AI menace!
twitch_live
#blender#3d render#3d model#stream#art stream#live stream#anti ai#no ai#fuck ai#wizards of the coast#magic the gathering
5 notes
·
View notes
Text

Nothing special. Just a random lightsaber I made to start getting a feel for Inkscape.
I guess I forgot to mention it here on Tumblr, but a couple months ago I officially told Adobe to go to Hell, and started seeking out free/open source alternatives to their software. Well, mostly free/open source. How did that go, you might ask?
Operation: Escape From The Adobe House was a complete success!
I ditched Illustrator in favor of Inkscape, and I'm loving it so far. It's so much *like* Illustrator that figuring it out has been a breeze.
Animate is out, and OpenToonz is in. Unfortunately, it's not as similar as Inkscape is to Illustrator, so getting the hang of it has been a bit of a slow, ongoing process. I don't hate it, though!
And Premiere- the main reason I had an Adobe subscription in the first place- has been replaced with VEGAS, the only one I decided to actually pay for. I know there are probably decent free/open source video editors out there, but I've had issues in the past as far as stability was concerned. VEGAS came highly recommended, so I checked out the trial, liked it, and bought it. It was $200, but importantly: it was $200 ONCE.
BUT WHAT ABOUT PHOTOSHOP!?
I bought Photoshop CS5 years ago before Adobe started pushing the subscription-only crap, so I still have it. The only reason I started briefly using Photoshop CC was because it was included in my subscription, and I figured I might as well use the latest version since it was there.
Even though I still have a good version of Photoshop, I looked into Krita for drawing, and I'm actually starting to like it quite a bit too. Funny how I used to use it for just about everything, and now all it's good for is making YouTube thumbnails and putting watermarks on stuff I made in other programs.
2 notes
·
View notes
Text
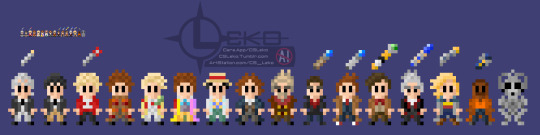
Mini Sprites V2 - Doctor Who Update
Been getting caught up over the past week or so. I was about 2 and a half seasons behind, but now I'm waiting for the next one alongside everyone else.
Just in time to add the latest Doctor to the mini lineup! Oh, and the Cyberman I left out last time because I wasn't happy with how he was turning out, but I finally got it.
Also made some minor adjustments to a couple of the other Doctors, and added the rest of the sonic screwdrivers.
#pixel art#doctor who#the doctor#new who#sprites#chibi#ncuti gatwa#jodie whittaker#peter capaldi#matt smith#david tennant#christopher eccleston#john hurt#paul mcgann#sylvester mccoy#colin baker#peter davison#tom baker#john pertwee#patrick troughton#william hartnell#cybermen#sonic screwdriver#bbc
8 notes
·
View notes
Text

Riven Fanart
The Video Game History Foundation released a remastered "Making of Riven" video, and it put me in a fanart-y mood. So this is what I did today.
Really more texture and lighting practice than much else, but I did get to use the "snake hook" sculpting tool to make the tree branches and roots. Never had any real reason to use it before, so that was neat. Top part of the tree is just a slightly lumpy sphere with some alpha mapped holes and a light inside. And another sphere inside with some noisy alpha mapping to make it look more shadowy.
Not a perfect recreation. There should be more thin roots around the base of the tree, and the lighting should be a couple notches brighter. Also, I had some really bad "fireflies" in the render that even the de-speckle filter couldn't get rid of. Even at 2048 samples and a bunch of unnecessary render things turned off, I still kept getting about 4 or 5 random white pixels around the water. De-speckle got most of them, but there was still one that I ended up having to just manually paint out afterward. Literally one pixel. So that was weird.
1 note
·
View note
Text


One quick look through my old renders folder and I felt compelled to redo another really old thing. This was originally a simple class assignment from back in 2011, and I don't remember exactly what the criteria was. I think it was following an exercise from the textbook, and was just about making the starfish and teapot. And I felt the need to go overboard with make into a whole thing. With water. Because I had apparently figured out how to do that. Sort of.
Anyway. About the new one. I tried to do some vertex painting around the edges of the water to make stuff look wet, but I don't think it worked very well. Also, the rusty bits are a lot shinier than they should be and make it look like copper instead of rust. Couldn't quite get the roughness to cooperate for some reason. Other than those minor nitpicks, though, I'd say it represents a significant improvement over the original.
1 note
·
View note
Text
Been thinking for a while about making an “archive blog” for my old DeviantART posts. Repost all the old crap with some new commentary, maybe.
Since DA finally killed my account because I wouldn’t shut up about the plague of AI spammers, I’m strongly considering going ahead with this idea because most of that old content is now entirely inaccessible.
0 notes