
faithcorona
*Hot Mess*
Tired and Trying My Best
1845 posts
Don't wanna be here? Send us removal request.
Last Seen Blogs

imposterx
REDlite

katiegirl901
Fate Loves The Fearless

captain-heiko
Skyrim stuff

desi33
Untitled

fonteurope7
The Life of Hill 976
Text

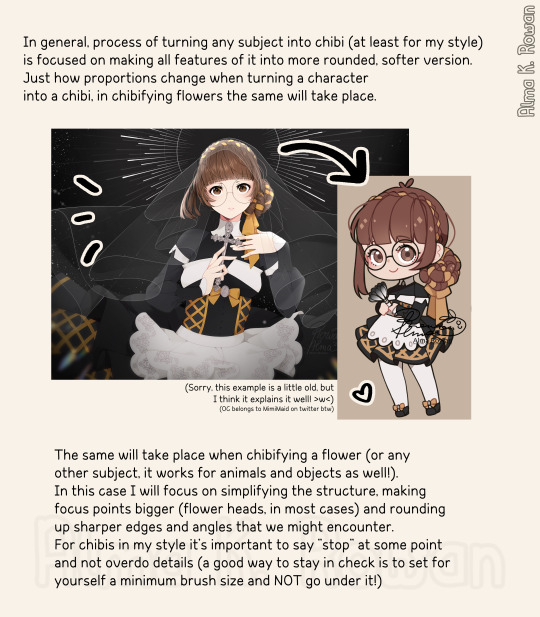
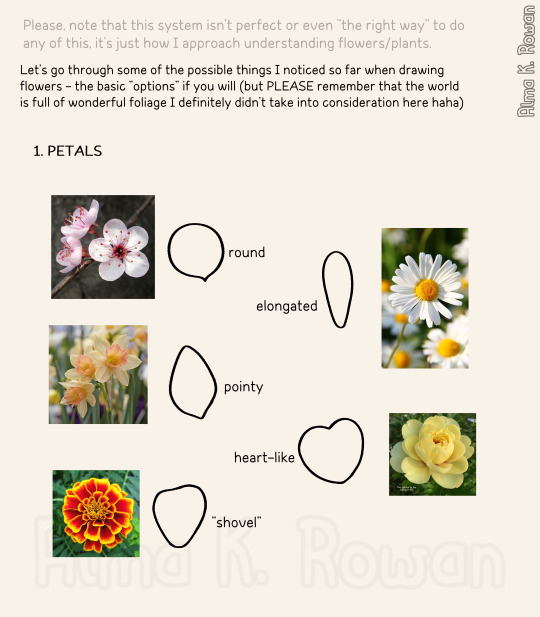
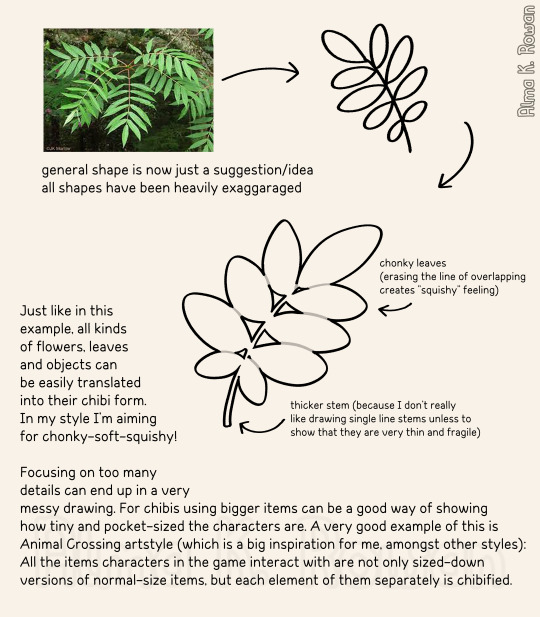
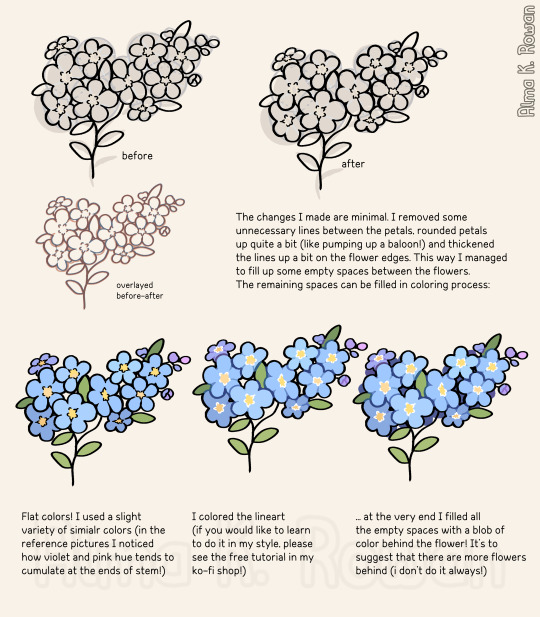
Part 1 of big "how to chibi-fy this flower????" guide is here!!! 🥰


11K notes
·
View notes


Text
Notes on Character Design

Character design and drawing are tome-sized topics and even if I had all the answers (I don’t - I have a lot to learn), I’m not sure I could communicate them effectively. I’ve gathered some thoughts and ideas here, though, in case they’re helpful.
First, some general things:
- Relax and let some of that anxiety go. This isn’t a hard science. There’s no wrong way, no rigid process you must adhere to, no shoulds or shouldn’ts except those you designate for yourself. This is one of the fun parts of being an artist, really - have a heady good time with it.
- Be patient. A design is something gradually arrived at. It takes time and iteration and revision. You’ll throw a lot of stuff away, and you’ll inevitably get frustrated, but bear in mind the process is both inductive and deductive. Drawing the wrong things is part of the path toward drawing the right thing.
- Learn to draw. It might seem perfunctory to say, but I’m not sure everyone’s on the same page about what this means. Learning to draw isn’t a sort of rote memorization process in which, one by one, you learn a recipe for humans, horses, pokemon, cars, etc. It’s much more about learning to think like an artist, to develop the sort of spacial intelligence that lets you observe and effectively translate to paper, whatever the subject matter. When you’re really learning to draw, you’re learning to draw anything and everything. Observing and sketching trains you to understand dimension, form, gesture, mood, how anatomy works, economy of line; all of the foundational stuff you will also rely on to draw characters from your imagination.
Spend some time honing your drawing ability. Hone it with observational sketching. Hone it good.

I don’t think I’ve ever seen anyone do this sort of thing better than Claire Wendling. In fact, character designs emerge almost seamlessly from her gestural sketches. It’d be worth looking her up.
- Gather Inspiration like a crazed magpie. What will ultimately be your trademark style and technique is a sort of snowball accumulation of the various things you expose yourself to, learn and draw influence from. To that effect, Google images, tumblr, pinterest and stock photo sites are your friends. When something tingles your artsy senses - a style, a shape, a texture, an appealing palette, a composition, a pose, a cool looking animal, a unique piece of apparel, whatever - grab it. Looking at a lot of material through a creative lens will make you a better artist the same way reading a lot of material makes a better writer.
It’ll also devour your hard drive and you will try and fail many times to organize it, but more importantly, it’ll give you a lovely library of ideas and motivational shinies to peruse as you’re conjuring characters.
- Imitation is a powerful learning tool. Probably for many of us, drawing popular cartoon characters was the gateway habit that lured us into the depraved world of character design to begin with. I wouldn’t suggest limiting yourself to one style or neglecting your own inventions to do this, but it’s an effective way to limber up, to get comfortable drawing characters in general, and to glean something from the thought processes of other artists.
- Use references. Don’t leave it all up to guessing. Whether you’re trying to design something with realistic anatomy or something rather profoundly abstracted from reality, it’s helpful in a multitude of ways to look at pictures. When designing characters, you can infer a lot personality from photos, too.


And despite what you might have heard, having eyeballs and using them to look at things doesn’t constitute cheating. There’s no shame in reference material. There’s at least a little shame in unintentional abstractions, though.

Concepts and Approach:
- Break it down. Sometimes you have the look of a character fleshed out in your mind before putting it to paper, but usually not. That doesn’t mean you have to blow your cortical fuses trying conceive multiple diverse designs all at the same time, though. You don’t even have to design the body shape, poses, face, and expressions of a single character all at once. Tackle it a little at a time.
The cartoony, googly eyed style was pre-established for this simple mobile game character, but I still broke it into phases. Start with concepts, filter out what you like until you arrive at a look, experiment with colors, gestures and expressions.

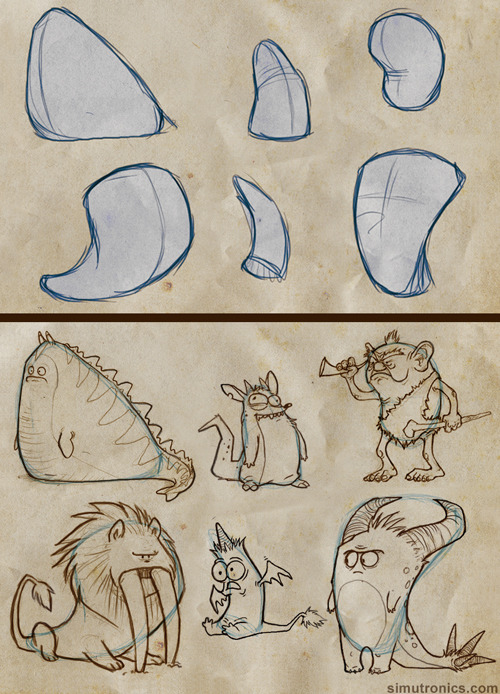
- Start with the general and work toward the specific. Scribbling out scads of little thumbnails and silhouettes to capture an overall character shape is an effective way begin - it’s like jotting down visual notes. When you’re working at a small scale without agonizing over precision and details, there’s no risk of having to toss out a bunch of hard work, so go nuts with it. Give yourself a lot of options.
Here’s are some sample silhouettes from an old cancelled project in which I was tasked with designing some kind of cyber monkey death bot. I scratched out some solid black shapes then refined some of them a step or two further.

Here’s an instructional video by Feng Zhu about doing much the same thing (only way better).
- Shapes are language. They come preloaded with all sorts of biological, cultural and personal connotations. They evoke certain things from us too. If you’re ever stuck about where to go with your design, employ a sort of anthroposcopy along these lines - make a visual free association game out of it. It’ll not only tend to result in a distinguished design, but a design that communicates something about the nature of the character.
Think about what you infer from different shapes. What do they remind you of? What personalities or attitudes come to mind? How does the mood of a soft curve differ from that of a sharp angle? With those attributes attached, how could they be used or incorporated into a body or facial feature shape? What happens when you combine shapes in complementary or contrasting ways? How does changing the weight distribution among a set of shapes affect look and feel? Experiment until a concept starts to resonate with the character you have in mind or until you stumble on something you like.

If you don’t have intent, take the opposite approach - draw some shapes and see where they go. (It’s stupid fun.)
You might also find it helpful to watch Bobby Chiu’s process videos in which he feels out his character designs as he paints.
- Cohesion and Style. As you move from thumbnails to more refined drawings, you can start extrapolating details from the general form. Look for defining shapes, emergent themes or patterns and tease them out further, repeat them, mirror them, alternate them. Make the character entirely out of boxy shapes, incorporate multiple elements of an architectural style, use rhythmically varying line weights - there are a million ways to do this
Here’s some of the simple shape repetition I’ve used for Lackadaisy characters.

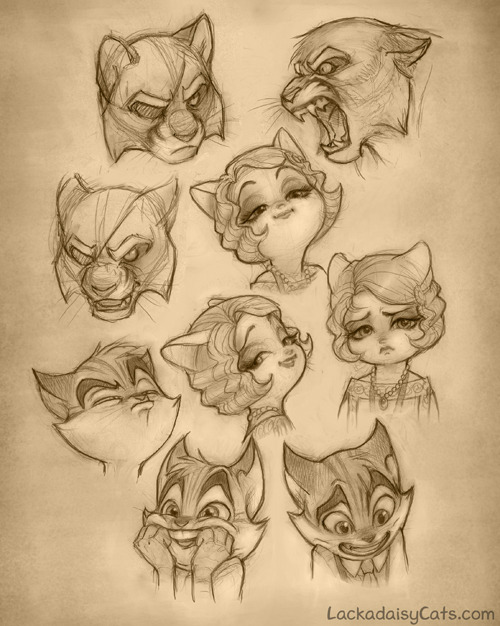
- Expressions - let them emerge from your design. If your various characters have distinguishing features, the expressions they make with those features will distinguish them further. Allow personality to influence expressions too, or vice versa. Often, a bit of both happens as you continue drawing - physiognomy and personality converge somewhere in the middle.
For instance, Viktor’s head is proportioned a little like a big cat. Befitting his personality, his design lets him make rather bestial expressions. Rocky, with his flair for drama, has a bit more cartoon about him. His expressions are more elastic, his cheeks squish and deform and his big eyebrows push the boundaries of his forehead. Mitzi is gentler all around with altogether fewer lines on her face. The combination of her large sleepy eyes and pencil line brow looked a little sad and a little condescending to me when I began working out her design - ultimately those aspects became incorporated into her personality.
I discuss expression drawing in more detail here (click the image for the link):

- Pose rendering is another one of those things for which observational/gesture drawing comes in handy. Even if you’re essentially scribbling stick figures, you can get a handle on natural looking, communicative poses this way. Stick figure poses make excellent guidelines for plotting out full fledged character drawings too.
Look for the line of action. It’ll be easiest to identify in poses with motions, gestures and moods that are immediately decipherable. When you’ve learned to spot it, you can start reverse engineering your own poses around it.

- Additional resources - here are some related things about drawing poses and constructing characters (click the images for the links).


Lastly…
- Tortured rumination about lack of ability/style/progress is a near universal state of creative affairs. Every artist I have known and worked with falls somewhere on a spectrum between frustration in perpetuity and a shade of fierce contrition Arthur Dimmesdale would be proud of. So, next time you find yourself constructing a scourge out of all those crusty acrylic brushes you failed to clean properly, you loathsome, deluded hack, you, at least remember you’re not alone in feeling that way. When it’s not crushing the will to live out of you, the device does have its uses - it keeps you self-critical and locked in working to improve mode. If we were all quite satisfied with our output, I suppose we’d be out of reasons to try harder next time.
When you need some reassurance, compare old work to new. Evolution is gradual and difficult to perceive if you’re narrowed in on the nearest data point, but if you’ve been steadily working on characters for a few months or a year, you’ll likely see a favorable difference between points A and B.
Most of all, don’t dwell on achieving some sort of endgame in which you’re finally there as a character artist. There’s no such place - wherever you are, there is somewhere else. It’s a moving goal post. Your energy will be better spent just enjoying the process…and that much will show in the results.
89K notes
·
View notes
Text
I compiled this a while ago but I was just looking for references and found the file so...
Best places to find reference photos:
Body types, poses, and anatomy:
http://reference.sketchdaily.net/en
https://www.posemaniacs.com/
https://quickposes.com/en
https://www.characterdesigns.com/#home-section
https://www.adorkastock.com/sketch/
https://line-of-action.com/practice-tools/figure-drawing/
https://www.proko.com/browse/tools?af=242
Giant anatomy reference tutorials Pinterest board:
https://www.pinterest.com/deedee1232/body-reference/
General:
https://unsplash.com/
https://pixabay.com/
https://www.pexels.com/
https://stocksnap.io/
https://www.freeimages.com/
https://kaboompics.com/
https://commons.wikimedia.org/wiki/Main_Page
https://morguefile.com/
https://www.flickr.com/
https://www.dreamstime.com/
https://pmp-art.com/
https://www.freepik.com/
https://photobash.co/
https://picjumbo.com/
https://burst.shopify.com/
https://magdeleine.co/
https://wordpress.org/openverse/
Historical:
https://nos.twnsnd.co/
23K notes
·
View notes
Photo
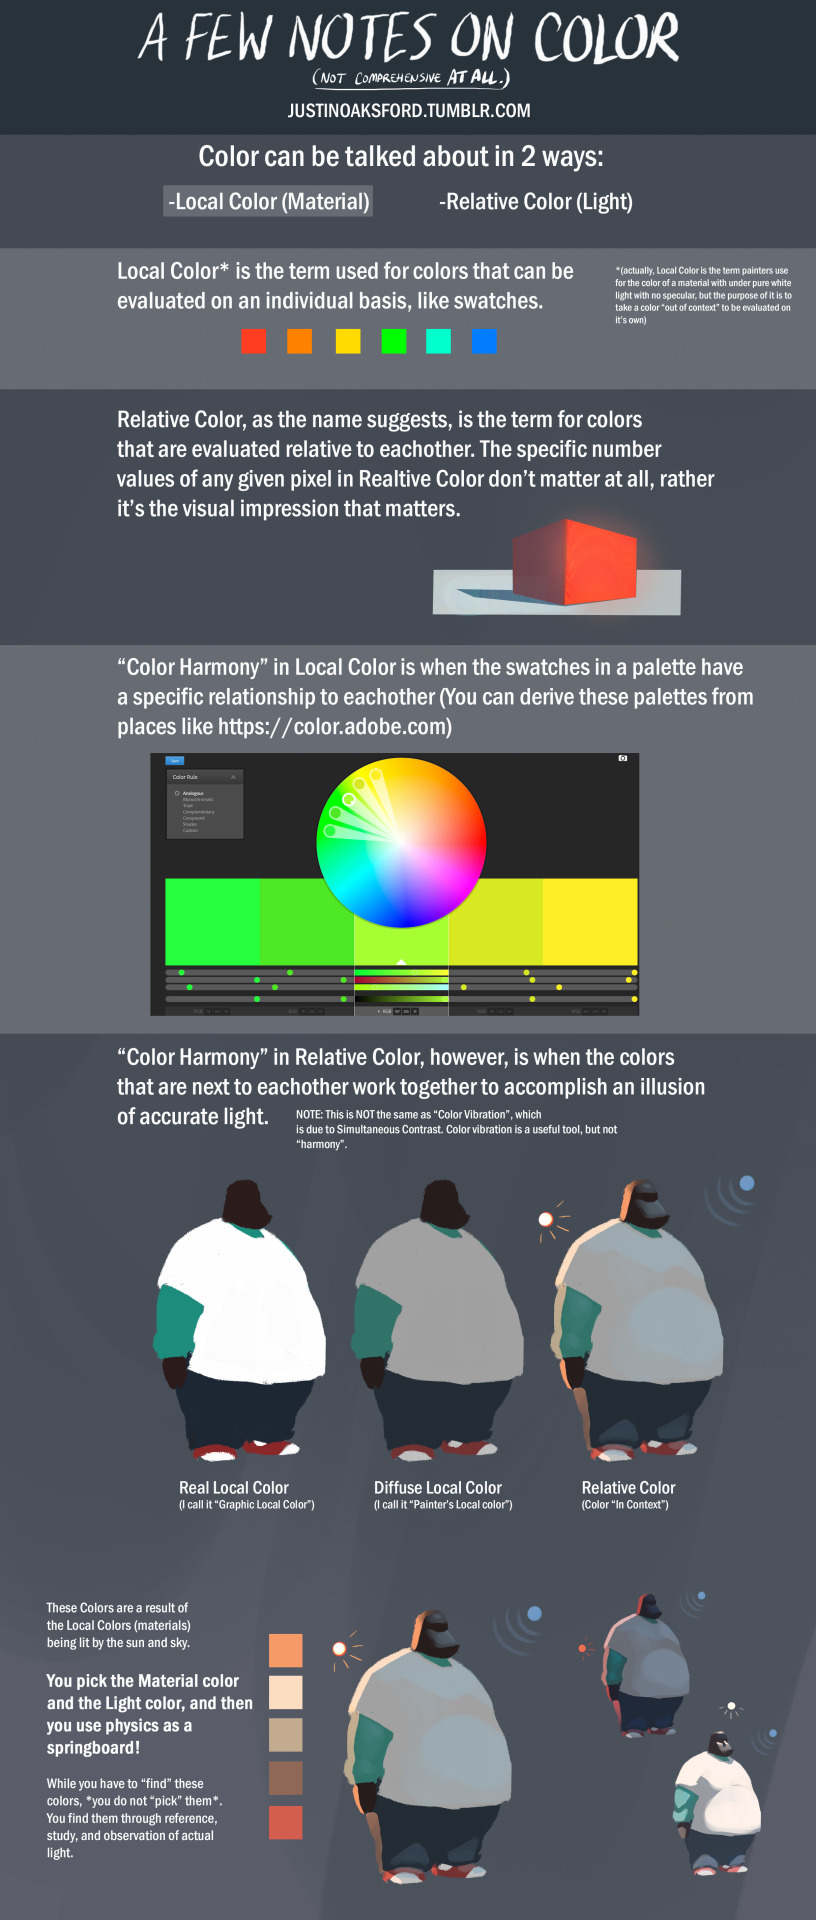
Notes for an Anon who asks,
“ Hey Justin, thanks for your reply earlier. Just wanted to expand on my previous ask - do you have any tips for achieving colour harmony across an entire painting? I often feel like the objects in my paintings look disjointed, like I haven’t chosen the ‘right’ brown for trees or the ‘right’ green for grass when I use opaque brushes, this isn’t so much of an issue when I’m painting a single object or character but when painting an entire scene I find it very difficult to tie everything together. “
btw, this is COMPLETELY UNACADEMIC- I mean, parts may be “academic” but this is not meant to be a textbook. Terms are used VERY CASUALLY and the information is not at all comprehensive. This is an extremely brief superficial look at the term “Color Harmony”.
If you want ACTUAL color education, either take Sam Nielsen’s Schoolism class, or get James Gurney’s Color and Light book, or do both!!!!!
That said, I hope it helps some folks!
27K notes
·
View notes

Photo
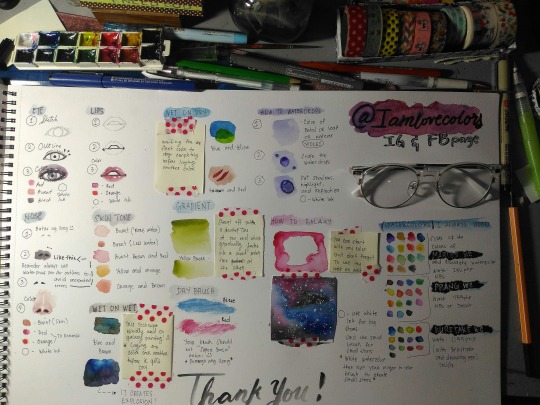
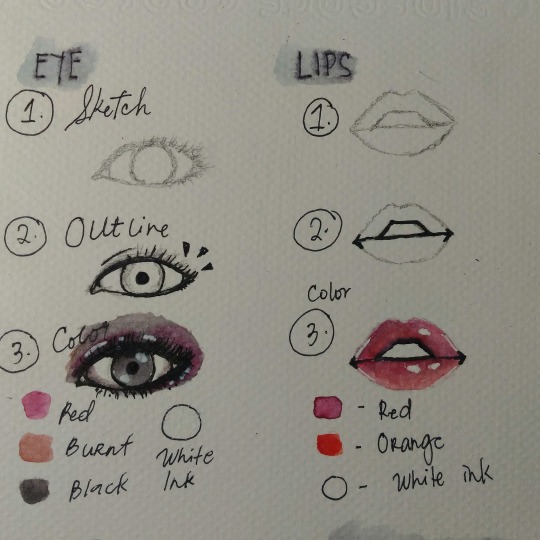


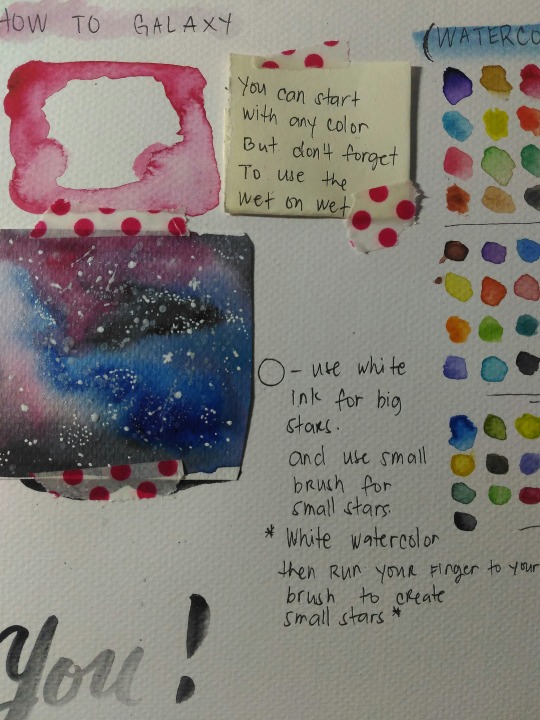


Watercolor Tutorial
EYES, NOSE, LIPS: You have to make a sketch of it first, then use pen for outlines and make sure that it is waterproof to avoid unexpected errors. Mix colors of your choice. Wet on wet technique is the key to mix it properly. Use white Signo Pen for highlights.
SKIN TONE COLORS
Burnt, brown, red, yellow and orange.
You can use both wet on wet and wet on dry technique. It is depends on your art style.
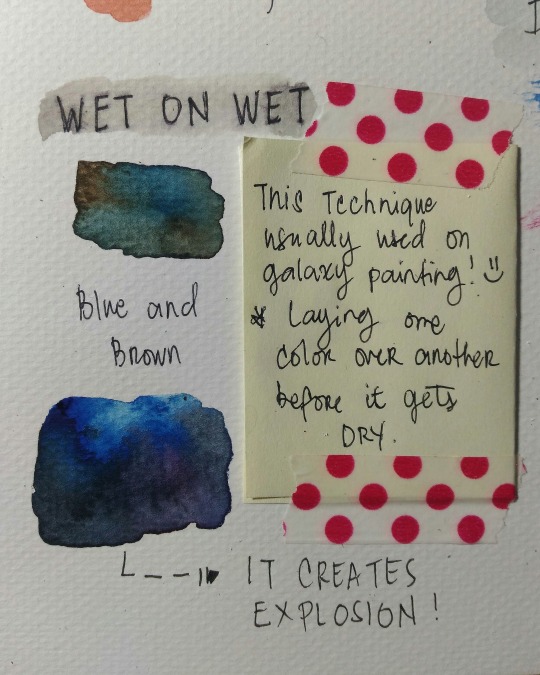
WET ON WET: Laying one color over another before it gets dry. This technique usually used for galaxy painting.
WET ON DRY: Waiting for the first color to dry completely before laying another color.
GRADIENT: Start off with dark tone and continue on laying your brush until you achieve a fading effects.
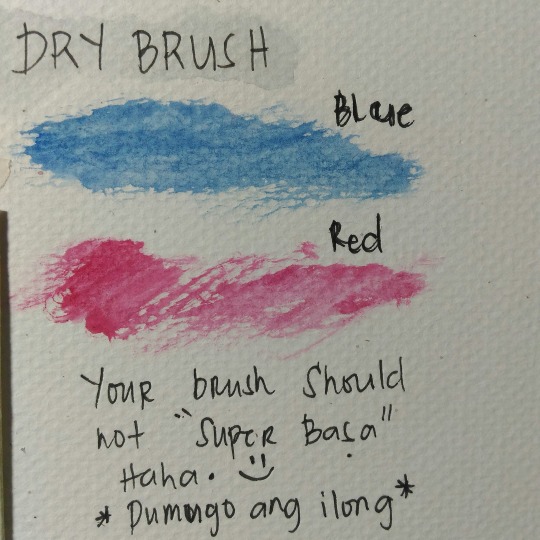
DRY BRUSH: Your brush should be slightly wet.
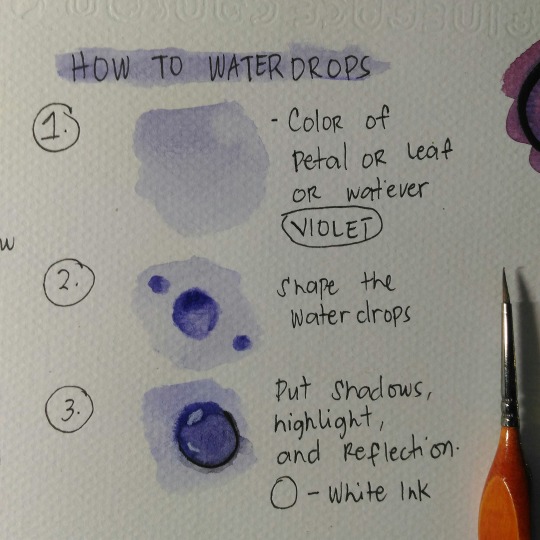
HOW TO WATERDROPS:
First layer for petal, shape the drops, put shadows and highlights. Use white signo pen for reflection.
More water to the color the lighter it gets
Thank you! I hope this will help you 😍
2K notes
·
View notes
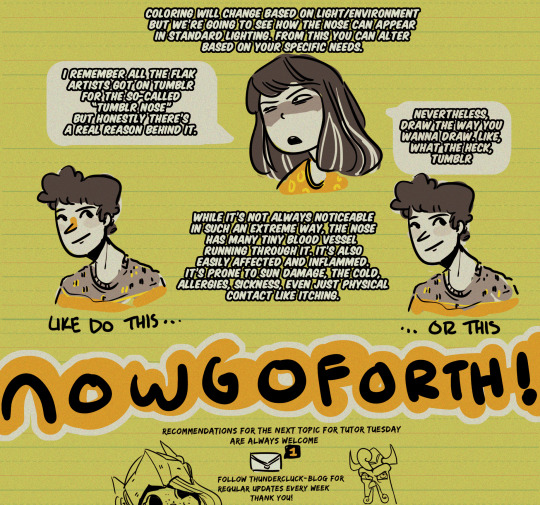
Photo

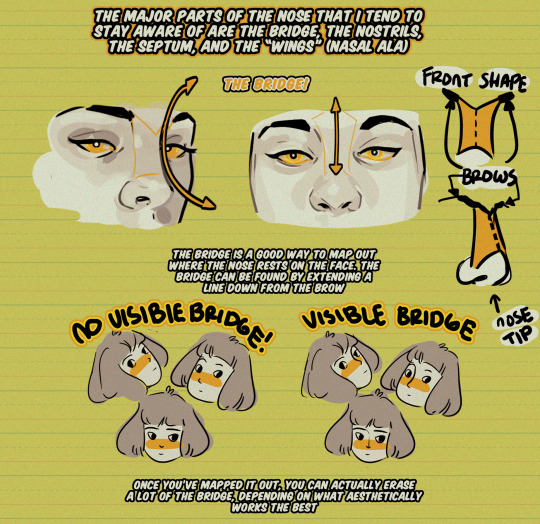
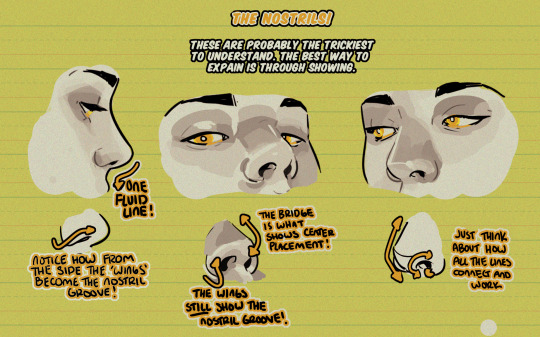

Hello, friends!
Meg here for another TUTOR TUESDAY! Today let’s look at noses! They can be quite pesky, I know. If you have any tutorial’s you’d like to see just shoot me a message here or on my personal blog! Seriously guys, send me requests! Keep practicing, have fun, and I’ll see you next week!
25K notes
·
View notes
Text
College and Chronic Illness: 19 Tips to Study Strong and Fight the Fog
I get a lot of students asking me for advice on how to change their study habits to fight brain fog. It’s no easy task and often feels like a lose-lose situation. Pain medication might make you feel sleepy and out of it. Pain itself is distracting and takes up a good portion of your mental effort. Add brain fog to that mix and retaining large quantities of complex information is quite a task.
I’ve shared these tips with an anon ask in the past, but it’s appropriate to include them in my College and Chronic Illness series. Plus, I’ve updated my list. Enjoy!
Color Coded— Writing the main concepts, theories, formulas, whatever, in a bright color (or multiple colors) helps me recall the content later (especially helpful for those of you who tend to have a photographic memory). Color coding your content with various colored pens works too.
Highlight, Highlight, Highlight— Even if the entire 12 page section has to be highlighted, do it. This can help you track where you are when you’re reading, while also forcing you to pay attention to exactly what you’re highlighting.
Write— If you’re a flashcard person, perfect. If not, writing out study content onto sheets of paper (copying notes, concepts, whatever) at least five times can help with retaining information and preventing memory lapses. It’s not particularly easy on the hands, but absolutely worth it if it works for you. If typing the information and then highlighting it after it’s printed, that might be a better alternative if you struggle to write like I do.
Try Study Groups— if you are in the process of figuring out which study habits work best for you, try getting a group of people together to study. If you don’ have friends, send out a mass email to your class and see who’d like to get together or if study groups have already formed. Great way to meet new people and motivate and help each other get through difficult content.
Repeat, Vocalize— Repeating terms and study content aloud allows you to hear it, focus on it, and remember it. It’s a great way to study.
Have someone quiz you— When you get the answer wrong, have the person quizzing you repeat the correct answer to you twice. Then, start from the beginning each time you get wrong. This forces you to go back over all the ones you already got correct (reinforcing them) AND the ones you got wrong. Keep doing this until you get past the one you got wrong. This is hands down the best method I’ve utilized to study and it really works well.
Acronyms— I think this speaks for itself.
Method of Loci— Method of what? MOL: a metacognitive technique/mnemonc strategy in learning; based on the idea that you can best remember places that one is familiar with. If one links something worth remembering with a familiar place, the location will act as a clue to help trigger the memory. As LupineLady put it, “you picture a room you know really well, and attach pieces of information to each thing in the room.” You can read more about how to use this technique here.
Time Management— This is probably the most important tip of all. Instead of cramming four chapter’s worth of information into your brain the two days before the exam, start a week (or more ) in advance and take in information slowly. Then, the two days prior to your exam should be reviewing the entire four chapters and focusing on any content you found particularly difficult to retain.
10/20, 20/40— Study 20 minutes, then take a 10 minute brain-break OR study 40 minutes, then take a 20 minute brain-break. Break your study periods up into blocks. This gives you brain a break and you avoid the brain drain of studying without breaks for an hour+. Play around with what time increments work best for you.
The Feynman Technique — a technique that helps you pinpoint exactly what you are struggling to understand or remember about a specific concept and make your study habit(s) more efficient. Simple and so effective. Here’s a PDF file with instructions for those who don’t want a video (the video is not too long & is better).
Study Stress Free— Okay, maybe stress-free isn’t realistic, but being in the right frame of mind helps. If you cannot force yourself out of bed, if you’re in agony or you know it isn’t going to happen— don’t force it. That said, plan ahead so you don’t end up without the option of not forcing it…avoid cram sessions unless it works for you.
Prep Your Study Space— Do you like to study with music? Make a playlist. Do you like a candle lit? Snacks? Prep your environment. If you need to take pain medication in order to be able to study, take meds 30 minutes (or however long they take to work) prior to your set study time. Have some ice packs or your heating pad ready.
Avoid Social Media Distraction— Get off of facebook, twitter, instagram, Reddit, whatever your weakness is. If you know you lack the self control to put these away, use a program that limits your internet access for a period of time. If you know you won’t be able to study if you have access to the internet, use a program that limits your access (google to find ones that work for Mac and PC).
Create a Physically Comfortable Work Area— Do you have a comfortable desk chair to sit in? Large space to spread your materials out? Curling up in a corner on the floor? Find/create your ideal study work area. When you are less distracted by physical pain (amplified by uncomfortable seating), you’re more likely to focus and have one less thing keeping you from studying.
Good Eats— Gum, mints, trail mix, fruit, etc. Healthy snacks are a great way to gain some nutritional value. Do not forget to take breaks to eat actual meals. Use dinner and lunch as a study break. Cook a healthy meal, enjoy it, and give your brain some fuel and a rest.
Stay Hydrated— this is paramount, especially for those of you inhaling massive amounts of caffeine to combat the fatigue (Starbucks espresso shot & 5 hour energy users, I am speaking to you). Drink a LOT of water while you study and don’t drink yourself into a caffeine crash. FYI: two Monster energy drinks have over FOURTEEN soda can’s worth of caffeine. Think about that and then think about your heart rate before you open up another can.
Utilize Outside Resources— I use Khan Academy to review (and sometimes learn…) course content. I find the interactive step by step videos to be easier than learning a concept from a textbook. KA is totally free and the concepts are explained correctly and quite simply. You can review a video as many times as you want at your own pace. Definitely something to hold onto whether you’re fighting the fog or not, for everything from stats to American History. If you are struggling with a particular concept, go ask your professor, TA, or find free tutoring on campus (it’s there, you just have to find it). Google the concept or find online interactive tools. Another good one for technical concepts (math, formula/calculation work) is Wolfram Alpha, the Computational Knowledge Engine. Find someone who will walk you through the basics and will work with your foggy brain and…
Don’t Be Embarrassed! Even people without brain fog go to tutoring and need concepts broken down. So what if we need them broken down a little more? So what if we need to re-learn basics again? So what if we forget basic algebra because our brains function in slow-motion? Who cares? Remember that this education is for YOU. YOU are earning your degree and anyone who looks down upon you for going at your own pace is not someone whose opinions you should take to heart anyway! “It does not matter how slow you go, so long as you do not stop.”
These are great tips for students regardless of whether or not one is dealing with brain fog, but for those of us who are struggling to fight the fog, it’s crucial we adapt our study habits to our bodies. I will add to this as I find more study strategies. Feel free to leave your comments, feedback, and/or any suggestions you have for others in the Disqus box!
RELATED:
College & Chronic Illness: Surviving Finals Week
College & Chronic Illness: Professor Etiquette
5K notes
·
View notes
Photo

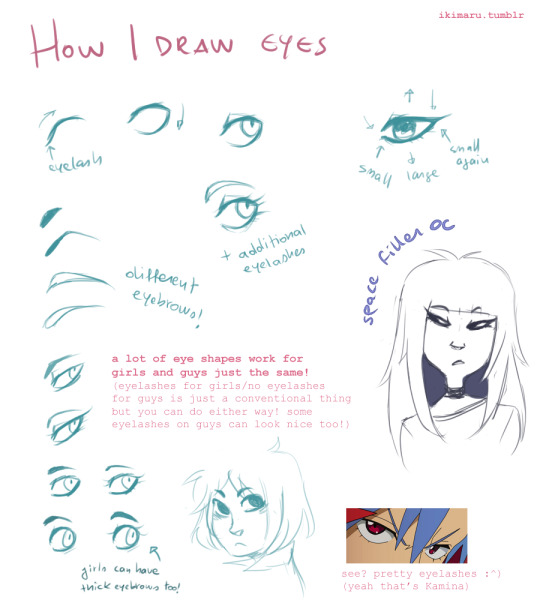


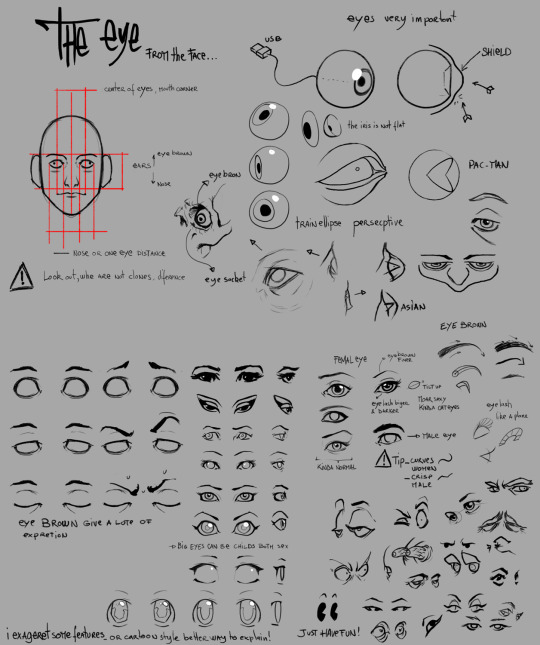
..not what I meant to do this evening but look I made a tutorial!
this kinda got out of hand but I was having fun shh
remember to experiment around, there are many different ways to do things! B) it’s up to you finding the one you like!
also gomen for crappy handwriting and some rushed drawings
80K notes
·
View notes
Photo


You can sign up for Construction and anatomy today wwwradhowtoschool.com
25K notes
·
View notes
Note
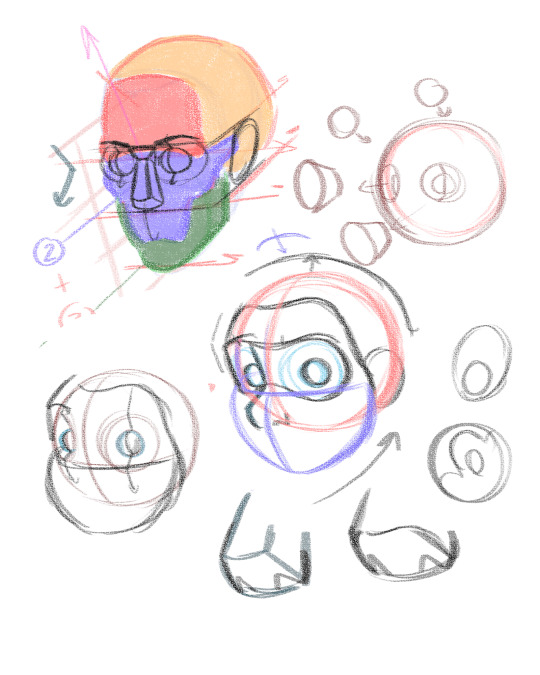
I really love your artstyle! Could I maybe get some tips on how to give variety to faces? My style has a little same face syndrome unfortunately.

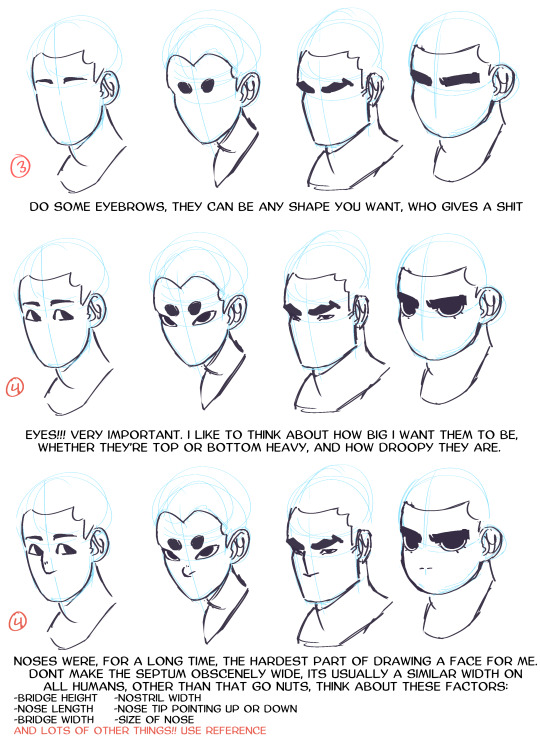

personally i found that when i used to sameface its because i was afraid of making an ‘ugly’ face but!! imo an ugly but interesting face is more fun than a good-looking but boring face. go forth
15K notes
·
View notes
Photo


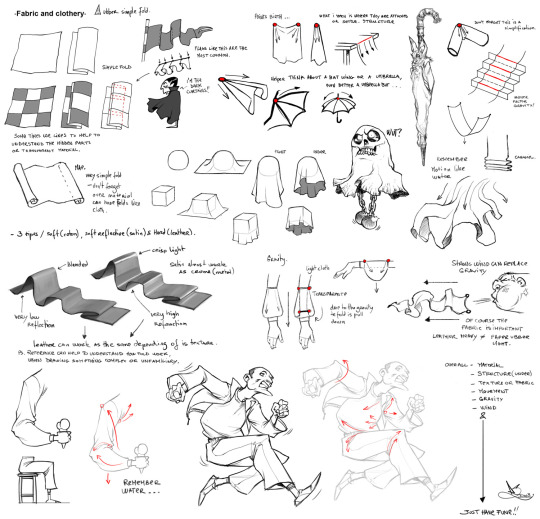
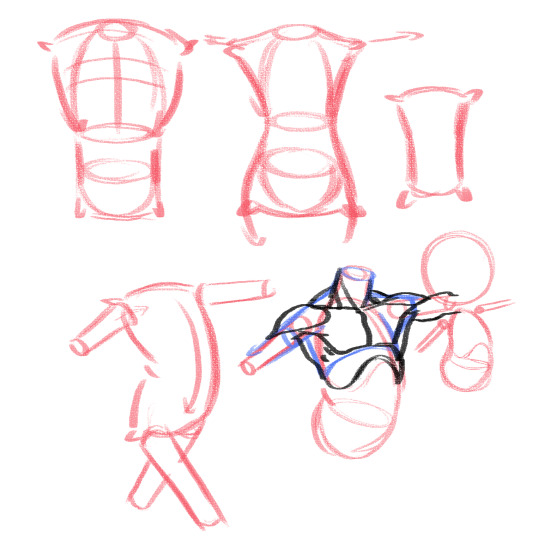
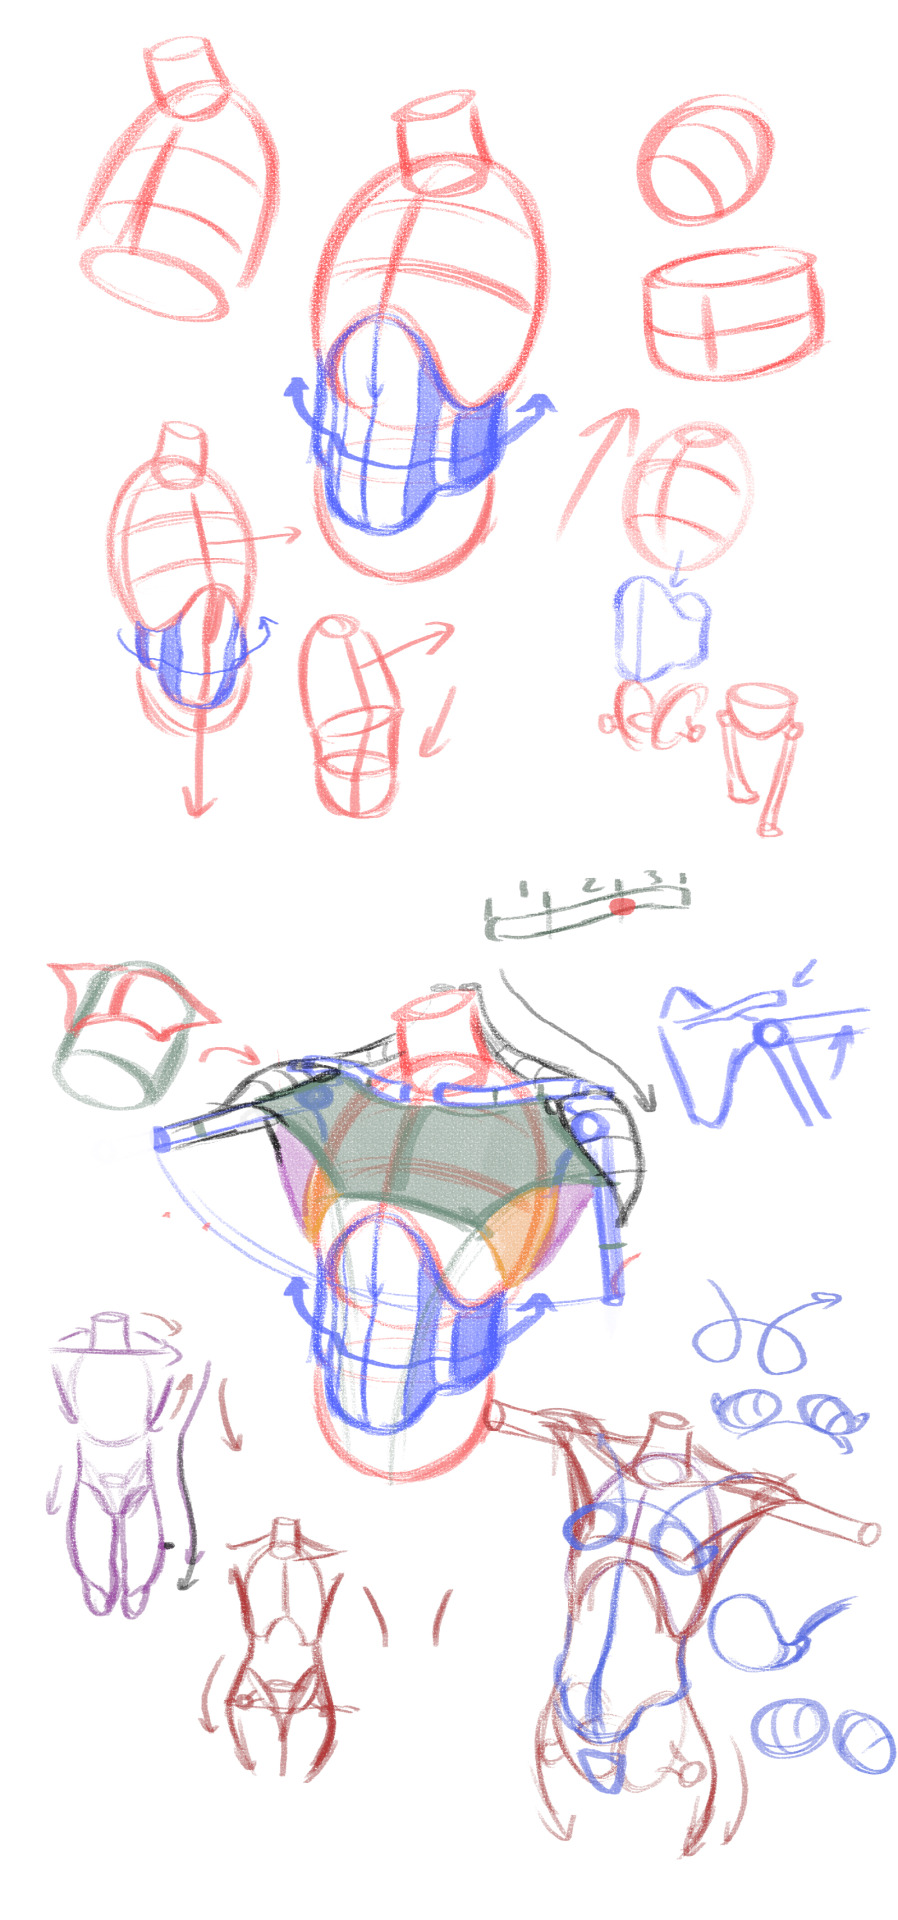
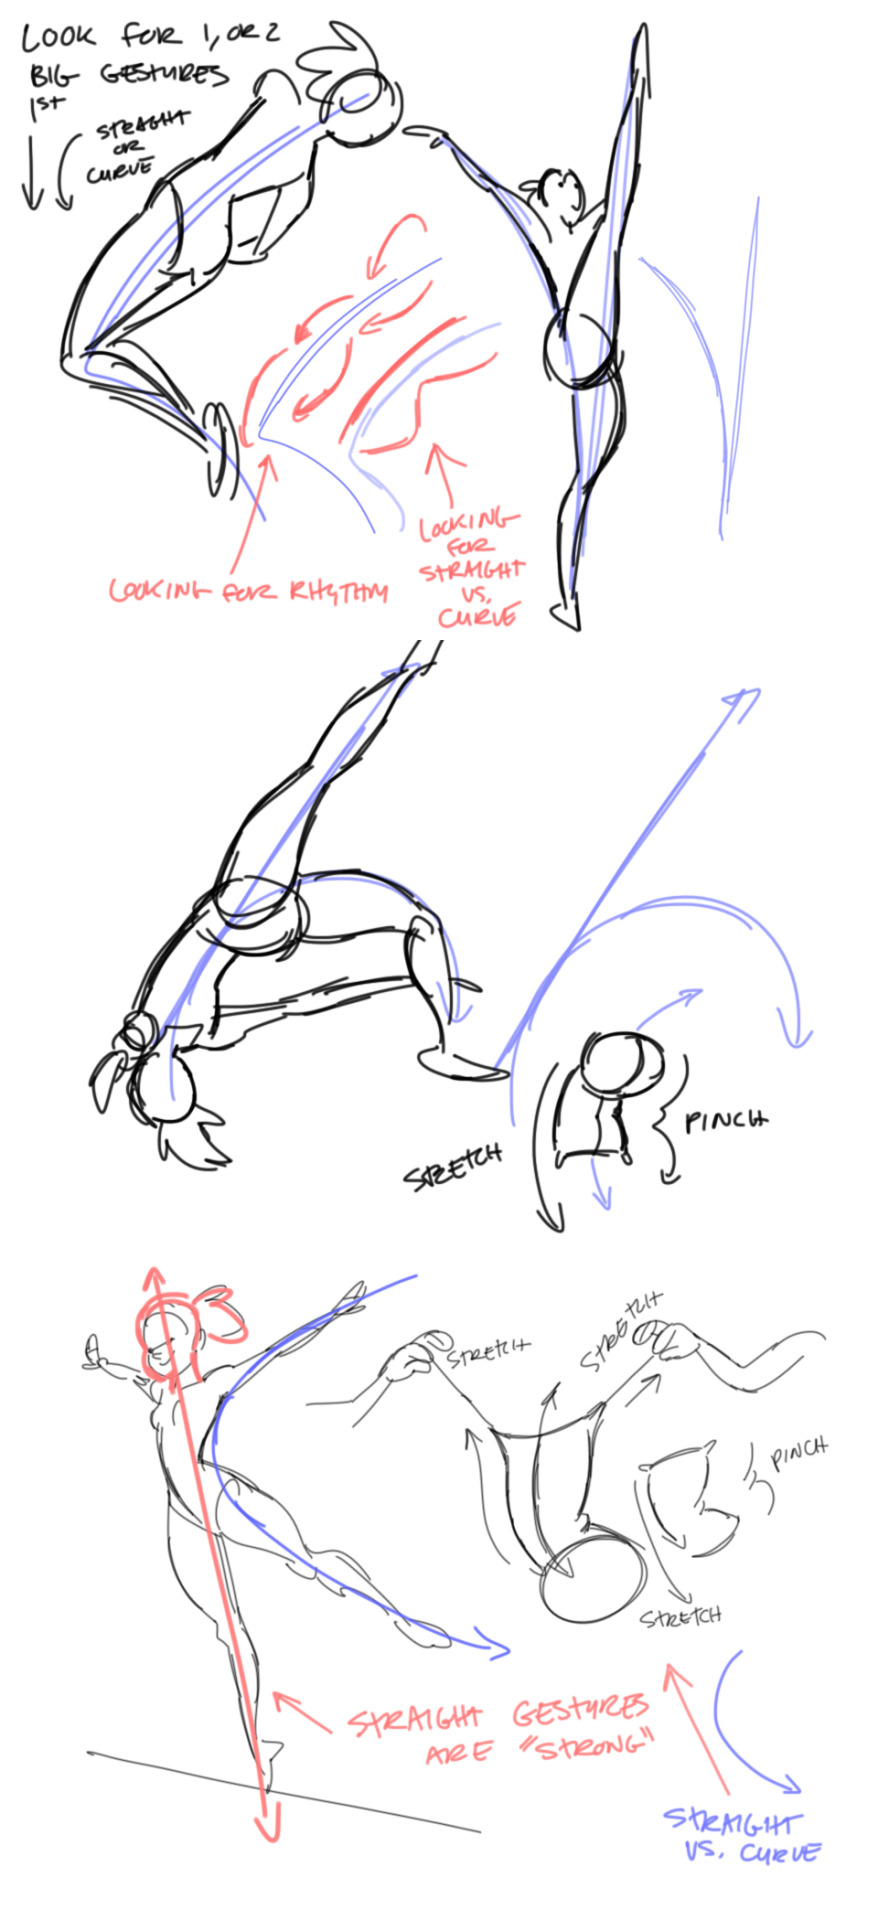
i tried to make a tut on how i draw bodies but it came out as a mix between me trying to make sense of my lazy technique and general art tips??
i get overwhelmed by complex scheming and sketching so i try to sketch with the least lines/shapes possible.
if you find this method too difficult-dont worry. ive had years of practice and ive developed a lot of shortcuts for myself, so this might be like reading the notes of a student who has their unique set of abbreviations.
hope that helps tho??
33K notes
·
View notes
Photo
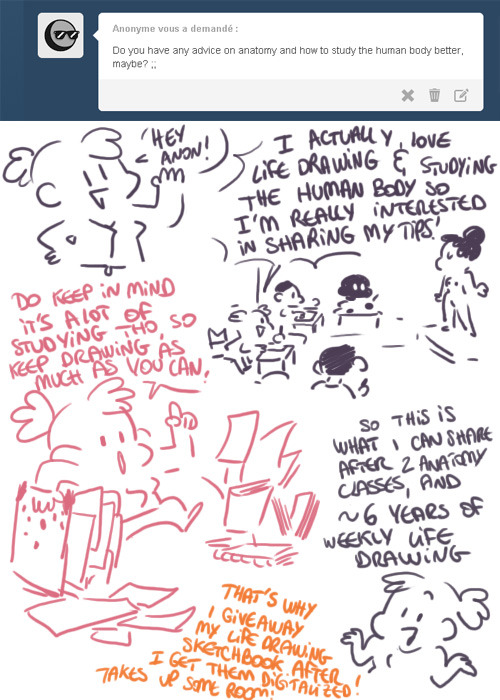


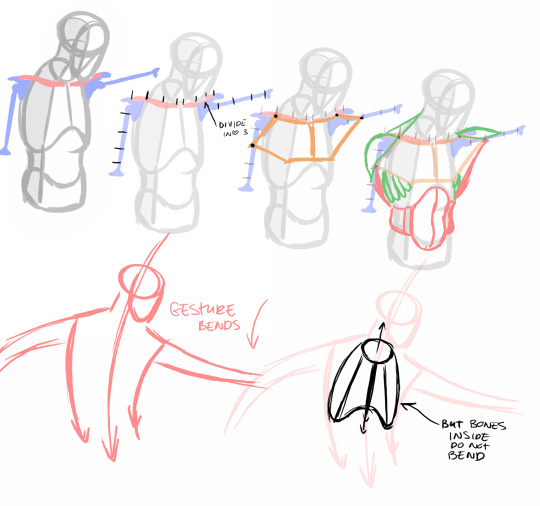
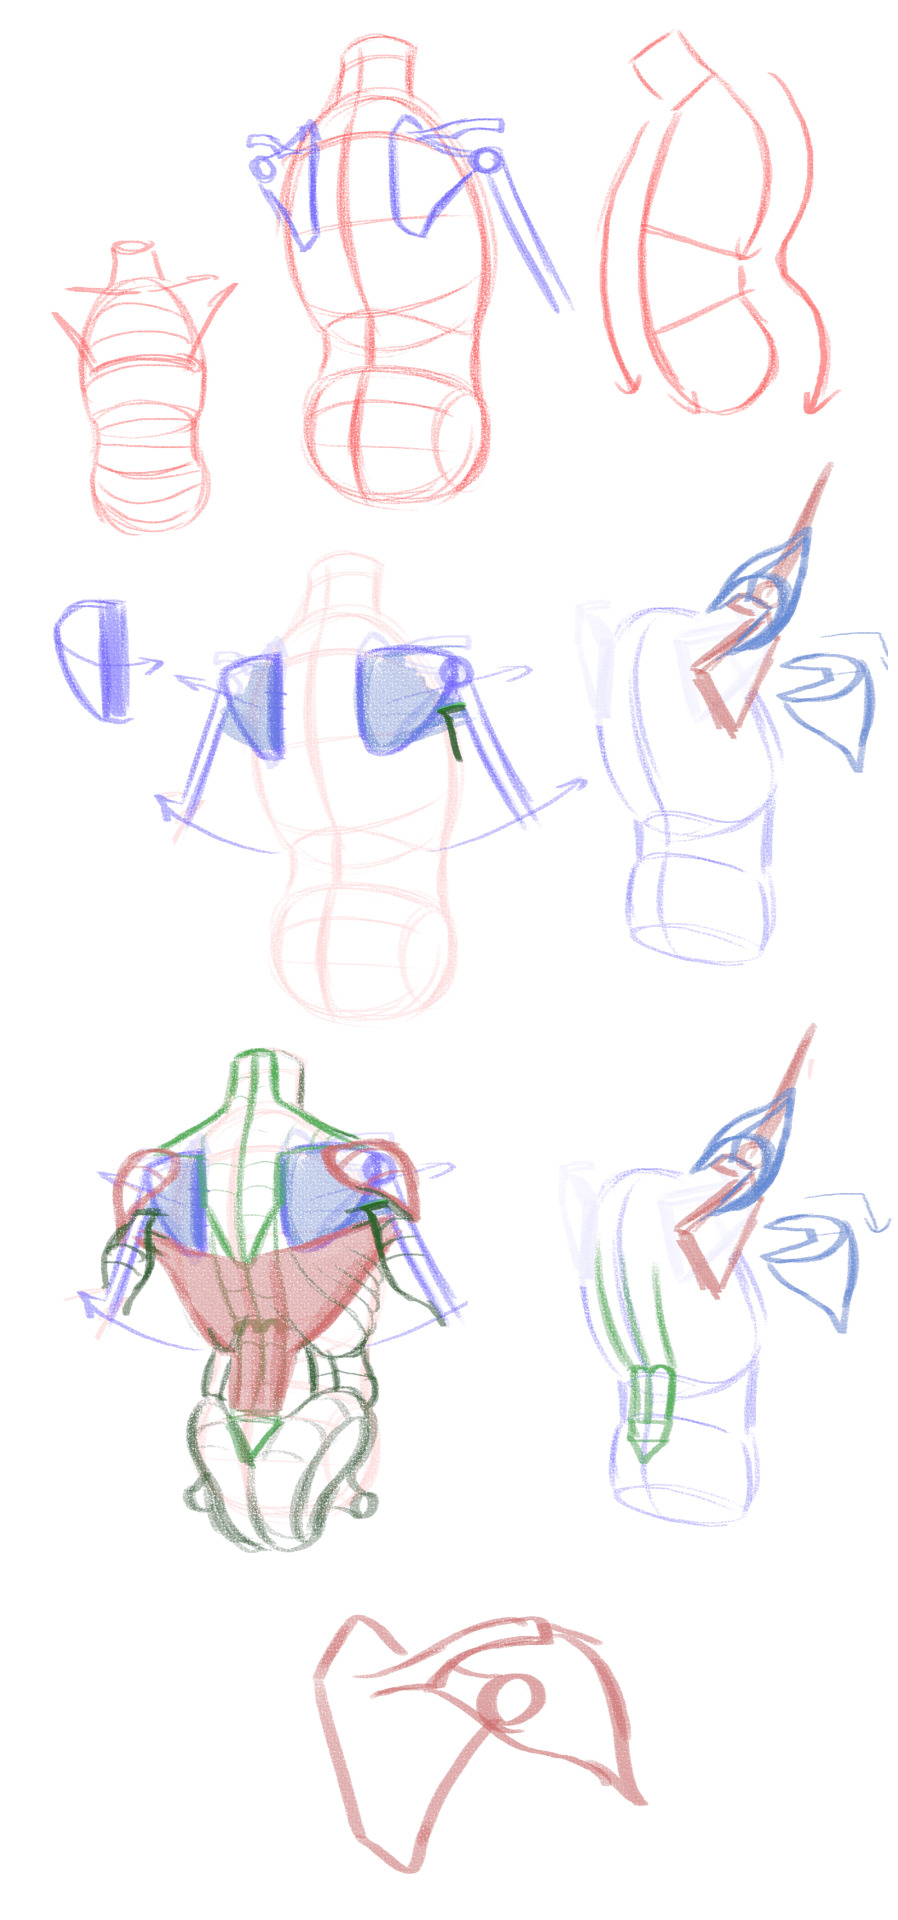
small tutorial for newbies to anatomy :) hopefully this is understandable and helpful !
20K notes
·
View notes
Photo
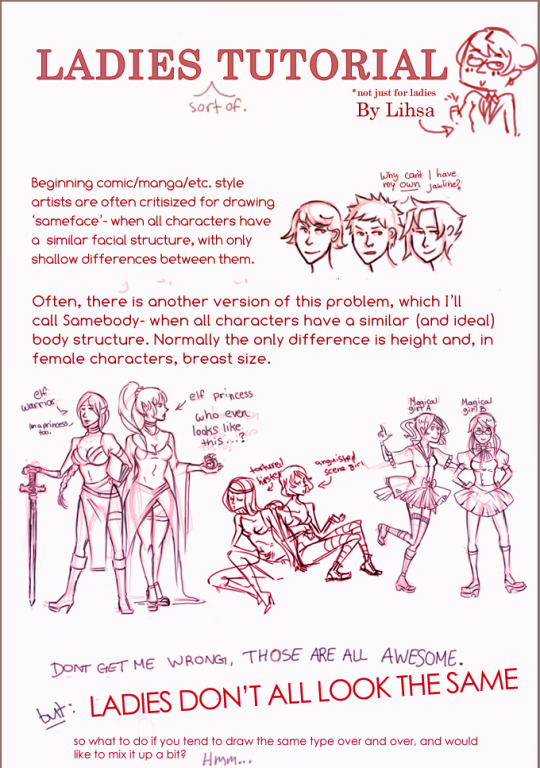


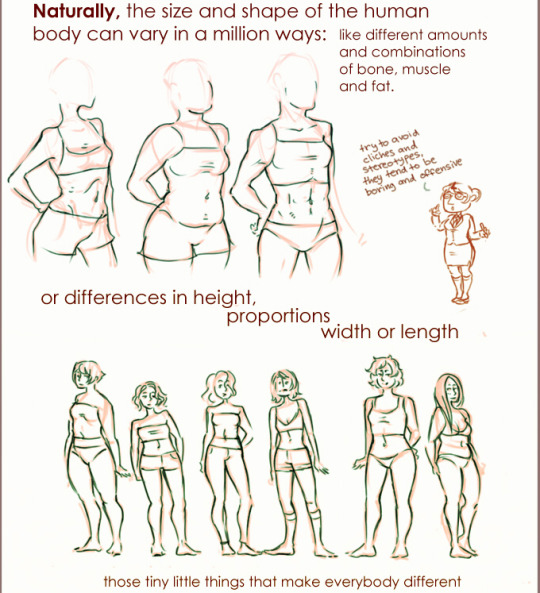
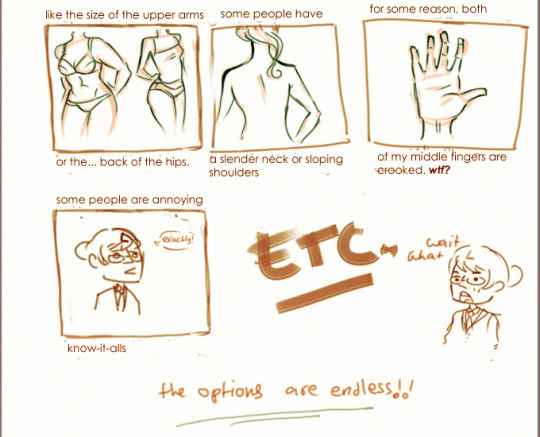
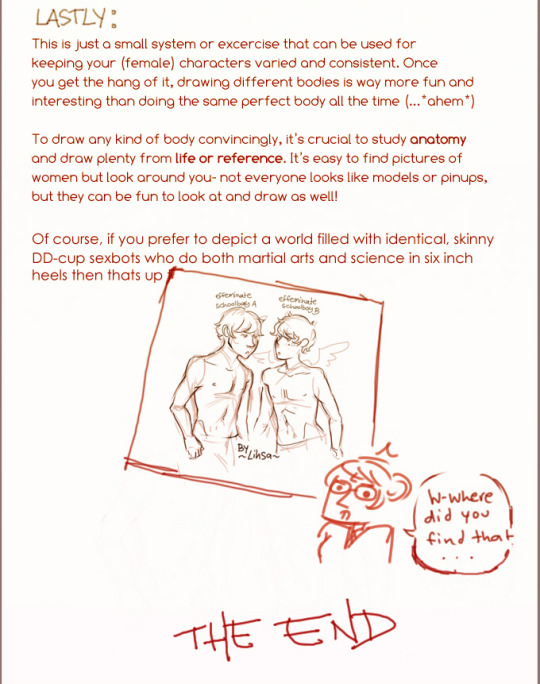
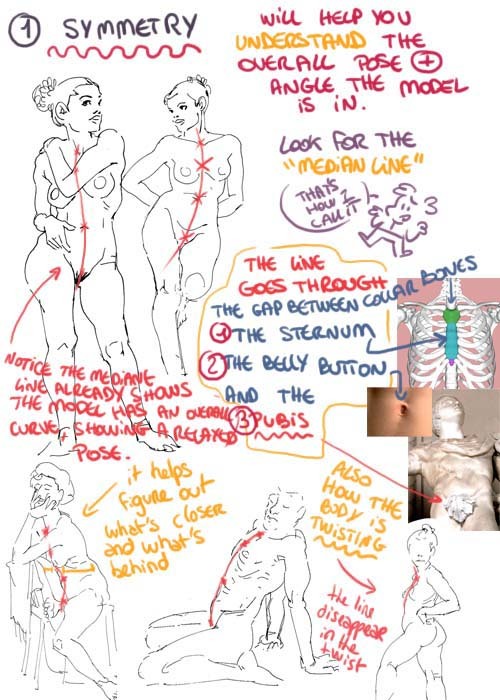
Ok I was recently reminded that this exists (i-I think someone DA-famous linked it or something because WHAT) and I think this may be relevant to tumblr’s interests so here’s my~female body variation tutorial~ whoo~
This came from some things I scribbled down when I was trying to keep my character designs consistent, and I realised that it kinda made me see bodies/proportions somewhat differently so I pasted it into this smarmy old tutorial, now cut up into (I hope) tumblr-friendly chunks so right-click for full size I think? (disclaimer: I don’t know anything and it is so far past my bedtime that it’s been tomorrow for a whole day so I’m going to nap and then maybe regret posting this.)
29K notes
·
View notes
Photo


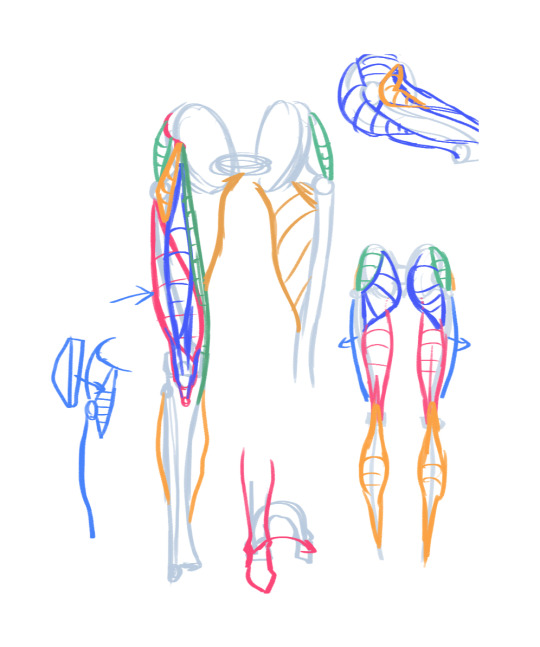
Was asked to do a tutorial on limb proportions– hope this helps!
Also, if you want to get more in-depth, I recommend checking out these books for reference: Classic Human Anatomy by Valerie Winslow & Dynamic Figure Drawing by Burne Hogarth.
2K notes
·
View notes
Note
Art advice question! I’ve been trying to practice drawing faces from more angles, but the profile or a 3/4 from the back is what kills me! I always have trouble with the mouth in those, Idk what it is, even if I try and draw in a super simplified way and only do a line it sill somehow manages to look wrong... any tips?
I don’t know how to help you when I can’t see your drawings. Maybe this can be useful:
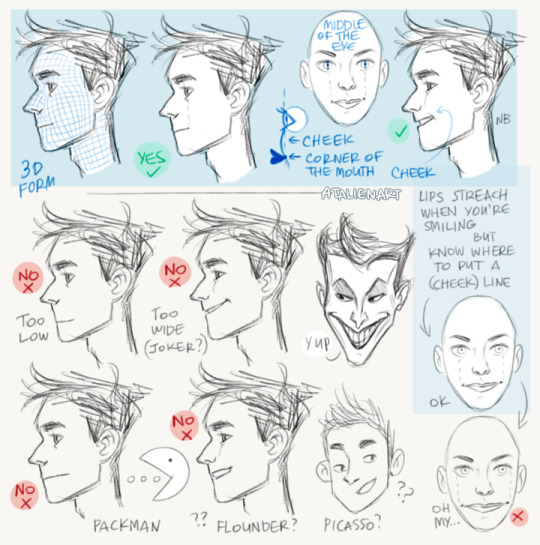

As I said, it’s hard to fix something when you don’t even see it. Use references, draw from life, it’s the best was to understand and learn things.
22K notes
·
View notes