
fallen-artist63
Fallen's Art
Art is magic that one's mind creates
46 posts
Don't wanna be here? Send us removal request.
Last Seen Blogs

inscaria
DECEPTION.*

tiltedaphelion-blog
tiltedAphelion

littlelosttotheworld
Anna Tuck

bl-archive
Bladed Dreams

Text
Final Indy Art Post :(
Ah, the end of the class is finally here again. But, before I get into what I did for this final week, I want to give a HUGE shout out to my art teacher. She’s retiring after this year, and it saddens me really. She was a big part of why I got back into art and how I came to love it again. She is and always will be my favourite art teacher, that’s something that’ll never change despite her retiring. I promise I’m not crying, it’s just so hard to realize that the teacher that you absolutely love, isn’t going to be there anymore. I want to thank her for making me feel welcomed to a brand new school and how she treated me as if I was always there. Thank you so much, I’ll miss you. I really will <3
Okay, I feel like I was able to say my piece :((( Now through misty eyes, I’ll continue with what was supposed to be done this week :(
Like I was saying yesterday, I had made the background for a rock creature I would make.

But we can’t just add a rock and call it good, no. I put my (terrible) writing skills to some use and created a story to go along with it--
A Rock and Roll Tragedy
Deep in a jungle not so far away, there’s a rock. Not just any rock, one that’s able to move, look around, and even grab things. May not be able to talk, but his actions make up for it.
Well, anyways, one day he went for his daily walk, like every other day, he goes to the pond on the west side of the jungle. There’s tamarack trees surrounding the edge of the pond as if it was a cage. The old willow tree is the sight to see, with its long droopy leaves hanging over the pond giving it an eery look, yet an elegant one. Moss hangs from the trees as if it was meant to be there, vines swoop from tree to tree almost giving the area above the pond a drapery feel.
This is the rock’s favourite spot to go to. He rolls to the edge of the pond and stares at the reflection that it gives. He sees his big white eyes, his massive body, and even his non-proportionate arms and hands. He reaches down to touch what he sees, but instead sends ripples through the water. The rock appears to sadden with a dark look passing over him.
He slowly rolls away, but then remembers why he came here. He starts to pick up his pace towards one of the more sturdy trees, he grabs around the trunk and starts to pull himself up the tree. The tree is swooning like a huge gust of wind was controlling it. Before the tree completely begins to fall or break, he would grab the vine and wing from one end of the pond to the other.
He was so busy having fun that he didn’t notice the vine cracking and breaking under his weight! He goes to make a spin around trick when the vine tears and has him falling toward the pond. He lands with a loud “kurplunk” followed by a splash of the water. He’s fighting to stay afloat, panicking, he frantically swims towards the shore, realizing he only has one arm. The rock must’ve lost it when the vine broke. He still did the best he could to land upon shore, eventually doing so before he sunk.
He stands there looking at the pond, searching for his lost arm and staring at everything blankly at the same time. He just give a shrug of his shoulder, turns around and rolls away. The rock may have lost an arm, almost sunk to the bottom of the pond, but does that really mean he won’t continue coming here and doing what he just did? No, it only enhances his curiosity to do it all again tomorrow :)
Well, I hope y’all enjoyed it-- But yeah, another thanks going out to my teacher, doing art classes next year just won’t be the same without her :(
Hope y’all enjoy your day today <3
#owo#final week#indy art#I'll miss my art teacher so much idk what to do :(#artist on tumblr#artist on instagram#rock painting#trees#painting#artist#art
2 notes
·
View notes
Text
Week 8 Update
So well, I finally finished up the trees owowowo
I will say, I really hate painting trees. Like- Especially willow trees, really not my thing LOL. But other than that I say it looks pretty well, lemme take you through some of what I did so far
Beginning the Willow Tree

Well, this was the very start of all the trees actually. The willow tree semi-finished at this point, I wasn’t really thinking about taking pictures before this tbh. BuT, this doesn’t look too bad, but it’s not the greatest.
So, at this point I spent about the entire week before this week painting the water, the underpainting, and then the basic beginnings of the trees.

owowowo This was the final stage of the willow tree, and then I sprung up the branches of the other trees and I really liked the way the trunks looked. This was probably about 4 hours trying to think of how I was going to achieve the width of the trees, how tall they’re going to be, how creative the trees are going to be. As you can tell, you probably wouldn’t see these kind of trees in the world as to them being so curvy LOL, but that’s just how I like making my trees.

This would be the entirety of the background for the rock creature. I really did try to make it look like it was in a jungle, but really- This picture makes it look so bad- It looks a lot better in the flesh man, but either way, I’m really proud of how far this has come. The circle in the middle of the water, where you see the circle-- That’s where my creature will go, I’m smart and didn’t use just water so now there’s a mark there lol, it’s amazing. But yeah, I’m most proud of the tree that’s closest to the front, like, you may not be able to see it, but the shading on that one is amazing, in my opinion :)
But with all of that being said, I’m going to work on the rest of the painting for the rest of the day, along with the rest of my schoolwork, and I’ll be back with the final project tomorrow :)))
1 note
·
View note
Text
Week 8 Goal/Final Goal
So, I originally had a week 8 goal, right. Well, the painting that for that goal is taking a lot longer than I had expected. With that being said, I’m just going to combine the two goals, y’know? Considering they were both going to be the same painting anyways lol. For these weeks I plan to have finished one painting of a rock creature in a swamp habitat. I’m really impressed with how far this one has come, can’t wait for you guys to see as well :)
1 note
·
View note
Text
Week 7
So here we are with week 7, this week was basically where I planned out how the final painting would go. Making small notes, arranging where everything in the background would be, how the creature would hang etc. Going on with that, let’s see the drawing plan owo

Okay, so I know not very many people can read my handwriting, or in this matter see it- So I’ll just be retyping it onto here to make y’alls life easier, mk?
Rock Creature
~Could just glue googly eyes on the rock itself for eyes LOL
Now c’mon, it seemed funny to me that way I didn’t have to really design eyes and then I could just take a picture of the rock sitting the way I wanted to draw it-
~Use the human skeletal structure for the arms
~Moss for the cushion between the “bones”, like the ligaments between human bones
~Vines to hold the rock bones together
~Hanging up in a tree like a monkey
~Don’t make it too stiff, smooth movement is key
~Use inspiration from Geodude (Pokemon) and Mr. Potatohead (Toy Story)
I n s p i r a t i o n - Not taking the complete idea, just using inspiration y’know? I’m taking the rock arm concept from Geodude, but not making him- I’m taking the feet idea from Mr. Potatohead but not making him. Kinda thing, you can use inspiration from other artist, just don’t steal their complete idea, y’know?
So- you see up on top I had tried to draw a fedora- Tried, I stress tried. I did make another attempt using a thingy from the internet just to get the base down- I’ll make sure to credit them dw, but yes otherwise I’d probably have no idea on how to draw one--
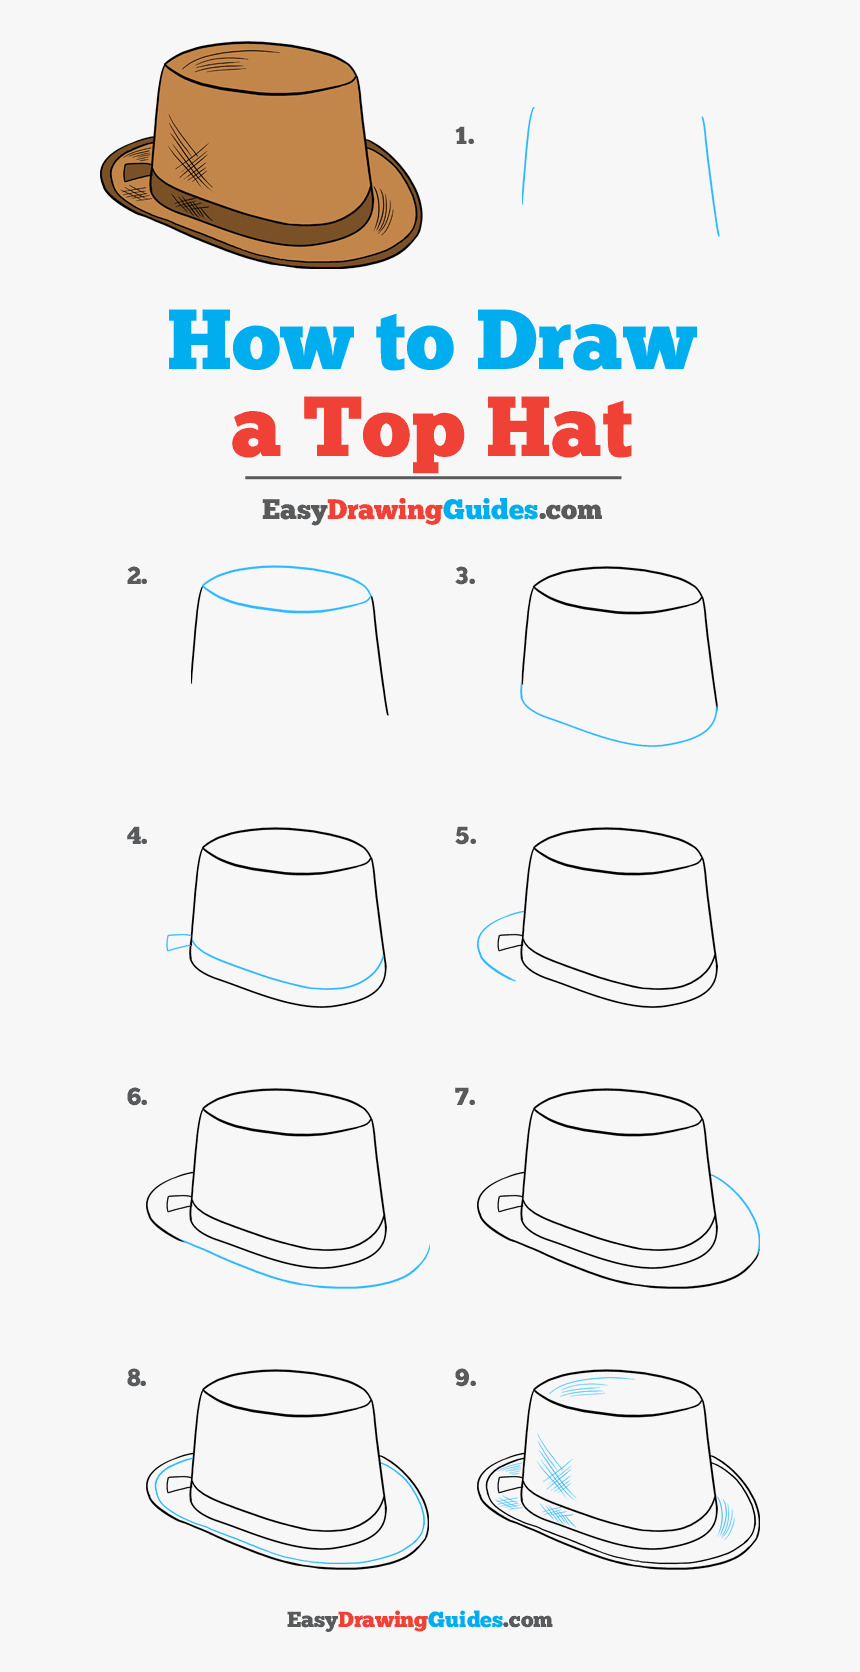
Check out this tutorial at EasyDrawingGuides.com!
Alright, that took me a while to find the right site before I looked at the picture, which had the site. The. Entire. Time. I-
But either way here we are :) Of course I’m not going to use the same exact fedora for my painting, but you get the jift. I don’t even know if that’s a word to be honest, but aNyWaYs. Let’s look at how well- I don’t even know if it’s well, but my attempt at making this version of a fedora.

Oh yes, the lines definitely are not straight, but yes- It’s pretty well done ig? For a first attempt y’know- It’ll evolve and become better as next week comes into play owo
Habitat
~Swampy jungle
~Multiple tress, on land and within the swamp itself
~Spanish moss
~Willow tree, tamarack, black spruce, swamp cottonwood
These would be the type of trees that grow in swampy areas to make my painting seem a little more legit, y’know.
~Mucky-ish water
Yes, mucky-ish is now a word.
~Some algae on the top of the water
~Vines
~Cloudy sky
I made a small layout on how I plan on arranging all of the trees and vines. But, since I really didn’t know what any of these trees look like, I searched up some eligible trees that I can use as reference photos :)

Ah yes, my reference photos c:
1. Black Spruce Tree
So, I seriously haven’t seen that many trees in my life man. But yes, this is a black spruce tree.
2. Spanish Moss
I thought it was called hanging moss, but the “real” term for it is Spanish moss xd
3. Vines
Self explanatory, it’s, a vine.
4. Tamaracks
I didn’t really find any decent pictures that aren’t all in the woods, so like. I could possibly add some dead trees to the background to get the swampy feel that I’m looking for?-
5. Swamp Water
Mine just won’t be as clean as this one-
6. Willow Tree
I honestly really like willow trees. To me they just look really cool, I kinda like how the branches just swoop with their leaves and such. With a tree like this in my painting, I may not need any Spanish moss to be honest.
7. Swamp Cottonwood
Again, I never really seen this tree before. Or I have and didn’t really pay attention. I’m not an expert on trees >:( But either way, yeah.
Colors that I’ll need for the painting
Okay, so I did write all the colors that I’ll be using. Not necessarily need, but either way-
~Black
~Brown
~Burnt Sienna
~Burnt Umber
~Crimson Red Lake
~Emerald Green
~Gray
~Medium Green
~Phthalocyanine blue
~Ultramarine blue
~Viridian
~Zinc Titanium White
So there we have it :) That’s my very basic yet kinda complicated layout LOL Next week, or rather this week. I’m probably going to start the basic of the background today, not a bad idea to be fair. But yes, I’ll be back later with some more updates :)
1 note
·
View note
Text
Week 7 goal
This week is the week that I’ll be starting to plan out a rock creature and it’s habitat. I’ll first start off by planning the ‘anatomy’ of the creature, making it stand in multiple positions just to get the feel of making it. Then after that I’ll be brainstorming on what the background or habitat of it will be :) I have a rough idea already, but in a few days I’ll share that with you guys as well.
1 note
·
View note
Text
Week 6
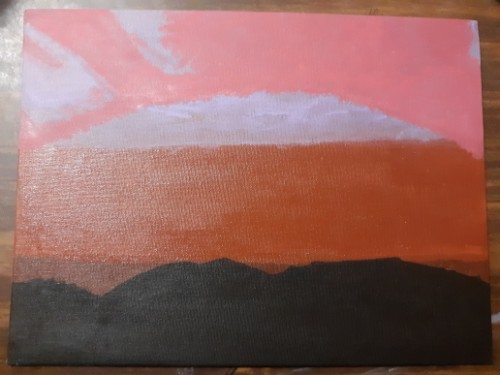
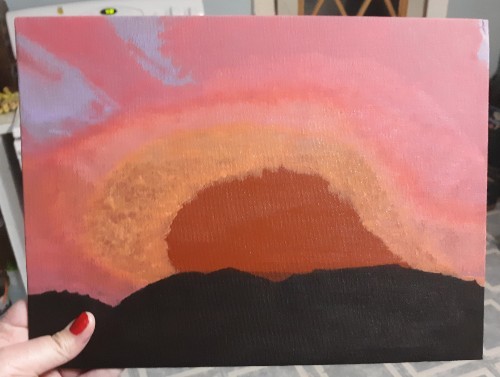
So here we are- Updating y’all on the sunset painting that I am now done with. I really tried to use some of the techniques that I had learned in Week 5 in this painting, such as under painting, glazing, and sgraffito
~Reference Photo~

I used this photo for inspiration, I did try my best to make it somewhat look like it, but we all know how that goes :)
~The under painting~
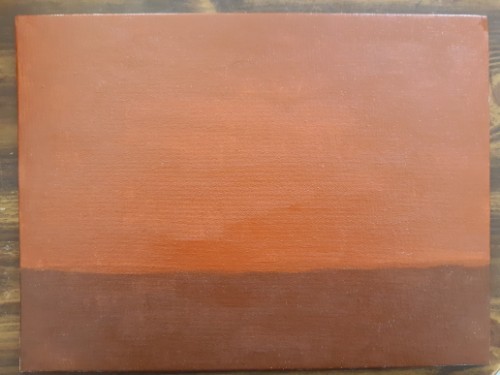
So here, I used a burnt sienna for the top and a burnt umber for the bottom where the ground will be.
~The ground~
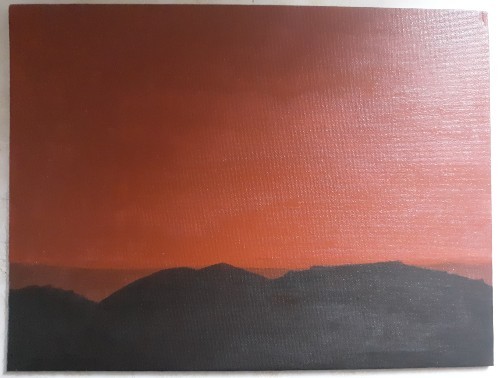
For the ground/mountains I used a chromatic black, which is either a mix of black with burnt umber, for more of a warmer black, or black with ultramarine, for more of a cooler black. Since I was painting a sunset, I went for the warmer black.
~The sky~
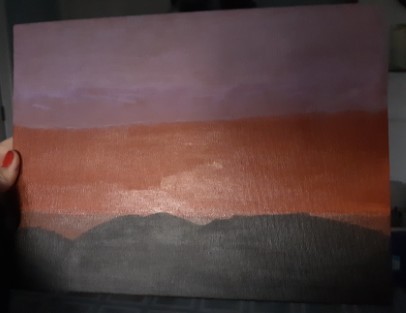
The quality of the picture isn’t the best, since there really wasn’t a whole lot of sunlight at this time- EiThEr WaY, this is the beginning of the sky where the purple is.
Now, I know- These don’t really look like clouds at the moment- But, these were supposed to be clouds LOL. I really just tried to follow the lines of where the pink began and ended, this is the part of the painting that I really enjoyed the most not gonna lie.

Anddd this is the part of the painting that I really started questioning my ability to paint- But no seriously, the blending wasn’t goin’ the way I had hoped for but I eventually made work of it later on in the painting.
Oh yes, my lovely thumb hmhm. I swear, it looks so much better in photos than it did when I was taking a photo of it. But, again I really enjoyed this process of making the clouds within the sky, time consuming, but fun y’know. Overall, I loved painting this. It really helped me see different views on painting, because I’ve never really liked painting to be completely honest with y’all. I’m more of a sit down and draw type of person. Doing these paintings for the class have really inspired me to go out of my comfort zone, try different art things, it’s just awesome really. I found that I highly enjoy painting :)
AnYwAyS eNoUgH oF tHe CuTe TaLk
Let’s continue shall we-
Now we all know how I have pretty bad memory-- I may or may not have forgotten to take pictures in between this last picture and the final one- oopsies
But all I really did was blend the colors a bit more, then went on to painting the brightest spot (which is the sun ofc), the glare of the sun, and then the touch-ups of the mountains.
~Final painting~

Now, like I was saying in the beginning- It doesn’t look exactly like the reference photo, but I like it. I really do, it still has the elements of a sunset and still looks pretty good :) I’m very proud of this one.
2 notes
·
View notes
Text
Week 6 Goal
So, this is a bit prolonged but, here we are :) This week I planned on working on using what I learned in week 5 and making a sunset. That way I can practice making landscapes to work up towards my final goal c’:
I’ll be back in a few days to update y’all <3
1 note
·
View note
Text
Week 5
Link #1: How to Create a Painting With Shading : Painting Techniques
~You want to make sure you have at least one dark color and one light color.
Okok, so I’ll be including a little picture of what I did, but I’ll be using Emerald Green as the light color and Ultramarine as the dark color :)
~Now mix them together to get your medium tone.
Oh. I mean, it comes out as a pretty teal owo. You’ll see in a bit, dw.
~Dip your brush in the water and just dip into your middle tone and paint a circle on your paper or canvas.
I hope y’all know that I don’t expect you to do this with me. I mean, I wouldn’t mind if you tried this out LOL. Whatever floats your boat y’know. Besides, who doesn’t love painting circles, am I right?- But seriously, circles do be pretty hard to make legit circles. Like, I think I’ve only managed to get one even close to being an actual circle, and that wasn’t even that close.
~It’s completely okay to have some variation, thicker paint around the edges and then kind of wash you paint in the center of the sphere (for now it’s a circle, but that’s besides the point)
~You don’t have to completely rinse your brush out. It's okay to leave a little bit of that color on because it’ll create a smooth transition.
I actually didn’t think of that to be completely honest with you. I tend to always wash my brush completely before I even go into the next color. I- well the more you know, the better you can be c:
~Grab a little bit of that light color and you’re gonna add some highlights in the upper left or right corner of your sphere (whichever one you prefer I suppose, I tend to always have the light coming from the left)
~Even though we’re using acrylic, the paint should be staying fairly wet and just kinda blend that lighter color in with the darker color.
So like, wait. I just kinda went braindead for half a second, I’m like- Acrylic paint isn’t wet, that’s only water colors. And- I’m just sitting here now dumbfounded because when you think about it- Water color isn’t wet- But acrylic paint is- it’s- yes- look I have no idea where I was going with this bit LOL. But here it is-(Intense brush strokes) LOL
~Create as smooth of a transition as possible between the upper and lower part of your sphere.
I cannot tell you guys how good this looks tbh, and we’re only maybe halfway done LOL
~Dip the brush back in the water (What if I wanted to dunk it though-) and go for your dark color and basically you’re just going to do the opposite of what you did with the light color, meaning that you’ll be in the opposite, bottom corner (Don’t mind the fact that I just said the bottom corner for a sphere- I’m intelligent, yes.)
~Really try to blend it in with the paint that’s already down there.
~You should be doing light brush strokes, you don’t need to push too much paint down onto the page.
See, the thing is. I have a pretty heavy hand when it comes to anything really, so I would say this was the most challenging thing for me, so far that is one of the main struggles for me.
~Now rinse your brush out and leave a little bit of paint on the brush and this is going to be used for the shadow, which is just gonna be a washy shape surrounding the bottom of the sphere and that’ll create a plane for your object (sphere) to be on.
I never actually thought of it like that- Usually I thought of the shadow as, well, a shadow lol. But I guess when you add the shadow it does give it a little place to sit. Almost like a dog sitting on a mat or something.
My little video painting a sphere :)
(This video was well done, I would like to say that the sphere doesn’t really look all that much like a sphere BUT it does show enough to help with one’s shading, which was the whole point of that video)
Link #2: Beginners Guide to Highlighting and Shading
(So, since this is a website not a video. I’m going to only write down what I didn’t know already, that way it doesn’t take years to get through all of this kk? I did include the link^ so y’all can check it out yourself as well :) )
~Most beginners use black for all their shadows. In reality, shadows are rarely a true black.
Okay, it’s not like I didn’t know this before. But I once made the mistake of trying to make every single shadow black. I can feel the pain, it’s okay. I just learnt this at the beginning of this class to be honest with y’all LOL.
~To find the right shadow color for your object, add tiny amounts of black or the cool complementary color to the original color of your subject.
So basically, what the first link said as well. You have the light color, and the dark color. But to get that dark color you need your medium tone, so kinda backwards in a sense-ish.
~Blend out the edges to make sure you don’t have a harsh line. Use various mixes of your shadow color to gradually lighten your shading and blend it into the surrounding area.
I meannnn, I think I’m pretty good at not having harsh lines for the most part. I would say that the edges are usually always a bit harsh, but other than that I think the shading part is pretty well blended.
~You can also use a glaze to add shading. (Yo, okay so I have zero idea what a glaze is when it comes to painting- I-)
~Shadows are not always dark.
To be fair, I think most of the beginners (including myself) start off thinking shadows are always dark. That they’re more prominent than the object itself. I think that’s what’s stopped me a lot of the times with my earlier paintings that I did a while ago.
~It is important to study your scene or reference photo before planning out your painting
I 100% agree, study the scene, the object, everything. Analyze the reference you want to paint before you actually dive right in. That goes with any art actually, not just painting.
~It is tempting to add pure white paint where the light source hits your subject. (I can relate, don’t worry) However, as with shadows, highlights are rarely pure white.
~Use a soft brush with a light touch for highlights. They should be subtle and the edges well blended into the surrounding color.
Oh goodness, again I’ll have to work on my heavy hand, but other than that I would say I’m doing pretty good about this.
~Gradually build up the highlight rather than having a blob of light colored paint.
Uh, oOpS ._.
Link #3: 7 Must-Know Painting Techniques For Artists
1. Under painting
~Create an underpainting in burnt umber or a mix or burnt sienna and phthalo blues to establish shadows and values.
I never actually thought about doing this tbh. I usually start with a white canvas and go from there, y’know? Maybe if I try this I’ll see some big improvements, who knows :)
~Work paint up from thin to thick, especially when using slow-drying paints. It’s impossible to work on top of heavy, wet paint. (I agree, like- There’s been times that I’ll legit just try and paint over the first coat maybe 15 minutes after I paint it on. I’m like, nahhh it’ll be fine to paint on, what’s the worse that can happen. Well- I ruined the painting lesson learned though) In the same way, work up to highlights, adding the brightest, and usually heavier, paint at the end.
2. Blocking in
~A filbert is a good general brush for blocking in form and paint. It has a dual nature, combing aspects of flat and round brushes so it can cover detail as well as larger areas.
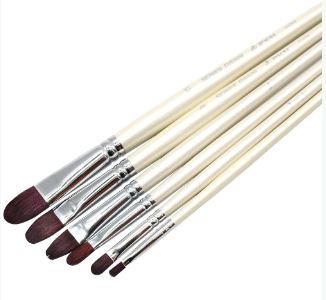
These would be the type of paint brush that they’re talking about. They’re a mix of flat brushes and round brushes. I maybe have like- 2 of these in all between 3 art kits to be honest. I may have to start investing in more of them, who knows.
3. Building up texture
~Almost anything can be used to add texture to your paint. (I honestly never knew that people added things to their paint to create texture) There are already made texture media available, but I have seen items such as egg shells and sand used to add interest to a painting.
Oh? Bro, who would’ve thought about adding eggshells to your paint, like I honestly never thought about adding anything actually. I just paint with what I got, y’know. But maybe I’ll try this soon™
~Use an old toothbrush to spatter your image with paint. This can be remarkably effective at suggesting noise and grain.
Well, that’s new. I really didn’t think about using anything else for a painting besides paint brushes. oOpS
4. Dry brushing
~This method tends to work best when applying light paint over dark areas/dried paint and is useful for depicting rock and grass texture.
So, I’ma be completely honest with you guys. I used to paint without water, and like- I was so ignorant about most of the things that I know now. I would only use water to wash my paint brush afterwards, but now. Water has become so helpful in my paintings oml, it’s amazing what a little bit of water can do for your painting.
5. Sgraffito
~Removing paint can be just as important as applying it.
I- I only ever removed paint when it was in the wrong spot.- I didn’t know that removing paint from anywhere can help, especially when you want to expose the underpainting.
6. Glazing
~Glazing is the process of laying a coat of transparent paint over a dry part of the painting, and it’s used for intensifying shadows and modulating colour.
Well, now I know what glazing is LOL.
7. Painting with mediums
~Mediums are fluids that can be added to paint to modulate its consistency, drying time and texture.
Again, I honestly never knew that. I’m so inexperienced with painting items and ways it’s not even funny man.
~In the case of acrylics, you get different mediums that make the paint matte or gloss.
Link 4: Acrylic Painting Techniques
1. Dry Brush
~You want to aim for seeing your brushstrokes in the paint.
I don’t tend to like seeing my brushstrokes within my painting to be honest, but if it works it works, kinda thing.
2. Sgraffito/combing
~Involves painting a layer or two of paint and then etching into it to create a design and reveal what’s underneath.
Again, I really don’t tend to do this either. Considering I just learnt it LOL but I wouldn’t have thought about removing paint or etching anything within the paint.
3. Wet-in-wet
~You can do wet-in-wet with acrylic just like you can with watercolor so go ahead and lay down some water on your paper and then you can just drop in the acrylic paint.
My thinking- If you want a watercolor effect, why not just use watercolors? Big brain time LOL
4. Overlay/glazing
~Start by laying down a darker color on your paper and then letting it dry. (Yes, we need to let this dry for several minutes. So while you’re waiting, pop in some popcorn, watch it pop, eat some and then you can go back to painting :) )
~What you’re going to do now is overlay or glaze a lighter wash over top so water down your paint just a little bit.
Y’know, this technique might actually come in handy with my next painting ngl. But we won’t talk about that until the time comes owo
5. Impasto
~You’re going to use a palette knife instead of a brush so this is a really nice way to achieve a lot of different texture within the paint.
So, I only ever use palette knives before for backgrounds. To get that kind of color dye/blending feel y’know- I can’t think of the word right off hand but- TYE DYE yes tye dye feel, hush- :(
6. Modeling Paste
Before we even learn anything, like- I never knew that you could use modeling paste for painting?!?!?! Like- I only ever used modeling paste when I was fixing a clay sculpture or something of the sort, y’know?- The more you know
~A great way to add texture into your artwork. So you can use a palette knife to scoop it out and then apply it onto your paper. You could also use a paintbrush to softly apply it to your paper. (My brain man, this is all so new for me- I-) Note you can also mix it directly with the paint color if you want to. Let the modeling paste dry and then you can paint over top of it.
Waittt, you could use this to make the texture of mountains owo and rock beds, bro- I feel so inspired by this one ngl.
7. Stencil/Stamp
So the girl in the video was pretty basic with it, you just use it as a stencil should be used and of course washing it afterwards.
8. Sponge
~With a sponge, similar process as you would use with watercolor. You’re just using the sponge to apply paint instead of a brush. (Big brain, she knows) You can go back in after you let the first layer dry a bit and add like a second or third layer of paint.
Y’know, time for a funny-ish story. So back in elementary school, we did this sponge painting, we could only use the sponge. And I’m like, I wonder what a pufferfish would be like with a sponge. So- I painted the sponge right, then I took some bottled glue, put the glue on the back of the sponge and glued it to the paper. LOL My art teacher found it funny, but had me remake the painting and explained that it had to be painted with the sponge, not made out of the sponge. So yeah-
9. Drips/Splatters
~To achieve drips, mix some water into your acrylic paint and you’re just gonna kind of angle your paper and guide the drips down. (So like, this would be kinda effective when you want the feel of a waterfall? Yes, no, maybe so?)
~For splatters, it’s better to use a flat bristle brush. Load it up with paint and you can actually just kind of flick the bristles and really control your splatters.
10. Gel Medium
~Gel medium is used to thicken your paint and also actually make it a little bit more adhesive. So you can mix it directly with your color and it’ll lighten it just a little bit.
So, when using this don’t expect the exact color, okay got it.
11. Scumbling
~You can scumble with paint just like you can with colored pencils. So use your brush in a circular motion but keep it controlled.
Well, that’s new. Now I know what it’s called at least LOL. I honestly never knew what that technique was called until now, but I remember always coloring with colored pencils like that just because my mum did--
12. Masking
~You can mask with masking tape of course or you can also use rubber cement.
Rubber. Cement. I- Howcanonemakecementrubber- I might actually have to search up what it looks like, I’ve never heard of anything called rubber cement.
~If your paint bleeds through, just go back through and patch it up with some paint.
13. Mediums: Gloss or Matte
She really just explained what she was doing for this one.
14. Soft edge vs. hard edge
~Soft edge and hard edge are just two paint terms for how the paint is laid down and the quality of it.
Who knew, I actually didn’t realize that how you lay down the paint affects how soft or hard the edge is.
So, I’m sorry for this being a bit late. But I feel like I learnt a lot with this one :)
0 notes
Text
Week 5 Goal
Yes, this goal is kind of delayed man. But, this week I was planning on watching some youtube videos and looking at websites to find more tips on shading, blending, and maybe find some decent ideas on what’s easier to paint etc. I plan to at least have 3 links that provide quite a bit of info and write down what I learned and share it with you guys :D
0 notes
Text
Week 4
Okay, this is kinda late. Well, not kinda, it’s a week late. Either way, it’s better late than never. But, let’s move on and see what was done this week :D
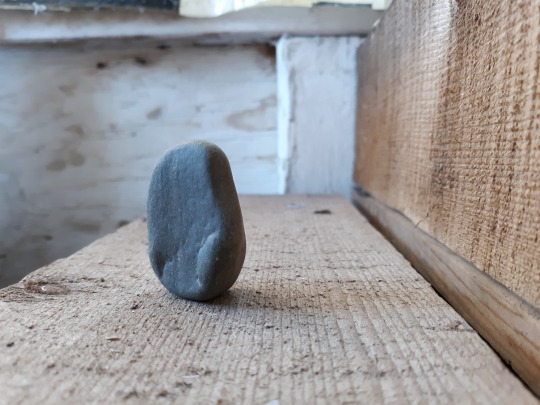
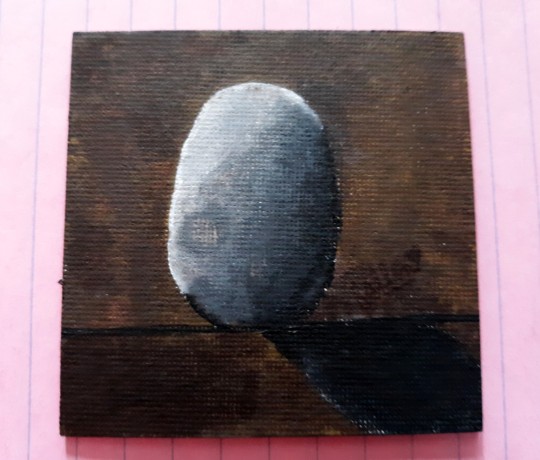
Taking photos of a rock
Yes, I took a couple photos of a rock. I went outside, looked in my driveway for a decent looking rock, cleaned it up and took inside to take pictures. The first one (top) was taken at sunset on my back porch, and then the second one (bottom) was taken in the morning when the sun first rose.

Watching a Youtube video
So, to help with my shading and blending of the rock, I watched a Youtube video on some techniques and such on how to.
The girl went over two techniques that she uses, one which is quite smooth and more put together, the other one has more of a blotchy and “an illusion effect” as she had called it. I honestly didn’t realize how much water helped with blending and smoothing out colors until I watched this xd
Click here for the video link
Last, but not least, finally painting owo
After taking her techniques and mixing them in with my own, I started to get to painting. Took roughly 45 minutes to an hour or so? I’m not exactly sure of how long it took, but I’m proud of the shading of the rock, not so much of it’s shadow, but then again I did want to focus more on the shading and blending this week.
#week 4#rock#painting#photography#indy art#artist on instagram#artist on tumblr#artist#owo#shading#blending
1 note
·
View note
Text
Week 4 goal
oK so
This week I kinda wanna work on my shading. I have some mini canvases that I can use to just practice on small pieces owo. Maybe I’ll start with taking some pictures of rocks in different spots or in different times of the day, just something basic so I can work on my shading c:
1 note
·
View note
Text
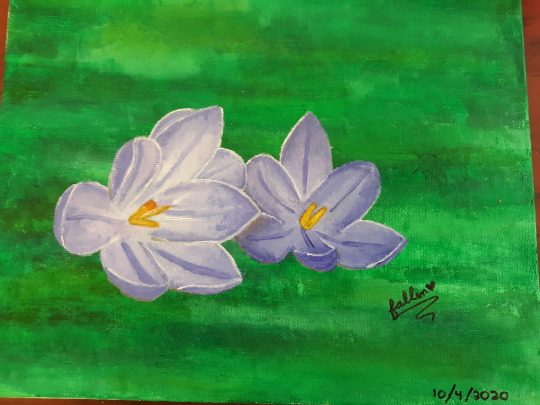
Painting #1
owo So- I actually finished it. I personally don’t find it all the greatest, but then again I’m usually not a painter. The shading could have been a little more accurate/better. But overall I say it’s fine :D
1 note
·
View note
Text
Week 3 Goal
I- I kinda forgot that I had to put my goal into my blog OoPs-
But either way, I’ve been working on a flower painting for this week, what kind of flower it is? I honestly don’t know- I’d have to check on that
But, either way this week was to just focus on what I can do right now and then as the weeks go on I’ll improve on what I feel needs more work and all of that kinda stuff owo
1 note
·
View note
Text
Long Term Overall Goal
Okok, here I am again xd With an overall goal for my Indy Art class.
I plan on focusing on painting this quarter, most specifically still life, but the further I go I hope to add some creatures or animals into them as well? Not sure how I plan on doing that yet, but we still have 7 weeks to think about that don’t we :)
1 note
·
View note
Text
Oh my.
Guys. I’ll admit, you all remember how I said I was going to be more active here. Yeah, about that. I’m kinda bad at making habits, AND the fact that I wasn’t able to get into Tumblr for months :(
But hey- I’m back for a few months, hopefully a bit more over the summer, but we’ll see. We also all know how I made a schedule 😓, I do plan on picking that back up and drawing them-- Since the whole virus thing is going on, and that I basically don’t have a life now, I can start drawing more often. I’m also in an independent art study class again :D So, every week will be something new. But, I’m still sorry for being gone for so long. I’ll make it up don’t worry--
owo
1 note
·
View note
Text
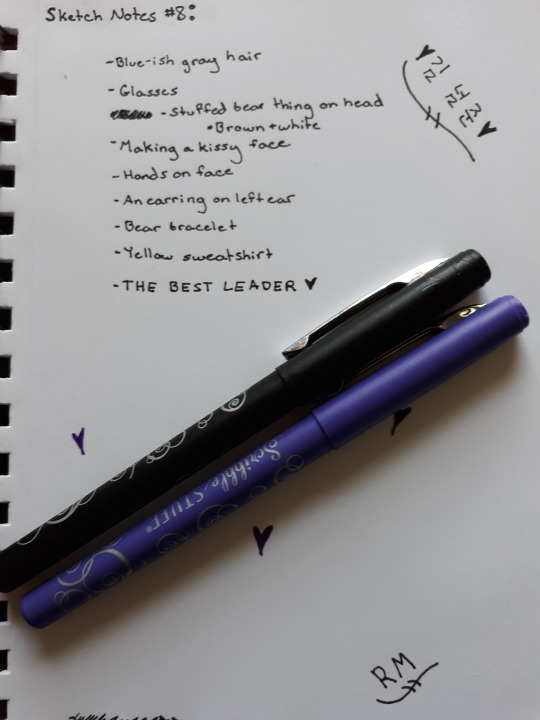
Sketch Notes #8
#sketch notes#preparing#drawing rm#hey im back#sorry for the long wait schools been taking up a lot of my time
2 notes
·
View notes
Text
Posting Schedule
So I finally made one~
It’s not the best, but it’ll be somewhat effective
☆ I’ll start posting sketch notes on Instagram also ☆
Drawings I Hope To Get Done In The Next 2 Months💖
~RM (BTS)
~Yeonjun (TXT)
~Han (Stray Kids)
~Felix (Stray Kids)
~Youngjae (GOT7)
~Chen (EXO)
~NaYeon (Twice)
~Seungmin (Stray Kids)
~JinYoung (GOT7)
~Lai Kuanlin (Wanna One) ;-;
~Key (SHINee)
~Ahin (Momoland)
~Bang Chan (Stray Kids)
~Jeonghan (SEVENTEEN)
~Jooheon (Monsta X)
~Jimin (BTS)
At some point we’ll get through all of these, just figured I’d make a rough schedule for y’all. The drawings will be in the order given. I’m not going to give an exact date for when I’ll get them done, just know I’ll get them done💜
Anyways, hope that helped. Take care lovelys~
1 note
·
View note