greatworldwar2
The Great World War 2
A blog dedicated to the display of weapons, divisions, events, people, equipment, and vehicles of the second world war from 1936-1945. Please Note this blog does it's best to remain neutral about the source material and does not support racism, homophobia, classism, anti-semitism or political flame waring in the comments of these posts. try to respect the history of this conflict and appreciate both the famed and unseen stories of the sequel of the war to end all wars.
216 posts
Don't wanna be here? Send us removal request.
Last Seen Blogs

gulfoilfield-blog
Gulf Oil Field Directory

francille
Humble Flea Enjoyer

jiajiathedragon
BellTruth1

prosperbe
Software Developers

dandjiheart
Dandji Heart
Text
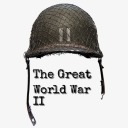
• Operation: Body Snatch
Operation Body Snatch, which began on April 27th of 1945, just three days before Adolf Hitler’s suicide, was an operation by U.S forces to return the remains of Germany’s most celebrated rulers: King Frederick Wilhelm I, King Frederick the Great, and Field Marshall Paul von Hindenburg. To their proper burial locations.
On The 27th of April, seven members of the U.S. Army Ordnance Corp were searching the northern reaches of Germany’s Thuringian Forest – basically the middle of nowhere - for hidden ammo dumps. That is when they stumbled across a salt mine in Bernterode that had been used as a munitions manufacturing and storage facility. The size of this mine, that one reached it by taking an elevator down about 1800 feet – that’s about a 1/3 of a mile or ½ a kilometer from the surface. Down there, the men found an estimated 400,000 tons of stored ammo in its estimated 14 miles or 23 kilometers of tunnels. However there was an ever bigger surprise in store for them. About 1/4 of a mile or 4/10 of a kilometer from the elevator shaft, the soldiers stumbled across a side passageway that appeared to be sealed off with fresh cement. They decided to find out what was behind that newly mortared wall. They tunneled an opening through an estimated 6-feet or 2-meters of masonry and rubble.
It was a room that had been partitioned off into bays that were filled with artwork, boxes, and tapestries. An estimated 225 Prussian flags and banners were hanging unfurled. More importantly, everything surrounded four coffins, one of which was adorned with a large wreath and red ribbons with swastikas and bore the name Adolph Hitler. Upon closer inspection, they noticed that someone had quickly scribbled a few words in red crayon on each casket. Three of these were the remains of Germany’s most celebrated rulers: King Frederick Wilhelm I, King Frederick the Great, and Field Marshall Paul von Hindenburg. The fourth casket belonged to Frau von Hindenburg. These remains had been placed down in the mine about three weeks earlier as the Russians were closing in on Potsdam, the location of the Tannenberg Memorial. The Nazis feared that the Russians would destroy not just the monument, but also the remains that were buried there – those of Hindenburg and his wife. They quickly removed the caskets and blew up the remaining sarcophagi, ultimately finding their way, along with the two Fredericks, to the Bernterode mine.
It has been theorized that this room deep in the mine was set up to preserve the most precious artifacts of German military history for the next rise of the German Reich. The job of getting these four coffins and all of the associated regalia up and out of the mine became the responsibility of the MFA&A – or the Monuments, Fine Arts, & Archives – branch of the military. This was a group of 345 art historians, museum directors, architects, educators, and curators that hailed from thirteen different countries. Better known today as the Monuments Men. The coffins were the last objects to be removed from the mine. Frau von Hindenburg had the lightest casket and was the first one to take the fourteen minute ride up to the surface. Next was Frederick Wilhelm I, followed by Field Marshall von Hindenburg. The last coffin, however, was not going to return to the surface easily. Frederick the Great’s casket was massive and weighed over half-a-ton. In addition to being incredibly difficult to maneuver. To the surprise of the men accompanying Frederick the Great on his journey skyward, as they approached the surface they could hear a radio blasting the Star Spangled banner followed by God Save the King. Germany had just surrendered the war.
These four caskets created an incredible dilemma for the US Army. Three of these four caskets belonged to men that played a significant role in Germany’s military history. They couldn’t be reburied in just any ordinary way. On the other hand, to give each a grand burial with an ornate tombstone or monument could help bring the Nazi party back to life. So, the Army without certainty of what to do with the caskets quickly passed the responsibility on to the higher-ups in Washington, DC to deal with. Since the US government was dealing with the bodies of dignitaries, the issue was deferred to the State Department, the branch of our government that deals with international relations. For an entire year the coffins didn’t move from their guarded storage location in the basement of a castle in Marburg. Ultimately, it was decided that these bodies were of historical importance and should be treated just like any other historical treasure or artwork plundered during the war. This top secret reinternment of the bodies once again became the responsibility of the Monuments Men.
Three officers were assigned: Theodore Heinrich, Francis Bilodeau, and Everett Lesley Jr. It was Lesley that coined the name of this top secret mission: Operation Body Snatch. Their instructions were fairly straightforward. The two kings were to be reburied in the US controlled zone Greater Hesse, while the two Hindenburgs were to be buried near Hanover in the British Zone. Why Hanover? That’s because Hindenburg had requested that he be buried on his family plot there. It was Hitler who decided to override his final wishes and have his remains placed at the Tannenberg Memorial. The US was simply trying to respect Hindenburg’s wishes, but it was not to be. The British government wanted nothing to do with the bodies. Word came back from London that would not allow the bodies into their zone under any condition. So, they couldn’t be buried in the British or French zones. It became clear that all four bodies needed to be buried somewhere in the US zone. Since all four of these corpses were of the Protestant faith, it seemed logical to bury them in a Protestant church. That idea quickly fizzled after it was determined that all of the suitable Protestant churches were either badly damaged or totally destroyed in the war. The next step of the three Monuments men was to see if they could find a place, any place, that had even a slight connection to the Hohenzollern family. After careful research, the Kronberg castle near Frankfurt seemed like the perfect fit. Once again, luck was not on their side. The Monuments Men, Theodore Heinrich in particular, had a bigger problem thrown on their plate. Someone had stolen the jewels that had been hidden in the Kronberg castle. Valued at $7.6 million dollars in 1947 or about $77 million today, the great mystery of the theft focused worldwide attention on the castle.
Ultimately, the answer they had been seeking was hidden right under their noses: St. Elizabeth’s church in Marburg. The church had survived the war in good shape and lie just a few hundred yards from where the bodies were currently being stored. But, the real question was whether or not the church had any space left to bury the bodies. The three officers spent a considerable amount of time searching through the church’s burial records to locate possible burial spots. It was decided that the two Fredericks would be buried below the floor of the north transept, while the Hindenburgs would find final rest at the base of its north tower. Before moving forward with their plan, descendants of both families were consulted to seek their approval. The French would not allow Crown Prince Wilhelm, the eldest son of Germany’s last Emperor, to leave their zone, so a letter notifying him that his eldest daughter Cecilia. Getting Hindenburg family approval didn’t go smoothly either. They were to meet his only son Oskar in Wiesbaden, but he was a no-show. It turns out that he had been arrested by American security police for signing a Wiesbaden hotel register with his full military title. Once released, Hindenburg was taken to St. Elizabeth’s and granted his family’s approval for the reburial plan. The four bodies were finally laid to rest on August 19th of 1946, 479 days after they were first discovered deep down in that Thuringian mine. There was fear that fanatics may want to steal the bodies, so the graves were covered with steel plates and a layer of concrete. In September of 1952, the caskets of the two kings were moved once again. This time they were taken to Hohenzollern Castle in Hechingen where a family spokesman declared they were to remain “until Germany is united again and they can return to Potsdam.” When the Berlin Wall fell in 1989, the decision was made to do just that. On August 17th of 1991, the 205th anniversary of Frederick the Great’s death, they were interred one last time.
#ww2#world war 2#second world war#world war ii#wwii#history#spooky#germany#german history#monuments men#funny history#military history
219 notes
·
View notes
Text
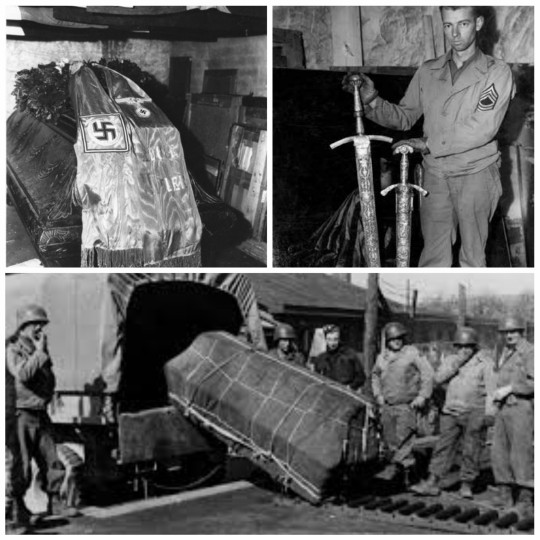
• HMAS Sydney
The HMAS Sydney, named after the Australian city of Sydney, was one of three modified Leander-class light cruisers operated by the Royal Australian Navy (RAN) during the second world war.
The ship was laid down by Swan Hunter & Wigham Richardson at Wallsend-on-Tyne, England, on July 8th, 1933 for the Royal Navy as HMS Phaeton, named after the Greek mythological figure. However, in 1934, the Australian government was seeking a replacement for the light cruiser HMAS Brisbane, and negotiated to purchase Phaeton while she was still under construction. The cruiser was renamed after the capital city of New South Wales, and was launched on September 22nd, 1934 by Ethel Bruce, the wife of Stanley Bruce, former prime minister of Australia and the serving Australian High Commissioner to the United Kingdom. Sydney was commissioned into the RAN on September 24th, 1935, drawing her ship's company from Brisbane, which had been decommissioned earlier that day. Following the announcement that Australia was purchasing a British-built cruiser, there was criticism, primarily from the Opposition of the day, stating that such a warship should be built using Australian resources and labour. Several reasons were given in reply for acquiring British-built cruisers instead of Australian-made: the ship was already close to completion, the pending threat of war meant that there was not enough time to train Australians in the necessary shipbuilding skills, and that of the two cruisers built in Australian shipyards, one (HMAS Adelaide) had taken seven years to complete.
Sydney was one of three Modified Leander-class light cruisers acquired by the RAN during the late 1930s. Although the first ship of the class to join the RAN, Sydney was the second ship to be laid down, although the first to be completed, in what was sometimes referred to as the Perth class: Perth and Hobart operated with the Royal Navy for a short period before they were purchased by Australia in 1938. Like most British cruisers, the Leanders were designed for long-range patrols, scouting, and trade protection duties. Sydney's displacement ranged between 6,701 tons (light) and 8,940 tons (full load), with a standard displacement of 7,198 tons: improved fabrication and welding techniques made her 52 tons lighter than her sister ships. She had a length of 530 feet (160 m) between perpendiculars and 562 feet 4 inches (171.40 m) overall, a beam of 56 feet 8.5 inches (17.285 m), and a draught at standard displacement between 15 feet 3 inches (4.65 m) forward and 17 feet 3 inches (5.26 m) aft. The ship was propelled by four Admiralty 3-drum boilers, feeding Parsons single-reduction geared turbines, which supplied 72,000 shaft horsepower (54,000 kW) to the four propeller shafts. Unlike the first five Leanders, which had their machinery arranged on the "in-line" principle (consisting of six boilers in three compartments forward, and four turbines in two further compartments aft), Sydney was designed with two redundant machinery groups, a design practice adopted from the United States Navy.
Sydney and her sister ships were constructed from 1-inch (25 mm) hull plating, with a 3-inch (76 mm) armour belt over the machinery spaces (the lengthening of this belt from 84 to 141 feet (26 to 43 m) to adequately cover both spaces negated the weight reduction from their reorganisation), and 2-inch (51 mm) plates over the shell rooms and magazines. Sydney was the first Australian warship fitted with asdic; a Type 125 unit in a retractable pattern 3069 dome. The retractable sonar dome, located near the bow, was a weak point in the hull. One of the cruiser's early commanding officers, Royal Navy Captain J.W.A. Waller, believed that the ship's single director control tower was a weak point in the design. The director control tower was the highest compartment on the ship, from where personnel would determine the range and optimum firing angle for a gun salvo, then transmit this information to the gun turrets: the actual firing could be controlled from the tower or the turret. Although Waller suggested that a second tower be installed aft to provide redundancy, it was deferred indefinitely as subsequent commanding officers did not share his concerns, and combat experiences of other Leander-class cruisers showed that the system was more robust than expected. Sydney's main armament consisted of eight 6-inch (152 mm) breech-loading Mk XXIII guns mounted in four Mk XXI twin turrets: "A" and "B" forward, "X" and "Y" aft. All eight guns could be fired in salvo, elevated to an angle of 60° and depressed to −5°, and fire eight rounds a minute at targets up to 24,800 yards (22,700 m) away. Four 4-inch (100 mm) quick-firing Mk V guns, mounted on single, high-angle, Mk IV mountings, were fitted to a platform around the aft funnel. These were primarily used to target aircraft at heights up to 28,750 feet (8,760 m), but could also be used against surface targets, with a maximum range of 16,300 yards (14,900 m). Their replacement with eight Mk XIX high-angle/low-angle guns in four twin mounts, which was to occur in the late 1930s, was prevented by the outbreak of World War II. The guns could have been swapped out during a maintenance docking, but the demand for cruisers and Sydney's fortune in never sustaining major damage meant that the additional time in dock could not be justified. For close-range anti-aircraft defence, the 4-inch guns were supplemented by twelve 0.5-inch (13 mm) Vickers Mk III machine guns, which were arranged in three Mk II quadruple mountings, one on each side of the forward superstructure, and the third on top of the aft superstructure. Eight 21-inch (533 mm) torpedo tubes were fitted in two QR Mk VII quadruple mounts to the deck below the platform for the 4-inch guns. Only eight Mark 9 torpedoes were carried.[31] Sydney was fitted with a single depth charge rail at the stern, which held five Mk VII depth charges. Four 3-pounder (47-mm, 1.9-in) quick-firing Hotchkiss guns were carried as saluting guns.
Sydney was fitted with a 53-foot (16 m), cordite-powered revolving catapult between the two funnels, which was used to launch a Supermarine Walrus (sometimes described as a Seagull V) amphibious aircraft. The Walrus was operated by Royal Australian Air Force personnel from No. 5 Squadron RAAF (which was redesignated No. 9 Squadron RAAF in 1939).
Sydney completed working up trials before sailing from Portsmouth on October 29th, 1935, Captain J.U.P. Fitzgerald RN in command. Almost immediately after departing, Sydney was instructed to join the Royal Navy's Mediterranean Fleet at Gibraltar and assist the 2nd Cruiser Squadron in enforcing economic sanctions against Italy in response to the Abyssinian crisis. During January 1936, the cruiser underwent maintenance in Alexandria and visited medical facilities in Cyprus: cases of rubella and mumps had been circulating through the ship's company since late 1935. In March, Sydney was reassigned the 1st Cruiser Squadron, where she and the heavy cruiser HMAS Australia continued to enforce sanctions and participate in fleet exercises with Royal Navy units. Following the resolution of the Abyssinian crisis, Sydney departed for Australia on July 14th; reaching Fremantle in late July before visiting Melbourne on August 8th and arriving in her namesake city three days later. After reaching Australian waters, Sydney spent most of her time on fleet exercises and training cruises. In 1938, the cruiser was one of several RAN units prepared to respond to the Munich crisis, but all ships stood down after the potential war was averted. From April 17th to 19th, 1939, Sydney was one of eight warships involved in a joint forces trade protection exercise off the south-east Australian coast. In early August 1939, Sydney was in Darwin, prior to visiting the Netherlands East Indies. However, in response to the events which prompted the start of World War II, Sydney was ordered to sail to Fremantle on a war footing, where she arrived on August 22nd.
Following the declaration of war, Sydney was instructed to carry out patrol and escort duties in Australian waters. Captain John Collins took over command of Sydney on November 16th. On November 28th, Sydney joined the Australian heavy cruisers Australia and Canberra in an unsuccessful four-day search for the German pocket battleship Admiral Graf Spee, which was known to be operating in the Indian Ocean. Sydney was relieved by HMAS Adelaide on December 13th, and sailed to Cockatoo Island Dockyard in Sydney for a maintenance docking. The work was completed in late January 1940, and as a shakedown cruise Sydney joined Canberra and the British ships Leander and Ramillies in escorting the Suez-bound Anzac convoy US 1; Sydney broke off after the convoy left the east coast of Australia and returned to Sydney. Returning to Fremantle on February 6th, Sydney relieved Australia as the cruiser responsible for patrol and escort duties on the west coast. On 19 April, Sydney joined the escort of Anzac convoy US 2 off Albany, and remained with the convoy until it reached the Cocos Islands on April 28th, and was replaced by French cruiser Suffren. The Australian cruiser set course for Fremantle, but in May was assigned to the East Indies Station and rerouted to Colombo, where she arrived on May 8th. Arriving in Colombo on May 8th, Sydney was immediately tasked with meeting Anzac convoy US 3 off the Cocos Islands and escorting it across the Indian Ocean. The cruiser departed on May 12th, but while en route, she was instructed to make for the Mediterranean.
The Australian cruiser, accompanied by HM Ships Gloucester and Eagle, departed the next day, with the ships crossing the Suez Canal during the night of 25–26th of May, and arriving in Alexandria that afternoon at 15:30. Sydney was originally marked for operations in the Red Sea, but after observing the performance of an Australian five-destroyer flotilla assigned to the British Mediterranean Fleet, Admiral Andrew Cunningham decided to "keep the Australian cruiser for himself" and attached Sydney to the Royal Navy's 7th Cruiser Squadron. Sydney was in Alexandria harbour on June 10th, 1940, and that evening learned of Italy's intention to declare war at midnight. By 01:00 on June 11th, all ships in harbour had departed to search for Italian warships in position to attack Alexandria, and secure the sea lines of communication in the eastern Mediterranean and Aegean. The Australian cruiser was involved in the westbound sweep, and sailed as far as the Gulf of Taranto during the four-day operation. Apart from an unsuccessful depth charge attack on a suspected submarine during the afternoon of June 13th, Sydney did not encounter any enemy vessels. On June 21st, Sydney fired in anger for the first time, joining the British cruisers Orion and Neptune, the French battleship Lorraine, and a force of destroyers in shelling the Italian-controlled Libyan port of Bardia. Sydney focused her fire on a military camp throughout the twenty-two-minute bombardment. During this operation, the Australian ship's Walrus amphibian performed bombardment spotting for the squadron, but was fired on by three biplanes: although reported at the time as Italian Fiat CR.42 Falcos, the attackers were later determined to be British Gloster Gladiators. The next day, a retaliatory airstrike against the ships, by then having returned to Alexandria, failed to do damage.
That same day, Germany and Vichy France signed the Second Armistice at Compiègne: although French warships (which had until that point operated with the Allies) were ordered to return to France and disarm, the British government was unwilling to allow them to fall into Axis hands. Sydney and the British warships in Alexandria turned their guns on the French, but unlike the situation in Mers-el-Kébir, which deteriorated into a naval battle, British Admiral Cunningham and French Admiral René-Emile Godfroy peacefully negotiated to disarm the ships at Alexandria. Sydney and other elements of the 7th Squadron sailed from Alexandria on June 27th, escorting a Malta convoy. Late on June 28th, the ships engaged a force of three Italian destroyers carrying out a ressuply mission to Tobruk. Although two Italian vessels were able to continue their way, the third, Espero was disabled. At 20:00, Sydney (which had little opportunity to fire during the engagement) was detailed to recover any survivors and sink the destroyer while the rest of the force continued on to Malta. However, while 6,000 yards (5,500 m) from Espero, the Italian ship fired two shells, both of which fell in line with but short of the cruiser. Sydney opened fire, and after four salvos struck the destroyer with no shots fired in return, resumed the approach. Espero sank at 20:35, and Sydney remained in the area for almost two hours to collect survivors despite the risk of submarine attack, before she was ordered to withdraw to Alexandria. The Australian cruiser spent five days in Alexandria for resupply and maintenance, before departing for Crete with the British destroyer HMS Havock. They arrived at sunset on July 18th, and the next morning, the two ships were ordered to patrol the Gulf of Athens for Axis warships and shipping, while providing support for a four-ship destroyer force (HM Ships Hyperion, Ilex, Hero, and Hasty) conducting an anti-submarine sweep north of Crete.
The only damage to Sydney during what came to be known as the Battle of Cape Spada was caused by a shell which knocked a hole in the forward funnel, and wounded a sailor through splinter damage. For his actions, Collins was appointed a Companion of the Order of the Bath, while other officers and sailors from Sydney received two Distinguished Service Orders, two Distinguished Service Crosses, five Distinguished Service Medals, and twelve Mentions in Despatches between them. Sydney herself was awarded the battle honour "Spada 1940". After refuelling and rearming, Sydney and HMS Neptune departed Alexandria on July 27th, to join the covering force for a southbound convoy from the Aegean. The ships were attacked five times that afternoon by aircraft, but Sydney escaped with only minor damage and shrapnel wounds. Back in Alexandria, Sydney underwent a refit, during which a 3-foot (0.91 m) high, 0.5-inch (13 mm) thick wall of armour plating was constructed around the 4-inch gun platform, while the ship's company repainted the ship from standard grey to a naval camouflage pattern. On the return voyage, Sydney and several other vessels were tasked with attacking Italian facilities. The entire Mediterranean fleet sailed from Alexandria on October 8th to provide cover for several Malta Convoys, and attempt to draw the Italian fleet into battle. The convoys reached their destination safely, and the operation was uneventful for Sydney; the only contact with Italian forces was an engagement during the early morning of October 12th, between the British cruiser Ajax and seven Italian torpedo boats and destroyers, of which Ajax sank three and damaged a fourth. No major incidents occurred until the 28th, when the Italians invaded Greece: the four ships were recalled to Alexandria, where they arrived that evening. On November 5th, Sydney and HMS Ajax departed from Port Said with military equipment to be used to establish an Allied advanced base at Souda Bay, Crete. After delivering the equipment, which included almost 1,000 soldiers, the equipment for a Bofors battery, cases of food, and several trucks, the cruisers rejoined the main fleet. From November 15th to 20th, Sydney and three other cruisers transported 4,000 Allied soldiers and their equipment from Alexandria to the Piraeus as reinforcements for the Greek military. Sydney started December in the Aegean, where she escorted convoys and shelled the port of Valona, then proceeded to Malta for a refit and repairs to her rudder, which lasted until the end of the year.
On the afternoon of November 19th, 1941, Sydney was off the coast of Western Australia, near Carnarvon, and heading south towards Fremantle. Around 15:55, the cruiser spotted a merchant ship on a northbound course, which quickly turned away from the coast at 14 knots (26 km/h; 16 mph). As she closed the gap, Sydney began to signal the unidentified merchantman, first by signal light, then after no reply was forthcoming and the distance between the two ships had decreased, by a combination of light and signal flag. The cruiser sent a request that the merchant ship make her signal letters clear, which the signals officer did by lengthening the halyard and swinging the flags clear. The callsign was that of the Dutch ship Straat Malakka, but she was not on Sydney's list of ships meant to be in the area. Further flag signals were exchanged between the ships, with Sydney asking the Dutch ship's destination and cargo. At 17:00, a distress signal was transmitted by Straat Malakka, indicating that she was being pursued by a merchant raider. Following this, Sydney pulled alongside the merchant ship from astern; pacing the merchantman on a parallel course, approximately 1,300 metres (4,300 ft) away. Sydney's main guns and port torpedo launcher were trained on the ship, while she sent the interior portion of Straat Malakka's secret callsign. Fifteen minutes later, at around 17:30, the merchantman had not replied, and Sydney sent a signal ordering her to show the secret callsign. Straat Malakka had not replied because she was the German auxiliary cruiser Kormoran in disguise, and when asked to reveal a callsign the Germans did not know, Kormoran responded by decamouflaging and opening fire. Prompted by the raider's unveiling, Sydney also fired (accounts are divided as to which ship fired first), but while her first salvo either missed or passed through Kormoran's upper superstructure with minimal damage, four of the raider's six 15-centimetre (5.9 in) guns (the other two guns were on the port side and could not fire to starboard) were able to destroy the cruiser's bridge and gun director tower, damage the forward turrets, and set the aircraft on fire. Sydney did not fire again until after the raider's sixth salvo: "Y" turret fired without effect, but "X" turret was able to put multiple shells into Kormoran, damaging machinery spaces and one of the raider's guns, while igniting an oil tank. During this, Kormoran maintained heavy fire, and around the time of the eighth or ninth German salvo, a torpedo launched at the start of the engagement hit Sydney just forward of "A" turret and near the ASDIC compartment (the weakest point on the ship's hull), ripping a hole in the side and causing the bow of the cruiser to angle down. By 17:35, Sydney was heading south and losing speed, wreathed in smoke from multiple fires. Her main armament was disabled (the two aft turrets had jammed on a port facing and could not be swung around), and her secondary guns were out of effective range. The cruiser continued to be hit by shells from Kormoran's aft guns as the distance between the ships increased.
The Australian cruiser continued on a south-south-east heading at low speed; observers aboard Kormoran doubted that Sydney was under control. Although disappearing over the horizon shortly later, the glow from the damaged, burning warship was consistently seen by the Germans until about 22:00, and sporadically until midnight. At some point during the night, Sydney lost buoyancy and sank: the bow was torn off as she submerged and descended almost vertically, while the rest of the hull glided 500 metres (1,600 ft) forward as she sank, hitting the bottom upright and stern first. Sydney's shells had crippled Kormoran; the German sailors abandoned ship after it was determined that below-deck fires could not be controlled before they reached the gun magazines or the mines in the cargo hold.Sydney's failure to reach Fremantle on November 20th was not initially cause for concern, as several factors might have delayed the cruiser, none of which were sufficient reason to break the order to maintain wireless silence. However, with no sign of the cruiser by November 23rd. shore-based wireless stations began transmitting orders for Sydney to break silence and report in. A raft of German survivors was recovered by a British tanker on November 24th, at which point a large-scale air and sea search began. Australian Prime Minister John Curtin officially announced the loss of the cruiser during the afternoon of November 30th. Sydney's destruction was a major blow to Australian morale and military capability: her ship's company made up 35 percent of the RAN's wartime casualties.
The battle between Sydney and Kormoran is seen as controversial: the disbelief that a modified merchant ship could so successfully defeat a cruiser combined with the lack of Australian survivors led some to believe that the German account was false. Rumours that the battle was not what it seemed had been around since Sydney failed to reach Fremantle on schedule in 1941, but several historians (including Tom Frame and Wesley Olson) credit Michael Montgomery and his 1980 book Who Sank The Sydney? with igniting the controversy. These claims have been proven false by historians and researchers; the 1998 inquiry by the Joint Standing Committee for Foreign Affairs, Defence and Trade concluded that the German accounts were a "feasible" interpretation of the battle, but there was no reliable evidence to support any of the alternative claims. Sydney was located in March 2008 just after 11:00, only hours after Kormoran's discovery was made public.Sydney was granted the battle honour "Kormoran 1941" in recognition of the damage done to Kormoran. This was one of only three honours awarded during the 20th century for the sinking of a single ship, and the second to a ship named Sydney (the other had been awarded to the previous Sydney for her defeat of the German light cruiser SMS Emden at the Battle of Cocos).
#second world war#world war 2#world war ii#wwii#military history#history#ww2#australia#royal navy#australian navy#australian history#long post#naval history
49 notes
·
View notes
Text

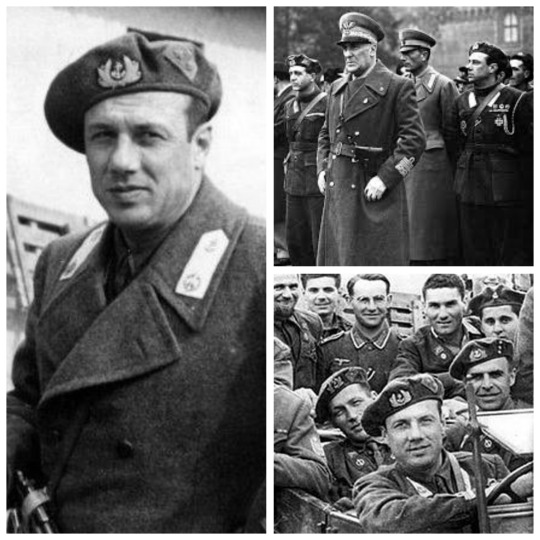
• Léo Major
Léo Major was a French-Canadian soldier who was the only Canadian and one of only three soldiers in the British Commonwealth to receive the Distinguished Conduct Medal (DCM) twice in separate wars. Major earned his first DCM in World War II in 1945 after a successful reconnaissance mission in Zwolle.
Born on January 23rd, 1921, in New Bedford, Massachusetts, to French-Canadian parents, Major moved with his family to Montreal before his first birthday. Due to a poor relationship with his father, he moved to live with an aunt at age 14. This relationship, combined with a lack of available work, led Major to join the Canadian army in 1940 to prove to his father that he was "somebody to be proud of". Major enlisted in the Canadian army when he was 19 years old and was sent overseas in 1941. One of Major's sons, said his father, a skinny and scrappy boxer and aspiring plumber, was drawn by the prospect of liberating Europe from fascism as well as a quest for adventure. For the next several years Major would receive reconnaissance training and would eventually be called up to be deployed as part of the Normandy landings.
Major was serving with the Régiment de la Chaudière which landed on the beaches in the Normandy Invasion on June 6th, 1944. During a reconnaissance mission on D-Day, Major captured a German armoured vehicle (a halftrack) by himself. The vehicle contained German communication equipment and secret codes. Days later, during his first encounter with an SS patrol, he killed four soldiers; however, one of them managed to ignite a phosphorus grenade. After the resulting explosion, Major lost one eye but continued to fight. He continued his service as a scout and a sniper by insisting he needed only one eye to sight his weapon. According to him, he "looked like a pirate". Major single-handedly captured 93 German soldiers during the Battle of the Scheldt in Zeeland in the southern Netherlands. During a reconnaissance, while alone, Major found shelter in a house from the rain and the cold. While there, he spotted two German soldiers walking along a dike. He captured the first German and attempted to use him as bait so he could capture the other. The second attempted to use his gun, but Major quickly killed him. He went on to capture their commanding officer and forced him to surrender. The German garrison surrendered themselves after three more were shot dead by Major.
In a nearby village, SS troops who witnessed German soldiers being escorted by a Canadian soldier shot at their own soldiers, killing seven and injuring some others. Major disregarded the enemy fire and kept escorting his prisoners to the Canadian front line. Major then ordered a passing Canadian tank to fire on the SS troops. He marched back to camp with nearly a hundred prisoners. Thus, he was chosen to receive a Distinguished Conduct Medal. He declined the offer to be decorated, however, because according to him General Montgomery (who was to present him with the award) was "incompetent" and in no position to be giving out medals. Whether he actually got this nomination and why he wouldn't have received it is not clear. The National Archives only has a record of Recommendations for Award for Major, which regards the DMC award he got in 1945 for the reconnaissance of Zwolle. In February 1945, Major was helping a military chaplain load corpses from a destroyed Tiger tank into a Bren Carrier. After they finished, the chaplain and the driver seated themselves in the front while Major jumped in the back of the vehicle. The carrier struck a land mine. Major claimed to have remembered a loud blast, followed by his body being thrown into the air and smashing down hard on his back. He lost awareness and awoke to find two concerned medical officers trying to assess his condition. He simply asked if the chaplain was okay. They did not answer his question, but proceeded to load him onto a truck so he could be transported to a field hospital 30 miles (48 km) away, stopping every 15 minutes to inject morphine to relieve the pain in his back.
After World War II he settled into civilian life as a pipe fitter, but he volunteered for service in the Korean War in 1950. In November of 1951, he was tasked to recapture Hill 355, which had been taken from American troops by the Chinese army. Taking a group of about 20 other snipers and scouts, Major and his men infiltrated the Chinese camps and commenced firing, scattering the Chinese army. For three days they held the hill against counterattacks, sometimes calling down supporting artillery fire so close to their position that their commanding officer could hear the bombs exploding through the walkie-talkie. Major was awarded a bar to his Distinguished Conduct Medal for this action. After his military career, Major returned many times to the town of Zwolle, establishing close ties with the townsfolk and having a road named after him. He is buried at the Last Post Fund National Field of Honour in Pointe-Claire, Quebec. Major died in Longueuil on October 12th, 2008 at the age of 87, and was buried at the Last Post Fund National Field of Honour in Pointe-Claire, Quebec. He was survived by Pauline De Croiselle, his wife of 57 years; four children; and five grandchildren. A documentary film about his exploits, Léo Major, le fantôme borgne, has been produced in Montreal (Qc). To commemorate the 75th anniversary of Victory in Europe.
#second world war#world war 2#world war ii#wwii#military history#history#ww2#biography#canadian history#snipers#unsung hero#badass history#canada#leo major
70 notes
·
View notes
Text
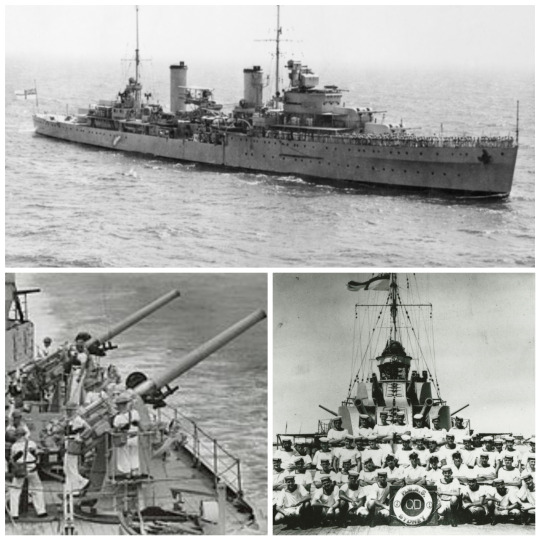
• Battle of Memel
The Battle of Memel or the siege of Memel was a battle which took place on the Eastern Front during World War II. The battle began when the Red Army launched its Memel offensive operation in late 1944.
The Soviet Belorussian offensive of June–August 1944 (commonly known as Operation Bagration) had seen the German Army Group Centre nearly destroyed and driven from what is now Belarus, most of what is now Lithuania and much of Poland. During August and September of that year, a series of German counter-offensives – Operations Doppelkopf and Casar – succeeded in stalling the Soviet advance and maintaining the connection between the German Army Groups Centre and North; however, Stavka made preparations for an attack by the 1st Baltic Front against the positions of the Third Panzer Army and thence towards Memel, splitting the two Army Groups. Soviet General Bagramyan planned to make his main attack in a 19 km sector to the west of Šiauliai. He concentrated up to half of his entire force in this area, using concealment techniques to ensure there was not a corresponding build-up of German forces, and attempting to convince the German command that the main axis of attack would be towards Riga.
On October 5th, Bagramyan opened the offensive against Raus's Third Panzer Army on a sixty-mile front, concentrating his breakthrough force against the relatively weak 551st Grenadier Division. The latter collapsed on the first day, and a 16 km (10 mile) penetration was achieved; Bagramyan then committed Volsky's 5th Guards Tank Army to the breach, aiming for the coast to the north of Memel. There was a general collapse of the Third Panzer Army's positions by October 7th, and a penetration further south by Beloborodov's 43rd Army. Within two days, it had reached the coast south of Memel, while Volsky had encircled the town from the north. In the south, the northern flank of Chernyakhovsky's 3rd Belorussian Front was advancing on Tilsit. Third Panzer Army's headquarters were overrun by the 5th Guards Tank Army, and Raus and his staff had to fight their way into Memel. The neighbouring Army Group commander, Ferdinand Schoerner, signalled on 9 October that he would mount an attack to relieve Memel if troops could be freed up by evacuating Riga. A decision on this matter was delayed, but the Kriegsmarine managed to withdraw much of the garrison and some civilians from the port in the meantime. The German XXVIII Corps under Gollnick held a defensive line around the town itself. The success of the offensive in the northern sector encouraged the Soviet command to authorise the 3rd Belorussian Front to attempt to break through into the main area of East Prussia. This offensive, the Gumbinnen Operation, ran into extremely strong German resistance and was halted within a few days.
The stalling of the Gumbinnen Operation meant that Soviet forces (mainly from the 43rd Army) settled down to a blockade of the German troops that had withdrawn into Memel. The German force, largely made up of elements from the Großdeutschland and 58th Infantry Divisions and the 7th Panzer Division, was aided by heavily fortified tactical defences, artillery fire from ships (including the Prinz Eugen) in the Baltic, and a tenuous connection with the remainder of East Prussia over the Curonian Spit. The blockade, and defence, was maintained through November, December and much of January, during which period the remaining civilians who had fled into the town, and military wounded, were evacuated by sea. During this time, the Großdeutschland and 7th Panzer Divisions were withdrawn, having suffered heavy losses, and were replaced by the 95th Infantry Division, which arrived by sea. The town was finally abandoned on January 27th, 1945. The success of the Soviet East Prussian offensive to the south made the position of the bridgehead untenable, and it was decided to withdraw the XXVIII Corps from the town into Samland to assist in the defence there; the remaining troops of the 95th and 58th Infantry Divisions were evacuated to the Curonian Spit, where the 58th Division acted as a rearguard for the withdrawal. The last organized German units left at 4am on January 28th, Soviet units taking possession of the harbour a few hours later.
Memel, which had been part of Lithuania only between 1923 and 1939 prior to being reincorporated into Germany, was transferred to the Lithuanian SSR under the Soviet administration. In 1947 it was formally renamed using the Lithuanian name, Klaipėda.
#second world war#world war 2#world war ii#wwii#military history#history#german history#ww2#russian history#soviet union#lithuania#1944
42 notes
·
View notes
Text
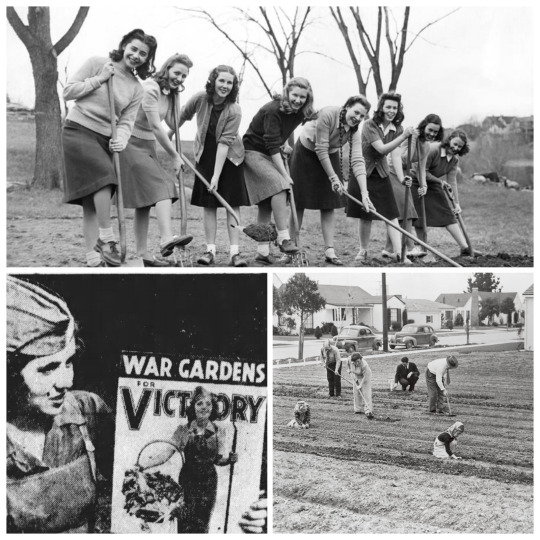
• Victory Gardens
Victory gardens, also called war gardens or food gardens for defense, were vegetable, fruit, and herb gardens planted at private residences and public parks in the United States, United Kingdom, Canada, Australia and Germany during World War I and World War II. In wartime, governments encouraged people to plant victory gardens not only to supplement their rations but also to boost morale.
George Washington Carver is believed to have wrote an agricultural tract and promoted the idea of what he called a "Victory Garden". In March 1917, Charles Lathrop Pack organized the US National War Garden Commission and launched the war garden campaign. Food production had fallen dramatically during World War I, especially in Europe, where agricultural labor had been recruited into military service and remaining farms devastated by the conflict. Pack and others conceived the idea that the supply of food could be greatly increased without the use of land and manpower already engaged in agriculture, and without the significant use of transportation facilities needed for the war effort. The campaign promoted the cultivation of available private and public lands, resulting in over five million gardens in the US and foodstuff production exceeding $1.2 billion by the end of the war. Victory Gardens had also became popular in Canada in 1917. Under the Ministry of Agriculture's campaign, "A Vegetable Garden for Every Home", residents of cities, towns and villages utilized backyard spaces to plant vegetables for personal use and war effort. In the city of Toronto, women's organizations brought expert gardeners into the schools to get school children and their families interested in gardening. In addition to gardening, homeowners were encouraged to keep hens in their yards for the purpose of collecting eggs. The result was a large production of potatoes, beets, cabbage, and other useful vegetables.
During the second world war, rationing and the idea of home gardens to boost morale became once again popular. In Britain, "digging for victory" used much land such as waste ground, railway edges, ornamental gardens and lawns, while sports fields and golf courses were requisitioned for farming or vegetable growing. Sometimes a sports field was left as it was but used for sheep-grazing instead of being mown (for example see Lawrence Sheriff School § Effects of the Second World War). By 1943, the number of allotments had roughly doubled to 1,400,000, including rural, urban and suburban plots. During World War II, sections of lawn were publicly plowed for plots in Hyde Park, London to promote the movement, while allotments growing onions in the shadow of the Albert Memorial also pointed to everybody, high and low, chipping in to the national struggle. Australia launched a Dig for Victory campaign in 1942 as rationing and a shortage of agricultural workers began to affect food supplies. The situation began to ease in 1943; however, home gardens continued throughout the war.
Amid regular rationing of food in Britain, the United States Department of Agriculture encouraged the planting of victory gardens during the course of World War II. Around one third of the vegetables produced by the United States came from victory gardens. It was emphasized to American homefront urbanites and suburbanites that the produce from their gardens would help to lower the price of vegetables needed by the US War Department to feed the troops, thus saving money that could be spent elsewhere on the military: "Our food is fighting", one US poster read. By May 1943, there were 18 million victory gardens in the United States – 12 million in cities and 6 million on farms. Eleanor Roosevelt planted a Victory Garden on the White House lawn in 1943. The Roosevelts were not the first presidency to institute a garden in the White House. Woodrow Wilson grazed sheep on the south lawn during World War I to avoid mowing the lawn. Eleanor Roosevelt's garden instead served as a political message of the patriotic duty to garden, even though Eleanor did not tend to her own garden. While Victory Gardens were portrayed as a patriotic duty, 54% of Americans polled said they grew gardens for economic reasons while only 20% mentioned patriotism.
Although at first the Department of Agriculture objected to Eleanor Roosevelt's institution of a victory garden on the White House grounds, fearing that such a movement would hurt the food industry, basic information about gardening appeared in public services booklets distributed by the Department of Agriculture, as well as by agribusiness corporations. The Victory Garden movement also attempted to unite the Home-front. Local communities would have festivals and competitions to showcase the produce each person grew in their own gardens. While the garden movement united some local communities, the garden movement separated minorities like African Americans. At harvest shows, separate prizes were awarded to "colored people", in similar categories, a long-held tradition in Delaware and the deeper South, as well as in Baltimore.
In 1946, with the war over, many British residents did not plant victory gardens, in expectation of greater availability of food. However, shortages remained in the United Kingdom, and rationing remained in place for at least some food items until 1954. Since the turn of the 21st century, interest in victory gardens has grown. A campaign promoting such gardens has sprung up in the form of new victory gardens in public spaces, victory garden websites and blogs, as well as petitions to renew a national campaign for the victory garden and to encourage the re-establishment of a victory garden on the White House lawn. In March 2009, First Lady Michelle Obama planted an 1,100-square-foot (100 m2) "Kitchen Garden" on the White House lawn, the first since Eleanor Roosevelt's, to raise awareness about healthy food. Historical documentary and reality television series such as The 1940s House, Wartime Farm and the second season of Coal House place modern families in a recreated wartime settings, including digging victory gardens. The 1975 sitcom The Good Life portrays the efforts of Tom and Barbara Good to become self-sufficient in their suburban home, including turning over most of their garden to vegetable production and a chicken coop.
#second world war#world war 2#world war ii#wwii#history#home front#british history#ww2#first world war#garden#gardening#victory garden
104 notes
·
View notes
Text
• Junio Valerio Borghese
Junio Valerio Scipione Ghezzo Marcantonio Maria Borghese, nicknamed The Black Prince, was an Italian Navy commander during the regime of Benito Mussolini's National Fascist Party and a prominent hard-line Fascist politician in post-war Italy.
Junio Valerio Borghese was born in Artena, Province of Rome, Kingdom of Italy on June 6th, 1906. He was born into a prominent noble family of Sienese origin, the House of Borghese, of which Pope Paul V was a notable member. His father, Livio Borghese, was the 11th Prince of Sulmona and younger brother to the more famous Scipione Borghese. Borghese was the second son of the prince and, as such, had the title of Patrician of Rome, Naples and Venice and the style of Don Junio Valerio Borghese. However, the press and the English-language historiography routinely used the courtesy style Prince Junio Valerio Borghese. Borghese was first educated in London, England, and, from 1923, he attended the Royal Italian Navy Academy (Accademia Navale) in Livorno. In 1929, the naval career of Borghese began. He married in Florence, in September 1931, the Russian countess Darya Vasilyevna Olsufeeva (Moscow, 1909 - Rome, 1963), sister of Alexandra "Assia" Vasilyevna Olsufeeva. They had four children. By 1933, he was a submarine commander. Borghese took part in the Second Italo-Abyssinian War. During the Italian intervention in the Spanish Civil War, he was in command of the submarine Iride, where he allegedly lost two seamen after his unit was depth-charged by the British destroyer HMS Havock.
At the start of the Second World War, Borghese took command of submarine Vettor Pisani, and in August 1940 was in command of submarine Sciré, which was modified to carry the new secret Italian weapon, the human torpedo. Known as "slow speed torpedoes" (siluri a lenta corsa, or SLC), and nicknamed "pigs" (maiali) for their poor maneuverability, these were small underwater assault vehicles with a crew of two. These were part of the 1ª Flottiglia Mezzi d'Assalto (MAS), the "First Assault Vehicle Flotilla" (later called Decima Flottiglia MAS), an elite naval sabotage unit of the Royal Italian Navy (Regia Marina Italiana). As commander of Sciré Borghese took part in several raids using SLC. The first of these, in September and October 1940, were directed at Gibraltar. The September raid was abandoned when the harbour was found to be empty. In the October raid Borghese took Sciré deep into Gibraltar Bay, making a difficult submerged passage in order to release the SLC as close to target as possible. For this he received the Medaglia d'Oro al Valor Militare (MOVM), despite the mission's overall lack of success.
In May 1941 a further attempt ended in failure, but on September 20th, 1941 a successful mission damaged three merchant ships in the harbour. After this last attack he was promoted to Capitano di Fregata, and named commander of the Decima MAS' sub-surface unit. On December 18th, 1941, he reached Alexandria in Sciré and launched the daring raid by three SLCs that heavily damaged the two Royal Navy battleships HMS Valiant and HMS Queen Elizabeth and two other ships in the harbour. The six Italian Navy crew that attacked Alexandria harbour all received the Medaglia d'Oro al Valor Militare, and Borghese was named Cavaliere dell'Ordine Militare di Savoia. In May 1943, Borghese took command of the Decima Flottiglia MAS ("10th Assault Vehicle Flotilla"), or Xª MAS with Roman numerals, which continued active service in the Mediterranean and pioneered new techniques of commando assault warfare. The roman numeral was in memory of Caesar's famous Decima Legio.
After Italy's surrender to the Allies on September 8th, 1943, the Xª MAS was disbanded. While some of its sailors joined the Allies, Borghese chose to continue fighting with the Italian Social Republic (RSI) alongside the German Armed Forces (Wehrmacht). On September 12th, 1943, he signed a treaty of alliance with Nazi Germany's Kriegsmarine. Many of his colleagues volunteered to serve with him, and the Decima Flottiglia was revived, headquartered in Caserma del Muggiano, La Spezia. By the end of the war, it had over 18,000 members, and Borghese conceived it as a purely military unit. The X Flottiglia gained a reputation for never firing a shot at any Italian military units fighting with the Allied forces. In April 1945 when the US command discovered that the British had granted permission to Marshal Josip Broz Tito of Yugoslavia, and his Communist troops, to occupy northeastern Italy from Venice to the east, Borghese moved the bulk of the X Flottiglia from the Ligurian and Piedmontese area to the Veneto. The X Flottiglia built a line of defense on the Tagliamento river where they resisted until the arrival of the Allied troops. In this action the X Flottiglia lost over eighty percent of the fighting sailors dispatched to the front against Tito's troops, and the Italian Communist Partisans allied with Tito. At the end of the war, Borghese was rescued by Office of Strategic Services officer James Angleton, who dressed him in an American uniform and drove him from Milan to Rome for interrogation by the Allies. Borghese was then tried and convicted of collaboration with the Nazi invaders, but not of war crimes, by the Italian Court. He was "sentenced to 12 years imprisonment, discounted to 3 years, due to his glorious expeditions during the war, his defence of north east borders against Tito's IX Corps and his defence of Genoa harbour". He was released from jail after four years' imprisonment by the Supreme Court of Cassation in 1949.
With his record as a war hero and his support of Fascism, he became a figurehead for pro-fascist, anti-communist groups in the immediate post-war period, acquiring the nickname Black Prince. Borghese wrote a supportive introduction, affirming his political ideology of an idealistic neo-fascist new aristocracy meritocratically based purely on character, to far right revolutionary-conservative theorist Julius Evola's book Men Among the Ruins. He later wrote a memoir of his wartime exploits, published as Sea Devils in 1954. He was associated with the Movimento Sociale Italiano (MSI), the neo-Fascist party formed in the post-World War II period by former supporters of the dictator Benito Mussolini. Following a last minute aborted coup d'état plot which fizzled out in the night of December 8th, 1970 (the Feast of the Immaculate Conception), referred to as the Golpe Borghese, he was forced to cross the border to avoid arrest and interrogation. In 1984, ten years after Borghese's death, the Supreme Court of Cassation ruled that no coup d'état attempt had happened. Nevertheless, the attempt is well known in Italy and film director Mario Monicelli made a biting satire of it called Vogliamo i colonnelli (1972) (We want the Colonels, as the Fascist Greek colonels were pulling the strings behind the scenes).
Latterly regarded as a political outcast and shunned by his ancestrally blue blood social connections for his "heretical" political extremism and disregard for the external norms of modern aristocratic etiquette and behavior, Junio Valerio Borghese died under mysterious circumstances in Cádiz, Spain, on August 26th, 1974, aged 68. The death certificate records the cause of death as "acute hemorrhagic pancreatitis"; however, since the Prince was visited by a physician who found him in good shape just a few days before, it has been suggested that the circumstances of his death, characterized by a sudden onset of abdominal pain immediately after supper, could be compatible with arsenic poisoning. He is buried in the Borghese family chapel in the Basilica di Santa Maria Maggiore, Rome.
#world war 2#second world war#world war ii#wwii#military history#history#naval history#italian history#biography#submarines#italy in ww2#italian navy
16 notes
·
View notes
Text

• 369th Croatian Infantry Regiment
The 369th (Croatian) Reinforced Infantry Regiment was a regiment of the German Army raised to fight on the Eastern Front during World War II. The regiment was formed in July 1941 from Croatian volunteers from the Independent State of Croatia (NDH) . The troops swore a joint oath of allegiance to the Führer, the Poglavnik, the German Reich and the NDH.
On April 10th, 1941, the Independent State of Croatia (NDH, Croatian: Nezavisna Država Hrvatska) was created as a puppet state aligned to the occupying Germans. The Ustaše fascist government of the NDH asked Germany for military assistance as they feared Italian territorial ambitions after ceding much of the coastal area of Dalmatia to Italy in treaties signed on May 18th, 1941. By June 25th, 1941, Poglavnik Ante Pavelić, the leader of the NDH, had sent an envoy to Berlin to offer volunteers to serve on the Eastern Front. By July 2nd, Hitler accepted the offer, and military units were formed under the supervision of two German army officers. The NDH viewed this as a means of strengthening its ties with Germany, potentially an ally in resisting further territorial losses to Italy. Although the NDH considered the unit to be a part of the Croatian Home Guard and the NDH authorities retained responsibility for providing replacements, the regiment's members swore an oath to Adolf Hitler. Whilst not officially part of the Wehrmacht, the regiment was under German military jurisdiction and direct German command throughout its existence, serving as part of the 100th Jäger Division.
All soldiers wore Wehrmacht uniforms with a Croatian checkerboard patch incorporating the word Hrvatska (Croatia) on the upper right sleeve and right side of the helmet. Initially, two battalions were raised and formed into a regiment at Varaždin. This was followed by the raising of a third battalion at Sarajevo. Only Croats, Ukrainians or White Russians were accepted as volunteers, and about one third of those accepted were Bosnian Muslims, who were mostly admitted into the 1st battalion. As the volunteers were promised high salaries and financial assistance to their families, the enrollment figures were relatively good. A training battalion was formed for the regiment in Stockerau, Austria. The regiment was then transported to Döllersheim, Austria for training. With an effective strength of 5,000, the regiment consisted of three infantry battalions, a machine-gun company, an anti-tank company, three field artillery batteries, headquarters staff and a supply company. In August 1941, the regiment was transported to Romania. From there, it spent several weeks marching on foot to the front line. On October 10th, the regiment linked up on the line of the Dnieper River with the 100th Jäger Division, which was then part of Army Group South.
To accustom the regiment to the conditions and divisional procedures and further progress their training, the regiment's units were initially divided up among other regiments of the division immediately after their arrival on the front line near Kharkov. The divisional diary recorded that the main goal for units of the regiment during this period was to improve discipline across various areas. To improve poor discipline, in September 1941, Colonel Ivan Markulj sent 43 officers and NCOs as well as 144 soldiers back to the NDH due to illness and/or for disciplinary reasons. After the Red Army counterattacked and re-took Rostov in November 1941, the 100th Jäger Division marched south to the front line on the Mius River on November 22nd. Temperatures dropped as low as -18C, and the regiment had no winter clothing. The regiment's units, still divided among the other regiments of the division, dug in alongside the Slovak Mobile Brigade and SS-Division Wiking. In mid-January 1942, the 100th Light Infantry Division was deployed to the Stalino area to assist in fighting off a Soviet cavalry corps that had broken through the front line. Through some heavy fighting along the line of the Samara River, the division held on through the winter. Starting in early 1942, soldiers were able to send messages back to the Independent State of Croatia. Troops wrote letters for family members and friends on any paper they could find, such as cigarette papers or pages torn from notebooks. Generalleutnant Werner Sanne, the 100th Jäger Division's commander, commended the regiment's successes over the winter, especially the actions of Lieutenant Colonel Marko Mesić's artillery battalion. From mid-May 1942, the regiment was reunited under Colonel Markulj, after which the 100th Jäger Division joined in the final phases of the pincer attack on the Red Army bridgehead at Kharkov. In June, the division supported the 1st Panzer Army's drive along the Don River, through Voronezh to Kalach where the regiment incurred heavy casualties trying to cross the river in the face of serious resistance. After the Second Battle of Kharkov, Colonel Markulj, Lieutenant Eduard Bakarec and six other regiment officers were awarded the Iron Cross First Class.
After participating in mopping-up operations in along the Don, the division rested briefly in September, and the regiment was re-organised after receiving some reinforcements. Markulj was transferred back to Croatia and was temporarily replaced by Colonel Marko Mesić on July 7th, 1942. At 'Proljet Kultura,' the regiment suffered 53 dead and 186 wounded in desperate hand-to-hand combat during the German attack on July 27th and subsequent overwhelming Soviet counterattack on July 28th. The worst recorded casualties before Stalingrad were 171 dead suffered in combat in various villages along the Samara River. In September 1942, during a visit to the 6th Army headquarters, Pavelić decorated and promoted some soldiers of the regiment. Two days later, the 100th Light Infantry Division was committed to the Battle of Stalingrad. From that date, the number of legionnaires was fast reducing to a reported total of 1,403 altogether by 21 October 1942. New fresh forces from Croatia were not added except for returns of sick and wounded and a few officers and staff. A total of 22 (15%) officers were killed, 38 (26%) wounded, and 66 (45%) returned to Croatia from the original 147 Legion officers in total before fall. Only 20 officers, including Mesic, remained in Stalingrad.
The 100th Jäger Division, including the 369th Croatian Reinforced Infantry Regiment, was involved in the heavy fighting for the "Red October" factory and for Mamayev Hill during the Battle of Stalingrad. By November 1942, the fighting in their sector had become a locked stalemate with little progress. By December 1942, the regiment had seen such intense combat that it was at 1/3 strength. Despite the harsh conditions, the German high command credited the regiment with maintaining 'proper and military bearing'. Several distinctions and citations are noted in war diaries and official military documents. There are several citations for bravery, valour, and leadership under fire for men of all ranks, including Lieutenant Rudolf Baričević. In addition, the regimental doctors received distinctions for their actions and success in saving lives. One notable citation is that of Captain Madraš, who was wounded and was to be flown out of Stalingrad, but refused and instead stayed and fought with his men. There were also acts of insubordination, dereliction of duty, and cowardly behaviour cited in reports. This was common for the demoralized and surrounded German and German-allied troops at Stalingrad, as the conditions were extremely harsh on the soldiers. Major Tomislav Brajkovic is noted to have desperately attempted to keep morale and discipline high. However, due to major disagreements with other officers, including his commanding officer, he was transferred out of the regiment. By January, the regiment's section of the front line had reduced to 200 m held by some 90 remaining troops, all suffering from extreme cold, hunger, fatigue and lack of ammunition. Colonel Viktor Pavicic reportedly left a resignation letter and disappeared from the theatre for good. During its last days at Stalingrad, the Legion desperately retrained about 700 inexperienced artillery and support soldiers to infantry combat duty. The last official report from January 21st, 1943 counted 443 infantry and 444 artillery soldiers in Stalingrad. Just before the surrender of the 6th Army at the end of January, about 1,000 wounded were flown out, and of the remaining men in the regiment, nearly 900 became prisoners of war. Among the last Wehrmacht soldiers to leave Stalingrad by air were a group of 18 wounded and sick Croat legionnaires. The evacuation also saved the regiment's war diary and other documents. Elements of the regiment fought as long as they could but ultimately surrendered to the Soviet General Vasiljev on January 29th, 1943. In the three months between 21 October 1942 and 21 January 1943, they had lost 540 of 983 troops fighting for the Red October factory.
The Legion assembled at Beketovka on river Volga where they were joined by some 80,000 mainly German as well as Italian, Romanian and Hungarian POWs. They were sent on a forced march to Moscow, where they were joined by Croatian legionnaires from the Light Transport Brigade who had been attached to Italian forces on the Eastern Front. From there, they were sent to work camps in Siberia. Many died on the march due to starvation, hypothermia or disease. More than 1,000 legionnaires were evacuated from the Soviet Union and later Stalingrad by various means and for various reasons. They were awarded the Croatian Legion 1941 Linden Leaf for their service and formed the core of a new unit, the 369th (Croatian) Infantry Division. In late October 1944, the Yugoslav Legion numbering about 3,000 operated as part of the Red Army around Čačak during the Belgrade Offensive. This unit was formed in early 1944 partly from former members of the 369th (Croatian) Reinforced Infantry Regiment. It was commanded by the former Ustaše Lieutenant Colonel Marko Mesić. Col. Mesić was given command by the Soviets of this newly formed 1st Yugoslav Volunteer Brigade, assembled from Yugoslav prisoners of war and volunteers living in Russia at the time. It is quite likely that most former Croatian soldiers of the 369. Regiment chose Communist Partisan service to avoid almost certain death in Soviet prisoner-of-war camps. During the first few months in captivity, Legionnaire numbers were reduced from some 700 to around 400 odd survivors or a 40% loss of life in under twelve months. The new Yugoslav partisan brigade, now wearing old Royal Yugoslav Army uniforms, was commanded by experienced former 369th Regiment Croat Legion officers. They were transported to Yugoslavia in late 1944 under direct orders from Tito, where they were sacrificed in combat against superior German forces, suffering very high casualties. The few remaining survivors were suspected, and most were later convicted of being Soviet infiltrators by the partisans as well as Croat NDH authorities.
This post was requested by @historyofcroatia go view their blog for extensive history of the Croatian people and country.
#second world war#world war ii#world war 2#wwii#military history#history#german history#Croatian history#croatian#stalingrad#yugoslavia history#untold history
27 notes
·
View notes
Text
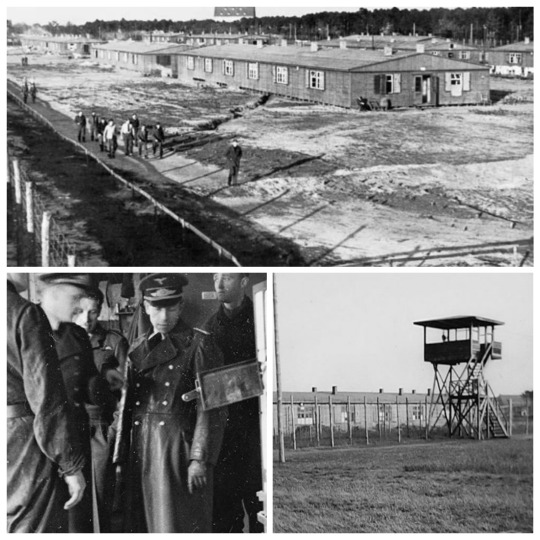
• Stalag Luft III POW Camp
Stalag Luft III (German: Stammlager Luft III; literally "Main Camp, Air, III"; SL III) was a Luftwaffe-run prisoner-of-war (POW) camp during the Second World War, which held captured Western Allied air force personnel.
The German military followed a practice whereby each branch of the military was responsible for the POWs of equivalent branches. Hence the Luftwaffe was normally responsible for any Allied aircrew taken prisoner. This included captured naval aviators, such as members of the British Fleet Air Arm. In a few cases, other non-air force personnel were also held at Stalag Luft III. The camp was established in March 1942 near the town of Sagan, in Lower Silesia in then Germany (now Żagań, Poland), 160 kilometres (100 miles) south-east of Berlin. The site was selected because its sandy soil made it difficult for POWs to escape by tunnelling. The first compound (East Compound) of the camp was completed and opened on March 21st, 1942. The first POWs, or kriegies, as they called themselves (from Kriegsgefangene, German for "Prisoner of War"), to be housed at Stalag Luft III were British and other Commonwealth officers, arriving in April 1942. The Centre Compound was opened on April 11th, 1942 and originally held British and other Commonwealth NCOs; by the end of 1942, however, they were replaced by USAAF personnel. The North Compound for British airmen, (where the "Great Escape" later occurred) opened on March 29th, 1943. A South Compound for Americans was opened in September 1943 and USAAF prisoners began arriving at the camp in significant numbers the following month and the West Compound was opened in July 1944 for US officers. Each compound consisted of fifteen single-story huts. Each 3.0-by-3.7-metre (10-by-12-foot) bunkroom slept fifteen men in five triple-deck bunks. Eventually the camp grew to approximately 24 hectares (60 acres) in size and housed about 2,500 Royal Air Force officers, about 7,500 US Army Air Forces, and about 900 officers from other Allied air forces, for a total of 10,949 inmates, including some support officers.
The prison camp had a number of design features that made escape extremely difficult. The digging of escape tunnels, in particular, was made difficult by several factors: the barracks housing the prisoners were raised approximately 60 centimetres (24 in) off the ground to make it easier for guards to detect tunnelling; the camp had been constructed on land that had a very sandy subsoil. The loose, collapsible sand meant the structural integrity of any tunnel would be very poor. A third defence against tunnelling was the placement of seismograph microphones around the perimeter of the camp, which were expected to detect any sounds of digging. A substantial library with schooling facilities was available, where many POWs earned degrees such as languages, engineering or law. The exams were supplied by the Red Cross and supervised by academics such as a Master of King's College who was a POW in Luft III. The prisoners also built a theatre and put on high-quality bi-weekly performances featuring all the current West End shows. POWs operated a system whereby newcomers to the camp were vetted, to prevent German agents from infiltrating their ranks. Any POW who could not be vouched for by two POWs who knew the prisoner by sight was severely interrogated and afterwards escorted continually by other prisoners, until such time as he was deemed to be a genuine Allied POW. Several infiltrators were discovered by this method and none is known to have escaped detection in Luft III.
The German guards were referred to by POWs as "goons" and, unaware of the Allied connotation, willingly accepted the nickname after being told it stood for "German Officer Or Non-Com". German guards were followed everywhere they went by prisoners, who used an elaborate system of signals to warn others of their location. The guards' movements were then carefully recorded in a logbook kept by a rota of officers. Unable to stop what the prisoners called the "Duty Pilot" system, the Germans allowed it to continue and on one occasion the book was used by Kommandant von Lindeiner to bring charges against two guards who had slunk away from duty several hours early. The camp's 800 Luftwaffe guards were either too old for combat duty or young men convalescing after long tours of duty or from wounds. Because the guards were Luftwaffe personnel, the prisoners were accorded far better treatment than that granted to other POWs in Germany. Food was an ongoing matter of concern for the POWs. Luft III issued "Non-working" German civilian rations which allowed 1,928 kcal (8,070 kJ) per day, with the balance made up from American, Canadian, and British Red Cross parcels and items sent to the POWs by their families. As was customary at most camps, Red Cross and individual parcels were pooled and distributed to the men equally. Every three months, weak beer was made available in the canteen for sale. As NCOs did not receive any "pay" it was the usual practice in camps for the officers to provide one-third for their use but at Luft III all lagergeld was pooled for communal purchases. Stalag Luft III had the best-organised recreational program of any POW camp in Germany. Each compound had athletic fields and volleyball courts. The prisoners participated in basketball, softball, boxing, touch football, volleyball, table tennis and fencing, with leagues organised for most. As described by J. Frank Diggs, many amenities were made possible by Swedish lawyer Henry Söderberg, who was the YMCA representative to the area, and frequently brought to its camps not only sports equipment, and religious items supporting the work of chaplains.
The first escape occurred in October 1943 in the East Compound. Conjuring up a modern Trojan Horse, kriegies (prisoners) constructed a gymnastic vaulting horse largely from plywood from Red Cross parcels. The horse was designed to conceal men, tools and containers of soil. Each day the horse was carried out to the same spot near the perimeter fence and while prisoners conducted gymnastic exercises above, a tunnel was dug. At the end of each working day, a wooden board was placed over the tunnel entrance and covered with surface soil. The gymnastics disguised the real purpose of the vaulting horse and kept the sound of the digging from being detected by the microphones. For three months three prisoners, Lieutenant Michael Codner, Flight Lieutenant Eric Williams and Flight Lieutenant Oliver Philpot, in shifts of one or two diggers at a time, dug over 30 m (100 ft) of tunnel, using bowls as shovels and metal rods to poke through the surface of the ground to create air holes. No shoring was used except near the entrance. On the evening of October 19th, 1943, Codner, Williams and Philpot made their escape. Williams and Codner were able to reach the port of Stettin where they stowed away on a Danish ship and eventually returned to Britain. Accounts of this escape were recorded in the book Goon in the Block (later retitled The Wooden Horse) by Williams, the book Stolen Journey by Philpot and the 1950 film The Wooden Horse.
In March 1943, Royal Air Force Squadron Leader Roger Bushell conceived a plan for a mass escape from the North Compound, which took place on the night of 24/25th, March 1944. He was being held with the other British and Commonwealth airmen and he was in command of the Escape Committee that managed all escape opportunities from the north compound. Falling back on his legal background to represent his scheme, Bushell called a meeting of the Escape Committee to advocate for his plan. Group captain Herbert Massey, as senior British officer, authorised the escape attempt which would have good chance of success; in fact, the simultaneous digging of three tunnels would become an advantage if any one of them was discovered, because the guards would scarcely imagine that another two were well underway. The most radical aspect of the plan was not the scale of the construction, but the number of men intended to pass through the tunnels. While previous attempts had involved up to 20 men, in this case Bushell was proposing to get over 200 out, all wearing civilian clothes and some with forged papers and escape equipment. As this escape attempt was unprecedented in size, it would require unparalleled organisation; as the mastermind of the Great Escape, Roger Bushell inherited the codename of "Big X". More than 600 prisoners were involved in the construction of the tunnels. Three tunnels, Tom, Dick, and Harry were dug for the escape. The operation was so secretive that everyone was to refer to each tunnel by its name. Bushell took this so seriously that he threatened to court-martial anyone who even uttered the word "tunnel". Tom began in a darkened corner next to a stove chimney in hut 123 and extended west into the forest. It was found by the Germans and dynamited. Dick's entrance was hidden in a drain sump in the washroom of hut 122 and had the most secure trap door. It was to go in the same direction as Tom and the prisoners decided that the hut would not be a suspected tunnel site as it was further from the wire than the others. Dick was abandoned for escape purposes because the area where it would have surfaced was cleared for camp expansion. Dick was used to store soil and supplies and as a workshop. Harry, which began in hut 104, went under the Vorlager (which contained the German administration area), sick hut and the isolation cells to emerge at the woods on the northern edge of the camp. The entrance to "Harry" was hidden under a stove. Ultimately used for the escape, it was discovered as the escape was in progress with only 76 of the planned 220 prisoners free. The Germans filled it with sewage and sand and sealed it with cement.
The Germans were aware that something was going on but failed to discover any of the tunnels until much later. To break up an escape attempt, nineteen of the top suspects were transferred without warning to Stalag VIIIC. Of those, only six had been involved with tunnel construction. One of these, a Canadian called Wally Floody, was actually originally in charge of digging and camouflage before his transfer. Eventually the prisoners felt they could no longer dump sand above ground because the Germans became too efficient at catching them doing it. After "Dick"'s planned exit point was covered by a new camp expansion, the decision was made to start filling it up. As the tunnel's entrance was very well-hidden, "Dick" was also used as a storage room for items such as maps, postage stamps, forged travel permits, compasses and clothing. Some guards cooperated by supplying railway timetables, maps and many official papers so that they could be forged. Some genuine civilian clothes were obtained by bribing German staff with cigarettes, coffee or chocolate. These were used by escaping prisoners to travel from the camp more easily, especially by train. German prison camps began to receive larger numbers of American prisoners. The Germans decided that new camps would be built specifically for US airmen. To allow as many people to escape as possible, including the Americans, efforts on the remaining two tunnels increased. This drew attention from guards and in September 1943 the entrance to "Tom" became the 98th tunnel to be discovered in the camp. "Harry" was finally ready in March 1944. By then the Americans, some of whom had worked on "Tom", had been moved away; despite the portrayal of three in the Hollywood film, only one American, Major Johnnie Dodge, participated in the "Great Escape", and he had become a British citizen. Previously, the attempt had been planned for the summer for its good weather, but in early 1944 the Gestapo visited the camp and ordered increased effort to detect escapes. Rather than risk waiting and having their tunnel discovered, Bushell ordered the attempt be made as soon as it was ready. Many Germans willingly helped in the escape itself. In their plan, of the 600 who had worked on the tunnels only 200 would be able to escape. The prisoners were separated into two groups. The first group of 100, called "serial offenders," were guaranteed a place and included 30 who spoke German well or had a history of escapes, and an additional 70 considered to have put in the most work on the tunnels. The second group, considered to have much less chance of success, was chosen by drawing lots; called "hard-arsers", they would have to travel by night as they spoke little or no German and were only equipped with the most basic fake papers and equipment. An early problem for the escapees was that most were unable to find the way into the railway station, until daylight revealed it was in a recess of the side wall to an underground pedestrian tunnel. Consequently, many of them missed their night time trains, and decided either to walk across country or wait on the platform in daylight.
Following the escape, the Germans made an inventory of the camp and uncovered how extensive the operation had been. Four thousand bed boards had gone missing, as well as 90 complete double bunk beds, 635 mattresses, 192 bed covers, 161 pillow cases, 52 twenty-man tables, 10 single tables, 34 chairs, 76 benches, 1,212 bed bolsters, 1,370 beading battens, 1,219 knives, 478 spoons, 582 forks, 69 lamps, 246 water cans, 30 shovels, 300 m (1,000 ft) of electric wire, 180 m (600 ft) of rope, and 3,424 towels. 1,700 blankets had been used, along with more than 1,400 Klim cans. Of 76 escapees, 73 were captured. Adolf Hitler initially wanted every recaptured officer to be shot. Hermann Göring, Field Marshal Keitel, (inspector in charge of war prisoners) pointed out to Hitler that a massacre might bring about reprisals to German pilots in Allied hands. Hitler agreed, but insisted "more than half" were to be shot, eventually ordering SS head Himmler to execute more than half of the escapees. Roger Bushell, the leader of the escape, was shot by Gestapo official Emil Schulz just outside Saarbrücken, Germany. Bob Nelson is said to have been spared by the Gestapo because they may have believed he was related to his namesake Admiral Nelson. His friend Dick Churchill was probably spared because of his surname, shared with the British Prime Minister. Seventeen captured escapees were returned to Stalag Luft III. The Gestapo investigated the escape and, whilst this uncovered no significant new information, the camp commandant, von Lindeiner-Wildau, was removed and threatened with court martial. The British government learned of the deaths from a routine visit to the camp by Swiss authorities as the protecting power in May; the Foreign Secretary Anthony Eden announced the news to the House of Commons in May 1944.
Just before midnight on January 27th, 1945, with Soviet troops only 26 km (16 mi) away, the remaining 11,000 POWs were marched out of camp with the eventual destination of Spremberg. In freezing temperatures and 15 cm (6 in) of snow, 2,000 prisoners were assigned to clear the road ahead of the main group. After a 55 km (34 mi) march, the POWs arrived in Bad Muskau where they rested for 30 hours, before marching the remaining 26 km (16 mi) to Spremberg. On January 31st, the South Compound prisoners plus 200 men from the West Compound were sent by train to Stalag VII-A at Moosburg followed by the Centre compound prisoners on February 7th. Thirty-two prisoners escaped during the march to Moosburg but all were recaptured. With the approach of US forces in April, the American prisoners at XIII-D were marched to Stalag VII-A. While the majority reached VII-A on April 20th, many had dropped out on the way with the German guards making no attempt to stop them. Built to hold 14,000 POWs, Stalag VII-A now held 130,000 from evacuated stalags with 500 living in barracks built for 200. The US 14th Armored Division liberated the prisoners of VII-A on April 29th. American section of Stalag Luft III in the final months of the war, ending with the winter forced-march from the camp, ahead of the advancing Soviet troops and eventually being liberated.
#second world war#world war 2#world war ii#wwii#military history#history#airforce history#british history#german history#prisoner of war#hogans heroes#great escape
119 notes
·
View notes
Text

• Oscar F. Perdomo (USAAF U.S Ace)
Oscar Francis Perdomo was a Hispanic United States Air Force officer and fighter pilot who was the last "ace in a day" for the United States in World War II.
Perdomo was born June 14th, 1919 in El Paso, Texas, one of five siblings born to Mexican immigrants to the United States. His father served in the Mexican Revolution under the command of Francisco "Pancho" Villa before emigrating to the United States. After completing school Perdomo enlisted in the army reserves in 1942. In February 1943, Perdomo entered an Army Air Forces (AAF) Pilot School in Chandler, Arizona. The AAF schools were civilian flying schools, under government contract, which provided a considerable part of the flying training effort undertaken during World War II by the Army Air Forces. Perdomo received his "wings" on January 7th, 1944. He was then sent to the Army Air Forces Basic Flight School at Chico, California, where he underwent further training as a Republic P-47 Thunderbolt pilot.
Upon the completion of his training he was assigned to the 464th Fighter Squadron which was part of the 507th Fighter Group that was sent overseas to the Pacific theater to the Island of Ie Shima off the west coast of Okinawa. The primary mission of the 507th was to provide fighter cover to 8th Air Force Boeing B-29's which were to be stationed on Okinawa. The 507th began operations on July 1st, 1945. Perdomo was assigned P-47N-2-RE number 146 aircraft. maintained by crew chief S/Sgt. F. W. Pozieky. Perdomo nicknamed his airplane Lil Meaties Meat Chopper with the nose art depicting a diapered baby chomping a cigar in his mouth and derby hat on his head, clutching a rifle. The name referred to his first son, Kenneth, then a year and a half old. Perdomo flew his first combat mission on July 2nd, while escorting a B-29 to Kyushu.
A "flying ace" or fighter ace is a military aviator credited with shooting down five or more enemy aircraft during aerial combat. The term "ace in a day" is used to designate a fighter pilot who has shot down five or more airplanes in a single day. The last "Ace in a Day" for the United States in World War II was 1st Lt. Oscar Francis Perdomo. Perdomo was a first lieutenant and a veteran of ten combat missions when on August 9th, 1945 the United States dropped the world's second atomic bomb on Nagasaki, Japan. The allies were still awaiting Japan's response to the demand to surrender and the war continued, when on August 13th, 1945 1st Lt. Perdomo, shot down four Nakajima "Oscar" fighters and one Yokosuka "Willow" Type 93 biplane trainer. While the 507th Fighter Group mission reports confirm his kills as "Oscars", they were actually Ki-84 "Franks" from the 22nd and 85th Hiko-Sentais. The combat took place near Keijo / Seoul, Korea when 38 Thunderbolts of the 507th Fighter Wing, USAAF, encountered approximately 50 enemy aircraft. It was Perdomo's last combat mission, and the five confirmed victories made him an "Ace in a Day" and thus the distinction of being the last "Ace" of the United States in World War II. He was awarded the Distinguished Service Cross and the Air Medal with one leaf cluster.
After the war, Perdomo continued to serve in the Army Air Forces. In 1947, he was reassigned to the newly formed United States Air Force and served until January 1950. When Perdomo returned to civilian life, he joined the Air Force Reserve. On June 30th, 1950, Perdomo was recalled to active duty upon the outbreak of the Korean War at the rank of captain. He continued to serve in the Air Force until January 30th, 1958 when he left the military at the rank of major. Perdomo was emotionally affected when his son, SPC4 Kris Mitchell Perdomo, was one of 3 men killed on May 5th, 1970, aboard a U.S. Army helicopter UH-1 Iroquois which crashed and exploded about 5 miles southwest of the city of Phy Vinh in Vĩnh Bình Province, South Vietnam. He had trouble coping with the situation and developed an addiction to alcohol, which took Major Oscar F. Perdomo's life on March 2nd, 1976. He was proclaimed dead upon his arrival at USC Medical Center, Los Angeles. His name is inscribed in the United States Air Force Memorial.
#second world war#world war 2#world war ii#wwii#military history#history#biography#us army air force#us history#airforce history#unsung hero#u.s aces#hispanic representation#hispanic history#hispanic heritage month
101 notes
·
View notes
Text
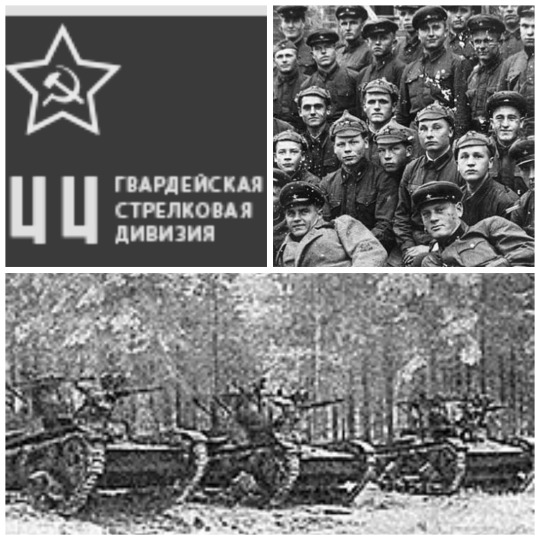
• 44th Rifle Division (Soviet Union)
The 44th Kievskaya of the Red Banner Rifle Division or 44th Kievskaya for short, was an elite military formation of the Soviet Union during the Winter War and Second world war. The unit is also famous for being the one of the first military formations out of which was formed the short-lived Soviet Ukrainian Army (1918–1919).
It was formed by the order no.6 of the Communist Party (Bolshevik) of Ukraine on September 22nd, 1918, as the 1st Insurgent Division along with the 2nd Insurgent Division. The 1st Insurgent Division was formed out of insurgent squads of Tarashcha and Novgorod-Sieversky uyezds. The chief of division (nachdiv) was appointed N.Krapivyansky and the chief of staff S.Petrikovsky (Petrenko). By the end of September the Division grew to 6700 bayonets, 450 sabers, 14 [artillery] guns, and from 10 to 18 machine guns "Maxim", 5 to 6 Colt, 20 to 30 Lewis. Because of that, selected regiments were reorganized into brigades. However, the name for the units were nominal as the brigade's headquarters were never formed, and functions of kombrigs were performed by the regimental commanders (colonel). Around that time at the divisional headquarters a security company was formed out of some 700 soldiers. That new unit was planned to be transformed into the 5th Regiment and used as a reserve. Also the 4th Insurgent Regiment was recommissioned as the 6th Insurgent Regiment (commander T.Chernyak) and along with the 1st Regiment of Red Cossacks was soon transferred to the 2nd Insurgent Division. In their places, were created the 3rd Insurgent Regiment, later called Novgorod-Sieversky (T.Chernyak) and the 4th Insurgent Nezhyn Regiment (P.Nesmeyan) transformed out the security company.
During the preparations for an assault on Kharkiv during the brief Soviet-Ukrainian war, most of the division, however, refused to obey orders except for the Red Cossacks and the 4th Insurgent Nezhyn Regiment. For that the divisional commander N.Krapivyansky was dismissed and court martialed. I Lokatosh was appointed the new chief of division and I. Panafidin the political commissar. The name of the division also changed to the Special Insurgent Division (order of Military Council of Kursk direction group of forces of November 21, 1918) as well as its formation consisting now only out of two brigades. The 44th Rifle Division participated in the Soviet invasion of Poland in autumn 1939. Later, during the Finno-Russian Winter War, the division was sent to the Finnish front as reinforcement for the Soviet 163rd Rifle Division which had attempted to advance into central Finland and become surrounded after capturing the town of Suomussalmi and was suffering heavy casualties. The 163rd Division, which was running short of food, was almost completely annihilated in combat with the Finnish 9th Infantry Division before the 44th Rifle Division could reach its position. With no ski troops, the 44th Rifle Division was completely road bound in the deep snow. The Finns, mounted on skis, and carrying superior arms (submachineguns), were able to break the route of march of the 44th Division on the road leading to Suomussalmi. By breaking the division into pieces along the road, after Finnish radio intelligence had confirmed that the whole division had entered the Raate road, the Finns were able to annihilate the entire unit. According to Robert Edwards, the division's Commander A. Vinogradev managed to escape, but later, on the orders of Stalin's emissary, Lev Mekhlis, he was shot for incompetence following a sham trial. Of the 44th Division's 17,000 troops, 1000 were captured and 700 escaped. The rest died.
The division was recreated after its destruction and part of 13th Rifle Corps, 12th Army, Kiev Special Military District in June 1941. 'Captured Soviet Generals' says that the division commander, Major General S.A. Tkachenko, was captured by the Germans. The division was immediately caught up in conflict and suffered heavy losses. By July 21st, 1941 the division was already short of shtat (establishment or Table of Organization and Equipment) by over 4,000 soldiers, 199 cargo trucks, and over 3,000 rifles and carbines. Divisional morale fell despite some small victories. Ultimately the division was wiped out in combat near the village of Podvyskoe in the Kirovograd and Uman region. The division was recreated at Leningrad in October 1941. It fought in northern Russia and Kurland with the 54th Army of Volkhov Front in January 1944 and the 67th Army of the Leningrad Front in May 1945. During the later stages of the war the division took part in assisting tank brigades as part of Operation: Bagration.
It was briefly reactivated after the war from 1955 at Uralsk in Uralsk Oblast, from the 270th Rifle Division. It was redesignated the 44th Motor Rifle Division on 4 June 1957. In January 1958 it became part of the Turkestan Military District with the dissolution of the South Ural Military District. The division disbanded on 1 March 1959. The 44th Rifle Division has lived on in games like Steel Division 2 as a playable battle group.
#ww2#second world war#wwii#military history#world war ii#world war 2#history#short post#soviet union#soviet history#divisions#steel division 2#military units
32 notes
·
View notes
Text
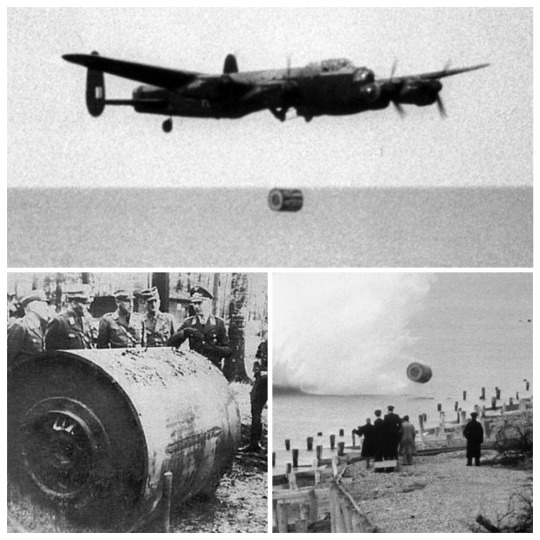
• British Bouncing Bomb
A bouncing bomb is a bomb designed to bounce to a target across water in a calculated manner to avoid obstacles such as torpedo nets, and to allow both the bomb's speed on arrival at the target and the timing of its detonation to be pre-determined, in a similar fashion to a regular naval depth charge.
Barnes Wallis' April 1942 paper "Spherical Bomb – Surface Torpedo" described a method of attack in which a weapon would be bounced across water until it struck its target, then sink to explode under water, much like a depth charge. Bouncing it across the surface would allow it to be aimed directly at its target, while avoiding underwater defences, as well as some above the surface, and such a weapon would take advantage of the "bubble pulse" effect typical of underwater explosions, greatly increasing its effectiveness: Wallis's paper identified suitable targets as hydro-electric dams "and floating vessels moored in calm waters such as the Norwegian fjords". Both types of target were already of great interest to the British military when Wallis wrote his paper (which itself was not his first on the subject); German hydro-electric dams had been identified as important bombing targets before the outbreak of World War II, but existing bombs and bombing methods had little effect on them, as torpedo nets protected them from attack by conventional torpedoes and a practical means of destroying them had yet to be devised. In 1942, the British were seeking a means of destroying the German battleship Tirpitz, which posed a threat to Allied shipping in the North Atlantic and had already survived a number of British attempts to destroy it. During this time, the Tirpitz was being kept safe from attack by being moored in Norwegian fjords, where it had the effect of a "fleet in being". Consequently, Wallis's proposed weapon attracted attention and underwent active testing and development.
On July 24th, 1942, a "spectacularly successful" demonstration of such a weapon's potential occurred when a redundant dam at Nant-y-Gro, near Rhayader, in Wales, was destroyed by a mine containing 279 pounds (127 kg) of explosive: this was detonated against the dam's side, under water, in a test undertaken by A.R. Collins, a scientific officer from the Road Research Laboratory, which was then based at Harmondsworth, Middlesex. A.R. Collins was among a large number of other people besides Barnes Wallis who made wide-ranging contributions to the development of a bouncing bomb and its method of delivery to a target, to the extent that, in a paper published in 1982, Collins himself made it evident that Wallis "did not play an all-important role in the development of this project and in particular, that very significant contributions were made by, for example, Sir William Glanville, Dr. G. Charlesworth, Dr. A.R. Collins and others of the Road Research Laboratory". However, the modification of a Vickers Wellington bomber, the design of which Wallis himself had contributed to, for work in early testing of his proposed weapon, has been cited as an example of how Wallis "would have been the first to acknowledge" the contributions of others. Also, in the words of Eric Allwright, who worked in the Drawing Office for Vickers Armstrongs at the time, "Wallis was trying to do his ordinary job [for Vickers Armstrongs] as well as all this – he was out at the Ministry and down to Fort Halstead and everywhere"; Wallis's pressing of his papers, ideas and ongoing developments on relevant authorities helped ensure that development continued; Wallis was principal designer of the models, prototypes and "live" versions of the weapon; and, perhaps most significantly, it was Wallis who explained the weapon in the final briefing for RAF crews before they set off on Operation Chastise, to use one of his designs in action.
A distinctive feature of the weapon, added in the course of development, was back-spin, which improved the height and stability of its flight and its ability to bounce, and helped the weapon to remain in contact with, or at least close proximity to, its target on arrival. Back-spin is a normal feature in the flight of golf balls, owing to the manner in which they are struck by the club, and it is perhaps for this reason that all forms of the weapon which were developed were known generically as "Golf mines", and some of the spherical prototypes featured dimples. It was decided in November 1942 to devise a larger version of Wallis's weapon for use against dams, and a smaller one for use against ships: these were code-named "Upkeep" and "Highball" respectively. Though each version derived from what was originally envisaged as a spherical bomb, early prototypes for both Upkeep and Highball consisted of a cylindrical bomb within a spherical casing. Development, testing and use of Upkeep and Highball were to be undertaken simultaneously, since it was important to retain the element of surprise: if one were to be used against a target independently, it was feared that German defences for similar targets would be strengthened, rendering the other useless. However, Upkeep was developed against a deadline, since its maximum effectiveness depended on target dams being as full as possible from seasonal rainfall, and the latest date for this was set at May 26th, 1943. In the event, as this date approached, Highball remained in development, whereas development of Upkeep had completed, and the decision was taken to deploy Upkeep independently.
Testing of Upkeep prototypes with inert filling was carried out at Chesil Beach, Dorset, flying from RAF Warmwell in December 1942, and at Reculver, Kent, flying from RAF Manston in April and May 1943, at first using a Vickers Wellington bomber. However, the dimensions and weight of the full-size Upkeep were such that it could only be carried by the largest British bomber available at the time, the Avro Lancaster, and even that had to undergo considerable modification in order to carry it. In testing, it was found that Upkeep's spherical casing would shatter on impact with water, but that the inner cylinder containing the bomb would continue across the surface of the water much as intended. As a result, Upkeep's spherical casing was eliminated from the design. Development and testing concluded on May 13th, 1943 with the dropping of a live, cylindrical Upkeep bomb 5 miles (8 km) out to sea from Broadstairs, Kent, by which time Wallis had specified that the bomb must be dropped at "precisely" 60 feet (18 m) above the water and 232 miles per hour (373 km/h) groundspeed, with back-spin at 500 rpm: the bomb "bounced seven times over some 800 yards, sank and detonated". In the operational version of Upkeep, known by its manufacturer as "Vickers Type 464", the explosive charge was Torpex, originally designed for use as a torpedo explosive, to provide a longer explosive pulse for greater effect against underwater targets; the principal means of detonation was by three hydrostatic pistols, as used in depth charges, set to fire at a depth of 30 feet (9 m); and its overall weight was 9,250 pounds (4,200 kg), of which 6,600 pounds (3,000 kg) was Torpex. Provision was also made for "self-destruct" detonation by a fuze, armed automatically as the bomb was dropped from the aircraft, and timed to fire after 90 seconds. Height was checked by a pair of intersecting spotlight beams, which, when converging on the surface of the water, indicated the correct height for the aircraft – a method devised for the raid by Benjamin Lockspeiser of MAP, and distance from the target by a simple, hand-held, triangular device: with one corner held up to the eye, projections on the other two corners would line up with pre-determined points on the target when it was at the correct distance for bomb release. In practice, this could prove awkward to handle, and some aircrews replaced it with their own arrangements, fixed within the aircraft itself, and involving chinagraph and string. On the night of May 17th 1943, Operation Chastise attacked dams in Germany's Ruhr Valley, using Upkeep. Two dams were breached, causing widespread flooding, damage, and loss of life. The significance of this attack upon the progress of the war is debated. British losses during the operation were heavy; eight of the 19 attacking aircraft failed to return, along with 53 of 113 RAF aircrew. Upkeep was not used again operationally. By the time the war ended, the remaining operational Upkeep bombs had started to deteriorate and were dumped into the North Sea without their detonation devices.
In April 1942, Wallis himself had described his proposed weapon as "essentially a weapon for the Fleet Air Arm". This naval aspect was later to be pressed by a minute issued by British prime minister Winston Churchill, in February 1943, asking "Have you given up all plans for doing anything to Tirpitz while she is in Trondheim? ... It is a terrible thing that this prize should be waiting and no one be able to think of a way of winning it." However, Highball was ultimately developed as an RAF weapon for use against various targets, including Tirpitz. From November 1942, development and testing for Highball continued alongside that of Upkeep, including the dropping of prototypes at both Chesil Beach and Reculver. While early prototypes dropped at Chesil Beach in December 1942 were forerunners for both versions of the bomb, those dropped at Chesil Beach in January and February 1943 and at Reculver in April 1943 included Highball prototypes. They were dropped by the modified Wellington bomber and at Reculver by a modified de Havilland Mosquito B Mk IV, one of two assigned to Vickers Armstrong for the purpose. By early February 1943, Wallis envisaged Highball as "comprising a 500 lb (230 kg) charge in a cylinder contained in a 35 in (89 cm) sphere with (an overall weight) of 950 lb (430 kg)", and a modified Mosquito could carry two such weapons. Further testing was carried out by three modified Mosquitoes flying from RAF Turnberry, north of Girvan, on the west coast of Scotland, against a target ship, the former French battleship Courbet, which had been moored for the purpose in Loch Striven. This series of tests was hampered by a number of errors: buoys intended to mark a point 1,200 yards (1,097 m) from Courbet, where the prototypes were to be dropped, were found to be too close to the ship by 400 yards (366 m), and, according to Wallis, other errors were due to "Variations in dimensions of [prototypes] after filling and [dimensionally incorrect] jigs for setting up the [caliper] arms". Because of these errors, the prototypes hit the target too fast and too hard, and two aircraft failed to release their prototypes, one of which then fell off while the aircraft was turning for a second attempt. By the end of May 1944, problems with releasing Highball had been resolved as had problems with aiming. Aiming Highball required a different method from Upkeep; the problem was solved by Wallis's design of a ring aperture sight fixed to a flying helmet. Highball was now a sphere with flattened poles and the explosive charge was Torpex, enclosed in a cylinder, as in Upkeep; detonation was by a single hydrostatic pistol, set to fire at a depth of 27 feet (8 m), and its weight was 1,280 pounds (581 kg), of which 600 pounds (272 kg) was Torpex. Highball was never used operationally: on 12 November 1944, in Operation Catechism, Lancasters with Tallboy bombs sank its primary target, Tirpitz. Other potential targets had been considered during Highball's development and later. These included the ships of the Italian navy, canals, dry docks, submarine pens, and railway tunnels (for which testing took place in 1943). But Italy surrendered in September 1943, and the other target ideas were dismissed as impracticable.
In January 1945, at the Vickers experimental facility at Foxwarren, near Cobham, Surrey, a Douglas A-26 Invader of the USAAF was adapted to carry two Highballs almost completely enclosed in the bomb bay, using parts from a Mosquito conversion. After brief flight testing in the UK, the kit was sent to Wright Field, Ohio, and installed in an A-26C Invader. Twenty-five inert Highballs, renamed "Speedee" bombs, were also sent for use in the USAAF trials. Drop tests were carried out over Choctawhatchee Bay near Eglin Field, Florida, but the programme was abandoned, after the bomb bounced back at A-26C-25-DT Invader 43-22644 on Water Range 60, causing loss of the rear fuselage and a fatal crash. Inert prototypes of both Upkeep and Highball that were dropped at Reculver have been recovered and these, along with a number of other examples, are displayed at various sites. In 2010, a diving project in Loch Striven successfully located several Highball prototypes, under around 114 feet (35 m) of water. In July 2017, two Highballs were successfully recovered from Loch Striven in a joint operation by teams from East Cheshire Sub-Aqua Club and the Royal Navy. One is now displayed at the de Havilland Aircraft Museum and the other arrived at Brooklands Museum in late 2019 after undergoing conservation at the Mary Rose Trust.
#world war 2#second world war#world war ii#wwii#military history#history#military technology#cool weapons#weird history#bombs#aviation history#britsh#british history
69 notes
·
View notes
Text
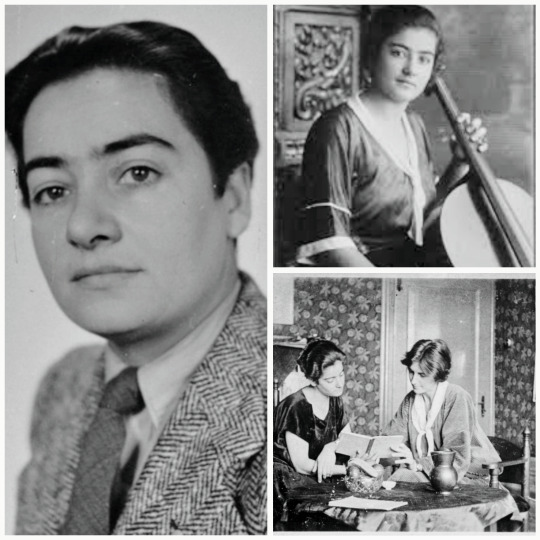
• Frieda Belinfante
Frieda Belinfante was a Dutch cellist, conductor, a prominent lesbian and a member of the Dutch resistance during World War II.
Born in Amsterdam on May 10th, 1904, she was the daughter of Aron Belinfante and Georgine Antoinette Hesse, Frieda descended from a line of Sephardic Jews who arrived in Holland in the 17th century and whose ancestry can be traced back to 16th-century Portugal. Other well-known descendants include the writers Emmy Belinfante, Isaac Cohen Belinfante, Jewish theologian Moses Cohen Belinfante and the journalist Emilie Belinfante (the younger). Many of the Belinfante descendants perished during the Holocaust. Belinfante was born into a musical family. Her father, Aron, was a prominent pianist and teacher in Amsterdam who was the first pianist to present the entire cycle of Beethoven piano sonatas during a single season in the Amsterdam Concertgebouw. Belinfante began her study of the cello at age 10. She graduated from the Amsterdam Conservatory and made her professional debut in the Kleine Zaal recital hall of the Concertgebouw at age 17, assisted at the piano by her father. Her father died a few months after. Following her debut, Belinfante studied intermittently with cellist Gérard Hekking in Paris, with whom she developed a close friendship. After directing high school, college and professional chamber ensembles for several years, Belinfante was invited by the management of the Concertgebouw to form Het Klein Orkest in 1937, a chamber orchestra for which she was to be artistic director and conductor.
Belinfante held this position until 1941, and it made her the first woman in Europe to be artistic director and conductor of an ongoing professional orchestral ensemble. Concurrently, Belinfante made weekly appearances as guest conductor on the Dutch National Radio, and appeared as guest conductor with orchestras in the Netherlands and in Northern Europe. In the summer of 1939, Belinfante attended the master class of Dr. Hermann Scherchen in Neuchâtel Switzerland to perfect her conducting skills. In recognition of her abilities, Scherchen awarded her first prize over 12 professional male conductors also enrolled in that class. The Nazi occupation interrupted Belinfante's musical career, which she did not resume until after the war.
Belinfante became a good friend of the artist Willem Arondeus, an openly gay man who was a leader of the Raad van Verzet (Resistance Council) in the Dutch resistance. She actively contributed to the resistance movement, mainly by forging personal documents for Jews and others wanted by the Gestapo. Together with Arondeus, she was part of the CKC resistance group that organised and executed the bombing of the population registry in Amsterdam on March 27th, 1943, which destroyed thousands of files and hindered Nazi attempts to compare forged documents with documents in the registry. The plan successfully destroyed 800,000 identity cards of Jews and non-Jews alike. The CKC group came under scrutiny by the Gestapo after the bombing, forcing Belifante and other members into hiding. While in hiding, Belinfante learned of the arrests and executions of the other CKC members, including Arondeus. Belinfante disguised herself as a man and lived with friends for 3 months before being traced by the Nazis. The resistance helped her avoid capture and cross the border to Belgium and France, where the French Underground helped her make her way to Switzerland. When she and her travel partner arrived at the border in the winter of 1944, they were forced to cross the Alps on foot to reach safety. Her former teacher Hermann Scherchen saved her from being sent back over the border by verifying that she was a Dutch citizen and his former pupil. On arriving in Montreux, she was given refugee status and worked for a short time as a farm laborer. Belinfante was repatriated to the Netherlands as soon as the war ended.
Belinfante emigrated to the United States in 1947, eventually settling in Laguna Beach, California and joining the music faculty of UCLA in 1949. Desiring to continue her conducting activities, she formed an ad hoc group she named The Vine Street Players in 1953, an orchestral ensemble of colleagues from the local area universities as well as studio musicians from Hollywood. The formation of the Vine Street Players proved fortuitous for Belinfante. A successful performance in the Redlands Bowl by the ensemble under Belinfante's direction prompted local civic and cultural leaders to invite Belinfante to form a permanent orchestral ensemble in Orange County. She subsequently became the founding artistic director and conductor of the inaugural Orange County Philharmonic Society, which incorporated as a tax-exempt nonprofit organization in 1954 and became the first such ensemble in Orange County. Concerts by the Orange County Philharmonic Orchestra were free to the public, funded entirely by donations from sponsors and memberships. The orchestral musicians agreed to donate their time for rehearsals free of charge with the permission of their union local stewards, while receiving a fee for the performances as Belinfante herself did. Belinfante insisted on this arrangement with sponsors, and that all concerts remain free of charge for all future attendees. The founding board of directors adopted Belinfante's suggestions as their business plan with the stated mission of maintaining a resident professional orchestra in the county.
Under Belinfante's direction, the orchestra grew into a "B"-class musical institution taking into account its budget, programming and geographical penetration in the ensuing years. Its activities usually included a 4- to 6-program season in all major concert venues throughout the region, as well as youth concerts, cultural development programs and chamber music recitals in the community with principals of the orchestra and Belinfante assisting in several capacities. Belinfante's involvement with the Orange County Philharmonic came to an abrupt end in 1962 when her contract was not renewed. Financial pressures had been mounting because the musicians' union wanted the players to be paid for rehearsals. Additionally, board members and supporters from the community felt a male conductor would raise the stature of the orchestra and increase revenue. In a 1994 interview, Belinfante said she believed that gossip about her sexual orientation was used to quell the objections to her removal. Belinfante's recorded output was sparse and poorly maintained. None of the pre-war recorded radio performances survive, and only the very last recording of her American career is preserved in archive. However, more than three decades of critical reviews exist internationally that document Belinfante's superlative musical gifts. Her conducting technique was noted for her command of period style, cohesive ensemble, clear and decisive baton technique, transparent ensemble textures, buoyant and propulsive rhythms, and conducting all performances without a score.
Belinfante continued her musical activities on a limited scale after her dismissal from the Orange County Philharmonic. Belinfante established a private studio in Laguna Beach that trained numerous musicians. She also joined the board of directors of the Laguna Beach Chamber Music Society, acting as booking agent and artistic advisor to that group for more than 20 years. Belinfante summed up her career in a Los Angeles Times interview: "It was just too early for me. I should be born again. I could have done more, that's what saddens me. But I'm not an unhappy person. I look for the next thing to do. There's always something still to do." In later years she earned recognition for her accomplishments. In 1987, the Orange County Board of Supervisors and the City of Laguna Beach both declared February 19 'Frieda Belinfante Day", honoring her contributions to musical culture in the region. Belinfante's life became the subject of the documentary, "But I Was a Girl" (1999). In 1994, The United States Holocaust Memorial Museum officially recognized Belinfante's contribution to the Dutch Resistance in World War II. Belinfante died on March 5th, 1995 from cancer, aged 90, in Santa Fe, New Mexico. Her story was also featured in an exhibition, funded by the Dutch government, about the persecution of gays and lesbians during the Second World War.
#world war 2#second world war#world war ii#wwii#history#biography#dutch history#orange county philharmonic#pride month#lesbian history#gay women in history#her story#music history#women in history#untold history
92 notes
·
View notes
Text
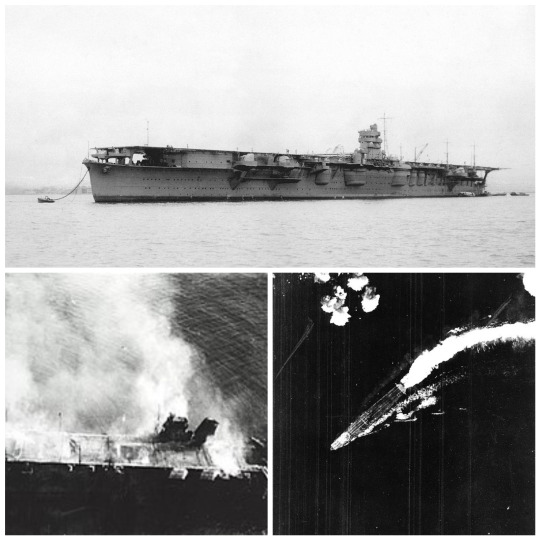
• IJN Aircraft Carrier Hiryū
Hiryū (飛龍, "Flying Dragon") was an aircraft carrier built for the Imperial Japanese Navy (IJN) during the 1930s. Generally regarded as the only ship of her class, she was built to a modified Sōryū design.
Hiryū was one of two large carriers approved for construction under the 1931–32 Supplementary Program. Originally designed as the sister ship of Sōryū, her design was enlarged and modified in light of the Tomozuru and Fourth Fleet Incidents in 1934–1935 that revealed many IJN ships were top-heavy, unstable and structurally weak. Her forecastle was raised and her hull strengthened. Other changes involved increasing her beam, displacement, and armor protection. The ship had a length of 227.4 meters (746 ft 1 in) overall, a beam of 22.3 meters (73 ft 2 in) and a draft of 7.8 meters (25 ft 7 in). She displaced 17,600 metric tons (17,300 long tons) at standard load and 20,570 metric tons (20,250 long tons) at normal load. Her crew consisted of 1,100 officers and enlisted men. Hiryū was fitted with four geared steam turbine sets with a total of 153,000 shaft horsepower (114,000 kW). Hiryū carried 4,500 metric tons (4,400 long tons) of fuel oil which gave her a range of 10,330 nautical miles (19,130 km; 11,890 mi) at 18 knots (33 km/h; 21 mph). The boiler uptakes were trunked to the ship's starboard side amidships and exhausted just below flight deck level through two funnels curved downward.
The carrier's 216.9-meter (711 ft 7 in) flight deck was 27 meters (88 ft 6 in) wide and overhung her superstructure at both ends, supported by pairs of pillars. Hiryū was one of only two carriers ever built whose island was on the port side of the ship (Akagi was the other). It was also positioned further to the rear and encroached on the width of the flight deck, unlike Sōryū. The flight deck was only 12.8 meters (42 ft) above the waterline and the ship's designers kept this figure low by reducing the height of the hangars. The upper hangar was 171.3 by 18.3 meters (562 by 60 ft) and had an approximate height of 4.6 meters (15 ft); the lower was 142.3 by 18.3 meters (467 by 60 ft) and had an approximate height of 4.3 meters (14 ft). Together they had an approximate total area of 5,736 square meters (61,740 sq ft). This caused problems in handling aircraft because the wings of a Nakajima B5N "Kate" torpedo bomber could neither be spread nor folded in the upper hangar. Aircraft were transported between the hangars and the flight deck by three elevators, the forward one abreast the island on the centerline and the other two offset to starboard.
Hiryū's primary anti-aircraft (AA) armament consisted of six twin-gun mounts equipped with 12.7-centimeter Type 89 dual-purpose guns mounted on projecting sponsons, three on either side of the carrier's hull. When firing at surface targets, the guns had a range of 14,700 meters (16,100 yd); they had a maximum ceiling of 9,440 meters (30,970 ft) at their maximum elevation of +90 degrees. Their maximum rate of fire was 14 rounds a minute, but their sustained rate of fire was approximately eight rounds per minute. The ship was equipped with two Type 94 fire-control directors to control the 12.7-centimeter (5.0 in) guns, one for each side of the ship; the starboard-side director was on top of the island and the other director was positioned below flight deck level on the port side. The ship's light AA armament consisted of seven triple and five twin-gun mounts for license-built Hotchkiss 25 mm Type 96 AA guns. Two of the triple mounts were sited on a platform just below the forward end of the flight deck. Hiryū had a waterline belt with a maximum thickness of 150 millimeters (5.9 in) over the magazines that reduced to 90 millimeters (3.5 in) over the machinery spaces and the gas storage tanks. It was backed by an internal anti-splinter bulkhead. The ship's deck was 25 millimeters (0.98 in) thick over the machinery spaces and 55 millimeters (2.2 in) thick over the magazines and gas storage tanks.
Following the Japanese ship-naming conventions for aircraft carriers, Hiryū was named "Flying Dragon". The ship was laid down at the Yokosuka Naval Arsenal on July 8th, 1936, launched on November 16th, 1937 and commissioned on July 5th, 1939. She was assigned to the Second Carrier Division on November 15th. In September 1940, the ship's air group was transferred to Hainan Island to support the Japanese invasion of French Indochina. In February 1941, Hiryū supported the blockade of Southern China. Two months later, the 2nd Carrier Division, commanded by Rear Admiral Tamon Yamaguchi, was assigned to the First Air Fleet, or Kido Butai, on April 10th. Hiryū returned to Japan on August 7th and began a short refit that was completed on September 15th. She became flagship of the Second Division from September 22nd to October 26th while Sōryū was refitting. In November 1941, the IJN's Combined Fleet, commanded by Admiral Isoroku Yamamoto, prepared to participate in Japan's initiation of a formal war with the United States by conducting a preemptive strike against the United States Navy's Pacific Fleet base at Pearl Harbor, Hawaii. On November 22nd, Hiryū, commanded by Captain Tomeo Kaku, and the rest of the Kido Butai, under Vice Admiral Chuichi Nagumo and including six fleet carriers from the First, Second, and Fifth Carrier Divisions, assembled in Hitokappu Bay at Etorofu Island. The fleet departed Etorofu, and followed a course across the north-central Pacific to avoid commercial shipping lanes. Now the flagship of the Second Carrier Division, the ship embarked 21 Mitsubishi A6M Zero fighters, 18 Aichi D3A "Val" dive bombers, and 18 Nakajima B5N "Kate" torpedo bombers. From a position 230 nmi (430 km; 260 mi) north of Oahu, Hiryū and the other five carriers launched two waves of aircraft on the morning of December 7th, 1941 Hawaiian time. In the first wave, 8 B5N torpedo bombers were supposed to attack the aircraft carriers that normally berthed on the northwest side of Ford Island, but none were in Pearl Harbor that day; 4 of the B5N pilots diverted to their secondary target, ships berthed alongside "1010 Pier" where the fleet flagship was usually moored. That ship, the battleship Pennsylvania, was in drydock and its position was occupied by the light cruiser Helena and the minelayer Oglala; all four torpedoes missed. The other four pilots attacked the battleships West Virginia and Oklahoma. The remaining 10 B5Ns were tasked to drop 800-kilogram (1,800 lb) armor-piercing bombs on the battleships berthed on the southeast side of Ford Island ("Battleship Row") and may have scored one or two hits on them, in addition to causing a magazine explosion aboard the battleship Arizona that sank her with heavy loss of life. The second wave consisted of 9 Zeros and 18 D3As, They strafed the airfield, and shot down two Curtiss P-40 fighters attempting to take off when the Zeros arrived and a Boeing B-17 Flying Fortress heavy bomber that had earlier diverted from Hickam Army Airfield, and also destroyed a Stinson O-49 observation aircraft on the ground for the loss of one of their own. The D3As attacked various ships in Pearl Harbor, but it is not possible to identify which aircraft attacked which ship.
While returning to Japan after the attack, Vice Admiral Chūichi Nagumo, commander of the First Air Fleet, ordered that Sōryū and Hiryū be detached on December 16th to attack the defenders of Wake Island who had already defeated the first Japanese attack on the island. The two carriers reached the vicinity of the island on December 21st and launched 29 D3As and 2 B5Ns, escorted by 18 Zeros, to attack ground targets. They encountered no aerial opposition and launched 35 B5Ns and 6 A6M Zeros the following day. The carriers arrived at Kure on 29 December. They were assigned to the Southern Force on January 8th, 1942 and departed four days later for the Dutch East Indies. The ships supported the invasion of the Palau Islands and the Battle of Ambon, attacking Allied positions on the island on January 23rd with 54 aircraft. Four days later the carriers detached 18 Zeros and 9 D3As to operate from land bases in support of Japanese operations in the Battle of Borneo. Hiryū and Sōryū arrived at Palau on January 28th and waited for the arrival of the carriers Kaga and Akagi. All four carriers departed Palau on February 15th and launched air strikes against Darwin, Australia, four days later. Hiryū contributed 18 B5Ns, 18 D3As, and 9 Zeros to the attack. Her aircraft attacked the ships in port and its facilities, sinking or setting on fire three ships and damaging two others. Hiryū and the other carriers arrived at Staring Bay on Celebes Island on February 21st to resupply and rest before departing four days later to support the invasion of Java. On March 1st, 1942, the ship's D3As damaged the destroyer USS Edsall badly enough for her to be caught and sunk by Japanese cruisers. Later that day the dive bombers sank the oil tanker USS Pecos. Two days later, they attacked Christmas Island and Hiryū's aircraft sank the Dutch freighter Poelau Bras before returning to Staring Bay on March 11th to resupply and train for the impending Indian Ocean raid.
On March 26th, the five carriers of the First Air Fleet departed from Staring Bay; they were spotted by a Catalina about 350 nautical miles (650 km; 400 mi) southeast of Ceylon on the morning of April 4th. Six of Hiryū's Zeros were on Combat Air Patrol (CAP) and helped to shoot it down. Hiryū contributed 18 B5Ns and 9 Zeros to the force; the latter encountered a flight of 6 Fairey Swordfish torpedo bombers from 788 Naval Air Squadron en route and shot them all down without loss. The Japanese aircraft encountered defending Hawker Hurricane fighters from Nos. 30 and 258 Squadrons RAF over Ratmalana airfield and Hiryū's fighters claimed to have shot down 11 with 3 Zeros damaged, although the fighters from the other carriers also made claims. On the morning of April 9th, Hiryū's CAP shot down another Catalina attempting to locate the fleet and, later that morning, contributed 18 B5Ns, escorted by 6 Zeros, to the attack on Trincomalee. The fighters engaged 261 Squadron RAF, claiming to have shot down two with two more shared with fighters from the other carriers. On April 19th, while transiting the Bashi Straits between Taiwan and Luzon en route to Japan, Hiryū, Sōryū, and Akagi were sent in pursuit of the American carriers Hornet and Enterprise, which had launched the Doolittle Raid against Tokyo. They found only empty ocean, as the American carriers had immediately departed the area to return to Hawaii. The carriers quickly abandoned the chase and dropped anchor at Hashirajima anchorage on April 22nd. Having been engaged in constant operations for four and a half months, the ship, along with the other three carriers of the First and Second Carrier Divisions, was hurriedly refitted and replenished in preparation for the Combined Fleet's next major operation, scheduled to begin one month hence. While at Hashirajima, Hiryū's air group was based ashore at Tomitaka Airfield, near Saiki, Ōita, and conducted flight and weapons training with the other First Air Fleet carrier units.
Concerned by the US carrier strikes in the Marshall Islands, Lae-Salamaua, and the Doolittle raids, Yamamoto was determined to force the US Navy into a showdown to eliminate the American carrier threat. He decided to invade and occupy Midway Atoll, which he was sure would draw out the American carriers to defend it. The Japanese codenamed the Midway invasion Operation MI. Unknown to the Japanese, the US Navy had divined the Japanese plan by breaking its JN-25 code and had prepared an ambush using its three available carriers, positioned northeast of Midway. On May 25th, 1942, Hiryū set out with the Combined Fleet's carrier striking force in the company of Kaga, Akagi, and Sōryū, which constituted the First and Second Carrier Divisions, for the attack on Midway. Her aircraft complement consisted of 18 Zeros, 18 D3As, and 18 B5Ns. on June 4th, 1942, Hiryū's portion of the 108-plane airstrike was an attack on the facilities on Sand Island with 18 torpedo bombers, one of which aborted with mechanical problems, escorted by nine Zeros. The air group suffered heavily during the attack: two B5Ns were shot down by fighters, with a third falling victim to AA fire. The carrier also contributed 3 Zeros to the total of 11 assigned to the initial CAP over the four carriers. By 07:05, the carrier had 6 fighters with the CAP which helped to defend the Kido Butai from the first US attackers from Midway Island at 07:10. Hiryū reinforced the CAP with launches of 3 more Zeros at 08:25. These fresh Zeros helped defeat the next American air strike from Midway. Although all the American air strikes had thus far caused negligible damage, they kept the Japanese carrier forces off-balance as Nagumo endeavored to prepare a response to news, received at 08:20, of the sighting of American carrier forces to his northeast.
Hiryū began recovering her Midway strike force at around 09:00 and finished shortly by 09:10. The landed aircraft were quickly struck below, while the carriers' crews began preparations to spot aircraft for the strike against the American carrier forces. The preparations were interrupted at 09:18, when the first attacking American carrier aircraft were sighted. Hiryū launched another trio of CAP Zeros at 10:13 after Torpedo Squadron 3 (VT-3) from Yorktown was spotted. Two of her Zeros were shot down by Wildcats escorting VT-3 and another was forced to ditch. While VT-3 was still attacking Hiryū, American dive bombers arrived over the Japanese carriers almost undetected and began their dives. It was at this time, around 10:20, that in the words of Jonathan Parshall and Anthony Tully, the "Japanese air defenses would finally and catastrophically fail." Three American dive bomber squadrons now attacked the three other carriers and set each of them on fire. Hiryū was untouched and proceeded to launch 18 D3As, escorted by six Zeros, at 10:54. Yamaguchi radioed his intention to Nagumo at 16:30 to launch a third strike against the American carriers at dusk (approximately 18:00), but Nagumo ordered the fleet to withdraw to the west. At this point in the battle, Hiryū had only 4 air-worthy dive-bombers and 5 torpedo-planes left. She also retained 19 of her own fighters on board as well as a further 13 Zeros on CAP (a composite force of survivors from the other carriers). At 16:45, Enterprise's dive bombers spotted the Japanese carrier and began to maneuver for good attacking position while reducing altitude. Hiryū was struck by four 1,000-pound (450 kg) bombs, three on the forward flight deck and one on the forward elevator. The explosions started fires among the aircraft on the hangar deck. The forward half of the flight deck collapsed into the hangar while part of the elevator was hurled against the ship's bridge. The fires were severe enough that the remaining American aircraft attacked the other ships escorting Hiryū, albeit without effect, deeming further attacks on the carrier as a waste of time because she was aflame from stem to stern. Beginning at 17:42, two groups of B-17s attempted to attack the Japanese ships without success, although one bomber strafed Hiryū's flight deck, killing several anti-aircraft gunners. Although Hiryū's propulsion was not affected, the fires could not be brought under control. At 21:23, her engines stopped, and at 23:58 a major explosion rocked the ship. The order to abandon ship was given at 03:15, and the survivors were taken off by the destroyers Kazagumo and Makigumo. Yamaguchi and Kaku decided to remain on board as Hiryū was torpedoed at 05:10 by Makigumo as the ship could not be salvaged. Around 07:00, one of Hōshō's Yokosuka B4Y aircraft discovered Hiryū still afloat and not in any visible danger of sinking. The aviators could also see crewmen aboard the carrier, men who had not received word to abandon ship. They finally launched some of the carrier's boats and abandoned ship themselves around 09:00. Thirty-nine men made it into the ship's cutter only moments before Hiryū sank around 09:12, taking the bodies of 389 men with her. The loss of Hiryū and the three other IJN carriers at Midway, comprising two thirds of Japan's total number of fleet carriers and the experienced core of the First Air Fleet, was a strategic defeat for Japan and contributed significantly to Japan's ultimate defeat in the war. In an effort to conceal the defeat, the ship was not immediately removed from the Navy's registry of ships, instead being listed as "unmanned" before finally being struck from the registry on 25 September 1942. The IJN selected a modified version of the Hiryū design for mass production to replace the carriers lost at Midway. Of a planned program of 16 ships of the Unryū class, only 6 were laid down and 3 were commissioned before the end of the war.
#second world war#world war 2#world war ii#wwii#military history#history#long post#naval history#imperial japan#japanese navy#japanese history#aircraft carrier#ships#midway
74 notes
·
View notes
Text
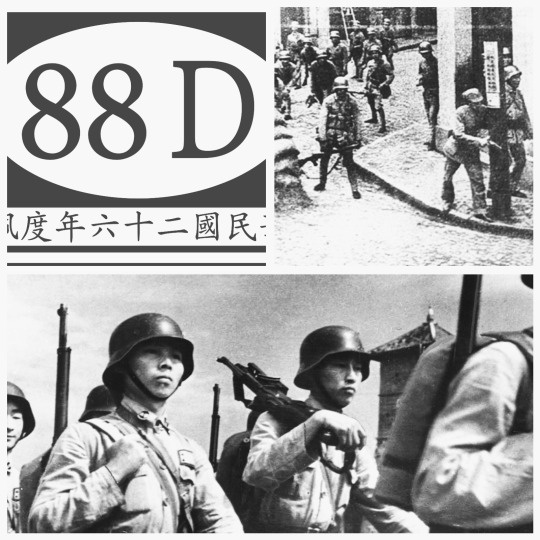
• 88th Division(National Revolutionary Army)
The 88th Division (simplified Chinese: 第八十八师) was a German-trained and reorganized division in the National Revolutionary Army.
In 1927 after the dissolution of the First United Front between the Nationalists and the Communists, the ruling Kuomintang (KMT) purged its leftist members and completely eliminated Soviet influence from its ranks. Chiang Kai-shek turned to Germany, historically a great military power, for assistance in the reorganization of the National Revolutionary Army. The Weimar Republic sent advisors to China, however due to restrictions imposed by the Treaty of Versailles, these advisors could not serve in military capacities. When Adolf Hitler became Chancellor in 1933 and disregarded the Treaty, the National Socialist Party and the KMT united by their shared anti-communist ideals began closely cooperating with Germany training Chinese troops and expanding Chinese infrastructure while China made its markets and natural resources available to Germany.
In 1934 General Hans von Seeckt, acting as advisor to Chiang, proposed a '60 Division Plan' for restructuring the Chinese Nationalist Army into 60 divisions of highly trained, well-equipped troops along German doctrines. The 88th Division was one of the first divisions to be reorganized and alongside the 36th Division and 87th Division became the cream of the crop of the National Revolutionary Army. The Japanese soon began a war with Nationalist China, thusly the newly trained divisions were mobilized. Due to its elite status, the 88th was deployed in the Battle of Shanghai in the summer and fall of 1937 against the Imperial Japanese Army in a decision by Chiang Kai-shek, agianst the advice of his chief German advisor, Alexander von Falkenhausen. Though still not completely trained and fully equipped with German weapons, the 88th Division under the command of Sun Yuanliang was rushed to the Second Battle of Shanghai alongside the other German-trained divisions. The elite, German-trained division performed admirably, pushing the Japanese marines back to the very shores of Shanghai.
While the Chinese Air Force provided much air-interdiction and close-air support early-on in the battle of Shanghai, pressing demands for air force units in the northern front at the Battle of Taiyuan and southern front at Guangzhou, plus heavy attrition in the Shanghai-Nanjing theater of operations eventually overwhelmed the Chinese Air Force units, the eventual absence of air and naval support, poor coordination between units, and the lack of defence in depth, resulted in the division suffering heavy casualties towards the end of the three-month battle. On December 25th, 1937, Generalissimo Chiang Kai-shek ordered the division withdrawn to join the ill-fated Battle of Nanjing.
This led to portions of the 524th Regiment remaining at the Sihang Warehouse for several days, where they successfully covered the retreat of the division while beating back numerous Japanese assaults on the warehouse. As the rest of the 88th retreated, 1st Battalion converged on Sihang warehouse, bolstered by additional volunteers and a machine gun company who provided their only heavy weapons, 4 Type-24 Maxim Guns (licensed copies of the German WWI MG 08). The 414 men tirelessly reinforced their fortifications, manufacturing sandbags with the warehouse’s grain sacks while burning down neighboring structures to create an open kill zone. These men were mostly raw recruits, having joined the NRA within the past three months in response to the Japanese invasion in July. The NRA command was evidently aware of their numerical and firepower inferiority – they deliberately continued to label 1st Battalion as ‘524th Regiment’ in all communications to feign strength that the men desperately needed. Clearly, the odds were stacked against them. Waves of Japanese attacks were fought off by the defenders, who held onto the warehouse’s high ground. The Japanese were restricted in their tactics – not yet prepared to fight the Western powers, the IJN dared not use mustard gas or aerial bombs so close to the foreign concessions. Rumors of the defense spread like a patriotic wildfire throughout China, spurring many civilians to line the foreign bank of the Suzhou River, just to cheer their soldiers on. More importantly, many more sent supplies through the Chamber of Commerce to aid 1st Battalion. It was then that the legend of ‘800 Heroes’ was born, etched into history by 414 soldiers.
After the Battle of Nanking, the 88th Division never recovered its former strength and was of limited significance later in the war. In 1938 the 88th Division participated in the Battle of Wuhan as part of the 71st Corps. In 1942 the 88th Division was again reorganized and redeployed into Burma as part of the Chinese Expeditionary Force (in Burma).
#world war 2#second world war#world war ii#wwii#military history#history#chinese history#nationalist china#asian heritage month#german history
28 notes
·
View notes
Text
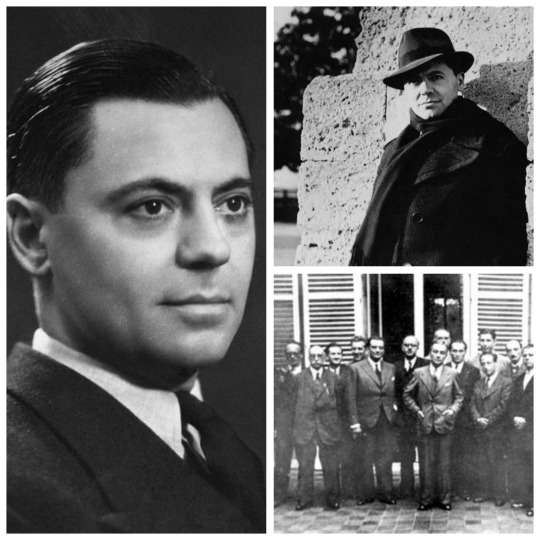
• Jean Moulin
Jean Pierre Moulin was a French civil servant who served as the first President of the National Council of the Resistance during World War II.
Jean Moulin was born at 6 Rue d'Alsace in Béziers, Hérault on June 20th, 1899, son of Antoine-Émile Moulin and Blanche Élisabeth Pègue. He was the grandson of an insurgent of 1851. His father was a lay teacher at the Université Populaire and a Freemason at the lodge Action Sociale. Jean Pierre Moulin was baptised on August 6th, 1899 in the church of Saint-Vincentin in Saint-Andiol (Bouches-du-Rhône), the village his parents came from. He spent an uneventful childhood in the company of his sister, Laure, and his brother Joseph. Joseph died after an illness in 1907. At Lycée Henri IV in Béziers, Jean was an average student. In 1917, he enrolled at the Faculty of Law of Montpellier, where he was not a brilliant student. However, thanks to the influence of his father, he was appointed as attaché to the cabinet of the prefect of Hérault. Moulin was mobilised in April 1918 as part of the age class of 1919, the last class to be mobilised in France. He was assigned to the 2nd Engineer Regiment of Montpellier. At the beginning of September, after an accelerated training, he headed with his regiment to the front in the Vosges, where he was posted in the village of Socourt. His regiment was preparing to go to the front lines as part of the attack planned by Foch for November 13th, but the Armistice was signed on November 11th.
Although Moulin did not fight directly on the front lines, he nevertheless was in a position to observe the horrors of war. He saw its aftermath on the battle fields, the devastation of villages and the state of prisoners of war. He helped to bury the war dead in the area around Metz. While still enlisted after the War, he was posted successively to Seine-et-Oise, Verdun and Chalon-sur-Saône. He worked as a carpenter, a digger and later a telephonist for the 7th and 9th Engineer Regiments. He was de-mobilised in November and, on November 4th, 1919, immediately resumed his post as attache at the prefecture of Hérault. After World War I, Moulin resumed his studies of law. His position as attache allowed him to finance his university studies as well as providing a useful apprenticeship in politics and government. He obtained his law degree in July 1921, He then entered the prefectural administration as chief of staff to the deputy of Savoie in 1922 and then sous-préfet of Albertville from 1925 to 1930. After his proposal of marriage was rejected by Jeanette Auran, Moulin, aged 27, married a 19-year-old professional singer, Marguerite Cerruti, in the town of Betton-Bettonet in September 1926. The marriage did not last long. Cerruti quickly became bored with the marriage, and Moulin responded by offering her further singing lessons in Paris, where she disappeared for two days. Moulin was appointed sous-préfet of Châteaulin, Brittany in 1930, but he also drew political cartoons for the newspaper Le Rire under the pseudonym Romanin. In 1932, Pierre Cot, a Radical Socialist politician, named Moulin his second in command or chef adjoint when he was serving as Foreign Minister under Paul Doumer's presidency. In 1933, Moulin was appointed sous-préfet of Thonon-les-Bains, parallel to his function of head of Cot's cabinet of in the Air Ministry under President Albert Lebrun. In 1936, he was once more named chief of cabinet of Cot's Air Ministry of the Popular Front. In that capacity, Moulin was involved in Cot's efforts to assist the Second Spanish Republic by sending it planes and pilots.
He became France's youngest préfet in the Aveyron département, based in the commune of Rodez, in January 1937. It has been claimed that during the Spanish Civil War, Moulin assisted with the shipment of arms from the Soviet Union to Spain. A more commonly-accepted version of events is that he used his position in the French air ministry to deliver planes to the Spanish Republican forces. In January 1939, Moulin was appointed prefect of the Eure-et-Loir department. He was based in Chartres. After war against Germany was declared, he asked multiple times to be demoted because " his place is not at the rear, at the head of a rural departement". Against the opinion of the Minister of the Interior, he asked to be transferred to the military school of Issy-Les-Moulineaux, near Paris. The minister forced him to return to Chartres, where he had trouble ensuring the safety of the population. When the Germans got close to Chartres, he wrote to his parents, "If the Germans who are able to do anything make me say dishonorable words, you already know, it is not the truth". He was arrested by the Germans on June 17th, 1940, as he refused to sign a false declaration that three Senegalese tirailleurs had committed atrocities, killing civilians in La Taye. In fact, those civilians had been killed by German bombings. Beaten and imprisoned because he refused to comply, Moulin attempted suicide by cutting his throat with a piece of broken glass. That left him with a scar he would often hide with a scarf, which is the image of Jean Moulin remembered today. He was found by a guard and taken to hospital for treatment. Because he was a Radical, he was dismissed by the Vichy regime, led by Marshal Philippe Pétain on November 2nd, 1940, along with all other left-wing préfets. He then began writing his diary, First Battle, in which he relates his resistance against the Nazis in Chartres, which was later published at the Liberation and prefaced by de Gaulle.
Having decided not to collaborate, Moulin left Chartres for Saint-Andiol, Bouches-du-Rhône, to study and join the French Resistance, and he decided to negotiate with Free France. He started to use the name Joseph Jean Mercier and went to Marseille, where he met other resistants, including Henri Frenay and Antoine Sachs. Moulin reached London in September 1941 after travelling through Spain and Portugal, and he was received in October by De Gaulle, who wrote about Moulin, "A great man. Great in every way". Moulin summarised the state of the French Resistance to de Gaulle. Part of the Resistance considered him too ambitious, but de Gaulle had confidence in his network and skills. He gave Moulin the assignment of co-ordinating and unifying the various Resistance groups, a hard mission that would take time and effort to accomplish. On January 1st, 1942, Moulin parachuted into the Alpilles and met with the leaders of the resistance groups, under the codenames Rex and Max. He succeeded to the extent that the first three of these resistance leaders and their groups came together to form the United Resistance Movement ( Mouvements Unis de la Résistance, MUR) in January 1943. The next month, Moulin returned to London, accompanied by Charles Delestraint, who led the new Armée secrète, which grouped the MUR's military wings together. Moulin left London on March 21st, 1943, with orders to form the Conseil national de la Résistance (CNR), a difficult task since the five resistance movements involved, besides the three already in the MUR, wanted to retain their independence. The first meeting of the CNR took place in Paris on May 27th, 1943. Some historians consider Moulin one of the most important figures in the French Resistance because of his actions in unifying and organizing the various resistance groups, which had previously been operating in an independent and uncoordinated manner. He was also instrumental in obtaining the cooperation of the Communist resistance groups, who had been reluctant to accept De Gaulle as their leader, because Moulin was known as a left-wing republican.
On June 21st, 1943, he was arrested at a meeting with fellow Resistance leaders in the home of Frédéric Dugoujon in Caluire-et-Cuire, a suburb of Lyon. He was, along with the other Resistance leaders, sent to Montluc Prison in Lyon in which he was detained until the beginning of July. Tortured daily in Lyon by Klaus Barbie, the head of the Gestapo there, and later more briefly in Paris, Moulin never revealed anything to his captors. According to witnesses, Moulin and his men had their fingernails removed using hot needles as spatulas. In addition, his fingers were placed on the door frames and the doors were closed again and again until his knuckles were broken. They then tightened the handcuffs until they penetrated his skin and broke the bones in his wrists. Because he still refused to speak, they beat him until his face was unrecognizable and he fell into a coma. Afterwards, Barbie ordered Moulin to be placed in an office and to be shown to all members of the Resistance not to collaborate with the Nazis. The last time he was seen alive, he was still in a coma and his head was yellow, swollen and wrapped in bandages, according to the description given by Christian Pineau, fellow prisoner and another member of the Resistance. He is believed to have died near Metz on a train headed for Germany. He was reported to have died on July 8th, 1943 at the age of 44. There has been much research, speculation, judicial scrutiny and media coverage of who betrayed Jean Moulin and the circumstances of his death. Klaus Barbie alleged that suicide was the cause, and Moulin biographer Patrick Marnham supports that explanation. René Hardy was caught and released by the Gestapo, who had followed him to the meeting at the doctor's house. There have been many suppositions in the postwar years that Moulin was Communist. No hard evidence has ever backed up that claim.
Ashes that were presumed to be those of Jean Moulin were buried in Le Père Lachaise Cemetery in Paris and later transferred to the Pantheon on December 19th, 1964. France's French education curriculum commemorates Moulin as a symbol of the French resistance and a model of civic virtue, moral rectitude and patriotism. As of 2015, Jean Moulin was the fifth most popular name for a French school, and as of 2016 his is the third most popular French street name of which 98 percent are male. In 1967, the Centre national Jean-Moulin de Bordeaux was created in Bordeaux. Its archives contain documents on the Second World War and the Resistance. The Centre provides pedagogical supports and research material on the involvement of Jean Moulin in the Resistance. In 1993, commemorative French 2, 100 and 500 franc coins were issued, showing a partial image of Moulin against the Croix de Lorraine and using a fedora-and-scarf photograph, which is well recognised in France.
#second world war#world war ii#world war 2#wwii#military history#history#french resistance#french history#french icons#resistance movements#unsung hero#biography#short post
31 notes
·
View notes
Text
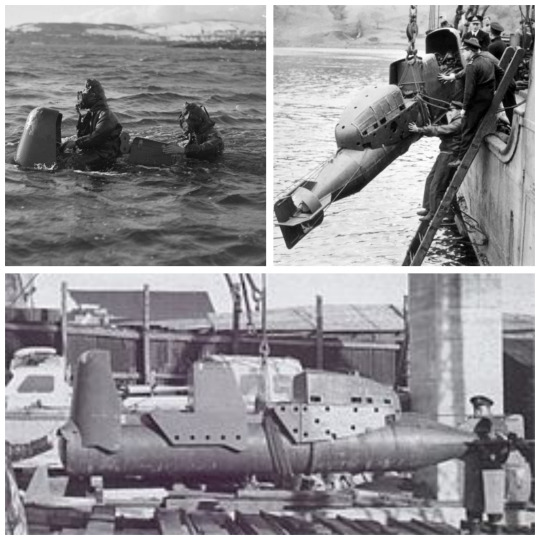
• Chariot Manned Torpedo
The Chariot was a British manned torpedo used in World War II. The Chariot was inspired by the operations of Italian naval commandos, in particular the raid in December 1941 by members of the Decima Flottiglia MAS.
The Italians were the first to use midget submarines to great effect in World War Two. In September 1941, six members of the Italian Navy's elite assault team known as the "Sea Devils" sailed their 20-foot long torpedoes called the Maiale or "Pig" into the British naval base at Gibraltar where they sank British cargo ships. Britain's wartime leader Winston Churchill was furious at the success of the raid and demanded that the Royal Navy establish a similar manned torpedo force to attack Axis shipping in their own harbours. Official development of the Chariot began in April 1942, primarily led by two officers of the Royal Navy's submarine service: Commander Geoffrey Sladen DSO*, DSC and Lieutenant Commander William Richmond "Tiny" Fell CMG, CBE, DSC. Training of crews was based out of the depot ship HMS Titania initially stationed at Gosport and later in Scotland at Loch Erisort (known as port "HZD"), Loch a' Choire (known as port "HHX") and Loch Cairnbawn (known as port "HHZ") and out of HMS Bonaventure in the same region. British Chariot Mark I was 22 feet 4 inches long, 2 feet 11 inches wide, 3 feet 11 inches high and weighed 1.6 tonnes. The battery powered motor had three settings: slow, medium and full which permitted a top speed of about 3.5 knots. The Chariot manned torpedo had a maximum diving depth of 27 metres and an endurance of about seven or eight hours. The detachable warhead containing 600 pounds of Torpex, an explosive mix developed for torpedoes which was 50% more powerful than TNT by mass. Some 34 Chariot Mark I torpedoes were manufactured from 1942 followed, in 1944, by thirty larger semi-enclosed Mark II examples which had a warhead containing 1,200 pounds of explosives.
A Chariot's limited range meant that it had to be transported relatively close to its objective before its crew could ride it to the target under its own power. The warhead, which was detonated by timer, would be detached and left at the enemy ship. The crew would then attempt to ride the Chariot to a rendezvous with a friendly submarine or be forced to abandon the Chariot and escape by other means. Later deployment of the Chariot was made by carrying the machines to their point of departure by submarine. In early attempts, tubes were fitted to the deck of a submarine to contain the Chariots. The tubes were 24 feet 2 inches long and had an exterior height of 5 feet 4 inches. The Chariots sat on wheeled bogeys inside, strapped down until needed. Later in the war, due to problems encountered with this method, Chariots were instead secured to the deck of the submarine using chocks.
After months of training in underwater sabotage and exercises (during which one frogman died) the British Chariot teams were finally ready for their first mission. It would be worthy of their elite status. An attack on the mighty German battleship - the dreaded Tirpitz, sister ship to the Bismarck, and the largest German warship in northern waters. Her presence seriously threatened Britain's Arctic convoys shipping supplies to the Russians. It was imperative that she be eliminated. Securely moored in a fjord in Norway and surrounded by torpedo nets and guard boats, the Tirpitz was going to be difficult to destroy. The plan (Operation Title) was to sail up the Trondheimsfjord where the Tirpitz was located and then launch the Chariots near the target. On October 26th, 1942 the Norwegian trawler Arthur, with two Chariots secreted beneath, entered the fjord. The trawler was commanded by Lieutenant Leif Larsen, a Norwegian in the British Special Operations Executive with the Chariot teams. Unfortunately a storm struck as they sailed along the Fjord and both Chariots were torn off the hull when just 10 miles short of the German battleship. Larsen regretfully was forced to abandon the mission. Despite its failure Larsen would be awarded the Conspicuous Gallantry Medal, the first non-Briton to do so, for his courageous attempt to disable the Tirpitz at its berth.
Chariots were sent to the Mediterranean Sea, and a more successful operation was carried out against the Italians. On January 3rd, 1943, two submarines launched Chariot torpedoes at Italian shipping in the Sicilian port of Palermo. While other teams attacked vessels in the harbour, including a liner being used as a troopship, Lieutenant Dickie Greenland RNVR, and Leading Signalman Alex Ferrier broke through the defensive torpedo nets surrounding the light cruiser Ulpio Traiano and attached their warhead beneath her keel. Realising that they could not now return to their parent submarine they decided to scuttle the Chariots and attempt to escape from Palermo overland. They were soon apprehended, but had the satisfaction of hearing the detonation of their explosive charges inflicting seriously damage to Axis vessels in the harbour. Chariots were not only used for attacks on enemy vessels. In May and June 1943 they were used to reconnoitre potential landing beaches for the Allied invasion of Sicily (Operation Husky). These were carried out partly by Chariots launched from the submarines HMS Unseen (P51) and HMS Unrivalled (P45). On the night of June 21st, 1944 a joint British and Italian operation was mounted to prevent the occupying Germans from sinking the Italian cruisers Bolzano and Gorizia as block-ships in La Spezia, northern Italy. Two Chariots were launched from a motor torpedo boat but unfortunately one had to be abandoned when it began to leak and could not be controlled. The other (crewed by Sub Lieutenant Malcolm Causer RN and Able Seamen Harry Smith RN) reached the Bolzano and successfully sank the cruiser at her berth.
In October 1944 "the final and only completely successful British Chariot operation" occurred when two crews on Mk II Chariots, commanded by Lieutenant Tony Eldridge RNVR, were launched from the submarine HMS Trenchant (commanded by Lt.Cmdr. Arthur "Baldy" Hezlet, RN) and sank two ships in the harbour of Japanese occupied Phuket, Thailand. After the war there were only six serviceable Chariot Mk.IIs left in the UK and by 1950 there were even fewer. With the post war defense cuts there was no serious consideration of procuring more. They were kept in limited service however and operated by Royal Navy Clearance Divers. The main tactical development was a plan to launch the Chariots against Soviet harbors from X-Craft midget submarines in the event of World War Three.
#second world war#world war ii#world war 2#wwii#history#british history#british navy#naval history#submarines#weird history#military history
38 notes
·
View notes
Text

• PTRD-41 Anti-Tank Rifle
The PTRD-41 (Shortened from Russian, ProtivoTankovoye Ruzhyo Degtyaryova), was an anti-tank rifle produced and used from early 1941 by the Soviet Red Army during World War II.
In 1939 the USSR captured several hundred Polish Model 35 anti-tank rifles, which had proved effective in the September Campaign when Poland was invaded by Germany. Vasily Degtyaryov copied its lock and several features of the German Panzerbüchse 38 when hasty construction of an anti-tank rifle was ordered in July 1941. The PTRD and the similar but semi-automatic PTRS-41 were the only individual anti-tank weapons available to the Red Army in numbers upon the outbreak of the war with Germany. The 14.5 mm armor-piercing bullet had a muzzle velocity of 1,012 m/s (3,320 ft/s). It could penetrate an armor plate up to 35 to 40 mm (40 mm with tungsten ammunition) thick at a distance of 100 meters at 0 degrees. During the initial invasion, and indeed throughout the war, most German tanks had side armor thinner than 40 mm (Panzer I and Panzer II: 13-20 mm, Panzer III and Panzer IV series: 30 mm, Panzer V Panther (combat debut mid-1943): 40-50 mm).
Produced from early 1941, they were effective against the thin side armor of German tanks and self-propelled guns; the tungsten core rounds were not able to penetrate the thicker frontal armor of tanks. As German tank technology advanced, particularly in terms of the thickness of armor, PTRD-41 anti-tank rifles, along with their PTRS-41 semi-automatic cousins, became much less effective. Additionally, combat experience found that the single-shot PTRD-41 anti-tank rifle gave off immense muzzle flashes, which in turn attracted counter-fire. Nevertheless, large quantities remain in service as Russian soldiers found them easy to transport and they were still useful against unarmored vehicles.
Furthermore, due to the high velocity and small size of the round, it had a very high chance of shattering or utterly failing against armor it should have penetrated, which was aggravated if the target was not at a perpendicular angle. Due to the obsolescence and inadequate ability against tanks, PTRD users were instructed to attempt to shoot view ports rather than actually try to penetrate the vehicles armor. This tactic was quickly found ineffective due to fact that despite the good range of fire the rifles were never fitted with telescopic sights, and the simple mechanical (iron) ones did not allow for proper aiming at the required distances. After poor results against the enemy tanks the PTRD and PTRS were finally relegated to anti-materiel duty in 1943 as they were still effective against lesser armored vehicles such as armored half-tracks, armored cars and unarmored vehicles.
The PTRD suffered from numerous flaws; the most notable are the lack of penetration versus enemy vehicles and inability to aim accurately with a telescopic sight, which frustrated PTRD teams, its size and weight which hampered its mobility and deployment, and its immense muzzle blast which gave away the unit's firing position. The PTRD was eventually replaced by the RPG series of anti-tank rocket launchers. After World War II the PTRD was also used extensively by North Korean and Chinese armed forces in the Korean War. During this war, William Brophy, an American Army Ordnance officer, mounted a .50 BMG barrel to a captured PTRD to examine the effectiveness of long-range shooting. Furthermore, Americans also captured certain number of PTRD from Viet Cong in Vietnam War.
#second world war#world war ii#world war 2#wwii#military history#history#soviet union#soviet history#anti tank rifle#firearms#military weapons#short post
59 notes
·
View notes