
harvest-moon-cookbook
The Harvest Moon Cookbook
Ever wished you could make dishes from Harvest Moon games for yourself? Well here you can find a collection of HM recipes~
For a complete list of all recipes, check out my "by name" link.
Credit goes to the original authors for all of these recipes (linked in each post).
217 posts
Don't wanna be here? Send us removal request.
Last Seen Blogs


beingaddiegreen-blog
Being Addie Green

tintin-official
tintin x unspeakable violence

timtygran
Tim Tygran

daisychainnoose
Layla
Photo

POUND CAKE
(From AWL)
https://sallysbakingaddiction.com/iced-lemon-pound-cake/
Ingredients:
1 and 1/2 cups (188g) all-purpose flour (spoon & leveled)
1/2 teaspoon baking powder
1/2 teaspoon salt
1 cup (230g; 2 sticks) unsalted butter, softened to room temperature
1 cup (200g) granulated sugar
3 large eggs, at room temperature
1/4 cup (60g) sour cream, at room temperature
3 Tablespoons (45ml) freshly squeezed lemon juice (about 1 lemon)
zest of 1 lemon
1 teaspoon pure vanilla extract
Icing:
1 cup (120g) confectioners’ sugar, sifted
1 and 1/2 Tablespoons (22ml) lemon juice
1 Tablespoon (15ml) heavy cream or milk (heavy cream produces a thick icing as pictured)
Directions:
Lower the oven rack to the lower third position and preheat the oven to 350°F (177°C). Grease a 9×5 inch loaf pan.
Make the cake: Whisk the flour, baking powder, and salt together in a large bowl. Set aside.
With a handheld or stand mixer fitted with a paddle or whisk attachment, beat the butter on high speed in a large bowl until smooth and creamy, about 1 minute. Add the granulated sugar and beat on high speed for 2 minutes until creamed. Scrape down the sides and up the bottom of the bowl as needed. With the mixer running on low speed, add the eggs one at a time. Once the last egg is completely mixed in, stop the mixer. Add the sour cream, lemon juice, lemon zest, and vanilla extract, then beat on medium speed until combined. Scrape down the sides and up the bottom of the bowl as needed. The mixture may look curdled as a result of the varying textures combining. This is normal and the batter will come together when you add the dry ingredients in the next step.
With the mixer running on low speed, slowly add the dry ingredients just until combined. If needed, run a whisk through the batter a few times to rid any large lumps. Avoid over-mixing. Batter is thick.
Spoon/spread the batter into prepared loaf pan and bake for 45-60 minutes, tenting the cake with aluminum foil halfway through baking to prevent the top from over-browning. Pound cakes are dense and take awhile to bake in the oven. Baking times vary, so keep an eye on yours and don’t be alarmed if yours is taking longer. The cake is done when a toothpick inserted in the center comes out *mostly* clean. A couple moist crumbs are OK.
Remove the cake from the oven and place on a wire rack. Allow cake to cool in the pan on the wire rack for 1 hour, then carefully remove the slightly warm cake from the pan. Let it continue cooling on a wire rack or on a serving plate/platter. You can add the icing while the cake is still warm or wait for it to cool.
Make the icing: Whisk all of the icing ingredients together and pour over cake. Serve immediately or wait until the cake cools completely, which promises neater slices.
Cover and store leftover cake for up to 3 days at room temperature or up to 1 week in the refrigerator.
#food#recipe#recipes#dessert#harvest moon#story of seasons#pound cake#flour#baking powder#salt#sugar#butter#egg#sour cream#lemon#vanilla#milk
78 notes
·
View notes
Photo

PEACH APPLE JAM (Phurum Jam)
(From AWL)
http://portandfin.com/heavenly-jam-peach-pear-apple-ginger/
Ingredients:
12 peaches, peeled and pitted (8 cups macerated)
12 apples, peeled and cored (8 cups macerated)
12 pears, peeled and cored (8 cups macerated)
24 cups sugar (1 cup of sugar for each cup of fruit)
Fresh ginger- a knob the size of your thumb, grated
Equipment:
1 very large stainless steel pot
1 food processor
1 long stem stirring spoon
Sanitized mason jars and lids
Tongs
Wide funnel
Ladle
Directions:
First, you will want to clean out your mason jars. There are several methods for doing this, but I like to take a short cut and run them through the dishwasher on the ultra-hot 'sanitation' setting, which also heat dries the jars. Do ensure your jars are dry before canning with them.
To peel the peaches, bring a large pot of water to a boil. Slice a small 'X' into the skin on the bottom of each peach. Place the scored peaches into boiling water for 30-40 seconds then shock them in a bath of very cold or ice water. The skins should peel off quickly and easily. Quarter the fruits, remove the pits and whiz them through the food processor. You should have roughly 8 cups of macerated fruit. Pour chopped peaches into your large jam pot.
Peel apples and pears with a vegetable peeler. Quarter and core fruits and blitz through a food processor in batches, similar to how you cut the peaches- small chunks are okay but try and get any larger pieces broken up. You should have roughly 8 cups of chopped pear and 8 cups of chopped apple. Add both to the jam pot.
Add 24 cups of sugar (1 cup for each cup of fruit) and grated ginger and stir well. On the stovetop, turn the heat on the jam pot up to high, stirring frequently to ensure the bottom doesn't burn. Once the fruit has come to a boil, turn the heat down to med-low and simmer for 40 minutes or so.
Using a spoon and a little bowl, skim the 'foam' that forms on the top of the jam as it is simmering. This 'jam waste' is cloudy but still delicious and is a great way to test for flavour and adjust the ginger to your palette!
When the jam is ready, the colour will have darkened slightly to a beautiful gold and the bubbles coming to the surface with 'burp' slowly, indicating a good thickness.
Fill a small saucepan with water and bring the water to a boil. Place the center lids of your mason jars (with the rubber seal) in the boiling water to sanitize them.
Using a ladle and a wide funnel, pour your jam into one of the sanitized mason jars. Using a moist cloth, wipe down the edge of the jar to ensure a tight seal. Using tongs, lift one of the mason jar lids out of the boiling water and place on top of the filled jar. Screw on the outer lid tightly and set aside. Repeat with the rest of the jars until all the jam has been canned. As you go through this process you will begin to hear a satisfying 'popping' noise as the hot jars seal themselves- that's a good thing! A 'pop' means the jar is well sealed and the jam will keep well in a cool dark place for up to a year or two!
14 notes
·
View notes
Photo

MUSHROOM CURRY
(From AWL)
https://ministryofcurry.com/mushroom-masala/
Ingredients:
1 pound white mushrooms rinsed, dried and sliced
2 tablespoons ghee or neutral oil for vegan version
1 large yellow onion finely chopped
2 teaspoons ginger grated
2 teaspoons garlic minced
¾ cup tomato puree or 2 fresh ripe red tomatoes pureed
½ teaspoon ground turmeric
½ to 1 tablespoon Kashmiri red chili powder or any other mild red chili powder
½ to 1 teaspoon garam masala
1 teaspoon kosher salt
⅓ cup cashews
1 tablespoon dried fenugreek leaves
cilantro leaves chopped for garnish
Directions:
Soak cashews in ½ cup warm water for 10 minutes and set aside. Drain all the water and blend the cashews with ¼ cup of water to make smooth paste and reserve.
Set the Instant Pot to saute mode and heat add ghee. Add onions and cook for 3 to 4 minutes with a glass lid on, stirring a few times. Add ginger and garlic paste, cook for 30 seconds. Turn the Instant Pot off.
Add tomato puree, turmeric, red chili powder, garam masala salt, and mushrooms. Mix well, deglazing the pot to remove any browning on the bottom of the pot. Close the Instant Pot, and pressure cook(Hi) for 4 minutes followed by Quick Release.
Stir in dried fenugreek leaves, cashew paste, and chopped cilantro. Mix well and serve with Basmati Rice and parathas. For a low-carb meal, serve mushroom masala over cauliflower rice. Add a side of cucumber salad for a delicious meal.
#food#recipe#recipes#harvest moon#story of seasons#hm cookbook#main dish#mushroom#oil#onion#ginger#garlic#tomato#turmeric#chili powder#masala#salt#cashew#cilantro
14 notes
·
View notes
Photo
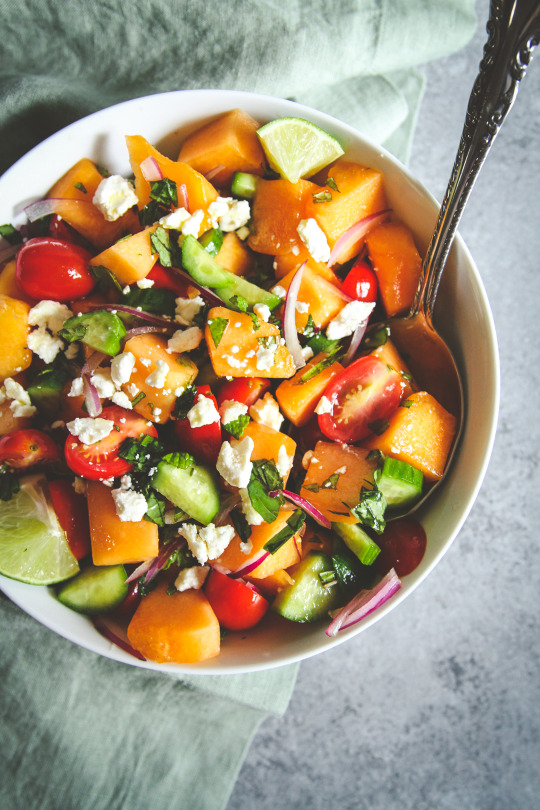
SUMMER MELON SALAD (Tomamelo Salad)
(From AWL)
https://sweetphi.com/summer-melon-salad/
Ingredients:
1/2 cup thinly sliced cucumber
1/2 cup cherry or grape tomatoes, sliced in half
1/4 cup thinly sliced red onion
1 tbsp olive oil
2 tsp apple cider vinegar
sea salt and black pepper to taste
3 cups cantaloupe, cubed or scooped with melon baller
2 tbsp fresh mint, lightly chopped
3 oz. feta cheese
For the dressing:
3 tbsp lime juice
1 tbsp maple syrup
1/2 tsp salt
1 tbsp olive oil
Directions:
Add cucumber, tomato, red onion, olive oil, apple cider vinegar, salt and pepper to a bowl and toss to combine. Set aside.
Prepare the dressing by adding lime juice maple syrup and salt to a bowl and whisk to combine.
Slowly add olive oil while constantly whisking to create an emulsion.
Add cantaloup to a large serving bowl and top with dressing. Gently toss to combine.
Incorporate the cucumber-tomato mixture (leaving excess liquid behind) and fresh mint by folding gently. Top with crumbled feta cheese and enjoy!
#harvest moon#story of seasons#food#recipe#recipes#harvest moon cookbook#hm cookbook#salad#cucumber#tomato juice#onion#vinegar#olive oil#cantaloupe#mint#cheese#lime juice#maple syrup#salt#appetizer#main dish
9 notes
·
View notes
Photo

FISH STEW (”Best Soup”)
(From AWL)
https://www.simplyrecipes.com/recipes/fish_stew_with_ginger_and_tomatoes/
This game is making my life difficult with the recipes :P This is my best stab at “best stew” since it calls for 1. Fish 2. Root vegetables, and 3. some hybrid cops that have any 2 of potato, sweet potato, and carrot.
Ingredients:
4 small (15 ounces, 443 g) red potatoes
2 tablespoons olive oil
3 tablespoons finely grated fresh ginger
1 clove garlic, crushed
1 can (14 to 16 ounces, 400 to 453 g) diced tomatoes
1/2 teaspoon sugar
1/2 teaspoon salt, or more to taste
1/4 teaspoon black pepper, or more to taste
1/4 teaspoon crushed red pepper
3 cups (700 ml) chicken stock
2 pounds (.90 kg) boneless firm-fleshed white fish, such as haddock, halibut, hake, flounder, pollock, whiting, or other local fish (it’s okay if the skin is still on)
2 tablespoons chopped fresh parsley
Directions:
Without peeling, slice the potatoes into 1/4-inch rounds. Steam them over boiling water in a vegetable steamer, tightly covered, for 10 minutes, or until tender. Set aside.
Meanwhile, In a Dutch oven or other large pot over medium heat, heat the oil and add the ginger, garlic, tomatoes and their liquid, sugar, salt, black pepper, and red pepper. Cook, stirring, for 3 minutes. Add the stock, bring to a boil, lower the heat, and simmer for 10 minutes, or until the flavors mellow.
Add the potatoes and return the sauce to a boil. Simmer 2 minutes.
Cut the fillets into 3-inch pieces. Add them to the sauce and press them down into the pan to submerge them in the liquid. Cover the pan and cook for 5 minutes, or until the fish is opaque and flakes easily with the tip of a knife.
Taste for seasoning and add more salt and black pepper, if you like. Sprinkle with parsley before serving.
#food#recipe#harvest moon#story of seasons#harvest moon cookbook#main dish#soup#stew#hm awl#fish#potatoes#olive oil#ginger#garlic#tomato#sugar#salt#pepper#chicken stock#parsley
13 notes
·
View notes
Photo

ICE CREAM
(From AWL)
https://www.tasteandtellblog.com/homemade-vanilla-ice-cream/
Ingredients:
1 cup whole milk
3/4 cup sugar
2 cups heavy cream, divided
pinch of salt
1 vanilla bean
6 large egg yolks
3/4 teaspoon vanilla extract
Directions:
Combine the milk, sugar, 1 cup of the cream and the salt in a medium saucepan.
Cut the vanilla bean in half lengthwise and scrape the seeds out of the center. Add the seeds and the bean to the mixture and stir over medium heat.
Cook until warmed through, then cover the pan, remove from the heat, and let the mixture sit and steep for 30 minutes.
Pour the remaining one cup of cream into a large bowl and set a mesh strainer over the top. In a medium bowl, whisk the egg yolks. While whisking, pour the vanilla bean mixture into the egg yolks and whisk completely, then pour the mixture back into the saucepan.
Place the saucepan over medium heat. Stir the mixture constantly with a heatproof spatula, making sure to scrape the bottom as you stir. Cook until the mixture thickens and coats the back of a spoon.
Pour the mixture into the strainer and stir it into the cream. Remove the vanilla bean from the strainer and add to the custard. Stir in the vanilla extract. Place in an ice bath and stir frequently until cooled. Cover the bowl and refrigerate until fully chilled, preferably overnight.
When ready to churn, remove the vanilla bean from the mixture. Freeze the ice cream according to your ice cream maker’s manufacturer’s instructions.
#food#recipe#recipes#harvest moon#story of seasons#dessert#ice cream#milk#sugar#cream#salt#vanilla#egg
17 notes
·
View notes
Photo
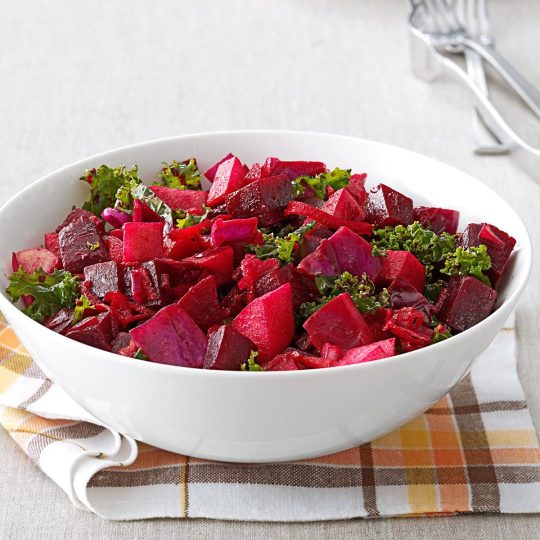
RED SALAD
(From AWL)
https://www.tasteofhome.com/recipes/ruby-red-beet-apple-salad/
Ingredients:
2-1/2 pounds fresh beets (about 8 medium)
2 medium apples, peeled and chopped
1 cup chopped fresh kale
1 cup chopped red cabbage
1 cup shredded carrots
1/2 cup chopped onion
1/2 cup cider vinegar
1/3 cup olive oil
2 tablespoons honey
1 teaspoon salt
3/4 teaspoon curry powder
1/8 teaspoon each ground ginger, garlic powder and pepper
Directions:
Scrub beets and trim tops to 1 in. Place in a Dutch oven; add water to cover. Bring to a boil. Reduce heat; simmer, covered, 30-60 minutes or until tender. Remove from the water; cool.
Peel beets and cut into 1/2-in. cubes. In a large bowl, combine the apples, kale, cabbage, carrots, onion and beets.
In a small bowl, whisk the remaining ingredients. Pour over salad; toss to coat. Refrigerate, covered, for at least 4 hours or until chilled, stirring occasionally.
#food#recipe#recipes#harvest moon#story of seasons#salad#red veggie#red salad#beet#apple#kale#red cabbage#cabbage#carrot#onion#vinegar#olive oil#honey#salt#curry powder#ginger#pepper
43 notes
·
View notes
Photo


Not only have we now completed the recipe list for (More) Friends of Mineral Town and gotten a graphic, the older games have updated graphics as well!
Thank you all for the love - it is very much appreciated! I’m glad you all are enjoying the recipes :)
33 notes
·
View notes
Photo

FRIED BUCKWHEAT NOODLES (Fried Soba Noodles)
(From M/FoMT)
https://www.pccmarkets.com/recipe/soba-noodle-stir-fry/
Ingredients:
1 (9 1/2-ounce) package soba noodles
1/4 cup soy sauce
2 tablespoons sesame oil
1 tablespoon molasses
2 tablespoons mirin
1 tablespoon rice vinegar
1 teaspoon salt
1 tablespoon grated ginger
1 tablespoon minced garlic
1/2 teaspoon white pepper (optional)
1 teaspoon red pepper flakes (optional)
2 tablespoons high-heat oil
1 (10-ounce) package firm tofu, cubed
2 (10-ounce) packages frozen stir-fry vegetable mix OR 4 cups fresh vegetables of choice (onions, bok choy, carrots, broccoli, peppers)
Directions:
Boil 2 quarts water in large pot. Cook noodles until al dente, about 4 minutes. Strain and set aside.
In a small bowl, combine soy sauce, sesame oil, molasses, mirin, rice vinegar, salt, ginger, garlic, white pepper and red pepper flakes.
Heat wok over high heat; add oil. Add tofu cubes and stir-fry until browned. Add vegetables and cover for 3 minutes. Add cooked noodles and sauce mixture to vegetables and tofu. Stir until coated evenly by sauce. Serve hot or cold.
#food#recipe#recipes#harvest moon#story of seasons#friends of mineral town#more friends of mineral town#fried buckwheat noodles#fried soba noodles#main dish#soba noodles#soy sauce#sesame oil#molasses#mirin#rice vinegar#vinegar#salt#ginger#garlic#white pepper#tofu
53 notes
·
View notes
Photo
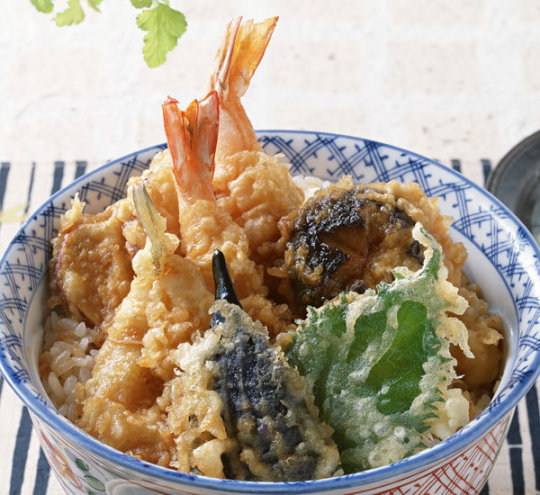
TEMPURA RICE
(From M/FoMT)
https://www.japancentre.com/en/recipes/354-tendon-tempura-rice-bowl
Ingredients:
300g cooked rice
75g tempura flour
4 shiitake mushrooms
1/2 peeled renkon lotus root
80g shelled king or tiger prawns - tails on
1/4 aubergine
sunflower or vegetable oil
sauce
6 tbsp mirin
2 tbsp soy sauce
1 tsp prepared liquid dashi
2 tbsp sugar
Directions:
When making a donburi it is better to start with the rice preparation as this takes the most time.
While the rice is cooking, let’s get our tempura ingredients ready to be fried. Begin by cutting the renkon and aubergine into slices of no more than a centimetre thick to ensure fast frying and removing the shell of the prawns leaving the tail attached.
The next step is to pat the ingredients dry with a piece of kitchen paper and to place on a plate in the fridge prior to cooking. Chilling ingredients is the secret to a nice and crispy tempura batter.
Now grab a heavy bottom pan and fill it approximately 2/3 with oil before heating it to 160-170°C (you could use a deep fat fryer to regulate the temperature). A thick pan is good for retaining heat but an iron wok is even better for this job. Check the oil is at the right temperature by dropping a splash of batter into the oil, if it sizzles then the oil is ready.
Whilst the oil is heating up make sure to keep an eye on it whilst mixing 75g of tempura flour with 110ml of ice cold water to make the batter. The colder the batter and ingredients before frying, the lighter and crispier your tempura will be. You can use ice cubes to keep your batter extra cold.
Now you’re almost ready to deep-fry. Dust the ingredients with a little flour, then dip into the batter, covering completely before placing the battered ingredients with your chopsticks into the oil and cooking for a minute or so on each side until the batter turns golden. Try not to cook too many pieces at one time as this will lower the oil’s temperature. Once cooked, remove from the pan and place on a wire rack before placing on kitchen paper to soak up the remaining excess oil.
Finally let’s prepare the sauce. Put the mirin to boil on high heat and let all the alcohol dissolve. When you can no longer smell the alcohol just add the soy sauce, dashi and sugar and let the mix simmer for a few minutes. Then grab a donburi bowl and add the rice and tempura before covering with the tasty sauce. Enjoy.
#food#recipe#recipes#harvest moon#story of seasons#friends of mineral town#more friends of mineral town#fomt#mfomt#main dish#tempura rice#rice#flour#mushrooms#lotus#prawn#aubergine#oil#mirin#soy sauce#sugar#dashi
148 notes
·
View notes
Photo

TOASTED RICE BALL
(From M/FoMT)
https://www.justonecookbook.com/yaki-onigiri-grilled-rice-ball/
Ingredients:
2 rice cooker cups uncooked Japanese short-grain rice (360ml; 1 rice cooker cup (180ml) of uncooked rice will make 3 rice balls.)
Water
kosher/sea salt
neutral-flavored oil (vegetable, canola, etc)
soy sauce
Directions:
Gather all the ingredients. Cook the rice in the rice cooker, pot over the stove top or pressure cooker.
Let the cooked rice cool a little bit until you can hold rice without burning your hands. Do not let the rice completely cool down.
Make Onigiri into triangle shapes. First wet both of your hands with water so rice won't stick.
Then put some salt in your hands and rub to spread all around.
Scoop about a half cup of rice onto your palm.
Cover the rice with the other hand and gently form the rice into a triangle.
Make sure covering hand (my right hand) should be forming a triangle shape. When forming the onigiri shape, your hands should be just firm enough so the onigiri doesn't fall apart. You don't want to squeeze the rice too tight.
I use three fingers (thumb, index finger, middle finger) to cover the area to make a nice triangle shape. Then rotate onigiri to make a perfect triangle.
While you squeeze onigiri firmly with both hands, one of your hand (my left hand) has to press onigiri to keep a nice form.
Gently squeeze the center of triangle on both sides so there is a slight indentation (for grilling onigiri). Now onigiri is ready!
Lightly oil a cast iron skillet and put it on medium heat.
Grill onigiri until all sides are crispy and lightly browned. Don't turn it around. Just work on one side at a time and avoid turning over frequently.
Lower heat to medium low and brush all sides with soy sauce. Rotate to make sure all sides become crispy. Be careful not to burn onigiri after you brush it with the sauce.
#food#recipe#recipes#harvest moon#story of seasons#friends of mineral town#more friends of mineral town#mfomt#fomt#appetizer#main dish#toasted rice ball#rice#salt#oil#soy sauce
21 notes
·
View notes
Photo

MOUNTAIN STEW
(From M/FoMT)
https://harvestmoon.fandom.com/wiki/Cooking_Recipes_(FoMT)
Ingredients:
About 1kg/2¼ lb scrag end or neck of lamb on the bone
2 carrots
1 large onion
2 celery sticks
1 leek
2-3 garlic cloves, crushed
1 large bay leaf
1 large sprig fresh thyme
Sea salt and freshly ground black pepper
150g/5oz small carrots
150g/5oz baby or pickling onions
1 large floury potato, about 300g/10oz weight, peeled and diced finely
2 spring onions, thinly sliced
A little fresh chopped parsley
Directions:
Using a sharp thin boning knife, remove as much meat from the lamb bones as possible. Chop finely and set aside.
Put the bones into a large pot. Roughly chop the carrots, large onion, celery and leek then place in the pot with the garlic and herbs. Cover with at least 4 litres/7 pints cold water.
Bring to the boil, season lightly, then simmer gently, uncovered for up to two hours.
Skim with a large tablespoon if necessary. Let the liquid simmer down until reduced by nearly two thirds. You need about 1.2 litres/2 pints of lovely sweet stock.
Strain and discard the bones etc. Ideally, cool and chill the stock then you can scrape off any fat that has settled on top.
Place the lamb meat into a large saucepan and cover with cold water. Bring slowly to the boil, skim off any scum, then immediately drain into a colander and rinse in cold running water. This scalding removes fat.
Return the meat to the pan and cover with the stock and bring to the boil. Turn down the heat and simmer partially covered, for about 30 minutes, or until tender.
Meanwhile, peel the carrots and cut into small chunks or shape into neat 'barrels'. Peel the baby onions, it helps to blanch them in boiling water for a minute for easy peeling. Add the small carrots and baby onions to the soup and cook for another five minutes.
Then add the diced potato and cook for another 10-15 minutes, until it starts to dissolve into the soup and thicken it. Finally check the seasoning, adding lots of aromatic black pepper and a little sea salt.
Garnish with sliced spring onion and parsley.
#food#recipe#recipes#harvest moon#story of seasons#hm#sos#friends of mineral town#more friends of mineral town#mfomt#fomt#mountain stew#soup#main dish#lamb#carrot#onion#celery#leek#garlic#thyme#bay leaf#pepper#potato
35 notes
·
View notes
Photo

BUCKWHEAT CHIPS (Buckwheat crackers)
(From M/FoMT)
https://www.bio-oz.com.au/blogs/news/bio-oz-buckwheat-flour-crackers-recipe-gluten-free
Ingredients:
3/4 cup of Buckwheat Flour
1/4 cup of filtered water
1/4 cup of Light, Extra Virgin Olive Oil
1/4 teaspoon good quality rock salt
1/4 teaspoon poppy seeds or sesame seeds (optional)
extra olive oil for brushing
extra salt for seasoning
Directions:
Preheat oven to 175 degrees cel (arrange so the middle rack is in position)
In a high powered blender or Thermomix combine buckwheat flour, water, oil and mix until smooth
Add salt and sprinkle with poppy seeds and mix again
Turn buckwheat mixture out onto silicone rolling mat greased with a little olive oil. The mixture should not be too sticky.
Roll out dough into a large rectangle so it is about 2mm thick. You may need to halve the dough in order to get it this thin. The thinner the better as they are nice and crunchy that way.
Turn the mat over (with the dough still stuck to it) and gently ease the rolled out dough onto your oven tray lined with baking paper.
Brush with extra olive oil lightly so as not to mark the cracker and sprinkle with a little extra rock salt
Score the dough into whichever shape you would like the cracker to end up. Sometimes I use a round cookie cutter for a biscuit the size of a rice cracker.
Bake for 15 minutes and then take them out and break them up along the score lines. Turn crackers over to bake on other side.
Bake on other side for another 15 minutes (if you have made them thicker you will need more cooking time) or until dark golden brown.
#food#recipe#recipes#harvest moon#story of seasons#friends of mineral town#fomt#more friends of mineral town#mfomt#buckwheat chips#buckwheat crackers#appetizer#side#flour#buckwheat#buckwheat flour#oil#salt#poppy seeds#sesame seeds
25 notes
·
View notes
Photo

APPLE SOUFFLE
(From M/FoMT)
https://milkandbun.com/2015/02/01/apple-souffle/
Ingredients:
300-350g apples
2-3 tbsp water
2 tbsp white caster sugar
1 tsp cinnamon, optional
2 egg whites
a pinch of salt
some butter or oil for greasing
Directions:
Wash, peel, core and cut apples into 4 slices. Put on a baking tray, add water and bake in preheated 180C oven for 20-30 minutes or until soften.
Puree apples. Put apple puree in a small pan, add sugar and cinnamon, cook on a medium heat for 10 minutes, stirring occasionally.
Meanwhile, beat egg whites with a pinch of salt until soft peaks. Continue beating, add warm apple puree and beat all together for 2-3 minutes more.
Brush ramekins with butter, pour in apple mixture. Bake in preheated 180C oven for 15-20 minutes.
Serve warm. Enjoy!
#food#recipe#recipes#harvest moon#story of seasons#dessert#apple souffle#apple#sugar#cinnamon#egg#salt#butter#oil
22 notes
·
View notes
Photo
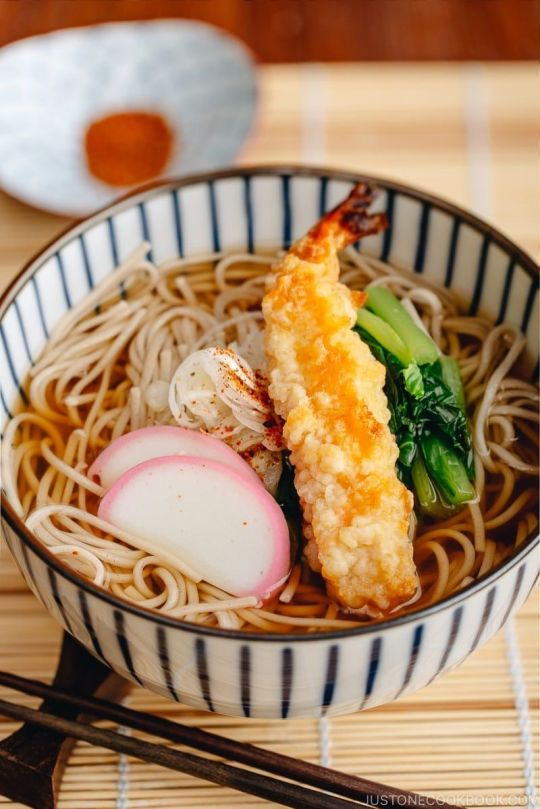
TEMPURA SOBA (Soba Noodle Soup, Tempura Buckwheat Noodles)
(From M/FoMT)
https://www.justonecookbook.com/soba-noodle-soup/
Ingredients:
4 cups water
1 piece kombu (dried kelp) (4" x 3” = 10 cm x 8 cm)
1 cup katsuobushi (dried bonito flakes) (1 cup = 10 g)
2 Tbsp mirin
1 Tbsp sake
2 Tbsp soy sauce
1 tsp kosher/sea salt
7 oz dried soba noodles (buckwheat noodles) (7 oz = 200 g)
Toppings:
1 Kamaboko (fish cake)
2 frozen shrimp tempura
1 bunch komatsuna (or spinach)
1 green onion/scallion (or Tokyo negi) (1 scallion = 3" Tokyo negi)
Shichimi Togarashi (Japanese seven spice) (or Ichimi Togarashi) (See Notes)
Directions:
[Optional] Soak kombu in water overnight (if you have time).
Transfer kombu and water into a saucepan. Bring the water to a boil. When it’s almost boiling, remove kombu from water and discard.
Add katsuobushi and simmer for 30 seconds. Then turn off the heat and let katsuobushi sink to the bottom of pan. Let Katsuobushi steep for about 10 minutes.
Strain the dashi over a large strainer lined with a paper towel set over another saucepan. Gently twist and squeeze the paper towel to release any remaining dashi into the saucepan.
Add mirin, sake, soy sauce, and salt in the dashi and bring the soup to a boil. Set aside until warming up later.
Insert a knife at the bottom of kamaboko to separate it from the wooden board. Then cut the kamaboko into 1/4 inch slices.
Slice green onion thinly and cut komatsuna into 2 inch pieces.
Boil the komatsuna in salted water. I first boil the hard bottom parts of komatsuna since they take longer to cook. Then add the leafy part later. Once they are tender, take them out and soak in ice water to stop cooking. Drain well.
Bake shrimp tempura at 400F (200C) for 15 minutes, or according to the package instructions.
Meanwhile boil two large pots of water (See Note). One for cooking soba noodles and the other pot for warming up the noodles after washing them. Cook soba according to the package instructions less 30 seconds*. Mine says cook for 4 minutes, so I cook 3 minutes and 30 seconds. Unlike pasta, you do not need to add salt to the water.
Drain the soba noodles and wash the noodles with hand under cold water to get rid of slimy texture.
Then transfer the soba noodles into the other pot of boiling water to warm up the noodles again. Once they are warm, drain and place them into a serving bowl.
Pour hot soup over the noodles and place toppings. Sprinkle shichimi togarashi or ichimi togarashi if you like it spicy. Serve immediately.
Notes:
You can use Ichimi Togarashi or Shichimi Togarashi (Japanese seven spice)
If you want to save time, just boil one pot of water, cook according to the package instructions (4 minutes), rinse under cold water, and then put the noodles directly into a bowl.
If you have Mentsuyu, you can dilute it with hot water to make a soup broth.
Adjust the seasoning as you like - to make it saltier or sweeter. I intended to bring out good dashi flavor so my seasonings may be too light for some of you.
#food#recipe#recipes#harvest moon#story of seasons#cookbook#tempura soba#tempura buckwheat noodles#soba soup#main dish#soup#kombu#bonito flakes#spinach#green onion#scallion#mirin#sake#soy sauce#salt#soba noodles
24 notes
·
View notes
Photo

EGG OVER RICE
(From M/FoMT)
https://www.seriouseats.com/recipes/2016/04/tamago-kake-gohan-egg-rice-tkg-recipe-breakfast.html
Ingredients:
1 cup cooked hot white rice (about 12 ounces cooked rice; 340g)
1 egg (plus 1 optional egg yolk)
Soy sauce
Kosher salt
MSG powder, such as Aji-no-moto or Accent (optional)
Mirin (optional)
Hondashi (optional)
Furikake (optional)
Thinly sliced or torn nori (optional)
Directions:
Place rice in a bowl and make a shallow indentation in the center. Break the whole egg into the center.
Season with 1/2 teaspoon soy sauce, a pinch of salt, a pinch of MSG, 1/2 teaspoon mirin (if using), and a pinch of Hondashi (if using). Stir vigorously with chopsticks to incorporate egg; it should become pale yellow, frothy, and fluffy in texture.
Taste and adjust seasonings as necessary. Sprinkle with furikake and nori (if using), make a small indentation in the top, and add the other egg yolk (if using). Serve immediately.
#food#recipe#recipes#harvest moon#story of seasons#cookbook#egg over rice#main dish#rice#egg#soy sauce#salt#mirin#hondashi#furikake#nori
19 notes
·
View notes
Photo
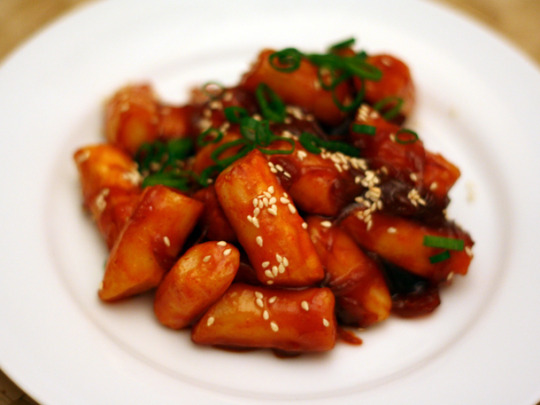
ROASTED RICE CAKES
(From M/FoMT)
https://www.seriouseats.com/recipes/2010/12/roasted-rice-cake-recipe.html
Ingredients:
For the roasted onions:
1 teaspoon canola oil
1 medium white onion, thinly sliced
Kosher salt
For the roasted rice cakes:
¼ cup mirin
¼ cup chicken broth
2 tablespoons canola oil
1 pound rice cake sticks
1 tablespoon sesame seeds
2 scallions, ends trimmed, green parts thinly sliced
For the Korean Red Dragon Sauce:
1/4 cup water
1/4 cup sugar
⅓ cup ssamjang (fermented bean and chile sauce)
1 tablespoon light soy sauce
½ teaspoon sherry vinegar
½ teaspoon sesame oil
Directions:
Heat oil in 12-inch cast-ion skillet over medium-high heat until lightly smoking. Add onions and cook, stirring occasionally until onions begin to brown, about 10 minutes. Season with salt and reduce heat to medium-low. Continue cooking, stirring occasionally until richly caramelized, about 30 minutes longer. Adjust heat as needed to prevent burning. Transfer cooked onions to bowl.
Meanwhile, make the dragon sauce. Combine water and sugar in medium saucepan and bring to a boil over high heat. Stir constantly until sugar is dissolved then remove from heat. Let cool for one minute, then stir in ssamjang until dissolved. Add soy, sherry vinegar, and sesame oil.
For the rice cakes, pour mirin and broth into a large heavy-bottomed saucepan and bring to a boil over high heat. Reduce to medium-high and cook until lightly thickened, about two minutes. Add red dragon sauce, reduce heat to medium, and cook until glossy and thick, about six minutes. Add roasted onions and stir well.
Meanwhile, clean out iron skillet, and return to stove. Add two tablespoons canola oil and heat over medium-high heat until just starting to smoke. Add rice cakes and reduce heat to medium. Cook until light brown on all sides, about 3 minutes per side.
Toss rice cakes with sauce. Garnish with sesame seeds and scallions.
#food#recipe#recipes#harvest moon#story of seasons#roasted rice cake#roasted mochi#appetizer#main dish#oil#onion#salt#mirin#chicken stock#rice cake#sesame seeds#scallion#sugar#ssamjang#soy sauce#vinegar#sesame oil
8 notes
·
View notes