
Last Seen Blogs

puresmile
보물창고

bts-trans
bts-trans

fortheloveoflovemylove
fall in love

vrtp360-blog
Untitled

karasunosimp
Untitled
Text
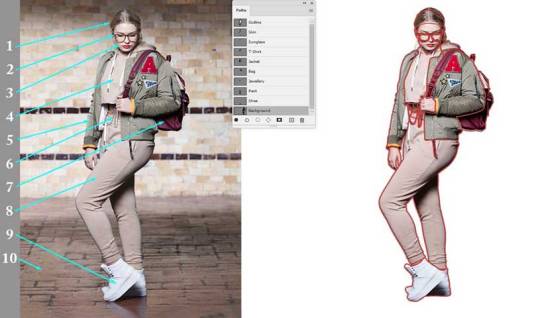
How to Change the Background of a Photo in Photoshop
How to Change the Background of a Photo in Photoshop
In this Photoshop tutorial, we will show you how to change the background of a photo in just a few simple steps. First, open up your photo in Photoshop and select the background layer by clicking on the layer button at the bottom of the screen. Then, click on the "Background" menu item and select "Change Background." Next, choose a new background image from the options that appear and click on OK to apply the changes. Have fun!
What is background of a photo?
Photoshop is a powerful photo editing software that lets you change the background of your photos. Here are simple steps on how to do it:
Step 1: Open the photo you want to change the background of in Photoshop.
Step 2: Select the "Background" layer by clicking on its icon in the Layers panel.
Step 3: Select the desired background from your computer's hard drive or from some online source. If you're using a digital image, be sure to choose a resolution that will fit on your printer without scaling down the image too much.
Step 4: Click on "Submit" to apply the changes to the Background layer. Congratulations! Your photo has a new, custom-made background!
Why need to change the background of the photo?
Backgrounds can make or break a photo, so it’s important to know how to change them in Photoshop. Here are easy steps suggested:
Open the photo you want to modify and choose File > New > Background from the menu bar.
Select the background you want to use and click OK.
In the Options bar, change the background’s Opacity (100% by default) to create a transparent background.
Choose File > Save As and save your new background image as a .png file on your computer.
Repeat steps 1-4 for each photo in your project and then merge all of the images together using Photoshop’s Merge command (Command+E).
Cool Ways to Change the Background of Your Photos in Adobe Photoshop
If you're looking to spice up your photos with a new background, Adobe Photoshop has some really cool ways to do it. Whether you want to add a gradient or use a Photomerge feature, there are plenty of ways to change the background of your photos in just a few simple steps. Here are of our favorites:
1) Use the Background Selector Tool (BST) to select the area you want to change the background of. You can then use the powerful Gradient Editor to create any gradient you want.
2) If you want a more custom look, try using the Free Transform Tool (T), which allows you to distort and resize your selected area. Simply hold down Alt/Option as you drag and rotate your selection around.
How to Add a Custom Background to Photos in Photoshop?
If you want to change the background of a photo in Photoshop, there are several ways to go about it. One way is to use the Background option in the Edit menu. This option allows you to select from a variety of predefined backgrounds or upload your own image. If you want more control over how your background looks, you can use the Image Processor tool in the Tools panel. This tool allows you to adjust things like color and brightness, which can give your photo a more customized look.

How to Change the Background of a Photo in Photoshop for Personalized Results?
Do you want to change the background of your photo for personalized results? Photoshop can help! Here are simple steps to achieve the look you desire:
Open your photo in Photoshop and select the Background layer.
In the Layers palette, click on the Adjustments panel and make sure that the Background Image option is selected.
Click on the Black & White button and then, in the resulting dialog box, set the Strength to 100%.
Click on OK to apply these changes and view your results in the window below.
If you want to make further adjustments, such as changing the color of your background or adding text, repeat steps 3-4 until you're happy with your results.
How to Change the Background of a Photo in Photoshop without Losing Quality?
If you want to change the background of a photo in Photoshop, there are a couple of different ways to do it. The first way is to use the Background layer. To do this, go to the Layers palette and select the Background layer. Next, use the tools on the toolbar to change the background color, texture, or image. However, this method can sometimes cause loss in quality because Photoshop uses bitmap images as backgrounds.
The second way to change the background of a photo is to use layers masking techniques. With layers masking, you can hide portions of the image that you don’t want stained by your new background color. This method is less likely to cause quality loss since Photoshop uses vector images as backgrounds.
How do I change the background of the photo to black?
If you want to change the background of a photo in Photoshop, there are a few different ways to do it. One way is to use the Background option in the Image menu. This will open up the Background options dialog box, where you can choose from a variety of different backgrounds.
Another way is to use the Layer dialog box. This lets you change the background of all layers in your photo at once. To do this, first select all the layers in your photo by clicking on the little circle next to each layer name in the Layers panel. Then, click on the “Background” tab in the Layers dialog box and choose a new background color from the list of available colors.
Finally, you can also use Photoshop’s Color Picker tool to select a new background color.
How do I change the background of a photo in Photoshop to a solid color?
In this quick Photoshop tutorial, we will be discussing how to change the background of a photo in just a few easy steps. To start, open up your photo that you would like to change the background of and select the Background layer from the Layers palette on the left. Next, click on the New Layer button located at the bottom of the Layers palette and name this new layer "Background." Finally, click on OK to close out of the Layers palette and return to Photoshop's main workspace. Now that we have our Background layer created, it is time to start changing things around! To do so, first click on the Background layer in order to select it and then click on the White Color button located at the top right corner of Photoshop's toolbar in order to open up its fly-out menu.
What is the difference between the Background Eraser tool and the Background layer?
If you want to change the background of a photo in Photoshop, you can use either the Background Eraser tool or the Background layer. The Background Eraser tool deletes the background behind your photo, while the Background layer permanently changes the background of your photo.
The main difference between these two tools is that the Background Eraser tool removes only the background from your photo, while the Background layer replaces all layers with a transparent version of their background. This means that if you have any text or objects on top of your original background, they will be hidden by the new background.
However, there are some limitations to using either of these tools: the Background Eraser tool can only be used on photos that are smaller than 100 pixels wide by 100 pixels high, and the Background layer cannot be used on photos that are larger than 1 megabyte in size.
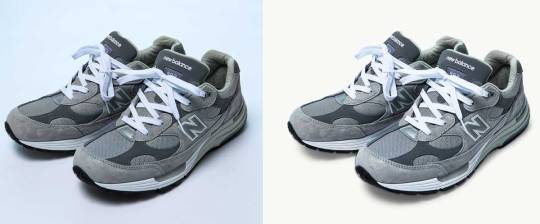
#clippingpath#graphicdesign#bestimageeditingservice#photoshopservice#photography#illustration#cutoutservice#adobephotoshop#ecommerce#products#model#modelphotography#modelphotoshoot#retouchingservices#photomaskingservice#maskingservice#ecommerceproduct#Amazon#eBay#b2bmarketingagency#newspaper#printmedia
0 notes
Link
1 note
·
View note