
Last Seen Blogs

airanomusou
♥あいらの夢想♥

nuwaveres
Nuwave Family Real Estate Solutions

somanyquestionsblog
yelshealthonline

akhanhabibi-blog
Ahmed Khan

unluckyrudy-blog
Fool's Gold
Text
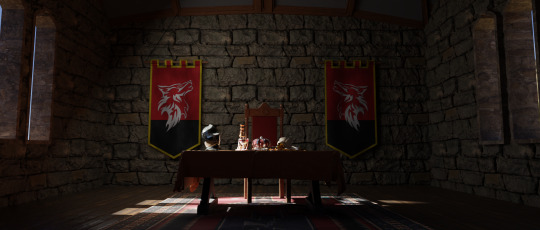
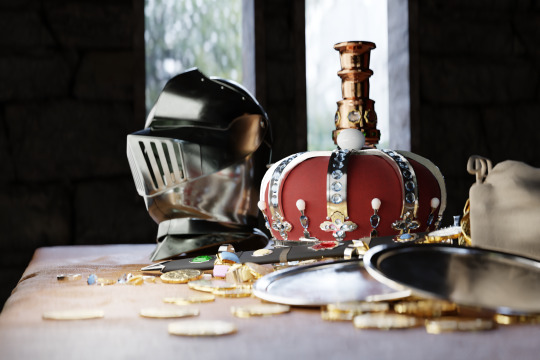
Kings Treasure Render
I created two renders for the kings treasure scene, one with the whole scene in frame, and a second with the helmet as the focus.
For this scene I had the goal of experimenting with compositing as well as the render. I am used to doing as much as possible in the render but if I can successfully do some things in comp then it might save me a huge amount of time.


0 notes
Text
Kings Treasure Custom Asset
For the Kings Treasure scene, we were tasked with creating an interesting composition with the provided assets as well as one of our own. This blog post will be about the creation of the custom asset.
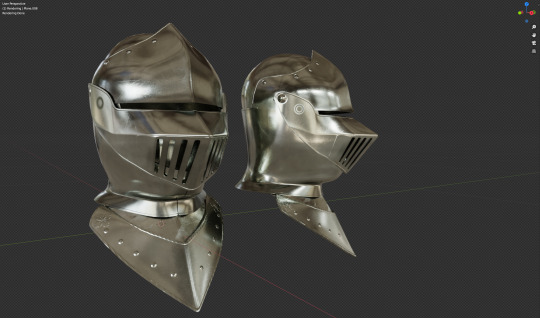
For the custom asset, I chose to create a medieval knight's helmet. This was because I thought it would match the scene well and that the complex curves would be a fun challenge.
The first thing I had to do was build a good set of reference images as well as finding an image I could use as blueprints for my model. (The image below is a screenshot of my reference library)

Before I started modeling I mentally deconstructed the shapes so that It was a less daunting task. By separating the collar, faceplate, and helmet, this task seemed much more approachable.
The Way I chose to model this was by using a nondestructive subdivision method. This method meant that I was able to model the 3 parts individually and then combine them all. The process of combining was made simple as I only needed to move a few vertexes and the curves were intact.
As I had already divided the model into key pieces, assigning materials and UV unwrapping was not very challenging. (Below is a screenshot of my 3D model)

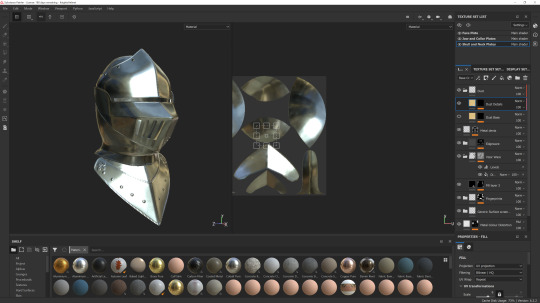
When it came to texture, I was set on not just using the substance painter auto materials and masks. I think this is one of my best outcomes from substance painter yet. I really enjoy working with substance as it is satisfying watching the layers building up and the model slowly looking more realistic. I chose to use three 4k materials for this model. This was an active decision as I knew this was going to feature in a close-up render so I didn't want there to be a lack of resolution. (Below is a screenshot of my substance file)
I am vey happy with my how the final product looks in the rendered view. I think I still have a lot to learn with substance but I think this is more than suitable for the Kings Treasure scene.
0 notes
Text
Mystery Scene Shot 1 Evolution
youtube
The video above shows my broken down process for how I created the first shot for the Mystery Scene. I intended on using a nuke-based projection setup to save me a lot of time on the render, which I was able to do with the second two shots. However, I chose to render this scene with a path tracing engine because there was too much detail and subtle lighting that would not have been possible with the projection. This shot probably took the least amount of time for me as it was the method of creating a full CG sequence that I was used to. I gave it multiple render passes to make sure that I was happy with every little detail.
The changes I made between renders were:
Between 1 & 2:
-Add cigarette smoke
-Make the Camera more specular
- Change the contact sheet from 120mm to 35mm to match the
camera
Between 2 & 3:
- Completely redo the lighting
- Added dust to the air
- Removed the camera
Between 3 & 4:
- Find a balance between the second and third lighting
- added the camera back, but smaller
- Removed foreground dust
Between 4 & 5:
There was not a rerender between these two, just some
compositing with nuke and AE.
- Cooler Lighting,
- gave it a film feel
- gave the highlights some glow
- general colour adjustments.
0 notes
Text
Mystery Scene Shot 1 Concept.
By now we have given the brief for our main project for the BA1b unit, the "Mystery Scene". The task was to create a short 10 clip that created a sense of mystery. I had already decided that I wanted to create a creepy woodland cabin, however, I needed to fill out that idea before I would begin working on the actual sequence.
The concept I landed on was a cold war era American cabin with Soviet radio and spy equipment inside and police cars illuminating it from the outside. To make it more creepy I wanted to slowly reveal these details to fill out the context as the scene progressed. Having only 10 seconds to work with, I decided to create 3 shots that were 80 frames each (240 frames at 24fps total). The First shot would show the Soviet Spy equipment in the cabin with a slight pulsing blue glow on it, the second shot would be a close-up of the cabin with clear blue lights flashing on the front. The third shot would have the full cabin in the shot, with police cars on either side revealing that the light was from the cars.
I have attached the reference I created for this shot
0 notes
Text
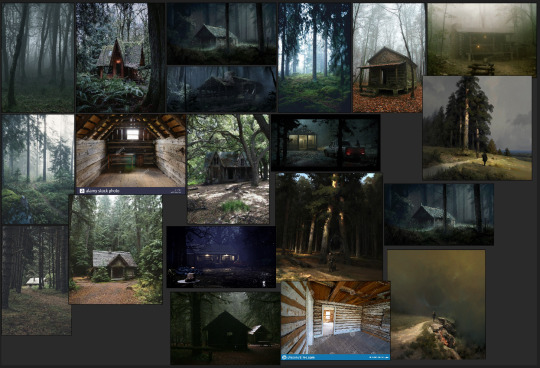
Creating A 3D Model Of A Log Cabin
I was aware that a "Mystery Scene" project would be coming up later in the BA1b unit. I wanted to refresh my 3D modeling knowledge and decided it would be good to create a model to prepare for this.
Having given it some thought, I was set on making a creepy log cabin that could create an eerie atmosphere.
I started by gathering some reference images for specifically 'American Woodland Log Cabin'.
(references used shown below)

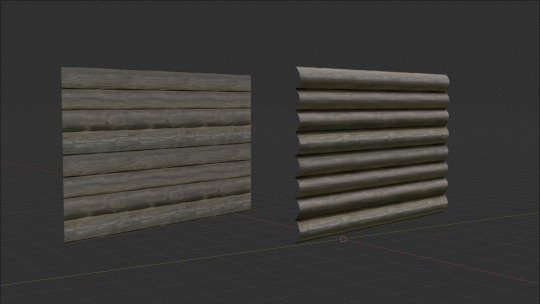
I initially planned on trying to gather lots of different log and plank 3D models, then kitbash them together to get the rough shape. However, I quickly realized this was not going to work for a multitude of reasons. First, It was going to become way too high poly for what I needed it for, so this was only going to slow me down. Secondly, there just wasn't a good source of high-quality 3D models of logs and planks that fit my requirements.
The workaround I found appears to work better than I had anticipated. I was able to find some perfect PBR textures for the materials I needed, most importantly, a log wall. using this material and extruding geometry to match the shape and gave a very convincing result.
(Shown Below, Non extruded material (Left), Extruded Material (Right))
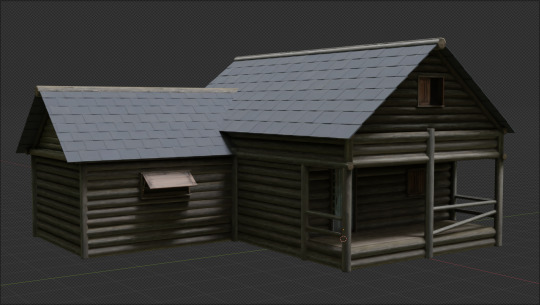
By Utilising this technique and a few other basic modelling tricks. I was able to create a model that I was very happy with. If I had a more clear idea of the mystery scene I was looking to create, I would Ideally have liked to be able to include higher details in the places that the camera would be closer to, notably the front porch.
(Shown Below is the clay render, and final render of the 3D model I created in anticipation for the Mystery Scene Project)

0 notes
Text
Texturing in Substance
I had been using substance painter before I joined the course. So the basics of this program were nothing new to me. I used this as an opportunity to try and optimise my personal workflow for modelling in Maya and texturing in Substance. The part I wanted to perfect was smoothly transporting models from Maya into substance.
Although I am used to substance, I believe my skills are far from perfect. The textures look good but not realistic, and would not be nearly good enough for an object in a vfx shot. something about it makes it feel like it would be better as a game asset. I'm not sure what that is but I would like to spend more time in substance trying to push my skills as far as I can towards photorealism.

^This image shows the final result for the chair model, along side its UVs
^This image shows the final result for the telephone model, along side its UVs.
0 notes
Text
3D Modelling and UVing in Maya
During this unit, we were given the chance to learn 3D modelling in Maya. I already had a good understanding of 3D modelling however that was not within Maya. The main difficulty this presented was learning the different Interfaces to get the result I knew was possible. I had a problem with the object mirroring tool but I was able to quickly adjust.
The Chair was a simple enough project. It was a symmetrical hard surface shape that could be made without too many polygons. When I finished the first time, I decided to start from the beginning, this was because during the first version, I made some mistakes early on that led to the final result being less refined than I would like. this included the problems with the mirroring, proportions and excess vertices.
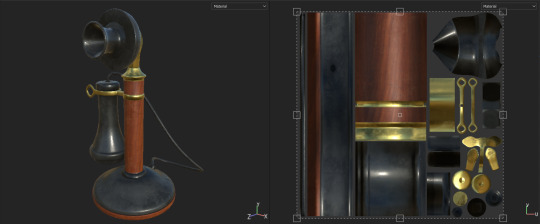
The Telephone was slightly more complicated, mainly due to it having more curves and being less symmetrical. Even though it took more time, it still used the same principles. This project did not require me to restart as I learned from the errors I made first time. However this project was more complicated when It came to UVs.
The UVing was pretty simple for the chair. It was a simple low poly model, but it took more time than I anticipated as I found it harder to adjust to UV unwrapping in Maya than I found it adjusting to the modelling side.
The Telephone was slightly more complicated. It had a much higher polygon count than the chair, it also had less clear boundaries between its shapes. Although it was much harder than the chair, It took about the same amount of time as I was able to begin to adjust to Maya.
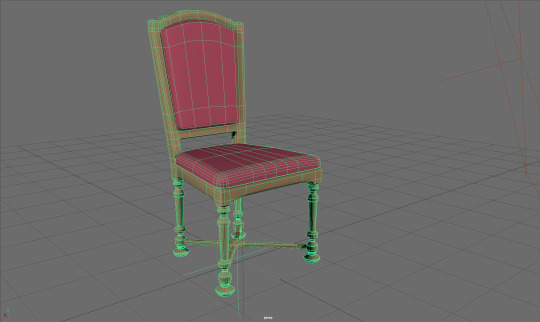
^ this image shows the second version of the chair I made in Maya

^ This Image shows the 3D model I made for the Candle stick telephone project.
0 notes
Text
Advanced Nuke Composition
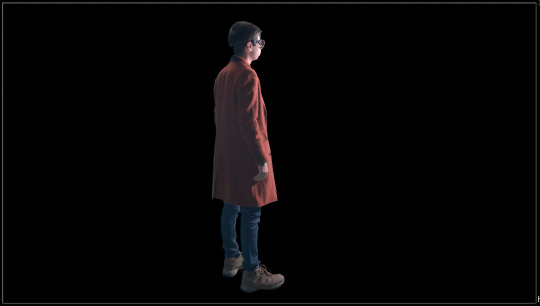
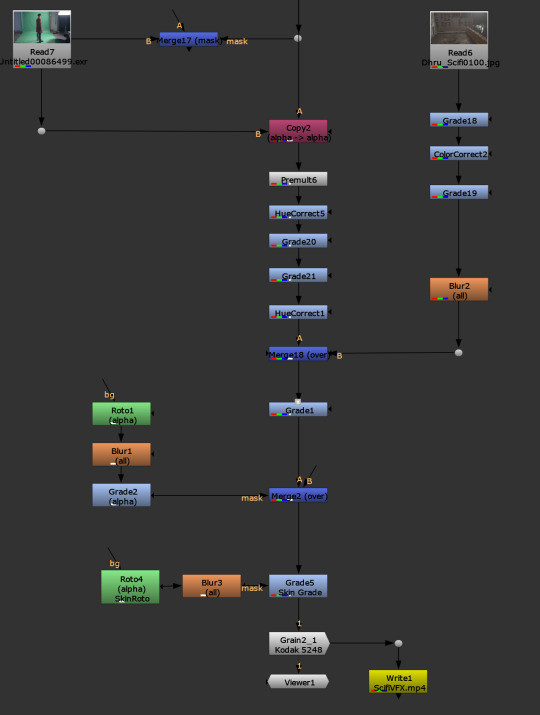
For this shot, I planned on combining this plate with a CG background. The intention of getting a better understanding of nuke. One of my main goals was to get the background and the foreground to match. The first step involved me tracking the shot and building the scene in blender. I found this relatively straight forward as this was the part of the process that I was most familiar with. Once I had the camera tracked, Building the 3D scene was simple. When I had all of that I was able to render the background and import into Nuke.

Once I had both the plates I needed in nuke, this was now the part of the pipeline that I was least familiar with. I had a little trouble with the keying at first but that was solved by using an exr sequence instead of an MP4 (Compression artefacts created a sharp key).
I am happy with the key I ended up with, It required me using some simple masks to individually key out the head, torso and legs. Along with a small amount of roto for his shadow the key was now finished.

Once I had the greenscreen layer on top of the background. All I needed to do now was match the two plates together. For this I used multiple grade nodes to balance out the colours of the foreground and background and some more roto to adjust the skin tone as it was looking too cold. On top of that, I added some simple colour grading over the whole sequence and added some grain to the background to match the original footage.

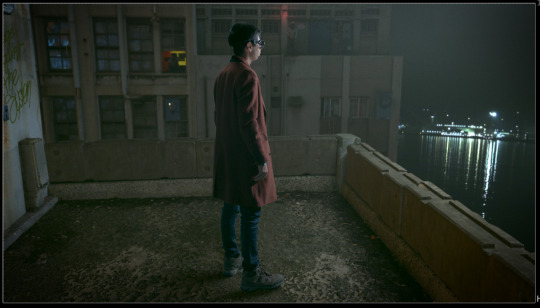
Overall, I am very pleased with the shot, I dont think its perfect as some of the colours are still off.
0 notes
Text
Nuke Practice with moving greenscreen
In the recent workshops with nuke, we have been working with keying and the 3D viewport. In the workshops we practiced with still images, we were also provided with some footage to practice with in our own time. One of these clips had a moving camera. The moving camera made these shots much more complex to composite but I believed that I had the knowledge to at least give them a shot.

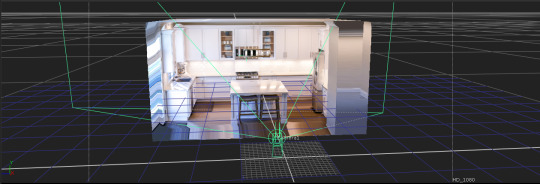
The First thing I did was bring the footage into Blender, where I motion tracked the footage, to get the movement of the camera in 3D space. Although there were plenty of good tracking markers in the footage, It still provided some results that still needed some manual fixing.
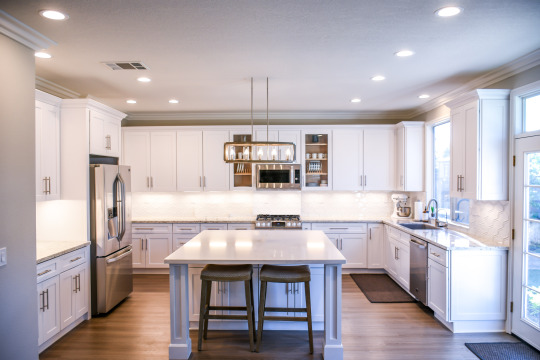
Once I had the 3D camera track, I needed to find an environment that I could put the character in. I decided to use a method of projection mapping that we were beginning to use with Maya in another workshop. I found a good image of a kitchen on a free stock image website. I did some clean-up in photoshop to remove some of the objects that would have been tricky to project geometry onto. I was able to create some 3D geometry that worked well with the camera motion with some basic 3D modelling.
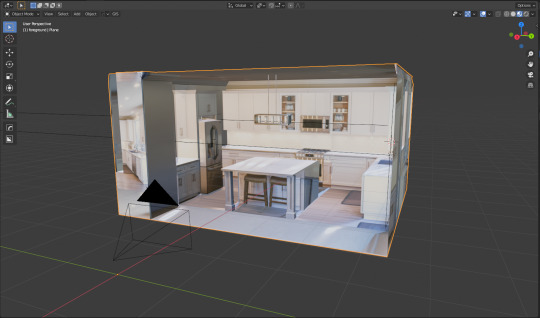
So far this had all been relatively straight forward as it was all techniques I was already familiar. The trickiest part of the process was trying to export the camera and model from blender and import it into Nuke. I tried using the .FBX format for the camera however it had problems with the location and rotation and no longer aligned with the projection geometry. After some quick research I found that the alembic (.abc) format worked best as it was able to maintain the correct position and rotation.
The Rest of the keying was quite simple, only some basic keying and masking. Conveniently the footage and the background matched well, and only needed some light grading, I did flip the environment so that the lighting source matched and it made it look much more convincing.
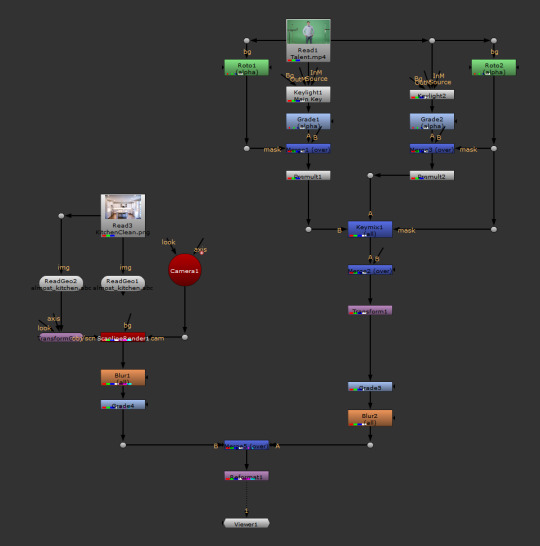
Overall, I am very happy with the results. I know that some of the colour matching isn’t perfect but I am very pleased with the results of the tracking and I believe that the end results looks pretty good.
youtube
0 notes
Text
Film Language Essay - Camera Movement
One of the biggest differences in the way the camera moves between these two sequences is the use of both drone and helicopter footage in Mission Impossible: Fallout. A Large majority of the shots in Point Break are hand held. The use of camera drones is a relatively recent development in cinema and was not a viable option in 1991 when Point Break was made. It allows for both ultra wide shots as well as moving in ways impossible for a camera man, these are both demonstrated in the chase in Mission Impossible. In a behind the scenes video[1] Robert Levy, the films producer, describes shooting most of the sequence with a ‘pogo cam, which is basically a camera on a pole’. Levy justifies using this technique because it gave the shoot a much more live and feeling, because of the camera shake, as well as it allowing the camera man to shoot through windows and over fences which would have been impractical if it was all hand held.
Both sequences use these techniques to their own advantages. No sequence is objectively better as a result of their camera movement techniques. The simplicity of the Point Break camera movement adds to the intensity and makes the camera feel like it is part of the chase instead of just watching it from a distance. In Mission Impossible, The drone and hellicopter shots allow for the camera to be at a distances that can truly show the scale and speed of the chase. It also allows for Tom Cruise to be kept smoothly within frame while he is sprinting and jumping, this would have been much more of a task if they had used the same techniques as Point Break.
[1] POINT BREAK (1991) | behind the scenes of Patrick Swayze cult movie #2 (2020). Youtube. Available at: https://www.youtube.com/watch?v=3CuFPurGYDk (Accessed: January 2, 2021).
0 notes
Text
Film Language Essay - Focal Length
Especially in the Point Break sequence, There is a difference between a ‘Wide Shot’ and using a lower focal length lens. There are multiple ‘Wide shots’ that have the full character and environment in frame. However, because most of the shots are framed within narrow alleys and buildings they needed to use a wider lens to fit the characters head / upper body in frame. Meaning that although the shots are technically close up, they are shot using a wide lens.
Point Break follows the traditional sequence used in film that is establish the scene and action with a wide shot and then follow it up with multiple close ups that intensify the action and convey more detail. The reason this is so common is because it is commonly considered to be the standard way to start a sequence. However, In Mission Impossible, Starts by following this traditional order however due to the environments in the sequences changing so drastically, first from an office building, then to the rooftops then finally to the streets, they need to keep using establishing wide shots in order to maintain continuity. This repeated use of wide shots makes the sequence feel more unique, by providing constant reminders of the scale, it makes the Hero’s actions feel more intense and impressive.
In Bordwell and Thompson’s Film Art: An Introduction they state ‘A long-focal0length lens also affects the subjects movement. Because it flattens depth, a figure moving toward the camera takes more time to cover what seems to be a small distance’[1]. By Inversing this, it suggest that by using a wider focal length, the characters movement appears to be faster and covering a greater distance. This is why the cinematographers in both of these scenes are choosing to use wide lenses for their close ups of the characters running, because it emphasises the momentum.
[1] (Bordwell and Thompson, 2010, p. 200)
Bordwell, D. and Thompson, K. (2010) Film Art: An Introduction. 9th ed. Maidenhead, England: McGraw Hill Higher Education.
0 notes
Text
Film Language Essay - Shot Length and Pacing
Upon a first analysis, I was under the impression that the sequence in ‘Point Break’ had a lot shorter average shot length and that the reason these shots were so shot was to place emphasis on the speed of the action. The reason I was assuming that Point Break’s shots were faster than Mission Impossible was because Mission Impossible utilises both close up and wide shots, with the wide shots lasting much longer than the close ups, than Point Break. This use of wide shots was used to demonstrate the distance and speed that Tom Cruise was running.
However, when I went back to timing the sequences and counting the shots, I found that in Point Break there was a total of 50 shots in 2:36 (156 seconds) and in Mission Impossible there was a total of 70 shots in 4:00 (240 seconds). This means that on average, each shot in the Point Break sequence lasted 3.1 seconds and in Mission Impossible lasted 3.4 seconds. This is a much smaller gap than I was expecting. I was assuming that there would at least be almost a second between them.
consequently, I needed to re-evaluate my initial reasoning for the shot timing. I came to the conclusion that the reason they were so similar is because they were not just cutting to the pace of the action, they were matching it to the beat of the music. This explained the uniformity in the timings.
With further research I found that, in David Bordwell and Kristin Thompson’s Film Art: An Introduction, they stated ‘Graphic and rhythmic relationships are present in the editing of any film’[1]. This is what I had overlooked, I was too focused on the graphical editing of the film that I completely overlooked the rhythmic cutting. Further More, looking back to when I mentioned that the Mission impossible shots featured multiple long and wide shots. Bordwell and Kristin go on to state that ‘Editing usually serves not only to control graphics and rhythm but to construct film space as well’[2]. This supports my earlier idea that these shots were placed in to break up the sequence of close up shots and provide the viewer with a greater sense of scale for the whole scene.
[1] (Bordwell and Thompson, 2010, p. 251)
[2] (Bordwell and Thompson, 2010, p. 258)
Bordwell, D. and Thompson, K. (2010) Film Art: An Introduction. 9th ed. Maidenhead, England: McGraw Hill Higher Education.
0 notes
Text
Film Language Essay - Choosing Two Scenes.
This Essay wants me to select two different film sequences and produce a critical comparison of the aspects of film language within them.
I decided that I wanted to select two sequences where the main character was involved in some form of foot chase. The reason I chose this was because these types of sequences allow for the director and cinematographer to use the different aspects of film language to create a vastly different display of the action on sequences that have a very similar focus. Foot chases lean into this well because they are able to use the environment to their advantage much more than a car chase would as they primarily have to stick to roads. This variation in terrain allows for much more unique feeling chases.
The first great foot chase that came to mind was the one in ‘Point Break’(1991), This is one of cinema’s most famous chases and is the guide for many of todays chases. The chase was heavily referenced in Edgar Wrights 2007 action/comedy ‘Hot Fuzz’. One of the reasons this chase is so popular is because it is incredibly simple, primarily handheld, and its use of environment (running through back alleys, houses and jumping fences).
My next task was to find a chase sequence that both complimented and contrasted Point Break’s. The Three films that came to mind where ‘Ferris Bueller's Day Off’(1986) and The Mission Impossible Movies (Both Four and Six have excellent chase sequences). I first eliminated Mission Impossible Four, For the reason that much like Point Break, it was primarily hand held and in a confined environment. This would not provide me with enough contrast in techniques to write my essay. I settled on ‘Mission Impossible - Fallout’’s (2018) chase in London. I chose this because although the premise is similar as Point Break’s (trying to catch up to the villain), The way it goes about it is very different. The pacing is different, not just constant sprinting from beginning to end, a large portion is shot on a much wider lens utilising drone footage.
Point break - chase scene (car & foot chase) (HQ) high quality (2009). Youtube. Available at: https://www.youtube.com/watch?v=VF7dPKXwag4 (Accessed: December 31, 2020).
Mission Impossible Fallout HD - Rooftop Chase (2018). Youtube. Available at: https://www.youtube.com/watch?v=Sjn3ELLcy2U (Accessed: December 31, 2020).
0 notes
Text
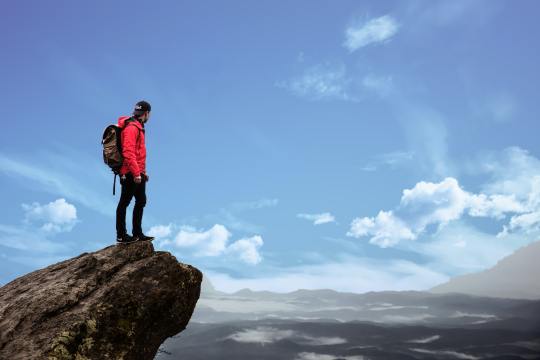
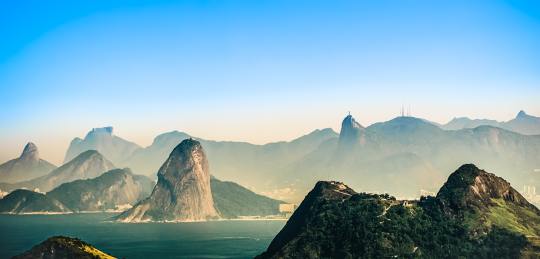
Practice Matte Painting
youtube
I wanted to practice the workflow of cutting images into layers and crating moving matte paintings using photoshop and nuke. I made this the day after the first tutorial for this workflow. The reason I wanted to try this is because, in the tutorial we only used one image, where as for this one I tried using 3 different images combined.
I am pleased with the outcome, I believe that there is still some slight problems with the moving distance however I am happy with how the images match each other.
The three images I combined were:
0 notes
Text
Nuke & PSD Matte Painting
youtube
For this tutorial, the goal was to take a single image, separate it into layers based on distance and bring them into nuke. Once brought into nuke it allowed for 3D camera projections that can create slight camera movements.
I have used photoshop enough to be able to confidently separate the image into layers. I enjoyed the introduction to nuke as it feels like a better way of creating larger composites than After Effects. I have used node based workflows before in programs like Houdini which made the nuke learning curve slightly less steep.
I am happy with the output of this tutorial. If I was to improve it further I would try and create more depth, although there is some in this scene, I feel like if the planes were further apart the scene would have a greater scale.
0 notes