
Last Seen Blogs
scootervoid
moved to @bkkdk77
vorxus
Vorxus
foxyon
Have A Day⋆。°✩
radityam
RANDI ADITYA

worlddomcentral
World Dom Central
Note
Hi ! Are u the one who made the enhypen index with all their contents organized by cb era? if so what happened to the spreadsheet?
hey! this is my resources sb (im @polaroidlove) but yes, it was me! I dont have time to keep the index updated anymore so i deleted it </3
9 notes
·
View notes
Text
COLOR TABLE TUTORIAL
No one asked for this, but I’m in a tutorial mood so here we go! :)
You know when you make a gifset and want the colors to be the same? So you use the same PSD on all of them, but they’re still different? This one’s for you.
1.) Open your reference image (can be the other gif you’re trying to match, a psd, png, etc., doesn’t matter)

2.) Click Save for Web like you would when you go to save a gif, but DON’T save the gif

3.) Click the dropdown arrow on the top right corner of the color table
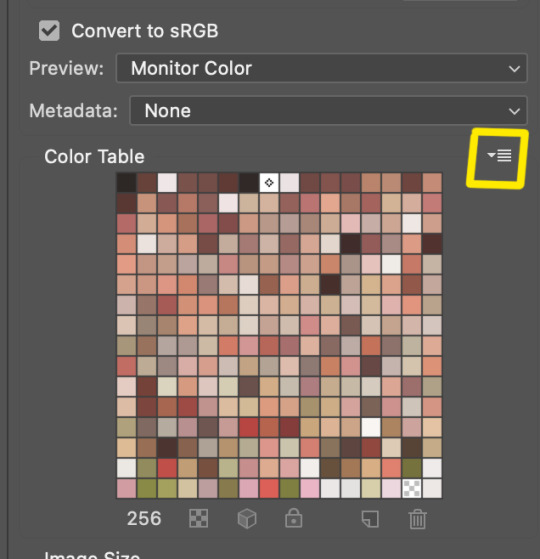
4.) Click save color table

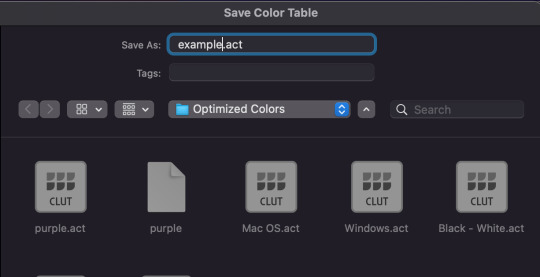
5.) Name the file and click save
Now choose a gif scene that has somewhat similar colors (warm or cool toned basically) This one is pinkish so it’ll look good with the color table
You can edit the gif to be as close color wise to the example, such as adding a certain PSD or adding selective layers to the gif to get warmer or cooler tones. The point of loading a color table is to get the EXACT same color hues in each gif.
In this example gif shown above, the colors are already along the same lines so I don’t even need to add any adjustment layers.
6.) Once you’re ready, go to Export for Web and click color table dropdown again, but this time click Load Color Table
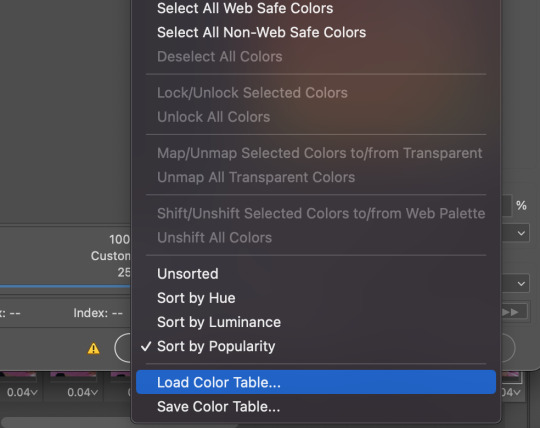
7.) Select your saved file and click Open.

8.) Then save the gif and it’s ready
This is really helpful when you’re trying to get all gifs in a color set to be the same colors. Hope at least one person gets some use out of it.
2K notes
·
View notes
Photo

Some people asked me how I made the typer effect in this graphic. So here’s a tutorial! Just saying that this might need your patience especially if you’ve got a lot of word to “type”!
Ok let’s start it :)
5K notes
·
View notes
Photo

some of my friends in pscentral and an anon recently asked me on how i did the glitch effect in this gifset. i know how tricky it appears to achieve, and hopefully you’ll feel a little more confident after this tutorial <3 this tutorial will assume that you know your way around photoshop
please like/reblog if this helps, tutorial under the cut!
Keep reading
816 notes
·
View notes
Text
✨ hope’s sparkly gifs tutorial ✨
let’s go! I’m quickly going to address the things I do before opening photoshop:
1. downloading:
kpop24hrs for .ts files.
4K Video Downloader for highest resolution possible from YouTube (files are either MP4 or MKV).
the bigger the file the better quality it is usually.
2. cropping:
I use vapoursynth to crop the size and length of the video but there are other programs as well. (I like using 540x450 for my gifs size wise).
ok now going into photoshop!
here’s where you can download my actions that I use in this tutorial!
3. import and cutting frames:
file > import > video frame to layers.
delete any extra frames so the gif is exactly what you want.
from here on make sure you’re at the beginning of the gif whenever you do something!! it’s very important!!
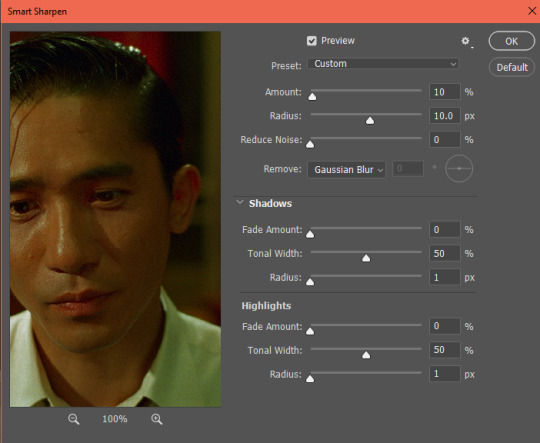
4. sharpening:
I shared the action that does the sharpening starting from this point but I’m also going to elaborate what the action does. I basically followed this tutorial, but I changed it a smidge.
turn frames into timeline, there’s a button right below the frames on the left.

select all layers and convert to a smart object: right click on layers > convert to smart object.
add the following filters: (can be adjusted but this is what I use mostly)
- smart sharpen1 (amount: 200%, radius: 0.3).
- smart sharpen2 (amount: 10%, radius: 10.0)
- high pass (radius: 5.0)
- right click the high pass filter > edit smart filter blending options > change to soft light.
here’s a before and after:

5. turn back to layers:
I have an action for this as well just to speed things up but its really simple.
click the button above the timeline on the right (circled in red) > convert frames > flatten frames into clips.

there will be some layers at the bottom that don’t have the eye on- you should delete them!
select all layers again and click the button above the timeline again > convert frames > make frames from clips.
6. sparkles:
like before I shared my action but I’ll explain what I do. I followed this tutorial originally.
select all layers and convert to a smart object: right click on layers > convert to smart object.
copy layer (alt+j) > set blending mode to screen.
add adjustment: image > adjustments > levels > input levels: move the left cursor all the way to the right.
add filter: filter > blur > motion blur (angle: 45, distance: 30).
add second adjustment: image > adjustments > levels > change the middle input to 1.50.
add second filter (identical to the first): filter > blur > motion blur (angle: 45, distance: 30).
copy this layer 3 more times
click each motion blur layer to adjust it as so:
- layer copy 2 motion blurs should be set to angle:-45, distance: 30.
- layer copy 3 motion blurs should be set to angle:45, distance: 10.
- layer copy 4 motion blurs should be set to angle:-45, distance: 10.
your layers should look like on the right. and here’s a before and after:

7. coloring + watermark + saving:
I know everyone like to do coloring and editing differently and honestly I don’t have much of a system but here’s what I usually do:
I like to edit on frames timeline so I change back to frames from video timeline using the same button on the bottom left that we used to change from frames to video.
group all gif layers.
put on a coloring from a saved psd (I have a bunch I rotate between) and edit until I like it. my favorite adjustments are selective color and hue.
add watermark from saved psd.
select all frames and set frame delay.
save for web. (not sharing my settings because I don’t actually know if they’re the best, so you’ll need to ask someone else for that lol).
here’s the final gif:
98 notes
·
View notes
Note
Hiiii! I really loved this set you made:
https://pedrorascal.tumblr.com/post/671127901414031360/ophelia-act-iv-scene-v
May I ask how did you create the first GIF effect? Thank you 😍😍

Heyoo 🌻 Before I start - I suck at explaining so there's a high chance this will be a hot mess - if something is unclear, let me know 🥰
Okay so here's how I did the blending thingy on the first gif of this set (there must be an easier way though, this is just how I worked it out by myself):
1. First of all, you'll need a B&W overlay gif, I got mine from here.
2. I created the two gifs separately and converted them to Video timeline, then selected all the layers on both of them and converted them to Smart Object. I opened my Overlay gif and did the same thing. Starting from here I worked in two windows:
3. The first window was my base gif (the purpl-ish one): I drag-n-dropped the Overlay gif on my base gif, I added an Invert layer as a clipping mask on the Overlay gif, so the blackness would swim in from the left side, like this:

4. Then I set the Overlay gif to Darken, this is how the first window looked like:

5. Moving on to my second window - my Overlay gif: I drag-n-dropped the B&W gif on the Overlay gif and set it to Darken/Multiply (I forgot which one because I forgot to save the PSD lol but it depends on your gif anyway).

Now you can see that the two windows are the two halves of the final gif, perfectly matching 🌝
6. I selected both layers in my second window (B&W gif and the Overlay gif), converted them into a Smart object, and drag-n-dropped this new Smart object on the top of my purple gif (aka first window), then set it Screen.

That's pretty much it, after this I just threw in some textures, Solid color layers and the text - they all help to make the blending a little smoother. 😊
I hope I could explain it decent-ishly, but yeah, let me know if you still have questions (or if I messed something up hehe)! 🥰
257 notes
·
View notes
Note
hey sole! in the fiona set you did how did you make the second gif with all those small gifs?
Hi! Yeah, sure. I'll explain it under the cut! As usual you'll need basic knowledge of Photoshop and on how to make gifs :)
(from this gifset.)
1. CREATE A TEMPLATE / SCREENCAP
I created a canvas of 540x540px and I used the Polygon tool (U). Each polygon has 6 sides and a size of 210x180px. I uploaded my template here in case you wanna use it (but any shape and layout will work, ofc.)
Next you'll have to screencap your scenes. In this case I needed 14 scenes and they need to have the same amount of frames. All my scenes had 37 frames.
2. GIFFING PROCESS
Now it's time to gif. I gif using Frame by Frime Animation instead of Video Timeline (it can be done on Video Timeline but the process will be different.)
As I said, each polygon of my template is 210x180px, so that's the size I'll want for my gifs. Now I've cropped, resized and sharpened one of my gifs and it looks like this:

It's time to give it the shape of an hexagon. We're going to click on the Polygon tool (U) again. Make sure your filling is some random colour (I used black but I think any will do) and you don't have any stroke colour (or the size won't be the same as the template.) Here's how the settings should look like:

Click once on your gif (without dragging your mouse!!!) and this window should pop-up:
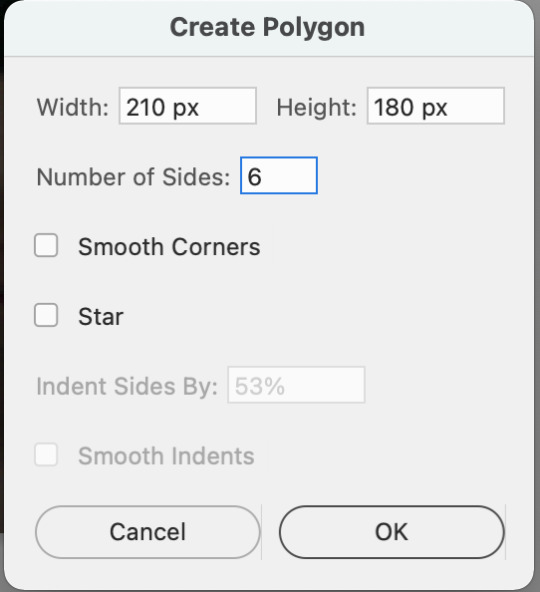
Make sure your settings are the same as mine and click 'Ok'. Now you have your polygon:
Now you need to drag your polygon layer under your gif frames. Select all your frames (except the hexagon), double click and select 'Create clipping mask':

And ta-da! You have your hexagon-shaped gif:
3. COLOURING PROCESS
Now it's time to colour your gif. First of all select all your layers (gif frames + hexagon) and create a New Group with them. Now you'll want to colour your gif however you want. Add as many layers as you need and when you’re done, select your Adjustments layers, double click and select 'Create clipping mask' again. Your layers should look like this:

After doing that I like to select my Adjustment Layers and Group 1 and create another group with al of them. That makes working with various gifs easier once you move it to your template. I usually name them ‘Gif 1’, ‘Gif 2’ and so on.
4. MOVING YOUR GIF TO THE TEMPLATE
Now you’re going to click on this thingy on the Timeline:

Click on ‘Select all frames’ and then click on it again and select ‘Copy frames’.
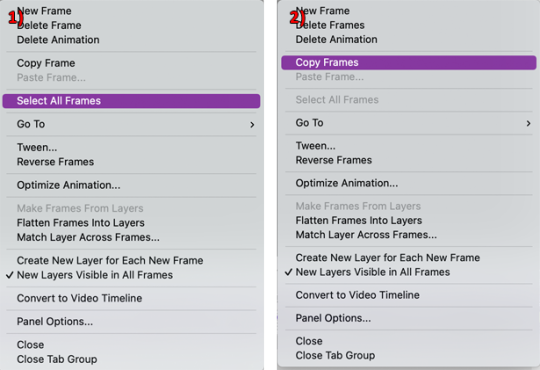
Now we’re going to open our template on Photoshop and we’ll Create a Frame Animation. We’re going to click that Timeline thingy again and this time we’ll click on ‘Paste Frames...’ and then ‘Paste Over Selection’. All you have to do now is drag your gif until it’s where you want it to be (you’ll probably need to use the Zoom tool to make it look perfect), like this:
5. AND REPEAT!
Gif as many scenes as needed and repeat all the steps to include them in your template. When you’re adding the gifs to the template make sure that before you’ve clicked on ‘Paste Frames’, you’ve clicked on ‘Select all frames’. Then, after you select ‘Paste Frames’ you’ll need to choose ‘Paste Over Selection’.
If you want to know how I made the fade transition between the happy and sad scenes check out this tutorial.
If you don’t understand something feel free to ask me again :)
356 notes
·
View notes
Note
hi :) would you be willing to explain how you got the red colour accent on the b&w gifs on your pinned lucifer/deckerstar set?
hey anon, no problem! 💖 i think some people do this via channel mixer but I use Gradient Maps to do it in this post because I find it easier in video timeline, I’ll explain it below the cut:
First you’ll need to make your black and white version of the gif. This one is two gifs/layers (1 of Lucifer, 1 of Chloe) blended together.

Then you duplicate both gifs/layers, and add an adjustment layer Gradient Map directly onto the layer via the top menu (Image > Adjustments > Gradient Map) and set the colour to Black & Red.
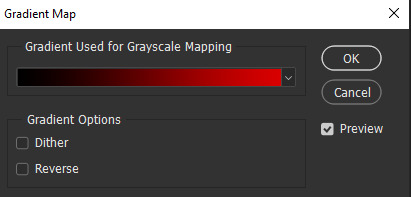
Then change the blending mode of your new black and red gifs to Lighter Colour, and then move your new layers slightly to the left and up from where they were originally which will start to show you the red edges. It should now look like this.
Now I just add a Layer Mask to each of the Black & Red gifs, and use this to erase any little bits I want to get rid of. (e.g. the light reflection from Chloe’s gif is over Lucifer’s face, and I think the red in their irises is a little too intense so i mask this out) and you get the final version. Same process applies to all the BW gifs in this set!
337 notes
·
View notes
Photo

Hello, loves!
I have decided to share an action set I’ve made dedicated to blurring out captions and graphics in gifs with just one click. It’s very straight forward and includes a very short list of steps, but if I can help cut out a tiny fraction of the time creators take to make wonderful gifs, then I’m more than happy to do so. This process can feel very repetitive, so why not compile all the steps into an action and call it a day?
Requires:
Basic gif making knowledge
Photoshop version with animation timeline
Below the cut is a thorough walk through of the action set and how to use it. I will explain the effects I included in the action and why, as well as some example images to follow if this process is something you’re new to! While I wouldn’t consider this post a full tutorial on how to blur captions manually (because there are plenty of those), I hope it’s still detailed enough that you find it helpful and purposeful enough to warrant downloading the action to save you some time!
Of course, this is something a lot of gifmakers can do step-by-step in their sleep by now (and probably already have actions of their own method), but we all start out somewhere and I wanted to gift a little something to the newer creators who are still finding their footing in gif making and find this process as tedious (and admittedly confusing sometimes) as the rest of us.
However, I want to make it clear that blurring captions is absolutely not required for your gifs to still be amazing! Please do not feel pressured to go through the trouble if it’s not something you want to do. It’s entirely a creative choice.
The download link will be at the very bottom of this post. Enjoy!
Keep reading
239 notes
·
View notes
Text
Coloring Tutorial Using Gradient Maps + Keyframes
This post wasn’t requested but I’ve gotten many asks asking how I do my colored gifs, this post will explain how to color moving gifsets, like these two gifsets. This will be our example:
With that being said, you will need some knowledge on keyframing on photoshop.
Keep reading
966 notes
·
View notes
Note
Hi can I ask what your sharpening settings are? Ofc of its not a bother for you , your gifs look so crisp and hd , it’s amazing
ahhh thank you so much!! here's a little mini tutorial of how i do my sharpening:
(disclaimer: i always gif in 1080p or higher, and i always download the largest file i can find! that goes a long way when it comes to making gifs look as sharp as possible)
1. start out with smart sharpen:

2. hit it with smart sharpen again with the following settings:
these are pretty standard sharpening settings that most gifmakers use. they'll get you to this:

perfectly fine, and depending on the quality of the footage you have you can probably stop there! BUT i like to add in a little extra *~*pizzazz*~* with a round of high pass:
3. go to filter > other > high pass
you can set it to anywhere between 2.5 and 5 depending on your personal preference. 4 is my standard setting:

4. right click "high pass" on your layers tab and select "edit smart filter blending options." then change "normal" to "soft light" and hit ok.

and voila!

you certainly don't have to use high pass if you don't want to, and i know some people prefer a smoother looking gif. but i've been using it for a while and i love the dimension and added sharpness it gives to the gif!
i also recommend recording an action for this process as it can be really time consuming without one! feel free to dm me if you have any questions :)
1K notes
·
View notes
Text
for anyone using the banned tags (see the explanation here on the latest tumblr changes) and dreading changing their tag(s), there’s this wonderful mass tag replacer.
5K notes
·
View notes
Text
how to pan gifs
were u ever like gahd these camerapeople again making yet another stage ungiffable. yeah me too.
sooo here in this tutorial i'm gonna try to explain how to pan gifs so ur subject can remain centered or at least not be out of frame, sth like this:
this is a more advanced tutorial, in a sense that i'll assume you know how to make gifs, not in a sense that this is complicated lmao, okay let's gooo:
Keep reading
1K notes
·
View notes
Text
A TS FILE / GIFFING GUIDE FOR ALL CCS ! (THE UPDATED END-OF-2021 VER.)
hi everybody! i’m back with an updated version of my ts file masterpost. unfortunately, a lot of accounts have closed down since the debut of my previous post, and i don’t have time to go through all groups ever to find accounts for all, so on this occasion i’ve only compiled accounts for artists suggested to me by my followers. if you suggested somebody and they’re not on this list, I DO NOT KNOW ANY UPLOADERS. asking me to double-check won’t change that because i try to look thoroughly.
i have also compiled short lists of other programs that i think may be helpful in regards to giffing! please REBLOG this post to spread the word for content creators who may need a hand. and as always, please show respect to the uploaders whose videos you use! if it wasn’t for them, we wouldn’t be able to make high-quality content in the first place.
Keep reading
250 notes
·
View notes
Text
how to fix grainy gifs
you won’t 100% but this helps a little 💕
idk how many of you are using this already but hopefully it will help someone out when saving gifs. but basically in this tutorial kinda thing i’ll try to explain how to play around with your colour palette to have your choice of 256 colours bc PS can be a b*tch.
Keep reading
2K notes
·
View notes
Text
Two-Toned Gif Background: A Tutorial
As requested by Anonymous, this post will explain how to add two background colors in your gifs like this post by ladiesblr/irisswest, with this as our example:

Please like/reblog if this has helped you and feel free to hit me up for any questions and concerns! ♥︎
↓ TUTORIAL UNDER THE CUT ↓
Keep reading
1K notes
·
View notes
Note
Hi. Long time lover lover, first time asker of photoshop related questions. I was wondering, if you explain the double text/thin white over line text from post/632522772600471552/we-get-to-see-this-man-who-weve-been-told-from that post? I didn't see it asked, but brain is dumb so I may have missed it. Thank you photoshop goddess, I burn a candle for your guidance and honor.
First of all, thank you for what has to be the funniest and most flattering way I have been asked for Photoshop help, down to the candle.
Adding a white outline is one of my favorite things to do with text and also super simple. I like to pair it with gradient + difference text, but I think it works with plain color text just fine—though I will add that you want to work with “thicker” fonts, as opposed to really fine ones like a lot of script fonts. (Basically: you want a font that allows an actual outline, and also one that will still be legible after adding said outline.)
Right click on your text layer where the text (“T”) symbol is, then choose Select Pixels. This should make a selection around your text so that it looks something like this:

Create a new layer and then right click anywhere on your canvas. You should see an option called Stroke, which brings up this window:
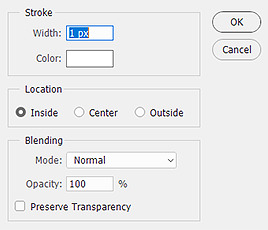
If your settings don’t already match the ones in the screenshot, quickly match them up before clicking OK. All that’s left is to move the white outline a few pixels away from the text (I pretty much always stick to 3px, first to the right or left, then up or down) and you should be all set!
917 notes
·
View notes