
jazzeria
jazzeria
Charlie (they/them or she/her). Crochet and stuff. This is a little journal of my adventures--mostly involving food, gardening, math humour, gender, polyamory, and whatever crafts I've stuck my nose into lately, including jewellery, calligraphy, crochet (including amigurumi), and paper crafts. Most things are OC unless otherwise noted.
2737 posts
Don't wanna be here? Send us removal request.
Last Seen Blogs
chaosconsumesme-blog
i'll let you know when i figure it out
backlittgirl
one of several tumblrs i currently run

lienmack-blog
Untitled
doggonebookshop
the Dog Gone Bookshop

pmatgafanfics-blog
Untitled
Text

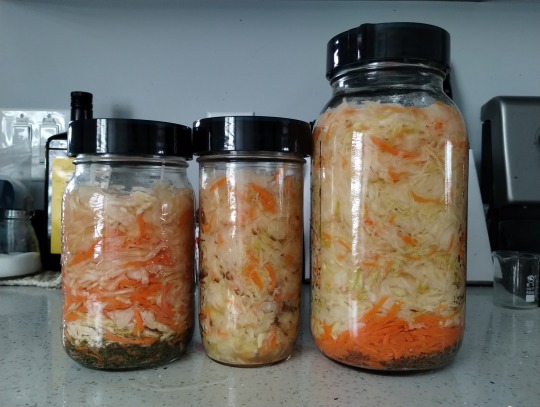
I've now been making sauerkraut for about a year.
I've had some experiments that went awfully--I got excited and wanted to pickle everything, which kinda meant that everything got kahm yeast. Carrots, man, carrots are hard.
So I decided to try my hand at carrots again, but tempering them with cabbage. I was going for "dill pickle carrots", with dried dill and (fermented) garlic. I cut my carrots and cabbage thicker than usual "Coleslaw" blend, for more crunch. It's pretty good!
#food#fermentation#sauerkraut#pickled carrots#preserved vegetables#lactofermentation#fermented foods#LAB fermentation#pickles#wild fermentation#home fermentation#cabbage#dill carrots#dilly carrots
0 notes
Text

Improvised tom yum breakfast ramen: tom yum broth carton, shrimps, bacon, arugula, chili oil.
0 notes
Text
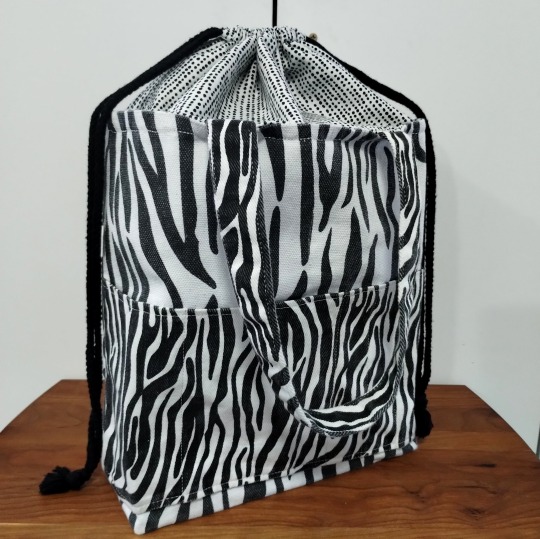
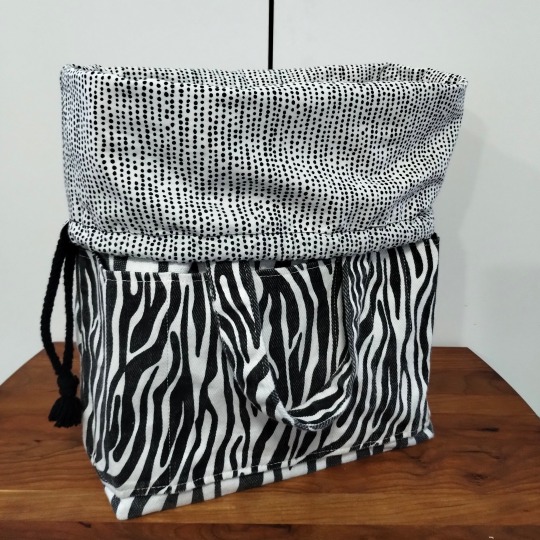
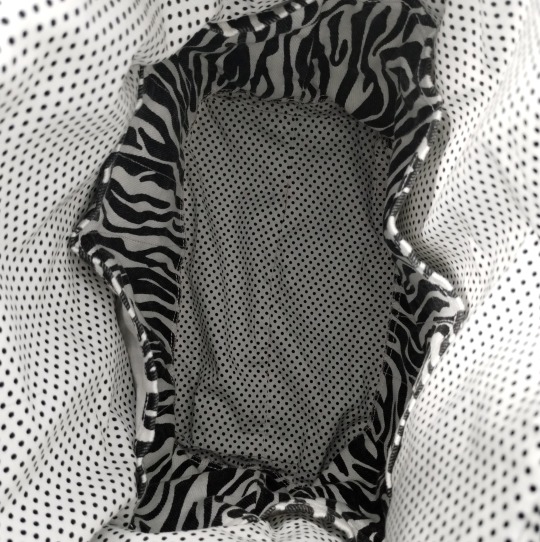
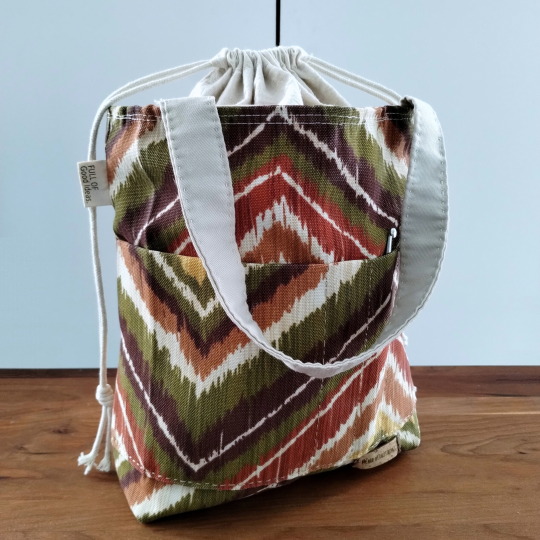
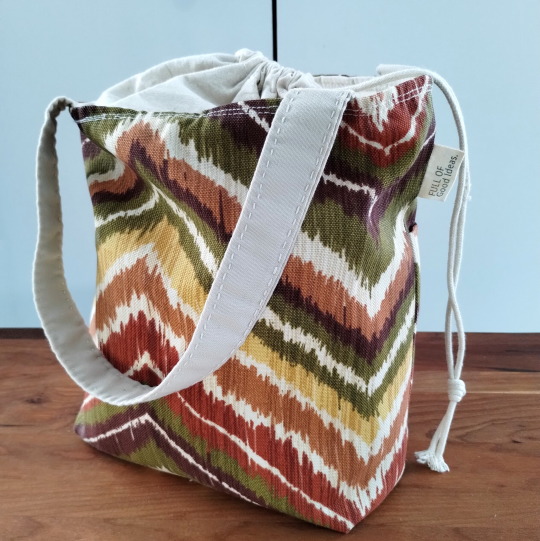
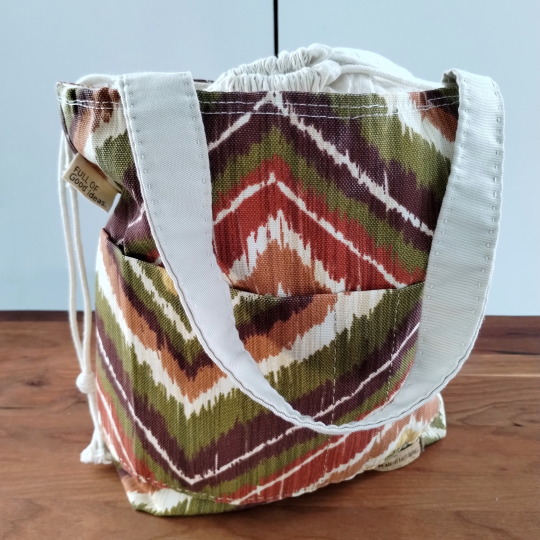
Latest "Marta" drawstring bag, in a zebra print fabric for my best friend who is a zebra spoonie.
I wanted to attach some spoon charms somehow, but I'm not sure how to do so in a way that makes sense? Maybe if I add a ribbon and lobster clasp (for keeping a pair of scissors), I can attach a spoon charm somehow there...
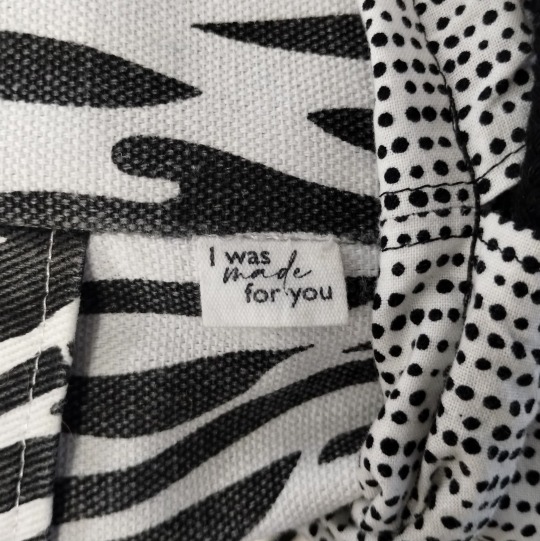
The label (by Intensely Distracted) reads "I was made for you," on the front, and, "and only you," on the back--which I didn't realise when I attached it. (Had I noticed this, I would have attached it under the pocket--I'm not keen on the exclusivity of this statement.)
Looking at all these black and white fabrics made me a little dizzy! But I think the bag turned out quite nicely.
#sewing#project bag#Marta drawstring bag#sewing finished object#drawstring bag#machine sewing#bag 9#crochet project bag#knitting project bag#zebra spoonie#zebra pattern#zebra fabric#zebra bag
1 note
·
View note
Text
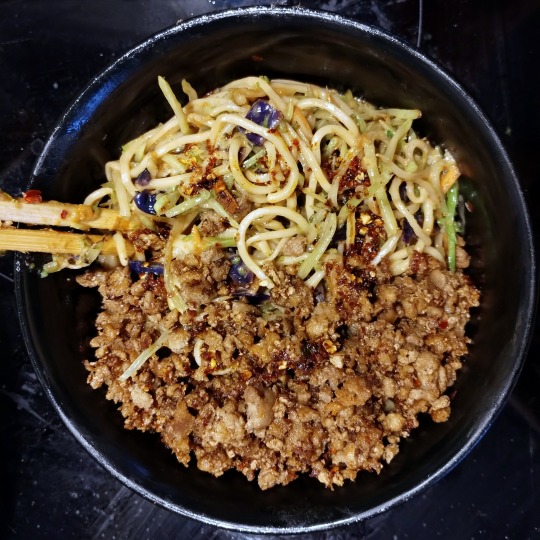
Chili garlic peanut noodles are my new go-to noodle. The vinegar takes it in a different direction from my usual dan dan noodles, and using storebought peanut butter (with sugar) adds sweetness.
I usually add some ground pork (sauteed with soy sauce and chili oil) and shredded broccoli slaw (seared in a wok with chili oil), and a big spoonful of chili oil. Because I can't eat much carbs, I use lots of broccoli slaw to displace the noodles.
0 notes
Text
After learning that pyrizhky dough can be deep-fried to make passable beignets, I decided to go a few steps further and make pyrizhky doughnuts.
After making the dough, let rise. Divide into, like, quarters or sixths: yank off a volume of dough that you think you can probably manage to deep-fry in a 20 min period.
Flatten with a rolling pin. Use a cookie-cutter to cut circles (I think this was about 2" diameter). Pull away the scrap dough, add to the bottom of the lump of proofed dough that you haven't cut, you'll get to it eventually.

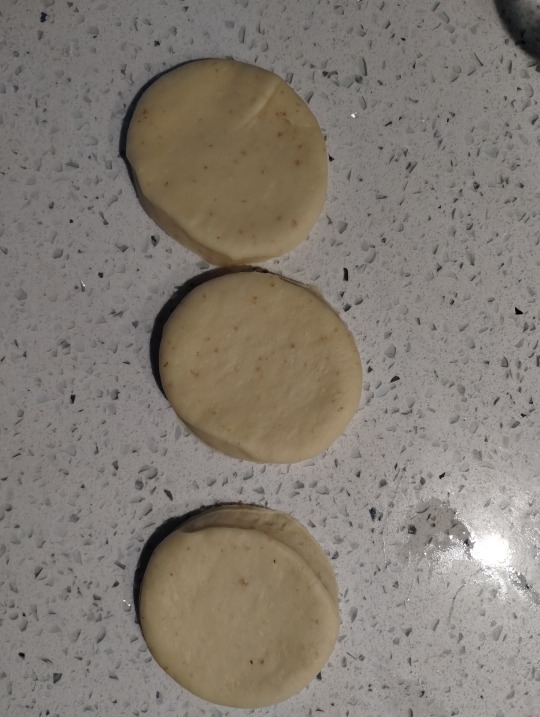
Loosely cover the circles so they don't dry out, and give them a few minutes to poof up again. (Or be impatient like me!)
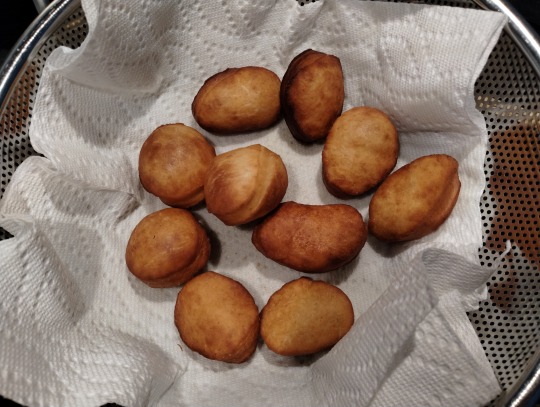
In a saucepan, heat about 3" of neutral frying oil (I use sunflower oil). Fry doughnuts in small batches, turning them occasionally to ensure even browning. I use long (Chinese style) bamboo chopsticks for this, sometimes even gently submerging doughnuts who want only to float one way.
Remove cooked doughnuts to paper towel -lined container (I used a giant metal strainer), and allow to cool to room temperature (probably 30 minutes).
Because I own a pastry gun that allows me to inject donuts with filling, I decided to fill my doughnuts with vanilla pudding.
I found that I needed to pre-poke a hole in the doughnuts before trying to fill them, so once again, chopstick to the rescue.
I also learned it's very easy to overfill these tiny nuggets.

It may be tempting to fill them full, but these doughnuts are a little crispy, which means they'll squish down when I bite, and make a mess everywhere. Less is more.
Dust the filled doughnuts with powdered sugar.
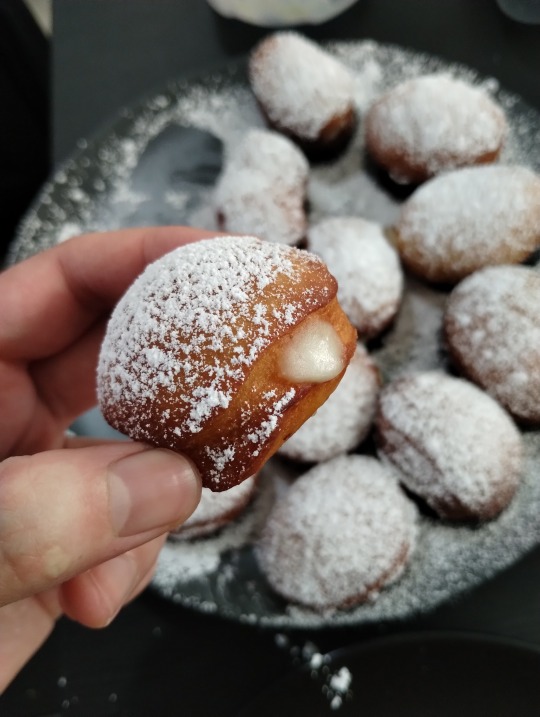
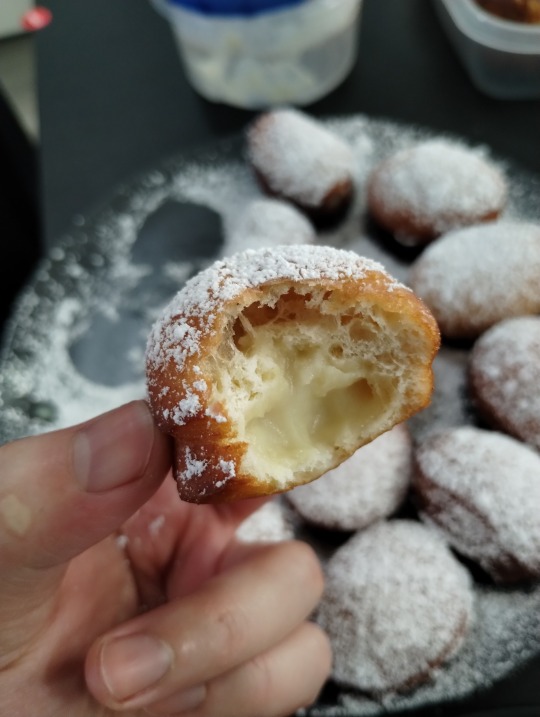
Try not to eat them all at once.
#food#doughnuts#donuts#donut holes#filled donuts#filled doughnuts#baking#bread#pyrizhky rampage#pyrizhky#mini donuts
1 note
·
View note
Text
(I am slightly disappointed by how unflattering some of these photos look: I usually put the tags on the seam, and centering the tags on the work means drawing attention to the imperfections at the seams, for example. But I am still excited to have my work for sale at a local museum!)

Last month, I applied to sell work at the Manitoba Crafts Museum and Library (Centre for Craft) museum shop! This was my first time applying as a vendor, and I was pleasantly surprised at how well it went! The centre accepted eight of my pieces to sell in the shop!
You can find my work under the "Textiles" section, or by searching for "Charlie" :)
(Note: I did not take these product photos.)
#for sale#crochet#hats#accessories#crocheted hat#crocheted cowl#witch hat#toque#neckwarmer#Manitoba Crafts Museum#Centre for Craft#made in manitoba
2 notes
·
View notes
Text

I've adopted my partner's coworkers and sometimes I make treats for the office. And sometimes I write little notes like this for my partner.
Note reads: "Oh [partner's name is blurred out]! Bag me and take me with you! I'm so hot (actually medium) for you!"
0 notes
Text
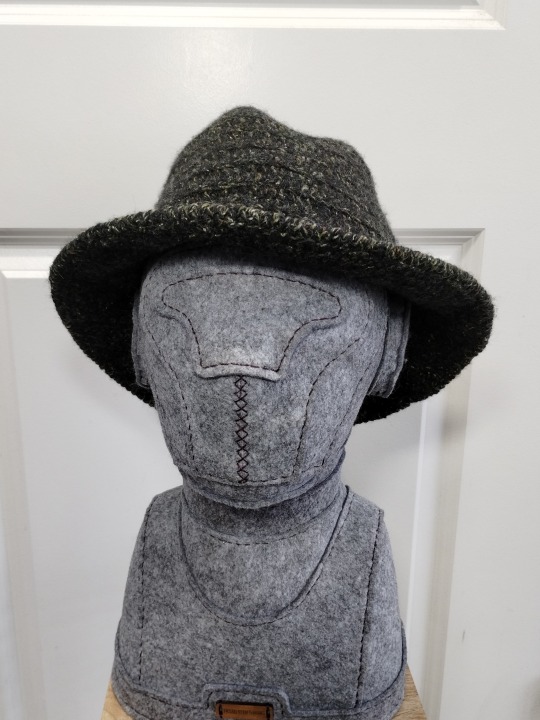
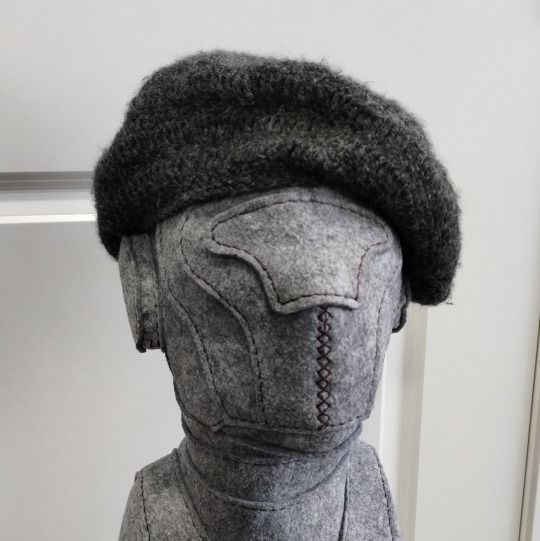
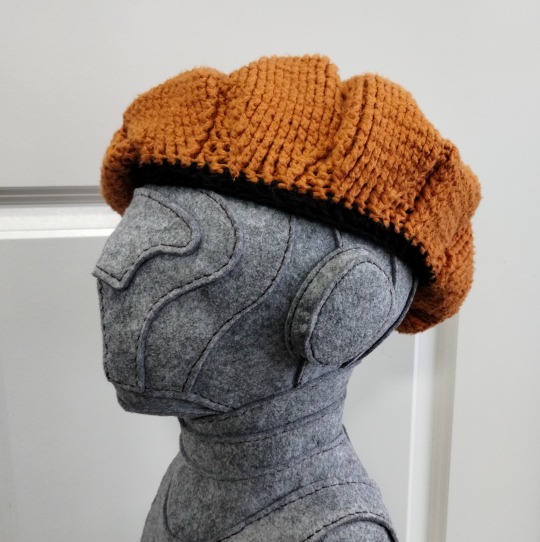
Another Hats Appreciation Post
Here is my mannequin head showing off some more hats I've made! Some of these will be available for sale at the Centre for Craft shop shortly!
Woolly witch hat:


Various berets/tams:


Felted rain cloche with pointed tip:

And a dual-layer lightly-felted neck warmer:

#crochet#mannequin head#crocheted hat#crocheted hats#for sale#felted crocheted hat#beret#berets#tam#tams#accessories#hat appreciation post#cloche#rain hat#neck warmer#neckwarmer#neck cowl
2 notes
·
View notes
Text
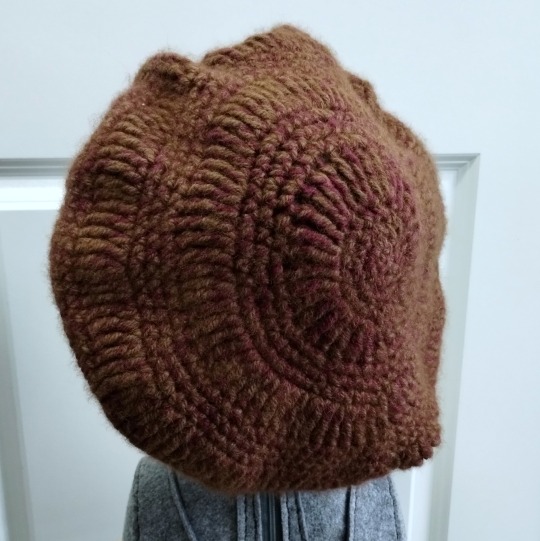
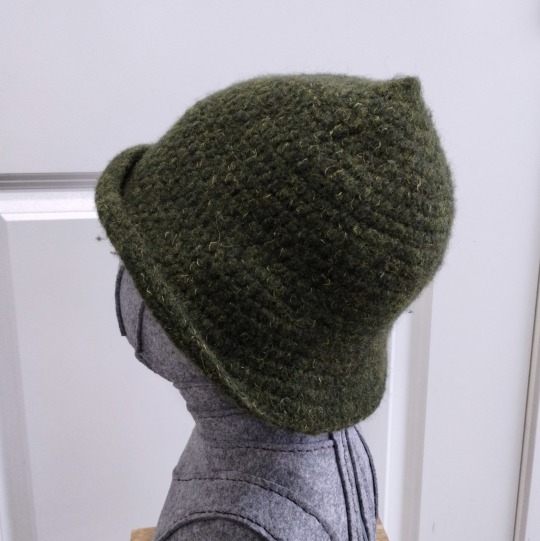
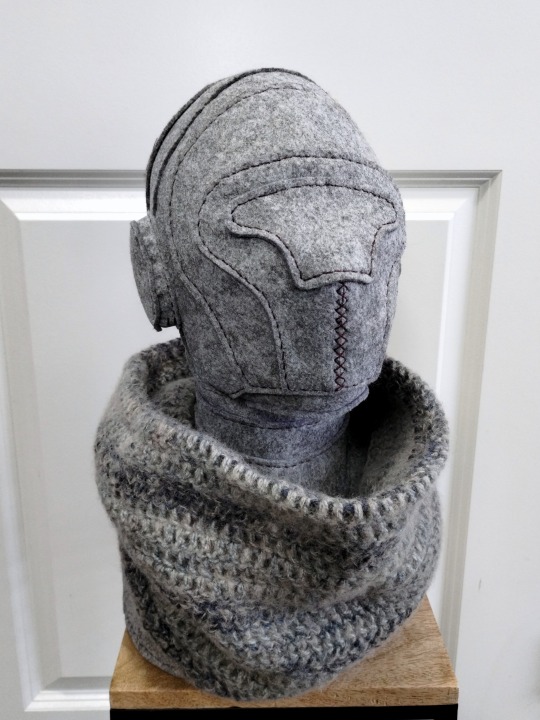
Another Hats Appreciation Post
Here is my mannequin head showing off some more hats I've made! Some of these will be available for sale at the Centre for Craft shop shortly!
Woolly witch hat:
Various berets/tams:
Felted rain cloche with pointed tip:
And a dual-layer lightly-felted neck warmer:
#crochet#mannequin head#crocheted hat#crocheted hats#for sale#felted crocheted hat#beret#berets#tam#tams#accessories#hat appreciation post#cloche#rain hat#neck warmer#neckwarmer#neck cowl
2 notes
·
View notes
Text
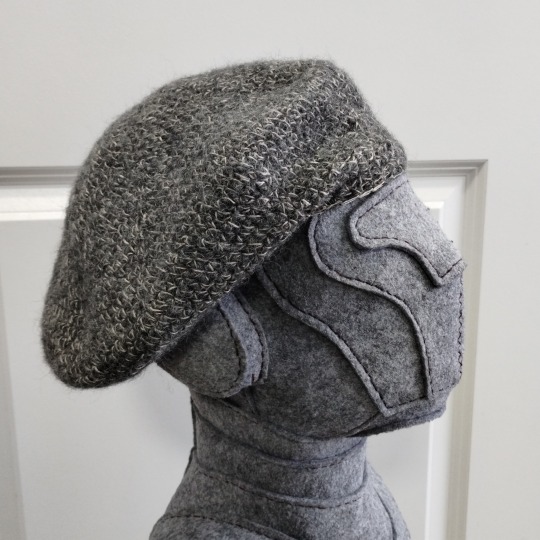
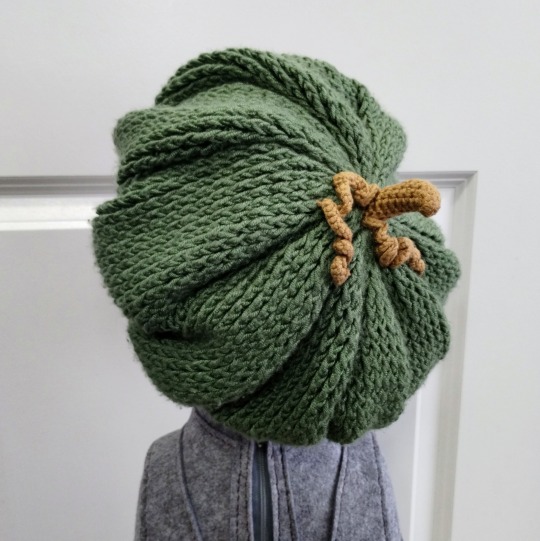
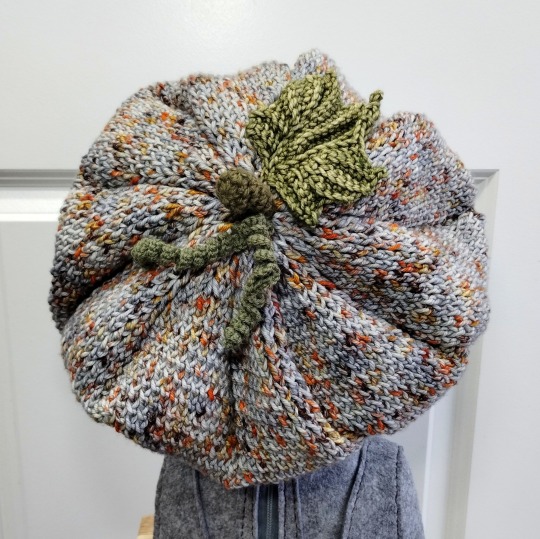
Pumpkin Berets Appreciation Post
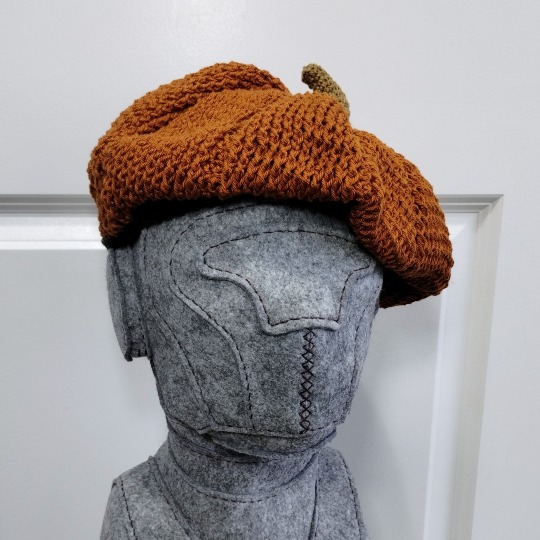


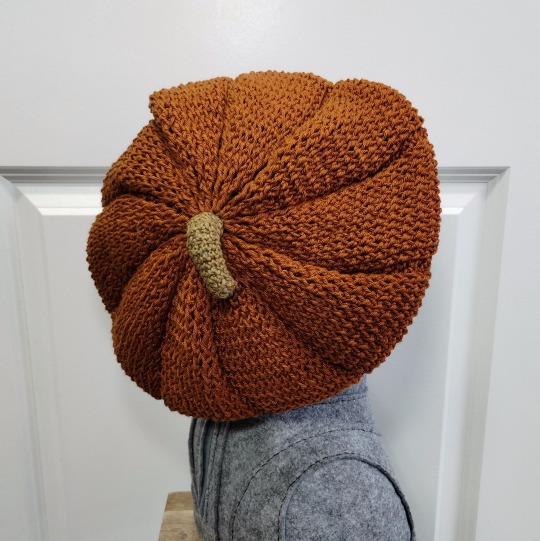
I recently took more photos of my crochet work as part of an application. I'm so pleased to be able to put this mannequin head to use! Some of these are for sale; contact me for more information.
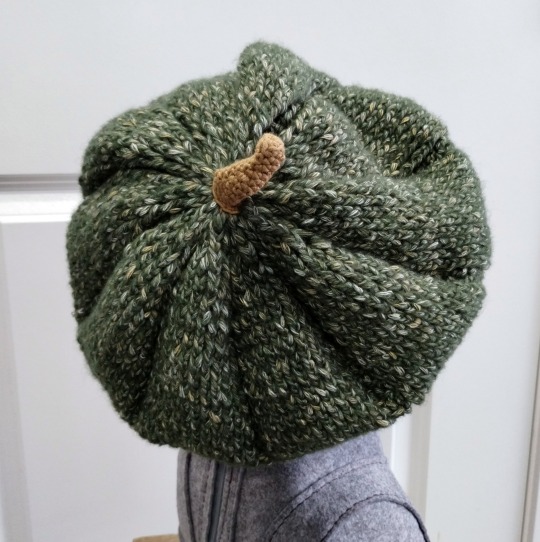
Here's an older green pumpkin beret:


Newer grey-mix pumpkin beret:


Orange cotton pumpkin beret:


Green-tweed pumpkin beret:

#pumpkin beret#crochet#mannequin head#hat#for sale#crocheted hat#crochet beret#crocheted hats#hats#beret#berets#pumpkin everything#pumpkin hat#pumpkin hats#hat appreciation post#pumpkin appreciation post#pumpkin beret appreciation post
3 notes
·
View notes
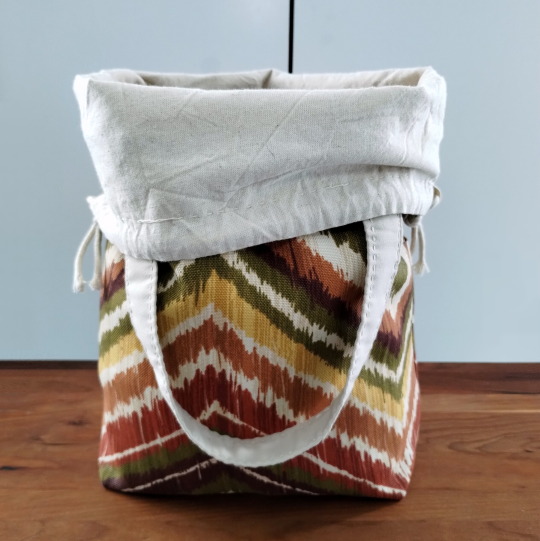
Text
For this larger size, I used a medium-weight fusible; but I think a heavy weight would have been better. The pattern also calls for making the bag 4 inches deep, but I think 5 would give more stability.
I tried using a stiffening spray after the fact (spraying it on the fusible, not the exterior), but that didn't seem to have much effect. Ah well. Next time!

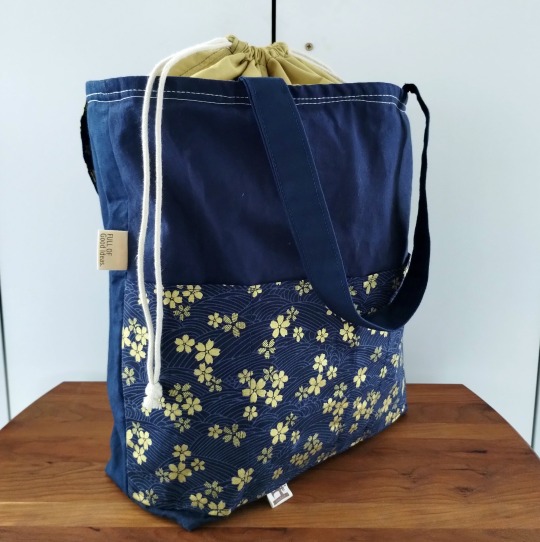


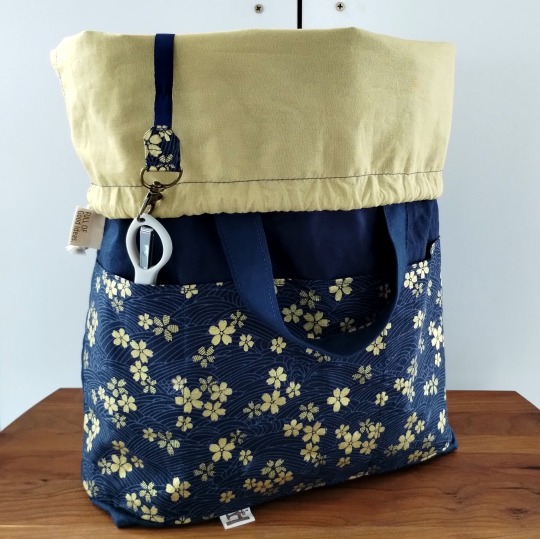
"Marta" drawstring bag (pattern by BurgioPatterns) in the larger size.
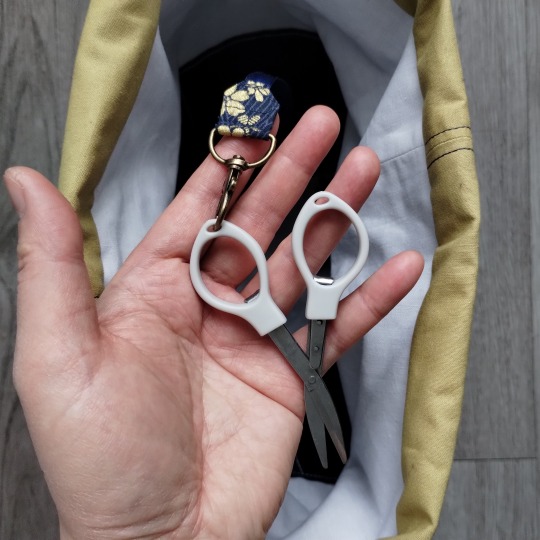
I'm extremely pleased with the fabrics I chose for this bag, and how they worked together. The main body is navy blue; accent pocket is a Japanese metallic bronze floral and blue wave print; drawstring channel is a sort of yellow that closely imitates the metallic print. On the side with the pocket, the handle is plain navy; on the other side, the handle uses the accent print. Inside, the lining is white, with the same navy for pockets. I also included a lobster clasp lanyard, to hold a pair of folding scissors.
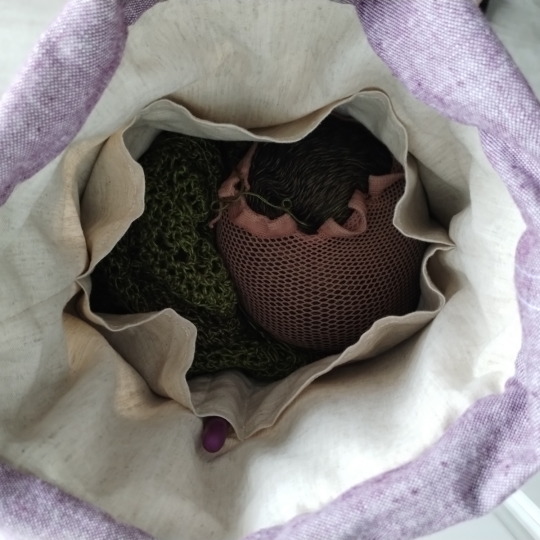
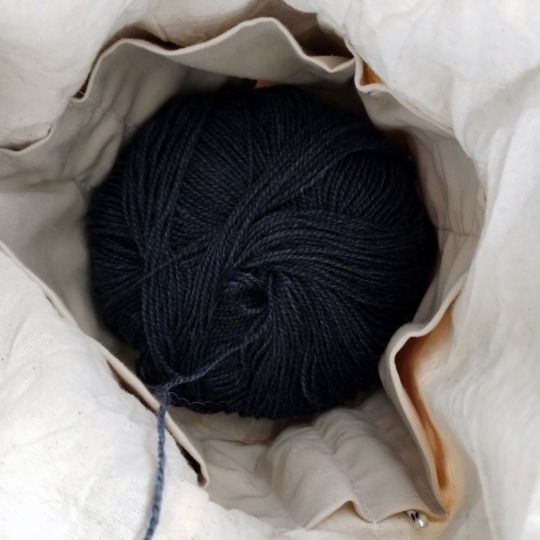
This bag is large enough for a me-sized sweater project. It comfortably holds this me-sized sport-weight sweater, for example:

I could probably fit a sweater, yarn, and tools in it. I'm not entirely convinced it could hold my partner's sweater, but he wears a 2XL-Tall.
Size comparison with the Small after the break.
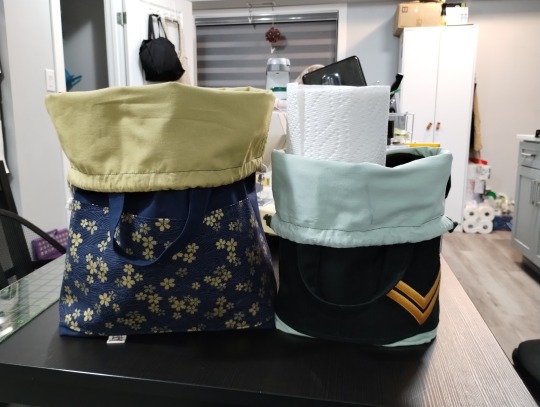
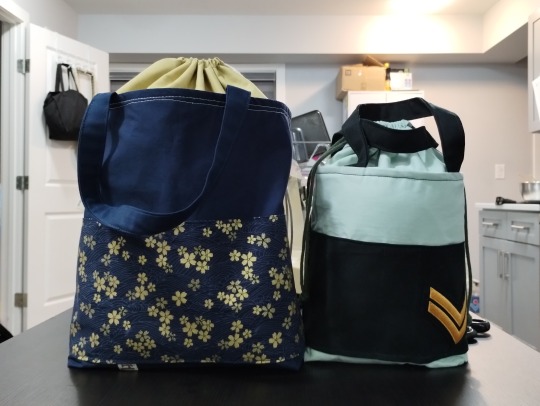
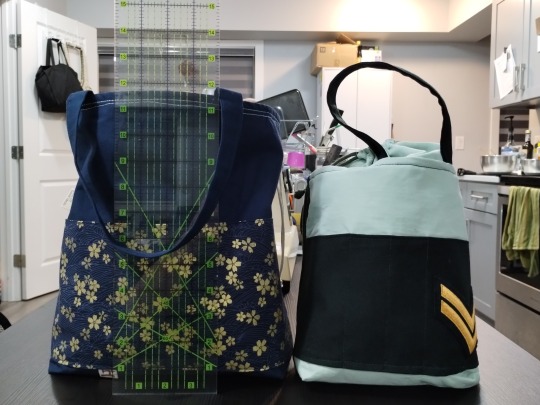
The Large could probably fit two paper towel rolls and close; the Small is wide enough for one inside, but not tall enough to close.
I'd say the Small is suitable for smaller projects that use 1-2 balls of yarn (eg: hats, socks, small shawls).
#sewing#project bag#Marta drawstring bag#sewing finished object#drawstring bag#machine sewing#bag 8#metallic fabric#Japanese fabric#crochet project bag#knitting project bag
1 note
·
View note
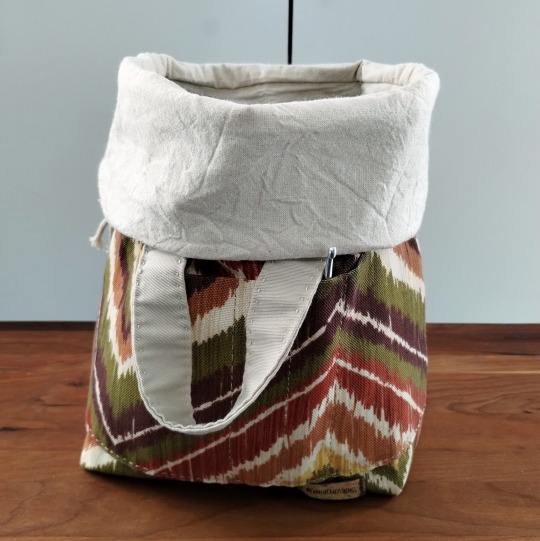
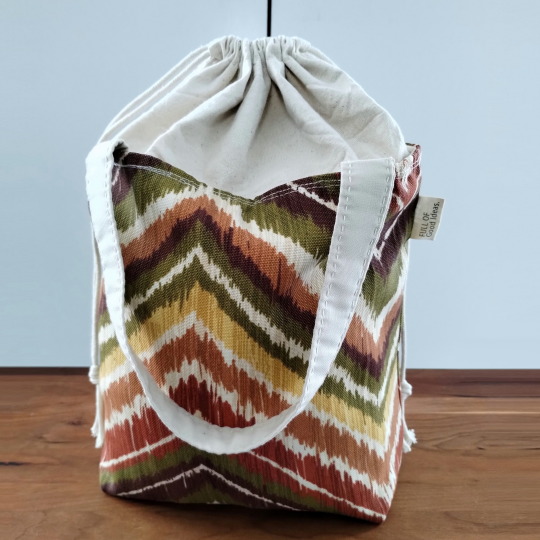
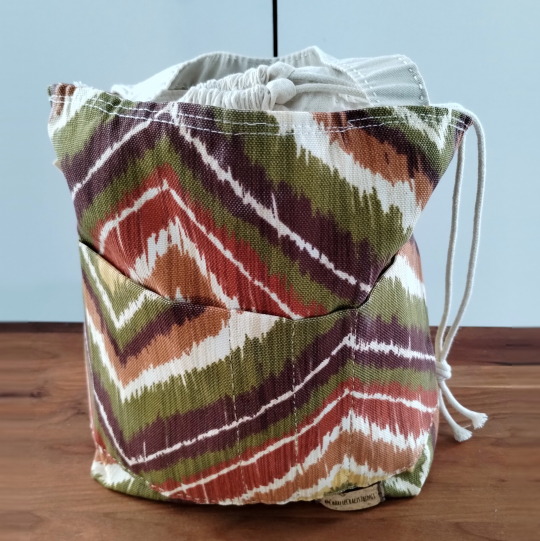
Text
I didn't want to say it any more explicitly on my "shop" page, but I used to describe the smell of "rucksack" as the smell of vomit and sadness.
Who knows how many soldiers before you used that ruck, for how many exercises? Who knows where it's been, what dirty laundry and leaky canisters it's carried, or whether it's ever been washed?
Potentially: nearly three decades of sweaty soldiers and the outdoors before it was my turn to contribute.
It's not a particularly pleasant smell. Though, neither was it particularly strong: I'd only notice it if I had my face right up close to it.
But it is apparently nostalgic.
(I'm wondering if anyone, anywhere, ever, will catch my extremely subtle visual pun of having two hooks on a bag with two hooks.)
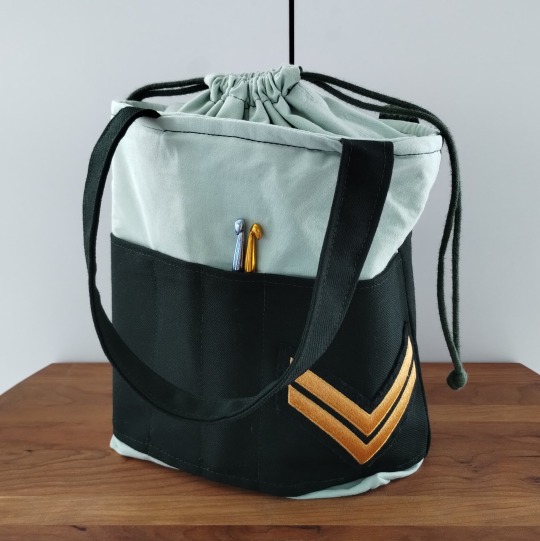
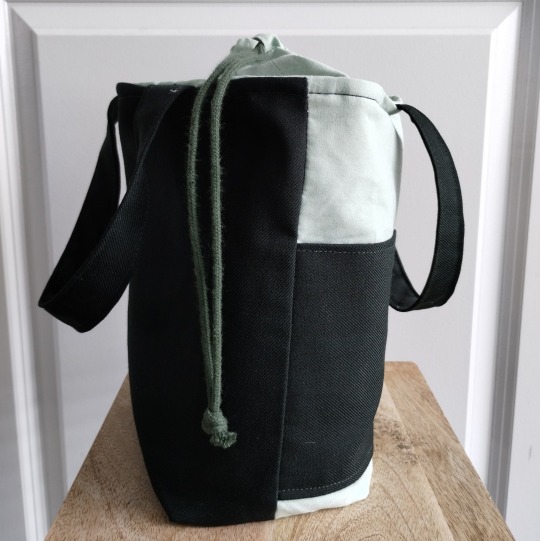
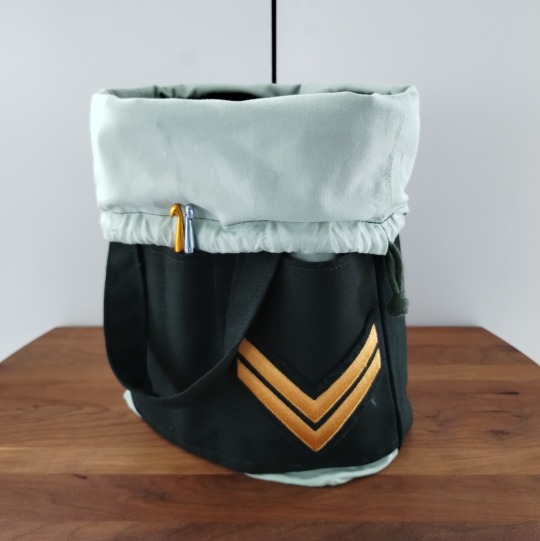
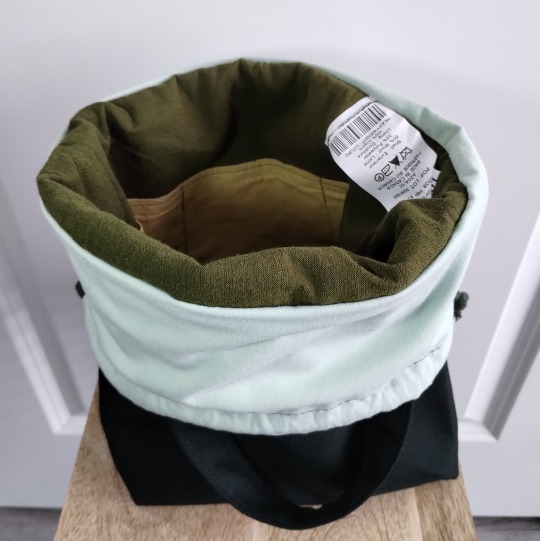
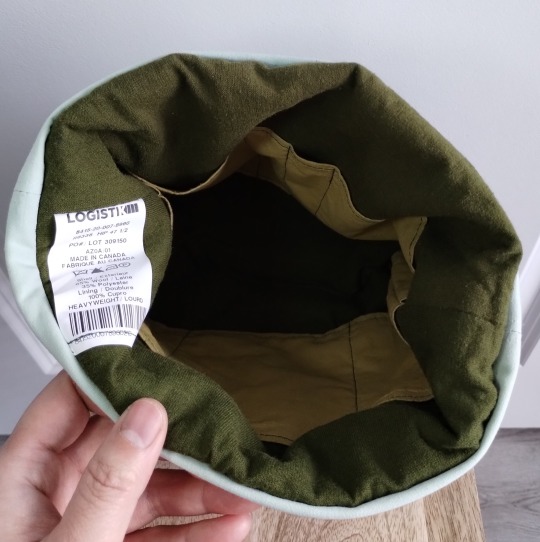
"Marta" drawstring bag (pattern by BurgioPatterns) in the smaller size.
Fabrics were (mostly) taken from parts of my old uniforms that I was allowed to keep: dark wool suiting, light green poly-cotton shirting, and the olive green cotton-poly jersey knit.
(The yellow-green cotton used on the interior pockets were purchased. But as I ironed it, I detected a familiar scent: this is what my rucksack smelled like! I always assumed it was just the smell of use: of sweat and the elements. But maybe it's just what the dye smells like! This association was not intentional!)
Drawstring is from salvaged paracord; tag is from pants that didn't fit me; rank insigna is for Corporal.
I released from the Canadian Armed Forces last year, after about 15 years in the Army Reserve. I made this bag partly as a keepsake, and a way to turn my retired uniform into something I will continue using.
#sewing#project bag#Marta drawstring bag#upcycled#sewing finished object#drawstring bag#machine sewing#bag 7#Army bag#upcycle#upcycled fabric#smells like rucksack#Canadian Armed Forces#Army reserves#rucksack#rucksack nostalgia#army nostalgia#two hooks
1 note
·
View note
Text
It's purple! 💜

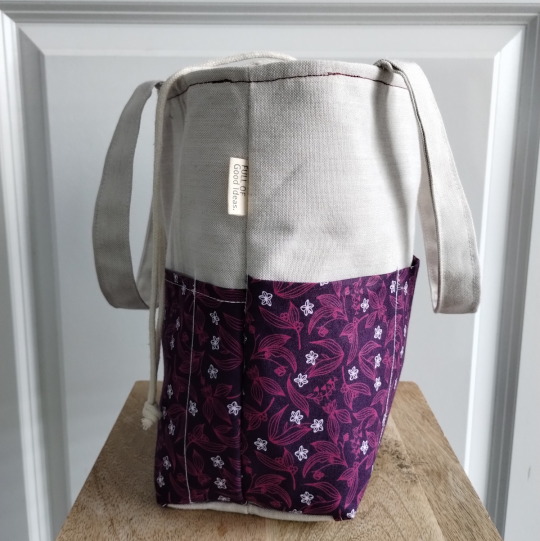
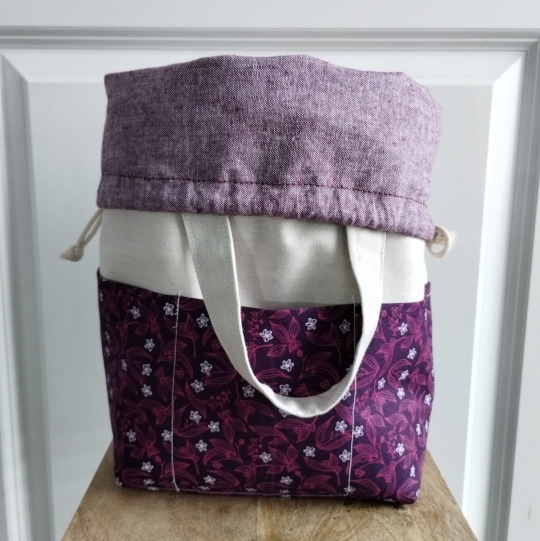
"Marta" drawstring bag (pattern by BurgioPatterns) in the smaller size.
Tag on the side reads "Full of Good Ideas" (by Winnipeg Sews). Tag on the bottom reads "@CharlieCraftsThings" (my IG handle)
Most of this bag was painstakingly bussed between home and the downtown library's makerspace (IdeaMILL) so I could use their sewing machines. I eagerly watched YouTube videos on the long bus ride, learning how to thread the machine, adjust stitch length, etc. This was also my first time using fusible interfacing!
Things don't line up perfectly, some topstitching is absent because I forgot about it, and other imperfections... but I love it anyway!
#sewing#Marta drawstring bag#project bag#drawstring bag#machine sewing#bag 6#sewing finished object#purple#crocheting
3 notes
·
View notes
Text
I'm learning so much about owning a sewing machine, its maintenance and operation--and enjoying it!
Is... is this how auto enthusiasts feel? "I can't wait to change the oil on this, or add accessories to improve its performance" or whatever? "I'm looking forward to going to the, uh, auto parts store" ?
My very dear friend loaned me her family's sewing machine. I have been using it every day since!
Getting it set up took only a little fiddling around, looking up manuals, and a sprinkling of YouTube autodidactism to solve my thread tension issues. But I got it working and have made several mediocre projects already! I even managed to make some good projects, too! But you'll see soon!

I am absolutely delighted to have a sewing machine in my home, and not have to bus to the library to sew!
4 notes
·
View notes
Text
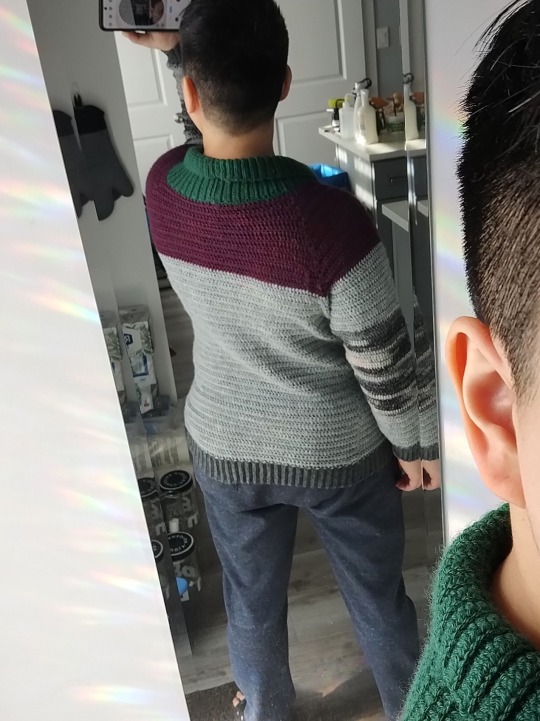
Sometimes I show off this sweater, and every single person has been impressed with it--and often for the very reasons that I think it's a good sweater!
I am very aware of the chunky-but-holey fabric that crochet often makes--which can also be a stylistic choice, but not one I often want to make--so I choose thinner yarns and stitches. I want to imitate knitwear in its drape and uniformity.


Progress on my partner's sweater, Feb 2024.
The sleeves are nearly done.
I enjoying working sleeves first, especially when shaping/sizing for someone else! I can get all the fiddly measuring done, before moving onto the extremely repetitive body.
#crochet#crocheting#sweater#pullover#done in love pullover#pullover wip#crochet wip#love sweater#crochet WIP#sweater gift#AW#DIL4
2 notes
·
View notes
Text
*coo, coo!*
I showed this to my occupational therapist and she called it "animal print" and I don't know if I will ever recover from that.
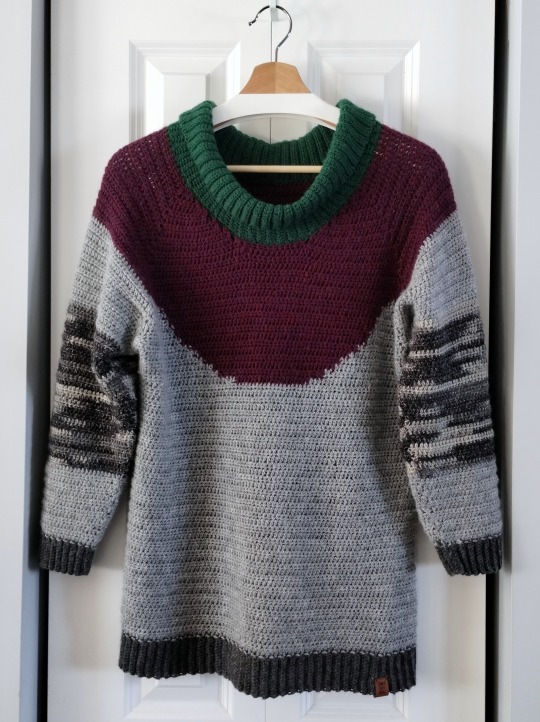
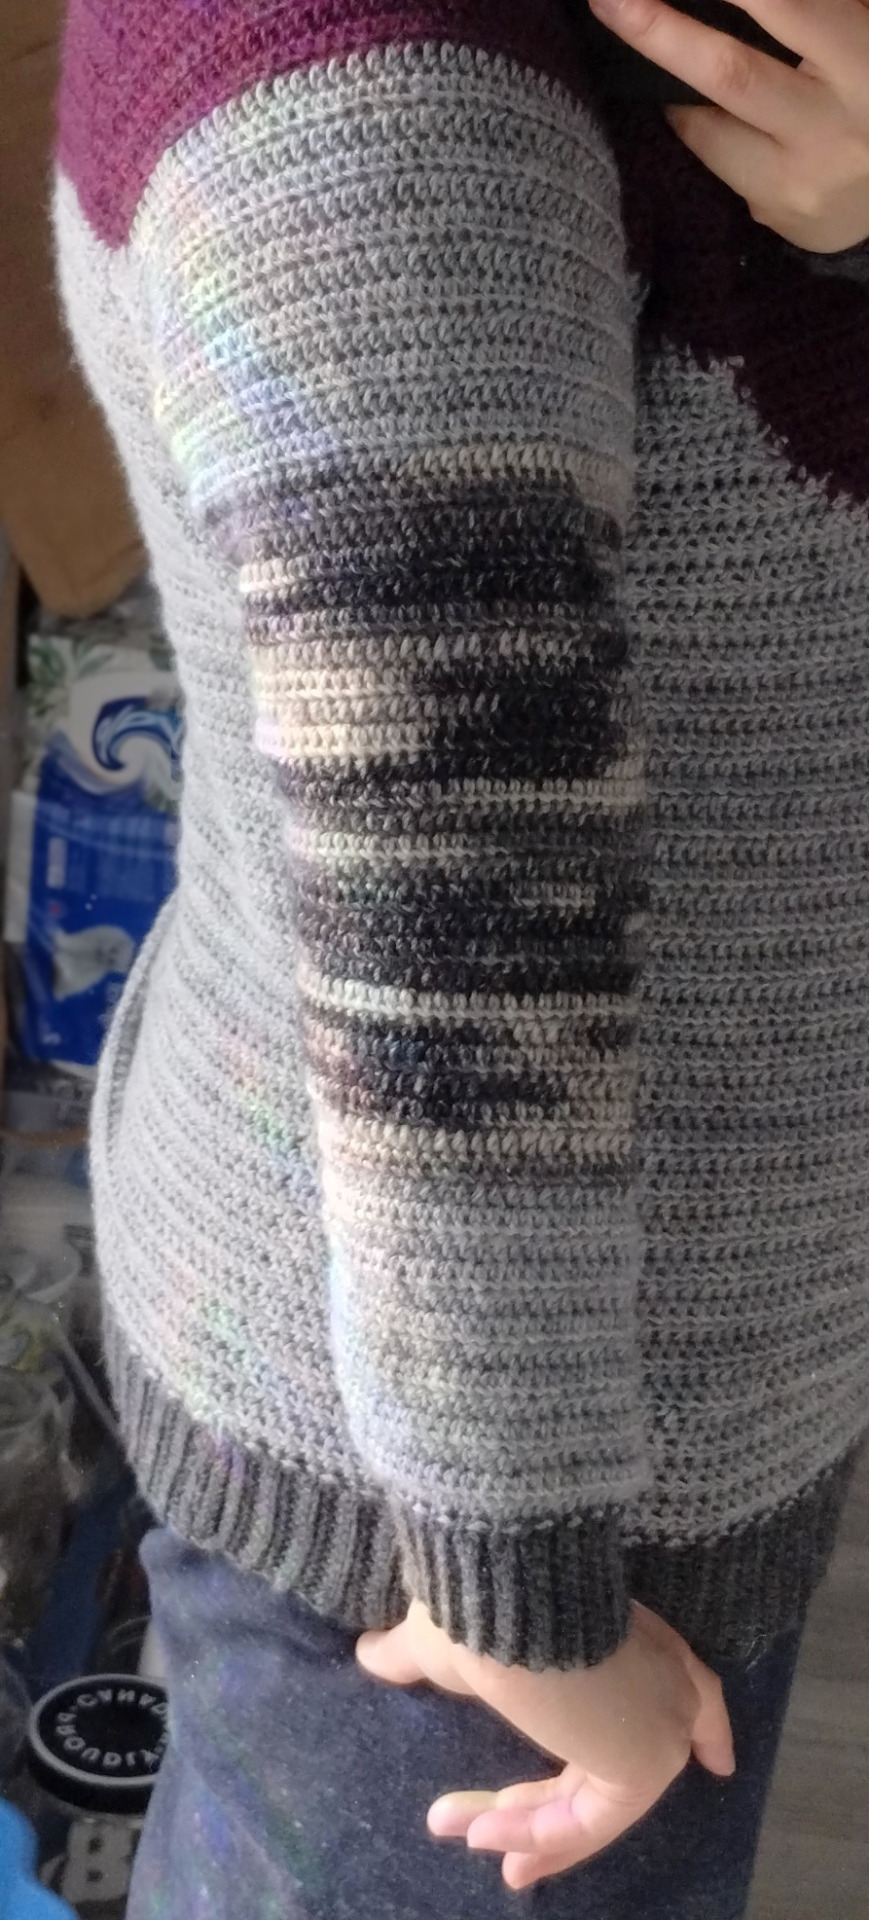

Pigeon Pullover, completed!
I am very pleased with how this turned out! It's very comfortable--I had worried about the mock neck getting in the way (which has been my experience with other garments), but this wasn't a problem! It's also just warm enough to keep off a chill, but cool enough I'm not overheating, even with a t-shirt underneath.
The self-striping sock yarn used to make the chequered wing pattern is toothier than the solid-coloured yarns. It's noticeable, but I don't think it's an issue.
Things I'd change next time:
figure out how to make a tighter mock neck
start the chequering sooner (higher)
round the purple yoke more; possibly start it sooner (end it higher)
Can't wait for Pigeon Pullover version 2!
#crochet#pigeon pullover#sweater#pigeon#crocheted sweater#pigeon sweater#Done In Love Pullover#DIL#crocheting#Done In Love#Doneinlovepullover#garments#all the sweaters#pullover#crochet sweater#birdbrain#birb sweater#finished object#mock neck
14 notes
·
View notes
Text
I'm not allowed to buy a sewing machine until I either have more space, or better space discipline. But I am allowed to borrow one!
"Marta" drawstring bag (pattern by BurgioPatterns) in the smaller size.
Fabrics were the cheapest I could find at the store: mostly bolt ends and muslin. The exterior fabric is some kind of synthetic (or blend) upholstery fabric.
I probably started this bag in Spring of 2023, hand-sewing about 80% of it. I was almost finished--at the part where I attach the lining to the exterior--when I just got tired of hand-sewing! (To be fair, I was hand-sewing a lot of project bags by then!)
...Or maybe I stopped because the topology of turning the bag inside-out evaded me at the time... I strongly believe more sewists should teach topology, and/or more topologists should do sewing.
In any case, I procrastinated finishing the bag until very recently, when I used a sewing machine for the first time!
Finishing this bag went very quickly with a machine--though not necessarily tidily. There are puckers where the feed was irregular (or maybe I didn't measure things properly so the lining was a different size than the exterior), and my stitches aren't straight. But it's pretty not-bad for my first time at it!
I'm already working on a second. And a third. ...and maybe a fourth.
#sewing#finished object#project bag#drawstring bag#hand sewing#hand stitched#machine sewing#Marta drawstring bag#bag 5#sewing finished object
2 notes
·
View notes