
Last Seen Blogs

marionphd
POE_RY&AR_

yaminoshohi-blog
💀 It won't end 💀

giftanon
i simply love giving gifts

lilias42
Une curieuse
mqllart
Smell
Text
Captain Marvel's Lunchbox! The Fonz!
Captain Marvel’s Lunchbox! The Fonz!
Hey y’all! I recreated The Fonz lunchbox from the film, Captain Marvel. Since this is a SUPER VALUABLE and SUPER PRICEY vintage lunchbox to buy from eBay. So I recreated the image for you to tape/glue/adhere to a lunchbox of your choice. It’s a PNG file sized to the “typical” vintage lunchbox size, (8″x7″). It’s totally free, just click the link below to download. If you do use it, just tag me…
View On WordPress
3 notes
·
View notes
Text
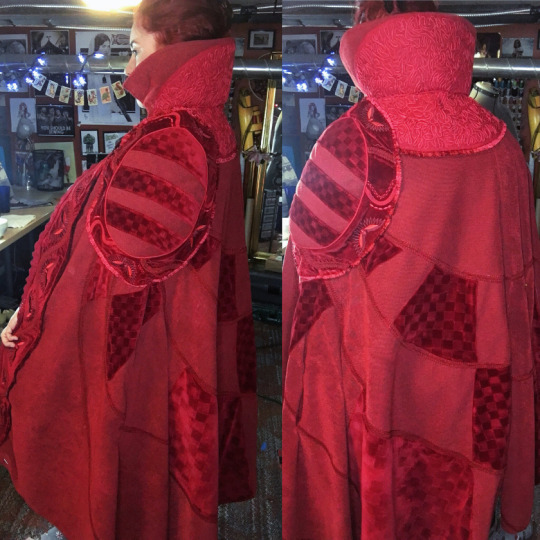
May I present, DOCTOR STRANGE! Yes, I’m Mr. Cumberbatch can’t you tell?! Well I will tell you that I’m not Stephanie Strange. Who isn’t a character in the Marvel Universe but yet I get called that for some weird reason? Hmmm.. I wonder why.🤷♀️ #womenincosplayprobs. BUT, I digress.
Let’s chat about how I made my favorite cosplay, yes I said it, MY FAVORITE COSPLAY I EVER MADE. That’s a tall order since most people would believe that my Star Wars cosplays are my favorite. Queen Amidala is right behind Strange in the “favorite costume line up of mine”. It’s all about the connection to the character. I love Doctor Strange. He is my favorite comic book character. I will say I came into this Strange dimension later than most. I’ve read some Avengers and Defenders comics before and I’ve always been intrigued by the character but never really dove into his storyline. It wasn’t until the movie in 2015 that I just fell in love with the character. I really loved that movie. So, I immediately dove into all the comics I could get. From the old 70s comics to the newest ones, I became enthralled. To show my appreciation for my new found comic love, I had to make his outfit.
I knew this build wouldn’t be a super long build (like 9 months for Amidala), but I knew I would be figuring things out along the way. The cloak was the first piece I wanted to tackle. I fabric swatched at Joann’s Fabric and on the first go, I found the exact fabric for the cloak. It was a special order upholstery fabric. More like fabric for a beautiful red couch. I needed that heavy drape looks but still have a little free flow to it. Next, I found a sensible red velvet and boom. The outer fabric has been sourced. Then, I headed over to Spoonflower.com to find the lining. Easy! Click here for the link to Spoonflower! The design was created by Shawna Lay. Thanks, Shawna!
Yippee! Fabric found. The next items I found were all the trims, cording, interfacing, and thread that I would need for the details on the cloak. I did use some pretty special interfacing for a lot of stiff parts of this whole cosplay such as the collar and shoulder padding on the vest. This stuff is pretty awesome, it’s called Super Structure Foam from the company Sew Much Cosplay. Click here to grab some and check them out.
With all the fabrics and notions for the cloak, it’s time to build. First, the draping. I did drape the cloak, so no pattern exists from me. If you are interested in finding a pattern for the cloak. Use the McCall’s 7676 Doctor Strange pattern. You can easily chop it up and use it. In my case, draping was the easiest.
Once the cloak was draped and I had the shape I wanted, I moved to the details that needed to be handsewn or machine sewed on. The collar has couching details on the back, check it out. This took some time.
From here on out it was a lot of topstitching trim and sewing on big pieces made like the shoulder pieces. Take a look.
I got creative with the trims and textures I had. Luckily Joann’s had a lot of great choices so I didn’t have to dye anything. Let’s move to the magic checkboard velvet pattern I created by accident. The cloak has these distinct velvet checkboard pieces on it. It really boggled my mind on how to get that exact design on the velvet. I thought that I would have to use chemicals to achieve that “burnout” look, so I purchased some. I really couldn’t get it to work well and I just hated dealing with it. I was using wax based chalk to draw out the designs on the velvet to establish an area for the chemicals. At one point, I made a mistake and to remove wax chalk mistake, you hit it with an iron and the chalk marks are removed. So I did that, and surprisingly a residue was left behind on the velvet causing the velvet to have a darker tone where the chalk was. GENIUS! So I grabbed my chalk and rulers then went to town.
It was pretty easy, draw out the design you want, hit it with the iron. Don’t forget to place a press cloth in between just to be safe. Turned out great!
The next couple of images are showing where I placed the checkerboard velvet pieces.
Here are some close ups of the shoulder piece creation.
With almost all my costumes, custom embroidery is added. This time, the custom parts were added to the borders of the cloak. I was able to find a blurry image of the piece online and then I cleaned it up in Adobe Illustrator, transferred it to my Embroidery design software, made it into an embroidery file, then moved it to my embroidery machine. Off it goes!
Now! It’s time to add the lining and call it done!
Very proud of this build so far! The cloak was a task. Let’s take a break.

I wanted to take a tiny break from sewing and work on some of the prop pieces for Doctor Strange. I was very lucky to have a great buddy from Twitter 3D print me the Eye of Agamotto (that works!), a sling ring, and the 2 triangle clasps on the cloak.
SO MANY THANKS TO @JediJeremy. Seriously dude, thank you.
Once I got the pieces, I painted them with gold leaf paint and then weathered with acrylic paint.
After the gold prop pieces were done, I moved to make the vest and tunic. Originally I thought I was going to completely draft these pieces with my own measurements, but I was just getting tired and I knew I could chop up the McCalls 7676 pattern to fit me just fine I made some mockups and did a lot of alterations, but it worked and fit great. If you want to use this pattern for your own Doctor Strange, go for it! Just be aware of the alterations you will have to do especially if you are trying to fit it around curves. I ended up raising the waistline up like 4-6 inches, thus also raising the hems too. Plus taking it in a lot on the sides and shoulder line.
As I stated above, I used simple linens and cotton for the fabrics. Just having the tunic and vest color is a tad different than the other. I completed the tunic using the McCalls pattern and added my own details like the striped pattern around the neckline. Those are just top stitched ribbons layered on each other. I ultimately ended up removing the zipper and just having it open. Worked better for the neckline.
Now the vest. The details I added into my vest are some of my favorite parts of the entire outfit. The best part of that is that it was pretty simple just time-consuming. Following the pattern from McCalls and then altering to my size, I then chose an X shaped embroidery stitch on my Bernina sewing machine. With about 4 different blue colored thread, I stitched vertical line after vertical line alternating the different blue colors. Take a look.
Neat! The last thing I added to the vest was to the shoulders. I wanted a sharp shoulder with a bit of padding but not a lot. So I grabbed the super structure foam that I spoke about above, cut a should pad shape and ironed it on. Then ran some more vertical stitches through to give it a quilted look. Loved it! To finish out the vest, I added random ribbons and selvage edges of fabrics to the armhole edges. Turned out great!
OK! Almost done. The waist cincher corset was simple.
I just used McCall’s 7555 Yaya Han underbust corset. I altered it to what I needed but it worked just fine. Used some heavy black cotton fabric.
Now what’s left are the belts, cuffs, boots, and wig. I purchased two “belt” trims from Joann’s and did little to no major alts to them. The main belts were made from black yarn woven into a 5 strand braid, the other belt I purchased was some black vinyl trim woven into a 4 strand braid. BOOM! I added brown vinyl bias to the black vinyl belt on the edges then hand sewed on snaps. Next, the woven belt was a bit different. View the photos below to get a good grasp of the pattern of that particular belt. Once I figured out the shape, I created the silver ring from EVA foam coated with plasti-dip and silver paint with black weathering spots too.
The details I added next are near and dear to me. With every costume I create, I give the opportunity for anyone to become a part of my costumes via donations through the site, Ko-Fi. Any donation made to my cosplays fund, I will add your name into my outfit somewhere/somehow. For this outfit, my donators got their initials etched into the metal details on my belt. Take a look!
To finish up the belts, I took some black leather strands and wrapped the silver ring. Then I took more of the leather strands and wove it into the knitted black belt. See below
Ok, belts are done! Move to the cuffs, these were easy in my opinion. First thing is to pattern your forearms, yes both because most people have two different sized forearms, then cut out 4 pieces of fabric with your pattern. 4 pieces because you will need to layer to make the cuffs more durable. Joann’s gets another win here because the trim pieces I found where from here too. Thanks Joann. Also, don’t forget to grab two separating zippers for your cuffs. Take a look at how I created them below, don’t be afraid to get a little haphazard with your placement.
After the cuffs where done, I then hit it with an airbrush to weather it. Anytime I can airbrush things, I’m all about it.
ARE WE DONE YET?! Nope! Hang tight, boots and wig left. My boots were super easy, basically, I purchased some cute knee high lace up boots from Amazon, then stitched on blue linen scraps. Yup, done. lol. I also airbrushed them too. Can’t stop, won’t stop. AIRBRUSH!
LAST THING! HERE WE GO. Wig time. I had the wonderful opportunity to win a seasonal sponsorship from Arda Wigs for my Doctor Strange cosplay. The sponsorship would cover my wig costs. THANKS, ARDA! So the wig and wig parts I chose are the Virginia Classic Lace Front in Dark Brown and Silver weft to tie in the sides of the wig. I actually made a Youtube tutorial video on the creation of the wig so take a peek below!
The last thing I want to add is my super awesome spell prop made by my buddy, Bubblesgal0re. If you are interested in grabbing one for yourself, shoot her an email!
If you have any questions at all, please feel free to contact me through email or any of my social media. I’m always ready to answer questions you have about your or my builds. Thank you so much for reading another long How-To blog post. I do appreciate it. My next posts will be all about my Luke Skywalker and Qi’ra build.
MTFBWY
❤ Amanda
Doctor Strange photos from Alexandra Lee Studios
Let’s get Strange. May I present, DOCTOR STRANGE! Yes, I'm Mr. Cumberbatch can't you tell?! Well I will tell you that I'm not Stephanie Strange.
12 notes
·
View notes
Text
New passion realized: SFX makeup
New passion realized: SFX makeup
There comes a time where, as an artist, you grow bored, hit a creative rock, or plainly just really start to hate your work you are producing. It SUCKS. I’ve hit this wall several times as an artist. When I feel at all unmotivated with my sewing projects, I put that project on hold (unless there is a deadline 😕) and move to something else. Anything else! For me, I will move to plein air drawing…
View On WordPress
7 notes
·
View notes
Text
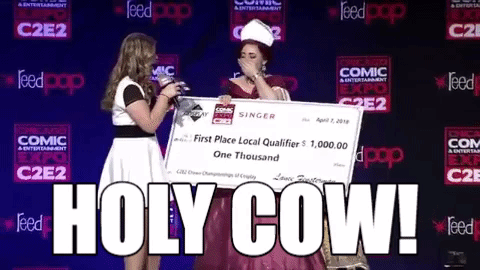
Y’ALL, I WON! I couldn’t believe it! I won the Central regional championship at C2e2 two weekends ago. The whole experience was just insane. I was not expecting any of this, but boy does it feel great. Over 6 months of work and tears I poured into Anastasia and to be given this honor was just heartwarming.
I just want to give out a major shout out to the entire competition competitors especially everyone in the needlework category. I don’t envy the judges. This was a tough competition. Sitting backstage with everyone in our category just made me so nervous because EVERYONE IS SO GOOD. Cosplay competitions are getting so much tougher. You really need to be a master of all trades now.

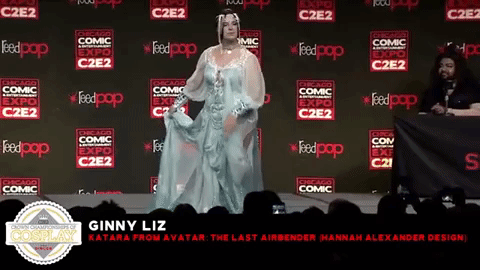
I want to give a mega shout out to Ginny Liz for soothing my anxiety backstage and through the competition. I was nervous y’all. The whole day was insanely busy and stressful. But she helped me through and she placed 3rd in the Needlework! I’m so proud!.
With more than a week of rest…oh JUST KIDDING. I’m already knee-deep in creating
Doctor Strange!! I’m enjoying this build so much so far because I’m a HUGE FAN OF DOCTOR STRANGE. He is bae. I plan to have his cloak of levitation done for the premiere of Avengers: Infinity War, which by the time I’m finishing this blog is less than ten days. I can do it!
His cloak is extremely detailed. WAY more than I thought. Which I love but also hate in a time crunch. I spent this past weekend in couching down a tiny red cord to his collar. It took me all weekend. I’m not starting to think he will be a competition piece for me. Since I’ve won a Best in Show already with Anastasia, I personally don’t think I should compete with her regionally anymore. I will compete with her again, it will just be at other cons nation wide and possibly internationally. I plan to try to compete with her at Dragon Con but that will be it for the year. I want to still compete at Gen Con, Cincy Comic Expo, and Louisville Supercon but I will be competing with Doctor Strange instead! Exciting!
Take a look at some photos so far of my Doctor Strange process. The best place to follow me while creating Doc Strange is my Instagram and my Instagram stories. Facebook reach is awful so Instagram is the place
C2E2 was amazing, and such a good kickstart of a con for my con year. Cheers to a good year ahead.
Central Champion of Crown Championships of Cosplay Y'ALL, I WON! I couldn't believe it! I won the Central regional championship at C2e2 two weekends ago.
6 notes
·
View notes
Text
Grand Duchess Anastasia Romanov. 6 months of fluff and rhinestones.
Grand Duchess Anastasia Romanov. 6 months of fluff and rhinestones.
View On WordPress
1 note
·
View note
Photo

"Sailor Mars here, ready for battle!" Have an awesome week y’all! 🔥 ___ #selfie #sailormars #cosplay #sailormoon #sailorscouts
9 notes
·
View notes
Photo

Wow! Seems like y’all are REALLY liking Anastasia! So great to hear! Here’s a side by side to one of several Russian court gowns that I drew inspiration from. I expanded her gown for theatrics and to stay true to her gown from the movie. Do you drew inspiration in your cosplays from historical works?! 💜✨💜 _____ #cosplay #anastasia #anastasiaromanov #sewing #costumedesign #royalty
8 notes
·
View notes
Photo

Anastasia test fitting! ▶️ swipe for video! Please disregard my no makeup and ill fitting too, it’s impossible to put on by myself. OTHER THAN THAT! OMGGGGG. She so royal! And really hard to move in but I’ll manage. I’m so happy! Can’t wait to finish the wig then photo her! __🌟 ____ #cosplay #anastasia #anastasiaromanov #costumedesign #sewing #royalty
12 notes
·
View notes
Photo

Diana, Princess of Themyscira! 🌟 ___ PC: @aleestudios ____ #wonderwoman #cosplay #dccomics #foamsmith #wonderwomancosplay #justiceleague
5 notes
·
View notes
Photo

Found this young Padme cosplayer at #D23Expo this past year and we instantly clicked! I wonder why 🤔😍 She was so amazing and of course she made her gown! ___ #queenamidala #starwars #cosplay #starwarscosplay #padmeamidala #cosplayerkids
12 notes
·
View notes
Photo
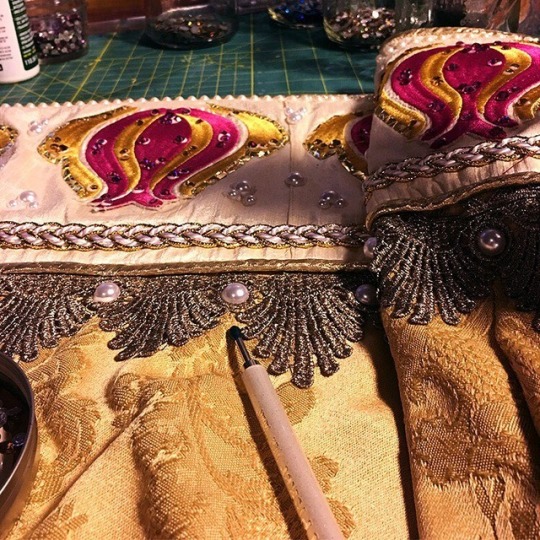
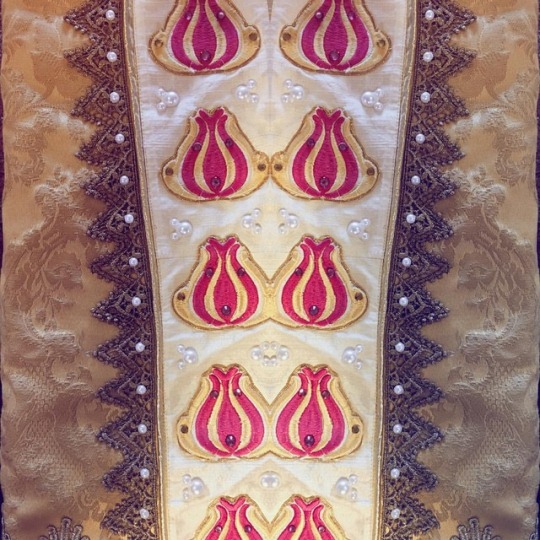
Rhinestoning for days. These small details really bring a punch to my gown. Wait till you see it 😎 ___ #sewing #rhinestones #anastasiaromanov #cosplay #workinprogress #costumedesign
5 notes
·
View notes
Photo

Bling! 🌟 late night post but it’s what I’ve been up to lately with Anastasia. I’ve finished all her jewels including her brooches for her sash. Next I made her matching choker, bracelet, a pair of earrings. So much bling! She’s almost done! 🌟✨🌟 ____ #anastasia #cosplay #costumedesign #jewelry #anastasiacosplay
1 note
·
View note
Photo
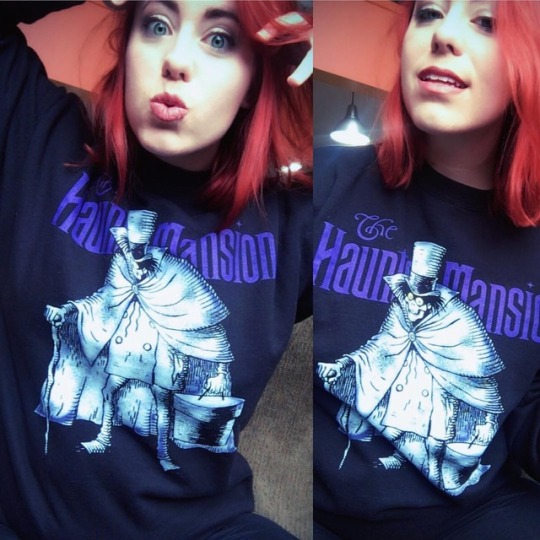
“Grim grinning ghosts come out to socialize!” 💜😈👻🖤 ____ purchased this epic sweatshirt at the #MagicKingdom ____ #selfie #hauntedmansion #disneyworld #spooky #redhair (at The Haunted Mansion)
3 notes
·
View notes
Photo

Close up of the Crown for Anastasia. Gosh I just love it so, it's also not that blue IRL. I'll be taking her to Indiana Comic Con and C2E2 very soon! 💙 _____ ______ #anastasia #cosplay #anastasiacosplay #costumedesign #anastasiaromanov #costuming
3 notes
·
View notes
Video
It fits and sits! I finished the attachment for it to stay on my head now the Crown is complete, now back to rhinestoning. ✨💙🌟 ___ #anastasia #cosplay #crown #sparkly #anastasiaromanov #handmade
4 notes
·
View notes
Photo
The current aesthetic for Anastasia ✨✨. ____ #anastasia #cosplay #rhinestones #aesthetic #anastasiaromanov
1 note
·
View note
Video
The Crown is complete now for Anastasia! 👸Wow, I can’t believe I made this. (High fives self) 💪 ___ #anastasia #cosplay #crown #anastasiacosplay #handmade #video #sparkle #anastasiaromanov
6 notes
·
View notes