
mysewingadventures
old fashioned
Hi everyone! On this blog you’ll find anything and everything on fashion history, from trying to make sense of some of the olden trends to my own attempts at sewing stuff. Hope you enjoy!
63 posts
Don't wanna be here? Send us removal request.
Last Seen Blogs

decaffeinatedbluebirdpaper-blog
Untitled

cowhoredinator
internet narcissist
eseninalexx-blog
krustymix

minakobeatrice-blog
MINAKO-Beatrice's Golden Land

wanderings0u1
WanderingSoul || Art
Text
Making a Modernized 1890s Skirt - Part 2/2
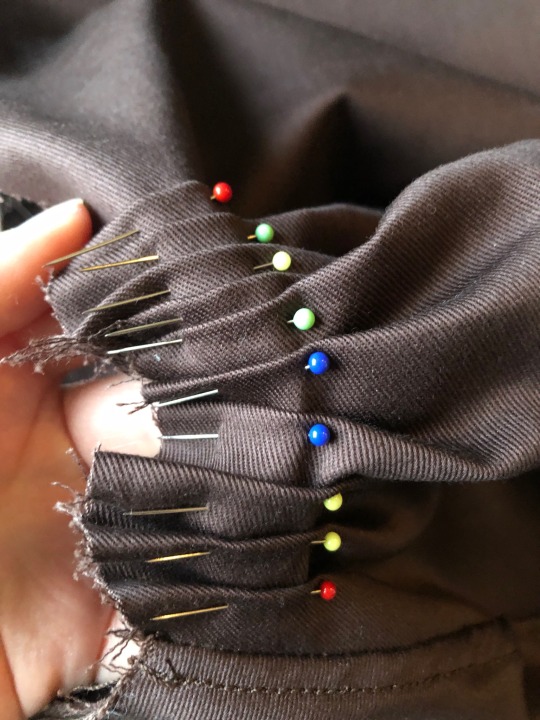
Last time, I finished off with the insertion of the zipper, so now it was time to hem the bottom. Since the Anne With an E dress was a little longer than what I would like the skirt to be, I didn’t add any seam allowances and decided to shorten it in this step. For that, I folded over the raw edges and stitched everything down. Easier said than done, as the skirt flares out quite a bit in the bottom so the hem ended up really bulky at first, but I was able to fix it by adding tiny pleats to the left side of the hem.

Ironically enough there aren’t any visible in this picture (unless you take a close look in the bottom right corner) but I added one pleat to every panel and two to the back one because it’s wider than the others.
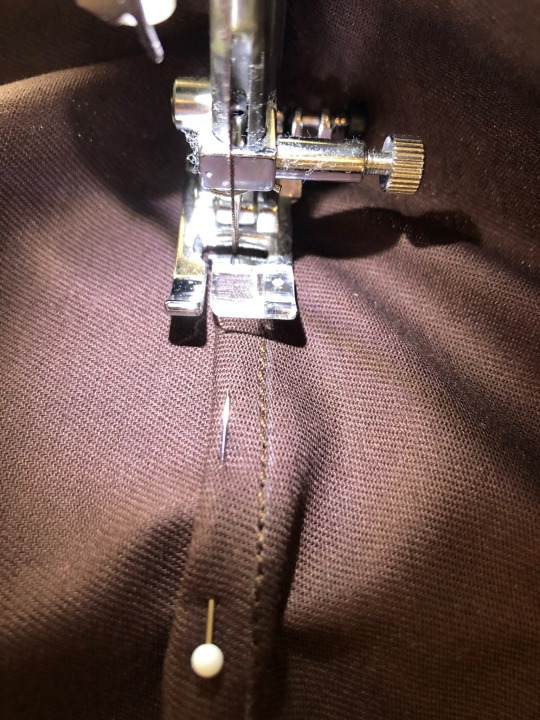
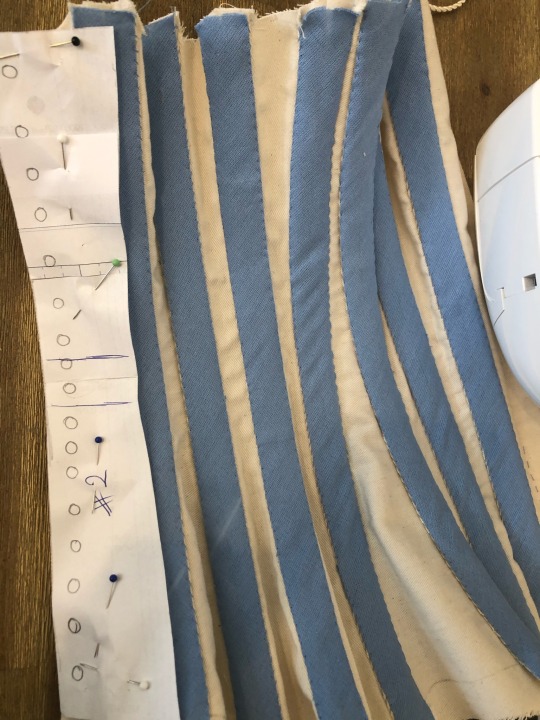
Next, I wanted to add the decorative bands. Now this proved so much trickier than I had anticipated, and I still don’t really know what exactly it was that caused the problem.

So this is what I wanted to do. Three rows of bands, and I actually thought this would be the easiest part. Oh boy how wrong I was. The first, thickest band turned out alright, but the second one ended up being super taught, almost as if my thread tension was too high, except I didn’t change a single setting. So I ripped out the seams again (quite literally) and just left the bottom one. I didn’t bother trying again at this point because it was very time consuming and besides, to make the thinner bands I had cut a wider band in two and the edges were starting to fray quite a bit.
Lastly, I added a button to the back above the zipper and it was done! And... I did a little photoshoot.


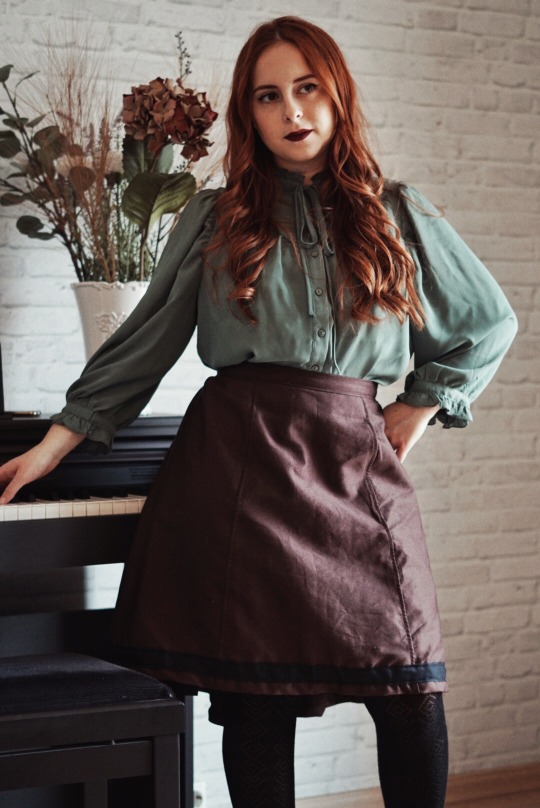


I love how the color of the blouse matches the fabric, I actually had this exact combo in mind when I decided for a brown skirt. So yeah, hope you like it as much as I do, and I’ll try to post again very soon!
#fashion#historical fashion#fashion history#victorian#victorian fashion#edwardian fashion#victorian skirt#sewing#mysewingadventures
45 notes
·
View notes
Text
Making a Modernized 1890s Skirt - Part 1
I spend a lot of time making historical costumes but I’m just never really able to wear them. In my day to day life I dress rather modern, with a few puff sleeve sweaters and ruffled tops, but overall it’s chain store with a small nod at history. For a while now, I’ve been wanting to make some modernized clothes I can wear on a daily basis, without needing a specific occasion to not look completely out of place (and time). So I decided a skirt was one, super quick and easy to make and two, a perfect way to give my outfits that much needed ✨vintage vibe✨.
This idea has been in the back of my mind since I watched this video by Bernadette Banner, I haven’t rewatched it since but I would say it is loosely based on it.
The idea was that I’d use the skirt pattern from the Anne With an E dress, as it was taken from an actual 1890s skirt pattern that I just shortened. So immediately when I received my package, I started working on it.
I didn’t need a mock-up as I’d successfully used the pattern before, so I cut it out of the fashion fabric right away - I’d bought 2 meters for this but honestly could’ve done with one. But having leftover twill is never a bad thing, there’s so much you can do with it!

As you can see, there are three pieces. Two of them I cut on the fold, so they’re double the width, and the third one is actually two seperate pieces, same shape but mirrored, those will be the side panels.
Next I stitched them all together and cleaned up the edges right away. So much easier to work like this.

Now it was time to pleat the back. I eyeballed it, pleating the entire back panel with pins and then tried it on to add some pleats to the side panels as well so it looks a little better.
I then decided to stitch down the pleats so I could take all the pins back out; it was impossible to add the waistband with them in place.

For the waistband I just cut out a rectangle, pressed it and sandwitched the raw edges and pleats between it. It was a little finicky but thankfully once pressed the fabric stays in place pretty well.
Next up was the zipper.


This was actually the first time I used a zipper foot, up until now I either sewed it by hand or used a regular foot, but it worked so well and i’m never not using a zipper foot again.
And that was it for one day of work. I’ll be finishing up the skirt asap and maybe even do a photoshoot, who knows!
#fashion#historical fashion#fashion history#victorian#victorian fashion#sewing#skirt#victorian skirt#edwardian fashion#mysewingadventures
42 notes
·
View notes
Text
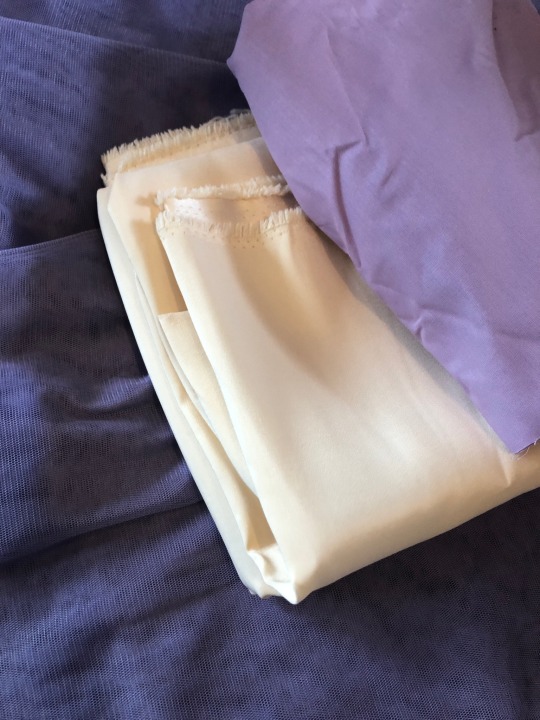
Making an early 1900s corset cover
Hey everyone, I’ve been absent for so long and that has many reasons, my studies are definitely taking up so much more time than I had anticipated. I feel like I should mention that I am not studying dress history, so like I always say - costuming is a hobby of mine but please be aware that I might not always be 100% correct about things. But I am minoring in art history where we do occasionally talk about costumes so... it’s something? Anyways, a while ago I made a corset cover that I forgot to take pictures of when it was finished, so now I’m doing that. But first, this is what I was roughly going off of:

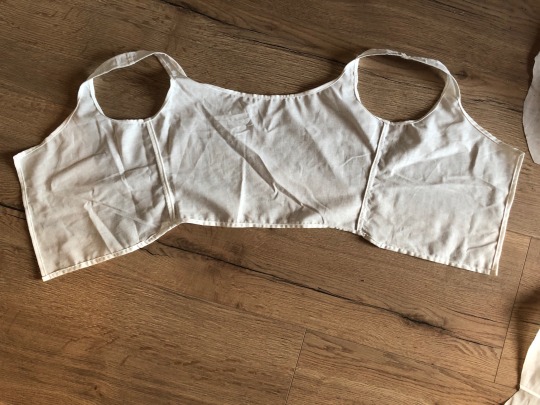
Having made some more complex things before I thought hey, this can’t be that hard? It’s basically just a bodice shaped piece of fabric with ruffles on. And surprisingly, I wasn’t that far off from the truth. I still severely underestimated the time that it took to sew all of those six pieces of ruffles on. That being said, here’s where I started:

Please excuse the fact that it’s not ironed, I was making it kind of in a rush.
I did make a mockup first that I tried on and made sure everything fits, but didn’t take a picture. Here you can see the mock up parts cut out of fashion fabric. I got out my french curve for the first time and was totally expecting to fail but it worked out really well! I used it to draw in all the curved lines. The reason only the back is curved and not the front is because I wanted the back to sit flat while the front would be gathered with a string and tied in the front, to help create that pigeon breast silhouette without having the back be puffy as well. As you can see, for that to work I’ve had to adjust the length of the side edges in the front so they had the same length as the curved ones.
So then I sewed all the edges together and cleaned them up right after so I wouldn’t have to do that later when it’s done.

I then cut out some rectangular strips for the ruffles and folded over and stitched all edges but one - the one that would be ruffled. Instead, I did a running stich that I could pull on to gather it, and then machine stitch it to the rest. Here’s where I began to struggle: I didn’t really know how to attach the ruffle so it would look nice. I didn’t necessarily want the stitches to be on top, so I initially stitched it upside down to the fold it over but that didn’t work at all, so I had to take it all out again and just stitch it down normally.

I kind of just eyeballed where I wanted the ruffles to go, used a ruler to rougly make sure the ruffled pieces are the same length and tried putting them all about three centimeters apart. I do like how the ruffles curve up on the sides, I thought the finished piece looks so much better like this.

Like I said, I wasn’t super happy with the top stitching, and since I had some white ribbon left I used that to cover it up.
Then it was time to insert the string, aka that same white ribbon. I originally wanted to add a separate channel for that but I thought maybe I can just use the cleaned up edge for it. I used a bobby pin to get that ribbon through this makeshift channel but it worked.
So then I added the buttons and made little “buttonholes” out of thread and sewed five buttons in place.
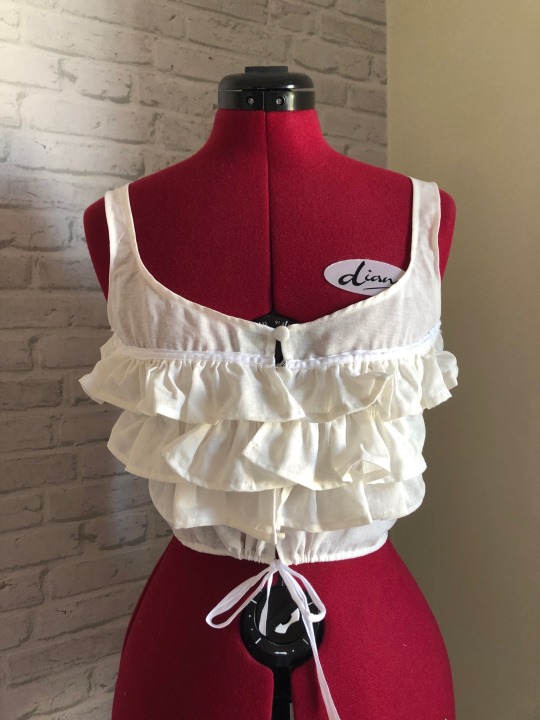

Here’s the finished piece. And you know what the ironic part is? It doesn’t fit me over a corset. And I have nothing but my own stupidity to blame. Thing is, I made this in order to wear under a dress that I’m going to make at some point, and I’m not really planning on wearing a corset with it (I want to modernize it a little), so I wanted something to help with the silhouette. So I never took my measurments in a corset, and I thought if I leave a little wiggle room it’ll be fine. No, learn from my mistakes and take your measurments! It’s not that big of a deal though because I did make it specifically with that dress in mind and having it fit over a corset would’ve just been a nice plus. And if I really try I can make it fit, it’s just a tiny bit small.
So, long story short, corset covers are great and not hard to make if you don’t make these obvious mistakes.
#fashion#historical fashion#fashion history#victorian#edwardian#sewing#edwardian fashion#victorian fashion#corset cover#mysewingadventures
111 notes
·
View notes
Text
Fixing my Robe à la Polonaise to make it more ✨historically accurate ✨
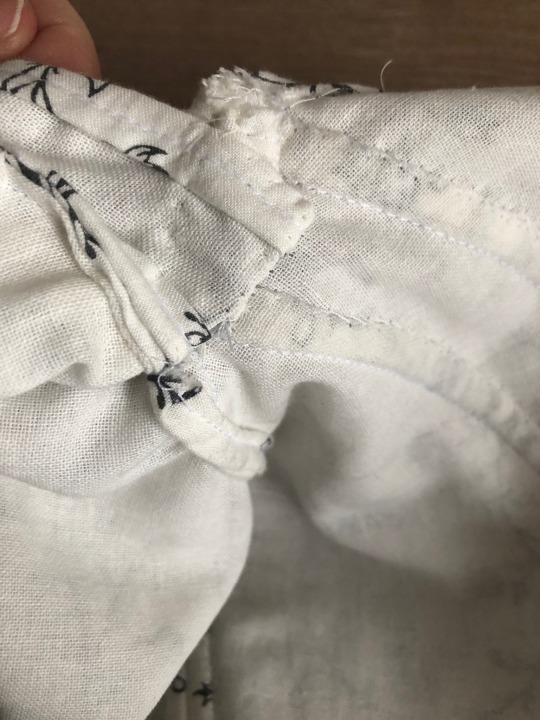
With every project I do, I learn more and more about techniques, sewing, and dress history as a whole. So there’s no surprise if I look at an older dress I made and find all kinds of mistakes that need fixing, and I know even in a few months I’ll look at my current projects with the same criticism. Just know that the obvious mistakes are something I’ve been very much aware of since I made it, I just added a fichu because I didn’t know how to fix it.
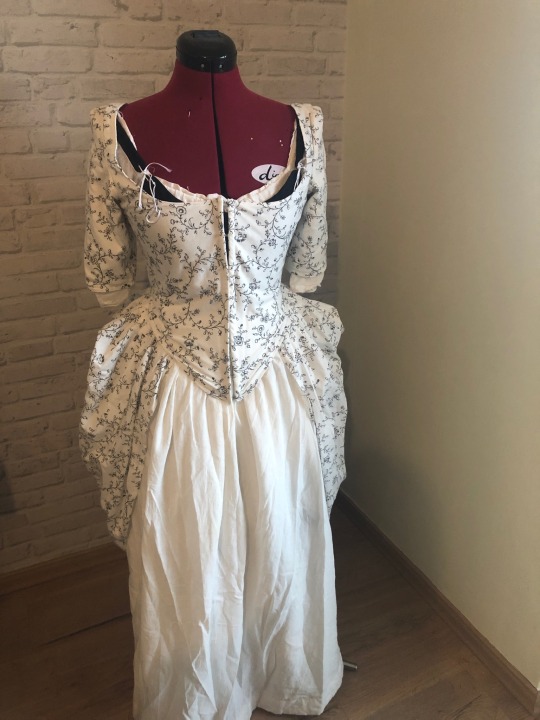
Here’s the dress. You can immediately tell that something went terribly wrong with the neckline, but there are also some issues with the undergarments that I’m going to deal with.
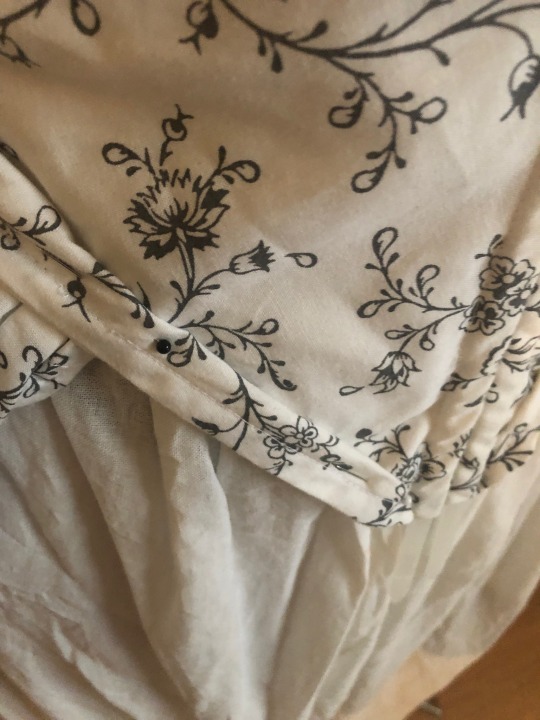
I made the mistake to cut the neckline straight when it should have been slightly rounded, that’s why it slopes up in the middle. For that, I’m taking out the boning in the front (and later replacing it with actual synthetic whalebone) and folding that slope over to make it rounder. This will however create an even lower neckline which is also one of the many flaws of this dress, so that’s what I dealt with next. Another problem that I had was with one of my sleeves. The right sleeve (left in the picture) wouldn’t lie flat on my shoulders. I have no idea how that happened as I cut both sides the exact same but it’s something I needed to fix so I folded this part over on the inside and stitched it in place.
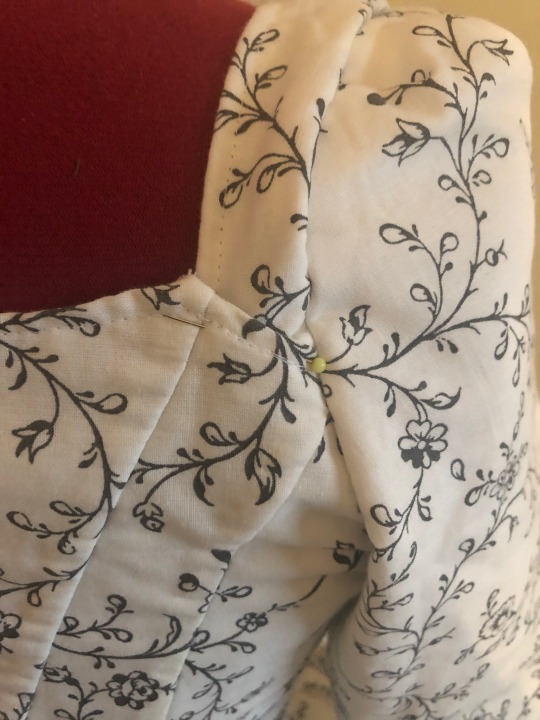
I did this on both sides so I could raise the neckline as well.
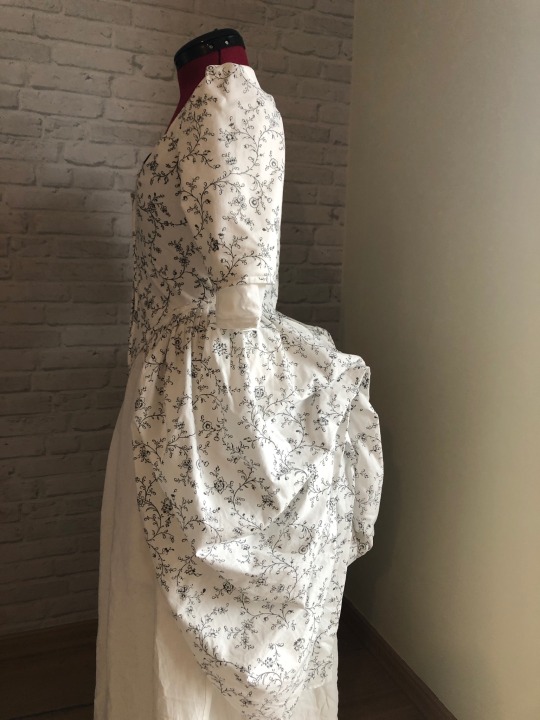
Then I noticed that the front of the bodice wasn’t laying flat, and I noticed that it’s probably too long. I folded the bottom seam over until I felt like it looked flatter and stitched that in place as well. It does look a bit awkward and is not the historically accurate way to fix it, but you can’t really tell from a distance so for the sake of facing my mistakes to practice it was good enough.
The gown still has many more issues that I’d need to make a new one to really make it work so I only tackled the most obvious parts.
There was this big fold in the back that I planned on fixing by resewing the side seam but for some reason after fixing the front it wasn’t so bad after all so I left it as it was.
Now to the petticoats. They’re fine overall, but I didn’t use bands for the ties, I made a tube out of the same fabric, which made it super bulky when tied. And since you have like, two or three of those underneath the actual gown it could make it look a little bulky in the waist area, which I wanted to avoid so I bought some cotton bands about a centimeter wide and replaced all the ties.


This is the fixed dress for now. The back is very boxy so I might resew the side seams after all but this is it for now.

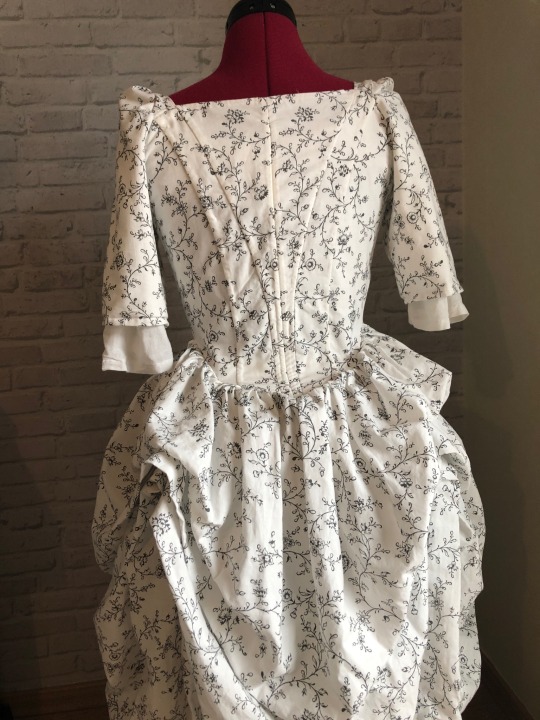

Like I said, to fully fix it I’d just have to make a new one and I will eventually but probably in the distant future as I have many more projects that I want to do. But all in all I can say that I’m really glad I fixed this dress as best as I could because like I said, every project is a big learning experience and fixing something even more so. This way I can make sure I won’t make the same mistakes again!
#fashion#historical fashion#fashion history#rococo fashion#rococo#18th century fashion#18th century dress#1700s#robe a la polonaise#mysewingadventures
64 notes
·
View notes
Text
Hi there! I really tried not to disappear again for over a month but I’m in the midst of moving at the moment and it’s been super stressful. I really thought I could start the new project before but it was impossible. It’ll take a while now to get settled and get everything sorted and by the time I do I think I’ll be starting uni again, but my deadline for this one is June next year so I will definitely have to start it at some point. So I decided to post a quick little sneak peek while I’m sorting out my sewing stash -
This will hopefully be made into a beautiful early 1900s gown, with some alterations to bring it a little bit into this century so I can wear it to a wedding and not feel completely out of place. I might add that the bride is very extravagant in her clothing as well and she granted me permission for this so I definitely will not outshine her. I’ll tone it down a notch too, so don’t worry. She said as long as it’s not white I can come up with whatever I want.
That being said, I’m basically going to be following (or trying to) this pattern from Patterns of Fashion 2:
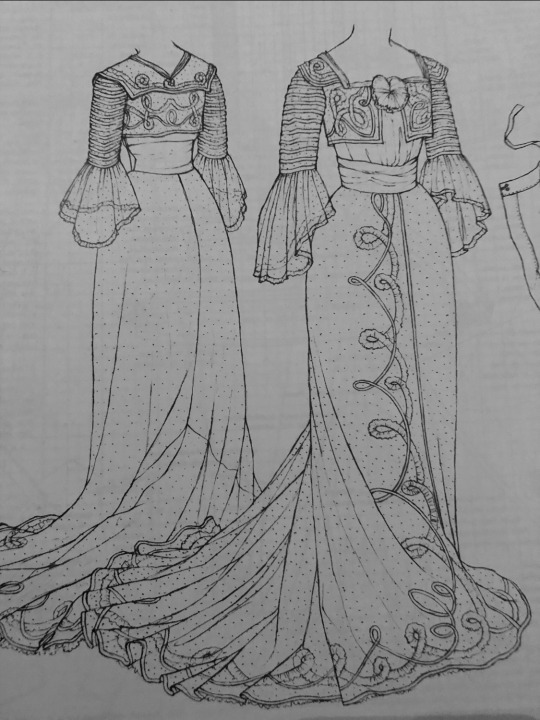
It’s not going to have the massive train and the flounces at the sleeves, and I don’t think I’ll be wearing a corset with it, much rather just a corset cover for the shape and put some additional boning into the bodice itself so the silhouette will still be there, roughly. The rest I think I’m going to make up as I go. It is also completely possible that I’m going to scrap this project last minute and buy a dress from the store. If it turns out nice, I’ll wear it!
This is it for now, and I’m truly hoping to start working on it this month but realistically speaking, I don’t know. Hopefully soon though!
#fashion#historical fashion#fashion history#sewing#victorian#edwardian#edwardian fashion#edwardian gown#mysewingadventures
86 notes
·
View notes
Text
Making a 1906 Corset (Part 5/5)

And finally, I am happy to say that I finished this project. There was very little left to do from where I left off in my previous post, I just needed to add the eyelets, the binding and the lace. Something that’s quickly done, right? .
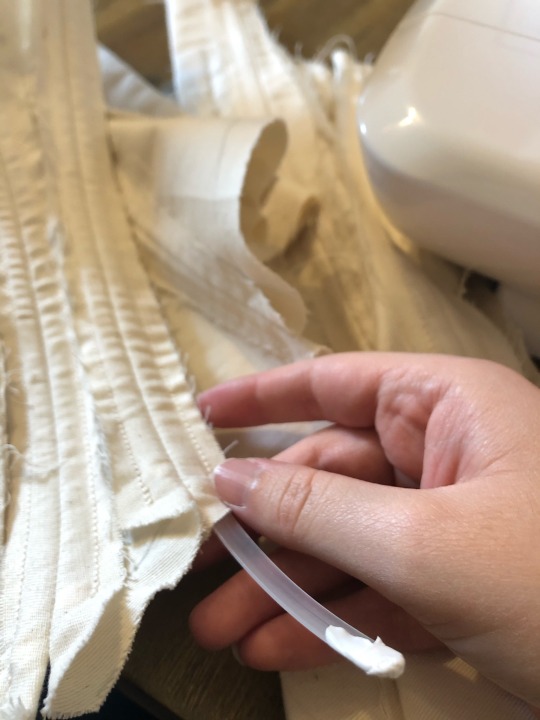
While I did finish it all in one sitting, it was quite a hassle to add the eyelets, for some reason moreso than with my previous corsets. But first, I decided to do the binding.
Finishing the raw edges like this is super easy, you just whip stitch a band in place and you’ve got a nice clean edge. But I’m also pretty sure this was my last one layer corset. It is really hard to whip stitch when you only have one layer, I had to constantly go back and fix some stitches because you could see them on the other side.
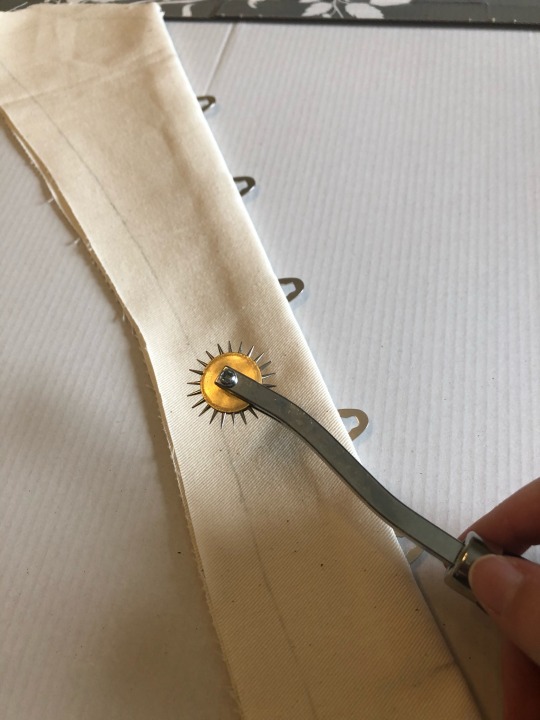
Next up were the dreaded eyelets, and now let me start this by saying that not only did pretty much nothing work the way I wanted it to, the eyelets are also of really horrible horrible quality. And I didn’t have anything to make holes in the fabric so I had to improvise.
Last time I made a corset, I figured out that if I just hammer the holes in it’s easier than trying to get the fabric to stretch using a nail. So I tried to hammer some holes but it ended up being super uneven. Long story short, it was back to the nail, then pencil, using a bigger utensil every time to widen the hole. Hammering the eyelets in also only worked up until the plastic handle broke, so then my dad made some makeshift eyelet pliers and we went from there. I think I spent about two hours on the eyelets alone, if not more, but then I was finally able to move on to my favorite part of the day - the lace.
Adding lace to a corset is pretty much the easiest step in making a corset. Much easier than adding the lacing. If you have a thread that’s the same color as the lace, it’ll be barely visible and you can pretty much just sew it on however you feel like. I just did a really quick hand stitch and it did the job. Super refreshing after spending so much time on the eyelets!
So here is my final product - it’s not perfect, in fact once I tried it on one of the steel bones kept poking out and I’ll have to fix it, but it fits me perfectly and gives me an incredible silhouette!


I don’t have the right padding just yet, but here are some photos where you can see what I’m talking about -


Now let’s talk crazy myths about tiny waists.
This corset makes me look as if I had a really small waist, especially in the third picture. Even when I looked into the mirror I was incredibly fascinated, and I got my measuring tape just to see what was really going on and what was solely due to the sheer shape of the corset. And guess what? My waist was just about 2cm smaller than it is without a corset. That’s not even an inch. But that just proves that corsets weren’t meant to shrink you down to nothing, I was perfectly able to breathe in it, in fact I wore it for about two hours, I did my hair in it and obviously took all the pictures and didn’t feel like I had to take it off at all when I did. At first it was a little restrictive, as it always is, but once I wore it for a few minuted it actually got really comfortable. Sitting down I noticed it put a lot of pressure on my stomach, normally I wouldn’t have cared but since I have stress related stomach issues at the moment I found it to be a little uncomfortable. But other than that it felt like a tight hug and didn’t hurt at all. This is probably my second most comfortable corset after the Pretty Housemaid! But is that really a fair comparison?
Hope you enjoyed my sewing journey and hope to see you next time when I actually start working on the ✨mysterious dress✨
Part 1 | Part 2 | Part 3 | Part 4
#fashion#historical fashion#fashion history#sewing#corset#corset making#edwardian#victorian#corsetry#victorian fashion#edwardian fashion#mysewingadventures#please excuse the cringy filter on the very first picture haha#i tried really hard to make it look old and it just wouldn’t work#the skirt i’m wearing btw is actually my petticoat for my anne with an e dress#i never made a post about that one!#i don’t have a shift that’s not 18th century so i had to use that and a tank top#i will make one someday
164 notes
·
View notes
Text
Making a 1906 Corset (Part 4/5)
It’s been a few weeks but I’m back with an update. Sewing each and every ribbon on top of the boning channels by hand took so much longer than I had anticipated, but I am so glad I can move on to the rest of the corset and don’t have to hand stitch the ribbons anymore.
It was very therapeutic though, not gonna lie, but after a while I just wanted to be done with it. The corset was supposed to be just a warm-up for a bigger project coming up soon, but who knew it would end up being a month-long project on its own.
After I was done with the ribbons, I wanted to go ahead and do the binding but I almost forgot I hadn’t put in the spring steel boning yet! Turns out we don’t have bowl cutters, so cutting them was quite a challenge and I ended up almost twisting my wrist and still had to wait for my dad to cut it for me. If you ever want to attempt to cut through spring steel, be careful or use a bowl cutter.
In the mean time, I decided to add the waist band. For that, I just transfered the markings from the pattern onto the fabric. I didn’t really measure it on myself since the pattern fit me pretty well and I figured it was fine to just transfer it. While I was at it, I decided to stitch my initials onto the band as well. Super extra of me, but they would sometimes stitch the brand name onto the waist band and I wanted it to be a somewhat personilazed.
Then I also added my markings for the eyelets and I’m serious when I say do as I say not as I do. For some reason I decided to mark them on the front thinking they’re going to be covered by the eyelets anyways so it’s not a big deal. Well, guess what happens when you make a mistake? It’s clearly visible. I’m gonna have to see if I can somehow get rid of those wrong markings. Maybe I’ll just try to erase them. At this point, it doesn’t matter how I do it.
Finally, I was able to insert the spring steel boning. It was my first time using it and I’m surprised at how sturdy it is. I guess it’s to be expected as it is steel but I just expected something similar to baleen. I only inserted two of them per back panel, so four in total.

To keep the sharp edges from poking through the fabric we sanded them and then I put some teflon tape around it and put it into the channels.
This is what it looks like now.

I am very excited to finally finish this piece and move on to the bigger project. I will have to make the proper bust improver and a bum pad as well as a corset cover at some point to really finish this corset but I think that’ll have to wait because I’m too excited to work on the upcoming dress. However, I will need the corset cover for the dress so.... I might make it soon? I don’t know, we’ll see! For now, I’m gonna try to finish this corset this week and then we’ll see.
Part 1 | Part 2 | Part 3 | Part 5
#fashion#historical fashion#fashion history#corset#corset making#sewing#edwardian#edwardian fashion#victorian#victorian fashion#s bend corset#mysewingadventures
80 notes
·
View notes
Text
Making a 1906 Corset (Part 3/5)
I just want to start this post by saying do as I say rather than do as I do. I am incredibly impatient as it seems so I decided to just screw everything and jump right in and wing it. But the correct way to do it would be to make yet another mockup (or fix the existing one, whatever works!) or, if you’re lucky enough and your mockup fit perfectly by now, you’re good to go and start sewing the corset.
In my last post I was describing issues I had where the corset fit me, but didn’t have that effect that Edwardian corsets usually do. So what I did now was, I reprinted the paper pattern and went up a size in the bust and hip area, leaving the waist as it was. I would much rather pad it and have the shape that I wanted than have it be closer in size to my actual body. I know it probably doesn’t make sense, but Edwardian corsets were kind of made with that logic. Edwardians knew that their body wasn’t perfectly hourglass shaped (or s-bend shaped) so they mainly focused on the waist and kept bust and hips to scale in proportion and padded out what needed to be padded. Like this, it gave the illusion of a tinier waist because the rest was simply bigger in comparison.
Long story short, I skipped the mockup this time as I, like I said, am a very impatient person and frankly could not be bothered to make that. Obviously, I’m only doing that when I’m making my own garments, I would never skip this when I’m making someone else’s. So I cut it out of my cream twill and am now fixing the markings (half of the pieces don’t have markings because I cut two panels at once if that makes sense?).

Then I stitched all the pieces together and inserted the front busk. I made sure to cut four panels of the busk panel and the back panel to be able to insert the busk and have some added support in the back.


Then it was time to secure the busk. I still cannot understand how people machine stitch busks. I tried it this time and, surprise, it didn’t work. I didn’t break the needle this time but the stitches were very uneven, so I ended up hand stitching it. My seams are somewhat uneven as well but that’s okay. I feel like the front is acceptable for my skill level but the back is very uneven, I don’t really know what happened there. I even used one of those rotary cutter spike thingies that mark your seams and maybe I used it wrong but I wasn’t really able to follow the markings as they disappeared after a few minutes.

Then I made the boning channels and started inserting the boning. For the first time I used synthetic whalebone and I’m genuinely surprised. It’s pretty similar in texture to zip ties but it’s slightly sturdier, though much easier to work with. I could easily cut it with my fabric scissors and sand it. I used water blocking tape to secure the edges so they weren’t as sharp and inserted them.

This is what it looks like now -

It’s still lacking a few boning channels for the spring steel boning but I forgot to add them as I don’t have it right now, I’m going to the fabric store tomorrow to get it. But overall, I’m super impressed with the shape and I really hope it fits now! It’s crazy to me how small the waist looks even though it’s not. I knew this in theory but it’s mindblowing seeing it with my own eyes.
Part 1 | Part 2 | Part 4 | Part 5
#fashion#historical fashion#fashion history#corset#dress history#victorian#corset making#edwardian#sewing#victorian fashion#edwardian fashion#mysewingadventures
79 notes
·
View notes
Text
Making a 1906 Corset (Part 2/5)
And once again, I am facing some issues. So when I made the first mockup, I was super happy with it and thought it fit pretty well but then I thought that can’t be right, there is no way a standard size fits me so well, and... I was right.
For stupid reasons (laziness being one of them) I didn’t take my measurments beforehand figuring since I’ve made so many things before, I know all my measurments, it’s fine. But now that I’ve decided to put some eyelets in and actually try it on I noticed what I had already anticipated - it’s too big. I can lace it up completely, no gap and I still feel like I could lace it up tighter. I’ve had this same issue before and a corset like this is completely unwearable. If the instructions say you have to take your measurments, you take your measurments.
Turns out I’m right in between two sizes, so according to the instructions I’m picking the smaller size for the waist and the bigger size for bust and hips and I’m going to have to redo the mockup. I’ll also have to lengthen it a little which seems weird to me now because I felt like it fit so well but I’m learning from my mistakes and following the instructions.
A tedious day later I have my second mockup:

I am going to be completely honest with you guys. I am slightly disappointed. We’ve all seen these beautiful s-bend corsets and how they trick your brain into thinking the waist is super tiny when it’s in fact completely average and the rest is just padded out. I have completely tight laced the waist while keeping the back gap parallel and padded out the bust (couldn’t get any padding into the hip area) and I just don’t see this effect. Maybe I was actually hoping for a five centimeter waist reduction which didn’t happen. Maybe I was hoping to look like one of those silent film actresses in photoshoots which I know exactly have been manipulated to make their waists smaller. Maybe it’ll look better when it’s actually made from the twill (I said coutil in my last post, it’s twill I’m sorry!) and has the lace on it and the correct padding. I think I’m going to go back up a size for the bust and hips to really have this s-bend shape that I wanted. Making mockups sucks, because you’re essentially making the corset over and over again, wasting so much fabric and thread. But I really wanted this to be the first project to actually turn out perfect. I’ve sewed a couple of things by now but every single one is flawed. I know I’m still learning and things don’t have to be perfect but I just want to look at something I made and be like damn, this actually turned out amazing! And I don’t want to spend time months later fixing some stupid mistakes I made.
But that’s what this blog is about - it’s the adventure, you never really know what you’re going to get and you’re learning on the way. With every piece I make I learn something new. Hopefully, I can make a piece that is actually perfect someday.
Part 1 | Part 3 | Part 4 | Part 5
#fashion#historical fashion#fashion history#corset#edwardian#victorian#victorian fashion#sewing#mysewingadventures
54 notes
·
View notes
Text
Making a 1906 Corset (Part 1/5)
It’s been a while since I’ve been on here and I apologize, uni has taken up so much more of my time than I had anticipated! As of right now I’m on my semester break so hopefully I’ll have some time to at least complete some of the projects on my to-do list. I have a much bigger project coming up but I still have to figure out the design so until then I decided to use some of my scrap coutil and make an Edwardian corset.
I’ve been wanting to make one forever but while I love Edwardian clothing I also feel like they are some of the most difficult ones to make so I always put it off. But now that I’ve found a free pattern from araneablack I’ve decided to give it a go!
This is the one that I’m going for:

(Apologies for the horrendous quality! I screenshotted that from a De Gracieuse magazine)
And this is my paper pattern.
I decided to go for size E which has a waist of 65 cm, I certainly do not have that waist size but I figured if it’s made for 5-10cm waist reduction maybe we can work with it. So I really hope the mockup fits, because let’s be honest, I have absolutely no clue what I’m doing.
First, I’m going to separate the panels again and cut them out of some old bedsheets. Up until now I’ve always sort of eyeballed the seam allowances on my mockups but for this one I wanted to be more precise. I know it’s gonna be less work in the long run!
I stitched everything together and quickly sewed some boning channels and inserted some cable binders. I didn’t cut them because i didn’t wanna waste them as I finally ordered some fake baleen and to my surprise found out that it is much cheaper than cable binders. I’m so sorry for ever recommending cable binders as a “cheap alternative”, I hope you were smarter than me.
Anyways, I tried it on to see if the length was alright and I think it is, then I pinned it onto my mannequin to see if the back fits and even with the padding inserted it seems to be fitting perfectly!


So I didn’t have the right padding and no bum pad (is that even what it’s called?), but I’m going to be making it. I inserted this makeshift padding just to see if it even works at all and it seems to be working out great! I’m obsessed with the shape and the silhouette and I can’t wait to see the final product!
I also didn’t have a front busk so I put in some cable binders as place holders but I’m gonna be ordering that soon!
Obviously, the mannequin is not a real body so I’m not sure how it’s gonna be when I actually pull it tight, I’m a little worried it might still be a little big. I might insert a couple of eyelets and test it out on the mockup but to be completely honest, I don’t want to waste sewing supplies so I might just go with it and hope it works out. I haven’t decided yet. I know the smart thing to do would be to insert the eyelets now and see if it fits. Oh well, I’ll decide tomorrow.
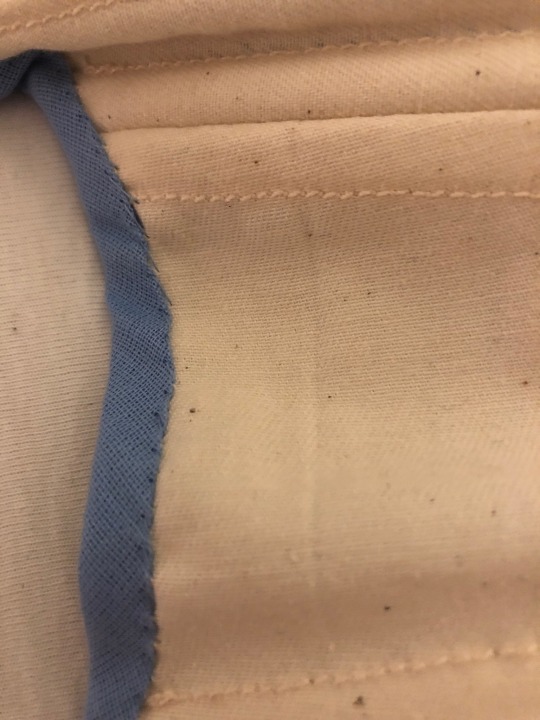
As for the final product, that’ll be one layer cream coutil with some coutil or canvas lining on the front and back pieces just for extra stability, the boning channels will be on the outside and I sort of want to do light blue coutil strips but I’m not sure yet. I have some blue lace I bought for a dress and never used and I really want to use it for this project. I don’t think I will be doing flossing just because it is so freaking tedious and I don’t think I saw it on the original, but maybe I’ll add some details if I feel like it. I’m also not entirely sure if I’ll add suspenders, it is the historically accurate way to do it but I don’t really have a costume to use this corset with so I think I could just add them whenever I need them.
That is it for now, I hope my supplies arrive soon so I can continue working on this!
Part 2 | Part 3 | Part 4 | Part 5
#fashion#historical fashion#fashion history#victorian#edwardian#corset#corset making#sewing#edwardian fashion#victorian fashion#mysewingadventures
82 notes
·
View notes
Text
An Overview of LGBTQA+ Fashions Throughout History
Happy Pride Month, everyone!
In honor of pride month I wanted to research a very particular topic which, unfortunately, isn't very widely studied. Being part of the LGBTQA+ community myself, I know that we have a very particular way of communicating through fashion, and I was wondering - in a world where homosexuality was punishable by death, how did LGBTQA+ people dress differently, or communicate their sexuality to other members of the community?
As I already mentioned, there is very little known about these things as nobody would openly document how they made others understand they were, for example, into the same sex, but we do know a little.
But first, we have to understand the circumstances in, let's say, the 18th century.
Homosexuality didn't really become "a thing" until the late 1800s, as in it didn't have a label, and it really wasn't "that big of a deal" in Rococo's upper class. Not to say it was common, but it was generally common in the upper class to have several sexual partners, and it was not a rare occasion that a rich man's mistress actually turned out to be another man. Though it was technically, by law, punishable by death, the more common punishment for "indecency", was public humiliation. The fact that it was especially common in the upper class really surprised me, as today's upper class tends to be much more conservative than the middle or lower class. But I guess it was the wealth that made their sexual encounters be swept under the rug while the lower classes were punished for the exact same things.
A big part of 18th century LGBTQA+ culture were Molly Houses, aka an equivalent of today's gay bars. Historians assume they first appeared in the middle of the 17th century, but very little is known about them for reasons already mentioned, but they were the place to go if you wanted to meet other LGBTQA+ people. However, if the wrong people found out about them, they would be raided by the police and... you can imagine the consequences.
But now, let's get to the actual topic: the fashion.
What we know, and what we can even derive from today's trends, is flamboyance. We know now that some LGBTQA+ people love extravagant fashion as a way to express themselves. I'm saying some because I don't want to stereotype, and I think it's awesome that we're slowly starting to normalize dressing however you want. But flamboyance was key in the 18th century. But now we wonder, in an era where extravagance was everything, what was even more extravagant?
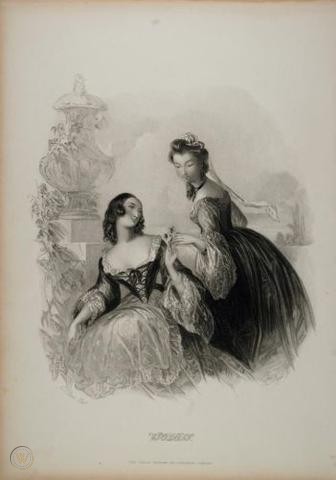
Unfortunately, I only found explanations of how men dressed, but they used an exaggeration of aristocratic costumes and elements from female fashion to express themselves. There are multiple paintings and drawings out there, but I didn't really want to include any in this post since the ones I found were bordering on (or straight up) caricatures and, if you put it nicely, works of their time. They do give us, however, an idea of what this extravagance could mean as they show people who were perceived as male at the time with high updos and sometimes even completely in traditionally feminine outfits. And in fact, there are mentions of people cross-dressing within the security of Molly Houses, but obviously they wouldn't do it publicly in a time like this. The only reports are, unfortunately, from police raids and those who did cross dress were given a much harsher punishment than those who didn't.
Let's look at a picture of Lord John Harvey, a bisexual man who lived in the 18th century.

When I first saw this picture, I could immediately tell it was different from the rest, I just couldn't pinpoint exactly what felt so off but then I realized - it was the way his left was just so casually propped on the... thing, and the silk draped over his arm. It's something I'm used to seeing in female portraits, and it has a sort of sensuality to it that just isn't common in male portraits. Sure, sometimes there can be a piece of silk draped around a man in a portrait, but I've never seen it done like this. I'm not gonna go into the fact that he's quite literally pointing at his crotch, I don't know enough about him to say why that is, but you're free to interpret that however you'd like.
Another interesting 18th century personality I found through my research is Ulrika Eleonora Stålhammar who became a Swedish corporal and married a woman. Long story short, she posed as a man and enlisted in the army, then went on to marry a maid named Maria Löhnman. Löhnman eventually found out about her wife's gender, but it didn't matter to her and they stayed together. They were put on trial but claimed they had lived in a marriage without sex and were subsequently acquitted from the charge of homosexuality, but Ulrika still got a sentence for posing as a man and her wife for not revealing the truth. After serving their short sentences (a month and fourteen days, respectively), they lived a quiet life at their family's estate. Unfortunately, there seems to be no picture of her out there!
I apologize for this short anecdote, I just thought that was really cool and wasn't expecting not to find a picture, but now let's get back to the fashion. Another great info I read was that in 18th century Paris, gay men wore shoelaces instead of buckles! Interesting!
Let's jump forward into the next century. Here's where flowers become important! The language of flowers was a huge deal in Victorian times, and who would've guessed - certain flowers could communicate your sexuality to others. For instance, in 19th century England, the color green indicated homosexuality. Irish author Oscar Wilde, a homosexual man, popularized pinning a green carnation to the lapel.

I've seen this picture colorized with the carnation being red but no, it is green so don't let google fool you!
For women, the color violet and violets became the symbol of same-sex attraction.
These women are wearing 18th century clothing but from what I could find, this is actually an engraving from 1838.
In early 20th century New York, LGBTQA+ men wore red neck ties or bow ties as a subtle signal.
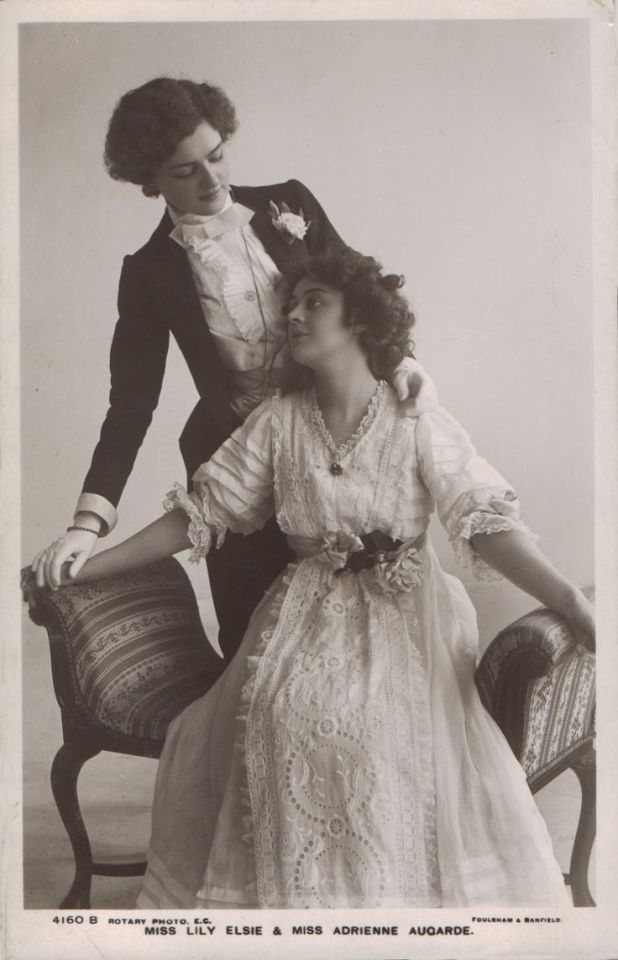
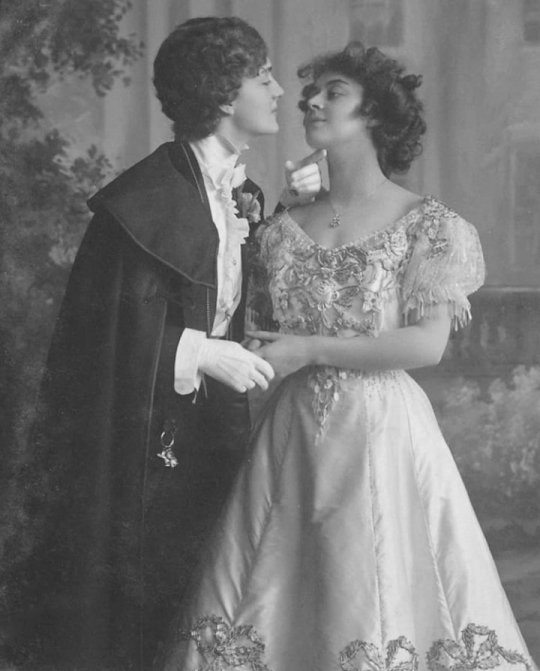
Speaking of early 20th century - I just thought I’d add these adorable pictures of actresses Lily Elsie and Adrienne Augarde. They’re from a show called The New Aladdin, and while neither of them are LGBTQA+ (as far as we know), they’re still worth a mention.
Nowadays, we are more fortunate to be able to be ourselves than these people ever were, and we can be thankful for that without forgetting about the fact that we still have a long way to go. Some countries, unfortunately, haven't seen any improvements at all. But I also know that being LGBTQA+ even in today's society can be scary, and sometimes signalizing it through fashion is a lot easier than going up to someone of the same sex and just ask them out. There is this slim line between stereotyping and genuine signals we send, and most of the time we do it so subconsciously that we're not even aware of it at all times. What I want to say with that is, take my research with a grain of salt. A lot of this information stems from a time when the LGBTQA+ community wasn't exactly respected and a lot has been interpreted from caricatures. But the most important thing to take from this is that no, LGBTQA+ isn't just a "modern trend", we've always been there and we always will be. And it's also important to mention that the reason for me starting my post with the 18th century is that before that, it really wasn't that big of a deal. In fact, the further back you go, the less of a big deal it was. And while today's society is still healing from the cruelty that came after, we can thank everyone who came before us for the rights that we do have now. Without them being their brave selves, we wouldn't be where we are today.
So here are some important historical figures who were part of the LGBTQA+ community.
Benvenuto Cellini (1500 - 1571), Italian sculptor and goldsmith, homosexual or bisexual
Pope Julius III (1487-1555), homosexual
Leonardo da Vinci (1452-1519), Italian painter, homosexual
William Shakespeare (1564-1616), playwright, probably bisexual
Thomas Cannon (18th century) author, wrote the first defense of homosexuality
Johann Joachim Winckelmann (1717-1768), German art historian, homosexual
Anne Lister (1791-1840), diarist, "first modern lesbian"
Walter Whitman (1819-1892), poet, homosexual or bisexual
Oscar Wilde (1854-1900), poet and playwright, homosexual
Vincent Van Gogh (1853-1890), painter, bisexual
Josephine Baker (1906-1975), entertainer, bisexual
Virginia Woolf (1882-1941), writer, bisexual
Bayard Rustin (1912-1987), African American leader in civil rights, socialism, nonviolence and gay righs, homosexual
Frida Kahlo (1907-1954), painter, bisexual
#lgbt#lgbtqa+#pride month#pride#fashion history#lgbt history#fashion#historical fashion#victorian#edwardian#rococo
91 notes
·
View notes
Text
For the longest time now I’ve been stuck in a creative block, so much so that my semester break passed without me even planning a sewing project. But a couple of days ago I was browsing the webs for some fabric because I wanted to redo my robe à la française when I stumbled upon some perfect silk taffeta for a time period I’ve never tackled before - so, needless to say, since I got a great deal on the fabric I decided to jump head first into an 1830s project.
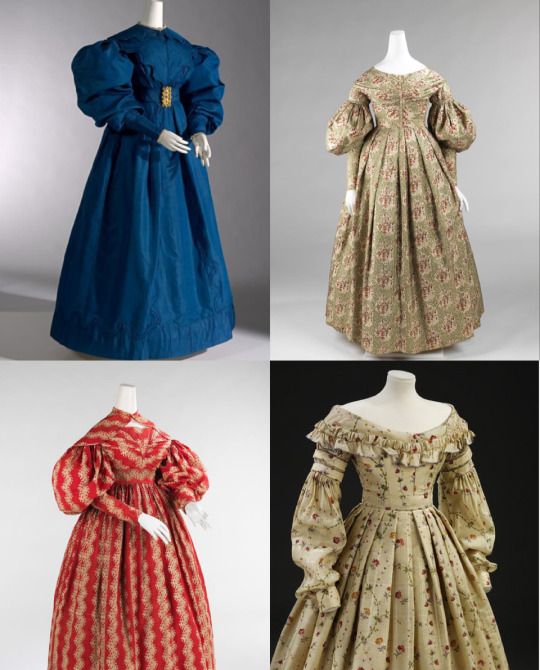
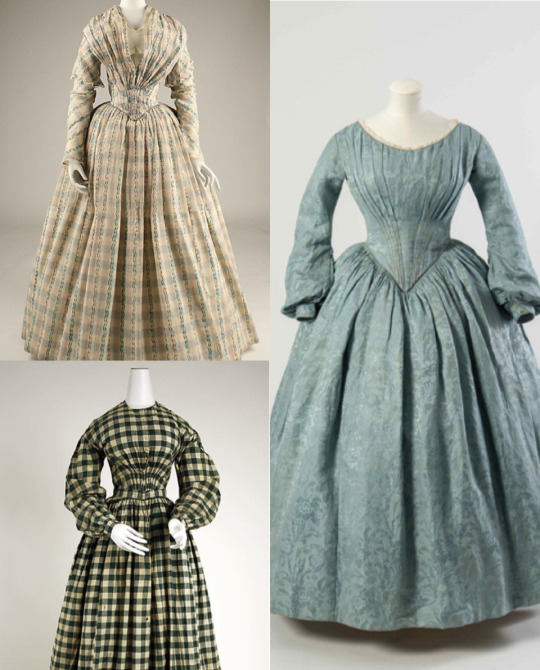
I’m not sure what this dress is going to look like, I’m not even 100% set on which half of the decade I want to do. On the one hand, when I first started historical costuming, I was really fascinated by the early 1830s silhouette, but when I got familiar with the later styles I also really fell in love with those smocked/gathered sleeves that are more 1837-38ish. Here they are once again in comparison:


Personally, I think I like the late style slightly better, but at the same time I feel like I’m betraying the 1830s by not going for the more iconic and well known look with the huge sleeves.
I really like this dress for example even though it’s a little lowkey for the time.

At the same time I’m also obsessed with this one. I even had a dream once that I got this exact fabric to recreate it.

Also, it seems like silk was more popular earlier in the decade. There is also the possibility of making two bodices, one for day and one for evening wear. I think I’ll have to think about it and actually do some proper research in the next couple of days. But yeah, I think this whole project is going to take a while as I have to make all the undergarments as well and have no experience whatsoever in this era. I hope the construction is similar to 18th century gowns, that way it won’t be that difficult. I also have to make this happen in between uni classes, so please bear with me! I’ll probably document the entire mock-up process so I’ll have something to write about in the meantime. If you’ve made anything from this era before and/or have any tips and tricks, please let me know!
#1830s#fashion#fashion history#historical fashion#georgian fashion#victorian fashion#regency fashion#sewing#victorian#romanticism#romantic era#mysewingadventures
100 notes
·
View notes
Text
White Wedding Dresses Throughout History
The rumor that Queen Victoria started the “white wedding dress trend” is so widely spread that many people don’t question it, but while it is somewhat true, it’s not the full truth and here’s why.
It is true that after Queen Victoria’s marriage in 1840, the white wedding dress gained popularity up until in the late 19th century, when it became a standard color for wedding gowns. However, white wedding dresses already existed prior to that.
I’m starting this wedding dress history in the 18th century, when a wedding was less about love and romance and more about politics, so a wedding was the perfect opportunity for the bride to showcase her status, and since white fabrics were generally more expensive and rarer than other colors, it was a popular choice. However, that doesn’t mean that other vibrant colors and/or prints weren’t just as popular back then, if not even more.
But since I’m focusing on white dresses in this post and I will make a separate post on non-white wedding dresses soon, here are two examples of an 18th century wedding dress.
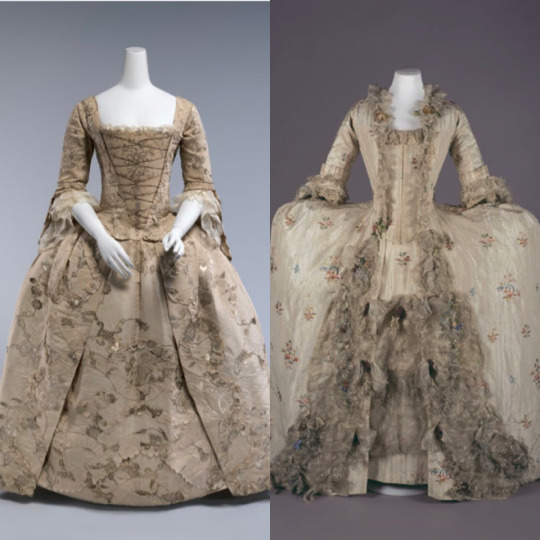
The first one from 1747 is a Robe à l’Anglaise, the second one from 1775 a Française. As you can see, they both have trimmings and decorations and that is because the focus wasn’t on making the dress white as it is today, it was more about showcasing what you were able to afford, so intricate trimmings and embroidery were the way to go. People would also continue to wear their wedding dresses for other special occasions, it wasn’t really an exclusive garment that you’d only wear once. Maybe the super affluent ones could actually afford to do that, but it was way more common than not to wear one’s wedding dress to other events, as the wedding dress wasn’t really a separate type of dress but rather just a more expensive version of a formal dress.
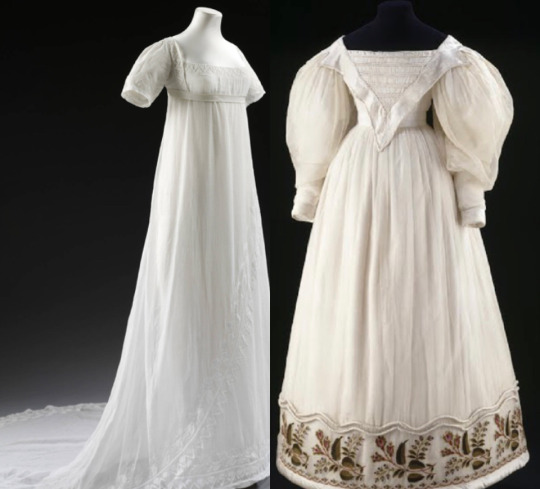
The early 19th century brought light muslin dresses, so a lot of special occasion dresses were already white. In the later regency decades, these muslin wedding dresses were more intricately decorated with embroidery for example, as shown in these beautiful extent pieces from 1807 and ca. 1830.
I couldn’t possibly make this post without including Queen Victoria’s wedding dress.


I read that the reason the white dress was such a big deal was because she was expected to wear the crimson velvet robe of the state. Instead, she announced that on her wedding day she would focus on being Albert’s future wife rather than the monarch and chose to wear a white dress as a symbol of innocence and romance. But either way, the monarchs were the fashion icons of that time, so it’s no wonder those who could afford it started to wear similar things to the queen.
Moving on to the next decade, here is a lovely muslin wedding dress from 1851.

It’s a very down to earth dress, not very flashy and it’s interesting to note the gathered/smocked front as it’s something that was very popular during the 1840s and very early 50s.
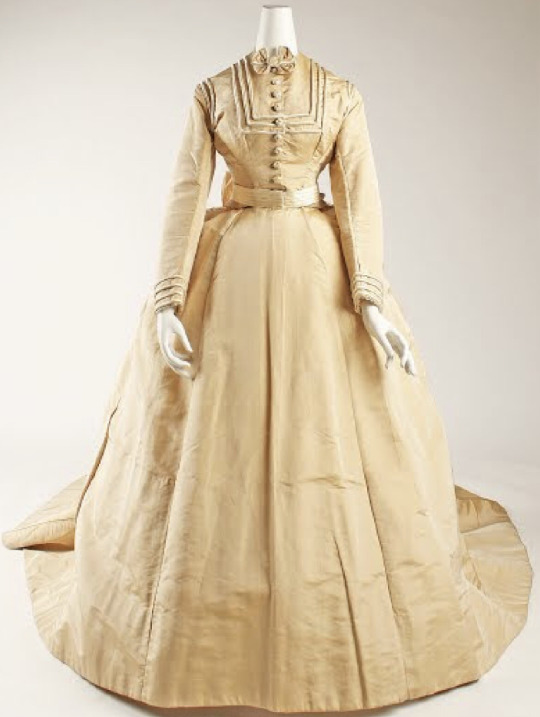
From the 60s, we have this pretty light beige dress, and yes I know I said white dresses only but none of them are perfectly white so I think I’ll let it pass.
Notice how all of the dresses so far strictly follow the fashion trends of that time? I think it’s really interesting if you compared it to today because it would essentially be the equivalent of just wearing a white version of a semi-formal outfit, which isn’t really a thing and shouldn’t be in my opinion. I’m all for wear what you want but I feel like we’ve already lost the charme of beautiful fancy outfits and I’m glad we still have the traditional white gown for weddings at least. If you’re already wearing fancy gowns on a daily basis, obviously the only thing you can do to make it stand out is make it white (or any other uncommon color for that matter). I would also like to mention that when I came up with the idea to write about wedding gowns I was expecting them to be white versions of evening/ball gowns but they’re mostly just day dresses. Very surprising I think.
For the 1870s I have two examples, since one is strictly speaking not white and they’re both really lovely and worth a mention.
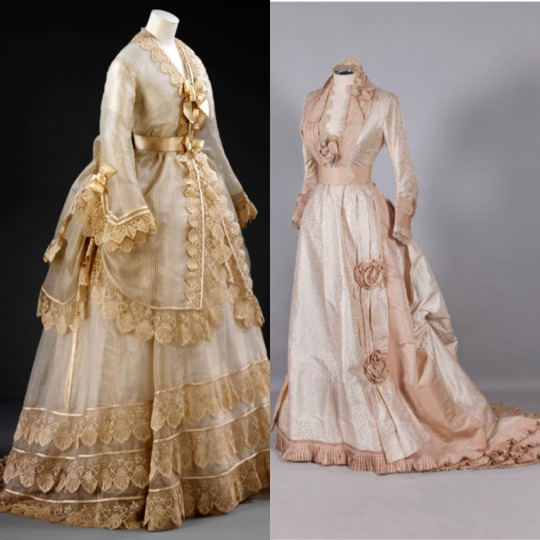
You can totally see the completely different styles and approaches even though they were made within two years from each other. I also really adore the leaf trimmings and the sheer (-looking?) fabric. What I don’t love though is the robe-like front, it looks a little too casual for my taste.
Let’s move on to the 80s with this gown.

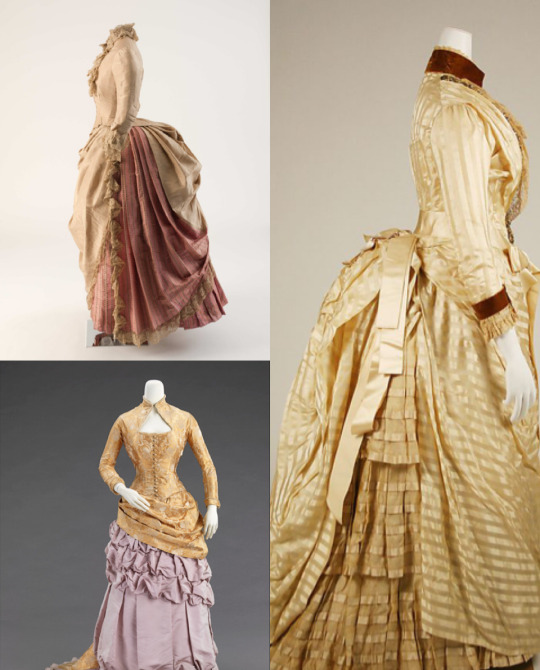
Now, that’s what I call a wedding dress! It’s not too casual, it’s most definitely fancy and those pearl accents- It really reminds me of Worth’s work with pearls (I am seriously contemplating making a post just showing pictures of Worth gowns with pearl decoration cause those are my absolute favorite thing) but it was actually made by Messrs Gladman and Womack in 1885 and has never been altered.
Alright, next up we have the 90s, another amazing decade in fashion and I couldn’t possibly not include a Worth gown.
Here you can see actual high fashion of the time. The princess cut had already been popular since the 70s but by the 90s, it was mostly reserved for formal wear. I don’t know what it is that’s so pleasing about this dress, something about the shapes, they’re so balanced and perfect. It always amazes me how Worth can work with seemingly plain colors/without much decoration but have the result still outshine every other dress. Maybe there’s even something contemporary in this dress - it doesn’t represent the typical "kitsch" we associate with the Victorian era, like the 1880s piece for example which is an almost stereotypical example of everything fashionable in the mid 80s. It’s none of that, but at the same time it’s everything.
And finally, I couldn’t possibly leave out my favorite decade—
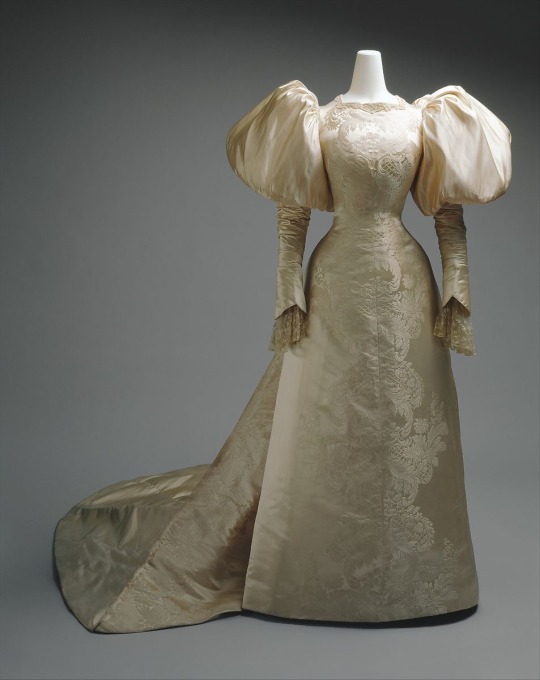
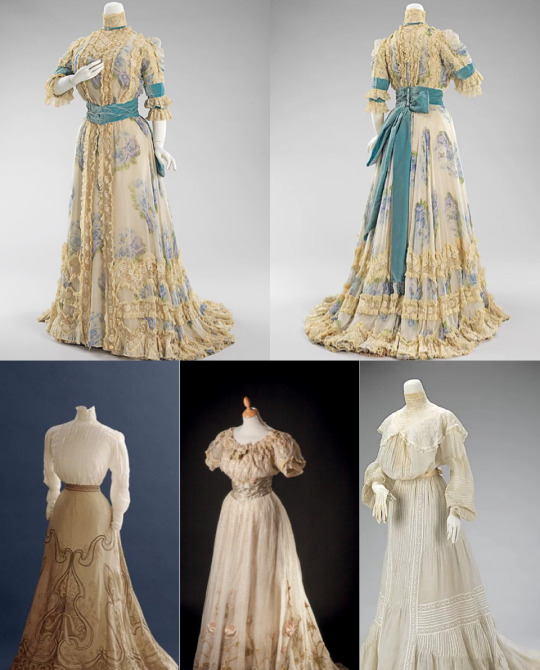
You got it. The 1900s.
Once again, it just looks like a white, fancy version of the day dress but notice how it has a really long train. Trains did become a thing again in the Edwardian era but weren’t that long for everyday wear. A lot of the examples above also have a longer than normal train, which was common for formal court gowns and the trend of having a long train stuck to this day! I think it’s really fascinating to look at old trends and analyze how they affect how we dress today. You might find more similarities than you’d expect.
Anyways, that is it for now. I hope I can actually get more consistent with my posting because I have quite a few ideas but I am also starting uni again next week after my semester break so we’ll see how that goes. Super nervous about it but I’m also excited!
#fashion#historical fashion#fashion history#victorian#wedding gowns#wedding dress#victorian fashion#edwardian#edwardian fashion#rococo#rococo fashion#georgian fashion
402 notes
·
View notes
Text
How To Tell Victorian Clothing Apart By Decades
First and foremost, Karolina Żebrowska made a video about this quite some time ago explaing everything in detail, but I just wanted to make my own little checklist and mention some things that I’ve noticed for myself. Of course, this list won’t be foolproof as I’m only going to talk about the most popular styles at the time and people technically could have made a regency gown in 1900, but... that’s not the point. For the sake of being able to show everything with pictures, I’m going to leave the Regency period out as I’ve already made a separate post about it.
The Victorian era is commonly packed into the visual of a brown bustle dress and/or the typical wide dresses of the Civil War, but the Victorian era actually spans over 64 years and many, many different styles.
Queen Victoria was crowned in 1837, so let’s start in the 1830s.
The 30s were wild, and that’s one word to describe it, but that mostly goes for the first half of the decade. Huge sleeves and full skirts were the thing, often in patterns inspired by wallpaper. That’s right - stripes, florals and anything that stood out was the hit. The off-the-shoulder look is just as important though, that’s what creates the round shoulder shape, together with the puff sleeves. The waistline sat a little higher than the natural waistline and was usually adorned with a belt. In the second half of the decade the sleeves started to "travel downwards", as in they started smocking or gathering the top part of the sleeve and just leave the pouf at the bottom.
The 40s left the puff sleeves and bright patterns behind, leaving high necklines, tighter sleeves and lowered the waistline to its natural position. Something very popular was the gathered front of a bodice and that trend even lasted into the early 50s. Skirts grew a little wider, requiring more support from layers upon layers of petticoats.
With the 50s here, ruffles came into fashion. If you see a wide, ruffled skirt, it’s probably from the 1850s. Some bodices extended over the hips now and almost looked like coats. Another important aspect: the pagoda sleeve. And obviously it’s important to note that the crinoline was finally patented in 1856. No more layers upon layers of corded petticoats! But this meant that dresses could be even wider than before. However, keep in mind that in the 50s, the crinoline had a round shape whereas in the 60s it started to become oval and extended further towards the back.

With the 60s, ruffles went out of fashion and synthetic dyes were invented, this meant brighter colors for a wider population! Actually, synthetic dyes were already invented in 56, but just like everything it took a while to make all the colors and really catch on so I’m counting it towards the 60s, because that’s when brightly colored dresses really took off. I find that especially evening dresses look very similar to 50s evening dresses so for me the best way to tell them apart is to look at the shape of the crinoline. Not to mention that a lot of people certainly continued to wear or slighly altered their 50s dresses but with a new crinoline.

Now we’re in the bustle era - the shape of the crinoline became slimmer but extended further towards the back, creating the bustle. I still find myself struggling telling mid 70s styles apart from the 80s, but there are some things I look at.
Firstly, the shape of the bustle. Early 70s style bustles are still pretty wide compared to the later silhouettes. Generally, you can say that in the 1870s, the profile of the bustle has a more gentle curve, the curve is not as steep. Also, a lot of 70s day dresses have trains. Many people actually started recycling old 18th century gowns into 1870s dresses so you can see a lot of inspiration and similarity in the shapes and how the dress is put together. The collars often mimick those of 18th century gowns and the back is draped like it was on a Robe à la Polonaise. Towards the very end of the 70s, bustles went out of style and women wore their dresses without a bustle.

Now on to the 1880s. Like I mentioned, the style was very similar but the bustle came back into fashion and became steeper. The necklines on day dresses were high and the collars weren’t square anymore. The draping of the overskirt still stuck, but the skirts became overall a little less wide. Very popular in the mid 1880s was draping the overskirt asymmetrically. That is the best giveaway if you’re unsure. Trains on day dresses still existed but weren’t as common as in the 70s. And once again, towards the very end of the decade the bustle went out of fashion, this time for good.
The 90s - certainly my favorite decade in the 19th century. Big sleeves were back! But no off-shoulder day dresses and the waistline was at its natural position. Pretty much all skirts were now straight in the front and gathered in the back - a very popular look. The size of the sleeves and the width of the dress reached its peak in 1895 and after that it all decreased in size again until the puff sleeve went out of fashion in 1898-99. Bodices had a slightly looser fit than in the decade before but were still tight-ish.

Now, the Victorian era only lasted up until 1901, but I’ve decided to add the 1900s to this list just because I really like that decade as well and think the clothes are really pretty.
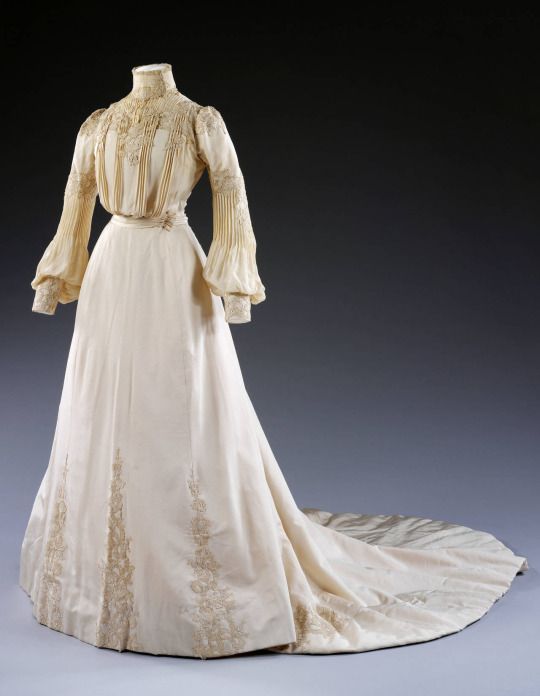
So, in the 1900s the silhouette changed once again. Now, loose lace blouses were all the rage and the so-called pigeon breast silhouette was created with the help of an s-bend corset and a lot of stategical padding, a frilly corset cover and a loose gathered bodice. At the waist, you’d usually find a silk belt called a sash that matched the dress. The straight front skirts stayed but changed their shape slightly to be bell-shaped and flare out at the bottom. A lot of lace was used for gowns as well as frills and dainty details. But on the other side, a working woman would usually just wear a light colored blouse with a usually dark skirt and wear a belt to tie the outfit together.
So this was my way to tell the decades apart! I specifically love 19th century fashion because every decade is so different from the one before and it’s so fascinating how quickly styles changed back then.
#victorian#fashion#fashion history#historical fashion#victorian fashion#victorian dress#historical dress#edwardian#edwardian fashion#victorian clothing
686 notes
·
View notes
Text
Worth Gowns
I feel like every single dress historian has tackled the topic of Worth gowns at some point so let me be no different. I keep seeing so many people wanting to make one themselves and looking to find their Worth gown that I wondered, maybe I can do that too.
Obviously, I’m by far not as skilled as all of these other amazing, talented artists (I mean, just look at Cathy Hay recreating the Peacock Dress) but maybe once I’ve made some Victorian gowns I’ll get the hang of it and maybe, I’ll feel like I can do it.
But today I sat down and thought I could make it a mission to look at photos of as many Worth gowns as I could possibly find and maybe find one for a future project.
But first, if you’ve never heard of Charles Frederick Worth, he’s basically the father of haute couture and the first fashion designer in the modern sense. He founded the House of Worth which existed from 1858 up until 1956. Worth gowns have the name Worth stitched onto the inside of the waistband either like this
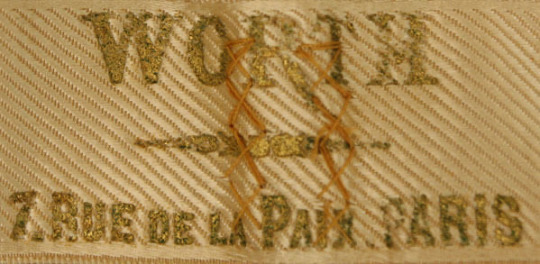
or like this

For now, I just looked through the collection of the Met Museum but there are still sooo many more gowns to find.
So now I would like to present to you some of my favorites and/or ones that I thought were particularly interesting.
First of all, we have this beautiful early 1860s lavender dress with two bodices, one for day wear and one for evening wear.
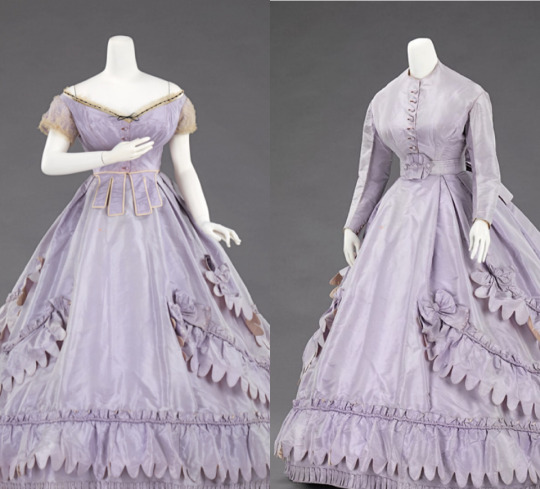
When I hear people talk about Worth gowns it’s mostly about 1880s or 90s dresses so when I found out that the House of Worth was already founded in 1958 I was very surprised because I didn’t actually know that. That’s why I wanted to include this dress, because early Worth gowns are not something that are mentioned a lot.
Next up there’s this seemingly ordinary dress.

It looks so ordinary I would’ve never guessed it was made by Worth! But then again, it’s a morning dress so it’s sort of understandable why it’s not as extravagant as the rest.
Then I stumbled across this interesting, very experimental-looking dress.

It’s almost as if an 18th century Polonaise and an 1880s dress had a baby.
Now, let’s get to my favorites! It’s really hard to decide which one’s the most beautiful one so I’m going to mention them in no particular order.
There’s this champagne-colored beauty with actual pearl tassles!
And once you take a closer look you’ll see that there’s pearl trimming around the neckline and it actually looks like pearl lace. Incredible.
Then there’s this gorgeous 1902 floral gown.

The way the flowers separate from the rest and are used as appliqué on the lace is just stunning.
Next up, we have this beauty.

I don’t really know what it is that I love about this gown, it’s everything. The way the colors aren’t the same but match perfectly, the gold patterns, the train...
And finally, we have... I think if I had to choose one this would be it, so maybe I did end up putting them in order of my preference. Oh well.

This is an 1882 evening dress, but I’m just gonna say... imagine this as your wedding dress. Not that I’d want to get married in it, but just... a hypothetical wedding with this hypothetical wedding dress, it’s giving me just enough fae vibe to feel like you’re in a Disney movie but not too much to make it too tacky.
So this concludes today’s search for The Perfect Worth Gown. If I had to recreate one, I’d probably choose the mermaid one, the green and blue one, just because I feel like that’s the most doable one of them. But ironically enough I picked almost only 1880s dresses, which is my least favorite Victorian fashion decade. Guess I might get myself a bustle after all to recreate a Worth gown.
#worth gown#fashion#historical fashion#fashion history#victorian#victorian fashion#charles frederick worth#house of worth#1880s fashion
210 notes
·
View notes
Text
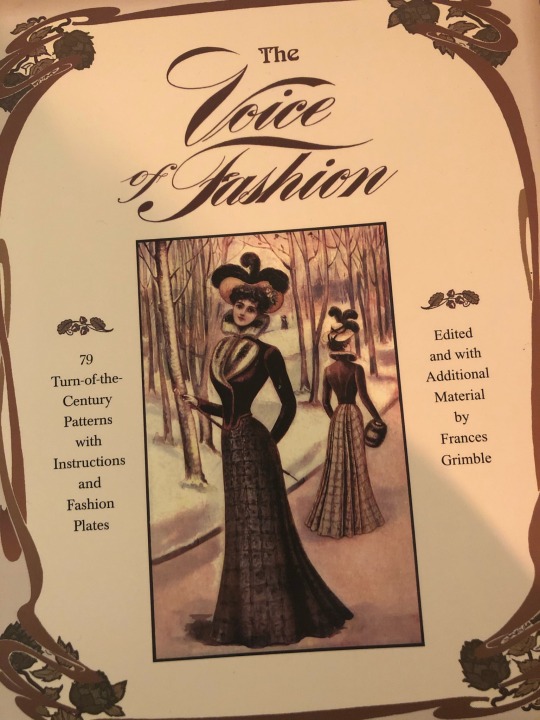
I found a treasure! (that everyone probably already knew about but me)
I’m in the middle of my exam season right now and I’m almost done (yay!) so I don’t have any projects in progress right now, but I still wanted to share something.
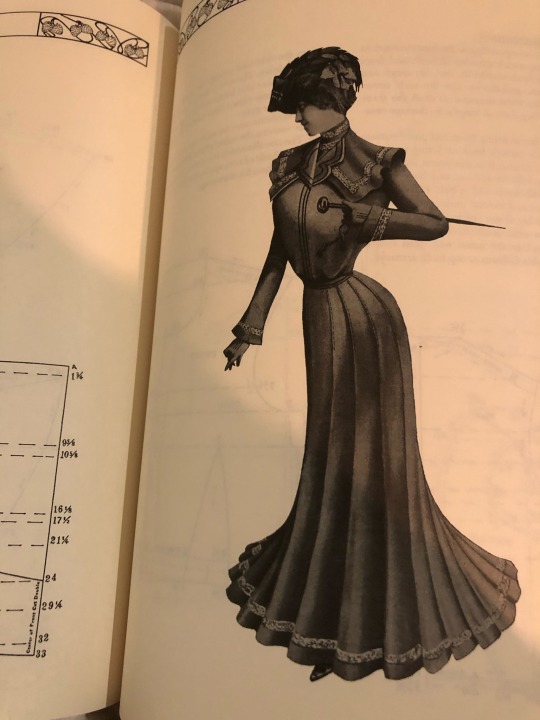
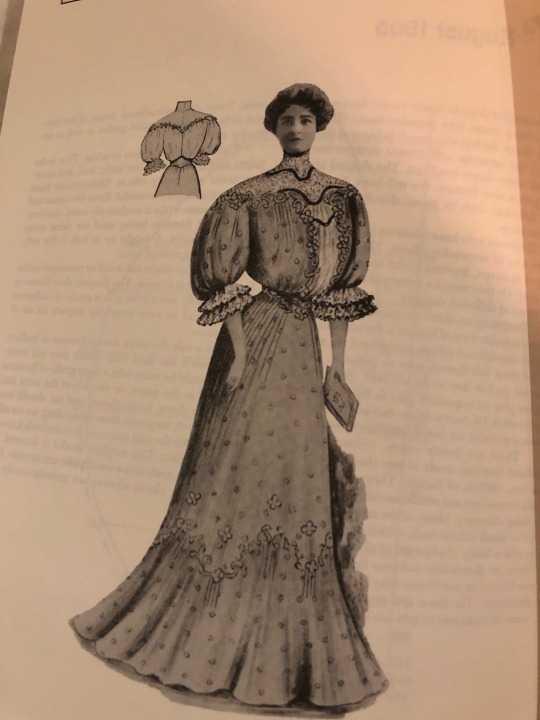
For the longest time it’s been a dream of mine to own an Edwardian gown. I keep raving about everything Edwardian on this blog but I’ve never really had the courage to make anything myself because damn, the amout of skill that you need! But I was recently browsing through archive.org looking for some old fashion magazines to find some Edwardian bodices for inspiration cause I wanted to make something actually wearable in the 21st century. Long story short, I found nothing but I came across two The Voice of Fashion magazines, both from the 1890s (Winter 1897 and Fall 1897) and I felt like I’d found a treasure. All of the magazines I had come across before were usually fashion magazines where you could order something and it’d take about two months (incredible, right?) to arrive. But not this one, not The Voice of Fashion.
They were full of patterns - actual, original 19th century patterns to make these gowns at home. So I quickly looked up those magazines on google to see if there was more and it turns out there is an entire book, a compilation of 14 magazines ranging from 1900-1906. So naturally, I had to buy it and it’s the most beautiful thing I’ve ever owned and I cannot wait to actually make something from that book!
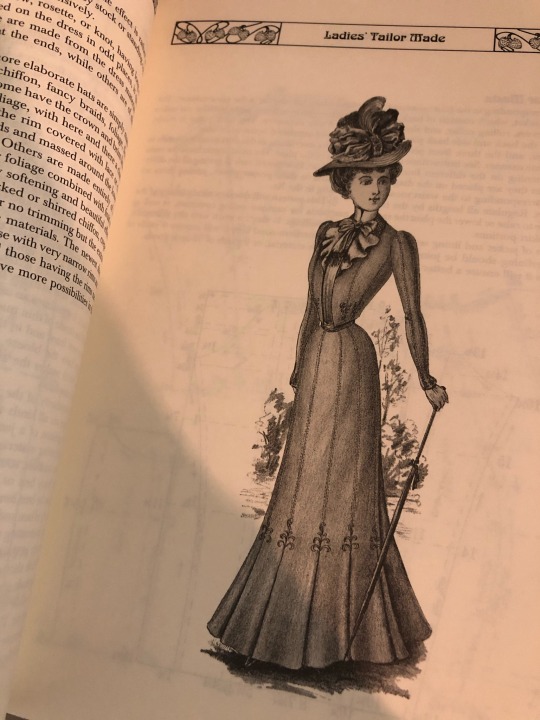
Here are some of my favorites:

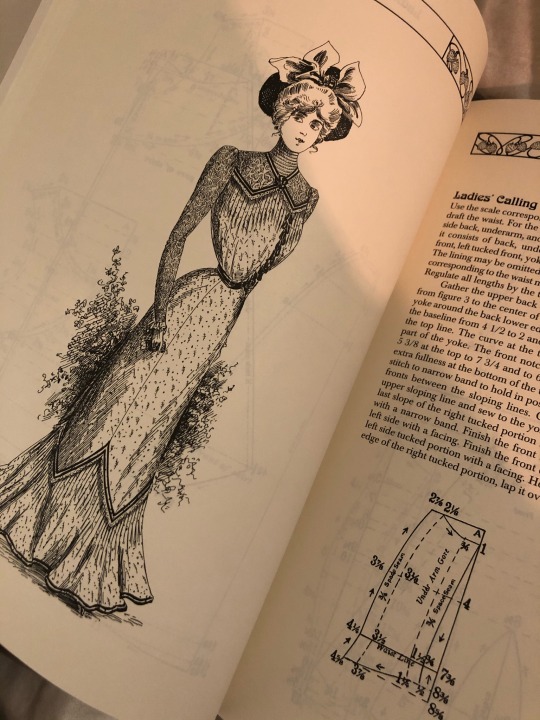

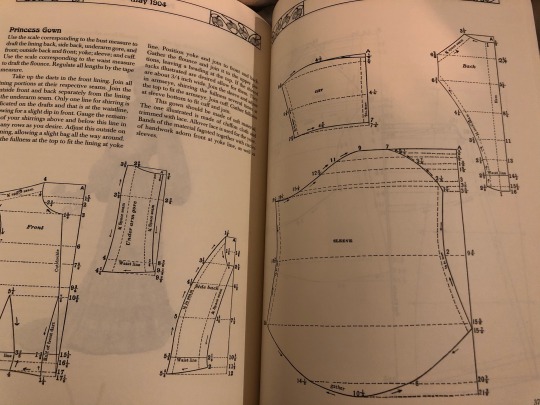
And that’s not all! There are also some patterns for underwear (here’s a chemise I’ve been wanting to make for a while).
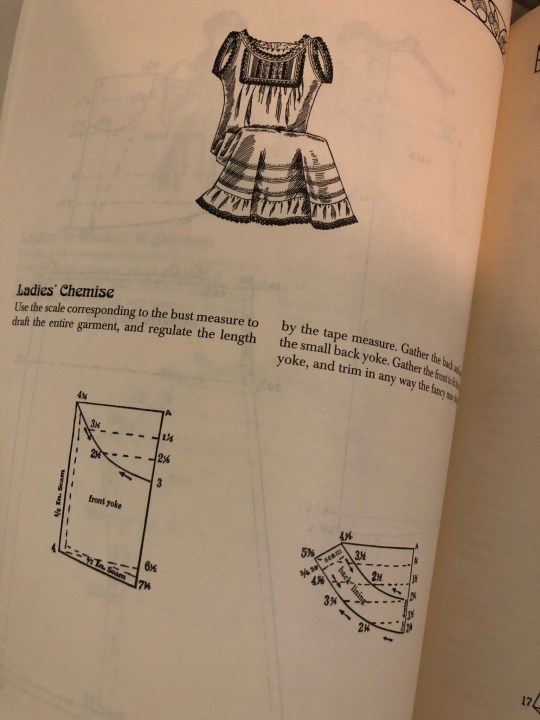
There are also hats and shirtwaists!

This is what a random pattern looks like. The system is very easily explained and I love that it doesn’t just stop at the pattern but there’s a short instruction as well!
So... I think these patterns and instructions are actually making me feel like I can do it? And it’s incredible to think that one day, hopefully soon, I will actually own one of these beauties!!!
So yes, I got really excited over a book and I hope I could share some of that excitement with you. I hope I can get back to sewing as soon as I finish my exams! Actually, I sort of have to make a petticoat next week so we’ll see how that works out.
Until then, stay healthy and if you’re in the middle of exam season like me, good luck, you can do it!!
#the voice of fashion#historical clothing#historical fashion#fashion#fashion history#victorian#edwardian#edwardian fashion#victorian fashion#edwardian dress#victorian dress
109 notes
·
View notes
Text
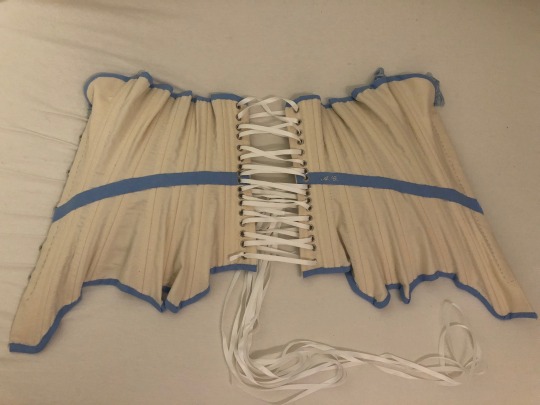
Making an 1890s Symington Pretty Housemaid Corset - Part 3 (final)
So... I’m done?

I was going to post an update before and then do the finishing touches but I was on a roll and just finished it this week end!
But yes, let’s get into the actual sewing adventure that led to this beautiful finished product.
Before my eyelets were delivered I took advantage of the time before I got them and added the lining on some panels, doing the back ones first so I could insert the eyelets once I got them. It was therapeutic once you develop a steady rhythm and accept the fact that it’s going to take you a while. For some reason I just love hem stitching... It makes everything look so authentic!

I decided not to line the busk panel as it already had the busk in and the lining wouldn’t really have had any effect at all so I just hemmed the raw edges. I was a little unsure whether I should line the side panels as I had messed up my stitches when making the side boning channels but in the end I tried my best to line it anyways. I also thought I would add some hip padding but I left that out, for comfort reasons and once I tried it on I also wasn’t too pleased with how bulky it made me look. I made the padding though so if I need it for structural reasons I can just quickly sew it in place.
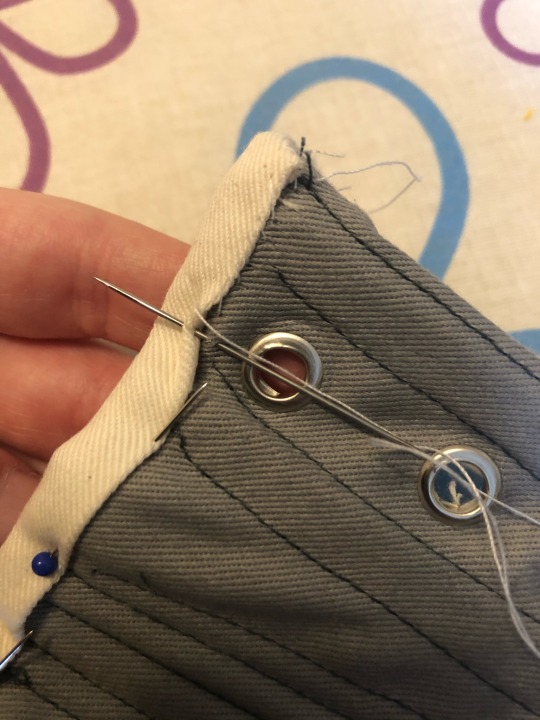
I had done most of the lining on one side and only the back on the other when the eyelets got delivered so of course, I had to put them in to be able to try it on!
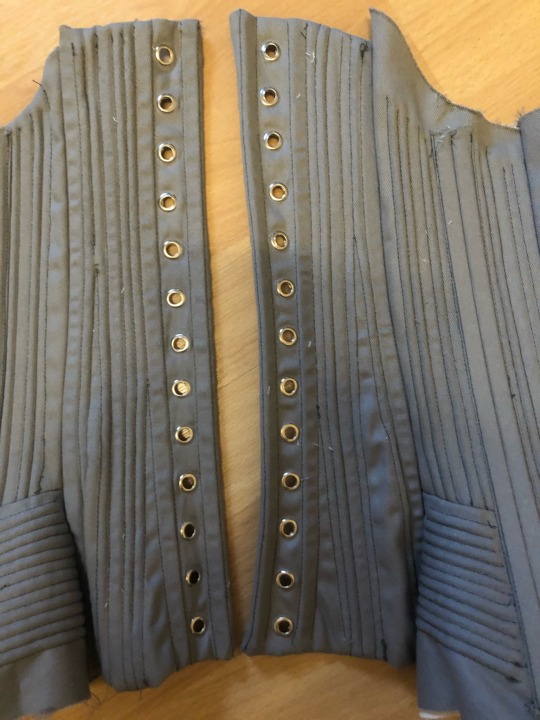
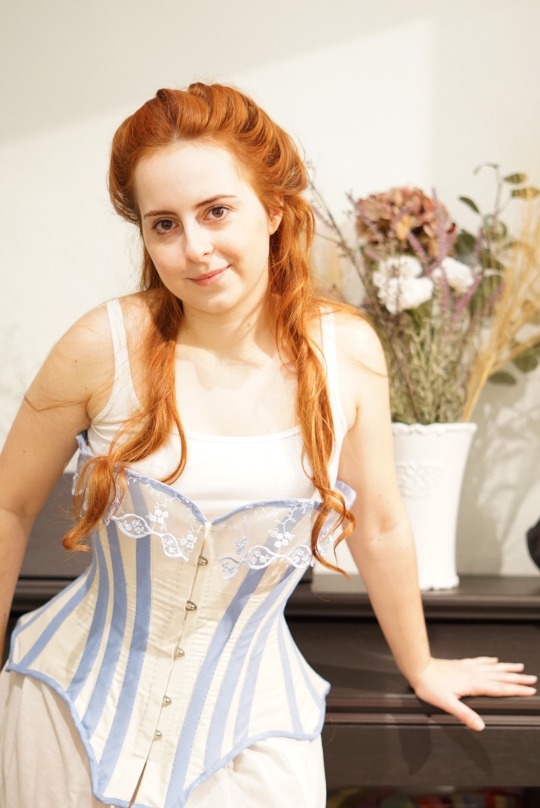
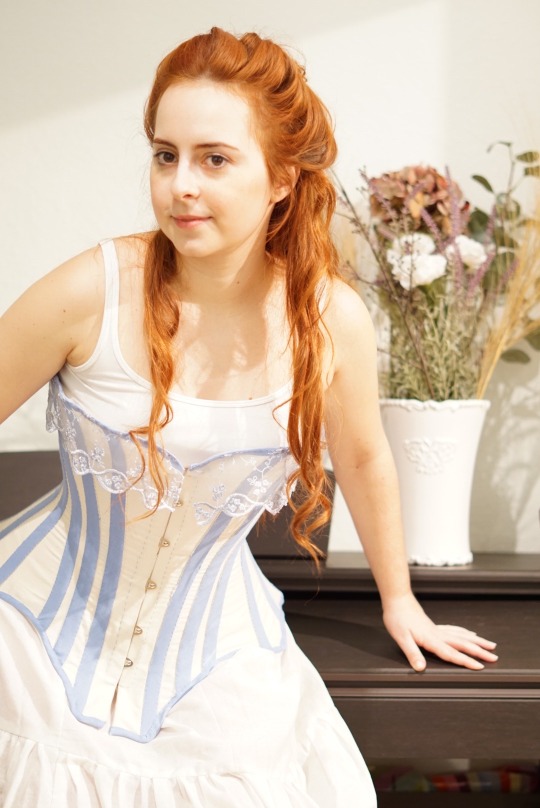
I added thirteen eyelets just like in the original and it was a process but I finally figured out the right method to punch the holes and then I got pretty quick at it. Then I could finally wear it for the first time, and let me tell you... it’s *chef’s kiss* so freaking comfortable! It’s hands down the most comfortable corset I own, and even as someone who constantly annoys people trying to educate them that corsets weren’t torture devices I was still very surprised by this. But it makes so much sense - it’s a Pretty Housemaid Corset. It was made for working women so it had to be comfortable. It provides just the right support in just the right places and I honestly didn’t wanna take it off again. But I also wanted to continue.
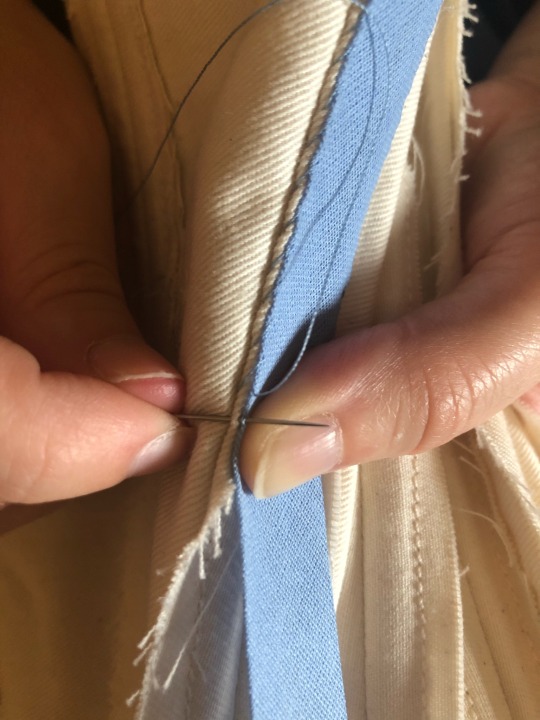
Next, I finished the rest of the lining and then I could move on to the binding. Binding is probably my least favorite part of making a corset, it is so time consuming but I decided to hem stitch it this time because I wasn’t going to use my sewing machine anyways so I might as well save some time hand stitching it. I actually made the binding out of the twill lining, I’d never made binding before but (this particular) twill made it pretty easy because once you press it with an iron it stays in place, which I really appreciated.
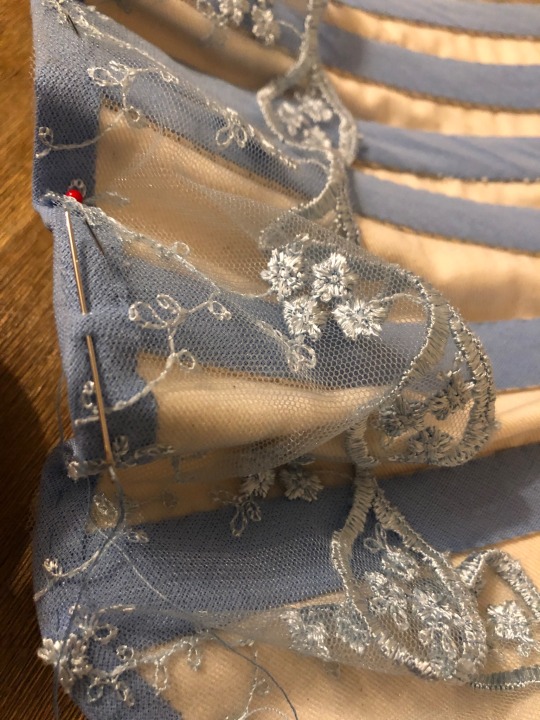
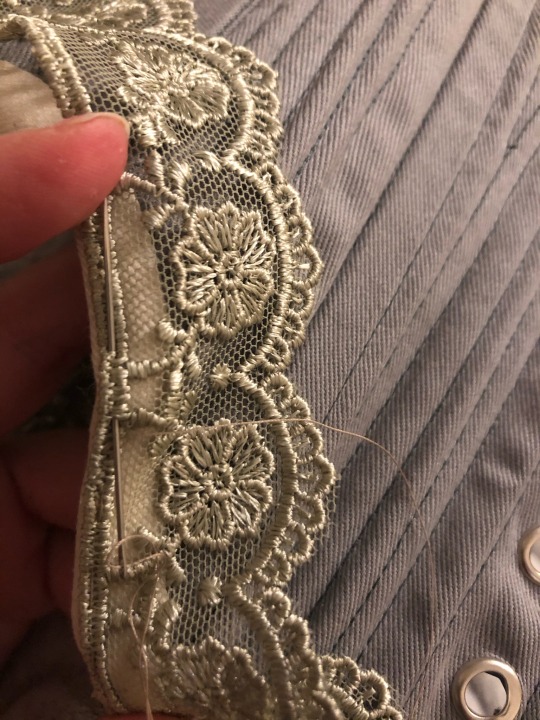
Then it was time for the lace trim! I fell in love with this lace the very first time I saw it back when I didn’t even have a project in mind but I just knew it would be perfect for a corset.
The last part was the flossing. I was going to do the same design as was on the original but I forgot to stock up on thicker flossing thread so I used regular thread but quickly came to the conclusion that it would take me forever, so I used the rest of the cream colored embroidery thread that I had leftover from the Anne With An E dress, but I didn’t have a huge amount so I looked through google pictures and found this design that I really loved.
But yes that was the sewing journey and I’m really happy with how it turned out and especially with the fit! It doesn’t cinch my waist by a lot, but then again it’s not meant to, it’s a corset specifically designed for work. A little padding or a bum pad can certainly help with the illusion of a small waist.
Here she is in all of her glory.
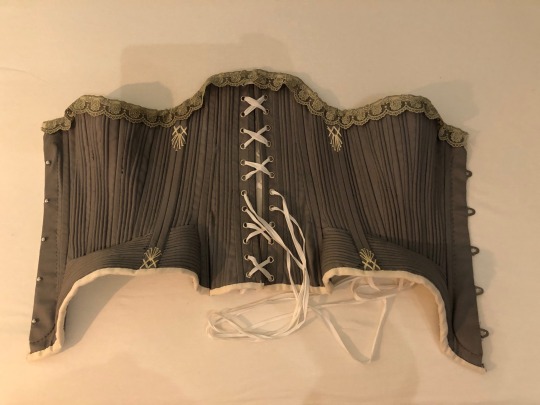


I might post pictures of me actually wearing it sometime in the near future. If the pictures turn out good. I already wore it over my late Victorian skirt and it’s awesome. I might just need a petticoat to cover the edges...
Part 1 | Part 2
#historical fashion#fashion history#sewing#victorian#victorian corset#corset#victorian fashion#corset making#edwardian#1890s#symington#pretty housemaid corset#fashion#mysewingadventures
169 notes
·
View notes