mysticandskepticmuses
Main RP hub.
Main roleplay hub for my assorted sideblogs. 18+ only. NSFW & triggering content may / will be present. Please check desc. of each blog for tw's etc. before following. Check pinned post for navigation guide, general guidelines & link to character / blog directory post. Written by PENNY.
820 posts
Don't wanna be here? Send us removal request.
Last Seen Blogs
frosen-steel-minibang
Dolts

look-at-all-of-bos-hoes
B.O. lingers and it makes you think.

hello-saemsblog
Saem's Blog

starkmarketing894
STARK MARKETING
eceeartz-blog
EceeArtz
Text
where to find me.
@moonefcrged ; dc hub.
@redroomfcrged ; marvel hub
@typhoidandstarlings ; hannibal
@galaxyfcrged ; star wars hub
@soufflefcrged ; doctor who hub
@jigsawfcrged ; saw multi muse
@prophecyfcrged ; ats/btvs hub
@rykerelias ; ryker
@frontierfcrged ; yellowstone / 1883 / westworld
@violencefcrged ; expanse hub
various ocs located here.
8 notes
·
View notes
Text
Jewelry: Green
The oldest kiddo’s birthday is coming up & our living room air condition died last week so I’m back on the train of trying to sell some of the jewelry I’ve been making or am in the progress of making. There will be many, many jewelry sets coming over the next few weeks but the second one I worked on are green hued ones.
All prices are before shipping & handling. Any order for 2+ items will receive 50 cents off each item ordered. Page will be updated as items sell or new items are made. Please send me an email at [email protected] or contact me on my social media if you know it. Items are first come, first serve. Only a few of these will be repeats, most of these are one of a kind (at least from me!). Payments are accepted through my Paypal only but you do not have to have a Paypal account to pay through it, they have an option to purchase via a credit card instead of using your paypal account. (same as my email.) (Also, if anyone feels like just helping out w/ the birthday things or ac replacement, I definitely would be appreciative - my paypal is the email above.)

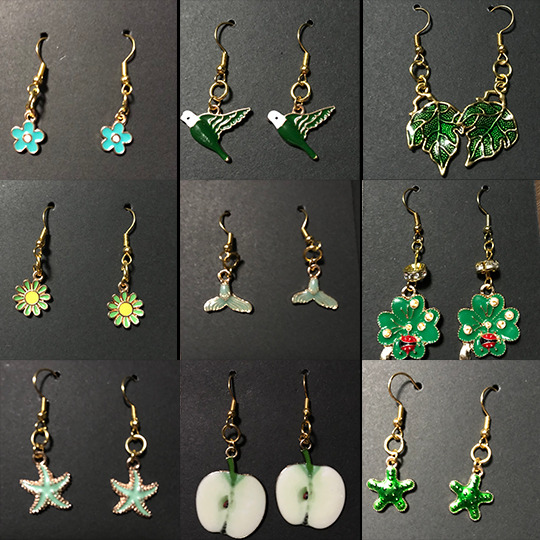
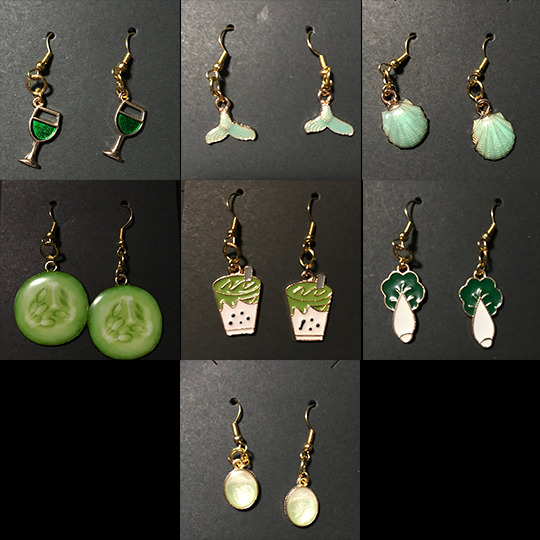
Info & pics / pricing can be found in a google doc HERE.
20 notes
·
View notes
Text
Jewelry: Space Themed
The oldest kiddo’s birthday is coming up & our living room air condition died last week so I’m back on the train of trying to sell some of the jewelry I’ve been making or am in the progress of making. There will be many, many jewelry sets coming over the next few weeks but the first one I worked on is the space / expanse themed ones.
All prices are before shipping & handling. Any order for 2+ items will receive 50 cents off each item ordered. Page will be updated as items sell or new items are made. Please send me an email at [email protected] or contact me on my social media if you know it. Items are first come, first serve. Only a few of these will be repeats, most of these are one of a kind (at least from me!). Payments are accepted through my Paypal only but you do not have to have a Paypal account to pay through it, they have an option to purchase via a credit card instead of using your paypal account. (same as my email.) (Also, if anyone feels like just helping out w/ the birthday things or ac replacement, I definitely would be appreciative - my paypal is the email above.)
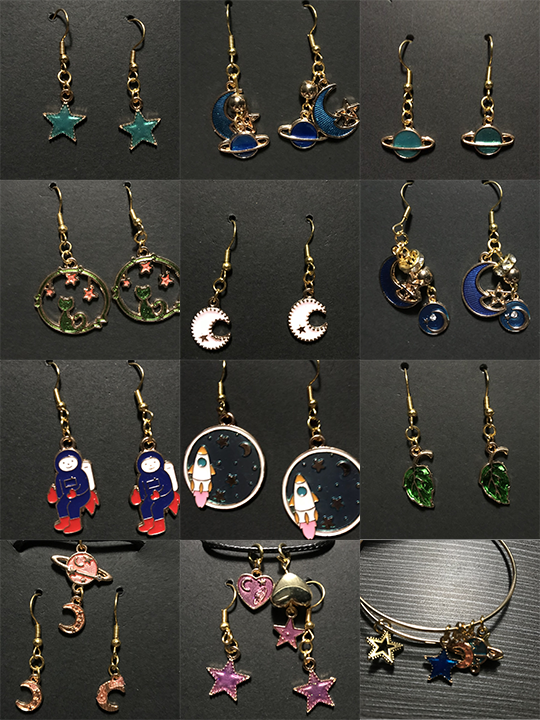


Info & pics / pricing can be found in a google doc HERE.
25 notes
·
View notes
Text
Riddick is being relocated to @chroniclesofriddick and I’ll be adding Jack @jackkyra(though the url might change cause i’m not sure i like it) - nothing at all there right now but that’s one of the places you can find me right now.
Also @lelaxtalionis a serial killer / guardian angel / er doctor oc, @finisfcrged a necromance/hitman oc @purplefcrged a 99% oc kara kilgrave @firmamentfcrged a nephilim oc @typhoidandstarlings hannibal lecter
6 notes
·
View notes
Text
If you’re interested in interacting with my Hannibal, find me at his blog @typhoidandstarlings
11 notes
·
View notes
Text
I have soooo many icons and caps that I need to get reposted...
In the meantime I'm going to provide links to all my cap and icon folders so you all can check if there's anything that you need.
ICONS
CAPS
As always, donations are SUPER appreciated but not necessary.
23 notes
·
View notes
Text
heads up i’m going to be purging a lot of subblogs over the next few days
going to cut down to just characters i really have reliable muse for bc i’m just not accomplishing anything anywhere honestly
7 notes
·
View notes
Text
heads up i’m going to be purging a lot of subblogs over the next few days
going to cut down to just characters i really have reliable muse for bc i’m just not accomplishing anything anywhere honestly
7 notes
·
View notes
Text
Petra is kind’ve awake, I only have a few drafts actually saved over there so if we had threads going and you want to continue them feel free to reply with your last post here or im them to me etc. If you want to make starters for her feel free too, or send her memes - she’s at @silencefcrged and you can send memes from here or anything from rpmemes-galore since that’s my go to these days.
Reminder that she is one of my more trigger heavy muses with mentions of suicide, suicidal ideation, depression, abuse, gaslighting, manipulation, and more heavily present in her history and in current plots so don’t follow unless you’re good w/ that content!
3 notes
·
View notes
Text
honestly i’ll probably be dropping at least 90% of my canon characters here and either moving the canons to their own blogs or something and making this a hub for all my ocs for ease
heads up i’m going to be purging a lot of subblogs over the next few days
going to cut down to just characters i really have reliable muse for bc i’m just not accomplishing anything anywhere honestly
7 notes
·
View notes
Text
heads up i’m going to be purging a lot of subblogs over the next few days
going to cut down to just characters i really have reliable muse for bc i’m just not accomplishing anything anywhere honestly
7 notes
·
View notes
Photo

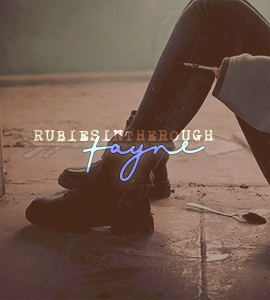
i am DESTROYING myself so other people can’t && it’s the worst kind of control, but it’s the only form i know —– ind. & sel. oc multimuse featuring : FAYNE LOBELLA CLARKE. Ballerina precariously balanced on the edge, and purposefully teetering further. ( personals / non-mutuals, do not reblog! beautiful promo made by the ever wonderful Penny! )
13 notes
·
View notes
Text
Petra is kind’ve awake, I only have a few drafts actually saved over there so if we had threads going and you want to continue them feel free to reply with your last post here or im them to me etc. If you want to make starters for her feel free too, or send her memes - she’s at @silencefcrged and you can send memes from here or anything from rpmemes-galore since that’s my go to these days.
Reminder that she is one of my more trigger heavy muses with mentions of suicide, suicidal ideation, depression, abuse, gaslighting, manipulation, and more heavily present in her history and in current plots so don’t follow unless you’re good w/ that content!
3 notes
·
View notes
Photo
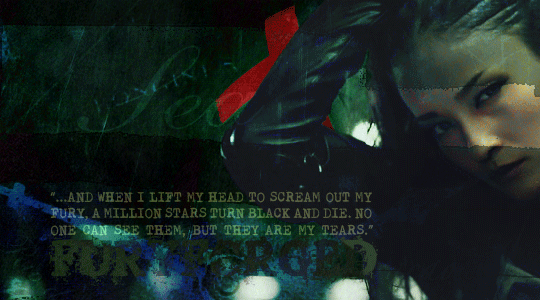

NORIKO of the old guard. comic & headcanon based w/ some movie influences. written by penny. sideblog of {ofbloodandbullets} / 18+ only. blog is somewhat a work in progress! please be advised that violent & potentially triggering plots will be present.
RULES. memes. bio. char info. starter calls. open rps.
41 notes
·
View notes
Note
Do you have any tutorials on making batch icons?
A few disclaimers - I am 99% self taught and everything I’ve learned is from trying to decipher other people’s tutorials, watching videos, and then trying to figure out how to actually do what they were showing in a way that made sense to me and or just trial and error until I figured out what I was doing so there may be better / other / faster ways to do these things but this is what I use.
Also I wasn’t sure if you meant base icons or applying a psd to base icons in bulk but I assumed it was the latter - if you were asking about the first one, let me know and I’ll see what I can do.
For batch production of base icons:
A few notes: for this to work all of the screencaps that you’re using have to be the same size. Otherwise the icons will end up either distorted or with some smaller / different perspectives etc etc so make sure your caps are sorted into folders by dimensions.
You’re going to need a base knowledge of photoshop and how to do an action / run an action to follow these instructions.
1: open one screencap / icon that you want to crop / resize etc. from your folder.
2. make sure you have windows > action open
3. hit the button to create / record a new action
4. use the crop tool [ w x h x resolution] (I use 200x100x100 because rectangular ones tend to work better for mass production. You can use any size / ratio that you prefer but the rectangular ones tend to make more usable ones but if you have lots and lots and want to do square etc. then go for it.) - align the crop where you want it and hit the check mark to complete the crop
* by using the w x h x resolution you can skip a step for resizing the image. if your computer lags and doesn’t handle w x h x resolution crop well, then just use ratio crop 2:1 or 1:1 - and then go to image size and enter in what wxh size you want to use
5. add in any additional steps like smart sharpen, or color shifts or brightness / contrast steps etc. that you want to use to edit the base icon.
* I tend not to use this step for things like adding text or borders etc. because I haven’t found a way to keep color choice settings work properly (in my experience it defaults to last used not what you recorded in the action) you can also do things like create a larger canvas if you want blank space around your icons at this stage, etc.
6. file > save as > ( choose your location ) > PNG. it is very important that you choose png as the file format because if you choose jpg or anything else it’ll ask for you to confirm image quality etc. each time the action runs.
7. file > close
8. go to your action tab and hit the stop recording button
9. file > automate > batch
choose the set & action that you want to run. choose your source folder - if there are multiple folders that you want to run at once (and all the images are the same size) you can choose the main folder & check the include all subfolders button.
destination should say :NONE because you already told photoshop where to save the file in the course of creationg the action. i choose save errors to file but if you want it to stop on error then choose stop for errors.
then just hit okay and it should begin processing your action.
P.S. you are free to reblog this if you like. Also, while I am happy to answer what questions I can and provide what caps and icons I can free of charge you are always welcome to donate if you feel like it and or if my answers and or resources have helped you out & you want to: you can find my paypal HERE!
55 notes
·
View notes
Text
TUTORIAL: batch applying a psd
A few disclaimers - again I’m 99% self taught so there may be better ways to do anything I write up a tutorial for but these are the methods that I’ve picked at / picked up / scrutinized other tutorials and picked what made sense to me and figured out the rest on my own etc.
Also, it’s important to note that applying a psd that’s heavy on color correction and so forth may have extremely varied results and it’s unlikely that ALL of the icons will be usable unless you go in and edit each icon individually (I tend not to do that bc I’m lazy and if I batch 1000 icons and end up with ½ of them usable I’m okay with that - but if you do want to edit each icon PLEASE NOTE that you need to make any edits to the BASE ICON LAYER and NOT to the psd - changing the psd will effect alllll of the base icons with this particular method so unless you’ve saving each icon individually as you edit them it’s important that you edit the BASE ICON WHILE THE PSD is on it so you can make it look like you want).
ALSO this tutorial assumes that you have all of your base icons already made, cropped, and are all the same size. It also assumes that your PSD is already the same size as your icons (If it includes a frame or text this is VITAL, less necessary if it’s just textures / color adjustment layers etc).
Step 1: File > Scripts > Load Files Into Stack
choose the icons that you want to apply the psd to, select ok and wait for them to load.
Step 2: Select> All Layers; Layers> Group Layers & then make sure window > timeline is selected.
Step 3: on the timeline toolbar, click the dropdown menu in the menu and choose create frame animation - ONE frame will appear at this point in time
Step 4: click the button on the top right of the timeline toolbar and choose make frames from layers
all of the layers will now appear in a row across the bottom of the screen in the timeline work area (the more layers you have the longer this will take)
Step 5: make sure your psd file is also grouped into one group/folder for ease of steps later on, right click the group and choose duplicate layer, choose your target document and hit ok.
your psd should now be over ALL of the layers/frames and should show up across all of the previews in your timeline work area.
Step 6: click the button with three lines at the top right of the timeline work area and choose: Flatten Frames Into Layers
the more you have the longer this will take. i definitely suggest testing your photoshop / machine and see what the average is that it can handle without overloading.
when it’s done all of the icons w/ the psd should appear on the right hand column in your layers, and there should be two groups/folders - the original base icons and the psd group.
Step 7: click the button with three lines at the top right of the timeline work area, Select All Frames, Delete All Frames.
(if you don’t do this exporting takes much longer because it will come back to the file and move over to the next frame in the timeline before it exports it and makes everything take so much longer and you can’t generally do anything else bc ps keeps popping up as the active program etc)
Step 8: select the two GROUPS / FOLDERS - the ones w/ the original base icons & the psd and DELETE them.
you should now JUST have the edited icons in your layers area. (If you don’t delete these groups, then they will be exported with the edited icons including every layer of the psd & the base icons so at minimum it doubles the time exporting takes and just uses up unnecessary resources/time)
Step 9: I highly suggest using the Export Layers to File (Fast) script which you can find HERE (if you don’t know how to add a script it’s a quick google search or you can send me an im if you can’t get it to work etc).
File> Script> Export Layers to File (Fast)
you’ll have the choice of how to name files, whether to export all, visible or selected files, the option to add a prefix, where to save etc.
I suggest by index from top because if you have too many sometimes it errors out or only exports the first 100 with the other options.
Again, this may take a while but this script makes it MUCH FASTER than using the native export option that comes with PhotoShop.
This tutorial is obviously free for anyone to use but if you’d like to toss a buck or two my way you can do so HERE. Please like and or reblog this post if you found it useful in any way.
24 notes
·
View notes
Text
OKAY SO, if you're lazy or dont have the time and patience to edit the background out of an image you want to use in a theme; I got a solution for you! if you go to remove.bg youll be able to upload any picture you want as render/png and it will give you a really nice result. we can edit a bit the image with their tool so the it can be more accurate the erased area and after we can edit in photoshop or photopea. its easy and free. it comes with a paid option but meh.
1K notes
·
View notes