
Last Seen Blogs

pinkavocadoswim-blog
Pink Avocado Swim


truegrau97
The Life of Bernstein 533

sevenfold66
Untitled

sneakers-yo
Sneakers_yo
Text
Microsoft Excel Screenshot

22 December 2014
Updated: 2 March 2021
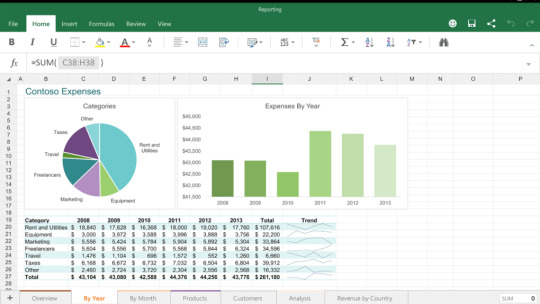
Take and Insert a Screenshot in an Office Document. You can also use it in the other apps included in the Office Suite like Excel and PowerPoint. Microsoft Office. Microsoft Excel 1 for Mac (1985) Excel was released for the Mac first, before it was available on MS-DOS or Windows. In fact, there never was a version of Excel for MS-DOS. Microsoft Excel 1.5 for Mac Splash Screen (1985) Source: winworldpc.com. Microsoft Excel 1.5 for Mac (1985). Click in the document at the location where you want to add the screenshot. In Excel, Outlook, and Word: On the Insert tab, in the Illustrations group, click Screenshot. In PowerPoint: On the Insert tab, in the Images group, click Screenshot. The Available Windows gallery appears, showing you all the windows that you currently have open. Microsoft is adding a price comparison feature to its Edge browser just in time for the holidays, alongside a really useful screenshot tool that will let you easily capture an entire webpage.
For years I have been creating screenshots for various reasons;
for use in training courseware;
to illustrate to a remote user a button I want them to press;
to relay information about a technical problem or error,
and the list goes on.
Anytime I want someone to see something on my screen or I need to see what is on someone’s screen, I use a screenshot.
Now for a touch of history, the screenshot function is also referred to as a print screen. It originated back when computers ran MS-DOS and processes on the computer required commands to be typed manually. Originally when a user pressed the PrtScn button or equivalent on the keyboard, the content of the screen would automatically be printed to the local printer, hence the name Print Screen. Now with our graphical based operating systems, e.g. Microsoft Windows, we now see a snapshot or “screenshot” of the current screen taken and saved to the computer’s Clipboard where you can then use the image in any program. If you are not familiar with the Clipboard and how it works, take a look at my post on the Office Clipboard.
With Microsoft Office, this feature is incorporated directly into the applications making this task much quicker and very straightforward.
Because the screenshot function has been around for so long it’s important to know there are now two methods to create a screenshot. There is the old way, which still works perfectly and in all honesty, I still use it myself, and then there is the method of creating a screenshot directly through Microsoft Office (version 2010 onwards).
Let’s take a look at how to create a screenshot using both methods.
Create a Screenshot using Windows
If you need to take a screenshot of any active window you can use the good ole’ PrtScn button on your keyboard.
The PrtScn button can also provide you with two different types of screenshots as outlined below:
PrtScn button
Pressing the PrtScn button individually will provide you with a full-screen shot, meaning if you have multiple windows visible at once, the screenshot will be identical to what you see on screen. A full print screen also includes the start button, taskbar and system clock areas.
Alt + PrtScn button
Pressing the Alt + PrtScn button together means you will only get a screenshot of the active window. I generally use this method more often so that I’m only getting an image of the application window I need and it leaves out the additional content such as the taskbar, clock, start menu etc.
This method also allows you to resize the window you wish to take a screenshot of, which is quite handy. In my example below I have used Alt + Prtscn to take a screenshot of only the Format Cells dialog box in Excel.
To create a screenshot using Windows, follow these steps:
Open your web browser and navigate to a website you want to take a screenshot of, you can even just use this window if you prefer
Make sure the web browser is the current window active (click the mouse anywhere within the window) and is maximised to fill the entire screen
To create a screenshot, press the PrtScn button on your keyboard. Because we are using the PrtScn button individually it will take a full screenshot of the entire computer screen including the taskbar and start button
Note: Your keyboard may use a slight variation of this button name, including Print Scn, Prt Scn etc
Do not be concerned if it looks like nothing happens, the screenshot will now have been saved to the clipboard of your computer
Now let’s open a program we can paste the screenshot into such as Microsoft Word, Paint or even a new email message
Now click the Paste button or press Ctrl + V on the keyboard
A screenshot of the web page will now be displayed inside the program window
Alternatively, you could paste the screenshot into a graphics program such as Adobe Photoshop or even Microsoft Paint to be saved in an image file format such as .JPG or .PNG.
Repeat the same process, however, use the Alt + PrtScn key combination to see the difference, you will notice it does not include the taskbar or start button.
Create a Screenshot using Microsoft Office
The screenshot process within Microsoft Office is very easy. Ensure you have open the window you wish to create a screenshot of, in this case, keep your web browser window open.
Open Microsoft Word, Excel or PowerPoint or even open a new blank email message in Outlook
From within any of the Microsoft Office programs, click the Insert tab and choose the Screenshot button
You will see a drop-down menu appear showing a thumbnail of each window currently active:
Select the thumbnail of your web browser and click it once
A screenshot of your web browser window will automatically be inserted into your document
You can now save the document you have open
Congratulations, you have now created a screenshot using the methods available in Windows and Office. For more articles and tips which can be applied across the range of Microsoft Office products check out:
Microsoft Excel Screenshot Extension
excel, powerpoint, print screen, screen shot, screenshot, windows, word
Microsoft Excel, Microsoft Outlook, Microsoft PowerPoint, Microsoft Windows, Microsoft Word
0 notes
Text
Allow Iteration Calculations In Excel

Now that it's going out to users that don't have iterative calculations enabled, it's breaking their spreadsheets. I already have a workbook open macro in place, just need to add a line to ensure iterative calculation is turned on with the following settings.'Enable iterative calculation'. Maximum Iterations = 100. Maximum Change = 0.001. If you're using Excel for Mac, click the Excel menu, and then click Preferences Calculation. If you're using Excel 2007, click the Microsoft Office Button, click Excel Options, and then click the Formulas category. In the Calculation options section, select the Enable iterative calculation check box. On the Mac, click Use iterative calculation. Jun 29, 2017 How to enable and control iterative calculation in Excel To turn on Excel iterative calculation, do one of the following: In Excel 2016, Excel 2013, and Excel 2010, go to File Options Formulas, and select the Enable iterative calculation check box under the Calculation options.
Iterative calculations can help find the solution to mathematical problems by running calculations over and over using previous results. This is made possible by computers that can run calculations repeatedly to find the likelihood of possible answers by getting closer to the results from different angles.

In Excel 2016, Excel 2013, and Excel 2010, go to File Options Formulas, and select the Enable iterative calculation check box under the Calculation options. In Excel 2007, click Office button Excel options Formulas Iteration area. In Excel 2003 and earlier, go to Menu Tools Options Calculation tab Iterative Calculation. Hi there, I have a spreadsheet I have created with iterative calculations in it (deliberately). The sheet is now about to go out to staff and won't function correctly if the iterative calculation isn't enabled. Is there a VBA code I can insert to enable this automatically when the sheet is.
In Excel, you can reference a cell that contains a formula and use its result in an identical formula in a different cell. For this, you would need to copy the formula and references as many times as you want to repeat the process. This can work if your model is relatively simple, but doing so in more complicated workbooks might prove much more challenging, if not downright impossible to do.
An alternative and better approach is to use the Excel iterative calculation feature. You can create a formula that refers to the cell containing the formula. The formula can use the result of the previous calculations, thus automatically calculating the same thing over multiple iterations.
As easy as it sounds, there are a few things you need to consider. First of all, the number of iterations should be limited. Even though a higher iteration count usually means more accurate results, this also means longer calculations times – and sometimes crashes. Another thing to note is that when iterative calculations are disabled, Excel will show a warning as circular references are usually considered user errors unless you know what you’re doing.
To learn more about circular references please see: How to Handle Circular References in Excel
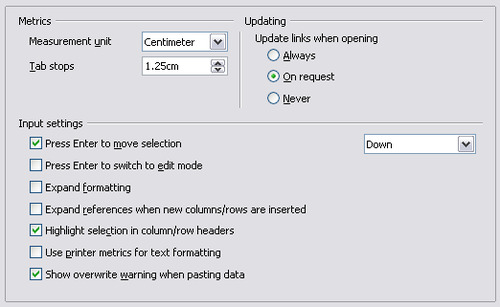
To activate and use circular references, you must first activate them by checking Enable iterative calculations option under the File menu.
Go to File > Options > Formulas > Calculation options section in Excel 2016, Excel 2013and Excel 2010.

In Excel 2007, go to Office button > Excel options > Formulas > Iteration area.
In Excel 2003 and earlier, go to Menu > Tools > Options > Calculation.
Enabling iterative calculations will bring up two additional inputs in the same menu:
Maximum Iterations determines how many times Excel is to recalculate the workbook,
Maximum Change determines the maximum difference between values of iterative formulas. Note that entering a smaller number here means more accurate results.
Iterative calculations stop when one of the conditions defined (iterations count or change value) are matched. For example, let’s assume that Maximum Iterations is set to 100 and Maximum Change to 0.001. This means that Excel will stop calculating either after 100 calculations, or when there’s less than 0.001 difference between the results.
Calculating Future Value of an Investment

Let’s assume that we have $10,000 and want to invest this money in a cash deposit (CD) account. We’re going to assume a monthly interest rate of 1.25%. You can download the sample workbook for this use case . To calculate the total value at the end of the 21st month, we’re going to calculate the principal for each month, and add the interest to the previous month.
Begin by entering the starting cash, interest, and the total value function like below.
=value * ( 1 + interest rate)
Then, select the cell with the initial cash value and add the reference of the total value function.
This will give a circular reference warning if iterative calculations are not enabled. If you haven’t done so already, enable this option and set the Maximum Iterations to 20 to find the interest for the 21st month. See the previous section Enabling Iterative Calculations to enable this feature.
Automatic Timestamp
Circular references can also be used to add time stamps into cells. You can download the sample workbook for this use case . Let’s assume we want to add time stamps to the orders entered in the table below.
We can use circular references to add a time stamp when a new order information is entered. Kontakt 5 library content not found. To do this, begin by adding a new column into the table where you’d like to print the timestamps. Type in the formula,
=IF(A2<>””,IF(I2<>””,I2,NOW()),””)
This formula will check whether there’s data in Order Number (cell A2). If it’s not blank and the timestamp cell is empty, the formula will return the NOW() function.
Note that pressing the Enter key will give a circular reference warning if iterative calculations are not enabled. See the previous section Enabling Iterative Calculations to enable this feature. This time Maximum Iterations or Maximum Change numbers don’t mean much, because we only need a single iteration, so you can leave these two inputs in their default values.
Now, every time we enter a new order and create a new row, a timestamp will be automatically printed on the Timestamp column.
Definition of Iteration:-
It is the repeated calculation of a worksheet until a specific numeric condition is met. Excel cannot automatically calculate a formula that refers to the cell — either directly or indirectly — that contains the formula. This is called a circular reference. If a formula refers back to one of its cells, you must determine how many times the formula should recalculate. Circular references can iterate indefinitely. However, you can control the maximum number of iterations and the amount of acceptable change.
The Enable Iterative calculations option allows us to do so.
Go to File > Options.
Excel Options dialog box will appear. Click Formula and tick the checkbox enable iterative calculations and click OK.
Now perform the Iterative option in Excel.
Use the formula in A1 cell
Use the formula in A2 cell
How To Allow Iterative Calculations In Excel
=1+A1
Formulas In Excel
As you can see the blue arrow pointing towards each other shows that the values of both cells depend on each other’s value.
Hope you will be performing more and more functions now. Please state that your query down in the comment box. We will help you.
0 notes
Text
Kontakt 5 Library
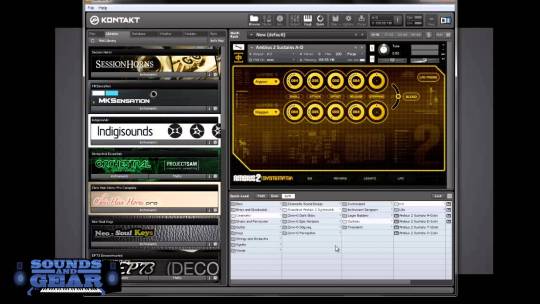
This stunning Kontakt sample library and virtual instrument contains playable picking grooves, textures and one shot samples all with 5 mic positions and on board mixer. Everything is wrapped up in a beautiful and easy to use interface that is a pleasure to look at. Kontakt 5.5.5.0 + Crack Kontakt 5.5.5.0 Crack only Install Note Download Setup and Path using one of the links above. Install setup as usual. If the path is in the location of the folder where Kontakt 5 files are located. Open Kontakt 5 and enjoy it. Notice: Use Crack, Path or Keygen. The library includes a full-ensemble preset and 4 Master and True-Legato section presets for 8 Violins, 6 Violas, 5 Cellos and 4 Double Basses. The Master presets include a broad selection of fundamental articulations, each with their own range of customizable real-time performance options, key-switch and mapping options, handy auto-functions.
Kontakt formatted files and Kontakt Libraries
Kontakt 5 Library Reddit
KONTAKT offers you a number of different tools that let you keep track of your installed sampling libraries and their contents. Ultimately, they all have the same purpose: to let you locate and use any item you’re looking for as quickly as possible.
The main differences between KONTAKT formatted files and KONTAKT libraries are that the KONTAKT libraries require an additional Activation code.
Powered by KONTAKT: Only libraries from Native Instruments and selected third party manufacturers can use theAdd Libraryfunction.
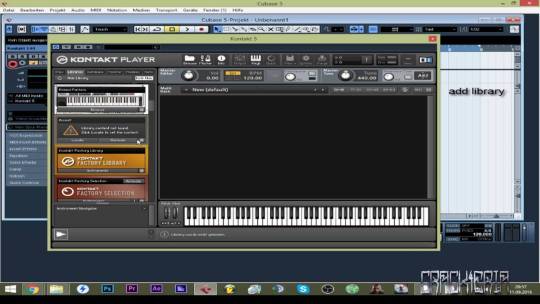
Others third parties Libraries: Kontakt formatted Libraries like Syntheway KONTAKT, containing instruments in .nki format with their respective wav samples, and cannot be added to the library tab. So, in order to load the files, please follow any of these 4 methods described below:
Via Browse icon: from Kontakt toolbar, click 'Browse' icon (folder) and select the Magnus Choir folder location. Open the folder, order by size and it will expand the nki list first. Double click on nki instrument that you wish to add in Kontakt rack.
Dragging in Kontakt rack: Drag i.e. Magnus Choir Kontakt nki files directly onto the Kontakt rack from your desktop or hard drive.
Via Files icon: load via the 'Files' menu (floppy disc icon) in the center of the Kontakt toolbar and select i.e. the Magnus Choir nki instrument.
Via Quick icon: Load via 'Quick' icon. Similar to the Libraries Tab, once you've clicked on the 'Quick' load button, you will see a browser. Drag your Syntheway library onto this browser. It will be there for future quick loading.
You also might like:

Kontakt 5 Library Content Not Found
KONTAKT Sample Libraries (.nki format) available:

Kontakt™ is a trademark of Native Instruments GmbH
Live™ and Sampler™ are trademarks of Ableton AG
HALion™ is a trademark of Steinberg Soft- und Hardware GmbH
How To Add Library Kontakt 5
DirectWave Player™ is a trademark of Image-Line
Kontakt 5 Library Mac
Mac® and macOS® are a trademark of Apple Inc., registered in the U.S. and other countries.
Kontakt 5 Library
Windows 7™, Windows 8™, Windows 10™ are either a registered trademark or a trademark of Microsoft Corporation in the United States and/or other countries.
0 notes
Text
Notch Raised By The People Rar
Notch - Live - 2004 Notch - Raised By The People 2007 Notch - Ya Tu Sabes!(The Beginning)aka-47 Notty - El Komplot The Mixtape 2007 (Ak-47) Notty Play - Un juego de malcriado Nostra Presenta - Los Intocables Noztra - Conteo Regresivo (Before Ya' Ain't Ready)The Mixtape. Explore releases from Notch at Discogs. Shop for Vinyl, CDs and more from Notch at the Discogs Marketplace.
06.Notch - Layaway Love 07.Notch - Rosalinda 08.Notch - Traemelo 09.Notch - Tocame 10.Notch - Mas De Ti 11.Notch - Ella Se Fue 12.Notch - Castigo 13.Notch - No Problema 14.Notch - Jah Mexi Cali 15.Notch - Mano & Mano 16.Notch Ft Baby Ranks & Jabba - Verme 17.Notch Ft Voltio - Chevere (Oficial Rmx) 18.Notch - Bailar Reggae 19.Notch - Bun Out Bad. Listen free to Notch – Raised By The People (Intro / Hay Que Bueno, Dale Pa'Tra (Back It Up) and more). 20 tracks (66:51). Discover more music, concerts, videos, and pictures with the largest catalogue online at Last.fm.
Notch Raised By The People Rar
Rapid rise of Mount Pinatubo's crater lake and recent geological assessments of the crater's lowest point, the Maraunot Notch, raised concern about a breakout lahar down the northwestern slope of the volcano. Three factors indicated a serious hazard. First, the lake rose about 50 m from May 98-August 2001 and was expected to overtop the Maraunot Notch within the last trimester 2001.

Evaluation, Proposed Solution and Current Status of the Crater Lake Breakout Problem, Mount Pinatubo, Philippines
Abstract
Rapid rise of Mount Pinatubo's crater lake and recent geological assessments of the crater's lowest point, the Maraunot Notch, raised concern about a breakout lahar down the northwestern slope of the volcano. Three factors indicated a serious hazard. First, the lake rose about 50 m from May 98-August 2001 and was expected to overtop the Maraunot Notch within the last trimester 2001. Overtopping might well have occurred at the height of a strong typhoon or under heavy monsoonal rainstorms. Second, the uppermost 10-20 m of 'dam' was erodible ash and poorly indurated coarse breccia, susceptible to failure by overtopping and erosion as at many landslide and other natural dams. Third, the volumes of lake discharge corresponding to 10 and 20 m of erosion would have been 28 and 55 million m3; peak discharges at a breach could have been as high as 3,200 m3/sec to 11,000 m3/sec, respectively. These discharges would have eroded 1991 pyroclastic and lahar material on the volcano's slopes, increased the flow volume by 3-6x, and entered the Bucao River as a large-magnitude lahar. The Municipality of Botolan (pop. ca. 40,000) lies on the delta of the Bucao River valley some 40 km downriver from the notch, and could have been at great risk. Given this potential risk, the Philippine Institute of Volcanology and Seismology (PHIVOLCS) in early August 2001 advocated three actions. (1) An intentional breaching of the Maraunot Notch by the construction of a spillway or canal, by the Department of Public Works and Highways (DPWH). Early breaching would limit further rise of the lake and thus reduce the magnitude of potential flood. Also, breaching would be scheduled during good weather to eliminate the danger of overtopping at an unknown time and/or under typhoon/rainstorm conditions. (2) An information campaign in Botolan in order to educate and prepare residents for breaching. (3) Evacuation of people at risk, one day before the scheduled breaching. A spillway was excavated by as many as 70 men with picks and shovels, and the specter of a wholly uncontrolled breach through the most erodible debris was averted. Early flow through the spillway was gentle and evacuees quickly returned home. However, 10-15 m of poorly indurated breccia still remains, lake level is still rising slowly, and we are watching to see whether outflow after heavy rains will armor the spillway or catastrophically erode the remaining dam. Insufficient communication between scientists and engineers led DPWH to design for less scouring than expected by PHIVOLCS, and politics and liability concerns at several levels halted digging before the trench could be deepened and outflow increased. Perhaps this is just as well. An inherent conflict arose between short- and long-term risk mitigation. Short-term risk was minimized; long-term risk was reduced but remains a concern. Complete breaching of the dam and thus elimination of long-term risk would have sharply increased short-term risk to Botolan. *Quick Response Team Members: Mabel Abigania, Rene Arante, Onie Arboleda, Maricar Arpa, Mariton Bornas, Edwin dela Cruz, Jojo Cordon, Toti Corpuz, Art Daag, Elmer Gabinete, Del Garcia, Lito Gelido, Lito de Guzman, Sheila Insauriga, Dindo Javier, Rudy Lacson, Bong Luis, Rey Lumbang, Danny Martinez, Mylene Martinez-Villegas, Chris Newhall, Jed Paladio-Melosantos, Mel Pagtalunan, Myla Panol, Jack Puertollano, Raymundo Punongbayan, Gina Quiambao, Andoy Ramos, July Sabit, Noli Sexon, Jimmy Sincioco, Opet Villacorte.

Publication:
Pub Date:
December 2001
Notch Raised By The People Rarest
Bibcode:
2001AGUFM.U31A..05B
Keywords:
Notch Raised By The People Rare Earth
1815 Erosion and sedimentation;
1821 Floods;
6309 Decision making under uncertainty;
8499 General or miscellaneous
1 note
·
View note