prissi
just breathe.
Just an effervescent girl, her piano, and a love for Sailormoon and the construction of ridiculous costumes (the sparklier the better). Oh, and a whole lotta nerdiness. Cosplay blog: @prissanthemum
2409 posts
Don't wanna be here? Send us removal request.
Last Seen Blogs

s-nnyd
Wake me up when the next star is born

blacktrash
blacktrash

nairobiraha30
Untitled

jonghyuny
널 끝 없이 사랑해요

cosmomilky
°✧Stardust✧°
Photo
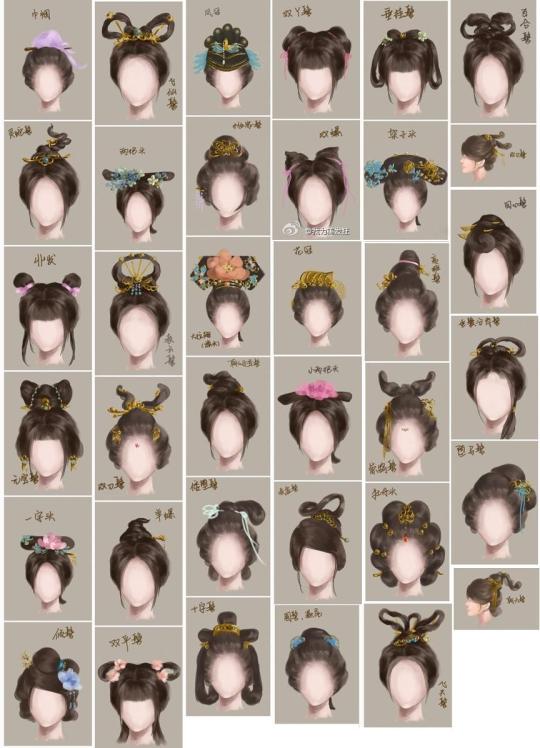
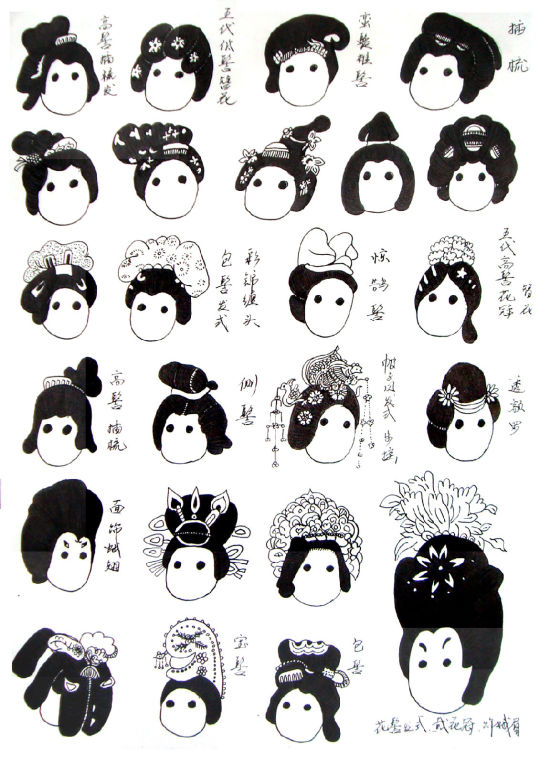
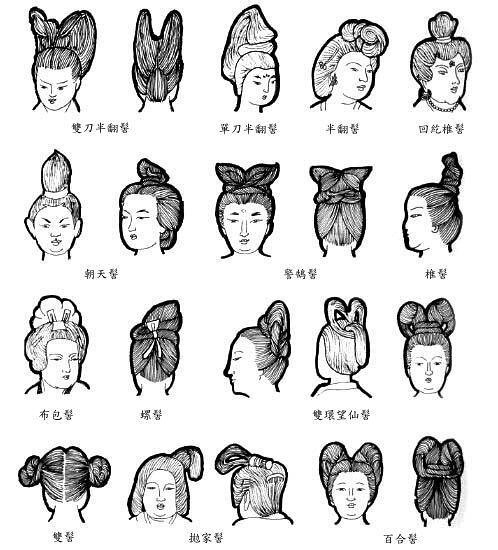


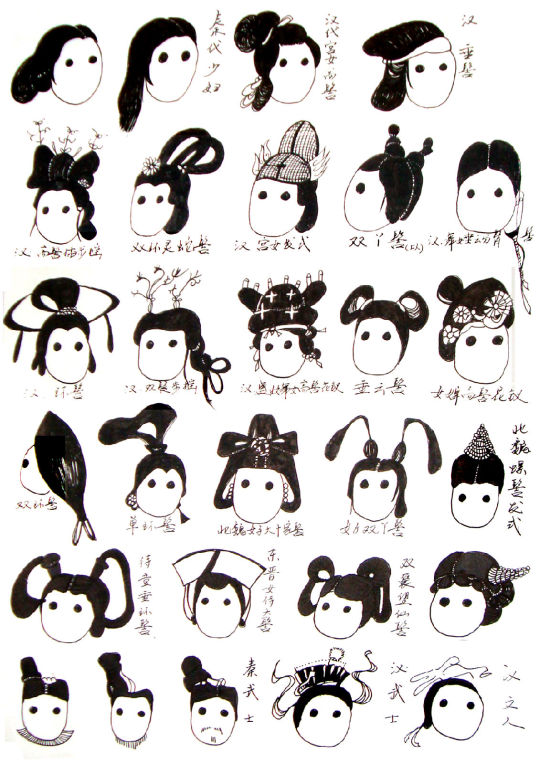
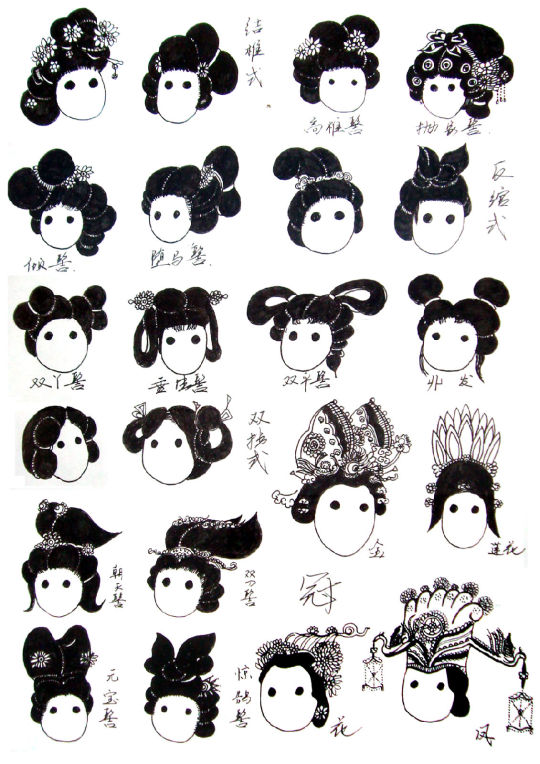
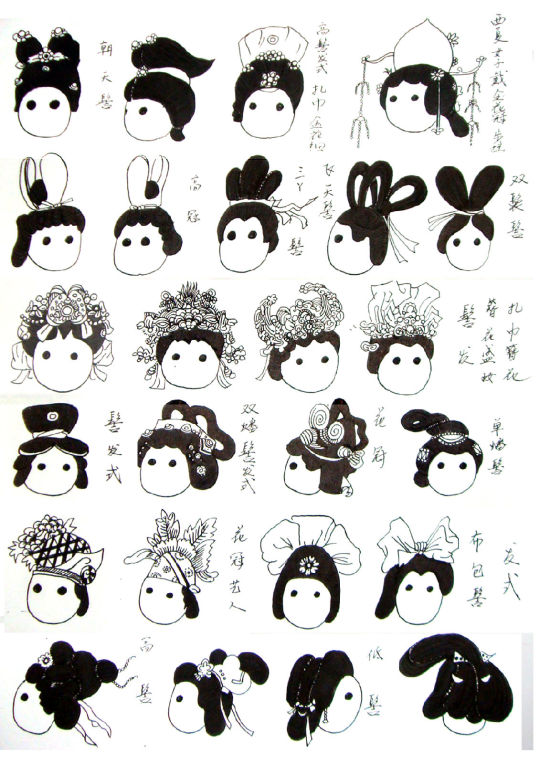
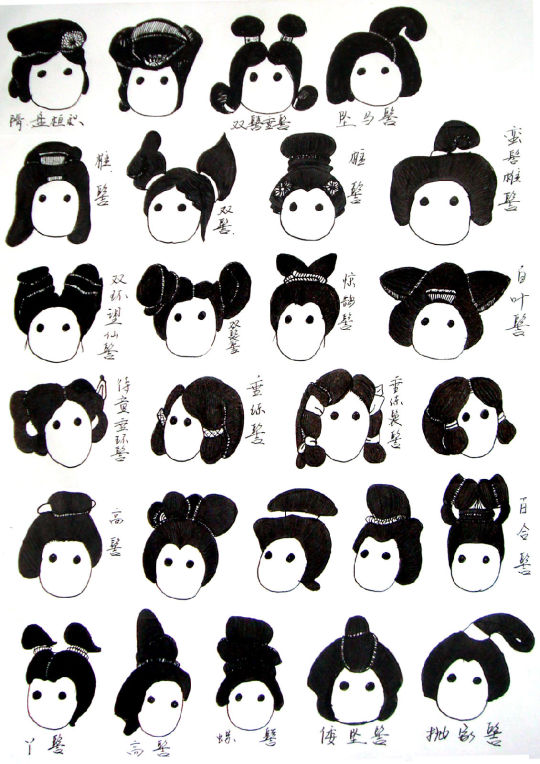
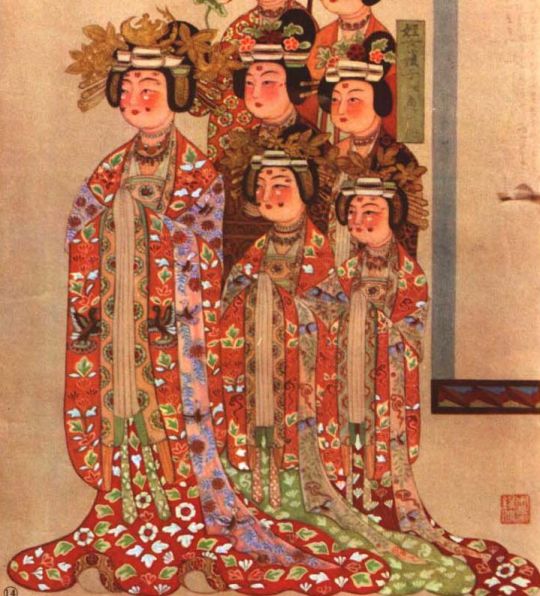
Samples of ancient Chinese buns from different dynasties. Because there are so many styles at least hundres of them, there is no uniform one in the history.
3K notes
·
View notes


Text
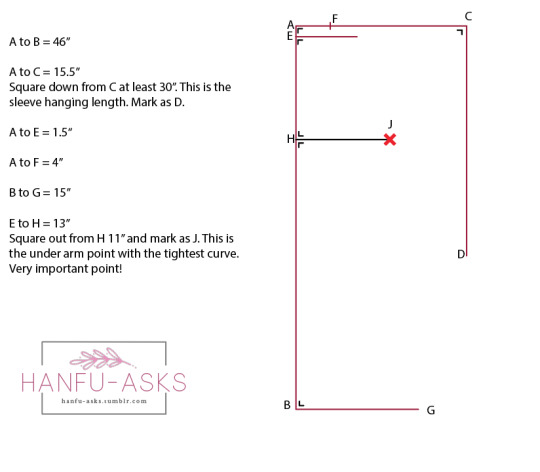
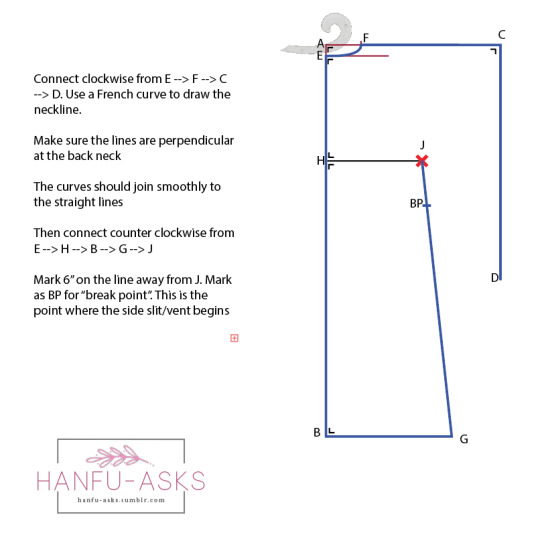
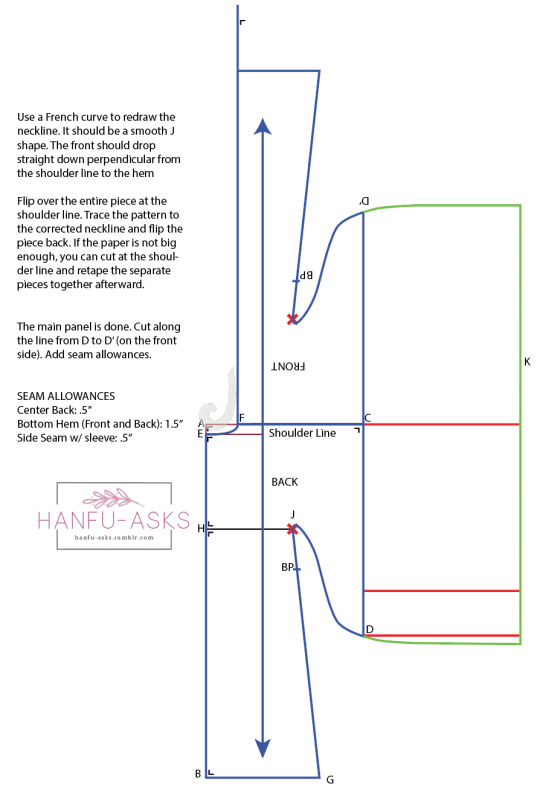
Daxiushan (大袖衫) Tutorial
Here are the basics on how to draft a daxiushan, or large sleeved robe.
Daxiushan were summer garments made popular in the Tang Dynasty. They are made from light and airy fabric and known for their broad sleeves. Worn by noble ladies and courtesans for special occasions, the daxiushan has become a staple in modern hanfu for its voluminous and ethereal effect.
I recommend using extra lightweight fabrics such as organza, chiffon, or georgette to achieve the proper look. Contemporary daxiushan can even be made from sequined fabric or non-woven materials if desired.
This garment was worn by women and commonly paired with ruqun. Please see @ziseviolet‘s tag for a better explanation and examples.
Note: this garment requires a lot of fabric and is quite wide, if you want to make a proper pattern to save for later, make sure your paper is very large! Image from (x) (x)
Since they are loose fitting, they are very easy to size for.
Next, let’s look at a technical flat.

The robe consists of:
Main Panel x2
Sleeve x2
Collar x2
Like all hanfu there is no shoulder seam, so the front half flows across the shoulder to the back as one piece.
The hardest part to draft and sew is under the arms. Because the panel extends out from the body and connects to the sleeves, it’s quite a tight curve and requires delicate sewing to help it remain smooth. I always recommend French seams when sewing hanfu as well as careful clipping and notching.
The daxiushan has side slits or vents that help it flutter and move around the wearer. The height of these slits is up to the designer, but they usually start around hip level. The rest of the garment has a slight flare, but not too much since the garment is so wide to begin with.
Because this garment is quite large, the measurements in this tutorial will be given. If you need to alter them to fit your body type please do. Giving “standard” numbers makes it easier for me to make the tutorial, and less measuring work for you!
Please do not Repost. Click for better quality.


Remember these tutorials are meant to give you a starting point in creating your own hanfu. They might not be perfect, so please bear in mind.
-Jaz
582 notes
·
View notes
Text
(Relatively) Historically Accurate Mulan I | Character Reimagined Yi-Guan 人物·衣冠 木蘭
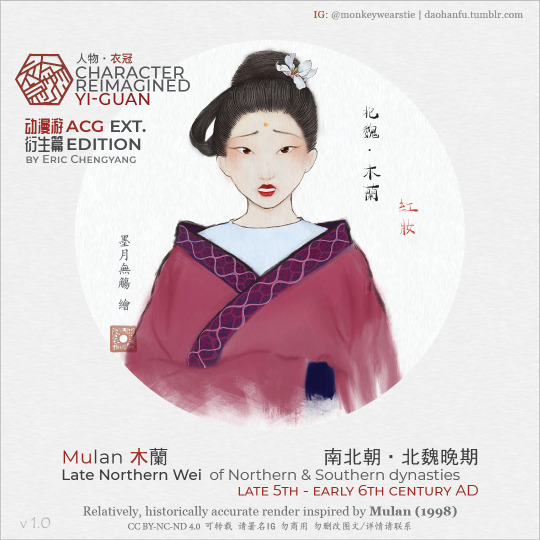
A re-imagined Mulan (花木蘭) in a relatively, historically accurate fashion from the Luoyang-era of the Northern Wei dynasty, inspired by the 1998 Disney film.
First, I’d like to introduce the term, hong-zhuang (紅妝), because many folks had mistaken Mulan’s matchmaking style as a Geisha’s attire since the release of the 1998 film.
Keep reading
469 notes
·
View notes
Photo

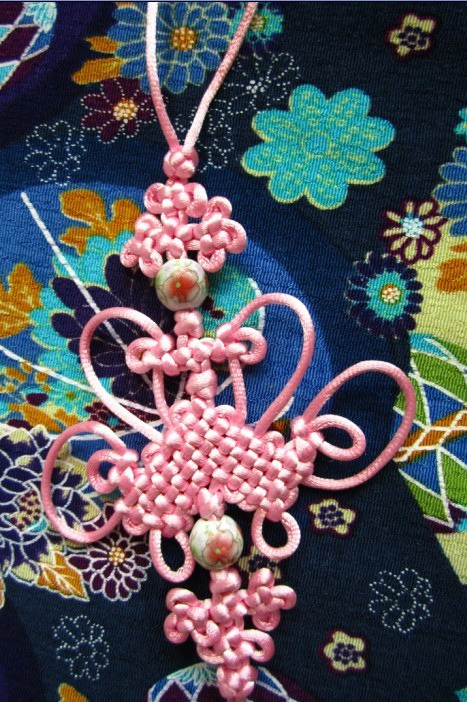


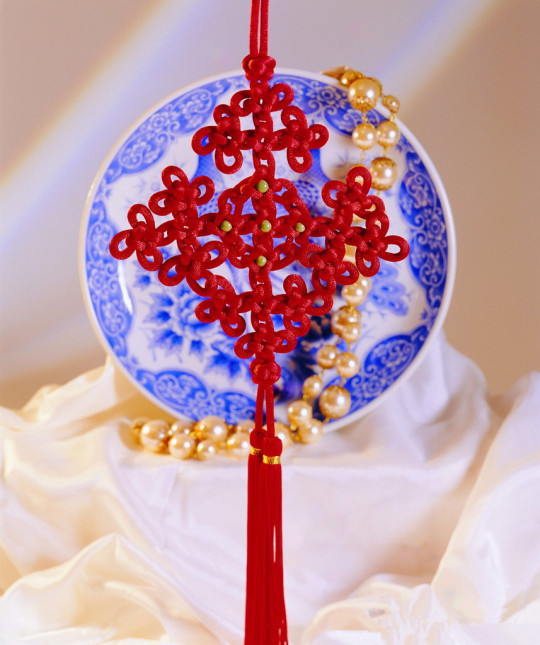


Chinese knotting (TC:中國結; SC:中国结;pinyin: Zhōngguó jié) is a decorative handicraft art that began in the Tang and Song Dynasty (960-1279 AD) in China. It is used as a decoration for rooms, fans, folding screens, musical instruments etc. and an accessory for clothing (mostly go with jewelries like jades).
Chinese knots are usually lanyard type arrangements where two cords enter from the top of the knot and two cords leave from the bottom. The knots are usually double-layered and symmetrical.
Some of the earliest evidence of knotting have been preserved on bronze vessels of the Warring States period (481–221 BCE), Buddhist carvings of the Northern Dynasties period (317–581) and on silk paintings during the Western Han period. Further references to knotting have also been found in literature, poetry and the private letters. In the 18th century, one novel that talked extensively about the art was “Dream of the Red Chamber”. It is mentioned that the knots were used as gifts for relatives and friends, also as a token of love depending on different types of knots.
4K notes
·
View notes
Link

After his real estate startup collapsed in 2014, Tian Haibo was left devastated and unsure what to do next. Then, he made a decision that caught many off guard.
He would create a mobile game to teach the world about the ancient art of Chinese joinery…
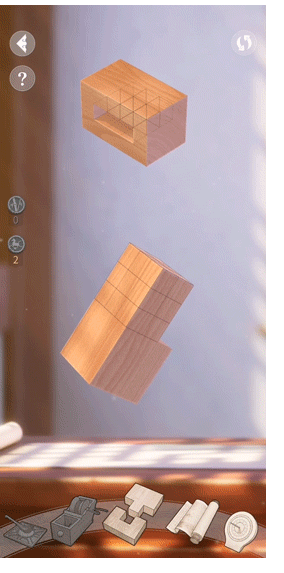
In Mortise & Tenon, players carve complex joints into floating blocks of wood, so the lumber can slot together tightly. Chinese craftspeople have been constructing buildings using this nail-free technique — known as sunmao in Chinese — for an estimated 7,000 years.
Tian tells Sixth Tone he was inspired to make Mortise & Tenon six years ago, after reading a magazine article praising a Japanese-designed building in Switzerland that made use of sunmao.
To Tian, it felt like Japan was getting credit for a Chinese invention. In the ’00s, Tian had lived in Canada and the Middle East for several years, and he’d developed a keen sense for how people abroad often overlooked Chinese culture. In one particularly hurtful incident, he’d been in line at a Korean restaurant in Canada when a local approached him, assuming he was from South Korea or Japan. As soon as the person learned Tian was from China, however, they’d turned their back and walked away without a word.
After discussing the encounter with friends, Tian eventually concluded the person had acted so rudely because they didn’t understand China. While Japan was known for its anime and South Korea was rocking the world with its pop music, his home country had produced few widely admired cultural exports.
For a real-life demonstration of the technique:
How to Make A Sunmao Stool by Grandpa Amu
youtube
230 notes
·
View notes
Video
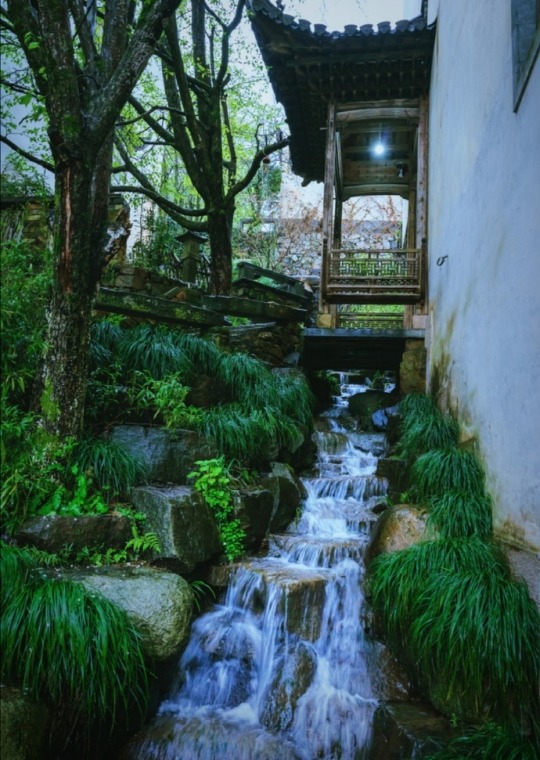
重渡沟 chong-du-gou/chongdu valley, Luoyang, Henan province.
21K notes
·
View notes
Photo


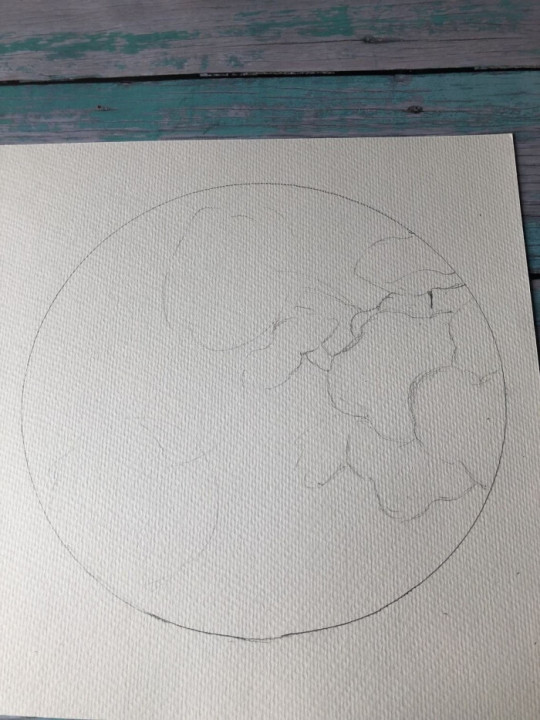


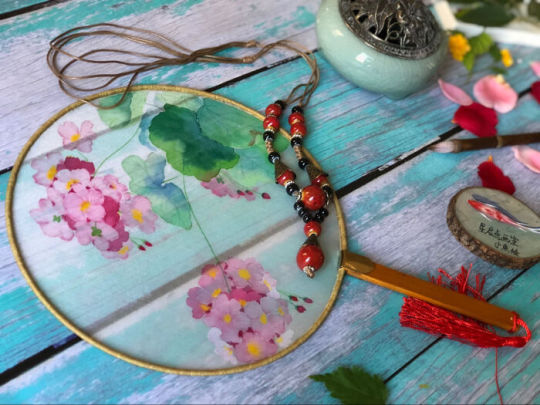

Hello to all my loves, hope you are all keeping safe. Stumbled across this tutorial by 小鱼的绘艺时光 (Little Fish’s Painting Time) showcasing the intricate but straight-forward steps in creating your own Chinese watercolour fan, perfect for those of you interested in arts and crafts during quarantine.
An artistic staple in Chinese culture and often associated with ancient beauties, the iconic 团扇 (tuan shan), commonly known as the ‘court fan’ in English, remains one of the most beloved symbols of Chinese culture today. The surface of the fan is usually made of a very fine silk which gives it a smooth finish. Although the watercolour paint will appear on the paper underneath just fine, it will slightly bleed around the edges of the silk, giving it its hazy oriental finish.
Here are some plain ones I found on eBay.
According to the tutorial, all you need is: sketching paper, a few brushes, a blank silk fan and some watercolour - the artist calls for Wuzhu/Chinese watercolour, so I have linked some from Amazon here.
The first step to creating your own court fan is to gently sketch an outline of the design you’d like. Obviously, you can run free with your imagination and sketch whatever you’d like, but some classical Chinese motifs can include flowers, birds or Song Dynasty paintings. You want to gently etch the pattern on the paper to prevent any harsh pencil tones from smudging onto the silk. In this tutorial, I will be explaining how to recreate the artwork in the photo.
Second step is to begin colouring in these fans with the watercolour. For the flowers, colour them in gently with a light pink shade and outline the petals with a darker red. Then add the buds and stems.
Third step, use two different shades of green to bring the leaves to life. Paint on silk does not spread as smoothly as it does on paper, so wet your brush and ‘drag’ the paint around to give it a gradient look.
Continue adding more pencil sketches to the paper until you are finally content with your design and leave to dry. Once your fan dries, trace the veins of the leaves with a darker green to make them look more realistic.
And there you have it, a straight forward tutorial in how to create your own silk court fan! I will link the original tutorial in Chinese to the artist here.
first two photos by 喵小天meow
511 notes
·
View notes


Note
This may seem like a sort of vague question, but what exactly is that type of thin scarf/cloth you see wrapped around the arms and behind the back called? And what is the history of it?
Hi, thanks for the question - it’s not vague at all!

The thin, long scarf that you see worn with hanfu, wrapped around the arms and behind the back, is called pibo/披帛.
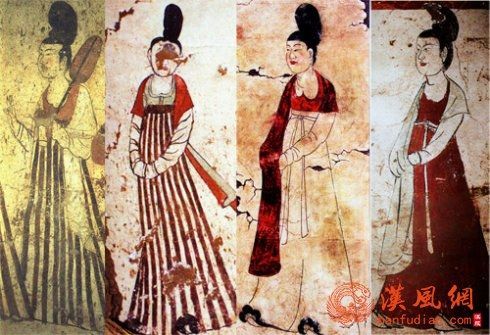
Sources state that pibo first appeared sometime around the Qin dynasty (221– 206 BC). It was originally used to protect against wind and cold air, and gradually became an important fashion accessory. There were two types of pibo: one was wider and shorter, used mostly by married women. The other type could be more than two meters in length, and was used mostly by unmarried women. Below - art of historical outfits with pibo from the Tang (1-3), Sui (4), and Song (5) dynasties:


Pibo really came into vogue during the Sui and Tang dynasties. The open, confident culture of the Tang meant that women were eager to utilize accessories to make their appearance and outfits more glamorous. Initially, it was worn by performers and those residing in the palace. After the rise of the Kaiyuan era, it became popular among the common people. Below - historical art depicting pibo from the Sui, Tang, and Five dynasties periods (581–960):
There were many ways of wearing pibo, and each time period had its own popular styles. For example, during the early Tang dynasty, women put pibo directly on their shoulders. During the middle Tang, one end was fixed to the chest, and the other end was draped around the shoulder:

After the Tang dynasty, the pibo gradually became less popular. It fell out of common use during the time of the Song dynasty. Recently, however, with the hanfu revival movement, pibo has been making a comeback as an essential accessory of hanfu. It comes in all sorts of fabrics, styles, and designs:

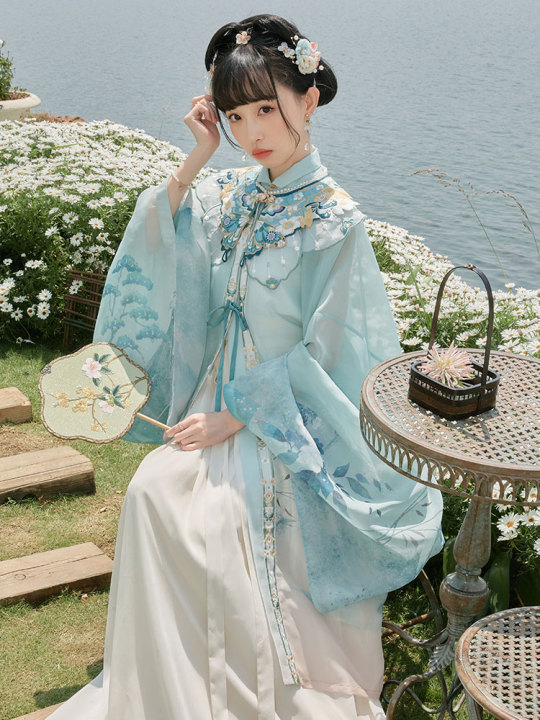
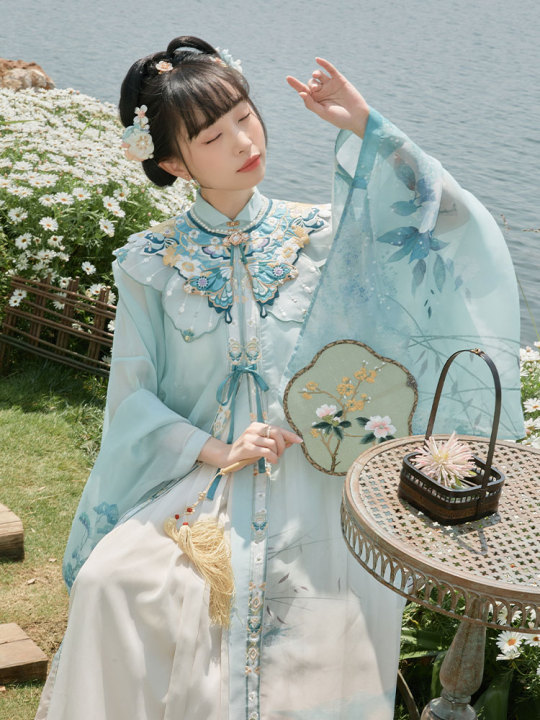
Pibo is generally only worn with ruqun, and wearing it with other hanfu styles such as quju or aoqun is seen as incongruous (see this post for definitions of hanfu terms). Of course, nowadays people can wear it however they want. For more references, please see my Pibo tag.

Hope this helps!
Sources: 1, 2, 3, 4, 5
Edit: Here’s a cute illustration showing some of the different ways in which pibo was worn during the Tang dynasty (Via):

4K notes
·
View notes

Note
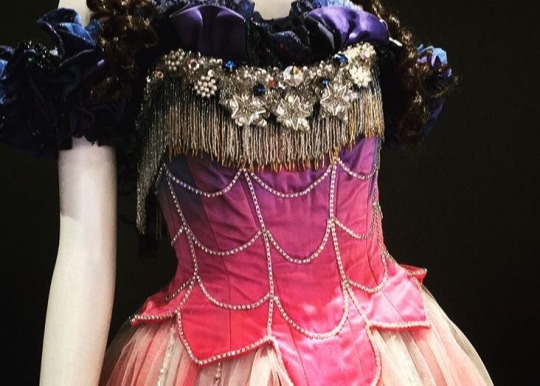
do you happen to have any photos of the inside/construction of the star princess bodice? Ive been trying to figure out where to start.
A Star Princess bodice is usually made of a double layer of lining (usually sturdy, unbleached cotton), with a layer of ombre silk at the exterior. This silk has been beaded or hotstone-decorated. Note that in many versions the amount of panels corresponds with the amount of vertical beading seen on the outside. The beads are literally covering the seams. So if you have a specific beading pattern in mind, this might affect the way you construct the bodice.
Most have the boning stitched on top of the seams. Others have a combination of methods, some sandwiched in between the two layers of cotton, and some on top of the seams. This depends on the preferences of the maker, and of the specific construction of the bodice.
Here’s one of Colby Thomas’ bodices from Hamburg, with very sturdy spiral metal boning in individual cotton pockets stitched on top of the seams:
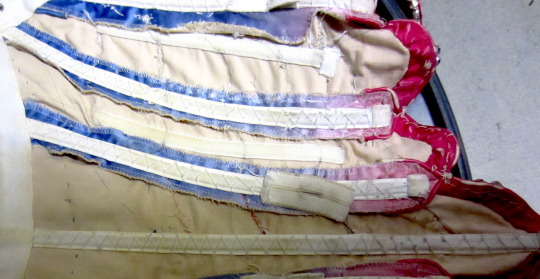
(the elastick piece with hole is where the skirt is buttoned on so it stays put during all the dancing and lifting in Masquerade)
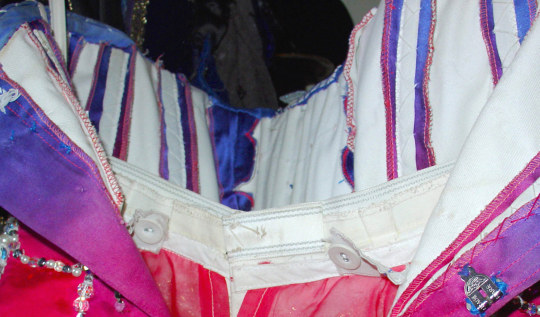
A very similar construction can be seen in this UK version, worn by Tabitha Webb in West End. Boning stitched on top of the seams, skirt buttoned to the bodice:
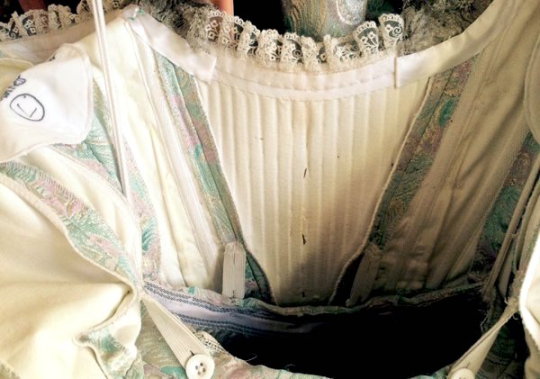
Although this shows the inside of a Rooftop bodice, it shows very clearly boning channels sandwiched between the two layers of lining. here the boning is at the middle of each panel, while there’s none at the seams - opposite of the ones above (and again, skirt attached with buttons and elastics):
Whatever method you go for will work fine, and you can also combine these two. So I think the main job is to find a good pattern to work withor draft one yourself based on where you want the vertical beading to be. Most Star Princess bodices have a lot of small panels because of this, and to construct the specific hourglass shape. An interesting exception is some of the Japanese versions, where the seams does not correspond with the beading/deco at all:
So if you don’t like these two up, you will have a stage alibi...
33 notes
·
View notes
Note
Hi! I'm a cosplayer currently starting the LONG journey to making a Star Princess dress. I just sent the better half of my morning going all the way through your profile and collecting references so thank you for that! I plan on going for the most current broadway version of the dress- do you have a breakdown for the fabrics that are best used for that?
Welcome to the madness of costume making!
The Broadway/US versions of the costume is one of my favourites, so hooray for you making that. The true star of these versions is the insane beading, but also the multiple layers of tulle and netting in the skirt which makes it come off as a period (romantic) tutu. Beautiful combination. I don’t have an exact list of all materials needed, but if I am to guess I would say something in the line of:
BODICE:
Double layer of sturdy, unbleached cotton, like drill or twill, for the lining.
An ombre blue/pink silk for the exterior - a very sturdy and not too shiny satin seems to be a good choice.
Boning of your choice, and a big-ass and sturdy zipper for the back closing.
A combination of horsehair braid, organza and/or tulle for the ruffles, which are gathered and sewn in place. There’s also multiple pearls, silver stars and crystals sewn into the construction. The ruffles can be plain blue, or a combo of blue/purple/pink.
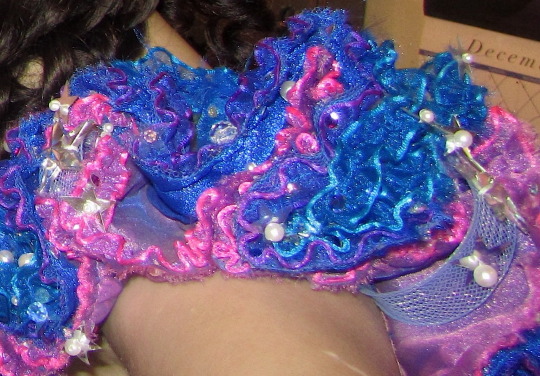
And then a gazillion beads; blue tube beads, “crystals” in all sizes, pink and blue beads, pearls, rocailles. This follows a specific ray or scallop like pattern in bodice front and back:

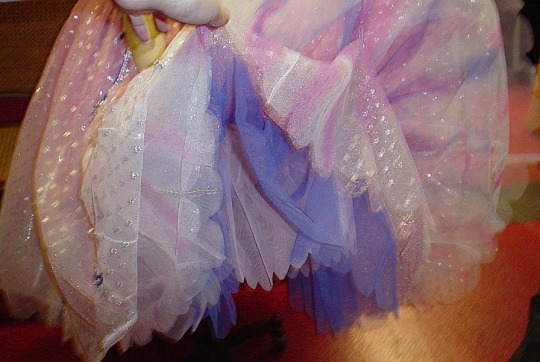
SKIRT:
A band for the waistline, broad and sturdy. Maybe ribbed, or tailored into a curvy construction. Closing in the back. Eventual ties or buttons to attach the skirt to the bodice. Snap buttons to camouflage the skirt opening (which is also often camouflaged by a row of beading/stars).
Layers of netting and tulle in blue, pink and silver shades., which is gathered and attached to the waistband. One layer of dotty silver tulle right under the transparent top layer where there’s vertical beaded rows with beaded stars.

The beaded stars are made of blue and silvery tube beads around a silvery or “crystal” star.
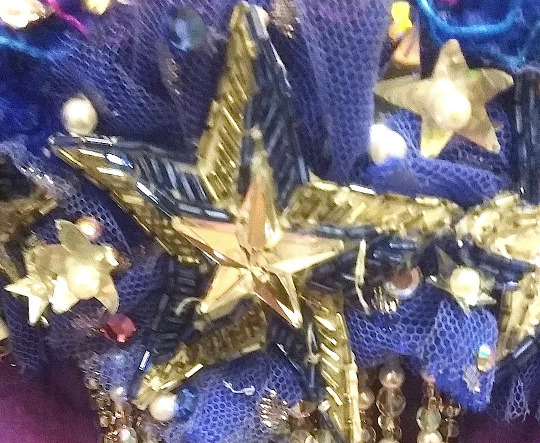
(one or several of these stars are also needed for the decorations at the bodice’s cleavage, as depicted above)
ACCESSORIES:
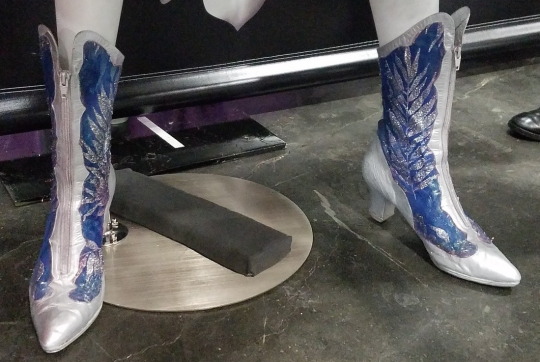
Victorian boots in blue and silver shades. In the US these have been made of printed fabric, hand-painted versions, or plain satin ones. They have a high, curved heel and a curved top:
Hand-held mask on stick - the US ones usually have the turned and painted handle on one side, and the mask itself is made of metal frame dressed in lace and with “crystal” decorations.

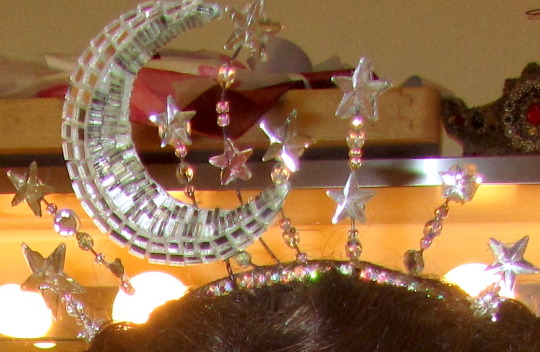
Last, but not least, the tiara. A moon with multiple tiny, square mirrors, various stars and circles crowning rows of beading, “crystal” details and a metal fundament with “crystals”:
That’s the details I can think of. There’s probably more, which you’ll probably discover during the process... best of luck with the making!
54 notes
·
View notes
Note
Hello! I have a question about the ruqun, is the sheer skirt meant to be a separate piece from the understkirt/lining? or are they sewn together. Also, would the sheer top layer of the skirt use more fabric than the underskirt or they both use the same amount of fabric? thank you so much
Hi! Thanks for the question!
The sheer layer is a separate piece. This allows the lining to move independently and more fluidly. If they were sewn together, it would look much bulkier. The lining is also a bit shorter than the outer layer.
You can make the top layer of the skirt fuller than the lining. For simplicity’s sake I patterned the lining the same width as the top layer, but since it’s underneath it won’t really matter. I always make sure the top layer is as full as is needs to be. If the lining happens to have less fabric *shrugs* so be it.
Another recommendation is to attach the lining about half an inch or 1 cm further to the center of the waistband. That way the material is staggered and there’s less of a chance to see the lining on the right side.
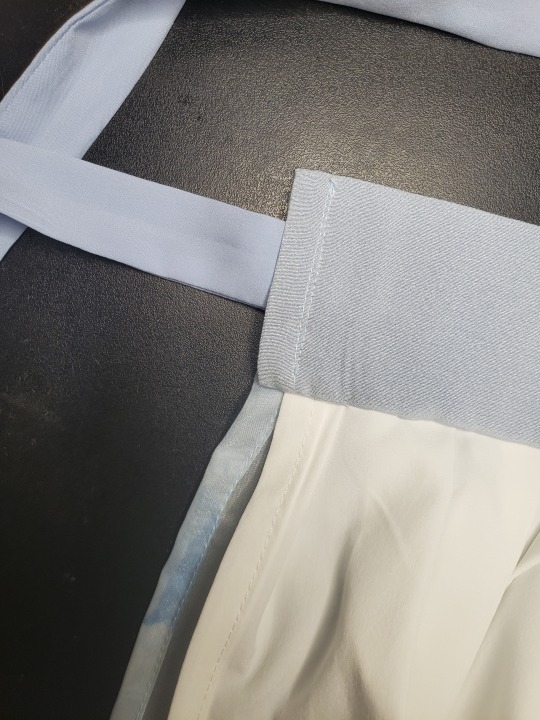
This is the wrong side of the skirt. Notice how the lining is placed further to the inside to hide it from view.
I hope this helps!
-Jinx
65 notes
·
View notes