
Last Seen Blogs

trustpersonal
Untitled
ihopesheseesthisbro
Getting the "Meh" of Most Worlds

leendraws
now @eileenwdj

vigarath
Untitled
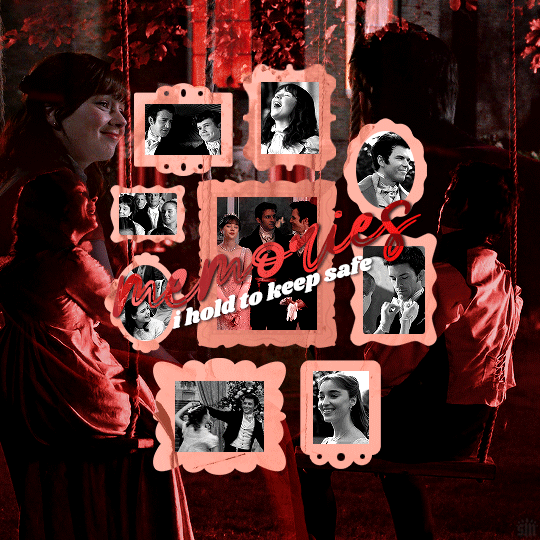
Photo
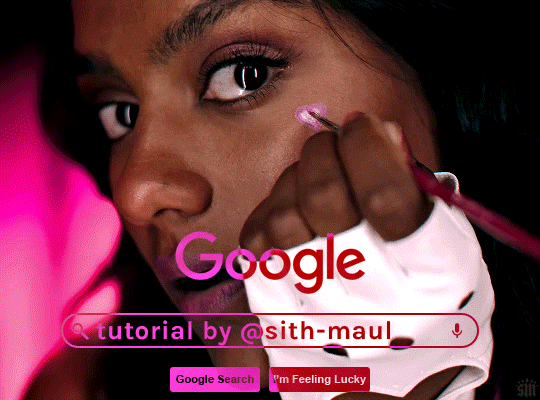
HOW TO: Make an Animated Google Search Overlay
A few people have asked how I did the effect in my pinned post and this set. So, in this tutorial, I’ll show you how to do this typing animation and give you a download to a template I made for the overlay! Disclaimer: This tutorial uses Video Timeline and assumes you have a basic understanding of gif-making in Photoshop.
Seguir leyendo
2K notes
·
View notes
Note
Hii Becca, congrats on your 15k! 📝Could you do a tutorial of how you do your rainbow color sets?
of course! let’s talk about rainbows such as the ones i’ve created here, here and here! this is maybe going to be more of a series of tips to use when attempting a rainbow set as i have my colouring tutorial explaining how i colour my gifs!
i’d also recommend taking a look at my tutorial on how to get several gifs in one as i also use techniques from this.
so let’s get started under the cut!
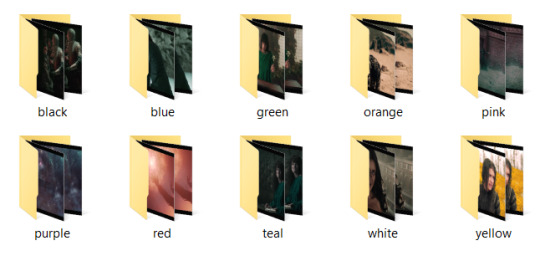
tip 1: finding scenes
one of the most important things when attempting a rainbow set is the scene picking. i usually go through and pick the scenes i like, but then sort them into their base colours. so for example i will put all of the blue scenes into a folder, then all of the green scenes into another folder (you can see a screenshot below of what i usually do).
this will save you a lot of time because it’s easier to enhance colours that are already there, rather than have to colour each scene from scratch. the smallest rainbow i’ve done is 30 gifs which is still quite a lot for one set (the others are both above 60) so you really want to make life easier on yourself by using scenes that already have those colours in them.
tip 2: decide on your layout
people have come up with all kinds of exciting ways to present rainbows recently. you have ones like i listed of my examples above which is fairly simple boxes or rectangles together, or you can do things with different shapes such as this really cool layout. you can experiment with whatever you want but it’s a good idea to start with an idea of what you want to achieve and how many gifs you want within it!
tip 3: start with your black and whites
the way i like to do my rainbow set is as a gradient, so each line gradually changes from one shade to the next. the easiest way for me to do this is by starting with my white lines and my black lines, even though they are at opposing ends of the set.
for my witcher set, because the darker scenes included yennefer with fire, i knew i needed to go from black to either red or orange. i went with red and was able to work, so this gave me the ‘starting point’ for my rainbow (even though on the set it’s the ending point, i know that’s a bit confusing!)

but having this meant i could now figure out my ending point. i knew this needed to be either pink or orange as these are the colours next to red in the spectrum. in making my white gifs, it was easier to add a little touch of light pink in with my colouring, so i created a white to pink transition as such:
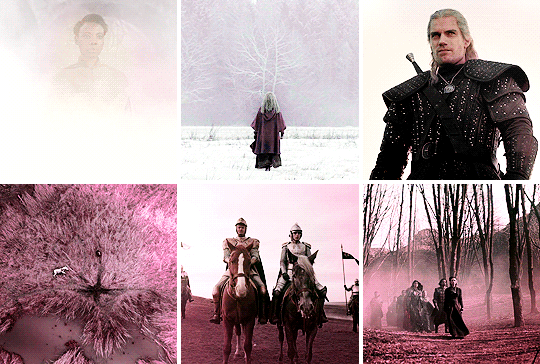
this has now given me the ‘start’ and ‘end’ points for my rainbow, which is really helpful in knowing my sequence of colours and how i’m going to transition throughout the set.
note: you can start anywhere on the colour spectrum like this, i could go from black > blue all the way through to say green > white. i will say in my experience i have found it more effective to transition from black to a warmer colour (such as red or orange) because these colours standout well on a black background which gifs you an effective gradient effect, but this also depends on the shows i’m working with.
tip 4: getting a line of gifs to match in colouring
obviously one of the key things about a rainbow is that each gif in a line is a similar shade. otherwise you won’t get quite the same rainbow effect going on! as i said before please read my colouring tutorial because a lot of what i’m going to talk about now will be presuming you’ve already gone through that.
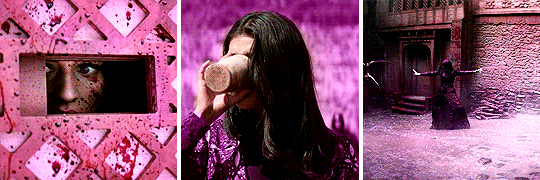
so in order to get my colours to match i firstly colour all of my gifs with their basic colouring separately, and then put them all together as so:

as you can see these all have elements of pink in them but most are not fully pink and also the shades do not yet match. but that’s fine! now i have them all together it’s easier to see as i colour each one how the shades match to each other.
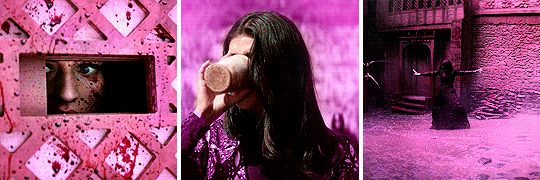
i proceeded to use my usual colouring method of using the paint brush (step 3 in my colouring tutorial). each of these gifs have all been coloured with the exact same shade with the brush, each under all the other colouring layers, with a slightly pink gradient over the top of all colouring layers. for the right hand gif i used some hue/saturation adjustments to change the cyan/green shades to pink but otherwise, they’ve all had the same painting adjustments:
as you can see they’re now a lot more pink, but they still don’t match in shade! the middle and right hand gifs were far too purply for me as i wanted more of a ‘rosy pink’ shade.
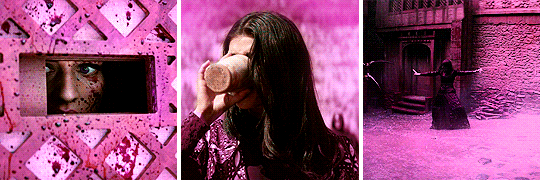
so, i added a few paint brush layers on top (again in exactly the same shade). in the middle gif, i have added a little bit of colour around the top of her head and set this to ‘hard light’ to lighten this area.
on the right hand gif i added a layer covering the entire gif and set this to multiply to bring a bit more colour depth, then added another layer with some colour to the top of the house as it’s shade is a little lighter, and set this layer to ‘hue’ lowering the opacity to 35%:
we can see here that the middle gif has been lightened around the edges, and the right hand gif now has a much stronger colour with the top of the house matching the rest of the gif!
but this still isn’t quite there. the shade of the left hand gif is still a bit lighter and more ‘rosy pink’. so, i cracked out the selective colours! selective colours are a dream when it comes to rainbow sets. all i did here was play around with the magentas using selective colours of each gif to get them to match.
left hand gif: i darkened the magentas a little and added more cyan tones
middle gif: i lightened the magentas, adding more magenta and yellow tones
right hand gif: i lightened the magentas, adding more magenta and yellow tones. i also added a layer of white with my brush right at the bottom and set this to ‘softlight’ lowering the opacity to 31% to just lighten the ground:
ta-da! now it seems like a cohesive colouring! the key here really is to just play around with your selective colours, look at the gifs together and see how each one matches to the next.
tip 5: transitioning between shades
as said before i really like making my rainbows more of a gradient where we transition through different shades. so i’m gonna walk you through how i work adjusting from one shade to the other and making it look ‘cohesive’.
so i usually work from line to line. i firstly try to get all of the gifs to match each other in colouring, and then i worry about how that looks in relation to the row above/below it. it’s always good to open your lines together on ps (even if they are in separate gifs) just so you can see how they work next to each other. so i have my first line here all coloured:
i’m currently transitioning from green to yellow so i want the next line to be more of a yellowy tone, but also not too yellow or the transition will be too sudden. so, what i do is create the next line of gifs and colour these also in green, using the same shade of paint brush as i did for the above line:

as we can see the greens match pretty nicely! the only issue of course is that i want the second line to be more yellow. but this is where we go back to our trusty selective colours. so starting with that bottom right gif, i added a selective colour layer reducing the cyans and increasing the yellows, then also a yellow selective colour layer increasing the yellows and magentas, and decreasing the cyans. i also threw in a hue & saturation layer to lighten the yellows so we get this:
now this is definitely stepping the colouring towards yellow, without making it a strong yellow yet (as that’s what my next line will be!). this is therefore a great transition shade between the light green and yellow, and will add a nice cohesive look to the set. with the right hand gif in a shade i like, i then worked on the other two gifs to get them to match the row (as spoken about in tip 4!).
this was again achieved by using selective colours adjustments to decrease cyans and increase yellows under the ‘green’ and ‘yellow’ tones. although for the left hand gif i also added a layer set to ‘color’ on top of all colouring layers at a dark green/yellow shade just to get a stronger colour for the background!

and there we go! we now have a green to yellow transition fade. to create the entire effect i continue like this. for the next line of gifs i would colour them in yellow, and then make any selective colour adjustments needed to create a ‘smooth’ transition, and then move to orange and on to red. i’ve said it before but i’ll say it again: play with selective colours! they are your best friend for making rainbow sets and really do make a world of difference.
the end
and that’s it! i hope the techniques i’ve gone over will help you get your head around rainbows and how best to tackle them. doing a rainbow set can seem daunting because there are a lot of gifs involved, and i will admit they are time consuming, but it is most about repeating techniques over and over again as you move through the rainbow.
i started on a ‘smaller scale’ of just giffing one of my characters in every episode and trying to make each gif flow as more of a gradient between a few colours, and that was a really great exercise for me on how to manipulate shades and get a set to flow in a cohesive gradient before i built up to a whole rainbow. so if you wanted to experiment with something like that first it might be a good starting point.
anyway, i really hope this helps and as always, if you have any further questions please feel free to ask :)
275 notes
·
View notes
Note
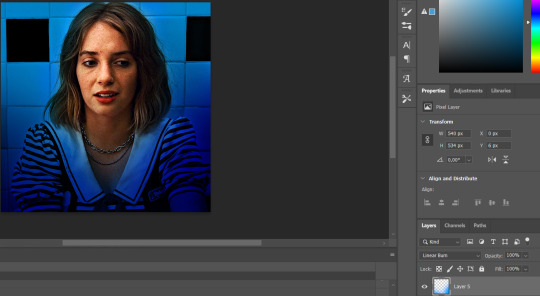
Anon here, hi! Sorry to be that person because I’m sure you get these a lot but I was wondering if you could do a tutorial on how you do your colorful gradients. My gifs only turn out right when I use the colors black and white or the color black with another color and I never really master using any other colors other than those. There was gifset in particular that I was looking at by you that I will link below. Sorry to be a bother! Hope you are doing well.
https://jakeyp.tumblr.com/post/691581779571802112/2k-follower-celebration-max-mayfield
hi nonnie!! dont worry at all you're not bothering!! i’ll explain how to do it below!!
let’s say you have your gif ready, brightened and with contrast etc
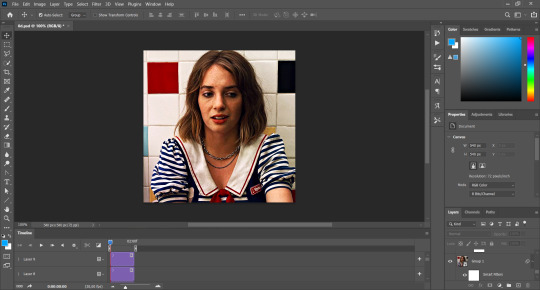
i picked this scene because the background is white, which makes it easy because it’s basically a canvas :) but it works on a dark background too!*
the first step now is to color the background and set the layer to multiply!
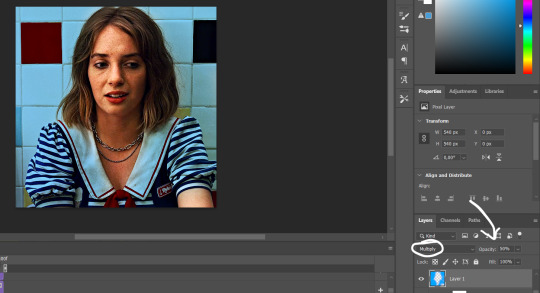
i set it to 20% to 50% since i do it a little messily and this makes it less noticeable. as you can see, i colored a bit of her clothes too, because they have a lot of white and i don’t want that part to be bright
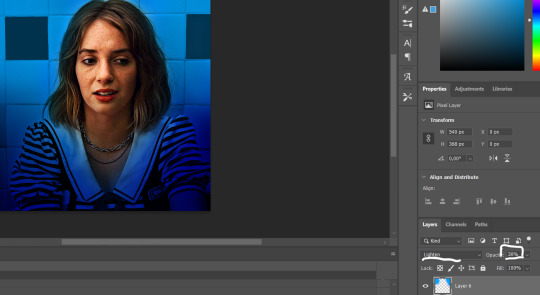
i did a second layer and set it to multiply too, this time in 100%

for this the gif has to be moving very little!! in the max gif set, she moves her head a bit, but that’s okay because i used the same color for the bg as her hair, which is hard when you are using blue. you can always do coloring frame by frame or use keyframes, but i like it this way!
next, you’ll color the background again, and set the layer to color:

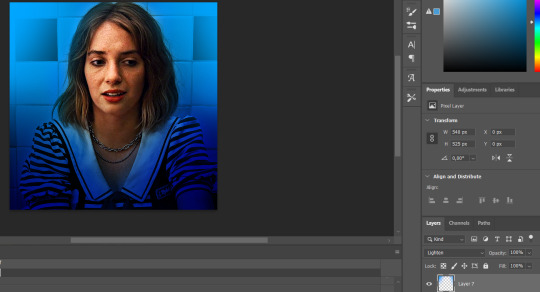
now the background is entirely blue! now, for the gradient effect, i use a darker shade of the color i’m using, in this case, a darker blue. i use a 500 size brush and only color the bottom. this layer is set to multiply:

but to make the gradient even more noticeable, i add another layer (with the original bright blue), and this time i set it to linear burn:
i colored her arm because this time it would be too hard to avoid, but usually i color over clothes and no skin :)
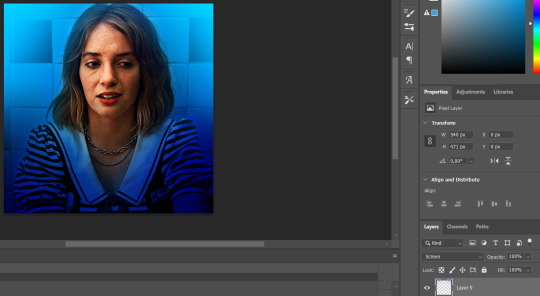
now for the brighter colors, i use a smaller size brush, 150 - 300 to lighten the corners, setting the layer to lighten of course, but only to 20% or 30%
*if you were using a dark background, you will want to use a bigger brush, around 500 or 600, because this is to cover the shadows, and in a dark bg everything would be shadow so this is useful to make it brighter!
see how the dark tiles behind her look now:
the difference is slight but i find it helpful so the shadows are easier to remove! now the next layer, which i set to lighten and 100%, looks like this on top of that:
when it comes to the blending mode lighten, i don’t like to touch the shadows of her hair for example, because it usually decreases the quality or makes it look grainy in those parts, but that’s just personal experience 🤷♀️
then you add a layer of hard light and NOW you can touch the shadows, it’ll make them look blue-ish in this case:

and lastly, the same layer, but set to screen:
and that’s kind of the cherry on top when you’re going for a gradient effect! to me it’s all about making the bottom dark and the top light or vice versa, either way, it looks really nice! i really hope this is helpful because i struggle a bit to explain things like this, but i broke down every layer so it was understandable and easy to follow. if you had any questions i’ll be happy to answer them!!
39 notes
·
View notes
Note
hii if i may ask you, what fonts did you use in this gifset, they're SO beautiful! (and so is the set!!) /post/689414180483301376/liking-male-characters-like
hi!! of course you may, thank you so much! ❤️❤️❤️
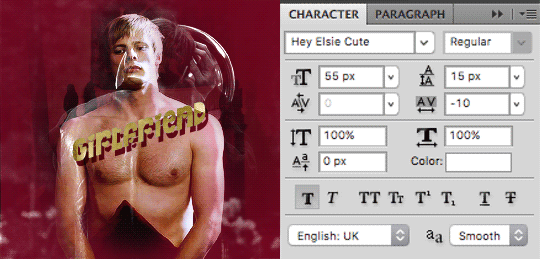
Hey Elsie Cute
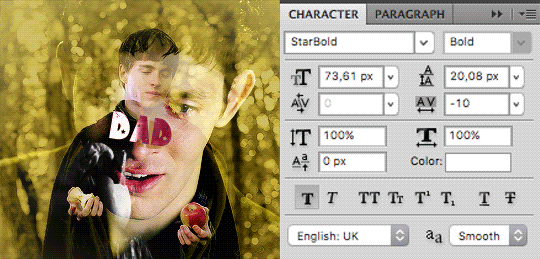
StarBold
5 notes
·
View notes
Photo
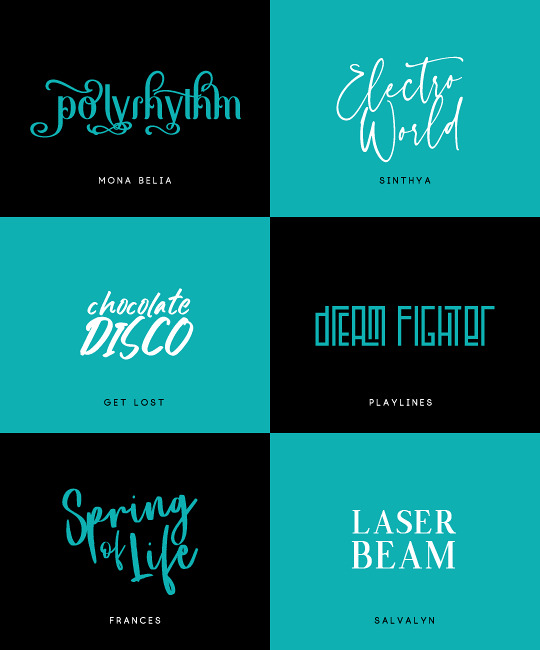
font pack #5
[monabelia] [sinthya]
[get lost] [playlines]
[frances] [salvalyn]
1K notes
·
View notes
Photo

Ici la maniaque collectionneuse de typos avec un dossier tellement énorme que je ne peux pas tout installer sous peine de tuer mon mac. Au final, j’utilise souvent les mêmes typos en ce moment et j’me dis ça peut être sympa de laisser ma petite sélection perso ici.
baskerville (police système) – rye
monk – avenir next (police système)
ultra – yeseva one
thedus – hanson bold
beckett – courier new (police système)
1K notes
·
View notes
Photo

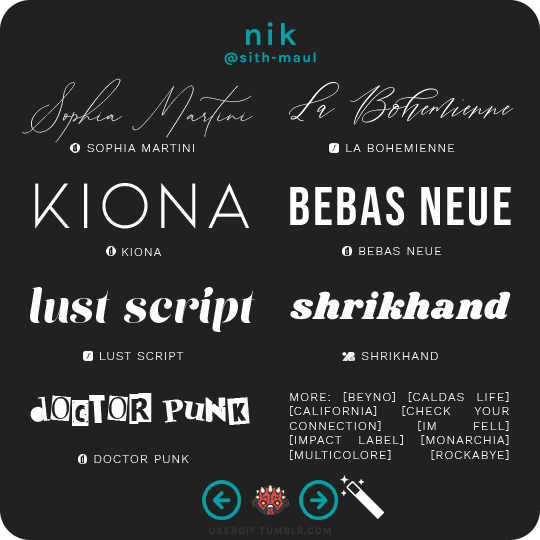
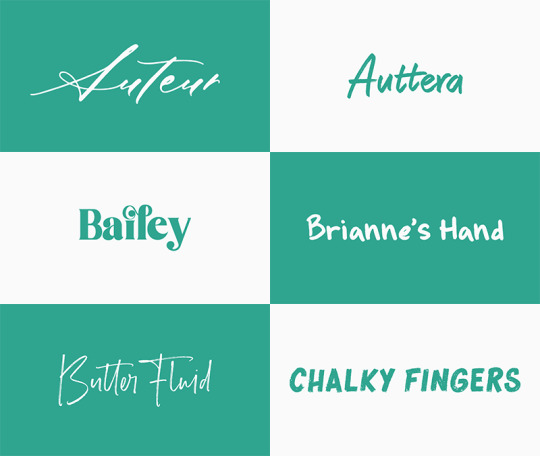
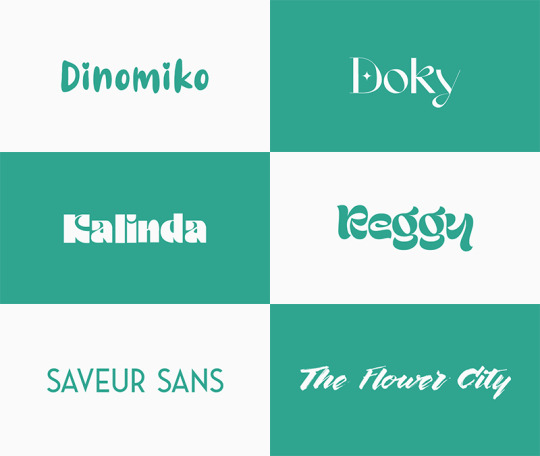
anonymous asked 💬 what are your personal font recs?
USERGIF FONT RECS 🪄 PER MEMBER
Here are some of our members’ favorite fonts! Fonts without a source icon are default fonts on Photoshop. Fonts with the source listed as “other” may require a deeper Google search or are only available to purchase, but most fonts are free! TIP: On mobile, slide your finger over the gif to slowly scrub through frames.
MORE RESOURCES FROM USERGIF MEMBERS:
— fade-animated text tutorial by nik [@sith-maul]
— font compilation by kate [@selinakyle]
— font compilation by sole [@fionagallaqher]
— font packs + downloads by jennifer [@antoniosvivaldi]
— glitching text tutorial by nik [@sith-maul]
— moving text tutorial by drea [@sashafierce]
— quick text styles tutorial by kate [@selinakyle]
— warp text tutorial by drea [@sashafierce]
— (all fonts listed below the cut)
Keep reading
3K notes
·
View notes
Note
hey sole! in the fiona set you did how did you make the second gif with all those small gifs?
Hi! Yeah, sure. I'll explain it under the cut! As usual you'll need basic knowledge of Photoshop and on how to make gifs :)
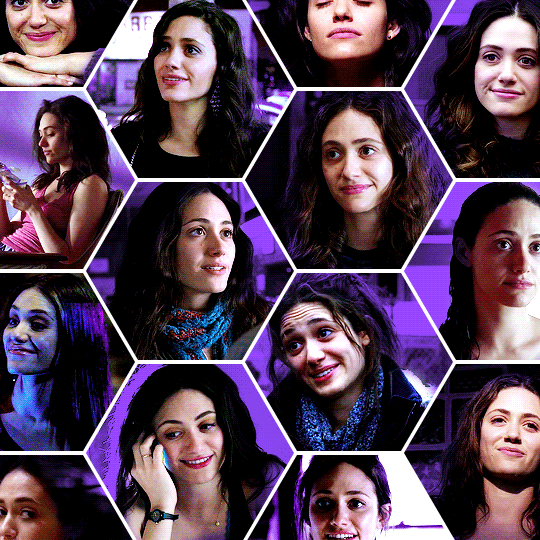
(from this gifset.)
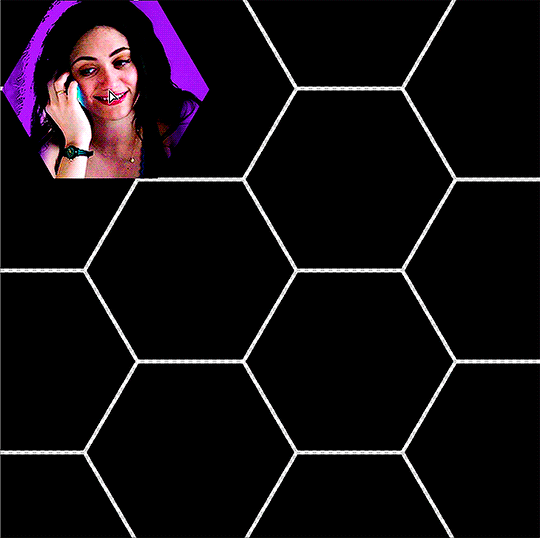
1. CREATE A TEMPLATE / SCREENCAP
I created a canvas of 540x540px and I used the Polygon tool (U). Each polygon has 6 sides and a size of 210x180px. I uploaded my template here in case you wanna use it (but any shape and layout will work, ofc.)
Next you'll have to screencap your scenes. In this case I needed 14 scenes and they need to have the same amount of frames. All my scenes had 37 frames.
2. GIFFING PROCESS
Now it's time to gif. I gif using Frame by Frime Animation instead of Video Timeline (it can be done on Video Timeline but the process will be different.)
As I said, each polygon of my template is 210x180px, so that's the size I'll want for my gifs. Now I've cropped, resized and sharpened one of my gifs and it looks like this:

It's time to give it the shape of an hexagon. We're going to click on the Polygon tool (U) again. Make sure your filling is some random colour (I used black but I think any will do) and you don't have any stroke colour (or the size won't be the same as the template.) Here's how the settings should look like:

Click once on your gif (without dragging your mouse!!!) and this window should pop-up:
Make sure your settings are the same as mine and click 'Ok'. Now you have your polygon:
Now you need to drag your polygon layer under your gif frames. Select all your frames (except the hexagon), double click and select 'Create clipping mask':

And ta-da! You have your hexagon-shaped gif:
3. COLOURING PROCESS
Now it's time to colour your gif. First of all select all your layers (gif frames + hexagon) and create a New Group with them. Now you'll want to colour your gif however you want. Add as many layers as you need and when you’re done, select your Adjustments layers, double click and select 'Create clipping mask' again. Your layers should look like this:

After doing that I like to select my Adjustment Layers and Group 1 and create another group with al of them. That makes working with various gifs easier once you move it to your template. I usually name them ‘Gif 1’, ‘Gif 2’ and so on.
4. MOVING YOUR GIF TO THE TEMPLATE
Now you’re going to click on this thingy on the Timeline:

Click on ‘Select all frames’ and then click on it again and select ‘Copy frames’.
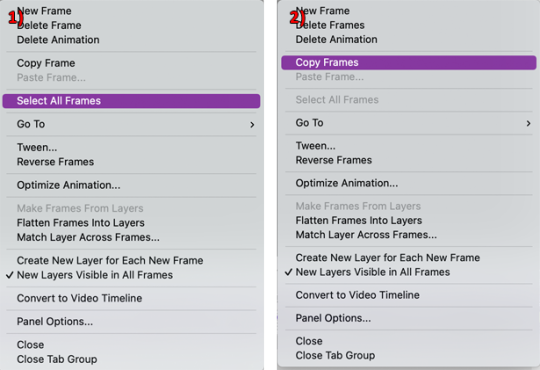
Now we’re going to open our template on Photoshop and we’ll Create a Frame Animation. We’re going to click that Timeline thingy again and this time we’ll click on ‘Paste Frames...’ and then ‘Paste Over Selection’. All you have to do now is drag your gif until it’s where you want it to be (you’ll probably need to use the Zoom tool to make it look perfect), like this:
5. AND REPEAT!
Gif as many scenes as needed and repeat all the steps to include them in your template. When you’re adding the gifs to the template make sure that before you’ve clicked on ‘Paste Frames’, you’ve clicked on ‘Select all frames’. Then, after you select ‘Paste Frames’ you’ll need to choose ‘Paste Over Selection’.
If you want to know how I made the fade transition between the happy and sad scenes check out this tutorial.
If you don’t understand something feel free to ask me again :)
356 notes
·
View notes
Photo


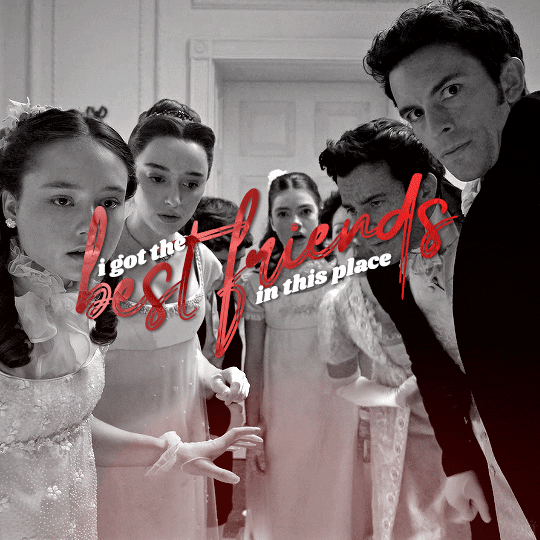
I love to love you, for God’s sake
I got the best friends in this place
And I’m holding on
609 notes
·
View notes
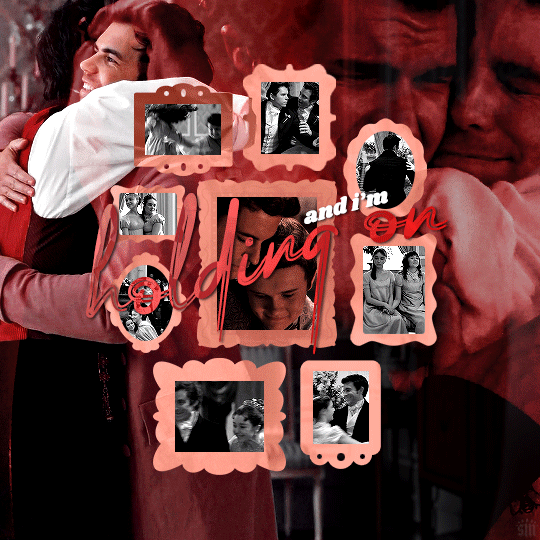
Text
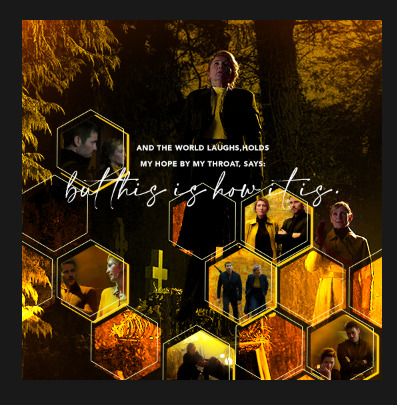
Tutorial for @chris-hargreeves ❤
This is my first tutorial ever, so please please bear with me. Here's how to create this effect:

We'll start by doing the following: the base gif, crop and color it and then little gifs that go in the polygon. I cropped them at 540px even though I knew I was going to use them smaller, because I just wanted to make it able for photoshop to run, but still have a big enough image that I could fiddle with when framing.
Here's how it looks so far:
My layers panel is a mess, so we'll ignore that part for now. We have the base colored gif and stacked on top of it should be the smart objects of the other tiny gifs.
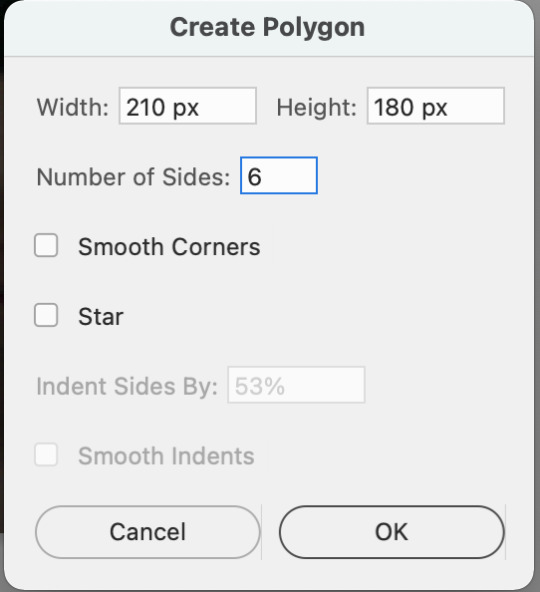
NOW we'll click on the polygon tool and draw your shape.
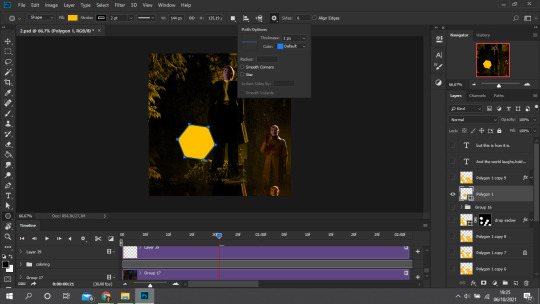
Things to note:
- if you don't have the polygon tool, just right click on the rectangle tool over rotate, in the left toolbar.
- When you click on it, the settings may be to 99 sides and then in configurations "star" may be checked. Change that to 6 sides and uncheck "star".
- Remember to pick a fill! Preferably the color of your gif.
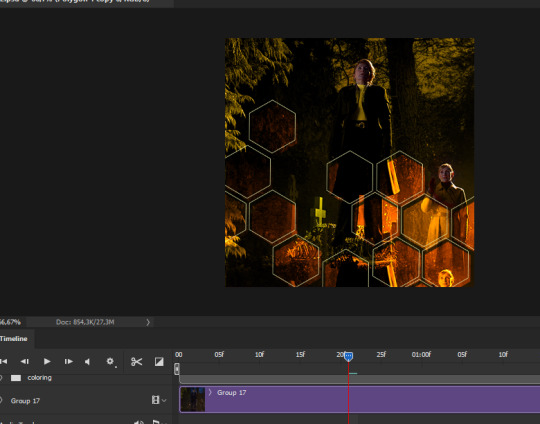
We're going to repeat this process as many times as you want, mine looked like this when I was done:

But I'm not giffing a show fortunate enough to have scenes for all the honeycombs. Besides, it would look cluttered. So I selected some of the combs (which polygon will generate 1 layer) and put them in a folder, the others in another folder.
With the ones that AREN'T going to become little gifs, you can rasterize and duplicate. Play with the settings.
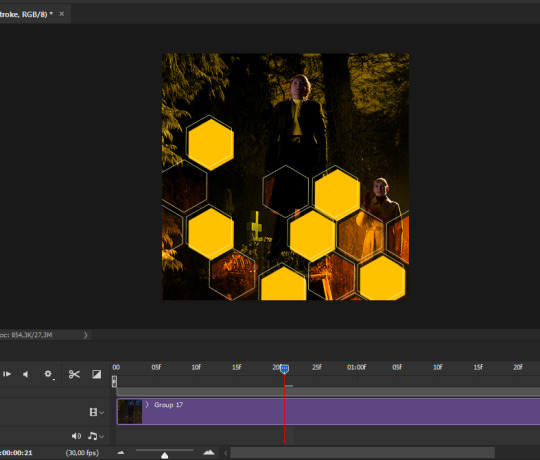
I have a layer set on difference, where I changed all the combs to be grey. Another one with the orange set to color. Another one with the orange set to overlay. ANOTHER ONE with a 0% fill but a stroke in light yellow and 1pt.
Here's how it's looking. The one with a stroke I moved a little to the left and a little up, so you can see it.
Now the combs that ARE going to be gifs. Set them on normal, 100% fill.
(Duplicate this rasterized layer, turn off visibility, save for later. )
We have shapes! You know what we're going to do now. Turn on the visibility of the little gifs, put on top of this layer, right click and select "Create clipping mask."
Now they're all bound to this shape.
Time to resize, organize, erase parts of your gifs, add more color, etc, etc, etc

One more step:
Remember that duplicated layer of the tiny gifs honey comb? Turn it back on, put it under everything, turn fill down to 0% and then double click. Drop shadow, yellow:

You'll see I also added some glow spots. That's easy to achieve, use a soft brush on a transparent layer on top of everything and brush with a light color, layer set to either "overlay" or "hard light."
Now we add text and it's done!
I know this tutorial was quite choppy, i'm sorry, it's just that my layers are SO MESSY currently bc I don't have the patience to do all the steps pretty like I've explained. Any questions, hit me up!
360 notes
·
View notes
Text

1989 INSPIRED FONT PACK. These fonts are NOT mine. Don’t forget to reblog/like!
Canvas // Reliable // DK Cinnabar Brush // First Take // Shorthalt // Flicker // Vignettic // Pruistin
161 notes
·
View notes
Photo
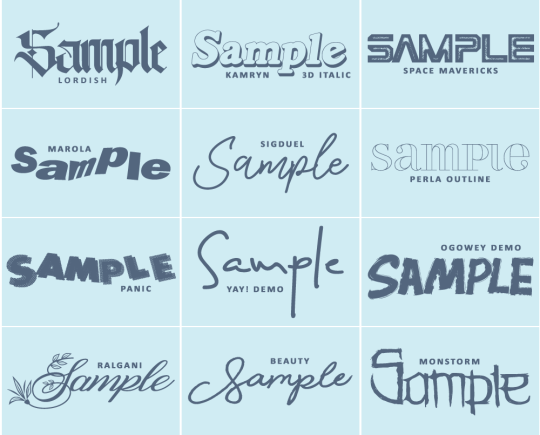
#2 FONT PACK by jessource.
below you will find links for the above twelve fonts. all credit goes to the original and rightful owners of each font curated. however please still like / reblog if using!
Lordish.
Kamryn 3D Italic.
Space Mavericks.
Marola.
Sigduel.
Perla Outline.
Panic.
Yay! Demo.
Ogowey Demo.
Ralgani.
Beauty.
Monstorm.
416 notes
·
View notes
Photo

Font Pack 15 by liohnelmessi
This is my 15th font pack, which contains twelve assorted high quality fonts that I have been using in my edits across my blogs. I hope you enjoy! {More fonts}
This pack contains 12 high quality fonts
Like / Reblog if you’re downloading
Download Links: {Dropbox} / {Mediafire}
900 notes
·
View notes


Photo
The Inspiration Challenge ▸ Create content for a creator who inspires you!
I was invited to participate by @leenow & tagged by @juiceofmoons to create a piece of content for an editor who inspires me.
I created this piece for @chanstopher! First of all, hi!!!! big fan of everything you do ♥ I’m in constant awe of your talent! You create so many beautiful edits and I wish to even have an ounce of your talent, your art is also amazing and every time you post a piece I’ll stare at it for so long bc it’s so realistic that it doesn’t even look like a drawing. All of your content inspires me to keep creating my silly edits, so I thank you for that and I hope you like this ♥
No pressure to do this challenge, I just wanted to show you my appreciation ♥
If anyone wants to participate, check the link at the top of the caption!
356 notes
·
View notes
Photo
@lightasthesun requested a tutorial for how to create the colored outline effect on black and white gifs, so i am here! this was heavily inspired by @usergif’s wonderful tutorial for the same effect on photoshop, which you can find here. i am constantly in awe of the whole team over at usergif. they’re crazy talented.
onward!
Keep reading
89 notes
·
View notes
Note
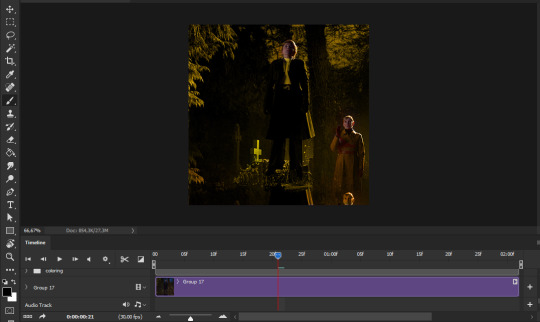
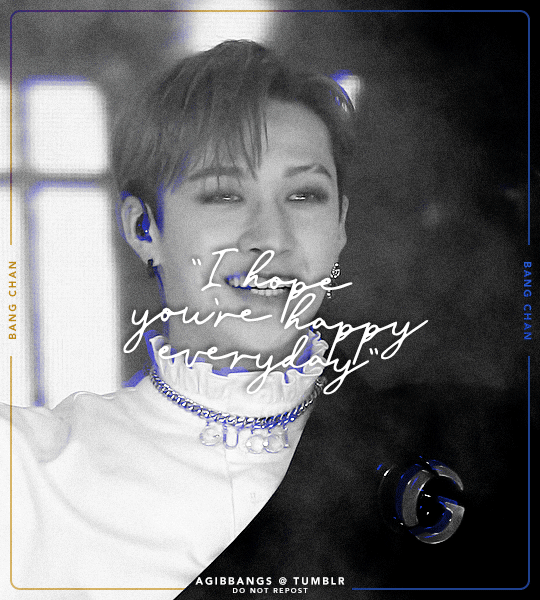
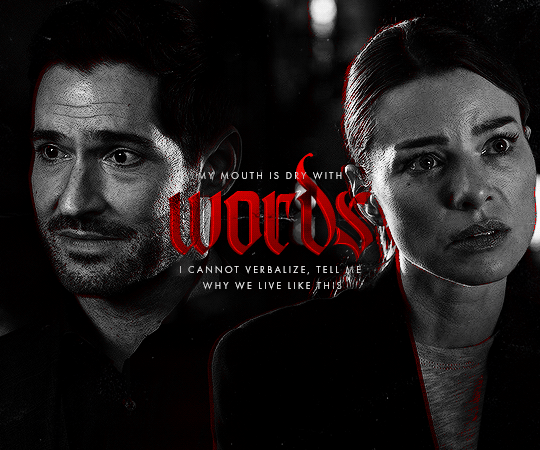
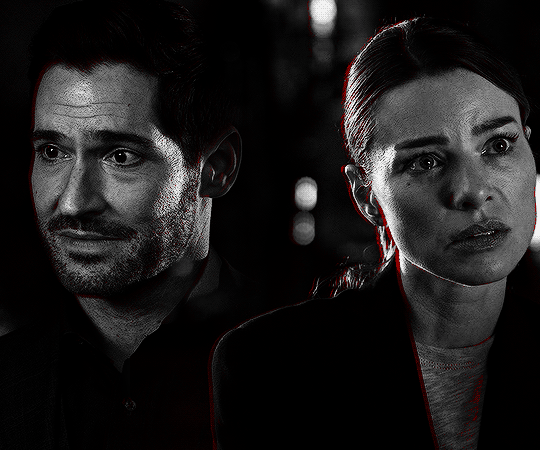
hi :) would you be willing to explain how you got the red colour accent on the b&w gifs on your pinned lucifer/deckerstar set?
hey anon, no problem! 💖 i think some people do this via channel mixer but I use Gradient Maps to do it in this post because I find it easier in video timeline, I’ll explain it below the cut:
First you’ll need to make your black and white version of the gif. This one is two gifs/layers (1 of Lucifer, 1 of Chloe) blended together.

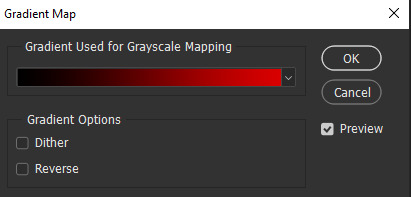
Then you duplicate both gifs/layers, and add an adjustment layer Gradient Map directly onto the layer via the top menu (Image > Adjustments > Gradient Map) and set the colour to Black & Red.
Then change the blending mode of your new black and red gifs to Lighter Colour, and then move your new layers slightly to the left and up from where they were originally which will start to show you the red edges. It should now look like this.
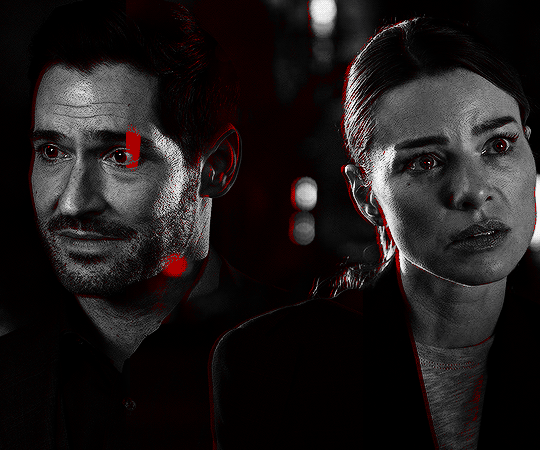
Now I just add a Layer Mask to each of the Black & Red gifs, and use this to erase any little bits I want to get rid of. (e.g. the light reflection from Chloe’s gif is over Lucifer’s face, and I think the red in their irises is a little too intense so i mask this out) and you get the final version. Same process applies to all the BW gifs in this set!
338 notes
·
View notes