#ホリデーハウス
Photo
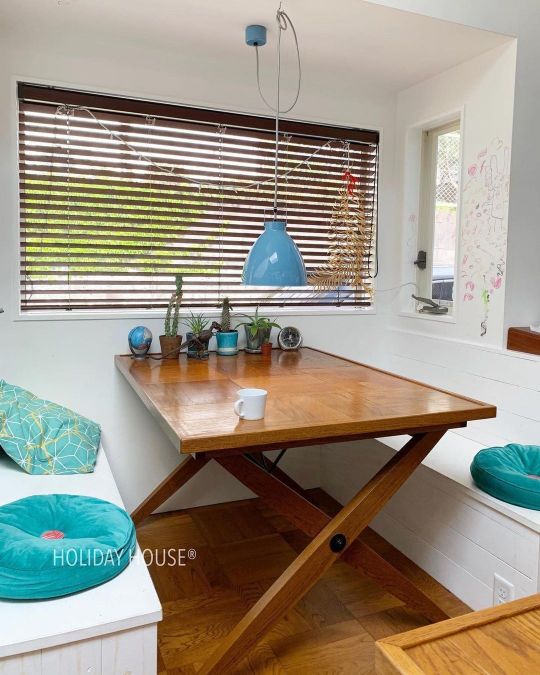
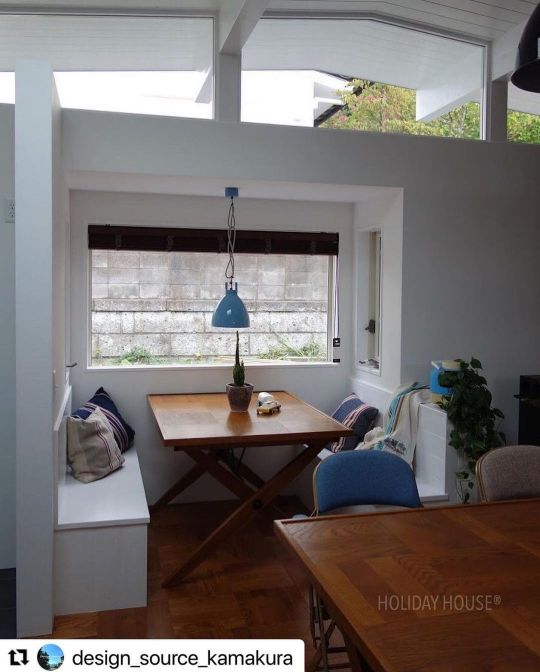
《nook》 #Repost @design_source_kamakura ・・・ HOLIDAY HOUSE®︎ 元々のコンセプトはくつろぎに満ちた大人の家 でも、鎌倉Y様邸は 子供が達が広い通路を走り抜けエネルギーに満ちたエネルギーに満ちた家となっています☻ Breakfast Nookの壁に描かれた絵もハンモックもぶら下げられた植物も、みんな家に似合ってる☻ アメリカのアイクラーホームをモチーフとし、その家の外観にピッタリのフローリング、キッチン、家具が標準装備☻ : #くつろぎに満ちた大人の家 #住みたい家に住もう #平屋 #規格住宅 #企画住宅 #holidayhouse #designsource : @design_source_kamakura @design_source_land __________ #デザインソース #ホリデーハウス #規格住宅でもお洒落な家 #かっこいい家 #pacificfurnitureservice #家具付き住宅 #家づくり #マイホーム #平屋の家 #平屋暮らし #フラットハウス #ヌック #アイクラー #アイクラーホーム #ミッドセンチュリー #カリフォルニア #カリフォルニアスタイル #アメリカンハウス #玄関 #breakfastnook #ハンモック #子供のいる暮らし https://www.instagram.com/p/CdQVBQLLrKW/?igshid=NGJjMDIxMWI=
#repost#くつろぎに満ちた大人の家#住みたい家に住もう#平屋#規格住宅#企画住宅#holidayhouse#designsource#デザインソース#ホリデーハウス#規格住宅でもお洒落な家#かっこいい家#pacificfurnitureservice#家具付き住宅#家づくり#マイホーム#平屋の家#平屋暮らし#フラットハウス#ヌック#アイクラー#アイクラーホーム#ミッドセンチュリー#カリフォルニア#カリフォルニアスタイル#アメリカンハウス#玄関#breakfastnook#ハンモック#子供のいる暮らし
0 notes
Text

18/10/22
造園屋さん 3ヶ月経ちました!
メンテナンスをメインにしたガーデナーの1人として働いてます。ホリデーハウス(別荘)が多いこのエリア、庭はもちろん建築も見応えある。植物も動物も初めて見る自然物がたくさん。ワーホリワーカーだとしても、自分と自然との繋がりを感じる職業で働けている事がなによりも嬉しい。ガーデナー目線でオーストラリアを感じれてるなんて…想像にもしてなかったわ。ここで働けていて、暮らせていることに、感謝です。
最近思うの、ガーデナーとして間接的に街づくりに関わっているような感覚。この辺り良い感じのカフェもレストランもあるし、公園も整備されてるし、アクティビティや自然保護のための案内もある、街の植栽も整ってる。色々ある中で、自分と街と仕事が噛み合ってて、 'この感覚' が自分に還元されてると分かった。
私たち以外にもローカルのガーデナーが沢山いて、お互いの仕事をリスペクトし合ってるなと思う場面が沢山ある。なんて素敵な関係なの…このエリアいいよねって言われる場所には理由があるね。
さてさて、ORLで働けているのも奇跡だな…と思っちゃうくらい運と縁を感じてます。初めの頃、身の回りで起こる奇跡かっ?て事に気持ちが追いついていかなくて、オーストラリアにもう1人の自分がいる気分だった、主に英語だし、別の私のような。最近はそんな事思わなくなった、地に足がついたようだ!
3 months have passed! just today! In this area with many holiday houses, the gardens and architecture are so lovely seeing. A lot of natural things to see for the first time, including plants and animals….amazing! I'm happy to be able to feel the connection with nature as a working holiday worker. I never imagined that I could feel Australia from a gardener's point of view. I am grateful to be working and living here.Recently, I feel like I'm indirectly involved in urban development as a gardener. Of course, there are many occupations, and working. Among many things, I realized that I, this city, and my work were meshing, and that this feeling was being returned to me.
3 notes
·
View notes
Photo


ゼミにホリデーハウスを管理しているんですが、客様入居作業をするとき、きざみうなぎをいただきました。 授業は大変だけど、時々よいこともあるんでー
45 notes
·
View notes
Photo
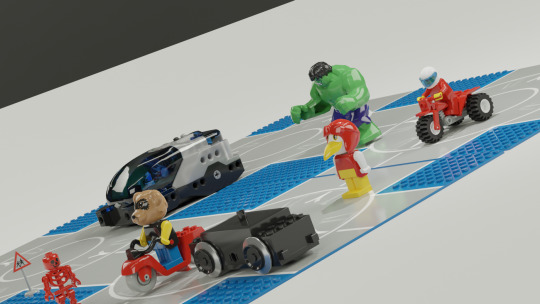
簡単におもちゃの写真のようなCG画像の作り方 「Ubuntu / Linux」・Photo realistic rendering with LeoCAD & Blender https://ift.tt/2wcprZl
簡単におもちゃの写真のようなCG画像の作り方 「Ubuntu / Linux」・Photo realistic rendering with LeoCAD & Blender
写真かCG?
はじめに
こんにちは streampack チームのメディです。
https://cloudpack.jp/service/option/streampack.html
Copyrights
Sintel
© copyright Blender Foundation | www.sintel.org
Big Buck Bunny
© copyright 2008, Blender Foundation | www.bigbuckbunny.org
LEGO® is a trademark of the LEGO Group of companies which does not sponsor, authorize or endorse the following softwares.
目的
LeoCADとBlenderの簡単な例を学ぶこと。
All those softwares are compatible with Linux, Windows & MacOS. As I didn’t find a lot of documentation for Linux I decided to focus this tutorial on Linux.
これらのソフトウェアはすべて、Linux、Windows、MacOSと互換性があります。 Linuxインストールのドキュメントが見つからなかったので、このチュートリアルをLinuxに焦点を合わせることにしました。
Tools・ ツール
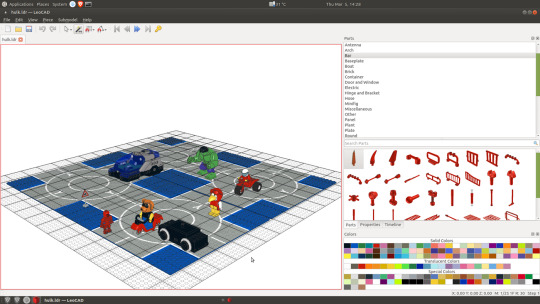
LeoCAD
ldraw-parts
Blender & ImportLDraw plugin
LeoCAD
LeoCAD is a free & open sources CAD software , you will be able to create scene easily with block parts using drag&drop. LeoCAD supports the ldraw file format.
LeoCADは無料でオープンソースのCADソフトウェアです。ドラッグ&ドロップを使用してブロックパーツで簡単にシーンを作成できます。 LeoCADはldrawファイル形式をサポートしています。
Blender
Blender is a free & open sources 3D modeler & renderer.
Movies like Sintel or Big Buck Bunny have been entirely made with Blender.
Blenderは、無料のオープンソースの3Dモデラーおよびレンダラーです。
SintelやBig Buck Bunnyなどの映画はすべてBlenderで作成されています。
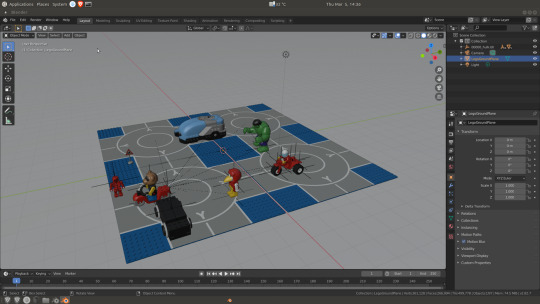
Blender plugin
Blender will use this plugin to import .ldr files and to setup the rendering options.
Blenderはこのプラグインを使用して.ldrファイルをインポートし、レンダリングオプションを設定します。
Versions ・バージョン
In this tutorial I am using the following versions :
このチュートリアルでは、次のバージョンを使用しています。
Software Version Ubuntu 18.04 LTS LeoCAD 18.01 Blender 2.82 ImportLDraw plugin 1.1.11 for blender 2.81
Installation and common use cases ・ インストールと一般的な使用例
LeoCAD
sudo apt-get install leocad
By default, LeoCAD is provided with a limited number of block parts. We will install more parts in the next step.
デフォルトでは、LeoCADには限られた数のブロックパーツが用意されています。 次のステップでさらに部品をインストールします。
More block Parts ! より多くのパーツ!
The following command will install more blocks for LeoCAD.
次のコマンドは、LeoCADのブロックをさらにインストールします。
sudo apt-get install ldraw-parts
Checking the ldraw-parts install path :
ldraw-partsインストールパスの確認:
dpkg -L ldraw-parts
When you install this package with apt-get, the default block parts location will be /usr/share/ldraw
The ImportLDraw plugin is looking for parts in ~/mldraw
このパッケージをapt-getでインストールすると、デフォルトのブロックパーツの場所は/usr/share/ldrawになります。
ImportLDrawプラグインは、〜/mldraw内のパーツを探しています。
As the paths are different we need to create a symlink.
パスが異なるので、シンボリックリンクを作成する必要があります。
ln -s /usr/share/ldraw ~/ldraw
LeoCAD is very easy to use and intuitive. You can easily drag & drop parts to create your scene.
Your saved scene will use the .ldr format.
LeoCADは非常に使いやすく、直感的です。 パーツを簡単にドラッグアンドドロップしてシーンを作成できます。
保存したシーンは.ldr形式を使用します。
Blender
In this tutorial I am using Blender v2.82.
Blender「v2.82」の静的ビルドを使用しています。
Download it from here
こちらからダウンロード
Blender plugin
Download it from here.
こちらからダウンロードしてください。
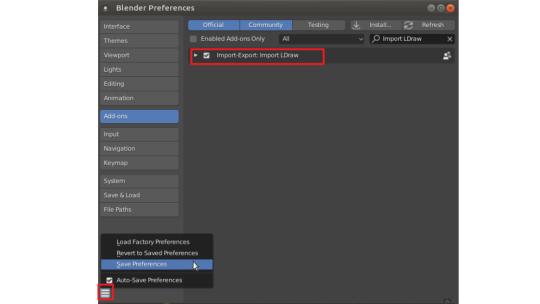
ステップ1・ STEP 1
Please choose
選んでください:
Edit > Preferences
ステップ2・ STEP 2
Click Add-ons, then Install
Add-ons、Installの順にクリックします

ステップ3・ STEP 3
Please select & install the plugin as shown in the screen capture.
画面キャプチャに示されているように、プラグインを選択してインストールしてください。

ステップ4・ STEP 4
Please activate the plugin & save the settings.
プラグインを有効にして設定を保存してください。
ステップ5・ STEP 5
You should now be able to import LeoCAD files.
これで、LeoCADファイルをインポートできるはずです。

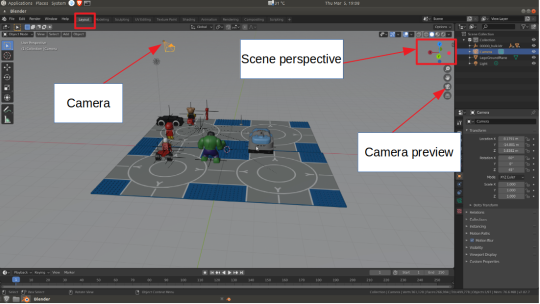
ステップ 6・ STEP 6
Checking the imported scene.
You can use the mouse wheel to zoom in and out on your scene.
You can hold the middle button of your mouse to move around your scene.
インポートされたシーンを確認します。
マウスホイールを使用して、シーンをズームインおよびズームアウトできます。
マウスの中央ボタンを押したままにすると、シーン内を移動できます。
ステップ 7 ・ STEP 7
Moving the camera & changing the perspective.
In order to move the camera you need to select it by clicking it, then press the G key and move it with your mouse.
カメラを移動し、視点を変更します。
カメラを移動するには、カメラをクリックして選択し、Gキーを押してマウスで移動する必要があります。
Some Blender keyborad shortcuts ・ Blenderのキーボードショートカット
From the Blender documentation
Blender doc から
Roll
Press R to enter object rotation mode. The default will be to rotate the camera in its local Z axis (the axis orthogonal to the camera view), which is the definition of a camera “roll”
Roll
Rを押してオブジェクトの回転モードに入ります。デフォルトでは、カメラのローカル Z 軸 (Camera View に直交する軸) で回転します。この動きをカメラの “Roll” と呼びます。
Horizontal Pan or Yaw
This corresponds to a rotation around the camera’s local Y axis. Press R, and then Y twice.
Horizontal Pan または Yaw
これは、カメラのローカル Y 軸を中心とした回転に対応します。R の後に Y を 2 回押します。
ステップ 8 ・ STEP 8
Settings the image size.
画像サイズを選択してください。

ステップ 9 ・ STEP 9
CPU Rendering・CPU レンダリング

Render faster with a GPU・GPUでより速くレンダリングする
If you have a supported GPU you can render pictures faster.
サポートされているGPUがある場合は、画像をより速くレンダリングできます。
Go to :
クリックしてください :
Edit > Preferences > System

Once you selected your GPU, you need to enable it for rendering.
GPUを選択したら、レンダリングを有効にする必要があります。
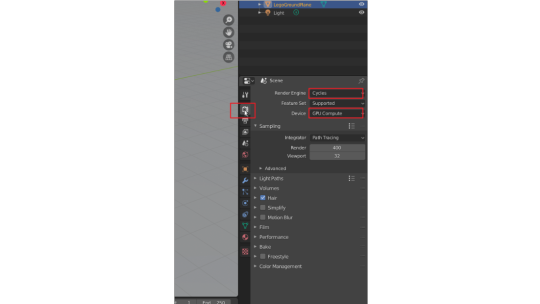
You can now start GPU rendering.
これでGPUレンダリングを開始できます。
Rendered pics examples ・レンダリングの例
Holiday house model can be found here.
ホリデーハウスのモデルはこちらにあります。
This picture has been rendered in 02 min 40 sec with a nvidia GPU.
この画像をnvidia GPUでレンダリングするのに2分40秒かかりました。

Train model can be found here.
列車のモデルはこちらにあります。
This picture has been rendered in 02 min 11 sec with a nvidia GPU.
この画像をnvidia gpuでレンダリングするのに2分11秒かかりました。

情報源 ・ Information sources
https://www.leocad.org/
https://www.blender.org/
https://github.com/TobyLobster/ImportLDraw
https://en.wikipedia.org/wiki/LDraw
https://www.eurobricks.com
https://docs.blender.org/manual/ja/latest/editors/3dview/navigate/camera_view.html
元記事はこちら
「簡単におもちゃの写真のようなCG画像の作り方 「Ubuntu / Linux」・Photo realistic rendering with LeoCAD & Blender」
March 17, 2020 at 12:00PM
0 notes
Text

Hotel California
去年の5.6月、キウイフルーツのパッキングのシーズナルジョブをするためTe pukeという町へ行き、すぐ近くのpukehinaというビーチエリアからキウイパッキングの工場があるTe pukeへ通っていました。そのpukehinaで住んでいた家がホリデーハウス(別荘)Hotel California という名前で家のすぐ近く、目の前がビーチ🏖住んでいた時期は寒くなっていく時期だったので海には入らずビーチをお散歩のみでしたが、すごく良い場所で、景色も良く、天気が良ければ毎日、ビーチを散歩しました。
家を出てすぐ↑
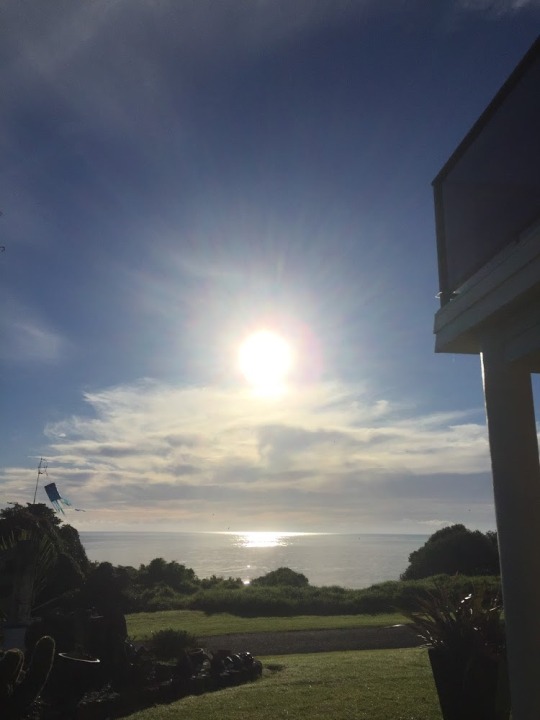


毎日、ビーチを散歩、最高でした!誰もいないので1人でビーチ沿いを散歩。
0 notes
Photo

《#アイクラーホーム 》 インテリアがヴィンテージモダンでカッコいい #ミッドセンチュリー な holidayhouse® #Repost @design_source_kamakura ・・・ : HOLIDAY HOUSE®︎ 天井近くのガラスの壁 昼は優しく光を取り込み 夜はやわらかに灯りを放ちます✨ アメリカのアイクラーホームをモチーフとし、その家の外観にピッタリのフローリング、キッチン、家具が標準装備☻ : #くつろぎに満ちた大人の家 #住みたい家に住もう #平屋 #規格住宅 #企画住宅 #holidayhouse #designsource : @design_source_kamakura @design_source_land __________ #デザインソース #ホリデーハウス #規格住宅でもお洒落な家 #かっこいい家 #pacificfurnitureservice #家具付き住宅 #家づくり #マイホーム #平屋の家 #平屋暮らし #フラットハウス #ヌック #アイクラー #アイクラーホーム #ミッドセンチュリー #カリフォルニア #カリフォルニアスタイル #アメリカンハウス #パシフィックファニチャーサービス #pacificfurnitureservice #リノベーション #新築一戸建て #男前インテリア https://www.instagram.com/p/CdNoa4JLddv/?igshid=NGJjMDIxMWI=
#アイクラーホーム#ミッドセンチュリー#repost#くつろぎに満ちた大人の家#住みたい家に住もう#平屋#規格住宅#企画住宅#holidayhouse#designsource#デザインソース#ホリデーハウス#規格住宅でもお洒落な家#かっこいい家#pacificfurnitureservice#家具付き住宅#家づくり#マイホーム#平屋の家#平屋暮らし#フラットハウス#ヌック#アイクラー#カリフォルニア#カリフォルニアスタイル#アメリカンハウス#パシフィックファニチャーサービス#リノベーション#新築一戸建て#男前インテリア
0 notes
Photo

《HOLIDAY HOUSE®》 #Repost @design_source_kamakura ・・・ : ︎アメリカのアイクラーホームをモチーフとし、その家の外観にピッタリのフローリング、キッチン、家具が標準装備☻ : 岐阜での依頼は@katojyukenfactory へ #くつろぎに満ちた大人の家 #住みたい家に住もう #平屋 #規格住宅 #企画住宅 #holidayhouse #designsource : @design_source_kamakura 土地の相談はコチラ↓ @design_source_land __________ #デザインソース #ホリデーハウス #規格住宅でもお洒落な家 #かっこいい家 #子供のいる暮らし #家具付き住宅 #家づくり #マイホー��� #平屋の家 #平屋暮らし #フラットハウス #ヌック #アイクラー #アイクラーホーム #ミッドセンチュリー #カリフォルニア #カリフォルニアスタイル #アメリカンハウス #ハンモックのある生活 #各務原工務店 #KATOJYUKEN https://www.instagram.com/p/Ccv_0LZPQNF/?igshid=NGJjMDIxMWI=
#repost#くつろぎに満ちた大人の家#住みたい家に住もう#平屋#規格住宅#企画住宅#holidayhouse#designsource#デザインソース#ホリデーハウス#規格住宅でもお洒落な家#かっこいい家#子供のいる暮らし#家具付き住宅#家づくり#マイホーム#平屋の家#平屋暮らし#フラットハウス#ヌック#アイクラー#アイクラーホーム#ミッドセンチュリー#カリフォルニア#カリフォルニアスタイル#アメリカンハウス#ハンモックのある生活#各務原工務店#katojyuken
0 notes
Photo
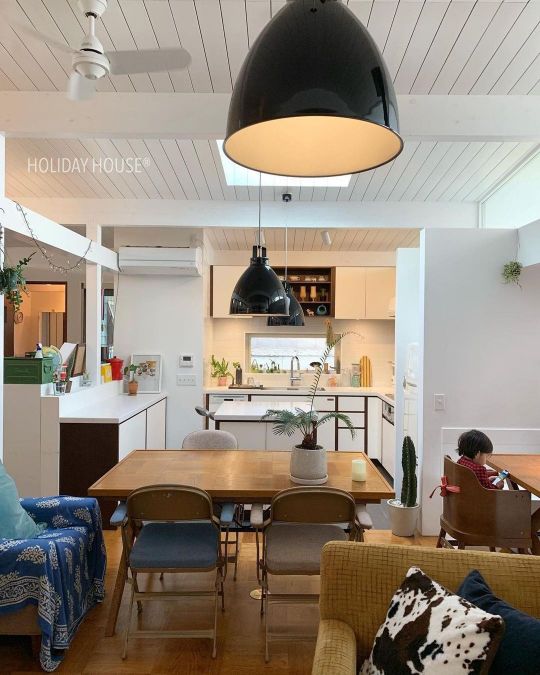
《#アイクラーホーム 》 インテリアがヴィンテージモダンでカッコいい #ミッドセンチュリー な holidayhouse #Repost @design_source_kamakura ・・・ : HOLIDAY HOUSE®︎ アメリカのアイクラーホームをモチーフとし、その家の外観にピッタリのフローリング、キッチン、家具が標準装備☻ : #くつろぎに満ちた大人の家 #住みたい家に住もう #平屋 #規格住宅 #企画住宅 #holidayhouse #designsource : @design_source_kamakura __________ #デザインソース #ホリデーハウス #規格住宅でもお洒落な家 #かっこいい家 #ジェルデ #家具付き住宅 #家づくり #マイホーム #平屋の家 #平屋暮らし #フラットハウス #キッチン #アイクラー #アイクラーホーム #ミッドセンチュリー #カリフォルニア #カリフォルニアスタイル #アメリカンハウス #シンプル https://www.instagram.com/p/CajzV0xvLd4/?utm_medium=tumblr
#アイクラーホーム#ミッドセンチュリー#repost#くつろぎに満ちた大人の家#住みたい家に住もう#平屋#規格住宅#企画住宅#holidayhouse#designsource#デザインソース#ホリデーハウス#規格住宅でもお洒落な家#かっこいい家#ジェルデ#家具付き住宅#家づくり#マイホーム#平屋の家#平屋暮らし#フラットハウス#キッチン#アイクラー#カリフォルニア#カリフォルニアスタイル#アメリカンハウス#シンプル
0 notes
Photo
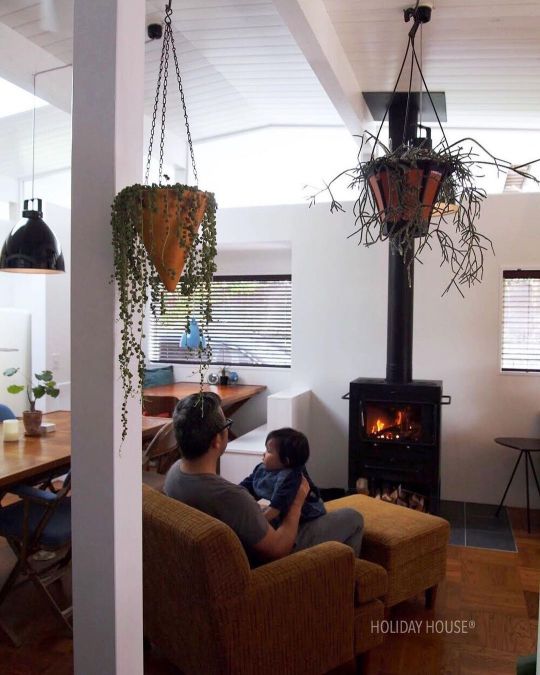
《#アイクラーホーム 》 インテリアがヴィンテージモダンでカッコいい #ミッドセンチュリー な holidayhouse® #Repost @design_source_kamakura ・・・ : HOLIDAY HOUSE®︎ 天井近くのガラスの壁 昼は優しく光を取り込み 夜はやわらかに灯りを放ちます✨ アメリカのアイクラーホームをモチーフとし、その家の外観にピッタリのフローリング、キッチン、家具が標準装備☻ : #くつろぎに満ちた大人の家 #住みたい家に住もう #平屋 #規格住宅 #企画住宅 #holidayhouse #designsource : @design_source_kamakura @design_source_land __________ #デザインソース #ホリデーハウス #規格住宅でもお洒落な家 #かっこいい家 #pacificfurnitureservice #家具付き住宅 #家づくり #マイホーム #平屋の家 #平屋暮らし #フラットハウス #ヌック #アイクラー #アイクラーホーム #ミッドセンチュリー #カリフォルニア #カリフォルニアスタイル #アメリカンハウス #施工事例 https://www.instagram.com/p/CaeWH1Ev1Bl/?utm_medium=tumblr
#アイクラーホーム#ミッドセンチュリー#repost#くつろぎに満ちた大人の家#住みたい家に住もう#平屋#規格住宅#企画住宅#holidayhouse#designsource#デザインソース#ホリデーハウス#規格住宅でもお洒落な家#かっこいい家#pacificfurnitureservice#家具付き住宅#家づくり#マイホーム#平屋の家#平屋暮らし#フラットハウス#ヌック#アイクラー#カリフォルニア#カリフォルニアスタイル#アメリカンハウス#施工事例
0 notes
Photo
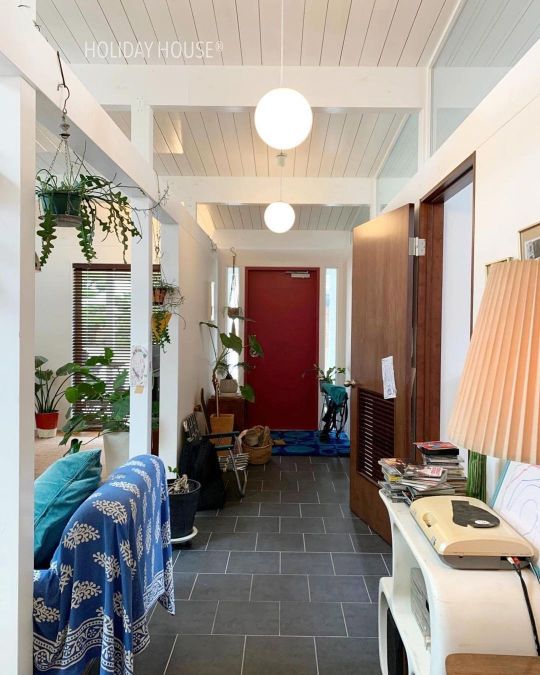
《#アイクラーホーム 》 インテリアがヴィンテージモダンでカッコいい #ミッドセンチュリー な holidayhouse®︎ #Repost @design_source_kamakura ・・・ : HOLIDAY HOUSE®︎ 完成時にはHOLIDAY HOUSEのエンブレム「HH」を外壁に取り付けします☆ アメリカのアイクラーホームをモチーフとし、その家の外観にピッタリのフローリング、キッチン、家具が標準装備☻ : #くつろぎに満ちた大人の家 #住みたい家に住もう #平屋 #規格住宅 #企画住宅 #holidayhouse #designsource : @design_source_kamakura @design_source_land __________ #デザインソース #ホリデーハウス #規格住宅でもお洒落な家 #かっこいい家 #pacificfurnitureservice #家具付き住宅 #家づくり #マイホーム #平屋の家 #平屋暮らし #フラットハウス #ヌック #アイクラー #アイクラーホーム #ミッドセンチュリー #カリフォルニア #カリフォルニアスタイル #アメリカンハウス #施工事例 https://www.instagram.com/p/CaaxX_PP5JT/?utm_medium=tumblr
#アイクラーホーム#ミッドセンチュリー#repost#くつろぎに満ちた大人の家#住みたい家に住もう#平屋#規格住宅#企画住宅#holidayhouse#designsource#デザインソース#ホリデーハウス#規格住宅でもお洒落な家#かっこいい家#pacificfurnitureservice#家具付き住宅#家づくり#マイホーム#平屋の家#平屋暮らし#フラットハウス#ヌック#アイクラー#カリフォルニア#カリフォルニアスタイル#アメリカンハウス#施工事例
0 notes
Photo

《上にみえるFIX窓》 天井近くの窓は昼間は優しく光を取り入れ、夜は優しく灯りを外に放ちますます😊 #Repost @design_source_kamakura with @make_repost ・・・ : #HOLIDAY_HOUSE ®︎ #鎌倉 #リビングダイニング ☻ : #くつろぎに満ちた大人の家 #住みたい家に住もう #平屋 #規格住宅 #holidayhouse #designsource : #デザインソース#ホリデーハウス #規格住宅でもお洒落な家 #かっこいい家 #おうち時間 #子供 #インテリア #家づくり #マイホーム #平屋の家 #平屋暮らし #フラットハウス #ヌック #アイクラー #アイクラーホーム #ミッドセンチュリー #カリフォルニア #アメリカンハウス #pacificfurnitureservice HOLIDAY_HOUSE®︎ パシフィックファニチャーの家具がカッコよく大人の雰囲気を出してます 岐阜でのお問合せはKATOJYUKENまで . . ----------------------------------------- MORE PHOTOS…👉 @katojyukenfactory ----------------------------------------- . . 気に入って頂けましたら、いいね&フォロー よろしくお願いします🙇♂️ これから、お家を建てられる方 ご興味のある方は お気軽にお声掛けください☺️✨✨ . 💻#オンライン相談会 も対応してます🙇♀️ . ⚒施工・diy【 @ksfactory_gifu 】 LINE公式アカウント【 @ks_style_house 】 📩お問い合わせ 【 @kj_contact 】 https://www.instagram.com/p/CYqjnHBPqfA/?utm_medium=tumblr
#repost#holiday_house#鎌倉#リビングダイニング#くつろぎに満ちた大人の家#住みたい家に住もう#平屋#規格住宅#holidayhouse#designsource#デザインソース#ホリデーハウス#規格住宅でもお洒落な家#かっこいい家#おうち時間#子供#インテリア#家づくり#マイホーム#平屋の家#平屋暮らし#フラットハウス#ヌック#アイクラー#アイクラーホーム#ミッドセンチュリー#カリフォルニア#アメリカンハウス#pacificfurnitureservice#オンライン相談会
0 notes
Photo
《朝の#cafetime☕️ 》 #breakfastnook でごゆっくりと お気に入りの時間をどうぞ☺️ #Repost @design_source_kamakura with @make_repost ・・・ : #HOLIDAY_HOUSE ®︎ #鎌倉 : #くつろぎに満ちた大人の家 #住みたい家に住もう #平屋 #規格住宅 #holidayhouse #designsource : #デザインソース#ホリデーハウス #規格住宅でもお洒落な家 #かっこいい家 #おうち時間 #岐阜平屋 #各務原工務店 #子供 #インテリア #家づくり #マイホーム #平屋暮らし #フラットハウス #ヌック #アイクラー #アイクラーホーム #ミッドセンチュリー #アメリカンハウス HOLIDAY_HOUSE®︎ パシフィックファニチャーの家具がカッコよく大人の雰囲気を出してます 岐阜でのお問合せはKATOJYUKENまで . . ----------------------------------------- MORE PHOTOS…👉 @katojyukenfactory ----------------------------------------- . . 気に入って頂けましたら、いいね&フォロー よろしくお願いします🙇♂️ これから、お家を建てられる方 ご興味のある方は お気軽にお声掛けください☺️✨✨ . 💻#オンライン相談会 も対応してます🙇♀️ . ⚒施工・diy【 @ksfactory_gifu 】 LINE公式アカウント【 @ks_style_house 】 📩お問い合わせ 【 @kj_contact 】 https://www.instagram.com/p/CWNjB_jvohy/?utm_medium=tumblr
#cafetime☕️#breakfastnook#repost#holiday_house#鎌倉#くつろぎに満ちた大人の家#住みたい家に住もう#平屋#規格住宅#holidayhouse#designsource#デザインソース#ホリデーハウス#規格住宅でもお洒落な家#かっこいい家#おうち時間#岐阜平屋#各務原工務店#子供#インテリア#家づくり#マイホーム#平屋暮らし#フラットハウス#ヌック#アイクラー#アイクラーホーム#ミッドセンチュリー#アメリカンハウス#オンライン相談会
0 notes
Video
《#ミッドセンチュリー な家》 . #Repost @design_source_kamakura with @make_repost ・・・ : HOLIDAY HOUSE®︎ アメリカのアイクラーホームをモチーフとし、その家の外観にピッタリのフローリング、キッチン、家具が標準装備☻ 写真のHOLIDAY HOUSE秩父O様邸はアレンジして2階に居室を設けました。 : #くつろぎに満ちた大人の家 #住みたい家に住もう #平屋 #規格住宅 #企画住宅 #holidayhouse #designsource : @design_source_kamakura __________ #デザインソース #ホリデーハウス #規格住宅でもお洒落な家 #かっこいい家 #pacificfurnitureservice #家具付き住宅 #家づくり #マイホーム #平屋の家 #ミッドセンチュリーインテリア #フラットハウス #ヌック #アイクラー #アイクラーホーム #ミッドセンチュリー #カリフォルニア #カリフォルニアスタイル #アメリカンハウス #ミッドセンチュリーハウス https://www.instagram.com/p/CVM50svA96h/?utm_medium=tumblr
#ミッドセンチュリー#repost#くつろぎに満ちた大人の家#住みたい家に住もう#平屋#規格住宅#企画住宅#holidayhouse#designsource#デザインソース#ホリデーハウス#規格住宅でもお洒落な家#かっこいい家#pacificfurnitureservice#家具付き住宅#家づくり#マイホーム#平屋の家#ミッドセンチュリーインテリア#フラットハウス#ヌック#アイクラー#アイクラーホーム#カリフォルニア#カリフォルニアスタイル#アメリカンハウス#ミッドセンチュリーハウス
0 notes
Photo

《ミッドセンチュリーな平屋》 . #Repost @design_source_kamakura with @make_repost ・・・ : HOLIDAY HOUSE®︎ アメリカのアイクラーホームをモチーフとし、その家の外観にピッタリのフローリング、キッチン、家具が標準装備☻ : #くつろぎに満ちた大人の家 #住みたい家に住もう #平屋 #規格住宅 #企画住宅 #holidayhouse #designsource : @design_source_kamakura __________ #デザインソース #ホリデーハウス #規格住宅でもお洒落な家 #かっこいい家 #pacificfurnitureservice #家具付き住宅 #家づくり #マイホーム #平屋の家 #平屋暮らし #フラットハウス #ヌック #アイクラー #アイクラーホーム #ミッドセンチュリー #カリフォルニア #カリフォルニアスタイル #アメリカンハウス #施工事例 https://www.instagram.com/p/CR0rkldsdeE/?utm_medium=tumblr
#repost#くつろぎに満ちた大人の家#住みたい家に住もう#平屋#規格住宅#企画住宅#holidayhouse#designsource#デザインソース#ホリデーハウス#規格住宅でもお洒落な家#かっこいい家#pacificfurnitureservice#家具付き住宅#家づくり#マイホーム#平屋の家#平屋暮らし#フラットハウス#ヌック#アイクラー#アイクラーホーム#ミッドセンチュリー#カリフォルニア#カリフォルニアスタイル#アメリカンハウス#施工事例
0 notes
Photo

《朝の#cafetime☕️ 》 #breakfastnook でごゆっくりと お気に入りの時間をどうぞ☺️ #Repost @design_source_kamakura with @make_repost ・・・ : #HOLIDAY_HOUSE ®︎ #鎌倉 : #くつろぎに満ちた大人の家 #住みたい家に住もう #平屋 #規格住宅 #holidayhouse #designsource : #デザインソース#ホリデーハウス #規格住宅でもお洒落な家 #かっこいい家 #おうち時間 #岐阜平屋 #各務原工務店 #子供 #インテリア #家づくり #マイホーム #平屋暮らし #フラットハウス #ヌック #アイクラー #アイクラーホーム #ミッドセンチュリー #アメリカンハウス HOLIDAY_HOUSE®︎ パシフィックファニチャーの家具がカッコよく大人の雰囲気を出してます 岐阜でのお問合せはKATOJYUKENまで . . ----------------------------------------- MORE PHOTOS…👉 @katojyukenfactory ----------------------------------------- . . 気に入って頂けましたら、いいね&フォロー よろしくお願いします🙇♂️ これから、お家を建てられる方 ご興味のある方は お気軽にお声掛けください☺️✨✨ . 💻#オンライン相談会 も対応してます🙇♀️ . ⚒施工・diy【 @ksfactory_gifu 】 LINE公式アカウント【 @ks_style_house 】 📩お問い合わせ 【 @kj_contact 】 https://www.instagram.com/p/CLEiwPPgqbP/?igshid=1e5k9jjxvlwb7
#cafetime☕️#breakfastnook#repost#holiday_house#鎌倉#くつろぎに満ちた大人の家#住みたい家に住もう#平屋#規格住宅#holidayhouse#designsource#デザインソース#ホリデーハウス#規格住宅でもお洒落な家#かっこいい家#おうち時間#岐阜平屋#各務原工務店#子供#インテリア#家づくり#マイホーム#平屋暮らし#フラットハウス#ヌック#アイクラー#アイクラーホーム#ミッドセンチュリー#アメリカンハウス#オンライン相談会
0 notes
Video
《#パシフィックファニチャーサービス の家具》 ミッドセンチュリーな雰囲気のパシフィックファニチャーの家具インテリアがカッコいいですね〜‼️ . holidayhouse®︎に付いてきます🙇♀️ #Repost @design_source_kamakura with @make_repost ・・・ : HOLIDAY HOUSE®︎ : #くつろぎに満ちた大人の家 #住みたい家に住もう #平屋 #規格住宅 #企画住宅 #holidayhouse #designsource : @design_source_kamakura __________ #デザインソース#ホリデーハウス #規格住宅でもお洒落な家 #かっこいい家 #myhome #インテリア #家づくり #マイホーム #平屋の家 #平屋暮らし #フラットハウス #ヌック #アイクラー #アイクラーホーム #ミッドセンチュリー #カリフォルニア #カリフォルニアスタイル #アメリカンハウス #施工事例 HOLIDAY_HOUSE®︎ パシフィックファニチャーの家具がカッコよく大人の雰囲気を出してます 岐阜でのお問合せはKATOJYUKENまで . . ----------------------------------------- MORE PHOTOS…👉 @katojyukenfactory ----------------------------------------- . . 気に入って頂けましたら、いいね&フォロー よろしくお願いします🙇♂️ これから、お家を建てられる方 ご興味のある方は お気軽にお声掛けください☺️✨✨ . 💻#オンライン相談会 も対応してます🙇♀️ . ⚒施工・diy【 @ksfactory_gifu 】 LINE公式アカウント【 @ks_style_house 】 📩お問い合わせ 【 @kj_contact 】 https://www.instagram.com/p/CK8OYdxg4GZ/?igshid=lb3ociuffrik
#パシフィックファニチャーサービス#repost#くつろぎに満ちた大人の家#住みたい家に住もう#平屋#規格住宅#企画住宅#holidayhouse#designsource#デザインソース#ホリデーハウス#規格住宅でもお洒落な家#かっこいい家#myhome#インテリア#家づくり#マイホーム#平屋の家#平屋暮らし#フラットハウス#ヌック#アイクラー#アイクラーホーム#ミッドセンチュリー#カリフォルニア#カリフォルニアスタイル#アメリカンハウス#施工事例#オンライン相談会
0 notes
Last Seen Blogs
t-h-ballard
Theodore

xv001
-TW-

imastoner-yourastoner
Moe :)

tinyempathbailiffflap-blog
wave of my feelings

disco-wizardz
worms