#*resources
Text
WELP.

fucked around and found out!
Anyone got some good jeans-patching resources? I kinda hulked through this pair, the inner thigh's fabric is more or less SHREDDED to bits so it can't just be re-sewn, I need reinforcements
I have a bag of soft cotton flannel in a few different colours from when I was trying to sew plushies n things, that'll work right?
188 notes
·
View notes
Text


(๑╹ω╹๑)/ ☆ ₊˚⊹ f2u no credz needed !!

#JOYYY :3#i finally finished it#and by it..#lets just say..#my peanits#im so tiref svae eme oh ym god sace eme im gonna die auhhhh!!!#web graphics#kawaii#favicons#resources#colorful#rentry graphics#rentry#pixels#carrd resources#rentry pixels
88 notes
·
View notes
Text
🦴 cutiepie stamps ‧₊˚ 🍮 ⋅ ☆


(all made by me :D)
#blinkies#graphics#neocities#resources#gyaru#dividers#cutecore#sanrio#stamp#stamps#gifs#carrd resources#carrd#glitter graphics#pixel graphics#rentry graphics#decome#graphix#2000s web#old web#webcore#clovercore#cute pixels#cute#cutegore#gurokawa#gurokawaii#kawaii#kawaiicore#hello kitty
118 notes
·
View notes
Text
다양한 ͏ ͏ ͏ ͏ ͏ ͏ ͏ 색상. ͏ ͏ ͏ ͏ ͏ ͏ ͏ 무료로 사용할 수 있는 ͏ ͏ ͏ ͏ ͏팔레트 ͏ ͏ ͏ ͏ ͏출시. ͏ ͏ ͏ ͏ ͏𝗍𝗎𝗆𝖻𝗅𝗋⠀⠀⠀𝗏𝖾𝗋¹ +


#͏ ͏ ͏ ͏ ͏ ͏ ͏ ͏ ͏ ͏ ͏ ͏ ͏ ͏ ͏ ͏ ͏ ͏ ͏ ͏ ͏ ͏ ͏ ͏ ͏ ͏ ͏ ͏ ͏ ͏ ͏ ͏ ͏ ͏ ͏ ͏ ͏ ͏ ͏ ͏ ͏ ͏ ͏ ͏ ͏ ͏ ͏ ͏ ͏ ͏ ͏ ͏ ͏ ͏ ͏ ͏ ͏ ͏ ͏ ͏ ͏ ͏ ͏ ͏ ͏ ͏ ͏#color palette#resources#tumblr help
71 notes
·
View notes
Text
https://lorraine-639.mxtkh.fun/h/vMHnauA
126 notes
·
View notes
Text
collection of plural resources:
beginning:
What is plurality? (link)
Am I plural? (link)
New/Questioning system (link)
guides:
Multiplicity links (link)
DIS-SOS (link)
First person plural (link)
The plurality playbook (link)
specifics:
System sources (link)
System Comfort's plural resources (link)
Plurality resources (link)
Discussing dissociation (link)
Exploration into endogenic & non-disordered plurality (link)
The tulpamancy guide I wish I had (link)
Tulpanomicon (link)
information:
Pluralpedia (link)
Multiplicity and plurality wiki (link)
Kinhost.org (link)
Tulpa.info (link)
feel free to reblog with more resources, will update as new resources are found!
last updated: Apr. 18, 2024
58 notes
·
View notes
Text

Just found out that The Japan Foundation has an awesome free library accessible to folks in the US, works basically the same way the Queer Liberation Library does except it's all, like, books about Japanese culture and history, manga, fiction, language learning books, and more, in both English and Japanese!
There's even a whole section of LGBTQIA+ stuff, including manga, language stuff, books, audiobooks...

Anyway, I filled out the sign-up form over the weekend and got my log-in info last night and I AM EXCITE and wanted to share.
Another free-to-folks-in-the-US library with lots of awesome books!!
Shout out to enigmalea on Mastodon, for making the post that let me learn this exists!
66 notes
·
View notes
Text
~ 459 Screencaps
Jon Bernthal in Mob City (2013)
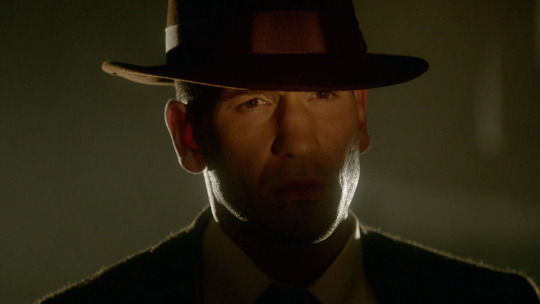


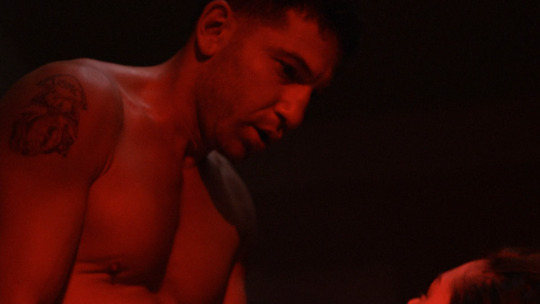
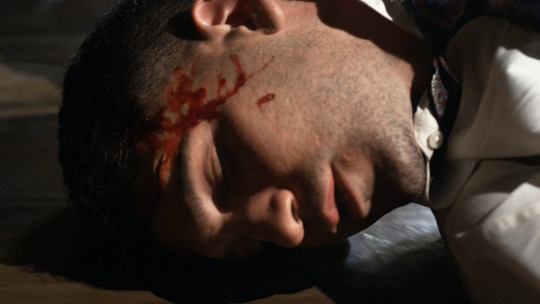


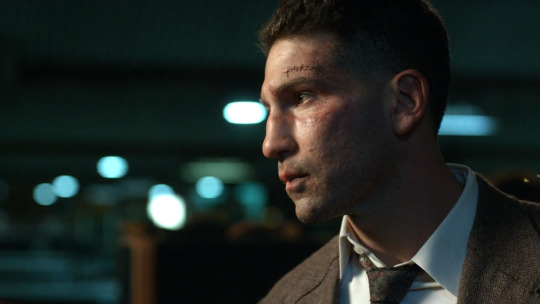
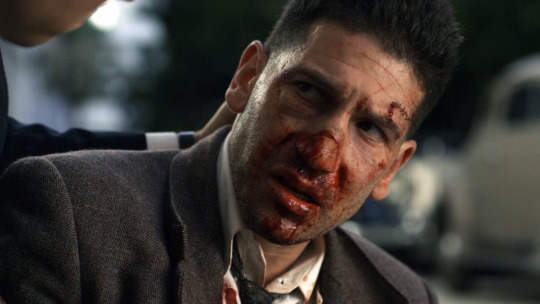

~ gallery ~
sorry no zip this time. it was up to 7gb and i have limited space in my drive.
credit: i used @papa-evershed's episodes to get these. you can watch the show in her post.
46 notes
·
View notes
Text
ㅤㅤ ㅤ ⊹ ⠀࣪⠀ㅤ୨୧ ㅤ ㅤ ⪩ 𔘓 ⪨ ִㅤㅤ ੭
⠀⠀⠀⠀ 𐔌 ㅤ 𐙚ㅤㅤ ࣪ 𓈒 ⠀ྀི ㅤׂㅤ ㅤ 𓉸 𓈒
ㅤㅤㅤ ᮫ 𖦹ㅤ ̼ ₊ㅤㅤ𝑑𝑜𝑙𝑙ㅤ ۪ ֹ ਏਓ

#⠀⠀⠀⠀ㅤ ㅤㅤ♡ㅤㅤㅤ𓈒ㅤ⊹⠀⠀ ָ࣪ ㅤ#aesthetic symbols#symbols#layouts#aesthetic layouts#bios#messy bios#messy symbols#twitter layouts#icons#bio#layout#symbol#cute symbols#aesthetic#messy aesthetic#kaomojis#cute kaomojis#aesthetic kaomojis#fonts#aesthetic fonts#messy fonts#cute fonts#messy#messy layouts#v6que#channel layouts#discord layouts#resources#dividers
26 notes
·
View notes
Text
THIS POST WILL BE REBLOGGABLE ONCE THE PICTURES ARE ADDED IN. FOR NOW, IT IS INCOMPLETE.

REQUIRED PROGRAMS: The Sims 4, SimRipper, Sims 4 Studio, & Blender 3.6 or higher.
Whether you want to make a brand new sim or use one you’ve already made, load up TS4 and make a new save. If you’re using a sim you’ve already made, then make sure you have them saved to your library beforehand. This save can be solely for ripping sims from. In my own experience, I’ve found that they eventually get corrupted over time. So, dress your sim up in CAS and make sure their first everyday outfit is the one you want to render.
Place your sim on a lot. Save the game and label the save as “Sim Ripper”. Anything along the lines that will remind you that save is only for ripping sims.
Open up SimRipper and select the NinjaRipper save. It may take a little while to load depending on how much cc you have in your game and the number of households. Once the list of townies loads, click your sim’s name.
Once they’ve loaded in, export them as a DAE file. Make sure you put it somewhere you’ll remember. It’s best to have a folder just for Blender content. Once they’ve been exported successfully, close out SimRipper.
Open up Blender. Click ‘general’. For this tutorial, I’m using Blender 3.6. Click ‘general’, then delete all the objects on the screen. (the lamp, cube, and camera). You can do this by left clicking and dragging a box around all the objects. Once they’re all selected, right click and click ‘delete’ or just press ‘X’. OR if you’re using a scene that you’ve downloaded, then just head to ‘file’, then open the scene you’ve downloaded. Most scenes come with a collection that say ‘DAE’, so click that and when you import your sim, it goes there.
Now, let’s import your sim! Head up to file, drop down to import and select ‘Collada (.dae)’. Head to the location where you saved your sim’s dae file from SimRipper. Double click it and it’ll open in Blender.
Let’s change the view, because everything’s gray right now. You wanna make sure your texture files imported properly too. Head to the top right of the Blender scene window and click this circle for viewport shading. Now, you can see your sim in all its glory. You may notice that they’re shiny or if they have on alpha cc, then their hair or lashed may be blocky. We can fix that by editing the nodes.
In the top left, pull the window over to open a new window. To the left of ‘Object Mode’ click editor type and go to ‘Shader Editor’. In the window your sim is in, click on your sim. In the shader editor window beside it, some stuff should pop up that looks like this:
Now, we just have to connect some nodes and add a few in. On the specular window, drag and drop the yellow circle to the ‘Specular’ section in the ‘Principled BSDF’ window. Now, your sim isn’t shiny anymore!
Let’s add in a ‘Mix Shader’ next. Press ‘Shift +A’, go to ‘Shader’, and click ‘Mix Shader’. Drag it in between the ‘Principled BSDF’ window and the ‘Material Output’ window, it should auto connect.
Click ‘Shift + A’ again, go to ‘Shader’, and then select ‘Transparent BSDF’. Connect the green BSDF node to the first ‘Shader’ node on the Mix Shader. It should take the place of the node connect from the Principled BSDF window. Then connect the Principled BSDF to the bottom ‘Shader’ node.
Last thing you have to do is drag the ‘Alpha’ node from the Base Color window and connect it to the ‘FAC’ on the Mix Shader window. Your final product should look something like this:
Now, let’s head to the Material section on the right hand side of the screen. Click it and under ‘Settings’ you’ll see blend and shadow mode. For both of those sections, click them and select ‘Alpha Hashed’. Now your sims is all set to pose!
Let’s change the Editor type from ‘Shader’ to ‘Non-linear Animation’. Now, on the right hand side of the screen click your rig. All the points on them should light up orange. Next click ‘I’ on your keyboard and then select ‘Rotation, Location, & Scale’.
Back in the Nonlinear Animation window, Click the pink box next to ‘Rig Action’. Click the orange track next to it, right click, and select ‘Delete’. It’s already clear, but this is good practice to do every time you render so your poses or animations won’t be wonky.
Now, let’s add in a pose. Open up Sims 4 Studio. Where it says ‘My Projects’ open up the pose pack you want to use. Select ‘Clips’ and then the pose you want to use. Now, you wanna export it. Don’t change any of the settings and just click export. Name it as something that describes the pose, so you can easily identify it. Then close out S4S.
Back in Blender, head to ‘File’ and click ‘Append’. Locate the blender file of the pose you just saved. Click it, then click ‘Action’, and select that file. Now, the action is in the Blender program so you just have to add it to your rig.
Click ‘Rig Action’ again and then click ‘Add’. Select ‘Add Action Strip’ and your pose should be there. Click it and voila! Your sim should be posing now!
All that’s left to do now is finish the scene, so you can render an image. Change the editor type again to ‘3D Viewport’. Now, click ‘Shift + A’ and add in a camera. You can click the camera and move it around using “G” or these the color arrows that show up. To adjust the size of the camera, you can click output, and change the dimension sizes to your liking. You can also change the camera perspective. For this tutorial, I’ll be using the ‘Orthographic Camera’. OR if you’re using a scene that already has cameras, drag your rig over to one of those and set them up. Make sure to click I on your keyboard again after moving them and click ‘Location, Rotation, & Scale’. That saves their position.
Once you’ve got your camera added in select it, then in the left window click ‘view’, ‘cameras’ and ‘set object as active camera’. That way you’ll be able to see exactly what the camera sees. If you’d like to change the resolution, then go to ‘output’ on the right hand side. There you can change the X and Y resolutions to your liking. Remember larger photos take longer to render, but the quality tends to be better.
Now, let’s change the shading again. In the window with the camera view change the viewport shading to the fourth ‘viewport shading’ circle. This allows you to see how your scene will looks rendered with all the lights included.
If you’re using a premade scene, then the lighting should already be set up. If you’re making your own, you’ll have to add in lights. Click ‘Shift + A’ again and go to lights. From there you can add in any of these, but for this tutorial I chose ‘area’. You can play around with each of these to see which ones you like best. You can adjust their settings in the data section and move the lights around the scene. If you’d like to add in shadows from the light, go to ‘data’ on the right hand hand side, then click ‘shadow’ and ‘contact shadow’.
Once your scene is lit, your sim is posed, it’s time to render the scene. I typically use Eevee to render instead of Cycles. Cycles takes longer and has a more realistic feel. You can render with whichever you like. Head to ‘render’ on the right hand side. Change the render engine to ‘Cycles’ or leave it on ‘Eevee’. You can click ‘ambient occlusion’ and ‘bloom’ if you’d like. I always use AO. Sometimes I use bloom. Also check ‘Screen Space Reflections’.
Once that’s done, go to the output section. It’s right below the render camera icon on the right hand side. Scroll down to output. Click the folder icon to change your render location from temporary files to whenever you’d like to put them. You can put them in a folder, on your desktop, or whenever. Next to ‘image sequence’ uncheck ‘overwrite’. If you’re rendering multiple images from a scene, then you don’t want them to overwrite each other. You can also change the color size and compression depth. Personally, I change compression size to 0 and color depth to 16, but be wary this makes your file larger. It also increases rendering time.
Once all that is complete, it’s time to render your image! In the top left click ‘render’, then ‘render image’. After however long it takes your PC to render the image, you’re all done! Lastly, click ‘image’ in the top left, then ‘save as’. Save your rendered image to wherever you’ve decided to put your files and then you’re all done!
21 notes
·
View notes
Note
teach me your ways on how to color whitewash idols. it’s so pretty
hiii omg thank u !! i will say i make new coloring for every set + recommend that so ur coloring is unique to the lighting, idol, etc.! i only mask over the original at the end of coloring (otherwise it can trick your eye into thinking something is off), and i ask people for help making sure i didn't oversaturate sometimes. i'll color a yeri set from the same file as those irene gifs earlier to show my process :)
sharpen! my sharpening whitens highlights most times, so i try to color over it so i know it won't become overexposed when i go to export. base gif (sharpened in vs) versus sharpened fully.

2. gauge how pale they are compared to naturally light photos w/ minimal to no editing / general 'what is too pale'. she isn't very pale here so not too much needs changing.
first adjustment layer: levels, set the blacks using the eyedropper. helps with contrast and overall look.
second: curves, adding back highlights and depth (especially around nose and cheekbones, which tend to get removed when it is washed out).
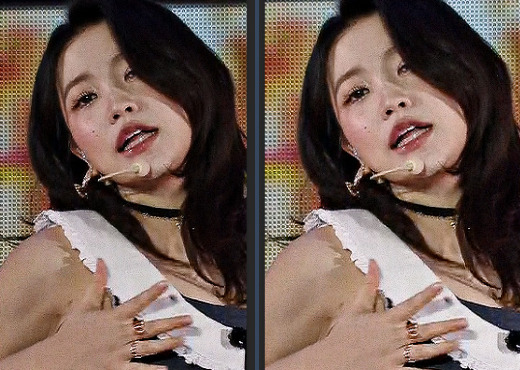
exposure! make sure to adjust gamma as well, don't go too far. this is the no. 1 cause of overly white gifs with otherwise nice coloring.
next is brightness and contrast, which same rule of thumb as exposure. don't over-do it.
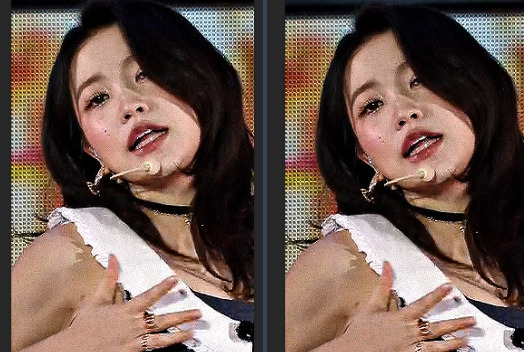
hue/sat: fix yellow or red leaning skin, and then i add saturation and darken skin channels to add life and warmth without making it too overdone (if you just saturate, it can look cartoonish imo)
selective color (#1): adjust reds, yellows, blacks, and whites. sometimes change neutrals (add magenta and yellow while lightening them overall) on very stubborn originals.
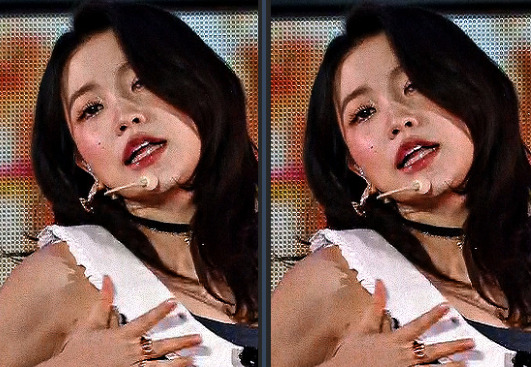
selective color (#2): fine-tune previous adjustments to look natural. ADD WHITE BACK TO HIGHLIGHTS! this helps with the glowiness
it can be done at this point, but i did one more fine-tuning hue/saturation (when i adjust other colors like blues to be the shade i want too). this is also when i use color balance or a second brightness/contrast to get my end result where i want!
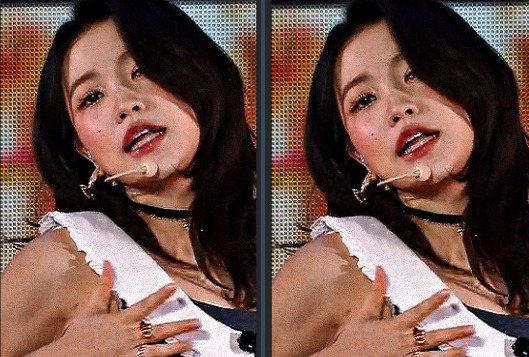
base (sharpened in vs) vs. the final :D

i also like to color with the previous / done gif next to the new one to make sure they match :) like so - i copy and paste the coloring group and then adjust it (and sharpening!) as needed for cohesion

the psd for yeri, and the irene set from earlier if you'd like to mess with them. irene's is more extreme as the lighting was worse.
#feel free to ignore tag friends <3#. . . letters#from : anon#m:tutorial#m:coloring#niniblr#useroro#awekslook#userdoyeons#userlovevivi#rosieblr#oorieri#userchoi#useryeonbins#long post#resources
28 notes
·
View notes
Text
People & countries mentioned in the thread:
DR Congo - M23, Cobalt
Darfur, Sudan - International Criminal Court, CNN, BBC (Overview); Twitter Explanation on Sudan
Tigray - Human Rights Watch (Ethnic Cleansing Report)
the Sámi people - IWGIA, Euronews
Hawai'i - IWGIA
Syria - Amnesty International
Kashmir- Amnesty Summary (PDF), Wikipedia (Jammu and Kashmir), Human Rights Watch (2022)
Iran - Human Rights Watch, Morality Police (Mahsa/Jina Amini - Al Jazeera, Wikipedia)
Uyghurs - Uyghur Human Rights Project (UHRP) Q&A, Wikipedia, Al Jazeera, UN Report
Tibetans - SaveTibet.org, United Nations
Yazidi people - Wikipedia, United Nations
West Papua - Free West Papua, Genocide Watch
Yemen - Human Rights Watch (Saudi border guards kill migrants), Carrd
Sri Lanka (Tamils) - Amnesty International, Human Rights Watch
Afghans in Pakistan - Al Jazeera, NPR
Ongoing Edits: more from the notes / me
Armenians in Nagorno-Karabakh/Azerbaijan (Artsakh) - Global Conflict Tracker ("Nagorno-Karabakh Conflict"), Council on Foreign Relations, Human Rights Watch (Azerbaijan overview), Armenian Food Bank
Baháʼís in Iran - Bahá'í International Community, Amnesty, Wikipedia, Minority Rights Group International
Kafala System in the Middle East - Council on Foreign Relations, Migrant Rights
Rohingya - Human Rights Watch, UNHCR, Al Jazeera, UNICEF
Montagnards (Vietnam Highlands) - World Without Genocide, Montagnard Human Rights Organization (MHRO), VOA News
Ukraine - Human Rights Watch (April 2022), Support Ukraine Now (SUN), Ukraine Website, Schools & Education (HRW), Dnieper River advancement (Nov. 15, 2023 - Ap News)
Reblogs with Links / From Others
Indigenous Ppl of Canada, Cambodia, Mexico, Colombia
Libya
Armenia Reblog 1, Armenia Reblog 2
Armenia, Ukraine, Central African Republic, Indigenous Americans, Black ppl (US)
Rohingya (Myanmar)
More Hawai'i Links from @sageisnazty - Ka Lahui Hawaii, Nation of Hawai'i on Soverignty, Rejected Apology Resolution
From @rodeodeparis: Assyrian Policy Institute, Free Yezidi
From @is-this-a-cool-url: North American Manipur Tribal Association (NAMTA)
From @dougielombax & compiled by @azhdakha: Assyrians & Yazidis
West Sahara conflict
Last Updated: Feb. 19th, 2024 (If I missed smth before this, feel free to @ me to add it)
#resources#important#congo#sudan#tigray#sámi#hawai'i#syria#kashmir#iran#uyghurs#china#tibetans#yazidi#west papua#yemen#sri lanka#afghans in pakistan#pakistan#human rights#palestine#twitter#lmk if there's a better reource or I linked smth wrong. I am very tired#my posts#genocide#social justice#nagorno karabakh#Bahá'í#kafala system#qatar
39K notes
·
View notes
Text
⊹ ࣪ ˖ pink stamps ⋆ ˚。⋆୨୧˚


#blinkies#graphics#neocities#resources#carrd#gifs#carrd resources#stamps#web graphics#old web#gyaru#lolita#dividers#rentry resources#rentry graphics#decome
22 notes
·
View notes
Text
Master doc that contains different resources and support for many countries including Palestine, Congo, Haiti, Hawai’i, etc ((the creator is underneath the link))

Link to the tweet: https://x.com/seaweedlagoon/status/1772449954046279818?s=46&t=s8SsfXh2OjpNRAj1OBxwqg
21K notes
·
View notes
Text
Reminder that in Gaza alone, around 90-95% of the water supply is contaminated and unfit for human consumption...
If you dont believe israel is capable of this evilness (that they've been enforcing for OVER 50 YEARS) read it for yourself, from AMNESTY INTERNATIONAL
#cant make this shit up#they're truly evil#current events#israel#gaza#jerusalem#palestine#idf#humanity#water#resources#human rights
27K notes
·
View notes
Text
— via The Slow Factory on Instagram !
#green colonialism#palestine#free palestine#anti imperialism#anti capitalism#resources#the slow factory
15K notes
·
View notes
Last Seen Blogs
tacosareyummy
eddie xoxo

apnb-marketing
APNB Marketing
femalepopgifs
FEMALE POP GIFS
kenmoti117
Kento Ishikawa

disembowel
asphyxiate