#*vs&ps
Text
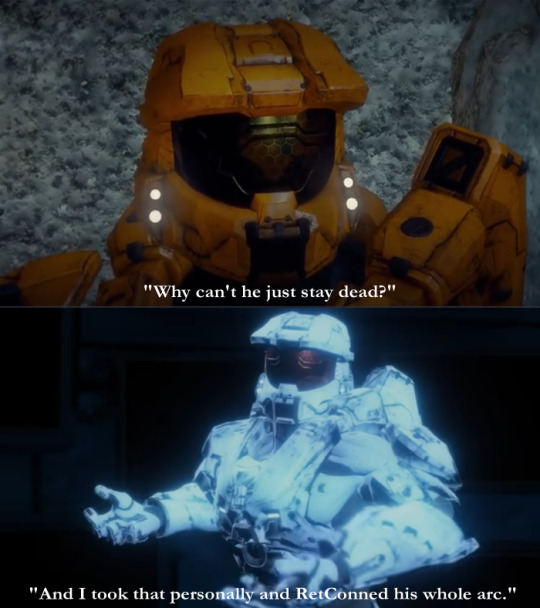
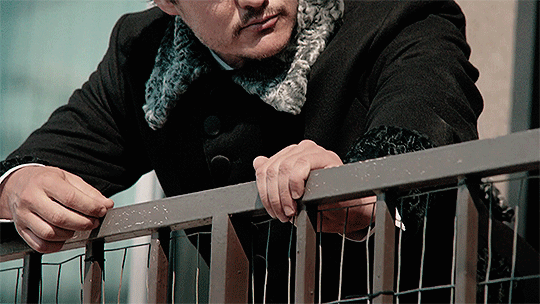
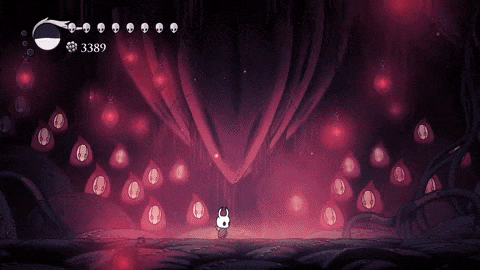
#RVB#rvb#Red vs Blue#dexter grif#Epsilon church#a pinch of salt#But srsly just a joke meme#S19 looks like it's gonna be badass with all those sexy animations#but im still a tiny bit bitter we are gonna lose seasons15-17(18)#it just doesnt make sense to me#so many real moments#and not just with my two favs but with others as well#Red Team never gets nice things like Plot Advancement#i have an idea for an art piece and i need to get it out asap#my biggest hope is perhaps whatever happens doesn't happen right away. . . and after they win the fight they still party#like a calm before the shitstorm#they win#they party#then maybe everyone leave chorus?#THEN things go sideways?#Dunno... but we'll see soon enough#PS Yes I know Donut was also like the Duotagonist for 15-17#which again#Red Team Problems ; u ;
260 notes
·
View notes
Note
GAHHHH MY HEART!!!
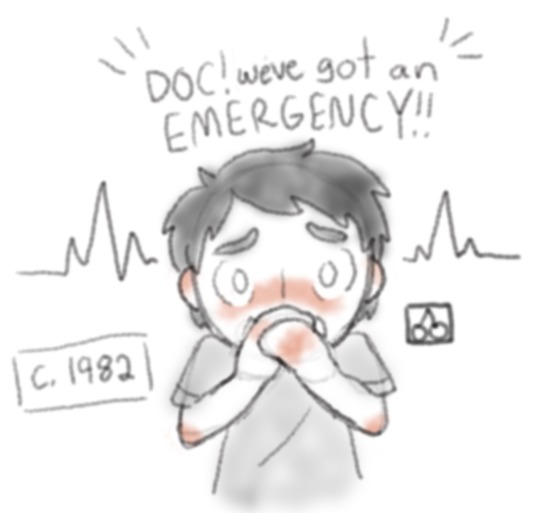
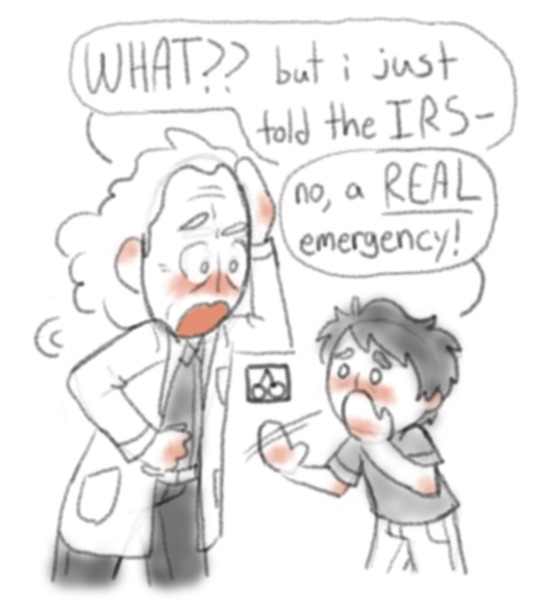
In the previous post, Cho left Mango one of their wanted posters at the door. What did he think of it? Poor Sec is being left out of the loop and can't see their new friend again TOT


nothing good!
previous runaway au post
first runaway au post
#ps: i used a School Bus Graveyard panel of Ashlyn on the toilet for Mango here lol#ava#avm#ava/m#ava fanart#avm fanart#animator vs animation fanart#animator vs animation#animation vs minecraft fanart#animation vs minecraft#alan becker#avm king#avm mt#avm mango#avm mango tango#avm king orange#ava au#avm au#ava/m au#ibis paint#my art#au where cho and sec are on the run from rocket corp with an itty bitty sec and an absolutely ratty cho
275 notes
·
View notes
Photo


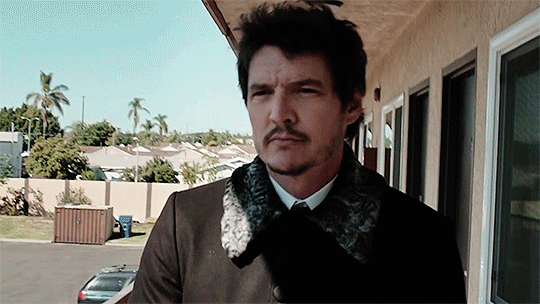

PEDRO PASCAL in “Hope” for Style Magazine | Part 1
for @deathswaywardson
#pedropascaledit#ppascaledit#hope#oaks#deathswaywardson#*waves* hi pedro fandom#i haven't made gifs in years#but this lovely man has brought me back#so i'll probably make shit people already have and didn't know it lol#also can someone tell me why the quality drops once the gif is on tumblr vs on ps?#did something change?#also idk when to post things so lmao#g:pp#pedrito
583 notes
·
View notes
Text

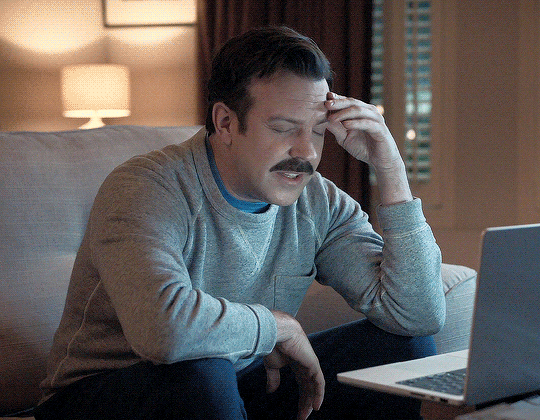

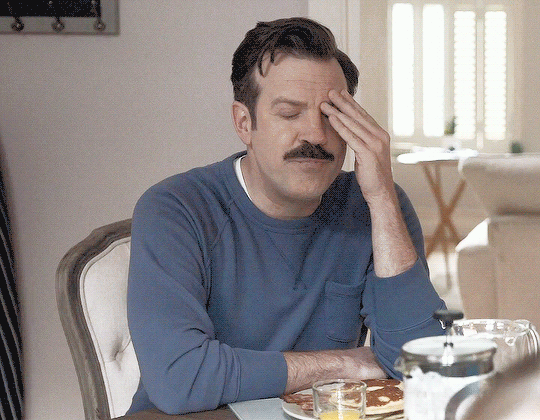
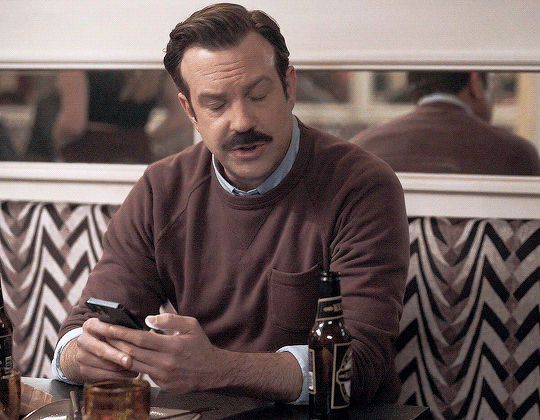
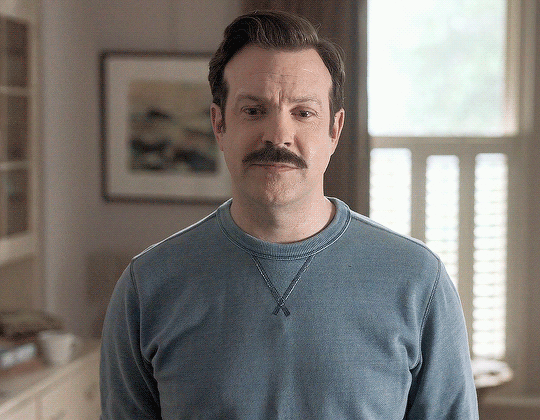
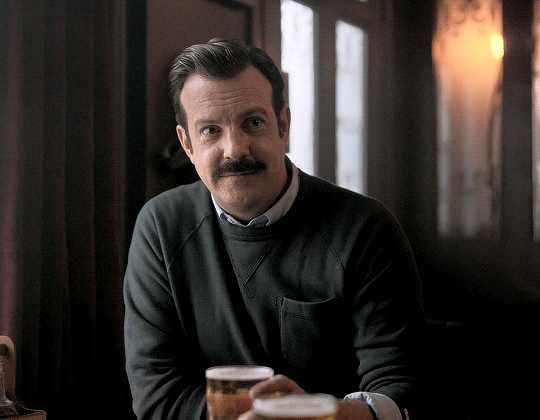
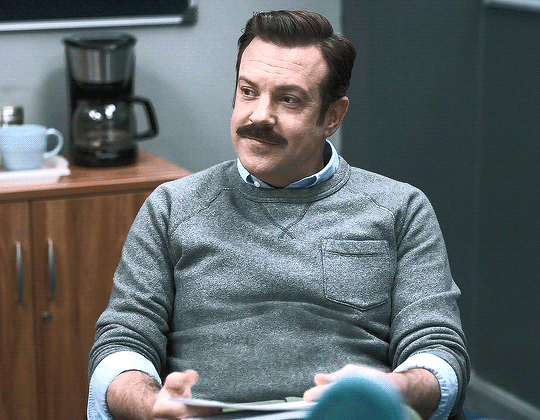

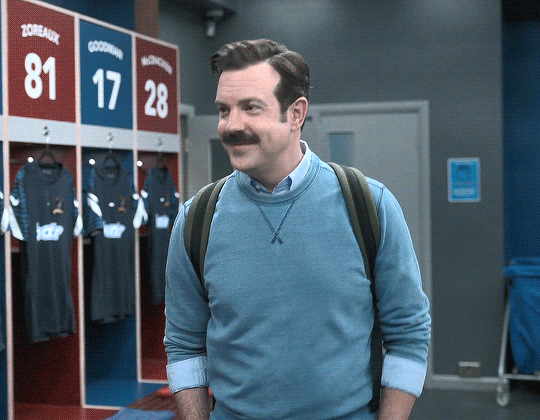

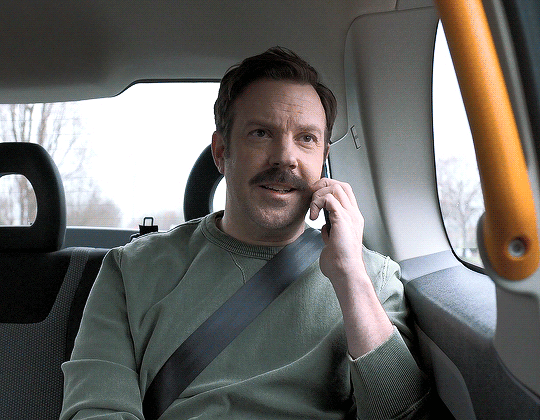

Jason Sudeikis as Ted Lasso Season 3 » Casual Sweaters/Jumpers
#Ted Lasso#Jason Sudeikis#Theodore Lasso#*mine: gif#tedlassoedit#sweater/jumper game#ugh you idiot with that face#stop staring at me swan#here's a gifset for the sweater/jumper lovers out there and sorry this is a long post. I just couldn't make up my mind on some of these#I spent way too much time overanalyzing the casual sweaters/jumpers. I was trying to only show each one once but then just gave up#deep dived research on the Todd Snyder site that's the kind of overanalyzing that happened#there is a lot of lighting messing with colors and for sure there are some repeats in this but whatever#I had this idea way back when we saw the variety of color sweaters/jumpers for S3#but after the end of S3 I lost a lot of feelings for this show#my motivation for giffing this show is not so strong anymore but there is a part of me that still wants to maybe try a layout set#I'm thinking of doing all 3 seasons and just an overall sweater/jumper encompassing gifset. both the work and casual together#kind of meh on how some of these turned out ¯\_(ツ)_/¯#it might be the added switch to the new editor and that all of these have been turned into gifv nonsense#also couldn't get the caption font to do what I wanted in html or at least it looked alright in drafts but not in preview#PS: thank you talldecafcappuccino for reading/helping with my color debate/same vs not same sweater/jumper nonsense
380 notes
·
View notes
Text

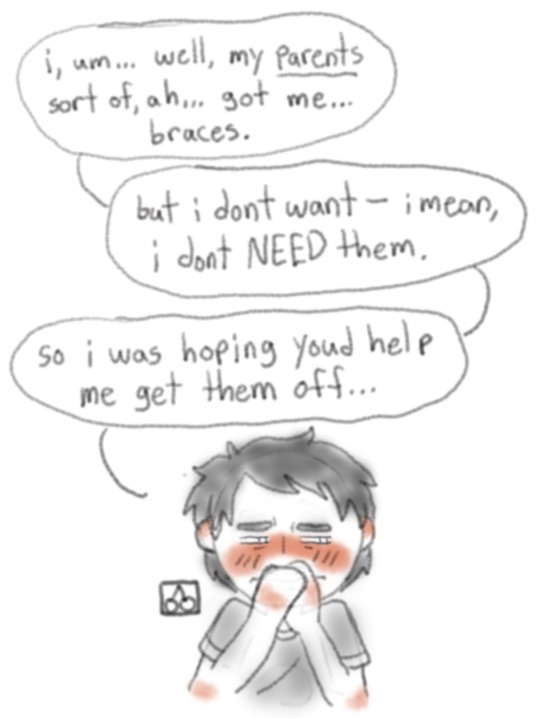


doctober day 28: metallic
local old man doesnt "get" the youths, pt 1/??
#back to the future#bttf#doctober#doctober 2023#marty mcfly#doc brown#emmett brown#christopher lloyd#michael j fox#my arts#my sketchy wip arts#im not saying marty definitely had braces... but im saying marty definitely had braces#basing it all on that scene in bttf3 where bufords gang randomly talks about martys teeth. thats my proof !!!#plus apparently average amt of time to have them is like a year so like its POSSIBLE. (i had them for like 3+ years so go off i guess 😒)#anyway this isnt late B) but it almost is bc i was still debating TODAY what to even do >_>;#but here we are so yeah <3#the generational difference of 'polite/goody two shoes' vs 'degenerate/badass' being seen as good and bad things respectively#docs thoughts: hooligan bad!! respectable citizen good :) -> martys thoughts: im not a nerd PLEASE GOD IM COOL I SWEAR#ps tell me marty WOULDNT ask the local disgraced scientist hes known for like 3 months to do literal surgery on him. theyre ride or die PLS#< for all the trans!marty truthers that also applies to u. i think we can all agree hes not above just straight up asking. king
74 notes
·
View notes
Text


@Giftober 2023 Day 12: Cozy
↳ Myoujin Tsukasa | Lupinranger VS Patoranger
Just for now! Please, heal me!
bonus!
#giftober2023#super sentai#kaitou sentai lupinranger vs keisatsu sentai patranger#lupinranger vs patranger#lupat#myoujin tsukasa#tsukasa myoujin#tokusatsu#toku edit#ps#horizontal#2:3#500px#hidengifs#quote
111 notes
·
View notes
Text


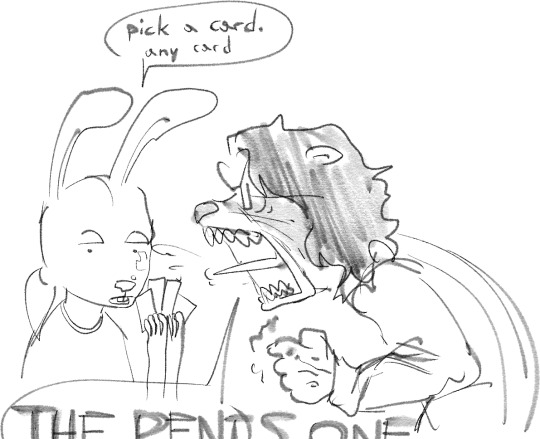
#ps: I imagine the HK characters as around human sized#Scarlet rot vs Scarlet flame#poll#who wins#malenia blade of miquella#malenia goddess of rot#elden ring#vs#nightmare king grimm#nkg#hollow knight#crossover
93 notes
·
View notes
Photo


fursona + a stockpile of dan.
oh. and uh...

dan... sleuth? problem dan? problem mandel. something.
#dan vs#dan mandel#problem sleuth#furry#sona#do not ask me about homestuck#i only ever reference it#but i will never be a casual fan#fuck you#ps forevah#my art
378 notes
·
View notes
Text
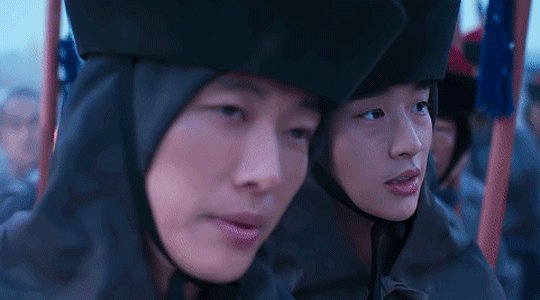

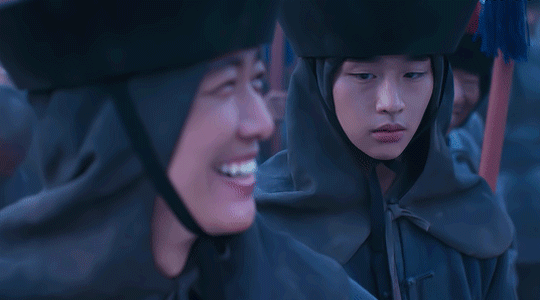
#mbc my dearest#my dearest#namgoong min#kim yoon woo#kdramanetwork#gif#mine#look what that hands focused shot made me do#open vs and ps for the first time in forever#after i thought i officially retired from this giffing business#anyway can we talk about hands#and how there was no reason to make it look so...so personal#the first time i watched it i didn't even realize he was passing him a secret message and i was ready to bite my fist lol#also i really need ryang eum to stop looking at him like /that/#it makes me feel unwell
144 notes
·
View notes
Text
HELLO & WELCOME ♡
to an all inclusive giffing guide, which includes:
- vapousynth installation on windows / mac
- how to source giffable material
- resizing / deinterlacing / denoising / sharpening on VS
- step by step breakdown of how to use VS
- giffing after you've used VS
- giffing using only photoshop
- simple colouring guide
- watermaking and blurring captions
( a better and updated version of the previous one )
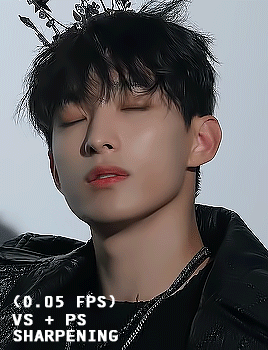
GIFFING USING VS + PS
1. VAPOURSYNTH & ITS INSTALLATION
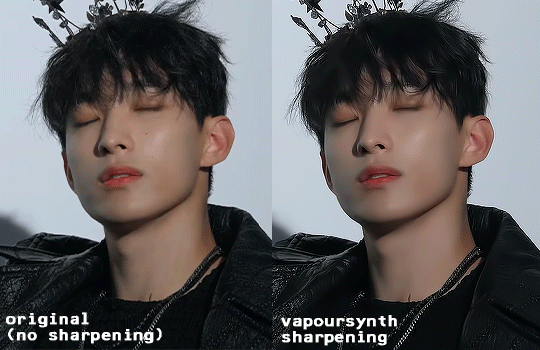
VS is free to download and use. it is truly an amazing tool which allows you to resize, denoise, sharpen your gifs all at once and save the output in gifs, frames , mp4 and mov.
You can install vapoursyth from here. The site has download software and installation guide for both MacOs and Windows. Please watch and read the installation guide thoroughly, it is a very well written one and if you follow along, installation will be done easily.
It is best to use a video with minimum resolution of 1080p but a good 720p would work sometimes. This is how gifs look after sharpening a normal 1080p video:
2. SOURCING GIFABLE MATERIAL
➞ You can start with downloading a 4K Video downloader. It will allow you to download clean and best available resolution videos from youtube.
➞ If you don't want to download a software, you can use screenrecording.
- Windows : windows key + alt +R
- MacOs: shift + cmnd + 5
➞ .TS files
- for seventeen .ts files, you can go to rosebay
3. TUMBLR SIZING
Tumblr has it own resizing rules so that your gifs aren't blurry after you've uploaded them. Keep this in mind when you're using VS resizing tool.
4. USING VAPORSYTNH
After you've installed the VS properly. You'll have a VS script shortcut on which you'll drop your video file for giffing.
Once you drop your video file on the VS shortcut, a window like this will pop up:

After you've put your timestamps and gif duration, a resizer will open up in chrome ( or your default web) along with a VS Script Window (sometimes it’ll take a min to open).
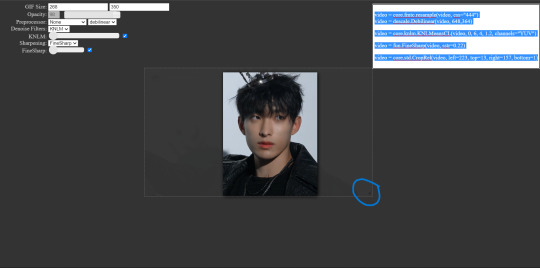
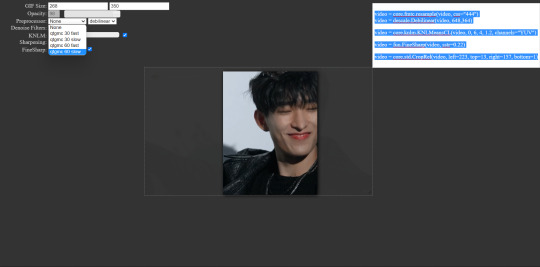
GIF Size: WIDTH (left space) and HEIGHT (right space). Use the bottom left triangle to adjust you clip.
Make sure 'Preprocessor' is set to 'None' and "debilinear'.
Use KNLM for denoising and FineSharp for sharpening by selecting them and ticking the small check box beside them. DONOT mess with the denoise and sharpening cursor on the resizer tab, we'll adjust setting on the VS Script.
There are CCs who use BM3D for denoising but it never worked for me. Always gave me an error. KNLM has worked without an error for years for me.
NOW, there are CCs who like to set frame per second ( qtgmc) on the resizer itself but qtgmc is designed to work with interlaced video. Don’t waste your time with fancams, it won’t do shit.
[ Interlaced content: live performances, variety shows. Typical formats: .ts/.tp/.m2ts
Progressive content: fancams, vlive/instagram videos, some variety shows (basically 1080p/720p/480p/…, anything with a p. Typical formats: .mp4/.avi ]
Copy whatever code that comes on the top right.
YOUR VS SCRIPT:
First, remove the # on line 9 to increase your cache size so that your VS doesn't slow down or crash. It is already removed in mine, but you'll have to remove the # on the start of line 9.
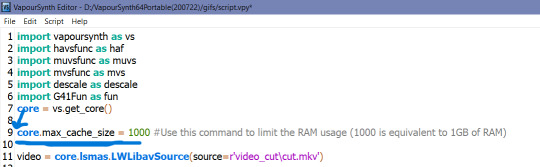
Remove everything from line 17 till before "video = core.fmtc.bitdepth(video, bits =16)" and paste the code you copied from the resizer on line 17.

After you've pasted the code, we put in our denoise and sharpen settings by changing these things.
denoise: 2, 6, 4 , 2
finesharp: 2
Now, Encoding aka Saving the output. Script > Encode Video and another window will pop up which allows you to select in which way you want to save your ouput.
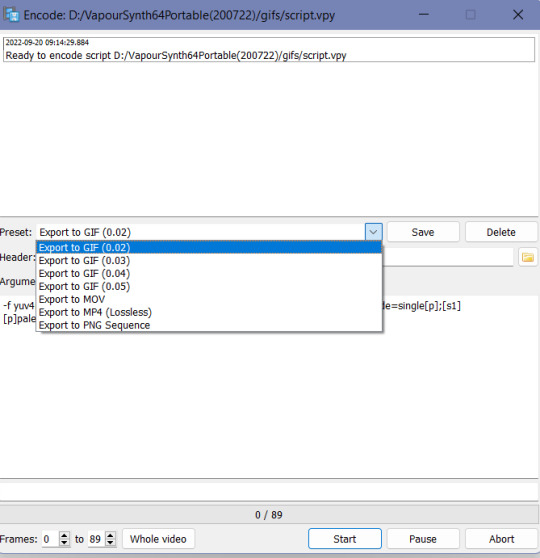
I would highly suggest using the PNG sequence because it is easily editable and is saved in hd from. GIF output can often be dithered.
Ensure that header in in Y4M mode
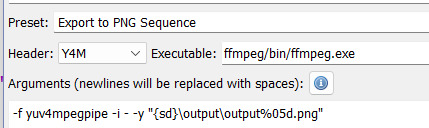
Click on Start to start your encoding process. Don't close any of the window tabs before the encoding is completed.
Your output will be saved under "D:\VapourSynth64Portable(200722)\gifs\output".
Before you start encoding another batch of frames or a gif, please cut and paste the previous output in another folder because each new batch of output gets saved in the same folder with the same name, thus, automatically replacing the files.
after you’re done with accessing your output PNGs, close all the windows and repeat the same for a new set of PNGs for another gif.
TRIMMING GIFS
If your saving as PNG sequence, you can simply trim your gif by removing the unwanted frames!
If you're saving as a GIF output, after loading your gif and converting it into a smart object, you can cut it using the 'scissors' button on the timeline.
Place the cursor thing from where you want to cut the gif from and press the scissors button.
It will split the gif in two. Select the unwanted one and press delete.
REMOVING FLASES FROM GIFS
To remove flashes in gifs in a simple and easy way is to save them as a PNG sequence. With that you can clearly see which frame has a flash and simply delete that before loading in photoshop as stack.

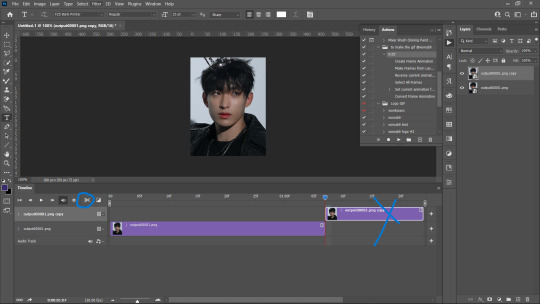
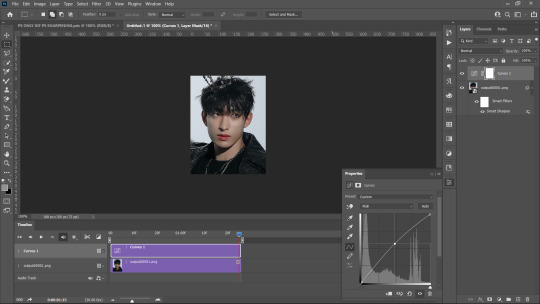
5. LOADING THE GIFS IN PHOTOSHOP
Firstly, turn on your timeline mode. WIndow > Timeline
To LOAD GIF FILE IN PS FOR COLOURING
File > Open > Select GIF > Enter
( a normal gif output will have a 0.02 FPS delay )
(if you want to sharpen or add any effects to the gif then:)
- Click the small button on the left bottom of the timeline to convert into into video timeline.

Select all frames on your right and convert them into a Smart Object (select all > right click > covert to smart object)
Add whatever filters you want.
Add your colouring and save.
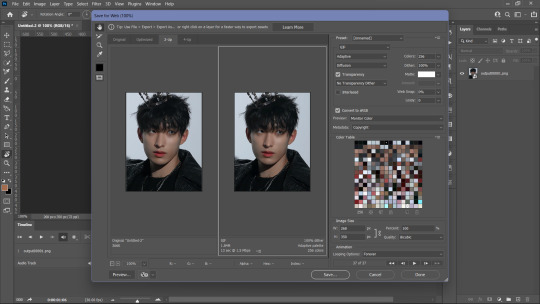
TO SAVE AKA EXPORT GIF
File > Export > Save to WEB
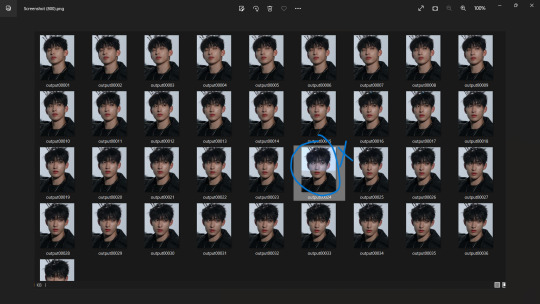
6. LOADING PNG SEQUENCE FRAMES FOR GIFFING
File > Scripts > Load into Stack > Browse
Browse will open your File Manager. Select the frames you want to be loaded as a stack. Let them load and click OK.
After PS is done loading your frames, Follow these steps:
Click create frame animation. It’s show only one frame so you have to click this ≡ symbol on the top right of the timeline.
Then click Create Frames from layers and it’ll make all frames.
Then click ≡ again and click “reverse frames” because ps loads stacked frames in reverse so you have to un-reverse it.
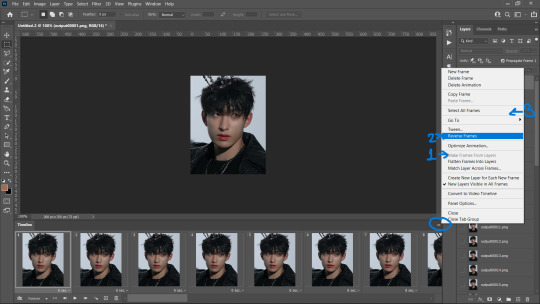
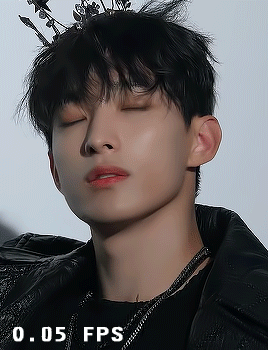
4. Most importantly, we need to set frames per second because we didn't set anything on the resizer. Frames per second can make a huge difference in how fast or slow you want your gif to be.
0.05 FPS is just my preferred setting.

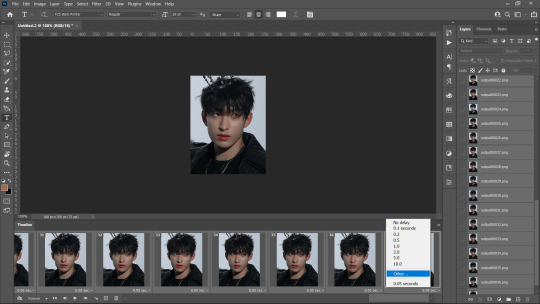
To input your desired FPS settings, select all frame from the timeline, right click on any frame > Other > Input your desired setting.
( anything above 0.08 will make the gif too slow )
5. Click on 'Create Video Timeline' to turn this into a video timeline. (bottom left of timeline)
i made an action that does all steps from 1 to 5. Download it here <3
6. Then select all your layers from the side panel and convert it into a smart object so that you can sharpen it and add other filters.
7. Add your adjustment layers for colouring and save it!! Saving process as same as before. (File > Export > Save to WEB)
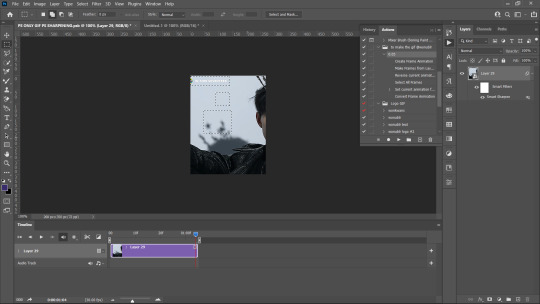
GIFFING USING ONLY PHOTOSHOP
If you don't want to go through hassle of installing and using vapoursynth, you can use this photoshop only method. You can simply cut the video and load them as frames.
File > Import > Video Frames to Layers
A window like this will pop up:
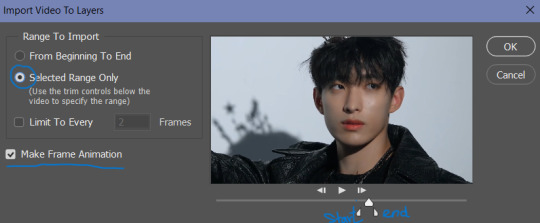
Use the triangle cursors to set the start and end of your clip. Make sure Make frame Animation is check. Press OK.
IMP: After you frames have loaded, you'll see the frames have loaded at a 0.04FPS. You can change it according to your preference but the speed is different (slower) for these gifs even if they're both at 0.05fps, that is because the number of frames is different than number of frames from a VS png sequence for the same clip.
You can adjust the fps the same way mentioned above.
You can see the difference even with the same FPS settings. The frames in the second gif are VS generated whereas the first one is PS generated.

After setting you desired FPS, click on the Make Video frame animation button at the bottom left on the Timeline tab,, Select all frames/ layers on the right and convert them into a SmartObject.
Now comes the main part, Resizing the gif according to tumblr.
For this, Image > Canvas Size. Input your desired dimentions and press OK.
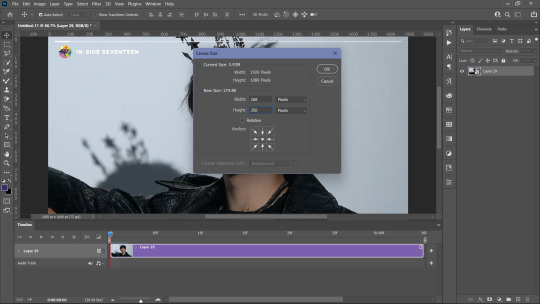
Then, Click of CTRL + T (Free Transform) and adjust the gif along the canvas. like this:

Press Enter. You gif is set. all you need to do is, add your sharpening (filters > smart sharpen).
You can also refer to this amazing tutorial by @jeonwonwoo for photoshop giffing.
BLURRING CAPTIONS IN GIFS
For this you only need a gif in a Smart Object, Marquee Tool and Gaussian Blur.
Marquee Tool is the small dotted rectangle tool. Click on it and then make your selection around the caption by clicking and dragging your cursor.

normal selection
Add to selection (to the normal selection)
( best for multiple captions, it lets you select in multiple places at once) Example:
after selection, go to Filters > Blur > Gaussian Blue > 3.0
IMP: If you want to add Blur using marquee tool on a smart object that already has a smart sharpen filter (or any filter) on then you need to convert that smart object into a smart object again.
after you've added your colouring adjustment layers, save your gif. File > Export > Save for Web
WATERMARK
To make you custom watermark shape, you can follow this wonderful tutorial by @yunaevis
How to set the custom watermark or any watermark, you can follow this tutorial by me. ( bonus: it'll also teach you how to use actions for watermarking)
BASIC COLOURING
Start off Curves.
Click and drag the curves from the middle to upwards. This will increase the brightness .
For skin, we begin with Selective colours. Messing with Reds and Yellows, give the skin more even saturation. You can accentuate blacks and increase brightness + contrast too.
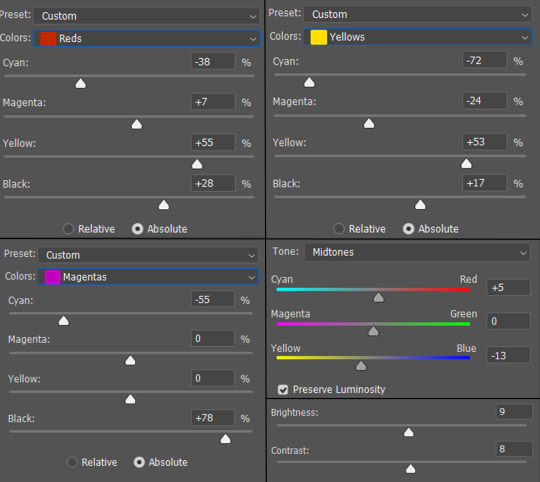
BEFORE AND AFTER:
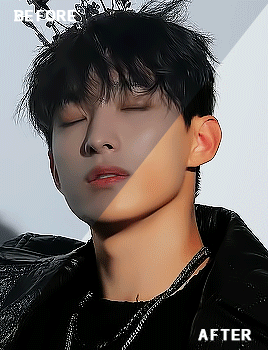
for a detailed basic colouring tutorial, you can follow this tutorial!
DONE AND DUSTED,,,, THANKYOU <333
I hope this was somewhat helpful <3 if anyone has a doubt, they can always contact me!
#photoshop tutorial#vapoursynth tutorial#all in one gif guide#gif tutorial#kpopccc#lee.guide#ps tutorial#watermark#giffing#blurring captions#resources#guides#allresources#vs#vapoursynth#photoshop#gif making#300
531 notes
·
View notes
Text

made a reverse 🔄 of that one s1 ad to show what rly happened in the end 😌
#young royals#Love vs Duty? Well LOVE WINS#me making frames manually in mobile Ps cos I have no idea what I'm doing 🤪#wilmon#yr s3#young royals s3#yr
23 notes
·
View notes
Text

#psx#ps1#ps#psone#playstation#playstation 1#ps1 games#psx games#retro gaming#90s#90s gaming#90s games#gaming#box art#cover art#sony#capcom#marvel#x men vs street fighter#fgc#fighting games
75 notes
·
View notes
Text
absolutely nothing on god’s green earth could ever make me hate her btw


#i would die for her and i’m not even joking#‘’they only included her to appeal to the younger audience’’ nah bro they made her FOR ME#thank you so much to whoever came up with her character i owe you my life#she’s easily one of if not the best thing added to megamind lore idc#baby girl 🥰#ps: we do not call middle schoolers annoying or stupid on this account or anywhere 🫶#keiko morita#megamind vs the doom syndicate#megamind rules
16 notes
·
View notes
Text

happy birthday @itshyuka!
#moasource#moacentral#tubatunet#hueningkai#txt#kamal hueningkai#tomorrow x together#tomorrow by together#mine.#mine:fanart.#f:hueningkai.#siyuantag#useryjunies#ayabestie#userjoanna#useryeonbins#happy birthday lia! i am so so so so so sorry i didn't make it on time <|3#you're truly my most favourite ningdungie ever and i am really very grateful that i had the fortune to meet you 3+ years ago 💖#thank you for bearing with me and my bajillion ps + vs related questions back then fjhskladkj#and for being my no.1 supporter since the start of my giffing journey :D#really don't know what i'd be doing here without you; i owe all of my content (especially the gifs) to you and your patience~#i hope we remain friends for a long time so that i can bother you with my never-ending train of thoughts again the way i did in 2020 HAHA#always remember that you're the bestest teacher ever and you're working hard + doing your best no matter what#and that everyone around is always rooting for you! hope you're well ♡
126 notes
·
View notes
Text
After careful thought...
I am now convinced RVB is, in a nutshell at its core, two twenty year long dimetric slowburn romance tropes comprised of viewing each from the lens of 'I'd die for you/I'd live for you' while accounting for the repercussions of those choices on the lives of those around them while also examining at the same time the 'Inability to let go/ever start' and how it ultimately locks your mind in a perpetual state of 'What if?' without taking the risk of DOING all by asking the simple fucking question
Ever wonder why we're here?
#But with Space Marines and War and PTSD#RvB#Chex#Grimmons#I'm mostly being silly about this#but i mean.... I don't think I'm technically wrong#Obvi there's a whole hell of a lot more#but eh just trying to joke a little here#But HOLY HELL Binging this show in three days was insane#I'd watched it ages ago up to like S10 but this time I went through ever season and damn it's just... become something so much MORE#Church#Tex#Griff#Simmons#I have a lot of feels for these dumb fucks#I hate 19 is the end... feels so off... wish they could have done an even 20.#I also don't buy this whole retcon thing... like... it makes no sense#but that's another post entirely#Red vs Blue#ps Church and Griff are pretty much the same brand of asshole and I think that's why they are my favs... Ngl
16 notes
·
View notes
Text


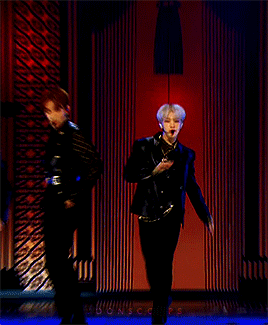
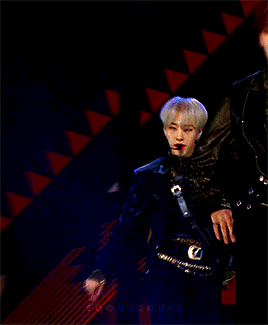
hoshi ⟡ egotistic ⟡ 191231
#flashing tw#svt#seventeen#svtcreations#hoshi#kwon soonyoung#n.gif#g:svt#m:hs#pls let's pretend these match <3#i had these saved as individual psds on my laptop#smth i never got around to giffing#idk if the file i used for these was a ts file or not but since i still had to crop them in ps i don't think they went thru vs at all jsdfj#i don't remember lol#anyway tried these out to play around with coloring <3
175 notes
·
View notes
Last Seen Blogs

brandlablondon-blog
BrandLab London Limited

bravethisstorm
Metal is never enough

vakarians-babe
Girlboss Sauron

