#. this show in 1080p always gets grainy
Note
hi ☺️👋 love chu💕 ❤️ I'm really new to gif making too for my favorite shows so I hoped to ask how you make the backgrounds look so smooth in your gifs?I'd appreciate any advice, it's just for practice. thank you if you answer in advance ❤️💕
Hello hello, and big love right back at ya! 💕😊
How exciting that you’re new to gifmaking – it’s so much fun to get to experiment with that and try all sorts of things. I learned a lot from following tutorials or talking with other gifmakers back when I first started out, and I’m definitely still learning new things now.
I think it’s a combination of factors that makes the background in my gifs so smooth? So I’m going to talk about some of those factors and show you a few things and hopefully that’ll help! I use Photoshop CS6 for gifmaking, but I think the majority of this advice also holds up in other versions haha.
First off, I always try to use video files of the 1080p variety. You can gif with videos that have 720p, too, but 1080p will provide a smoother and clearer image because there are more pixels in 1080p. (There’s also 2160p, which is even higher resolution, but I’ve personally found that unwieldy to screencap and 1080p looks very good already!) This is the technical reason why the gifs look smooth: work with a high resolution video and get better results, that’s just how it is.
Another technical thing is the type of scene you pick to gif. When the scene is very busy with a lot of people and objects coming into focus at once (group shots, shots in heavily decorated rooms, etc), there’s very little in the scene that actually fades into the background focus-wise. With close-ups of a single face, the focus is entirely on the face and the background will fade to some degree. This really has to do with how the show’s made, like how the director and camera people and everyone else chose to portray/film the scenes. As a gifmaker, you can always choose to crop some things out of the scene when you want the focus to be on a specific thing – you’re essentially choosing a new focus for the viewer in that case. But yeah, overall, the way it’s filmed affects everything else about the gif.
Now, onward to the actual Photoshop things…
When I gif, I also sharpen the gif itself. This will make some details pop more and help move the focus to where I want it to be most, which is usually either a face or something important happening in the scene. I do think it might affect how you see the background as well – when everything in the foreground is sharpened, the background will naturally have a bit of blurriness to it. I have a sharpening action I use for every gif, but I believe its settings are as follows.
This is Filter -> Smart Sharpen by the way.
First Smart Sharpen:

And the second Smart Sharpen (yes we do it twice!):

Most importantly, I think the way you choose to brighten and color the gif will affect how the background will look. A show like House of the Dragon unfortunately can be very dark, so the urge to brighten it and fix the filters they put on these scenes is immense. 😂 But it’s also really easy to brighten it too much with that urge to see what’s going on, lol, and that’s when the background’s going to look grainy or pixelated! So it’s always a fine balancing act and a lot of trial and error (seriously, the undo-button is my best friend) when working with scenes like these.
There are a few ways you can brighten a gif. My preferred method is with the Curves layer, but I also use Exposure and Gradient Map as additions to that sometimes. Mostly when a scene is so dark that I have to take care not to render it too pixelated by adjusting the Curves, really. When a gif gets too tricky, I use all three. 😂 Below are some basics of each layer, but it’s really about trying and clicking and trying and clicking and trying and… you get the picture, lol.
Curves
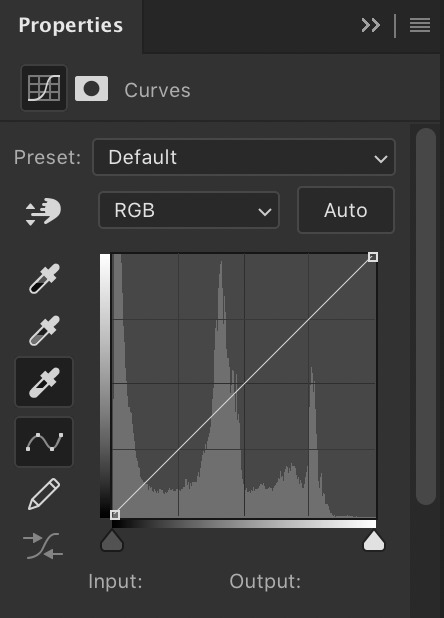
The little eye dropper tools I marked with white – grey – black in the picture below are the most important. Select the white eye dropper and click on the section of the gif that’s closest to white (but not fully white). Then, select the grey eye dropper and click on the gif section that’s either beige or grey or at least in that neutral color zone. Finally, select the black eye dropper tool and click on the darkest part of your gif. You should see immediate results, but it tends to take me a few tries to get the best version! It’s not uncommon for me to zoom in on an image to, like, 600% just to see which pixels I should be clicking. This takes patience, haha!

Exposure
Use it sparingly, cos it’s going to be an asshole about how bright it makes some things. My settings typically are:
Exposure: between 0,13 and 0,22 (this brightens certain areas)
Offset: -0,0009 or -0,0019 (please don't forget to add the - to the numbers, this will deepen the black areas a bit)
Gamma Correction: 1,04 (I’ve found it ‘marries’ the light and dark parts a tad more and makes it look more natural)

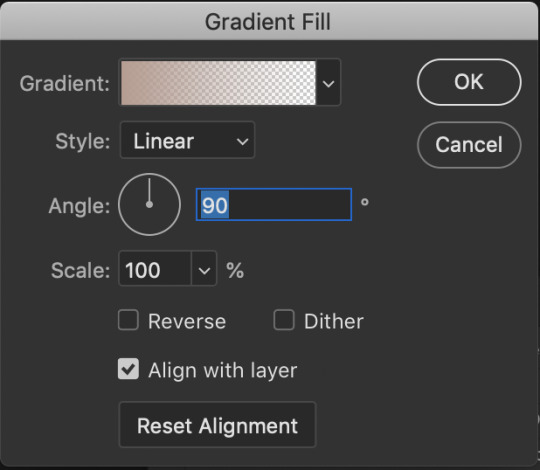
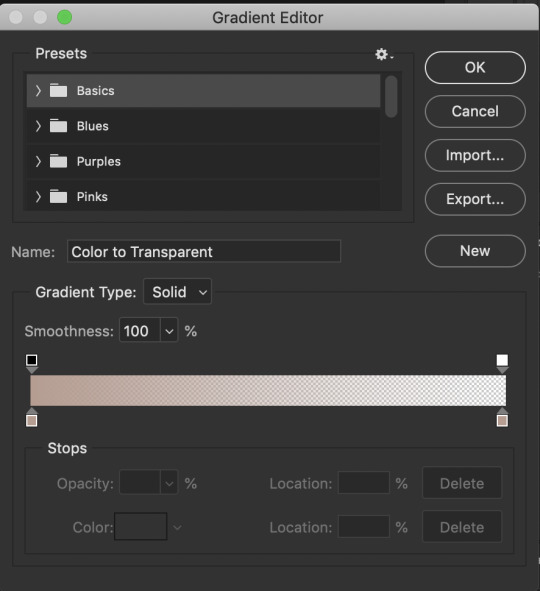
Gradient Map
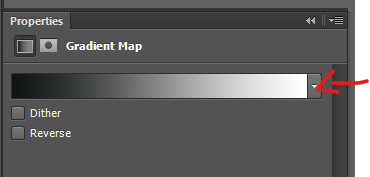
Gradient map my beloveddd. It doesn’t always do the thing, but sometimes it really helps me add a bit of color correction or helps me lighten a certain part of a scene a bit more. Be careful with it, though, as using it too much might make the gif a bit grainy/pixelated (and we don’t want that). There are a few different ways you can use it, but my favorite way is the only good thing TikTok ever taught me (I’m old as dirt, y’all) and that’s this in a nutshell…
Add the layer and click on the gradient itself.
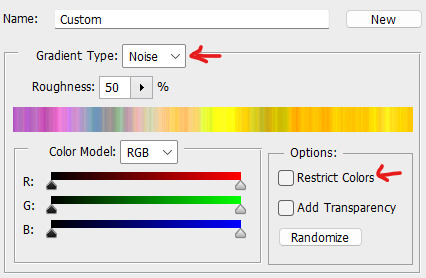
Now, this is going to make the gif look scary as heck but bear with me? Select Noise, uncheck Restrict Colors. Click OK. Don’t cry.
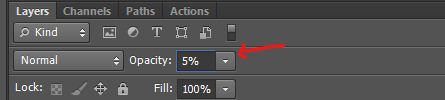
Go to the Opacity of your Gradient Map layer and set it to a percentage between 2% and 5%. Dry your tears.
If it’s not to your taste, go back into the gradient map itself by clicking on it again and selecting the nifty Randomize button you see on the screencap. Click and click and click until you find something that makes the gif sing.
Soooo. Very long story short, all of the above is going to contribute to how a gif looks and to how smooth the background is. I hope some of it is helpful to you! 💕 (And if anything’s unclear, please ask!! I know I get a little wordy and technical about some of the giffing sometimes, haha.)
23 notes
·
View notes
Note
hello! i hope ur day is going well! im not really sure how to word this but ur one of my favorite gifmakers on this site!! and i was wondering if u have any tutorial or would be willing to tell how!! do u make ur gifs so sharp! along w being so smooth and gorgeous im foremost always just stumped at how beautifully sharp ur gifs r!! not to mention the coloring!! regardless of if u get to answer any part of ur process or not, i just wanted to tell you ur gifs r very very beautiful. im always so awed and admiring wnv i see them! so warm and prettily colored yet so sharp!! apologies for gushing here, pls have a good day!!!
AHHH THIS MAKES ME SO HAPPY, ANON! It always makes me so happy, when I get any kind of compliments on my gifs, so this really really really warms my heart!! ♥
I did a gif tutorial like 1,5 years ago which you can find here! My sharpening has changed slightly from back then, so I'll just tell you what I do now.

Much more detail under the cut (this got way longer and detailed than I had expected)!
This is a walk through of my sharpening/effect process, so if you want any tricks about colouring or anything let me know!
The first important step to sharp gifs is the video quality! The higher the video quality is, the prettier and sharper your gifs will be. TS files are the highest quality (most of the time, sometimes they kind of scam you ngl) files you can get. Else 4k videos are great too! For me I usually don't go under 1080p (with few 720p exceptions). Sometimes I don't really like TS files, because they're a bit too sharp for me. This is mostly if it's a variety show. Concerts tend to be not as sharp in my experience.
I use vapoursynth to resize my gifs before putting them in photoshop. I usually don't do any sharpening or denoise in vapoursynth. This site has everything you need for vapoursynth!
For sharpening and stuff in photoshop, I usually do camera raw + topaz denoise + sharpening + 1% blur at 30% oppacity.
A bonus tip is, if you've done everything and tried soooo hard to make it non-grainy, but you just can't get it to do whatever you want it to... embrace the grain and add a noise layer! I do this with big gifs (540x540) usually.
To go more in depth, my settings for those are as following...
Camera raw
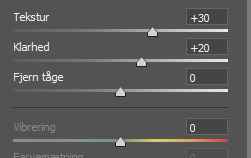
Texture (tekstur) I usually go between 20 and 30, depending on the thing I'm giffing. For Clarity (klarhed) I do the same number as texture, but minus 10. Idk why, it's just how I usually roll!
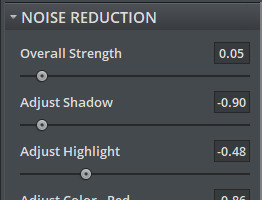
For Topaz denoise I usually only use a little bit. Like 0.04-0.06 overall strength. I don't really have any "this is what I always do" settings, but usually my shadow is at 0.90 and my highlight is 0.48 (because I liked it one time and then just kept it). You can also use the denoise option in vapoursynth, I just prefer photoshop, because it feels like I have more control over it. I know a lot of people don't use denoise at all, but I usually do with files less than 4k quality!
OBS! Using topaz denoise on smart objects in photoshop is a bit tricky, but I made a video about it once, so here you go! (the video is kind of outdated for me, so ignore the sharpening part and focus on the "how to do after you've put denoise on your gif" part. Also ignore my voice, thank you).
Sharpening:
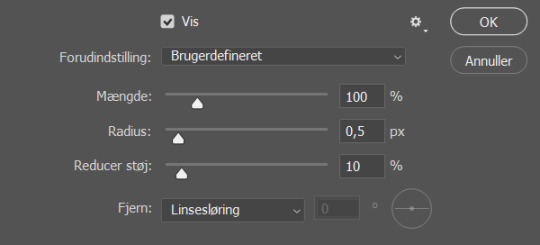
These are my settings for sharpening. If I think the gif is a bit too sharp after I've added a blur filter, I change the amount (mængde, sorry my ps is in Danish) to 80% and that usually does the trick!
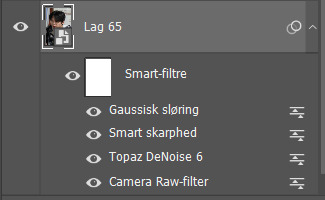
If you use all of these, this is how the smart object will look, before you convert it into frames
Let me know if you have any other questions or anything at all!! ♥
#ask#answered#anon#tutorial#kind of#I've kind of considered doing a “maja's tricks and tips for colouring and other stuff with gifs” post so let me know if that has any intere#i answered this as soon as i got home cause I got excited that someone was asking me for tips ♥
6 notes
·
View notes
Note
hi! i just wanted to say that i absolutely love the quality of your gifs! they always look so good, especially when the show you're giffing is older and originally very grainy. i hope this makes sense lmao but yeah! hope you have a lovely day <3
Hey anon!
Aw, ty! This is very kind of you to say <3
I have worked really hard over the three years to improve my gifs and I finally feel like I know what I'm doing... somewhat... especially as I'm completely self taught 😅
That's also to say I don't always get it right but I think because I work with differing quality from 480p/720p/1080p I've kind of figured out what to do and a lot of shows I work with are older. Sometimes it's just dumb luck and you can make a show that's originally lower in quality or grainy look HQ and sometimes you can't lol. I have multiple settings and it's a case of trying a few to see what I like best. I have found there's not one blanket option for gifs.
I hope you have a wonderful day/night wherever you are too and ty for taking the time to send this 💛
#soph asks#i am always surprised when people compliment my gifs#because i always think they look awful lol#shoutout to all gifmakers it's way harder#and more complicated than people think#kind anons make the world go round
4 notes
·
View notes
Note
Hello<3 I saw your questions yesterday from that anon, and how kind you were about it. Thank you, not many people care to help like that you're a really sweet person. I had a question of my own if that's alright? See I've been a gif maker for a year now and was wondering how experienced gifers such as yourself get that nice matte look to them? I work with 780-1080p myself, but the pixels still show. Is it like a texture over the gif? Hope I made sense I'm not English :') If not please ignore!<3
Hi! I love helping people out honestly, for me it’s only a few minutes to answer but i know for the other person learning a new technique can be a huge help!
I’m not a hundred percent sure i know what you mean by matte, however what i can think of that makes my gifs look less pixelated is first of all my files: even though i always work with 1080p only, i always try to download the biggest file, because that’s the least compressed
another thing is sharpening: i sharpen twice, first 500% with 0,3px radius then 30% with 10px radius. I personally don’t like to do more because i don’t want my gifs to look grainy
a lot also depends on your save settings, these are the ones that i swear by:
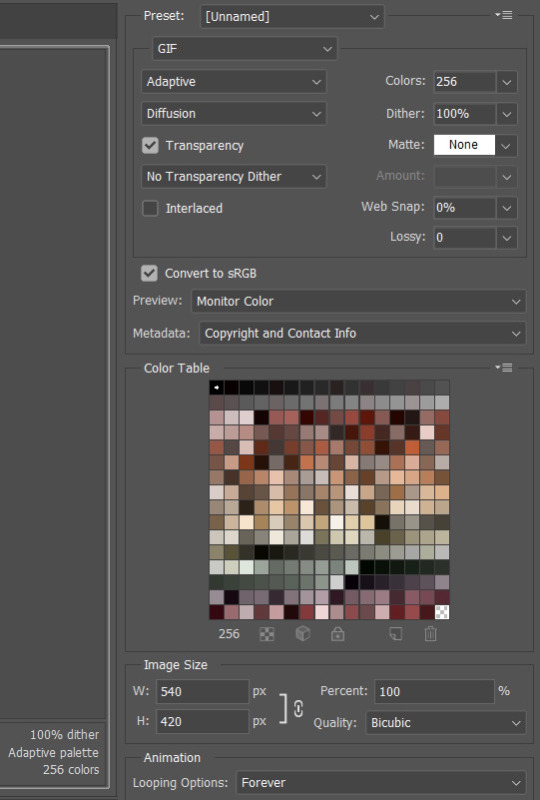
I always use adaptive - diffusion. I know that using pattern is very popular as well but i think diffusion creates a smoother look overall.
Also if your gifs looks pixelated because you work a lot with dark scenes i recently started using selective color to make the darker elements in the background fully black and it makes a huge difference! You just create a selective color layer, choose black in the drop down menu and you set the black anywhere between 0 and +100. I usually do +5
I hope one of these helps!! <3
4 notes
·
View notes
Photo
xue "i will murder entire clans but i draw the line at being accused of stealing" yang
THE UNTAMED / 陈情令
episode 10
#theuntamededit#cqledit#fytheuntamed#cdramanet#the untamed#cql#xue yang#wang haoxuan#tv series#*gif#*#. no one seeds the 4k t///ent uh?#. this show in 1080p always gets grainy
2K notes
·
View notes
Text
gif tutorial ♡ by @tifaa
Lately I’ve had a few questions about how I make my gifs, so under the cut is a small tutorial about how I make them! If I forgot something or you have any questions, please just send a message or an ask. It’s also best to view this on desktop because mobile with mess with the quality ; - ; ♡
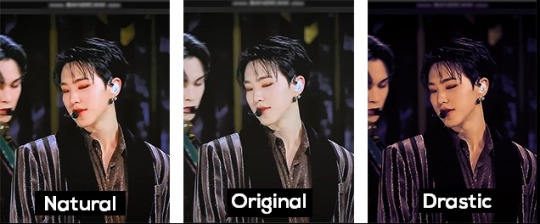
I’m going to show you the process of how I turned the gif on the left into the one on the right. (Please ignore the middle one for now!) Basically, turning a gif with absolutely no editing into a coloured, sharpened, and smooth gif!
1. Downloading Videos
I use 4k Video Downloader to get videos from YouTube.
☆ The most important thing is to download videos in the highest quality possible (I personally never gif a video that is below 1080p)
2. Preprocessing
This is optional, but I do see a big difference between gifs that I have preprocessed and ones that I used to make using only photoshop. It doesn’t take that long and you get a really smooth result, so I definitely recommend it!
Vapoursynth download + tutorial (make sure you download the one that’s titled ‘VapourSynth64Portable(200616).zip’). Since it’s quite complicated to download for Mac, I recommend trying Avisynth instead. I may do a seperate turotial on VS, but since the one I linked is in a video format rather than text, I found it really easy to follow compared to other written tutorials I had found!
These are my VS settings:
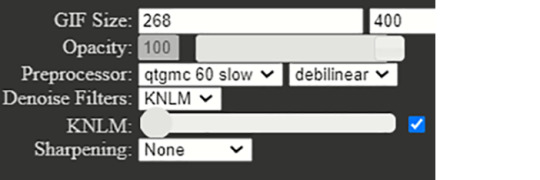
☆ GIF Size will change depending on how many gifs you want to make per row:
1 gif per row: 540px
2 gifs per row: 268px
3 gifs per row: 177px
You can change the height to whatever size you want, but I wouldn’t recommend going over 540px.
☆ Preprocesser is how many frames per second you want your gif to be. qtgmc 60 slow gets you the smoothest possible gif. As for the second setting, I always use debilinear. You can find more information on these here!
☆ KNLM is a denoising filter that basically smoothens your gif and makes it less grainy! You can also choose to utilize the sharpening setting here, but I prefer to do that in Photoshop!
Once you have chosen your desired settings, you can paste the output script that’s on the right-hand side into the VS Editor resizer.html window. (Please refer to the video tutorial〜)
3. Importing into Photoshop
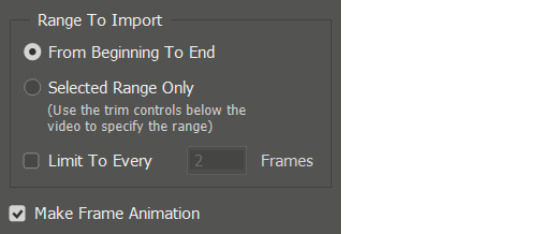
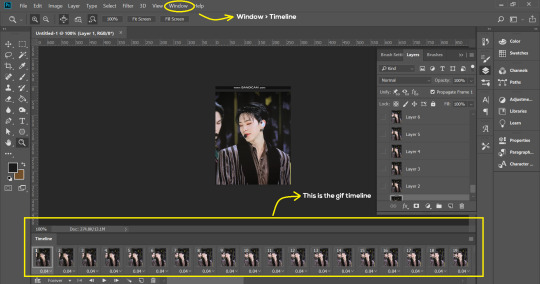
To open the video in PS, go to file > import > video frames to layers (the preprocessed clip will be located in the ‘output’ folder). These are my import settings:
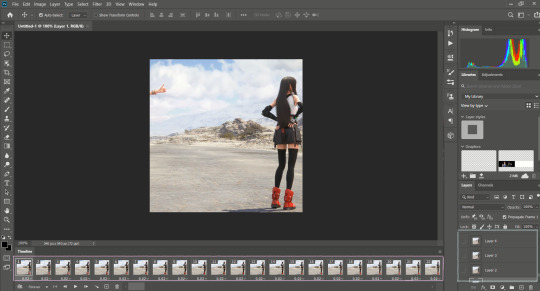
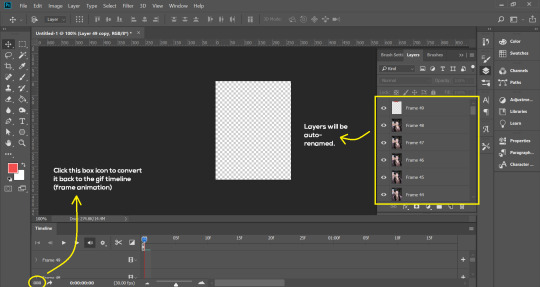
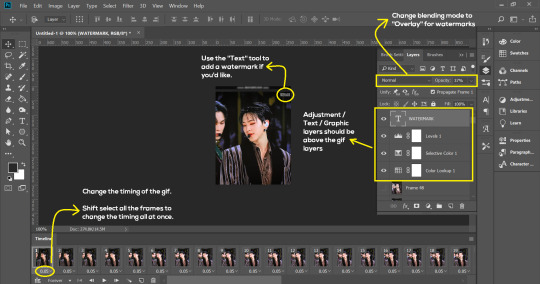
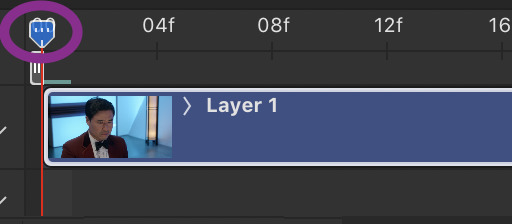
Your workspace will now look something like this: ( I’ve highlighted the frames in pink and the layers in blue, so you can remember!)
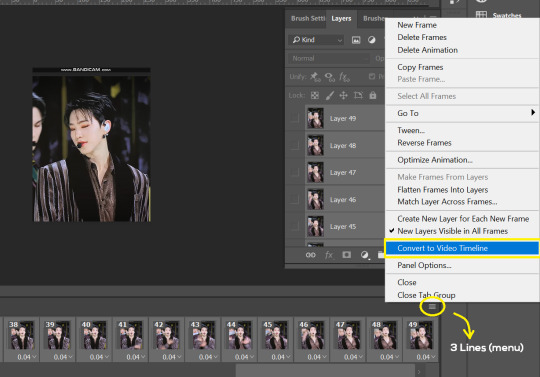
Now, delete any excess frames from the timeline if you have any (eg. frames that include a different scene). Then, select all of your remaining frames and click on this little button on the top right-hand side of the timeline:

From this menu, go to > convert to video timeline. Now, look at the layers on the right-hand side of the screen. If you deleted excess frames at the beginning, you should now delete the corresponding layers (that is, all of the layers without the eye symbol next to them).
To be able to colour and sharpen the gif, we have to convert it into a Smart Object. To do this select all of your layers and go to > filter > convert for smart filters.
4. Colouring
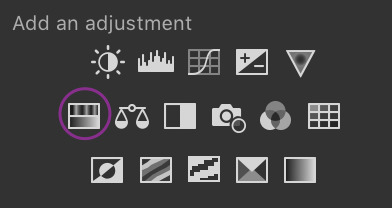
Now, you can colour your gif however you’d like! There isn’t necessarily a right or wrong way to do this, but some settings I’d recommend trying out to begin with are colour balance, selective colour, levels, hue/saturation. To apply these settings go to > layer > new adjustment layer.
☆ Below is are some examples of this lovely scene of Tifa ♡ The first one is a base gif (no colouring at all), and the second one is what it looks like once I’ve coloured it. We’ll get to the third one soon, don’t worry!
5. Sharpening
Click on your Smart Object in the layers tab and go to > filter > smart sharpen. These are my settings:
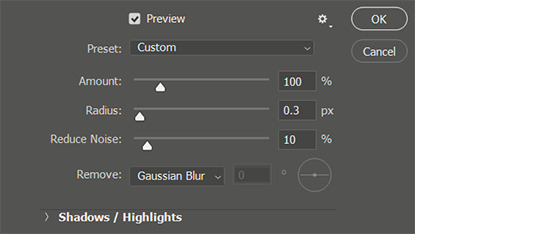
☆ The next step is optional, but it’s just a preference for how I like my gifs (it just makes them really smooth and removes a lot of the noise)!
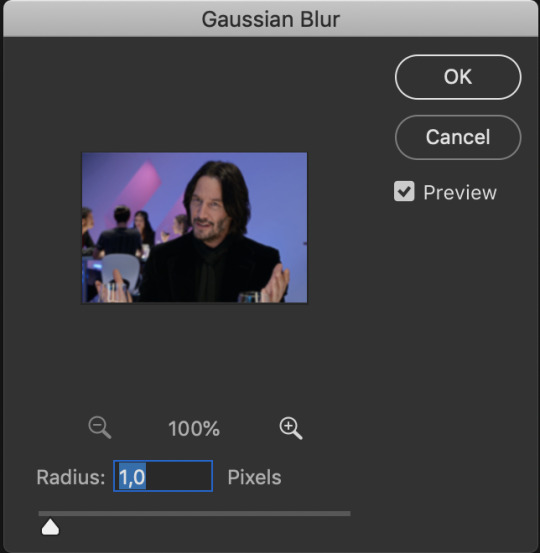
Once I have sharpened my gif, I duplicate the sharpened later (right-click on the layer and select ‘duplicate layer’ from the menu). Then I add a gaussian blur filter to the duplicate layer (filter > blur > gaussian blur) and set the radius to 1.3.Your layers should now look something like this:
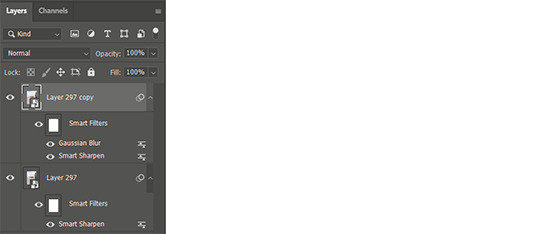
You can see the result is the third gif from the above step. Nice and smooth, right〜?
6. Saving your gif
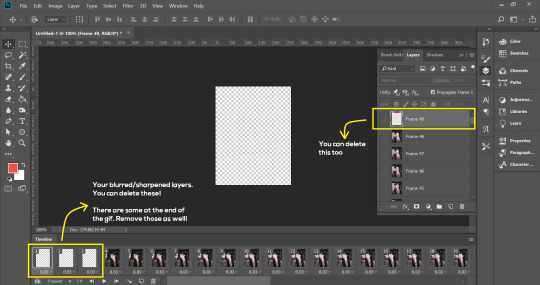
To save our gif, we have to convert it back into a frame animation.
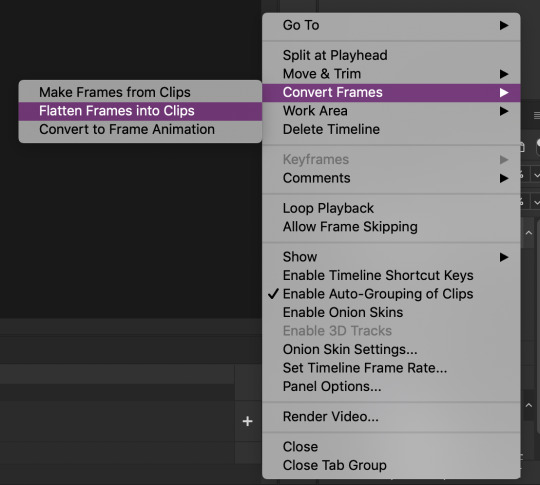
To do this, select all of your layers and press the little bars icon above the timeline (the one we used to convert our frames into the video timeline from before!), and select convert frames > flatten frames into clips. Now, select all of the visible layers (the ones with the eye symbol shown), and from the same menu as last time, convert frames > make frames from clips. Again, from the same menu, go to convert to frame animation.
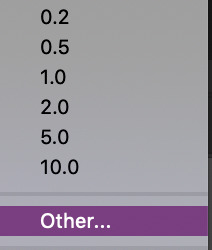
To set the speed of your gif, select all of your frames and click on the little number icon below it (it should say something like 0.03), then click ‘other’. Here you can set the speed. I usually put it somewhere between 0.02 - 0.04 depending on the scene, so just try out which speed you prefer.
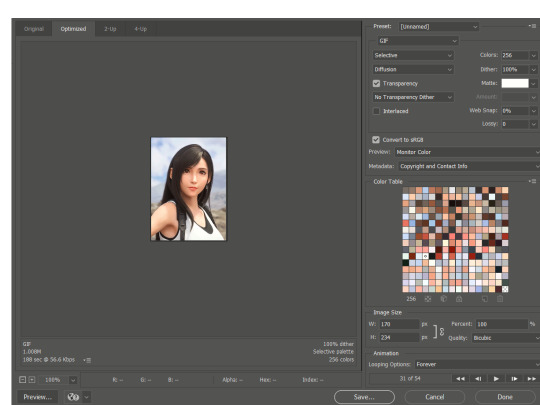
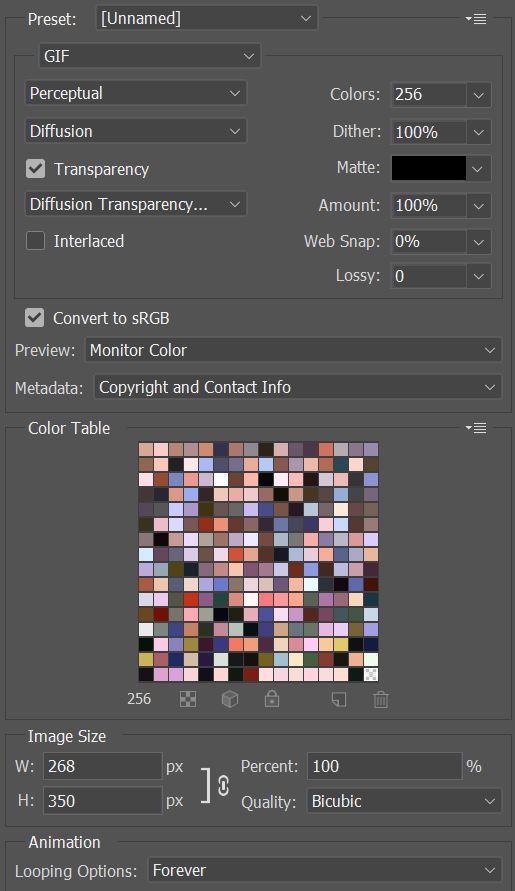
Now, we can finally save the gif: file > export > save for web (legacy)! These are my output settings.
☆ To make sure that your gif plays more than once, you must have looping options (near the ‘save’ button’) set to ‘forever’ ! ! !
Again, this is just the way I make gifs, so there are many other tutorials out there that may be more suited to your preferences! You can find some examples of my gifs here.
☆ I’ve never made a tutorial before, so I really hope that it helps you even a little bit! Please please do ask if you have any questions, either by dm or inbox! ♡
#gif tutorial#yeahps#itsphotoshop#wehearttutorials#completeresources#anon who requested please let me know if you see this!#i hope it's OK!#♡♡♡#daily gaming#videogamewomen#videogameedit#gamingedit#gamingnetwork
69 notes
·
View notes
Text
MY GIF-MAKING TUTORIAL
for @sunshinesquash
i use photopea.com for making gifs so if you have photoshop i’m not sure how much different these tools will be, but i hope this can help!! i also have a windows computer so if you have a mac my recording technique might not work :’( all the tools i use are pretty simple and basic so if you can’t afford to download a lot of software dont worry!
recording:
when you’re finding videos to use for gifs, you want to use the highest quality footage u can find! you normally always want to use 1080p, but if you can only find 720p then make sure its not too grainy!
for the actual recording, i use the (windows + g) shortcut. once you click that this should pop up!

if this is your first time opening the game bar, it might just show only the top bar - if that happens, click on the second icon! when the capture sidebar shows up click on the third icon and the recording will begin :] make sure that your recording is 4-5 seconds max, otherwise it will be too big for photopea to handle and there will be too many frames!
opening the recording:
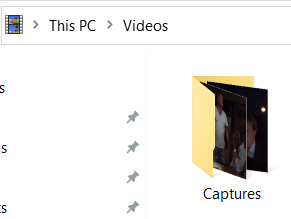
all your recordings from the windows game bar will automatically show up in videos > captures.
open photopea, and then click file > open and locate your recording!
when it’s opened photopea should look like this:

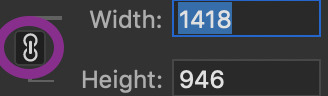
this image size is 1920 x 1080 which is way too big for photopea to load your final gif and for tumblr to accept! because of this you’ll click file > new and get to a pop-up that looks like this:

the size that i normally make my gifs is 540 x 540 which is what i’m going to use for this tutorial! you can always go for other dimensions - whatever you’re comfortable with :]. click create!
ok now comes the complicated part :
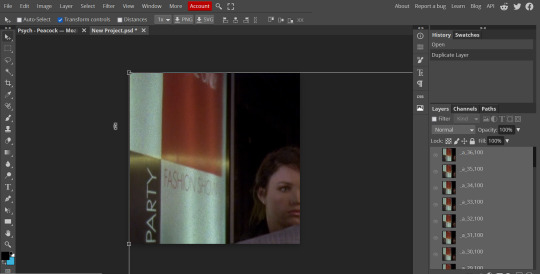
select all of the frames that you’re going to work with until they become highlighted grey. make sure the folder is not selected!

right click on the highlighted area so an options bar pops up!
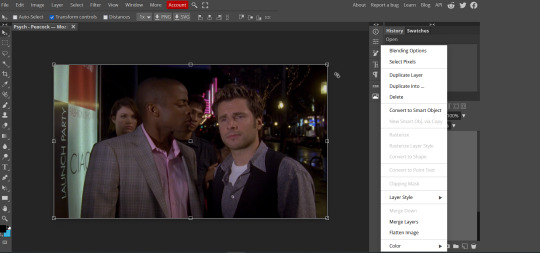
click on ‘duplicate into...’ and select the drop down menu and click on ‘new project.psd’. there will be a ‘new project’ and a ‘new project.psd’ option - ‘new project.psd is the one you want to click on! ‘new project.psd’ is the 540x540 project that you created.
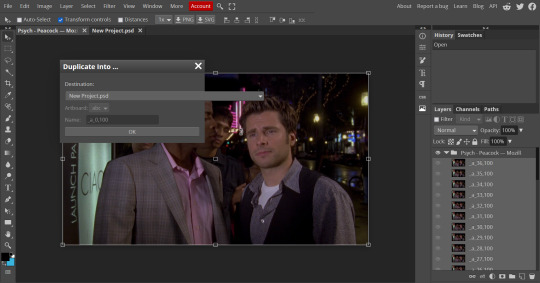
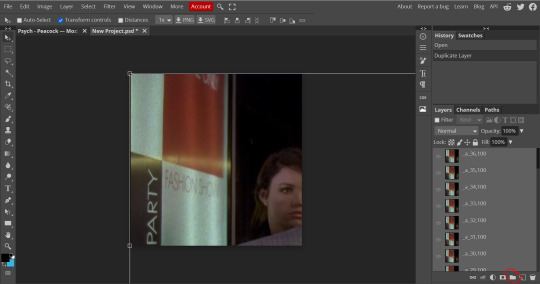
next, click on the tab that says ‘New Project.psd’ and it should show you something like this:
the frames are really zoomed in because of the different dimensions, so we’re going to fix that! make sure all of your frames are still highlighted and then click on the little folder button that i circled:
now all of your frames are going to be under a single folder. make sure ‘transform controls’ on the top menu is selected! now single click on the edge of the selected frames:

now a new menu is going to show up where it used to say ‘transform controls’ was! make sure the little hamburger button in between the dimensions is selected.

replace the 100% with 50% and now your dimensions will look like this!
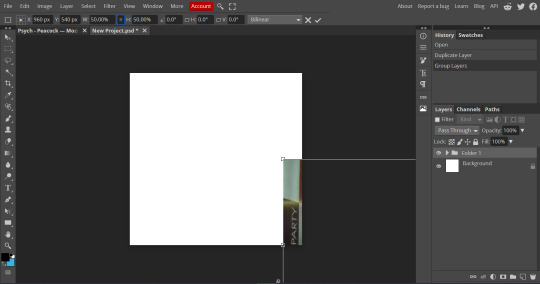
now just drag that box of frames onto the white area! (make sure only the folder is selected on the side bar):

sharpening + color:
now you’re going to open that folder and then select all your frames again (make sure the folder is not highlighted):

now click filter > noise > and type in 1%.

im adding noise here because it helps smooth out the gif and makes sure there arent any wavy/grainy lines!
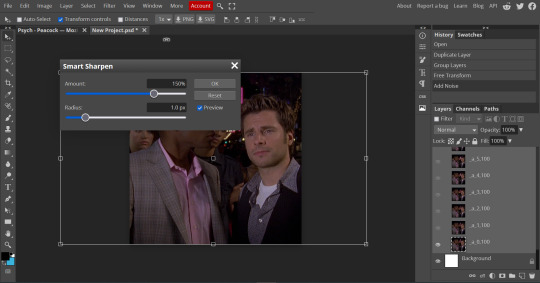
after you click ‘ok’ then click filter > sharpen > smart sharpen. you don’t have to change any settings here! just click ‘ok’ with the default settings.
now your base gif is ready for coloring!
all your coloring tools will be under layer > new adjustment layer.
always remember that whatever settings/coloring that i use may be different from the way you want to do it! gif-making always starts with exploring and experimenting with your style :]
the first type of adjustment layers that i always start with are the ones that deal with adjusting brightness! depending on how dark your gif is you will either want to start with ‘brightness/contrast’ or ‘levels’. (you can also use curves but levels are easier to control for me.)
if you have a super dark gif, you’re going to want to start with ‘brightness/contrast’. no actual adjustments will be made to this layer but you’re going to make its type ‘screen.’

BE CAREFUL WITH THIS LAYER! doing ‘screen’ with brightness/contrast will often whitewash characters of color so for this gif we’re going to just use ‘levels’! (there are ways to get the original skin tone back when using this layer, so if it’s completely necessary depending on the scene, you’re going to have to work a lot with coloring adjustment layers to make sure not to oversaturate or whiten when doing this. you’ll get there with practice, but for this tutorial we’re going to work with safe adjustments!)
if the gif becomes too bright because of ‘screen’ in brightness/contrast you can adjust the opacity!
whenever you use brightness/contrast you’re also going to use a levels layer because just this layer can remove a lot of the depth
now let’s open the levels layer!
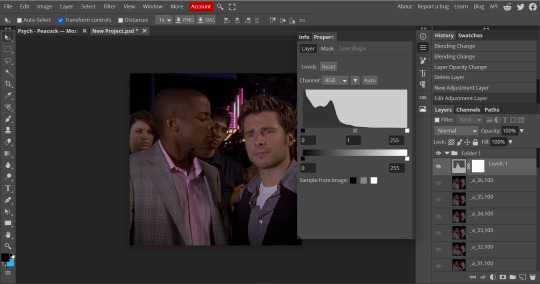
you’ll see the three squares that you can adjust - the black is shadows, the grey is mid-tones, and the white is highlights. when working with characters of color don’t brighten the mid-tones, this will also whitewash them! dragging the squares to the left will brighten, and to the right will darken. each scene will require different adjustments so explore and figure out what’s right! make sure when brightening, that you remember to give it enough depth.

now the gif has proper lighting!
after your brightening layers, you’re going to look at the scene and check whether you need a photo filter layer! if your scene has a strange filter - for example, cw shows often use a weird dark yellow filter: this is where a photo filter comes in.
for this tutorial im going to show how to use the photo filter! shawn’s face has a yellow tint so we’re going to try this out. (there are ways to get rid of the yellow in selective color, but for this tutorial we’re going to start with photo filter.)
photopea automatically provides a yellow color photo filter which is not what we want for this scene! (if you have an especially blue scene this might help though!)

click on the orange square and drag the color picker to the opposite color of the one you’re trying to get rid. we’re getting rid of yellow, so we’ll select blue.
now, we’re going to adjust the density so it doesn’t look so blue. now it looks perfect!

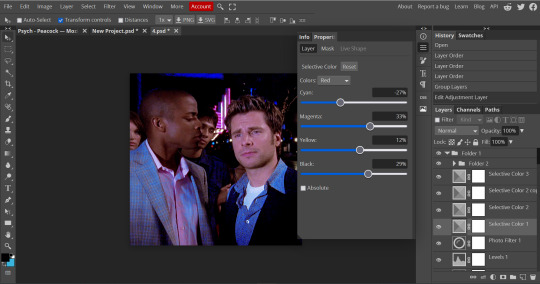
now we’re going to go to my favorite tool: selective color :]
you can see hints of blue, and pink in the scene already - so we’re going to really bring those out!!

click on the drop down that will bring up a list of colors! we’re going to especially go for cyan and blue. when i really need to bring out blue, i drag the cyan fully over to 100% and the yellow to -100%

if you look at the gif now, you can see that the blue is starting to come out! duplicate that selective colors layer until the blue becomes saturated enough, but not grainy. i duplicated mine’s three times for this gif!

now that you see how to manipulate the colors with selective colors, experiment and see what you can do! i felt like the skin tones were too pale so i messed with the reds :] you may think differently, that’s why coloring is subjective not objective!
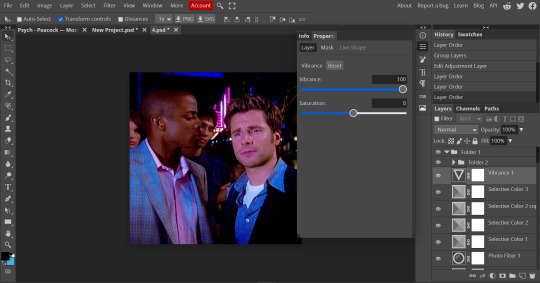
one of my other favorite tools to use is the vibrance tool! make sure not too saturate your colors too much so be careful with this layer!
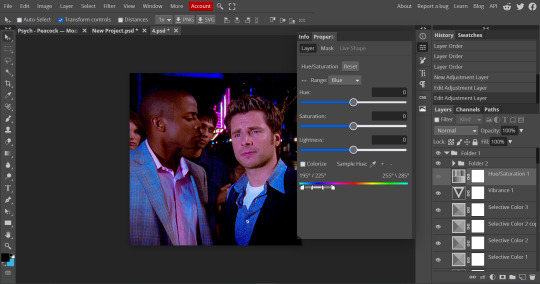
another really fun tool to use is the hue/saturation tool! if you have a very prominent stable color that isnt too grainy, you can manipulate it to another totally different color! this gif may not do too well, since the blue isn’t completely solid, but we can still test it out!
click on the drop down to the color you want to manipulate and have fun with it! i could make the blue a little cyan here without making it too grainy so this is what we ended up with :]

this is going to be the end of the tutorial for now but always feel free to ask me if you need some more advice. if some of it was confusing dm me or i can always make a video of my process!
[VERY IMPORTANT: REMEMBER that photopea.com is a website so it’s always prone to crashing. always ALWAYS save your psd’s after you’re done editing. a psd will save all your coloring and frames! go to file > save as psd. to export your frames as a gif go to file > export as > gif > save! if photopea starts lagging, it might be the time to open it in another tab and start making your other gifs there.]
this is our before and after coloring!:

#husband.message#*mystuff#gif tutorial.#i hope this could help a little bit!!!!#ok for anyone to rb!!!
21 notes
·
View notes
Photo
Welcome to soonhoonsol’s gif tutorial!
As a nice anon asked me how I make my gifs, I thought it’d be cool to create an in-depth tutorial :) Perhaps this can help some others enter the gif-ing world too!
What we’ll be using for this tutorial:
Software: Bandicam, Avisynth, Photoshop CC 2018, Topaz Labs
File Format: .mp4
Operating System: Windows
Disclaimer: This is just my method. Every gif maker works differently and has different preferences. What works for me may not work for you, and that’s completely okay!
Let’s get into it!
1. Find the best quality video you can find
This really depends on the content you want to gif. For variety shows, music videos or photoshoots, any video of [1080p] should be sufficient. Try not to use anything below 720p.
For stage performances, fancams tend to have higher resolutions [1440p, 4k]. Use these if your computer can handle it. If not, usually 1080p works fine. The best option would be to download .ts files, which provide clearer and less grainy videos.
For Seventeen, you can get .ts files from The Rosebay on Twitter :)
2. Screen recording
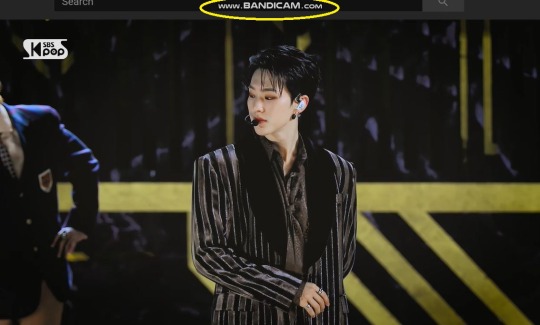
As a Windows user, I don’t have a built-in screen recorder on my laptop. So, I use Bandicam, which is a free screen recording software. The only con to it is that it has a watermark.
To combat the watermark, I always have the boundary box a little bigger than the video itself so that I can crop it out of the gif.
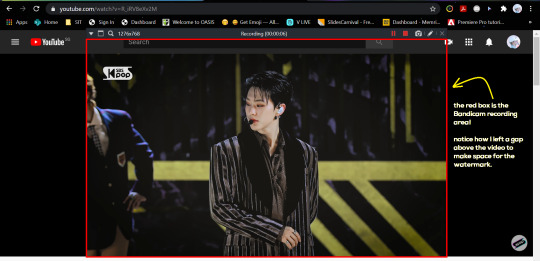
This is what the recording would look like:
Just record the scene(s) that you want to gif so your video file doesn’t end up too large! Your recording should be in .mp4 format.
(You may use pure .ts files in Avisynth but it never worked well for me so I usually screen record the .ts video and move on)
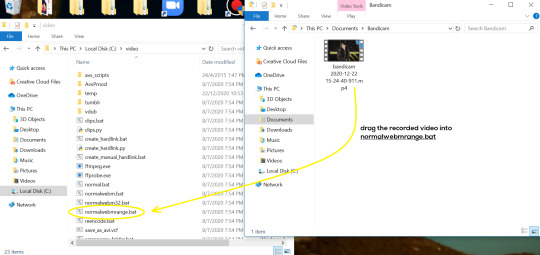
You can find your recorded videos in Documents > Bandicam.
3. Avisynth
I followed THIS tutorial to download Avisynth. This software is really helpful if you want sharp and clear gifs! I recommend to follow the steps in the tutorial as the below method stems from it.
- Once you have downloaded it, open up your recorded video from Step 2 and watch it. Take note of the duration you want to gif. (e.g. from 00:01 to 00:05)
- Drag your video file into normalwebrange.bat. On Windows, you can find this in File Explorer > Local Disk (C:) > video. For other .bat files, you may check out THIS tutorial.
- In the pop-up box, key in the start time for your gif (e.g. 00:00:01). It has to be in hh:mm:ss format. Press “enter”.
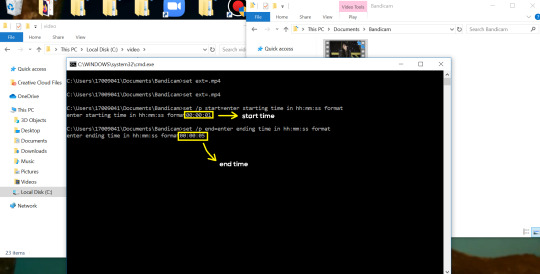
- Key in the end timing and press “enter” again. A resizer should pop up in an Internet Browser. I found that Firefox works best for me.
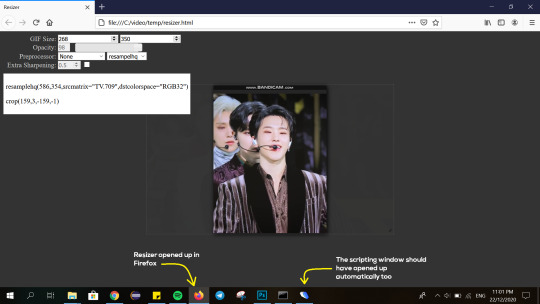
- In the resizer, you may indicate the size of the gif you’d like to make. You can also click and drag the video to resize and frame it to your liking. You may refer to THIS post for Tumblr dashboard sizing.
(These are some common gif sizes for stage performances):
1 gif - 540px by 540px (square)
2 gifs - 268px by 350px
3 gifs - 177/178px by 250px
- Under “Preprocessor”, select “debilinear” for the second box. For the first box, you may pick between qtgmc 30 (same frame rate as video) or qtgmc 60 (doubles the frame rate; smoother).
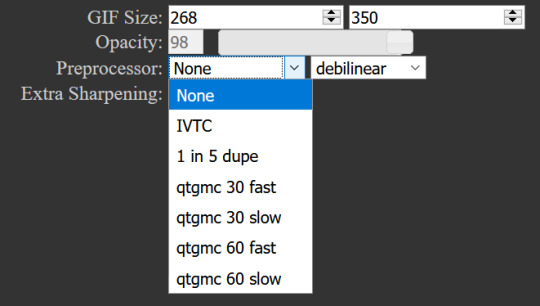
- You will also see “fast” or “slow” options. These are just how long the video will take to render. “Fast” will give you slightly lower quality as compared to “slow”, but usually is good enough.
(You can see that his features are sharper and more defined in the “slow” gif as compared to the “fast” one.)
- Copy the code in the white box. Navigate to the scripting window (it should have popped up with the resizer) and paste the code at line 17. Type a “#” before qtgmc on the same line. This will prevent the software from lagging.
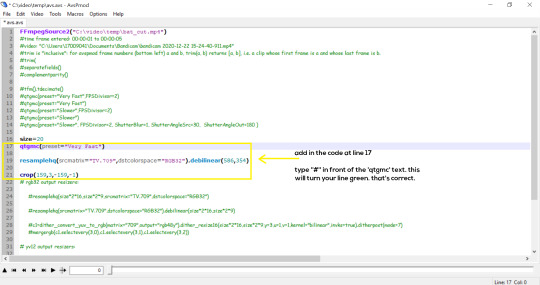
- Click on the inverted triangle at the bottom of the screen. Your video will now appear in the scripting window. Drag the slider to the intended starting point of your gif and press the “home” key on your keyboard.
- Drag the slider again to the intended ending point of your gif and press the “end” key on your keyboard. This blue area you see is the duration of your gif.
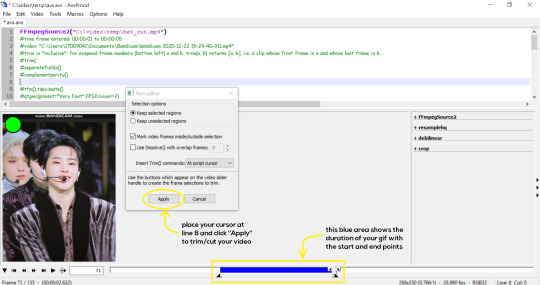
- On an empty line (I usually go to line 8), place your cursor there and click “Apply” in the mini pop-up window. Afterwards, remove the “#” from line 17.
- Go to File > Save or press Ctrl + S to save the code. Close the scripting window. The video renderer will pop up. When it’s done, it will automatically close by itself.
4. Using Photoshop and Topaz
I’m using my school license for Photoshop 2018, but if you don’t have that, there are plenty of cracked versions for free. I don’t have any to recommend though so I’m sorry about that :(
I followed THIS video tutorial to download Topaz plug-ins for free. I use Topaz DeNoise (the most helpful) and Clean, but you may use others if you’d like :)
Alright, let’s dive in to the steps!
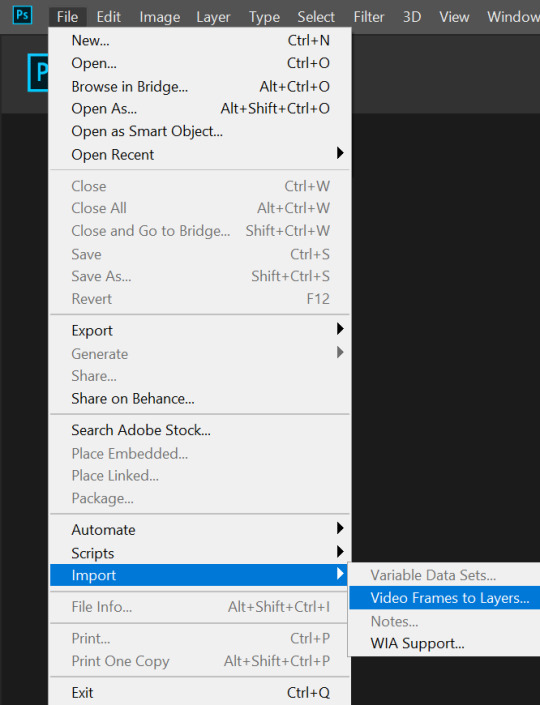
- Open up Photoshop and go to File > Import > Video Frames to Layers.
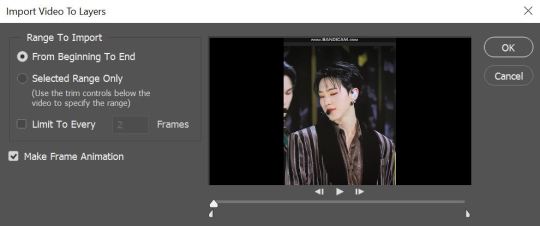
- A pop-up will appear. You can find your deinterlaced Avisynth video in File Explorer > Local Disk (C:) > video > temp > video.avi. Follow the settings in the picture and click “OK”.
- Go to Window > Timeline to open up the timeline. You should be able to see your gif spread out in frames. If you press the play button, it should play like a video.
- (Quick optional step I learned from THIS tutorial) Go to Image > Canvas and set the Resample option to “Bicubic (smooth gradients)”.)
- Select the first frame of your gif in the timeline. Shift select the last frame. Go to Window > Layers. Shift select these layers as well.
- With everything selected, click the 3 lines at the top right corner of the timeline. Select “Convert to Video Timeline”.
- At the top of the screen, select Filter > Convert for Smart Filters. Your layers will condense into one layer. Don’t worry, your gif is fine.
- Now it’s time to sharpen the gifs. Go to Filter > Sharpen > Smart Sharpen. Play around with the settings to your liking!
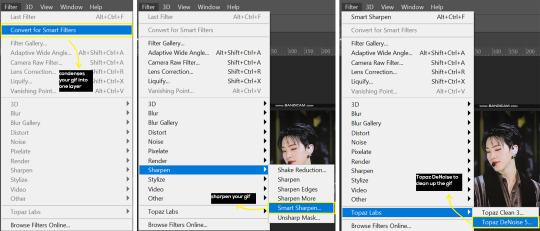
- If you’ve downloaded Topaz correctly, it should appear under Filter > Topaz Labs. If a pop-up asks you for an activation key, you may use THESE to activate it for free.
- Go to Filter > Topaz Labs > DeNoise and/or Clean and play with the settings until you’re satisfied.
5. Blurring
If your gifs have captions/logos that are distracting, you’d want to blur them out. Don’t be like 2018 me that blurred out the logo frame by frame; it’s very tiring. Instead, using this method from @scoupsy‘s tutorial, you’ll save lots of time.
- In the Layers tab (Windows > Layers), select the “New Layer” icon. It should be blank.
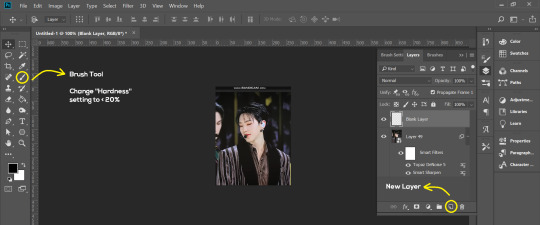
- Select the Brush tool. Make sure the “Hardness” setting is below 20%. This will blend the blurring nicely into the gif.
(For the sake of this tutorial, I will be blurring out the Bandicam logo to show you.)
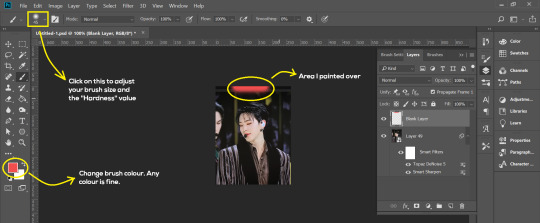
- Paint over the captions/logos. Make sure this is on the blank layer!
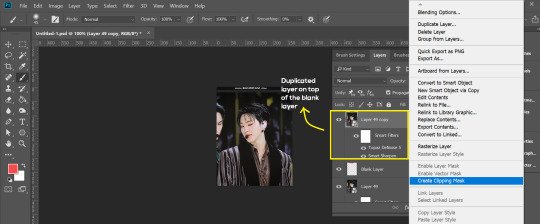
- Duplicate (Right Click > Duplicate) the gif layer and drag it so that it’s on top of the blank layer.
- Right click on the duplicate layer and select “Create Clipping Mask”.
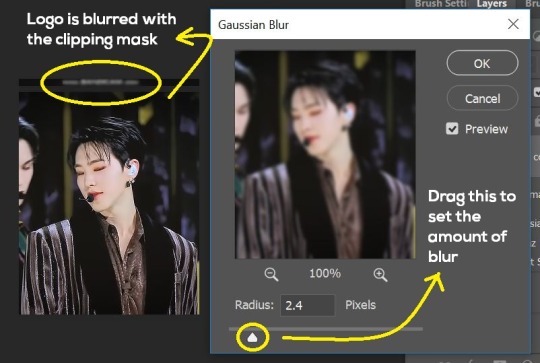
- Go to Filter > Blur > Gaussian Blur and play around with the settings until you’re satisfied with the level of blurring. Click “OK”.
6. Flattening & Colouring
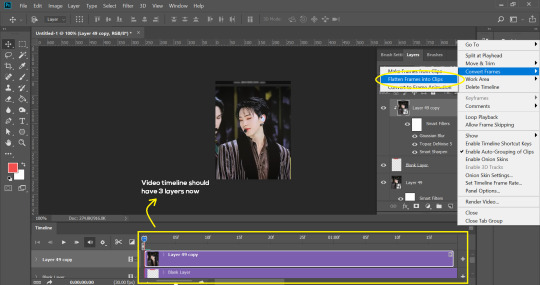
- Once you’re done with sharpening and/or blurring, click on the 3 lines on at the right corner of the video timeline and go to Convert Frames > Flatten Frames Into Clips.
- Topaz layers and blurring will take some time to render so you can just chill for now~
- When it’s done rendering, click again on the 3 lines and go to Convert Frames > Make Frames From Clips.
- Convert it back to the gif timeline by clicking on the 3-box icon at the bottom left of the timeline.
- Select the first frame of your gif. It must be the FIRST.
- Scroll to the top of the layers and select the layer at the top. Any other layers you add should be on top of this layer. VERY IMPORTANT!!
- In the Adjustments Tab (Window > Adjustments), there are many different things to play with. There’s a high chance you won’t use everything, but here’s a few of my favourites.
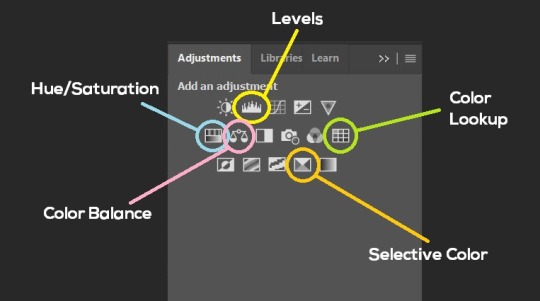
Levels - Adjust the brightness and contrast of your gif in depth.
Hue/Saturation - Useful for changing colours, or switching it to black and white.
Color Balance - Tweak the colours to your liking.
Colour Lookup - Comes with built-in LUTs that you can use as a preset. Great starting point for colouring. Saves time too. You can even download plug-ins for this. 11/10 tool.
Selective Colour - Adjust the vibrancy of specific colours.
- Colouring is completely up to the gifmaker. Go crazy go stupid :D
7. Exporting
We’re almost to the end!
- Set the timing for your gif.
If you used qtgmc30, the best timing would be 0.04s / 0.05s / 0.06s.
If you used qtgmc60, the best timing would be 0.02s / 0.03s / 0.04s.
- Once you’re satisfied with everything, go to File > Export > Save for Web (Legacy).
- Follow the settings in the picture below:
- Tumblr’s gif limit is 10mb per gif. Check the gif size at the bottom left of the pop-up window. Make sure it’s below 10mb; the smaller the better.
- Click “Save”. Choose where you’d like to save the gif.
- Done!
~~~~~~~~~~~~~~~~
And that’s it! You’ve successfully made a gif! Good job you :D
I hope this tutorial was helpful! Please leave some feedback if it helped, or if you have other methods you’d like to share :)
Lastly, if you have any questions, feel free to send in an ask or DM me!! :)
Good luck and happy gif-ing :’D
#gif tutorial#kpop gifs#avisynth tutorial#topaz tutorial#gifs#chey.resource#kpop#idk what else to tag so...#i finally posted the tutorial yay!!#please spare a reblog if you find this even remotely helpful thank you <3#also to spread it hehe i spent a lot of time on this#if anyone has any questions please feel free to DM me!!#i apologize if there are any spelling errors
221 notes
·
View notes
Photo
GIFFING 101 - YOUR ULTIMATE GUIDE ON HOW TO GIF
I have gotten many, many asks before about how I gif and I finally decided to make a tutorial. This is going to be very long, very image heavy and with a lot of details and examples. I mean it, I’m going through every, single aspect of giffing that I can possibly think of. From start to finish. And please read the disclaimer at the very start.
* I use a macbook pro but this should probably work on windows too!
I hate doing this but if this helped and you want to, please consider donating to my ko-fi or if you want, commission a theme or page from me at @amaanat <3
tutorial under cut, I hope it helps!
★★★★★
- CONTENTS
disclaimer
what will you need to create gifs?
how to download videos?
extracting your scene from handbrake using VLC / built in video player
opening in photoshop
trimming, cropping and resizing videos
sharpening
colouring and psds
masks
adding subtitles
editing frames / timeline speed
multiple gifs in one grid.
actions
exporting the gif
last minute tips and extra links.
★★★★★
- DISCLAIMER
First off, this is not meant as a post where I am saying look here, this is the only and perfect way of giffing. Not at all. When I started out, there were many tutorials available that helped me figure out how to gif, and I slowly developed my own style and I would like to create an in depth tutorial that helps you grasp the basics. Heck, make your gifs whatever way you want, go absolutely crazy on colours or whatever, this tutorial is just here to guide you through the process of gifmaking, because I know it can be very intimidating to people who are just getting into it. That is why I made this and why I spent 8 hours writing this, because I want others to know too and this is the kind of in depth tutorial I needed when I was starting out 4 years ago. Thanks for reading, hope it helps and go crazy ahhh go stupid.
★★★★★
- what will you need to create gifs?
photoshop. I use photoshop CC 2020 on a mac and I pay monthly bc of student discount. There are many, many links you can find on @completeresources for downloads. You can use any photoshop you like, as long as you have the timeline option.
Handbrake. This nifty program is used mostly to convert MKV files to MP4, but I also use it to quickly extract the part of the video I want, because opening an entire movie in photoshop can quickly clog up space bc of cache and it’s a pain to find that one second scene you want with that tiny scrollbar. Download it from here.
your video (downloading explained down below)
extras: VLC, just to find how many seconds the scene is at, so we can input the time in Handbrake. You can use any other player though for that step, I use VLC or Quicktime. Download VLC from here.
★★★★★
- how to download videos
Ok so I will quickly go through a few methods here for getting your clips.
1. t*rrenting.
This is the most popular method for getting your film or tv episode. I personally get my t/rrents from rarbg dot to or if I am having trouble finding one, I go to 1337x dot to, because they compile them from different sites. I copy the magnet link and go to the qbittorrent application, import magnet link, choose the files I want and it downloads. Remember, the higher the seeder leecher ratio, the quicker it will download.
But which file should I choose?? there’s so many? Well yes there are many many files for different movies. On RAR, I found more than 40 t/rrent files for Endgame. I think that generally, the 4/5 GB 1080p copies are just fine. I have compared giffing with a 60GB Interstellar Remux (which is directly ripped from bluray) file to giffing from a 4GB 1080 file, it literally gave me the same quality and the 1080 looked crisper. So yeah don’t kill your computers space, just go for those 3/4/5GB files.
hot tip - don’t download from yify, the quality is way worse.
2. movies from twitter accounts such as logolessHD.
these accounts post MEGA links to movies and shows, but you will have to request to follow them to be able to get the links. Then you can download the movie from there. The accounts you can get these links from are here: 1 - 2 - 3 - 4. The quality can be a bit less though compared to t/rrents. Here is a link to a tumblr blog with these kinds of downloads too.
3. downloading from youtube.
ok, use 4kvideodownloader for this. It is incredibly easy to use, you just need the youtube link. Always Always go for 1080p, if you can’t then 720 at the most because otherwise quality gets really bad really fast.
4. netflix / screenrecording
If you don’t want to download / can’t find something, try using netflix and screen recording. In my experience, SC only works on google chrome and not safari so jsyk!! Here is a tutorial on how to screen record on mac (or for quick access, click command+shift+5) and windows.
NOTE: quicktime screen records at 60fps, which is nearly thrice the frame rate of movies and shows, so at the end you may end up with duplicate frames in the timeline of photoshop, so you will have to delete those frames one by one sorry.
★★★★★
- extracting your scene from handbrake using VLC / built in video player
muahaha here’s where the magic starts to happen. Open handbrake and import your video. For this part I am going to use a scene of Keanu Reeves from the 2019 movie Always be my Maybe. I will demonstrate with that scene up until colouring, because then I will show how I colour different scenes!
So when you have opened the image in HB, you get this layout. (link to imgur)
it is a bit intimidating, I know. So basically, first, click on where it says chapters near the top right and click seconds. then, input the time you want to extract from the entire video. For the Keanu scene, that scene starts at 00:57:18 and ends at 00:57:21. These are not exact timings, I usually add an extra second so the entire scene is captured and I heavily recommend you do the same.

Now down below, you can click browse and edit where your new video will be saved and you can also change the name of the new clip. Always ALWAYS remember to keep the .mp4 ending do not cut that part out!!! If the ending says .m4v change it to mp4!!

Ok then I undertake the following steps to ensure the video that will be exported is of the highest quality possible:
Firstly, I uncheck all these three boxes:

Then you see this bar here right? Well I will edit the dimensions, filters and video now. You don’t have to do anything for audio, subtitles or chapters so leaving that alone is best. Lets go to dimensions first.

Here are my settings for dimensions:
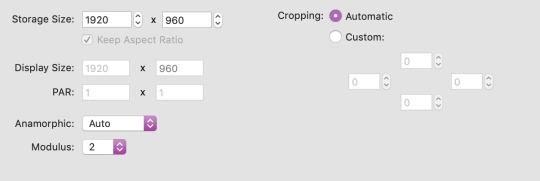
The storage size depends on if your file is 1080p or 720p. Most movies are shot in a ratio of 2.35:1, so if it does not say 1920x1080 like a 1080 file should be, don’t fret. The cut off parts are just the black bars you see when watching the movie. Handbrake doesn’t recognise nor convert them so that’s one less thing we have to worry about.
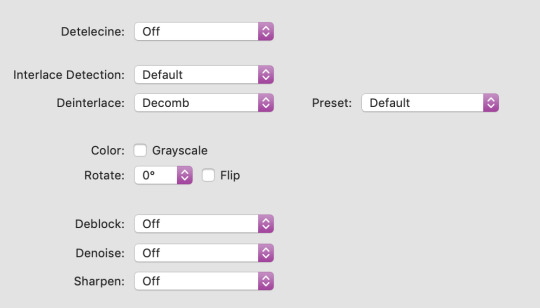
Now onto filters. Literally do NOT change anything there. Leave the settings as they are, which is like this:
Finally, go to video. You will see this kind of window and these are my settings (imgur)
Firstly, leave video encoder at H264 or 265 depending on how your video is encoded. For the FPS, choose same as source for the framerate and click constant instead of variable!!! This will ensure your video is smooth. For quality, bring the slider all the way to the right. RF0 means it will be at the best quality possible. I didn’t edit the settings at the bottom at all so just leave them be.
Now click this green icon (imgur) at the top and your video will start encoding! It does not take long at all and then your video is ready to made into a nice lil gif!
★★★★★
- opening in photoshop
woohooo we got our video!! Ok now open photoshop. Click on file -> open:
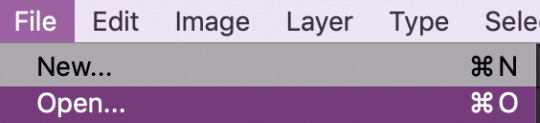
now search for the file you extracted from VLC and import it! Now your screen will look like this (imgur). With a different video, of course lol.
★★★★★
- trimming, cropping and resizing videos
ok so firstly, we will trim the video. As you can see in the image I linked in the step before, the screencap you see is of someone else in ABMM, not Keanu, like I want. So use this slider:
and click and drag it to where your scene begins and shows up in the window. Then, click the following button to split at playhead.

This will split the clip and so the timeline and layers section will look like this (imgur) (mine has three sections because there was space before and after the keanu scene so I cut two parts which made three clips)
so now all there is left in trimming is delete the layers of the video you do not need! For me in that image it was layer 1 and 3!
cropping and resizing
This depends on the kind of gifset you want to make. This picture is a handy guide for resizing:

This post is also very very useful for resizing info
Ok now I will crop my gif. Click on this tool:

and now my interface looks like this. I am using the ratio 6 by 4 but you can use whatever you want.

Ok now you may need to crop some black bars but since I don’t have to, I just moved the crop area around a bit and clicked enter to crop it. Just play around with sizes and whatnot, and get a feel of what you like!!
cropping tip: crop as close as you can to the edges. The more you zoom in, the more pixels that will be visible and it will make your gif extremely grainy!!
So now for resizing, go to image -> image size or click command-shift-i

and you will get this window.

A LITTLE NOTE - I personally do not use automatic but a friend who shared her sharpening psd would prefer if I kept it secret, but automatic is what most people use and it is what I used up until november 2019 and it worked just fine.
Ok anyway now I want to make my gif 268px wide so I will input that as width and make sure you click this!! It makes sure your height and width are proportional!
ok now we have this. After you’ve done that, click ok!

congrats, you just resized a gif!! Your gif probably looks smaller now in the main window once you click ok, just zoom in to it! don’t worry about it looking bad quality, sharpening is next!
This is how my gif looks with trimming, cropping and resizing (with 0.05 speed)
★★★★★
- sharpening
Now we sharpen! Make sure your layer is selected Go to filter -> sharpen -> smart sharpen and this window will pop up:

These are my settings which most people use. Just remove gaussian blur
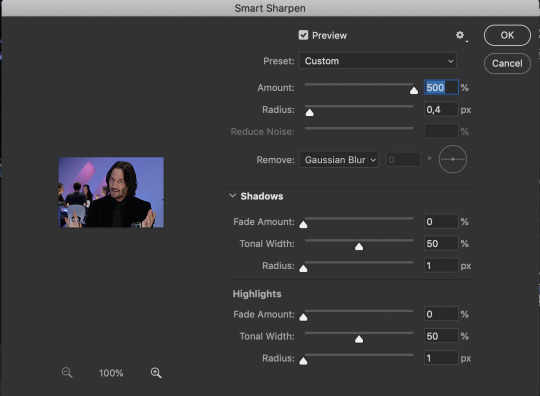
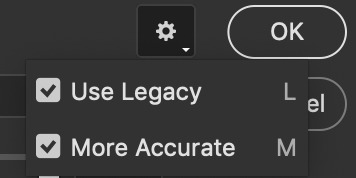
I have more accurate and use legacy checked too!
click ok! Now ... your gif might look a bit oversharpened. That’s why we use a bit of gaussian blur. Go to filter -> blur -> gaussian blur.

now I think most people also use a 1.0 radius so set that and click ok.
But now your gif looks too blurry. Lets fix that. Double click the icon below in the layers panel

and adjust the opacity! My go to is between 25 to 35, just so the gif looks smooth!

Now we’re done with sharpening! This is how our gif looks with sharpening with 0.05 speed:

sweet right? Now .... the best and hardest part ... colouring!!!!
★★★★★
- colouring and psds
First I will shortly talk about psds. They are photoshop files, that save the entire document which means you can share it with someone after uploading it and when they download and open it, they can edit the layers, tweak things just like they made the file in the first place. Many people upload psds of gifs with colouring so others can use that colouring. You can find so many psds on completeresources (I only linked gif psds but they have psds for icons and headers too) or allresources. I do not use psds but colour from scratch every time so I will not be explaining them further, sorry.
So for colouring, I will go very in depth into different styles. Here are the main types of colouring I have noticed people use on here:
simple - I normally use this for scenes with people in it
vibrant, bright - I use this for scenes with lots of colours in them
pale
black and white
gradients - I use this to spice scenes up a bit
colour palette
I only go for simple, vibrant and gradients and never do cp, pale or black and white, but I will link a few tutorials by talented creators who do and after that I will explain the three ways I colour by showing you three different examples :)
Some useful tutorials I have found for pale/bw/cp colouring are:
this pale tutorial by @samecoin. Especially useful read because Tippy explains how to avoid whitewashing in pale edits.
this pale tutorial by @kateausten. Very easy to read and to follow.
this colour palette tutorial by @freddyfreemen. They explain the basics and provide a psd too.
this colour palette tutorial by @stenbranlons. Very image heavy which guides you through every step of the way.
A blog dedicated to pale resources is @finesources and is definitely worth checking out!
this tutorials page by completeresources has many many tutorials on how to do different kinds of styles
Btw, this is a useful website that explains all the different adjustment layers in photoshop if you’re still getting the hang of them
ok now onto my examples for the colouring. I will first do simple colouring for which I will use the keanu gif. For vibrant and gradient I will use two different gifs. I usually put my colouring into a group so first, close the video group layer and click this to make a new group which will contain the adjustment layers for our colouring:

SIMPLE COLOURING
First I will brighten the gif up with some curves. That is this tool:

Then you get this window:
As you see, I have selected that white eyedropper tool. Using that I will brighten the image. Basically, you want to click on the whitest part of the gif using that tool. This is because wherever you click, the eyedropper will turn that part into white and adjust the entire gif that way so if you click somewhere dark, you’ll get this white bright fuzzy mess. So I clicked on the lightest place which imo is the white specks near the glass in front of his hand and now my gif looks like this:
Ok now if you look at the above image, there is a black eyedropper two steps above the white one. You want to use that to click on the darkest place of the gif bc it’ll turn that to pure black. Here is my gif when I did that:

not a massive difference but it balances things out. Now I will add some saturation. Click this icon:
which brings up this window. I have already set saturation to around 15 to make it a bit warmer:
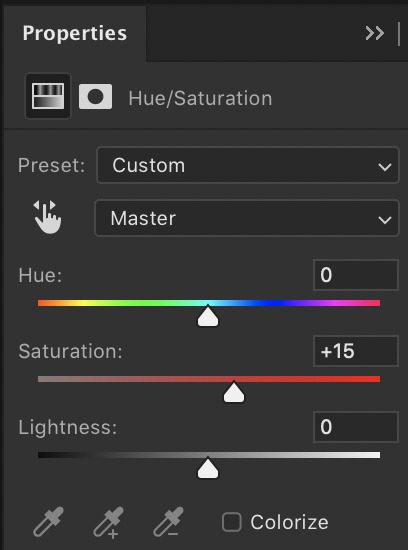
and the gif looks like this now:
I think it looks nice, but I would like to add something extra. That is why I am going to play around with selective colour to make the background pop a bit and make the black colour more dark. So click this icon:
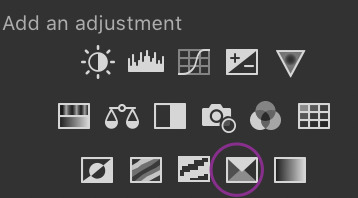
and you get this window and these colours (imgur). You can play around a lot with selective colour and manipulate colours! So if I turned the black dial on reds to +100, they would become wayyyy darker. However because I want the background to pop, I would use the colours magenta and blue (and black for the final touch). For those my settings are this: 1 - 2 - 3 (imgur). So now my gif looks like this:

And now i think we are done! For comparison, this is what the gif looked like with absolutely no colouring or sharpening:
And that was all for simple colouring!! Lets move on to vibrant colours!!
VIBRANT COLOURING
For this I will use an example from Thor: Ragnarok bc thor is my soft bb. I did not do much for this first example except play around a lot with selective colour and I used the exact way of adding saturation and curves as shown before. Honestly just playing around with selective is the best bet to get vibrant colouring. The gif without sharpening etc was this:
the gif after colouring and sharpening is this:
pretty sweet huh? Just play a lot with saturation, hue and selective colour and channel mixer and you can create a lot of styles that way!
GRADIENT
for this I will use another clip from Thor, but from The Dark World. It is a bare clip where it is raining and I will add a gradient on it. This is the gif without colouring nor sharpening:

now we will do the sharpening and colouring. I already applied a basic curves and saturation layer so now it looks like this:
It looks a bit better right? Ok lets get that gradient applied. Click here:

and click on gradient, NOT gradient maps bc those are different things and I honestly dont know how maps work.

now this is what will appear, I haven’t changed anything to this yet:
What style, colours, angle you choose is up to you. I personally am going for 0 angle because I want it going right. Now, to choose colours, double click on the colour shown next to the word gradient. This window will show up:
The fun part is you can do what you want here. Just experiment, click the buttons, adjust opacity etc. When you click at the bottom of the bar somewhere another stop marker appears meaning you can have even more colours! Just click on the bottom markers and edit to your hearts content! Use the top button to adjust opacities. Personally I went for this gradient:

Ok but now we have a problem because our gradient is fully covering the image and you can’t see anything. That is where blending modes come in. Right click on the gradient layer and click blending options. This window will pop up (ingur). When you click blending mode, these options appear (imgur).
Here is a good guide explaining the blending modes
I just recommend playing around seeing which one suits you. I went for overlay, which makes my final gif look like this:
and that was that on colouring!! Let me know if u have questions about it! Onto the next part, masks!
★★★★★
- masks
I will not go in depth here, but instead I will link some tutorials but the amazing @thepunisher who has explained it much better than I ever will be able to. The tutorials are all in this link. If you have any questions do lmk but idk how I could explain it.
★★★★★
- adding subtitles
although we wish we could, we can’t all lip read so we need subtitles also I’m hard of hearing and need them anyway but yeah, I will quickly highlight how I add subs! I use the font Arial Rounded MT Bold Regular.
I will first link to this post because it helped me a lot and may explain stuff better than I do.
Lets take the keanu gif we had earlier. In it, he says ‘fish flakes’. Now what I do is this. Click on this icon:

and drag a box around the gif fully. Add your text. Mine looks like this now:
Well that ... does not look like a subtitle. BTW my settings are:
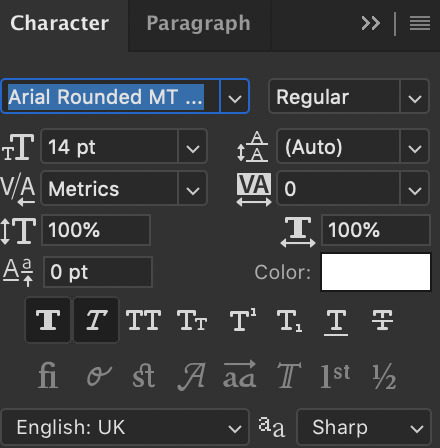
*when there are two people speaking I change the colour of the second person to #ffff00 - also for 540px gifs I usually use 12/13px text.
Ok now I will add the stroke and drop shadow. Right click on the layer of text, click blending options and change your stroke and drop shadow settings to this and this (imgur). Now just click the move tool or hit V on keyboard to select it and drag the gif down wherever you want. Now my final gif looks like this:

Ok, now if you have two gifs and you want them to be the same distance from the bottom, right click the text layer of the first gif document, click duplicate layer and you will get this window:
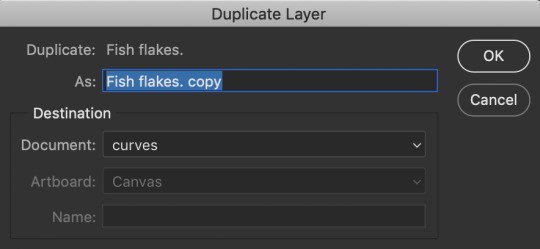
now click on destination and depending on what files you have open in PS, you will get this window:

now just choose where you want the text to go and if the gifs are the same sizes itll appear exactly where it did in the first one and you can edit the text for the second. You can do this with adjustment layers, groups etc too!!
Now text is done! Off to the next part!
★★★★★
- editing frames / timeline speed
We are done editing, now time to convert to frame animation and edit the speed!
Ok click on the four bars on the right side of the video timeline. It will bring up a menu. From there, select this:
This will make individual layers of every frame into clips. Now, click this at the bottom left side of the video timeline:

This will convert your video timeline to a frame animation timeline. Now it looks like this (imgur). you’re probably wondering wait where the heck did my layers go well don’t fret, lets click the four bars on the right side again and click this:

now look! We have got all our frames into the timeline! Just delete the excessive frames at the front. Now click the four bars again, select all frames and then click the number at the bottom and change it to 0.05 or 0.06 or whatever speed you want:

Now we are done with this step!
★★★★★
- multiple gifs in one grid
I myself am not going to explain this, instead here are links to a few amazing tutorials that will help you further
this tut by @brolinjosh
this tut by @futurist
★★★★★
- actions
Now actions ... man they make everything so much easier. Basically actions are a sequence of steps you undertake in photoshop that are recorded which you can then save and use on multiple files. This makes the giffing process much much faster!!! For instance, these are the actions I have saved (mind the doubles lol I am experimenting a bit!)
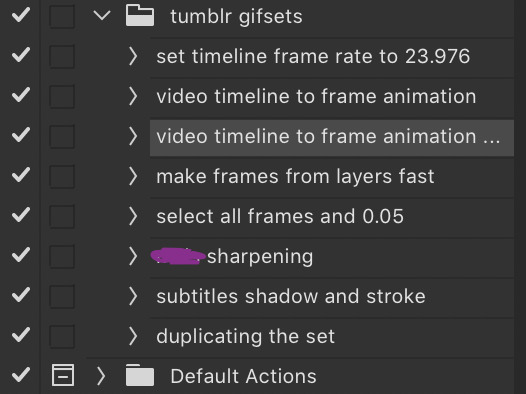
As you can see, I have one for undertaking the entire video timeline to frame animation process and one for sharpening and the subtitles. It has saved me around 75% of the original time I put into creating sets before which is a lifesaver.
I cannot explain how to make actions bc I am really bad at explaining stuff, but here are some tutorials:
- https://helpx.adobe.com/photoshop/using/creating-actions.html
- https://completeresources.tumblr.com/post/66560261468/how-make-action-%D0%B7
- https://completeresources.tumblr.com/post/50583786863/how-to-use-an-action
- https://completeresources.tumblr.com/post/50362731526/how-to-use-actions-on-gifs
https://www.creativebloq.com/adobe/create-own-photoshop-actions-61411918
★★★★★
- exporting the gif
now we’re at the final stage! When you have your gif ready, go to file -> export -> save for web legacy
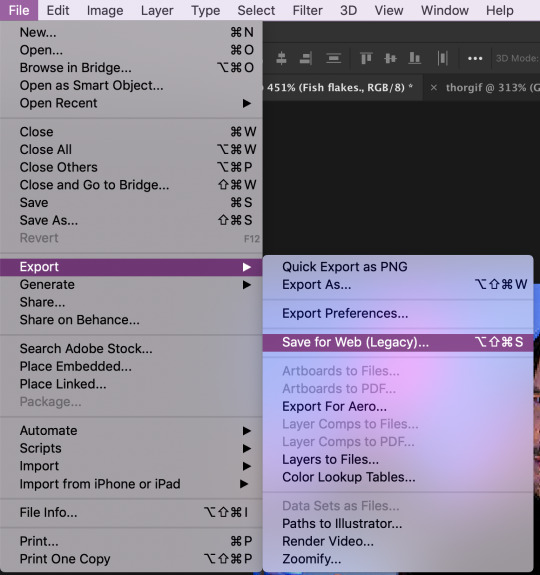
ok now the next window is this which looks intimidating I know
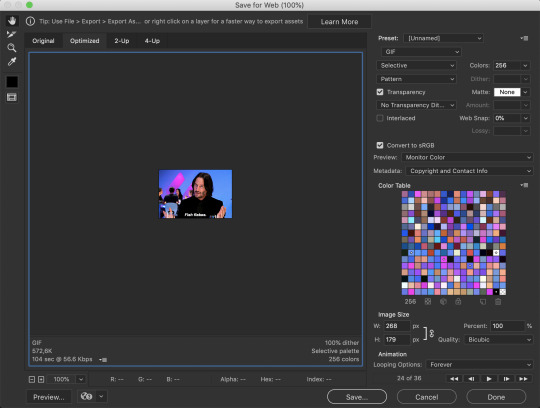
Well basically, those are my settings above. Make sure the looping option is set at forever. Also on the left size you see how big your gif is, make sure it is under 8mb but tumblr is unstable so keep it under 5MB and it should be fine.
I use different exporting types at times. Sometimes I use selective and pattern, sometimes diffusion or adaptive+dif. Just remember that the gif size depends on which you choose so keep that in mind. Here’s the difference (if u can even spot it).
selective + pattern

selective + diffusion

adaptive + diffusion
Personally I mostly only use selective + pattern!
btw make sure your matte is at NONE!!! This is because otherwise you have those whitish transparent borders on your gif, esp noticable on dark gifs, like shown in this tutorial by the talented @joewright !
And congrats, you have officially made a gif! Now go experiment, have the time of your life and do whatever the heck u want with your gifs. And if you want me to see them, tag me!! I track #usernums !!!
★★★★★
- last minute tips and extra links
man idk what to say here really but here goes:
@completeresources and @allresources are amazing places to learn more about gifmaking, pls take advantage of the opportunity
reminder: quicktime records at 60FPS, so unless you want a laggy gif delete the extra duplicate frames in the frame animation timeline!!
When opening import video frames to layers, do not click skip every second frame!! do not!!!!
Do not steal gifs. Try making them. I know it takes time and it can get frustrating but don’t post someone elses gifs as your own. Even the ugliest gifset in existence made originally by someone is better than a stunning set put together full of stolen gifs from various users. Don’t be that person
Don’t be afraid to ask for help pls just go on anon if u want!!
use the tumblr dimensions!!! I cannot stress enough how important this is because if you don’t, your gifs will look stretched af and lose quality so like .. don’t do that
1K notes
·
View notes
Note
Hi! I hope I'm not bothering you, but I love your mood board edits and was wondering if you could explain how you go about making/colouring them? I see lots of places to find gifs but turning them into a set is so hard. Thank you in advance!
hi! first of all thank you so much and second of all it’s not a bother at all! i am happy to give some of my own tips even if my explanation probably isn’t super helpful. i won’t give like a ps tutorial but below the cut (since i included example gifs, it’s VERY long) is my process for my latest jily aesthetic:
i keep track of all my ideas/sets in a spreadsheet (which i won’t show bc there’s a lot of info i’d have to blur/black out) but i always have a list of what scenes i need to gif/what gifs i’m editing and where i’m getting them from. i also include a couple extra ideas in case the gifs i have planned end up being too hard to color or don’t fit in the set. i’ve found it’s best/easiest to start w the list bc there is literally nothing worse than spending hours on a set and then not being able to complete it.
as for actually finding the material, i have a pretty healthy number of scene packs saved in my giffing folder, esp. for things i know i will gif frequently. most of the time i will peruse youtube, vimeo, and instagram for any aesthetic scenes. i also have a lot of gif packs saved specifically for the purpose of making mbs (usually i mix my own gifs w gif packs), if you msg me i’m happy to direct you to some gif packs i use regularly or you can check my #resources tag. a couple tips for finding material:
always opt for download when possible, i used to screen record and the difference when i switched to downloading was astronomical. (it’s easy to lose quality and esp if you’re on mac, quicktime duplicates frames so either you have to manually delete those extras or you get sort of choppy gifs when you load them into ps.)
always use 1080p or better, 720p will work in a pinch for 268px or 177px gifs since you can make up some of that resolution loss with sharpening, but don’t go any lower than that, just love yourself.
for pale sets, look for the right colors. i tend to look for scenes w high color contrast especially if it features poc so it’s easier to color without whitewashing, ie if the subject is a person then i look for light colored or blue/green/violet/white backgrounds. it’ll make your life wayyyyy easier. this also means if you’re making a set try to find scenes with already similar lighting bc you won’t have to work so hard to make it look cohesive.
here’s a quick rundown of what i do before coloring:
import all frames and save all the files in a folder together!!
play around with frame delay so all the gifs are moving at about the same speed, usually keep it between 0.03-0.05s
crop and resize gifs (i use 268x145 most of the time)
convert to timeline
when it comes to coloring it can be really hit or miss, i’ve recently gotten back into my groove but i was having sooo much trouble earlier this year. in general, don’t stress yourself out!! sometimes it’s easier to just find a new scene/gif (hence my list of extras!) than to try too hard to fit a gif into your set. i color all my gifs by scratch (ie no psds) but i tend to follow the same pattern, i’ll explain using these gifs/psd as an example since then i can also explain how to fix white-washing:
first off when you’re coloring gifs with poc always always always make a layer mask so you can compare the edited and unedited skin tones directly! i use the marquee tool to make a selection in the middle of the character’s face, select the folder of my adjustment layers, and hit ‘add vector mask’ (the third button from the left on the layers panel, it’s a white rectangle with a circle in it).
i almost always begin by using hue/saturation layers to highlight and delete certain colors. here i highlighted red and raised the lightness on yellow by a lot since it’s a very yellow scene. then i use a combination of brightness/contrast, levels, and curves layers to brighten the scene. here’s what i have now:
i add a gradient map set to black/white, change the blending to exclusion, and lower the opacity to between 5-10% (depending on the scene) to lighten the contrast further:

then i add back a little depth with selective color in neutrals and blacks:
now i have two main goals: 1. add contrast between the background and the subject, and 2. brighten the scene into a pale gif. to do this, i use color balance to tweak the color of the background, taking out the yellows. this step works best if there’s at least some shade difference between your subject and background, otherwise isolating the two will be impossible. here’s what i have after adding color balance:

i use hue/saturation to selectively highlight the background color. in this case i chose to adjust magenta and used the color picker (the first eyedropper on the left) to identify the exact shade i wanted to lighten. now i have a fairly neutral background and a colorful subject, which gives a sort of pale effect:
and now i use a curves layer and a selective color (white) layer to brighten further:

before i go further, i start fixing white-washing. keep in mind that some variance is normal since you are naturally changing the lighting of the scene; this gif shows it rlly clearly bc of how yellow and dim the lighting is, so some lightening is to be expected. however, both because the vector mask shows a lot of whitening and because i’ve giffed dev patel before and have a general idea of what he looks like in this type of lighting, i know what needs to be fixed, so i go back in under the psd/adjustment layers with a combination of selective color (red and neutral) and hue/saturation layers to darken his skin again:

now that some more contrast has been added in, i can go back to working on the psd and use curves and selective color to play around with the background again:

i use another hue/saturation layer and a black/white gradient to tone down oversaturation:


usually i leave those layers on top, so if i want to make any adjustments (like lightening the background more), i go in under those two. in this case i tweaked the whites and reduced the contrast a little to get this:
again, you can see his skin tone has changed from the original, but variation is to be expected given how much brighter the room is, the fact that i took out a lot of yellow lighting, and the brightening effect of the computer screen in front of him. some other things to keep in mind when coloring:
when you add layers to correct white-washing, you’re likely to end up with overly red/orange skin tones (red-washing). this can be fixed by upping cyans in the reds, desaturating/darkening the reds, or adding b/w or desaturation later on.
when in doubt, it’s better to be darker than lighter (the issue with white-washing is that it promotes colorism, and there is nothing inherently wrong with a darker skin tone) but really. just put in the effort to color poc correctly.
when changing the lighting a lot it helps to look at pictures of the subject in natural/bright lighting, since you get a better idea of what their normal skin tone is.
don’t try to squeeze all your selective color layers into one. you’ll get less grainy gifs if you separate them out and work one by one.
TURN OFF NIGHT SHIFT/NIGHT MODE! yes i KNOW it’s bad for your eyes (especially if you’re like me and gif at night, when the lighting outside isn’t changing every 20 seconds) but your gifs will look VERY different under f.lux or night mode compared to daytime screens. especially if you’re giffing at different times of day, blue light filters can really change the way your coloring appears. best to keep it consistent.
my sharpening settings vary depending on what i’m giffing but in general i do two layers of smart sharpen (500% with radius between 0.2-0.4, 10% with radius at 10px) and then gaussian blur at 2.5px and adjust the opacity so it’s somewhere between 15-20%. i try to strike a balance between smoothing out the graininess from selective color, and sharpening details like clothes and hair. here’s what i ended up with for the gif above:

then i rinse and repeat for the rest of the gifs in the set! i tend to start with the gifs that i know will be hardest to color, which is usually the darker ones (coloring is limited by how much i can brighten the scene) and those that include poc (again, limited by how much i can brighten and adjust the scene’s lighting without white-washing). then i check set cohesion as i go, using those first few gifs as benchmarks. once i have all 8 (or 9 or 10) gifs, i play around with composition and try to balance and vary the subject, colors, and composition of gifs next to each other. i go back and make a couple of adjustments here and there according to what i observe and what i think might improve the overall appearance.
and that’s pretty much it! i hope this was helpful, if you have other questions feel free to message me and i’d be happy to help/troubleshoot. happy giffing!
#Anonymous#*#resources#answered#sorry this was sO long but i hope it helped on the coloring end#tbh i exceeded my own expectations with the dev gif lol#yeahps#completeresources#chaoticresources#tutorial#coloring tutorial
54 notes
·
View notes
Text
How to gif without photoshop
Hello! By popular demand (of like 4 people) I am going to write out a tutorial of how I make gifs when I’m on my personal laptop and don’t have access to photoshop. There is another method I use with a different software that is a bit more complicated and if people are interested, I will make a tutorial of that method as well. I’ll do my best to keep this concise, so let’s get started.
Warning that this is VERY text and image heavy because I know how frustrating it can be when a tutorial feels like it’s skipping steps and I want this to be as clear as possible. Also please read this on desktop, tumblr mobile kills the quality of gifs inside text posts.
This is the video I will be giffing and here is the gif I will be making!

What you need:
A video to gif
For the best results, I recommend a video that is either 720p or 1080p (basically the higher the quality, the better). Videos with good lighting and bright colors also turn out the best. Unfortunately for me, I gif the TV show Prodigal Son a lot and that show has neither of those things, which is why my gif example is from that show; if you can make a scene with zero lighting or vibrancy look even somewhat decent, you can make anything else look good.
A video downloader or screen recorder
This is the video downloader I use and this is the screen recorder but basically any youtube video download website or screen recorder program works. Keep in mind that ezgif has a pretty low upload limit for videos, so if you want to gif something longer than like ~4 minutes, cut the video down to the specific parts you want first on a website like this one.
ezgif
A very straight forward website that anyone can access. You don’t need to download anything, it’s all online.
Bonus: Online Image Editor (not required, but I use this website to add text to gifs)
1. Making the gif:
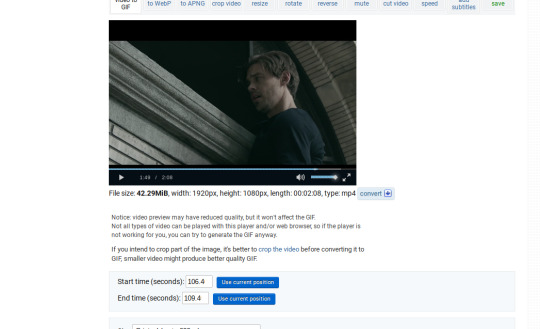
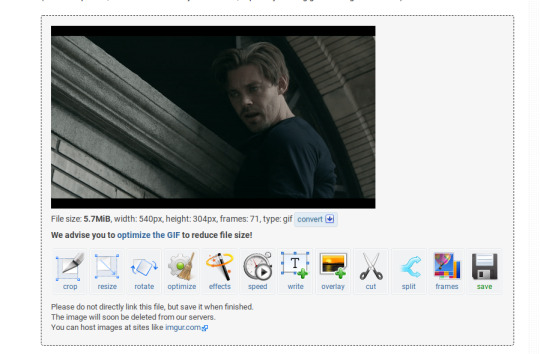
Once you have a video downloaded, you go to ezgif.com and go to the section video to gif. Click choose a file, scroll to your downloaded video, and hit upload video. Your screen should look like this now.
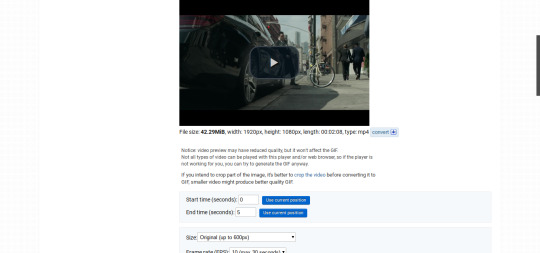
There are two ways to pull out the sections of the video you want to gif. You can either write in the start and end time in the little sections (you have to convert them to seconds: for example, if my gif started at 1:16 and ended at 1:20, it would be 76 seconds and 80 seconds respectively). Or you can do the method that I feel is easier, where you go to the section you want it to start on, hit pause, and hit the blue button that says “use current position” then let the video play until it hits your stopping point, hit pause again, and click on the second “use current position” button.
Once you have the start and end time recorded, scroll down to the next part of the screen with the size options. For size, select “540xAUTO (for Tumblr)” since tumblr gif sizes start at 540p and go down the more gifs are in a row. For frame rate, try to do either 20 or 25; the higher the frame rate, the smoother the gif will look. If you are trying to gif something in 540p that is longer, you might need to chose 10 to keep it under 5mb, which is the tumblr gif size limit. For method, leave it on FFMPEG. Then hit, convert to gif.

your gif will now look something like this!
Now, this gif is currently 5.7mb, which is above the size limit for tumblr (5mb or above gifs will still play if I recall, but the quality will be really bad when you post them). If I was planning on keeping the gif this size, I would go back and change the frame rate to either 20 or 10 to get the size down. However, I am going to resize the gif to 268p, so I don’t need to worry about it being to big.
Using the correct gif size for tumblr is one of the easiest ways to make sure the gif looks good! For gifs that take up a whole row, the size should be 540p wide. For two gifs in one row, the size is 268p each. For three gifs in one row, the sizes are 177p, 178p, and 177p in that order. Here is a visual of it.
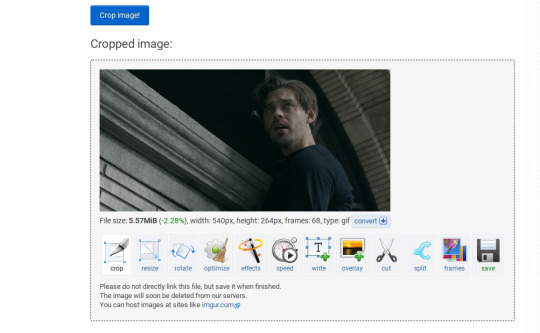
The next step would normally be resizing the gif, but Prodigal Son youtube videos come with a black banner on the top and bottom that I need to crop out. You will see a menu full of options under your gif, and you want to click on “crop.”
Cropping is pretty straight forward; you just move the little box over the part you want cropped, then hit the “crop image” button. Make sure width stays 540p!

Your gif now looks like this
Next, you look at the options under your gif again, and go to “resize.”
Again, resizing is pretty straight forward. I just put in 268 into the “width” section and leave the “height” section blank since the site will automatically resize the height. You can ignore the other menu options.
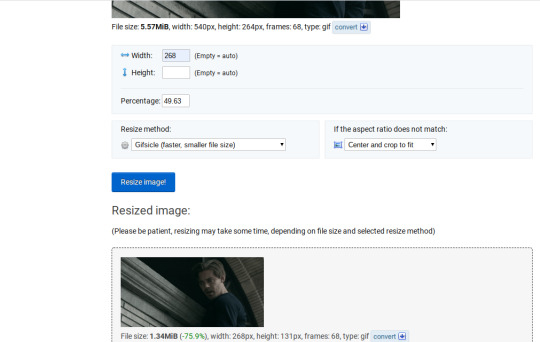
Your gif now looks like this

Next step is optional, but I usually do it. Once again, you go to the menu of options under your gif and select “speed.”

Speed is also super straight forward. I almost always reduce the speed of my gifs somewhere from 90% to 80% no matter what, just because I think it makes it look smoother. For gifs that are of short scenes that go really fast, I will reduce it to anywhere from 70% to 50%. You can try different speeds to test out what you think looks best. For this gif, I’m going to put it at 80%.
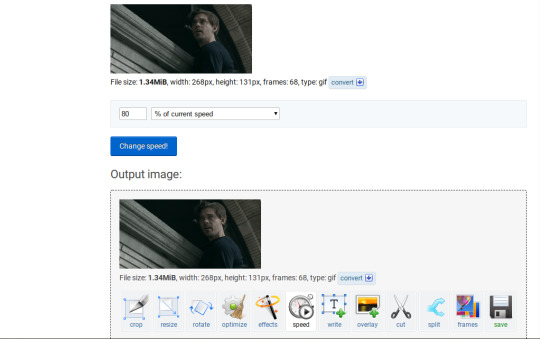
Here’s what we have so far. Congrats, you have made a gif!

Now for the fun part!
2. Coloring the gif
Go to the “effects” option, in the menu under your gif. You will see a LOT of options, but the panels I’m going to focus on are “colorize”, “brightness and contrast” and “color presets”. This section is going to vary a lot depending on what specific video you are giffing so remember to be flexible and try lots of different options out! It took me a while to get to a place where I can just eye a scene and know what settings to use. It’s super easy to go back and tweak a setting if the gif doesn’t look like how you want it the first time, but it’s a lot of trial and error.
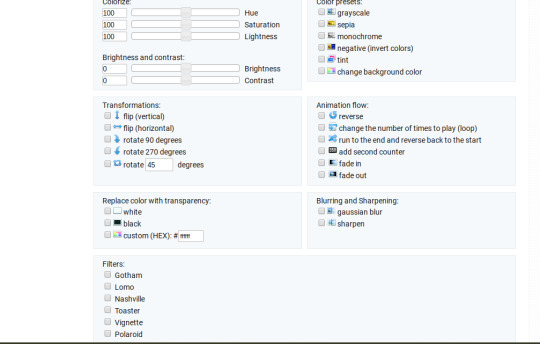
The main option I focus on in the “colorize” section, is “saturation.” This is what will make all the color in your gif pop out. The saturation I use varies a ton; for scenes that already are colorful/bright, I usually keep it around 120 to 150, since you don’t want it to be over saturated. If I’m making an edit that is supposed to look toned down or more grey/neutral tones, I’ll decreases the saturation in the range of like 90-40. For a show like Prodigal Son, where there is basically zero color vibrancy, I tend to go full out with saturation, usually in the 150-200 range. For this gif, I have it all the way up to 200.
Next is brightness and contrast. This also varies wildly, but a good rule of thumb is I always try to keep my contrast at least 5 points higher than whatever my brightness is, it just makes the lighting more even. You need to find a good balance; obviously, the darker the scene, the higher you want the brightness and contrast, but if you go too high, the gif with be staticy/grainy. For Prodigal Son, which has horrible lighting, my brightness is anywhere from 10-30 and my contrast is anywhere from 15-35. For this gif, my brightness is on the lower side since the scene is outside in natural light; brightness is 16, contrast is 26.

After you get those settings, I go over to “color presets” section and click on the “tint” option. It will pull up a color chart that looks like this
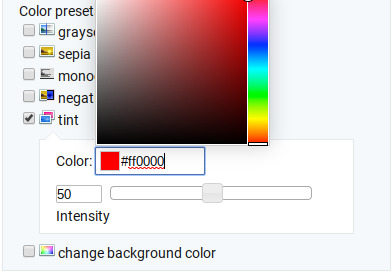
You ALWAYS want the intensity up to 100. This part is where the most trial and error occurs; there isn’t any one color option that works for every gif. The shade I use most often is light red/pink or light blue/light purple. For scenes that are lacking warm tones (which is almost all of Prodigal Son) I tend to go to the light reds, and for scenes that are lacking cool tones, I go to the light blues. The light reds are best for making characters skin tones look more...like actual skin tones and not totally washed out. To select a color, you just move your mouse around the chart. This is the range of color codes I tend to use.

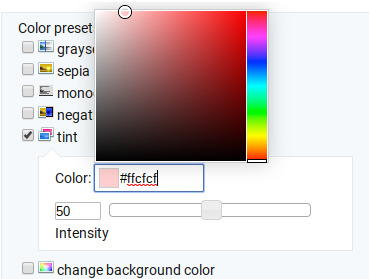
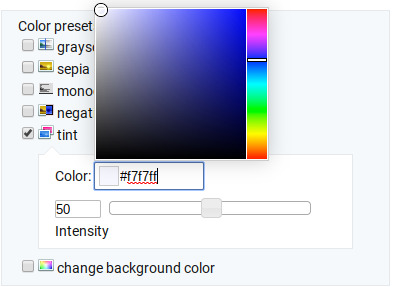
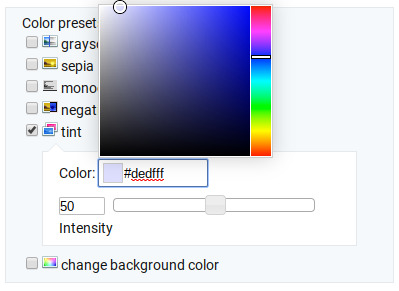
Again, intensity should be up to 100 (it automatically starts at 50 and I was too lazy to move it while getting screen shots :P).
For this gif, I actually used a new technique I’ve been trying out where I start with a light blue tint to even out the color tones, then once that gif is done, I go back to effects and add a layer of pink to make the colors brighter. Usually, one color works fine, but sometimes it’s hard to find a good balance (the red colors can get too red and the blue sometimes brings out too much of a yellow shade). For now, I have my color tint set at #eeebff.
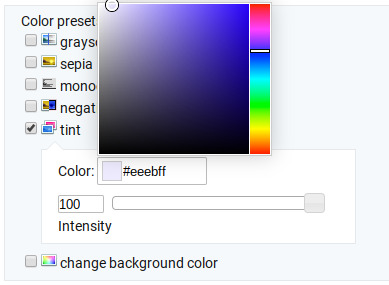
Ultimately, this is what my effect settings look like and this is what the gif looks like now.
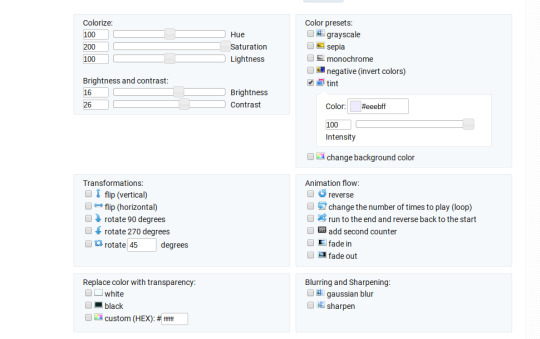
Now, like I said before, I added another layer of tint to this gif. All you have to do is go to the menu under your gif, and click on effects again.
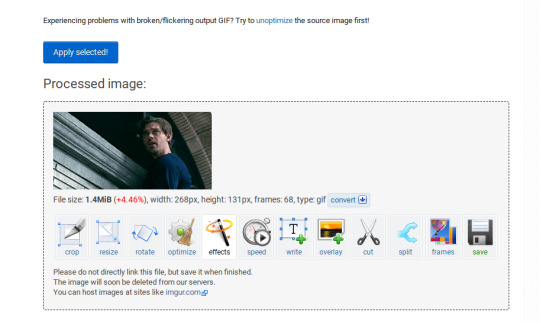
It will take you back to the panel you were just on, expect now your colored gif is on the top and all the settings are blank again. The only setting you need to use now is the tint option; go there, and select a light red shade. I used #fff0f0.

And here is the final gif! To save it, just right click and hit “save image as.”
I know it seems like a long process, but once you get a hang of it, it goes by super fast, especially if all your gifs are coming from the same video.
BONUS: Adding text
If you are trying to gif something with dialogue or you want a quote to put over your gif, you will want to put text over it. ezgif has a “text” option that you can use if you want, but I personally don’t really like their font options, so I use the website Online Image Editor.
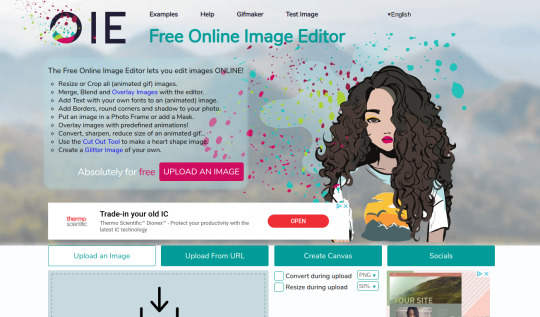
This is what it looks like. You can either hit “upload an image” and upload your saved gif, or you can go back to ezgif, right click the gif, hit “copy image url” and paste that url into the “upload from url” option. The web page should now look like this.
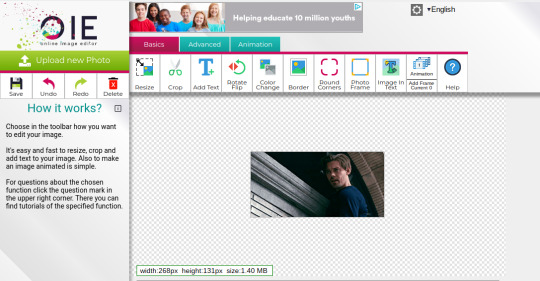
It’s pretty straight forward from here; click on the “add text” button and a menu will appear on the left hand with options for the text.
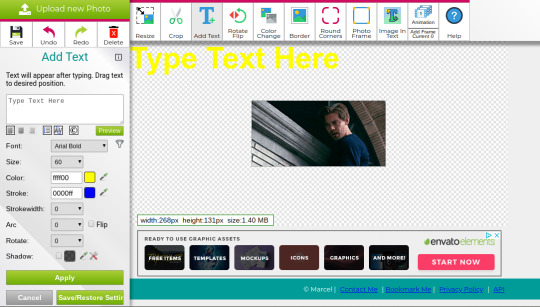
Type whatever you want the caption to be in the “type text here” box. This website has a ton of font options you can play around with, but when I just want to caption a gif, I stick with “Arial Bold Italic.” For a 268p gif, the font size should be 10-12, depending on how much writing you plan to put on each gif (if some gifs are going to have more writing than others, pick a smaller font size so it stays consistent!) When I make a 540p, the font goes up to 14-16. I use white for the color and black for the stroke. I make the strokewith 3 because it makes the caption stand out more. Once all these settings are selected, hit the “preview” button under the text box.
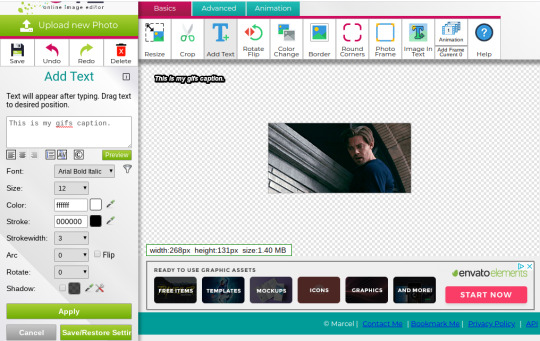
You can now drag your text anywhere you want on the image! The only bad thing about this website is that it doesn’t automatically center text, so you either have to eyeball it, or if you’re picky, like me, open up one of those online ruler applications and use it to measure out the center. For captions, I move the text just slightly above the bottom of the gif.
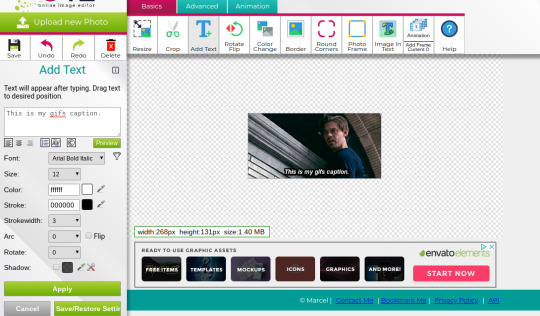
Finally, you hit apply. Once your gif has the text on it, all you have to do to save it is right click it and hit “save image as.” And here is the finished project!
That got a lot longer than I thought it would, but I hope it was informative! If anything was unclear or if you have further questions, feel free to send me an ask. Thank you for reading.
#gif tutorial#giffing tutorial#giffing#gifmaking#mine#my gifs#long post#I hope this makes sense lol#pls rb if it helped!!!#also if mobile doesn't keep the read more...idek
322 notes
·
View notes
Note
hii!! i have a very silly question but how do you get your gifs to look so high quality even on mobile? is it bcs you only use ts files, or is it a sharpening setting / a particular layer? hope you have a great day!
omg hi that's not silly at all!!! i actually don't use ts i just download the highest quality i can find from youtube mainly (so usually 1080p but 4k if it's available) and i use vapoursynth to resize (& sometimes denoise a little bit) ! i don't use vapoursynth to sharpen tho i just smart sharpen in photoshop:
the 1st setting i use is 500% with a 0.3px radius & reduce noise 10% + remove gaussian blur
if it still looks too blurry i'll apply smart sharpen again with 10% at 10px & reduce noise 10% ... honestly sometimes i'll apply this setting like 10 times (especially for film gifs) just to get it to not look so pixelated ;; if u overdo it it'll make people's faces look like wax sculptures tho so just. use in moderation lol for kpop gifs i'd say use this a max of 3 times otherwise it starts to look super fake
for colouring i find that for like.. midtones? the brighter they are the less pixelated they look on mobile. pixels show up easily on dark colours unfortunately :(( unless it's 100% black! so i might set a black point w/curves or i'll go to selective color & bring down the blacks. or the classic way of just adjusting the levels!! whatever works for u <3
i know kpop gifmakers don't like to do this but adding grain (or adding noise) can help make it less pixelated! but you're also making it more grainy so it's up to ur personal taste :))
ok !! & then when i save for web i use the default settings ? which are selective diffusion.. 256 colours.. 100% dither.. bicubic i think??? some people prefer adaptive over selective i honestly do not know the difference even tho i've saved with both before so totally up to u!! u can experiment to see what works best for u 💕
oh also this is such a hassle but i always always check on mobile before i post. i have a sideblog where i literally just dump my gifs & look at them on my phone to make sure they're not too pixelated it's very annoying & u might have to save ur gif like. 10.... times....... w different settings ....... but ! at least it won't be too pixelated??
i just realised i've been talking about 540px gifs this whole time ghhghfjg if you're making 2x2 sets or whatever then u definitely don't need to sharpen as much!!! anyways happy giffing!!! pls lmk if u want clarification on anything 💞
#thank u for this tho anon im virtually sending u pics of kermit w/heart emojis <3333 im honoured u think my gifs look ok sgshhd#also never forget the tried & true method of getting rid of a gif if it's really not looking too hot 💔💔💔#i can't tell u how many gifs i've trashed mmgmh i almost never post on this blog either all my gifs are on my sideblog 😔#i hate that tumblr compresses everything :/ like on twitter???? gifs are like. never pixelated????? wtf.#ANYWAYS. im sorry this is insanely long i hope this helps! im not exactly a veteran giffer so im sorry if some of this is plain wrong dgbdb#asks#anon#long post
2 notes
·
View notes
Text
"palette” gif tutorial
hi everyone!!! so i’ve gotten countless requests to make a tutorial for my lara jean gifset, more specifically this gif:
so today i’ll be showing you how i make this gif right here:
as mentioned in the original post, this whole gifset was inspired by one of my favorite mvs of all time: palette (hence the creative name lmao). i essentially used screenshots of the mv to make my own similar template to work off!
disclaimer: i suck at explaining things, so you’re all gonna have to bear with me and my 100000 screenshots and poor attempts at explaining wtf i’m doing. hopefully you can manage to understand what i’m on about!!
if you’ve never made a gif, check out this detailed tutorial i made some time ago:
how to make gifs + color gifs (this tutorial includes links to download ps)
tutorial under the cut (i’m sorry for how long this is rip)
first, screenshot the mv. (timestamp 0:38)
here is my screenshot:
now, we’re gonna open ps and go to file > open to open the screenshot on there. this is my screen rn:
notice how my timeline is there (little box on the right side of the screenshot). we’re going to need the timeline for the gif later. if u don’t see the timeline, go to window > timeline and it should show up!!
time to crop the screenshot. using the crop tool, (left sidebar, 5th icon from the top) remove the black parts of the image (top and bottom) until all you’re left w is the white area. final product:
now it’s time to change the size of the canvas we’re working it so it can be the dimensions we want it to be! go to image > canvas size
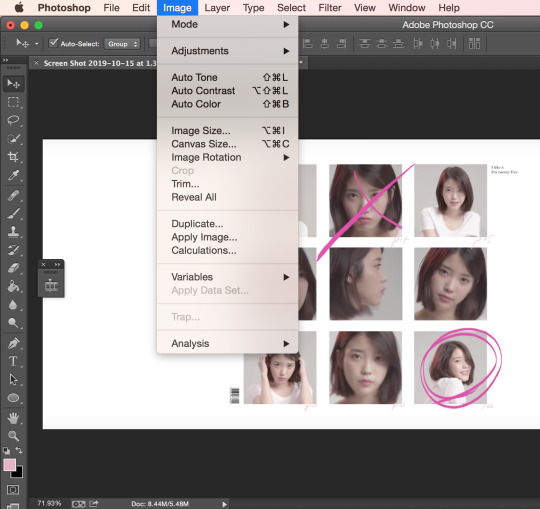
a window like this should pop up:
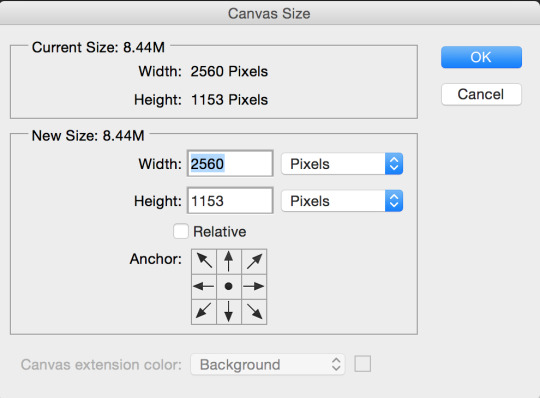
we want our gif to b 540px by 400px, so just fill that out and press ok:
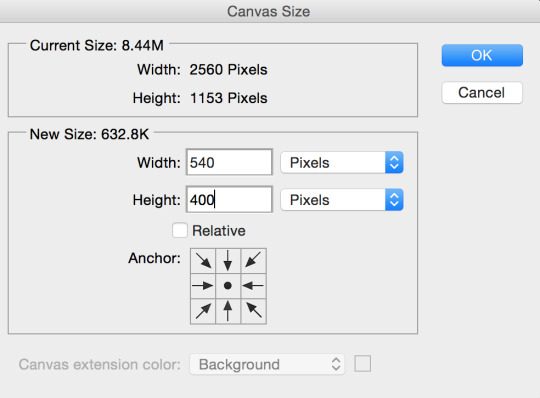
this is what your screen should look like after (aka super zoomed in):

we’re gonna fix that rn!!! making sure the layer (right sidebar) is selected (you can tell it’s selected when it’s in blue), press command + t, which will leave you with this:

okay, so i’ve covered this before in my previous basic gif making tutorial and not much has changed since then aka i’m still shit at attempting to explain wtf i’m doing. BUT basically this part involves using the top bar (pictured below) and changing the % of the W and the H to make the image the amount of zoomed in i want it to b (if that makes sense)

again, i usually just play around w the %s, depending on how zoomed in i want my image or gif to be, its dimensions, etc. the higher the %, the more zoomed in it is. basically, putting in 50% would make it way more zoomed in than 20% and so on. for this, i’ve tried out several % and decided to use 39%, but of course you can pick the % you prefer. so write in your chosen % in these two boxes in the top bar like this:

click the checkmark at the right of the top box and voilà! this is what you should have rn:
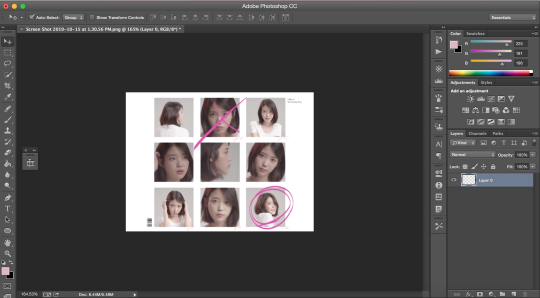
see how all the 9 squares fit perfectly inside? wow, powerful. anyway, let’s keep going djfhdkfd. now we’re going to make our own squares aka the squares in which the gif is going to be. start by creating a new layer (at the bottom of the right sidebar, the second to last icon before the trash icon). give it a name so it’s easier to keep track of: i picked s1, since this is going to be the layer where the first square is going to be (and so on). also make sure the new layer is above your image like this:
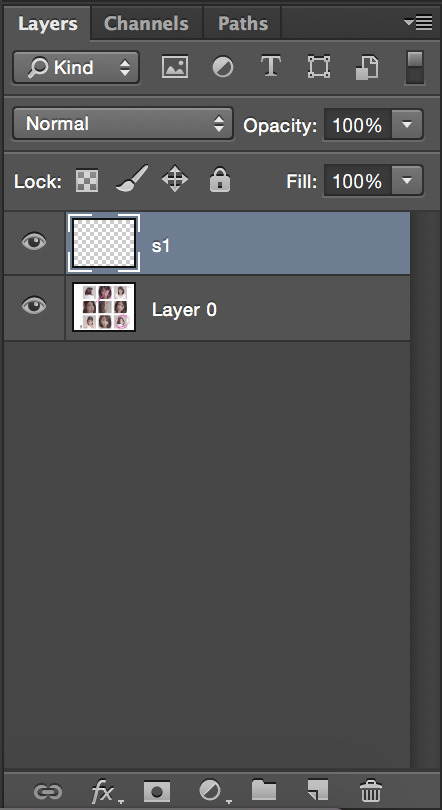
time to actually make the first square!! select the rectangular marquee tool (left sidebar, 2nd icon from the top) and select one of the squares in the image (113px by 113px) like this:

select the paint bucket tool (left sidebar, under the eraser tool) and make sure the color is set to black (#000000) before you click on the square you just selected. very important: don’t forget to have the s1 layer selected (should be in blue) when you do this or else it will fuck up.
this is what your screen should look like after:
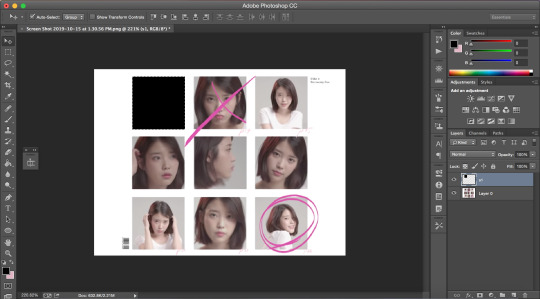
as you can see, we have one square done, but there are 8 more left. right click on your s1 layer in the right sidebar and click on duplicate layer. name that layer s2. making sure the s2 layer is selected, drag it to the place of the second square:
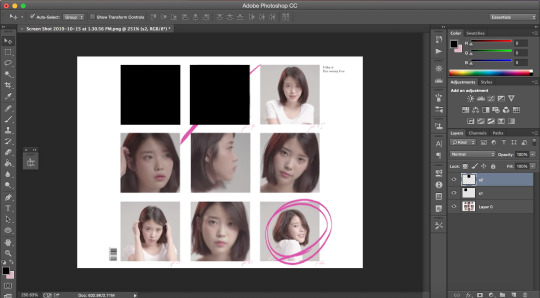
keep doing the same thing until all the squares are covered with black ones like this:
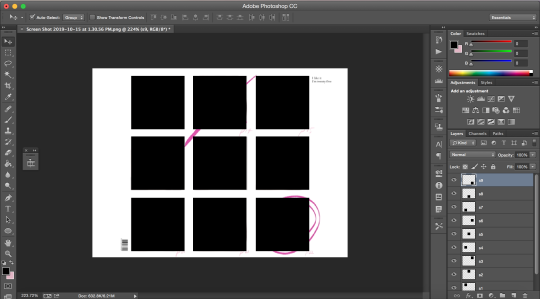
now i’m going to hide the black square layers by clicking on the little eye icon (left of layer) for each of them bc i want to include the little dark pink doodles on my gif as well, but you don’t have to, so if you don’t wanna include it in your gif, you can skip over this part!!
there are technically 3 ways you could do that (well maybe more lol but these 3 are the ones who came to mind:
method #1: use the brush tool to draw your own doodle (or trace over the existing one with a new brush)
method #2: use the magic wand tool to select the doodle and use the brush tool over your selection
or method #3: look up doodles on google and drag them onto your image
i don’t have an ounce of patience rn, so i will b using method #2. select the magic wand tool (left sidebar, 4th icon) and make sure you select the first doodle the best you can. don’t forget to make sure your screenshot (image with the doodle on it) is selected while you select the doodle or it won’t select anything!!! like this:
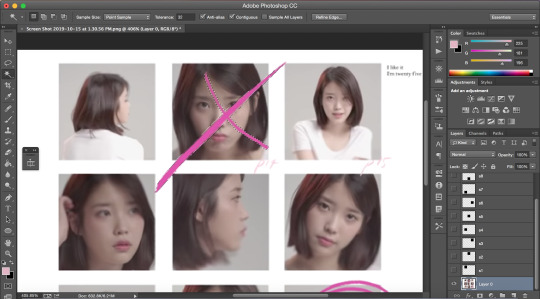
create a new layer (bottom of the right sidebar, the second to last icon before the trash icon) and again, make sure it’s above all the other layers. with your new layer selected (in blue), select the paint bucket tool (left sidebar, under the eraser tool) and pick a color (i used #e1b5c4). click on your selected doodle. this is what you should have:
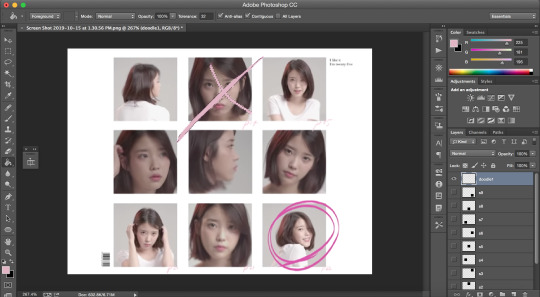
repeat for the other doodle with another layer.
final product:
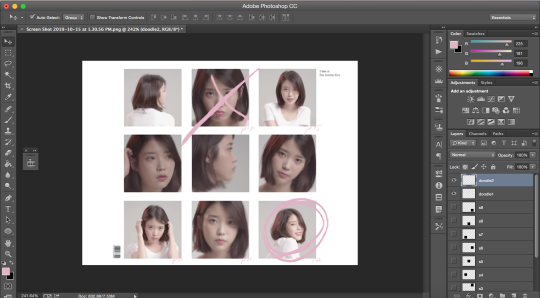
it looks a bit Rough, but hopefully you get the idea?
now we’re going to merge all the little squares into one layer of little squares. if you have doodles, remove the eye icon (left of layers) for both of them to hide them and make sure all of your eyes are there for the square layers. select the s1 layer and then the other layers up to s9 while keeping one finger on the shift button until all the square layers are selected (in blue) like this:
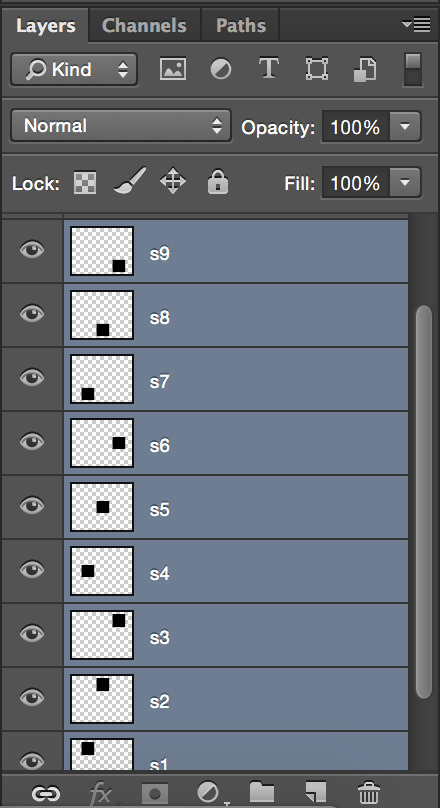
right click on the s1 layer > merge layers. all you should be left with is:
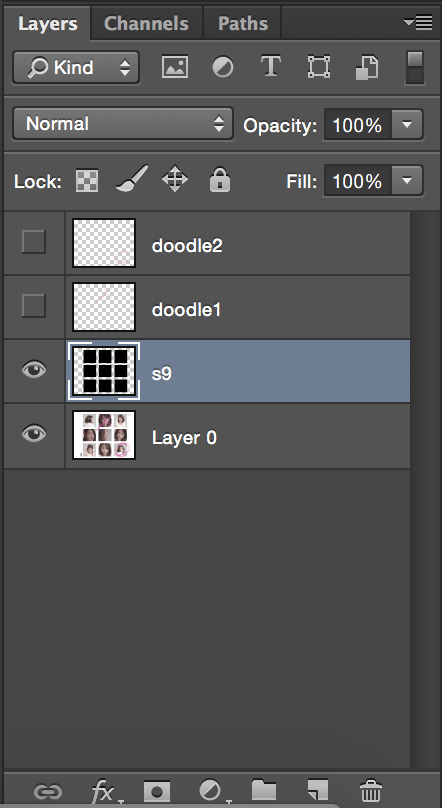
now that this is done, we need to fix the background.
create a new layer that you will drag above the screenshot (layer 0) but under the s9 layer. i named mine bg (background). i want to keep the barcode in the original screenshot, so i won’t select that part. using the rectangular marquee tool (left sidebar, 2nd icon from the top) and with the bg layer selected, draw a square at the right of the bar code so you have this:
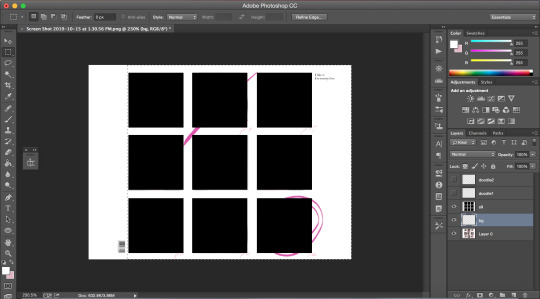
with the paint bucket tool (left sidebar, under the eraser tool) and the color set to white (#ffffff), click on the selection.
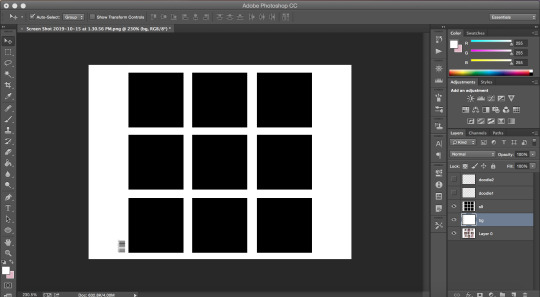
and that’s your template!!!
with doodles:
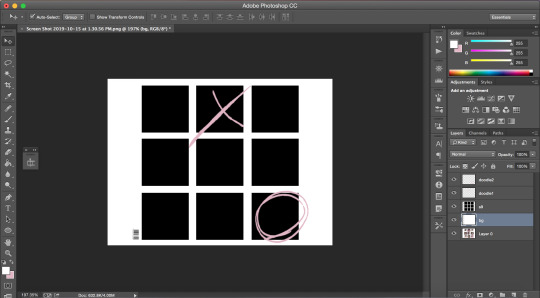
now onto making sure the gif is going to actually move properly.
click on the little arrows at the right side of the timeline to expand it until you have this:
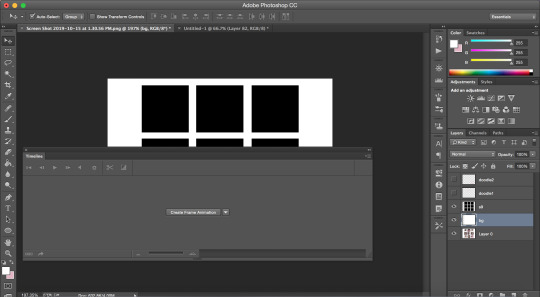
and then click on create frame animation. your screen should look like this:
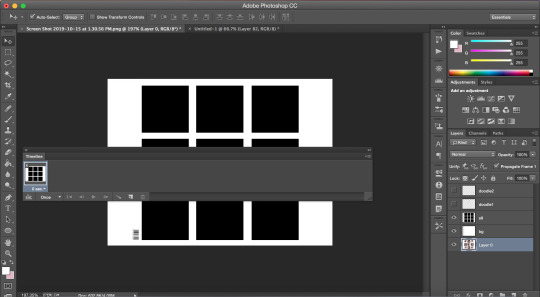
notice how it says once at the bottom of the timeline? make sure to change that to forever, or it will not play:
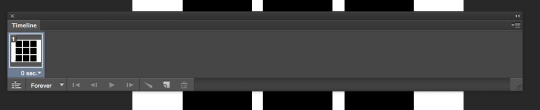
click on the convert to video timeline icon (the one on the left of the forever). this is what you should be left with:
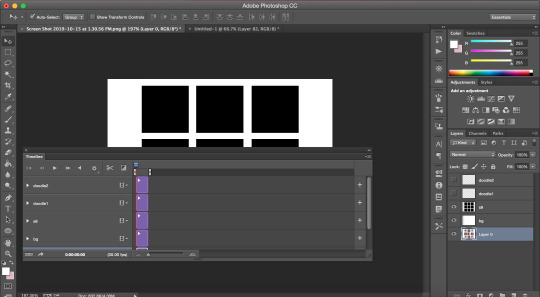
now, time to make the gif that is going to go there*
*if you have no idea how to make gif and are lost af, i suggest you check out my previous tutorial where i explained this part with more screenshots and more specifically bc i will be more vague here regarding this
also i’ve said this again and again, but remember to ALWAYS USE 720P OR 1080P FOOTAGE WHENEVER POSSIBLE FOR YOUR GIFS or else they will be grainy and extremely unpleasant to work with.
i’ll be using a video from youtube for this. i suggest converto as a converter, it works really well and allows you to download youtube videos in 720p and 1080p!! once you have your footage ready, go to file > import > video frames to layers. use the markers to select the part you wish to gif, and, once you’re happy with your selection, click ok.
to select all the frames, click on the icon on the right of the timeline (4 lines with an arrow) and click on select all frames. then, go to select > all layers in the top bar. everything should be selected (in blue) like this:
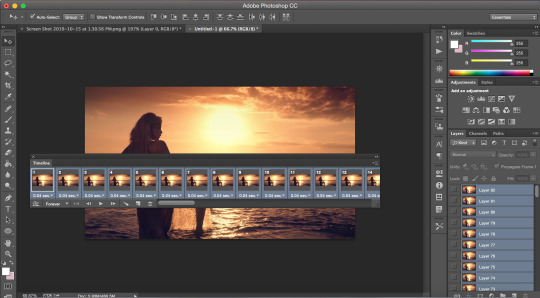
now, fixing the speed of the gif.
super helpful post explaining gif speed right here
i’ll personally be using 0.06 here.
click on one of the frames in the timeline > other. write in the speed you chose and then press ok. go to convert to video timeline icon (the one on the left of the forever).
you should have something like this:
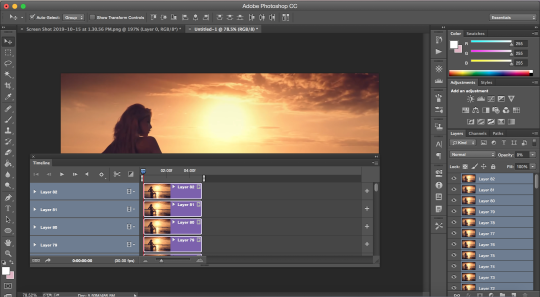
go to filter > convert for smart filters:
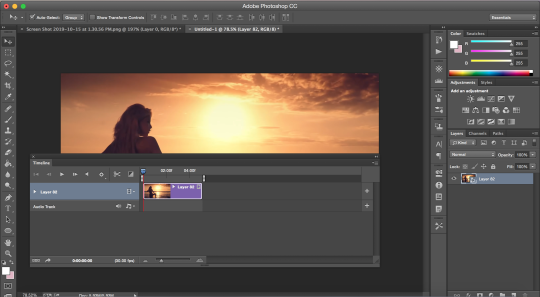
the time has come to drag your gif to the canvas:
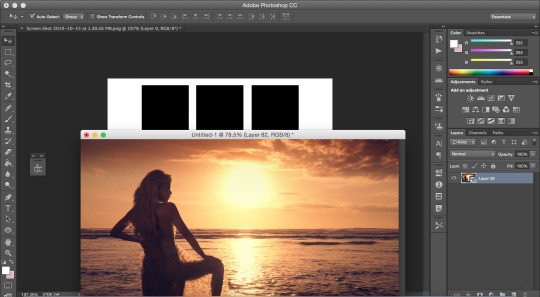
make sure the gif is above the s9 layer (layer with the black squares) like this:
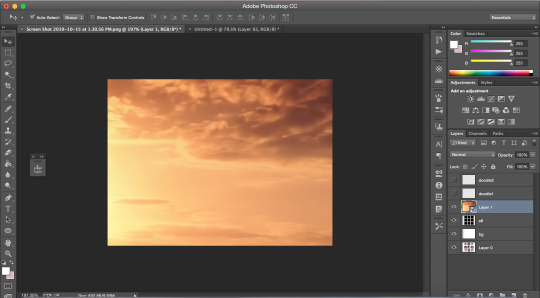
to make our gif fit inside the squares, we’re going to make sure the gif layer is selected. then, press the option (alt) button and click between the gif layer and the s9 layer to create a clipping mask (like this). this is what it does:
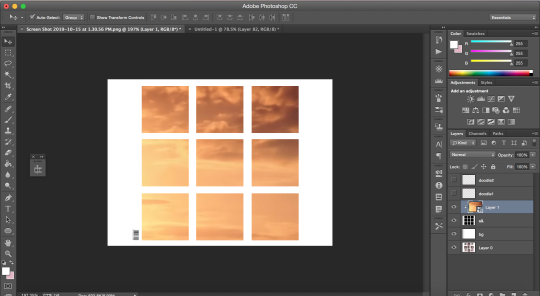
this is where i usually play around trying to find a size for my gif that looks nice. press command + t and, like we did earlier, find a % you’re happy with. i’m going to go with 20%. after moving my gif around and making it less zoomed in, it now looks like this:
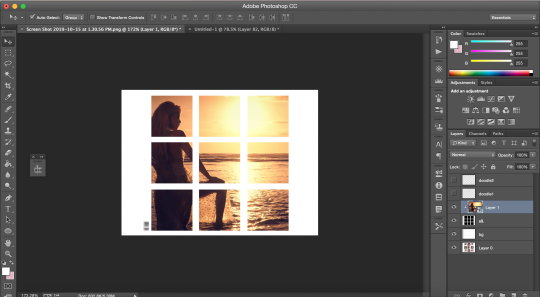
this is usually where i would sharpen my gif, so, with your gif layer still selected, go to filter > sharpen > smart sharpen, and then ok.
these are my settings:
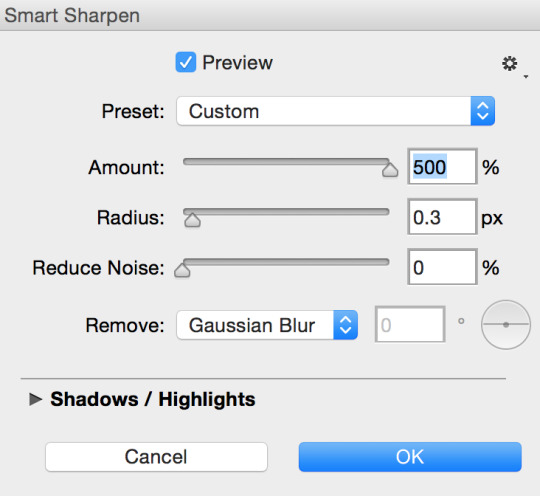
we have to fix the length of the gif, since there’s a lovely limit on this amazing site. i suggest you pick something to gif with not much movement, or you’ll have to make it even shorter. there’s no magic formula, just try not to make it too long, especially since the gif is large in size, so the smaller the better in this situation. this is what i have:
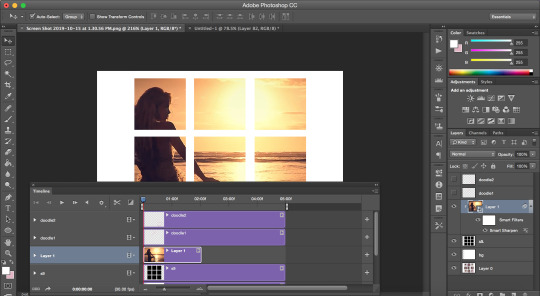
notice how the layers in the timeline are all of different lengths, so make sure you make them all the same like this:
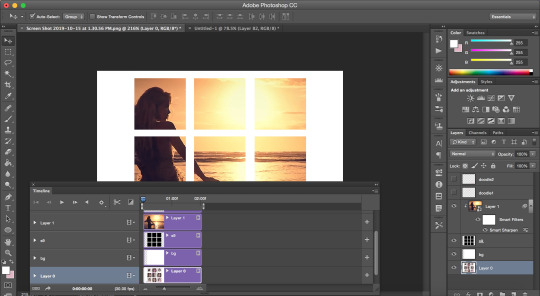
once you have a psd ready, go to file > open and when it loads, drag it onto the canvas, above the gif. i added one of my psd on mine.
for the text on the top right, i can’t remember the exact font i used, so i picked another font different from the original.
these are my settings:
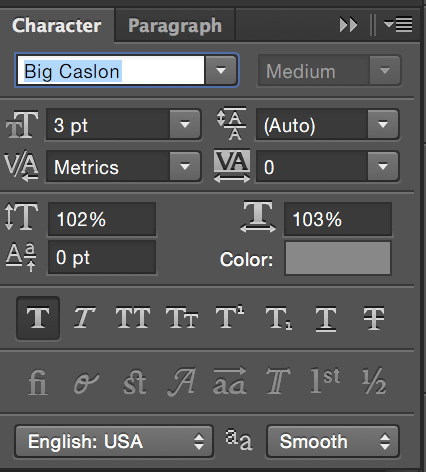
what it looks like with the psd + doodles + text:
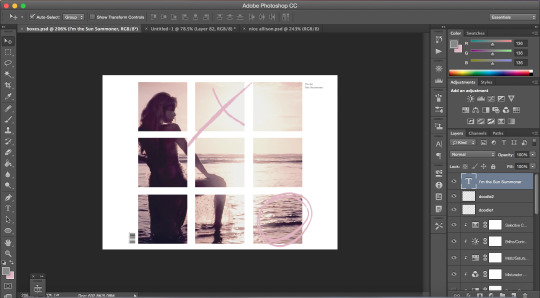
and we are DONE!!! all that’s left is to save our gif!! go to file > save for web
these are my settings:
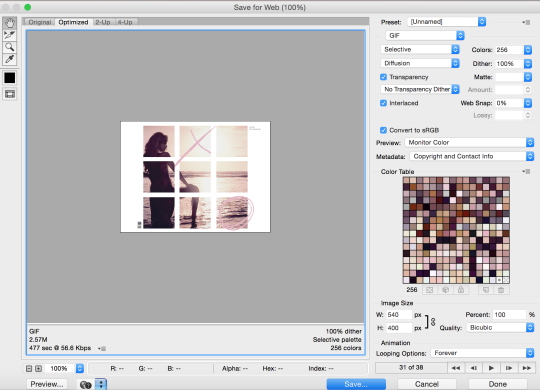
SUPER SUPER IMPORTANT: make sure your gif is set to forever in the looping options at the bottom right of the window or else your gif will absolutely not play properly!!
also, CHECK YOUR GIF SIZE (bottom left). with this website changing its gif limit every 2 seconds, better safe than sorry!!
here’s the final product:
thanks for sticking around and reading all of this!!! i hope it was somewhat helpful even though i suck at explaining how i do stuff! :)
#stupid tumblr crashed so i had to start over but here it is finally!!! sorry for how long it took!!#gif tutorial
48 notes
·
View notes
Note
20, 24, 31, 42, 46, 47 :)
thank you for sending these Katie!
20: Mac or PC?
PC! i pretty much take any opportunity i can to shit talk apple products. i’m an android and pc bitch forever. i have an ipad, so i know the differences between the interfaces and apple is just so much less customizable. i need my freedom! the only downside to not having a mac is that i can’t screen record with kmplayer.
24: 480p 720p 1080p? What is the minimum quality you’ll gif from?
720p is the lowest i will go usually. it’s just super frustrating and not even worth it to use video that’s less than that bc the gifs will be ugly and grainy and do that weird fuzzy wall thing. i have files of that’s so raven that i really wish i could gif, but they’re like 480p and i just can’t put myself through that.
31: Do you schedule/queue posts or do you post right after you’re done?
always queue!!! i will NEVER post a set immediately unless i genuinely hate it and don’t want it to be seen, or if it’s time-sensitive like a request. i always schedule my stuff for at least the next day, but sometimes months in advance (for when i go back to school/work and need to keep my blog active). i also generally schedule stuff to post between 1pm and 4pm PST bc i read that that’s supposedly when this site is the most active. keep an eye out bc sometimes i will tag my long-queued posts with stuff like “this post has been queued since (date) so hello future!”
42: How is your gif folder organized? Is it organized at all?
my folder is just organized by the name of the show/movie for the most part. my gif psd folder isn’t organized at all, though, i just keep it alphabetical. and i never delete anything bc i tend to go back to certain gif files to see how i did specific colorings or effects.
46: Ever gotten a really sweet compliment over a set?
so literally every time emma (@oliviasrodrigo) reblogs any of my sets i CRY bc she’s so sweet and kind and makes me feel so appreciated! i get so excited for her to see my gifsets bc she always leaves nice comments. i don’t deserve her!
also colleen (@summercohen) is super sweet as well, and i specifically remember when i posted my very first barry gifset, she reblogged it multiple times and said so many kind words!
47: Any advice for novice gif makers/people who want to start making gifs?
so i included a “random tips” section in my gif resources masterpost, but i think the most meaningful advice i gave there was to follow and uplift other gif makers. every bit of positivity you put out comes right back to you. when you make an effort to support other people, they will want to support you. and that’s what makes this whole experience so fun.
questions for gifmakers!!!
#anyway emma makes me feel so valid#i cant believe she invented being supportive#answered asks#amandaseyfried
5 notes
·
View notes
Note
i'm new to giffing, what technique or what extension do you use to get your gifs so sharp
Hi dude! Honestly, the main thing is to make sure you’re downloading quality files. Anything under 720p will make your gif look grainy and not that sharp. Always download 1080p if you can but just don’t go under 720p or it will look bad. The second most important thing is sharpening your gifs - it’s what makes them look really nice imo. These are my settings (I think everyone uses these tbh):
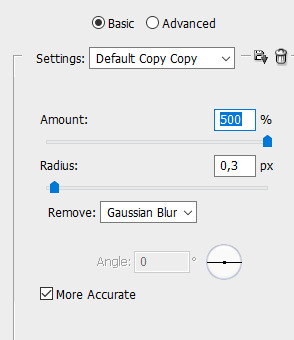
The way you color your gifs is also really important to the quality of the gif - if you edit it too much, you can actually ruin the quality of the image (happened to me before and the gifs just looked rubish) so if you’re still not sure how to color certain things, a lot of people share the psds they used for movies or shows and it can help you figure out how to work with each adjustment - that’s how I started anyways.
Your saving settings also affect the quality of the final product. A lot of people use different settings (I personally think it depends on what you’re giffing tbh) but, at the moment, these are my saving settings:
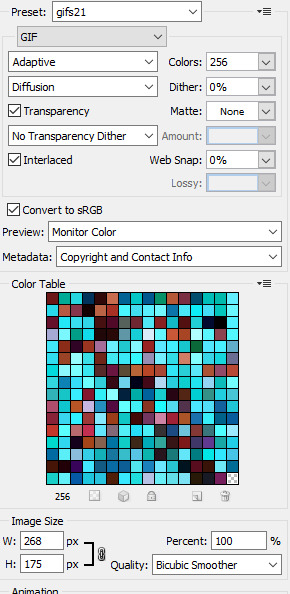
3 notes
·
View notes
Text
THE 100 GIF/COLORING TIPS
Okay, so I know nobody asked for this lmao but I’ve seen a lot of people complaining about the lighting on The 100 (which is completely understandable since it’s very bad.) And even though I’m not at all a pro, I’ve been giffing this show for awhile and I’ve found out some stuff that might be useful for other The 100 gifmakers out there.
Please reblog/like this if you save anything from this tutorial or if it helps you at all :)
WHAT YOU NEED
Photoshop (I use CS5).
General knowledge on giffing.
Patience because The 100 is a hard show to color.
COLORING PREVIEW

WARNING: This is very long. Everything starts under the cut!
GENERAL GIFFING TIPS
Get 1080p/720p downloads. Since The 100 is already a very dark and grainy show, anything lower will ruin the gifs’ quality.
Make sure you have cropped the gifs to the proper Tumblr size. Click here for reference. And get rid of the network logo when you’re cropping it! It always looks better without it.
Sharpen your gifs! I don’t see any reason why you shouldn’t. Sharpening your gifs will make it look more HD and show off your coloring better. My sharpening is a smart sharpen with these settings. You can go here if you want to experiment with other actions/settings, though.
Do not have any skipping frames. Please. Your gif will look sloppy and won’t be as smooth, therefore ruining the quality of it.
Make sure you have the gif timing right. I usually go for 0.05 seconds because personally I think it looks best, but I’ve seen some who went with 0.04s or 0.07s and that also works well. Go for 0.05s! I realized now other time settings doesnt work as well as 0.05s especially with The 100.
Save settings. My usual go-to settings are these. Though sometimes I went for selective instead of adaptive and it looks okay, too! :)
+ extras: subtitle!
The font you use for subtitles on your gif will also affect the way your gif looks. Fonts that are too big or too small will make it look less HQ, but having the right font with the right size (and the right position!) will make it look good. Here are some text settings you can use that I’ve found: [ one / two / three ]
COLORING TIPS
Now that you’ve kind of gotten the general giffing tips, I’ve listed out some coloring tips that I found out specifically for The 100. All PSDs will be linked at the end of this post.
Adjust your brightness before anything else.
The 100 is generally very dark, but even with scenes that are already not too-dark, you’re still gonna want to adjust the brightness so you can work on the colors better. I’ll go detailed with this one. We’ll be working on 3 scenes, bright, neutral, and dark scenes.
1. BRIGHT/YELLOW
For this one, I used a scene of Clarke from Season 5.

The scene is already very bright, so what we’re gonna do here is to adjust it so it’ll look prettier without being too bright that it hurts our eyes. First let’s do curves. I added two curves layer, the first one is to add just the tiniest bit more brightness to her face, and the second one is to darken the background. and then I’m gonna add brightness and levels for contrast:
Alright, now that I’m already happy with the brightness, I’m gonna go and adjust the color. This is too yellow for me, so I’m gonna add a color balance layer to and pull up the blues/cyans/magentas

That’s good, but it’s too desaturated. I’m gonna go and add selective layer to make the colors pop up. I adjusted the red, yellow, and neutral and I got this:

Now this looks great already! Unfortunately, I’m annoying so I have to add more adjustments lmao. This is the final result after being added with an extra brightness layer and a gradient map on luminousity.
2. NEUTRAL
For this one, I’m gonna use a scene of Lexa (reshop heda you’ll always be missed) from Season 2. It’s not very bright but it’s also not too dark.
Now the tips with scenes with enough clarity (doesn’t have to be super bright, but if you can still see things clearly) like this one, clicking the ‘auto’ button on curves saves a whole lot of time. I did so and this is what I have in result:

The auto curves will usually brighten the gif and balance the color on it. Often times you still have to adjust it again. But still this will save a lot of time. I added some more brightness and levels before adding color balance and selective colors layer, and here’s the final gif:
Keep in mind that this will only work with some scenes. This will work alright with the Clarke gif above, but it definitely won’t with this next gif we’ll be coloring.
3. DARK/BLUE
Okay now this one requires some work. I chose Octavia’s scene from the Season 6 trailer.
The original sharpened gif (notice that I got rid of the logo! It’s really annoying for me so I always find a way to get rid of it.)
It’s reaally dark. So let’s start with brightening it up a little. I added curves, brightness, levels and more brightness because it was still dark as hell:

Now, you may think it’s already bright enough, but for me personally I can still make it brighter, so I added exposure. With dark scenes exposure works really well. But you have to take it easy with this layer since it affects the gif drastically with very minimal effort. I also added a black and white Gradient Map layer that I always set to luminousity:

Now it’s time to go and adjust the hell out of the color balance to make it less blue! I also added an extra selective colors layer to make the reds pop out and get rid of the pixelated/grainy blacks on her hair. After that I added another brightness layer. Here’s my final result:

The quality on this gif is not as good as the others since it was from the youtube trailer (1080p youtube video are still low compared to web-dl’s) but that’s basically the gist on how I work on The 100′s darker scenes! :)
Color balance and selective colors.
The 100 lighting often makes your gifs not only too dark or too bright, but also too yellow or too blue. Balancing it out using a color balance almost always helps. Selective colors layer will also help when you want to pop up certain parts of your gifs. Here’s some tips on selective colors that I got from msmarvel’s coloring tutorial.
Selective colors and color balance layer usually go in the middle or on top of brightening adjustments for me. But I found out that color balance could also be done after you’ve done your coloring, but you have to put it under the other adjustment layers to have the most effect.
I’m gonna show you how I edit this gif here of Raven and Murphy with what I’ve said above.
Without any coloring:
Yeah, I know. I can’t see anything either.
I brighten up this gif using my method above for dark blue scenes. Curves, brightness, levels, and add more depending on what you need. Here’s what I have now:
We can see both of them properly now, but it’s waay to blue. Also I’m losing some color from Raven’s skin so I’m gonna add color balance under every adjustment and pull up the reds and yellows.
Now it’s better! You can totally leave it here and post your gif like this. but I added an extra selective colors layer to bring out the red, yellows and blacks, and here’s the final result:

I should mention that when it comes to scenes with POCs, you have to be very careful. With this scene with Raven color balance and selective colors helped bring back her color, but on other scene adjusting too much of the red/neutral/yellow might ruin her skin. You are allowed to adjust the colors on a gif extremely when necessary, but be careful about it :)
Some dark scenes are supposed to stay dark.
I realized that with the 100 (or any other shows tbh) brightening up a gif with a dark scene too much will make it lose so much quality and ruin it. So, what I’ve learned to do is to let it be dark. I’ve seen some people brighten their gifs too much and even though I understand your frustration, it’s gonna be better if you just let it be as it is. But, still, make sure it’s bright enough so you can still see the things happening on the gif.
Here’s a gif of Bellamy from Season 5. You can see how dark it is without any coloring:
First, let’s brighten this baby up so we can see Bellamy’s face. I added curves and brightness, levels and more brightness:
Now I know it’s still very dark, but instead of brightening it up too much I’m gonna go to color balance and add the tiniest bit of red and yellow, and then I’ll add a photo filter. These two adjustments are done so we can have more color on his face instead of the ugly dark red we had. With those adjustments, what we have now is this:
Next, we’ll move on to selective color. This is what I mean when I say you have to be careful with this adjustment. I want to brighten up Bellamy’s face by putting down the blacks on the red selective color. But by doing so I might erase all the reds from his face and whitewash him. To prevent that, while I put down the blacks, I bring up the reds (lowering the cyan) and yellows. I also pull up a bit of neutral and black selective color so I can get rid of the grain (adjusting the black on both selective colors.)
With a little more last-minute brightness, here’s the final result:

That’s pretty much it! You can add more brightness than what I did here (I was in a rush when I made this but I would definitely add a little more curves or brightness) as long as it doesn’t ruin the colors and won’t make the grain too visible.
Now as promised, here are the PSDs I made for this tutorial! Please don’t claim them as your own and feel free to tag me (#useraaya) if you make anything with them so I can check it out :)
[ clarke ] [ lexa ] [ octavia ]
[ murphy & raven ] [ bellamy ]
I hope this helps! Don’t hesitate to message me on my main blog if you have any questions. <3
#itsphotoshop#yeahps#chaoticresources#the100edit#the 100#**#gif tutorial#coloring tutorial#*tutorials#*resources#aaya
421 notes
·
View notes
Last Seen Blogs

oisforohwow
watching the stars

dashhamirua
Darya Mirgorodskaya
agrontalks
Q U E E N ;
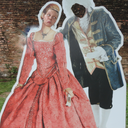
auburnaussieabroad
Auburn Aussie Abroad

tempelogist
your low fat protein source