#1 inch plywood
Text
Who wants to make a peller box?
Guess what! I finally gathered my pages of scribbled notes, my camera of haphazard in-progress pictures, and finally compiled a set of instructions for making one of these bad boys!
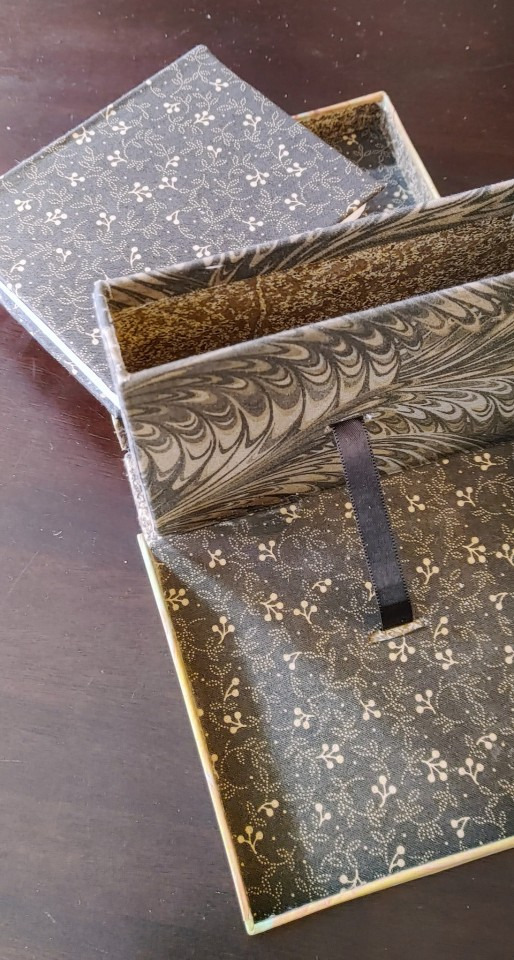
And not only that, but I've got two versions of this baby. I like mixing and matching my unit families because sometimes 1/32 inch sparks joy and sometimes 14 mm is just so convenient, but especially since all of my chipboard comes in english thicknesses, here's a version of the process for my fellow imperial units weirdos:
And here's one for the sensible folks of the world, raised on a base-ten system rather than dividing everything in half and then in half and then in half-- I won't subject you to inches, when there's a workaround, but I was tempted! Have your localized version of the story and have fun with it:
Mad credit of course goes to Hugo Peller, who developed these things in the first place, but also to Jack Fetterer, who preserved a set of notes from a 1990 class, which, as far as I can tell, are the most complete set of instructions available online. But I'm an engineer, I couldn't be satisfied there, I had bludgeon it into a system of equations, sorted by usage and material. And I also go into some of the hiccups I ran into trying to follow those class instructions, like being a green amateur at leatherwork, or not having the equipment to saw plywood boards in my apartment. These instructions still do make some unfair assumptions about the base knowledge level of anyone who wants to give this a try, like using bookcloth rather than plain cloth, but I may try to loop back and adjust that soon.
I can't claim any kind of expertise in this type of work, but I beat my head against an interesting problem, and it's time to share what I got out of it! And, secret goal, I want to help more people make more cool things, and maybe improve on my process in ways I can absorb and chew on in the future. Save my work, change it, I dare anyone who sees this to improve it!! I want it to be better. Credit would be cool, and of course the actual experts I leveraged for this deserve all the credit in the world, but that's not my priority. I want the world to have more exciting things in it, and I want more people to have exciting skills. Go forth and go nuts!!
6K notes
·
View notes
Text


Untitled #1093 (Buddha Boy), 2001 - 03
by Petah Coyne
Specially-formulated wax, cast-wax statuary figure, pigment, silk flowers, synthetic feathers, acetate ribbon, tassels, white pearl-headed hat pins, artificial pearl strands, horse hair, chicken-wire fencing, wire, acrylic primer, plywood, metal hardware, aluminum 52 x 51 1/8 x 52 inches. Photograph: Wit McKay
297 notes
·
View notes
Photo

Shahryar Nashat at Gladstone, 2022
Boyfriend_05.JPEG, 2022
Acrylic gel, ink on paper, plywood
14 x 12 inches (35.6 x 30.5 cm)
15 1/8 x 13 x 2 1/8 inches (38.4 x 33 x 5.4 cm) framed
3K notes
·
View notes
Text
the home stretch
Went over to the house yesterday morning and Jim was there sawing a hole in the exterior wall.
Not alarming at all once I remembered part of this remodel that i'm really excited about is that we're getting an actual exhaust hood for over the stove. Not one of those ones that goes through a microwave either, a real exhaust hood that goes to the outdoors. (The real ones are mounted 30" above the stove top. Microwave ones have to be lower so you can reach the microwave. i can't stand cooking in such a constrained space like that. No thank you. Keep my microwave separate!)
He had sawed out a big chunk of drywall on the interior too, and replaced it with plywood, which is much sturdier to screw mounting hardware into. At my request, he'd extended the plywood down a couple more inches (it'll be covered by the tile backsplash so it won't even show!) so I can screw a couple of heavy-duty mounting hooks in there and have a place I can hang both my cast-iron skillets when they're not in use. I don't like leaving them on the stove (my mother's approach) or stacking them on a shelf (dude's approach) because one is untidy and the other requires me to lift every piece of cast iron i own at once to access any of them. (I also have a square griddle and a Dutch oven and also a tiny skillet which Dude uses all the time when I'm not around and neither of us uses at all when I am around, because it is very much a Cooking For One mini skillet LOL.)
He paused to show me the deer hunting hut he'd meticulously constructed for himself while he was on Christmas break and then artistically had painted camoflage. ("My friends were like omg how long did that take you? I dunno, I wasn't counting, I had a blast. Had a beer in one hand, spray paint can in the other, I just let it take as long as it took. It's like arts and crafts! Who's keeping track of the time?") It did look great. As he was swiping his finger accidentally slid onto the later bits of the camera roll and it showed me the deer he'd gotten on the last day of hunting season. "Oh! I'm sorry, I didn't mean to make you look at that," he said, and then looked at me and laughed, remembering I had told him I work in a slaughterhouse. "Right, you don't mind that kind of thing, but still." It was a nice big doe, cleanly felled, nothing to object to there.
I went and called the appliance company, who'd said they'd deliver my dishwasher and vent hood on new year's eve probably. They seemed confused that I'd called, and then were confused when they discovered that indeed both my items were in stock and should have been delivered. I said I figured the holiday had confused things (genuinely, probably the vent hood had come in on NYE like the salesman had thought it might, but I bet somebody had the day off and they weren't on the ball about calling people) so I just wanted to call and find out if anything needed sorting. They told me they'll call me today to tell me the two-hour delivery window. So I'm getting my dishwasher today! Pumped. It's gonna go into the living room to start with but like, y'know, that's fine.
The counters are going in on Thursday. Hopefully, Jim said, the counter people could do it in the morning, because then he could start on the tile that afternoon.
Ah they've just called, my delivery window for the appliances is 11-1. OK cool.
The plumber can't come until Monday. But then once he's been there I'll have my stove and sink and dishwasher. And, Jim says, that means the final, last little button-up details will be done on Tuesday.
"And then," he said, amused, "I can go back to the regular schedule, because the people who refused to have their houses torn up over the holidays will be clamoring to get the work done now. It's good you didn't mind." Which is precisely why we thought we'd gotten bumped up by two months, but it's funny to hear him so directly confirm it.
"I'm the luckiest person in the world," I said, "with my mother-in-law's house vacant walking distance away for this whole time, so it's been genuinely no trouble at all." And I am. She's coming back on Tuesday, so I figure we'll move back into our house over the weekend, and I'll deep-clean her house and (sighhh) put all the beautiful sewing equipment back where I found it. I won't really miss her fancy modern sewing machine (which she just got and is third-hand and I don't think she knows how to use either) but her old workhorse straight-stitch machine is a beautiful, unfussy beast I've really enjoyed spending time with.
OK i gotta get off my ass and go get the grocery shopping done so I can go sit in my house for the delivery window. I saved plenty of things to do, don't worry. I'm starting to put stuff into the cupboards, made Dude come sit with me over the weekend and give his opinion-- he's been busy at work and has had no attention span but I refuse to take his "idk just put stuff wherever" at face value, he spends more time in this house than me and i will NOT have him after the fact annoyed with how I chose to organize things. So he did give opinions, finally. And I need a few more lazy susans and storage baskets and half-shelf-rack kinda thingies here and there but I'm getting there.
33 notes
·
View notes
Text
Guys, I FINISHED IT.
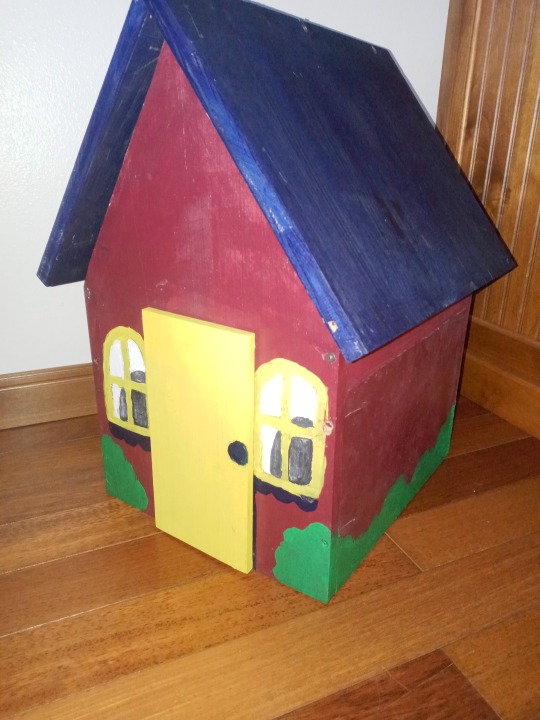

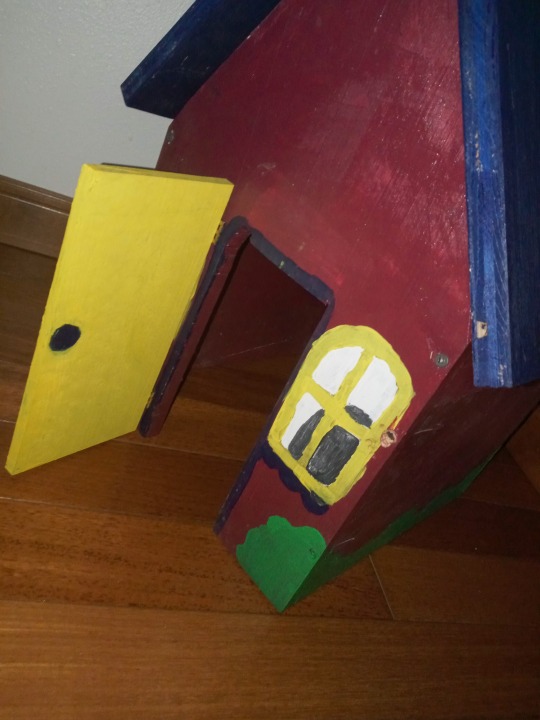
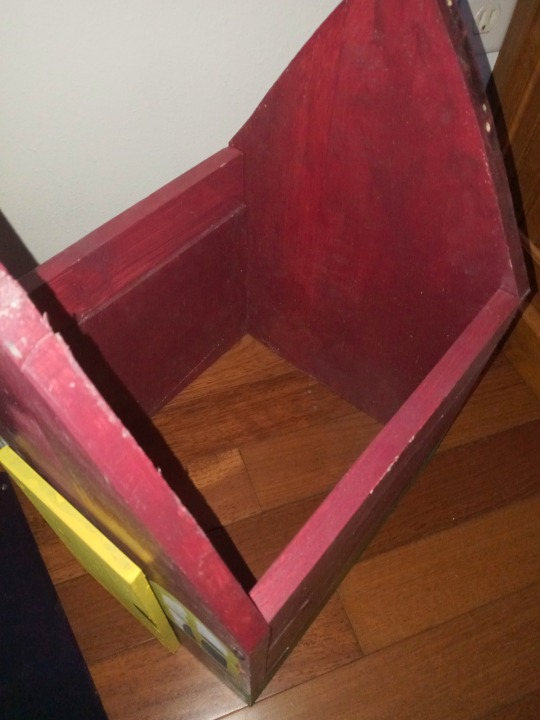
I've been working on this in my woodshop class for about 2 1/2 months now and it's done. It has has a working door, a removable roof, roughly 20 inches tall, and is made of mostly maple minus the roof which is oak plywood. It's not perfect and looks chipped in some places, but I'm pretty happy overall. Now I just need the Wally Darling plush to arrive so I can put him in it.
And if anyone is curious, I got an A- (probably because I messed up at least 5 times. We don't talk about what happened with the roof and screws and my lack of math skills).
#welcome home#welcome home puppet show#welcome home home#wally darling#wally darling welcome home#welcome home wally#wally darling plush#woods#woodworking#woodshop#welcome home fanart#technically#welcome home fanwork#dollhouse#partycoffin
43 notes
·
View notes
Note
hello! you very kindly answered an ask of mine recently, and now that i’ve gone through your ball python tag i have a few burning questions!!
1) i’m having a very hard time keeping humidity up for our BP. she’s been doing fine, but she shed recently and it didn’t go as smoothly as it has before. after reading a few of your tips, i think i’m going to try helping her with the last little bits of skin with some reptile shedding spray and a short soak. do you have any other tips here? i know i should keep the water shallow and not try to force off any skin with my fingers.
2) this wasn’t the worst shed ever, but i’d really like to get ahead of it next time and just go ahead and figure out how to get her humidity right. i’m already using coconut substrate, but misting with a sprayer doesn’t seem to be cutting it. i was planning on buying a fancy reptile humidifier, but i haven’t seen that discussed much here. i saw you say somewhere to add water to the substrate itself, but what exactly does that entail/how much should i use? and about how much substrate should actually be down in the tank?
3) for her enclosure itself we’re using exo terra’s 40 gallon tank, which comes with a screen top. we covered a lot of it with a towel (also serving as a privacy curtain) to keep in humidity but i wasn’t sure if that was a good idea or not?
sorry to ask so many questions!! thank you so much for your time!!
(oh, last note! i know 40 gallons isn’t the right size for an adult BP, but she is currently about the same length as the long side. i haven’t had her long enough to know quite how fast they grow, should i be scrambling for a bigger enclosure now?)
Hello hello - these are all good questions, and I really love the care and love you're putting into giving your snake the best!
A soak sounds like a great idea. Make sure the water is lukewarm but not hot - it should feel the tiniest bit chilly on your fingers. Giving your snake a washcloth during their soak is a great idea because that gives them something to hold onto and they'll often be able to rub stuck shed off themselves with it.
I recommend no less than an inch of substrate. How much water you add to rehydrate depends on how big your enclosure is, but a good general rule for a 40 gal is about a cup of water poured into the corners will do nicely. Especially since you've got a screen-top enclosure (which are very difficult to keep humidity in), if you want to spring for a humidifier, it might be a good idea. I don't personally use them (because I'm old and I prefer to limit the number of devices that could malfunction in my snake enclosures), but it might work well for you in this situation. Another trick for raising humidity levels is to make sure you're keeping a deep water dish on the warm side so it'll evaporate into the air (though, again, with screen-top enclosures that'll only do so much).
A towel can help to retain humidity in screen-top enclosures, but there are a few other tricks that might work better. A sheet of plywood or PVC cut to cover most of the enclosure is what I've found to work best; failing that, covering the top with tinfoil you've taped down securely is another good option. Screen-top enclosures can be a bit of a nightmare with humidity-loving snakes like bps, but there are workarounds!
How fast a snake reaches thier adult size depends on how much they eat and individual variation, but in general you can expect most snakes to reach their adult size between 3 and 5 years old. Some will be faster and some slower. If your snake is comfortable in a 40 gallon now, that's fine! I prefer to get snakes in their adult enclosures at around 2 years old, but there's no need to scramble. Just keep in mind what she'll eventually need (I recommend no smaller than a 4x2x2 enclosure), plan for that eventuality, and prepare to have it when she outgrows her current setup.
All the best!!
73 notes
·
View notes
Text
Extremely Strong Shower Bench
I've gotten feedback from the community asking me to share my plans, so here it is. If you want to build your own shower bench, this is how you do it. Make sure to ask a thinno for help, this will not be easy to do!
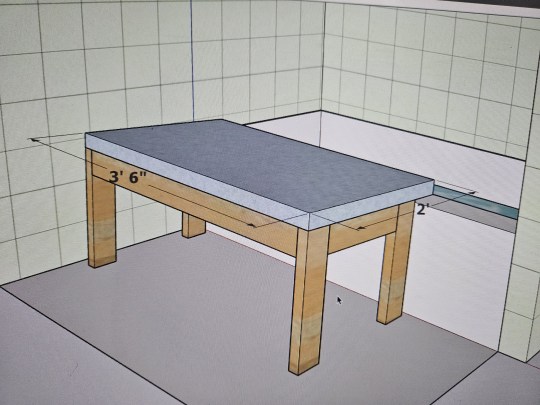
This is an extremely strong shower bench with a 1000+lb capacity. The floor under you will fail before the bench does! This shower bench is designed to remove you from the shower and basically have you sit on the ledge. You will need a couple feet of clearance away from your tub's ledge for it to work.
The top of my tub's ledge is about 1' 3⅜" up from the ground. If yours is taller/shorter by more than ¼" or so, you will need to make some adjustments to measurements down below.
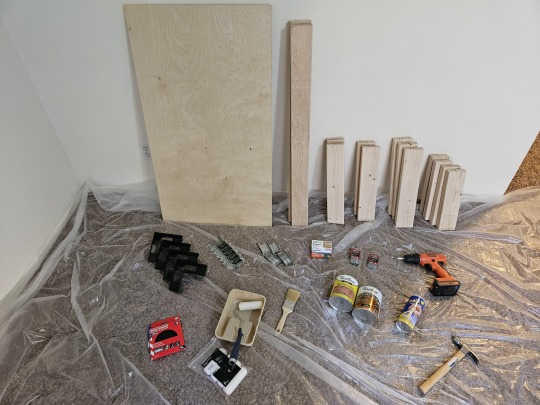
This is a photo of the materials I used to make this build. I got everything I needed at my local hardware store. My build wasn't perfect though. I would suggest you learn from my mistakes and acquire a slightly different material list though:
1x 2'×4' plywood sheet. Get something pre-sanded and rated for outdoor use. I recommend ¾" thick.
2x 8' 2×4s. Most any wood type will work, so get what you like most. I just got some normal 2×4s and made sure they looked pretty. If you don't want to bother with staining or weatherproofing the structure of your bench, get pressure-treated 2×4s.
4x 2' ½"×½" square dowel.
4x Simpson Strong-Tie RTC2Z. Get the black-powder-coated ones if you can.
2x Simpson Strong-Tie LUS24Z. These will be used for the cross beam.
4x Simpson Strong-Tie FB24Z. These will be the feet.
1x Simpson Strong-Drive SD9112R100 #9×1½" 100ct Connector Screws. You won't use the whole box. It comes with a bit.
4x 3" common nails.
32x 1½" common nails.
35x 1" brad/finish nails.
200-220 grit sandpaper.
Oil-based high-gloss polyurethane.
Small dense-foam roller & roller pan.
If you're applying stain, oil stain & staining brush for oil stain.
Liquid rubber. Get something that will provide grip.
Rubber-foam weather stripping. The thicker and wider, the better. I got 20' of 1¼"×7⁄16" and it worked great for me.
4x paper clips, hair ties, or something to hang the feet from.
A plastic tarp, thickness is more important than size.
As for tools, you really only need two things:
Hammer
Drill, ratchet, or socket screwdriver
OPTIONAL: File or knife
I also highly recommend some PPE. Get some cheap/disposable cleaning gloves, a mask of some type, hair ties for your hair, and an old change of clothes.
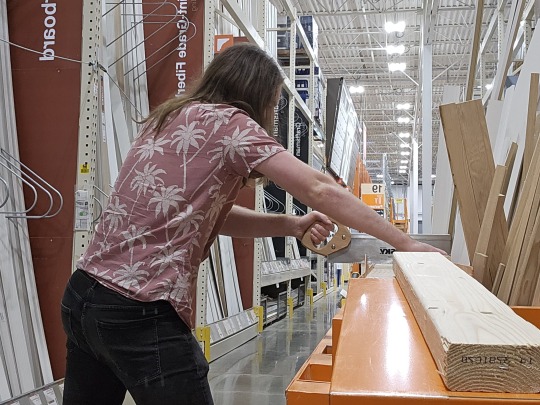
If you don't have access to a table saw at home, *don't leave the store yet!* You need to cut your wood at the store. Many home improvement stores will cut your lumber for you, either for free or for a low price.
Ask an employee to cut the two 2×4s like this:
2×4 #1: 38", 38", 17"
2×4 #2: 33½", 33½", 13", 13"
NOTE: If your tub ledge was taller/shorter than mine, then for every 1" difference, lengthen/shorten each 33½" cut by TWO inches.
Then ask them to cut two dowels down to 20½", and two down to 24".
You should also ask them to take 6" off the short side of the plywood, so it's 2'×3½' instead of 2'×4'.
You're not ready to leave yet! You need to make two more cuts, and the store employees will not help you with these. Many home improvement stores will have a DIY handsaw table where you can cut moulding down to length. You'll need to use this to make the last two cuts yourself.
You need to make an ANGLED cut into the 33½" boards. Lay the first 33½" board down flat as shown. On the edge closest to you, mark a point 1' 5⅛" away from the left end of the board. Then on the edge farthest from you, mark a point 1' 5¼" away from the same left end of the board. Position your saw across both points, and cut through the board. You may need to roll the board over to finish the cut.
NOTE: If your tub ledge was taller/shorter than mine, then for every 1" of difference, add/remove 1" from the 1' 5⅛" / 1' 5¼" measurements above.
For the second board, *do not measure!* It is more important that the cuts in the boards be identical than it is for any one cut to have exact dimensions. Lay the second board down, then set one of the cut pieces on top so the ends of the two boards are aligned, then use the existing angle in the cut piece to start the cut in the second board.

When you are done, you will have four boards, two slightly taller than the others, with the exact same angle cut in all of them. In the above photo, the boards are resting on their angled ends. These pieces will be your long and short legs.
NOW you can bring everything home.
First, lay down your tarp somewhere. Ideally you'll have access to a 5'×10' flat area outside.
Then you need to sand *everything* (except the big faces of the plywood, and the pressure-treated wood if you went that route). Pay special attention to the corners and cuts in the wood.
Now you need to attach the square dowels to the outside of the plywood board. Choose a face of the board to be the "up" face, the one you'll sit on. Put the 24" dowels on top, right along the short edges. Choose a long edge to be the back, and squeeze the two shorter dowels in along it between the side dowels. Nail everything down with the finish nails.
Next is staining, if you chose to stain. Apply according to the directions on the tin. You will likely have to do multiple coats.
Now the truly hard part, applying polyeurethane. I recommend using the foam roller for this and applying many coats. You can prop up the plywood sheet using the 2×4s if you like so you can get all the way around the edges in one pass. You'll still need to flip it over and do three more passes when done with the top, so you can protect the underside from warping.
While waiting for your polyethylene to dry, you may as well make the rubber feet. Grab your four FB24Zs and tie something through one of the holes in the end. Open your can of liquid rubber and follow the instructions to fully submerge each one before leaving it out to dry. One coat should be enough. Once dry, try to remove excess rubber from the inside using a file or knife.
When everything's had a good long dry (at least a day after final coat), it's time for assembly.
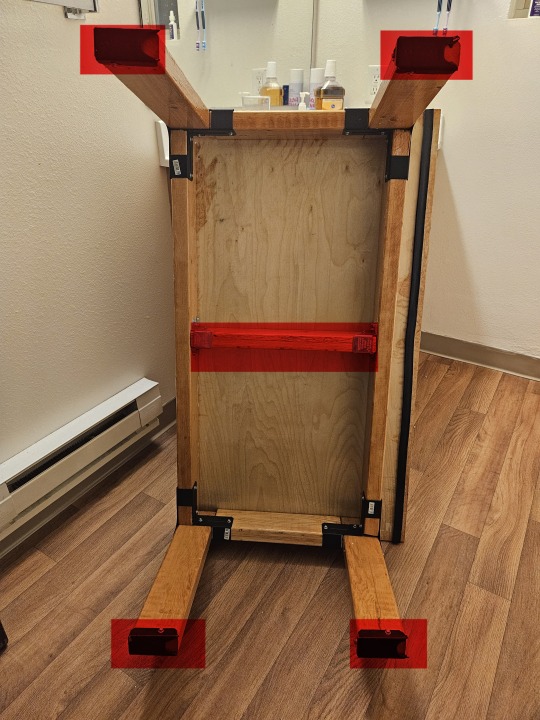
Grab your two 38" boards, your two 13" boards, all four of your legs, and your four RTC2Zs — everything except what's highlighted red in the first photo above. Set the 38" boards down on their narrow side along the long edges of the board, and the 13" boards down on their narrow side along the short edges of the board. Bring them together to form a rectangle, then set the RTC2Zs upside-down on the corners. Each RTC2Z has an L-shaped hole in its bottom; the top/bottom of each L-shaped hole will be filled by the ends of the 38" boards, while the center and left/right of each hole will be filled by the legs. The ends of each 38" board will butt against the wide side of the legs, while the ends of each 13" board will butt against the narrow side of the legs. Now make sure everything is pressed firmly together as you use the Strong-Drive screws to attach the RTC2Zs to the 38" & 13" boards. For each corner, four screws go into the 38" board and two screws go into the 13" board. *DO NOT ATTACH THE LEGS YET!* The legs are just here for spacing right now. Remove the legs when everything is attached.
Grab your 17" board and your LUS24Zs. The 17" board should squeeze in nicely right in the middle, turning your blocky 0 into a blocky 8. Straighten out your LUS24Zs if needed (mine were bowed outwards too much), set them down over the ends of the 17" board, and use 4 screws each to attach them to the sides of the 38" boards. Now grab your long 3" nails and use two on each LUS24Z, installing them at a 45° angle into the remaining holes. They'll nail at an angle into the 17" board and go straight through into the 38" board.
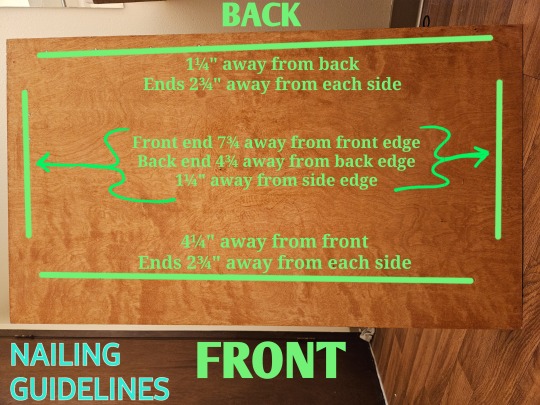
Flip everything over such that the plywood board is now resting good-side-up on top of the mostly-complete frame, with the whole thing resting on the rounded bottoms of the RTC2Zs. Center the frame between the left and right sides of the plywood (should be ½" overhang on each side); let the plywood's back overhang ½" off the back of the frame, and its front overhang 3½" off the front. Now use the 1½" common nails to nail in the plywood into the frame. I used four lines of nails, one for each outer board; measurements are in the second photo above.
OPTIONAL: Apply a final polyurethane coat over the nail heads. This will need a day or two to dry.
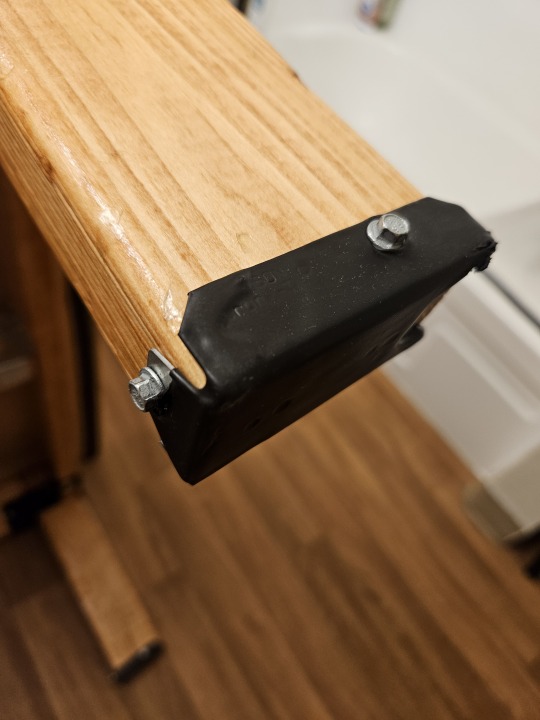
Screw the feet into the ends of the legs. See the third photo above for a reference. Try to make the feet as straight and snug as you can get them.
Insert the legs into the holes left from step 1. The short legs go in on the front side, and the long legs go in on the back side. You should have a bench that tilts slightly forward, to allow for water to drain into the tub. Use some sort of material as a spacer as necessary to adjust each leg to level out the bench. Don't be afraid to introduce gaps between the legs and the plywood; the metal connectors are what hold the weight. Once everything is nice and level, use six screws on each leg to attach then to the RTC2Zs.
Apply your rubber-foam stripping. I applied stripping all along the length of my tub's ledge AND along the underside of my bench.

And you're done! Your bench will look different than the photo above, I hadn't yet added the stripping, the wooden dowel siding, or the feet. And perhaps you chose a different stain color, or made your legs out of pressure-treated wood! In any case, this thing is built like a tank (made with actual home framing materials) and shouldn't break easily. I hope it serves you well!
16 notes
·
View notes
Text
Park Avenue White Cabinet
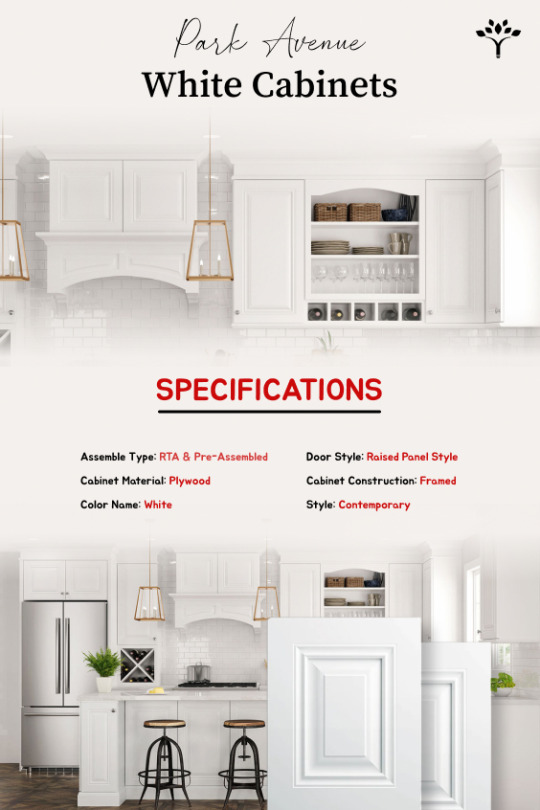
The Park Avenue White Cabinets showcase a commitment to quality craftsmanship and intelligent design. Crafted from 3/4 inch thick, 1-1/2 inch wide, kiln-dried solid hardwood, the frame and sides employ an interlocking system for both easy assembly and robust strength. The back panel, constructed from a full 1/2 inch plywood, features a secure interlock system and is impeccably finished on the exterior. The end panel, with 1/2 inch plywood sides, combines a finished exterior with a natural wood-finish veneer interior.
#kitchen cabinet#buildmyplace#home decor#louisville#us#kitchen renovation#kitchen#kitchencabinets#kitchendesign#kitchenremodel#kitchendecor#kitchenrenovation#cabinets#homedecor#kitcheninspo#kitcheninspiration#kitchenideas#kitchensofinstagram#kitchengoals#design#interior#home#kitchens#homedesign#customcabinets#dreamkitchen#interiordesigner#modernkitchen#decor#kitchenstyle
8 notes
·
View notes
Note
Bestie Prompt
You have to tell me why we are committing a felony before we do it
No it’s not going to stop us but at least I’ll have all the facts
(canon divergent, since i've altered the course of the FTW belt lol)
In the end, it's a surprise. It wasn't Lee Moriarty, or Swerve Strickland, or even one of the former holders, like Brian Cage. No, in the end, it was a surprise when the person to finally peel the FTW belt off Hook is Wheeler Yuta. Maybe it shouldn't have been. After all, the BCC has declared themselves the top of the roster, the best of the best. They're the ones out there attacking whoever they see as a potential shadow over their reign. And that meant that Hook, with his undefeated record and his steady rise, ended up flying too close to the sun.
Yuta is a real bastard about it, too; grabs Hook by the hair after the bell has rung, after Hook has already lost, after he's spitting out blood that's run down his nose and between his lips. He pulls Hook's head up and sneers in his face. It's an awful shot, right in front of the cameras: all it does is plaster Hook's loss, the belt, all over every single television tuned in.
"You thought you were untouchable," Yuta hisses in Hook's ear. "But we were forged in combat."
Mox and Claudio and Danielson, they're all ringside. They move in a pack, because the numbers game plays into their favor. Jack watches them from the opposite side, not because he's scared, but because starting anything now will only make things worse for Hook.
Yuta drops Hook's head back to the ring, and his forehead bounces on the mat, leaving a smear of red behind. Shit.
The others come out, as they always do, just to get their hits in. They kick his ribs, scream at his face. Jack launches himself through the ropes, and it's 1 versus 4. Mox ends up shoving him against the post and laughing about it. Jack never believe he'd scare them off, just that he'd take the heat. With his head ringing, he slides down onto all fours.
The belt is gone. Hook's legacy—stolen. As the BCC makes their way up the ramp to the thunderous boo of the crowd, and thank goodness for small favors, really, Jack touches Hook's shoulder. The muscles beneath his fingertips shudder.
"You gotta get up," Jack whispers, hair obscuring the shot of his face. "Get up and walk out, Hook. Don't let them take this, too."
Hook's hand shoots out, grappling, finally finding Jack's wrist and curling tight. He's hurting. Every inch he pushes himself up must be agonizing, but he fucking does it, and Jack helps him with a fierce rush of pride. He remembers this sensation: peeling himself up off the mats and knowing it's his own blood that's covering the square. He remembers feeling like the smallest piece of shit ever, snubbed beneath the heel of his opponent's boot.
They make their way backstage, one step at a time.
People are nice about it. Of course they are; Hook is beloved. He gets a few pats, and Chuck Taylor brings a wet towel to help him wash up, and Jack sits with him as Hook runs the terrycloth over his face. The fabric comes away pink.
"Can we go?" Hook asks, low. There's a tremor in his tone.
"Already got the keys," Jack replies.
When they get in the car, parked in the garage at the back of the arena, Jack pauses. From the passenger seat, Hook gives him a questioning look. Jack points up at the corners. "These cameras down here? They aren't actually turned on."
"What?"
Jack shrugs. "I passed by the security office a few times. Wondered if they were. Turns out, they aren't even connected. Just for show."
"O-kay," Hook says, slowly.
"And this side of the garage, this east side, see, it comes around the back of the assigned locker rooms."
Hook's forehead furrows. His tongue slips out, running across the lip that will be swollen for days. "The walls aren't brick."
"Naw," Jack says. "Just drywall and plywood. A few load bearing columns. This whole side was a later addition, and it was done kinda fast. Cut a few corners."
Hook scans the interior of the car. "You requested the Suburban?"
"Weirdly enough, nobody else had it reserved."
Hook looks at Jack, a cut over one eye and his hair plastered to his forehead. He looks like he went through hell, but you know what? He came out the other side still in one piece. And Jack is ready to burn the entire fucking arena down in vengeance for what Yuta and the BCC clawed into his skin.
"Thanks for telling me we're committing a felony before we do it," Hook says. "Won't stop us, but I appreciate the heads up."
"Yeah?" Jack asks.
"Yeah." Hook's expression goes a little watery. "Hey. Thanks."
"You don't have to thank me," Jack tells him. "I'd murder those assholes for you."
"This SUV is pretty big," Hook says, but he's smiling, and that's really all that matters, "so, you really might."
Jack throws the Suburban in reverse and steps on the gas. And boy does he hope the entire BCC is in that locker room celebrating when they fly through the wall in an explosion of debris and insulation.
18 notes
·
View notes
Text
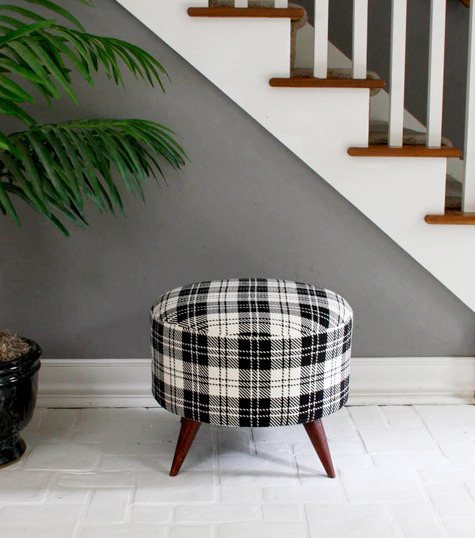
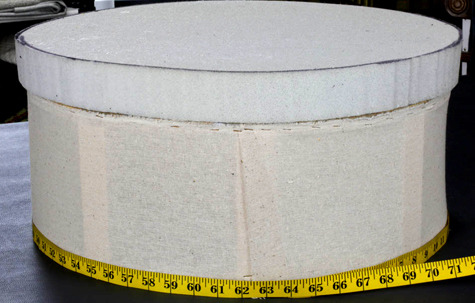
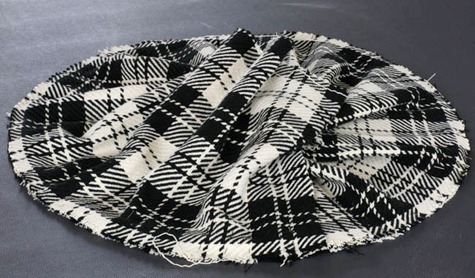
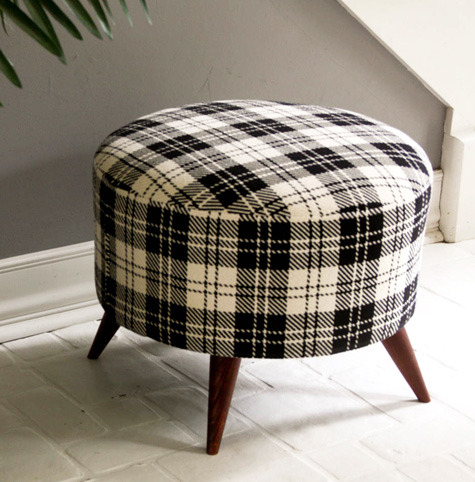
DIY Salvaged Spool Ottoman
Project by Shelly:
i know ottomans aren’t the most indispensable piece of furniture in the house, but is it criminal to say they bring me the most joy? i think upholstery maven shelly (aka ModHomeEcTeacher) would agree with me; she’s made a whole collection of smart looking ottomans using a range of found fabrics and materials. i am so excited to follow her instructions and craft an adorable plaid ottoman of my very own, just in time to welcome fall. click here to see more of shelly’s amazing work, including her tutorials on everything from upholstering with rugs to aligning atomic legs. thanks, shelly! –kate
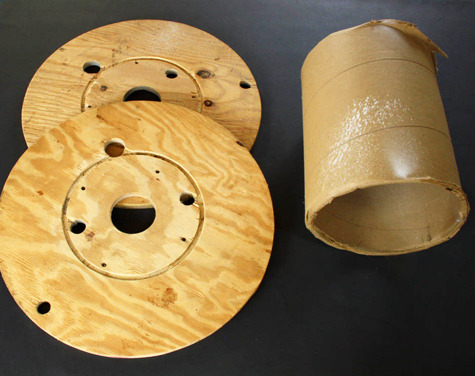
When Lowes stopped selling the pre-cut wood circles I used to construct my ottoman frames, it was a dark day. I soon discovered that cutting perfect circles with a hand-held jigsaw wasn’t easy, or even really possible. Weeks later, while roaming the store searching for an alternative, I discovered the empty electrical spools that are routinely discarded. Two perfectly cut round pieces of 5/8” plywood with a removable cardboard cylinder in the middle? Now we’re talking. With a tiny bit of carpentry, I came up with a way to easily re-work these into frames for my upholstered ottomans. I would label this as a mid-level DIY project that you could complete in a weekend. Once you get the hang of it, you these would make fantastic handmade gifts for friends and family. –Shelly
Materials:
-1 20” diameter empty electrical wire spool (hardware stores usually throw these out, so ask about picking them up instead)
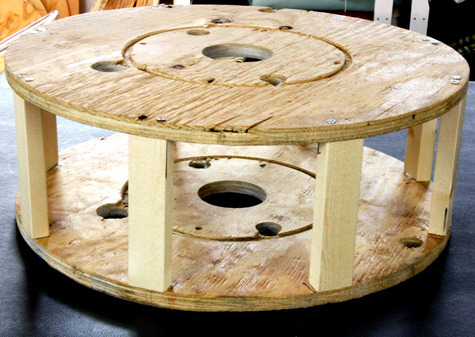
-8 pre cut 1”x 2”x 6” pieces of wood (a hardware store will cut these for you)
-Wood glue
-32 1 ¾” screws
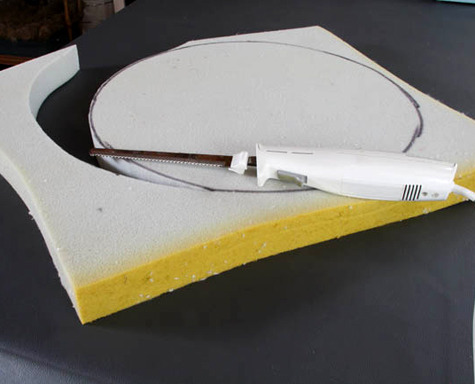
-A piece of foam (anywhere from 3” to 6” thick and at least ½” larger all around than the wood)
-Spray adhesive (Elmers makes a spray adhesive available at the craft store)
-Scrap fabric ( this to attach around the ottoman frame measuring about 8” x 65”. An option would be to use a bendable piece of cardboard)
-1 ½ yard of cotton or dacron batting
-1 ½ yard of 54” wide fabric
-¾” yard of scrap fabric to cover the bottom of the finished ottoman
-Thread and straight pins
-Staples
-4 screw on leg plates (hardware store)
-4 fabulous ottoman legs (look around for good legs on cruddy, inexpensive Goodwill furniture)
Tools:
-Big marker
-Drill
-3/32” drill bit and a 3/8” drill bit
-Electric knife
-Electric stapler
-Scissors
-Measuring tape
-Flat head screwdriver
-Pliers (crescent or needle nose)
-Sewing machine
Instructions:
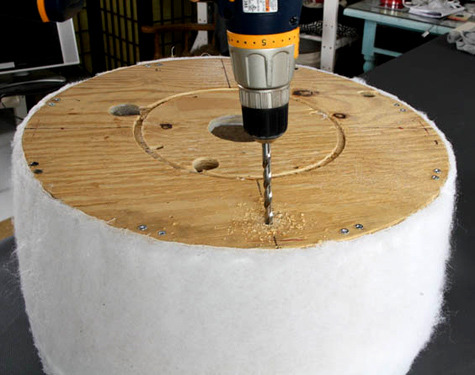
Making the frame:
1. Take the spool apart and make a pattern by tracing the circle on a large piece of paper, adding ½” all around for the seam allowance. The pattern will be used for cutting out the foam, batting, fabric and a dustcover for the bottom. Lay aside.
2. Glue and screw 6-8 posts evenly around the outside edge of one wooden circle, then add the other piece of wood on top of the posts and attach. Be sure to keep the wood circles aligned.
Padding:
1. Use the staple gun to attach the long piece of cotton muslin around the outside edges of the top and bottom circles. Keep fabric pulled taut. The fabric serves to fill in the open spaces between the support posts. Cut off excess fabric. (Option: use bendable cardboard)
2. Trace the pattern onto the foam and cut the foam using the electric knife. Keep the knife blades perpendicular to the foam to get a crisp, even cut.
3. Use spray adhesive to glue the foam to the top of the ottoman frame.
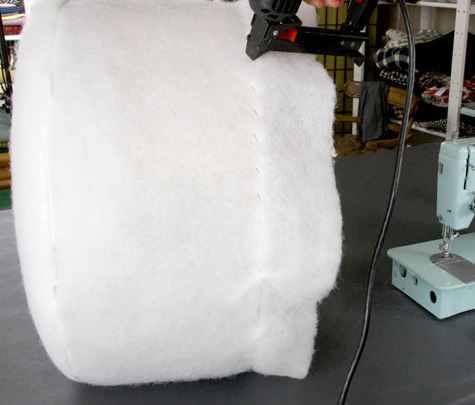
4. Trace the pattern onto the batting, cut out. Also, cut out a long strip of batting equal to the total height of the ottoman, from the top of the foam to the bottom edge, plus two extra inches.
5. Pin the batting strip to the batting circle, starting 1” from the short end of the strip and ending 1” from the other end. Stitch in place.
6. Remove from under the sewing machine and stitch the open seam closed and go back and complete stitching that section of the band to the batting top.
7. Trim off the excess seam allowance, turn the batting covering right side out and pull it down on top of the ottoman frame.
8. Measure and mark the batting band (all the way around the covering ) so that it will be stapled evenly from the top seam to the bottom EDGE of the frame. Do not attach the batting to the underneath side of the wood. Attach it to the edge and cut off the excess batting.
Sewing and Upholstering:
1. To make the fabric covering, which is a bit like a snug slipcover, trace the pattern onto the fabric and cut it out. You’ll need to cut a band of fabric 3” longer than the height of the ottoman and 5” wider than the circumference. If you need to stitch two pieces together to get a long enough piece for the band, split the circumference measurement in two and add 3 extra inches to each piece.
2. To prepare the fabric covering for stitching, fold one short end of the cut fabric band over 1” with wrong sides together. With the right side of the band to the right side of the fabric circle, patterns matching, pin and begin stitching at the folded short edge all the way around to the other short end. Overlap the excess fabric 2” past the folded short end. Cut off any excess fabric beyond the 2”. Pin and stitch the overlapping fabric to the seam.
3. Turn the fabric covering right side out and topstitch the folded seam closed from the bottom of the band to the top seam.
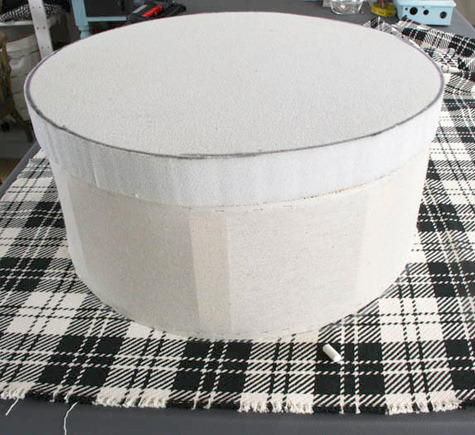
4. Pull the fabric covering down over the dacron covered ottoman. Adjust the fabric pattern and straighten so the pattern or plaid is aligned.
5. Pull the fabric down firmly and staple in place evenly and snugly.
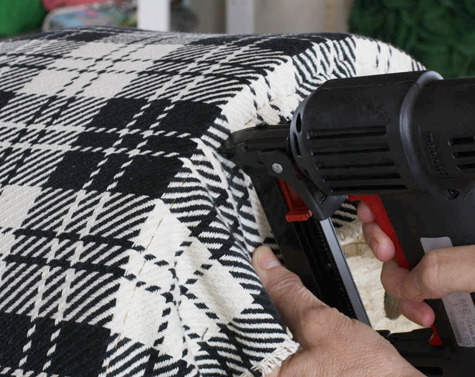
Upholstery Tip: It works best to start with one section and attach with a few staples, move to the opposite side and do the same. Then repeat for the other sides. Attach the fabric between the set staples by smoothing and easing in the fabric.
Attach Legs:
1. Measure and mark the bottom of the ottoman base for leg attachment. Place the leg plates on the marks to make sure they are equidistant from each other. Mark the center hole of the plates. Use the 3/8”drill bit to drill out the center hole. You can also do this step prior to putting the fabric on (as shown below).
2. Cut out a dustcover from scrap fabric and attach it to the bottom of the ottoman by folding the edge under ½”.
3. Locate the drilled holes, line the leg plates up, screw the leg plates on using a Phillips head screwdriver or the drill. Attach the legs to the plates.
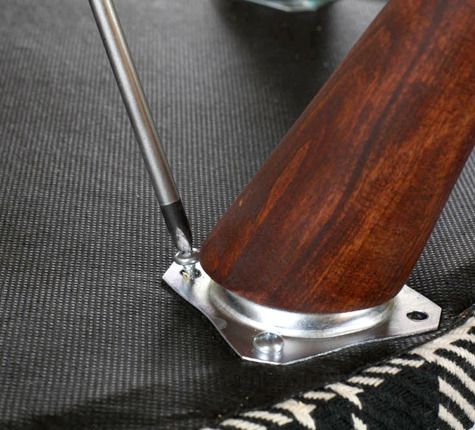
VOILA!
4 notes
·
View notes
Text

Dave Muller - Youth Misspent (in Record Stores), 2022, Acrylic on gessoed plywood panel, 60 x 48 x 1 5/8 inches (152.4 x 121.9 x 4.1 centimeters)
#Dave Muller#2022#art#painting#contemporary art#kunst#abstract#art contemporain#art today#music#stickers#record
103 notes
·
View notes
Text
Groundwork: Laying the Foundation
As we mentioned in our last post, we're building a chicken coop to add some life to our orchard and keep Bobcrow company. In this post we get into some of the details around laying the foundation - which as it turns out, is more than just digging some holes.
First we had to figure out how big we wanted to make the coop. A quick dive into resources like Almanac.com and The Feather Brain equipped us with essentials for space requirements: 4 square feet indoor and, at least, 4 square feet outdoor, per chicken.
The run was a pre-existing 20'x6' space. For the coop, we decided on a 16'x6' foundation using pressure-treated 4x4 corner posts. Twenty-four chickens, let's go!!

One challenge was leveling on uneven ground and getting square corners. A bit of high-school geometry and the 3:4:5 ratio came in handy here. As for placing the posts, we chose the time-honored method of burying them (which is apparently a debate) and setting them in Quikrete, considering our California location and the nature of the wood we picked. Some guidance we picked up: dig your hole at a depth 1/3 the height of your post, with a radius of 3x the post's width, and add another 6-inches for a gravel layer for drainage.
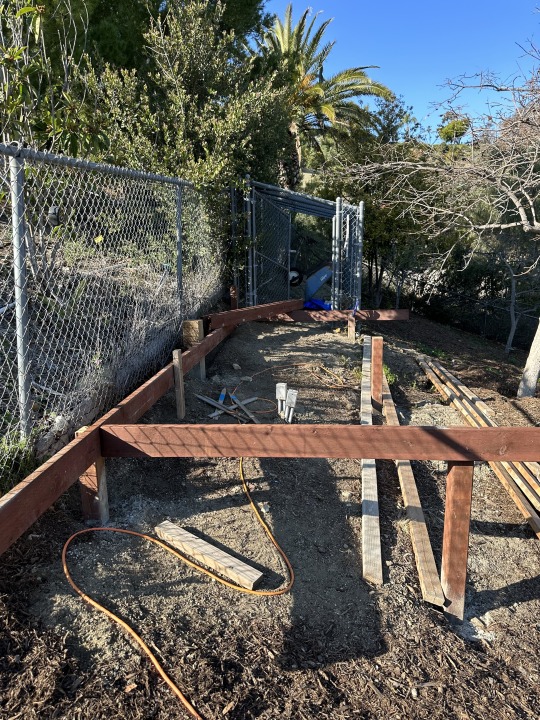
Some research led us to opt for 2x10 rim joists running at 8-foot spans between six posts—four at the corners and two in the middle. These rim joists would be fortified with 2x6 floor joists at 16-inch centers, all pressure-treated and ground contact rated, creating a robust flooring structure. The floor itself would be of 3/4" plywood so it was nice and sturdy atop the joists.

After laying down the foundation, we stood back and realized—wow, this coop is going to be massive! Twenty-four chickens would have made for quite the bustling community, almost too much for our lone sentinel, Bobcrow, to manage.
Up next, we'll explore our clever solution to this delightful dilemma, along with how we tackled the framing of the walls. Stay tuned!
4 notes
·
View notes
Note
Your cabin sounds like my house and my garage. My dad decided to fix the garage since it's a disaster waiting to fall down and had been but decided to wait till it was pretty much condemned to do it. Both were built in 1905- the house is better than the garage that used to be the carriage house but both are leaning and nothing is the same size.
The garage is, apparently, purposefully built so that it is leaning and at an angle and the rafters are all anywhere between 1-10 inches out out alignment when it should just be possible to put 4x4 pieces of plywood on the roof but that's too easy
You can see where the builders put a wedge between the door and the trim bc they messed up or just didn't care to fix it, and you can see where half is leaning to the right but the back half is leaning to the left
It's literally only still standing through sheer spite and because of the ivy that was growing on it (we were all convinced that once the ivy was pulled off it would collapse in the middle of the night)
Yep, that all sounds about right. For awhile we were convinced the cabin has been slowly sliding down the hill, but upon closer examination of some electrical piping stuff at the back of the house we are now deeply confused, because the pipes have bent in such away that could only happen if the house was going UP the hill. So that's fun.
33 notes
·
View notes
Text
Gary Hill
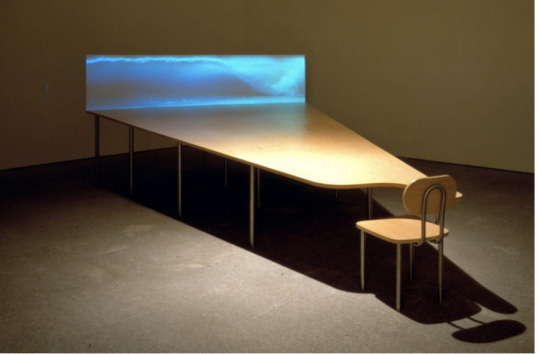
Learning Curve
1993
Video projector, plastic, plywood, stainless steel combined table chair, one laserdisc player and disc
35 x 128 x 204 in

Language Willing
2002
Speakers, HD video server Voice/Text: Chris Mann
3.05 x 4.27 m

Loop Through
2005
240 inch LCD monitors, to channel sync box, two, DVD players, two DVDs
Varies
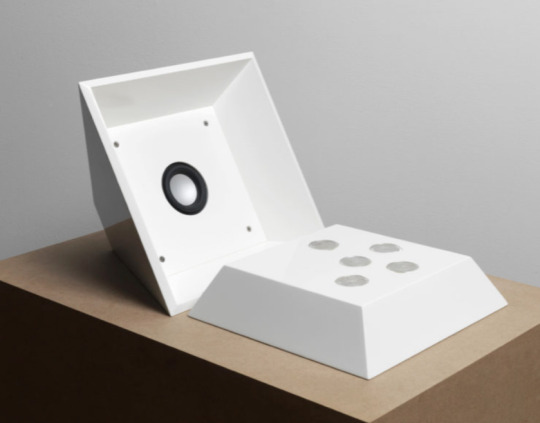
Poor Man’s Guilt
2007
Five silver coins, speaker, electroics, painted MDF board
11 1/2 h x 13×13 inches 

Untitled
2014
Glass
Fat man: 20.25X 20.25X 33 in.
Little boy equals: 13.25X 13.25X 36 in.
2 notes
·
View notes
Text
Why do I have trust issues?

Seriously. Some of the 1/4 inch plywood was looking might thin today, and we realized why!!
It would be more comical if wood didn't cost a mortgage payment.
7 notes
·
View notes
Photo
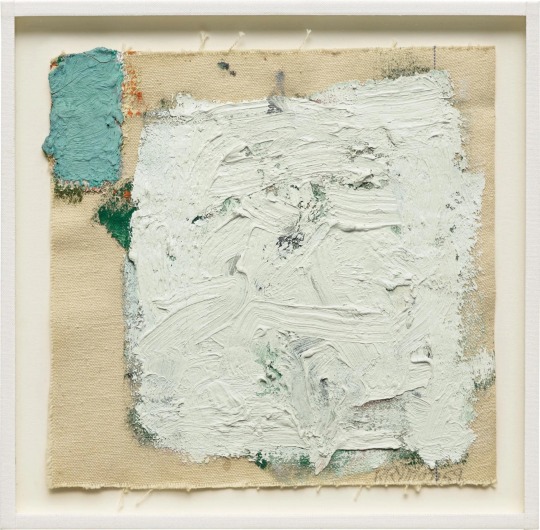
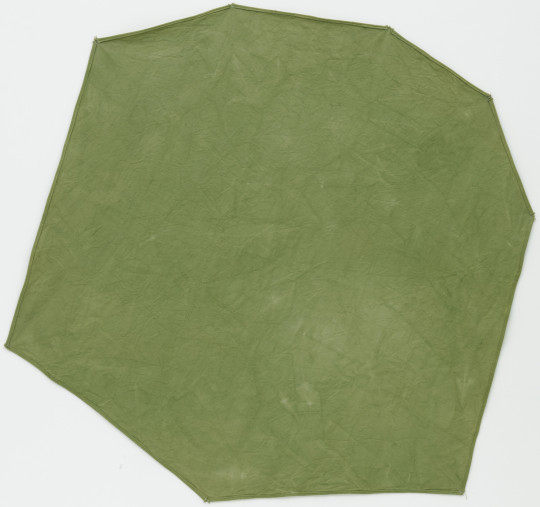
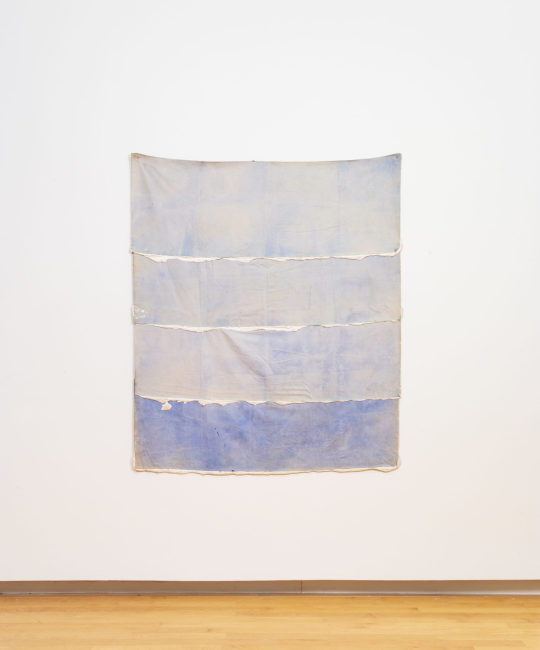


This series of images show unstretched canvases and textile art. Cali has been painting on unstretched canvas, and has expressed an interest in presenting these works in that form. Unstretched paintings are very material-forward in that we are forced to see them, first and foremost, as objects hanging on the wall (as opposed to windows opening onto a scene). Here are a few examples, beginning with Minimalist painter Robert Ryman’s tiny, barebones work of brush marks on rough, unsized canvas, displayed inside of a protective frame. Richard Tuttle’s Cloth Octagonal is something else entirely, a shaped soft object dyed green and attached to the wall with nails or pins. Mary Heilmann may have been inspired by Tuttle’s work, but her work feels more like a painting in its materials and rectangular shape. Heilmann’s later canvases are stretched in the conventional manner.
Richard Hambleton was a graffiti artist, in the 1980s, whose “Shadowman” figures appeared on walls of the Lower East Side of Manhattan. His work made the jump to galleries along with that of the better known Keith Haring and Jean-Michel Basquiat. Carole Harris is a textile artist; it has long been the norm to display tapestries and weavings by simply hanging them. The last artist, Michael Luchs, was deeply concerned with surfaces and textures; his paintings have a fragility that requires some sort of support, but using a stretcher or conventional frame would seem to be out of the question. Mounting them on painted plywood, as seen here, allows the viewer direct, unimpeded access to his layered, painted, hole-punched surface, along with rough details such as the dangling yarn of his unravelling canvas.
Robert Ryman (American 1930-2019). Untitled 1959. Oil on unstretched cotton canvas, 7 1/8 x 7 3/8 inches. Source.
Richard Tuttle (American b. 1941). Cloth Octagonal, 2 1967.Dyed and sewn canvas, 57 1/8 x 53 3/4 inches. Museum of Modern Art, New York.
Mary Heilmann (American b. 1940). Malibu 1970. Acrylic gel on unstretched canvas, 64 1/4 x 55 inches. Source.
Richard Hambleton (Canadian 1952-2017). Untitled 1983. Acrylic on canvas, 74 x 48 inches. Source.
Carole Harris (American b. 1943). Flowers for Breonna 2020. Mulberry paper, thread, fabric; 19 x 21 1/2 inches. Source.
Michael Luchs (American 1938-2021). Untitled (Rabbit) 2014. Mixed media on canvas, mounted on wood board; 42 1/2 x 53 1/2 inches. Source.
3 notes
·
View notes
Last Seen Blogs

facciofintadiniente
Faccio finta di niente

mayanersilva
Mayaner Silva💦❤️😜

theobserver12321
VoreVoyeurism

mickeysmilkovich
mickeysmilkovich -> maevewiley

420alt
420Alt