#40 hours
Text

"Longing"
This piece took SO LONG TO MAKE. I've been working on it since before my birthday... But it's done. AND IT LOOKS SO GOOD. I love him sm (,,,,:
Time spent: 40 HOURS
Layers used: 950??????
Made during: May 10th, 2023.
#sato mafuyu#mafuyu sato#given#given fanart#fanart#drawing#mafuyu sato fanart#longing#the guitar#40 hours#950 layers#why did i work on this so long#because its good#thts why
142 notes
·
View notes
Text
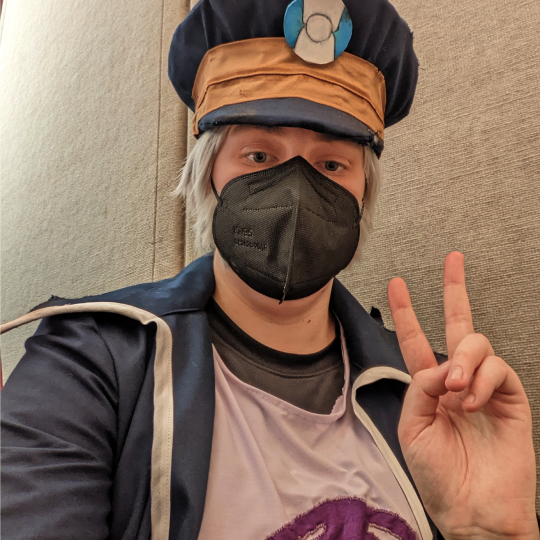
Warden Ingo Cosplay Build Log
Hey Legends Arceus / Submas / Pokémon fans ! I spent two months last year making a Warden Ingo costume because the game made me fall in love with the franchise all over again (and because I love sad amnesia uncle, of course). I'm pretty proud of it, so I thought it'd be fun to share the process here in painstaking details. I've been cosplaying for over a decade now and I learned a bunch from so many defunct cosplay tutorials on this website, so I thought I'd give back.
This isn't a guide, persay, but rather a dive into the methods and decisions I picked to complete this project. Any pre-made items or patterns that are available online will be linked! I'll be splitting down each piece of the costume into its own section for easier reading.
This is gonna be a long one with a bunch of pictures, so I'd suggest viewing on the blog directly! Without further ado, all aboard!
Station 0: The Guidelines
Before getting into the build itself, I wanted to preface this wall of text with the guidelines I set myself for this project.These core pillars inform a lot of the decision-making, and some people might feel like using this log as reference for their own cosplays, so I thought it'd be good to put them here to explain why I did some stuff the way I did.
Comfort first: I knew I was gonna wear it in the summer, and stand around all day at a convention, so it needed to be lightweight and comfortable. (well, as much as a cosplay can be, anyways.)
Realism: Ok, that's kinda weird to associate "realism" to a Pokémon costume (unless you're Detective Pikachu I guess), but I wanted to look more natural instead of translating a shiny fancy 3D model straight to real life (nothing against that, it just wasn't my goal). This meant adapting certain elements that only really worked in stylized Pokémon graphics.
Be a huge cheapskate: I didn't wanna break the bank with this one, so if I could save money thrifting or reusing stuff I had lying around, I was going to do it. Whenever you see me pull some material out of my ass that wasn't entirely fit for the job, that's why.
After putting these down, jotted down a battle plan for the project (basically just a huge compartmentalized list of all the material I expected to need and the steps to complete the costume), and then it was time to get to work.
Station 1: Thrift Shop Pit Stop

I like starting every project with a quick trip to the local thrift stores to see what I can find. I hate sewing pants with a passion, so my priority was to grab some navy suit pants to match the coat's fabric to later. I also found a long sleeve black shirt for Ingo's undershirt, a belt I ended up not using, and lucked out with some excellent clown shoes with removeable insoles. After slapping in my own insoles, replacing the shoelaces and fixing up the pants' button, we were good to go on every element that could be done without any extra work on my end. Moving on.
Station 2: Three Refined Metals For A Hat
I'll be honest here: when I initially planned out the entire project in my notebook, the hat was scary as hell. I had no clear idea how I was going to do it; I didn't really want to buy a similar pre-made hat cause roughing it up would've been stupid hard to get to look right. I figured I could probably make it out of EVA Foam (a certified cosplay classic), but I've never patterned a shape this complex before.
Turns out Kamui Cosplay made a foam pattern for the same kinda hat. Score! I purchased the pattern and assembled the hat using 6mm EVA Foam and Contact Cement according to the instructions. I then destroyed some poor polyester cord trim from the bottom of my scrap bin and glued it into the base for the... sticky-outies? The damaged bits. Y'know.

With the base finished, I drafted a pattern for the fabric covering, cut my pieces out of navy twill, sewed it up and slid it over the hat. I did the same for the inside with some cheap black muslin leftovers from another project, glued it all to the base in strategic spots, and then patterned, sewed and glued the band on. Finally, I took my seam ripper and scissors and opened up the seams where the little piles of sad polyester scraps were lining up to free them.
With the main part of the hat complete, I cut up a disc of 10mm EVA foam for the insignia, scored the design on with a hobby knife and heated it up to form a bit of a curve. It was then sealed with flexbond, painted and sealed with a clear coat, and glued on! All that was left after this was weathering the hat. It's a little hard to photograph this piece properly, so I'll show the weathering process when we get to the coat.

I apologize for basically pulling a "rest of the fucking owl" here, but honestly a lot of the process was improvising and somehow not destroying the entirety of my progress, so I have no pictures of the hat building process beyond this.
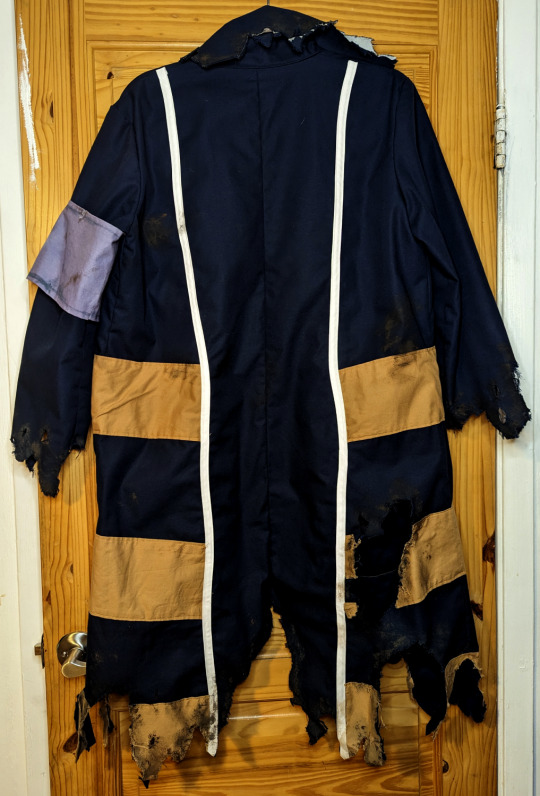
Station 3: Sneasels Ripped My Coat
Ingo's coat started with a heavily modified version of a commercial pattern. Specifically, it's the D Coat from Simplicity's 4789. I could've probably found a pattern closer to the Subway Bosses' coat design, but this one had already been in my pile of "patterns I bought for an abandonned project and will totally use someday, I swear" and it was close enough, so I used it. Modifications included extending the collar, making the coat a little longer in proportion to my body, the sleeves wider at the ends, and adding inner pockets (a cosplayer's best friend). Oh, and the white bias tape on the edges and the orange stripes, of course.
You may have noticed I'm not showing the pattern with all the modifications here. That's because as part of the Cheapskate Protocol, I really wanted to use this old Simplicity pattern to save money. A pattern I bought when I was a teen way back when. the misses sized pattern enveloppe.
So I had to size up the entire damn thing. The biggest size on this pattern was like 7 inches off my measurements. It's a paper Frankenstein golem. It looks godawful. The actual adjustments to make the pattern Submas-ready are incomprehensible in there.
But hey, I saved like 10 dollars!
I started by assembling the base coat (undamaged) out of navy twill. I added heavy interfacing in the collar to help it stay up. I considered adding a lining to it to really sell the fact this used to be a modern machine-assembled piece of clothing, but it wouldn't have looked as good with the rips and tears later on. As a bonus, it's one layer less in the fight against heat exhaustion! However, if I were to make this coat for Pre-Eeby-Deebied Ingo, I'd definitively do a lining.
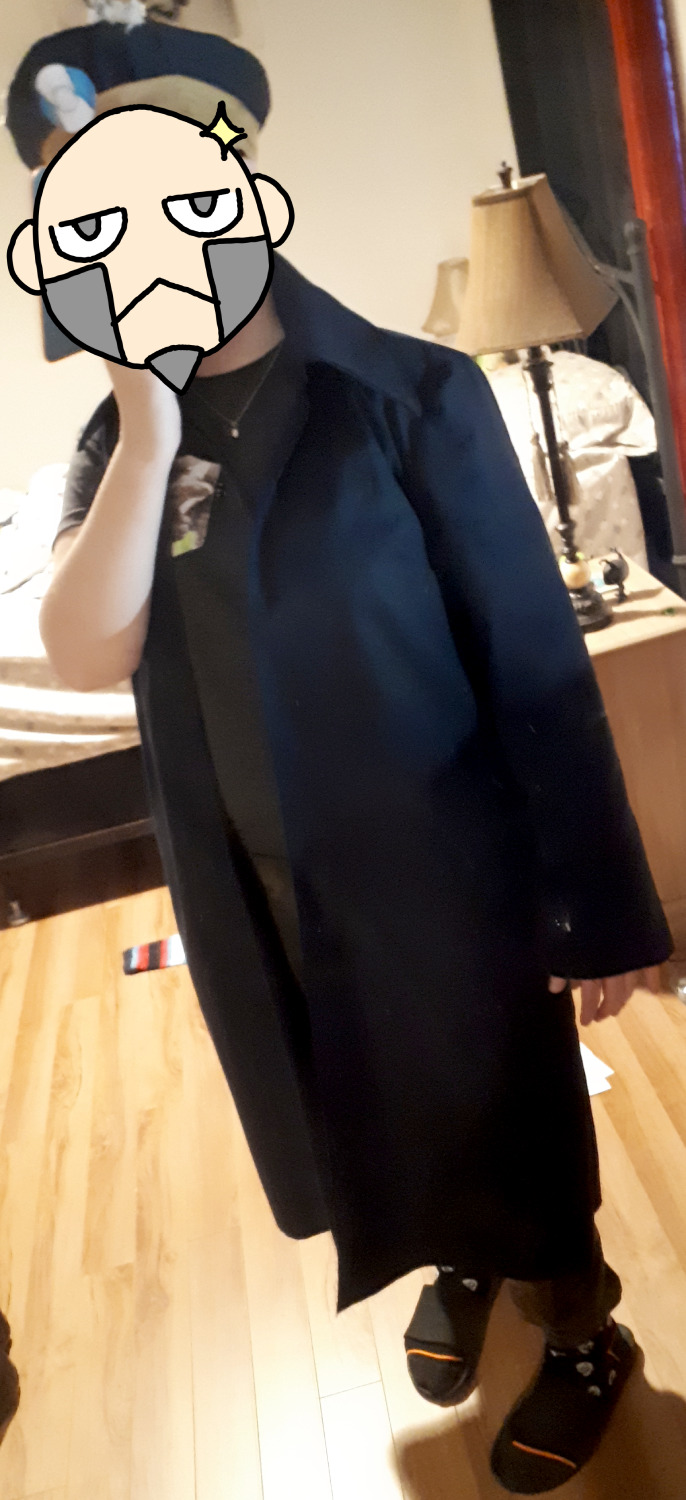
Next step was the stripes! I used some double fold white bias tape to finish the edges of the coat and topstitched the ones on the back of the coat on. I then used the same orange cotton as the hat band for the three orange stripes,which were topstitched on. Cheapskate Protocol made me buy barely enough orange cotton this time around because I was tired of building up the pile in the fabric scrap bin, so I had to improvise to make it work by snipping the bands in strategic spots in order to cover to whole coat properly. It's not like the parts that would be cut off later for the damage would need them, anyways. ✨Optimization✨
After rolling my rock up the hill of a Hell of my own creation, I booted up the game, dragged my avatar to the Ingo enclosure and marveled at the magnificent creature to see where the coat was ripped. I traced a loose guide of the tear designs with washable fabric chalk and crudely cut up the bottom edge, sleeves and collar to have the basic shape down.
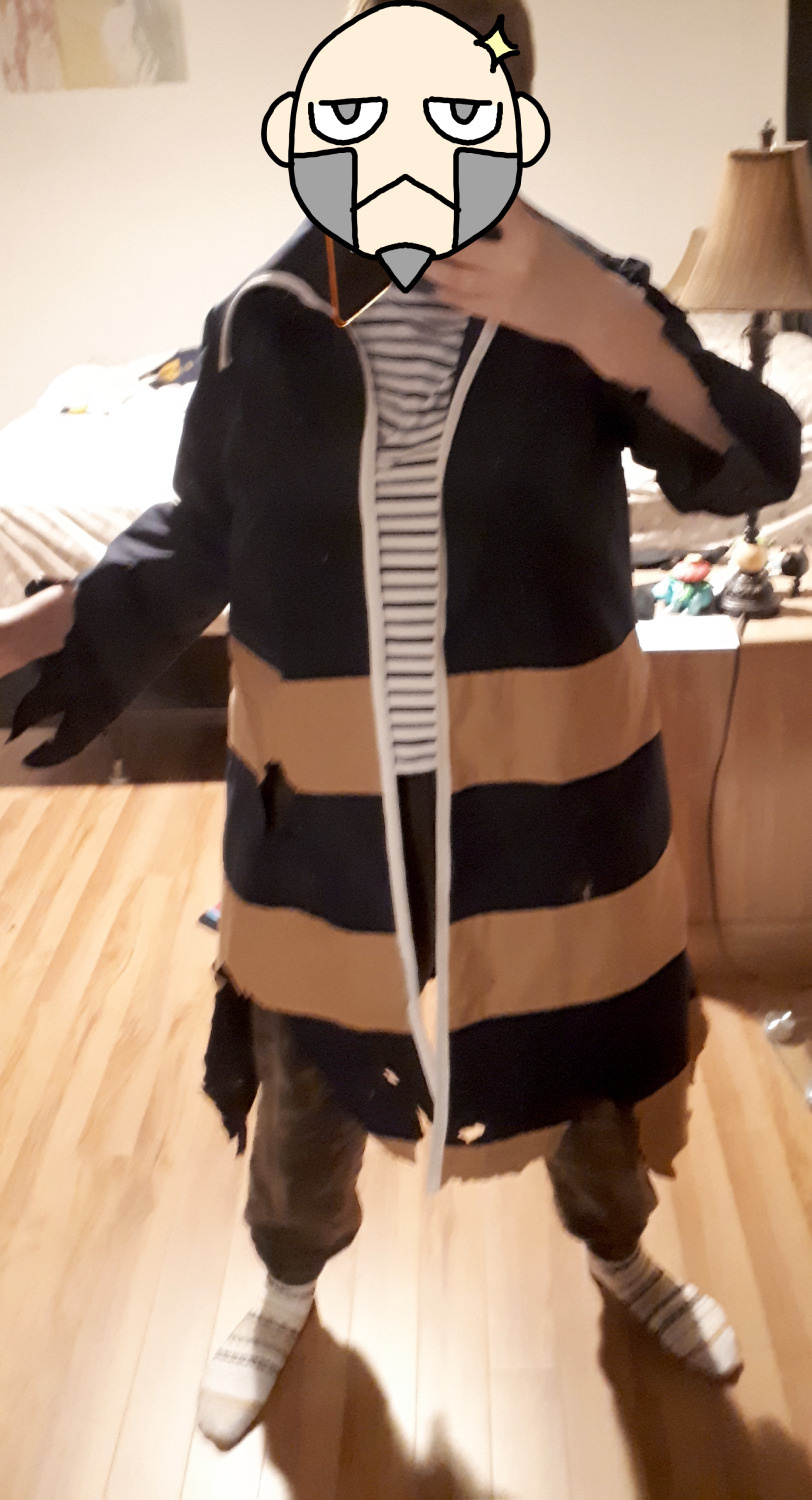
All that was left was to add the armband and the buttons. Turns out the only metal buttonsI could find that were big enough were those buttons kits to cover with fabric. Since I wanted to go for realism here (and be able to throw the whole thing in the wash after sweating in it all day), I wanted to avoid crafting them myself. With the main construction done, it was time to do the weathering!
...
...
...
OH GOD I FORGOT TO ADD POCKETS
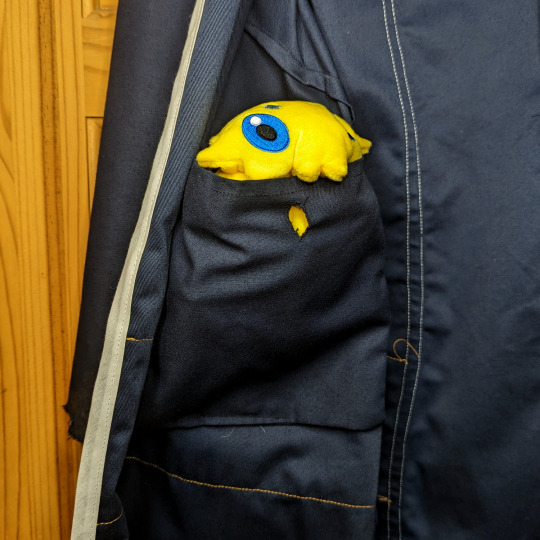
Behold, the world's most awful pockets. Two stupid little bags sewn in such a way you hopefully can't tell from the outside that I completely forgot that I wanted these. They literally only exist so I can have my phone handy at a convention. There's a buttonhole to close it too, I guess. They're shamefully hidden with all my lining-less, raw seam sins.
Ok now we can destroy the coat
Station 4: Stinky And Dirty
I mentionned earlier during the hat section that I was going to get back to the weathering process. This is happening now.
For the sake of Realism™️, I wanted the damage to look natural in real life, so I had to make it look believable. Luckily this wasn't my first rodeo with the Dirt, so I had plenty of weathering experience under my belt. To break up the awkward scissor cuts from earlier on the edges and fray everything up, I pulled out the sandpaper and started... Sanding the fabric. Might sound weird to some, but a lot of costume makers swear by it. It's also great for ripped jeans (if those are still popular today) and general natural wear. I also refined the shape along the way with scissor to break up any long straight cuts before fraying the edges. I took care to reinforce any newly destroyed seams with a sneaky staystitch so it doesn't unravel in the future.
I then mixed up a bunch of different shades of brownish grime with fabric paints (I had black, brown, yellow, orange and green on hand) to dirty the whole thing up. This doesn't look as realistic as some other methods like weathering powders and Just Using Real Dirt, but as mentionned earlier I wanted to be able to just throw it in the washing machine at the end of the day to sanitize it. (If you're interested in actually learning how to weather a costume, this guide is where I started my journey.) I prioritized the ripped edges and any spots where grime would realistically accumulate in over time, like under the edge of the hat band. Paint was dabbed, stippled and rubbed on with whatever garbage tools I could find, which in my case were some old crusty brushes, sponges and toothbrushes I could get really violent with. (brushes were harmed in the making of this costume, but not my good brushes.)
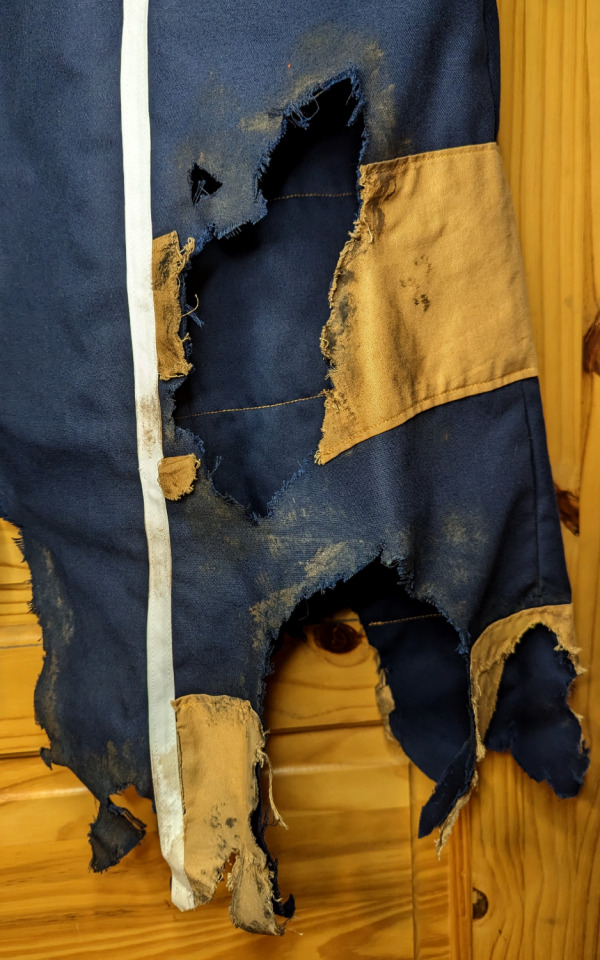
The whole thing was then sealed with heat using a flat iron as per the fabric paint instructions. With the coat done, all of Ingo's old Subway Boss uniform was complete!

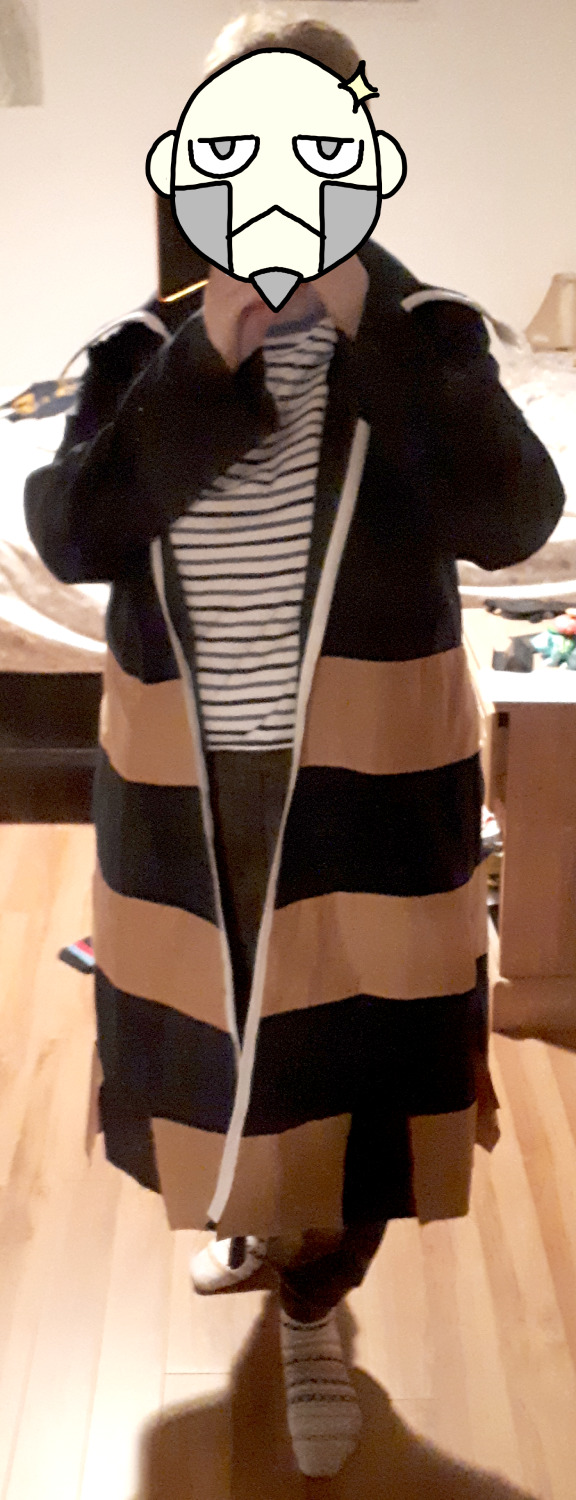
Station 5: A Warden's Garb
Next step on the list was making the Pearl Clan uniform. Thankfully, there's a fun little piece of concept art that shows Ingo without his signature coat, so from it we can confirm that his clan outfit has short sleeves (good for the comfort goal) and consists of two pieces: a tunic and some kind of hip sash. I omitted the hood on the tunic because I was realistically never going to wear it up and it would have just bunched up under the coat anyways. Now you'll be painfully aware of that terrible corner cutting truth whenever you scroll down and see photos of the costume. Sorry.
I drafted out a quick pattern for both pieces of the clan garb through the power of math for the sash (a couple half circles with another piece for the border) and tracing over a tunic in my wardrobe for the shirt. I assembled a test version out of scrap muslin to make sure it worked properly, then set the pattern aside so I could prepare the fabric.
In order to have all of the tunic elements match together, I picked up a bunch of white stretch knit fabric and a bottle of purple synthetic dye so I could reach the shade of dusty lavender I wanted. I measured out two squares of fabric based on the pattern. One square was for the darker border on the waist sash, while the rest was the lighter color for the whole outfit. I boiled water according to the dye instruction and worked on my Fabric Soup.
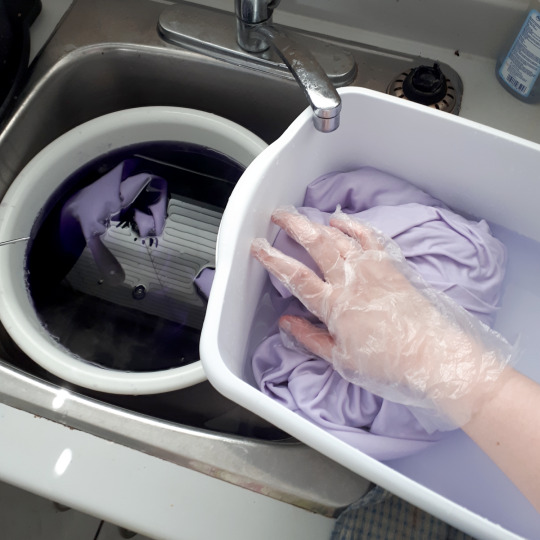
With the fabric dyed and washed, I cut my pattern pieces out and assembled everything together. Nothing special happened there since the pattern had been tested and adjusted prior to sewing the real deal. Ok, one thing happened actually. My sewing machine absolutely hated how thin this fabric was and kept trying to eat my costume. By the end I was about ready to throw the machine out the window, but things worked out.
It's pretty sneaky and totally not visible on the outside, but the sash is held closed with two snap buttons on the front. It's easily the single jankiest piece of the costume due to the aforementioned attempt by my sewing machine to have fabric dinner. But hey, it works and the jank isn't visible so who caaaares (I care)

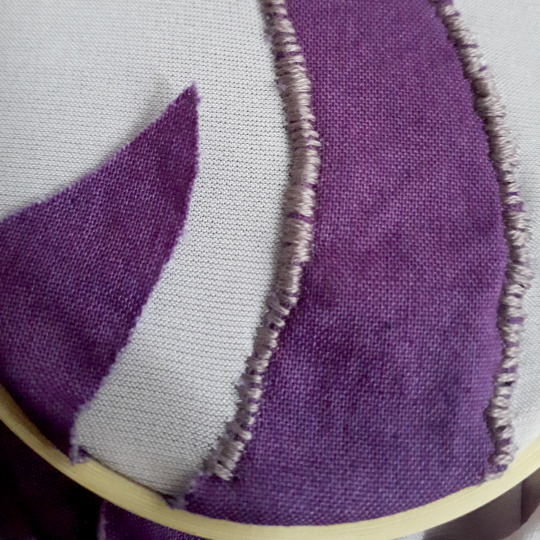
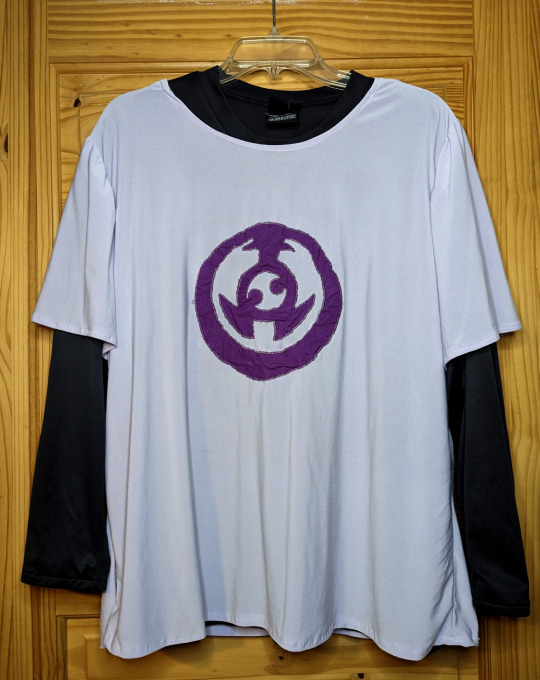
Final step for the Pearl Clan outfit was adding the logo on the front. I wasn't sure how I wanted to do this, at first, but to keep the fabric's stretch and keep with the idea that this is a hand-sewn garment from old Hisui, I decided to go with hand embroidery. I grabbed some scrap white cotton, dyed it purple, then cut it out in the shape of the logo. It was then painstakingly applique'd to the tunic by hand with embroidery floss.
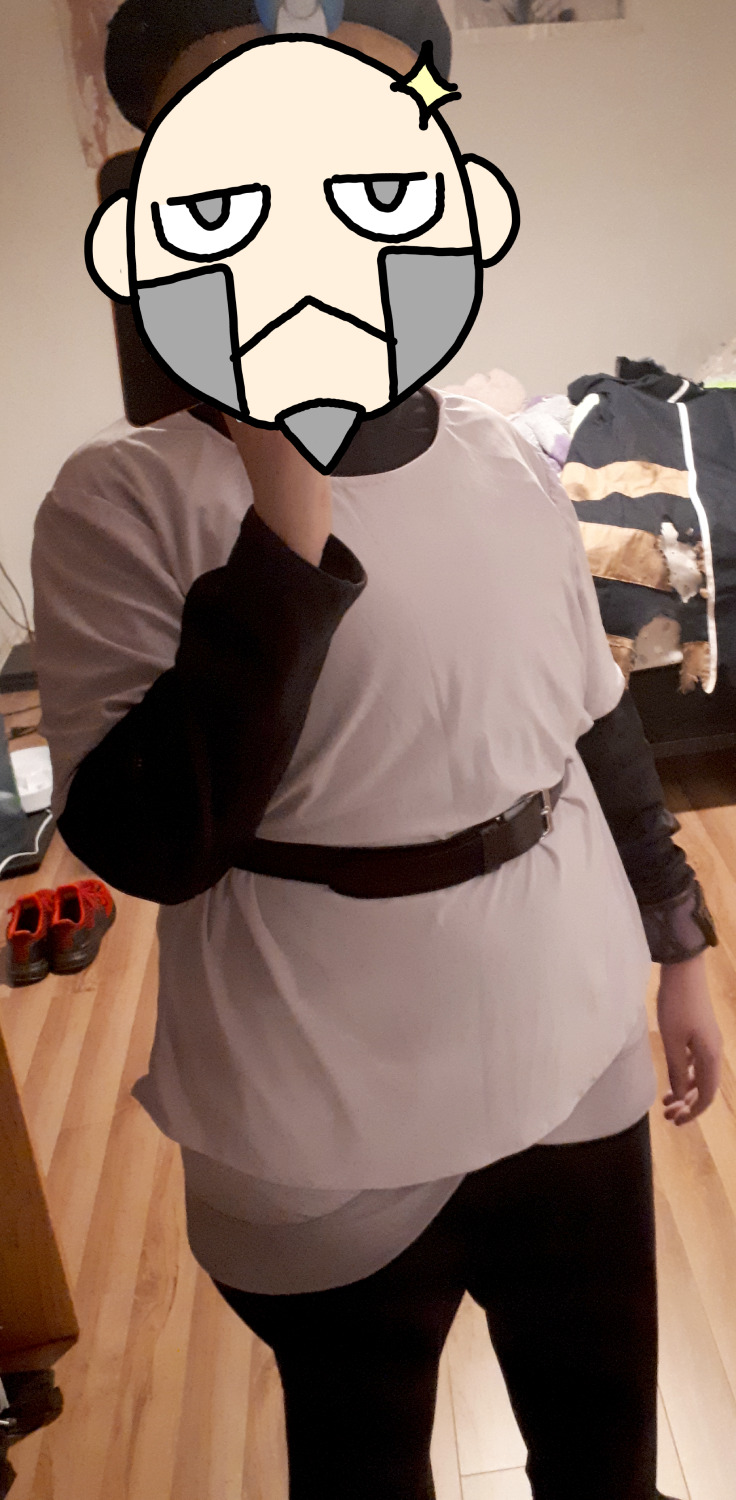
With that done, the tunic was completed! It looks absolutely depressing on a coat hanger, but when worn with a belt it's all nice and cozy. As a bonus, it layers with the coat well enough that I don't have to wear a binder under everything to hide obvious boob shapes. Another win for the Comfort team! 👏 With all the sewing done, all that's left is the Warden bracelet and the hair.
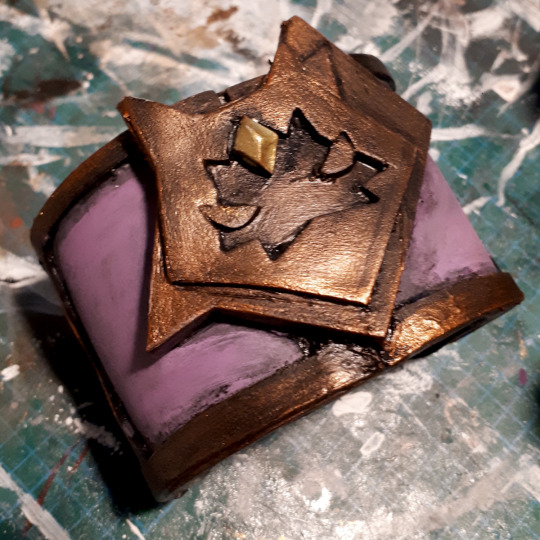
Station 6: Noble Sneasler's Cool Bling
Ingo's got a bestie bracelet of his best pal Sneasler, so we gotta make that. The build should be pretty standard to anyone that's made anything out of EVA Foam for a cosplay. I drafted the pieces by referencing the in-game model, cut them out of different thicknesses of the material to create some depth, and glued everything together with contact cement and hot glue. (The main bracelet is 6mm foam, the details are 2mm foam and the black parts for the base of the head and the gem are 4mm foam.) I added an elastic on the wrist to keep the bangle secured to my arm while still being able to easily slip it on and off.

The whole thing was then sealed with flexbond, painted and then sealed with a spray clear coat. Honestly, it was the simplest part of the build and it actually went without a hitch this time around.
With the accessories done, it was now time to get to what I am convinced is every Submas cosplayer's worst nightmare: The Goddamn Hair.
Station 7: The Goddamn Hair
There's a lot of artists credited as character designers in the credits of Pokémon Black & White (2010). This means I can't figure out who to blame for Ingo and Emmet's stupid sideburns that make absolutely no sense in the real world. Instead we're just going to scream at the heavens and find a solution to the geometric flaps.
Another fun fact: I'm awful at wigs. Like absolutely awful. I understand the methods involved, but I'm stupid bad at applying that knowledge on an expensive mop of plastic hair I don't want to ruin. So I did some research to figure out how people were making the twins' hair on their own cosplay. Everyone did a great job, but it wasn't really the effect I was looking for, so I decided to start from scratch. Because, you see, I was going to completely avoid styling a wig.
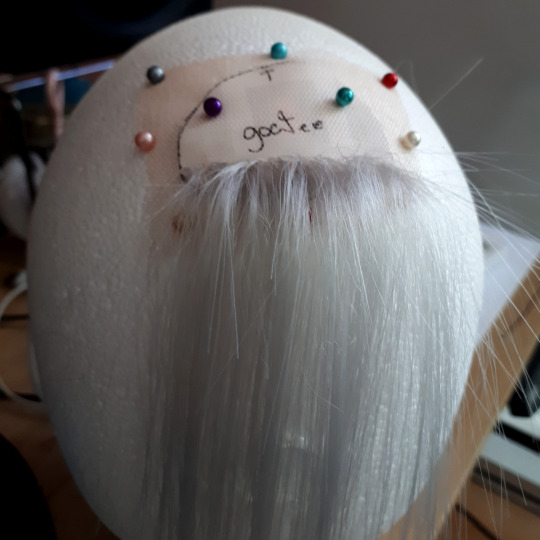
I've always interpreted the art as them having some sick sideburns/muttonchops. (This art piece by waltias on twitter was posted like a week after I finished my cosplay and I felt so so validated in my interpretation) I also love Makeup FXs, so I thought "hey, I can look up beard makeup tutorials." I ended up with two ideas: either I could buy crepe wool hair in grey and glue the fibers to my face individually every time I put the costume on, or I could make a reuseable prosthetic.
I'm a lazy piece of garbage that likes doing things once so prosthetic it was. I mean, I know how to ventilate wig lace. It'll be reusable and take 4 minutes to apply. Smart! I got the Jett in Light Grey from Arda Wigs, a ventilating hook, matching wefts and the lace. I had a plan, I was ready, it was going to look great.
And then I spent 40 hours tying individual strands of plastic hair on a wig lace mesh. For a total surface area of maybe 3 square inch.
(Pictured above: A Fool.)
It was hell. I might've incurred a stress injury from the process and then had to let it rest for a week because I did it all over a couple days. Would I recommend doing it? If you're patient, sure. I love the result. But this was, by far, the worst part of the entire project. 40 hours. The entire coat took me like 6 hours.
40 fucking hours.
After painstakingly tying individual hairs to a mesh and realizing I might've reached the Ninth Circle of Hell along the way, I took my couple squares of ventilated wefts and trimmed them to the proper length. The result was awesome, and I don't regret it at all. It looks exactly how I pictured the idea of sideburns would look like. But it also took 40 hours of me just tying some fucking hair to a mesh.
Maybe there was a better solution, but there's so little ressources about the process online that I just went with the methods I could find, really. I pray someone starts offering squares of pre-ventilated wig lace someday so no one else has to suffer like I did. As a sidenote, I didn't even bother with the balding hair since I wasn't gonna go through all the effort of heavily modifying a wig and wearing a bald cap if I wasn't even gonna take the hat off.
40 hours.
Station 8: Bits And Bobs From Under the Subway Bench
Honestly, after the absolute nightmare I went through making the sideburns and goatee, The final touches were a cakewalk. After all, the costume is complete! What's next?
Warden Ingo uses Pokéballs like a cool guy, so I wanted one. I usually make pretty much everything myself for costumes because it's fun, but after the ventilating adventure I just wanted to rest. I'd been following NisuzCraft's work for a while now, and I loved the wood grain effect on their Hisuian Pokéballs. I wholeheartedly recommend them, their work is awesome.

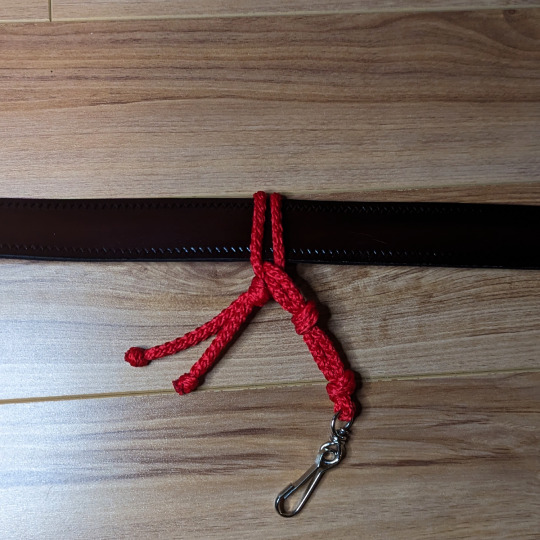
As a final touch, I grabbed some red cord I had lying around from a previous project to craft a little loop to hook my convention badge onto. I don't really like having the badge show up on photos, so it was a clean way to have it easily accessible while having it be easy to slide out of sight. I based the idea off of the knotted ropes the Galaxy Team member hang their Pokéballs from on their uniforms.
Lastly, though it's not necessarily part of the costume itself, I made an overly indulgent ita bag panel for the first con I took Warden Ingo out to. The collection's grown since then, but here it is:

Chandelure: JellyBearDesigns
Ingo & Lady Sneasler: AstroTeenyArts
Warden Ingo, Emmet&Ingo Duo: Cynniarts
Ingo & Emmet with fingers crossed, Hanging Ingo, Emmet & Warden Ingo: Zhampip
Rubber Straps: Official Pokémon Mate Merch
Go show them some love!
Terminus: You Have Reached Hisui Station
So, first con wearing Warden Ingo came and went. What's the verdict? Pretty great experience, honestly. It was relatively comfortable to wear despite record heat in the middle of summer. The only real issue was that having a wig and a hat together trapped heat real bad, therefore some wig breaks were needed. I also initially used spirit gum to stick the facial hair on, and I struggled to remove the residue afterwards from the lace mesh, so now I just use body tape to keep it on. Nothing broke, nothing hurt, so I'd say it was a success! I haven't had to modify or repair anything for the future, so I'm very proud of the results.
To anyone who read this Build Log to the very end, thank you so, so much for your interest. I hope this may have given you some insight into the process; especially if this helps your in future cosplay projects! If you don't cosplay, I hope it was still an entertaining read.
Hoping to see more wonderful Submas cosplays in the future!
#Cosplay Build Log#cosplay tutorial#pokemon cosplay#submas#warden ingo#ingo#pokemon ingo#subway bosses#original content#40 hours
69 notes
·
View notes
Text
Props to my neighbour for being the only person to practice scales at home and do it at a reasonable hour
28 notes
·
View notes
Text

Painfully true :')
#40 hours#full time#work#dissociation#what are weekends#if only I didn't have to pay for bills in two different countries#buy my music on Bandcamp
17 notes
·
View notes
Text
Anyone else here a twosetter?
I just came home from their live show in London and it was SO GOOD. a true once in a lifetime opportunity
if there's a show in ur area I would highly recommend if u like classical music and some comedy.
14 notes
·
View notes
Text
because im insane, i picked up the violin and learned how to play it since nov 2021. with pure tenacity (autism), i finally am equipped to learn vivaldi's winter -- a piece i only ever dreamed of playing (i have a lot of these lmao) -- now, i can hear it right under my fingertips 😭
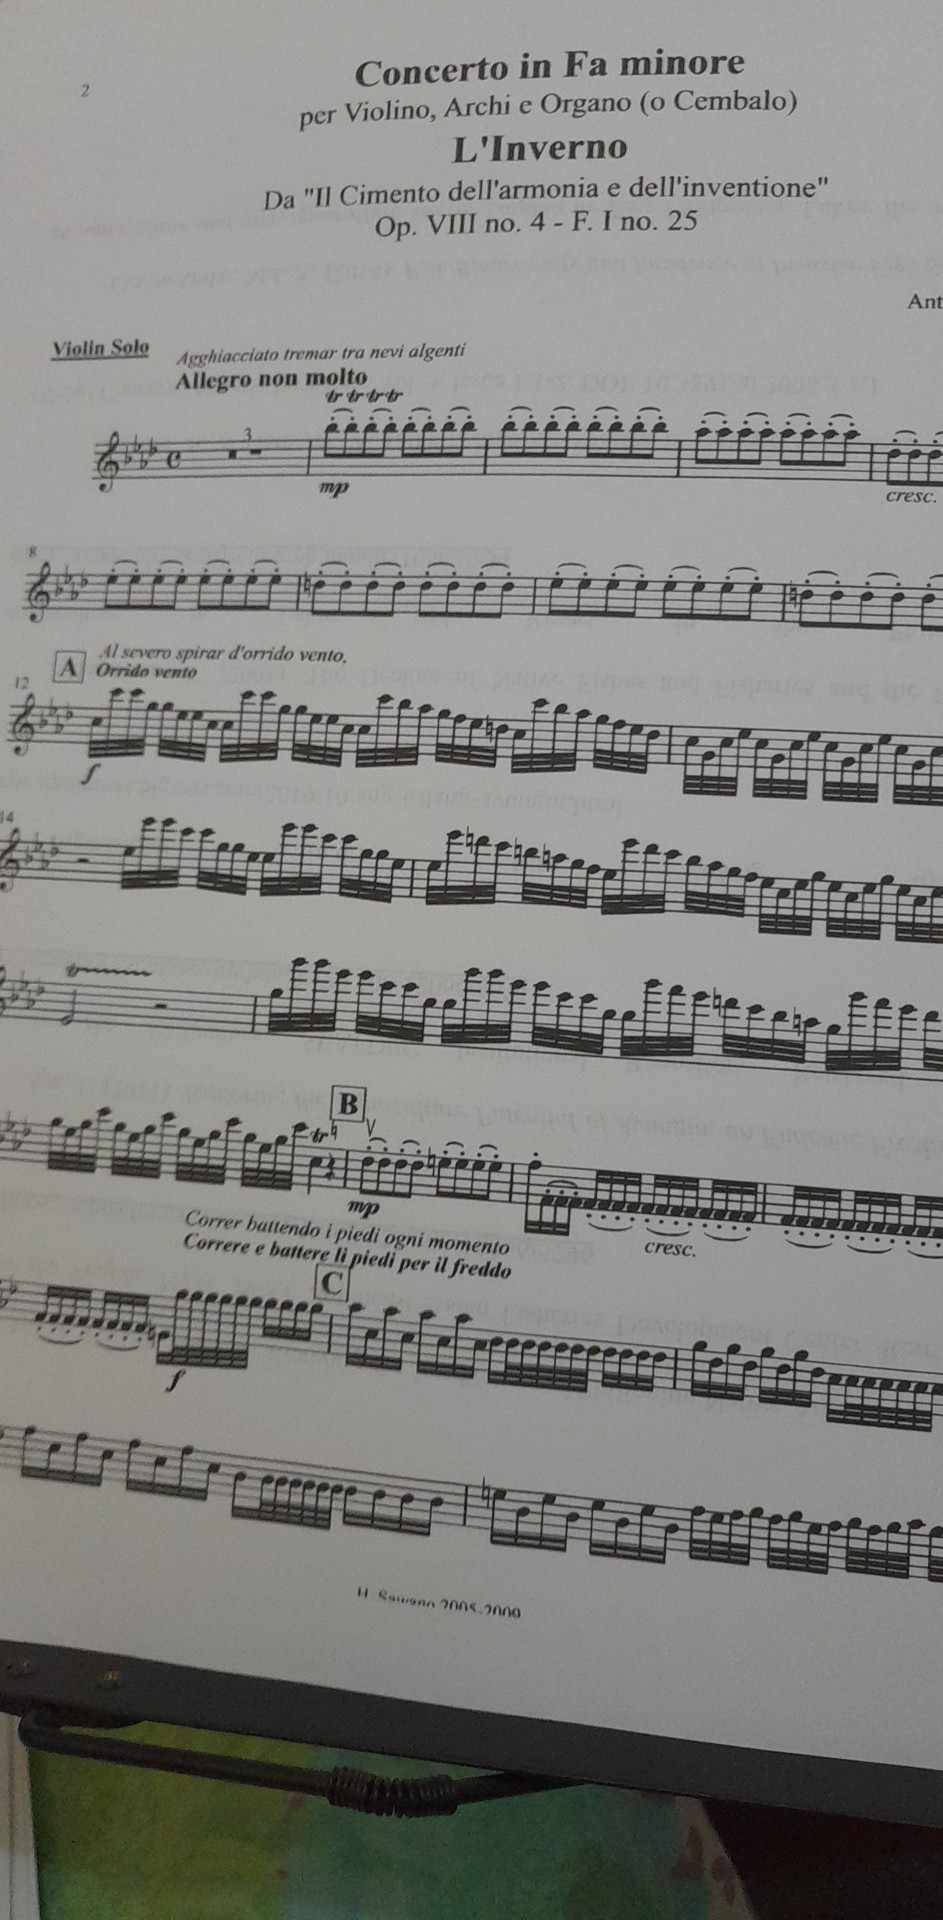
im still debating with myself on whether i should use spiccato or staccato on the C sections and also the bowings but eh, lessgo ✨️
8 notes
·
View notes
Text
twosetters: wow, that person sounds like they practise 40 hours a day!
some random guy: tHeRe’S oNlY 24 hOuRs In A dAy
twosetters: >:(
#twosetter#twosetviolin#violin gang#ling ling#40 hours#this has probably been done before#but it’s still funny
4 notes
·
View notes
Note
How many years for base programming + a script if they saw me 40hr a week?
How early does programming start? Like the moment your born or do you have to be at least 1 or something?
If able programming would begin in the womb. If not at birth or as soon as possible.
For clarification, programming isn’t completed like a 40 hour work week. If programming were like an eight hour work day it couldn’t be completed successfully.
That being said if programming were to occur for eight hours a day total internal parts could be created, base programs, mapping of parts would be incomplete, levels would be incomplete, the script would be incomplete.
Programmers work to have these things in place by the age of eight, 9 at the latest.
Oz
4 notes
·
View notes
Text
i’ve played nearly two full days worth of fnv in the last two weeks
0 notes

Text
I think Deku has a bit of a mean streak, actually. he’s no Bakugou—that’s for sure—but he’s not this innocent, sweet angel baby that the media has painted him out to be. but you only catch it when you least expect it, when you’re pushing his nerves, when the stakes to everything around him are high, when he’s tired of endless sleepless nights and just—snaps.
“Oh?” you go, grin unfurling like some grinch, chin resting on your hands as you leer at him from across his expansive desk. “You’re mean.” your words are teasing, a snarl that curls your mouth up. Deku stutters, eyes going wide, jaw snapping shut in surprise as he tries to think back on how rude he just sounded.
“No, I’m not—I mean, you wouldn’t stop and I just—there’s a lot on my plate right now—and you just—you keep on—I’m not—I’m not mean.” He’s sputtering, hands all over the place, the glasses perched on the bridge of his nose falling even lower with how he jabbers on and on. it’s endearing really, to see how he tries to upkeep his image of being so kind and understanding, even though his nostrils just flared at you. and his eyebrows turned down and he gritted at you, his hands were balled into fists, his words were so nasty, so ugly, so unbecoming for Deku.
you liked it. loved it even—vowed to get him like this every single fucking second that you could.
you pick and poke at him whenever you see him, teasing him and pulling at him. pushing him around even though the hero is so much stronger than you, so much bigger. and he lets you, tries to defend himself but—that’s not what you want. you want the ugliness, the snark, the mean.
he snaps, eventually, when you least expect it. grabs you up in black whip when you go to push him against the wall for the third time in only a minute, his eyes suddenly dark, the aura of the room suddenly charged.
“That’s what I was looking for.” you whisper to him, the grin spreading your face quickly dissipating in only seconds when you become the prey. when you become the one pushed up against the wall with teeth at your neck, a hand in your underwear, bullying your hole with too thick fingers.
“Why do you want me to act like this? Be so mean to you, huh?” he sounds so frustrated with himself, with you, growling and nipping and licking when you don’t answer quick enough. but your breath is caught in your lungs because finally—finally, did you get what you wanted. it just took a little bit of pushing, you suppose.
#omg I wrote this idea down last night and couldn’t even type it up#bc I took some sleep meds and it put me out SO FUCKING QUICK????#usually I don’t lay down until like an hour and a half or two#but it was literally like 40 mins and I was DONE!!!!#but I finally wrote it :D#there’s also been so much talk of him on the dash and i am. very much so liking this#I miss him bc I don’t think about him enough#but I also think he can be. so mean. like NASTY mean when his limits are pushed enough#ohhhh my god I wont him so bad#okay gn I took more meds bc my pelvis has been in so much pain????#just the right side too??? omg AM I DYING GELP#—new treat in the streets! 🍫#deku treats! 🍬
2K notes
·
View notes
Text
#my post#nostalgiacore#90s nostalgia#since I was born in 94 my childhood was mostly in the 00s but I ofc have some memories of the nineties as it was happening#also a solid 11 song playlist if you want to feel like you're listening to the no break hour on the top 40 station in mid 1999
2K notes
·
View notes
Photo
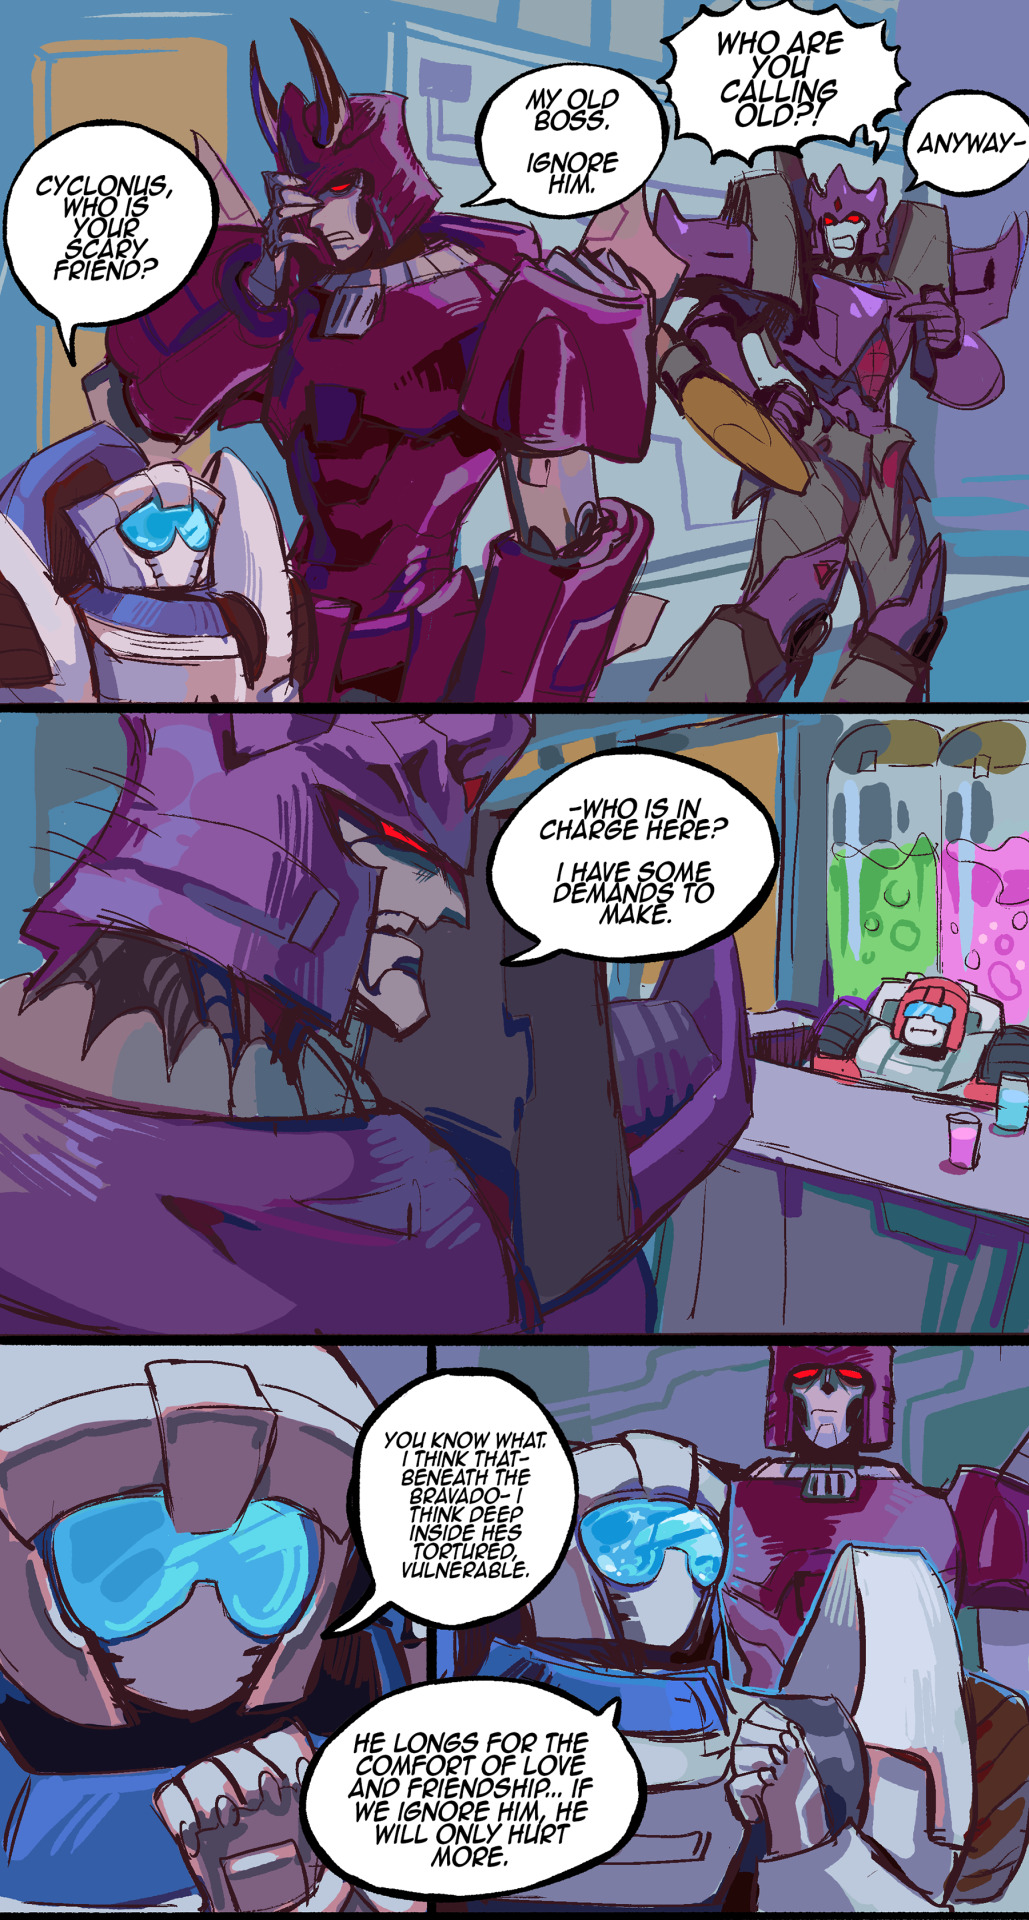

Ultra Magnus has to step in to be like 'the right to trial by combat was removed from the constitution 10 million years ago'
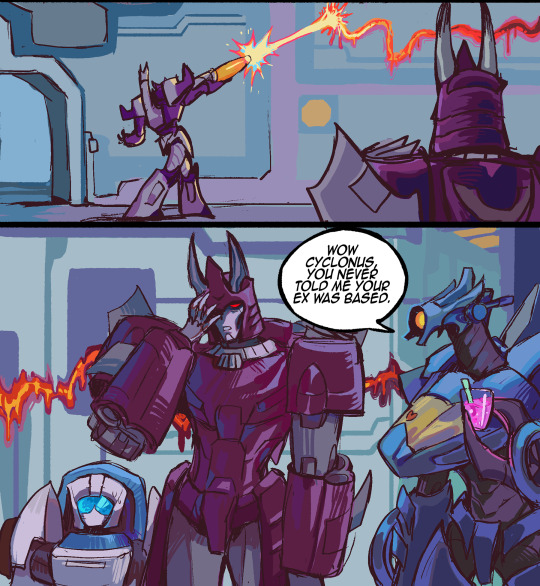
#transformers#maccadam#galvatron#cyclonus#tailgate#whirl#tf idw#my art#rodimus is like 'ok galvatron you may sit in the captains chair. for 10 minutes. if you promise you wont steer us into a wormhole or smth'#galvatron is like 'yes. of course :) i promise!' while crossing his fingers behind his back#i am not spending 40 hours painstakingly rendering this comic out sorry guys it got a little too long!#i simply love it when cyclonus suffers >:)
6K notes
·
View notes
Text
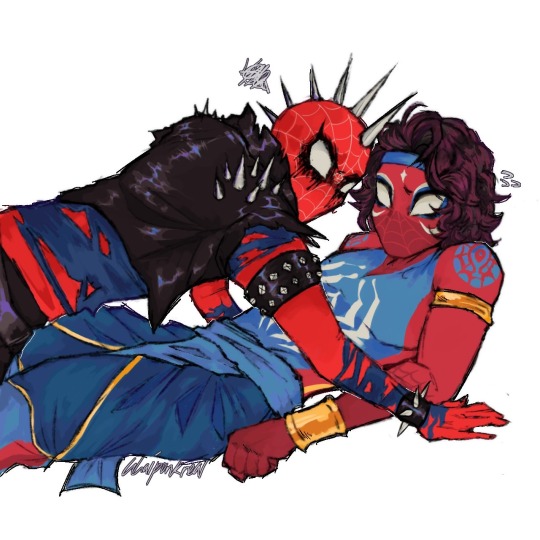
THATS EMBARRASSING LOL (little frame redraw from the movie hahag)
love them<3
#chaipunk#punkchai#atsv fanart#atsv#hobie brown#hobie x pavitr#pavitr prabhakar#across the spiderverse#across the spider verse fanart#i spent like 40 fucking hours on this not even exaggerating
8K notes
·
View notes
Photo
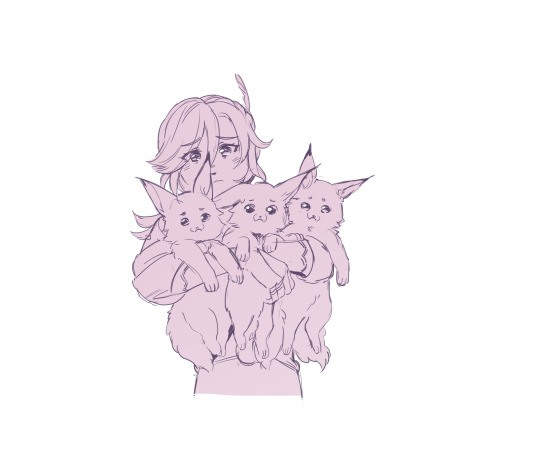
after the interdarshan championship
a little WIP because im having a bit of a bad day I just couldnt resist drawing pleading eyes emoji kaveh with those desert foxes
#genshin impact#this is haikaveh trust me it WILL be#kaveh#the references for these foxes accidentally were the lions from the lion king remake#i was watching a 2 hour 40 review of how it sucked and i was drawing them like#damn man i wish there was a way to make them both realistic and expressive#anyways fuck that movie#maybe some of yall know what video im talking about
4K notes
·
View notes
Text
bro 40 hours of practice took off the paint on my poor fingerboard
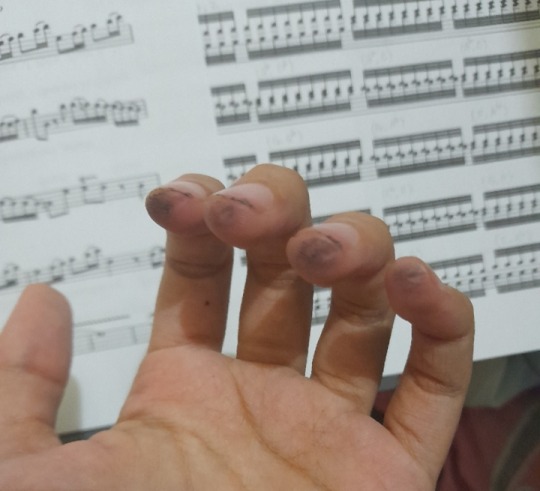
almost done with winter's 1st mvt gotta up the tempo next and then proceed to the 3rd mvt.
i also revisited eine kleine (1st, 2nd, 3rd mvts) lol and I'm more comfortable doing staccatos now, it's much much smoother than four months ago 💀

I've also been reviewing my notes for "our hearts' symphony" tee hee and i need more ideas, unfortunately 💀💀 can't start formally writing it yet, but we'll get there!
Please give it a read and a comment, i feel lonely 🥲
#practice#40 hours#violin#fanfic#please give me a comment there i am begging you i need attention#or else i die
3 notes
·
View notes
Last Seen Blogs

comeback-kid94
Comeback_kid94

akingdraws
A King Draws

theloversclubhouse
𝐤𝐢𝐞 ☽
barb-l
just meme the pain away

magisettei
マギ 設定資料集