#Adobe Photoshop Selection tool Quick selection magic wand Object selection subject selection Color Range tool Graphics Design class গ্রাফিক্
Text
Best Remove Photo Background with Photoshop | Background Removal Service

How to Remove Photo Background with Photoshop
Imagine your photo subject with removed photo background with photoshop that you designed from scratch with your imagination. Before placing an object in an entirely new landscape, you must remove photo the background with photoshop from the original image. Removing the background is a complex art and requires more than an eraser, but you don’t have to be a graphic designer to learn the steps in Adobe Photoshop CC.
Remove Photo Background in Photoshop.
Different programs are used in the Remove photo background in Photoshop. Adobe Photoshop came first in this matrix. You may prefer it over others because of its wide range of photo editing tools and options. The best tools to remove the background are Pen Tool, Magic Wand, Lasso Tool, Layer Mask, Channel Mask, Plug-in, etc. This article will discuss the best Photoshop tools to remove background from photos, along with a guide for the process.
#1. Magic Wand Tools [remove photo background with Photoshop]
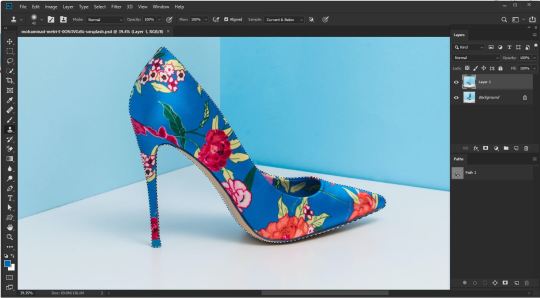
It is a great tool that can remove a photo background with Photoshop. It’s a magic wand because it works like a bit of magic. It looks like a great magical tool. Very effective on shaped images. The tool works well if the background is solid and the image’s outline is strong.
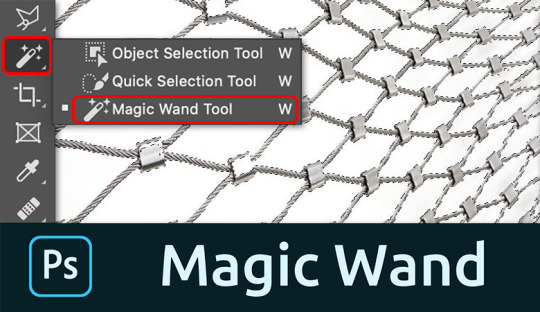
As you know, the image of this tool should have a solid outline. So we selected this image and opened it in Photoshop to remove the background.
We select the Magic Wand tool in the left pane of Photoshop. You can select this tool by clicking the tool or just pressing “W/Shift + W” on the keyboard to select it.
Click on the background you want to select. A dotted line may flash around the selected layer.
If you feel confused with options like dashes, you can move on to something else, namely tolerance, as we show in the snapshot below. We used a tolerance of 50% to select this image, with proven and continuous anti-aliasing. This part will vary with different images. You should try if the selection is imperfect.
Press Ctrl+D to deselect the main theme. Go to the layer palette, create a new layer and place the new layer below the main layer by dragging it from top to bottom.
Set the background color, and make sure it is cropped properly. By the way, after all these steps, you can remove the background with the magic wand.
# 2.Quick Selection Tool [remove photo background with Photoshop]
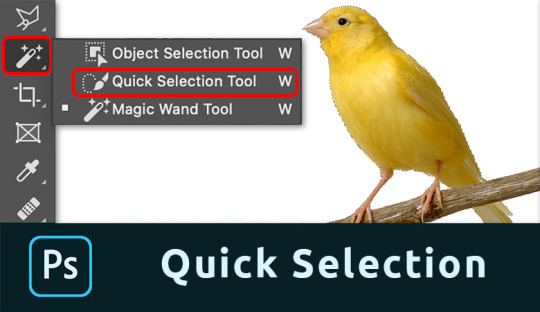
The quick selection tool will do a lot of the work for you and works best when there is good contrast between the subject and the background.
Take a photo with Photoshop. We use the same football image here. You can apply the method to any image you want to process.
Before starting work, ensure that the image’s background is locked or open. Double-click the lock icon to unlock the layer if it is locked.
Select the Lasso tool from the toolbar. Draw a line around the main object by dragging. Hover over the starting point.
After drawing the line, click the Path palette in the Layers palette and create a path by clicking the Path Trace image.
Next, click on the Selection tool from the toolbar.
We think you are still concerned because your drawing is wrong. No problem, click on the drawing line with the Pick tool, and you will get several reference points to help you resize the line.
Press Ctrl + Enter to select the rows. Return to the Layers palette.
To separate the subject from the background, click Select at the top and then Invert. You can do this from the keyboard by pressing Ctrl+Shift+I. Now press Delete to remove the background.
Take a new layer below the main layer and give it a background color. This way, you can remove unwanted background.
# 3. Pen Tool [remove photo background with Photoshop]
The pen tool works best with simple objects. It is ideal for making a selection of objects with solid, straight, or curved lines.
Select pen tool
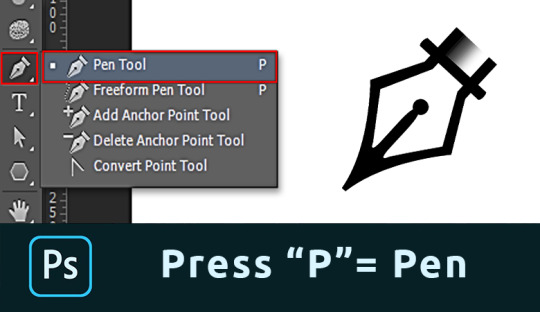
Select the Pen tool from the toolbar on the left. You can also use the key combination “P.” Make sure to set “Path” in the top menu.
Make path

Click any edge of the object to create the first anchor point. Create another landmark. If correct, click. If you want a curved line, click and drag an arc from the line.
This allows you to work smoothly around rounded and curved edges.
Always press the Option key (Alt in Windows) on the last reference point after the curve. If you don’t, the next row will automatically appear according to the previous row.
Pressing the Option key resets the reference point, allowing you to recreate the line.
It takes some practice to master, but you will progress much faster after a while. Continue the process until you have created a path around the object.
When you reach the first character, click it. The road will be closed automatically.
Convert Path

In the Paths window, hit the “Load path as selection” icon.
Remove background with Photoshop.
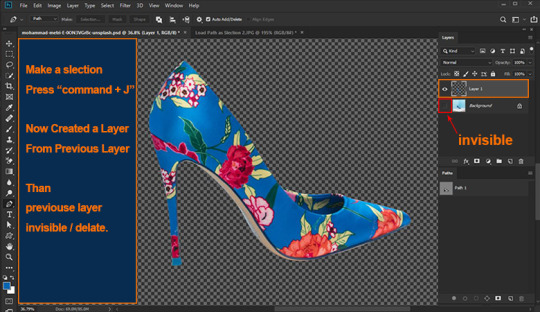
Now there are several options. To remove the background, select> Invert and press the Remove button. You can also use the keyboard shortcut Cmd + Shift + I (Ctrl + Shift + I for Windows).
Just press Cmd + J (Ctrl + J for Windows) to copy the object to a new layer. That’s it; you’ve isolated the subject and removed the background in Photoshop.
# 4. Background Eraser Tool [remove photo background with Photoshop]
Next, we have the Background Eraser tool. Again, it works best with a clean background.
Background Eraser Tool
Select the Background Eraser tool from the toolbar on the left. It is usually hidden behind the eraser tool. Hold down the eraser tool to reveal it.
Erase the Background
Start by removing the background. Automatically detects edges of objects that are not in the background. It is better to set a smaller brush size for more complex areas.
Selection edge on image
The background eraser is great but not perfect. Sometimes the subject and background have the same colors and shades. You must select these fields yourself. We recommend selecting the bottom layer and clicking the Add Mask button in the Layers panel.
Fill the layer mask with black. To do this, select the Paint Bucket tool, set it to black and click on your photo with the mask thumbnail selected. Now use the brush and set it to white or black. Black color erases parts, and white shows parts.
Make sure the mask size is selected and start painting the image. This way, you can manually adjust the areas that need more work.
FAQs about removing photo background with Photoshop
How do I remove background from hair in Photoshop?
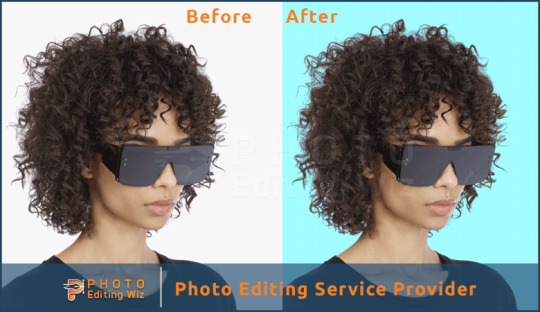
You remove the background from hair in Photoshop using the steps in this post:
Set up your layers
Create a high-contrast layer
Remove the background around the hair and model
Replace the background
How can I change my hair background?
You can change the background of your hair by removing the background by following the steps in this guide. Then choose a background color or a new image to replace it, or leave it as transparent background.
How Do I Make a Background Transparent in Photoshop CC?
To create a transparent background, you need to open the background layer. Double click on it and click OK. Now start erasing the areas, and you will see a shiny background.
How Can I Remove a Background From a Picture?
There are two options here. First, select the background and click the Remove button. The background disappears.
You can also add a layer mask instead of removing the background. This way, you can always re-expose the background.
#Backgroundremoval#clipping path#cutoutimage#removebackground#silopath#deepetching#adobephotoshop#imageediting
8 notes
·
View notes
Link
We are among the leading multi clipping path service providers in this industry, and we have more than thirty professionals who can modify different images. Our firm offers quality clipping paths at an affordable cost, and they are delivered within the agreed timeframe. When collaborating with us, you are not compelled to make upfront payments. We offer express service to online stores and web shops amongst others who need a quick turnaround time. You can rely on us to manage your multi clipping path work as you concentrate on significant enterprise activities to get optimum results from business operations.
We offer quality and cost-effective services that could range from simple to complicated multi clipping path. You can use clipping path images to meet your commercial needs in catalogs, e-commerce websites, brochures, flyers, posters, and magazines. Due to increased internet usage, clipping path services have grown to be popular among photographers, web developers, graphic designers and publishing houses for different photos. We have an unlimited revision policy that enables clients to get 100% satisfaction from our final products. In case they are displeased by an item, they should send an email to us and wait for the appropriate products that best suits them.
When editing, manipulating and retouching pictures, we take great care and deliver a standard quality multi clipping path service. We offer free samples to clients for them to assess our product's quality. After conducting intensive research, we concluded that manual clipping paths have a higher accuracy in product cutting than that of mechanical techniques that are in graphics studio domains. We also offer correct handmade clipping paths. They are useful in various ways such as vector conversion software and publishing houses.
Our competent editors regularly use the pen tool to complete clipping tasks. The most productive technique applied to image masking service is the image clipping path. It only reveals the interior side of clipping paths while concealing the rest. Despite there being man clipping path firms in the current market, it could be hard for you to choose one. Selecting us to cater for your clipping path needs would be a wise decision.
Why Choose Us?
Trusting an offshore multi clipping service provider to offer path creation services is a significant concern. These are some reasons as to why we would make the best long-term business partners for you.
High-quality services charged at affordable prices
A quick turnaround time
There is a monthly resource hiring plan
100% customer satisfaction is guaranteed
Free samples are given to clients to ascertain our product's quality
There is an all-round customer support available
We deliver large quantities quickly
You can rely on us
Bulk discounts are offered once in a while
All quotations are provided in less than an hour
There are unlimited revisions given
Our pricing is competitive
Our company offers industry solutions such as resizing, website photo optimization, cropping for online shops, adding, neck montage, original shadow, mirror shadow, shadow removal, retouching, color correction and drop shadow. Our unique e-commerce portal services are characterized by :-
Taking a section of a picture and merging it into another one. Our expertise in image manipulation is renowned.
We offer multi clipping path service by using a pen filter and tool to eliminate background effect in photos.
We usually fix stubborn dust patches on a piece of cloth by using a skill.
Our company shoots dresses by put them on mannequins. We then make them professional and web-ready.
As we are well aware of the importance of color enhancement in jewelry, we modify subtle details with multi clipping path to make it more appealing.
To increase product's attractiveness, we add a mirror effect after removing background effect in photos.
Photoshop Multi Clipping Path Service
Multi clipping path is a vocabulary to image editors and in the image manipulation industry. It typically is a photo background removal activity that is done with a pen tool, Adobe Photoshop. A photo is placed from an inappropriate layout to an ideal one. Alternatively, you can also remove the background after choosing a background removal Adobe Photoshop pen tool. However, both background removal and multi clipping path can be alternated. Clipping path is used on many occasions.
Adobe Photoshop Multi Clipping Path Categories
It is a blocked vector path through which an object can be excluded or included after its applications. However, multi clipping path service is divided into six major classes.
1. Basic shaped subjects
It is a primary class among all the rest. The technique is applied to photos with a round plate, ball or egg shape.
2. Simple shaped subjects
It is mostly applied to curved products with holes such as shoes, T-shirt, watches, and rings. They have more holes than those in primary shaped objects.
3. Compound shaped subjects
The path is applicable in a wide array of pictures with intricate curves, double holes, horizontal and vertical designs. The super sophisticated multi clipping path comprises of trees, gates, hair paths, single chains and group bracelets.
4. Complex shaped subjects
It is handy in photos with many curves, holes, complex and compound shaped goods. They may also comprise some closed paths such as net, furry doll, chain and group people. You can exercise it on group food, group watch, shoes, and bracelets.
The path includes designs and some holes. It has several anchor points that are applied to products with few curves, corners, and embedded transparency. One can exercise it on bracelets.
6. Multiple clipping path subjects
The path allows clients to change individual components of a photo based on numerous fillings, color level, size change, rotation and changing opacity. Effects and filters can be used in image enhancement. Different images have different manipulation time due to differences in variability and complexity.
Quality Assurance
Production QA: Photo editing is lead by a quality assurance supervisor who ensures that it adheres to customer requirements.
Post-production QA: A post-production QA manager scrutinizes edits and ensures that they meet client's requirements.
Pre-delivery QA: A production manager assesses the product's quality before their images are delivered to clients.
Unlimited revision: Although we provide a flawless clipping path service, we allow unlimited changes on our goods if a fault in a product or an image doesn't meet customer's requirements.
Pen tablet: A pen tablet helps us offer precise, quality and professional retouching service.
Refund guarantee: : In most instances, our clients always get what they needed. However, if one is not satisfied, they can get a money-back guarantee.
The Multi Clipping Path Process
After creating a path, restart the whole procedure again and finalize drawing the line. If you keenly look at the path palate, a path resembling your image will appear. At this point, you can change the path name and convert it into a selection. Click on the path and press on Ctrl+Enter. The path will now be translated into a choice that you can use according to your needs.
When you reach a curved edge of a photo, you will feel a curved line. Click and gently hold onto it. Using the mouse, you can view a straight line to indicate direction. You can now draw a curved line with a handle. Grab it and move the mouse front and backward to curve and use your line.
When opening Photoshop, import a picture by clicking on the screen today. If you are an amateur, it is recommended that you take a single and straightforward view to clip path. Choose an elegant tool such as Pen Tool from a variety of photo multi clipping tools. Click on one edge of a picture from where clipping will start. A tiny black rectangular shape will appear, and you will notice that a line is shifting from one point to a different one. They are called anchor points.
Benefits of Multi Clipping Service
The primary goal of Photoshop multi clipping is to either remove image background or to add an attractive one that allows one to draw clients' attention. The best multi clipping path service is mandatory for photo retouching, resizing and color correction. Each day numerous new businesses are established all over the world hoping to be successful.
However, most of them are still struggling a lot. They tend to have a weak detail description of products necessary to attract first-time clients. Lack of a detailed display of goods causes lack of interest in clients. It has been discovered that an array of goods with a white background has a higher probability of being bought than others.
Image masking service is essential to photographers. When he has many pictures to work on, he can outsource a multi clipping path provider as having a flawless presentation is crucial. Clipping is also essential in magazines and model images.
Value Added Services That We Offer
Multi Clipping Path Tools
Multi clipping path service is the most complicated task in Photoshop. For it to be successful, there are various tools that one could use. They include the lasso tool, quick selection tool, magnetic lasso tool, polygonal lasso tool, magic wand tool and pen tool. Most of them produce imperfect and terrible results when used in performing quick tasks. Defective clipping paths have a negative impact on businesses. To have a perfect performance, you need to work manually while using the pen tool. It is often called Bezier Pen or Bezier Tool
Anchor Points
An outline is a line that links two anchor points. It may be curved, crooked or straight. To create a path, you need to have at least two points. One can't use a pen tool without having a path. An anchor point is an ending and starting point of a line. A path creating may entail having several anchor points. On the other hand, when drawing a curved line, you will direct a track by a handle that is visible at each anchor point. When curving the line, click and firmly hold the mouse on one anchor point. A handle, which is a straight line, will appear.
Clipping Path
We are a multi clipping path firm that comprises of experienced professionals who offer quality services to clients. They include photo manipulation, editing and object extraction. Our charges are low compared to those of most of our competitors.
Photoshop Image Masking
Masking pictures are vital in image editing especially for calendars, product catalogs, magazines, photographs, brochures and posters for online stores. It is usually a strenuous and time-consuming activity if one is to achieve the desired results. Our staff uses unique tools and equipment that results in 100% customer satisfaction.
Image Retouching
We provide an affordable quality image retouching service. It is essential when a subject's appearance in a photo is vague. Modified photos can increase a project's visual appeal.
Ordinary Clipping Path
It is typical for shoes, accessories, jewelry, handbags and fashion clothing. A standard multi clipping path is drawn using a pen tool to detach a photo from the background. The service is pocket-friendly, and it is done by experienced professionals. It aids in clipping an old background of an image and using a new one. Through it, one can also cut a foreground object hence increasing other subjects' visibility.
Portrait Retouching
We are renowned for our unique portrait and product retouching skills. Our firm offers a variety of these services ranging from skin retouch and portrait background modification. Portrait retouching is mostly a combination of color modification and beauty retouching.
Web-ready Pictures
We have an additional package of web-ready pictures for online shop owners. They have an 800X800 px crop size which fulfills the photo size requirements of various e-commerce platforms such as Amazon, Square space, Shopify and eBay.
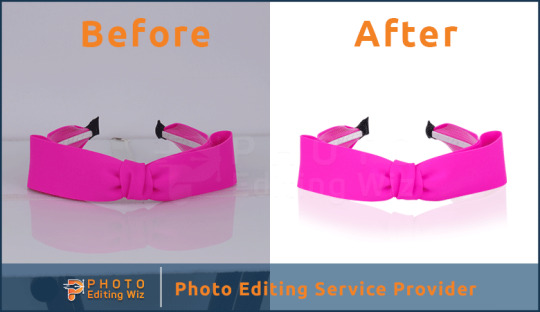
Photo Background Removal
It is a photo editing service with the highest demand globally in e-commerce markets. We ensure that all your pictures fit in your e-commerce picture editing guideline by resizing, cropping, removing borders and image background. It turns it into a colored, transparent or pure white background.
Image Color Matching
Our expert image editors are capable of altering the size and color of a product according to your preference.
Whenever you need a multi clipping path service, feel free to visit any of our regional offices. We will give you an affordable package, and we will be willing to answer any queries.
#clipping path services#imagecolormatching#image colorization#web-ready picture#portrait retouching#ordinary clipping path#image retouching#anchor point#multiclippingpath
2 notes
·
View notes
Text
Adobe's AI-powered Photoshop update is a time-saver
Adobe has unveiled Photoshop 19.1 with a much-anticipated AI-based feature for photo retouchers and a fix for longstanding Windows display issues. The first feature is called "select subject," and uses Adobe's Sensei deep-learning algorithms to make it much easier to isolate subjects from backgrounds. Adobe sent Engadget a preview copy of Photoshop to test, and I found that it's a big time-saver that doesn't always work, especially if your subject and what's behind it are too similar.
The tool is certainly simple to use. You load up your photo and choose either the "quick selection," "magic wand", or "select and mask" tools to bring up the "select subject" option at the top of the screen. Once you choose that, the AI does the rest, attempting to find the subject in the shot, whether an animal, human or prominent inanimate object.
To be clear, Adobe does not tout this as a feature that can automatically and perfectly select things for you, in the same way as dedicated apps like Fluid Mask. Rather, it aims to do a decent job of getting you started, making the rest of the manual process much simpler.
For instance, photo retouching specialists often separate models from their backgrounds in order to do things like change their skin tone or blur the background more. The first step of that is often to use a magic wand or manually outline the person, both of which are hit and miss and time-consuming. The select subject feature does the entire first step in one shot, freeing your time to fine tune the selection in areas like hair or clothing.
I tried it myself on a bunch of scenes of people, cameras, dogs and cats, and as you'd expect, how well it worked depended completely on the photo (see the gallery, above). If the subjects are well-separated from their backgrounds in terms of colors, shape and depth of field, the system works well. On the other hand, if the background is similar or overly complex, then the feature failed to varying degrees. (To be fair, a subject not well-separated from its background means you probably took a bad photo.)
Even if the selection was poor, the system still saved me a bit of time. Sometimes, however, it was easier to just punt and select things manually from scratch. Overall, it's a nice addition, but hopefully Adobe will improve it to the point that it makes everything more automatic.
The other primary improvement in Photoshop 19.1 is high-resolution monitor support for Windows 10 Creator's Edition. Up until today, users with high-resolution QHD or 4K laptop or desktop monitors could end up with tiny text, making the app nearly unusable without a lot of fiddling. That sucks considering that many folks probably bought their high-res screens to do Photoshop better.
With the new release, Photoshop "now offers a full range of choices for UI scale factors from 100 percent to 400 percent, in 25 percent increments ... so that the Photoshop user interface will look crisp, beautiful, and the right size no matter the density of your monitor," Adobe said. The app will automatically adjust itself based on your Windows settings.
What's more, Photoshop also works better for those of us who use dual monitor setups with multiple resolutions (I have a 3,200 x 1,800 pixel laptop, and 4K primary display, for instance). "One monitor can have a scale factor of 175 percent and another a scale factor of 400 percent," Adobe said. "This allows Windows users to choose either the highest-end 13-inch laptops with 4k screens, the more affordable 1080p models, or tap into the new 8k desktop monitors, each with an uncompromised experience."
Speaking of Microsoft, Adobe also improved support for the Dial controller. The feature is no longer a technical preview, and you can now change brush settings on the fly while you paint, rather than between strokes as before. Photoshop 19.1 rolls out today with other Adobe CC products and should be available in your neck of the woods soon.
- Repost from: engadget Post
0 notes
Text
Types of Selection Tool in Adobe Photoshop for Beginners

Selection is the most important and very first thing to do in a designing application or any other field like programming. There are 10 types of selection tool available in Adobe Photoshop which are simply and most convenient selection tools.
If you are a beginner and just started learning Photoshop course then you must read this mini tutorial on selections tools of this versatile application.
Types of Selection Tools in Adobe Photoshop
Below we are going to talk about the selection tools in depth.
1. Marquee Tool
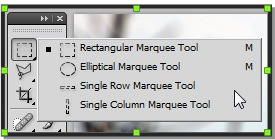
Marquee tool is an elementary selection tools that we find at top in the toolbar. To use it, we have to click and drag around an area where we want to select. There are four kind of marquee tool these are - rectangular marquee tool, circular marquee tool, single line row marquee tool or single column row marquee tool. We can use chosen marquee tool that allows us to pick the options by holding down the button.
2. Lasso
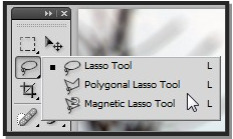
Lasso tool performs almost similar function like marquee but it allows us to move around the areas that marquee doesn’t provide. You can remove the unwanted portions using this gadget. Since marquee provides us limited options like line, circle and frame, we can’t select the more at once. Hence, we have lasso which solves our issue within a short time.
Using lasso, one can create the selection very easy by dragging the pointer along path.

3. Magnetic lasso tool

In the comparison with other lasso tools, we find Magnetic Lasso tool more convenient for creating the outline of desired area. You can easily select the curves of any object by this tool as it allows us to follow outlines like a magnet. Just click on the first point and move the pointer along the path or outline you wish to follow and finish the selection by going back to the original point.
4. Magic Wand

We used this gadget for selecting color-based area which has similar button space like quick selection tool. It can create the selections of curves and sharp edges more quickly than other tools. You can select the particular color area by clicking on that. If you want to create the selection any color- based desiring area then you can use Magic wand.
5. Quick Selection

There are very similarities between quick selection and magic wand tool. It just helps to select that are which is based on colour and tone. Just click on that area and Photoshop will automatically determine the area you want selected.
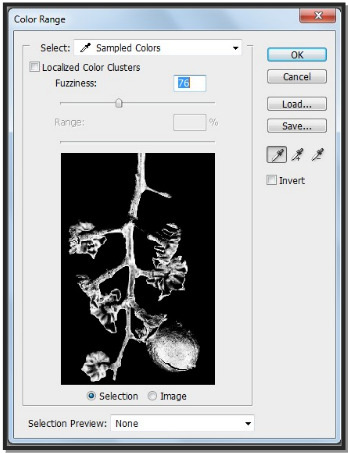
6. Color Range
We have one hidden tool too in Photoshop which we can find from sub menu. This hidden gadget is know as color range that is like a copy of Magic wand. Multiple color selection and limitation is the main feature of this amazing gadget available by using the add and subtract eye dropper options.
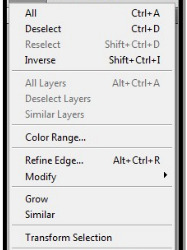
7. Inverse
Inverse is used only with a pre-existing selection.It is automatically select the area that isn’t selected initially and deselects the pre-existing selection.If selecting an area is more difficult than selecting the areas around it, we can use inverse by selecting those areas outside and choosing to inverse the selection later. This makes the process faster.
Just have a look at the example below that clearly shows the background has an even tone compared to the subject. (Ctrl + I) is a shortcut of Inverse selection.
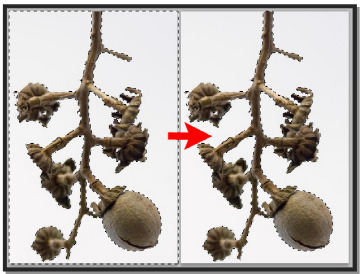
8. Grow

Grow is a selection option also used with a pre-existing selection.It extends the selection based on the current selection,usually based on color and tone. The example below shows that it selects the area that expand and cover a wider but within the confines of its tone and color.
But It further expanded when you use to Grow tool one more time.we can repeat the process until the desired area is selected fully.
9. Similar

Similar is also accessible through the Select sub-menu, also works with a pre-existing selection and is much like color range where it extends the selection to the whole image given the specific color and tonal range of the existing selection. Let’s say you’ve selected a patch of clouds in the sky, you can extend the selection to include the other clouds which would probably have the same color and tonal range using Similar.
Take note however that it will also include areas in your frame that are of similar color and tonal range even if they aren’t clouds. Like Grow, this process can be repeated as desired.
10. Refine Edges
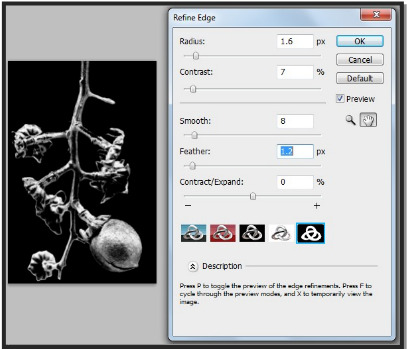
When you want to be meticulous about the edges of a selection, use this tool to manipulate or customize the contours of the selection given in the Refine Edges options. It takes a lot of practice and it is indeed helpful in making the selection more precise.
Hope you comprehend the concept of selection tools in Adobe Photoshop. But I would really recommend you to join any Photoshop Training center in Delhi where you can attain required techniques and methods to become a Photoshop Master within a small amount of time.
And I know one place where you can go for advanced Photoshop training in Delhi and i.e. Video Editing Institute. This institute offers professional certificate and diploma courses video editing as well as photo editing. So, start learning Photoshop in a better way from today.
Source:- http://admec-multimedia-institute.blogspot.in/2018/05/types-of-selection-tool-in-adobe.html
0 notes
Last Seen Blogs

torispr
𝚌𝚑𝚛𝚘𝚗𝚒𝚌 𝚙𝚎𝚜𝚜𝚒𝚖𝚒𝚜t

alaskaartz
Alaskaartz

basakkuus
başak kuş

mexashepot
Witchunter Hunter.
jeykdom
Inking