#Can we use 3mb+ headers now?
Text
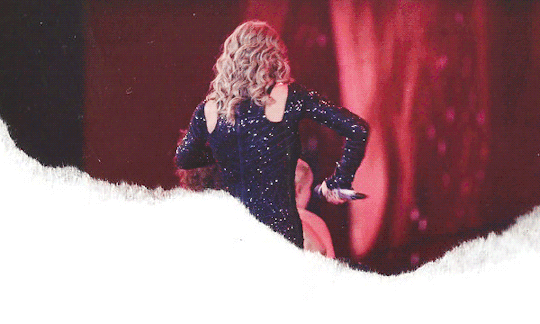
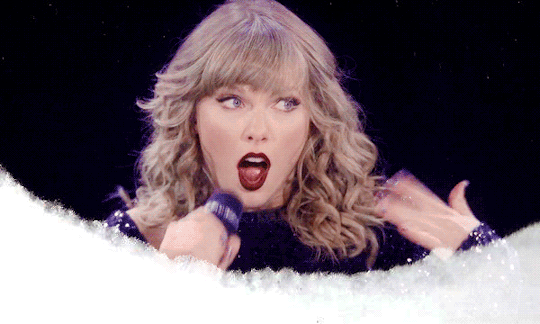
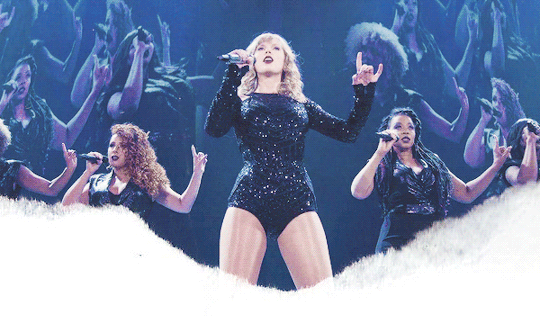
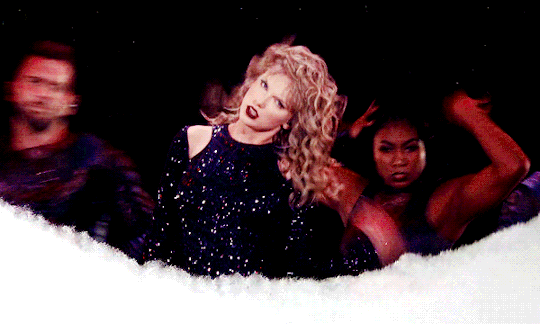
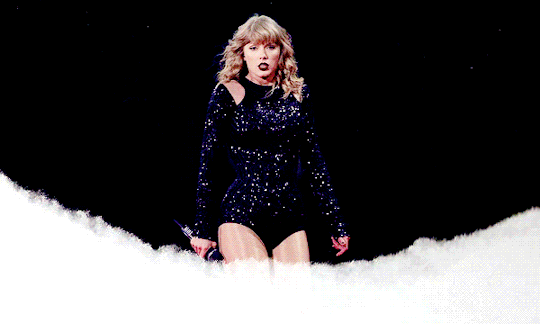
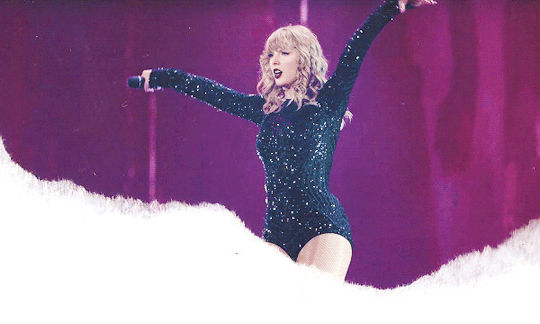
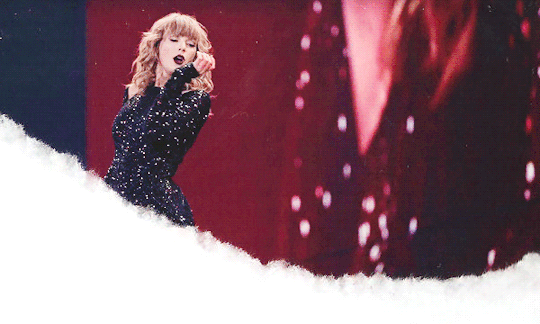
REP TOUR / I Did Something Bad tumblr headers
12 tumblr headers of reputation tour I Did Something Bad live, requested by anon. Size: 600 x 360. Feel free to use, hope you like them! But please don’t steal them, don’t re-edit them, don’t claim them as yours and credit me please! Thank you! Stay healthy!


In case tumblr doesn’t want you to save them properly, dl
#Tswiftedit#Candy Swift#My Gifs#tscreatorsnet#Tumblr Header#Anonymous#Can we use 3mb+ headers now?#I don't know so I still make them under 3mb
181 notes
·
View notes
Note
Since I'm curious, what caused you to become very possessive of your gifs? Not out of rudeness but curious, since no matter what you do a lot of them show up in the gif function on Tumblr which automatically credits you at the bottom of the gif.
Hey. Tbh, at first I didn’t wanna bother with yet another anon but since I see no ill intent behind this, I decided to go and answer it. Unfortunately, half-way through I realised my reply is turning into incredibly long semi-bitter rant and expands well beyond calling out just one person in Psychonauts fandom (and yes, this is related to Psychonauts fandom – you do know that these anons are not really that anonymous, right?) so… buckle up! All that beneath “read more”.
I’ve been on this hellsite for like…7-8 years? Maybe more? Can’t really tell cause I moved blogs and my old blog now consists of only 4 posts I’ve made close to leaving so I honestly have no idea how much time I’ve spend here before moving. Anyway, during those few years I’ve spent on my first blog I’ve met a lot of creative gifmakers who enjoyed sharing their love for fandoms they were in. I’d like to point out that this was waaaaay before tumblr created that insert-gif option so, back in the day, the only way to add gifs to your post was to: 1. make them yourself 2. take them from someone else. And a lot of people were taking them from someone else which resulted in many gifmakers giving up on making gifs and leaving fandoms and/or even leaving tumblr – and I’ve had many of my friends give up on what they love and have their games/shows/movies/whatnot ruined for them cause people would not stop stealing from them. And many of my friends eventually left tumblr cause they couldn’t deal with it anymore.
Tumblr adding insert-gif option, in my opinion, honestly, just made it worse for gifmakers. Cause now people had the opportunity to use gifs for their posts, with or without creators’ permission/knowledge, but it was alright and it was perfectly fine cause creators were credited. There’s their name at the bottom. It’s alright. Like… it doesn’t matter if they’re actually okay with people using something they’ve put hours into making or if they’re not – tumblr gives them credit so they SHOULD be okay with it. Simple as that.
Well, we’re all different and some people are not okay with that. I’m not okay with that. It took me weeks to figure out how to use photoshop correctly. Took me countless hours of looking through different tutorials and basically trial-and-error-ing my way through the process. Whenever I make gifs, it takes me hours to record videos and then hours trying to achieve that 3mb limit on gifs (thank lord these days we’re beyond 1mb limit). After all that effort I put into creating gifs for games that I love and enjoy, someone is going to make 2 clicks and have that same gif added to their post, without even asking. So how is that okay?
Back to your question. Yes, “no matter what you do a lot of them show up in the gif function on Tumblr”, that is true and that is something I was aware of when I saw you-know-who announcing they would be starting 30 days Psychonauts challenge. So, hating to see my gifs used against my will, and not wanting to start any unnecessary drama and threaten people in advance with reporting them if they do use them, I’ve made my blog as private as I could. It was only accessible through the dashboard, it was not showing in ANY search engines inside and outside tumblr, and my gifs were impossible to find through insert-gif function – I’ve made sure. I did all that cause I just knew that during those 30 days, someone would use my gifs and I would get mad and I desperately wanted to avoid that (hence going extreme). And you know what happened? You know what creator of this challenge (who prevously already reposted my gifs) did? *drums* They used my shit anyway. :3 They just uploaded it from their computer, where they’ve saved it earlier.
And like… a lot of people see pretty pic and decide to save it - I mean, we all do that. Heck, even I have a folder full of shit I saw online and liked it – but i’m not uploading it online cause I haven’t made it. It’s not mine to share.
But some people are not like that.
Some people see fanart of something they like and they want to share their opinion on it – and instead of making their own post, maybe drawing the fanart themselves, they decide to use someone else’s art for their post. Do they know who made it? Do they have creator’s permission to share it? If the answer is NO, then they should be a decent human being and not do that to creators. Oh, they shared it anyway but now people in fandom are calling them out BUT this actually happened on accident? They know who the creator is but, somehow, they accidentally forgot to credit them? OK, well, it’s possible, shit happens, but they better make sure it doesn’t happen again.
Then sometime later these same people decide they want to make a post appreciating their fav character and they want to include pics cause duh, you can’t have character appreciation post without pics, right? Now they have several options: they can get their own screenshots, make their own gifs, maybe draw something… or they can just take someone else’s creation. Do they know who made it? Well there’s my fuckin name on it, and since they’ve stretched it from 245 to 500px, it’s really hard to miss, plus it’s not like there are that many people making Psychonauts gifs. Do they have permission to share it? Hmmm, nope, didn’t ask me. Is this also an accident? Could be. I mean, I’ve seen stranger things happen, so accidentally forgetting to credit content creators twice… kinda suspicious but still possible. Who am I to say?
Now if these people then decide to make a post appreciating their fav ship and they want to add a cute pic of the loving couple – yup, you guessed it! They can either create something or take something. Again: they know who did? They asked for permission? Got the permission? No?!?! But they posted it anyway?!?! :o Could it really be, that after being called out publicly, after being told that reposting is bad (something that’s very easy to understand), after even having tumblr staff intervene and remove stolen shit from their blog, after all that - could it really still be an accident?
Nah, man.
They just don’t give a shit.
Cause if they did, they’d stop with that crap first time they were called out.
(and if you think Psychonauts fandom is their only fandom and that they’re not doing this crap in other fandoms too - hoooo, boy, do I have some bad news for you! Do you know how many stolen and butchered HP fanart is on their blog? Hobbit stuff? They seem to be one of the most accident-prone users on tumblr. And honestly - it’s a real miracle their blog’s not been terminated.)
Back to what I was talking about - I’m not okay with people using my gifs and I’ve made it very clear. I literally do not give a shit if I’m credited or not, I’ve made it very clear that I don’t want my gifs used without my permission. If you like them and want them on your blog, there’s a fuckin reblog button. It’s sole purpose is to allow you to share other people’s creations. Or shitposts, cause lord knows we all love those.
So that’s why when someone spends hours going through my Psychonauts tag and goes as far as to send me “I love your gifs” anonymous message, but the very next day makes stim moodboard post including one of my gifs, now cut and resized to fit 3x3 format they’re going with, I get mad. And that’s why when someone uses one of my gifs to promote their RP blog, butchering it to fit their aesthetics, and later when confronted going as far as blaming their good friend on it cause god! they’ve had no idea it wasn’t theirs, I get mad. (makes you wonder though: if they friend has such skills, why not making them gifs themselves?)
Like…. I’ve had my gifs stolen plenty of times. I’ve had them stolen for roleplaying, for headers, for imagines, just for notes… I’ve had them stolen by people claiming to run official fan sites (that’s a real wild story but I won’t get into that now)… I’ve seen them on pinterest, weheartit, FB, all those random gif sites… and I’ve seen EVERY. POSSIBLE. EXCUSE. ranging from: “well i found it on google so why should i credit you” “lol dunno who made this but its pretty so im posting it” “ive had it on my computer for years so i don’t remember where i got it from” “i dont know how to make gifs so im using weheartit as a source” “credit to whoever made this” (that’s my fav) to “its just a gif so who gives a shit” (it’s not – it’s hours of creator’s time and lots of love that you’re now shitting on so thanks) and “i have an /illness/ and getting notes makes me feel better so dont u dare blame me for stealing” (I don’t remember exact excuse but it was something along those lines and like… how do you even respond to something that without looking like an asshole?).
And sometimes it really is just an accident. Sometimes people really do forget to credit you and/or ask you for permission. And I’ve had my fair share of those accidents. People in Psychonauts fandom have been using my gifs for various crap but, when approached, they’ve removed it and apologised. And it’s something I really appreciate. (if they actually bother reading this and they recognise themselves: i’m really grateful and thank you for not being an ass)
But you know what I don’t appreciate? People making a call out posts about me, asking about my gifs when they know very well they’re the main reasons why I’m not making those gifs anymore, at the same time failing to address any of the issues I have with them and instead rather explaining to others what happened BUT explaining only the parts that make me look like a villain cause how I even dare be mad about them stealing? How I even dare call them out on it? That is so ridiculous and criminal of me, and it’s so so sooooo bad that they need to call me out. I deserve to be called out by the very same person who’s been stealing my shit.
And their explanation is…well… it’s something.
They were sympathetic and polite? When did this happen? Did I completely missed that part? Please someone fuckin enlighten me with such post/message where they expressed their sympathy and politeness and I’ll apologise right this second.
I told them to “literally fuck off”? Yeah, that did happen, I admit that. Did they bother explaining why I told them to fuck off in the first place? Did they say they were caught stealing from me and had tumblr stuff remove my shit from their blog? Did they get into details of how they demanded the proof of my so very wild and obviously false claims but then when I showed it, they just deleted that “how dare u call me out cause I would never do such thing” post? No, they didn’t and geee, I really wonder why.
Instead, what did they choose to address? Out of all the things I’ve said. Hm? What did they choose? Me telling them to fuck off. Me dropping the F-bomb on them, rudely rejecting their obvious kindness and politeness. Nothing else.
Back to what I was talking about before I got derailed again: no, I’m not mad cause this person used my gifs without crediting me. I mean – I am, but that’s not my main issue with them (and they know it). My main issue is that this is someone who will continuously lie and steal and still deny any of it, even when there’s plenty of proof (and you can always count on me to show up with proof tbh), and then go as far as to publicly ask about my gifs and try to call me out. Like me getting mad that something I’ve put hours of work into, and something I’ve made cause I love the game and I want to share my love and appreciation for it, is now being shared against my will and my knowledge - like me getting mad over something like that is so unreasonable that they need to make an entire post about it while pretending they have absolutely no idea why I’m even mad and why we have issues.
And I have every fucking right to be mad. 3 times is not an accident. 2 times to the same person is not an accident. They know it. But yeah, playing stupid is their defense so it’s not like I expected them to actually address their actions this time either.
And you know what? Just because I swear a lot doesn’t mean I’m wrong. Doesn’t mean there’s no solid ground for my claims. People on tumblr have always been and always will be stealing shit. Sometimes they will credit you, often they will not, and that’s just how it is, doesn’t matter if you’re okay with it or not. But that doesn’t mean I’m just gonna sit quiet and accept someone’s shitty behaviour. Especially when it’s directed at me.
TLDR: giving credit =/= having permission
but my previous posts leading to this ask were not about that
you knew that already
#psychonauts#this is a lot longer than i expected#meh#also: all those posts are now under one tag#so you don't have to check my blog 4 times per day#that hobbit reposter#my psychonauts stuff
8 notes
·
View notes
Note
ah yes this isnt allie asking how to make a gif because she forgot what pft what gave you that idea weeb
ok alliethis is just how i do it lmao sorry 2 make others cringe AHAHAHAlook under the cut weeb
so first i look for a ts file and i use this website primarily & i chose this oneonce i have my ts file, I watch the entire thing to get my timestamps,

and then i drag it into vaporscript/synth (idk lmao) mac & windows download thoand you should get smth like

once you get that press enterand this should pop up

everything in that box in the corner is what you’ll put in the vaporscript thing whatever its calledit looks like:
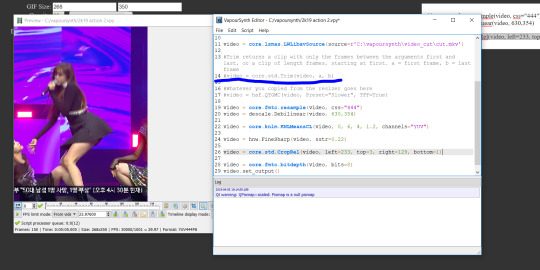
what’s underlined in blue is the video trim, i normally keep the # in front of it until im about to render (same thing for line 17) once i trim it & am going to render:
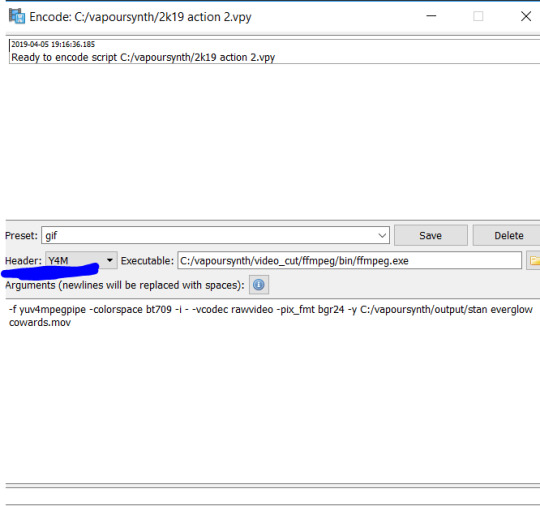
doNT FORGET TO SWITCH THE HEADER TO Y4M OH gOD i rly dont know why but i just know that all the times i done goofed and forgot it was bad LMAOnow we go into photoshop lolfile>import>video frames to layers, you should get this to pop up:
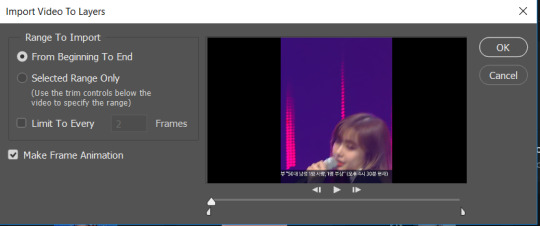
dont touch anything just press okay, here you just trim anything else, crop it and add a colouring
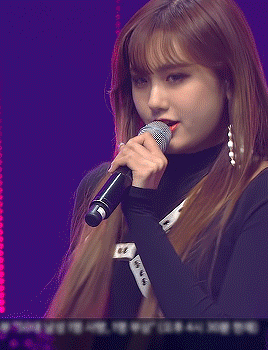
so far right now all i have is:

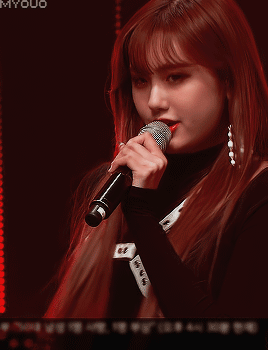
and while yes technically you can call it done here, i like to have a coloring & my watermark among other things, make sure your gif is under 3MB I also want to get rid of that little banner at the bottomI learned how to do this from @/nakamotens using thisso now we have:
time 2 add colorings and my watermark, i rly like the whole black and red colorings??? i dont know why, so thats what i normally try and do, i usually use brightness/contrast, vibrance, selective color & gradient map (if u want me to make u a coloring lmk lmao i wing it most of the time, but you can use some photoshop resources to find them) now we have
nd we’re done.sorry im so shit at explaining things HAHAAHHAHA if you need anymore help tell me aiefjhueafjioa ill redo this if i need too
3 notes
·
View notes
Text
Information:
First of all I just want to say that I am NOT a professional and have no clue what I am actually doing here. There might be ways to do this that are way easier and more efficient, but this is the only way I know based on my self taught experience.
• You need: Photoshop (I am using CS5.1)
My Photoshop is unfortunately not in English but I will try my best to find the accurate translations.
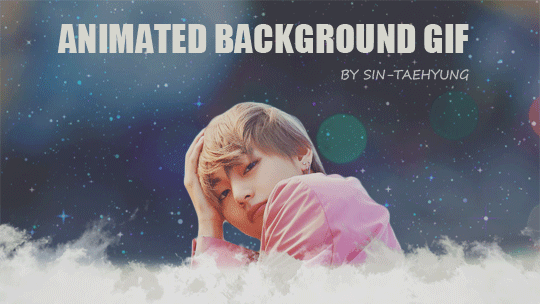
• This is about: Creating a picture/gif with an animated background (as a mobile theme header for example).
Under the cut you will find a very detailed tutorial on how to create the example on top so please like/reblog if you found this helpful and don’t claim as yours!
Before we start : The size of the mobile header is a 16:9 ratio (640 pixel width and 360 pixel height for example) and the upload limit is unfortunately only 2 megabytes for gifs (for a normal post it’s 3MB) - please keep that in mind.
1. Building a base
First we need a base aka a background to add the sparkle to (or whatever effect you would like). You can settle for a monochrome background, a colour gradient or a picture, just choose whatever you like, but keep in mind that the effect might look better on a darker background. In my example I am only using a part of the Dispatch Facebook Header with Taehyung on it.

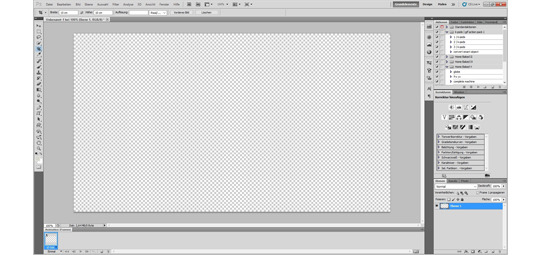
So I open a new document in Photoshop with a transparent background and a size within the 16:9 ratio. I personally like to start with a bigger base and then resize it in the end but of course you can start with 640x360 px as well. For the rest I use the default settings.
Now that you have your naked base you can build your background however you like it. In my case I just drag the photo from the folder directly onto my new Photoshop document and place it in a way I like it.
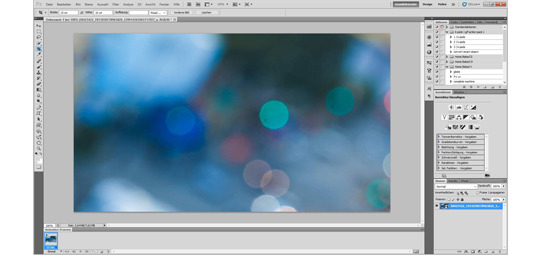
2. Adding the effect
Time to search for an effect you like. It has to be gif! On Tumblr you can find a ton of these searching the ‘texture gif’ or ‘sparkle/stars’ tag. If you find a transparent one then congrats - it would be ideal. I am quite picky and favour the endless loop ones, so that there is no harsh cut in the sprakle if you get what I’m trying to say here. I can highly recommend the ones from LEMAT WORKS, they have literally every kind of sparkle you can wish for.
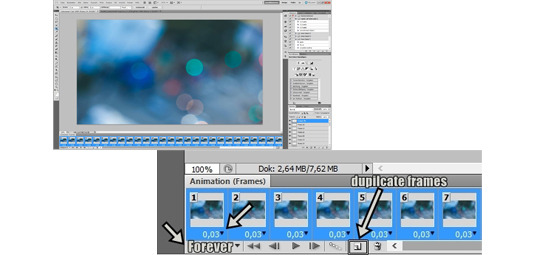
When you found the one you like best, open it in Photoshop and check how many frames it has and how much delay each and every frame has.

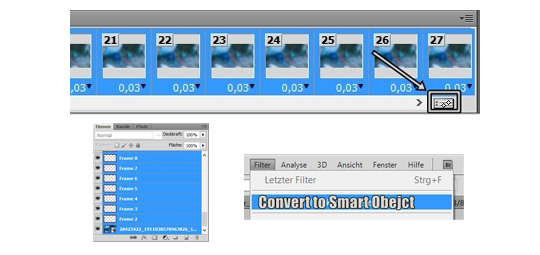
Then you go back to your first base and duplicate your frame until it has the same amout of frames as the sparkle gif. Then also change the delay to the same amount and don’t forget to change the loop from ‘Once’ to ‘Forever’.
When both are the exact same you have to change both of them individually into smart objects. For doing so you select all of your frames on the bottom row and click on the timeline button. Then also select all the layers on the right side and click on ‘Filter’ → ‘Convert to Smart Object’.
Now everything should be compressed into only one layer. To get your sparkling effect onto your base you just have to pick the first tool on the left side and simply take the whole sparkle gif and drag it onto the background document.

With pressing ‘CTRL’ + ‘T’ (for Apple users ‘CTRL’ → ‘ Command ⌘’) you can now resize the sparkle gif to your liking and change the opacity. Again, the darker the whole picture, the better the effect. I changed the opacity to 40% in my case. Now is also a moment to add any kind of other filters if you want to change the colour, put on a gradient or add something to the background, you do you.

Then you just have to save it as a gif. So keep in mind that you can’t just save it normally like a picture, you have to save it under ‘Save for web and devices’. Also check again that your Looping Options are on ‘Forever’ Photoshop likes to change this when you work with a smartobject.

3. Adding the main part
Since the base is done we can open the saved gif and change it into a smart object again to be able to work with it further. Now we have to think about what we want to put on top of it. Keeping in mind that we don’t want to cover up our wonderful background we need a png, or cut it out ourself. In my case I just crappily cut out Tae from the original picture and then drag and dropped it onto our background (just like we did with the texture gif earlier).
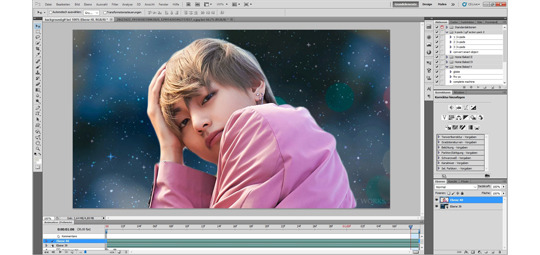
Now you can resize and place your png to your liking again with ‘CTRL’ + ‘T’. Of course you can place as much different things as you like, just take care that the layers on the right side don’t get mixed up and something ends up under your background. Again you can add any kind of filters here, don’t hold back, but don’t forget that the filter is going to change the background now too. So if you want to add any kind of filters only to the things on top you have to do that beforehand seperately.
At this point you can go crazy with your creativity and do whatever you want and save when you feel like it’s done. Remember to save as a gif and that your limit is 2 megabytes for Tumblr to accept it as a header!
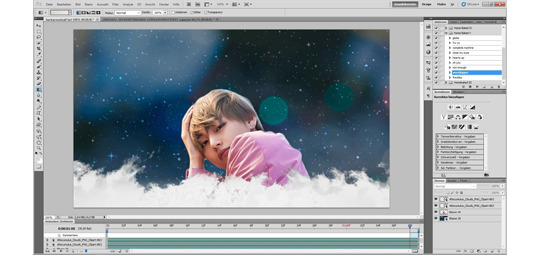
4. (Optional) Creating a transition
Personally I like it when my header has a nice transition to the mobile theme main colour, so I take it a step further. There are many different ways to get a transition and you can just search on google for a ‘border png’ and slap it on your gif or create your own. I just personally like clouds and think they fit well to this dreamy vibe, so i just drag and drop a cloud png onto what I have done so far. Again resizing and placing it to my liking. I ended up using the same cloud twice, layering it for a better opacity.
To get a smoother colour in the clouds I use the ‘Gradient Tool’ (I sadly don’t know if this the right name) on the left toolbar. You can change the settings of this tool to your liking as always but the default settings work just fine. You can choose the colour in the upper right and double click on the left square to get the exact colour you want in the pop up.

Now you have to move the cursor from the bottom of your picture upwards to the top of your clouds to get a smoother colour gradient. You can repeat this as often as you want and play with the opacity of the clouds to get a little more dimension until you are happy with it.
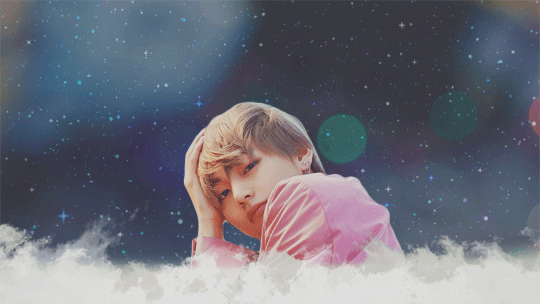
To wrap it all up I put a soft colour filter over everything (except for one cloud) and saved it.
And that’s it, we’re done!
If there are still questions that Google can’t answer I will try my best to help you out, I am only self taught as well after all.
I hope that this can help someone and you can go further from here and make even better things! Feel free to tag me or send a message, I would love to see what amazing things you create!
151 notes
·
View notes
Photo

(unofficially titled: how to change the grey wall)
As a thank you for reaching 2.5k followers, I thought it was about time to stop being lazy and do a gif tutorial as it has been frequently requested. Hopefully, this will help anyone who wants to start making gifs as well as anyone who wants to understand how to create colourings!
What You Will Need:
- Photoshop (I use CC)
- A source video
What Will Be Covered:
- How to get the video
- Timing, Resizing & Cropping
- Sharpening
- Colouring (and how to achieve extra af colours)
- Subtitles
- Saving your gif
This is going to be very thorough and informative (to the best of my ability) so all the information on how to make gifs is below the cut! As a disclaimer, you can use any version of photoshop for this.
1. Getting the Video.
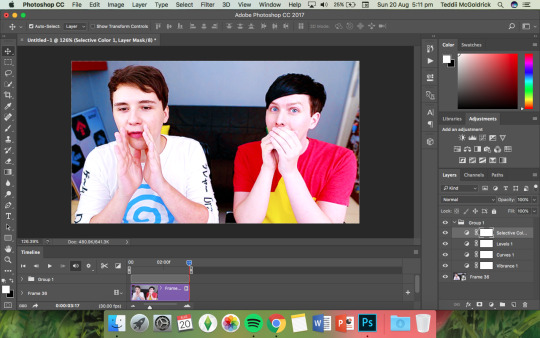
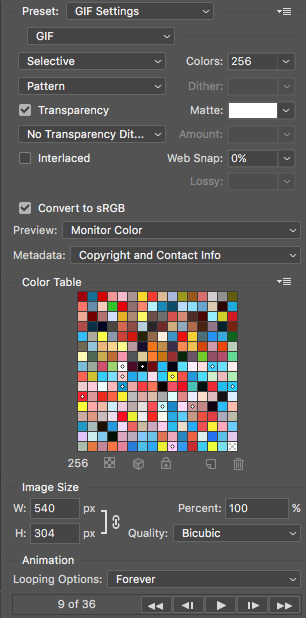
For this tutorial, I’ll be using a random clip from Dan & Phil’s crash bandicoot video. There are a lot of different methods to download a youtube video but I prefer using clipconverter. When downloading a video, you want to get the highest quality available (always try to get at least 720p). I used the download settings shown below:
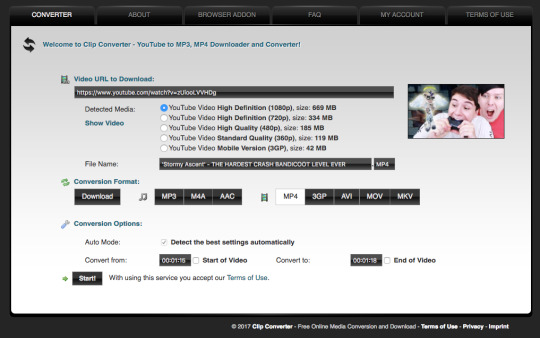
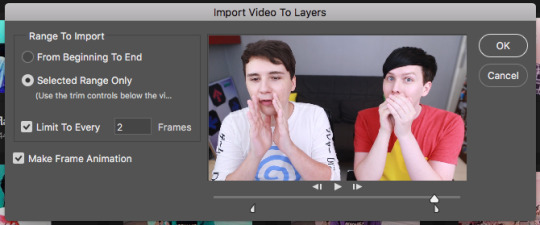
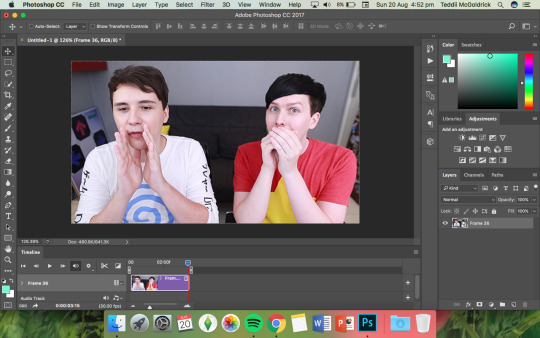
Once it’s downloaded, open up photoshop and import the video. To do this, go to File > Import > Video frames to layers. I use the settings shown below. (I had to trim the video slightly to only include the part I wanted)
Now that your video is imported, make sure your workspace looks similar to mine (the timeline section is the most important thing for gif making. you can add it from the window menu).

2. Timing, Resizing & Cropping.
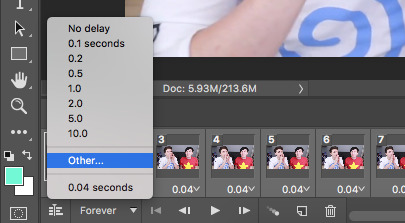
Timing is super important in making sure your gifs aren’t too fast or too slow. To alter the frame rate, select all your frames (shown at the bottom of your workspace) and then click on where it says 0.04 change the speed to 0.09.
After that, we have to change the image size since it’s currently way too big for tumblr. To do this, go to Image > Image size and change it to the settings shown below. 540px is the current optimised sizing for tumblr although 268px is used when making gifs that will be displayed in two columns like this.

Cropping is an optional step that I sometimes do as a way to make the file size smaller/for the aesthetic. Youtube videos have a default ratio of 16:9 and to alter the ratio you just use the crop tool and change it to what you desire. side note: I often use the cinematic ratio of 2.35:1 (i used it in this tutorial’s header).
3. Sharpening.
Sharpening your gifs is essential to making them look clean and crisp. Below is the difference between what our current gif looks like with and without it:
Without:
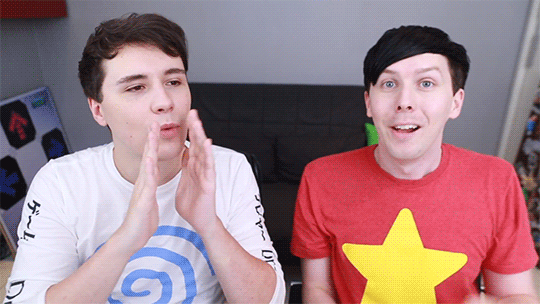
With:

As you can see, the second gif is way more crisp and defined. I use this action to sharpen my gifs (Full details on how to use it can be found in the link.) Once the action is finished, I then convert the frames into a video timeline by pressing the button in the bottom left:
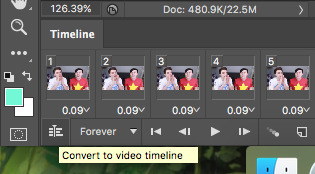
I then select all the layers, right click, and convert to smart object. Now your workspace should look like this:
4. Colouring.
Colouring is by far my favourite part about gifmaking and the reason why I made this tute (questions about colour have always filled up my inbox so I hope this answers some of them). I’m going to show you how to make the same bright blue colouring that I used for the header!
I’d like to start by saying that I never took art or design classes so my knowledge on why adjustment layers do what they do is very minimal. I pretty much learnt how to colour by playing around in Photoshop so this is just a disclaimer about how there is probably an easier/proper/more informative way to do this.
I didn’t particularly know how to explain half the settings so some will be accompanied by screenshots while others will just have descriptions (I really hope it makes sense because heck, my colouring method is chaotic).
Firstly, we want to make a new group to put the adjustments in so to do this you go to Layers > New Group... and make sure the mode is set to pass through.
To create colourings, I use the following adjustments:
- Vibrance
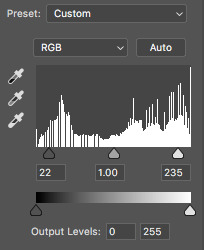
- Curve
- Levels
- Brightness/Contrast
- Selective Colour
- Hue/Saturation
- Colour Balance (occasionally)
Vibrance: I almost always make the vibrance +100 (I don’t alter saturation)
Curves: how you make a curve will differ with every video but for this gif I set my curves to this

Levels: it does a similar job to curves tbh
Brightness/Contrast: I chose not to alter it for this tute.
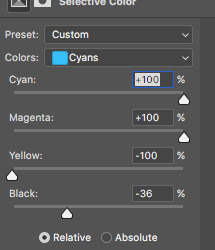
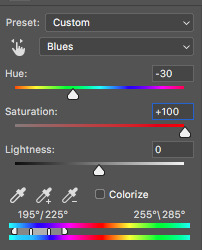
Selective Colour: now this is where A LOT of adjustment is going to happen. I found this section the hardest to explain so I apologise in advance. I tend to heavily alter cyan and blue.
Since we have the ability to alter red, yellow, green, cyan, blue, magenta, white, neutral, and black, I’ll write the specific adjustments I used instead of adding a lot of pictures to this already massive post. But this is what selective colour looks like:
Reds: Cyan -34, Magenta +5, Yellow +8, Black - 7
Yellows: Cyan - 37, Magenta -31, Yellow +35, Black +14
Cyans: Cyan +100, Magenta +100, Yellow -100, Black -36
Blues: Cyan +100, Magenta -65, Yellow -100, Black -26
Now this is what it should look like after adding all those adjustments:
Yes, it is slightly blue but not THAT blue. We then have to add a second selective colour layer with these settings:
Cyans: Cyan +100, Magenta +15, Yellow -100, Black - 8
Blues: Cyan +100, Magenta -21, Yellow -100, Black +15
Blacks: Cyan 0, Magenta 0, Yellow 0, Black +20
(more selective colours will be added later because I’m extra)
Hue/Saturation: This a neat adjustment where you can turn one colour into a completely different colour. For this gif, I chose only to adjust the colour blue with these settings:
Now you’re probably confused at why it looks so noisy but don’t worry! We’re going to fix that (this is where it gets kinda tedious. Feel free not to use the hue/sat adjustment if you want to make your gifs quickly. I wanted to make this tutorial super in depth hence why it’s about to get problematic)
Selective Colour (Again): You now have to create a 3rd selective colour layer and place it under the hue/sat layer before using these settings:
Magentas: Cyan +100, Magenta -100, Yellow +100, Black +79
Cyans: Cyan +100, Magenta +100, Yellow +5, Black 0
Blues: Cyan +100, Magenta -16, Yellow +100, Black -47
Your gif should now look like this:

Some noise will still remain and we’re going to fix that by erasing some of the adjustment layers! You may notice that the far right behind Phil looks messy so, with the erasure tool, erase that area on the hue/sat layer.
There is also some noise/unwanted colour on the lounge and Phil’s hair so I did the following:
I erased the area of the lounge on selective colour 1, 3 and hue/sat and I erased Phil’s hair on selective colour 1,2,3 and hue/saturation.
Now your layers should look something like this:

And that’s it for the colouring! Erasing the messy bits isn’t always necessary although in this particular case I had to. Protip: If you don’t want to make a colouring from scratch you could always use a pre-made psd!
5. Subtitles.
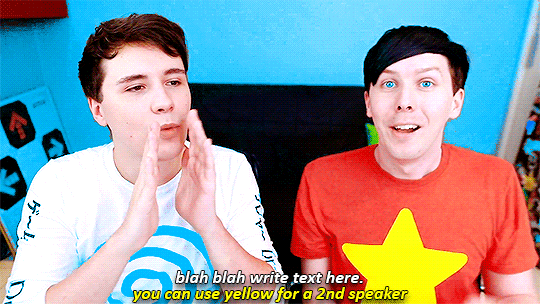
This gif doesn’t require subtitles but for the purpose of this tutorial, I’ll teach you how to do them since they’re an essential aspect of gifmaking! Every gifmaker has an individual preference on how to make their subtitles so this will be just an insight on how I do mine.
To make subs, select the text tool and create a textbox in the bottom part of the gif. I use the font Calibri (download it here if you’re a mac user) in bold italic size 18pt. If text takes up two lines use the settings shown below:
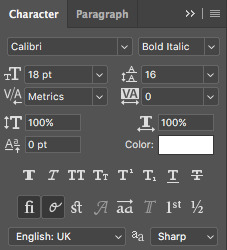
The main colour used for subtitles is pure white and the alternative/2nd speaker colour is yellow (I use the hex code #ffff00).
Now that we have the text you may notice how it doesn’t stand out. To fix this, right click on the text layer, select Blending options... and use these settings for stroke and drop shadow:


Now your gif should look like this:

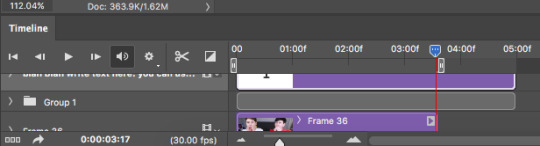
You may notice that your text layer lasts longer in the video timeline than the actual frames. To fix this, make sure you drag the text layer to the start of the timeline and adjust the grey things above the text layer (I’m stumped at the proper word for them) so that the video ends at the last frame (shown below):
6. Saving your Gif.
Now that we are done with making a gif, it’s time to save!
To do so I use the shortcut command + option + shift + s (for mac) or you can go File > Export > Save for Web (Legacy) (for CC) or File > Save for Web (other versions)
My #1 tip for saving a gif is to make sure it’s under 3mb! Tumblr only supports gifs under 3mb so as long as it’s 2.999mb or less you’re fine. Fortunately, our gif ends up at 2.721mb but if you ever do go over, I suggest deleting a few frames or cropping it to a smaller ratio.
Copy my settings when saving:
And we’re done! You should now have a gif that looks like this:
Final Notes:
I hope this tutorial has made some kind of sense and helped you understand the basics of gifmaking and colouring. If you did find this useful and made some hella bright dnp gifs, feel free to tag me in them. I track #scifiphan and will be delighted to reblog them! If you have any questions feel free to send me an ask or a private message (I’ll always respond).
Please like/reblog this tutorial if you found this helpful!
#i actually really like this colouring heck#i created it as i was making it and now i wanna make gifs using this psd#i hope this makes sense#i suck sm at explaining things#this is super long#and the colouring part probs confuses u all#but enjoy#teddii's discourse#gif tutorial#phandom#gifmaking#photoshop#photoshop tutorials#chaoticresources#itsphotoshop#this took me ages to write rip#idk what else to tag it as#validate me lmao
380 notes
·
View notes
Last Seen Blogs

amature06
Amature06
417chill
麻クラPOSSE
bellatorlunaefic
Bellator Lunae

harukaotani
Haruka Otani
harukaotani
Haruka Otani