#Canon EOS 6D MK II
Text
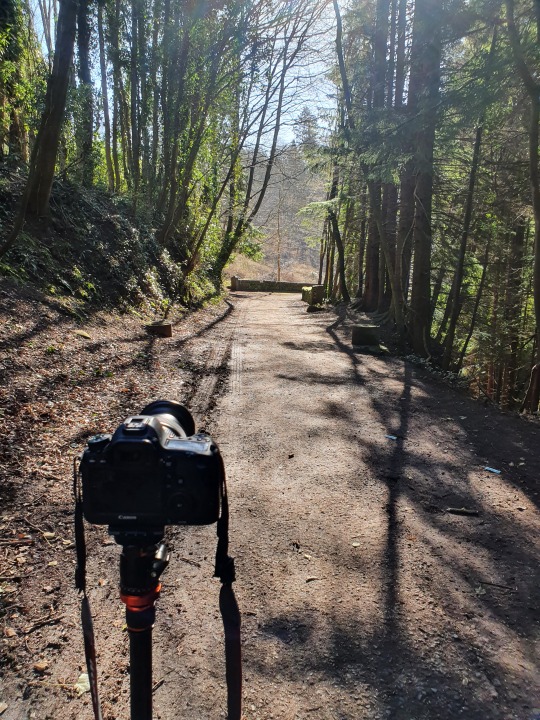
Block 3: Shoot 6 - Behind the Scenes
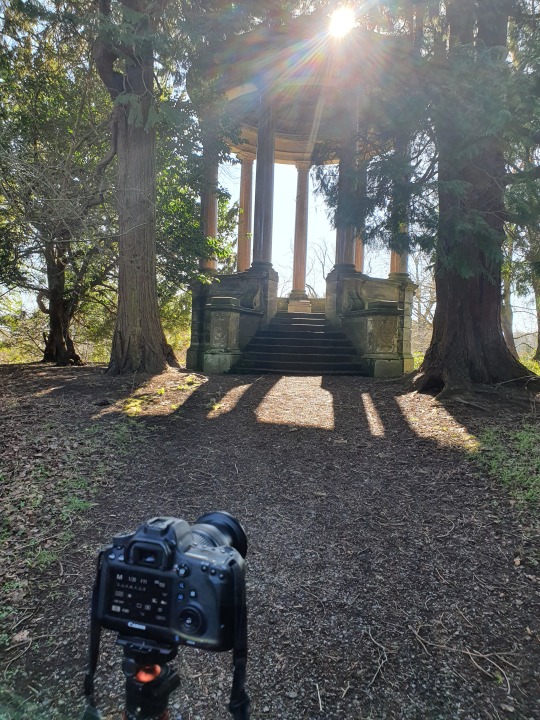

These photos show the camera settings and environment used in shoot 6 of the graded unit.
These images were shot in the same area as the previous two, Chatelherault Country Park, Hamilton.
This shoot was also conducted on the same day as the previous two meaning that they used similar equipment in; a canon eos 6d mk ii, canon lens 24-105mm, a basic tripod and the canon camera connect app. In order to flatten the perspective of the background i ended up using the lens at it's maximum focal length of 105mm.
In addition to this, in this setting i chose to use a shutter speed of 1/20 alongside an aperture of f11 and an ISO of 100 in order to create a correctly exposed image in the extremely harsh morning light. Although the shutter speed was set extremely low the use of a tripod and a remote trigger was able to create images that were in sharp focus.
Furthermore, an aperture of f11 was used in order to create an extended depth of field and capture the entire scene with an extended depth of field.
0 notes
Text

Birthday treats.
#my photography#photographers on tumblr#original photograph#colour photography#flash photography#Canon EOS 6D MK II#Canon 24-105mm 1:4 L IS USM f4 Lens with UV filter#Canon Flash#Cough Candy#birthday gift#for#our daughter#mrminty#08/03/2020
31 notes
·
View notes
Photo
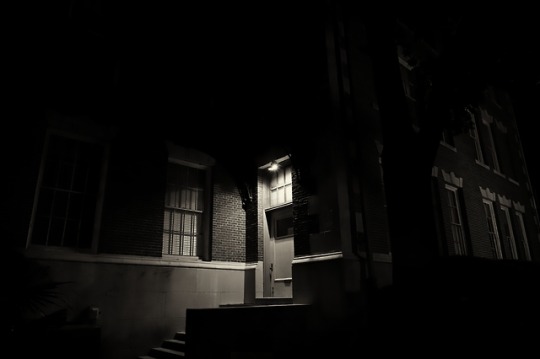
Spooky, on my explorations into the far night.
#night photography#southern gothic#Georgia#Canon EOS 6D mkii#Canon 6D mk ii#black and white photography
11 notes
·
View notes
Photo

Canon EOS 6D Mark II / MK 2 Digital SLR Camera (Body) Brand New https://t.co/uKnpIfsvXX http://twitter.com/AmazonBay4u/status/1181352265363279873 October 08, 2019 at 12:35AM
Canon EOS 6D Mark II / MK 2 Digital SLR Camera (Body) Brand New https://t.co/uKnpIfsvXX
— AmazonBay4u (@AmazonBay4u) October 7, 2019
#Canon EOS 6D Mark II / MK 2 Digital SLR Camera (Body) Brand New https://t.co/uKnpIfsvXX AmazonBay4u
0 notes
Photo
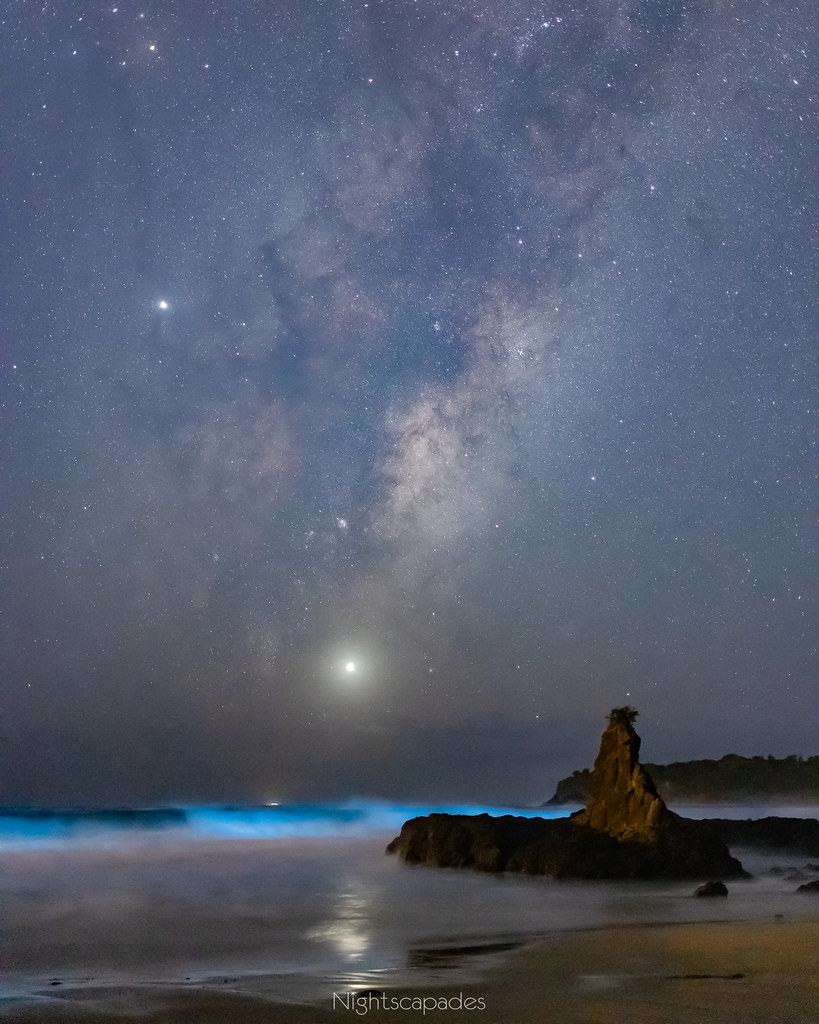
#Repost @nightscapades ・・・ 27 May 2019. Orion over the waves 🌫🌟 Although a thin layer of cloud covered the western half of the sky when I shot this photo, light from the stars of the constellation Orion still managed to make its way across space and onto my camera’s sensor. The Orion Nebula’s pinkish hue is prominent in the image just right of centre and about one quarter down from the top of the frame. The reflections of the stars in the shallow tidal pools are brighter than the actual stars themselves. Wave 🌊 The part of the sky that was cloud-free was showing lots of atmospheric airglow, which helped to light the foreground & make the shot viable. The white wave wending across the headland adds a lovely aquatic feature to the starry scene. 📷 This single-frame image was shot using my Canon EOS 6D Mk II camera, a Yongnuo 50mm f/1.4 lens @ f/1.8, using an exposure time of 6.0 seconds @ ISO 800. https://www.instagram.com/p/Bx_ZOK0BEI1/?igshid=relbv3j03j70
7 notes
·
View notes
Video
flickr
Not a bad start! by Doug Ingram
Via Flickr:
I’m happy to be off and shooting for the 2019 Milky Way core season. The Milky Way is visible all year round, of course, but right now is the time of year when the dense central hub of our galaxy, the “core”, reappears in the early morning skies. Late last night (Sat 9th Feb) I drove south for about 100 km to a spot that I’ve heard so much about but never visited, Cathedral Rocks, near the coastal town of Kiama, Australia. It’s a gross understatement to say that I struck gold by choosing this location. Not only did I have the famous rock formations to feature in my foreground, with the majesty of the galactic core rising in the southeast to dominate the frame, but I was treated to the presence of the planets Jupiter and Venus as they rose over the Tasman Sea. The intensity of Venus’ light is unmissable in the photo, shining both low in the sky and reflected off the waves breaking on the beach. The unexpected bonus for the night was the light from bioluminescent organisms in the water turning the waves a glowing blue colour. I’m ridiculously tired from staying out late and only getting a few hours of sleep, but it was so worth it! I shot this single-frame photograph with a Canon EOS 6D Mk II camera, a Canon 40mm f/2.8 STM lens @ f/2.8, using a 10-second exposure @ ISO 6400.
#Astronomy#Astrophotography#Bioluminescence#Cathedral Rocks#Galactic Core#Jupiter#Kiama#Milky Way#Night#Nightscapes#Planets#Sky#Stars#Venus#New South Wales#Australia#AU
21 notes
·
View notes
Photo

A moody long exposure shot during the rain with some cheap square nd filters from china. It hazes the image but i hope i fixed it well. Swipe to see the shot before editing. . Canon EOS 6D mk ii Sigma 24-105 f/4 DG OS HSM Art iso 50 30 seconds f/11 . Follow @andriantam for more ☺️ . . . . . #canonmalaysia #canon #canonphotography #canon6dmarkii #canon_official #imaginatones #fatalframes #earthscope #passionpassport #ig_alls #moodyvisuals #instamood #agameoftones #earth_shotz #inspirationcultmag #vibesofvisuals #exploretocreate #artofvisuals #shotzdelight #gramslayers #visualambassadors #weekly_feature #sigma24105art #longexposure #rocks #landscape #landscape_hunter (at Tip of Borneo) https://www.instagram.com/p/BtAMmLxHwp3/?utm_source=ig_tumblr_share&igshid=iv79d7vmmq14
#canonmalaysia#canon#canonphotography#canon6dmarkii#canon_official#imaginatones#fatalframes#earthscope#passionpassport#ig_alls#moodyvisuals#instamood#agameoftones#earth_shotz#inspirationcultmag#vibesofvisuals#exploretocreate#artofvisuals#shotzdelight#gramslayers#visualambassadors#weekly_feature#sigma24105art#longexposure#rocks#landscape#landscape_hunter
1 note
·
View note
Text
Canon EOS 6D MK II - Cámara digital réflex de 26.2 MP (pantalla táctil de 3.0'', Wifi, Bluetooth, Dual Pixel CMOS AF, vídeos time-lapse en 4K) negro - kit cuerpo con objetivo EF 24-105 IS STM
Canon EOS 6D MK II – Cámara digital réflex de 26.2 MP (pantalla táctil de 3.0”, Wifi, Bluetooth, Dual Pixel CMOS AF, vídeos time-lapse en 4K) negro – kit cuerpo con objetivo EF 24-105 IS STM
Price: (as of – Details)
El sensor de fotograma completo de 26.2 megapíxeles ofrece un excelente nivel de detalle, con alta latitud de exposición y bajo nivel de ruido. Dual Pixel CMOS AF enfoca con tanta seguridad como cuando se utiliza el modo Visión en Directo “Live View”. 45 puntos AF tipo cruz, que permiten enfocar con precisión milimétrica: capta momentos fugaces a 6.5 fps. Conexión Wi-Fi…

View On WordPress
0 notes
Text
Block 3: Shoot 5 - Behind the Scenes

These photos show the behind the scenes of photoshoot 5 in the graded unit.
Due to how the previous images turned out i chose to use the same equipment as before; canon eos 6d mk ii, canon lens 24-105mm, a basic tripod and the canon camera connect app. In order to flatten the perspective of the background as much as possible the lens was used at it's maximum focal length, 105mm.
The camera settings were relatively similar to the previous shoot in chatelherault although the Shutter Speed went up slightly to 1/20, and the Aperture lowered slightly to f14. Due to the tripod used, the low shutter speed did not affect sharpness in the final images, instead it allowed for me to shoot with a larger f-stop and a low ISO in order to create correctly exposed images of the highest quality possible.
This photoshoot was conducted around 7:30AM in one of the forest paths of Chatelherault Country Park, Hamilton to capture the morning light coming through the trees and onto the path. This also served to create interesting shadows on the path for added detail and visual appeal in the final images.
1 note
·
View note
Text

#my photography#photographers on tumblr#original photograph#colour photography#Canon EOS 6D MK II#Canon 24-105mm 1:4 L IS USM f4 Lens#music#Fender Blues Junior Amp#things are hotting up behind bars !#mrminty#26/01/2020
17 notes
·
View notes
Text
Stop Motion Technical?
23rd March 2021
https://spark.adobe.com/page/RoxjX7LHZExTE/
What are the four most important rules for creating stop motions?

Dont shake your camera
Dont alter your lighting
Shoot some test frames
Shoot more than you think you’ll need
https://www.likeable.com/blog/2014/stop-motion-animation-tips/
What equipment will you need?

DSLR Camera
Tripod
SD Card
Editing Software
Laptop/PC
Objects/Materials
Set build
Light sources
https://www.masterclass.com/articles/how-to-make-your-own-stop-motion-animation#what-tools-do-you-need-to-make-stop-motion-animation
What are the standard resolutions for (resolution Width x Height e.g. 6000 x 4000):

• a TV at home
Toshiba LCD 24inch (1366 x 768)
https://gadgets.ndtv.com/toshiba-24-inch-lcd-hd-ready-tv-24pb1-9067
• HD (high Definition TV)
1920 x 1080 (1080p)
https://en.wikipedia.org/wiki/High-definition_television
• UHD (Ultra High Definition TV)
(3840 x 2160)
https://en.wikipedia.org/wiki/Ultra-high-definition_television#:~:text=and%20DisplayPort%3A%20DisplayID-,Resolution,as%202160p%2C%20and%204K%20UHD.
• a Laptop you use
HP EliteBook (3840 x 2160)
https://www.notebookcheck.net/HP-EliteBook-840-G4-What-is-the-best-display-option.223934.0.html
• a Desktop PC you use
Windows 10 (1920 x 1080)
https://support.microsoft.com/en-us/windows/change-desktop-icon-size-or-screen-resolution-c6626736-5bb0-e094-7f03-49c828ff5da3
• a top spec iMac
(2560 x 1600)
https://everymac.com/systems/apple/imac/imac-aluminum-tapered-edge-faq/how-to-run-imac-retina-5k-at-full-resolution.html#:~:text=The%20Retina%205K%20iMac%20models,of%20a%20%22traditional%22%20display.
• a smart Phone you use?
Samsung Galaxy A3 (540 x 960)
https://gadgets.ndtv.com/samsung-galaxy-a3-2108#:~:text=Samsung%20Galaxy%20A3%20Summary,1.2GHz%20quad%2Dcore%20processor.
What does the term Aspect Ratio mean?
The term Aspect Ratio refers to the ratio of a photograph’s width to its height, it is usually expressed as two numbers seperated by a colon eg 16:9.
https://en.wikipedia.org/wiki/Aspect_ratio_(image)

For the below screens, what are the different aspect ratio’s?
• a TV at home
Toshiba 24 Inch - (16:9)
https://gadgets.ndtv.com/toshiba-24-inch-lcd-hd-ready-tv-24pb1-9067
• HD (high Definition TV)
(16:9)
https://en.wikipedia.org/wiki/16:9_aspect_ratio#:~:text=16%3A9%20(1.77%3A,Full%20HD%20and%20SD%20TV.
• UHD (Ultra High Definition TV)
(1.78:1)
https://www.planar.com/blog/2015/9/9/what-s-the-difference-between-4k-and-uhd/#:~:text=On%20the%20television%20side%2C%20Ultra,pixels%20narrower%20than%20Cinema%204K).
• a Laptop you use
HP EliteBook - (16:9)
http://www.hp.com/sbso/square-vs-widescreen.pdf
• a Desktop PC you use
Windows 10 - (16:9)
https://answers.microsoft.com/en-us/windows/forum/windows_10-other_settings-winpc/how-do-i-change-aspect-ratio-windows-10/2b61c273-c0d0-461c-ad6c-1be9edaaafec
• a top spec iMac
iMac - (16:9)
https://www.bhphotovideo.com/c/product/1380963-REG/apple_z_18c_4_bh_27_imac_pro_with.html#:~:text=The%20iMac%20Pro%20features%20a%2027%22%20Retina%205K%20Display%20that,a%2016%3A9%20aspect%20ratio.
• a smart Phone you use?
Samsung Galaxy A3 - (16.9)
https://www.devicespecifications.com/en/model/054b387c
What is the PPI for the below devices?
• a TV at home
Toshiba 24 inch - (1366 x 768)
https://www.displayspecifications.com/en/model/bf49daa
• HD (high Definition TV)
(1920 x 1080)
https://www.saji8k.com/displays/pixel-density/
• UHD (Ultra High Definition TV)
(3840 x 2160)
https://pcmonitors.info/articles/the-4k-uhd-3840-x-2160-experience/#:~:text=For%20reference%2C%20the%20pixel%20density,27%E2%80%9D%201920%20x%201080%20monitor.
• a Laptop you use
Windows 10 - (120 x 114)
https://www.digitaltrends.com/computing/how-to-adjust-high-dpi-scaling-in-windows-10/
• a Desktop PC you use
(267)
• a top spec iMac
iMac - (5120 × 2880)
https://en.wikipedia.org/wiki/Retina_display
• a smart Phone you use?
Samsung Galaxy A3 - (720 x 1280)
https://www.phonearena.com/phones/Samsung-Galaxy-A3-2017_id10330
The number of Frames Per Second (FPS) can vary, research commonly used FPS for Stop Motion / Animation / Video and consider the effect this has visually?
https://www.youtube.com/watch?v=heRuLp7CyTM
The most common use of Stop Motion is probably in Social Media, what are the recommended aspect ratios & Resolutions & FPS for the below:
• Instagram
Aspect Ratio - (1.91:1) (4:5)
Resolution - (1080 x 608) (1080 x 1350)
FPS - 30
https://www.oberlo.co.uk/blog/best-instagram-video-format#:~:text=Instagram%20supports%20a%20range%20of,and%201080%20by%201350%20pixels.
https://tribe.digital/resources/igtv-the-ultimate-guide-to-instagrams-video-platform/#:~:text=Videos%20should%20have%20a%20minimum,60%20minutes%20is%203.6GB.
• Facebook
Aspect Ratio - (1.1) (4:5, 2:3, 9:16)
Resolution - (1280 x 720)
FPS - 30
https://blog.hootsuite.com/facebook-ad-sizes/#:~:text=Facebook%20recommends%20uploading%20video%20with,sound%20(by%20enabling%20captions).
https://www.izzyvideo.com/facebook-video/#:~:text=The%20ideal%20Facebook%20video%20dimension,some%20quality%20in%20the%20process.
https://www.izzyvideo.com/facebook-video/
• YouTube
Aspect Ratio - (16.9)
Resolution - (2560 x 1440) (1440p)
FPS - 24 - 60
https://support.google.com/youtube/answer/6375112?co=GENIE.Platform%3DDesktop&hl=en#:~:text=The%20standard%20aspect%20ratio%20for,video%20and%20the%20viewer's%20device.
https://consent.yahoo.com/v2/collectConsent?sessionId=3_cc-session_8b17c218-b2fd-4d5c-91a9-9d23eca0690a
• Vimeo
Aspect Ratio - (16.9)
Resolution - (2560 x 1440) (1440p)
FPS - 60
https://vimeo.zendesk.com/hc/en-us/articles/360056550451-Video-and-audio-compression-guidelines
What would happen if you had too many pixels (resolution & PPI) when playing your Stop Motion on the above devices?
If the resolution is too large then the video would lose its quality. The video would then need to be reduced to a lower quality such as 720p before uploading it.
https://help.salesforce.com/articleView?id=000320305&language=en_US&mode=1&type=1
What does a TV do if it doesn’t have enough pixels & what is Photoshops equivalent?
The image on the TV would be stretched resulting in a distorted image. The image would become smaller in Photoshop
How many pixels (resolution WxH e.g. 6000 x 4000) does your camera have?
Canon EOS 6D Mk II - (35.9 x 24.0)
Canon EOS 30D - (3504 x 2336)
https://www.itsjustlight.com/photography-course/image-resolution/#:~:text=For%20example%2C%20this%20camera%20%E2%80%94%20the,inch%20images%20at%20180%20PPI.
https://www.digicamdb.com/specs/canon_eos-30d/
What is the resolution (WxH) of the recommended Stop Motion Brief?
The recommended resolution for the Stop Motion Brief is 1920 x 1080 (1080p)
What is the aspect ratio of the Brief submission?
The aspect ratio for the submission is 16.9
Draw a proportional sketch (or print from PhotoShop) of the difference between your camera aspect ratio and the brief submission.
How much of the image area do you need to crop out from your camera image
I have cropped out one of my location images in order to suit the size of the 16.9 aspect ratio which crops out roughly 1/3 of the image.
Does your camera allow you to change the aspect ratio so you can see the crop in camera when shooting?
The aspect ratio for the Canon EOS 6D mk II can be changed to 16.9 in its settings.
https://www.photoreview.com.au/reviews/dslr-cameras/advanced/canon-eos-6d-mark-ii/
0 notes
Photo

#Repost @nightscapades ・・・ 26 Nov 2018. The heavens at halfway 📆 Not quite halfway, but it was only a week after the midpoint of 2018 when I was out in the cold of an Aussie winter night, capturing the photos that I used to create this vertical panoramic image. Located near the rural city of Lismore in New South Wales, Australia, this old and former church building is blessed with dark skies on a moonless night. The lack of light pollution, as well as the dry and clear air on that evening, provided excellent conditions for revealing the wispy dust lanes and dark nebulae that characterise the core region of our Milky Way galaxy. 🌌🌟💫 As with so many of my photos from this year, Mars is a dominant player in the scene, looking big, bright and orange over at the top-left of the frame. The Large Magellanic Cloud is peeking out from the bottom edge of the church’s roof on the left, with its sibling the Small Magellanic Cloud making a more conspicuous appearance over the tree near the lower corner of the frame. The short tail of a meteor forms a triangle with Mars and the Small Cloud. For all of the interest that these celestial objects give to the scene, it’s our majestic, magic and magnificent Milky Way that my eyes go straight to, every time I look at this photo. 📷 As I mentioned above, this is a vertical panorama which I composited from ten single, overlapping images. For each of those individual frames I used a Canon EOS 6D Mk II camera, a Rokinon 24mm lens @ f/2.4, and a 15-second exposure @ ISO 6400. I had the camera mounted on a Nodal Ninja III panoramic head, tipped at 90 degrees to allow for the vertical orientation. • • • • • @astro_photography_ @space @universe247 @photographerfocus #astro_photography_ #astronomy #astrophotography #canon #darkskyshots #earth_tag #ig_astrophotography #nightimages #nightphotography #nightscape #nightscapeoz #nightscaper #nightshooters #space #stargazing #startalkradio #timelessuniverse #universe #universetoday #WeOwnTheNight_IG #milkyway #galaxy #WOTN_MilkyWay #MilkyWayChasers #MilkyWayGrams #lismore #church https://www.instagram.com/p/BqynLIEB7gc/?utm_source=ig_tumblr_share&igshid=7sc4wcpcqhen
#repost#astro_photography_#astronomy#astrophotography#canon#darkskyshots#earth_tag#ig_astrophotography#nightimages#nightphotography#nightscape#nightscapeoz#nightscaper#nightshooters#space#stargazing#startalkradio#timelessuniverse#universe#universetoday#weownthenight_ig#milkyway#galaxy#wotn_milkyway#milkywaychasers#milkywaygrams#lismore#church
15 notes
·
View notes
Photo

Gestern Abend habe ich ihn zum ersten Mal mit eigenen Augen gesehen: C/2020 F3 alias Neowise. Der Komet war etwas östlich unterhalb des Sternbilds Luchs sichtbar - leider mit ein paar Wolken und dem Restlicht der untergegangenen Sonne. Dennoch war es ein toller Anblick. •••••••••• 📸: Canon EOS 6D Mk II, EF 70-200mm f/2.8L IS II USM; 200mm, f/4.5, ISO1600, 2.5s (at Freising, Germany) https://www.instagram.com/p/CCnGGRjnCVd/?igshid=1wvel4y10kz8g
0 notes
Photo

26 Feb, 2018. Shhh! The antennas are sleeping 🤷🏼♂️ Yep, I’m stuck for something to post, once again. Too much cloud and too much moon means my diminishing archive of not-previously-posted photos are going to suffer some searching and scouring over the next couple of weeks. 🛰 🚀 Tonight’s image is from my visit to NASA’s Canberra Deep Space Communications Complex at Tidbinbilla, in the Australian Capital Territory. I was located about 3km (1.9mi) from the two antennas that I captured in the shot, using my 50-500mm zoom lens. The two dishes (DSS-45 & 35, I think) were in the “stowed” position for this photo. I guess even deep-space antennas need their beauty sleep! 📷 This photo was shot with a Canon EOS 6D Mk II camera, a Sigma 50-500mm lens @ 313mm focal length @ f/6.3, 10 sec @ ISO 400. @astro_photography_ @space @universe247 #astro_photography_ #astronomy #astrophotography #darkskyshots #elitelongexposures #fantastic_universe #globalpixels #ig_astrophotography #ig_shutterworld #night_shooterz #nightimages #nightphotography #nightscape #nightscapeoz #nightscaper #nightshooters #stargazing #startalkradio #timelessuniverse #universe #universetoday #WeOwnTheNight_IG #night_excl #StargazingABC #super_longexpo #nasa #canberra #tidbinbilla #satellite (at Canberra Deep Space Communication Complex)
#stargazing#timelessuniverse#ig_shutterworld#nightscape#universetoday#night_shooterz#globalpixels#startalkradio#super_longexpo#nightphotography#nightscaper#universe#weownthenight_ig#stargazingabc#ig_astrophotography#satellite#nightshooters#elitelongexposures#fantastic_universe#astronomy#nasa#tidbinbilla#astrophotography#astro_photography_#nightscapeoz#nightimages#canberra#darkskyshots#night_excl
1 note
·
View note
Text
How to get your nice camera set up as a high-quality webcam
Everyone needs a webcam these days, whether for business meetings or the distant socializing accomplished via video calling — but if you’re like most, you’re using the built-in camera on your laptop or some piece of junk from years ago. But if you happen to have a nice big-brand camera, it’s easy to set it up as a standalone webcam and produce imagery that will be the envy your friends and colleagues.
Our guide to setting up a professional-looking home webcam solution with lighting, audio, and all the other fixins is here, but unless you’re using a capture card (that’s a whole other how-to) getting your DSLR or mirrorless camera hooked up to your computer isn’t as simple as it ought to be.
How to create the best at-home videoconferencing setup, for every budget
Surprisingly, you can’t just take a camera released in the last couple years and plug it into your computer and expect it to work. So far only Canon, Fujifilm, and Panasonic provide free webcam functionality to at least one desktop OS. For Nikon, Sony and Olympus, you may have to pay or put up with a watermark.
Here are the easiest ways to put each brand of camera to work. (Spoiler warning: For Macs, it’s mostly Cascable. I’ll mention that a few more times because people are probably just scrolling past this to their brand.)
Canon: EOS Webcam Utility
Canon released this software just a couple weeks ago and it’s still in beta, so there may be a few hiccups — but it supports both Windows and Apple machines and a good variety of camera bodies. There’s even some extra documentation and tutorials for the app at its microsite.
Compatibility is pretty good, working with any of their camera bodies from the last 3-4 years: the Rebel T6-T7i, T100, SL2, SL3, 5D Mk IV, 5DS, 5DS R, 6D Mk II, 7D Mk II, 77D, 80D, 90D, 1D X Mark II and Mark III, M6 Mk II, M50, M200, R, RP, PowerShot G5X Mk II, G7X Mk III, and SX70 HS. Download the software here.
If you’re having trouble, check out the third party apps listed for other brands below and see if you have more luck.
Fujifilm: X Webcam
Fujifilm’s solution is easy, but a bit limited. The popular X100 series is not supported, and Macs are left out in the cold as well. But if you have one of the company’s more recent interchangeable-lens bodies and a Windows 10 machine, you’re golden. Just install and plug in your camera with a normal USB cable.
Compatibility includes the X-T2, X-T3, X-T4, X-Pro2, X-Pro3, X-H1, GFX100, GFX 50R, and GFX 50S. Get that medium format setup going right and your eyes will be in focus but not your ears. Download the software here.
This guy really did Mac users a favor.
For Macs, Cascable is a useful bit of Mac software that acts as a bridge to your camera for a variety of purposes, and the author just added webcam capability. It has wide compatibility for both wired and wireless connections, and provides broader functionality than Fuji’s own software, but it isn’t free. But the current $30 price is probably less than you’d pay if you opted for a nice webcam instead.
If you’re confident fiddling around in command lines, this tutorial tells you how to get a Fuji camera working on Macs with a bit of fiddling around and some other third party software.
Panasonic: Lumix Tether
That’s it. That’s the image they provided.
Panasonic just made the webcam-capable version of their Lumix Tether Windows app available, and you can tell from the paucity of the documentation that it’s a pretty barebones solution. The price is right, though. It works with the GH5, G9, GH5S, S1, S1R, and S1H. The company also posted a helpful start-to-finish tutorial on how to get going with streaming software like OBS here:
youtube
Cascable works well with a variety of Panasonic cameras, far more than the official app, even some superzooms that could be really fun to play with in this context.
Sony
There’s no official software to turn your Sony cameras into webcams, so we have to jump straight into third party options. Unfortunately it appears that there is no software available for Windows that lets you use your Alpha as a webcam — you’ll need a capture card to do it.
Cascable on Mac is again your best bet there, with support reaching back several generations to cameras like the NEX series and RX100 III. Ecamm Live also has limited Sony compatibility, but only supports the latest bodies. It’s $12 per month, but there’s a free trial if you want to give it a go first.
Olympus
It’s the same story for Olympus on Windows. You’re out of luck for now without a capture card.
On Mac, Cascable has wired support for many more Oly bodies, including Stylus cameras and the retro-style PEN F, which will probably resent being used for such a modern purpose. Ecamm Live has compatibility with the latest bodies — the E-M1 II, III, and X, and the E-M5 original and Mk II. No go on the PEN series, unfortunately.
Nikon
Surprisingly, while Nikon recently put up a rather helpful page on streaming using its cameras, it doesn’t produce any of the software itself, referring the reader to a variety of third-party programs.
As before, Cascable seems like the easiest way to get your Nikon working with a Mac, and SparkoCam is a frequent recommendation for Windows.
Warnings to the webcam-curious
These methods may be easy, but they’re not completely without issues.
One potential problem is heat. These cameras were designed primarily for capturing stills and short video clips. Running full time for extended periods can result in the camera getting too hot to function and shutting down. A camera shouldn’t damage itself seriously, but it’s something to be aware of. The best way to avoid this is using a dummy battery with a power adapter — these are pretty easy to find, and will mitigate overheating.
Audio also may not be as nice as the image. For people doing serious video work, an external mic is almost always used, and there’s no reason you shouldn’t do the same. Considering a solid mic can be had for under $50 and should provide a substantial upgrade to your device’s built-in one, there’s no reason not to take the plunge.
You may also want to check a few forums for the best settings to use for the camera, from making sure it doesn’t turn off after a few minutes to exposure choices. For instance, since you’re not doing stills, you don’t need to worry about sharpness, so you can shoot wide open. But then you’ll need to make sure autofocus is working quickly and accurately, or you’ll end up lost in the bokeh. Check around, try a few different setups, and go with what works best in your situation.
And when you’re ready to take the next step, consult our more thorough guide to setting the scene.
from RSSMix.com Mix ID 8176395 https://techcrunch.com/2020/06/10/how-to-get-your-nice-camera-set-up-as-a-high-quality-webcam/ via http://www.kindlecompared.com/kindle-comparison/
0 notes
Text
How to get your nice camera set up as a high-quality webcam
Everyone needs a webcam these days, whether for business meetings or the distant socializing accomplished via video calling — but if you’re like most, you’re using the built-in camera on your laptop or some piece of junk from years ago. But if you happen to have a nice big-brand camera, it’s easy to set it up as a standalone webcam and produce imagery that will be the envy your friends and colleagues.
Our guide to setting up a professional-looking home webcam solution with lighting, audio, and all the other fixins is here, but unless you’re using a capture card (that’s a whole other how-to) getting your DSLR or mirrorless camera hooked up to your computer isn’t as simple as it ought to be.
How to create the best at-home videoconferencing setup, for every budget
Surprisingly, you can’t just take a camera released in the last couple years and plug it into your computer and expect it to work. So far only Canon, Fujifilm, and Panasonic provide free webcam functionality to at least one desktop OS. For Nikon, Sony and Olympus, you may have to pay or put up with a watermark.
Here are the easiest ways to put each brand of camera to work. (Spoiler warning: For Macs, it’s mostly Cascable. I’ll mention that a few more times because people are probably just scrolling past this to their brand.)
Canon: EOS Webcam Utility
Canon released this software just a couple weeks ago and it’s still in beta, so there may be a few hiccups — but it supports both Windows and Apple machines and a good variety of camera bodies. There’s even some extra documentation and tutorials for the app at its microsite.
Compatibility is pretty good, working with any of their camera bodies from the last 3-4 years: the Rebel T6-T7i, T100, SL2, SL3, 5D Mk IV, 5DS, 5DS R, 6D Mk II, 7D Mk II, 77D, 80D, 90D, 1D X Mark II and Mark III, M6 Mk II, M50, M200, R, RP, PowerShot G5X Mk II, G7X Mk III, and SX70 HS. Download the software here.
If you’re having trouble, check out the third party apps listed for other brands below and see if you have more luck.
Fujifilm: X Webcam
Fujifilm’s solution is easy, but a bit limited. The popular X100 series is not supported, and Macs are left out in the cold as well. But if you have one of the company’s more recent interchangeable-lens bodies and a Windows 10 machine, you’re golden. Just install and plug in your camera with a normal USB cable.
Compatibility includes the X-T2, X-T3, X-T4, X-Pro2, X-Pro3, X-H1, GFX100, GFX 50R, and GFX 50S. Get that medium format setup going right and your eyes will be in focus but not your ears. Download the software here.
This guy really did Mac users a favor.
For Macs, Cascable is a useful bit of Mac software that acts as a bridge to your camera for a variety of purposes, and the author just added webcam capability. It has wide compatibility for both wired and wireless connections, and provides broader functionality than Fuji’s own software, but it isn’t free. But the current $30 price is probably less than you’d pay if you opted for a nice webcam instead.
If you’re confident fiddling around in command lines, this tutorial tells you how to get a Fuji camera working on Macs with a bit of fiddling around and some other third party software.
Panasonic: Lumix Tether
That’s it. That’s the image they provided.
Panasonic just made the webcam-capable version of their Lumix Tether Windows app available, and you can tell from the paucity of the documentation that it’s a pretty barebones solution. The price is right, though. It works with the GH5, G9, GH5S, S1, S1R, and S1H. The company also posted a helpful start-to-finish tutorial on how to get going with streaming software like OBS here:
youtube
Cascable works well with a variety of Panasonic cameras, far more than the official app, even some superzooms that could be really fun to play with in this context.
Sony
There’s no official software to turn your Sony cameras into webcams, so we have to jump straight into third party options. For Windows users, Ecamm Live is probably your best bet, but it has limited Sony compatibility, only supporting the latest bodies. It’s $12 per month, but there’s a free trial if you want to give it a go first.
Cascable on Mac is again your best bet there, with support reaching back several generations to cameras like the NEX series and RX100 III.
Olympus
It’s the same story for Olympus. On Windows, Ecamm Live has compatibility with the latest bodies — the E-M1 II, III, and X, and the E-M5 original and Mk II. No go on the PEN series, unfortunately.
On Mac, Cascable has wired support for many more Oly bodies, including Stylus cameras and the retro-style PEN F, which will probably resent being used for such a modern purpose.
Nikon
Surprisingly, while Nikon recently put up a rather helpful page on streaming using its cameras, it doesn’t produce any of the software itself, referring the reader to a variety of third-party programs.
As before, Cascable seems like the easiest way to get your Nikon working with a Mac, and Ecamm Live for Windows — though for Nikons, SparkoCam is also a frequently recommendation.
Warnings to the webcam-curious
These methods may be easy, but they’re not completely without issues.
One potential problem is heat. These cameras were designed primarily for capturing stills and short video clips. Running full time for extended periods can result in the camera getting too hot to function and shutting down. A camera shouldn’t damage itself seriously, but it’s something to be aware of. The best way to avoid this is using a dummy battery with a power adapter — these are pretty easy to find, and will mitigate overheating.
Audio also may not be as nice as the image. For people doing serious video work, an external mic is almost always used, and there’s no reason you shouldn’t do the same. Considering a solid mic can be had for under $50 and should provide a substantial upgrade to your device’s built-in one, there’s no reason not to take the plunge.
You may also want to check a few forums for the best settings to use for the camera, from making sure it doesn’t turn off after a few minutes to exposure choices. For instance, since you’re not doing stills, you don’t need to worry about sharpness, so you can shoot wide open. But then you’ll need to make sure autofocus is working quickly and accurately, or you’ll end up lost in the bokeh. Check around, try a few different setups, and go with what works best in your situation.
And when you’re ready to take the next step, consult our more thorough guide to setting the scene.
0 notes
Last Seen Blogs

pajama-girl
most likely sleeping

makkalnewsmedia
Untitled

stockholmgf
trunk bunny

omgroleplay
OMGroleplay

sharemarketinsider
share Market Insider