#Config.txt
Text
SELECT A TEXT FILE
(1)🗒️README.TXT
(2)🗒️ERROR_LOG.TXT
(3)🗒️CONFIG.TXT
(4) EXIT
USERS/WHEEZE>▯_
9 notes
·
View notes
Text
【Raspberry Pi】シャットダウンボタンの実装する
Raspberry Pi はその手軽さで人気のあるコンピュータボードですが、電源ボタンが無く不意の電源断による SD カードの破損リスクがあります。特に、SSH などを使用してリモート操作している際、ネットワークの問題でシャットダウンができなくなることがあります。このような状況で強制的に電源を切ると、SD カードが破損し、ラズパイが起動しなくなるリスクが高まります。
シャットダウンボタンの実装
この問題を解決するために、物理的なシャットダウンボタンの実装をします。
手順は以下です。
外部シャットダウンの有効化
/boot/config.txt ファイルを vim や nano…

View On WordPress
0 notes
Text
Try and except blocks: group, as, .errno
When errors are of a similar nature and there's no need to handle them individually, you can group the exceptions together as one by using parentheses in the except line. For example, if the navigation system is under heavy loads and the file system becomes too busy, it makes sense to catch BlockingIOError and TimeOutError together:
def main():
· · · · try:
· · · · · · · · configuration = open('config.txt')
· · · · except FileNotFoundError:
· · · · · · · · print("Couldn't find the config.txt file!")
· · · · except IsADirectoryError:
· · · · · · · · print("Found config.txt but it is a directory, couldn't read it")
· · · · except (BlockingIOError, TimeoutError):
· · · · · · · · print("Filesystem under heavy load, can't complete reading configuration file")
If you need to access the error that’s associated with the exception, you must update the except line to include the as keyword. This technique is handy if an exception is too generic and the error message can be useful:
try:
· · · · open("mars.jpg")
except FileNotFoundError as err:
· · · · print("Got a problem trying to read the file:", err)
Got a problem trying to read the file: [Errno 2] No such file or directory: 'mars.jpg'
If you’re catching a more generic OSError exception, which is the parent exception of both FilenotFoundError and PermissionError, you can tell them apart by the .errno attribute:
try:
· · · · open("config.txt")
except OSError as err:
· · · · if err.errno == 2:
· · · · · · · · print("Couldn't find the config.txt file!")
· · · · elif err.errno == 13:
· · · · · · · · print("Found config.txt but couldn't read it")
0 notes
Text
Raspberry PI as KIOSK for HomeAssistant
Follow the Installation as per the above tutorial. Read the comment on rotating the screen. The following steps is to be done to rotate:
Edit config:
sudo vi /boot/config.txt
comment out “# dtoverlay=vc4-fkms-v3d”
Edit xorg file:
sudo vi /usr/share/X11/xorg.conf.d/40-libinput.conf
Find the InputClass section of touchscreen:
add “Option “TransformationMatrix” “0 1 0 -1 0 1 0 0 1″”
see:…

View On WordPress
0 notes
Text
ラズパイでパケットキャプチャ
概要
ESP32 の動作確認のためにパケットキャプチャできる環境をラズパイで構築したのでその覚書
目的
ESP32 が期待通りにパケットを出力しているか、および家電・スマホアプリの間でどのような通信が行われているのかの確認
方針
ルーターでパケットキャプチャできれば簡単なのですが、普通の家庭用ルーターにそんな機能は無いので、 代わりにラズパイをWifiブリッジとして動作させてパケットキャプチャすることにしました。 有線接続機器間のパケットキャプチャは必要ないので非対応です。(有線LANアダプタ使えばできますが)
やったこと
SSH/VNC 有効化
USB-Ethernet アダプタ接続 (リモート接続用)
Ethernet 2本ともルーターに接続
eth1 (USB-Ethernet) を固定IP化
wireshark をインストール
hostapd をインストール
公式ドキュメント Setting up a Bridged Wireless Access Point を参考にブリッジ設定
そのほか
固定IPにするには /etc/dhcpcd.conf を修正
/etc/network/interfaces を修正しろとかいう情報は古い
ディスプレイ無しで運用するなら /boot/config.txt にある #hdmi_force_hotplug=1 をコメントアウトしないとVNC接続できても画面が映らない
UltraVNC Viewer では認証不能で VNC 接続できなかった、RealVNC Viewer なら接続できた
hostapd をブリッジが準備できる前に実行すると失敗する
ブリッジを作るのに bridge-utils をインストールしろとかいう情報は古い
参考
Setting up a Bridged Wireless Access Point https://www.raspberrypi.com/documentation/computers/configuration.html#setting-up-a-bridged-wireless-access-point
0 notes
Text
Listening Sculptures
So far I have the LEDs now connected only to the raspberry pi, and the python speech to text sketch running at the same time! so pretty good:
raspberry pi:
theres another post on here that takes u through it, but update it first (https://phoenixnap.com/kb/update-raspberry-pi) and use vnc viewer with the pi on the same network as the laptop (i.e. ur phone network)
LEDs:
using that library and had to turn off the audio in the config (https://learn.adafruit.com/neopixels-on-raspberry-pi/python-usage) (Sound must be disabled to use GPIO18. This can be done in /boot/config.txt by changing "dtparam=audio=on" to "dtparam=audio=off" and rebooting.)
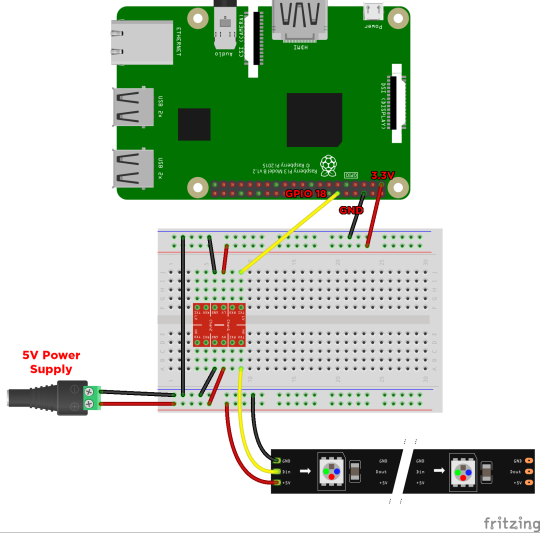
main thing really is that the logic converter is just upping all the levels as the LEDs need a higher voltage.
0 notes
Text
This guide has been written to help Linux and Cloud users to install and configure Proxmox VE 7 on Hetzner root server. Root server in Hetzner Cloud is a dedicated server which is completely isolated from one another to give you full access and control to configure the server anyway you want without affecting other users. Hetzner Online GmbH provides auctions for dedicated server hardware at a very competitive rates with a monthly payment model. Visit Hetzner Server auction page to bid on servers and save money.
Proxmox Virtual Environment (VE) is a very powerful and enterprise-grade server virtualization software using Debian Linux as its base with a modified Linux kernel. With Proxmox you can run both Virtual Machines and Containers powered by KVM and LXC technologies respectively. The Proxmox VE source code is free, released under the GNU Affero General Public License, v3 (GNU AGPL, v3).
This guide is intended for personal Labs only. We’ll do a single node installation of Proxmox VE Server on Debian 11 (Bullseye) operating system. It comes with an integrated graphical user interface (GUI) for management, there is no need to install a separate management tool. For a multi-node Proxmox VE Cluster setup, visit the official Proxmox VE High Availability to read more if interested with the solution.
In this article, we shall perform installation of Proxmox VE 7 on a Hetzner root server with the following hardware specifications.
CPU: Intel(R) Xeon(R) CPU E5-1650 v3 @ 3.50GHz (Cores 12)
Memory: 256GB RAM
Disk: 2 x 480GB SSD
Network: 1Gbit
IPV4 Addresses: 1 x IPV4 public address
When you order an hetzner root server, by default, you get a single IPv4 public IP address. If you need more public addresses, you’ll have to order separately.
Step 1 – Boot the Server in to Rescue Mode
Login to your Hetzner root server console and move Main functions > Servers > Server Label > Rescue section to boot your server in rescue mode.
From the page shown, select the Operating system, CPU Architecture, and public key or password and click on “Activate rescue system” to use activate rescue system.
After activating rescue system, the system has to be rebooted. This is done on Server > ServerName > Reset section in the console.
Step 2 – Create Root Server Configuration.
SSH to the server in rescue mode using root user and password shown during Rescue activation.
$ ssh root@serverip
Welcome to the Hetzner Rescue System.
This Rescue System is based on Debian 9 (stretch) with a newer
kernel. You can install software as in a normal system.
To install a new operating system from one of our prebuilt
images, run 'installimage' and follow the instructions.
More information at http://wiki.hetzner.de
Rescue System up since 2021-12-03 21:01 +02:00
Hardware data:
CPU1: Intel(R) Xeon(R) CPU E5-1650 v3 @ 3.50GHz (Cores 12)
Memory: 257653 MB
Disk /dev/sda: 480 GB (=> 447 GiB) doesn't contain a valid partition table
Disk /dev/sdb: 480 GB (=> 447 GiB) doesn't contain a valid partition table
Total capacity 894 GiB with 2 Disks
Network data:
eth0 LINK: yes
MAC: b4:2e:99:47:fa:5c
IP: xxxxxxxxxxxxxxxxxx
IPv6: xxxxxxxxxxxxxxxxxx
Intel(R) Gigabit Ethernet Network Driver
root@rescue ~ #
As seen from the output, the server we’re using has two disks @480GB. We’ll configure them in non-redundant RAID 0 configuration.
Disk /dev/sda: 480 GB (=> 447 GiB)
Disk /dev/sdb: 480 GB (=> 447 GiB)
Next we create our Hetzner server installer configuration file. We’ll name it debian-install-config.txt
vim install-config.txt
This is the data populated that will be used by the installimage to install Debian 11 (Bullseye) operating system from pre-built image.
DRIVE1 /dev/sda
DRIVE2 /dev/sdb
SWRAID 1
SWRAIDLEVEL 0 # Use 1 for Raid 1
BOOTLOADER grub
HOSTNAME proxmox7.example.com # Set correct hostname
PART /boot ext4 512M
PART lvm vg0 all
LV vg0 root / ext4 50G
LV vg0 swap swap swap 8G
LV vg0 var /var ext4 300G
# List images with ls /root/.oldroot/nfs/install/../images
IMAGE /root/images/Debian-1101-bullseye-amd64-base.tar.gz
Configure your own partitioning scheme depending on storage hardware and usable space.
Step 3 – Install Debian 11 (Bullseye) on Hetzner root server
With correct installer configurations, initiate the installation process of Debian Linux on Hetzner root server by running the following command:
# installimage -a -c install-config.txt
Installation process will start immediately after command execution:
Found AUTOSETUP file '/autosetup'
Running unattended installimage installation ...
DRIVE1 /dev/sda
DRIVE2 /dev/sdb
SWRAID 1
SWRAIDLEVEL 0 # Use 1 for Raid 1
BOOTLOADER grub
HOSTNAME myrootserver.computingpost.com
PART /boot ext3 512M
PART lvm vg0 all
LV vg0 root / ext4 50G
LV vg0 swap swap swap 8G
LV vg0 var /var ext4 300G
IMAGE /root/.oldroot/nfs/install/../images/Debian-1101-bullseye-amd64-base.tar.gz
WARNING:
Starting installation in 20 seconds ...
Press X to continue immediately ...
Installation will DELETE ALL DATA ON DISK(s)!
Press CTRL-C to abort now!
The script will do disk preparation and Debian server installation for you. Just sit and relax as magic happens!
Hetzner Online GmbH - installimage
Your server will be installed now, this will take some minutes
You can abort at any time with CTRL+C ...
: Reading configuration done
: Loading image file variables done
: Loading debian specific functions done
1/17 : Deleting partitions done
2/17 : Test partition size done
3/17 : Creating partitions and /etc/fstab done
4/17 : Creating software RAID level 0 done
5/17 : Creating LVM volumes done
6/17 : Formatting partitions
: formatting /dev/md/0 with ext4 done
: formatting /dev/vg0/root with ext4 done
: formatting /dev/vg0/swap with swap done
: formatting /dev/vg0/var with ext4 done
7/17 : Mounting partitions done
8/17 : Sync time via ntp done
: Importing public key for image validation done
9/17 : Validating image before starting extraction done
10/17 : Extracting image (local) done
11/17 : Setting up network config done
12/17 : Executing additional commands
: Setting hostname done
: Generating new SSH keys done
: Generating mdadm config done
: Generating ramdisk done
: Generating ntp config done
13/17 : Setting up miscellaneous files done
14/17 : Configuring authentication
: Fetching SSH keys done
: Disabling root password done
: Disabling SSH root login without password done
: Copying SSH keys done
15/17 : Installing bootloader grub done
16/17 : Running some debian specific functions done
17/17 : Clearing log files done
INSTALLATION COMPLETE
You can now reboot and log in to your new system with the
same credentials that you used to log into the rescue system.
When installation is done, reboot to Debian 11 (Bullseye) environment.
# shutdown -r now
SSH to the server as root user with password or SSH Public key if set.
$ ssh root@serverip
Linux proxmox7.
example.com 5.13.19-2-pve #1 SMP PVE 5.13.19-4 (Mon, 29 Nov 2021 12:10:09 +0100) x86_64
The programs included with the Debian GNU/Linux system are free software;
the exact distribution terms for each program are described in the
individual files in /usr/share/doc/*/copyright.
Debian GNU/Linux comes with ABSOLUTELY NO WARRANTY, to the extent
permitted by applicable law.
We can review our current system partitions on the server. If you used LVM and still have space in VG, you can adjust Logical Volumes capacity.
# lsblk
NAME MAJ:MIN RM SIZE RO TYPE MOUNTPOINT
sda 8:0 0 447.1G 0 disk
├─sda1 8:1 0 512M 0 part
│ └─md0 9:0 0 511M 0 raid1 /boot
└─sda2 8:2 0 446.6G 0 part
└─md1 9:1 0 893G 0 raid0
├─vg0-root 253:0 0 50G 0 lvm /
├─vg0-swap 253:1 0 8G 0 lvm [SWAP]
└─vg0-var 253:2 0 300G 0 lvm /var
sdb 8:16 0 447.1G 0 disk
├─sdb1 8:17 0 512M 0 part
│ └─md0 9:0 0 511M 0 raid1 /boot
└─sdb2 8:18 0 446.6G 0 part
└─md1 9:1 0 893G 0 raid0
├─vg0-root 253:0 0 50G 0 lvm /
├─vg0-swap 253:1 0 8G 0 lvm [SWAP]
└─vg0-var 253:2 0 300G 0 lvm /var
# pvs
PV VG Fmt Attr PSize PFree
/dev/md1 vg0 lvm2 a-- 893.00g 535.00g
# vgs
VG #PV #LV #SN Attr VSize VFree
vg0 1 3 0 wz--n- 893.00g 535.00g
# lvs
LV VG Attr LSize Pool Origin Data% Meta% Move Log Cpy%Sync Convert
root vg0 -wi-ao---- 50.00g
swap vg0 -wi-ao---- 8.00g
var vg0 -wi-ao---- 300.00g
See below example which adds extra 50GB to /dev/vg0/var Logical Volume
# lvextend -r -L +50G /dev/vg0/vg0
Confirm Debian successful installation by querying OS release info:
root@proxmox ~ # cat /etc/os-release
PRETTY_NAME="Debian GNU/Linux 11 (bullseye)"
NAME="Debian GNU/Linux"
VERSION_ID="11"
VERSION="11 (bullseye)"
VERSION_CODENAME=bullseye
ID=debian
HOME_URL="https://www.debian.org/"
SUPPORT_URL="https://www.debian.org/support"
BUG_REPORT_URL="https://bugs.debian.org/"
Update and upgrade your Debian 11 (Bullseye) system
apt update
apt -y full-upgrade
apt install wget vim sudo bash-completion
[ -f /var/run/reboot-required ] && reboot -f
Step 4 – Install Proxmox VE 7 on Debian 11 (Bullseye)
Now that our Cloud server is ready, we can dive to the actual installation of Proxmox VE. Refer to our guide below to proceed with the setup.
How To Install Proxmox VE 7 on Debian 11 (Bullseye)
To change Proxmox VE UI theme see guide below:
How To Customize Proxmox VE Web UI With dark theme
0 notes
Text
Logitech hd 720p raspberry pi compatibility

SteelSeries Rival 110 Gaming Mouse Review SteelSeries budget-priced gaming mouse strikes a good balance between price, comfort, and good performance. Vous tes streamer et la recherche d'une webcam pouvant faire la diffrence avec les autres streamers Alors la C922 Pro de Logitech est faite pour vous Cette dernire vous permet de diffuser et d'enregistrer des vidos en 1080p 30 images par seconde. Steel Division 2 Review Steel Division 2, expanding on the original, takes you to the eastern front of World War 2 and the biggest defeat of the Wermacht, Operation Bagration. Raspberry Pi 4 Review A must-buy for makers, hobbyists and tech enthusiasts everywhere, the Raspberry Pi 4 features a faster processor, more RAM and 4K video output. It's not hard, but good results requires more than just cranking things up to 11. Overclocking the Raspberry Pi 4 We'll walk you through overclocking both the GPU and GPU of the Raspberry Pi 4. Lutris is an excellent gaming platform This ought to be interesting! A review of Lutris, an open-source gaming platform for Linux with support for DOS, WINE, Steam, and many other engines, covering setup and first steps, look & feel, game search, installation and testing of several games including via Steam for Windows, runners, configuration and settings, some small problems, other observations, and more. I have my XBOX360 working over the HDMI -> DVI cable, and it is using these settings: 1280x720 Breedbeeld (Widescreen) DVI+A I have been fiddling now with the config.txt file with mixed results, but none of them seem to really work. Logitech G MX518 (Legendary) Review Logitech's iconic gaming mouse is back, and it's better than ever! The G MX518 (also known as the MX518 Legendary) features the flagship HERO optical sensor, Omron switches rated for 20 million clicks, an updated, flexible cable, and many great features, and of course all this inside the truly legendary shape that many love to this day. I have my Raspberry Pi hooked up to an old Philips HD ready FlatTV.

Is it worth $189? Join us as we find out. They're extremely versatile for wherever you need great audio, customizable, and have sensors to double as a fitness tracker. In addition, this display has a backlight-adjustable function that allows you to adjust the brightness using the buttons on the back. We tested it with raspberry pi 3b/3b+ and windows10. Today, we?re taking a look at their little brother, the Jabra Elite Active 65T. Specifically, this display has a resolution of 7201280 and a viewing angle up to double 178 degrees.

Jabra Elite Active 65T True Wireless Earbuds Review Earlier this week, we kicked off our Jabra coverage with a review of their flagship Evolve 65T True Wireless Earbuds. The platform has largely seen stagnation in terms of core and thread count over many generations since the first Core series CPU that launched back in 2010 but last year brought a big change to the CPU giant.

SteelSeries Rival 110 Gaming Mouse ReviewĪSRock Z390 Phantom Gaming 7 Motherboard Review Intel has come a long way with its mainstream processor platform. Jabra Elite Active 65T True Wireless Earbuds Review Here a roundup of today's reviews and articles:ĪSRock Z390 Phantom Gaming 7 Motherboard Review
0 notes
Text
By the way none of the words in my tumblr are in config.txt
1 note
·
View note
Text
Photosounder full version download

#Photosounder full version download update#
Changes in Photosounder v1.9.3 Moved config.txt (Mac and Windows) and logfile.txt (Mac only, Windows keeps it in the program’s folder) to the proper Photosounder files folder. Regularly $79 USD, Photosounder is on sale at 40% off regular exclusively from Plugin Boutique, priced only $47 USD until March 1st, 2020. It is the ultimate bridge between the graphical world and the audio world, bringing the full power of image editing to the service of creating and transforming sounds. Fixed issues with the Gamma and Intensity knobs as well as various other issues.Can save images to linear 32-bit per channel TIFF.Much faster FFT-accelerated and GPU-accelerated convolution between layers.Console you can bring up using F3 to enter commands.New interface system that adds dialogs for creating a new project, opening/importing files, analysis options, and more. The full commercial license entitles you to free updates for at least 1 year from the date of purchase and then until version 2.0 (excluded), access to the latest beta build of the program containing the latest new features and bug fixes (see changelog), the right to use and sell the resulting audio without limitations and gives access to e.Ability to import more files to a single project, each on its own layer.It is the ultimate bridge between the graphical world and the audio world, bringing the full power of image editing to the service of creating and transforming sounds. Only Photosounder truly allows you to transform any sound as an image and to create any possible sound from an image. Version 1.10.0 includes various improvements and fixes.Įvery sound you’ve ever heard can be represented as an image and all possible sounds can be made from an image.
#Photosounder full version download update#
Photosounder has announced an update to the Photosounder image-sound editor and synthesizer software.
0 notes
Text
【Raspberry Pi】WiFiやBluetoothを無効にする設定
Raspberry Pi は非常に便利なコンピューターで、長期にわたって運用しておられる方も多いと思います。そんなとき、Raspberry Pi の消費電力が気になりますが、WiFi や Bluetooth などの通信機能をオフにすることで消費電力少しでもを抑えることができます。
本記事では、Raspberry Pi の Bluetooth と WiFi を無効にする方法を紹介します。
Bluetoothの無効化
Raspberry Pi で Bluetooth を無効にするには、/boot/config.txt ファイルに設定を追加するだけです。vi や nano など任意のテキストエディタを使用してファイルを開き、末尾に以下の行を追記します。
dtoverlay=disable-bt
この変更を保存して Raspberry Pi を再起動すると、Bluetooth…

View On WordPress
0 notes
Text
Sodor workshops passowrd

#Sodor workshops passowrd update
#Sodor workshops passowrd full
#Sodor workshops passowrd rar
The informations provided for each asset found are more detailed and more consistent. New links "Next" and "Previous" as well as a pop-up help to move from web site to web site or from kuid version to kuid version You can now order the results by third party site, by size of the file to download, by version of kuid, or by relevancy, according to the context. The search results are now splitted in tabs : results found in third party sites, on DLS, in built-in assets and in web pages for the search by kuids,įor search by kuid, results found in web pages and in assets for the search by keywords. With the advanced part of the form you can apply more focused filters. The basic search part of the form requires to fill only one field and to choose between four search options that give the most results for the first one to least results for the last one. The search by kuid bring back as well a list of web pages from third party sites where the wanted kuid is quoted in the text. New search for kuids quoted in third party sites : You can work several days or weeks with its content, add, remove, hide or unhide kuids. In addition your dashboard is persistent. It can process hundreds kuids.Īfter that you only have to select a kuid in the list to access the details of what the dasboard has found for this kuid.
#Sodor workshops passowrd full
The dashboard process in background the full list in a few minutes. Search by kuidĪ smart dashboard that search kuids for you : You feed it by pasting a list of kuids and it will search for you how many are found in third party sites, on Dls, etc. The extractor don't work with IE or with too much old release of any other browsers.
#Sodor workshops passowrd update
Don't hesitate to update your browser for better performance. The actual performance will depend of course on the specs of your computeur. However, it is not recommended to use the extractor to generate large files or files containing a large amounts of assets. This tool is fully integrated in the web site and don't require any installation on your computer.ĭuring the tests the extractor was able to display in a few minutes the content of files of more than 1 gigabyte or containing thousand of assets. The files are processed on your computer. In addition this extractor can extract no compiled assets :Īssets as set of files in directories with a config.txt at the root are handled too and can be extracted in a zip file. Now you import in the game only what you need.
#Sodor workshops passowrd rar
With this very versatile tools you can explore your personnal collection of Trainz filesĪnd the files you have downloaded from third party sites, including zip and rar archives,Īnd extract one or more assets in order to import them in the game.įorget the old time about importing hundreds assets while you need only one.
0 notes
Text
This is oh-so-late, thanks to life being a butt, but I did contact MaXKennedy and he’s given me permission to reblog directly from his DeviantArt account, for which I am extremely grateful. Big big thank yous to everyone who helped out with identifying artists who had Tumblrs!
#deviantart#fanart#i went to london#then started a new job#the first month was crazy#i have so much stuff to catch up on#config.txt
3 notes
·
View notes
Text
Para leer detenidamente...
0 notes
Text
Subnautica How To Get Water HD
You can get filtered water from fabricator using a bladderfish. Look out for a coral (the big coral tubes you can also swim through) and strike it with the survival knife.

H2.0 Update Subnautica
You can find this machine in wrecks, bulb zone, and dunes.

Subnautica how to get water. Reclaimed water may refer to: As soon as you get your titanium and a creepvine seed cluster (= 2x silicone rubber) you can craft a survival knife. Eventually you'll find the planter which will let you plant your own crops to eat (melons for hydration and even gel sacs for aerogel production) and then you'll find the aquarium which is great for creature breeding and an infinite fish food source.
It works on 51 units of energy per minute. Once you get a knife cut the coral shell plate this will help in disinfecting the water giving you drinkable water. The earliest sources of food and water both come from small fish, such as the boomerang, bladderfish and peeper.
The water gauge never exceeds 100 under any circumstances, but the food gauge will overflow above 100 if a consumed item's food value would take it beyond 100, and it is not already 100 or higher. Craft the water filtration machine to get a steady supply of large filtered water. If your base ever drops below 1 hp/si, the hull starts breaking and water gets in.
A water filtration machine utilizes energy from the seabase to desalinate seawater, producing salt and drinkable water in the form of large filtered water (subnautica). Your only option for creating water at this stage is to process a bladderfish to create filtered water (h2o: But the easiest way is probably salt + tube coral samples > bleach, then bleach > disinfected water x2.
You'll get 20 hydration points. Disinfected water (subnautica) disinfected water (below zero) This is the easiest type of water you can get in subnautica.
Subnautica 's water filtration machine can be placed in a multipurpose room and will produce water and salt in exchange for about 51 energy a minute. All of these fish can be. Melting snow, using a water filtration machine.
Next to remove the tick from disable console options press menu and then press lb+rb. Consuming a fish will increase the water level of a player by three to ten levels depending on the type of fish consumed. Water is essential for survival mode and can be created in three ways.
This is a disambiguation page, intended to distinguish between articles of similar subject or title. To craft filtered water, simply collect a bladderfish and transform it using the fabricator. Note that disinfected water is +30 water while the filter fish water is only +20.
After putting the mod folder in the qmods folder, you can open up the config.txt file to change the water level. In subnautica, explorers will need the advanced polymer to upgrade the cyclops, seamoth, and prawn suit.considering how helpful these. These items are useful in a pinch.
You will see a start menu on the game, go down to the seventh option. This creature is very common in subnautica and you can find it almost everywhere in the game, especially in the beginning area. The developers options, enable it and you can use different subnautica cheats for xbox one.
On xbox one press lb + a + rb to see the input box. The two gauges are marked out of 100 but work slightly differently: Polyaniline or pani is a polymer used to conduct electricity.
Also you get two per bleach used. If an internal link referred you to this page, you may wish to change the link to point directly to the intended article. To get proper drinking water you will need to fabricate a knife and to do it collect titanium and quartz crystal both of the ingredients can be found at the bottom of the seafloor.
Apart from keeping hydrated, consuming cooked fish will also. What does disinfected water do in subnautica? You can loot the aurora, there's tons of water bottles (and +75 foodcubes) on that thing.
There are salt deposits around, but nothing that provides calcium to make into bleach (the core ingredient for disinfected water). So that is all for our guide on how to get water in subnautica: Find any fish swimming around you and cook it up in a fabricator.
The most common way to stay hydrated in the world of subnautica is by consuming some cooked fish. It takes about 15 minutes and 40 seconds to produce one large filtered water (+50 water) and 7 minutes and 40 seconds to produce one salt. This mod will allow you to set a custom water level for your game.
Disinfected water may refer to: In survival and hardcore, keeping your water and food levels high is important if you want to stay alive. It has split storage with dedicated slots, two for water bottles and two for salt, meaning the player has control over which resources it will continue to generate.
They’re used to craft filtered water, which add +20 h2o. There are several ways of getting water in subnautica: When water level is above 0 ascension with the space bar does not work.
The first and easiest for early game is to acquire a “bladder fish”, which is a fish of pink color and with a slightly bloated looking appearance. Make filtered water from bladderfish. That said, here are all the kinds types of water and how to get them.
The nutrient bars and filtered waters in the lifepod will help you start, but can only get you so far. If you would like to know about the subnautica below zero world map & coordinates, make sure you check that article too. A few notes to remember about water.
The second method is to. As you now have a survival knife, it's time to get some coral samples. To drain the water that's now in your base, you need to raise the hp/si into the positive by doing on, or all, of the following.
But, really, those methods aren’t necessary. If an internal link referred you to this page, you may wish to change the link to point directly to the intended article. One large filtered water can get you +50 water.
Not as useful as disinfected water, but it’ll get the job done. Your best option for getting water early game is to catch bladderfish, and then use the fabricator in your lifepod or seabase to convert each of them into a bottle of filtered water. (they reduce the hp/si number quite a bit.) add reinforcements.
How to get water in subnautica. This video shows how to get water in subnautica below zero. They can be found all around your lifepod without having to venture very far.
This is a disambiguation page, intended to distinguish between articles of similar subject or title. The only source of water you can get en masse right now is filtered water, which requires catching bladderfish. Bladderfish provide water early on until you can get more complex things to satisfy hydration like melons, water purifiers, and espresso machines.
It can be any positive or negative value, or 0 which is default.
3 notes
·
View notes
Text
In this article, we will focus on installing CentOS 8 | CentOS 7 on Hetzner Root Servers. Hetzner is a cloud hosting company providing auctions for physical server hardware for very competitive prices with a per/month billing model.
We will be doing this installation on a Hetzner root server with the following specs.
CPU: Intel(R) Core(TM) i7-8700 CPU @ 3.20GHz (12 cores)
Memory: 64GB RAM
Disk: 2 x 1024GB NVMe SSDs
Network: 1Gbit
IPV4 Adresses: 1 x IPV4 public address
Note that with Hetzner Root servers, you get a single IPv4 public IP address but you can request for additional IP or subnet for use.
Step 1: Boot to Rescue Mode
Login to your Hetzner console for Root servers and navigate to Servers section under Main functions.
Main functions > Servers > Server Label > Rescue
Select the Operating system to use in rescue mode, CPU Architecture, and public key and click on “Activate rescue system“.
Reboot the server under “Reset” server section.
Step 2: Create Root Server Configuration.
SSH to the server in rescue mode using root user and password shown during Rescue activation.
$ ssh root@serverip
Welcome to the Hetzner Rescue System.
This Rescue System is based on Debian 9 (stretch) with a newer
kernel. You can install software as in a normal system.
To install a new operating system from one of our prebuilt
images, run 'installimage' and follow the instructions.
More information at http://wiki.hetzner.de
Rescue System up since 2019-07-04 23:34 +02:00
Last login: Sat Jul 6 09:03:05 2019 from 41.90.217.125
Hardware data:
CPU1: Intel(R) Core(TM) i7-8700 CPU @ 3.20GHz (Cores 12)
Memory: 64339 MB
Disk /dev/nvme0n1: 1024 GB (=> 953 GiB)
Disk /dev/nvme1n1: 1024 GB (=> 953 GiB)
Total capacity 1907 GiB with 2 Disks
Network data:
eth0 LINK: yes
MAC: b4:2e:99:47:fa:5c
IP: xxxxxxxxxxxxxxxxxx
IPv6: xxxxxxxxxxxxxxxxxx
Intel(R) PRO/1000 Network Driver
root@rescue ~ #
My root server has two disks @512GB. I’ll configure them in non-redundant RAID 1 (stripping) configuration. Let’s create a Hetzner server configuration to be used by installimage for a new operating system from one of our prebuilt images.
$ vim install-config.txt
DRIVE1 /dev/nvme0n1
DRIVE2 /dev/nvme1n1
SWRAID 1
SWRAIDLEVEL 0 # Use 1 for Raid 1
BOOTLOADER grub
HOSTNAME myrootserver.computingpost.com
PART /boot ext3 512M
PART lvm vg0 200G
#PART lvm vg0 all
LV vg0 root / xfs 50G
LV vg0 swap swap swap 16G
LV vg0 var /var xfs 100G
LV vg0 tmp /tmp xfs 30G
IMAGE /root/images/CentOS-79-64-minimal.tar.gz # CentOS-80-stream-amd64-base.tar.gz for CentOS 8 Stream
Once the configuration is done, install image and create partitions.
# installimage -a -c install-config.txt
The installation should start.
Installation process.
Hetzner Online GmbH - installimage
Your server will be installed now, this will take some minutes
You can abort at any time with CTRL+C ...
: Reading configuration done
: Loading image file variables done
: Loading centos specific functions done
1/17 : Deleting partitions done
2/17 : Test partition size done
3/17 : Creating partitions and /etc/fstab done
4/17 : Creating software RAID level 0 done
5/17 : Creating LVM volumes done
6/17 : Formatting partitions
: formatting /dev/md/0 with ext3 done
: formatting /dev/vg0/root with xfs done
: formatting /dev/vg0/swap with swap done
: formatting /dev/vg0/var with xfs done
: formatting /dev/vg0/tmp with xfs done
7/17 : Mounting partitions done
8/17 : Sync time via ntp done
: Importing public key for image validation done
9/17 : Validating image before starting extraction done
10/17 : Extracting image (local) done
11/17 : Setting up network config done
12/17 : Executing additional commands
: Setting hostname done
: Generating new SSH keys done
: Generating mdadm config done
: Generating ramdisk done
: Generating ntp config done
13/17 : Setting up miscellaneous files done
14/17 : Configuring authentication
: Fetching SSH keys done
: Disabling root password done
: Disabling SSH root login without password done
: Copying SSH keys done
15/17 : Installing bootloader grub done
16/17 : Running some centos specific functions done
17/17 : Clearing log files done
INSTALLATION COMPLETE
You can now reboot and log in to your new system with
the same password as you logged in to the rescue system.
Once the installation is complete, reboot the server.
# shutdown -r now
Login and confirm server installation.
[root@myrootserver ~]# cat /etc/os-release
NAME="CentOS Linux"
VERSION="7 (Core)"
ID="centos"
ID_LIKE="rhel fedora"
VERSION_ID="7"
PRETTY_NAME="CentOS Linux 7 (Core)"
ANSI_COLOR="0;31"
CPE_NAME="cpe:/o:centos:centos:7"
HOME_URL="https://www.centos.org/"
BUG_REPORT_URL="https://bugs.centos.org/"
CENTOS_MANTISBT_PROJECT="CentOS-7"
CENTOS_MANTISBT_PROJECT_VERSION="7"
REDHAT_SUPPORT_PRODUCT="centos"
REDHAT_SUPPORT_PRODUCT_VERSION="7"
Update CentOS and install basic packages.
sudo yum -y update
sudo yum -y install vim wget curl bash-completion epel-release telnet
You now have a successful installation of CentOS 7 on Hetzner root server.
0 notes
Last Seen Blogs

occur-effort-walk-nature
Untitled

untoldstar
Mari

agameroj12
A N A L U C I A

redtwink00005
Untitled

craydaugh-blog
us fake identity