#Easy & Simple Acrylic Painting
Text
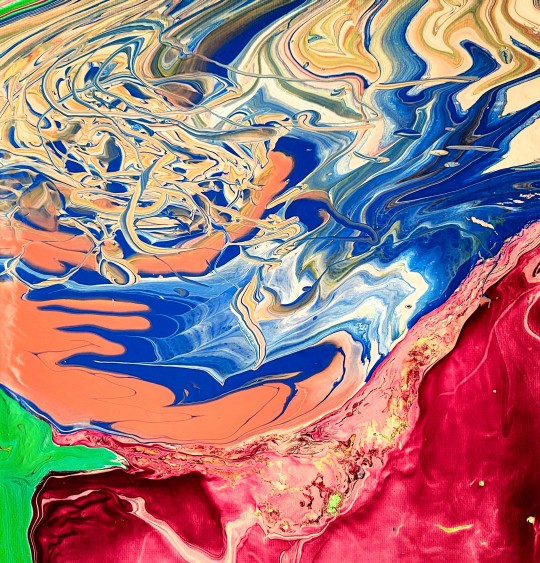
“Terra Panoramic” - Acrylic paint on canvas
#acrylic#acrylic painting#acrylic paint#art on tumblr#painting#paint#art on canvas#abstract art#abstract#abstract expressionism#pour paint#pour painting#simple painting#these are so fuckin' easy guys#almost feel bad for posting them#satellite view#curvature#terra#earth#art#pour paints = insta-art
89 notes
·
View notes
Text
Website : https://www.bevfingerart.com/
Address : Wellington, Colorado
Beverly Finger was born and raised in the rural ranch country of western South Dakota. This rural area, was Bev’s playground and inspiration for the future. She developed a love of the wide-open spaces, the prairie, hills, trees, the creeks and rivers. Throughout her life she has continuously observed Mother Nature’s many moods and atmospheric changes - the elements that have become instrumental in the composition of her works of art.
Business mail : [email protected]
Keywords:
landscape paintings in oil
painting landscapes in acrylics
fantasy digital art landscapes
landscape painting wheat field
modern italian landscape paintings
painting landscapes in oil
fine art landscape photography
landscape clip studio paint
landscape painting van gogh
landscape wall art framed
paint by numbers landscape
van gogh landscape paintings
landscape art 19th century
landscape paintings for sale
large landscape wall art
painting landscapes in watercolor
star wars landscape art
black and white landscape painting
easy landscape painting ideas
landscape george w bush paintings
landscape oil painting on canvas
painting landscapes in oils
renaissance artist landscape paintings
acrylic landscape painting ideas
landscape canvas wall art
landscape paintings in acrylic
painting landscapes in acrylic
spray paint for landscaping
18th century landscape paintings
19th century landscape paintings
abstract landscape wall art
acrylic abstract landscape painting
blue-green landscape painting
landscape george bush paintings
landscape oil paintings for sale
landscape painting in acrylics
landscape prints on canvas
minimalist abstract landscape painting
new mexico landscape paintings
o'keeffe landscape paintings
sci fi landscape art
simple chinese landscape painting
ukiyo-e landscape art
wayne thiebaud landscape paintings
beautiful fantasy landscape art
black and white landscape art
contemporary abstract landscape painting
david hockney landscape paintings
easy acrylic landscape painting
easy desert landscape painting
Facebook : https://www.facebook.com/profile.php?id=100011379910228
#blue-green landscape painting#landscape george bush paintings#landscape oil paintings for sale#landscape painting in acrylics#landscape prints on canvas#minimalist abstract landscape painting#new mexico landscape paintings#o'keeffe landscape paintings#sci fi landscape art#simple chinese landscape painting#ukiyo-e landscape art#wayne thiebaud landscape paintings#beautiful fantasy landscape art#black and white landscape art#contemporary abstract landscape painting#david hockney landscape paintings#easy acrylic landscape painting#easy desert landscape painting#easy landscape acrylic paintings
2 notes
·
View notes
Note
ahh hi tella!!! so happy that ur writing for obx :) i need to see how rafe would handle a latina sweeetheart 🎀 maybe she’s kie’s cousin? i just know he’d probably be such a cocky jerk ughhhhhh thx babe
omg i am blushing just thinking about this xo

you were laid on the warmed surface of your towel, leaning on your forearms as your sun kissed skin continued the drink in the intense rays, your white, cherry covered bikini clashing perfectly against your tanned complexion, you loved days at the beach, i mean, what better way to kill time, than to eat fresh fruits and listen to your favorite music, while taking in the stunning north carolina sun for all of its glory?
you continued to lay back, your sunglasses shielding your eyes as you hummed along to the amy winehouse song that flowed through your speakers. the sudden shadow that overtook your vision, now causing you to remove your sunglasses, your eyes squinted as you took in the sight of your cousin - kiara carrera.
your chest visibly rose and fell as you sighed, your squinted frown fading into a gleeful smile, “what’s up, kie?” you asked, your wispy eyelashes batting as she hastily dropped herself onto the sand beside you.
she quickly looked over her shoulder, rolling her eyes as she returned her attention back to you, her arm reaching over you stomach as she grabbed a red grape that sat in the sweaty sand-covered container that rested by your waist, “nothing, it’s just jj being — jj,” she sighed, popping the small fruit into her mouth.
you liked jj, platonically, of course.
“he seems nice,” you chirped, turning onto your stomach, the cherry decorated bikini bottoms that you wore, now wedged between the plush cheeks of your ass as it faced the warm sun.
kiara shrugs with a slight shake of her head, you could tell that she wanted to say more, but decided against it, the moment her eyes fell on your back.
your nails clashed against one another as you undid the knot that secured your bikini top, and concealed your perky breasts, eager to get as much of an even tan as possible, “why are you looking at me like that?” you questioned, reaching for a grape.
“i dunno — maybe it’s because you just undid your top?” kiara countered sarcastically.
you stuck out your tongue, placing the grape into your mouth, soft biting into the crispy fruit before resting the side of your cheek against the surface of your hand, “but, i hate tanlines,” you pouted with a laugh.
you and kiara were thick as thieves, and sure, the reasoning for why you had to live with your cousin wasn’t the most pleasant — but she loved having you around. you were raised as sisters, both of you holding the most intimate details about the other. and boy, did you both balance each other out well! you were bubbly and were quick to let anyone in, which served to be a detriment to you at times, nevertheless, you were a hopeless romantic who made it her business to find beauty in even the most mundane of things.
as you would say, you loved everything that was pretty. your blown-out hair was always shining, wispy eyelashes always curled immaculately, supple lips glazed in shimmery gloss, acrylic-enforced nails always painted in varying shades of pink or a simple french design. you loved wearing clothes that would show off your lower back and midriff - why? no rhyme or reason, you just like how it looked.
you had a heart of gold, wrapped in a bow, making it easy for those around you to be pulled into you and your dreamy ways.
it also made it just as easy for you to end up hurt and taken advantage of.
you and kiara remained engrossed in each other, laughter emitting from the both of you, “so, are you going to stay for the kegger or are we going home for dinner?” kie questioned, a smile remaining on her lips as she watched you try to tame your overwhelming fit of laughter.
you spoke with a giggle, “i don’t know, i promised tio that i’d help him with dinner, one of these days,” you whined, your innocent eyes searching kiara’s for any kind of pull towards your decision.
“okay, well we need to decide soon, before-” kiara began, her words ceasing as a large shadow suddenly towered over the two of you.
you straightened your neck, looking up through your lashes as the tall guy crouched down, your eyes following as he leveled with you. fuck, he was hot.
“shit, kie, y’didn’t tell me you had a secret hot sister,” the guy spoke, his bright blue eyes cutting into yours as swallowed thickly, your glossy lips now running dry.
you tried to remain as still as possible, your eyes widening at the realization that your bikini top was still untied.
“fuck off, rafe, she’s my cousin,” kiara scoffed with disgust.
you remained entranced by the guy, rafe, who kept his bright eyes on yours, a smirk tugging on his lips as he took a quick look over your shoulder, tilting his head at the sight of your untied top and barely-there bottoms.
“ah, cousin?” he asked mockingly, licking over his lips, “does this cousin of yours have a name?” he pushed, the glint of his chain peeking out from his crisp t-shirt now catching your eye.
you sweetly revealed your name, your oh-so slight accent spilling through as you subconsciously batted your pretty lashes up at rafe, “and you are,” you smiled, a toothy grin.
“rafe cameron,” he spoke sternly, ignoring kiara’s protests with a roll of his eyes as he leaned closer to you, until his lips reached your ear, “i’d shake your hand, but i wouldn’t want everyone at this beach to see what you got under there,” he cooed, his condescending tone like silk in your ears.
you couldn’t help but blush like a schoolgirl, much to your cousin’s dismay.
rafe decided to make push just a little bit more, “may i?” he spoke rhetorically, his large hands sliding down your shoulder blades.
“rafe, what the fu-”
you remained still, refusing to make eye contact with kiara as rafe tied the strings of your bikini top into a secure knot, “relax, kie - m’just making her decent,” he pulled away, standing firmly of his feet.
you’d be lying, if you said that you rafe’s hands against your warmed skin didn’t excite you. his touch was oddly tantalizing for you as you were forced to ignore the subtle ache that pulsed between your legs.
you pushed yourself off of your front, now standing directly across from rafe, his eyes shamelessly drinking in the sight of your chest as he was especially intrigued by the tan line that was revealed by the shifted cup of your bikini top.
“thank you, rafe” you spoke softly, holding out your hand as you took in the staggering height difference between you and the man before you, his buzz cut hair causing you to bashfully bite down into the sticky swell of your bottom lip.
rafe accepted your hand, the sound of his name rolling off of your tongue causing blood to rush to his length as he let out a dry chuckle, enclosing his fingers around your hand, watching closely as your breath slightly hitched from his subtle grip on your hand. you two remained like this for a beat as rafe sized you up — he could smell just how genuine and sweet you were, his mind carelessly wandering to how you’d look under him, taking him for all he has. you were much smaller than him, and it ticked a region in his tainted mind that suddenly ached to have you around in any way possible.
the sudden cut of a deep voice calling out didn’t even faze rafe as his lips curved into a smile, “yo! rafe, i’ve been looking everywhere for you man,” a taller blond guy appeared beside rafe.
rafe softly released your hand, before wiping the corners of his mouth with his index finger and thumb, exhaling sharply as he faced the blond, “well, top, i’ve been busy catchin’ up with good ol’ kie, and her pretty little cousin that’s she’s been hiding from us.”
the taller blond glanced at you, he was quicker to size you up, before redirecting rafe back into his original conversation. kiara softly grabbed your arm, carrying your speaker and container of grapes.
“let’s go home,” she nudged her head towards the street, completely privy to how dumbstruck rafe had made you. she could tell that you liked it and refused to ever allow rafe to get his hands on you.
at least, not when she was around.
“oh, okay,” you mumbled defeatedly, reaching down to grab your towel from the sand, quickly turning to face rafe who watched intently as you walked away.
“bye,” you mouthed with a small wave, before turning around to catch up with your feverish cousin.
rafe continued to feign interest in whatever the fuck topper was talking about, his eyes set on your body as you walked farther and father away from him. god, he loved the way your ass bounced with each step you took. in his fucked mind, he knew that kiara was right to keep you hidden, but now since you weren’t hidden, at least not from him, he knew that it would only be a matter of time before you were his, and his only.
of course, you being such a willing sweetheart made it all the more easier for him.
#anon#asks#rafe cameron prompt#rafe cameron x reader#obx#rafe cameron#rafe x reader#rafe cameron imagine#sweetheart!reader
602 notes
·
View notes
Text

Bob Kuhn, (1920-2007), Dust Devil, acrylic on board, 12x20".
Discussing this painting the artist wrote, “It’s pretty easy, living as we do in the Sonoran Desert, to find any desired bit of plant or rock detail within short driving distance. In this simple format I chose to use a defunct agave or century plant as a major design element, with the bobcat and his rocky resting place as the other ingredients. It might be called a still-life, though it isn’t one, strictly speaking.”
Coeur d’Alene Art Auction
638 notes
·
View notes
Text

My final Fanfic Writers' Appreciation Day package has been delivered! Ten Prides in Portland by Leiascully and Simple Machines by coffeesuperhero continue the Leverage OT3 theme I've got going on this year. The fic aren't necessarily a series, but are thematically connected, and also the authors are married to each other. (It happens! My wife and I met writing Due South and Hard Core Logo fanfic lo these many years ago!)
There are some similar things I adore about both these fics. I love the sort of playing with structure in both of them, and watching the characters evolve, and also, seeing the queer community in all of its heartfelt messy occasionally infuriating glory. I also adore the thoughtful Eliot character exploration.

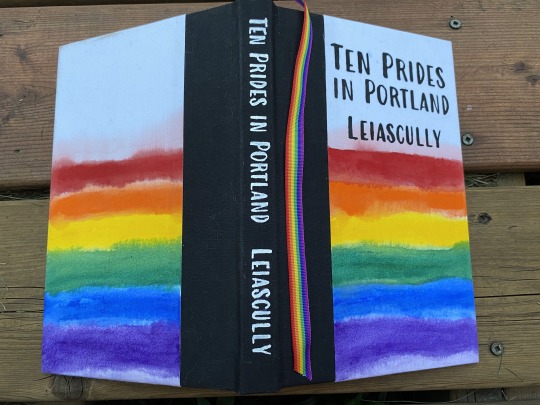


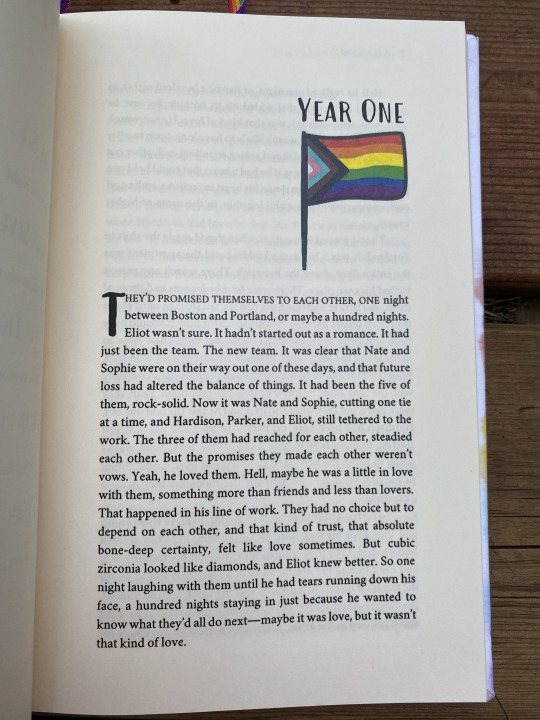
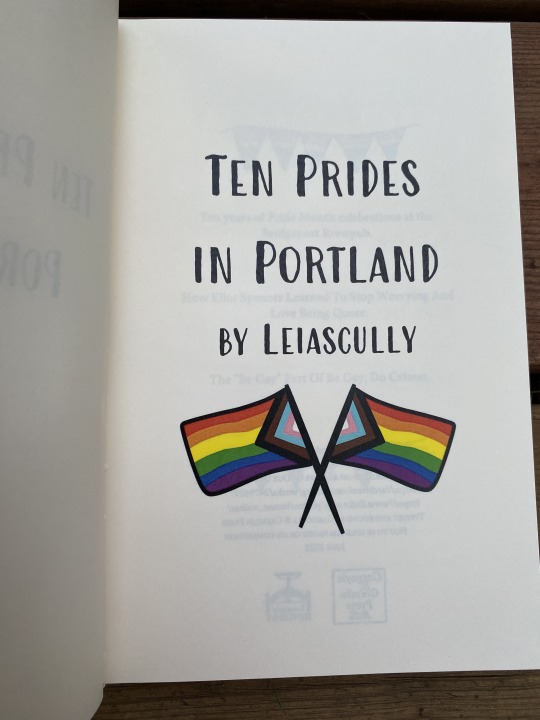
First off, Ten Prides in Portland! What it says on the tin. Ten years post-series at a certain brewpub in Portland, as Elliott finds queer community and figures himself out. This book is the reason I now have rainbow ribbon for bookmarks. As you can see, I went so very literal with this one. Homemade book cloth, acrylic paint, and cardstock endpapers printed with a map of Portland.
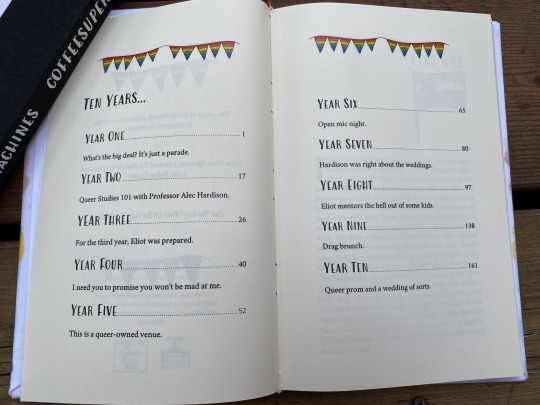


I had way too much fun with the layout on this one! It was an easy theme to lean into.
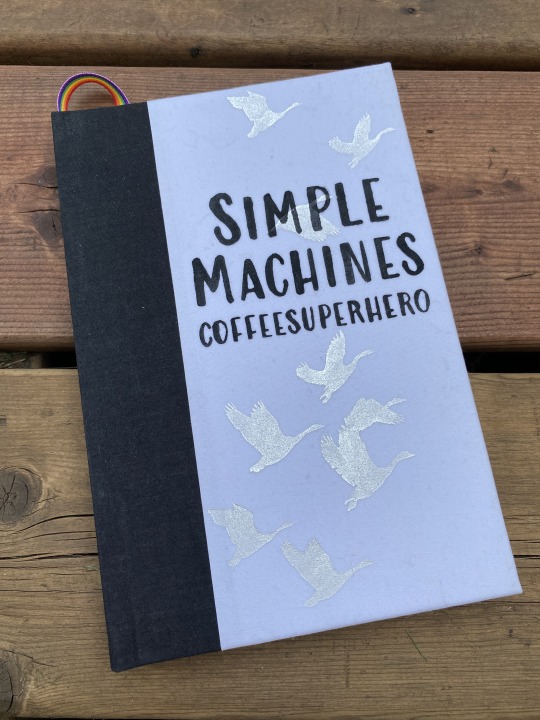

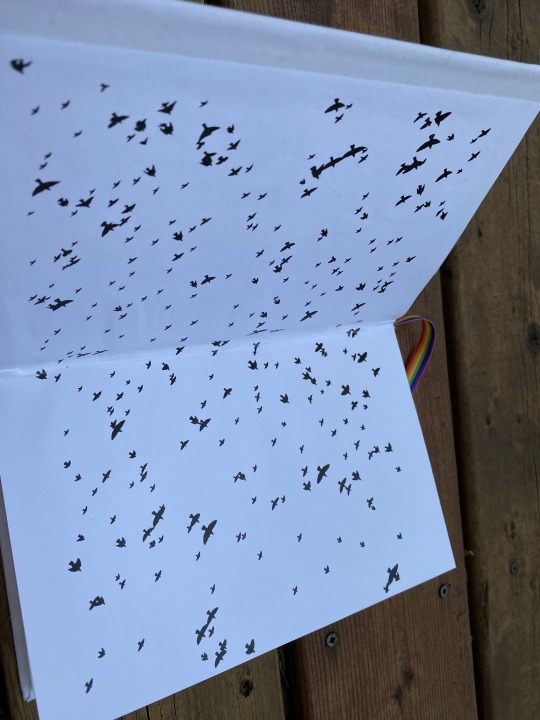

Eliot navigates a relationship with two people he loves, runs a restaurant, and figures himself out. I love the character dynamics, the cast of queer characters, and the way the second fic in the series is structured around brewpub menu items. The titles are from the iconic Mary Oliver poem Wild Geese, which is where the bird theme comes from. I used a really lovely fancy liquid mirror silver paint for the geese on the cover, which is gorgeous in person but hard to photograph.


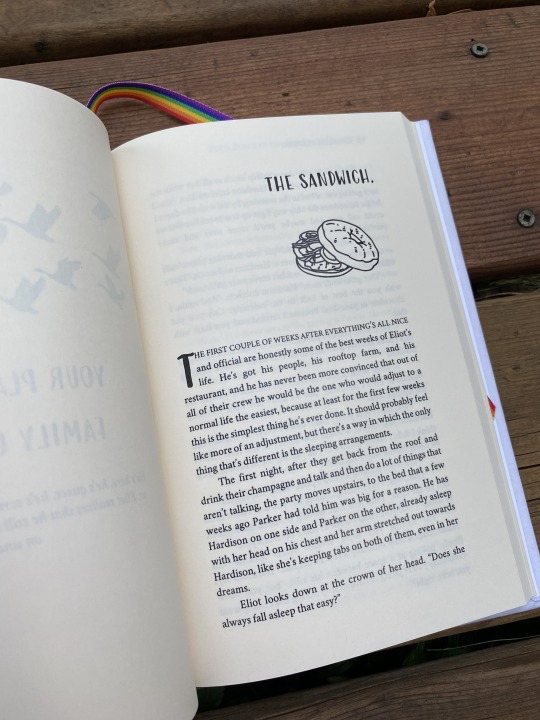


More geese! Some menu formatting! Also, a food-themed illustration at the beginning of each chapter to match the menu item. (Thank you, stock images on The Noun Project.) This was another fun one to play with.
Not pictured here for either book: the insurmountable printer issue I was having where any page with an illustration turned out extra-dark, and the flip side was correspondingly lighter. BUT. I'm still pretty pleased with how they both turned out, happy to have both of these on my shelf, and even happier to send them off in a set together to the authors' hands.
Happy slightly belated FFWAD, Leiascully and Coffeesuperhero!
#fanbinding#ficbinding#ffwad 2023#fanfic writers appreciation day#renegade loves fic#leverage fic#leverage ot3#eliot/parker/hardison#operation: give queer characters queer community#ten prides in portland#leiascully#simple machines series#coffeesuperhero#just another really elaborate fic rec
153 notes
·
View notes
Text
VAMPIREKIN TIPS
Hey fellow vamps! Here is a list of tips that give me euphoria but absolutely feel free to modify these to your liking. Vampires can have any style and vibe so remember to do what feels right for you!

Eat foods with blood in them or rare beef! Blood sausage and blood pudding, to name a few! Here’s a wiki for more options: https://en.wikipedia.org/wiki/Blood_as_food
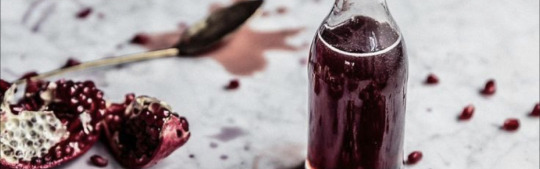
Drink red drinks: energy drinks, hibiscus tea, pomegranate juice, cranberry juice, etc
Enjoy the feeling of biting into ripe fruit - so easy, very satisfying… I feel like it’s alike to fangs on skin
Wear black cloaks / clothes / gothic wear / gothic lolita fashion / etc etc
Keep a journal all about your vampirekin. Decorate it and such! I use this as a bullet journal and it’s mainly in use at night.
Music! Make some vampiric playlists for yourself. I recommend classical and organ music
Look after your skin! “Vampire skin”
Get and light some red candles, black candles or, even better, bleeding candles. Bleeding candles can be found on Etsy or Amazon!
Exploring decades of history and researching about historical accounts of vampires
Play A Thousand Year Old Vampire! An amazing tabletop journaling solo DnD game where you play as a vampire and write a journal for them. I can’t explain to you how euphoric this is… just amazing.
Vampire DnD in general is euphoric to me (putting this here incase folks can’t afford the precious game!) Look on https://itch.io for free solo DnD and other indie games!
Read vampire stories, watch vampire movies!
Wear fake fangs and get some fake blood for comfort <3
Create a Pinterest board based on your vampirekin
Decorate your room with gothic items! Interior design goes a long way - for example, I keep a few Halloween decorations up that are bat and vampire related!
If you’re spiritual, get vampire / gothic tarot decks!
Painting with acrylics- paint done pomegranates, I don’t know why, very euphoric.
Buy a coffin made to be a bed! Of course, if that isn’t available to you then make your bed coffin-esc. You can do this with getting gothic bed sheets, arranging some cute bat plushies, having a veil over your bed etc… which reminds me-
Buy bat plushies!
Go out safely at night and gaze at the moon when she’s out. Appreciate the silence and beauty of the night.
If you are able to do so, pull an all nighter. Please don’t do this if you have responsibilities the next day, are chronically disabled (aka you can’t stay up all night for your own health), etc.
Get your nails done! Coffin shaped or nice and pointy! Look on Pinterest for some design inspo
Try out some vampiric makeup, get creative!
Research the different kinds of vampires!
Research the differences and overlap between IRL Vampire/Modern Vampire and Vampirekin
Take gothic photos with vampiric vibes. Filters, editing, soft light and outfits can help
Find community! Vampirekin spaces online and tags can really help feel like you are a part of a collective community and less alone
RED LEDS! Very useful for me and very comforting - I have bat shaped LEDs
Go on Victorian house tours or explore Victorian-like houses! Gothic houses are very pretty from the outside but the inside is even more astonishing! If you can’t go in person, watch a YouTube video!
If you’re a vamp who isn’t keen on sunlight, stay in the shade, get sunglasses, get a gothic sun umbrella and wear sunscreen!
Create picrews of your vampirekin self
Enjoy cathedrals, cemeteries and graveyards at dusk/night. Just enjoy the liminal energy and calming space.
Go to abandoned churches!
Get athames/ritual knifes. I’m a practitioner so I use it in my ritual work but honestly you can get it for the vibes!
Write love letters to yourself, vampires are confident - self love 2023 <3
Get lovely silver candle holders
Gift yourself a dried flower bouquet <3 Dried roses look and smell amazing!
Get red bath bombs! Bathe in a soothing red bath 🫶🏾
Get chew stim toys if you have biting stims or urges
If you have a garden, get night blooming flowers! A lovely lil nocturnal garden
If you have bats around then watch them at night! We only have a few where I live but it’s a delight to see them fly about.
Study tips: do so by candle light, annotate everything, red/pink highlighter, important notes in red pen
Tell yourself some vampirekin affirmations!
Vampirekin Affirmations
My fangs are stunningly sharp, I love how they glisten in the moonlight!
I am lookin’ vampiric today!
My experiences as a vampirekin are completely valid.
I am valid even if I don’t have fang shifts.
I am valid even if I don’t have blood lust.
I am valid even if I have a phobia of blood.
I radiate vampiric energy and I attract those alike to myself.
I am a master of self love, acceptance, and monstrous energy.
I’m a vampire. I’m literally the main character AND the fan favorite.
I am worthy of respect.
I am a vampire. I am doing the best I can.
I accept myself as I am.
#otherkin#otherkinity#otherkin community#alterhuman#vampirekin#vampire community#vampcore#vampirism#sang vamp#vampys thoughts#vampirekith#vampire aesthetic#vampire kin#vampirekin tips#vampirehearted#vampire tips#vampyre#vampyr#vampire#affirmations
323 notes
·
View notes
Text
DIY Goth Shorts
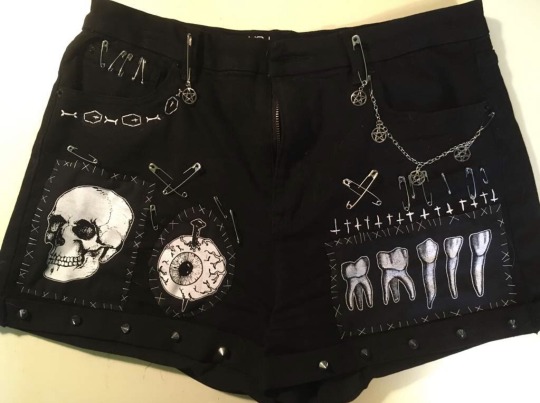

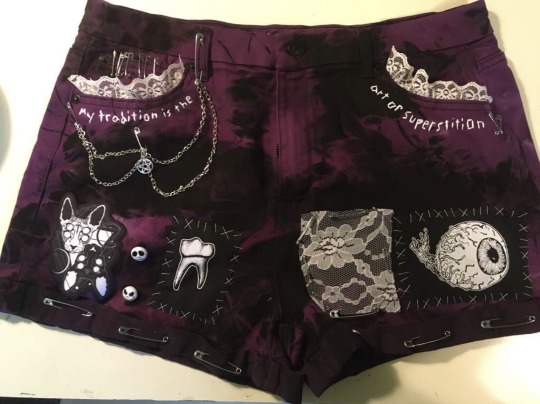
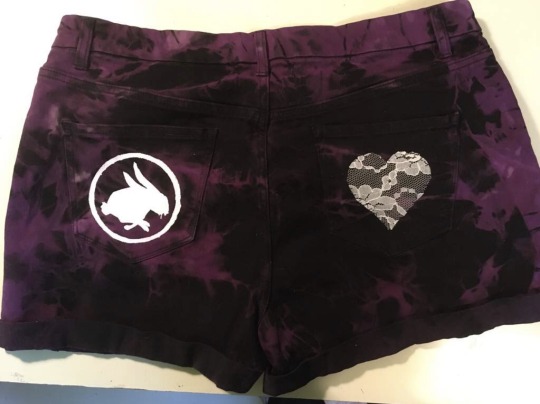


Goths of Tumblr, grab your sewing needles and safety pins, because have I got a fun and easily-customizable project for you!
I’ve been gothifying shorts and pants for a couple years, now, and they’re just so much fun to make! Very affordable, too, since all the shorts I get are either thrifted or from Walmart. From then on, I add anything I see fit—patches (bought from Hot Topic and Etsy or DIY), beads, chains, safety pins, fabric paint, embroidery, charms, ribbon, lace, buttons—you get the idea. Lots of my lace trim comes from thrift stores, charms are easy to find in bulk online, you can get beads at Walmart or your local craft store, embroidery floss and needles can be found at Walmart and are cheap (and easy to learn how to use!), and if you don’t want to buy patches you can easily make your own by creating stencils with freezer paper (tutorials are on YouTube) and dabbing on fabric or acrylic paint with a sponge brush.
I’ve also tie-dye bleached and dyed some black shorts for a cool black-and-red and black-and-purple pair. I’ve customized long pants for colder weather, as well, which may get their own post if people are interested.
If all this sounds intimidating to a new crafter, worry not! I have some really simple pairs that took no skill. I don’t have pictures, but I have one pair that just has 2-inch safety pins on the hem and a chain pinned at the pocket. That’s it! No sewing, no painting, just pins!
I also have a pair that has sew-on-studs on the hem and one patch on the leg for a less-busy design if all the eclectic clutter isn’t your vibe.
Point is, you can add whatever you want to some shorts to make them uniquely yours. They can be as busy or plain, colorful or monochrome, girly or grungy as you like! Heck, they don’t even have to be goth. I encourage anyone who knows how to hand-sew or embroider to customize their clothes, no matter their style. It’s fun!
347 notes
·
View notes
Text
Here's Looking at You Kid
By Messermoon(@sophsicle )
"Of all the gin joints in all the towns in all the world..."
George wanders into a bar. Nothing is ever the same.
Thanks to Soph for accepting a copy of this story. Apologies for the delay and ups being trash 💀
Thanks to @upthehillart for approving my use of their art for this fic.
Special thanks to the @renegadepublishing server for all your support, advice, and encouragement during the making of these books.
To ups, I hope you never feel the gentle touch of a woman, that your child never hugs you again, and that every time you enter a room, you forget the reason you are there.


Below, I will discuss the process, which will include a lot of spoilers. (But also more pics 😈)
When I heard this story was set in the same universe as choices, I lost my shit a little and read it. Slowly, however, this story began to mean a lot more to me than I could put into words. George's grief over the lost of his soul mate, the struggle to find himself, and Blaise's love, passion, kindness, and confidence in himself resonated to me in such a way that I knew I needed to hold it in my greedy little hands.
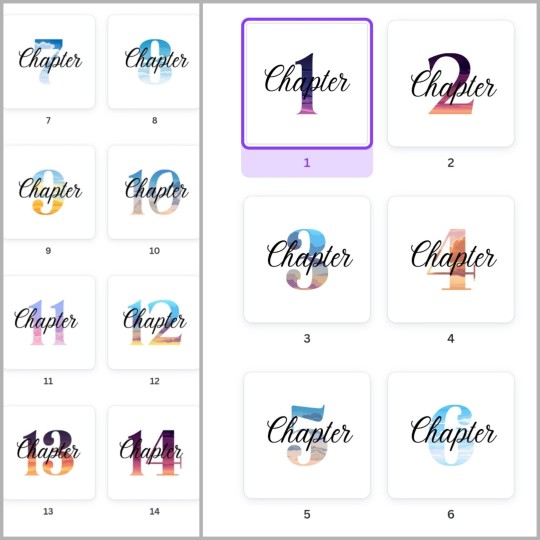
I started to think about what I wanted to do and how I wanted to bind this story. I struggle a lot from picking the font for the body text to picking the chapter titles. I finally, after fucking around with canva for more time than I'm willing to admit , I was able to come up with these:
(If you would like the files for anything I used, please dm me, and I will send them to you! I will eventually set up a google drive)
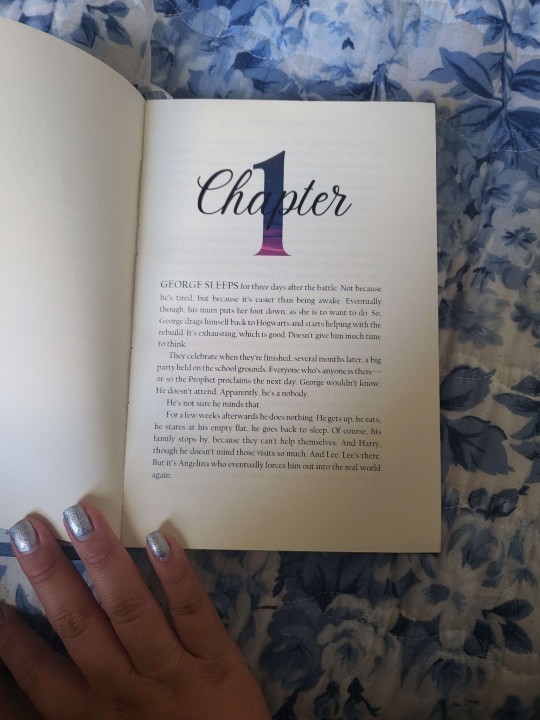
In the story, there is this moment where Blaise casts a spell that creates a constellation, of which George got the inspiration to make a mood ring that created a little sky, and depending on your mood the sky changes to reflect how you feel. He gives it to Blaise, and they have a picnic under the sky, indoors, later at Blaise's party they have such a cute moment at night and so I wanted to implant the sky in some way.
I also wanted to use constellations in this bind. I didn't know how or where. I just knew I needed them in my life. So while i mop over my inability to impelent them, I took a break. So one day, I was reading a book with these very cute corners, and then it hit me. (No, I didn't finish the book i was reading. I was busy stalking the internet, trying to find the perfect image)
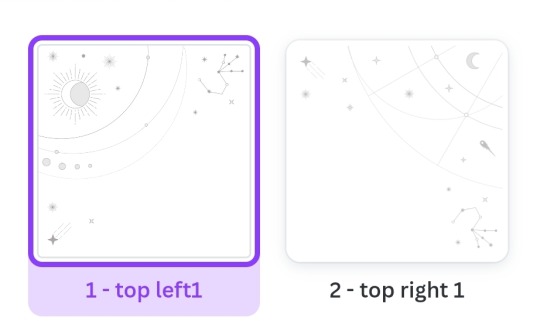

After that, picking the page breaks was easy. I wanted something simple since I didn't want the typeset to look so busy that it took away from the most important element of the bind, aka the story. I added a few little things for me in Draco and Harry's 2 chapters because I'm weak, and that's for soph to find all on her own 👀
I will put this here, tho.
Lastly, because Tumblr won't let me post more pictures, here are the endpapers I used for 2 of the 3 books.
As some of you may have notice, there are blues, pinks, and whites in this bind. It's a subtle yet very loud depiction of the Trans flag. It was very important to me to show that this story is of a Trans man that, as soph, puts it, saved himself.
I added all the chapter notes, trigger warnings, and more information about this bind on the typeset itself. Ultimately, to me, this is a form of archiving stories I think matter, and if for whatever reason, technology dies on us, this story will still live on.
The info that's only important to the binders 💀:
Materials list:
Bookcloth: Colibri in color Cornflower, this cloth has a silk like finish.
Htv: I used siser's htv easy weed vinyl with a bit of a pinkish undertone to it.
Endpapers: they are from paper tree nook in the uk
Endband: 2 mm 100% leather with blue viscous thread
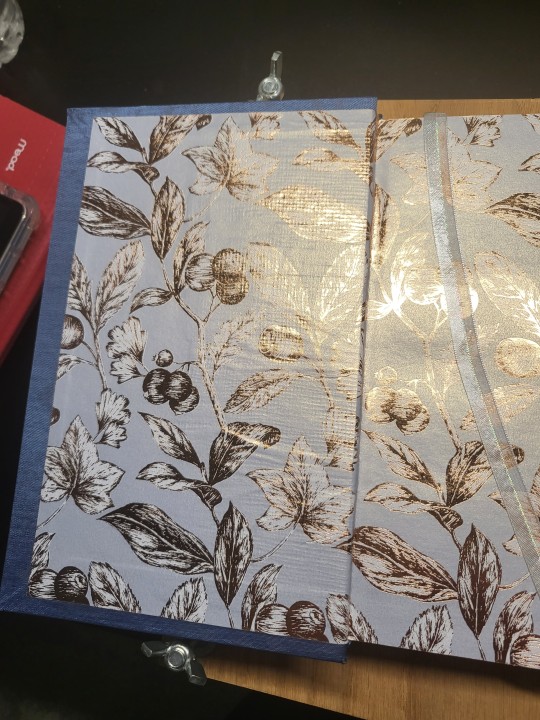
Textblock: I used standard 20lbs cream color paper. I used toner to print. To sew the textblock, I use blue linen thread and remie bands gifted to me by my friend duranbinding. I painted the edges using golden acrylic paint, and the charm and ribbon are both from Michael's
Typeset:
(I will edit in this bit later since I made so many changes its hard to recall them all)
#hlayk#regulus black#jegulus#draco malfoy#harry potter#george weasley#blaise zabini#choices messermoon#fanbinding#fandom#bookbinding#my first post#blaise zabini x george weasley#draco x harry#colibri#ups sleep with an eye open
127 notes
·
View notes
Text
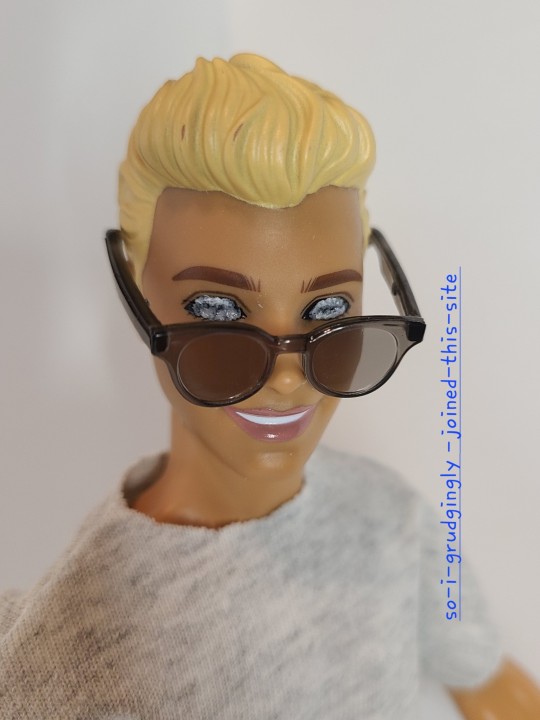
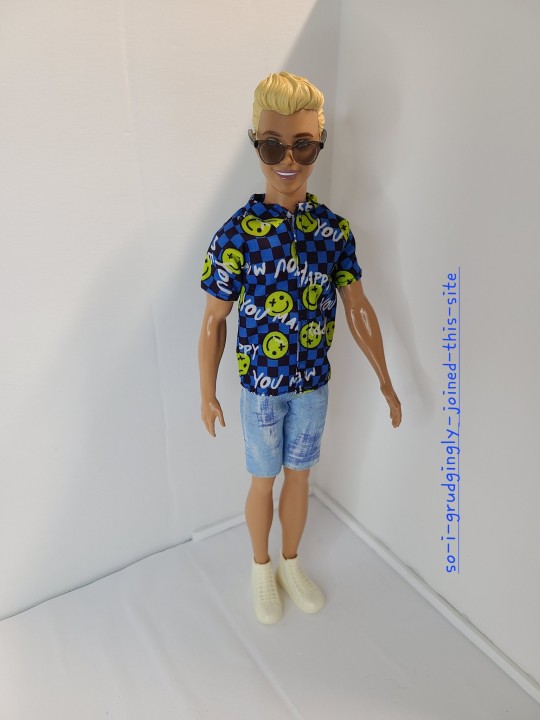
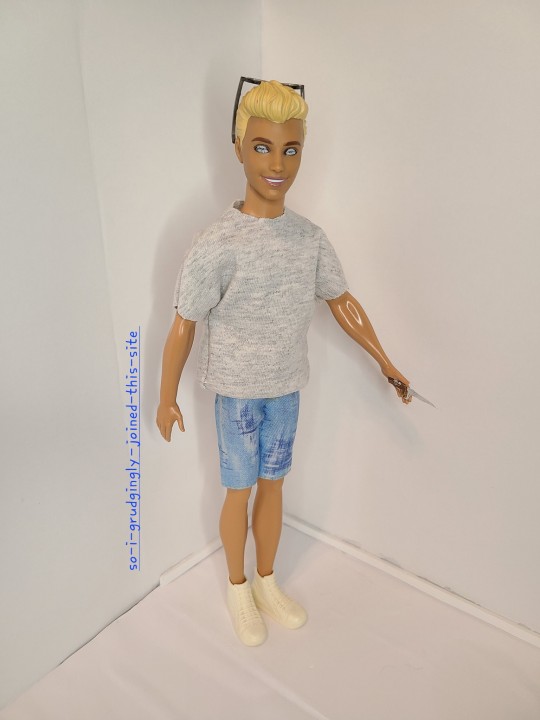
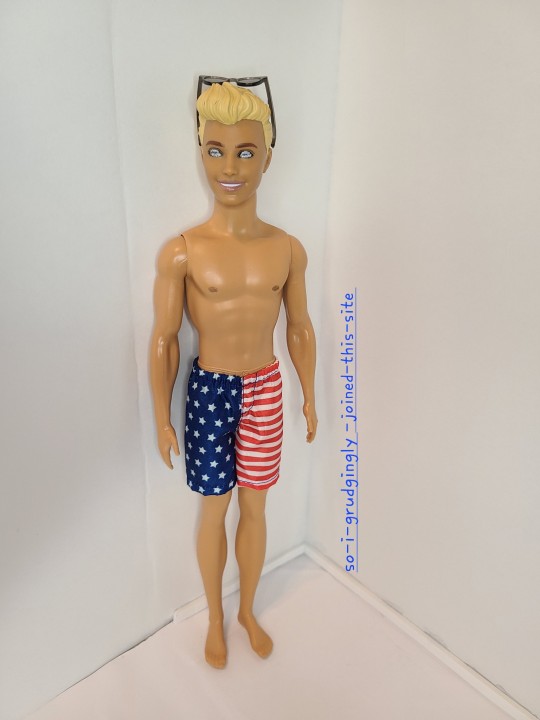
This Ken is the American Dream Nightmare!
Sometimes, I need to take it easy and do a custom project that doesn't require a lot of extreme modifications, and The Corinthian was a great choice for such a project. For the most part, I just had to find a Ken with blond hair and a sufficiently charming/sinister smile, repaint the eyes, and then procure a wardrobe for him.
For the wardrobe, I kept it simple with a T-Shirt look based on Cori 2.0 from the books. The sunglasses, x-eyed smiley face shirt, and jorts were from an official Ken fashion pack--and the shirt felt especially on-theme for him! The American flag beach shorts were a leftover from one of the beach Kens I used as a custom base for another doll. I also made a tiny knife for him out of aluminum foil tape and acrylic paint.
Tagging mutuals under the cut:
@serenityspiral @duckland @violetoftheendless @roguelov @roguedoodles @dotieeee @orionsangel86 @ambercoloredfox @academicblorbo
#the sandman#the corinthian#neil gaiman's sandman#ooak doll#ooak ken#custom doll#custom ken#the sandman comics#the sandman netflix#art#fanart#my art#original post
95 notes
·
View notes
Text
Tired of people going 'all goth fashion is super easy to diy and everyone should do that instead' because like... yes a lot of it is but some very much not. So some thoughts on how much I'd recommend diying various goth fashion stuff as someone who does a lot of it:
Simple jewellery is definitely much better to diy and particularly chains and stuff. I remember going to dangerfield one time and they had a chain with a bat ornament on in for 20 dollars 🤣 ... you can get a bunch of chain from the hardware store pretty cheaply and the exact same bat pendant on it I had got like 20 off etsy for 5 dollars. It usually doesn't take that long and extra tools e.g. pliers are helpful but not necessary - 10/10 absolutely recommend for all goths or other people interested in gothic fashion
Same thing goes for distressed clothing/fishnet shirts there are tons of tutorials for that kind of stuff, and it generally doesn't require that much time, experience or materials 10/10
Minor clothing modifications e.g. some tailoring, adding/removing parts, mending damaged old clothing, changing buttons - this is something that is really useful in everyday life, usually doesn't take that long and is very useful for turning normal clothing into more spooky stuff 9/10
Designs on clothes or patches: if you get some fabric paint, screen printing ink, bleach or even acrylic you can paint designs onto clothing pretty easily. Personally I like dilute screen printing ink as it gives the nicest surface, but it can be a bit of a pain to use as you have to do a lot of layers, and it doesn't colour the fabric intuitively in the way that fabric paint or acrylic do 8/10 - would recommend very strongly to anyone who enjoys art, and recommend trying at least once to people who don't enjoy art as much (you can always make stencils), but it does take a long time and you need some materials. Also, for patches particularly for small bands it can be better to order them from the band to support the artist, but also lots of bands don't have patches or merch or international shipping to some countries makes it not accessible
Embroidery: often looks really good and professional in a way that painted designs don't, takes absolutely ages. 7/10 - would recommend very highly for people who enjoy textile stuff and maybe trying a bit for everyone but yeah if you don't enjoy it it's a pain
Smaller articles of clothing: I've made some waistcoats and shirts and stuff which have been pretty fun and it's really good to be able to do specific designs you wouldn't be able to buy (e.g. my skeleton one) and get stuff to fit right. They were all hand sewn and took a pretty long time (however you can also do it while listening to online classes or whatever), + a bit of time to learn techniques and stuff. Definitely a cheaper than buying them 6.5/10 - do it if you enjoy textile art stuff but will probably be a really painful experience if you don't and you're hand sewing. Also useful if you've got sizing or dimensions that mean you just... can't buy stuff that'll fit which is how I got into sewing
More complex sewing: I've made 2 (well, finished one and 98% of the way through another) long spooky coats and one cape with really complicated edges and embroidery and stuff. Coat 1 was entirely by hand out of not great fabric and took absolutely ages but was definitely vastly cheaper than buying it from the store, and it fit well and everything. With the cape, I got repetitive strain injury in my thumb that still is a bit of a problem 3 years later! With the final coat it was mostly by machine and then touching some stuff up by hand e.g. edges of the lining, making the eyelets and stuff, but it still took ages. Also, something I never see people talking about with diy goth clothing is how hard it is to get the materials - there were only 3 black brocade fabrics available in my city - One was really bad quality and I tried to make a shirt out of it, but it kept falling apart. One was 150 dollars a meter. The one I ended up using was really nice and reasonably priced, but I got the last 2.5 meters of it so it almost wasn't an option. So when people talk about diying clothing being cheaper it can actually not be that much because a clothing business can get fabrics in bulk + unless your city is really big there are probably not many options, so there's also shipping costs if you then need to order fabric. Out of curiosity I compared how much the coat cost in terms of materials to the price of a similar looking coat off dracula clothing which is a pretty well known and apparently quality materials and ethically made goth fashion shop and it came out a bit cheaper but not massively so (not counting shipping...) so 3.5/10 - fun to do if you enjoy textile art as a hobby, not even vaguely a practical alternative to buying a coat
And then there's other stuff like more complicated jewellery making and leather work which idk much about
28 notes
·
View notes
Text
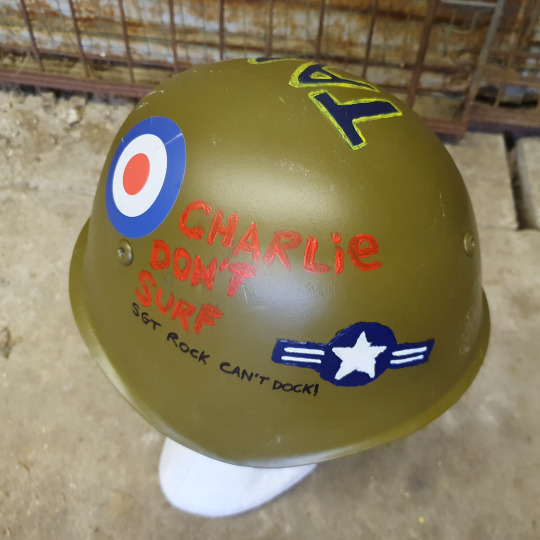
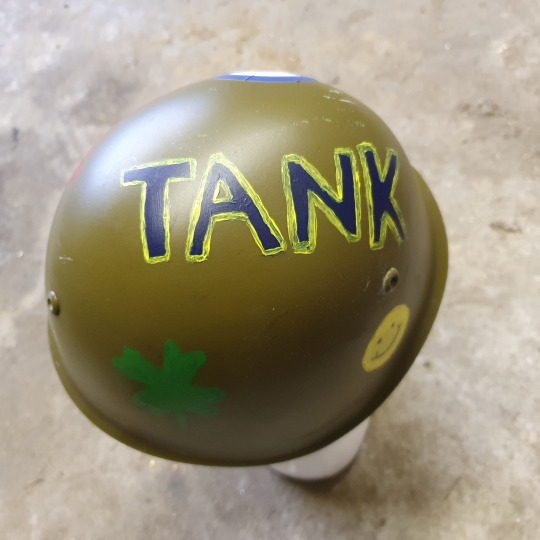
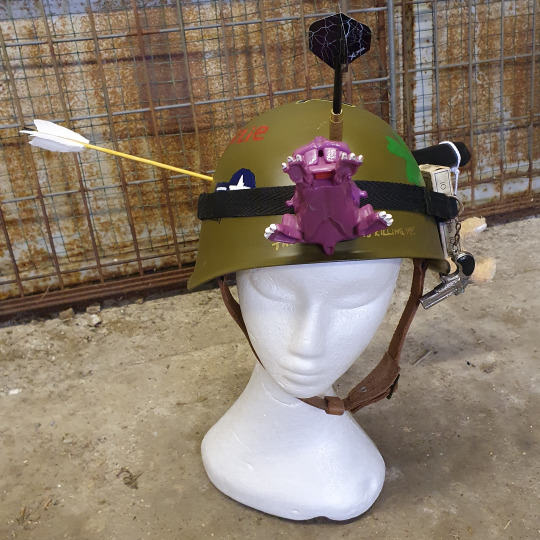

As any Tank Girl fans out there will know, our gal can often be seen wearing customised army helmets. They’re a super fun accessory, so I decided a few months back to have a go at making one. I started off by picking out a couple of ones I liked in the comics (see above for an example) and worked out a design. There were a lot of sticky out bits, so I had a feeling putting it together was going to be easier said than done, but I’ve never let that stop me before and didn’t this time. I could have taken the easy route and bought a plastic helmet, which would have been soooo simple to attach things to, but me being me, I decided to go with something authentic, namely (and I quote) a ‘genuine vintage Bulgarian army M72 steel combat helmet’ which was going cheap on good ol’ ebay 👍👍. I was totally expecting to have to drill holes in this for some of the attachments, but as luck would have it, there were some readymade ones 😊. These are the other bits I used…
1 x plastic creature head – I was looking for something which resembled the head on the attached reference picture and stumbled on something perfect while rummaging through a box of random toys in a thrift store.
1 x neodymium magnet – Used to fix the creature head onto the front of the helmet.
1 x dart – To stick in one of the holes. My only complaint here was I had to buy a pack of 3 and don’t know what to do with the other 2. Maybe I can use them in some future cosplay project.
1 x wooden rod + craft feathers + 1 x plastic wall plug – Used to make an arrow to poke in another of the holes. I had to make my own arrow, as none of the ones I saw for sale would have fit.
1 x kitchen fork – Another thrift store find which looked like it would be a good stand-in for the knife in the picture if I chopped the top off.
Some straps and buckles from an old bag – Stitched together to make a carrying strap for the helmet (which I needed to hang things off).
3 x old bullets for decoration
Some bits of leather to make a bandolier type thing to hold the bullets.
1 x old cigarette box for decoration.
1 x gun keyring – This was an impulse thrift store buy, which wasn’t in the original design, but I thought would be another good decoration (there were actually so many impulse buys like this I couldn’t use them all and ended up making a Tank Girl baseball cap for the overflow – more about that another time).
One of my old teddy bears (Flapjack) to hang from the knife (really a kitchen fork) handle.
1 x old white shoelace to make a hangman’s noose for my teddy (poor Flapjack 🎻).
Acrylic paint and brushes - I’m sure y’all can guess what these were for.
1x target sticker – I bought this in a craft store, because it looked just like the target on the helmet in the picture and I wanted to save myself a tricky painting job.
It took me a while to get all of that together (as you can imagine), but eventually I was ready to go. I eased myself in gently by sticking on the target sticker. Then I did the painting bits. I seem to be getting better at this, as I managed to get through it with no major screw-ups😊. I left the paint to dry for a day and sprayed on some fixative to protect it. It seems to be doing the job, though I have no clue how long it will last.
I made my arrow from the bits mentioned above and sawed off the top of the kitchen fork to make my stand-in knife. Then I worked out how I was going to attach everything. As I said, I used a magnet for the creature head. I stuck the arrow into one of the holes and the dart into another with a plastic bung on the other side to hold it in place. For the knife, I pushed a long screw through the last hole and screwed it into the top of the handle. You can see the screw from some angles, but it was the best I could come up with and it does the job.
I hung Flapjack from the knife handle, clipped on the carry strap with its various decorations and that’s pretty much it. It’s not a bad take on the Tank Girl originals if I do say so myself, though it takes some getting used to. I can’t tell you how many times I’ve bashed one of the sticky out bits on something when I’ve been walking around. Also it’s heavier at the back, so it has a tendency to slip off. As always, this isn’t a proper tutorial, but maybe it will be helpful if anyone out there is thinking of making their own Tank Girl helmet. Have fun if you do. I’m on Ko-fi if anyone is feeling generous and wants to support me in my cosplay adventures… ༻ko-fi.com/christabelq༺ It’s always super-appreciated. Bye for now. ❤️🧡💛💚💙💜
#tankgirl#tank girl#tankgirlcomic#cosplaygirl#cosplayers#ukcosplayer#cosplaygirls#comicbooks#follow for follow#follow back#followback#followforfollow#like for like#likeforlike#costume design#prop design#cosplay tutorial#rocket launcher#alan martin#jamie hewlett#helmet
68 notes
·
View notes
Text
Painting Their Nails (Ryoga, Shogo)
Hello! I'm new to the ParaLive fandom, but I hope you enjoy <3
Ryoga Tosa
While his younger self may have protested, it may surprise some to see Ryoga quietly comply with your request to paint his nails
He treasures you greatly, after all; having a daily reminder of you helps him get through the day
But his easy assent to your request doesn’t make him any less fidgety
Which makes it difficult to cleanly paint his nails, but he tries his best to stay still!
He’s shocked that pushing back his cuticles doesn’t hurt or damage the nail
Super patient- He’ll let you spend as long as you want to paint designs on his nails, too (just please don’t make them too cute– he’ll never hear the end of it from Kenta or Shion)
Ryoga’s quiet during the process; you glance up from time to time to check his reaction, but all you see is a look of concentration— almost a level of reverence — on his face
Unfortunately, that look is quickly traded away for one of hot embarrassment as soon as his eyes make contact with yours
The scent of the lotion you massage into his hands locks into his olfactory memory after you paint his nails a few times, and he relaxes whenever he catches whiffs of the familiar fragrance from then on.
Overall? Enjoys the ritual wholly, though Kenta and Shion don’t let him live it down qwq
Shogo Yamato
He’s excited as soon as you mention the idea to him-
Loves selecting a cute pastel shade, and his eyes light up when you tell him that you could paint gummy designs on his nails as well
Greatly enjoys talking to you while you paint his nails, whether it be about a new song VISTY will be releasing, or thoughts on other competitors
As the leader of an idol group trying to make its way back to the top, he shoulders a great deal of stress, but being forced to sit still helps him relax, especially if you have any sweets on hand
Would be over the moon if you bought boba for the both of you to enjoy while painting his nails, and would make it a ritual from that point forward
Even though you’re not made known to the Stellas (for both your privacy and Shogo’s), Shogo can’t help but feel a bit of pride knowing that you had painted his nails and took the time to make them pretty— he says that he shines even brighter when he’s donning nail polish applied by you because it feels like you’re a part of him during the performance
A fan of having matching nails with you, even if they’re just simple swatches of color on your nails that correspond with his
He may not be able to wear acrylics or gels due to an idol’s requirements to change their appearance on a regular basis, but he treasures each set you paint on him nonetheless
10/10 would absolutely be game to make it a routine for you to paint his nails
Comments, reblogs, and likes are loved and appreciated <333
Also, if you'd like to send in a request, feel free! I'll have a rules and info post up soon <3
#paradox live#paradox live x reader#paralive x reader#ryoga tosa x reader#shogo yamato x reader#paralive scenarios#aaaa i hope you enjoyed <333#the fandom seems really nice so far and im excited to be a part of it!
72 notes
·
View notes
Photo

Saturn’s Free CSP Brush Recommendations, CS Asset Store Edition
I may sell brushes now, but I still love me some free brushes & love to share them with people. These are a bunch of cool brushes made by other people that you can use to build up a nice library of tools without having to spend any cash on, perfect if you’re new to CSP or are on a budget. If you do download these, be sure to like them & give some love to the artist if you enjoy them. :D
How to find: type in the Content ID or Ctrl/Command + C & P (copy and paste shortcuts) into the Clip Studio asset store on the Clip Studio application. I’ll add a link as a preview but copying & pasting the content ID is easiest. I have automatic translation ON, so sorry if you read some weird names.
Feel free to reblog this with your own suggestions, there’s many brushes out there I missed. :D Check defsiarte’s suggestions too, and if you want to see my recommendations for stuff on Gumroad/DA & other places, check this tag.
Large Packs

“An analogue art supply" - 1813808
Huge pack of everything, including acrylic, oil, watercolor, marker, pen, & pencil. I like the markers and sometimes use the acrylics too.
Crm's Toolbox, Watercolors, Markers, & other treasures
Fantastic use of texture and some cute effects pens. The artist has posted everything from quality painting & drawing pens to quality glitter pens for writing.
The Old Default Assets - 1842027 & 1841759
These aren’t pictured, but if you ever see an older tutorial or video showcasing some default brushes you never had, it’s because CSP reworked its default tools around version 1.9. Fortunately they rerelased them so anyone can redownload them. The old ones are still good to use, they’re just not included.
Painters - With Texture
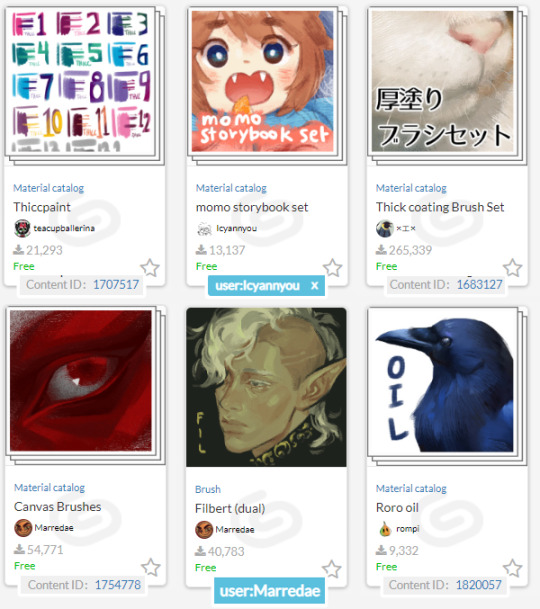
Thiccpaint - 1707517
Never leave home without it. I riot if I don’t have them on my computer.. They have the right combination of texture, shape, & blend with great handling and great variety.
Icyannyou's Momo Sets - user:Icyannyou
Super cute packs that give a lovely painterly look. The Storybook pack is fantastic, and even if you don't draw cute you can still use these painters & blenders to give your artwork character. :)
Thick Coating Brush Set - 1683127
I like these for background work, but it's a big pack of thick textured painters with good handling & neat effects.
Marredae's Brushes - user:Marredae
This artist has a knack for textured brushes. Very high rec, fantastic library of wet & dry painting/rendering tools.
Roro Oil - 1820057
Rompi is another user I enjoy the stuff of, and I'll recommend a few more brushes from them in other categories by the time this post is done. Check 'em out!
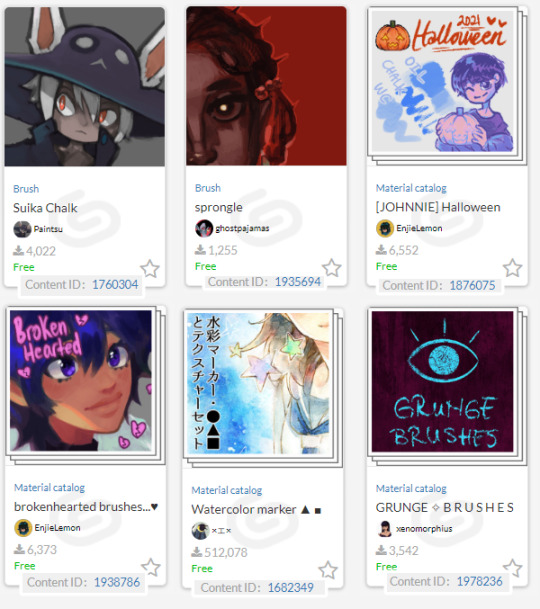

Suika chalk - 1760304
Very useful rough chalk. Sometimes, that’s all you need!
Sprongle - 1935694
A simple round brush with a nice rough tip. Slightly rough without being too rough, great for quick paintings.
Johnnie halloween pack & Brokenhearted brushes... - 1876075 & 1938786, user:EnjieLemon
EnjieLemon has some nice brushes in general, but some are paid for. Still worth checking out due to their cheap clippy price (and clippy can be obtained for free). The Brokenhearted brushes have a nice texture. The Halloween pack includes a cute pumpkin stamp along with some easy to use chalk, oil, & watercolor brushes. Compact and easy to use!
“Watercolor marker and texture set” - 1682349
There's a reason this set is one of the most downloaded on the asset store. It's one of the best looking watercolor replicas out there, and even if you don't use the brushes, you can likely still find a use for the textures. Great for soft coloring.
Grunge Brushes, Soft | Heavy | Complex Brushes & Xenomorphius' stuff in general - user:xenomorphius
Xeno drops some cool natural looking brushes out every so often for painting, inking, and dry media. Please check 'em out! The grunge brushes create a fun, grungy look like it says on the pack, & the soft/heavy/complex set can be used for painting as well as lining.
Oil-h5 trial - 1976418
These brushes are hard to explain. They work with the dual brush setting, & push around a layer of paint on top of your regular paint, creating a cool, streaky look. They're a hidden gem.
MYNQZO brushes - 1993875
A pretty darn good set for painting. I really love rough brush 2, it's great for sketching & rendering.
Painting, non-textured
(basic rounds & other shapes for smooth rendering)
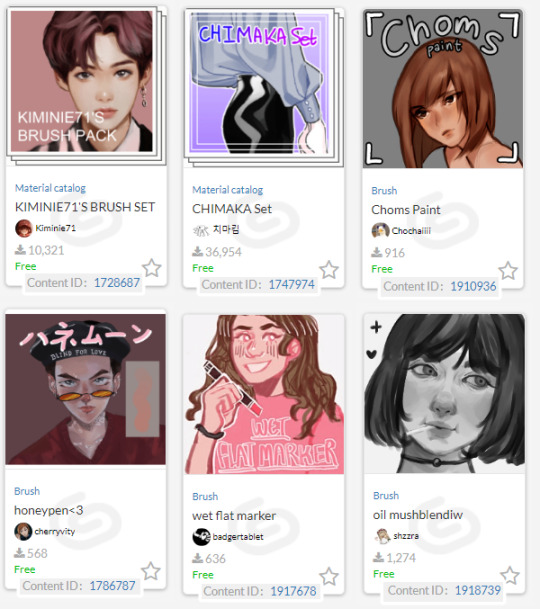
Kiminie71's Brush Set - 1728687
4 simple rounds that are great for rendering!
https://assets.clip-studio.com/en-us/detail?id=1728687
CHIMAKA Set - 1747974
Heavy drag paint that highlights well & applies thickly. Great for bold shading.
Choms Paint - 1910936
It just gets me. No further elaboration.
Honeypen<3 - 1786787
Fits great in my paint hand. Very slidey & blends like intended!
Wet flat marker - 1917678
Super blending brush, gives super soft edges to paint. Blends great.
oil mushblendiw - 1918739
Another simple & easy to use roundbrush.

Paint - 1760641
This plainly named brush is a triangle brush that goes between heavy & light with pressure. The creator, Puppsicle, also sells some neat brushes on Ko-Fi if you enjoy this brush.
"The Scarlet Knot Brush Set 2" - 1916125
I use the watercolor of thought out of this set, but they're all pretty good & easy to use.
https://assets.clip-studio.com/en-us/detail?id=1916125
Sunday - 1825825
A round brush with a watercolor border that gives a nice, sketchy feeling.
https://assets.clip-studio.com/en-us/detail?id=1825825
Marker Brushes
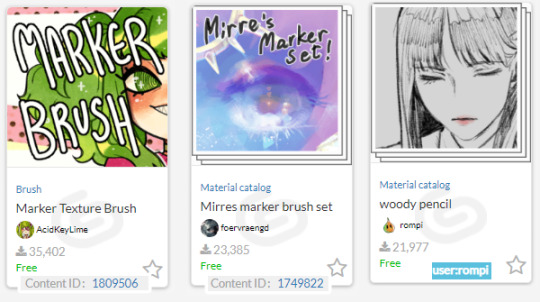
Marker Texture Brush -1809506
A very nice subtly textured brush. Has a nice instructional guide on how to get the best results with it. :D
Mirre's Marker set - 1749822
Another good brush with a subtle texture. Comes with its own blender!
Woody Marker & Pencil set - 1772987
I also love the pencil in this pack. Nice woody feel, feel free to turn off multiply.
Pencils & Sketchers
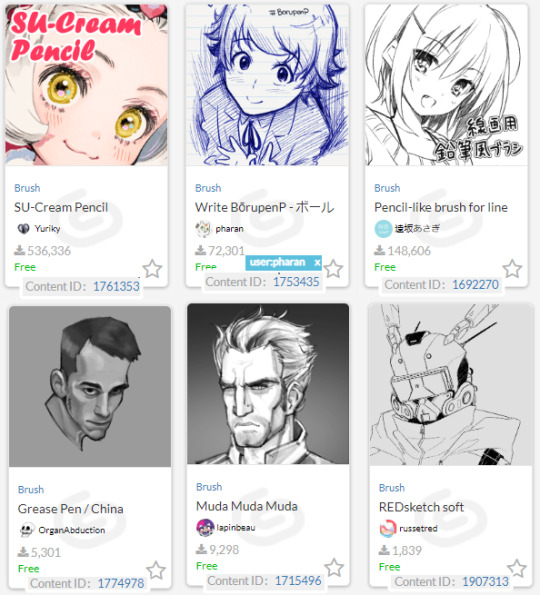
SU-Cream Pencil - 1761353
no wonder its popular. Can be used for lineart, sketching, and coloring, this versatile brush delivers a great smooth look with a gentle textured end finish on pressure.
Write BoruPenP - 1753435
Probably the best ballpoint pen on Clip. Please check out Pharan's things, I love them.😊
“Pencil-like Brush for Lineart” - 1692270
Ok this is kind of a weird way to recommend something. It's SUPPOSED to be a pencil but I use it like a paintbrush with the opacity & density on pressure control, & another copy with blending turned on. Whatever you use it for, you're sure to get a good result!
Grease pencil/china marker - 1774978
Chunky brush for chunky sketching needs.
Muda muda muda - 1715496
A pretty darn good dark pencil.
REDSketch soft - 1907313
just a nice sketcher! Good for shading too.
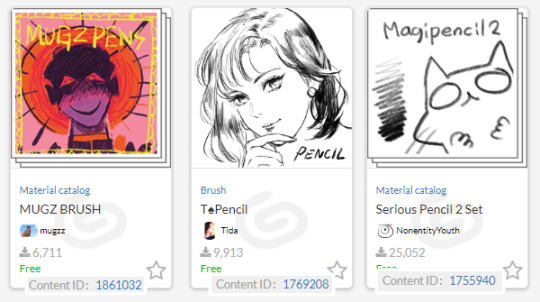
MUGZ BRUSH - 1861032
A set of dry chalk & brushes. Gives a fun messy look when used!
T Spade Pencil - 1769208
A pencil that looks great for lineart as well as sketches. Good taper.
Magipencil 2 - 1755940
Utterly good for textured and smooth lineart. These pens get me. Can’t recommend them enough. :)
Pens & Inkers
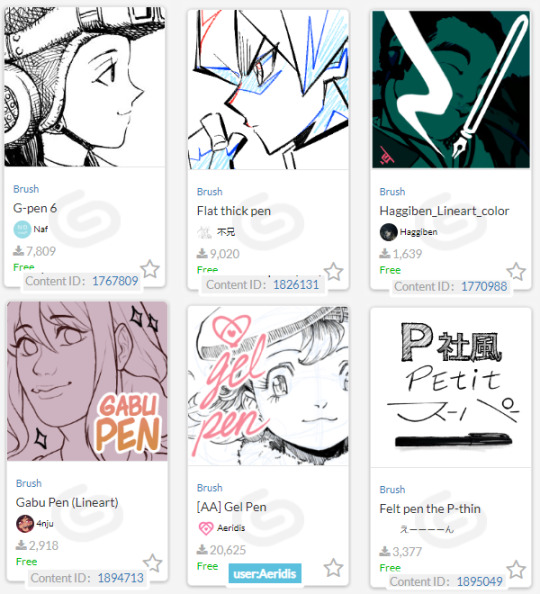
G-pen 6 - 1767809
A generic name but a good Gpen with character. Organic without sacrificing too much smoothness.
"Flat thick pen" - 1826131
I call it the card games pen. I think you can see why. Solid at high pressure, a little bit of texture at low pressure, and pretty great for sharp angles.
Haggiben_Lineart_Color - 1770988
A nice triangle liner.
Gabu Pen - 1894713
Very slightly rough pen on one side, another nice triangle-like liner.
Aeridus - user:Aeridis
All 3 of their pens give a nice result.
Pilot Pen - 1895049
A great IRL brush now a digital one!
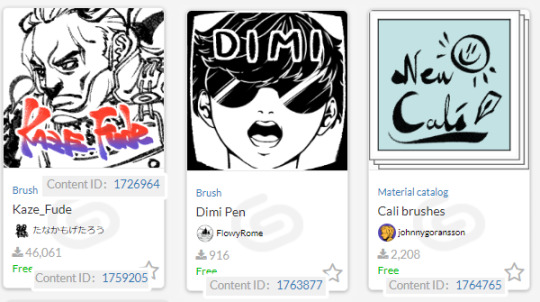
Fude set - 1726964 & 1759205
Heavy, beautiful ink! The creator has some more good ink pens too, take a look. :D
Dimi - 1763877
It's a ga,l with a knife and a nice calligraphy pen. Can't ask for more. Turn on >particles "change with brush size" in settings to keep the shape without chaning.
New Cali
A nice set of Calligraphy brushes. They have smooth transitions between big and small.
Blend, Fill, & Erase

Noise and texture blur - 1842730
If you want a more painterly look to your blur, get these! They said they're supposed to be turned from free to paid, but the artist hasn't come back and done it yet. Will they do it? I'm not sure. :0
Textured Blending & Blurs - 1904941 & 1971444
They're actually made by me, my apologies, but it's hard to find textured blenders by themselves. Most are included in a set or are something you have to pay for, so I released a few free stand alone ones due to it. Normal solid round blenders & blurs are easier to find & even easier to create yourself!
https://assets.clip-studio.com/en-us/detail?id=1904941
https://assets.clip-studio.com/en-us/detail?id=1971444
Unhelpful Eraser - 1798605
The terrible hard eraser that you had in school becomes digital. Download it as a tribute.
Quick Lasso Fill - 1978471
Fills up a lasso'ed area.
Random Color Fill - 1707873
Picks random spaces to fill. The picture in the demonstration shows it better than I can describe.
Scratchy Coloring - 1845677
A fun scratchy brush that can fill areas up.

Quick Lasso Eraser - 1875033
This and the next brush are both @pharan ‘s again. This does the same as the lasso fill, but erases as you can tell.
Erase along Edge - 1800143
An eraser that takes advantage of reference layers. The description explains it in detail.
"Create Solid-irregularity set" aka adding texture to black solid ink patches - 1768052
These distress the paper, making it look more textured. Easier to look at than to explain, click the link for more!
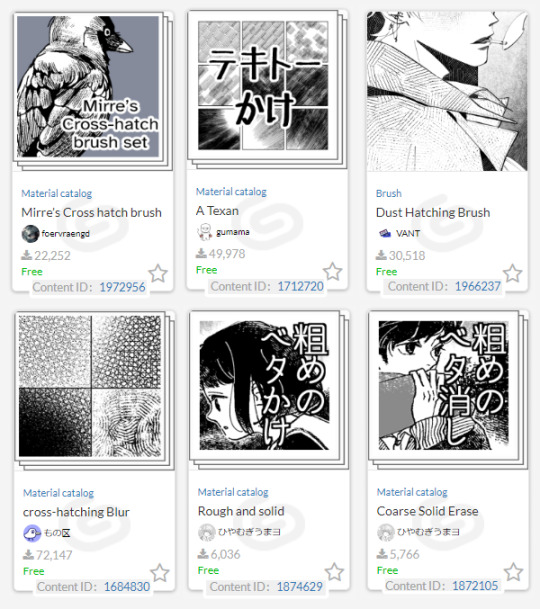
Mirre Cross Hatch Brush Set - 1972956
I love the look the spaced lines give. Fantastic set.
Overlap Hatching (…"a texan"???) - 1712720
One of the most popular Clip Studio Hatchers for a reason, easy to apply hatchers that you can just keep adding to for a sparse or dense look.
Dust hatching brush - 1966237
Simple light hatcher with dust particles around it for a dusty feeling.
Cross-hatching Blur - 1684830
I actually recommend all of user:もの区 ‘s stuff they have posted for crosshatching. There’s a whole bunch of great free brushes there for anyone who enjoy hatching!
“Rough and Solid” - 1874629
A ribbon brush that makes good borders.
“Coarse Solid Erase” - 1872105
For those who like to fill an area, then erase the light parts away.
chaos brushes - 1569895
A great marbler.
"Dirty cross hatching_monochrome" - 1727346
A nice, thick, analogue hatch. SB has some great material in general, but most needs clippy.
Creepy Lines 1 & 2 - 1405766 & 1707236
Get some spooky lines into your art!

Simple Retro Halftone - 1802041
A small set that's easy to use to add some halftone texture.
retro halftone brushes - 1852027
A larger yet still easy to use set with more specific brushes to use for each color.
Mar's Halftones - 1949506
A set with a lot of fun patterns! Check out SpiralPuzzle's stuff in general, they post some unique brushes.
Pixel Art
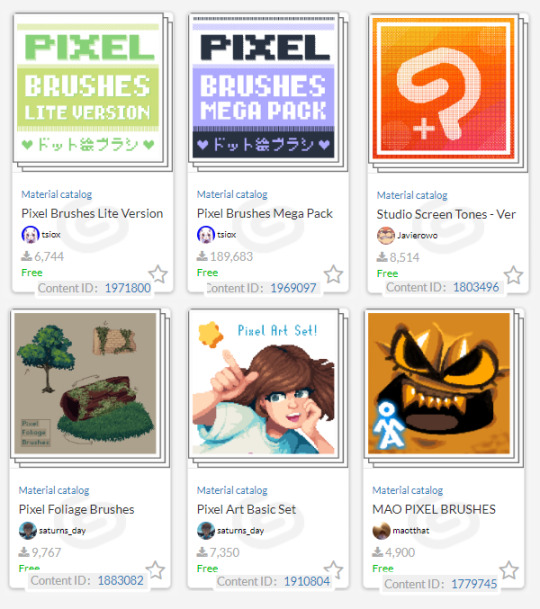
Pixel Brushes by tsiox - (small) 1971800 & (large) 1969097
THE Clip Studio pixel set. Has a ton of tools & textures to use. The small set is better for slower internet connections & if you don't want all the patterns.
Studio Screen Tones - 1803496
If you like Flipnote studios or need more dithers, get this!
Pixel Foliage Brushes - 1883082
I apologize for promoting my own assets again, but I promise they're useful if you're doing anything with grass, trees, or bushes! ;w;
My basic set - 1910804
Another lighter set with a few noise brushes that are useful at tiny size. Did my best not to overlap with tsiox’s set while covering the basics.
Bonus: two blending pixel brush sets.
Mao Pixel (1779745) & Scummy Pixel(1782455). They’re not for exact pixel art, they’re more for playing around with & painting. :)
#clip studio paint#csp#clip studio#clip studio paint brushes#clip studio paint brush#recommended brushes for csp
104 notes
·
View notes
Text
Stained glass tutorial bc the birds are good for it.
The tldr with more resources and a few video tutorial links is here (link)
this is our target and this is our pattern:

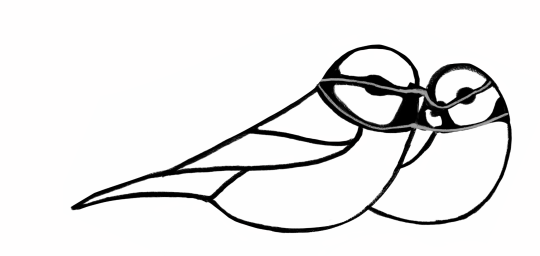
if you're wondering why I'm just handing out the pattern to a piece i plan on selling, the answer is because all stained glass pieces are their own pattern. By posting the image of the piece i already gave you the pattern to it.
What you need:
1 sheet of printer paper,
scissors,
glue stick or a washable marker that works on glass,
grozier pliers,
curved jaw pliers,
glass cutter,
flux and something to apply it with,
60/40 acid free solder,
copper tape,
gloves,
eye protection,
soldering iron with stand and rheostat,
water proof sand paper or waterproof nail file,
black patina or black acrylic paint,
some kind of heat proof surface to work on. I use asphalt coated compressed fiber board because it was cheap and easy to get at the hardware store
a well ventilated area to work in. or a table set up outside, which is the most well ventilated area you probably can access without a key card to a chemistry lab.
finally: 1+ panes of translucent/cathedral glass.
if something is not pictured in the below image it's because getting it meant fighting my cord management or standing up to go get it. The white waffle grid thing is not necessary. It just makes clean up easier so I'm using it and also i was too lazy to move it. a box of nails is pictured, they are also helpful but also not necessary. especially if you are not using something you can easily push them into as a work surface

I'm just using my normal glasses for eye protection, you don't need anything super fancy but you do need something to stop any flying shards.
Anyways. Soldering and finishing is in a reblog of this. i needed more pictures than you can put in a single Tumblr post
Step 1 Pattern Prep
print your pattern out. once if you are just going to use a marker to copy it onto your glass, twice if you are going to glue it down to use that way.
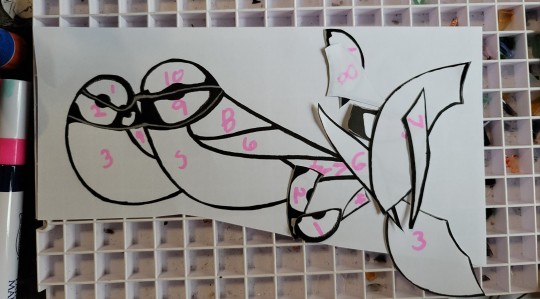
you may notice my pattern is backwards. That's because i printed it out wrong and can't be fucked to go fix it. Anyways.
Number your pieces in the same order on both copies if you are using the glue method, for such a simple pattern it's not uber necessary but it's a good habit to get into. Larger and more complicated pieces rapidly become broken glass jigsaw puzzles if you don't.
Step 2 putting the pattern on the glass
the way you make the glass the right shape is by using a glass cutter, that bronzy thing with all the tape around the barrel to make it easier for me to grip. the way it works is it holds a very thin metal disk that you press into the glass to introduce a fault line the glass will hopefully want to break along. I said hopefully for a reason.
All cuts have to go from one edge of the glass to the other because that's what the crack will do when you break it. Keep that in mind while you lay down your pieces. I've used a marker to show how i plan to cut this pane but unless you're doing a tricky cut order you don't really have to do that
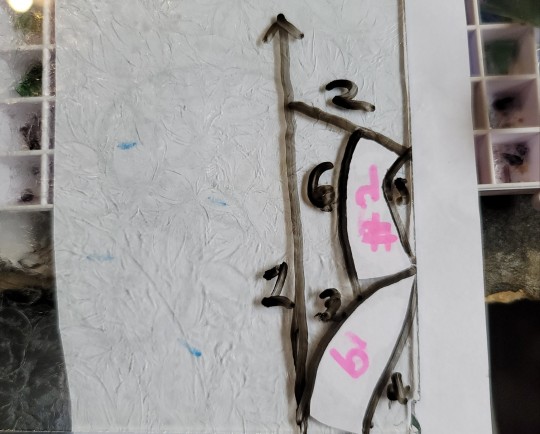
I'm using what i have on hand so how you lay your pieces out will probably be different if you've bought whole panes to work with. This is a much more wasteful way of doing it than i normally would, but the goal with this one was to produce a piece that doesn't require a glass grinder as those are an expensive thing to get when you're just starting out.
Also plan to cut on the Less textured side of the glass, the texture can get in the way. if you would like the texture to be on the front of your finished piece simply glue your pieces upside down onto the smoother side. also know that less textures glass is easier to use
I didn't have any more of that darker grey blue so I'm using a light bluish lavender piece instead. it looks brown because of the the yellow underneath it
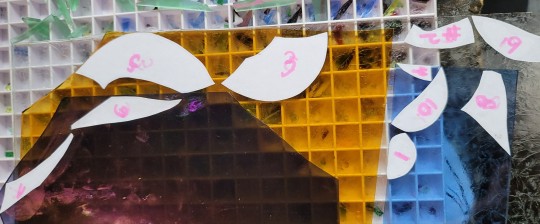
step 3 cut the glass
take a piece of preferably translucent glass and practice this step a few times before doing it on your project.
Press the wheel at the end of the stylus firmly against the glass at one edge, the keep pressure as you push or pull your line. you will know if you're using enough force because clear glass makes a very specific noise when it's being scored. I can't describe it but you'll know it when you hear it. you'll also be able to see the score line from some angles, it should look like a very fine crack in the glass. I've also heard it described as "like a white hair has been set on top of the glass". do not stop, lift your cutter, or go backwards over the scorline you have already made. The crack is a Lot more likely to go off course and destroy your piece if you do.
do only one line at a time before using the grozier pliers to break the glass.
there should be a line on the silicone protector things on the edge of you pliers, hold them so that that mark lines up with your score line and apply pressure , start light and slowly increase until it begins to crack. If the crack immediately runs the whole length of the pane then your done, if it doesn't, rotate the pane and do the same thing on the other edge of the glass until it starts cracking from there too. if it Still doesn't meet in the middle help it along by tapping along the uncracked part of the score line with the tip of your pliers handle until the crack finishes the job. If it's a very long straight one you can also use the edge of a table to encourage the crack to form in the right place.
if the crack decides to go off your scorline just finish breaking that score line and then peel off your pattern piece and reposition it to try again. if you used something like an Elmer's glue stick you can reactivate the glue with a Small amount of water dabbed over the pattern piece with your finger.
Once you have most of the glass broken off use your curved jaw pliers to very carefully nip away at any extra bumps. like half a millimeter at a time, don't just bite into a big chunk, itll shatter the piece. The flat side of the jaws is used to leverage the piece against to break it that way. it's helpful to pick an orientation for your pliers and just commit to always holding them like that. with the flat jaw either up or down. It'll help you build the muscle memory and learn to use them faster.
enjoy your pile of broken glass and dream about the grinder that wouldve made this easier.
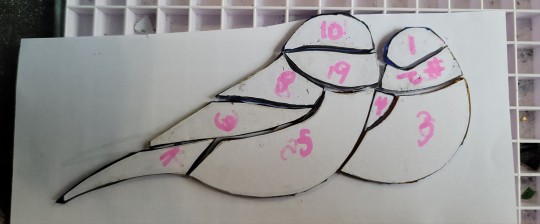
Step 4 grinding deburing.
use your water proof file or sand paper to to knock any little bits of broken glass off. it is Vitally important that you do this with the file Wet. glass dust likes to float on any little draft and it's Super not good for your eyes lungs throat or nose.
You can also take the time now to refine the shapes and sand off any little nubbins that are in the way.
once you're done use a little dish soap to remove the pattern and any grease or glue left on the piece. if you need to re number the pieces.
Step 5 Foil
foil comes in a handful of sizes, and in silver, black, and copper backed. The sizes determine how thick your leading will be, thinner foil, thinner lines. With art glass or very textured glass you may need to go up a few sizes to make it fit. The color on the back will be visible through clear glass so you might want to pick one that vibes with your colors. I'm using what i had, so i don't actually know the thickness. It is copper backed tho.
take your piece and your roll of foil and place the edge of the piece in the center of the tape so that there's an equal amount of hangover on either side. then carefully roll your piece to wrap the edges in tape. being sure to keep it centered the entire way around. when you get back to where you started let the tape overlap itself by at least a quarter of a centimeter or like 1/8th of an inch. then cut the foil.
use your fingers to smooth the foil down over either side of the glass. and then the handle of your scissors or any hard plastic object to firmly press out any creases in the foil. The smoother you can get it the better. because that will make the solder sit flatter.
use the second/primary copy of your pattern for reference and lay out your pieces on top of it. If you're using nails and and a softer work surface you can press them into it around the edges of your pattern to keep the pieces from shifting. for a piece as simple as this it's not necessary but it still might help.
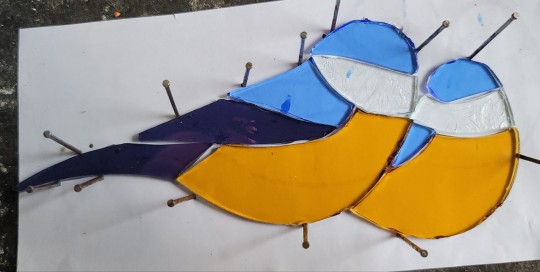
Soldering is next up but I'm posting from mobile and have an image limit to keep in mind. so that will be posted as a reblog in a bit.

117 notes
·
View notes
Text
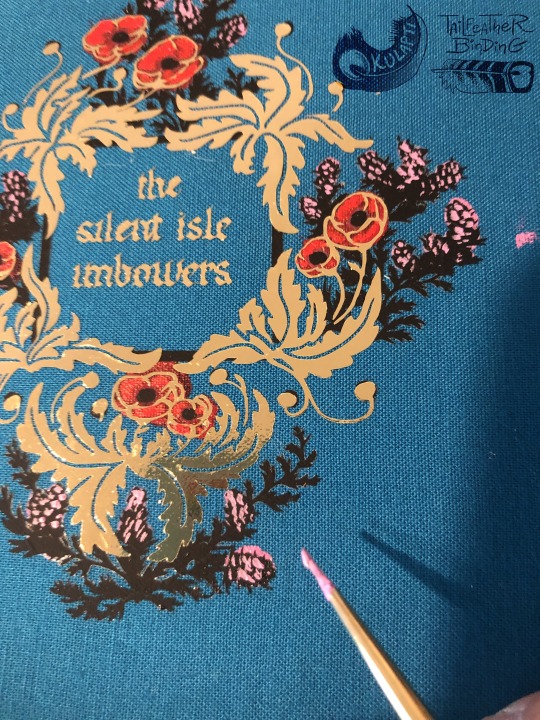


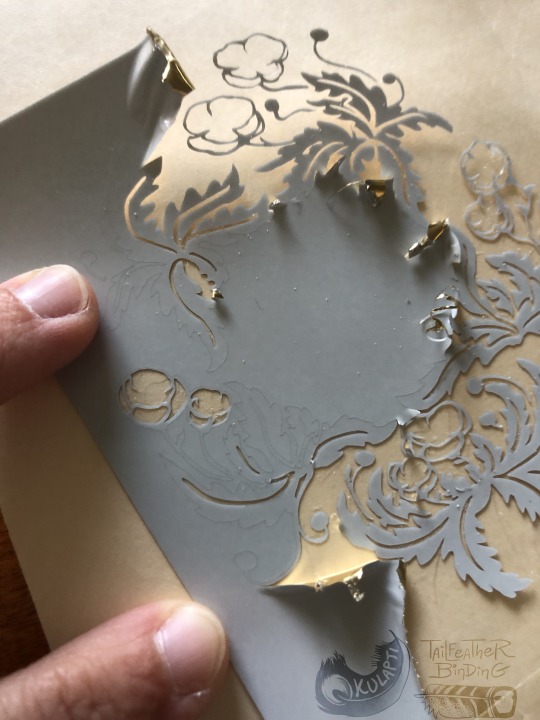

Cover construction for The silent isle imbowers, July-Aug 2023.
Finished binding here.
Materials shown: metallic gold and matte black heat transfer vinyl with cricut-cut designs, cricut-cut paper stencil, acrylic paint, bookcloth made of cotton + drawing paper backing + Lineco PVA glue. Calligraphy by quillingwords, flower art and cover construction by me.
————-General tips on how to make smth like this:
Steps in order were (1) have bookcloth, (2) cut and paint stencil, (3) cut and weed both HTV layers, (4) apply black HTV, (5) apply gold HTV, (6) add paint detail with paintbrush over the vinyl, (7) apply bookcloth to cover board.
This is not a beginner-friendly design LOL. Be like me and try most of the steps by themselves on other projects first.
I drew this design knowing how the sections would be layered, and which materials (and therefore colors) would go with each layer. Achieving a similar result with a premade design will likely require editing in a digital art program.
Test how your materials will layer before committing to a complex design. In this case I discovered that the type of bookcloth I made actually helps conceal the adhesive spread under the black HTV.
Layering HTV over small sections of acrylic paint works! Cannot confirm the result if you were to use large painted sections.
PSA This black layer with many very small pointy bits is at the extreme limit of what I think is possible to weed from machine-cut HTV. A different material might work better, and I got a lot faster at weeding the second copy than the first one, but some of this is just a technical limit. The gold section worked great but I would not recommend this for the black.
Layering HTV is much easier to do uniformly with a heat press! Check if your local library or maybe an art class studio has one you can use before doing smth like this with your iron.
Paper stencils are easy to make with the cricut but don’t try to use them for anything with small details. The above example is pushing it despite being very simple shapes. Stick-on stencils are better.
Tiny HTV design tip: designs with jagged sections and very thin lines are hardest to weed successfully. Smooth curves are much easier.
Scale all pieces of a stacked design on the same drawing program and within the same canvas in cricut so they layer precisely.
Cut tiny HTV designs with the washi paper setting on a cricut. I did not find this out myself but I can confirm the results! Using the HTV setting will cause the blade to catch on and pull up small sections of the design while cutting, ruining parts of the design.
—————-Tiny HTV design weeding tips:
For the love of cheese do not try anything this complicated the first time you use a cricut. or the second. you will cry
Seriously consider trying both HTV and cricut stencils before doing anything complicated like this. I wish I had at least attempted the black layer as a stick-on stencil.
This isn't a weeding tip but again you better cut this with a washi setting.
Use a very sharp weeding tool, good lighting, and consider a magnifying glass
Be prepared for this to take several hours, especially if you have never done a tiny piece before.
Important! The cricut does not perfectly cut out designs, leaving very small connected sections around the design at various locations. This is almost unnoticeable on large designs but can ruin tiny designs very easily. Be prepared to hold down the “keep” sections of the design with tweezers or a fingertip while pulling or trimming off some of the “remove” negative space.
Do NOT attempt to pull off all the negative space in a single piece. Either add dividing lines to your design for the machine to cut, or use a sharp tool to scrape them yourself. You are much less likely to accidentally remove part of your design if you weed the design in distinct sections.
#my art#bookbinding#work in progress#fanbinding#art tips#artists on tumblr#here there be fandom#long post#weeding the black layer was so. lol. I started the first one and was like I may have made a terrible mistake#renegade chat lighting candles for me#worth it!! also would hopefully come up with a more efficient stencil strategy instead next time!!#I normally post wip stuff on my side blog but figured this might be worth going on main#also the first wip photo looks neat so#only the vision of this fic being a Really Hecking Badass Book could sustain me thru 12 hours of weeding those black layers#my Learn Bookbinding Skills strategy is basically to choose an extremely ambitious project that excites me enough to keep me motivated#and then to just work on it for months because I am stubborn as all hell and genuinely find this fun instead of frustrating :D#tailfeather binding#id in alt text#described#update I have added ids!
44 notes
·
View notes
Text
Tired of breaking a nail while working your physically demanding labor job? Try this simple trick!
Glue on fake nails you cut from 304 stainless sheet steel
Paint over top so they look pretty 💅🎆


Addendum A: do not go through metal detectors.
Addendum B (a few days later): maybe skip this one. 0.5mm Steel plate is too hard to shape and cut, if it's not PERFECT, then glue doesn't stick right, and comes off easy, I've already lost a few. Might work better with thinner sheet, or a different material like tin or aluminum. Needs to be able to bend during application to form to the nail shape. I switched to acrylic gel hardener ("nail-aid 1 minute artificial") as a base coat for polish, just trying to keep my nails from chipping and cracking, not be indestructible. Still like the idea, might re-visit at some point.
9 notes
·
View notes
Last Seen Blogs

gottabeskinnie
18 Plus please 💖

smokin-tires
Mopar 💙

sarahindah
My Story

mellowgentlemencherryblosso-blog
Untitled

luketttoasr94-blog
Senza titolo