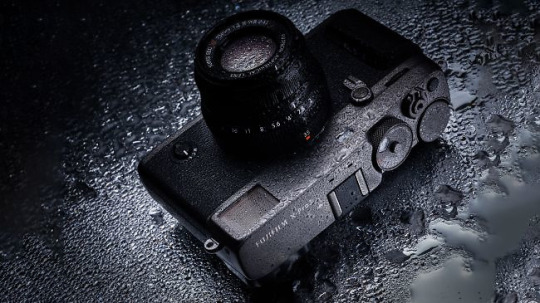
#Fujifilm X-Trans raw files
Text
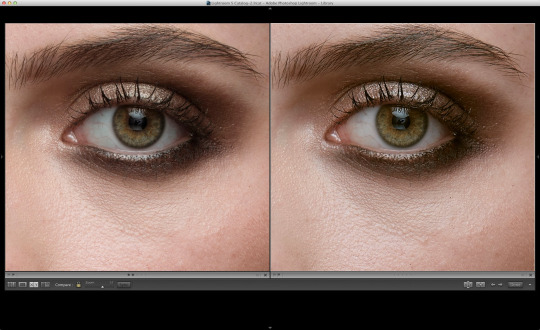
Trying Out New Colours in DxO PhotoLab Elite & DxO FilmPack Elite
View On WordPress
#DxO FilmPack Elite#DxO PhotoLab Elite#Fujifilm X-Pro1#Fujifilm X-Pro2#Fujifilm X-Pro3#Fujifilm X-Pro4#Fujifilm X-Trans raw files#Fujifilm X-Trans sensors#Fujinon XF 56mm f/1.2 R#Lomography X-Pro Slide 200
0 notes
Text
Price: [price_with_discount]
(as of [price_update_date] - Details)
[ad_1]
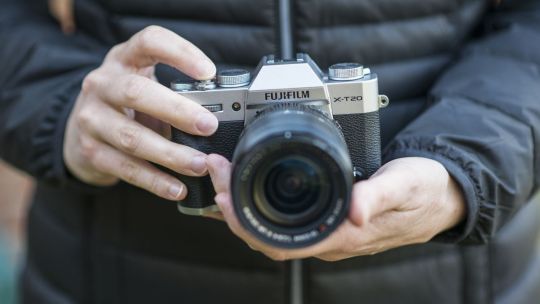
FUJIFILM X-T5 Mirrorless Camera (Silver) A portable and powerful multimedia mirrorless camera, the FUJIFILM X-T5 features the newly developed 40MP APS-C X-Trans CMOS 5 HR BSI sensor for simply stunning results. Comparable in size to the original X-T1 and lighter than its predecessor, this camera provides a classic, dial-based layout and cutting-edge technology that includes a seven-stop in-body image stabilization system, Pixel Shift Multi-Shot mode for 160MP files, and action-freezing shutter speeds up to 1/180,000 sec from the electronic shutter. In addition to its versatile suite of stills capabilities, the X-T5 is also a highly capable moviemaking machine, recording up to 6.2K in 4:2:2 10-bit color internally or 12-bit ProRes RAW and Blackmagic RAW via HDMI. FUJIFILM XF 18-55mm f/2.8-4 R LM OIS Lens Mixing versatility, speed, and a sleek design, the XF 18-55mm f/2.8-4 R LM OIS from FUJIFILM is a flexible 27-84mm-equivalent standard zoom for X-mount mirrorless cameras. Its bright f/2.8-4 maximum aperture range suits working in difficult lighting conditions and also helps to keep the overall and size and weight of the lens down. In regard to optics, this zoom features three aspherical elements and one extra-low dispersion element, which help to control spherical and chromatic aberrations in order to improve sharpness and clarity. A Super EBC coating also improves contrast and color neutrality by reducing flare and ghosting when working in strong lighting conditions. Additionally, benefitting use in a variety of situations, a linear motor delivers quick and quiet autofocus performance and a five stop-effective image stabilization system minimizes the appearance of camera shake.
7-Stop In-Body Image Stabilization and 425-Point Intelligent Hybrid AF System
3.69m-Dot OLED Electronic Viewfinder and 3" 1.84m-Dot Tilting Touchscreen LCD
20 fps E. Shutter, 15 fps Mech. Shutter and 160MP Pixel Shift Multi-Shot
Bluetooth and Wi-Fi Connectivity and XF 18-55mm f/2.8-4 R LM OIS Lens
[ad_2]
0 notes
Text
Best settings for iridient x transformer

#Best settings for iridient x transformer software#
It took an unsharp mask of radius 1.5 amount 0.15 applied in GIMP to get the Darktable output to match visually (matched output pictured). It is apparent that Iridient is applying a small amount of sharpening even with sharpening disabled. This image was then post-processed through Darktable, applying the same color profile, basecurve and sharpening (none) as the other images to permit pixel to pixel comparison.ĭarktable’s output was generated by processing the RAF file directly with the Markesteijn demosaicking algorithm (3-pass mode), 2 iterations of false color smoothing (chroma median filter - this amount selected to match the appearance of false colors in the Iridient image), and no sharpening. Iridient output was generated by Iridient X-Transformer (which produces a demosaicked RGB DNG file ) with the following settings: Detailed, Sharpening Off, Luma NR Off, Chroma NR Off, Lens Correction Off. Visual acuity varies as widely as does opinion on the significance of detailed image analysis. Even with these prerequisites, I’m sure some percentage of you will be squinting at the screen and wondering what the heck I’m talking about. Have a cup of coffee (double espresso for me, thanks). Examplesīuckle up and get ready for some crops! Put on your reading glasses if you need them.
#Best settings for iridient x transformer software#
Note that Darktable, dcraw, UFRaw, RawTherapee, and perhaps other Free Software RAW processors, all use Frank Markesteijn’s algorithm for demosaicking X-Trans images, so similar results can be achieved with any of them, but we’ll focus on Darktable here because it is, in my opinion, the most capable and mature, and the program I use the most personally. In this article, we will explore the differences and similarities as they relate to image quality, in particular the quality of luminance detail. I’ve seen the results of several shootouts between Lightroom, FujiFilm JPEGs, and Iridient, and I know from my own experience that Darktable’s output is very similar to Iridient’s (as exemplified in the aforementioned), but I haven’t come across any direct comparisons - which isn’t very surprising considering the fact that Darktable is not a commercial product and nothing is to be gained financially from promoting its use. Since this is clearly a subject still mired in confusion, I thought it would make an interesting topic for another article. (I don’t have access to Lightroom and therefore cannot provide my own example of its output, but a simple web search will provide you with more than you need to confirm this assertion.)Īdmitting that if we want to preserve fine color detail we must abandon the camera JPEG output, the question remains: which raw processing software will provide the best results? While everyone seems to agree that Iridient is better than Lightroom, the question has never been answered as to whether or not it is better than Darktable. Iridient has become a popular alternative/adjunct to Adobe’s Lightroom for FujiFilm X-Series camera users who wish to process RAW files, due not so much to Iridient’s excellence as to Lightroom’s inadequacy in desmosaicking X-Trans images. (But I also pointed out the compromise between color detail and false color/m oiré inherent in X-Trans.) Several commenters suggested that I could get better results from a commercial software product called called Iridient Developer (which, it should be noted for those yet unaware, cannot be installed into your FujiFilm camera’s firmware in order to improve its JPEG output). I showed that, specifically in terms of color detail, Darktable was able to do a better job than FujiFilm’s own processing. In my previous article, X-Trans: The Promise and the Problem, which focused on the difficulty of demosaicking FujiFilm’s X-Trans sensor data while preserving fine color detail and in particular the trouble FujiFilm’s own image processing pipeline has with it, I used the Free/Libre software Darktable to process the RAW examples. Eking the Most out of X-Trans: Can Free Software Beat Iridient?
0 notes
Text
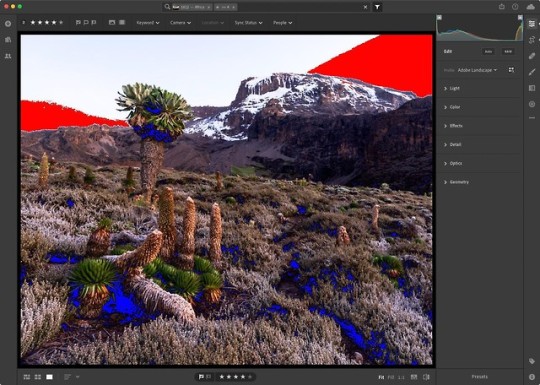
Dxo photolab 4 review

#Dxo photolab 4 review software
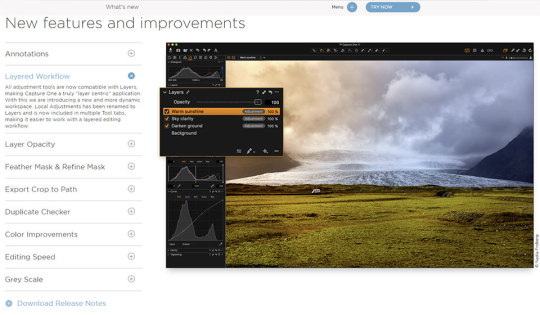
The grey tones used for the user interface are great for photo editing as the neutral tones won't affect the colours/tones of the images you are working on. Those who have used previous versions of PhotoLab will be familiar with the setup and those who have used Adobe Lightroom and Photoshop will also see some similarities between the brands. When you first launch DxO PhotoLab 5 you are asked how many of the automated features you'd like to appear in your workspace so more experienced photo editors can choose to work in a less cluttered workspace with options to toggle palettes and automated features as needed.Īs with version 4 of the software, PhotoLab 5 offers two interfaces: PhotoLibrary and Customise so where you organise photos and edit them are kept separately. Selective application of Control Points and Control Lines.You also get a speedier RAW file development tool and support for additional cameras including the Fujifilm X-Trans sensor camera range which is a first for the software. The introduction of DxO PhotoLab 5 brings improvements to local adjustment tools as well as an updated PhotoLibrary.
#Dxo photolab 4 review software
We'll mainly be focusing on 'what's new' in DxO PhotoLab 5 so if you do want more of an overview of what the PhotoLab software is, have a look at our previous reviews and take a look at the DxO website. With version 5 comes updates to both areas of the software so we're putting it to the test to find out just how easy it is to organise and edit our photos with the new software.
PhotoLibrary options could still be improvedĭxO PhotoLab 5 is the latest version of the French company's photo editing software that also combines a photo library/management tool within the same user interface.
0 notes
Text
Best settings for iridient x transformer

Best settings for iridient x transformer for mac os#
Best settings for iridient x transformer update#
Best settings for iridient x transformer manual#
Best settings for iridient x transformer full#
The Fill Light adjustment is quite similar to increasing or decreasing overall exposure. These include an adaptive Fill Light functionality and pixel neighborhood adaptive Highlights and Shadows adjustments. Iridient Developer version 3 includes several new options for adjusting overall tonality in the Exposure tab. Soft is more suited to portraits and is subtle, hard is more suitable for landscape type scenes and will produce a crisper image. Right-clicking the slider opens a popup menu that offers a choice of three different styles Soft, Standard, and Hard. Keep in mind that certain blending methods can be more suited for some subjects than others. You can alter the look of the sharpening by varying the blending type. The Radius and Amount sliders work just like they do in Unsharp Mask. Although many things can impact the ideal radius setting, in general, the sharper you shot your image the smaller the radius value will need to be.ġ00% crop with Iridient Low Pass sharpening This slider changes the size of the edges that are enhanced by the sharpening. Nearly all of the sharpening techniques use the term radius terms. Contrast is then selectively increased along these edges using this mask, leaving behind a sharper final image. It uses a slightly blurred layer of the original image that is subtracted from the original to detect the presence of edges, effectively creating a high-pass filter. This technique uses multiple layers and can be done in nearly all image editors like Photoshop. Reveal combines several sharpening methods including aspects of both traditional edges contrast enhancement and deconvolution.Īll these sharpening techniques have their roots in processing actions that photographers have been using for decades. This system prevents color shifts, provides superfine gradations and a more realistic color rendition.īesides Unsharp Mask, High Pass, DoG, and Reveal sharpening techniques, Iridient 3.0 brings two new sharpening methods: Iridient Reveal and High Pass. This RAW developer processes your images at 32 bits/channel floating point bit depth, very wide gamut, and perceptual color space to only the lightness or luminance data. The latest version of Iridient Developer also brings two new sharpening methods: Iridient Reveal and High Pass. Iridient v3 XTRANS B&W normal New Sharpening Methods If you can, you definitely need to invest in a dedicated RAW developer. I’ve processed the same XTRANS2 file here with the 3 available color demosaicing processes. Now the results will vary greatly depending on the type of image (portrait, landscape, architecture,…) and are often subtle. This variety means you’ll be able to get the most out of your images. One of the interesting thing about a dedicated RAW developer like this is that it offers different developing techniques for all supported sensors. Bayer, require different development techniques. And that different sensors, think X-Trans vs. Suffice to say that there are different demosaicing techniques that, depending on your image, will render better output results.
Best settings for iridient x transformer manual#
The Iridient manual has some interesting information on this if you’d like to know more, so I’m not going to go into this here. This process reconstructs a full-color spectrum image from the incomplete color samples registered by your camera’s image sensor. RAW ProcessingĪll RAW images require demosaicing to render them into a viewable format. I’ll mainly be going over the new functionality of this RAW developer, and especially the latest sharpening methods for Fujifilm XTANS files.
Best settings for iridient x transformer full#
I’ve been using their version 3 beta releases for the last few months so I feel pretty confident in doing a full review.
Best settings for iridient x transformer update#
This version is a major update with new features and improvements including new RAW processing algorithms, sharpening methods and noise reduction methods. This RAW developer is known for it’s superior demosaicing of Fujifilm X-TRANS2 files, but offer support for over 500 other cameras, now including the Samsung NX1.
Best settings for iridient x transformer for mac os#
Iridient Developer 3.0 is an advanced RAW image conversion application for Mac OS X. Iridient Developer 3.0 review Introduction
0 notes
Text
My favorite Fujifilm film simulation settings
Like so many other Fujifilm users out there, one of the main things that drew me into the X series system was the quality of their jpg files and the film simulations. The colors and details are just stunning, and as someone who grew up with film photography in the 80s, the idea of having film simulations directly in the camera was just perfect!
That being said, as much as I appreciated the quality of the jpgs, I almost always ended up working on the raw files for the added post-processing flexibility and to get a more stylized look. It’s nothing short of amazing the range you get when editing Fujifilm’s raf files, especially when it comes to recovering shadows and highlights. But the greatest thing about working in raw quickly became my biggest problem: the endless possibilities provided by editing in Lightroom means it’s a never-ending task. You can get as many different looks as you want, none necessarily “better” than the others, just different. Choosing between them became an extremely time consuming task and it got to the point where I would sometimes spend over half-an-hour with a single photo going back and forth between different presets.
Earlier this year I realized that I should really spend less time editing and more time shooting, so I decided to start using the jpgs instead of the raw files as much as possible. I started exploring different possibilities with the film simulation settings and found lots of great ideas online. One of the sites I came across during this period was Ritchie Roesch ‘s “Fuji X Weekly”, which features some really excellent film simulation recipes inspired by classic films. I’ve tried all of them, but there’s 2 in particular that really stood out and quickly became my go-to color simulations: Vintage Kodachrome and Fuji Superia 800.
Kodachrome to me screams summer vacations photos, so it’s my default film sim for bright sunny days. Superia 800 brings out some more cooler tones, so I use it mostly for cloudy or rainy days. Both settings create stunning jpgs straight out-of-the-camera,but usually I still run them through Lightroom to apply a custom preset to tweak the tone curve slightly and sometimes apply some extra grain (I’m not a fan of the camera’s inbuilt grain effect). This workflow has reduced my editing time dramatically, as in most cases I don’t even need to open each individual photo, I just apply the LR preset to a batch of files.
As for black and white, I use my own custom recipe which I came up with once I upgraded to an X-trans III camera. I’m a fan of contrasty, grainy images when it comes to B&W, so I experimented a bit and discovered that the Acros film sim when shot at high ISOs produces some very film-like grain, which looks much more natural than the fake grain effect in the film sim settings. This simulation works particularly well with older legacy lenses, because of their natural imperfections compared to current lenses.
My settings are:
Film sim: Acros Red
Dynamic Range: DR200
Highlights: +3
Shadows: +4
Noise reduction: -4
Sharpening: -1
Grain effect: off
ISO: 12800 (in bright sunlight I sometimes have to reduce the ISO, in which case I’ll usually switch to Auto-ISO with a minimum of 2000)
Below are some examples of jpgs taken with each of these film simulations, with only minor adjustments in Lightroom. There are plenty of other great film simulations settings out there, so I encourage everyone to try some and see which ones work best for you.
Fuji Superia 800

Vintage Kodachrome


“Gritty Acros”
#fuji#fujifilm#film simulation settings#fujilove#fujifeed#fujixseries#fujifilm x100f#fuji x100f#x100f#fujifilm x-t20#fuji x-t20#x-t20#canon fd 50mm 1.4#jpg#raw
10 notes
·
View notes
Video
flickr
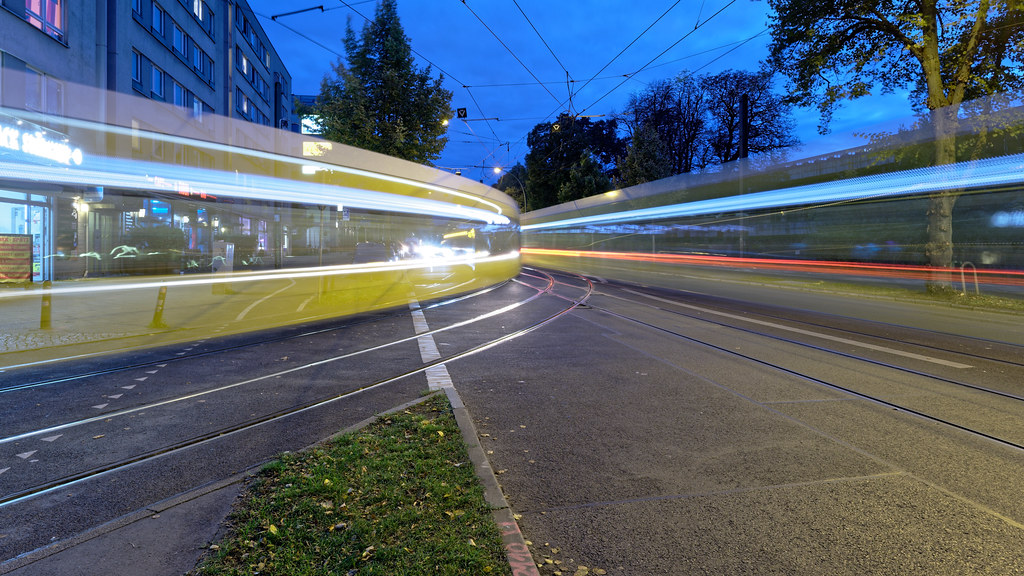
Das alte Rein-Raus-Spiel in Farbe by Pascal Volk
Via Flickr:
Endlich! DxO PhotoLab 5 www.dxo.com/dxo-photolab unterstützt endlich RAW-Files von Fujifilms X-Trans-Sensoren! :-)
#Europe#Germany#Berlin#Berlin Lichtenberg#Alt-Hohenschönhausen#Konrad-Wolf-Straße#Tram#Straßenbahn#trolley#streetcar#Tranvía#Flexity Berlin#BVG#Berliner Verkehrsbetriebe#VBB#Motion blur#Bewegungsunschärfe#Desenfoque de movimiento#Langzeitbelichtung#Bulb#long-exposure#Larga exposición#slow shutter#Blue hour#Blaue Stunde#Hora azul#Wide Angle#Weitwinkel#gran angular#super wide angle
0 notes
Text
Shooting with a 21-Year-Old Camera: The Fujifilm S1 Pro
I find it incredibly fun to use older, especially unique, digital cameras both as a challenge and for sheer enjoyment.
I think part of it is psychological. With archaic cameras sporting outdated technology we anticipate subpar results, and so we focus more on what we can control: composition, lighting (when applicable), exposure, and so on — the things we should always be focusing on.
Conversely, when we have a Hasselblad in our hands, we may let go a bit in the unconscious belief that the camera can make up the difference for our lack of talent or effort. Of course, we all know it can’t.
I won’t get into the boring history of why I own a lot of early to mid-2000s digital cameras, but at some point, I found myself the owner of a Fujifilm Finepix S1 Pro — the first in a five-model line of Fujifilm DSLRs that housed some incredibly unique sensor technology that it dubbed “SuperCCD.”
Apologies for the subpar product photos. I didn’t have access to my full setup.
In the S1 Pro, the photodiodes of the 3.1-megapixel SuperCCD sensor took the form of a honeycomb tessellation, oriented in a zig-zag array rather than a simple vertical/horizontal mosaic. Because of this, the distance between cells is smaller, making for about 40% more (square root of 2 = 1.41) sensor cell rows horizontally and vertically than a regular Bayer sensor.
The camera then uses an interpolation algorithm that supposedly results in a resolution equivalent to a 6.2 megapixel Bayer sensor. The 45-degree orientation also allows for improved capture of horizontal and vertical detail. This is good because most of the world, thanks to gravity, exists in horizontal and vertical planes — however, this happens at the expense of diagonal resolution, which is where traditional sensor layouts excel.
The honeycomb design of the SuperCCD sensors.
Released in January 2000, the Fujifilm S1 Pro is based on the Nikon N60 (aka F60) film camera body (with modifications by Fuji). It logically sports a Nikon F mount and can use AI, AI-S, AI-P, AF, AF-D, or G type lens — however, only AF and AF-D lenses will autofocus. AI and AI-S lenses can only be used in manual exposure mode as there is no meter coupling.
Most of these photos were shot with either the Nikon AF-D 24-120/3.5-5.6 or Nikon AF-D 50/1.8. While the 24-120 is not a quality optic, it’s a more than sufficient match for this sensor, especially stopped down a bit — and you can stop down to your heart’s content without hitting diffraction on this camera.
I had initially gone out shooting with some superior G-type lenses, however, accurate manual focusing is impossible for me through the straw-like OVF (wearing glasses doesn’t help either) and the focus confirmation dot is totally unreliable. Strangely, I had more issues manually focusing on distant objects stopped down than closer ones wide open — the photo above was manually focused with the Sigma Art 35mm wide open at f/1.4, yet the below photo (slightly out of focus) was at 24mm and f/8 with the Nikon 24-120mm f/4G VR.
Shutter speeds top out at 1/2000th. There are several metering modes (3D 6-zone, 6-zone, center-weight), a pop-up flash and hot-shoe (Nikon TTL compatible), and ISO options of 320, 400, 800, and 1600. There is no auto ISO function, and you have to menu dive each time you want to adjust it.
File choices are JPEG or TIFF only — no RAW, unfortunately — recorded to either CompactFlash or SmartMedia. The camera certainly did not accept my 64 or 128GB cards, but I was able to dig up an old 1GB card that can hold a whopping 56 TIFF files in the highest quality mode available (“Hi RGB TIFF”).
This is easily the slowest camera I have ever used. The menu is the antithesis of intuitive; it’s mostly just a collection of symbols and abbreviations and my hat is off to you if you can guess their meaning without reading the manual.
Forget chimping. Just murder that idea and bury it. It takes a solid 31 seconds (yes, I timed it) for an image to populate the screen. Once it does, just about the only thing you can confirm is that a photo was indeed taken, though a histogram is available for more accurate analysis. JPEGs, however, are significantly faster to review.
In a way, if you choose TIFF over JPEG, using the camera is akin to shooting a bulked-up Nikon N60 loaded with a roll and a half of film — no image review, roughly 55 maximum shots, and no quick adjustment of the ISO.
The S1 Pro allows you to choose between either 3.1MP or 6.2MP output. To produce a traditional image file — which exists in rows and columns — the camera must interpolate by using adjacent photosites to generate data between existing pixels. After all, the recorded file can’t exist in the same zig-zag honeycomb pattern as the sensor. After each line is read out and the missing data is filled, you end up with twice the spatial resolution (6.2MP).
Compared to the Nikon D40, which uses a 6.1-megapixel Bayer sensor, the S1 Pro doesn’t quite reach the same level of pixel acuity. However, side by side with the 4.1 megapixel Nikon D2Hs, there isn’t much in it between the two. So, I think the real Bayer-equivalent resolution sits somewhere in the middle of 3.1 and 6.2MP — around 4-4.5 megapixels. As it would happen, this is exactly in line with the roughly 40% increase in sensor cell rows (3.1 * 1.41 = 4.37). It also depends on the scene — some benefit from the unusual sensor design much more than others.
CCD sensors are not forgiving of sloppy exposure. Pushing or pulling can quickly result in blotchy chroma noise, severe color shifts, and compromised roll-off from the quartertones into the highlights. It is not unlike slide film in this way.
The colors are phenomenally accurate and neutral out of the camera. “ORG” tone and color produce a lovely, neutral file that’s perfect for editing, and “STD” (standard) tone and color make for a pleasingly usable straight-out-of-camera file. Even with color set to “HIGH” and tone set to “HARD,” the images aren’t bombastically oversaturated and Disneyland like we often see with the “Vivid” setting in modern cameras. In fact, High Color/Hard Tone photos exhibit only a very modest bump in saturation and contrast compared to Standard Color/Tone. One thing is perfectly clear: Fujifilm was producing cameras with beautiful color output long before X-Trans.
All the images here were shot at ISO 320, 800, or 1600. ISO 400 is completely pointless given that it’s a mere quarter stop gain over base. It would be easier to just dial in a third of a stop of exposure compensation rather than clicking through the menu. I really wish there was a lower base ISO of 160, as well as intermediate options like 640 and 1280.
The camera’s high native sensitivity — combined with early CCD architecture — means that there is a noticeable level of noise even at base ISO. Thankfully, the noise is quite pleasing and mostly luminance up through ISO 800 — even 1600 has very minimal chroma noise straight out of the camera. Anecdotally, I’ve found this to be a running theme with CCD sensors — considerable noise even at base ISO, but the noise presents very favorably through most, if not all, of the sensitivity range depending on the camera. It also makes for astonishingly appealing black and white photos, especially given the finely grained texture from what is largely high-frequency noise. “Film-like” would be an apt descriptor for the results.
The considerable noise in this image is the result of bringing up an underexposed photo in post. Black and white helps cover the color shifts and chroma noise.
If you nail exposure in camera, ISO 1600 will produce remarkably great results with an unexpectedly low amount of noise for a sensor of this type and age — there isn’t much to speak of in terms of offensive noise and photos are completely usable without any noise reduction. However, at this point, you’ve lost a good bit of dynamic range and if you try to push the image in any way, blocked up patches of low-frequency chroma noise and banding immediately rear their head. There is essentially zero room for pushing the files at all if shot at ISO 800 or higher.
Quite impressively, there is almost nothing in terms of color shift throughout the entire sensitivity range — what is accurate or pleasing at base ISO will be accurate or pleasing at 1600. Again, this is something I have noticed on more than one occasion with CCD cameras — the Pentax 645D behaves almost identically throughout its ISO range.
ISO 1600, SOOC “Standard” color and tone, auto WB. Noise reduction and sharpening zeroed out in ACR. No adjustments aside from downsizing.
While restrictive by modern standards, a highly usable ISO 1600 in an APS-C camera in the year 2000 was exceptionally good. Fujifilm claimed the SuperCCD cameras to have superior sensitivity performance — the honeycomb photosites allow for more pixels to be packed within a given area and their shape more closely mirrors the circular microlenses that sit above them. I think Fuji’s assertation bears out in practice.
I would estimate roughly 7.5-8 stops of usable dynamic range, which is up against what I presume is an 8-bit ADC (analog to digital converter). Given this, along with the unforgiving nature of CCD sensors and processing latitude further limited by the lack of RAW, you need to be very deliberate with your exposure choices. Even in a scene of moderate contrast, you will almost certainly have either crushed blacks or clipped highlights.
However, like most CCD cameras, you do start to lose dynamic range quickly once you boost the ISO by a couple of stops. There also isn’t much in the shadows — modern cameras (CMOS) tend to have a lot of their dynamic range bunched up in the shadows, allowing for some truly incredible detail recovery. CCD sensors do not work the same way, and even with a full-blown RAW file, I doubt you’d find much usable information at that end of the histogram. You can mitigate this somewhat via ETTR (“expose to the right”), but with what is already a suboptimal amount of dynamic range, you’ll only have a small amount of latitude for ETTR, if any.
Oops, highway patrol got me. High contrast scenes like this are difficult – the whites are just on the cusp of clipping, but the blacks are gone in numerous areas.
While the camera’s light meter, particularly the 3D 6-zone multipattern meter, is exceptionally adept at balancing exposure in difficult scenes, the auto white balance is a duality: it’s either one of the most accurate I have ever seen or it’s the worst. Almost all the photos I took required zero tint adjustment and usually only +1 to +4 temperature adjustment. However, on three occasions the images were off by so much I’m still baffled as to exactly why.
The most egregious were photos taken about two hours before sunset in the shade — they were rendered extremely blue and about half a stop underexposed. The white balance went so far off the map that most of a plain white T-shirt measured blue values from 240 on up to completely clipped! I assume the culprit for this error is a combination of the camera’s CCD light meter design and spectral response — the infrared filter may be causing issues in certain situations too. IR filters can strongly affect the blue channel and it’s possible there was a bit of Rayleigh scattering at work.
The major issue is that without a RAW file, your options are extremely limited — those botched files required +76 temperature to correct. Such a massive shift in an 8-bit TIFF file results in horrendous noise — especially bad because the blue channel is always the noisiest — and extreme spectral shifts across the entire image. Strangely, a separate shot of a red step ladder taken five feet away at the same time required only -3 tint and zero temperature adjustment.
Using the S1 Pro reminds me of shooting with the original 18-megapixel Leica M9 and Leica M Monochrom cameras — both with Kodak CCD designs. Neither those cameras nor the S1 Pro has any tolerance for “underexpose to protect the highlights” or similar approaches in the same way that CMOS sensors allow — not unlike how slide film doesn’t take kindly to push processing. People who worry about how a camera handles being pushed five stops will need to adjust — it’ll help them in the long run so they can finally learn to stop underexposing so much.
Ultimately, while the files from the S1 Pro don’t contain anywhere near the latitude of even modern JPEGs, let alone the power of RAW, my biggest takeaway while using this camera was how much I adore and value transparency as a starting point out of the camera. In a way, the naturality of colors and tones from this camera makes it even more aggravating that the files can’t stand up to much manipulation — I would absolutely LOVE results like this out of my Nikon Z7, and every other camera I have for that matter.
My father assisting in the repair of a Pentax 6×7. In scenes like this, you just have to expose for your subject and let the extreme ends clip.
What I would love to see is a universal “Natural Color Solution” (to steal a term from Hasselblad) adopted by all manufacturers and implemented in their cameras as an option. If you want that “Natural Color” RAW file, you can have it. If you want the look that you’ve come to love from your manufacturer, you can pick that too. Aside from Hasselblad, I’m not sure what would be the risk for manufacturers to do this — other than that it would take some effort and time.
I would not call the Fujifilm S1 Pro a fun or pleasant camera to use at all. To be honest, I probably immediately deleted 99% of the photos I took while doing this review. And even among the ones you see here, there are more than a few that I am not happy with. Normally, I would not settle for posting simply passable images, but in this case, I think even the lesser photos here do have value by showing both the warts and the ornaments.
Have no doubt, this is a challenging camera to use. I’m sure my images would greatly improve with continued use, but how much I am not sure — I feel like you hit the ceiling quicker than you might imagine.
Perhaps I can follow this up with a retrospective review of 2005’s Fujifilm S3 Pro, which sports a new SuperCCD SR sensor with two photodiodes per photosite — one of normal sensitivity and a smaller one of lower sensitivity. Both are combined to produce enhanced dynamic range (and it works very, very well). The general principle behind such a design comes from the structure of the crystal coating in silver halide film. The S3 also has a 14-bit ADC and produces 14-bit RAW files! That’s just a few of the improvements, but I’ll tell you this much: the SuperCCD SR sensor does NOT disappoint.
from PetaPixel https://ift.tt/3Ambu6I
0 notes
Text
Adobe Capture One

Adobe Color Capture One
Adobe Vs Capture One
Adobe Vs Capture One
Capture one is better, as imaging software, for Fuji GFX and provides better results after editing for the Fuji XT2. Capture one pro efficiently processes RAW images captured through Fuji XT3 digital camera and cameras that use the Fujifilm x-trans sensor, than Adobe Lightroom does. Some Fuji cameras supported by Capture One include: Fujifilm X-T2.
Design is all around us and inspiration can be found everywhere in the world from nature to cityscapes. Transform digital images of physical objects that inspire your imagination directly on your desktop. Turn the coarse texture of tree bark or sweeping wisps of grass to the symmetry of a brick face or patterns of metal work into captivating digital assets. Designers can trigger the in-app Adobe Capture extension from the Libraries panel in Photoshop (desktop version only) to create patterns, vector shapes, color themes, and gradients extracted from images. The ability to capture workflows is no longer limited to the mobile experience. Designers can use the Capture desktop extension to access powerful mobile workflows via the desktop to avoid distractions and save time when creating a variety of digital assets.
Adobe Color Capture One
Capture One + Adobe Bridge (1/1) neilcolton: Hello All-Full disclosure, I'm quite new to the DAM digital workflow, but I'm generally sold on Peter's approach After years of shooting film, I'm finally getting my arms around Peter's way for digital shooters. The more I learn about the digital world of images, the more sense Peter's method makes.
Capture One Pro lets you edit files from all major camera brands. Or save with a Capture One version that's just for Fujifilm, Sony or Nikon cameras. Plus, get solutions for business and multi-user teams. Products & Plans. Scroll to explore. DK-2000 Frederiksberg.
Adblock plus for edge. Capture in action. Use your mobile device as a vector converter to turn photos into color themes, patterns, type, materials, brushes, and shapes. Then bring those assets into your favorite desktop and mobile apps — including Adobe Photoshop, Illustrator, Dimension, XD, and Photoshop Sketch — to use in all your creative projects. Last Published: October 19, 2020 Adobe Capture gives you the power to create production-ready color themes, patterns, vector-based shapes, 3D materials, type, and custom brushes—all from a single photo.
Adobe Capture Color Themes Module.
Use your existing Library creative elements to create unique digital assets that can be imported into your Creative Cloud desktop applications via Creative Cloud Libraries. Adobe Capture allows you to use photographs and transform the physical world around you into creative library assets and elements that can be incorporated into your creative design work. Simply open an image or project file, edit, and add to your Library, which can be accessed directly on your desktop and in mobile apps. With the Adobe Capture in-app extension, you’ll find a new level of ease when it comes to creating and editing creative assets. Batch process multiple assets at once, or quickly extract multiple assets from a single image, and streamline your workflow by reducing steps and saving time on task.
Adobe Capture Shapes Module.
With Adobe Capture, you can create and vectorize shapes on the fly without scanning or using live trace. Vectorize directly in Photoshop within the extension panel and avoid a long manual process using the pen tool. Use the slider to select the level of detail and invert the image to vectorize it. You can modify and apply smoothing to reduce path points. To turn the vectorized images into actionable assets, just add them to your Creative Cloud Libraries and bring in the vector shapes as layers in Photoshop.
You can also do vectorize images while you’re on the move, thanks to the new Photoshop for iPad. Adobe Capture lets you use these assets for masks and adjustments in your .PSDs whether you’re at your desktop or on the road. To use your shape, drag the element from the Library panel and place it onto your Photoshop project. From Photoshop, you can use the shape in Illustrator, Indesign, XD, Premiere Pro, Animate, and After Effects. This workflow is powered by the new Cloud PSD file format (PSDC – the “C” is for cloud), which allows you to move .PSD files seamlessly between your desktop and the cloud. The new PSDC file format for Photoshop with iPad will also autosave changes and allow you to store files in your CC Libraries or other cloud storage.

Using Capture to create color swatches and gradients
You can easily create color palettes using Adobe Capture. Open an existing image or project file to start creating your new color theme with harmony rules. Edit swatches by changing the color levels, selecting a color harmony, and moving the color drops in the original image. Save swatches in a variety of color spaces including LAB, CMYK, HSB, and RGB formats to your CC Libraries. Add swatches directly to Adobe Color to create Pantone color themes for your real world creative output projects.
Adobe Capture allows you to create custom gradients using images and photographs from your Creative Cloud Library. Switch to gradient capture mode to view and edit gradients with Capture’s organic creative process, replacing the tedious and time consuming non-creative method of gradient production. You have full control to add or remove stops (drops) to create gradients from two to fifteen unique color swatches within the Capture panel.
BitPay and Coinbase are major points of entry known to every crypto enthusiast in the world. Even though BitPay is only a bitcoin payment processor while Coinbase is primarily a crypto exchange, the two of them have been making a lot of changes and constantly adding new features to cater to the needs of the evergrowing number of customers. Select to Send on Coinbase (off-chain) or Send on the blockchain and follow the remaining prompts. Note: All sends to crypto addresses are irreversible. Coinbase mobile app. Tap at the bottom. Tap Send; Tap your selected asset and enter the amount of crypto you'd like to send. You can toggle between the fiat value or crypto amount you’d like. Users can also buy crypto from Coinbase or Wyre directly in the BitPay app. If you prefer to buy cryptocurrency through an exchange, the process in most cases will be: Create an account on the exchange. Register a payment method. Buy cryptocurrency. Send the funds to your BitPay Wallet. Learn more about purchasing cryptocurrency. Bitcoin wallet vs coinbase. James from BitPay here. Right now Coinbase accounts aren't suitable for paying BitPay invoices. We go into the details for that here. You will need to send some of your spending bitcoin to one of the bitcoin wallets which are compatible with the Bitcoin Payment Protocol. Learn more about getting a. After Coinbase approves your account, you can link your BitPay app to your Coinbase account. This allows you to buy and sell bitcoin from Coinbase with your BitPay app directly. Below is the process for connecting your Coinbase account to the BitPay app: Step 1: Open the BitPay app. Step 2: Click the gear icon near the bottom right corner of.
Adobe Capture Gradient Module.
Adobe Vs Capture One
Create patterns
From your collected images you can create seamless tiling patterns within the Capture panel in Photoshop, something that wasn’t previously possible without spending a lot of time and effort compositing images. Creating patterns in Capture is as simple as opening an existing image in the pattern module. Bartender for wedding near me. Any image can be used to create kaleidoscopic patterns. Change the reference shape to create different repeating vector patterns that you can save to your library and use in your design work.
Adobe Capture Patterns Module.
Adobe Vs Capture One
The Adobe Capture extension panel tool set allows you to find inspiration and create creative elements on the fly from your Library images. Seamlessly sync your files and elements across platforms with the expanded Creative Cloud integration to manage your files and bring new creativity to your projects with Photoshop.
0 notes
Text
DxO: DxO PureRAW 3, the groundbreaking RAW photo enhancement software, gives photographers incredible image quality thanks to DeepPRIME XD – Commentary

View On WordPress
#Canon Bayer raw files#DxO#DxO FilmPack Elite#DxO Nik Collection#DxO PhotoLab Elite#DxO PureRAW#Fujifilm Bayer raw files#Fujifilm X-Trans raw files#Nikon Bayer raw files#Olympus Bayer raw files#Panasonic Bayer raw files#raw image editing software
0 notes
Text
Cature and output research Task
What type of sensor does your camera have?
My Camera is a Fujifilm XH-1 Mirrorless camera with an APS-C X-Trans III sensor.
Is it Full-Frame or Cropped?
It is a cropped sesor but it is larger than Canon croped sensor camera’s with a 1.5X crop factor rather than a 1.6X.
Find out as much information as you can about your DSLR sensor.
The Sensor inside the Fujifilm XH-1 is the same as used in the Fujifilm Xpro-2, XT-2, X100F and XT-20.
It is paired with an X III processor which gives the XH-1 enhanced maxiumum shutter speed up to 1/8000s at up to 24fps*. The sensor is also attached on an In Body Stabilisaion system (IBIS) which gives up to 5 stops of stablilisation to help take shots in low light situations handheld.
The Maximum resolution of the camera is a 24.3mp image (6000x4000p) but can be increased using the inbuilt panoramic feature for up to a 102mp panoramic. The maximum ISO setting is 200 - 12800 expandable to 160-51200.
Unlike most CMOS sensors the one in the XH-1 and its siblings does not use the traditional Bayer Filter array, it uses a custom 6x6 photosite solution which Fujifilm claim reduces moire and increases image quiality and colour reproduction. The Drawback to this sensor is with RAW file editing with some programs such as Lightroom CC where it can create some “Worming” atrifacts, to avoid this I personally convert them to DNG files if nessesary.
It is equipped with a 3.7million dot OLED EVF rather than a traditional viewfinder but it gives it, and other mirrorless camera’s an advantage where you can see exactly what image is being taken at the cost of battery life which is a rather pethetic 320shots (approx).
The XH-1 was introduces as a professional camera in 2018 for the price of nearly $2000 but was quickly reduced in price when the Sony A7 mk3 (a full frame camera) came out becoming the professional mirrorless camera of choice, leaving the XH-1 in a weird situation where its better than everything else in its class but too expencive to justify purchasing one, there hasn’t been an upgraded “XH-2″ released as of yet.
0 notes
Text
Fujifilm X-T20 review | TechRadar
Our Verdict
The X-T2 is one of our favourite cameras at the moment, and with the X-T20 Fujifilm has managed to distill many of these key features into a slightly more compact and affordable camera that's likely to hit the sweet spot for many photographers.
For
Rich and detailed images
Tactile controls
Excellent handling
Advanced AF system
Film simulation modes
Against
Limited touchscreen control
EVF magnification
Battery life could be better
Just as when it followed up the X-T1 with the X-T10, Fujifilm has taken a lot of the good stuff from the X-T2 and packaged it in a lighter, more affordable body to give us the X-T20.
Rather than leaving a 16-month gap between launching the two cameras as it did with the X-T1 and X-T10 though, Fujifilm has hardly missed a beat, announcing the X-T20 just over four months after the X-T2.
So should X-T2 owners now be kicking themselves over their purchase, or are there enough differences to separate the two?
Features
APS-C X-Trans CMOS III sensor, 24.3MP
Touchscreen control
High-resolution electronic viewfinder
Just as we’ve seen with the X-Pro2 and X-T2, the X-T20 incorporates Fujifilm’s latest 24.3MP X-Trans CMOS III APS-C sensor. It delivers a significant boost in resolution from the X-T10’s 16.3MP sensor, and brings the new camera in line with pretty much most of its competitors.
Fujifilm X-T20 specs
Sensor: 24.2MP APS-C CMOS
Lens mount: Fujifilm X-mount
Screen: 3.0-inch tilt-angle touchscreen, 1,040,000 dots
Burst shooting: 8fps
Autofocus: 325-point AF
Video: 4K
Connectivity: Wi-Fi and Bluetooth
Battery life: 350 shots
Weight: 383g
The ISO range gets a boost as well, with a native sensitivity range of ISO200-12,800, compared to ISO200-6,400 on the X-T10, and while the expanded range stretches to the same sensitivity limits of ISO100-51,200, there’s some welcome news here too – unlike on the X-T10, where the expanded range was restricted to JPEG-only files, the X-T20 allows you to shoot raws as well JPEGs at this expanded range.
The X-T20 sticks with the same 2.36 million-dot OLED electronic viewfinder as we saw on the X-T10. Interestingly, while the resolution matches that of the EVF used in the X-T2, the magnification isn’t quite as impressive, at 0.62x compared to 0.77x, and not quite a match for the Lumix G80/G85’s 0.74x magnification.
While the X-T2 did away with a touchscreen interface at the rear – at the time Fujifilm believed, after feedback from users, that there wasn’t a demand for it – it seems to have had a bit of a change of heart for the X-T20.
The X-T20’s 3.0-inch touchscreen doesn’t quite offer the same breadth of control as, say, the one on the Canon EOS M5 or G80/G85 though, limiting you as it does to tapping the display to acquire focus and trigger the shutter, in addition to pinching to zoom when reviewing images; if you’re hoping to be able to toggle and adjust controls on the rear display you’ll be left disappointed.
The X-T20 sticks with the same 2.36 million-dot OLED electronic viewfinder as we saw on the X-T10
Resolution receives a boost over the X-T10, increasing from 920k-dots to 1.04m-dots, matching that of the X-T2. Unlike the X-T2, the X-T20’s display doesn’t take advantage of Fuji’s double-jointed design, but the mechanism still allows you to pull the display outwards for waist-level shooting, and downwards should you want to use the camera raised aloft.
The X-T20 also comes equipped with Fujifilm’s X-Processor Pro imaging engine, which sees it spring into life a little quicker than the X-T10 at 0.4 seconds, while the shutter lag has been reduced to 0.05 seconds.
There’s just a single SD card slot on the X-T20, compared to the X-T2’s two, while it doesn’t support UHS-II cards.
The X-T20 offers 4K video capture (3840 x 2160) at 30p as well as Full HD (1920 x 1080) at 60p, both of which support film simulations as well. There’s an input for a microphone, but not for audio monitoring.
Best mirrorless camera: 10 top models to suit every budget
Read the full article
0 notes
Text
<p><h2><strong><font color="#f79646">Regular Photography Turned Inside Out as Fujifilm X-Pro3 Officially Arrives</font></strong></h2></p>
As part of a drive to rediscover “pure photography” is a rear screen that has been turned inside out.
Innovative Feature
Tilting the screen downwards to become visible, the rear screen that faces inwards not outwards,is a bizarre yet extraordinary feature making headlines that will cause a stir in all sorts of ways and is unique and exclusive to the new Fujifilm X-Pro 3.
This could actually be a stroke of brilliance as barmy as it sounds to have an inside-out screen. It makes us concentrate on the picture we’re going to take next instead of meaning we have to stare at the picture we’ve just taken.
Top Of The List
Topping lists of the best Fujifilm cameras, the X-Pro3 is a development of Fujifilm’s existing X-Pro2. To the usual mirrorless camera brigade the X-Pro models are designed for a very different audience. The X-Pro is a bit too specialized if you’re looking for the best mirrorless camera. It has a unique hybrid optical/electronic viewfinder and although it comes with regular autofocus rather than rangefinder focusing it’s still styled like a classic rangefinder camera. The X-Pro3’s optical finder is best suited to Fujifilm’s range of prime lenses but it can be used with all Fujifilm X-mount lenses via the electronic view.
Fujifilm X-Pro3 Key Features
Already seen in the Fujifilm X-T3 and X-T30, the X-Pro3 inherits the latest 26.1MP APS-C X-Trans sensor as well as its new feature, the unique back-to-front rear screen and hybrid viewfinder that makes it notable. The X-Pro3 can focus in light levels as low as -6EV, or close to pitch darkness, because of the sensor and the latest X-Processor 4 images processing.
There’s a USB Type C (USB3.1 Gen1) port for fast image transfer and USB charging alongside Fujifilm’s highly regarded Velvia, Provia, Astia film simulation modes with the addition of a new ‘Classic Neg’ film simulation mode.
Thanks to a 70-point weather sealing, a magnesium chassis, and titanium outer sections it should be very durable. Offering a premium finish with the Duratect surface hardening there will also be two colour variations.
Adding rich colour gradations to black and white images is possible due to the ‘Monochromatic Colour’ function, multiple exposures are made possible up to 9 frames in Additive, Average, Comparative Bright or Comparative Dark modes, and the X-Pro3 also features a new in-camera HDR function which combines a series of shots at different exposures. The Grain Effect function has been extended with strength and size adjustments and it’s now possible to add Clarity to images.
It’s no slouch even though the X-Pro3 has a deliberately conservative “classic” look. It shoots at 30fps with an electronic shutter in 1.25x crop mode and has an 11fps continuous shooting mode with a pretty impressive buffer capacity of 42 raw files/145 JPEGs, and it can shoot both C4K and 4K UHD video at 30p, 25p, and 24p.
This camera is not a bargain camera for beginners, rather, it is a premium product for the cognoscenti, so you won’t be looking for a cheap deal here but buying a camera because you love it. It goes on sale on 28 November 2019 for $1,799 / £1,699 for the regular version, or $1,999 / £1,879 for the Duractect versions from mid-December.
Words by Elijah (Content Marketer) via Digital Camera World.
0 notes
Photo
Watch Adobe has announced an update to its Lightroom CC, Lightroom Classic and Camera Raw applications, the highlight being a new feature, powered by its Sensei AI, called Enhance Details. Adobe claims the new feature harnesses the power of machine learning and computational photography, with its ultimate purpose being to increase resolution in images by up to 30%. This is thanks to a revised method of demosaicing images, which is the process raw files from most cameras undergo in order to establish red, green and blue values at every pixel. Lightroom CC vs Lightroom Classic CC: 10 key differences The company reckons this is effective on images regardless of whether they’ve originated from a camera with a Bayer RGB color filter array or one of the X-Trans CMOS sensors found inside the majority of current Fujifilm cameras. A white paper released by the company goes into further details. Histogram clipping indicators. Credit: Adobe Other functions that arrive in this most recent update incl.. video
#Games - #video -
0 notes
Last Seen Blogs

xiaowhore
mao

rushum-blog
Vigilant Words
klepto-bird
Crow's Art Blog

oscar-wilde-thing
Work in Prog-Mess

herbocare-in
Herbocre