#Hoya Red Intensifier
Photo
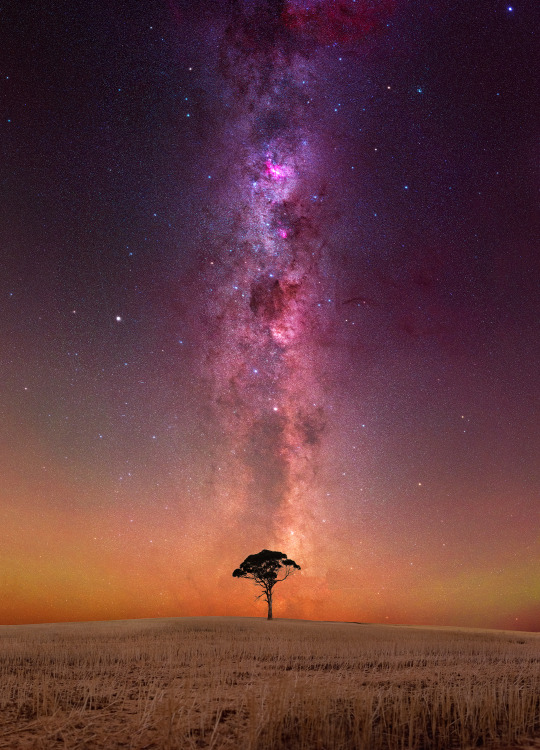
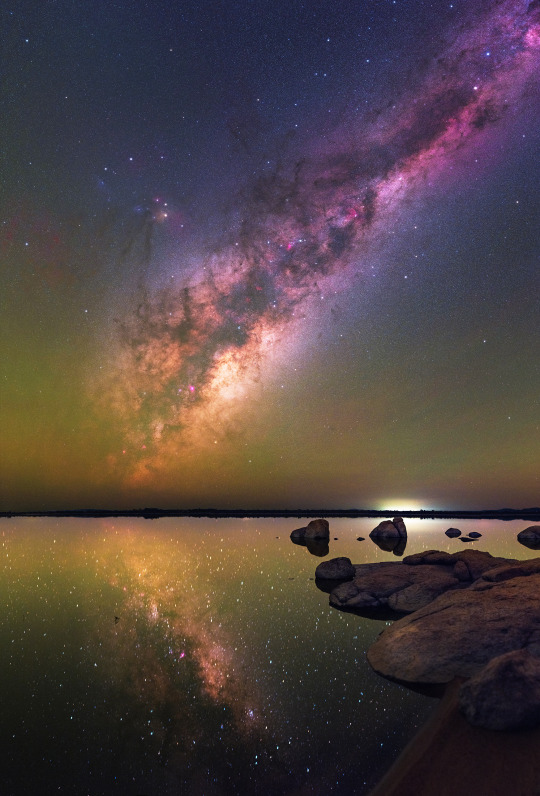
Summer Milky Way at York, Western Australia
Nikon d810a - 50mm - ISO 6400 - f/2.5 - Foreground: 6 x 30 seconds -
Sky: 17 x 30 seconds - iOptron SkyTracker - Hoya Red Intensifier filter
#Milky Way#stars#space#night#sky#galaxy#universe#Astronomy#astrophotography#landscape astrophotography#carina#nebula#crux#lone tree#York#Western Australia#Australia#nikon#d810a#Hoya Red Intensifier#iOptron#SkyTracker
3K notes
·
View notes
Photo

Summer Milky Way at Harvey Dam, Western Australia by Trevor Dobson Nikon d810a 50mm ISO 6400 f/2.8 Foreground: 14 x 15 seconds Sky: 49 x 30 seconds iOptron SkyTracker Hoya Red Intensifier filter This is a 63 shot panorama of the Southern Hemisphere's summer Milky Way as it arches from the north (left side of the image) to the south above Harvey Dam, 1.5 hours south of Perth in Western Australia. Prominent in this image is the pink, petal shaped Carina Nebula and the Crux constellation in the centre right, in the top right corner is the Large Magellanic Cloud and to its left is the large, deep red Gum Nebula. On the left side is the easily recognisable Orion Nebula and Barnard's Loop. There's also quite a bit of green and red airglow above the horizon. The partially submerged tree in the dam was light painted with a hand held spotlight. https://flic.kr/p/2ocoELE
0 notes
Photo
Milky Way at Nambung Desert, Western Australia by Trevor Dobson Nikon d810a 50mm ISO 6400 f/2.8 Foreground: 15 x 25 seconds Sky: 41 x 30 seconds iOptron SkyTracker Hoya Red Intensifier filter This is a 56 shot panorama of the Milky Way above Nambung Desert, about 2 hours north of Perth in Western Australia. This is about 15 minutes south of The Pinnacles and is a roughly 4 square km area of pure white sand dunes adjacent to the main coastal road, so only a short walk from the roadside to the dunes. Prominent in this image are the Large & Small Magellanic Clouds just above the horizon and right of centre, just above the LMC is the pink Carina Nebula and to the left of that is the dark Coalsack Nebula with Crux to its immediate right. And of course that's me standing and admiring the entire scene :) https://flic.kr/p/2nyDtkH
1 note
·
View note
Video
flickr
Carina Nebula and the Large Magellanic Cloud - Jarrahdale, Western Australia by inefekt69
Via Flickr:
Nikon d5500 50mm + Hoya Red Intensifier Filter 28 x 30 seconds ISO 3200 f/2.8 iOptron Sky Tracker Stitched in MS ICE This is the byproduct of some testing I did this morning on my iOptron SkyTracker which I've had collecting dust for a year or so now. The image was taken at Sullivan's Rock, just outside the Perth city limits and features the Carina Nebula (the pink splotch) and the Large Magellanic Cloud, just left of the red airglow on the bottom right. I intended doing a full panorama but ran out of time while also learning that a tracker will mess with your grid pattern while taking panoramas :) A valuable lesson for next time....
#iOptron#Skytracker#Hoya#red#intensifier#didymium#Panorama#stitched#mosaic#cosmology#southern hemisphere#cosmos#southern#Western Australia#Australia#DSLR#long exposure#rural#night photography#Nikon#stars#astronomy#space#galaxy#Astrophotography#outdoor#sky#50mm#d5500#nebula
3 notes
·
View notes
Video
Summer Milky Way Arch - Quairading, Western Australia by Trevor Dobson
Via Flickr:
Nikon d810a 50mm ISO 5000 f/2.8 Foreground: 14 x 30 seconds Sky: 50 x 30 seconds iOptron SkyTracker Hoya Red Intensifier filter This is a 64 shot panorama of the summer Milky Way as it arches over Pink Lake near Quairading, 2 hours east of Perth in Western Australia. The lake is split in two by the road you see in the middle of the image, at certain times of the year one side of the lake turns pink while the other maintains its muddy brown colour. Prominent in this image are the Magellanic Clouds to the right, the nearby pink Carina Nebula just below the large deep red h-alpha region called the Gum Nebula. On the left side is the well known Orion nebula surrounded by Barnard's Loop and in the far left bottom corner of the sky are the blue coloured Seven Sisters aka the Pleiades or Subara constellation. There's also quite a bit of airglow, mainly on the right side above the horizon.
#Milky Way#Pink#Lake#Quairading#road#Crux#Carina#Eta-Carinae#panorama#stitched#mosaic#MS ICE#southern hemisphere#cosmos#Western Australia#DSLR#long exposure#rural#night photography#Nikon#stars#astronomy#space#galaxy#Astrophotography#outdoor#core#sky#50mm#d810a
7 notes
·
View notes
Photo


The JarredSpec Introduction to Milkyway Landscape Photography for beginners. Part I: Gear!
This is a series of posts i’ll be posting over on Patreon and my Website over the next few weeks. Patrons get them a week earlier than anyone else :)
Part II coming Next week!
If you’ve been following me for the past few years you’ll have noticed that I do enjoy going out at ridiculous times of night in the freezing cold to point my camera at the stars. The shot above is from my first real attempt at deliberately shooting the Milkyway.So. With the intent of going out this season and dragging a few people out with me, I thought i’d write a quick blog post covering what gear you need (plus some gear that makes the job easier), the basics of shooting and some basic tips on composition.
GEAR
MUST HAVES:
An interchangeable lens camera and a wide angle lens. Not saying that this sort of stuff can’t be done with point and shoots to some extent and even smartphones these days, but we’re going to start with people who have already invested in some dedicated photography gear. The lens ideally should be wide angle and have a maximum aperture of f/3.5 or faster at its widest focal length. This is still not ideal, but I’m aiming this at beginners who most likely have an 18-55mm kit lens with their camera.
Tripod: This is a must. Shooting the milkyway comes under the umbrella of “Long Exposure Photography” and as we will be having our shutters open for up to and sometimes longer than 30 seconds, the camera needs to be held in place without it being able to be shaken. I use the Sirui AM-254 with A10R Ballhead - a fantastic sub $500NZD Carbon Fibre tripod. Look forward to a Youtube video with an overview of this guy!
WARM CLOTHES. You’re going out at night, probably in winter. No ones needs to bring Hypothermia home along with their epic Milkyway shot.Editing Software: To bring the best out of the Milkyway, we will be shooting RAW and processing the Image. Adobe Lightroom and Photoshop are probably the most popular editing tools worldwide and are what I use to edit all of my images. Worth the purchase!
BONUS EQUIPMENT:
A remote shutter release. These are handy to make sure you don’t introduce and camera shake while you’re pressing the shutter button, and to allow precise shutter durations in bulb mode. Sometimes a lens might be optimal at something like 19 seconds, and your camera might only have 15sec and 20sec available to select while in manual mode. Setting it to the longer might introduce unacceptable levels of star movement. I use an old school Cable release with my Fujifilm X-T4, but if you shoot with any other main brands you can probably get your hands on a wireless remote if you shoot Canon, Nikon or Sony
A fast, wide angle lens. When we describe a lens as “fast” were are speaking about its maximum aperture. A “fast” lens will generally have an aperture of f/2.8 or larger (remember, the lower the “f/X.X” number, the wider/larger the aperture). Fast wide angle lenses usually don’t come cheap, especially from the main camera companies themselves. Thankfully third party options are out there and offer fantastic value while performing very well. Tokina and Samyang are notable examples of this. If you shooting Nikon or Canon Id recommend looking at the Samyang 14mm f/2.8 or the Tokina 11-20mm f/2.8 (or its older version, the 11-16mm f2/8 on the second hand market). If shooting Fujifilm or Sony the Samyang 12mm f2.0 is fantastic and is currently my chosen lens. Caveat: The Samyang lenses are manual focus only, something to consider if you intend on using the lens for anything other than Astrolandscapes.
A Light pollution filter. This is bottom of the list. Not even slightly necessary to shoot the Milkyway, but at times can be handy to filter out the spectrum of light cities tend to produce. These are becoming less and less useful as the world moves more towards LED lighting. Up until recently I have been using a Hoya RA54 “Red Enhancer/Intensifier” but have since moved to a Kase Clip in “Neutral Night” filter via Meghan Maloney Photography here in NZ. These are nifty lil suckers - look forward to a video on this guy too. Stay tuned for Part II where we talk about planning, composition and shooting! Comment below with any further questions you might have and ill do my best to answer them!
#milkyway#milkyway photography#photographers of new zealand#photographers on tumblr#astrophotography#dark skies#night skies#join my patreon#landscape photography#new zealand
5 notes
·
View notes
Photo

Milky Way at Dowerin, Western Australia by inefekt69 Nikon d5500 50mm ISO 3200 f/2.8 Foreground: 13 x 10 seconds Sky: 59 x 30 seconds iOptron SkyTracker Hoya Red Intensifier filter This is a 72 shot panorama of the Milky Way rising over a lone gum tree on a farm halfway between Dowerin & Cunderdin, about 2 hours north east of Perth in Western Australia. For the first time I had to change batteries on my tracker during this shoot, lucky I had spares in my backpack otherwise it would have been ruined :) https://flic.kr/p/2jevDjP
1 note
·
View note
Photo

— inefekt69 —
Milky Way at Yenyening Lakes, Western Australia
Nikon d5500 50mm + Hoya Red Intensifier filter ISO 3200 f/2.8 Foreground: 26 x 13 seconds Sky: 77 x 30 seconds iOptron SkyTracker This is a 103 shot panorama of the Milky Way setting over a dry lake bed at Yenyening Lakes near Beverley, about two hours east of Perth in Western Australia. This is a late season panorama with the core low on the western horizon. In this part of the world the galactic band is viewed almost horizonally aligned with the horizon as sets to the west. There is always quite a bit of controlled burning going on at this time of year, before the summer sets in, so the air in parts is quite thick with smoke which scatters the light giving it a yellow/orange glow as you can see here. Two prominent magenta/red coloured nebulae can be seen also just above the horizon, Carina on the far left and the North America Nebula on the right.
1 note
·
View note
Photo
Milky Way at Lake Norring, Western Australia
Nikon d810a - 50mm - ISO 6400 - f/3.2 - Foreground: 5 x 30 seconds - Sky: 12 x 30 seconds - iOptron SkyTracker - Hoya Red Intensifier filter
#Milky Way#stars#space#night#sky#Astronomy#astrophotography#landscape astrophotography#galaxy#universe#Western Australia#Wagin#Lake Norring#lake#reflections#nikon#d810a#iOptron#SkyTracker#Hoya Red Intensifier
2K notes
·
View notes
Photo
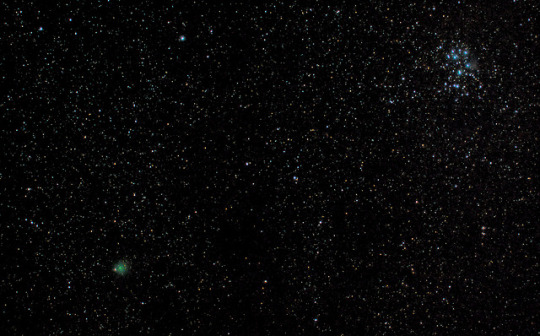
Comet 46P/Wirtanen & Pleiades
Pentax K-3 II with Astrotracer, Tamron 70-200mm f/2.8 at 70mm, f/4, Hoya red intensifier filter to reduce light pollution, 25 x 10 seconds. I was not able to see the comet by eye with binoculars. The moon was near the field of view, to the right.
#photographers on tumblr#Mineral Point#Pennsylvania#United States#Astrophotography#Comet 46P/Wirtanen#Comets#M45#Open clusters#Pleiades#Seven Sisters#Star clusters#Tamron SP 70-200mm F2.8 Di LD (IF) Macro
30 notes
·
View notes
Video
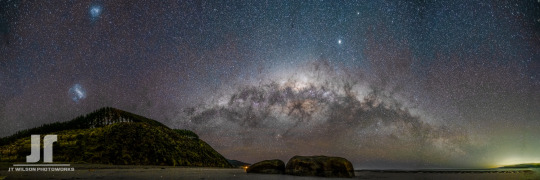
Summer Milky Way at The Pinnacles Desert, Western Australia by Trevor Dobson
Via Flickr:
Nikon d810a 50mm ISO 6400 f/2.5 Foreground: 6 x 1/3 seconds Sky: 24 x 25 seconds iOptron SkyTracker Hoya Red Intensifier filter This is a 30 shot panorama of the Crux & Carina region of the Milky Way as it aligns perpendicular to the horizon at The Pinnacles Desert, 2 hours north of Perth in Western Australia. I tried a different method for the foreground lighting on this one, simply putting my fairly bright handheld torch off to the left hand side. I placed it on the ground to accentuate the textures on the desert floor. I was surprised how short of an exposure I needed, just one third of a second. Prominent in this image is the pink coloured Carina Nebula, just above centre. The dark Coalsack Nebula is just below that with Crux to its immediate left. The deep red region near the top is the Gum Nebula.
#Milky Way#Crux#Carina#Eta-Carinae#Pinnacles#desert#panorama#stitched#mosaic#MS ICE#southern hemisphere#cosmos#Western Australia#DSLR#long exposure#rural#night photography#Nikon#stars#astronomy#space#galaxy#Astrophotography#outdoor#core#ancient#sky#50mm#d810a#landscape
2 notes
·
View notes
Video
Check out what Tony has for us at @pro_camera_hawaii . . #suportlocalbusiness #supportlocalbrand #supportsmallbusiness #supportlocal #camerashop #cameragear #Repost @pro_camera_hawaii (@get_repost) ・・・ Hoya Nitetime Red Intensifier filters are here and in stock. This was the same one showcased in the Stan Moniz Astro workshop. We will still honor the expo pricing. https://www.instagram.com/p/BoVJDdug6k1/?utm_source=ig_tumblr_share&igshid=vafy0fl9qjv8
#suportlocalbusiness#supportlocalbrand#supportsmallbusiness#supportlocal#camerashop#cameragear#repost
1 note
·
View note
Text
Pua Aloalo (Yellow Hibiscus)
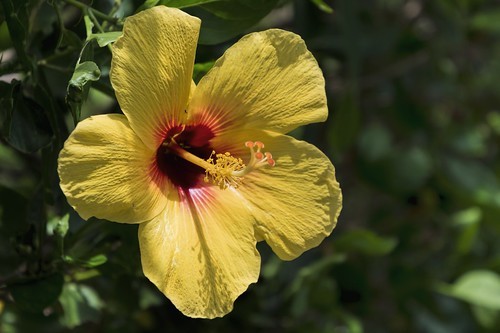
traveltoparadise.com/state-flower-of-hawaii-the-hibiscus/
Yellow Hibiscus flowers are showy, fragrant, and exotic… just like Hawaii! It’s no wonder the hibiscus was selected as our state flower.
The hibiscus flower has been honored in Hawaii since well before we officially became part of the 50 states. It was first adopted as a territorial emblem in the 1920s because of its beauty and prevalence throughout Hawaii. In 1959, when Hawaii achieved statehood, the hibiscus came along as its symbol.
However, it wasn’t until 1988 that the native yellow hibiscus officially became Hawaii’s state flower. Prior to that date, you would see all types and colors of hibiscus used to represent Hawaii, but since then you will see the yellow hibiscus represented most often (such as on postcards, travel brochures, etc).
Not only are hibiscus flowers beautiful, but they are useful and versatile as well. Here are some cool hibiscus tips:
For a unique taste of hibiscus, try making a hibiscus syrup and then mixing a little with your favorite champagne for a unique and refreshing treat.
The flowers themselves are edible and can be eaten candied or dried.
Hibiscus tea is extremely popular.
The flowers are known for their health benefits: hibiscus is high in vitamin C and reported to help lower blood pressure.
You can use hibiscus to make paper.
Hibiscus flowers also attract beautiful butterflies and and bees, of course.
If your resort has hibiscus plants about, stop for a moment to admire their beauty and usefulness as a plant!
Brought to you by Travel to Paradise – your Hawaii Travel Agent vacation expert!
Posted by Fletch in HI on 2019-06-23 20:52:57
Tagged: , Nikon , D5600 , Tamron , 16-300mm , Yellow , Hibiscus , Hickam-AFB , Hoya-Red-Intensifier-Filter
The post Pua Aloalo (Yellow Hibiscus) appeared first on Good Info.
0 notes
Photo
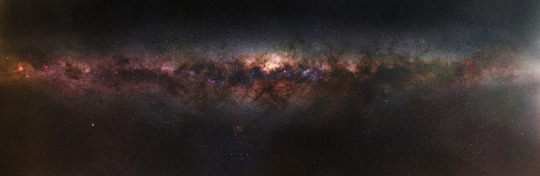
Horizon to Horizon Milky Way - Herron Point, Western Australia by inefekt69 Nikon d5500 50mm + Hoya Red Intensifier Filter 93 x 8 seconds ISO 4000 f/2.2 Stitched in MS ICE This was taken in September last year near Herron Point, south of Mandurah in Western Australia. I tried some different techniques in processing this one so it looks a bit different to my usual night skies :) This was taken using a didymium (red enhancer) filter which is good for at least partially eliminating sodium based light pollution. As a result you get nice dark skies and they also help to enhance nebulae such as the Carina Nebula you can see on the left side of the image. https://flic.kr/p/23LPLez
0 notes
Photo
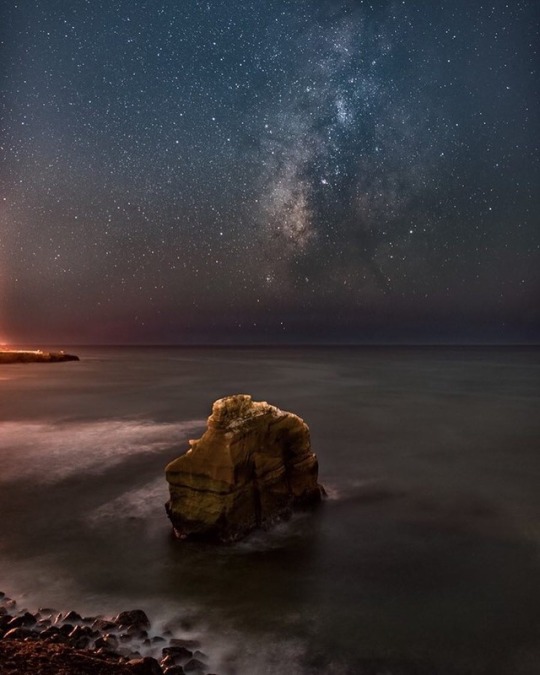
Ev Yorobe at Reeds Rock — REPOST: @evgenyyorobephotography from http://ift.tt/1WIhwba chosen by @ — MWC Admin: @tracyleephotos --- #milkywaychasers to be featured or post on http://ift.tt/1WIhwba. Tag a friend who might enjoy this Milky Way image and journey! --- From Evgeny about this image: --- STACKED http://ift.tt/2ncFiRG http://ift.tt/1xz5AwA The Milky Way setting over the Pacific Ocean and Reeds Rock (aka Birdsh*t Rock) Sunday night, 9/24/17. The first Santa Ana of Autumn brought the perfect clear conditions on the coast needed to capture the Milky Way. I had been wanting to try out my new Hoya Red Intensifier Filter in some strong light pollution and this was the perfect opportunity now that the Milky Way is to the Southwest over the Ocean. I would say it helped a little. Nikon D750 & Rokinon 24mm with Hoya Red Intensifier 13 seconds f2.0 iso 1600, 6 light images and 3 dark images stacked --- http://ift.tt/2fHPHTb
0 notes
Last Seen Blogs

bangtterfly
butterfly
fury-and-beardies
Lizards=serotonin

disneyupdates
Disney

secretqueerspy
you're a cowboy like me

conpaptex
Con-Pap-Tex