#I actually used cycles and eevee for this one
Text
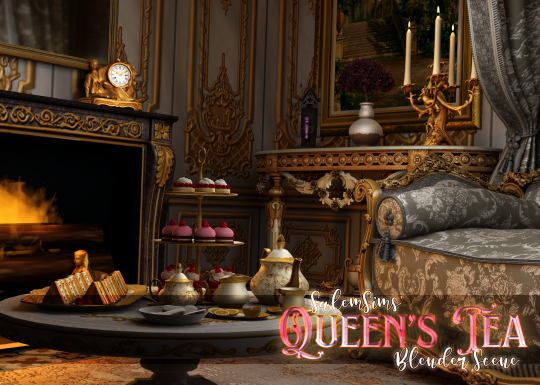
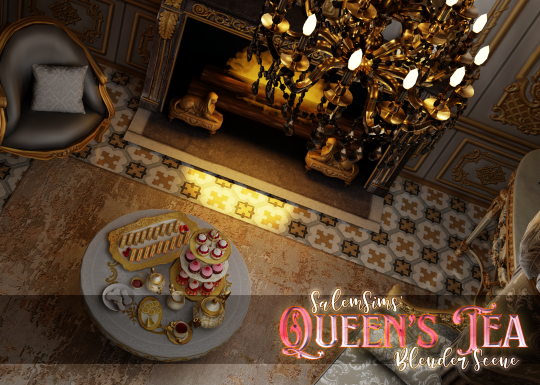

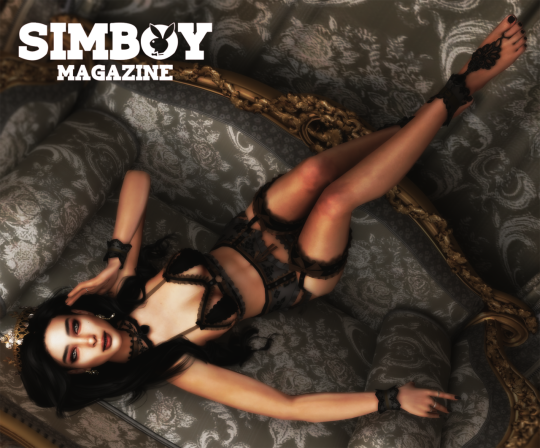
Queen's Tea Blender Scene
THIS IS A SCENE FOR BLENDER - THIS IS NOT SIMS 4 GAME CONTENT
At long last... I've been rendering since 2021, and often create my own scenes, but I've never shared any.
Until today!
I present my very first downloadable blender scene!
Queen's Tea consists of One (1) fancy little room for your sims to enjoy an afternoon in, whether they prefer to have an actual cup of tea... or something a little more... spicy.
Details:
CYCLES ONLY (not at all optimized or even tested in Eevee)
Texture heavy, use caution if trying to use this scene on older machines
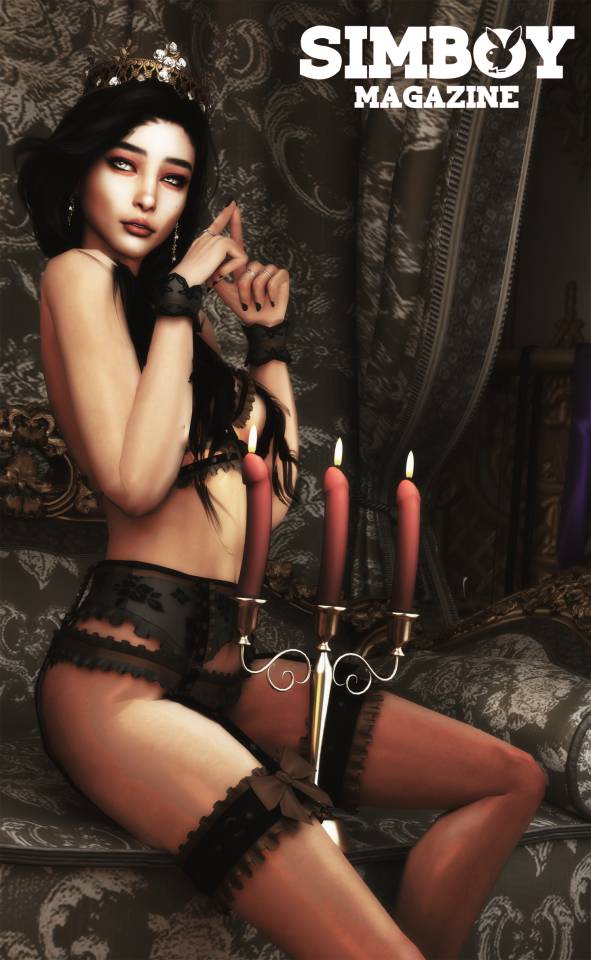
Includes spicy items that are completely optional, if you'd rather not include them, turn off the "lewd" folder
TOU:
DO NOT CLAIM AS YOUR OWN OR REUPLOAD
Feel free to add in additional cameras/camera angles
Feel free to edit/adjust the scene as needed but please try not to make it unrecognizable from my original scene
PLEASE tag me if you use it! This is my first released scene ever and I'd LOVE to see it out in the wild!
For troubleshooting, please send me an ask on Tumblr off anon (here or here), and I'll do my best to help you.
CONTENT CREDITS: This scene wouldn't be possible without content from these amazing creators! (NOTE: You do not need to download anything additional for this scene to work)
Strange Storyteller Sims
Cowbuild
Golden Sanctuary Sims
AggressiveKitty
SM Sims
Felix Andre
THIS FIRST SCENE IS FREE however please be aware that all of my scenes moving forward will be Early Access.
Blender scenes (yes even ones that use game content) take several hours (and sometimes days/weeks) to create, compile and perfect.
DOWNLOAD (Patreon, free)
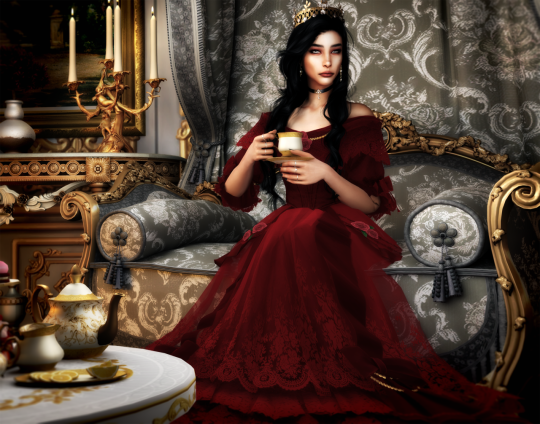
Renders using this scene under the cut:
(Special thanks to @boobpancakes for testing it for me!)
UPDATE: The rug's texture wasn't showing up. I've fixed it! Please redownload!


#ts4 blender scene#ts4 blender scenes#sims 4 blender scenes#sims 4 blender scene#sims blender scenes#sims blender scene#ts4 blender scene download#sims 4 blender scene download#sims blender scene download#salemsims download#salemsims blender scene#ts4 download#sims 4 download#sims download#ts4#sims 4#sims
73 notes
·
View notes
Text
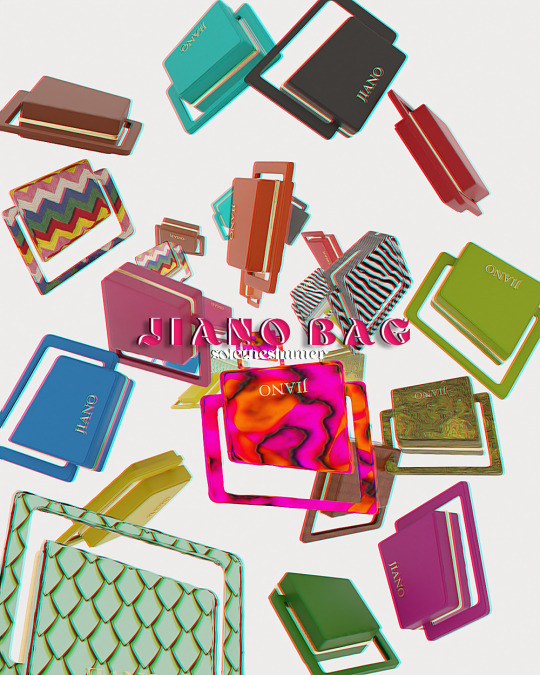


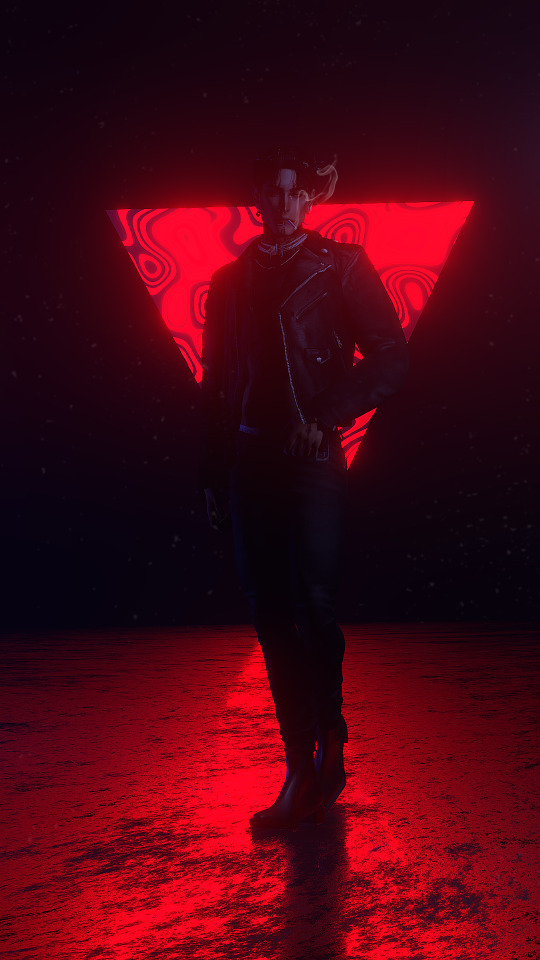
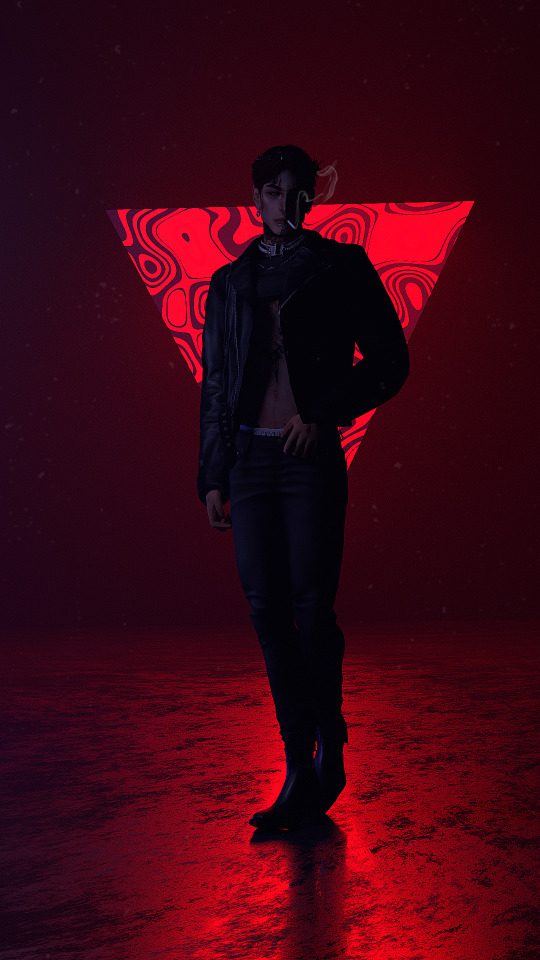
" 𝕁 𝕀 𝔸 ℕ 𝕆 " 𝔹 𝔸 𝔾 [ 𝔹𝕃𝔼ℕ𝔻𝔼ℝ 𝔸ℂℂ𝔼𝕊𝕊𝕆ℝ𝕐 ]
A bag mesh!! This is one of the many bag meshes I've been creating. I took inspo from the actual Jiano Bag. This is the first of many to come, so please enjoy!
Created in Blender 3.5 (Compatible with 3.4)
100% MESH BY ME
CYCLES + EEVEE [Images rendered in Cycles]
16 SWATCHES [COLORS + PATTERN ADDITIONS]
DOWNLOAD
Feel free to tag me @soledadgri/@solethesimmer on IG or @solethesimmer on Tumblr.
INBOX IS ALWAYS OPEN IF YOU'RE HAVING ISSUES💗
Terms of Use:
Do not claim as your own
Do not reupload/convert to other games/platforms
Do not alter the meshes materials/textures
Don't put behind paywall
3d content/meshes not allowed in paid/early access Blends
#ts4cc#sims 4#ts4 custom content#the sims 4#s4ccfinds#sims custom content#sims#simblr#blender#blender3d#3d model#sims 4 render#ts4 render#sims render#ts4 simblr#ts4 cc download
65 notes
·
View notes
Note
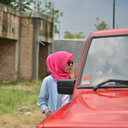
What renderer are you using for your pony?? Between the hair and the plastic (is it SSS?) I thought it was a photo for a sec.
it's just the default for Blender, which is called "eevee" I think.
I'm afraid I don't know much about rendering, I know that blender has one called "cycles" which is much better but I render most stuff in eevee because its so much faster
eevee (a second):
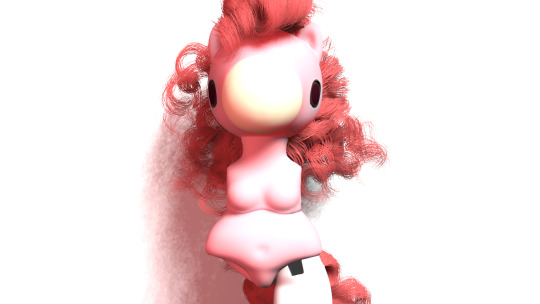

vs cycles (like 20 minutes)
someday I should probably learn what renderers actually do and their negatives/positive but uh. i don't really know atm what they do.
On the plus side, as long as im making models that are intended to be dolls, the plastically look of 3D modelling looks good. There's a reason why Pixar made toy story with early 3D modeling software!

9 notes
·
View notes
Text
Okay fuck it. The Discord has helped me make a new AU.
BNHA!Pokemon but this time it's Mystery Dungeon! So they're actual Pokemon instead of just trainers with Pokemon.
It actually works really well because like. Heroes = Explorers. Hero Agencies = Guilds. So on and so forth. UA is basically a training Guild for new Explorers to learn the ropes.
Uh. So who is what Pokemon? Fuck we're gonna get complicated.
One thing of note is that all the kids are first stage Evolutions because ya know. Baby. They're probably going to evolve over the course of the series but I'll list where they start
Izuku - combining the original pokemon au's thing of Izuku not realizing what Legendaries are and the monster au's Changeling thing. Izuku is a Mew that thinks he's a Shaymin. Kind of a 'Mewthree' actually? Long story we'll come back to it.
Katsuki - Riolu (it evolves with FRIENDSHIP just fuckin kill me!)
Ochako - Cleffa! Cute round pink motherfucker from space!
Kirishima - Sandshrew (technically ground not rock but I have a reason and it's a VIBE)
Kaminari - Pichu(BABY PLEASE)
Jiro - Noibat
Tsu - Froakie
Aoyama - Staryu
Fumikage - Murkrow
Hagakure - Kecleon
Sero - Spinark
Ojiro - Aipom
Sato - Milcrey (but like. Big.)
Momo - Eevee(unsure on later Eeveelution)
Himiko - Zorua
Mei - Tinkaton
Tetsutetsu - Alolan Sandshrew(matches with Kiri because siblings but steel type!)
Monoma - Smeargle
All Might - Palafin (Come on it's PERFECT)
Recovery Girl - Blissey
Present Mic - Chatot (LOOK I CAN'T NOT)
Nezu - Ironically, he's the random Human who got yeeted into this mess
Midnight - Slazzle
Cemetoss - Conkeldurr
Power Loader - Exadrill
-
Before we circle back to Izuku's nonsense let's talk about the Todoroki Family!
Enji is an Incineroar! Rei is an Alolan Ninetails!
Toya is a Kantonian Ninetails but he got the Alolan's Snow Cloak ability.
Natsuo is the opposite, being Alolan but with Flash Fire.
Fuyumi is full Alola
Shoto is still a chimera so both Kanto and Alola.
-
Now we circle back to Izuku's fuckery!
So like. We're kinda rolling with the fact that the Mystery Dungeon games happen post-Human Apocalypse? (possibly using the events of Detective Pikachu as how that happened?)
Which leads to having AfO being a very old and VERY pissed off Mewtwo.
Part of what he was doing was kind of a cycle of bullshit that involved trying to recreate himself/recreate the original Mew. Which resulted in Izuku being made.
Izuku is unaware of this, as he escaped pretty soon after waking up(probs teleported his ass out lmao). He's lost and confused and his instincts have him use Transform to turn into the nearest other Pokemon, which happens to be Inko who is a Shaymin. Inko thinks she just happened across an abandoned hatchling and goes 'well my baby now!'.
There really isn't a direct translation for being Quirkless with Izuku. I think the best thing would be that since he's not actually a Shaymin and isn't aware he can use transform, Gracidea Flowers have no affect on him. So he gets a bit othered for being a little fucky in that regard. But it's not quite the same.
22 notes
·
View notes
Text
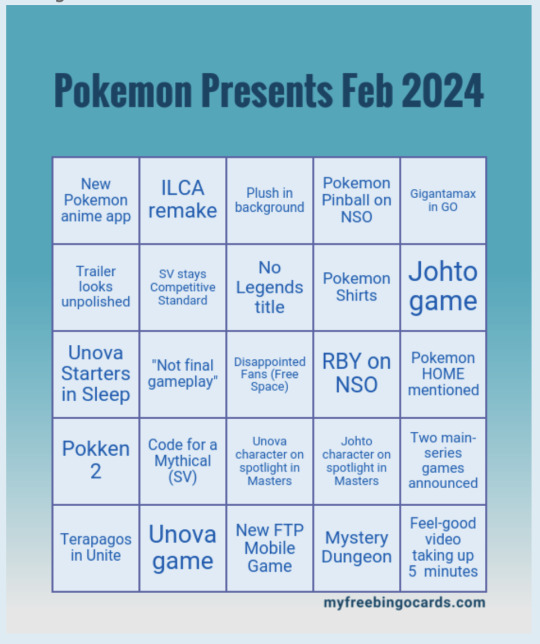
Reactions/Thoughts about Today's Pokemon Direct (Feb 2024)
First off: I was predicting a Johto remake over a Unova remake. Because LGPE counts as part of the remake cycle.
I also pre-made a bingo card, so I was paying attention for these things:
I was still setting up during the intro, so I didn't even process the Unown.
Plush in back! Check! (That was going to be obvious)
SV event is Tera Raids, no Mythical. Might still be coming?
Pokemon GO is a tie-in to Horizons with a couple of new species. Neat. No Gigantamax (honestly with how Raids are what Dynamax is based on, I'm not sure how that'll be introduced).
Legendary in Sleep!!!! (I actually play this game, so I'm excited.) I was tempted to put Mew or something as my Sleep prediction, but I thought that was too far-fetched this early and a Unova tie-in would be appropriate if there were Unova remakes. Wait... Johto beasts? Johto..?
Master's EX has Silver on spotlight! Check off the Johto character on spotlight in Master's EX slot! No Unova characters, it seems. We have Geeta, the Aether family, and Riley, which are from neither region. Two Johto things, though...
Cafe Remix has some Paldea Pokemon. I haven't played this game since it came out and every time I think about going back I remember I got stuck on a puzzle and I seemed to need to pay for a microtransaction to win so I just don't.
Unite I randomly guessed Terapagos and I was wrong. Lots of Ceruledge today.
This TCG thing appeals to me. Very much appeals to me. I played TCGO pretty much only logging in daily so I could open a pack every five days - the actual gameplay took way too long. Opening two packs every day with a shorter type of gameplay? Appeals very much. I am the target audience here.
Oh and exploring the artwork? Having the artwork actually designed to look good on the phone's screen? I am the target audience. I love this. I want this now.
Wait, Unown in this transition. Unown in the intro. Johto Beasts. Silver. We're getting Johto this year! I was right!
That font in the Confidential writing... reminds me of the Team Rocket Pokegear style in HGSS.
City design? Is this a spin-off actually?
There's an awful lot of Kalos Pokemon...
That's the Eiffel Tower type thing. It is Lumiose!?
It's a Legends title! And Z! In 2025!
I absolutely did not expect this. I expected something unexpected, which is why I put "No Legends Title" on my card, but I did not expect them to skip over Johto AND Unova to head straight to a Kalos revisit.
Z-A is the actual name. AZ's whole plot took place 3000 years ago, and this isn't 3000 years ago. By other people's saying when the Eiffel Tower went up, it's taking plaace more like 150 years ago, which is contemporary (within 30 or so years) of Legends: Arceus's real-world equivalent.
But Z-A might mean we go back in time further? Maybe? That'd be interesting. But as always, I can't get my hopes up too much.
The A definitely looks stylized like it's an actual Pokemon like Z is Zygarde, but it's not one we know. Mysterious.
2025 is a good sign. Though Legends: Arceus came out in January of the target year and it still seemed it could have used some polish. Not as bad as Scarlet/Violet, but it certainly looked worse than Sword/Shield and Let's Go Pikachu/Eevee. So I hope they release it when it's actually polished, not just functional. I hope to see trailers for it in next year's Pokemon Day Pokemon Presents, and its inclusion this year was only because there's no other real headline.
As for my Bingo card?
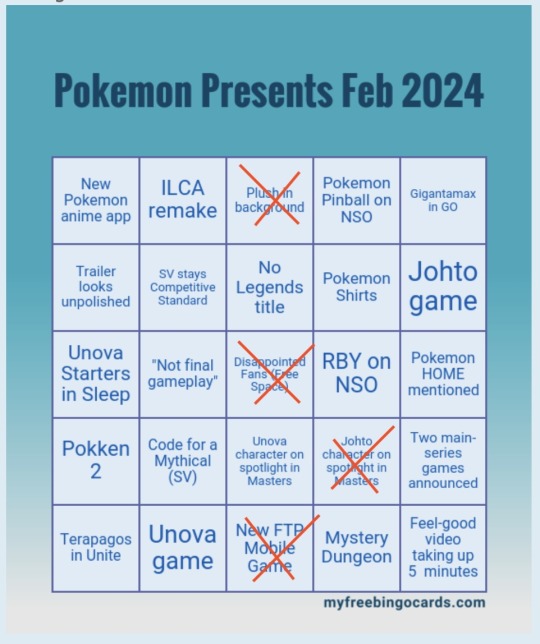
No Bingos.
3 notes
·
View notes
Text
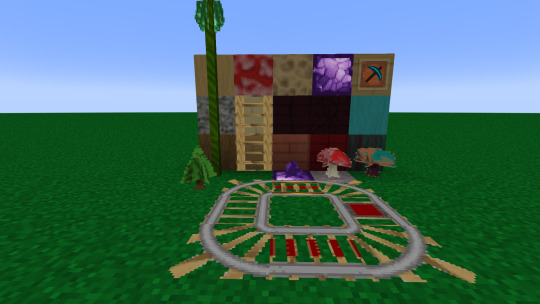
An attempt at a 3d-rendered resource pack, done using Blender Eevee (and Paint.NET's Quantise filter).
Please note that this is just a style-test, and if I do an actual one, it will probably look different (since I'll render the images using Cycles so I can do stuff transparent blocks and edge-wear effects).
8 notes
·
View notes
Photo


Transverse versus rotary gallop (right lead)
I loosely used the word ‘canter’ for a slower transverse gallop that I posted here: https://reignofsiderians.tumblr.com/post/701664326262685696/siderian-walking-cycles-transverse-right-lead
However, true (right lead) canter is actually a three beat gait with the following pattern: Left back – Right back and Left front simultaneously – Right front.
LB (1)– RB & LF (2) – RF (3)
The numbers indicate the beat.
Gallop is a four-beat gait in which the third beat in which the right back and left front limb hit the ground, is broken into two beats with a slight delay between right back and left front.
Then there are two forms of gallop: transverse and rotary. Rotary gallop is the fastest gait whereas transverse gallop is more energy efficient.
In transverse gallop, the front and rear follow the same order in which the limbs hit the ground. For right lead transverse gallop it would be: left back- right back - left front - right front
LB (1) – RB (2) – LF(3) – RF(4)
In rotary gallop, the order in which the limbs hit the ground is switched between the front and rear. In right lead gallop the order is as follows: right back – left back – left front – right front.
RB(1)– LB(2) – LF(3)– RF(4)
Suspension phase:
This the moment in which all limbs are off the ground. Normally gallop has only one suspension phase:
Transverse: LB - RB - LF- RF <suspension>
Rotary: RB- LB - LF -RF <suspension>
However, some fast animals (including Siderians) can do a double suspension rotary gallop:
RB-LB <suspension> LF-RF <suspension>
The Siderian in this animation has a double suspension rotary gallop, although the the first suspension phase is very short.
Lead:
The last front limb that leaves the ground in a cycle is what determines whether a canter or gallop is right or left lead.
Left lead canter: RB – LB & RF– LF
Left lead transverse gallop: RB – LB – RF – LF
Left lead rotary gallop: LB- RB- RF – LF
Both animations are done in Blender and rendered with Eevee. This is my Demo v.1 model, so no real muscle contractions yet (only crude shapekeys) and a very simple rig done with the Rigify add-on. I hope that better animations follow with Demo v.2 and v.3
#running animation#walking cycle#Siderian#bigcat#Feline#gallop#canter#transverse gallop#rotary gallop#CGI#Blender#Eevee render#FelisGlacialis#my art#animation#Mu v1#Demo v1
17 notes
·
View notes
Text
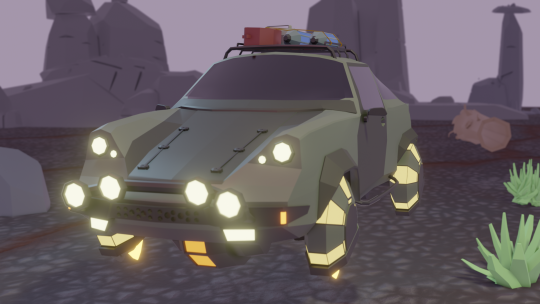
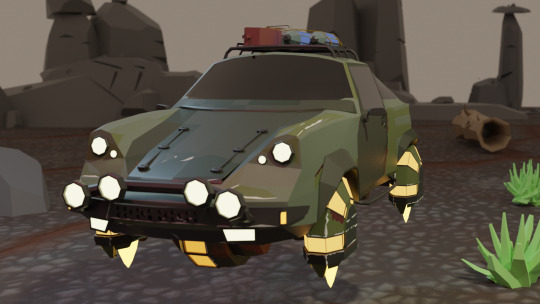
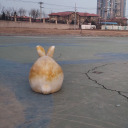
Decided to whip together a little concept of what my hover car project is going to look like. The car materials are done, the top being an undamaged version while bottom one includes some dents and rust.
The desert materials aren't actually finished I just tossed on some pre made ones I had from Ducky3d.
The top picture was rendered in Eevee and what will be used for the final render.
The bottom render was in Cycles and as nice as that can look it took nearly 15 minutes for this single frame to render so I'm not about to do a full animated short at that rate as nice as it might look a month or two later. (though I do have credits with a render farm soooo)
2 notes
·
View notes
Text
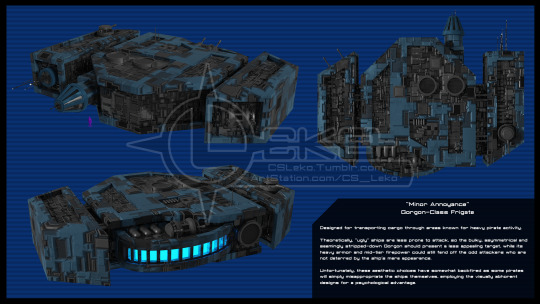
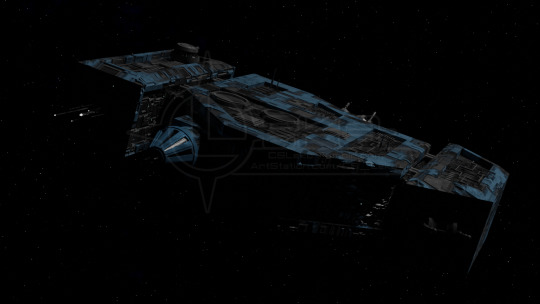
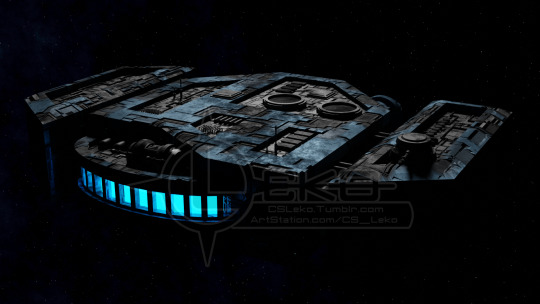
The Minor Annoyance
There's a few things going on with this, so I guess I'll break it down into sections.
The Design
A REALLY long time ago, I drew a design for a ship that was primarily inspired by the Millennium Falcon, Ebon Hawk, and Outrider. A bunch of Star Wars ships known for some key features: bulky, asymmetrical shapes, offset cockpit.
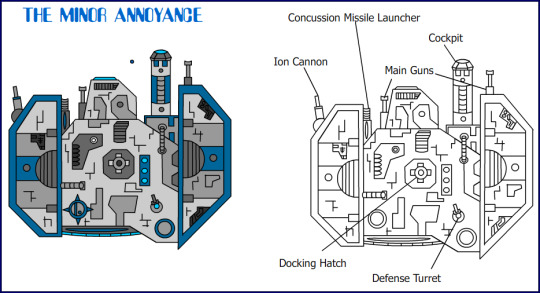
I came up with this thing, sketched it on paper, then drew it in Flash. (I did almost all my stuff in Flash at the time because it was easier to do clean line art and I didn't have Illustrator.) I'm pretty sure this was around 2009/10, and I'm only sure of that because DeviantART had a contest to design a ship for EVE Online around that time and I made a 3D model of this design to enter for it.

The Texture
I've been trying for the longest time to figure out a good way to procedurally make reasonably detailed sci-fi panels to use for spaceship hulls. The Random Flow and Grid Modeler plugins are great and all, but they do require the addition of geometry, and can be difficult to use on certain shapes.
I actually kind of stumbled on this setup while using it to make something completely different: a circuit board texture. I was basically trying to get a green board with a pattern of gold lines, and while I got what I was after I did discover that by adjusting the color ramp I could get patterns of squares and rectangles that would overlap. All it took was adding a few more colors to the ramp and I had a very simple and easy sci-fi panel texture. And by combining two of these textures (one with a larger scale setting and one smaller), I could get an amazing amount of detail onto a relatively small amount of polygons.

Here's what the ship looks like without any textures. I knew I couldn't get away with JUST the texture, so I pulled in the greebles from that other ship I posted and just stuck 'em on.
The Animation
I literally just dropped in the planet from that other post, did two keyframes, and set the camera to track to the ship as it moved. Thanks to the tutorial I followed to make the planet, I also learned how to add glow effects in the compositor (because emissions don't actually glow in Cycles like they do in Eevee.)
I'm not particularly happy with the lighting on the ship in the rendered animation, though. I had to crank up the sun to get the planet properly lit, but the ship textures look much better with darker lighting. The camera movement is also a little choppy. Were I to redo it, I would probably render the ship alone on a transparent background with better lighting, and overlay it on the background in Premiere.
0 notes
Text
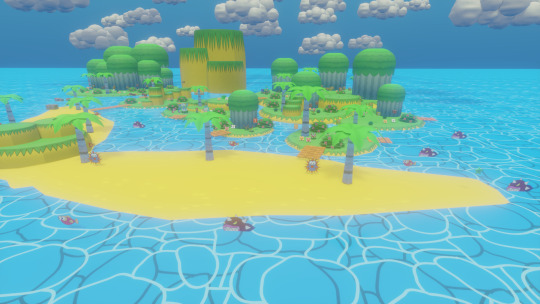
Another NSMB2-based Mario Story/Paper Mario scene set!
Once again, I've made more graphic assets and screenshots based on one of New Super Mario Bros 2's worlds. This time, it's the Beach half of World 3!
As an aside, due to how long rendering in Cycles takes, only the first image is done that way, while the rest are Eevee renders.
Enough of that, though- let's swim right in! ...Or maybe not, given what you're about to see.

A small beach island area, the gang must navigate the islands and sands to reach the Gold Star at the end!

Two Yoshis on a honeymoon were apparently interrupted by the boss' arrival, a tale which Captain Ahant recounts to Mario, Sushie and Captain Azure! But it's nothing that hammering, swimming and tossing can't handle!
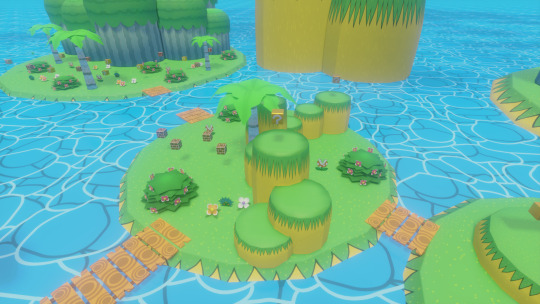
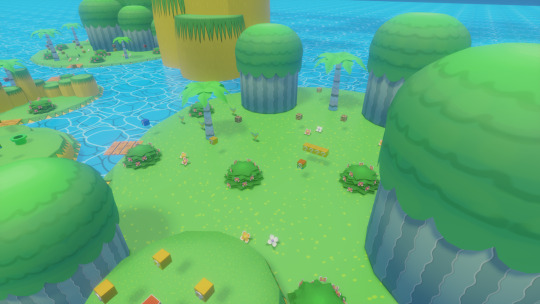
The first island area. With careful throws, Azure must toss Mario onto the lowest cliffs to navigate. All the while, Piranha Plants are moving around to and fro. There's a bridge to the next area...but what's that over there?

Ah- a far-off island with a bunch of Item Blocks and baddies. Even better- a Green Star on the far-off west side! Perhaps this water-bordered land can be reached with Sushie!
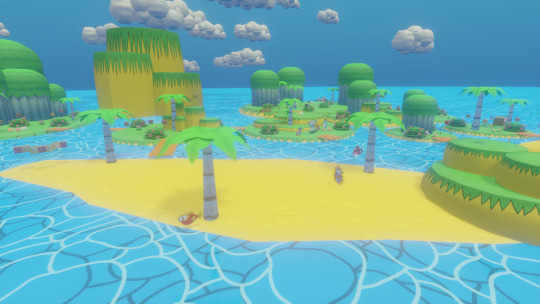
Next up, the actual beach. A whole bunch of Trouters, Urchins and Spike Basses call these sands and waters home. Mario and his pals will have to endure quite a frantic, thorny barrage to make it!
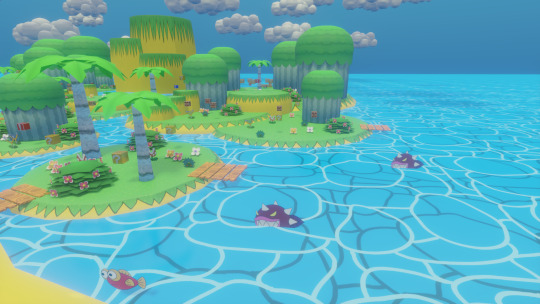
With Sushie's help, Mario and Azure must ride her across Spike Bass-inhabited waters. Hope Sushie can handle the weight, or she'll be sushi! Also, M Bushes litter the beach!
The last stretch before the boss. Among many Hurt Plants is a switch activating a plank bridge back to the start! Then, the gang should use the Save Block to save their progress in history, gather the items, and continue on their way to the Gold Star-

-Aw, naw. Not CHEEPSKIPPER again! What does a fat fish want with a Gold Star, anyways? Whatever- Mario, Sushie and even Azure are ready to throw down!
---
I should probably explain why NSMB2 keeps getting picked, despite it's infamy among the fandom and redundancy. My original plan was to try and have a mix of locales from DS, Wii and 2. However, upon review of the three games and deciding which game would depict which archetype, I noticed 2 generally has the more colorful and unique designs of the trio, while DS...yeah. I actually thought DS would get more slots, but the areas seem kind of bland even for the NSMB series.
That's not to say no NSMBWii locations will be depicted. It's just NSMB2 keeps getting lucky with its incarnations of various world types early on.
Also, while NSMBU is the best of the NSMB series, due to U being implied to be a specific wild area of the Mushroom Kingdom rather than just general locations, its levels weren't and couldn't be considered, in the interest of fairness. I may do them one day, though- just not in the near future.
#blender3d#blender render#paper mario#mariostory#new super mario bros 2#cheepskipper#sushiepapermario#supermariobros
1 note
·
View note
Photo
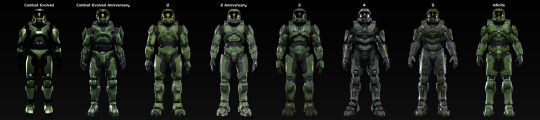
behold!
(pls click for better view)
#halo#this took like. 3 hours.#many colors many shapes many forms. same friend :]#in case there was any confusion about the other posts i made being really grey- that is a fan made retexture#edit: ok i should clarify the model for 4 seen here is the one from the game. the one from my previous posts is the fanmade one#and the infinite model you see here is also a fan made retexture of the fortnite skin#all rendered in blender cycles :) the old models actually look better in eevee (render engine. not the pokemon)#but i used cycles for everything with the same lighting set up to keep it consistent
151 notes
·
View notes
Photo
◌⭒˒ ˎˊ hey guys ! so i decided to redo my first render that i posted and ended up with this. i couldn’t find the exact pose i used for my first one but i couldn’t bother finding it so we used a different one. the first image is rendered in eevee and then the second one was rendered in cycles. to be honest, i actually prefer the eevee one a lot more than the cycles one. eevee just works a shit ton better when it comes to using the emission nodes. cycles is just dulled down but def cleaner and has a lot more shadows that i personally prefer. this is definitely just a means of showing my improvement from my first time (which i started on the 15th of may) and i’m really happy with how things are going.
64 notes
·
View notes
Text
Let’s Rip A Sim...Again ( A TS4 SimRipper Tutorial for Blender 2.8x)
I got a request from the sweetest anon the other day to do an updated tutorial and I couldn’t say no. So, let’s get into it!
You’re gonna need the following things:
TS4 SimRipper
Blender 2.8x (The ‘x’ stands for any number after .8, this could make it 2.80, 2.81, etc)
Blank Posing Rig from Sims 4 Studio or a premade pose from a pose maker
A basic to intermediate understanding of Blender. ( I assume that if you’re using 2.8x, you at least understand how to use 2.79 )
Fun fact! This process is the exact same as my last tutorial for 2.79, but if it were in cycles render instead of blender render!
If you do not already have SimRipper downloaded, please download, install, and open SimRipper . Load your save file by pressing “Select”.

Unlike in the last tutorial, we will actually be using Aaliyah lol
Use the filters on the left to narrow down your chosen sim. Select your sim from the list. Using the controls on the right, select the outfit you want your sim to wear.
For this tutorial, I am using SimRipper version 3.1.0.0. Because of that, my right sidebar might look different, if you are using an older version of SimRipper. Don’t worry, this process will be exactly the same for the older version.
If you are using the updated version of SimRipper, make sure that instead of “Single mesh and texture”, the right hand dropdown box says “Solid and Glass meshes and textures.” Click on the button on the right that reads: “Save as DAE”
Importing The Ripped Sim
Open Blender. Open the blank rig.
Click file and click on import. Import as Collada (.DAE)
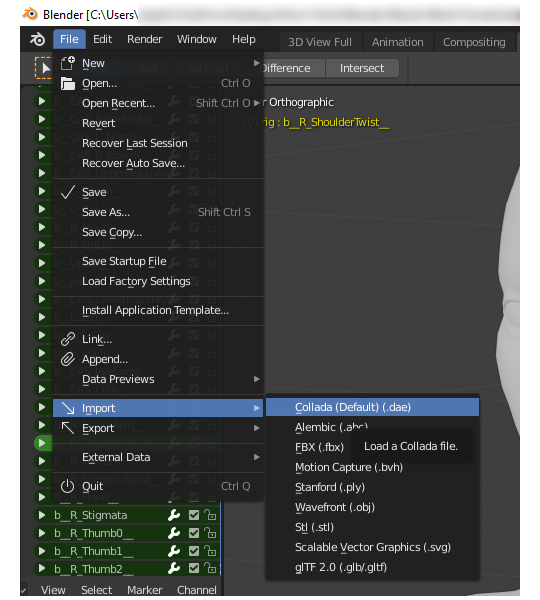
Delete the base Sims4Studio sim from your imported rig or pose. Also, delete the Rig.001 that imports with your sim’s .DAE file. Do not delete your sim, please.
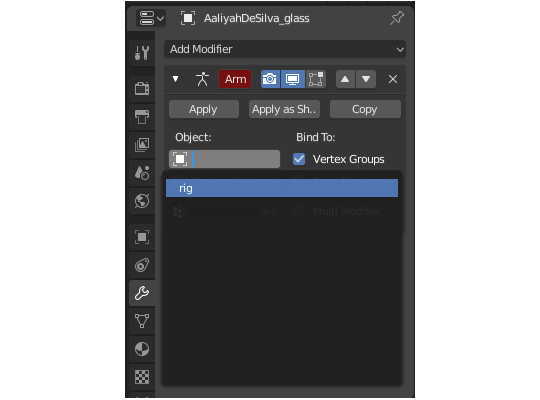
Attaching the Rig
Click on the modifier tab, which looks like a wrench, or spanner if you’re not American, on the bottom left panel. Click on the “Object:” box and select “rig”.
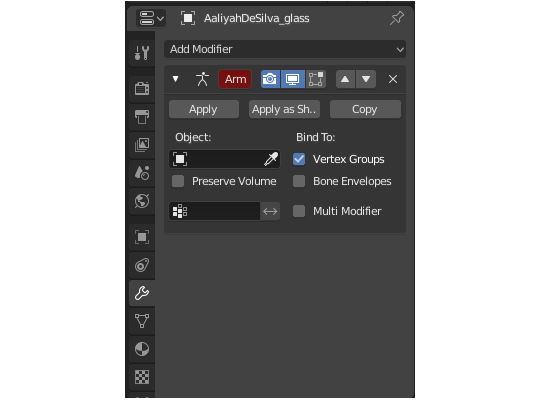
NOTE: The face area might be slightly unaligned to the rig and that is NORMAL. It is supposed to be. When you move things around in CAS, the rig stays the same. Do not worry about it.
NONE #2: If you are using height sliders, you sim will not align to the blank rig at all. You have to have made your sim without the height sliders and use height rigs like this one with this tutorial to have an accurate height for you sim. Basically, have two versions of your sim, one with the height sliders and one without, and use the height rig to have your sim be the right size while posing.
Adding The Texture
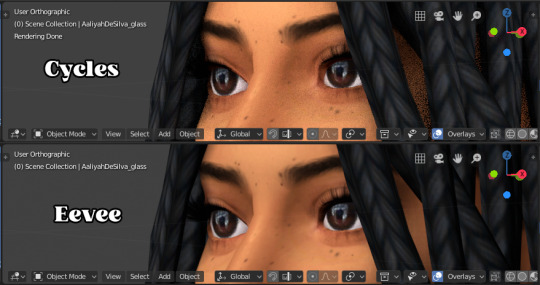
Now, for this part of the tutorial, I am going to split the glass textures up into two parts, because Cycles and Eevee renders transparent textures slightly differently and I want to make sure I’m as clear about that process as possible.
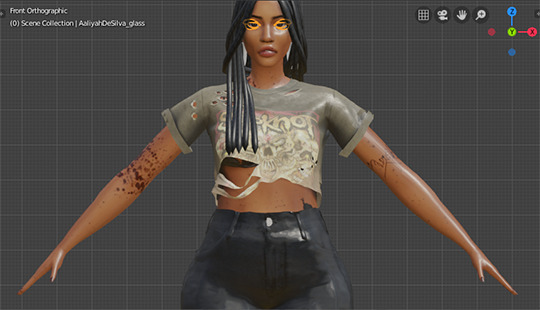
If you are using the most recent version of Simripper ( as of making this tutorial, that version is 3.1.0.0 ), when you import your .DAE file, it will also import the texture along with it, which is helpful if you do not want to do a lot of work, but not so much if you want your glass textures to show up correctly. As you see below, there is Aaliyah in all her shiny glory.
If you are using an older version of SR, it will not automatically add the texture to your sim for you, so let’s do it together.
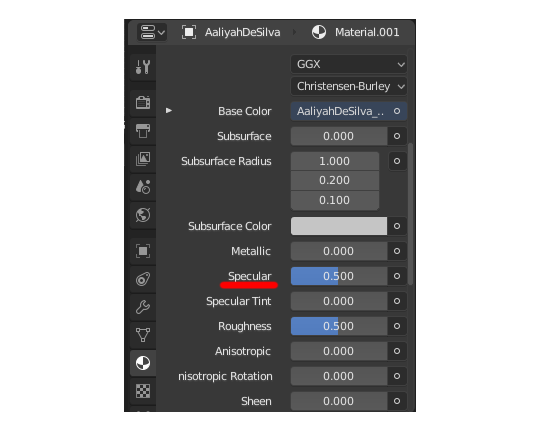
Select your sim and go the materials tab. There, you will see a button that says “New”. Click on it. After doing so, there will be different sections. We’ll focus on the “Surface” section. Under Surface, there is another button that reads “Principled BSDF”. Under that, there is another button that reads “Base Color”. This is where our image texture is gonna go.
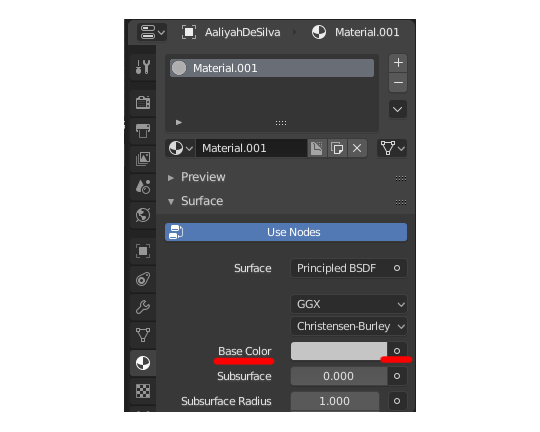
There is a small circle next to Base Color, click on it and it will open a menu. Select “Image Texture” under the “Texture” column. Click “Open” next to your new image texture shader and locate and open your texture. If you already have your image in Blender, click on the small picture icon and select it from that menu.

Now we have a textured, but shiny sim. To quickly fix that, scroll down the material tab and you’ll find a value input labeled “Specular”. Make it 0.00. Now your sim isn’t shiny! Yay!
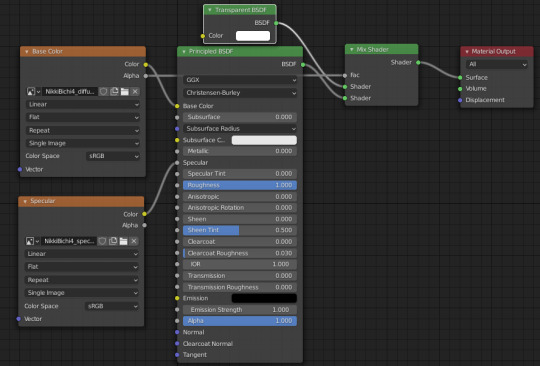
Glass Textures
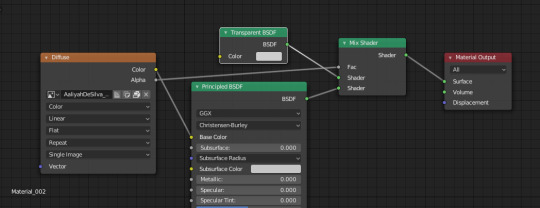
To add your Glass textures a lot easier, you’re gonna need to open the node editor. Follow the above instructions for your Glass object exactly, except use you glass texture. Yes, including the specular step. Luckily the only thing you have to do add two nodes, the “Mix” shader and the “Transparent” Shader.

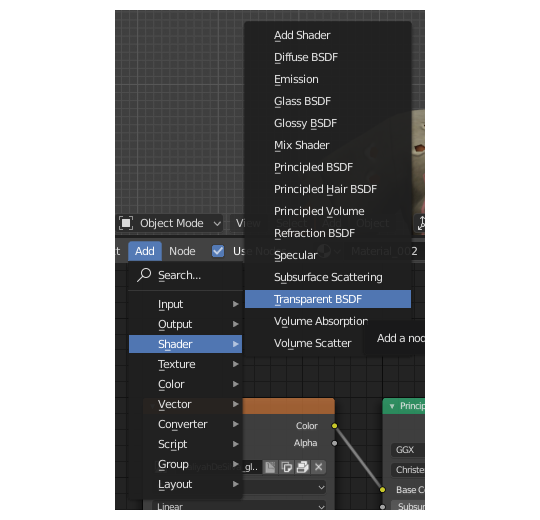
After doing so, situate your nodes as below:
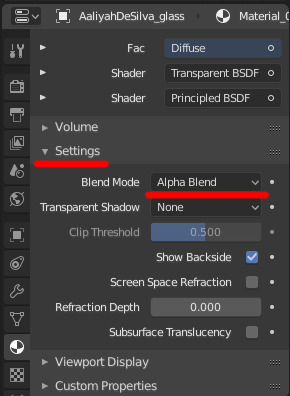
For Eevee, you’re going to want to do one really important thing. Scroll down the material tab and find settings. Under there change Blend Mode from “Opaque” to “Alpha Blend”. If you are working with more complex transparent objects ( Like hair or fluffy objects ) use “Alpha Hashed” instead.
Here is a comparison of Cycles and Eevee for glass textures. It is very subtle.
Now, your sim is in Blender 2.8x. Like last time, this tutorial is not a posing tutorial, so and questions that are off the topic of SimRipper or have already been answered in my tag for this tutorial will be ignored. Here are some good tutorials for posing.
My own posing tutorial
Simmerberlin
Voila!
Before you send me a message for this tutorial, please refer to this tag and this post. Also, I am not a Blender expert and becuase of that I am not the best person to ask for help in regards to Blender. @thefoxburyinstitute has a whole database of great tutorials and resources for Blender!
116 notes
·
View notes
Text
Slogging my way through Brilliant Diamond really showed how Platinum's pacing and execution of various story beats was just better. Like Platinum was already an improved version of Diamond/Pearl taking many of the complaints about those games and fixing them. To then revert back to the poor pacing, the confusing story beats (nothing tells me I should go talk to that Galactic Grunt after the Water Gym, absolutely nothing tells me that he's suddenly gonna have new dialogue than he did before I fought the gym so I went back to Hearthome before realising I had to go talk to this dude again whereas in Platinum he gets a cutscene right after that gym (which is Gym 5 rather than 4 which is in my opinion a better place to put this chunk of story content because after this you then go do a fetch quest for Cynthia AND THEN face the Ghost gym whereas it just feels better to have all this story after the 5th Gym then go off to Canalave City for the 6th Gym and more Story content. By having this story content before the 5th gym in DP it feels like "ops we need to now sidetrack ourselves to go back and fight that one gym we couldn't fight earlier even though we know we should really be going to meet up with Rowan and the others in Canalave").
Like these remakes aren't bad but I don't think they are anywhere close to Pokemon Quality even the worst Pokémon games are often more polished than this for their time. The graphics are still terrible, not the art style necessarily, just the actual graphics look worst than Let's Go Pikachu and Eevee like the lighting is terrible, the controls are horrendous it is emulating SwSh 3D controls but the world is still built on a grid so you end up just running into things a lot. The Pokémon models were all brand new and yet they look worse than SwSh Models. They look almost like they've been made of clay, now I know Pokémon models have never been the height of realism but I noticed it mostly with Chimchar I can't put my finger on it but they just look more fake. Also somehow the animations for moves feel.... less somehow even the most simple moves but that might just be me nitpicking at this point.
The Poketch is worse than useless here, not only is it the DP Poketch that only has one button to cycle through all the apps but there isn't a second screen so you've got to actively stop everything and open it up onto your screen which renders the dowsing machine worthless. Only time I use the Poketch is for HMs.
And on that note. No HMs is appreciated, truly it is. And for that reason these remakes are easily better than the original Diamond and Pearl. But they are not better than Platinum and I know in the future I will choose to replay Platinum over these basically every time.
One thing I will say the remake does better than even Platinum. The grand Underground is very fun, but it is not an integral part of the game so even that doesn't win it a great review from me.
So while I still haven't finished the game considering how loyal of a remake it is I've experienced enough to make a pretty firm judgement on my opinions on it and thats (since I'm not judging plot so only need to really experience the mechanics to make a judgement. Only plot related thing I've touched on was the fact I feel Platinum has better pacing and I've now experienced the parts of the game again that Platinum changed the pacing and still feel Platinum has better pacing than OG DP and this remake).... meh Platinum still a better game.
4 notes
·
View notes
Note
Idk if you could help at all but whenever i use blender for my sims the eyelashes are always just solid black bars around the eyes. Im very new to blender 😭 i followed a tutorial and everything looks great its just the eyelashes that are so blocky. Thank you if you know how to fix it 💖
that would be an issue with the alpha channel! so first of all, this only works in cycles, not eevee. if you ever use alpha hair, you'll run into the same issue, but it's pretty easy to fix, you're just going to pop over to your shading panel.
nodes take some time to learn what you're doing, and while this looks really complicated you're only actually adding two more nodes. hit shift+A to pull up the menu, and search for "mix" to create a mix shader node, and do it again and search "trans" to get a transparency node! and then plug them in like sooo:
if this doesn't help, or brings up more questions than you had to begin with, please don't hesitate to come off anon so i can help you out one on one!
10 notes
·
View notes
Note
Hi! Because you're very talented and I love your mods, I want to ask you (if it's not too much trouble), do you have any tips or tricks for importing hair textures to Blender? I'm new to 3D modeling so I've been practicing and getting familiar with hair styles by porting existing meshes to other games, but for the life of me I always get stuck with the texture file. I can't seem to make it look good in Blender. Do you have any tips to avoid common mistakes for example? Thanks in advance!
Hi! I'm happy you like my stuff :) I explained my base preview setup below the cut.
This is for Blender Eevee (the Cycles one i use in renders has more shit to it but for simply viewing hair for editing this will do). The example is from Cp2077. Esp hair color textures will vastly differ from game to game (most don't use common color textures anymore but mix in the color using masks. Cyberpunk does this aswell but to preview you can use the gradient mask for color input).
To get transparency you need an alpha/opacity texture. It will always be some b/w mask image like the lower one shown here. Sometimes these are stored as an actual alpha channel in a texture.
The other params here are just personal preference for quick previews. Physical correct hair aint metal, but i like the effect it has on shine but honestly tweak this shader's params to your liking and find out what suits your needs best. To judge colors the best, turn Specular to 0, that will show you raw colors with no influence from shine. I added brightness contrast to the alpha channel because ingame it renders thicker than it does in blender (due to game tech) and making the alpha brighter will increase opacity.
Everything except color tex (sRGB) is a 'Non-Color' texture!
To actually see transparency in Eevee you need to change the material settings as marked here.
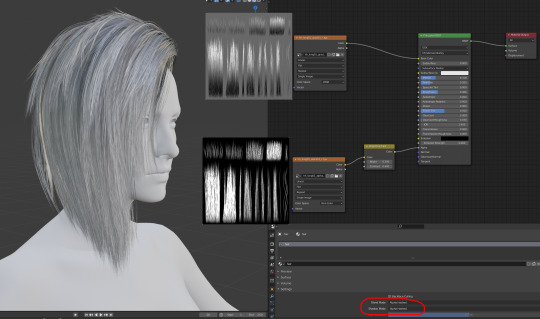
Note: I recommend extracting textures to tga always because PS lets you properly see all the channels. Always seperate Alpha and whatever you use as color image it to their own images.. Blender is stupid and doesn't handle textures properly with alpha channels (eg. if the alpha is actually in the color tex it will still be passed on and the hair will look more transparent than we want it to or look darker)
6 notes
·
View notes
Last Seen Blogs


afkingshuk
Untitled
dying-for-the-truth-made-slant
I Weep And Weep And Can Never Go Home Again

katte83
abstract girl