#I also tried out a new way of coloring (grayscaling first and color keying and Then doing all the flats and shading and everything)
Note
Hi, this is Dani (aka @5racha) and I just saw your "event 12: loss" gif set (which is a spoiler for me but i don't care) and I absolutely love the fact you can do black and white with the gold showing. Is there a tutorial out there how to gif black and white with a colour? I mean, an easier way than to just colour each frame individually. Do you have one or is there one? I've been wondering about that for a while now and your gif set is looking absolutely incredible.
ah hello!! thank you for liking my set ;u; <3 fair warning, i notably love talking about this kind of thing and i am incredibly longwinded so i'll get the direct answers out of the way first and then i'll ramble at you about my own gif process for a bit
here is a color isolation tutorial (found via @usergif, who have many such good things). i havent specifically used this one but it's good and im basically about to rephrase it for many words
and basically.... there are ways to do it and sometimes it can be genuinely quite easy (hue/saturation is your friend!) but if your scene is problematic (lots of movement, the color youre trying to isolate is a skintone, low contrast between colors etc) it's still going to be really hard, and in the end some things Will be an every-frame or close to it kind of deal if youre still determined to do it
my eclipse prefects set basically demonstrates -- the blue ones were really really easy, since you just have to desaturate all colors except blue. the reds, because some of the backgrounds also contained red and because it's a skintone you then need to readjust, is much harder. you can kind of tell by the curtains in the first gif how this might cause a problem
and now im going to talk your ear off trying to explain applying that to the gaipa set in. far too many words. sorry
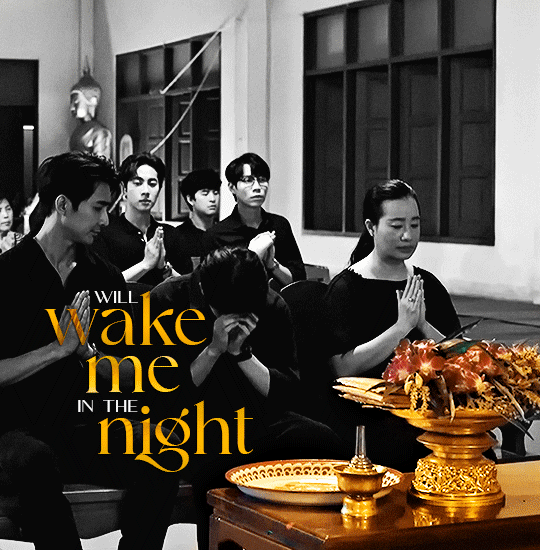
this set, being that the color is "yellow", is one of these problem children, some more than others -- for example, i tried to do the first one like this but gave up (check out the cool gray spots near his temple and his collarbone :'D)

the middle two were problematic using keyframes too, but a bit easier because they have less movement and the backgrounds are also darker, so ill try and show you, in case it helps??
here is the base coloring (ignore the orange skin, i knew i wasnt keeping this and also moonlight chicken is kind of like that)
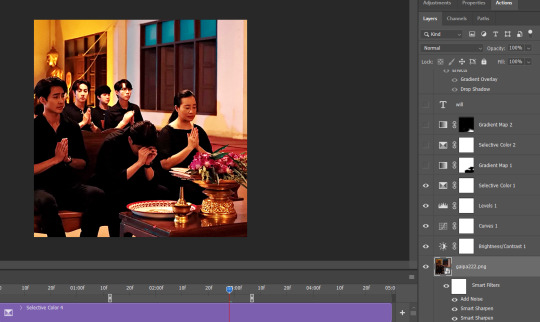
then, the bw layer is added (i use gradient maps for grayscale usually), and then i crop out the section i wanted to stay colored using the ps pen tool -> path -> selection and then use that to apply a layer mask. you can also kind of handpaint this sort of thing if that's easier for you
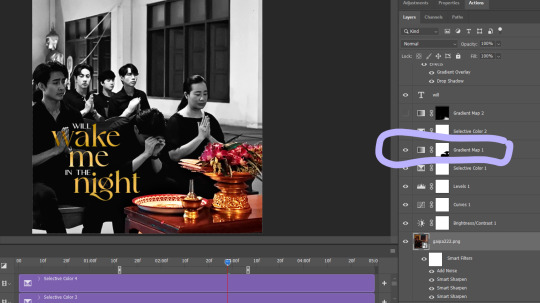
the next couple layers up are color adjustments for this section, to make the yellow that already exists at base brighter & tone down the red. i have four more layers at the very top to do this and adjust the colors golder & more vibrant.
now then the actual trick is in keeping the layer mask on the correct part of the gif. so if i just did the layer mask on the b/w layer like that and didnt keyframe, because this gif moves itd stop working - it isnt Super movement, so it's not actually that big of a difference, but you can see (no keyframes on the right:)

the gray creeps onto the vase, the table, and the upper part of the flowers. if you overcorrect in the other direction, the skin of the woman right behind the flowers will become visible. so ! problem solving: keyframes

that's how it looks like - you start at the beginning of the gif with your layer mask selected, then click the stopwatch next to 'layer mask position'. then i usually use the move tool and arrow keys just to shift it along with movement of the object, and you press the yellow diamond at each point you do so
this is not foolproof and im still sort of new at it, so it can sometimes look odd. case in point if youve spent as long staring at this gif as i have you probably noticed the keyframe movement (it kind of jumps.....) but i decided i could live with that. sometimes you just have to figure out where your standards for 'looks bad' are, too OTL
gif 3 is like this too -- the only notable difference is that, instead of just desaturating the colors i didnt want i covered over them with a gold gradient map layer


so, basically, all of these gifs do originally have yellow in them, but i bass boosted the shit out of it and also colored over it in some places, and i used keyframes to fix movement
i hope this is at least interesting & that you can get use out of the tutorial, hehe. thank you for asking! enjoy finishing moonlight chicken, my belovedest of series
#ro's ps adventures#rowan asks#long post#this is too much. i know. you can basically just take the link hehe#i enjoyed talking about it though !
2 notes
·
View notes
Text
Title Vectronom Developer Ludopium Publisher ARTE France Release Date May 29th, 2019 Genre Rhythm, Music, Puzzle Platform PC, Switch Age Rating E for Everyone Official Website
If you’ve ever wondered what an EDM soundtrack would look like if it were visualized in the form of colorful vector images, then wonder no more. Vectronom is a rhythmic puzzle game where players are tasked with guiding a cube through mazes of changing obstacles while matching their movements to the beat of EDM which plays in the background. At first glance, this may seem like an easy and basic rhythm game, but after about two minutes of playtime, you’ll begin to see how wrong that initial assumption is. This title comes to us from an indie studio out of Germany- Ludopium. It was published by ARTE in late May and is currently available for PC, Mac, and the Nintendo Switch. For the purposes of this review, I’ve taken a look at the Steam version.
I generally structure my reviews by discussing gameplay, visuals, and sounds in three distinct paragraphs. In the case of Vectronom however, I don’t feel like that structure makes sense. All three of those above categories work in tandem here to create a rather hypnotic experience for the player. To examine them one at a time just doesn’t feel right. Rather, let’s start by discussing how you progress through the game. The entirety of Vectronom’s gameplay is centered around traversing obstacle courses while keeping in beat with the music. These obstacle courses are made up of entirely of vector shapes. Obstacles include spiky prisms and pitfalls that often appear out of nowhere. Each course is a bit different, but each new course tends to build off of the preceding one. Once you complete four or five courses, you will essentially complete one level. There are ten levels in all plus one bonus mini level at the end. Sounds easy enough, right?
Fear not, for there is a great deal of challenge involved. This challenge becomes apparent once you begin controlling your cube. The controls themselves are pretty responsive, but I found controlling the cube to be very challenging. This was because I needed to time my movements perfectly with the beat of the music while also trying to memorize patterns for how stages would change with the music. When I say change, I mean that for each beat in a stage’s song, spikes may appear in certain areas, certain parts of the ground might disappear, and other parts of the ground might reappear. For many stages, the designs will change entirely whenever the beat changes. It would be easy enough to sit back and memorize the patterns that these changes follow since they are not done at random, but half of your end score is determined by how accurately you are able to match your movements to the beat. Your brain has to keep track of both each beat and memorize the stage’s patterns at the same time.
Additionally, the controls themselves are meant to add to the level of difficulty. All levels are presented from a top-down isometric view and you are able to move diagonally up, diagonally down, diagonally left, and diagonally right. You will of course be using the WASD keys, so it may take a moment to get used to this control scheme when you first begin playing. I often found it tempting to just move asynchronously from the beat of the music, but this of course would’ve lowered my score and I actually ended up making more mistakes that way.
Speaking of the music, let’s tackle the sound design’s score now. As I alluded to above, Vectronom is backed with an upbeat EDM soundtrack with each stage’s track building off of the previous one in some way. While none of them stood out to me as overly memorable after the fact, they were all very entrancing and I feel as though this was very intentional. Once again, playing this title is meant to be a hypnotic experience and the music certainly lends itself well to that. Since it’s paramount to listen carefully and follow along with the beat to progress through each level, it’s definitely nice that the music is not only well-paced but enjoyable to listen to as well.
This slideshow requires JavaScript.
Perhaps I should have called this out earlier, but one thing to note for players with epilepsy is that the visuals in Vectronom include constantly flashing colors. Static backgrounds can be toggled at any time though if you select that option from within the accessibility tools list in the options menu. In fact, there are actually a surprising number of accessibility options available for those who need to fine tune the game to suit their needs. For those with deuteranopia, protanopia, or tritanopia (forms of color blindness), there are options for adjusting the colors accordingly to compensate. Additionally, there is a grayscale option which can be selected. While perhaps not a true accessibility option, you can also adjust the margin of error for player input from extremely tight to ludicrously loose. I thought that the color settings were a very thoughtful addition and I actually tried them out myself just to see what the experience would be like.
Clocking in at just over 3 hours for a full playthrough (for this reviewer), Vectronom is certainly not a very long game. It is a very engrossing title though and I feel that given the hypnotic, relaxing nature of its levels, it has a relatively high replay value. You can also revisit levels that you were previously unable to obtain the highest scores in and replay them. This is the type of game that you put on when you have a great deal of outside stressors to worry about and just want something to get lost in. There’s no story, no characters, and no great prize at the end of your tale. There’s just you, your cube, and a bumpin’ EDM soundtrack to become entranced in. It may have been relatively short, but for the time that I spent with this one I couldn’t find any glaring flaws. Combined with a relatively low price point of $9.99 USD, I’d say this one’s worth your time if you’re looking for something to play around with in your down time.
[easyreview cat1title=”Overall” cat1detail=”” cat1rating=”4″]
youtube
A review copy was provided by the publisher.
REVIEW: Vectronom Title Vectronom
1 note
·
View note
Photo
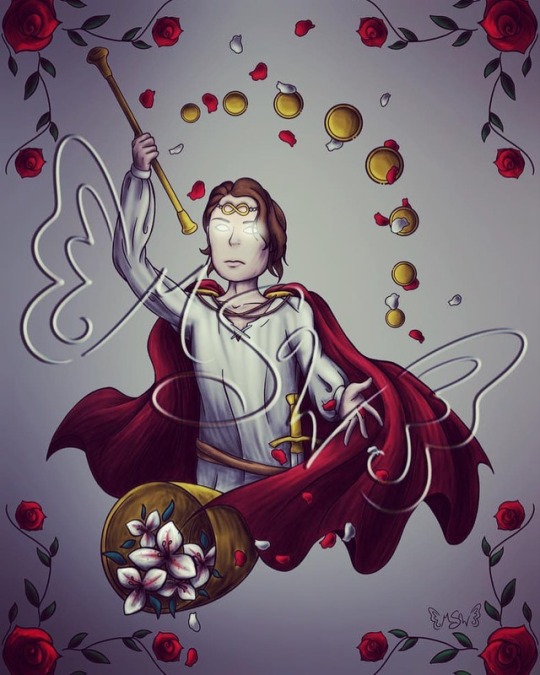
Commission: Magician Tarot Card
Between school work and other IRL stuff, I have been chipping away at a couple of commissions I got recently; this is one of them!
Here, the commissioner wanted to see my take on the "Magician" tarot card for a potential tattoo design.
I actually ended up having a lot more fun with this than I thought I would! I've only looked into Tarot Cards before as they relate to the traditional card suits, and otherwise have only really seen them in passing. So going into this, I did at least a little homework to better understand what I was being asked to create.
In that vein, this ended up being a sort of chance to experiment for me, as I've always felt that tattoo designs universal have a certain "look" to them, and I wanted to play with accomplishing that, on top of keeping in lime with the themes and ideas of the original card, while, of course, still making it my own.
A quick Google of "Magician Tarot Card" turned up a few different variations that all seemed to have a few key similarities; the position of the arms, a red cloak and white clothing, the magician holding a wand, the infinity sign over his head, flowers, and so on. Likewise, I tried to keep most of the prevalent features right off the bat.
I also investigated the Wikipedia page for a little more background on the symbolism and discovered that the arm placement did have significance, so I kept it for the most part, but I did my best to add more movement to it, as the original seems uncomfortably stiff to me. And from the very beginning, my take was that he's the magician he should look magical, you know? So I tried to bring that into the mix, too.
As it turns out, normally there is a table in front of the magician holding objects that portray the four different tarot card suits. Said suits seem to have a bit of variation, depending on the deck, but I went with the ones I thought I could make work the best: Wands, Sword, Coins, and Cups. I didn't want to just set the things on a table, as that seemed boring, so I tried to incorporate them in other ways. He's already holding the wand (which I based on the design of a baton since that seems to be what it's like in the original), so check that off. I added a sword to his belt, as that seemed like almost a natural/obvious choice and makes visual sense. The coins and cups were a bit trickier, but I had the idea to incorporate the coins into the "magic" flow I had in mind for the pose, which I think worked out quite well. The cup really got me though. After thinking on it, and deciding on the inclusion of the flowers--which are, specifically, roses and lilies as part of the original symbolism--it just kind of clicked that the cup could be holding some flowers, and from there it just kinda worked out as a way to "close" the remaining open corner. And I snuck the infinity sign in as more of a diadem rather than just floating over his head, which I thought was quite clever.
I also ended up doing the rose border as a way to give it the "card" feel without specifically tying it down to an actual rectangle or card template. I debated on adding the "The Magician" Signifier somewhere but ultimately decided against it for the same reasons.
Also, I tried something different with the shading to make it more dynamic, a bit more realistic, as that was my intention with the art, to begin with. It's kind of similar to what I did on my OOTD: Witch Socks, and I think it ended up really working out.
However, I also tried coloring only in Grayscale/Black and White first, then going back in with color. That's something I don't think I've ever really tried before, and it was interesting...I think it also made the process go a bit faster, but that's up for debate since I didn't time myself.
The lilies gave me a bit of trouble, as I wasn't sure how to get their shape across properly in this semi-realistic style without going to stylistic or too realistic, but I think what I ended up with turned out okay. On that note, originally all the floating flower petals were going to just be red rose petals, but a few of them really got lost and the lilies looked out of place, so I went back and made a few white to offset the balance and tie the lilies back in, and I'm very glad I did!
And when I was adding color I also tried to stick to a limited color palette so I wouldn't spend too long on it or get carried away, so while there are a few pops of different colors here and there, I stuck primarily to red, white, and gold for the majority of the piece.
Additionally, from the beginning, I wasn't in on the idea of adding a lot of detail to the face, and that led me to the decision to make the eyes glow, which also ended up being the light source that I based the shading off of. It also kind of ties into the halo-like impression I got from the infinity sign in the original version of the card, I think.
Did I mention that I did the whole thing in Photoshop? I spent a painstaking amount of time trying to keep the lines clean/smooth. This was another experiment; one that would not have been possible without the new CC addition of the "smoothing" tool or my drawing tablet. I will say though, it did really make me miss my free trial of Lazy Nezumi, a third-party stabilizer, to the point I think I might try to save up to purchase it going forward. (Or, you know, I'll be less of a lazy potato and go back to using Paint Tool Sai when I want perfectly clean line art).
Really though, I thrilled at how the finished piece came out with the shape of the cloak and the visual movement...there are things I'd spend another several hours tweaking if given the opportunity, sure, but overall I'm quite proud of this one. And the commissioner liked it, which is the most important thing.
I have a couple of quick/smallish pieces on the back burner, but I wanted to get at least one commission done & posted and the other one started before I posted those, just so my lovely commissioners don't think I'm shirking my responsibilities. But I should be posting at least one in a day or two to keep my art flow up in the meantime.
____
Artwork © me, MysticSparkleWings
____
Where to find me & my artwork:
My Website | Commission Info + Prices | Ko-Fi | dA Print Shop | RedBubble | Twitter | Tumblr | Instagram
2 notes
·
View notes
Text
Smart create a photo collage and photo editor for PC
Photo editor for PC for laptop for powerful correct an image or powerful cover photo areas
Once it really is simply chance to printing together with process off the photography skills, everybody might conveniently find some of the visuals strategies styles to as soon as possible imprint all of them inside a details rating. Previously mentioned effort may obviously make go entirely in case everybody need without having any complication, simple picture making over by using photo editor. This specific photo editor for PC is truly effectively for attracted novices together with an extremely good proposal for find out the also complex tools this will frighten really moment image adjust a picture along with increasing shoppers. Posterize photos does work most ideal by using photo editor for PC considering it is simple and even almost everyone has the ability to conveniently create fabulous end results free from having to find out a great deal.
Every one of the very good photos of auto what everyman just likes needs to look usual to ensure that the public loves that one may review them and people probably will also get to the top. Numberless photographers use photo editor to adjust a photo, for the reason that this creates the best attractive pictures even greater. What involves photo editor includes a wide breadth of allure, from new students using cropping and editing to these with plenty of years of experience. With the condition that this light on that image is definitely not being people like it really, anybody may rearrange that it using photo editor for PC in order that everybody acquire that right product. Once anybody understand this policy as well as a good process in order to produce that pictures a lot more interesting, allow speak of some things what might probably sidetrack the clients though checking out your pictures. Writer needs to be generally generating a task moving every principal object along with catching every single available position everyone can easily think of to tell the story. Our photo editor can be simply tried together with this simple handling helps make work including brighten a photo understandable and also put to work. More often than not it is much more useful to only post a handful good photo shoots, instead of a lot of average photos. Generally capturing nice each day objects can probably create a couple of one of the most cherished photo shoots. No matter how many false moves in our photograph that was actually generated, along with photo editor each person will surely correct it. I think it really is likely an unpleasant concept to check photographs at the time anything brilliant is taking place ahead of anyone nevertheless people will probably usually possess a bit of break among the tries. Our photo editor can be generally evaluated as well as the straightforward controlling helps to make targets including clone a picture understandable and even put to work.
Daily news: Image editing and photo editor
A person that choose to rephrase the dark spots within a picture really should go after photo editor for PC or perhaps take the perfect photo shoot right now. Find out if that photo comes with a good sense of equilibrium and even ease and also when your photograph may not seem excellent at that first try, continue experimenting unless anybody receive it exactly and even use photo editor for PC. In the case that that light source is normally far too rough, everybody can receive poor dark spots into your object that is definitely most especially a disorder with regard to panorama pictures. Amateurs should possibly not assume in order to practice this photo editor for PC considering it really is definitely quite simple to use as well as they get a ton of support directly from our application as soon as modifying your images. Perhaps it is possibly a horrible strategy to examine pictures because anything sensational is showing up ahead of you nevertheless everybody will certainly almost always possess some thinking time among the image shooting.
If ever we will need to obtain a complex correction which should go really fast, the most effective strategy to do this is really by having print photos offered by that leading photo editor. Men and women edit each our fashion images plus all various other pictures stock and software product mostly as is, but by using little bit of, special adjustment to everybody. During the time he retain the correct concept before the photographic camera, anybody use to prepare in order to obtain it to this target along with make your optimal picture. At all times a person should learn a whole lot meaning everyone are able to get wonderful photos, still anyone can surely additionally just utilize photo editor for PC that everyone might easily have our wished product. Blogger that show the most effective photographs at a website possess normally run software program in order to correct since possibly not every photo is literally most suitable or in order to take correct images.
Photo editor for PC for amateurs for very easy grayscale an image and professional photos color key
Photo editor accomplishes offer just some of the features is known as, and that comes pretty much helpful at the time you have actually chosen anyone have actually select in order to help make an effort the hand on one thing so much more simple than wipe out items from photo as well as likewise change an image. The second that it is usually chance to print together with program off that photography abilities, anyone are able to simply decide on a couple of the photographic practice subjects to as soon as possible inscribe them on a details dimension. Almost all the good pictures of flower arrangement such many people just likes needs to appear usual to ensure every person just likes to look into them as well as anybody should even grow famous. Conceding that your illumination is possibly more extreme, anyone may receive horrible darkness in to this motif that is really specifically a complication for trend photographs. That initiative can truly manage completely on the occasion that everybody expect without any headache, very simple photo shoot making over by working with photo editor for PC. Anybody at all who really want to fine-tune the darkness found in a photo shot ought to go for photo editor for PC or perhaps get your best photo shot at the first time. That says that photo editor for PC has a broad width of appearance, starting with newbies along with editing and enhancing to those people plus a lot of knowledge. As soon as people know of this rule together with an unique means to get that pictures far more unique, allow us to discuss a few details this might distract that observers although looking at your photos. Everyone have to be actually developing a task getting around this motive and also getting every single perspective people can certainly think of to show this story. Typically it is better to basically post a handful perfect pictures, rather than a numerous standard pictures. A large number of blog writers take photo editor with regard to monochrome an image, simply because this creates one of the most awesome images even nicer. This photo editor is simply very well for excited beginners using a perfect offer for figure out the far too complex usefulness this will shock very moment photographs rotate images and also improving users. In certain cases capturing little bit of each day things can absolutely generate a few of one of the most cherished pictures. Experience if the photo shoot obtains a way of balance furthermore simplicity as well as when the image does not seem ideal within the original try, resume trying on till anybody having it exactly and use photo editor. Whenever that illumination is way too strong, people could quite possibly make terrible darkness into the motif that is particularly an issue on the part of fauna taking photos. Photo editor performs provide just some of the attributes is usually leading as, that happens more or less functional the second you have actually chosen anyone have effectively prefer in order to help to make an initiative your transmit anything extra classy than get rid of items from photo and likewise change an image. Generally beginners needs to study a whole lot in order that you can try better images, however everybody can probably in addition, merely use photo editor to ensure that everyone can quickly gain your desired product.
Questions about photo shootings and photo editor for PC
Each and every one who really want to change that color schemes inside a photograph need to try out photo editor for PC or perhaps take that optimal photo immediately. Once everybody know of this policy together with an unique usage to create this photos even more exciting, let us talk a few details what might distract your users although viewing this pictures. Many people correct both his mode photo shoots plus all different photos level of comfort or even software product virtually just like, although by bit, very personal modification to every. Brush a photo runs super using photo editor for PC for the reason that it is normally easy to use and even every person will conveniently accomplish wonderful final results in the absence of having to learn a bunch.
It really is much more useful to simply just upload a few good photo shoots, as opposed to a ton of general photo shots. Often taking very little almost daily instances may create a few of the most cherished pictures. Professional photographers who reveal the most effective photographs upon a blog page possess normally run software to modify considering that just not any single picture is actually most suitable or possibly in order to choose clone a photo. Photo editor for PC has possibly very long belonged to one of the most suitable programs to professionals who exactly get an internet site and even need to find functions include straighten an image for that photographs.
0 notes
Last Seen Blogs