#I have a hot tip! if you boil a vegetable; retain the water and freeze it.
Photo

it’s about the little joys amidst the grind for survival
#my art#hornet#hollow knight#*crawls out of a gutter covered in wet leaves* sup.#i've been slowly poking at asks but it gets frustrating to have so little time to draw so i wanted to make something really quick..!#my life lately has been about the grind for survival /_\#onset of cold season means i won't be warm again for several months and i'll be usually tired and hungry#isn't it fascinating how the body responds to seasons? idk if it's from less sun or higher caloric demands from heating the body#POV you are biking to work in a downpour. it's before sunrise and cars' headlights are reflecting off the rain on your glasses#you cannot fucking see and there are branches all over the sidewalk from the wind which is strong enough to shove you around#only reason I never fell is because i've been cautious after a recent bad crash.#well now i have a raincoat and learned the lesson to bring spare pants when it's raining and i can move my knee again. luxury!#how does everyone else just keep going when it gets dark and cold all the time. i feel like a bear that should be hibernating.#can't wait to go apeass crazy during the thaw. sprint until i collapse the moment i feel a warm breeze. makes winter worth it#real self-care is using what little energy you have at the end of the day to make a meal big enough to provide several days of leftovers#*throws eggs into the rice* please you need protein for tomorrow i love you. eat well and be strong!#been falling into the habit of skipping meals because i'm too tired to cook and eat. thank you me of yesterday for not being selfish :]#I have a hot tip! if you boil a vegetable; retain the water and freeze it.#last month's accidental yam stock was this week's risotto base#don't you dare discard nutrients and flavors. you need those. they are so scarce and precious.#anyway. don't get lost in the struggle. squeeze in some art and get that creative juice out of your system.#personally i am excited for hornet to explore the arts :]#oh at least autumn is beautiful. but I moved to a place with less nature..#didn't realize how important it is to me to have large stretches of woodland. I miss my free ranging territory! suffocating in the suburbs!#well now i go to get not enough sleep. nighty night.#(huh? it's almost halloween? since when??)
3K notes
·
View notes
Text
How to Make Spicy Beef Tendon
Introduction/History
Spicy Beef Tendon / Wong Bak is a food popular in Guangdong province. It takes the shape of strips and it has an orange color with a smelly smell. You will find them hanging on outside walls during wintertime, especially on wet markets or night markets. Some restaurants even have stalls selling Spicy Beef Tendon alone for their signature food.
Anticipating the coming Chinese New Year, there are more new year snacks like this spicy beef tendon to appear at markets and trains stations. And these spicy beef tendons were so extremely creative that they can be used as decorations!
Ingredients for Spicy Beef Tendon
1 big chunk of beef tendon
3-4 pieces of Chinese dried chilies, chopped
half teaspoon of cracked white pepper and salt (used as a condiment)
Procedure For Making Spicy Beef Tendon
1. Prepare the tendon by cutting it into small pieces.
Make sure the tendon is cut evenly before heating the wok.
2. Heat the wok to high heat, and then add in the oil. Add in some of the beef tendon pieces while stirring occasionally.
3. Add in some salt and pepper for taste, followed by dried hot peppers when cooked (Note that a large proportion of dried chilies should be used here).
Then stir-fry till the scent from the dried chilies are released and it becomes fragrant, which will take about 2 minutes at most to give a spicy kick! You can also stop cooking earlier if you like your food less spicy.
Use a pair of kitchen scissors to "cut" through sticky parts and allow them to cook thoroughly on both sides. The hot chili oil from the wok will give it a more fragrant tone.
4. Cover the wok with a lid to allow all the nutrition in the wok to be locked within, and continue heating until it reduces into thick sauce; this will take about 2 minutes at most.
5. Pour away hot water over them to remove excess oil serve immediately! (You may like to squeeze some lemon or lime juice for taste)
Tip
1. If you want your spicy beef tendon to be less dry, you may wish to add in some sauce from the wok when serving (i.e. soupy).
2. You can also make this dish more fragrant by adding ginger or garlic during cooking time. Some recipes even recommend putting them into boiling water for a few minutes before cutting and using them out
However, I feel that it tastes better without these additional ingredients because the marrow of the beef is able to go perfectly hand-in-hand with red chilies.
FAQS
1-What does beef tendon taste like?
When you eat it, the texture will be very hard and rubbery, but when you chew it, you can feel its juicy chewy texture. Or in simple terms. Have a bite of it yourself to experience the unique taste!
2-Can I use other types of beef like tenderloin?
Yes! You can even try using mutton or chicken thighs instead for variation (Note: Chicken/mutton tendons are sold at Chinese supermarkets). And why not add some vegetables to your wok while cooking? Cabbage, carrots, and ginger will only give more flavors to the dish!
3-Is there any leftovers afterward?
I do not recommend removing these dishes from a wok as they get removed with a tong /big spoon. But if you manage to remove them, leave them in paper towels so the sauce that is left on the beef can be absorbed and they won't stick together making cleaning easier.
4-Is there any other way of cooking this dish?
No, but you may like to try my other recommendations: Spicy Braised Beef Brains, Chicken Feet With Chilies, Fish Head Curry (For Dry)
5-Is this dish suitable for young children or teenagers?
No, this dish has a very strong taste of chilies which is too spicy for them. You may try to mix some beef tendon with other dishes like beef noodles or fried rice and serve the tendon in slices instead.
6-Can I use any other spices instead of white pepper?
Yes! You may also add black pepper if you wish. However, please note that fresh ground white peppercorn powder will give out more fragrance from the wok than normal ones (especially when heated).
7-How long can it be stored after cooking?
You should keep it in a fridge or even frozen within 24 hours as temperature changes will cause the meat's natural juices to leak out. In order to cook again, you can keep it in the freezer for consumption within a year.
8-What else should I try?
You may also wish to try some other dishes like spicy braised beef brains and chicken feet with chilies which are recommended as well!
9-Cacan't find dried red dates at supermarkets? Can I use fresh ones instead?
No, do not attempt this since they will taste terrible due to their water content. Instead, you may like to try my other recommendations: Spicy Braised Brains With Red Dates, Fish Head Curry (For Dry), Spicy Chicken Wings, And Tendon With Fermented Black Beans Sauce. You can even mix them with Rock Sugar Syrup to make delicious sweets with balanced fragrant and spicy tastes at the same time!
10-Can I freeze this dish afterward? If yes, how to cook it after being frozen for a long period of time?
Yes, you can. And if you choose to do so, be sure to defrost the beef tendon first before cooking them again. This will prevent excess human error from ruining your frozen goods.
The only problem is that it might take more black pepper than usual because of its freezing process. (Depending on their current moisture content)
11-How does this dish compare in spiciness between Malaysia and Taiwan?
Its spiciness differs depending on which region/state you are living in since there are different levels of tolerance among the Asian countries. But the overall spiciness is similar between Malaysia and Taiwan.
12-What other ingredients can I use instead of dried red dates?
You may replace it with either rock sugar or star anise if you do not have any knowledge on how to find these dried fruits!
13-Is this dish for consumption during breakfast?
No, that's because the beef tendon is suitable to be served as a main course due to its unique texture which is very different from most popular breakfast choices like rice/congee/noodles.
Even though some European living in Asia prepare their morning meal with beef tendon by preparing it in fried eggs/toast, they are doing so willingly and not out of necessity.
14-is beef tendon expensive?
About $2.95 in Taiwan which is equivalent to about RM10 for a small packet weighing the same as half a chicken.
15-Is there any other way of cooking this dish?
No, but you may like to try my other recommendations: Braised Beef Tendon With Rock Sugar Syrup, Fish Head Curry (For Dry), Spicy Chicken Wings, And Fish Maw Soup. You can even mix them with rock sugar syrup to make delicious sweets with balanced fragrant and spicy tastes at the same time!
16-Can I substitute beef tendon with meatballs or fish balls?
Yes, but they will taste totally different since their texture is very chewy while the ones mentioned above are softer. Some people prefer softer textures while others prefer chewy ones.
17-Can I use any other beef parts for this dish? Why was it specifically selected?
No, do not attempt to substitute them since they have conflicting textures and are unsuitable for braising.
18-How long does the preparation take if I'm cooking for 2 people?
Assuming you know how to prepare the ingredients beforehand, its preparation should take about 30 minutes or so with 10 of which being used on the stovetop.
The remaining 20 minutes is used for cutting/chopping the vegetables and preparing the marinade before proceeding to cook again shortly after. Be sure to set aside enough time beforehand because anything can happen during your day!
19-How Much Expensive Spicy Beef Tendon in the USA??
I have never been to America before, but I know that spicy beef tendon is sold at supermarkets with a price tag similar to that of their fresh counterpart.
20-Can you cook this dish with pork?
Yes, absolutely! But I recommend using short ribs instead since their texture is similar to the ones used here as they are high in collagen and fats. (They retain more juices when cooked) But if you are looking for a cheaper alternative then feel free to use pork belly/pork knuckle as well!
Read More About How to Make Lava Cake in Oven
Conclusion
Overall, this dish uses very reasonable ingredients which are easily available at the local supermarket and their preparation is also very simple. Hence I highly recommend this dish if you wish to prepare something new for your family or friends!
The overall spiciness of this braised beef tendon (which takes 20-30 mins) depends on your choice of chili padi/dried red dates that you use. So do not hesitate to adjust accordingly in order to suit your needs! Do give it a try!
0 notes
Text
HYDERABADI BIRYANI – CUISINE OF EDIGEST FOODS

Hey How are you all , It has been a long time since I have not written about my food experiences due to my project work in Greater Noida . Greater Noida is a modern city with all modernized civilization . It’s a student area and street foods are in common. But here are many restaurants which are good. Though according to me the best restaurant in greater noida is EDigest Foods which serves hyderabadi biryani in greater noida .
After having my dinner at EDigest Foods . I went to the chef and how he makes the best biryani in greater noida .He said that Hyderabadi Chicken Biryani boasts of a beautiful cacophony of flavours that is known the world over. A delicious medley of fine long grain rice spices and chicken pieces, this Hyderabad style dum biryani is very easy to make and a delight to eat. Here is how to make Chicken Biryani Recipe at home.
What’s great about Hyderabadi biryani is its unique taste and influences from different parts of the world, especially from the Mughals. It’s one dish that’s really close to everyone’s heart and the perfect definition of soul food.
Hyderabadi Chicken Biryani boasts of a beautiful cacophony of flavours that is known the world over. A delicious medley of fine long grain rice spices and chicken pieces, this Hyderabad style dum biryani is very easy to make and a delight to eat. Here is how to make Chicken Biryani Recipe at home.
Hyderabadi Chicken biryani served in a bowl.
What’s great about Hyderabadi biryani is its unique taste and influences from different parts of the world, especially from the Mughals. It’s one dish that’s really close to everyone’s heart and the perfect definition of soul food.
This delectable dish is made with tender, juicy pieces of chicken cooked to perfection with Indian Spices and caramelized onions, each rice grain bearing the flavors of this royal treat.
When I started to cook, I never thought that Biryani can be made at home. It was always a special dish we went out to eat.
Then one day, a friend of our’s invited us over a biryani dinner and that day changed everything for me.
The biryani he made was out of the world and was made at home from scratch. I became his fan immediately and we had many biryani meals at his place later.
This man gave me the confidence to try out biryani at home and with a little hand holding by him, it took me no time to become a Biryani champion myself. I made many variations later apart from chicken biryani and posted the recipes here.
Some of the other biryani recipes I’ve posted are: Mutton Biryani, Hyderabadi Vegetable Dum Biryani, Kathal Ki Biryani, Hariyali Jheenga Biryani, Egg Dum Biryani and a seafood special Fish Dum Biryani.
What is Hyderabadi Chicken Biryani?
Biryani is basically rice cooked with meat in layers and on very slow heat or dum. There are many ways in a which a biryani is prepared and each method is unique and have it’s own significance.
There is Hyderabadi Style Biryani, Lucknowi Biryani, Ambur Biryani, Donne Biryani etc to name a few.
Hyderabadi Biryani is prepared in two ways – Kacchi or Pakki Biryani. Kacchi Biryani is where the meat is not cooked separately but gets cooked along with the rice while in the pakki biryani, the meat is cooked prior to layering it with rice.
The method I have mentioned below is Kacchi Biryani method and I will soon be posting the Pakki Biryani method too.
How to make Chicken Biryani?
This royal treat is prepared by cooking the rice first, and then layering it with chicken. Long grain basmati rice is to be soaked and added into a bowl of boiling water with khada garam masala, salt and shahi jeera. The rice is allowed to infuse the flavours of the masala and jeera and cook in it.
The chicken pieces are marinated with ginger paste, garlic paste, garam masala powder, red chilli powder, turmeric powder, salt, vegetable oil, green chilli and lemon juice, it’s allowed to sit for a few hours so that it soaks in all the flavours of the marinate and become tender.
You must make sure to marinate the chicken well in advance for it to get tender and cook under dum to perfection.
Once marinated, this delicious Hyderabadi biryani is assembled by putting in the chicken first and topping it with partially cooked rice.
As the rice starts to cook, the biryani is topped with milk, soaked saffron, browned onions and ghee. Then the pan is covered and the biryani is allowed to cook on dum beautifully with the flavours of the spices and toppings.
At this point in time, the aromas in your kitchen are going to be simply divine. It’s important to slow cook the biryani so that all the flavours seep right through and the chicken gets cooked thoroughly. Once it’s cooked completely, the biryani is mixed and served hot.
It’s very important to see to it that the rice is cooked to perfection; you don’t want it to be too mushy. The flavours of this dish speak for itself, chicken is to be marinated well and the final touch of saffron give this whole biryani a royal touch.
People from all over the world flock to Hyderabad to get a taste of this delicious Hyderabadi Chicken biryani, but what most don’t realise is that you can bring the taste and flavours of Hyderabad to your home. In Hyderabad, the taste of the biryani differs from region to region, but the method of cooking the biryani continues to be the same.
So for your next party, do try this delicious Hyderabadi Chicken Biryani and you won’t be disappointed. This recipe continues to be one of my all-time favourite biryani recipes.
Tips to make best Chicken Dum Biryani
Use best quality rice to make biryani. Long grain basmati rice which is atleast 2 years old is considered best to make a good biryani. I use Fortune basmati Rice to make my biryani.
The chicken must be marinated before hand. Since we are not cooking it separately, marinating it beforehand will make it tender and easy to cook.
Use a heavy bottom pan to assemble the biryani. The biryani needs to be cooked for 35-40 minutes on low heat and if the pan is not heavy, it might burn.
The traditional potli masala used to make biryani recipe has many unusual ingredients, but since it is not easy to source them, I have a mix which is easy to find and not compromise on taste.
Making Birista at home is the best way to go. I always make a large batch and freeze it for later use. You can check the recipe to make golden fried onion or Birista here.
Be very attentive while cooking the rice. Do not stir the rice much while cooking otherwise it will break the grains.
Choose a pan with a tight fitting lid. This biryani cooks on dum or steam and we want to retain as much steam that is formed inside. Traditionally, a sealing of dough used to be put around the pan and the lid but I don’t think that it is required if the lid fits tightly.
How to choose rice to make best Chicken Dum Biryani Recipe?
Both the taste and visual appeal of Biryani should stand out in its preparation. Now while this recipe takes care of the taste, the visual appeal comes only through rice grains. Longer the grain, better would be the biryani. I always choose the rice which is extra long and stands out as individual grains.
This gives the visual appeal of a blooming flower and makes eating biryani an enjoyable experience. Hence Basmati rice is the best choice to make Biryani, it stands out individually, without forming lumps while cooking.
In the market, you now even get specially selected long grain Basmati Rice, which is perfect for this Biryani.
The age of the rice is also very crucial to make good biryani. Choose the rice grain which is at least 2 year old. The older the rice, the better it is.
What to serve with Chicken Biryani?
Chicken Biryani can be served with any raita of your choice like Onion Tomato Raita, Boondi Raita or Pineapple Raita.
You can serve Mirchi ka Salan with it too.
So If you are in Greater Noida and you are a biryani lover then go to the EDigest Foods because it’s the best biryani restaurant in greater noida.
0 notes
Text
How To Catch And Cook Fish And Chips

Introduction:
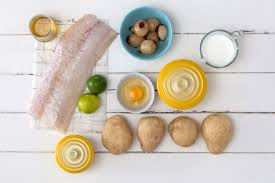
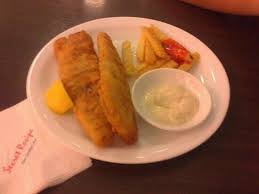
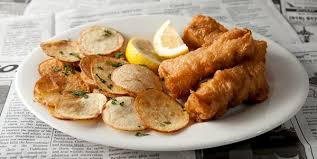
This is an easy meal to cook and, with some early preparation it’s ideal when you have guests. Filleting and freezing the trout on the day of your catch, if you have time, not only saves room in your freezer but also makes the preparation on the cay much simpler and quicker. I recently cooked my Posh Fish and Chips for six at a family holiday in Norfolk saving a long queue at the chip shop! The Fish and Chips have moist, tender fish fillets wrapped in a light crispy beer batter, thanks to a double fry. Served with some crisp fries and malt vinegar they're unbeatable. For those that are new to fishing, and do not even have an idea on how to catch fish, you can click on this link to our previous article on how to catch fish, and you can also click on this link for equipment which would help you on your fishing campaign.
Cleaning the Fish
This is probably the most unpleasant step in the cooking process. Even some of us who have done it indefinitely still don’t feel at ease while doing this.
We’re catching fish, so that means that we should end its life first. Find the most merciful way to do so. A method that has been used over the years is to hit its head as hard as possible. That way, the death will happen almost instantly. Now let’s see all the important steps for properly gutting and cleaning the fish.
We gut the fish by inserting the tip of our knife into the belly near the tail. Then, we make a shallow cut all the way to the head. However, make sure not to hurt the intestines, as the fish will then have an awful and bitter taste.
Slowly open the body and get all the intestines out. Cut out the anus. If there’s a dark spot near the backbone, remove it with something dull, since that’s the kidney.
Find running water to rinse the fish. A stream will always do. However, if you’re planning to fish on a lake, make sure to bring bottled or tap water with you.
Cut off the fins. You can leave the head on if you prefer. Fins need to be cut out simply because they’re sharp and unnecessary.
Scraping the scales is probably the most tiring part. It needs to be done thoroughly. You can do it with your knife or anything that’s serrated.
We always feel relieved once we’re done with this part since the real fun starts once it’s finished. We usually don’t de-bone or make fillets out of the catch simply because it takes too much time, and we’re usually very hungry by this point. However, you can do it if you like.
Starting the Fire
We usually split up, and while one of us cleans the fish, the other one starts the fire. Why? Well, getting the right heat will take some time. We don’t need large flames, as they will simply damage our catch. The fire must burn down to embers in order for the fish to properly cook.
First of all, find some small dry branches, dry leaves and put them in one place. They will be the basis for starting the fire. Larger branches and logs are the meat. They go in as soon as the fire starts. However, the fire will need some mass, so make sure to add wood and let it burn for some time. Once it’s reduced to hot coal, you may proceed with cooking.
Here, we will show you two different ways you can cook your fish. They both give a delightful taste, and we recommend to try them out.
Ingredients (serves two):
• One medium to large trout filleted (around 900g – 1200g)
• Salt and pepper
• One large knob of butter
• Plain flour for dusting
• Olive or vegetable oil for pan frying trout and coating potato wedges (posh chips!)
• One Lemon
• Twp baking Potatoes about 225g (8oz) each
• A sauce of your choice (tarter, ketchup etc)
• Garden or mushy peas
• Vinegar (optional)
Method:
• Wash the potatoes and slice each potato into eight wedges. Then rinse the wedges in a bowl and dry them on kitchen paper. Place them in a large bowl and coat with olive oil, sprinkle with plenty of black pepper and sea salt. Place them on a greased baking tray and put in the pre-heated oven for 35 to 40 minutes at 200C fan / Gas7. After 20 minutes turn the wedges to ensure an even crisp bake.
• In a saucepan, boil the water for the garden peas and place the peas in the boiling water just before pan frying the trout fillets.
• Dry the trout fillets on kitchen paper, season with salt, pepper and lightly dust the skin side with plain flour. Heat (moderate) the olive oil in a non-stick frying pan and add a large knob of butter. Once the butter starts to sizzle, place the trout in the pan skin down. After four minutes turn the fillets over for a further two minutes or until cooked through.
• Plate up with a slice of lemon and enjoy.
Cooks Tips
• As an option, add freshly chopped rosemary to the potato wedges before baking
• Replace garden peas with mushy peas or have both!
• Soaking the wedges in water removes the excess potato starch which prevents the wedges from sticking together and helps achieve maximum crispness
• If you have not filleted trout before then take a look on YouTube. It’s easier than you think!
• Excellent with a glass of beer or your favorite white wine
• You can microwave the potato wedges by arranging the wedges around the edge of a large microwave plate and cook on a high for 6-8 minutes. Re-arrange wedges and cook for a further 6-8 minutes
Here is another method you can make use of in preparing your fish and chips
Ingredients:
· 4 medium potatoes (I used a mix of yukon gold and russet)
· 4 medium fish fillets (cod, haddock and albacore work well)
· 2/3 cup all-purpose flour
· 2 tablespoons cornstarch
· 1/4 teaspoon paprika
· 1/4 teaspoons onion powder
· vegetable oil (for frying)
· 1/4 teaspoon baking powder
· 1/2 cup beer very cold (you may need a little more)
Method:
· Scrub the potatoes well, then cut into 1/4" thick batons. Dry thoroughly with paper towels and leave them sitting on paper towels to allow the surface of the potatoes to dry out for about 30 minutes. You can skip this step if you're pressed for time, but your potatoes won't turn out as crisp.
· Mix the flour, cornstarch, paprika, and onion powder in a medium bowl until well combined. Dust each fish fillet with the flour mixture on all sides.
· Add 1 1/2" of vegetable oil to a heavy bottomed pot and heat to 330 degrees F. Line a 2 wire racks with 2 layers of paper towels each.
· Fry the potatoes in batches until a light tan color and the edges are just starting to brown. Transfer the fried chips to one prepared rack to drain.
· When the potatoes are done frying, add the baking powder to the flour mixture and whisk together. Then add the cold beer to the flour mixture and lightly whisk together. It's okay if there are still a few lumps, just make sure you do not over-mix the batter or it will end up heavy.
· Dip the fillets in the batter and fry them in batches. Flip the fillets over with tongs when you see the edges start to turn light brown. Transfer to the second prepared rack as they finish frying.
· When the fish is done frying, increase the heat of the oil to 375 degrees F. Fry the chips a second time until they are golden brown and crisp. Drain on a rack and sprinkle with salt.
· Fry the fish a second time at the higher temperature until golden brown. Drain on a rack. Serve the fish and chips with lemon wedges or vinegar.
How to Keep Fish Warm for Dinner
The answer to this question really depends on the way you're preparing your fish. If you've steamed, baked or sauteed your fish, you're in luck all you have to do is turn the heat off, put a lid on your pot or pan, and let it sit for up to 20 minutes. The steam will gently warm your fish until you're ready to serve. If you've taken care not to overcook your fish in the first place, keeping it steamy for 20 minutes won't dry it out.
But when it comes to retaining a crispy skin or batter on skin-on or fried fish, it gets a little trickier. The biggest cooking error that leads to sogginess is wrapping or covering anything with a crunchy coating. Though it's tradition in Britain to deliver fish and chips wrapped in newspaper, it's actually a huge mistake. The contents of the package end up steaming themselves into soggy submission.
To keep batter or skin crispy when you're cooking up fish in batches, try this technique:
· Heat your oven to 200 degrees Fahrenheit.
· When fish is thoroughly cooked and ready to keep warm, transfer it to a wire rack placed over a baking sheet. Do not cover or wrap in foil! Hold in the oven for up to 30 minutes.
· When it's ready, eat it immediately, and eat it all especially if it's fried. Fried foods turn to mush as leftovers, so enjoy it in all its crispy glory.
· When keeping food warm or letting it sit out at room temperature, always keep in mind the cooking "danger zone," of which few home cooks are aware. Food should never stay between 41-135 degrees Fahrenheit for more than four hours. At that temperature range, bacteria begins to grow rapidly and will quickly take over your food. (Keep this in mind for those summer picnics!)
How to get Fish Batter to Stick
Give your fish a light dusting of corn starch before dredging in the batter. Flour works to some extent but without gluten formation flour is working as a drying agent more than anything else. Corn starch is, as its name implies, a starch which will actually act as a weak glue when heated wet. Just don't pile it on. dredge each fillet in the corn starch and tap off the excess until you're left with a thin, uniform layer. Your batter will stick to the corn starch, which will stick to the fish.

Phil Cross
Phil Cross was brought up in rural south Leicester shire and was introduced to a variety of field sports spending his youth coarse fishing and rough sporting. Living on his own he learned to cook and realized it was not as complicated as he thought. Over the years he has developed his cooking skills to the extent that his wife is happy to leave him in the kitchen whilst enjoying a glass of wine! Phil was introduced to fly fishing by a close friend, starting with practicing casting in the village park. They now fish together on a weekly basis.
Conclusion:
The “fish” in fish and chips is generally cod or haddock, but other white fish, like Pollock, plaice, and skate, aren’t uncommon, along with halibut, flounder, and tilapia in the United States. It all comes down to what’s available — many restaurants will let you choose from several options (be wary of a restaurant that can’t tell you what kind of fish goes into the fish and chips). The batter for this dish is generally just flour and water with some baking soda and vinegar added, but some restaurants replace the water with beer or milk. As for the chips, British fries are usually thicker than their American counterparts, with a super crunchy exterior and light and fluffy interior. The whole platter is served with a wedge of lemon and some malt vinegar on the side, and in the United States you’ll usually get tartar sauce as well. A popular side dish is mushy peas, which is exactly what it sounds like: peas cooked down until they’re mushy (it tastes better than it sounds).
Facebook
Twitter
Instagram
Pinterest
Google-plus
Android

Read the full article
0 notes
Text
Why Can?
By Gail Damerow
Whether you are a veteran home canner, or have just begun taking your first tentative steps into preserving your own homegrown food, you already know many of the reasons why anyone would bother. But if you’re wondering why so many people put in so much time and effort to fill their pantries with home canned foods, let’s look at some of the reasons.
Home canned food tastes better, especially since it contains your favorite varieties of vegetables or fruits, instead of generic or substitute ingredients (such as commercially canned pumpkin containing other kinds of winter squash), and the ingredients are all fresh.
• Home canned food is better for you. When you home can produce from your garden, you know it was safely grown, safely handled after harvest, and safely processed. You know it contains no GMOs, preservatives, excess salt, high fructose corn syrup, artificial coloring and flavoring, and other undesirable ingredients.
Ready to Start Your Own Backyard Flock?
Get tips and tricks for starting your new flock from our chicken experts. Download your FREE guide today! YES! I want this Free Guide »
• Unlike many commercially canned products, which are sold in cans lined with BPA-based epoxy, home canned food is free of BPA. (Information on BPA in commercially canned foods may be found at ewg.org/research/bpa-canned-food.)
• Home canning saves you money in terms of purchased canned goods and trips to the grocery store. The greatest economic return may be realized by processing enough food at a time to fill the canner.
• Home canning reduces waste, since it lets you store each season’s excess produce for out-of-season use. Also, unlike food bought in cans, your canning jars are infinitely reusable (barring occasional, and inevitable, breakage).
• Home canning reduces your carbon footprint, since the food you can at home is not trucked cross country, but travels only from your garden to your kitchen and from there to your pantry.
• A lot of home canners cite self-satisfaction and self-sufficiency as important reasons why they preserve the harvest by canning.
HOW CANNING PRESERVES FOOD
Canning is a method of preserving food by sealing it in jars, cooking it in the jars to destroy enzymes and undesirable microbes, and in the process removing air that hastens the spoilage of fresh foods. The trick is to heat the food just enough to destroy spoilage organisms without heating it so much it loses its nutritional value and flavor.
To anyone who grew up in a household where canning is not practiced, the process may seem somewhat mysterious. Too many people believe canning is complex and inherently unsafe.
But to those of us who grew up with mothers or grandmothers who canned routinely it becomes second nature. My husband Allan and I both grew up helping our mothers preserve foods by canning. Today we fill our pantry by canning much of what we grow in our own garden and orchard.
Peaches and other
stone fruits are
usually pitted prior to being canned.
STORING HOME CANNED FOODS
After the jars have cooled, remove the metal bands. Otherwise, residual moisture between a band and the jar’s threads may cause the band to rust, making it difficult to remove later and also making the band useless for reuse.
Jars removed from the canner often have food residue sticking to them. If left on the outside of the jar, this residue will eventually attract insects and mold. Clean the cooled jars by washing them in warm, soapy water. I find that if I have added a splash of vinegar to the water in the canner before the jars are processed, they are easier to wash.
Canned food keeps best in a cool, dark place. The storage area should be as dry as possible, especially if your jars are sealed with metal lids. Dampness can cause the lids to corrode, resulting in a broken seal and spoiled food.
The ideal storage area has a temperature range of between 50°F and 70°F. Our pantry, like those of both our mothers, is in the basement where the seasonal temperature fluctuation is less than it is upstairs in the kitchen. When Allan and I lived in a house that didn’t have a basement, we stored our jars in the crawl space under the house.
Where we lived then, we didn’t have freezing weather. Freezing can cause a jar’s contents to expand, cracking the jar and spoiling the contents. Or freezing and thawing may cause the food to get unpleasantly soft. If you must store your jars where freezing is likely, pack them in well-insulated cartons, or in a refrigerator or freezer that isn’t plugged in (locked, please, for the safety of children).
Avoid storing home canned goods where the temperature reaches 95°F or above, such as in the attic or near a furnace or other heater. Also do not store them on a windowsill or any place where they will get direct sunlight. Such conditions can cause your precious canned foods to rapidly lose quality.
Be sure to label each jar with the contents and the date. The contents may seem obvious at the time, but in the future may cause confusion. For example, Allan and I can beets both pickled and plain. The contents are used in different ways, but in the pantry the jars look identical, as I found out when I once grabbed a jar of plain beets and served them as pickles.
The date is important because you should always use your oldest jars first so they don’t get out of date. In our pantry, we place the newest jars to the right of older jars, and use the jars on the left first. The USDA recommends canning no more than you can use in a year, which is basically sound advice. However, in our house we rely on canned homegrown foods to get us through the year, but we can’t always rely on any particular harvest. For instance, in the summer of 2014 we had a bumper crop of tomatoes, which we use a lot of, but the summer of 2015 brought us barely enough tomatoes to enjoy fresh. Had we not diligently canned all the surplus tomatoes the year before, we’d have gone for an entire year without home canned tomatoes.
The problem with prolonged storage is not so much spoilage (provided the seal holds) but a potential reduction in quality. According to Brian A. Nummer, PhD, Food Safety Extension Specialist at Utah State University, unopened home canned foods have a shelf life of one year and should be used before two years. In this case, the ambiguous term “shelf life” does not mean that home canned food suddenly “turns bad” at the end of one year, but rather it means that during the first year canned food has its highest nutritional value and retains its freshest flavors.
Preserve the Harvest with Countryside
Future articles in this series will offer step-by-step detail on how to safely preserve the harvest. Briefly, it involves these basic and common sense steps:
1. Select only the freshest foods.
2. Sort out any that are not sound (bruised, diseased, or moldy).
3. Rinse produce to remove dust, insects, and residual soil.
4. Peel produce (such as potatoes) that require peeling.
5. Pit stone fruits (such as apricots and peaches).
6. Partially cook foods that must be packed into canning jars while hot.
7. Cover fruits with sweet syrup and vegetables with salted water.
8. Leave adequate head space (empty space at the top of the jar).
9. Add vinegar or lemon juice to low-acid fruits or vegetables as needed.
10. Seal the jars with canning lids held with metal bands.
11. Place jars in either a boiling water canner or a pressure canner.
12. Process jars for the prescribed amount of time.
13. Remove jars from the canner, cool, and test them for an air-tight seal.
14. Remove the metal bands, then wash and dry the jars, as well as the bands.
15. Label the jars and store them in a cool place away from light.
SAY WHAT?
BPA. Bisphenol A, a synthetic estrogen in the epoxy coating of commercial food cans that is linked to many human health problems.
CANNER. A large vessel used for processing jars of food, which may either use boiling water or steam.
CANNING JAR. A jar specifically designed for the home processing of foods; also called a Mason jar, Ball jar, Kerr jar, or fruit jar.
CANNING LID. A specially designed disk used to vacuum seal a canning jar.
HEAD SPACE. Empty space between the top of canned food in a jar and the jar’s rim.
METAL BAND. A reusable metal ring that is screwed down over a canning lid to hold it in place while jars are being processed in a canner.
— Gail Damerow
After the jars have
cooled, remove the metal bands, and wash both the bands and the jars.
FURTHER READING
Each food, and combination of foods, may be safely canned only according to instructions established by home canning experts. These instructions are offered on authoritative websites and in related published pamphlets and books.
Over the past few years, the specifics for safe canning have changed significantly. Many recommendations in older books and pamphlets (and passed along by folks who have been canning for decades using methods they learned from Grandma) are now considered unsafe. The following two reliable sources are available both in print and online:
The USDA Complete Guide to Home Canning was last updated in 2009. Its 190 pages cover all the basics for canning fruits, vegetables, meat, and seafoods in an easy-to-follow format designed to instill confidence in the novice. Much the information may be found online at nchfp.uga.edu (click on “publications” or “how do I… can?”).
The Ball Blue Book Guide to Preserving has long been called the canner’s bible. The 37th edition was published in 2015. Within its 200 pages are currently recommended step-by-step instructions for all types of home food preservation. Ball’s website also offers a wealth of canning information at freshpreservingstore.com.
— Gail Damerow
Why Can? was originally posted by All About Chickens
0 notes
Text
Time to check back in at Mas d’Augustine and find out how the owners and managers, Jane and Gary Langton, are spending their time with no guests, but plenty of chores. As we visit the Langtons, it appears that Jane has quite a few projects in mind. Let’s see how they manage it all…
“It’s a busy time of year in the Chambre d’Hotes business………even though we’re closed,” says Jane.
I suspect, most people think we have our feet up in front of the fire doing little or nothing before we welcome guests in April. Unfortunately, this is not the case, as there is just too much that needs to be done both inside and out.
I had planned for us to be working in the garden this week but we had to stop as, despite the beautiful blue skies and sunshine, it is just too cold. I have decided to increase the size of the vegetable garden this year so that we can offer a wider selection of organic home-grown fruit and vegetables. As a consequence, Gary has (reluctantly) agreed to remove the existing hedge (circa 5 metres high) which will enable me to plant a long row of tomatoes. Previously we had room for 6 tomato plants, but I want to include a wide selection of Heirloom tomatoes in all colours, as they are such an important ingredient in Provençal cooking and straight from the garden the flavours are really intense.
Last year’s garden
New garden in progress
All the hedges bordering the property need to be cut, olive and fruit trees pruned and there are two Italian Cypress trees that need to be cut down as they did not survive last year’s hot summer. I also have a plan to improve 3 of the existing flower beds, which involves the building of a dry-stone wall, changing of soil and the re-shaping of the beds. I am hoping to create a new lavender bed, a white rose bed and extend the giant poppy bed. I think Gary is rather grateful for the cold snap, as he is not an enthusiastic gardener!
One of last year’s flower beds
Before the cold snap started, Gary moved our lemon trees to their winter home up on the terrace and I have wrapped up the diplodenia – fingers crossed it will survive the freezing night temperatures.
Gary has just returned from a quick trip to London to welcome his new granddaughter into the family. Mathilda was born last Friday and we are looking forward to her first visit in the summer.
While he was away I pressed on with the redecorating. I have nearly finished painting the main kitchen, but decided to leave the ceiling to Gary. Next week we will start the office, closely followed by re-varnishing the front doors and re-painting all the windows at the front of the mas.
Painting and decorating done, we will be tackling the garden to make certain everything is ready for the first shoots of Spring in mid-February. Then, in March, it will be time to clean the terraces and fill the pool, layout all the garden furniture, clean the summer kitchen and get the rooms ready for our first guests in April.
I like to add something new to the guest rooms every year, so we will spend a few Sundays visiting the local brocante and antique markets searching for interesting items.
There is one job that Gary looks forward to every year………. tasting the dishes for the newly designed menus. Over the next few weeks I will prepare all the new recipes for us to sample and critique.
We are enjoying hearty French classic dishes to help keep out the cold. One of our favourites is a traditional French stew. In the Languedoc region this stew is known as a Cassoulet. Made with meat, sausages and beans, it takes a while to cook and prepare but, on a cold winter night after a hard day in the garden, it’s definitely worth it.
Cassoulet
A wonderful change from traditional casseroles, it takes a while to cook but the flavours are wonderful and very warming
Ingredients – serves 6
140 grms of pork belly
140 grms of smoked bacon
300 grms of garlic sausage
600 grms of haricot beans, soaked overnight in plenty of water
1 celery stick
1 small white onion
2 carrots
2 large plum tomatos
6 cloves of garlic
2 tsp of lemon juice
2 cloves, crushed
6 confit duck legs or 6 pre-cooked chicken legs
25 grms of goose fat or 2tbls of olive oil
1 tsp of dried mixed herbs
Method
1. Chop the bacon, pork belly and garlic sausage into bite sized chunks.
2. Drain the beans that you soaked overnight and tip into a large saucepan with the bacon, sausage and pork belly. Cover with water and bring to the boil, blanch for about 15 mins. Drain and set aside. Heat the oven to 120 c.
3. Chop the celery, carrot and onion and peel the garlic leaving the cloves whole.
4. Heat the goose fat or olive oil in a large oven proof casserole or frying pan and over a low heat sweat the garlic, onion, carrot and celery for about 5 minutes until softening. Add the tomatoes and herbs and continue cooking for another 5 minutes.
5. Add the sausage, bacon and pork belly to the pan and cook for 2 minutes, add the beans and then 1 litre of water.
6. Bring the mixture to the boil and add the lemon juice, cloves and season with salt and pepper.
7. Transfer the casserole to the oven and cook uncovered for 2 to 2.5 hours, stirring occasionally, the beans will soften and thicken the juice.
8. Remove the cassoulet from the oven. Now add either the confit duck legs or your pre-cooked chicken legs, place them under the beans and cook the cassoulet for another 2 hours for duck and 1 hour for chicken
Serve the cassoulet in bowls sprinkled with chopped parsley and plenty of crusty French bread.
Proud Granddad Gary and Mathilda
Next: Gary and I are hoping to grab a few days skiing in the coming weeks once the weather has improved and the snow has settled. Besides, the slopes are only a few hours away!
… there’s always time for a horse ride
Stay tuned …
Mas d’Augustine, a former silk farm built in the latter part of the 18th Century, retains many of its original features and has been restored with respect for the original architecture. For information about a visit with Jane and Gary at Mas d’Augustine in the village outside Uzes, La Bruguière, check out the website: masdaugustine.com
A Slice of Life in the “Off” Season: A Chambre d’Hotes in France Time to check back in at Mas d'Augustine and find out how the owners and managers, Jane and Gary Langton, are spending their time with no guests, but plenty of chores.
#barefoot blogger#expat in Uzes#female expat living in Uzes#Female traveling alone#french cassoulet recipe#French Country Food#French cuisine#hearty southern french meal#life#living in south of france#owning and running a chambres d&039;hotes in France#Provence#Provence Languedoc#running a bed and breakfast in France
0 notes
Text
How To Catch And Cook Fish And Chips

Introduction:
This is an easy meal to cook and, with some early preparation it’s ideal when you have guests. Filleting and freezing the trout on the day of your catch, if you have time, not only saves room in your freezer but also makes the preparation on the cay much simpler and quicker. I recently cooked my Posh Fish and Chips for six at a family holiday in Norfolk saving a long queue at the chip shop! The Fish and Chips have moist, tender fish fillets wrapped in a light crispy beer batter, thanks to a double fry. Served with some crisp fries and malt vinegar they're unbeatable.

Cleaning the Fish
This is probably the most unpleasant step in the cooking process. Even some of us who have done it indefinitely still don’t feel at ease while doing this.
We’re catching fish, so that means that we should end its life first. Find the most merciful way to do so. A method that has been used over the years is to hit its head as hard as possible. That way, the death will happen almost instantly. Now let’s see all the important steps for properly gutting and cleaning the fish.
We gut the fish by inserting the tip of our knife into the belly near the tail. Then, we make a shallow cut all the way to the head. However, make sure not to hurt the intestines, as the fish will then have an awful and bitter taste.
Slowly open the body and get all the intestines out. Cut out the anus. If there’s a dark spot near the backbone, remove it with something dull, since that’s the kidney.
Find running water to rinse the fish. A stream will always do. However, if you’re planning to fish on a lake, make sure to bring bottled or tap water with you.
Cut off the fins. You can leave the head on if you prefer. Fins need to be cut out simply because they’re sharp and unnecessary.
Scraping the scales is probably the most tiring part. It needs to be done thoroughly. You can do it with your knife or anything that’s serrated.
We always feel relieved once we’re done with this part since the real fun starts once it’s finished. We usually don’t de-bone or make fillets out of the catch simply because it takes too much time, and we’re usually very hungry by this point. However, you can do it if you like.
Starting the Fire
We usually split up, and while one of us cleans the fish, the other one starts the fire. Why? Well, getting the right heat will take some time. We don’t need large flames, as they will simply damage our catch. The fire must burn down to embers in order for the fish to properly cook.
First of all, find some small dry branches, dry leaves and put them in one place. They will be the basis for starting the fire. Larger branches and logs are the meat. They go in as soon as the fire starts. However, the fire will need some mass, so make sure to add wood and let it burn for some time. Once it’s reduced to hot coal, you may proceed with cooking.
Here, we will show you two different ways you can cook your fish. They both give a delightful taste, and we recommend to try them out.
Ingredients (serves two):
• One medium to large trout filleted (around 900g – 1200g)
• Salt and pepper
• One large knob of butter
• Plain flour for dusting
• Olive or vegetable oil for pan frying trout and coating potato wedges (posh chips!)
• One Lemon
• Twp baking Potatoes about 225g (8oz) each
• A sauce of your choice (tarter, ketchup etc)
• Garden or mushy peas
• Vinegar (optional)
Method:

• Wash the potatoes and slice each potato into eight wedges. Then rinse the wedges in a bowl and dry them on kitchen paper. Place them in a large bowl and coat with olive oil, sprinkle with plenty of black pepper and sea salt. Place them on a greased baking tray and put in the pre-heated oven for 35 to 40 minutes at 200C fan / Gas7. After 20 minutes turn the wedges to ensure an even crisp bake.
• In a saucepan, boil the water for the garden peas and place the peas in the boiling water just before pan frying the trout fillets.
• Dry the trout fillets on kitchen paper, season with salt, pepper and lightly dust the skin side with plain flour. Heat (moderate) the olive oil in a non-stick frying pan and add a large knob of butter. Once the butter starts to sizzle, place the trout in the pan skin down. After four minutes turn the fillets over for a further two minutes or until cooked through.
• Plate up with a slice of lemon and enjoy.
Cooks Tips
• As an option, add freshly chopped rosemary to the potato wedges before baking
• Replace garden peas with mushy peas or have both!
• Soaking the wedges in water removes the excess potato starch which prevents the wedges from sticking together and helps achieve maximum crispness
• If you have not filleted trout before then take a look on YouTube. It’s easier than you think!
• Excellent with a glass of beer or your favorite white wine
• You can microwave the potato wedges by arranging the wedges around the edge of a large microwave plate and cook on a high for 6-8 minutes. Re-arrange wedges and cook for a further 6-8 minutes
Here is another method you can make use of in preparing your fish and chips
Ingredients:
· 4 medium potatoes (I used a mix of yukon gold and russet)
· 4 mediumfish fillets (cod, haddock and albacore work well)
· 2/3 cup all-purpose flour
· 2 tablespoons cornstarch
· 1/4 teaspoon paprika
· 1/4 teaspoons onion powder
· vegetable oil (for frying)
· 1/4 teaspoon baking powder
· 1/2 cup beer very cold (you may need a little more)
Method:
· Scrub the potatoes well, then cut into 1/4" thick batons. Dry thoroughly with paper towels and leave them sitting on paper towels to allow the surface of the potatoes to dry out for about 30 minutes. You can skip this step if you're pressed for time, but your potatoes won't turn out as crisp.
· Mix the flour, cornstarch, paprika, and onion powder in a medium bowl until well combined. Dust each fish fillet with the flour mixture on all sides.
· Add 1 1/2" of vegetable oil to a heavy bottomed pot and heat to 330 degrees F. Line a 2 wire racks with 2 layers of paper towels each.
· Fry the potatoes in batches until a light tan color and the edges are just starting to brown. Transfer the fried chips to one prepared rack to drain.
· When the potatoes are done frying, add the baking powder to the flour mixture and whisk together. Then add the cold beer to the flour mixture and lightly whisk together. It's okay if there are still a few lumps, just make sure you do not overmix the batter or it will end up heavy.
· Dip the fillets in the batter and fry them in batches. Flip the fillets over with tongs when you see the edges start to turn light brown. Transfer to the second prepared rack as they finish frying.
· When the fish is done frying, increase the heat of the oil to 375 degrees F. Fry the chips a second time until they are golden brown and crisp. Drain on a rack and sprinkle with salt.
· Fry the fish a second time at the higher temperature until golden brown. Drain on a rack. Serve the fish and chips with lemon wedges or vinegar.
How to Keep Fish Warm for Dinner
The answer to this question really depends on the way you're preparing your fish. If you've steamed, baked or sauteed your fish, you're in luck all you have to do is turn the heat off, put a lid on your pot or pan, and let it sit for up to 20 minutes. The steam will gently warm your fish until you're ready to serve. If you've taken care not to overcook your fish in the first place, keeping it steamy for 20 minutes won't dry it out.
But when it comes to retaining a crispy skin or batter on skin-on or fried fish, it gets a little trickier. The biggest cooking error that leads to sogginess is wrapping or covering anything with a crunchy coating. Though it's tradition in Britain to deliver fish and chips wrapped in newspaper, it's actually a huge mistake. The contents of the package end up steaming themselves into soggy submission.
To keep batter or skin crispy when you're cooking up fish in batches, try this technique:
· Heat your oven to 200 degrees Fahrenheit.
· When fish is thoroughly cooked and ready to keep warm, transfer it to a wire rack placed over a baking sheet. Do not cover or wrap in foil! Hold in the oven for up to 30 minutes.
· When it's ready, eat it immediately, and eat it all especially if it's fried. Fried foods turn to mush as leftovers, so enjoy it in all its crispy glory.
· When keeping food warm or letting it sit out at room temperature, always keep in mind the cooking "danger zone," of which few home cooks are aware. Food should never stay between 41-135 degrees Fahrenheit for more than four hours. At that temperature range, bacteria begins to grow rapidly and will quickly take over your food. (Keep this in mind for those summer picnics!)
How to get Fish Batter to Stick
Give your fish a light dusting of corn starch before dredging in the batter. Flour works to some extent but without gluten formation flour is working as a drying agent more than anything else. Corn starch is, as its name implies, a starch which will actually act as a weak glue when heated wet. Just don't pile it on. dredge each fillet in the corn starch and tap off the excess until you're left with a thin, uniform layer. Your batter will stick to the corn starch, which will stick to the fish.
Phil Cross
Phil Cross was brought up in rural south Leicester shire and was introduced to a variety of field sports spending his youth coarse fishing and rough sporting. Living on his own he learned to cook and realized it was not as complicated as he thought. Over the years he has developed his cooking skills to the extent that his wife is happy to leave him in the kitchen whilst enjoying a glass of wine! Phil was introduced to fly fishing by a close friend, starting with practicing casting in the village park. They now fish together on a weekly basis.
Conclusion:
The “fish” in fish and chips is generally cod or haddock, but other white fish, like Pollock, plaice, and skate, aren’t uncommon, along with halibut, flounder, and tilapia in the United States. It all comes down to what’s available — many restaurants will let you choose from several options (be wary of a restaurant that can’t tell you what kind of fish goes into the fish and chips). The batter for this dish is generally just flour and water with some baking soda and vinegar added, but some restaurants replace the water with beer or milk. As for the chips, British fries are usually thicker than their American counterparts, with a super crunchy exterior and light and fluffy interior. The whole platter is served with a wedge of lemon and some malt vinegar on the side, and in the United States you’ll usually get tartar sauce as well. A popular side dish is mushy peas, which is exactly what it sounds like: peas cooked down until they’re mushy (it tastes better than it sounds).
Facebook
Twitter
Instagram
Pinterest
Google-plus
Android

Read the full article
0 notes
Last Seen Blogs

vyapaarjagat
VyapaarJagat.com

tranghandmade
Sans titre

archaicallegory
Archaic Allegory.

dnpisgreat-blog
Untitled

thylovelylionheart
Asianajaja Riihimäki