#I need a HD version of this scene because I need to gif it so bad
Note
NAPOLEON - Official Trailer (HD) - YouTube
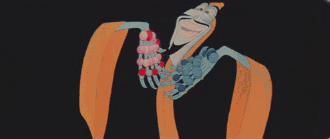
Do you see this bullshit, your majesty? Seriously, I'd like to know your opinion, because I don't think it looks very good. Basically, it seems like a truncated and simplified version of the 2002 French miniseries with Christian Clavier, and that one already suffered from having to cut corners in terms of time allotted to various historical events...
Yup, I definitely think it’s going to be oversimplified. Napoleon deserves a 10 hour series *minimum* to get anywhere close to grasping the whole scope of his life and legacy. But they can’t really do that with a single film 😅 Unfortunately, I think they have to cut a lot of stuff.
I have a lot of thoughts about this trailer.
About Napoleon:
I’m not sure why he’s mumbling so much. It seems like the actor is intentionally acting stiff and I don’t know why. Napoleon was described by his contemporaries as “energetic” and “electric”. Not mumbling and rigid. He should be very charismatic.
My guess is that the reason they are depicting him in such an emotionless way is because they want to portray him as a tyrant who doesn’t have any remorse or feelings and only cares about power. But I’m hoping they show more to him and his character in the actual film. Fingers crossed.
His age is wayyyyy off. He should be in his 20s, the age he was in the 1790s. 34 when he became emperor. Not 50s or whatever the actor is. That’s the age Napoleon was when he died.
About Josephine:
Okay I have a lottttt of thoughts but I feel that I need to see the film first before I make any judgements. First off, I like the actress they casted a lot (despite the fact that she’s younger than the Napoleon actor). I’m really intrigued with how they are characterizing her. I like that they are not depicting her as completely submissive and without any influence. I was worried they would try to portray her as powerless, which I don’t think she was. Instead it seems like they are doing the exact opposite. I had difficult time understanding everything in the trailer, but I think Josephine in the film told Napoleon that he was a “little brute that would be nothing without me.”
Um…… that’s an interesting take.

There’s a lot of little things I’m curious about, such as the depiction of Brumaire, the pyramids, etc. I guess we have to wait until it comes out to see those scenes in its entirety though. I’m also really excited to see their depiction of Talleyrand!!
The cinematography is really cool!! I noticed some shots which match real life paintings, which I love! 😊😊


The trailer actually gives me some hope that it might be a really good film despite the issues. I am hopeful but cautious! If it ends up being bad, at least we will have some more aesthetic shots to enjoy lol
46 notes
·
View notes
Text
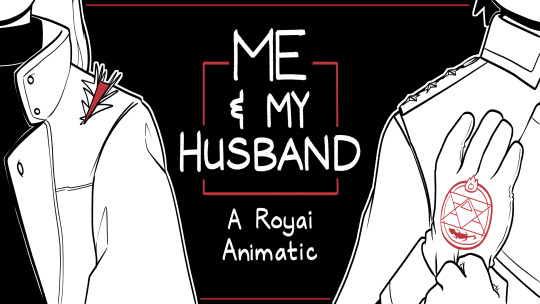
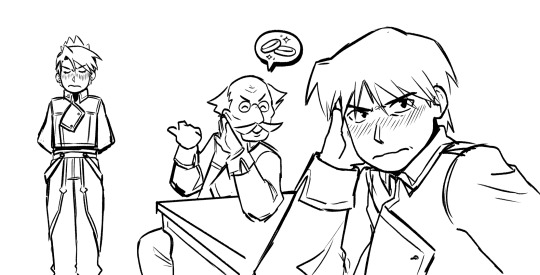
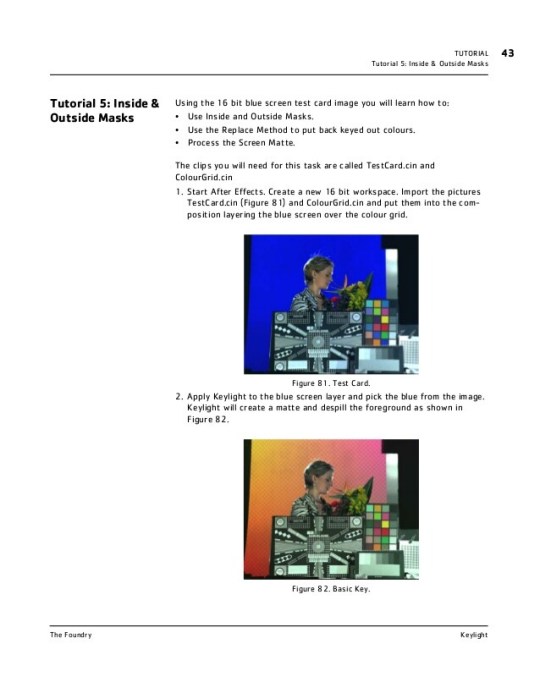
Wahoo, time for another Animatic Deep Dive!
I did this on twitter after my jeanmarco animatic came out last year, and I wanted to do something similar for the Royai animatic! This post will include HD stills from the animatic, as well as some nerdy insight into some shot choices and such, bc I need an outlet to geek out about it. Everything is under the ‘keep reading’ break! :]
Ok to start off, I wanted to show some behind-the-scenes stuff, including my first thumbnails I drew in my sketchbook, as well as part of the shot sheet that kept me organized (and sane) throughout the animatic.

Also, fun fact is that I'm primarily a 3D animator, so I used that knowledge to sculpt a rough version of Mustang's office for the final shot :]

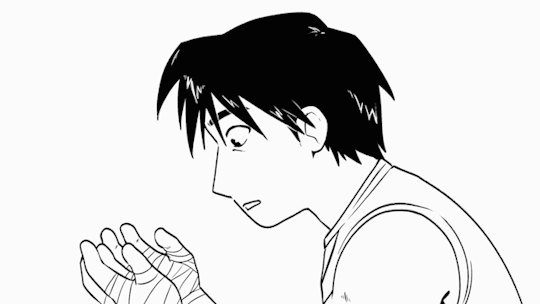
Ok so now for actual stills...starting with one of my FAVORITE sequences to draw, which I have dubbed 'the scrolling bit.'


And a fun little composition tidbit about this sequence is that I tried to show the passage of time through Roy & Riza's placement in the shots. So in order, they progressively go from the right of the screen to the left. It was actually a really last-minute decision, bc originally I had two different shots (see below) which got scrapped in order to do that silly compositional thing. I think it was a worthy sacrifice because that drawing of Black Hayate on Mustang's head was just so fun to draw.

OKAY, now I want to move onto my favorite part of any animatic, which is the pretentious stuff about 'character placement' and "the deeper meaning." Blah blah, all that art-school kind of stuff that you'd hear in some film analysis class.
It's not intentional whatsoever, but I realized after the animatic was finished that Hawkeye is almost always on Mustang's righthand side, other than a select few times when he's the one supporting her. Feel free to look into that if you'd like, but just know it was not intentional and isn't consistent 100% of the time.
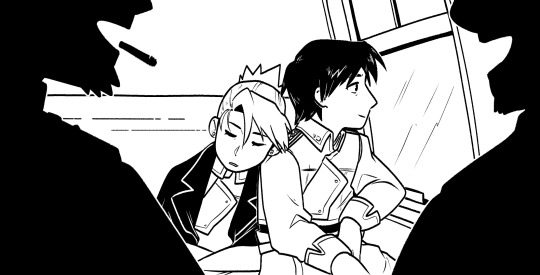
What was intentional, however, were these 4 shots, and specifically the placement of Mustang & Hawkeye within them:
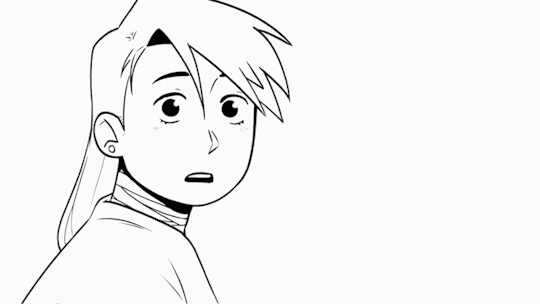

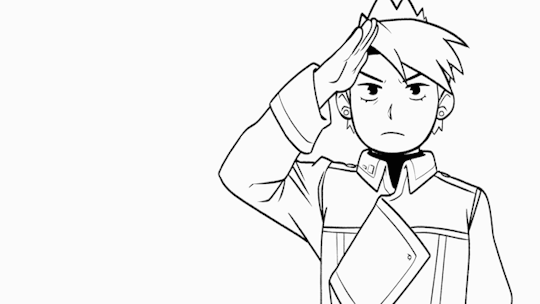
These 2 sequences are meant to be direct parallels to each other, in everything including how Mustang turns to Hawkeye, and Hawkeye is already facing him. They were also my favorite shots to animate, especially with Riza coming out of her salute. Seeing them in the final animatic almost made me tear up, ngl. They're just so dang in love!
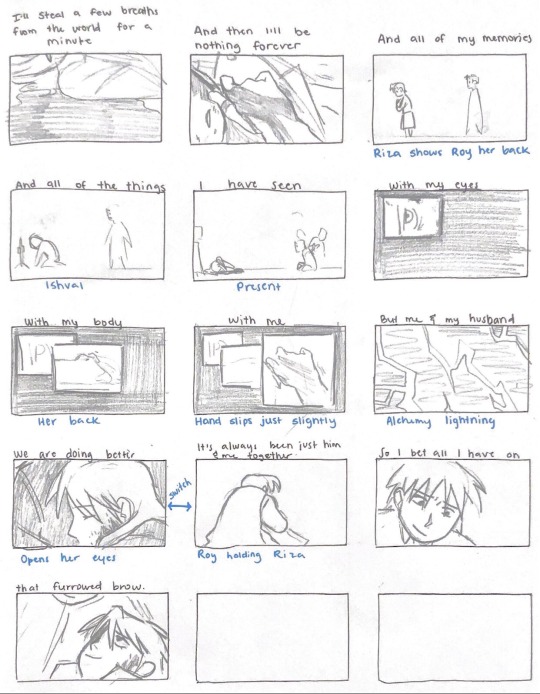
Finally, the last part that holds some artsy deeper meaning is a sequence I actually shared a long long time ago. I've dubbed it the 'spotlight section' bc idk how else to describe it.
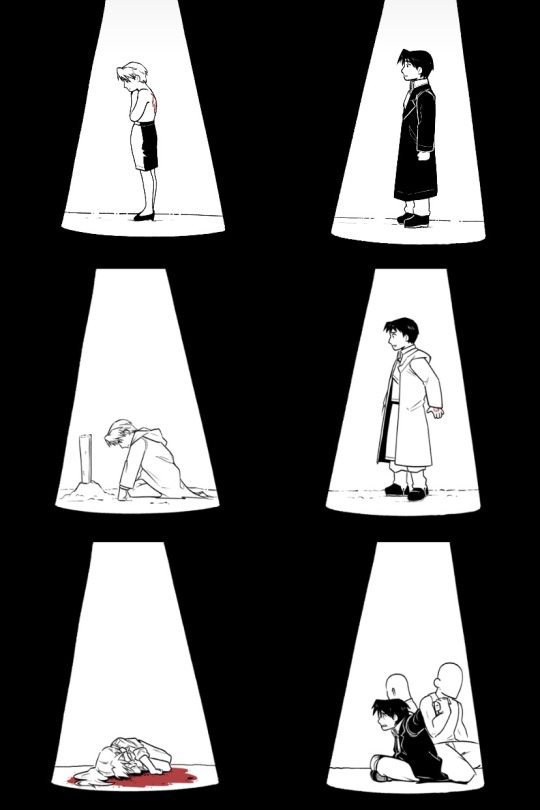
Back when I teased this sequence, I alluded to some "deeper meaning" behind the use of red in the tags. And while the use of red is a pivotal thing throughout the entire animatic, it's most important here. It starts on Hawkeye's back, then transfers to Mustang's glove, and finally goes back to Hawkeye as her blood. Basically what I was trying to get at was something about consequences, and where flame alchemy has led them. In some way or another, Riza's decision to show Roy her tattoo ended up leading to her own (near) demise. So the red was supposed to show that transfer of consequence, if that makes sense.
ANYWAYS. Enough of me rambling. Thank you for reading if you somehow made it this far. All the love on this animatic - even since I first started teasing it back in November - has been insane to me. I still feel like I can't wrap my head around it. I'll leave you all with one last sketch from when I first started making the animatic. Have a good night, everyone!
#WOO THIS IS A LONG POST#basically just me rambling about my own work#and some exclusive behind the scenes stuff ;)#props to you if you make it all the way through#royai#animatic deep dive
117 notes
·
View notes
Text
GIF Coloring Guide: An Introduction to Adjustment Layers in Photoshop
This is going to be a super basic guide meant to show you the power of Adjustment Layers in Photoshop. It’s not going to be a step-by-step tutorial, though, in which I dictate what exactly you should do because it will always be different for every gif.
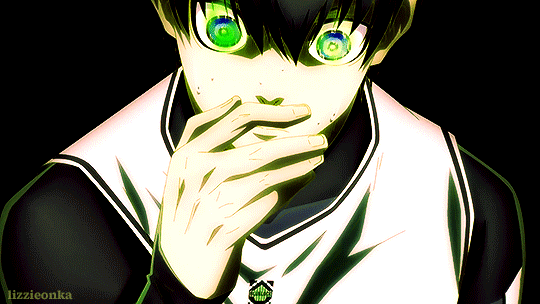
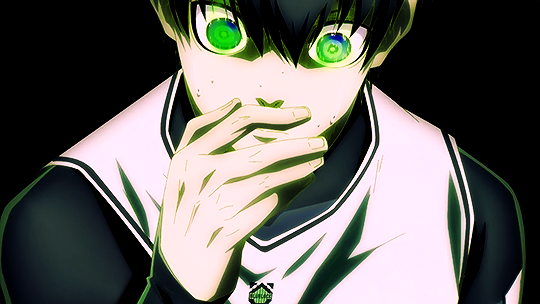
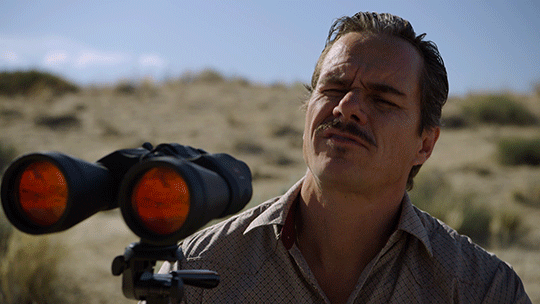
I’ll be turning this Isagi gif:

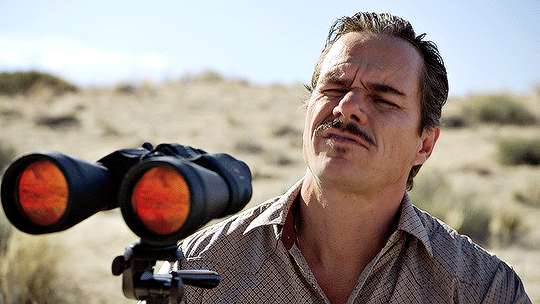
into this:
What you need:
Adobe Photoshop (any version should be fine. I use CC v23)
Basic gif-making knowledge using Photoshop
Basic Photoshop knowledge in general
What this guide is good for: A simple gif where the brightness and colors of each frame are about the same.
I’m writing this guide for those who already know how to make a gif in Photoshop. You’ve imported your frames, deleted the ones you don’t need, and you know how to save it as a gif. I will only be teaching you how to color, so I’m not gonna walk you all through the Photoshop basics. You can google that yourself.
Now, first things first, I want you to keep in mind that the GIF file format can hold only up to 256 colors. Thus, when coloring gifs, I try to “reduce” the colors by making the blacks blacker, the whites whiter, removing color noise, and de-emphasizing colors that are not essential to the overall scene. Otherwise, the final image will just look noisy or muddy because of the gif trying to compensate for all those extra colors—which is not bad in itself, by the way, if that’s the look you’re aiming for. I just prefer my GIFs to look HD.
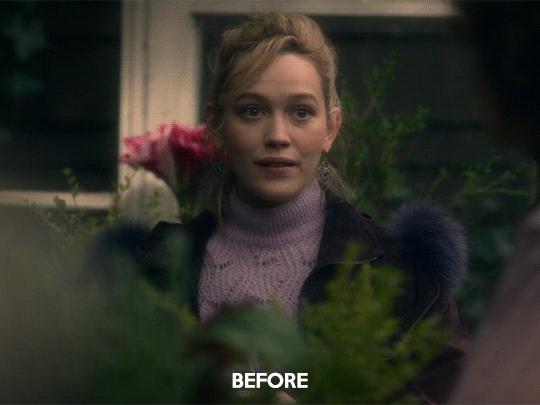
And from what I’ve noticed, noisy and muddy gifs will also have a larger file size. The uncolored gif above, for example, is at 6.69mb. Meanwhile, the colored gif is at 4.96mb. Both were exported using the same settings. Although we have a 10mb file size limit for gifs here on Tumblr, I still like to keep the file size down as much as I can.
Now, with that out of the way, let’s get to the actual guide—
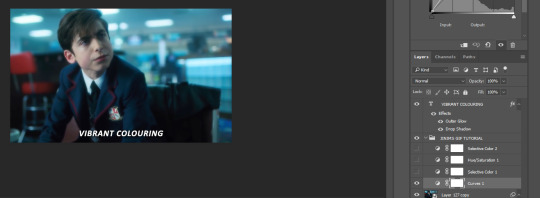
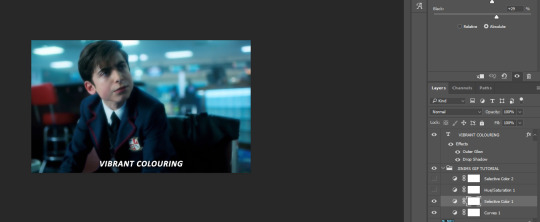
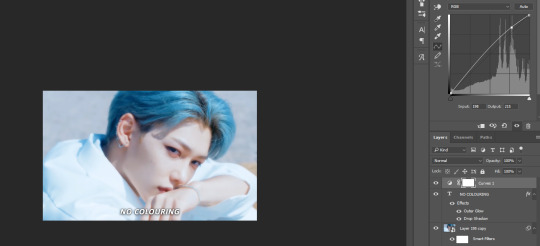
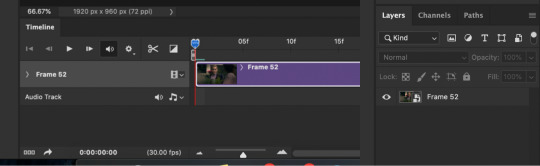
In the Isagi gif I’m using as an example, I made him look like he’s glowing in the dark and also partly blended him into the background. Here’s a screenshot of all the adjustment layers I used to achieve this effect:

All these layers should be on the very top of your gif layers. I grouped them together for convenience in toggling all changes on and off, allowing me to quickly check the “before and after” of the gif.
Before I explain what those layers do, I just want you to know that the order of those layers matter. I purposely put one Selective Color at the bottom, and that second Selective Color is no mistake. More on this later.
Selective Color 1
Selective Color is my favorite, and it’s also the most important. It lets me fine-tune individual colors without affecting the other colors much. It’s also usually the first thing I add as it lets me pick which colors to emphasize and which to de-emphasize.
Now, let’s look at our unedited Isagi:
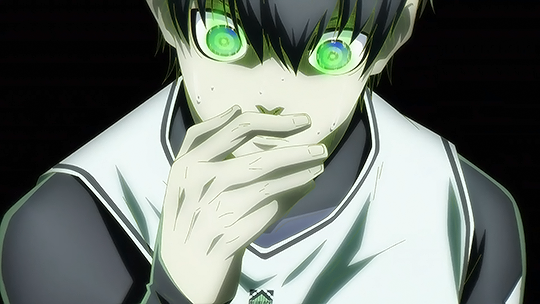
(Above is a still image and not a gif. From hereon, I’ll be using still images coz the gif looks about the same in each frame anyway)
The colors on Isagi look too gray and cold to me. I want to make the black of his suit darker, remove a bit of that green tinge on his skin, make the blue of his eyes bluer, and just give him an overall warmer look.
Here are my settings for Selective Color 1:


Unedited vs Selective Color 1:

Although I said I wanted to remove the green tinge on his skin, I did not touch the “Greens” at all in my Selective Color 1 layer. That’s because doing so would also reduce the greens in Isagi’s eyes, and I didn’t want that. Instead, I tried to counter the green on his skin by adding some Magenta and Yellow on the “Whites” to make it appear warmer and more reddish instead.
Of course, I didn’t come up with the final settings above in one go. As I added more adjustment layers on top, I would go back to Selective Color 1 and play around with the different sliders until I was satisfied. Gif coloring doesn’t have to be a one-way process. With adjustment layers, you aren’t affecting the pixels of the image itself, so you can always go back and tweak your settings.
Dragging the slider to the right for positive values would return darker colors, while dragging it to the left for negative values would return lighter colors.
I want my Isagi gif to be vivid and for Isagi to look like he’s glowing in the dark, so I dragged the sliders in “Blacks” up to the positives. Then in “Whites,” I dragged the black slider down to the negatives.
However, if you want a more muted look like this Isagi gif 2:

...You can slide the black slider under “Blacks” to the negative values instead.
Curves
Curves, along with Levels, is usually the first thing a gif-maker learns to use. It’s good for quickly getting some nice brightness and contrast on your image. I’ve seen some gif-makers refer to Curves as the better version of Levels, but I disagree. Curves and Levels, though both affect contrast in an image, go about it differently and achieve very different effects.
In my Isagi gif, I used both Curves and Levels. But in some of my other gifs, I used only one of them.
Curves is what I usually add in the beginning stages of coloring (i.e. the layer is placed lower) when doing complex coloring. Although I never make Curves the bottom-most adjustment layer, sometimes I add it first just to give the image a burst of brightness or to quickly darken an image that may be too bright. I would then put a Selective Color underneath to make necessary adjustments.
Our Isagi gif, on top of being still muddy, is now also too reddish. I had only added those reds to get some warm undertones in our gif, and now that we have that, it’s time to reduce those reds. We’re not gonna do this via adjusting Selective Color 1 because doing so would only bring back the greens we wanted out. Instead, we’re gonna subtly bring in some whites to the gif by making it brighter with Curves. And while doing so, we can also enhance the contrast on the image.
Here are my settings:
The more S-shaped that curve is, the more contrast and saturation you’ll get. I just want a subtle change, so the curve is nearly flat.
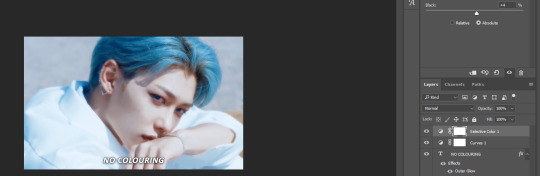
Unedited vs Selective Color 1 vs Selective Color 1 + Curves

See the difference? Now there are darker blacks and less green on Isagi’s skin. The colors are also starting to pop, and the gif looks less muddy.
If you want colors to look muted instead, like in Isagi gif 2, you can do a reverse S curve instead. Well, actually, feel free to play around with Curves. It doesn’t have to be S or reverse S. You can add as many points there as you like and form whatever curve you want.
Selective Color 2
Remember when I said that the order of adjustment layers is not random? I’m now going to explain why.
When we added Selective Color 1, the image that layer is editing would be our unedited Isagi with all those greens and grays.
However, when we added Curves on top of Selective Color 1, the image we were editing was no longer the original Isagi but the Isagi + Selective Color 1.
Layers build on top of each other. It’s like when you’re painting. If you add red paint and then put blue above it, you get violet. If you want to put another color on top, you’ll have to work with the violet and not the red that’s no longer there.
That said, our Selective Color 2 here is not going to be redundant. Selective Color 1 was coloring the unedited Isagi, but Selective Color 2 will be coloring the version that has Selective Color 1 + Curves.
Now, I intend to use Selective Color 2 to enhance Isagi’s green aura as well as the blue of his eyes. We weren’t able to increase the “Greens” in Selective Color 1 because doing so would also make Isagi’s skin green. But now that Isagi’s skin is more red than green, we can play with the “Greens” of his aura safely.
Here are my settings:

Unedited vs SC 1 + Curves + SC 2:

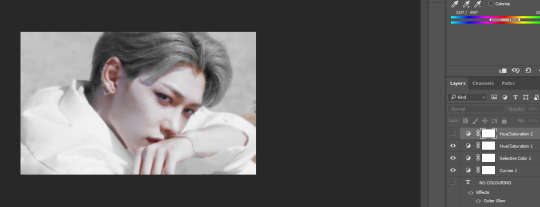
Levels
Now, time to make our gif bright and vivid. You can use another Curves layer here or a basic Brightness & Contrast layer, but since the colors of our Isagi gif are predominantly black and white, I’m gonna go with Levels since it works really well with black and white images.
Here are my settings:
See those 3 sliders under that graph? From left to right, those are sliders for Shadows, Midtones, and Highlights. If you slide them to the right, said shadows, midtones, and highlights would turn darker. Slide them to the left, and they become lighter.
I often get carried away the first time I add Levels, resulting in extra vivid/saturated images which I later have to adjust. So yeah, try not to overdo it. It’s like vanilla extract. A little goes a long way ;)
Unedited vs SC 1 + Curves + SC 2 + Levels:
Beautiful ✨
The image is no longer muddy, but we’re not done yet!
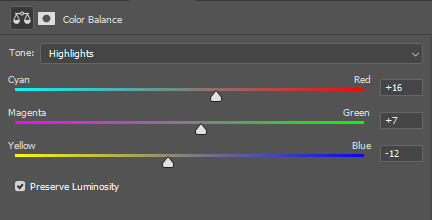
Color Balance
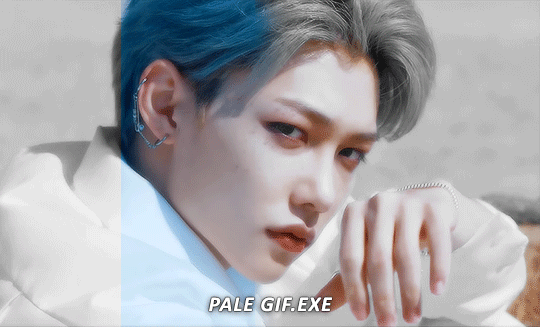
I haven’t used Color Balance much in my gifs because Selective Color often does bulk of the job for me. However, the Isagi we have right now hasn’t quite yet achieved that glow in the dark effect I wanted. I also want to give Isagi that techy Matrix vibe by really emphasizing his green aura, so for that, we’re gonna add Color Balance for the finishing touches.
I think the midtones of the image look okay, so I’ll just tweak with the shadows and highlights. Here are my settings:

....And with that, we are done!
Before and after:
Compared to pre-coloring, the gif is now more vivid and not at all muddy. We also made his green aura brighter without making him look like Shrek uwu.
I actually also went to all of the 104 frames of this gif and manually reduced the noise for each one so we can have a more HD-looking gif. That’s outside the scope of coloring, though, so I won’t be including it in this guide. I’ve also reached the 30-image limit for posts, so I couldn’t include it even if I wanted to 😩
Anyways, I hoped this guide helped! There are many more Adjustment Layers that were not covered in this guide, but they should be easy to learn once you get the hang of working with multiple adjustment layers. You’ll probably never even need to use every single Adjustment Layer out there, anyway. The ones I mentioned in this post are often more than enough.
Now tagging the mutuals who may be interested in this: @usagi-yoichi and @gachagon
#gif tutorial#gif making#gif coloring tutorial#gif coloring guide#blue lock#isagi yoichi#dailyresources#allresources#photoshop tutorial#coloring tutorial#completeresources#photoshop resources#photoshop adjustment layers#usergif#tutorial#resource#photoshop#miyamiwu.tut#lznkgifs#miyamiwu.src
66 notes
·
View notes
Note
Hey! How do you make your gifs?
hello! when i make gifs, i need only the following tools: 1) photoshop (my version is cs5), 2) a high quality video to gif from, and 3) a screenrecording program to get that video. super serious giffers will tell you that you shouldn't make gifs of anything less than a 4k downloaded file, but i'm lazy and don't have infinite storage space on my laptop and don't care if my gif is only 720-1080p instead of super HD or 4k, so if i'm giffing wheel of time, for example, i will just screenrecord a small clip straight off the prime video player rather than download the entire episode. i use the xbox windows app to screenrecord, which is free - not sure if there is an equivalent for macs.
i did a gif tutorial a couple years ago that should still be pretty accurate! just 2 updates i would add now: 1) over the summer tumblr added something that made gifs fucked up, i forget the details but my takeaway was that in order to preserve gif quality, i need to change the speed of just 1 frame of the gif. so if my gif has 50 frames, i will make 49 frames a speed of 0.06 and 1 a speed of 0.07 or 0.05. i'm not sure if this is still necessary or if everybody hated the gif update so much that tumblr changed it back, but i still do this every time to be safe. i think it was that if your gif is all 1 speed then tumblr would change it into some bizarre file format to compress it or something, with the result that it looked awful. so just change the speed of 1 frame to get around this (it's totally unnoticeable in the final product if 1 frame has a speed that's 0.01 different from the others).
2) the coloring psd pack i linked in the old tutorial worked great for medici, the main show i was giffing at the time, but it doesn't look good for wheel of time. instead, i have created my own psds for wheel of time - i'm not going to do a coloring tutorial because i'm an amateur and i just mess around until i get something i like, and i wouldn't be good at explaining that mess around process haha so instead i will link the 2 psds i've made! with the following TOU:
please like/reblog if downloading
do not reupload, claim as your own, or use it as a base to make a new psd which you then upload and claim as your own
the 2 psds are very similar - the difference is that #1 is brighter, more vibrant, and closer to the original colors, while #2 is a bit subtler and has some alterations to decrease greens (since the original scene had a green tint)
psd #1: download here

psd #2: download here

32 notes
·
View notes
Note
Can we have a gif tutorial? and a tutorial on how you capture the vids? please
I think there are better specific tutorials out there than I can write myself (this is a really good one for beginners), but I can give a general rundown of my process! And some tips/tricks I’ve found useful.
First off, I mostly use paid software which may limit how much use you can get out of this. The only thing really specific to my process though is Photoshop. I think it’s worth the subscription if you really want to get into gif making. There are tutorials and resources out there for other programs, but there are a lot more resources that are catered to PS. I have a subscription so I’m using the latest version, but any version that supports video timelines should be alright. (Btw I won’t go into how to get PS without a sub, but other tutorials out there might!)
Get the Vid
People will tell you "always use 1080p" and yes you should look for the highest quality first, but as someone who often gifs more obscure stuff, let me say do not let it stop you if you can’t find 1080p. Gif what your heart wants to gif.
The first place I will look for vids is through t*rr*nts. I won’t detail that here, but if you want to do this, you need to get a vpn. I use NordVPN and they will occasionally have some really good deals. But whatever you get, make sure it has some kind of "kill switch" option that should always be enabled when you're downloading.
My next option when I can’t find a download is PlayOn. This is a reasonably priced paid service that lets you download episodes from streaming services you are subscribed to. It supports most major streaming services. I’ve found the app version (PlayOn Cloud) easier to use, and it’s pretty self-explanatory, just make sure you set your settings to HD downloads. Also the recording quality will depend on the streaming service, I find it’s a bit hit and miss.
Lately, I’ve been having a difficult time with PlayOn because all the Spanish programs are defaulting to subtitles and I haven’t found an easy way to turn that off. As a last resort, I screen record. Again the quality will vary here. This is another thing I use a paid version of to avoid watermarks. There’s a lot of different programs out there, but you’ll need to find something that works with sites like netflix and doesn’t block the screen record. I’m using iTop Screen Recorder.
Finally, for Youtube vids, there are tons of free options for downloading directly, the tutorial I linked has one!
Clip the Vid
This is a divisive step, but what I've personally found the easiest is to clip the scenes I want to gif in a separate program first. (Some other tutorials, like the one I linked, will have directions for using screencaps instead.) I use Movavi, but there are tons of different video editors out there. You can clip directly in photoshop, but I find it easier to clip down the scenes beforehand so I can load in multiple gifs at a time.
The downside of this method is when it comes to loading the vids into photoshop, it’s going to use more cpu and a lot of scratch disk space, so hopefully you have a laptop that can keep up. There’s also an annoying issue with photoshop where if it crashes, these temp files won’t get deleted and will eat up all your disk space. Occasionally you have to go into your AppData folder (something like C:\Users\<your user>\AppData\Local\Temp) and delete any files that look like “Photoshop Temp...”. But that disclaimer out of the way, this method saves me more time in the long run. :)
I typically find that I can fit at most ~3 seconds into a gif and keep it under the 10 MB limit. So I’ll clip a video down to a bunch of 3 second bites. I will then export as one big video file and I have a process for making a bunch of gifs at once. But tbh it’s a bit convoluted, so for the purpose of this rundown, let’s assume you have cut a single clip to make one gif from the video. Make sure you export the video with the highest possible quality so you don't lose any quality in this step! In Movavi, this would be Export > Advanced > And then drag the “Quality” slider all the way up.
Load into a gif
In photoshop:
1. Select File > Open, and open your vid
(If you hadn’t already clipped a scene, you could do it here now, but will assume you already have the couple seconds you want to gif.)
2. Use the crop tool to crop if desired.

3. Resize by going to Image > Resize Image. For most gif sets, I will set the width to 540px and let the height be determined accordingly. The most important thing here is that the chain link symbol stays selected to maintain aspect ratio when changing the width or height. You can also play with the Resample options. I have mine set to Bicubic (smooth gradients).
4. Occasionally, especially with lower quality vids, you may get a couple pixel line on one of the edges. Check for this and crop it out and redo the resize steps if needed. Make sure when you are done your file is still 540px. (This is not referring to the transparent line around the entire edge that most gifs will get in the resize step. This transparent line will be handled in a later step.)
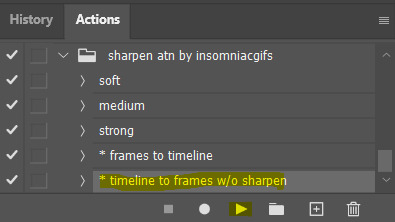
5. I use the action from this post for making my gifs. Save this action and open in photoshop.
6. With your gif video file selected, in the Actions panel, select “* timeline to frames w/o sharpen” under the new action you just loaded, and then click the Play button to run the action.
7. Wait for the Action to complete. At this point, you could save and you already have a working gif!
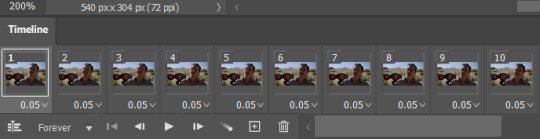
Note: This action will set the frames to 0.05 seconds per frame which I find to usually be a good speed for gifs. But the timeline is where you can adjust if needed. This is also where you may need to end up deleting some frames from the beginning/end if your gif size ends up being too large.
Sharpen
You can go in and play around with smart sharpen, and other tutorials will give you some help with that, but this is another thing I’ve found most useful to just use an action for! My fave I’ve found is this one here. It has two different sharpening actions, basic and hd. I tend to choose hd if I have a higher quality vid but I find it doesn’t always work as well on lower quality vids. This is also a good time to mention to save often!!! It’s hard to undo an action, so you’re better off reopening the file if you decide you don’t like the action you chose.
Here’s my gif with the hd sharpening action applied:

Color
I am really going to breeze over this step. I think there are a lot better tutorials out there for coloring. I will say that Levels, Curves, and Exposure will get you a long way! And I think they’re relatively easy to get the hang of. Selective Color is another adjustment I’m fond of, whenever I need to tone down or highlight certain colors. These can all be found under Layer > New Adjustment Layer.
Here is my gif after tinkering with these adjustment layers a bit:
Besides finding some good coloring tutorials, I find it really useful to search for coloring PSDs! I don’t recommend just slapping a psd on top of your gif without other adjustments, but I like to sometimes use them as a jumping off point, or just as a learning tool to see what different adjustment layers will do.
Export
Once you’re happy with how your gif looks, go to File > Export > Save For Web. Here you will need to make sure your gif is under 10 MB, or go back and delete some frames if it isn’t. You can also play around with the export settings to try and get the best quality. These are the settings I usually go with:
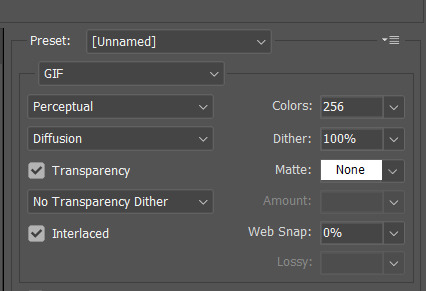
An important setting here is “Matte: None”. This will get rid of that transparent line around the border of the gif that I mentioned earlier, for a cleaner looking gif.
After you hit Save, that’s it! You’ve got a gif. Hopefully you found some of this useful. And if you have any questions, feel free to ask!
#intended to just give a quick rundown and some tips but this got long#and kinda did become a tutorial#i don't think i'm the best teacher#but hopefully there's something of use in there for someone#resources
21 notes
·
View notes
Photo

Okay, so I tried to make the kissing scene from the HD version (my computer can’t handle 4K, so I made it only from the 1080p version), actually I guess we can see a bit more things, maybe because it’s sharper, but yes, the whole scene is simply too dark to see (much) more details. (That’s why we need more fanarts. ;))
#due south#mountie on the bounty#fraser/rayk#benton fraser#ray kowalski#my gif#duesouthedit#due south HD#;)
75 notes
·
View notes
Note
actually animation! i always thought that drawing one pose per page is more easier than using an animation programm but seeing some videos about the programms make me wonder.. how do they make it look so smooth?? and satisfying??
(and thank you! sometimes i like more to ask people than google cuz it sucks and people love to share!)
UUUUUUGH of course tumblr deletes my entire post when I try to add a gif.
ANYWAY AS I WAS SAYING!
It really depends on what's getting animated. Animating every single frame at 24 frames a second on 1s gives you complete control over every single drawing, but it's incredibly labour intensive. And even the highest grade 2D animated films I know of don't have every single scene be animated on 1s because it isn't practical and not every scene requires that much movement. the ONLY movie I know of completely animated on 1s is The Thief and the Cobbler and it was never finished. (although I highly recommend the Recobbled Cut of the film because it's fantastic)
(and tumblr deletes my entire post if I add gifs so just bear with me)
Most TV animation these days (and even a few 2D feature films) will use a combination of hand drawn animation with traditionally drawn in betweens, but will use animation programs' built in "tween" system to have the computer create animation effects. This cuts down a LOT on animation, but animation programs can only tween cut-out drawings. So you have to draw the arms separately, the head separately, the legs separately etc etc and tween them all individually. You then have to go in and tweak the computer tween because, being a computer, it can be extremely unnatural and robotic looking or it could have interpreted the tween badly.
However this means that you can get shots done much faster simply because it takes less time to tween individual scenes than it does hand animation them, even if it does not give you as much control and is usually still unnatural looking and easy to spot when something is drawn versus if it's been tweened
I
(Wander over Yonder uses a mix of tweens and hand drawn frames)
and then lastly the new thing some people are experimenting with, is taking animated sequences at whatever frame rate, and running them through an AI upscaler or other AI program to artificially boost the frame rate to higher than what it was drawn at.
Good examples of this are to go onto youtube and check out people who have taken old anime intros from the 80s and 90s and upscaled them to HD and used an AI to extend them to 60 frames per second (which is what video games run at but is not pleasant for either animation which would be impractical OR film which is uncomfortable to watch and can induce headaches.)
It's an interesting experiment but it's actually really bad animation wise, both because of the uncomfortable watch it creates and the headaches, but also because these 60fps upscale AIs can severely fuck up the animation itself, just as HD upscale AIs can fuck up the art of a show (do I need to show the HD version of usagi's house again?? BECAUSE I WILL!!!)

(it's so ugly...)
But yeah, some people are experimenting using this as a toon to create smoother animation but it's generally not really a good idea if you like.... actually understand animation and you're not just some IT guy who things more frames = better animation somehow.
Actually here's a dude who made a video about it explaining it better than I could
youtube
163 notes
·
View notes
Text
hello! i recieved an ask yesterday asking how i made and coloured these five hargreeves gifs and i’ve had some people ask me in the past how i make gifs + my colouring and sharpening settings so i thought i’d put together a guide to how i make my gifs!
note — there’s isn’t just one correct way to make gifs as so many gif makers on this site use different techniques and software to make their creations so there’s no such thing as doing it wrong! each person has a style that’s suited to them ✨ this is going to be a fairly long and image heavy tutorial so most of it is going to be under the cut!
what this tutorial covers
— how to make gifs
— how to sharpen gifs
— how to colour gifs / strong colours, vibrant colours and pale colours
what you need
— photoshop cc / i use photoshop cc 2017 and you can either buy it or you can download it illegally because in 2021 we are eating the rich
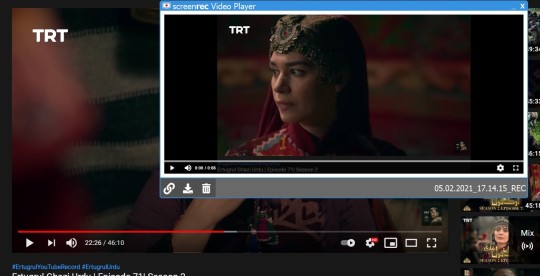
— a screen recorder / i use screenrec which you can find here! it’s free to use and you can record hd videos!

— first you need to find a high quality video and i’d recommend 1080p! otherwise you’ll notice patchiness in your gifs especially in different coloured spots
— if you’re making gifs of kpop stages, then .ts files are the best to use however you will need an additional program such as vapoursynth to deinterlace the videos to make it clearer
— for my purposes, i just use youtube simply because i want to save data and not download entire episodes!
— i’ve found the part of the video that i want to gif and just paused on it!
— for screenrec i press alt + s and it comes up with a small window where i can select the screen size that i want to record! i recorded the small clip and it comes up with a small pop up at the end to save the file as an .mp4 to my computer!
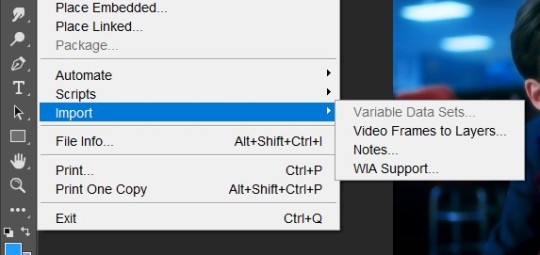
— now we can move to photoshop! i first clicked file then in the dropdown menu i selected import and then video frames to layers. photoshop then opens a file window where you can find your saved clip and select it by pressing open!
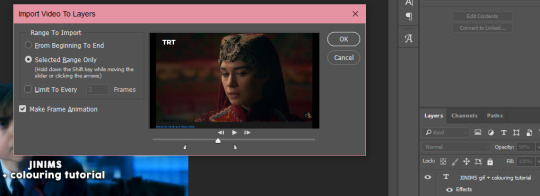
— once the file has been selected, a small photoshop popup appears again and it’s titled import video frames to layers where it shows the clip with options on the side and a small timeline with ‘clips’ at the bottom!
— you can use the large inverted triangle to search for a particular scene and then use the smaller halved triangles to bracket the scene you want to clip! so in this instance, i’m creating a gif for whatever is between those two boundaries! then you click ok!
— make sure you have the timeline open in photoshop and you can do that by clicking window in the top bar and then clicking on animation although in some versions of photoshop, the animation option is just called timeline! this is the timeline below!

— this is where gifmaking can vary for different people! my understanding of this part is not that brilliant so i just follow the simple method i learnt when i first started making gifs! there’s a small symbol that looks like three bars with a line through them and i click them!
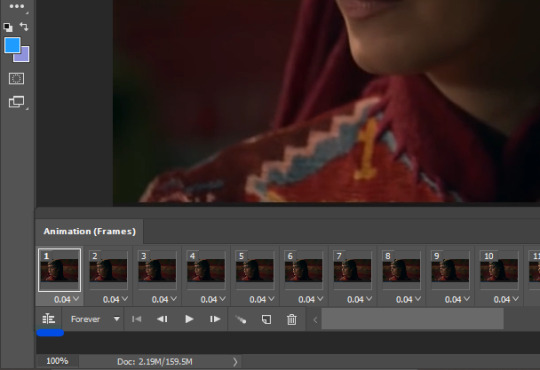
— now that i’ve clicked that, the individual frames have been converted to a timeline! and this is what it looks like now!

— now i’m going to turn my attention to the sidebar where the layers are all visible and i’m going to select all the layers before right clicking and hitting convert to smart object!

— all the layers have become one smart object which i can apply filters and colouring on to! this little red line and blue marker helps me slide through the gif and trim the gif down even further to the exact moment i want to keep!
— now i’m going to crop my gif! the dimensions and ratios of your gif depends on how its going to be laid out on tumblr and there’s a general guide for gifs:
one gif per row is 540px width
two gifs per row is 268px width
three gifs per row is 177-178px width!
— you can keep the height as much as you want but remember larger gifs have larger file sizes and they may exceed the tumblr upload limit of 10mb! quality often decreases with larger gifs as well! i’ve cropped by gif to a 540px by 326px gif! this is all personal preference <3

— technically, that’s your first step done! if you’re happy with your gif and how it appears, then it’s ready to be saved! click file then export and then save for web! these are the gif saving settings that i use!

— and this is the final gif! there’s no sharpening settings on it nor any colouring but it’s ready and working! you can choose to leave it at this!


— on tumblr, people like to sharpen their gifs! it makes the gifs seem cleaner and smoother and of a higher quality. there are many programs which you can use to denoise and clean gifs such as topaz, vapoursynth, or avisynth!
— for the sake of tutorial (and my sake, since i’m no expert in those programs) we’ll stick to the sharpening that you can achieve with photoshop!
— there are different types of sharpening settings and today i’ll show you three settings that i’ve seen on tumblr and that i mainly use!
— i’ll add that you see a variety of sharpenings in different fandoms on tumblr! in my experience, kpop blogs like smooth, denoised gifs with more of a matte finish and for example, netflix shows and marvel gifs have more defined, grain finish! but of course, anything goes 🌈
— i go to filter and then sharpen followed by smart sharpen!

— the first sharpening setting uses 500% amount sharpening, a 0.3 radius and it removes gaussian blur! this is what it looks like:

— the next is very similar to the previous sharpening however it softens the sharpening just a little! once you’ve done version #1, you duplicate that layer and go to filter then blur and then gaussian blur and make the setting 1% which really does blur the gif out but THEN you change the opacity of the duplicated layer to 30-40% and i use 35%!

— the final version is the one i used the most often, it’s similar to version #2 except the sharpening in the first layer is NOT 0.3px but 0.4px and the duplicated layer has a gaussian blur of 2% instead and the opacity is 50%! it creates a very soft and glowy finish!

— there are many different ways to sharpen but these are my main settings! now you can compare the three ways, in the end, it’s up to personal preference!


— so you want to colour gifs? well there’s many different ways on how to colour gifs and once again, there’s no correct or right way! its your creation so you can have as much fun with it as you want!
— when i say strong colouring, i mean the type where hues get changed greatly such as blues to aquas, yellow to orange or deep red lips!
— i have one psd that i made myself that i use and it is made up of selective colours, gradient maps, channel mixers, vibrance sliders and colour balance!
— you can probably find many psds like this on deviantart and slap them on!
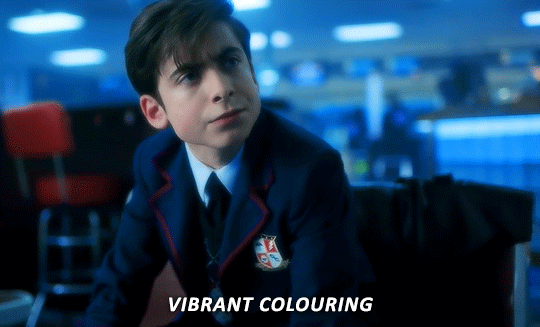
— there’s not much guidance that i can offer with strong psds as they vary so much and it’s up to you! but here’s an example of the one i use where you can compare the before gif to the after gif!


— vibrant gifs are a personal favourite of mine! there's so many options and they're fun to make!
— i'll be using the same gif as above for the vibrant tutorial! a major step is curves where you can adjust the brightness and the lighting of the gif with more depth than a simple brightness/contrast layer!
— after the curves i adjusted the selective colouring and turned the reds and yellows up to highlight his facial features and skin tone! imo its a very good step especially if you're giffing poc!
— the next step is very important for vibrant gifs! if you have a major colour and in this case, blue, then go the hue/saturation and turn the saturation up for that colour! be sure not to over do it until it becomes grainy!
— as you can see the blues have become a lot more prominent!
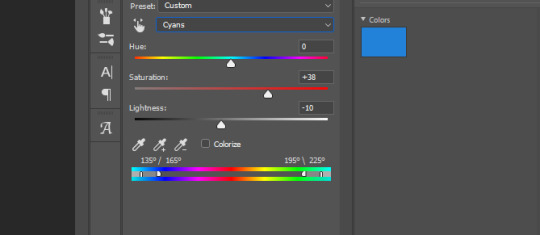
— with another selective colour layer, i changed the cyans until they were less of an aqua and more of a deeper blue!

— and now this is your final vibrant gif! this is a very simple method i use and this was an easy gif to colour however there are brilliant tutorials on tumblr where people explain how they coloured harder scenes/scenes with reds and yellows!

— i’ve always adored pale gifs! they’re so aesthetic and clean to look at and there’s been a resurgence of pale gifs on tumblr lately!
— in the past, pale gifs, and especially for fandoms, were always extremely whitewashed with poc being lightened so much that their hands are pale :/ or even more so, there were no poc in pale gifs at all! but luckily in the past year or so, there have been brilliant gifmakers who have proven that there is no excuse for whitewashing poc in pale gifs and @fadenet have a brilliant tutorial for making pale gifs with poc that i truly recommend!
— this is a very basic look into making a ‘pale’ gif and i will update this section later with another gif that shows a subject with darker skin! but for now, this is just how to take away colours such as blue!
— this is the gif without any adjustments made (except for sharpening!) please ignore the terrible timing of this gif!
— first i’ll use the curves layer and tweak it slightly! but as you can see, it changes felix’s skin tone and makes it a bit too pale!
— i brought back some of the red of his cheeks and the yellow skintone as well! altho this music video is already pretty whitewashed but we’ll do our best here! :/
— next we go to hue/saturation and completely draw back the saturation on felix’s hair by using the cyan sliders! there’s a major difference and we haven’t touched the lightness setting yet! it may look like the colour blue is gone but it’s not! go to the blue sliders and turn the saturation up!

— as you can see, even though we got rid of the cyan, the blue undertones are still there!

— so we’re just going to draw that out entirely! you can see if the blue tint of the background is gone now! unfortunately he looks like a vampire and we’re going to try and bring some colour back by adding another hue/saturation layer again and drawing up the red and yellow saturation!
— in hindsight, this felix wasn’t the best version to use for pale gifs so i’ll update this version with a different gif! but this is the difference between the original gif and the pale gif!
— in conclusion! i do hope this tutorial was somewhat helpful and if you have any questions, don’t hesitate to send an ask <3
#allresources#gif tutorial#ps resources#photoshop#gif#kpop#completeresources#photoshop tutorial#this is so long aa im sorry!!!!!#mine#mine: resources#mine: 2021
141 notes
·
View notes
Text
Basic Giffing Tutorial
How I make gifs for a simple scene + coloring + captions under the cut:

I’ll show you how to make this ^^^ gif (including the sharpening, coloring and captioning process).
Okay let’s start with what you need to do this: A version of photoshop with timeline (I use photoshop 2020 but probably any version will work, the program layout might just look a bit different), HD videos to gif from (preferably 1080p, especially for making big gifs, but 720p is also okay if you can’t get anything better, I just recommend making smaller gifs with it), some kind of video player that lets you trim clips in it (I use Quicktime Player because it’s the default for Macs)
1. Start with a video clip of the scene you want to gif. I usually download full episodes and clip scenes from the episode. My computer is a MacBook Pro and the default video player is Quicktime so I just trim my clips directly in that. In Quicktime you can just press CMD+T and it’ll give you trimming options. Most people use the screencapping method to make gifs, but it requires extra software and that’s not how I learned, so I’m going to tell you how to gif straight from video clips. I have no idea if there’s a difference in quality or ease between the two methods, but if you find that my way is too difficult then there are plenty of tutorials on how to do it via screencapping too like this one.
2. Open the clip in Photoshop. Just hit CMD+O and then select the video you want to gif from (or go to File > Open). Then, in the Timeline window at the bottom, scrub through the video and trim it (with the little scissor icon to the left) at the first frame of the scene/shot you want to gif and the last frame. Delete the excess clips. Before the next part, I usually crop off the black borders that some videos have if their original aspect ratio isn’t 16:9 (which most aren’t). For TV shows from Netflix, for example, the aspect ratio is usually 2:1 (or 540:270) so if you set the crop ratio to this you can get rid of exactly the black, no more and no less. I have several preset crop ratios (540:270 for TV shows, 540:225 for most movies, etc.). You can do further cropping after you have made and colored the gif, but getting rid of borders before converting the video to frames makes this easier. If your video does not have these black borders to begin with, ignore this part.
3. Convert video to frames. In the upper right hand corner of the Timeline window there is an icon that is four small lines stacked on each other (time line menu). When you click on it, a drop down menu will appear. In this menu select “Convert Frames > Flatten Frames into Clips.” Then click the button in the lower left hand corner (three small rectangles next to each other; frame animation button) that says “Convert to frame animation” when you hover over it.

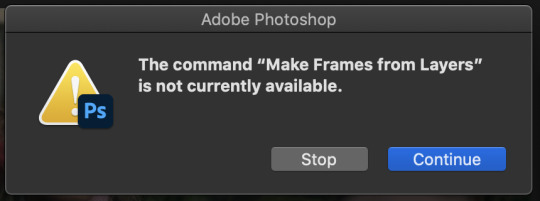
After, it should look like either of these. Sometimes, if you crop the video before you start the process, it gives you two frames like in the image on the right above. If this happens, delete the frame with the shorter time stamp on it (as indicated by the number at the bottom). Next, click the dropdown menu in the timeline window again and select “Make Frames From Layers.” It will then turn into multiple frames, as shown below:

Delete the first frame (it will have a number under it, while the rest of the frames say “0 sec”), then use “select all frames” from the dropdown menu so that they are all highlighted and click “0 sec > other” and set the frame delay to “.06 seconds.” Scroll down to the bottom of the layers channel window and click and delete “Video Group 1″ then scroll back to the to top of the window and select all the layers by holding Shift and clicking on the top layer. Click the icon in the lower left hand corner that says “Convert to Video Timeline (video timeline button) and the frames should convert to long purple bars stacked vertically on top of each other. Then, under the “Filters” drop down menu at the top of the screen, select “Convert for Smart Filters.” This converts the layers to a smart object, turning the stack of bars a single purple bar and a single layer in the layers channel. When you press play in the timeline window, the image should move and play through like a video. If it doesn’t, you missed a step. It should now look like this (the left is the timeline window; the right is the layers window):
This seems like a lengthy process, but I have compiled most of these steps into a few Actions. With the actions (starting at step 3 of this tutorial) you use “Part1″, delete the frame with the shorter time stamp on it (if needed), “make frames from layers,” delete the first frame and Video Group 1, select all frames in Timeline and change frame delay to .06 seconds, select all layers in the Layers window, then use "Part2″. I assign my actions to function keys so all I have to do is use a few keyboard shortcuts ( i.e. Part1 is F1, Part2 is F2, etc.). This makes the whole process much quicker. Here is a link to download the actions I created for this process. Once you get the hang of using the actions, it all goes pretty fast. Also, when using the actions you might get messages like this:
Just click stop and keep going with the instructions.
4. Duplicate the frame in the layers window and set the top layer to screen using the drop down menu in the window (it’s the second from the top and should say “Normal” to begin with. That changes the scene from this:

to this:

5. Make coloring adjustments. Everyone colors gifs in their own ways, so you absolutely don’t have to follow what I do. This is just the basics of how I color:
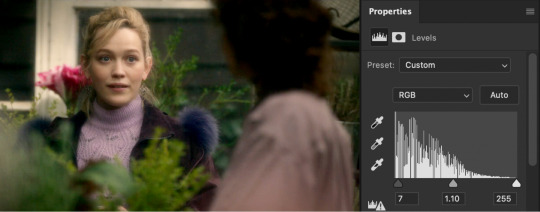
I always start with Levels (some people use curves, some people use both, I never learned how to use curves though). Under the levels adjustment menu, I start by using the black point dropper and select the darkest part of the image. Sometimes it takes a bit of clicking around with the dropper to find what works. Depending on the scene (colors, lighting, etc.) I also move the sliders if needed. There’s no real formula to it, I just do everything by sight, changing things until it looks good to me. For this gif, I selected a dark part of Jamie’s hair with the black point dropper. Then I did some minor adjustments with the sliders on the graph. If you’re coloring a darker scene, the sliders are very useful for brightening the scene, but this is a fairly well lit scene so not much is needed. This is the scene with Levels added:
Next, I usually use color balance to fix the color changes that Levels made. This looks too yellow to me now, so I use the yellow-blue slider to add in blue. You’ll have to play around with what looks best for whatever scene you’re giffing, but I’ve found that most scenes I add blue and sometime add red or cyan, but rarely use the magenta-green slider. With color balance added:

Next I use a series of selective color layer. Make a new layer for every different color adjustment you make, it makes it easier to edit if you make a mistake or want to make changes later. I always start with Black, usually just adding a little to Cyan, Magenta, and Yellow so that it increases the contrast of the whole scene.

From there, you have to pick out what colors you want to accent or correct. You get better at this the more you do it. In this scene, I want to accent the green of the plants and the purple of their clothes. Normally I would do Red next to adjust skin tone, but because I want to increase the green in the picture, I’m going to start with Yellow. This will make skin tones look too yellow-green, but you can correct this with a Red Selective Color layer. The Yellow layer made the plants greener, but the Red returned the proper color to Dani’s skin.


I keep adding more selective color layers to bring out more color in the scene.

To make it even more vibrant, I use several Hue/Saturation layers to increase the saturation of certain colors.


Sometimes I also add a Vibrance layer, but for this scene it wasn’t needed. Lastly, I usually add a Brightness/Contrast layer. I prefer to get contrast out of deepening the blacks in the scene rather than use the contrast setting in this adjustment layer, but sometimes I do use it. Most of the time I just increase the brightness a little, depending on the lighting in the scene.

Really, coloring is all about just messing with different settings until things look right to you. I’m still learning new things every time I make a new gif. There are tons of other adjustments available that I haven’t even tried out, so feel free to mess around with them. Note: The more adjustment layers you add, the more the quality might decrease. I do try to do minimal adjustments normally, but I wanted to make this coloring fairly vibrant so it has a lot more layers.
If you are making multiple gifs from the same scene, repeat the process of Steps 1-4 and then copy the adjustment layers from the first gif to each subsequent gif. I normally group all the adjustment layers together (select the layers and press CMD+G) which makes it easier to copy the layers to another PSD.
6. Crop and resize the gif. You can crop your gifs any way you want. I’m in the habit of making rather large gifs (which is thankfully now possible due to the 10mb size limit) and most of my gifs are cropped at ratios of 3:2, 4:3, or 1:1. For longer scenes I usually use 16:9. Crop your gif at whatever ratio you want and then resize it. For Tumblr, there are specific dimensions that gifs have to be for them to format properly in posts. For “large” gifs (one per row), they must be 540px wide. Height does not matter. For smaller gifs they have to be either 268px (two per row) or 177px (three per row). Resize the gif by either using CMD+OPTION+I or going to the “Image” dropdown menu at the top of the screen and clicking on “Image Size” If you already cropped at your desired ratio, just change the width to 540, 268, or 177, according to the size gifs you want.
7. Sharpen the gif. After you have cropped and resized the gif as desired, you need to sharpen it. Because of the method I used in the beginning (duplicating the layers and setting the top to screen), you will have to add a Sharpening filter and a Gaussian Blur filter. Select the top layer of the gif (not the top coloring layer) and click on the “Filter” dropdown menu at the top then select “Sharpen > Smart Sharpen” These are my sharpening settings (if you’ve ever giffed before, or looked at other tutorials, you’ll notice this is sharper than most people would use. That’s because you also have to slightly blur the layer below it, which dilutes it to a proper sharpness):
Next, select the lower layer of the gif and go back the the “Filter” menu and select “Blur > Gaussian Blur” and set the radius to “1.0 pixels.”
These sharpening and blur settings are also actions I’ve created. If you download the action I listed before, assign them to function keys and you will just have to select the appropriate layer and use the function key to do the work. Additionally, learning the keyboard shortcuts speeds along the process.
8. Export/save the gif. Go to “File > Export > Save for Web (Legacy)” or CMD+OPTION+SHIFT+S. These are my save settings (I actually have no idea what any of these things mean... I’ve never changed any of them).
The important thing really is that you make sure that under looping options near the bottom (not shown in this screenshot) it says “Forever,” not “Once.” And also check how big the file is in the bottom left corner:
As long as the number under GIF is less than 10M, you’re good to go. Then save the file and name it.
9. Caption the gif (if needed). You can either do this in the PSD you already had open to create the gif or you can open the gif you just saved and caption it there. I find it easier to add captions directly in the current PSD. When it comes to captions, it’s really based on your own preferences. I’ve seen people use all different fonts, sizes, colors, and placements for captions. Some fonts I can recommend are: Myriad Pro, Calibri, Arial Rounded MT Bold, and Keep Calm.

There are plenty of others too. The main thing is that they normally look best when they are bolded and italicized. I have been using Keep Calm for my captions lately. I also add Stroke and Drop Shadow to the text (my text settings are also included in my Actions):

Just make sure the text is centered and has a good margin from the bottom.

This is what it looks like with those effects ( font: Keep Calm; size: 13; tracking: -25).
Anyway, that’s my basic process for gifmaking and coloring. I hope this gives you some kind of foundation to work off of. Just keep experimenting with different techniques and you’ll keep getting better. Read other people’s tutorials and tips and try them out to see what you like and works for you.
#if you're seeing this now i dont make gifs like this anymore#if you ask i'll make an updated tutorial#riah.txt
223 notes
·
View notes
Video
youtube
Digimon Adventures ~ x Kagerou Project
“ Otsukimi Recital ” [ Moon-Viewing Recital ] AMV
[ music ( C ) Jin, singer: IA / Vocaloid ]
( K@gepros [subbed] video for Comparing: watch here ! )
featuring DUO/SHIP:
Taichi Yagami [“Tai Kamiya”] x Koushiro(u) Izumi [“Izzy Izumi”]
[Taishiro(u)]
PAST AMVS / VIDEO EDITS IN THIS SERIES:
Kagerou Daze (Heat-Haze Daze) / Children Record [+Adv Chosen] / RED / Additional Memory and Imaginary Reload music edits for KageDaze / Days (short edit) / Lost Time Memory / Yesterday Evening / Summertime Record / Shounen Brave [+Jou] / Outer Science [+Villains] / Headphone Actor (short edit) / DAZE (short version / TV Size OP) / KOUSHIROS ? CYBER JOURNEY [+Maki] / Brave Heart x Kaien Panzermast [+Chosen Children] / Night Tales Deceive [Yobanashi Deceive] / [KOUSHIRO’S] Imaginary World / Mekakushi Code [Blindfold Code] [+Yamato&Sora&Adv Chosen] / Ultramarine Rain [+Mrs Yoshie Izumi; Izumis] / Imagination Forest [+Mimi&Jou] / Transparent Answer [TaiKou+Meiko] / Jinzou Enemy [Artificial Enemy] / DEAD and SEEK (short edit) / Headphone Actor (Full version Preview)
REPEATVERSE/EXTENDED STORY INTRODUCTION: HERE
( *note: extended summary contains some spoilers for the fic )
[ however, it also explains the worldbuilding involved and plot setup ! ]
( * It’s ok to start on/only watch this current AMV ! )
[ *You may understand the story/implied timeline of things better if you begin from my “Kagerou Daze” AMV, though it’s also not required!
“Children Record” is also recommended as a starting point/upbeat song! ]
Basic Summary of This Video:

{ NOTE : PLEASE read my FAQ and “about” sections BEFORE interacting directly with me, my contents / fanworks / this series, or my blog !! ! }
{ IF YOU IGNORE THIS WARNING
AND I NOTICE ( UPON VETTING YOUR BLOG ),
YOU WILL LIKELY BE HARDBLOCKED. DON’T DO IT }
{ IF YOU FIT ANYTHING IN MY DNI,
THESE CONTENTS ARE NOT FOR YOU !!! }
part of my Taishiro [Taichi x Koushiro] REPEAT?_ ficverse
(please note any and all notes/trigger warnings for said ficverse!!)
[seriously, please note the warnings, the plot is kinda heavy]
(please note any and all warnings for K@gepro’s plot too if you look into that!!)
- no, it’s NOT a direct parody (but v[ERY] inspired) (if you can’t tell)
- watching it in HIGH(ER) QUALITY at the original Youtube link is encouraged!
- to do so, go to the original youtube link, click “HD” button, then “ 1080p ” !
{ Additional note: this post/fanworks series is
mainly intended TAICHI x KOUSHIRO [Taishiro],
please remember + respect this when interacting
please tag ONLY as “Taishiro” for ship
and not just “brotp” or the like, thank you! }
[ * it is ok to tag as “friendship” along WITH the ship name ! ]
{ * I don’t mind if others have
differing LGBTQIAPN+ headcanons for them,
please simply respect mine ! }
- short version of implied story/plot of this series: T I M E L O O P S
- Tri ( and as of lately, um, KIZUNA [AUs?] ??? ) is here because … ah...
- let’s just say it’s probably AT LEAST ONE part of the “start” of it all ah
- KOUSHIRO IZUMI VOICE : ( ‘ W H Y ’ )
- DO THEY MAKE IT TO THE END
- @ TAICHI & KOUSHIRO, ARE YOU SURE YOU /WANT/ TO ——-
- TBH HOW MUCH do KOUSHIRO or TAICHI even REALLY REMEMBER
- MUCH LESS THE REST OF THEM
- who even knows after a certain point anymore
- timeloops are fun !! ! !
( this particular AMV also explains SOME of it … )
Spoiler warnings for Tri / Kizuna / DigiAdv 2020 scenes used +
Further notes/warnings & LYRICS under ‘read more’!
A.M.V. Summary:
- is it TAICHI HELPING KOUSHIRO or KOUSHIRO Helping .....
- WELL YOU GET THE IDEA BY NOW IT'S LIKELY ( BOTH )
- oh Tri!Taichi is Kinda here too ( BRIEFLY ) { AS AESTHETICS }
( PLOT RELEVANT THOUGH ) ;;;;
- tbh there's some too-slow scenes here I wanna
Replace later if I remake this but
( wHEN WE GET MORE INTERACTIONS ) { HOPEFULLY }
LYRICS PREVIEW:
(if you click the ‘lyrics’ link and ‘English translation’ tab on that Wiki,
full lyrics there as well!):
" OH , WHATEVER I DO NOW , IT’S ALL P O I N T L E S S ";
I SAW YOUR DISTRESSED FACE ,
And I knew just saying " DON’T GIVE UP !!! "
WASN’T GOING TO CUT IT !!!!
FEELING BLUE IN THE SUNLIGHT ,
I’M GENUINELY CONCERNED FOR YOU!
YOUR EYES GET WATERY,
" I’M SURE IT’S NO USE FOR A WEAKLING LIKE ME ..... "
FEELING BLUE IN THE EVENING ,
As THE SUNLIGHT is LOCKED AWAY ,
IN A MOMENT YOUR FACE LAMENTED ,
AND SOUNDLESS TEARS SPILLED AND F A D E D . . .
THIS TERRIBLY SMALL WORLD
BARES ITS BIG FANGS,
THINKING " I WANTED US TO BE TOGETHER , "
IT WEIGHTS DOWN ON YOUR HEART . . .
EVEN IF MY MEAGER WORDS
CAN’T GET THROUGH ANYMORE ,
I WANT TO GIVE YOU STRENGTH !
" - I WANT TO HELP YOU. - PLEASE , GRANT MY { WISH } !! "
" I BELIEVE BECAUSE YOU’RE YOU !!! "
SAY IT LOUD AND MEAN IT !!!
" IT’S ABSOLUTELY NOT HOPELESS !!
IF YOU { WISH } FOR IT , YOU’LL M E E T AGAIN !! "
TAKING A GREAT BIG BREATH ,
YOU TIMIDLY FACED THE DISTANT M O O N ,
AND SHOUTED , " I’LL GIVE IT A SHOT !!! "
... Did THAT sound kinda " COOL ? " * " ... I / GUESS / " !!
* TAICHI VOICE “ SUGOI ” !!! = {COOL / AWESOME / AMAZING}
{ GIF BY ME } { PLEASE DON’T REPOST } { Thank you !!! }

[ Note: commenting/tagging positively/respectfully is ok !! ]
FULL LYRICS:
[ VERSE 1 ]
" OH , WHATEVER I DO NOW , IT’S ALL P O I N T L E S S ";
I SAW YOUR DISTRESSED FACE ,
And I knew just saying " DON’T GIVE UP !!! "
WASN’T GOING TO CUT IT !!!!FEELING BLUE IN THE SUNLIGHT ,
I’M GENUINELY CONCERNED FOR YOU!
YOUR EYES GET WATERY,
" I’M SURE IT’S NO USE FOR A WEAKLING LIKE ME ..... "
" THEN YOU NEED TO KEEP YOUR SPIRITS UP ,
Or else TOMORROW WILL DAZE YOU TOO !! "
WITH THAT , I TAKE YOU ALONG ,
PERHAPS A LITTLE F O R C E F U L L Y ... "
FEELING BLUE IN THE EVENING ,
As THE SUNLIGHT is LOCKED AWAY ,
IN A MOMENT YOUR FACE LAMENTED ,
AND SOUNDLESS TEARS SPILLED AND F A D E D . . .
[ CHORUS 1 ]
BUT I BELIEVE BECAUSE YOU’RE YOU !
SO WHY NOT LOOK AT WHAT’S AHEAD ?
WHEN THINGS ARE TRULY H O P E L E S S ,
I’LL GIVE YOUR HEART THE SUPPORT ... IT NEEDS !!(?!)
DON’T GIVE UP with " MIGHT AS WELL "s,
That's a big NO-NO !!
HEY , CAN’T WE GO AHEAD TOGETHER ??
LET’S DESTROY ALL THESE LONESOME FEELINGS !
[ VERSE 2 ]
" I DON’T EVEN KNOW WHAT’S GOING ON , "
... You say as you HOLD IN TEARS A G A I N ,
SIGHING ALL THE TIME and SHUTTING YOUR EYES ;
YIKES , this is DESPERATE !
[ INTERLUDE VERSE ]
" IF YOU DON’T GIVE IT ALL YOU’VE GOT ,
YOUR MEMORIES WILL VANISH INTO YESTERDAY ! "
So we DASH DOWN THE STREETS ,
No doubt AGAINST YOUR WILL (?) ...
[ INTERLUDE VERSE 2 ]
FEELING BLUE IN THE EVENING ,
As THE SUNLIGHT is LOCKED AWAY ,
IN A MOMENT YOUR FACE LAMENTED ,
AND SOUNDLESS TEARS SPILLED AND F A D E D ...
[ CHORUS 2 ]
THIS TERRIBLY SMALL WORLD
BARES ITS BIG FANGS,
THINKING " I WANTED US TO BE TOGETHER , "
IT WEIGHTS DOWN ON YOUR HEART ...
EVEN IF MY MEAGER WORDS
CAN’T GET THROUGH ANYMORE ,
I WANT TO GIVE YOU STRENGTH !
" - I WANT TO HELP YOU. - PLEASE, GRANT MY { WISH } !! "
[ FINAL CHORUS ]
" I BELIEVE BECAUSE YOU’RE YOU !!! "
SAY IT LOUD AND MEAN IT !!!
" IT’S ABSOLUTELY NOT HOPELESS !!
IF YOU { WISH } FOR IT , YOU’LL MEET AGAIN !! "
TAKING A GREAT BIG BREATH ,
YOU TIMIDLY FACED THE DISTANT M O O N ,
AND SHOUTED , " I’LL GIVE IT A SHOT !!! "
... Did THAT sound kinda " COOL ? " " ... I / GUESS / " !!
*
SPOILERS / NOTES:
this one is . Overall, Major Spoilers free but TINY scenes for:
( Bokura no Mirai ) an aesthetic shot of Taichi simply just, glaring
- the background scenery kind of spoils a bit but not a Lot -
( Kokuhaku ) ending Taishiro interaction moments
( Kyousei ) not majorly spoilery Taishiro
by campfire with Concerned!Taichi seeing Koushiro's face
( less spoilery Tri things ) just like an aesthetic shot of Taishiro
being Silly { Saikai ; long before any battles }:
( Movie 1 near end ) TAICHI VOICE ' FOOD ' +
( from Movie 1 start ) aesthetic scenes of Tri!Taichi,
at the lake Brooding +
{ early on from intro scenes } Lifting His Head
( Kizuna ) ONE shot of Taichi during a battle moment
but not The Battle Scenes
but it technically is because
all he's doing is reaching out
but you can see a tiny bit of context of
What's Happening to him
( DigiAdv 2020 ) Eps 01~03 scenes &
Ep 14 Sad!Koushiro moments yUP
ok but this one is MOSTLY scenes from pre Tri Advs
+ DigiAdv 2020 /For Once/
{ PROBABLY THE BIGGEST SPOILERY MOMENT }:
( Tri ) Movie 6 / Bokura no Mirai - Taichi;
Not Long Before The Ending except it's
not The Ending Battle Scenes
( more specifically if you've already seen these
in the past AMVs, you know it ) : when he's in . ( scroll for spoiler )
.
.
.
the Capsule
.
.
.
DISCLAIMERS re: the original K@gepros video:
- the duo is Slightly Controversial in that fandom now because
we were Not Given Aged Up Designs after nearly 10 years and Yeah
No Comment on original duos status bUT ;;;;;
IN GENERAL... IN GENERAL... MY FAV... CHARAS
- Interlude before final chorus bit gore-y
- POLES
- TIMELOOPS SERIES
#taishiro#izzyizumi amvs#izzyizumi posts#repeat taishiro#taichi x koushiro#otp: shall we go together#amv: otsukimi recital#repeat adv taishiro#repeat tri taishiro#repeat kizuna taichi#repeat 2020 taishiro#repeat izumi family#repeat 2020 koushiro#(HAPPY ROSH HASHAN@H)#(IT IS ALSO SHABB@T)#(AND MY J.EWISH DADS' BIRTHDAY TOO)#(AND EVEN MAMORU HOSOD@s OF OUR WAR GAME TAISHIRO INTERACTIONS FAME all these in one day aHA)#(PLS ENJOY HAPPY!TAISHIRO AMV)#(A LOT OF THE FICVERSE AND PREVIOUS AMVs LEAD STRAIGHT TO THIS ONE)#(WOW A GOOD END ????)#(I TOLD YOU THEY'D GET GOOD THINGS TOO)#(ANYWAY yes it is My Dads Birthday so i need NICE THINGS Today)#(OH THERES ALSO THE NEW DIGIADV 2020 EP TONIGHT)#(OK BUT Pls @ my dash seriously PLS Stay Chill today and tonight Pls)#(I SPENT THE LAST FEW DAYS MAKING THIS SPECIFICALLY SO I COULD HAVE A GOOD DAY TODAY OK)
8 notes
·
View notes
Text
Keylight 1.2 Download
July 12, 2010
Keylight™
» Download « Sphere Utilities is fully compatible with Adobe After Effects CC (2021). Sphere Utilities is a package containing four plug-ins that are essentially tools to be used to create, edit and animate spherical maps.
Keylight 2.2 After Effects Download - DOWNLOAD (Mirror #1) e31cf57bcd Should I remove Keylight 2.1v1 (64 bit) for Fusion by The Foundry? Learn how to remove Keylight 2.1v1 (64 bit) for Fusion from your computer.Download Keylight for Pocket PC now from Softonic: 100% safe and virus free.
Free keylight for adobe after effects download software at UpdateStar - 1,746,000 recognized programs - 5,228,000 known versions - Software News.
Version 2.0 for Final Cut Pro 6 and 7, OSX 10.5
Version 1.2 for After Effects CS3 for OSX 10.5 and CS4 for 10.6 (32-bit).
Variable licensing scheme, consult website:
www.thefoundry.co.uk
By Loren S. Miller
Keylight 2.0 in Final Cut Pro 7 under OSX 10.5 Leopard.
KeyLight 1.2 in After Effects CS4, under OSX 10.6 Snow Leopard, (but not 64-bit) with virtually identical controls.
Keylight™ is a powerful plug-in from UK's The Foundry, (maker of the high-end Nuke compositer/VFX program). Keylight is used on chromakey shots in virtually any major feature film you can think of. It comes from a product developed specifically for motion picture chromakey work, normally bluescreen production.
If you're wondering what the difference between bluescreen and greenscreen might be, well, let’s see. Different colors? True; and blue is better for blonde characters, green for everybody else. Originally, blue-filtered imagery was motion picture in-camera special effects. In the 1930’s Technicolor’s London lab came up with the blue screen process which better suited color film. (It’s always from the UK, isn’t it? Except Technicolor itself was invented in Boston by refugees from MIT.) It was an arduous workflow from shooting against blue, controlling spill, pulling male and female traveling mattes… a headache. Today, for digital film and video, greenscreen is enormously popular, because the green channel in video carries most all the luminance information needed to isolate a key background from a foreground subject.
Today, whole feature films like 300 and SIN CITY are greenscreen productions, unless everybody’s blonde. Why are we seeing so many green shoots? Is the economy really improving?
Enter the web!
Live-on-webpage production is becoming extremely popular. You often see spokespeople walking out of nowhere onto a browser web page when you load it, to say hello, deliver a mission statement or company overview. It's a little spooky to see leprechaun-like folks talking to you or to each other, but, when done right, message transcends media, and it's compelling. You see instructors standing next to bullet-point examples of their topic or product, often interacting with it-- often only when you click your mouse to direct the presentation. It's a whole new “humanizing” media initiative which doesn't challenge bandwidth the way full size videos do. But it requires careful planning, shooting, and good tools in post.
Cyclone Interactive of Boston, working with Moving Media of Arlington, MA, used greenscreen for a multinational corporate client specifically to bring live action and virtual sets together on the web, along with stand-ups to be composited against web page white backgrounds, all ending up as Flash elements. The experience and workflow was typical and today many editors get involved in these shoots.
Moving Media's A.J. Dimaculangan directed the green stage elements and I was hired to pull keys in two venues. The first was live on stage, allowing the director and client to check HD greenscreen alignment with the intended virtual sets for each scene. We captured each take through a Sony Z1 camera’s FireWire output, directly to a 13” MacBook (back when it had a FireWire port) right into QuickTime recordings, and from there imported into After Effects CS3 —which unlike FCP actually ran on a MacBook! With the wrong keying tool, this could be a fairly high pressure job.

The second venue was in post, refining keys, troubleshooting unwanted shadows, and with the wrong tool, you may not have all the bells and whistles you need for special situations.

The Foundry's Keylight™ excelled in both venues. It's hard to believe you can sit right on a stage and get a workable key with but one mouse click. That's often the case with Keylight™, because very good default edge spill suppression is incorporated. This is why the product has been used on major feature work.
A greenscreen shot ready to key. The eyedropper click will be made inside the
yellow area.
Resulting composite with virtual set by Dave Taylor of Taylor Imaging
Keylight also has a gift for tracking reflections (car windows, for example) and tackling hair- the toughest keying problems. Often you can confidently utilize the shadows cast on the green stage floor in your final composite! Sample the source green near the subject and poof, you get exactly what you want, with no erosion of the subject and all the background completely knocked out, as was I by its ease of use live on stage. You can use matte sliders to refine the knockout if the background was unevenly lit.
Nevertheless, this is a heavy-duty post tool with a raft of controls for refining less than stellar keys. Keylight packs together functions often available as separate filters in other product lines. There are convenient controls for tweaking foreground subject, background, and edge, from fine spill suppression to gain, softness, color quality and correction, all grouped into sections on one powerful pane.
Keylight even gives you the ability to crop the edge of the frame and replace it with a custom color to eliminate stage apparatus you’d normally garbage-matte out. It allows you to load special foreground and background masks, so you can apply one pass for each to troubleshoot areas you cannot tackle with one application of the filter. It gives you the ability to choke the edge or spread it, and to blend edge pixels with a custom color background, which makes for virtually invisible keys. Look, Ma, no lines!
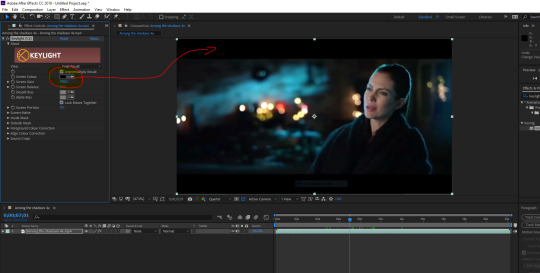
There are so many controls in Keylight it helps to know what each does to the image. For example, there is one default setting which affects the quality of the foreground object color. It’s the Replace Method option under Screen Matte settings, and the default is “Soft Colour.” I found, at least with HDV footage transcoded to ProRes444, I repeatedly got better quality keys switching to Hard Colour, and early on this was a little “gotcha!” I had to track down, as characters wearing dark clothing were noisier than they should have been. Mod the sims 4. Switching to Hard Colour cleared them up most every time. Your mileage may vary with “true” HD or stage variables.
Though now available as Version 2.0 in Final Cut Pro, many prefer to use Keylight version 1.2, with identical controls, in Adobe After Effects, which has offered it preinstalled going back several editions. It's now also available as a version 2.0 plug-in for AVID DS, Shake, and several other systems. In FCP, you’re provided image wells to load custom inside (foreground) and outside (background) custom masks if you need them.
Keylight is available with a flexible licensing scheme-- you pick the lease time. Foundry support is responsive and constructive. The tutorials are concise, providing real feature film blue and greenscreen frames on which the product was actually employed. There are some insane examples of realworld footage they had to deal with. The website’s Keylight page shows it in use in FCP, and the revision history reports early bugs have been squashed.
Keylight can be described in a short time, and its default settings are good. Mastering custom controls of the toolset in a variety of stage and subject lighting situations takes a bit longer.
Keylight™ - a major key to success in the new economy. Also check out The Foundry’s Technical Academy Award-winning FurnaceCore plugins.
Keylight 1.2 After Effects Download
With very special thanks to The Foundry, and to Cyclone Interactive, Moving Media, and Taylor Imaging for use of stage and virtual set scenes. ©2010 Cyclone Interactive, Inc. All rights reserved.
Keylight 1.2 Free Download
Loren Miller is a freelance storyline editor working both coasts, reports for LAFCPUG and other venues. He is inventor of the ShadowBuster™ greenscreen light prop table; develops KeyGuide™ shortcut placemats for popular media applications; and teaches college-level basic and advanced editing. Reach him anytime at [email protected].
0 notes
Photo


- ̗̀ How to Make Gifs with Photoshop and KMPlayer (Very Detailed) by quirkyresources © ̖́-
♡ All my tutorials ♡
Hi! I'm no expert, but I've been making gifs for at least like four or five years, and over that time I've learned a lot, so I want to share that stuff :) Also, someone requested that I teach them how to gif. I hope this helps!
This tutorial will teach you how to create simple but quality gifs, like the ones in the gifset above! Those gifs are all from TV shows, but it should apply to giffing almost anything. I’ll be using KMPlayer and Photoshop.
This is the gif I’ll be showing how to create, as an example:
If you have any questions at all, please feel free to message me here :) And I’m somewhat new to writing tutorials, so if you notice that I got something wrong, please let me know. Thanks!
Please like/reblog if this is at all useful to you. Thank you so much if you do!
You need:
KMPlayer (link below)
Photoshop (I'm using CC 2017, but I think any version with the timeline should work)
A video to gif (recommended source below)
A sharpening action (recommendations below)
A PSD / or to know how to color gifs (recommendations & tips below)
I'll go over:
How to buy/download PS, download KMPlayer, and download a video!
Taking screencaps in KMPlayer
Importing the screencaps into Photoshop
Cropping and timing the gif, organizing layers, etc.
Adding a PSD or tips for coloring it yourself
Adding subtitles & learning font settings
Saving for web
Posting to Tumblr
Various tips along the way!
The tutorial is under the cut. Have fun and good luck! ♥
[Note: If a photo looks too small, right click it and choose "open in new tab"]
Step 1: getting Photoshop, KMPlayer, and quality videos
Get Photoshop:
I was able to buy my Photoshop, so I don’t have any free downloads to recommend, I’m sorry! But there are plenty of other Photoshop blogs on tumblr that can help with this stuff :)
And there are some deals from adobe that might help you afford it if you want to buy it instead. They had a great one for college students that totally helped me.
Anyways, if you can get it somewhere/somehow, here are the next steps...
Download KMPlayer:
Here's the link (it's free!): kmplayer.com
You can use it to watch videos, but in this case we use it to take screencaps of them to use for gifs.
Get your video:
If you’re going to download a movie or show, I recommend getting torrents from thepiratebay.org and using μTorrent to download them. (Here's a tutorial for how to download stuff with it.) Be careful with viruses and stuff, though!
When you look for a video, try to get one that's as HD as you can find, meaning one that is 720p or 1080p! That tells you what the height of the frames will be, in pixels. They are usually big files, but should be much better quality than others.
Also, try to find videos that do NOT have network logos or ads on them!! They can make gifs look pretty bad, and it takes some serious cropping to get rid of them, which then makes it look even less quality.
Step 2: taking your screencaps
Open your video in KMPlayer. (Open KMPlayer and press CTRL O.)
Get to the exact scene/clip you want to gif. (Tip: it's hard to find the exact place you're looking for, so I recommend using your right/left arrow keys to skip through a little at a time.)
Once you're at the part of the video you want to gif, press CTRL G. This brings up the "frame extraction" window. This is where, as you can probably guess, you extract the frames for your gifs! Here are the settings I use:

I use these exact settings almost every time, except for the image format section. I go between JPEG and PNG. I use JPEG if I'm making a smaller gif (like 268px width or less) and I use a PNG if I'm making a larger gif (like 540px width.) This is because (or at least I've heard) PNGs are the highest quality option, JPEGs are the middle, and bitmaps are the lowest (don't use them!!) The only downside is that the higher the quality, the higher the screencap's file size. So use PNGs sparingly if that matters to you.
You can also change the "prefix" of the screencap filenames.
After figuring out all of these settings, click "start"! Then press play on the video, play until the end of what you're giffing, and press "stop" and pause it.
Then, in the frame extraction window, click the "open" button that’s to the far right of the "extract to" bar. This will open up the folder location of your new screencaps.
Step 2.5: organizing your screencaps
What you'll want to do now is organize the screencaps into separate folders for each individual gif. This is something that's good to do whether it's all from one scene or you're doing a compilation of different clips. This is because, when you upload the screencaps into PS, it's best to have them in their own little folders!
(Tip: Personally I use 75 frames or less in each gif. This is because that’s the limit on the sharpening action I use, but I also think it's a good amount to stop at.)
Step 3: importing your screencaps into Photoshop
Next, we're finally going to move the screencaps you took into Photoshop. Yay!
Open file > scripts > load files into stacks. (Tip: Sometimes this function doesn't work on certain Photoshop downloads. If this is the case for you, here's a tutorial on how to get around that!) This brings up this window:

Click "browse" and find the folder with the screencaps you want for your gif. Select all of them and click "open". Then click "ok" and wait for them to load. Each screencap will load as its own layer in the layers panel, which is what you want to start with.
Step 4: changing the screencaps from layers into frames in the timeline
Once they're all loaded as layers, go to window > timeline. This brings up the timeline!
At this point, things should look something like this:

Now we can start using the timeline! In this method we convert the layers into frames that live inside the timeline, which we’ll use to make the gif move.
First click on the button in the middle of the timeline panel that says "create frame animation" right here:

Then click on the little three bars icon on the top right corner of the timeline. Click "make frames from layers" on the thing that pops up .
It depends, but you might need to reverse the frames (if it imports them in backwards). So just click on that three bars icon again and click "reverse frames".
Step 5: cropping the gif
It's really important to know the Tumblr dimensions! If you have a gif that doesn't fit the dimensions most Tumblr users view it at it can get distorted.
So the width dimensions you should use are:
A row of just one: 540px wide
A row of two: 268px wide each
A row of three: 177px & 178px & 177px
A super helpful explanation of good dimensions to use is this one made by karazorel. It's very close to the way I do it.
So to crop it, go to the crop tool (duh, sorry) and enter in the dimensions you want into the area I highlighted here:
Here's what the gif looks like so far:
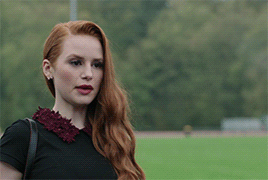
You'll probably notice it moves really fast and stops moving after playing once. That's because we haven't gotten to the step to fix that yet. But that's next!
Step 6: timing, looping, etc.
Timing:
Select all of the frames. You can do this by selecting the first frame, holding shift, and clicking on the last frame. Now click the little arrow next to where it says "0 secs." under any of the frame previews right here:

Click on "Other..." and type "0.14" into the text field. That represents the number of seconds, or usually the fraction of a second, that each frame will play for. (It's "0.14" in this case because of the way we entered the settings in KMPlayer in the "Frames to Extract" section. The number depends on what you enter there.) Press enter/okay.
Looping:
Next change the looping setting from "once" to "forever". Here's where I'm talking about:

Step 7: sharpening the gif frames
This step can either be done at this point (before coloring it) or later (right after coloring it.) I go back and forth on which is better, and different people say different things. So just play around with it!
I use this sharpening action. It can sharpen up to 75 frames, which is a really good amount in my opinion.
Once you have a sharpening action downloaded, go back to Photoshop and go to window > actions.
Click this little menu button, then click "Load Actions...".
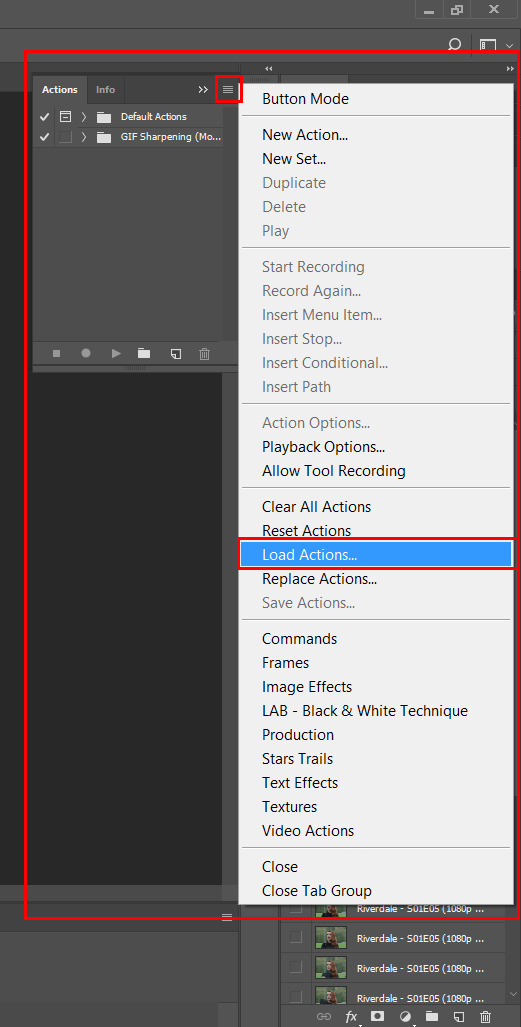
In the window that pops up, choose whatever sharpening action you downloaded and open it. This will load it into your actions panel!
Next, click the menu button on the upper right corner of the timeline panel and click "Flatten Frames Into Layers". Now there will be a new set of layers that are labeled Frame 1, Frame 2, Frame 3, etc. Keep those, and then you can delete the OLD set of layers. (That can significantly lower the file size, and it doesn’t mess anything up if you do it right!)
Now select the very first frame in the timeline, labeled "1", and select the corresponding layer, labeled "Frame 1".
Then open the sharpening action's folder within the actions panel and select the folder labeled with the number of frames you have in your gif. For example, I have 18 frames in my gif, so I selected the folder labeled "18 frames". Or at least that's the way they labeled things in the action I'm using. You may have to explore yours to figure it out.
Then click the play button on the actions panel:

Now that should have sharpened all of your frames/layers! Woohoo! Here's what the gif should look like by now, all cropped, timed, looped, and sharpened:

If this way of sharpening doesn't work for you, here are some other gif sharpening tutorials:
How to use sharpening actions in Photoshop CC by peacelovegifs
Gif sharpening tutorial by manofsteel.co.vu
Sharpening for Photoshop CC by completeresources
Sharpening all gif frames at once by thosetutorials
Sharpening masterpost by itsphotoshop
Gif sharpening action tutorial + download by themazerunnrs
Step 7.5: grouping your layers (a baby step!)
A bonus step that I recommend you do is to put all your layers into a group to keep things neat. Just select all of them and press CTRL G.
Step 8: adding a PSD and/or coloring it yourself!!
Here's the fun part! Now you can let out your creativeness with the coloring. It takes a LOT of practice to get good at this, trust me. I've been doing this for YEARS and I still hate my results sometimes. But if that happens to you, too, don't let that stop you from trying again! (God, I sound like a motivational speaker or something, sorry!)
Here’s some background on PSDs for beginners, but you can totally skip this bit...
"PSD" stands for "Photoshop document", meaning a file you make or edit in Photoshop (sorry, kind of self explanatory). On Tumblr, when people talk about PSDs, they're usually referring to a document with layers that add effects (mostly adjustment layers) to a gif/photo/graphic, etc. Also referred to as a "coloring". They usually include things like brightness/contrast, vibrance, curves, selective color, etc. People post these so you can download them and use them for your own work! (Just don't repost and claim as your own. Not cool, man.)
All you have to do is download the file, open it in Photoshop, make sure you have the layers panel open (windows > layers), and drag the PSD file's window on top of your file's window, but keep them separate so you see both at once. Then drag the PSD file's group of layers (but not the background!) over to your file.

(Then you can close the PSD window.) Then on YOUR file, mess around with the adjustment layers and stuff to change it to whatever you want it to look like. I usually edit mine like crazy!
Anyways, here are what your options are.
Finding a PSD (and then I recommend editing it to however you like it)
Here are places to find some great PSDs on Tumblr! (FYI, some are tag pages with sections for PSDs, with different types to choose from. So look around.)
QuirkyResources (Navigation) (Yup, shameless self-promo!)
QuirkyResources (My PSDs)
CompleteResources
ItsPhotoshop
ChaoticResources
YeahPS
DrunkandColoring
AresColoring
That's just a few of my favorite sources, so message me if you want more recs! :)
Coloring it yourself
I'm not going to do a full-on coloring tutorial right now, but here is my tag for those made by other people!
Basically you should learn how to use the most important adjustment layers: curves, brightness/contrast, selective color, color balance, hue/saturation, vibrance, levels, exposure, and gradient maps. At least those are the ones that I use the most and find super useful. Many of the tutorials in that coloring tutorial tag I just linked go over how to use those. So check them out!
In this case, I used my current fave PSD by dracoharry. (I’ve noticed it works on most shows I gif, so it’s super useful! I actually used it for all of the gifs in the gifset I made for this post.)
Here are the layers I kept hidden/showing:

FYI, I changed the layers' settings and whatnot a bunch.
And here’s what my result was:

Step 9: adding text & learning font settings (optional)
This is usually when I add text to the gif, if relevant.
There are various fonts and settings you can use for this, but to make things easier, here's a font PSD by adorkablelena. It’s for subtitles/quotes. I recently started using it. It's really cute! If you're not into it though, here's my tag for other font PSDs you can check out.
When you find a font PSD you like, open it and drag it into your document the same way you would with a regular PSD.
Select the text tool and replace the text with your quote. (Tip: Try not to misquote or misspell things if you can help it! I've done it and it sucks when that happens. Ugh.)
As far as colors go... For the primary quote I make the text white, and the secondary quote I usually make it yellow (#ffde00). And if there is a third I'll use some shade of orange, and anything after that I just use whatever I can make look the best. The stroke color I use varies sometimes, but I usually use black (#000000).
Finally, select the move tool (V) and make sure "smart guides" are turned on. To check this, go to view > show > smart guides, and make sure it's checked. Now when you drag around the text (select its layer first), you can see little purple vertical/horizontal guides pop up when you drag the text to the center of either direction. For the subtitle we're making, we want it to be centered horizontally and close to the bottom of the gif, but not too close. Also, if you have more than one line of text, just press enter somewhere in the text that splits it into similar-sized lines. Here's an example of all of this stuff put together:

Step 10: saving for web
There are a lot of settings to remember and play around with when saving for web, and specifically for Tumblr.
First, go to file > export > save for web (legacy).
Here you'll see a lot of settings to choose from, but they're not as intimidating as they may look!
Here are my usual settings:

Red highlight: There are multiple options in the top drop down list in the area I highlighted that are good to use. I usually use “Adaptive”, but “Perceptual” and “Selective” are good options too. In my experience, the rest make your gif look pretty gross. For the drop down list under that I choose "Pattern". This arranges the pixels in a pattern, and I like the look of that more than the two other viable options, ”Diffusion” and “Noise”.
Orange highlight: This is where you choose the number of color shades that are in the gif. I use the top amount allowed, 256, because this achieves the highest quality possible! If you need to make the gif's file size smaller, you can lower this amount, but I don't recommend it. If it's a B&W gif you can sometimes get away with using less and have it still look just as quality.
Yellow highlight: Looping options: Forever. Very important! Like I showed earlier, you can also set this setting before you get to the "save for web" option. Either way, this makes it so the gif loops forever.
Green highlight: Gif size! As I mentioned earlier, there is a limit for Tumblr. This example is a pretty small gif (592.9K) and the current file size limit on Tumblr is 3MB. Tumblr seems to change this limit a lot though, so you may want to look that up once in awhile to stay up to date.
Turquoise highlight: Always check the box next to “Convert to sRGB”. I just learned that this setting is important. It basically keeps the vibrance intact when you take it from Photoshop to Tumblr. Read a much better explanation here! :)
Then just click "Save...", choose the file location, and press "Save" again.
Step 11: uploading/posting to Tumblr
Now, last but not least, it's time to upload it to Tumblr! I probably don’t need to explain this, but I’m going to anyways. It's super-duper easy. Just go to your dashboard and click on this button:

Then the post creation window pops up, and just go on from there. Upload your images/gifs, drag them around to arrange them however you like, and add a caption if you want.
(Tip: Don't forget to add tags! It's super important to add tags if you want people to actually find your post. Only the first 5 tags show up in the main Tumblr tag-search results (ugh wtf, right?) but sometimes the other ones you add will show up on the general search page. I don't really get how to explain it or how it works tbh, sorry! But I do know that many fandoms have developed their own tagging-language to find people's posts more easily (and avoid spam) which is very useful once you figure it out. For example, if I was posting a gifset of Cheryl Blossom from Riverdale, I'd tag it with things like "riverdaleedit" and "cherylblossomedit" and maybe "madelainepetschedit". So basically the name of the show/character/actor/ship plus "edit", no spaces. Or an abbreviation of any of those, like "spnedit" or "dwinchesteredit". I hope that at least makes a little sense?
As far as the amount of tags that will show up on individual blogs, I'm not positive, but I believe you can use up to 30. After that the post won't appear on the tag's page. Grrr.)
Then, of course, just post it! I recommend saving it as a draft and then posting it at a time when a lot of people are likely to be on Tumblr. (There's research done on this timing!)
THE END! :D
I really hope that was at least somewhat helpful. Sorry if it was annoying that I went into sooo much detail, I just thought I should explain everything so it would make sense to most people, especially total beginners. Again, if anyone has any questions at all, you can absolutely ask me here! Or let me know if you think I got anything wrong, I would definitely want to fix it! Thanks for reading, and please like/reblog ♥ I’d really appretiate it!
#photoshop tutorial#completeresources#itsphotoshop#chaoticresources#yeahps#tutorials#gif tutorials#gif making#how to make gifs#gif making tutorial#mine#mine: tutorials#peachresources#riverdale#riverdaleedit#coloring tutorial#sharpening tutorial#photoshop tips#ps tips#photoshop 101#ps 101#500
626 notes
·
View notes
Last Seen Blogs
frdrcks
girl next door.
xravensflowerx
Black Onyx Thalia
sourspence
🌞🦋☁️
heavybodymodification
Heavy Body Mods

klashnikov47
untildawnwrites