#I should buy proper paper for this as you can see the tape got stuck in some areas ;_;
Text

a product of a major headache

self portrait
#I should buy proper paper for this as you can see the tape got stuck in some areas ;_;#ok to rb#don't repost#my art#line art#illustration#portrait#self portrait#painting#gouache
3 notes
·
View notes
Text
OH BOY GUYS HAVE I GOT A MUN-DAY STORY FOR YOU
( tl;dr I was refused entry into my mom’s home country, spent the night in an airport terminal during a pandemic, made friends with the son of one of my mom’s colleagues who just so happened to be in the exact same situation because the universe has a sense of humor, and was eventually allowed into the country because I had understood the regulations properly and the border guards had not.)
So it all started on Thursday, when my mom -- an epidemiologist working on COVID -- told me to come home ASAP because Switzerland (where she lives) was about to close its borders and had already restricted entry to anyone from neighboring states: first Italy, then Austria, Germany, and France as well.
I had already booked tickets for early April, so I called the airline, and they helped me rebook for the end of March -- the earliest I could come without paying huge fees.
Cut to Friday. I wake up to 4 missed calls and a zillion texts from my mom informing me that she had booked me on a flight for the following day -- Saturday.
With a layover in Germany.
As I had spent a good 40 minutes the previous day on the phone trying to avoid layovers in France and Germany, I was a little miffed. And worried. But the airline had assured my mother that:
a) the new restrictions on Germany wouldn’t go into effect until Sunday, and
b) since airport terminals are international territory, I technically would not have actually been in Germany.
After some deliberation, I agreed to come home immediately. As in, Saturday. As in, the next day. The 21st. A day before Switzerland’s travel restrictions on Germany were supposed to go into effect (according to the airline, and I’m not sure what their source was).
You might already see where this is going.
I arrived at Frankfurt airport after a frankly very surreal trip -- both the flight and the original airport, which was a ghost town -- and was told by the gate agents that I couldn’t board the plane because Swiss border control would refuse me. After a bit of back and forth -- during which I switched from English to German, which got them to be a bit more helpful -- they realized that yes, indeed, citizens and residents of Schengen countries (excluding Germany, France, Italy, and Austria) were exempted from the border restrictions. This included me, as I’m a resident of Sweden.
They let me on the plane, but I was seriously worried -- because given the general environment of confusion, I had no faith that Swiss border control would know more than the Frankfurt gate agents. You’d assume they’d be informed on some things, but lets face it -- uniformed and armed people tend not to be very good at subtlety and legal minutiae, so who could know.
The one thing that can be said for the overwhelming, anxious rage I felt when the Swiss border control told me I couldn’t enter the country was that it absolutely K.O’d the part of my brain that tends to overthink my language skills and inhibit my ability to speak languages I’m not fluent in -- and I made my case in very good French. I have never spoken French so well as when I was talking to the cop I’d been palmed off to and explaining to him why I was right and they were all wrong. My mom also insisted on talking to him, and after some hesitation -- which probably had less to do with touching my potentially virus-infested phone and more to do with being on the receiving end of a middle-aged mom’s wrath -- he took the call. I offered to put it on speaker and hold it so he wouldn’t have to, but he took the phone, and argued with my mom all the way through the airport.
He seemed basically sympathetic and like he wanted to help, but his mantra was always the same: “I have my orders, I don’t know anything beyond what I’ve been told and I can’t disobey my orders.” He told mom the name of the organization to call to help out with this, but didn’t have a number for them, and couldn’t provide any other support. He was polite enough, but “polite” wasn’t going to get me home.
Where it got me was locked down tight in the airport international terminal with 10 other people who have also been turned away.
Luckily, the terminal is massive, so there was plenty of room to maintain distance.
The cops assured me that they would handle my suitcase and took my documents -- passport, Swedish residency card, and boarding passes from my trip (so they could make my flight reservations, they said, but there was probably more to it) -- and left me there.
An international airport at midnight during a pandemic is pretty much the definition of a liminal space. Every other seat in the gate waiting areas had a strip of red and white police tape running over it, back to front, and tied off at the top of the seat back to ensure that people would maintain proper distance and not sit next to each other. The music was on at a volume that, during the day, was probably appropriate to be unobtrusive over the ambient sounds of a living airport, but which in a locked-down terminal was unbelievably annoying. The lights were dim enough that there were still dark corners, and you could look around without your eyeballs melting out of your face. The only sounds (apart from the music) were the hum of the vending machines (our only food and drink options until the cafe opened at 5:30 the next morning) and the soft shuffling of people trying to get comfortable and get some sleep on the rock-hard, probably COVID-contaminated seat rows.
We were given nothing. No hand sanitizer, no water (apart from what you could buy from the vending machines), no blankets or pillows. Nothing. We had access to bathrooms with hand soap, but you had to touch the dispensers with the heel of your hand. The paper towel dispensers also weren’t automatic, so you had to touch them to get the paper towels out. There was one janitor who came in around 1 AM to clean the whole terminal, which obviously wasn’t sufficient.
I’m tough. I’ve been in some incredibly crappy situations, and at least we were warm and safe inside, and I wasn’t physically uncomfortable. I had some money to buy water, food, and later in the morning, coffee, and I figured out how to wash my hands without touching anything. But the fact that we were left in an almost certainly contaminated public space with no precautionary measures and no support for an extended amount of time -- 9 hours in my case -- was absolutely infuriating. And dangerous. And I am almost definitely going to get sick, probably because of that.
Which only made me more determined to get home. If I was going to get sick, I was going to do it in a place where I could be taken care of and nursed back to health, instead of someone else’s apartment where I just rent a room and would have had a much larger radius of contamination (my landlady/flatmate has kids and grandkids and is still going to work).
The issue, as the immigration cop had told me, came down to the fact that I had flown in from Germany.
Even though I hadn’t set foot on German soil, I had been in a German airport, and that was apparently enough. If I had flown in from any other Schengen country (apart from France, Austria, or Italy), I could have entered with no problem, since I have Swedish residency.
There was an obvious loophole there: while Sweden had no flights to that city for the following day (Sunday), Netherlands did. Brussels and Czechia did.
So while my mom contacted the immigration authority in Bern, I booked a refundable flight for 9 PM Sunday evening from Amsterdam to my mom’s city, and would request that they send me to Amsterdam instead of Stockholm. The plan was basically to make a big loop and enter through a country they deemed acceptable. The irony wasn’t lost on me -- that I would risk further contamination by city-hopping in order to loop around and end up back where I started -- but the police had prevented me from just getting into my mom’s car and self-quarantining at her apartment, which had been the original plan, so I didn’t have much of a choice.
All that was left now was to wait -- in a non-sterile, contaminated airport terminal playing the most mediocre pop album-filler of the ‘70s and ‘80s.
The only thing that made it bearable was that I made a friend.
Around 1 AM, a 20-something Japanese dude in dress pants and a polo shirt shows up on our side of the terminal from the opposite end, wanting to know if we were also bothered by the music and if he should call someone about shutting it off. He wouldn’t bother if it was just him, so he wanted to see if it was collective. I agreed, and after a few failed attempts, we miraculously managed to reach someone who said they would do what they could to turn off the music.
We got talking (and moved away from the people trying to sleep), and it turns out that it’s a small world and we were in an even smaller city, because our mothers work in the same department, were extremely close colleagues about 10 years ago, and still work together occasionally. I immediately recognized her name.
Turns out, this dude and I had both gone to school and done the IB in the same city. We both have moms working on COVID, dads living in our countries of origin (Japan for him, US for me), and younger sisters. He had also been turned away, despite having documentation that should have given him leave to enter. So there we were, stuck in that situation together, waiting to be deported and with our passports held hostage by the authorities.
We talked for six straight hours about every topic we could think of. Travel, food, relationships, siblings and family in general, COVID, electric cars, how our respective countries are reacting to COVID, racism and xenophobia (worsened by COVID -- he had an example from that same day), bosses and managers and how our offices are (and, in my case, had been) run, the pros and cons of wearing medical masks if you’re not showing symptoms of COVID, dry hands from all of the washing to avoid COVID, politics, our respective cultures and business cultures, depression and mental illness, natural disasters we had lived through, etc. “Ah fuck I’ve got COVID in my eye” became a bit of a running joke throughout the morning, as we became increasingly tired and our eyes increasingly dry, prompting runs to the bathroom to clear them out and wash our hands. We had both basically resigned ourselves to catching it -- it was just a matter of trying to pass it on to as few people as possible, preferably 0.
Around 7 AM, my new friend -- let’s call him Mike -- points out that a guard is making a beeline towards us, and he’s not holding his passport. I look, and it’s mine, and I prepare myself to argue for them to send me to Amsterdam instead of Sweden. He tells me he had just come over to see me and make sure that I was still there (??? he had my passport where was I going to go??), and he would be back in 15 minutes to let me know whether or not I could enter Switzerland.
I was completely baffled, because that option hadn’t even crossed my mind. I had been operating 100% on the assumption that I was going to be put on a plane. And Mike was happy for me, but also pretty miffed, because they had already booked a flight for him but our circumstances were pretty much identical. He had documentation proving extenuating circumstances, and I have Swedish residency and never set foot on German soil. The only difference between us is that he’s Japanese, and I’m white. I agreed that it was almost definitely a xenophobia thing, and told him that if I got in, I’d vouch for him.
15 minutes later the cop (this one was very compassionate and borderline sweet compared to the ones we’d dealt with the previous night) comes back and tells me I could go through. I gather my stuff, and explain to him about Mike. The cop looks puzzled, but promises that he’ll make some calls and try to sort it out, and I should come with him. He takes me through to get my suitcase and escorts me to the exit, where he welcomes me to Switzerland with a big smile.
I called my mom and settled in to wait for her to pick me up. Ten minutes later, Mike tells he’s also been allowed through. My mom (who had literally rolled out of bed in her pajamas, thrown on a coat and shoes, and jumped in the car) and I offered him a ride, but he had called his mom immediately and she was coming to get him. I didn’t see him again -- my mom arrived before he came through -- but we’ve been in touch, and both of us got home safe.
Now my mom and I are completely self-quarantined with the cats, and honestly, it’s wonderful. We’re not leaving the house except for the occasional walk. I slept 12 hours last night. My mom is plying me with tea to make sure I’m hydrated as we wait for me to get sick, and I spent the 6 hours recording this whole nonsense saga for posterity.
tl;dr I was refused entry into my mom’s home country, spent the night in an airport terminal during a pandemic, and made friends with the son of one of my mom’s colleagues who just so happened to be in the exact same situation
9 notes
·
View notes
Text
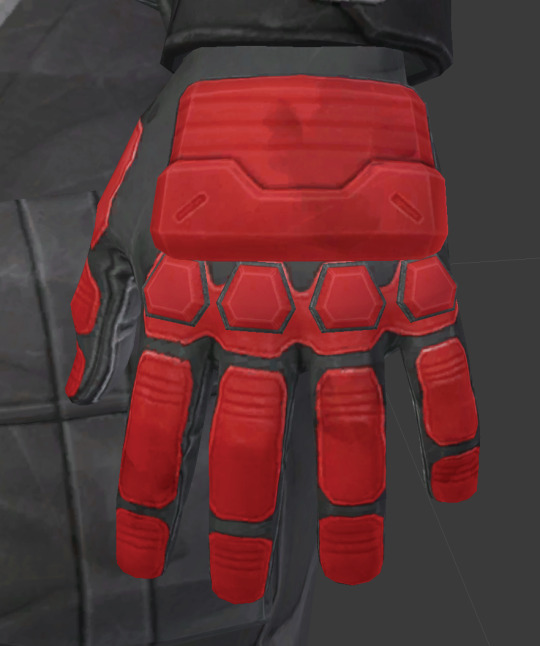
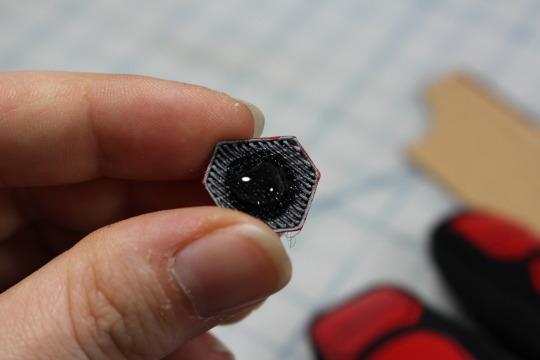
Making Soldier 76′s Gloves: A Tutorial

Yay gloves! This is a walk-through that shows how I made them. I did make several mistakes along the way, but hopefully there is still value to be found in the process. Enjoy!
Warning: Ridiculously image heavy!!
As usual, I started by hoarding references. The 3D model I downloaded was very helpful for this.

Several months ago at the beginning of this adventure, I sat down and planned how all the costume components would be built. At the time I intended to use spray adhesive to tack down some type of stretchy, plastic-y fabric--probably vinyl. Later I learned that my library’s makerspace had a die cutter, so “stretch vinyl” was replaced with heat transfer vinyl. I did choose to omit the grey palm, but otherwise these are accurate to the game model.

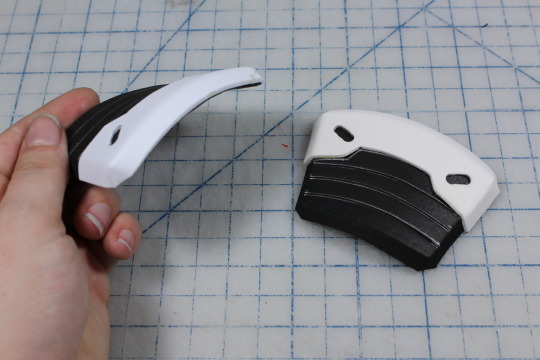
The pre-existing gloves were a pair of these from Costco. In hind sight, they weren’t 100% ideal; see that seam across the knuckles? It’s going to cause trouble later.

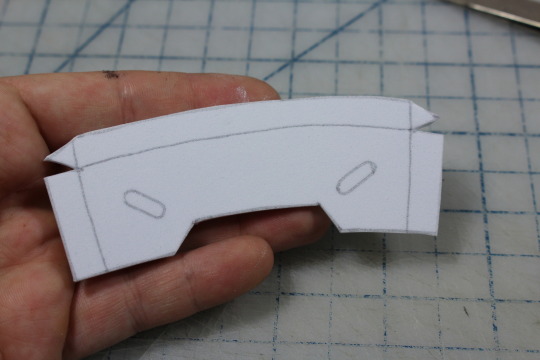
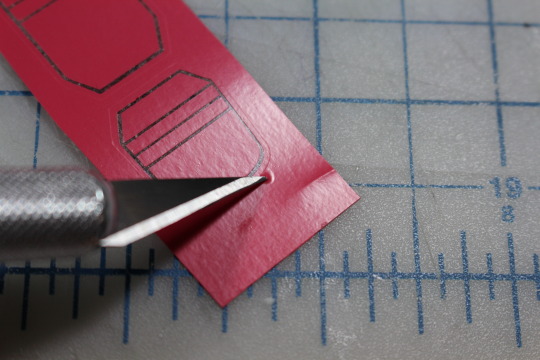
Next I needed to make a digital cut file for the Silhouette die cutter. Die cutters are basically digital cutting machines... sort of like printing with a knife. You give them a file with lines, and a knife (or other tool) traces them onto materials like paper, fabric, and vinyl. The software requires vectors to cut, so I used Adobe Illustrator. If you don’t have access to this software, the open source equivalent Inkscape would work just as well. I began by very carefully measuring the gloves to make a janky but correctly scaled pattern. The red armor was drawn over the top.
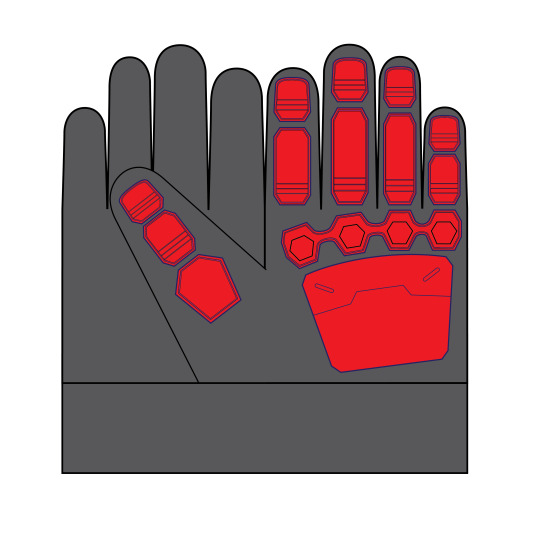
Next, the templates were printed and laid over the glove to check for scale. as you can see, the guard on top of the hand is much too large. I made a few adjustments to the paper templates, scanned them, and modified the vectors to fit.

Then it was cutting time! Only the finger and knuckle guard bases were made from heat transfer vinyl. (If I didn’t have access to the die cutter, I would have traced the templates onto masking tape and used them as a mask for fabric paint.)

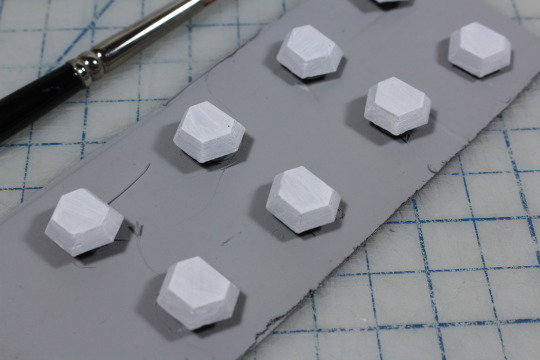
Next I wanted to make the knuckle guards. These could have easily been made with Sculpey, but I sit next to a 3D printer all day at work so I took the easy way out.
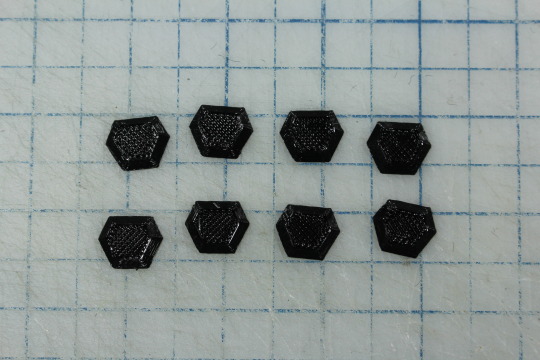
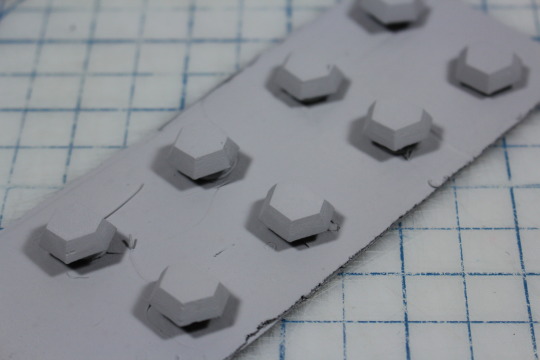
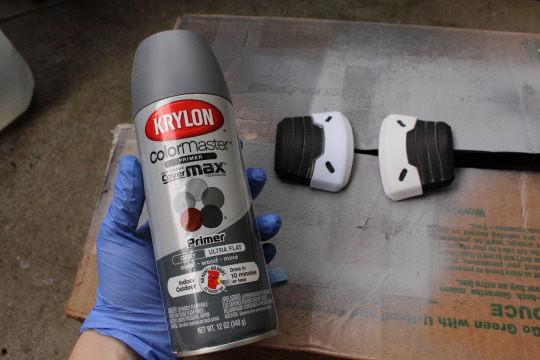
As normal with 3D prints, these had a distinct texture. I decided to take the opportunity and try out Automotive Filler Primer since it’s supposed to be the bee’s knees for smoothing 3D prints. Sanding PLA sucks, so I’ll jump on any possible opportunity to avoid it. In preparation for spray painting, the knuckle guards were stuck on a piece of cardboard with hot glue. A little clearance from the surface means their edges will be more clean, plus I don’t need to keep track of 8 tiny pieces of plastic. The hot glue will peel off cleanly later.
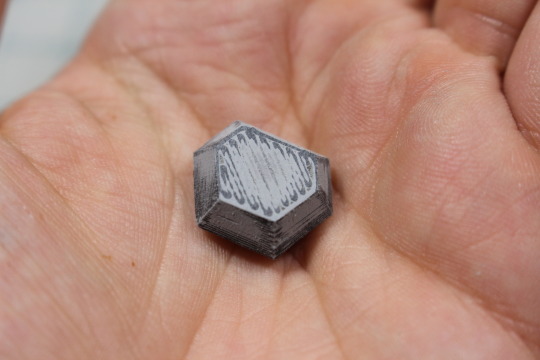
From what I had heard, you don’t need to sand filler primer because it self-levels. After one coat, I was not so sure.

Three coats in and the ridges were actually more pronounced, so I broke out the sandpaper.

Amazing!!! It looks awful but dang did it feel smooth and it sanded SO MUCH EASIER than PLA! 220 grit paper was plenty remove material.
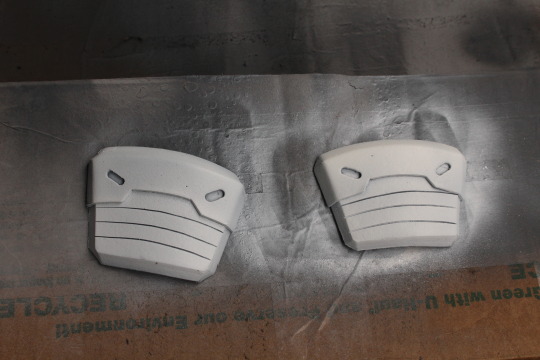
After two more passes of spraying and sanding, the guards were looking pretty smooth. Here they are after their final spray:
Fun fact, that stuff will clog up your paper something fierce! Buy a lot of sandpaper if you have large things to surface.
Next up was painting. Normally I would spray paint or airbrush something like this, but the weather has not been cooperating lately so I hand-painted them instead.
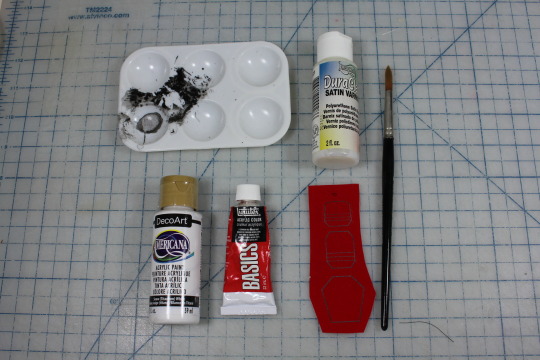
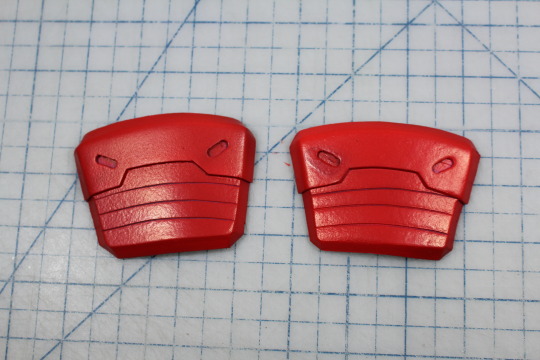
Since the red paint is somewhat translucent, I gave the parts a thin coating of white first. Then red was layered on until I achieved full coverage.
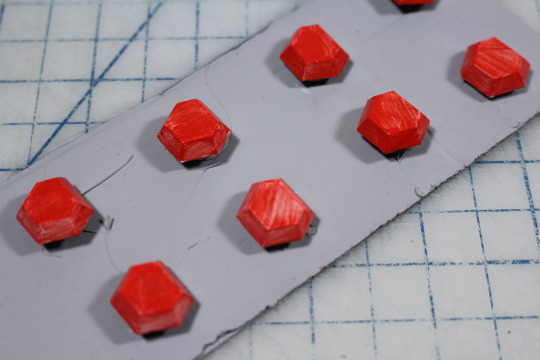
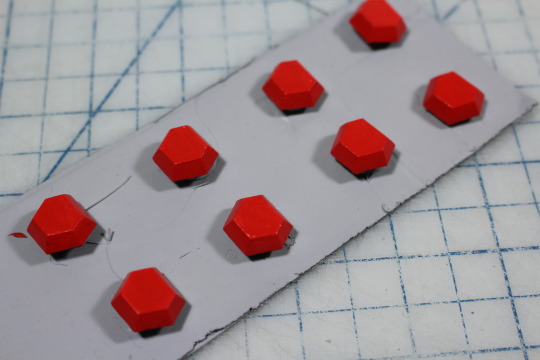
The final detail for the knuckle guards was a thin, black line running around their base. Any permanent marker will do.

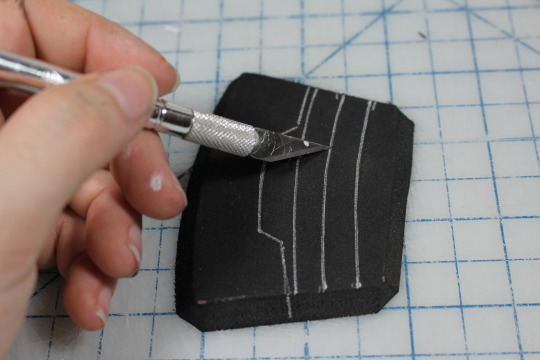
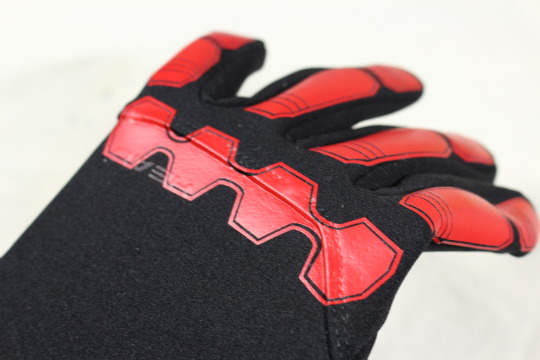
The knuckle guards still need weathering, but I prefer to weather everything at once so I moved on to building the hand guards. Using the paper template from Illustrator, I traced the main shape onto 6mm foam. You will notice some indents running along the flat surface:
Those were recreated by scoring the foam with an X-acto knife. When blasted with a heat gun, the foam will contract slightly to create a groove (pictures of this later).
I added a second layer to the guards with 2mm craft foam.
In order to emphasize the angles, I carved a teeny grove with my pen knife and removed the excess material with a pair of tweezers.


This channel helps the foam bend a little sharper. It might seem subtle, but the effect was worth it.

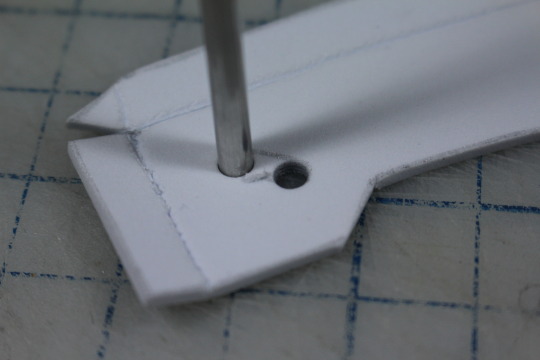
Next, I used a sharpened aluminum tube to punch perfect circles into the foam. You can find these at most hobby stores and sharpen them with a needle file--also to be found at most hobby stores. The holes were expanded into slots using my handy X-acto. This was surprisingly hard to do neatly; I wish EVA foam was a little more dense :/

The parts were adhered together with contact cement. I had to do this outside and it was dark, so I don’t have good pictures :( As a last step before painting, I used a heat gun to give them a gentle curve and emphasize those grooves. Unfortunately, I was a little liberal with the heat and you can see some low-key melting. Oops. Given the size of these parts, it was an interesting challenge to attempt without gloves.
For painting, I decided to use my airbrush. I was gifted a setup yeeeeeeeears ago and I hardly ever use it. Time to change that! I primed the foam with this all-purpose primer which claimed to be slightly flexible. This is a lie. Don’t buy this brand of primer if you need something to be flexible!!
Like the knuckle guards, I gave the hand guards a light pass with white so it would take less red to reach full coverage. Full disclosure, I kind of suck with air-brushes. See that weirdo blob on the left corner of the left guard? That’s what happens when you spray too much paint with an air-brush. They also had a funky texture which I believe was a result of too much paint at once.

For weathering, I used 400 grit sandpaper to remove paint from corners and edges revealing the primer beneath. I think it gives a pretty neat effect! Grime was a mixture of Mars Black, Burnt Umber, and water. Finally, a coat of brush-on varnish sealed the paint job.


It was only after applying the varnish that I realized it was glossy, so I misted the parts with Matte Fixative meant for sealing drawings. This is not ideal and you should be smarter than me and buy the right varnish to begin with.
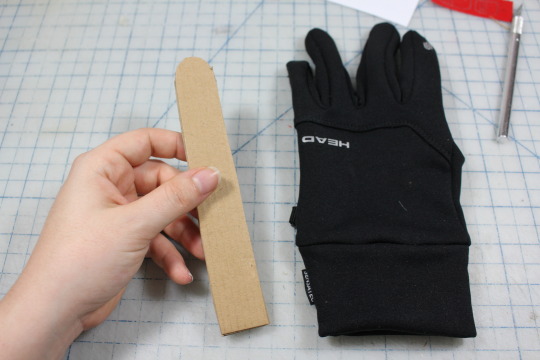
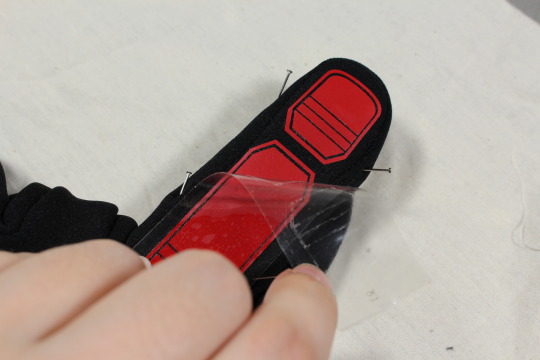
Finally, it was time to add the finger pieces and assemble the gloves! This was done with an ancient (circa 1970′s) iron, a scrap of muslin, some cardboard, and sewing pins.

Note about the vinyl: There is such a thing as stretchy heat transfer vinyl. I didn’t know this when purchasing, but stretchy would definitely have been preferable. The fingers of a glove are constantly flexing and moving, so over time my regular vinyl will break down. I did verify that my pattern would stretch, but you should still purchase the proper variety if you choose to do something like this. Thankfully the pattern I cut allowed the material to stretch somewhat.

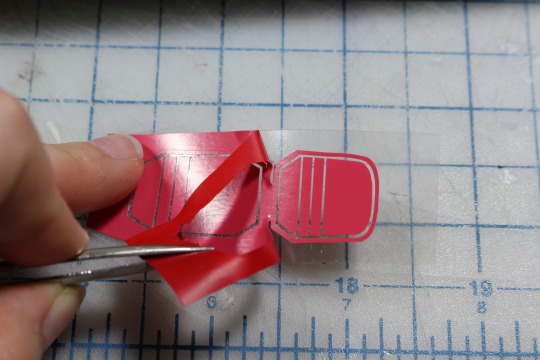
Once cut, the vinyl needed weeding. Weeding is the process of removing everything you don’t need from the piece to be transferred. While there are specific tools available for this task, I like using an X-acto knife. After you get a piece started, tweezers can help remove the rest. Be very careful during this step; sometimes the machine doesn’t quite slice all the way through and you can pull off the wrong parts.
With the parts weeded, it was time to iron them in place. Heat transfer vinyl needs to be pressed while perfectly flat. The fingers of these gloves have gussets on each side which equals a lot of fabric and seams in a small area. Such construction makes them form-fitting and comfortable, but I couldn't get them to lay flat. To remedy this I made an insertable cardboard finger and pinned the fabric in place. It was important NOT to stretch the fabric while doing so or else the vinyl would crumple when un-pinned.


With the fabric secured, I attempted to stick the vinyl in place using the mildly adhesive cover plastic. Alas, it just wouldn’t stay, so I used a snugly pinned piece of muslin to hold it down. 15 seconds of pressing with the iron, and ta-dah! Red decals :)
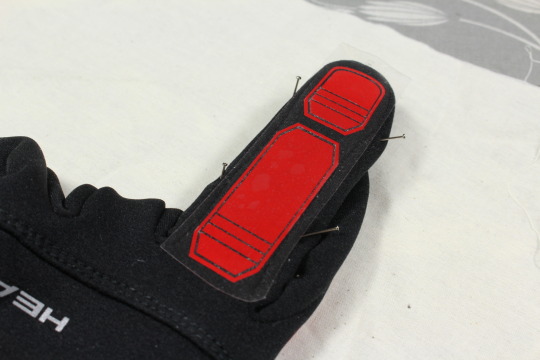


These gloves are two sizes too big for me in case you couldn’t tell :)
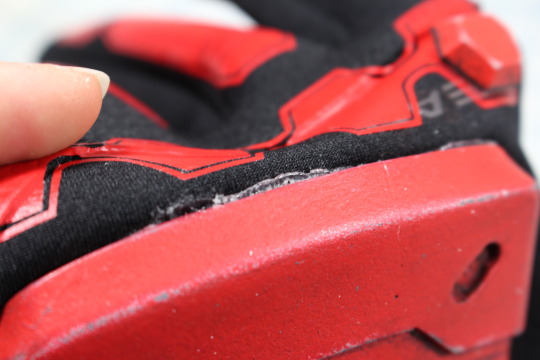
Remember how I mentioned that seam across the back causing trouble? Unfortunately it runs right through the middle of a decal. It was very tricky to iron without burning the vinyl and it’s kind of ugly. 10-foot rule will save me, but it could have been avoided by buying better gloves.
The last step was gluing the hand and knuckle guards in place. Because the fabric is stretchy but my parts are curved, I needed to put the gloves on Casey before gluing down anything rigid. Alas, I don’t have many images here because Casey didn’t feel like being a hand model and we were outside because of glue fumes. Each hand guard got a thorough application of E6000 in the center with hot glue around the edges. I wanted the strength of E6000 but needed the quick dry time of hot glue, so this worked fairly well. Overflowed hotglue was colored with a Sharpie and disappears from a distance.

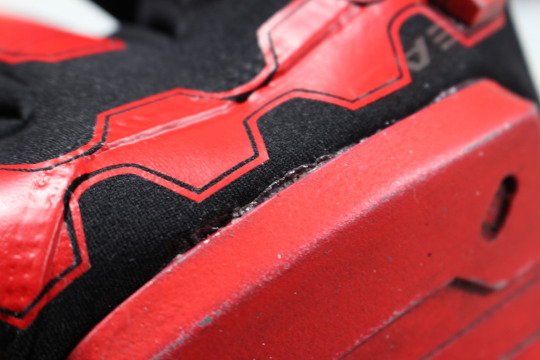
More E6000 was used to fix the knuckle guards. Then the gloves were tossed into the Bin of Shame ™ to cure without fumigating my room.

After two days of curing, everything was finished! I'm really happy with how they turned out :D

98 notes
·
View notes
Text
CHAPTER 1 She squirms in the chair, trying to loosen the ropes, tears streaming down her terrified face. I just laugh. “I was a Boy Scout, babe. You’re in a Siberian Hitch-Transom Knot combo.” I turn on my best German accent. “Your resistance is futile.” She sobs harder. “You’re right. The German thing was hacky.” “Are you gonna rape me?” She gasps for a phlegmy breath. “What? Don’t flatter yourself, sweetie. Rape you? Sheesh. You see all this plastic all over the place? You think I cum that much? You’ve never watched Dexter? Rape you. Pfft. Hell no. I’m going to kill you.” I stretch, tear and fix some duct tape over her mouth before she can scream. Fuck. I’m low on duct tape again. “What’s your name again?” I fish her wallet out from her purse. “McKenzie. Of course it is. Fucking Millennial.” I grab the garden shears and squeeze the handles a couple of times for effect. You just can’t beat that metal-on-metal sound. If you have just the right amount of torque on the springs, you can conjure the sound a sword makes when it’s slowly pulled from its sheath. That metallic ring. Now I can’t get the Game of Thrones theme out of my head. #ADD. She moans through her duct-taped mouth, her curly brown hair matted to her face with tears and sweat. “Now, you know I don’t want to do this. But, I have to. I told you to be good. But you weren’t, were you? I mean, look at this! See?“ I lift my sleeve and show her the claw marks she gave me when the back of her head smacked off the bathroom sink (I may have been holding her throat at the time). “I can’t have the cops find my DNA under your pretty nails, sweetie. And, I’m a comedian - not a surgeon. What that means is I don’t have the skill-set to remove just the nails, so I’m gonna have to take off your fingers.” She convulses, letting out a muted, duct-tape softened screech. I grab her index finger between the blades. “I mean, I could do this after you’re dead, but where’s the fun in that? Now then…Where is pointy, where is pointy?” SNIP! Her finger, once so adept at pointing, comes off cleanly in my gloved hand, spurting blood everywhere. “Here I am! Here I am!” I dance the finger about in front of her scarlet, glassy eyes. She is so fucking loud even with the duct tape. I never get that. It’s like scream-humming. I turn up the music on the motel’s cheap alarm clock. MakeDamnSure by Taking Back Sunday. Nice. I was seriously thinking about some GOT pay-per-view when I got back to my hotel, but these tunes have my head back in the game. I hold her bloody finger in front of my pursed lips. “Shhh! Hahaha! Come on, McKenzie! I don’t usually do prop comedy, so consider yourself lucky. I mean, I can’t have you ‘finger’ me for this!” She hangs her head in defeat. I hate it when they don’t go down swinging. I almost feel bad for them. Takes the fun right the fuck out of it. McKenzie. This girl’s a joy vampire. Maybe a proper mind fuck will make it interesting again. “Do you want to know why you’re here?” She nods weakly, possibly thinking I’m some storybook villain, stalling with a sad tale that might elongate her life. I’m not. I’m a comedian. All about the short game here. “You sat in the front row of my show. You didn’t laugh once. You fucking Facebooked and Tindered the entire fucking time because the Comedy Caravan in backward-ass Louisville doesn’t take peoples’ damned phones, so some of this is on them, but do you know what that does to me? It makes me insecure. I’m giving myself to you. You’re a fucking stranger. I’m trying to relate. I’m trying to make you happy! To make you laugh! To connect, to reveal some human truths in a funny way, and you’re swiping left, with that little manicured index finger of yours, on pictures of douchebags like you’re some beauty queen who can judge people in a second. Fuck you! Oh,” – as if just noticing her index finger in my hand – “and fuck your little finger too! And on top of that, you sat so close to my stage, I was able to see you left less than a ten percent tip for your server, and that makes you a cunt, and cunts gotta go! Do you understand?” Her whole body trembles. I pretend to feel bad. Have to keep the acting chops fresh. One can never really give up on that Hollywood career. “Hey, hey…c’mon. Don’t do that,” I say in my softest sympathetic tough guy voice – channeling some daytime soap I must have squirrelled away in my brain at some point. “It’s okay. It’s okay. I’m sorry. I, I am. Look, do you feel like you maybe learned a valuable lesson today?” She raises her head, her eyes hopeful. Nods slowly. “If I let you go, do you promise you won’t say anything?” She nods like she’s got epilepsy. “Swear?” She’s a bobble head. “Okay. After all, you did agree to get a drink with me after the show. Fine. I’ll cut you loose. Let me get my scissors.” I look around; make a spectacle of myself (my specialty, if you must know). Lift up the alarm clock. Hmm. Not there. Check my pockets. Take off my left shoe, not in there either. Inside this bible? Zilch. She just hangs her head again, finally realizing that I was fucking with her. “Oh, but…look what I found.” A Louisville Slugger I stashed under the bed. “Not much to do in Ken-fucking-tucky. So, I toured the ol’ bat factory today. It was that or a bourbon tasting, and I had to keep my shit together for the show tonight. Just think. You’ll be one of my Greatest Hits.” I get into my stance. “Here’s the pitch!” I bring it around with everything I’ve got. The wood connects with her temple, and the fat part of that sturdy, all-American bat breaks off a good, satisfying, chunk of skull. “Foul ball!” In My Defense: I haven’t always been a killer. Obviously. I mean, at one point, I was shitting in my diaper, so wielding knives wasn’t exactly a thing I could do. That’s like saying “I don’t know how we lost, the game was so close at one point”. Of course it was, you idiot. Games start out at zero for both teams. Hang on, I need my notebook… Joke about how sports fans say they don’t get it when they lost cause it was so close at one point. Also, get more duct tape. Where was I? Oh yeah. Killing. Just saying it gets me all worked up. It’s like when you see a hot girl laying by the pool at your apartment complex and you have to go watch porn and wax the dolphin so you can focus. Anyway, I don’t think I’m a bad person. I don’t. I’m not. There’s just a monster inside me. And he’s the bad one. Mr. Hyde, my alter ego, my Id, Night Me, Murder Voltron, whatever he/it is, it’s there. I don’t know why, or how it got there, running the front office, but it’s alive and well, and I’ve just about given up trying to keep it down. Yeah, I’m part monster, but I’m also part human, so I have to rationalize all parts of me. I’ve thought about why I am this way. First off, I suffered a preponderance of head injuries at the hands of my older brother when I was a kid who unwisely demanded the top bunk. He’d start laughing at something, I’d hang my head down from the top to see what had him in stitches, he’d grab me by the scruff of my neck, yank me over the edge and I’d land on my head. I was such a sucker. I fell for it every time. Me crying in the kitchen in my PJ’s with an icepack on my forehead was a common sight. Knowing what we know with these suicidal NFL players, my self-diagnosis is that it must have knocked something (or possibly everything) loose. Second, I’m based out of L.A. Everyone there pretends everything’s going great. They always have some project, on the verge of “making it”, but if you ask me, they’re all self-made orphans chasing an impossible dream, leapfrogging from one lily pad of a project to the next, and just one SIG alert away from homicide themselves. But I think the biggest thing that shaped me was the decade I spent in the service industry before I finally started paying the bills with jokes. The service industry does a lot of damage to a person. Outwardly, it makes you subservient: opening doors, serving plates, clearing plates, taking orders, custom tailoring those orders, fulfilling needs, wants, letting people cut in front of you, being patient, smiling, cleaning puke, sending food back cause it wasn’t warm enough, enduring insults, pretending you don’t hear them talking about you and how short you are and you tell yourself that you’re not a duck in a shooting gallery, listening to them chew, and breathe and gulp and belch and pretending you like them; just basically getting psychically butt-fucked by these garbage human consumer strangers because they might give you a tip for eight plus hours a day, five nights a week. To this day, if a guy is washing his hands next to me I’ll hurry to dry my hands first so I can get some paper towels into his wet hands. That is real shit. I hate myself for it. I have conditioned myself to “be in service to”. To be second. To not Receive. That’s what happens to you on the outside. Fuck, I can taste the bile rising right now. I should really try that Kabbalah shit. But the red string. People would know… Inwardly, the industry makes you hate people. Restaurant workers; they’re not the only ones. Anyone dealing with the public in large enough quantities will eventually hate people if they have a brain in their heads. Why do you think cops rough people up, or flat out shoot them? Nurses and doctors abuse their patients? It’s no mystery. The general public sucks out loud. They come in and buy shit. They demand shit- unhappy with this/that; they make you dance like an organ grinder’s monkey. They’re not at work. They’re leisurely drinking. They have better clothes than you. You hear about their job, their vacation in Hawaii, how they’re closing on the second home, can they have some water, you hear the dumb shit guys say to hot girls, and even though it’s so mundane, you watch them leave together, and you’re stuck behind this literal and metaphorical bar, waiting till these people you’ve turned into retarded infants stumble home so you can clean up after all of them, count what little money they deemed you worthy of and go home yourself. All the while knowing some Neanderthal bro bore is balls-deep in some sugar walled beef sleeve. You find yourself secretly wishing you pass a drunk-driving accident on the way home that you hopefully contributed to, so there’s a few less of them. A culling of the cheap zombie-minded assholes who haunt your sleep. I never know if I’m making myself clear. Let me make sure. They are fucking awful gross rude meat skeletons stumbling around naked under their brand names trying to fuck and be fucked, but need to be drunk in order to connect and leave a swath of social destruction in their paths in the process. So, yeah, a decade builds up. I went from being a party-going extrovert to a self-isolating Hobbit (yes, that’s a short joke) forever cursed to quietly traffic in this jaded human taxonomy. I could only tolerate relating to people with the protection of some sort of barrier. First a bar. Now a stage. And I think the last thing you should know about me is that I try to only kill people who really should be killed. I really do. There’s a lot of two-legged colostomy bags out there, and I think the fact that society believes that we’re all supposed to tolerate them is a bigger crime than me taking out the proverbial trash. End of Disclaimer. I’m now buck-naked and rock hard as I wind butcher paper around her plastic-wrapped arms, and pack them into my empty suitcases. The layers of plastic and paper keep the Samsonites from leaking - and they look like cuts from the butcher shop in the X-Ray as long as you cut off at the joints, then in between the limbs. Sectioning each arm and leg into four wings and drumsticks suffices, and you have to split the hands and feet at least in half the long way. If you have the time, cleaving them into three is ideal. You never know if there’s a former hall monitor who’s still a virgin watching those screens. Oh, and I personally like to treat myself after a kill. After all that labor-intensive bone sawing, I save the breasts and ass for the end. It find it super enjoyable to carve ‘steaks’ out of those. I like to play around with them; try to really mimic the cuts I see at the grocery store. Obviously, I start with top rounds, move to sirloin, then to filets, rib eyes and I’m currently perfecting my New York Strip. It’s weird, because I’ve never considered myself artistic. Before I discovered an aptitude for carving human flesh into imitation beef steaks, I’d only really experimented with creating temporary art in a way only I could personally appreciate. I mean that literally. I started doing it when I was young, and I’m a little ashamed to admit I continue to do it to this day. Whenever a man urinates, it creates bubbles in the toilet water, and conversely, that stream in turn bursts those bubbles. I discovered if I whipped my bubble making pee shooter to and fro fast enough, I could use the shitter’s round shape as a globe and form my piss bubbles to create a bubbly map of North and South America. As I got better, I was able to use the rest of my pee stream to cut across the Atlantic and get going on the Iberian Peninsula. As my geographical knowledge and alcohol abuse escalated, I tackled Africa and the Sub Asian region. And, I’ll be even more honest. Once I learned men could do Kegels, I created a regimen and set upon my still-unrealized goal of mastering Southeast Asia. Between natural disasters, political power dynamics and the sheer urethral discipline it requires, I wonder if this endeavor is a folly of my yawning stupidity, or my personal Golden Fleece (intended) I will someday attain. I honestly don’t know. Once you break the seal and let the pee stream out, it’s so hard to squeeze it off to dot the toilet water’s ocean with a Sri Lanka. I do have self-awareness. I fully admit it’s a juvenile, yet fluid art form. Crickets, huh? Sometimes jokes are a numbers game. And there goes the shin. This girl got her calcium for sure. I always travel with empty luggage. Obviously, the Monster needs the space. No, I don’t keep the meaty bones as trophies. I’m not that sick. We’ll get there, just give me a minute. It comes down to the ‘evidence problem’. It’s an easy fix since I’m pretty basic with my fashion choices. The shitty towns we perform in usually have bargain basement stores and Wal-Marts, and it’s just safer to buy twenty dollar jeans and eight dollar shirts that I’m going to throw away anyway after the Monster has his way with me. If fashion choices dictate fate, it really explains why I’m here. I give the room a quick sweep with a black light on luminol to see if I missed anything. How do I have luminol? It’s amazing what you can get from drunken LA cops when you tell them you’re a writer working on a crime movie and offer them the promise of a consulting credit and fee when principal photography commences. Her head fucking spurted all over the ceiling. Thank God I lined that with sheeting. I fucking despise this part. The cleaning. Serial Killers get caught cause they’re sloppy, or if they don’t mix it up. You gotta keep it fresh. The MO, the victimology. It’s just like comedy. Look at Ron White. It’s the same set. Every time. “I got thrown out of a bar…” You gotta come up with new material to stay ahead of the game. We’ve all said it when it comes to dating: “So and so’s not my type.” It only proves that people do have a type, and because of that, serial killing and dating have a lot in common. Have you seen Reggie Bush’s girlfriends since Kim Kardashian? Three Words. Single Armenian Female. Scary, right? The Yorkshire Ripper: always sex workers, always a hammer, knife and screwdriver. John Bunting: gays or pedophiles, always beating, toe crushing and strangulation. Herb Baumeister: gays and drowning. Ted Bundy: bludgeoning, strangling and necrophilia, and he went for cute girls. That one friend you have who only dates Asian chicks. Actually, once, I dated an Asian chick. We’d have sex but I’d be horny twenty minutes later. Hey Now! I could go on, but you get the point. They look for patterns. The key is to not have one. This is why I don’t worry. I’m pretty sure the FBI doesn’t have a profile for a murderer of the “People Who Fucking Suck” demographic. And, I’m not “the Husband” or the “Ex” or the “Co-Worker”. I’m not “The Quiet Guy Next Door”. I’m a comic who performs on stage. In different cities. Good Christ, I open for Riley Rock, who, if it weren’t for a few movie and TV credits and his own short-lived TV show forever ago he’d be just as invisible as me. Riley Rock is the guy you see at the club and think, “Hey, isn’t that the guy from that show where he works with the dad sometimes?” Fuck him. Wait, where was I? Oh yeah. Cleaning. I wish I was the “Neat Monster” Dexter was, but that’s a work of fiction. I’m way too lazy. My apartment looks like a 10 year old with a job lives there. I have that crippling brand of OCD where everything’s a mess and I have trouble venturing outside. So, I prepare up front. Plastic, plastic, plastic! I can’t stress it enough. Saves so much time at the end. You just saw, wrap and go. This would be the greatest infomercial ever. Saw, Wrap and Go with the new…nah, that’s a shit premise. I work the saw rhythmically above the left knee. Fuck this bitch has some quads. Must be one of those cross-fit cunts. One more reason to have offed her. My ass crack is sweaty. Keep on a-workin’. Eff you, I’m in the South. Lemme indulge.

0 notes
Text
Humbug.
(3am on Sunday morning, I’ve skimmed the headlines, social mobility department walk-out, concerns about the long-term functionality of multi-academy trusts, and mental health support ‘available in all schools by 2020.’ I have opinions, but they’re too close to the bone.)
Merry Christmas Theresa-Ebeneezer.
The Facebook friend who always posts that she finishes her Christmas shopping and wrapping by the end of November has put up her usual “BOOM! Done!” status, other people are posting putting up trees. My inconsiderate, bin-stealing neighbours put up their blue-flashing outdoor lights last weekend, it’s a month-long migraine. Another former colleague Facebook-posted her shock at seeing a shoplifter ‘tackled’ by security, and then expressed her concern that the woman was stealing Christmas presents, socks and toiletry gift-sets. I’m not shoplifting, because I don’t ‘do’ Christmas.
“I don’t celebrate Christmas.” is enough to close-down most of the superficial “What are you doing for...?” and “Would you like to come...?”, when the initial “Nothing.” and “No, thank you.” responses aren’t accepted. Tell people you don’t celebrate Christmas, and they tend to assume you’re a Jehovah’s Witness, they bugger off before you start trying to ‘convert’ them. There was a tongue-in-cheek Guardian article a couple of days ago, about turning down invitations, and how to sneak away from parties you didn’t want to go to in the first place.
I’ve never liked Christmas. Aside from my ranting that it’s a sterilised bastardisation of a pagan festival, claimed by Christianity, to suit their calendar, the commercialisation and the compulsion are what really irk me. (Side-rage about a former colleague, who had a Christmas spreadsheet shared with her husband. “I’ve put this ring on, but I don’t really want it, what if he buys me that? Is £300 too much for a ring, do you think?” That’s how they choose to live their lives, it’s none of my business, it only irritated me so much because she kept squawking on about it when I was trying to work.) Most people are more materialistic than I am, nobody’s ‘right’ or ‘wrong’. The ‘expectation’ among some children and adults infuriates me, whether that’s adults ‘hinting’ to partners on Facebook, or the inevitable slew of sulky children posting “Worst Christmas ever, my life is ruined!” when they open the ‘wrong’ iPhone.
For the better part of 2 decades, I told the in-laws not to buy me anything for Christmas. 17 or 18 years later, they were still giving me a jumper two sizes too big, and two pairs of tights. I don’t wear tights, and I loathe jumpers that touch my throat. “The bill’s in the bag, if you want to swap it!” One year, I swapped the jumper for a slow-cooker. It genuinely would have been easier for all concerned if they paid any attention at all to me saying I didn’t want anything, because I REALLY didn’t want tights and a jumper. I wonder if, now my son is 19, they’ve stopped pestering him, from September, to tell them what he wants for Christmas? He’s cut from the same cloth as me, he doesn’t ‘want’ much, and when he decides he really needs something, he buys it himself. Thank the Gods for Steam vouchers.
The ex was quite materialistic, and hideously susceptible to advertising. The bastard ‘Furby’ ended up in the shed after a while, the batteries ran down, and it started making random spooky noises. The ex played with the ‘Robosapien’ more than the kid did, after I’d been scouring the internet for weeks to find one. I shudder to think what assorted tat he’ll present the boy with this year, last year he bought him a £100 coat, a scarf, and I think the camping-filtration water bottle. “Thanks, Dad, now I can have clean drinking water wherever I am!” (The water bottle might actually have been the previous Christmas, either way, it’s at the back of one of my cupboards, because it’s of no real practical use, and the kid sees no point in buying replacement filters for it.)
I was absorbed into that family, with the “You’ve GOT TO, it’s Christmas!” mentality. I don’t have to do anything, I especially don’t-have-to sit at a table where people chew with their mouths open, eat food from each other’s plates, and that one unfortunate nephew tries to eat all of the mashed potato. Seriously, I’ve seen hungry dogs eat more slowly, and with fewer sound-effects. “Have a bit more!”, no thank you, it’s quite uncomfortable enough just being here, without entering into an eating competition, I don’t need to stuff myself until I’m distended, and I know which serving dishes you’ve touched with your eating utensils.
I don’t have to go there this year, but I’ve probably complicated my own life by appearing in public, at my brother’s wedding party, I was productively invisible until I did that. I’ve had more contact with my family in the last month than I did over the last 20 years. I’ll be politely declining well-meaning invitations soon enough, because of the ingrained assumption that nobody should be alone at Christmas. I do see the point for people who don’t want to be alone, and it’s heartwarming to see initiatives popping up for people who want to share food and company, I’m just not one of those people.
I imagine my sister-in-law will be the most forceful, and I will have to play the brain damage card with her, because she simply won’t understand the don’t-want-to explanation. The sensory overload with my brain injuries is a constant background-battle, lights, sounds, smells, ‘normal’ environments are exceptionally stressful and painful for me now. My maternal half-sister might be difficult, but I think she’ll eventually accept my reasoning. I’m not expecting either of my parents to push the point too far, they both know why I cut contact with them. The paternal half-sister probably doesn’t know the back-story, again, I’ll use the medical angle when she suggests a pub-lunch over the holiday period, which I suspect she will. I’m not sure whether Porsche-man will have another go at ‘involving’ me with his version of Christmas, I think I was direct enough with him that doing ‘nothing’ for Christmas didn’t mean there was a gap he was obligated to fill.
The boy will most probably go to his Dad’s for Christmas Eve, and to the in-laws for Christmas day lunch. I’ve already ‘spoiled’ his Yule-box, by telling him he’s essentially getting a food-parcel, and a recent text message, asking me if I liked Bombay Sapphire gin will probably have been his Dad, or Grandparents, ‘stuck’ on what to buy me. (Absolute CRINGE at the year the ex sent me into every shop in the village to look for ‘proper’ Bailey’s, saying it was for his Grandma, and then presented the Bailey’s, wrapped in a carrier-bag and Gaffa-tape to me. I don’t like Bailey’s, and could have bought multiple bottles of wine with the £16 that came out of my bank account anyway.) I’ll chuck a bit more rubbish in amongst the noodles and canned goods, slightly smirking at the year he asked “Mother, did you just ram-raid the pound shop for all of this?”, and the year he was disproportionately excited about a pound-shop version of the ‘JML bobble-off.’ Rubbish is ‘our’ tradition, and I’ll probably put that tin of Moose soup in again, I think he’s had that about four years in a row, now, oh, and that football I found in the garden, that’s still mostly wrapped from last year, he peeled back a bit of the paper, and said something quite rude to me.
The kid and I aren’t Christian, so there’ll be no midnight mass, or church-related activity of any kind. We’re not particularly consumerist, he’ll see the practicality of the food-parcel, because he cocked up his student finance application, so has less disposable income this year. What we’re both going to have to deal with in our own way is the compulsion, with other people telling us what we have to do, “because it’s Christmas.” He likes his grandparents, even though they’re both a bit deaf, and both refuse to wear their hearing aids, they’re both a bit dim-racist, and very old-fashioned in their perspectives on a lot of other things, too. I’ll support him in whatever he wants to do, even if that means he stays here with me, coating the furniture in popcorn, and slurping his tea. (Yes, he does, and I do want to cause him physical harm when he does it.)
No tinsel, no fairy-lights, no plastic tree. With both of my parents now knowing where I live, there’s a chance they might send Christmas cards, I hope they’re not glittery ones, I hate glitter. The kid finishes his university term on the 15th of this month, so he’ll probably be back with me some time between then and the 17th, until his next term starts on January 15th. ‘Probably’ because he’s dependent on the ex for transport with his multiple bags of stuff, and the ex does what he wants, when he wants to, regardless of any plans other people might have. I’ll sacrifice the relative order of the house for a month, and probably do a fair bit of leaving-the-room when the kid slurps tea, or puts that tedious Dungeons and Dragons role-play thing on TV. (Seriously, some of the broadcasts are five hours long, he’ll sit, for five hours, watching other people play Dungeons and Dragons.) I’ve been stock-piling food for months, we won’t starve, but we might end up eating a lot of potatoes. I’ll schedule a ‘big shop’ just before he’s due back, and have the ‘difficult conversation’ with him that I have very limited funds available for top-up shopping, so, if we do re-watch any of our box-sets, we can’t really play the drinking games any more. (It did get a bit dangerous at one point, when we were watching GoT, and decided that ‘horse’, and ‘legs’ were rules, as well as ‘naked’, ‘death’, and ‘full title.’)
I don’t ‘have to’ put decorations up, I don’t ‘have to’ attend any gatherings or events, as much as some family members might want to take pity on the poor spinster aunt. I know they’ll only make the invitations because they care, and because they worry, but that’s their world, not mine. I’ll goof about with the boy in my world, we’ll try not to get on each other’s nerves too much, with me falling asleep in the evenings, and him not going to bed until the early hours of the morning. We’re both very bad at eating, and both have a tendency to ‘save’ the best of the food for the other, I’ll have to steer on that, there’s a lobster in the freezer, and I might put a frozen chicken in the next grocery order, if I can condense-down the un-labelled containers of ‘brown stuff’ to make enough room. It’s not the biggest goose in the butcher’s window, and “You, boy, what day is this?” has no meaning any more. I don’t need to play Bob Cratchitt, and ask Mr Scrooge for another lump of coal, because I’m wearing four jumpers, the kid doesn’t feel the cold as much as I do, but, if I catch him wearing his dressing-gown over his clothes, I’ll turn the electric heaters on.
My family can take the roles of ‘Christmas Past’, and stay there, the kid is my ‘Christmas Present’, I don’t know what ‘Christmas Future’ will play out to be, I wouldn’t want to, as much as I hate not-knowing, there are some things I’d rather not know.
0 notes
Text
Tips on How to Remove Old Shower Tile
As you might have already picked up on previous posts, my Instagram, or if you just have a pretty awesome streak of ESP this week, I’ve decided that my master bathroom is finally going to get my focus this summer. It’s not going to be just my floor that gets some tile help, though — I’m redoing the shower, too!
But before I get into the whole do-it-yourself project of how to tile a new shower (I’ve actually already had some trial and error in the last week I need to share with you, and I’m trying to shoot some video too!), there’s a part of this whole process that I really have a fondness for: DEMO… DEMO… DEMO
However!
Demo isn’t just jump right in, hammers a-swingin’ — if you want to remove an old tiled shower properly and efficiently, you are probably going to need this handy list of tips. Not because I don’t think you aren’t perfectly capable of figuring this out on your own (and a lot of it is common sense, really), but because the temptation to swing a hammer at ugly tile you can’t wait to remove is VERY hard to resist. So, you might be a little premature (like I was) and get all giddy from seeing the tile fall off the wall and ignore some important stuff. These tips will not only help you from damaging the things you don’t want to, but it will prepare yourself a little more than I did to avoid injury.
Affiliate links may be used in this post when linking to products I recommend. Thank you for supporting this site!
How to Demo A Tiled Shower — Effectively and Quickly!
Protect the Tub
In my case, I wanted to keep the tub. So, I laid down some old sheets and taped up the edges with painter’s tape to give the tiles something to land on. The tiles may not seem razor sharp, but if it breaks at a weird angle, it can still chip the tub below. Even if you don’t plan on keeping the tub and want to sell it or something, it’s still better to sell it damage-free. And don’t forget to plug the drain with something!
Start at the Edges
This seems obvious, but outside > in works best. If your shower is as old as mine, you might even have some looser tiles around the tub base and can start there first (and note to self: any areas you find water damage or areas of the tub where water tends to drip should be spots you’re sure to waterproof when you install new tile).
Hammer a Putty Knife at Grout Lines
One of the things I least expected was that using a putty knife blade (more specifically, one of those 6-in-1 painter’s tools) along grout lines and hammering on the end of the handle (sort of like a chisel) before trying to pry at each tile seemed very effective. I tried it mainly out of curiosity at first. My impression was that the tiles were still stuck on pretty well, but I assume the hammering at weak points created enough vibrations to fracture underlying spots of old thinset and grout. I only know that this was more effective than not because I started secretly (aka, unbeknownst to him, but for my own demolishing pride) competing with a very helpful bearded dude who was removing tile on the opposite side of the shower* — I wound up smoking his ass in demo. He swore it was only because I had the better putty knife, and while I can’t deny that I used a better quality tool, after a while he wanted me to whack at the grout lines on his side when mine started coming off in larger chunks.
*And yes, this is how we do date night sometimes, and I really like that we haven’t tried to stab each other with so many weapons tools at our disposal to do so (so far). There were plenty of “this is not how I pictured being in the shower together” jokes made that night.
Wear Protection
You know I’m laughing at myself for yet again having a suggestive tip for DIY, but honestly: if you are regularly doing DIY or woodworking projects and you don’t find yourself thinking “that’s what she said” at least once during each project, you might be doing something wrong. Or don’t have my sense of humor. Or aren’t in the U.S. and haven’t watched The Office (in the British version I’m pretty sure it was “said the actress to the bishop”).
But anyway, back to the important tip: wear ear protection, eye protection, and proper clothing. Hitting anything with a hammer in general tends to be noisy, and tile and grout in particular is very loud. And even if your removal is perfect, tile will chip and send little bits flying, like in parts of the room that might also contain an eye or two. In my case, I wound up with a bloody calf.
…
… (allowing those of you time to scroll past this spot if you don’t like the sight of blood or feet)
It was a small cut, and due to all of the debris falling, it didn’t register that I had been cut until after I was outside about thirty minutes later and felt my leg itching (then looked down and saw that I had been bleeding). It was small and easily dealt with, but still rather surprising! In hindsight, I probably should have worn pants instead of shorts (it’s Georgia summer, though — it’s shorts weather unless something has the potential to be really dangerous). Though now is a pretty good time to remind you guys to be up to date on all of your shots (like a tetanus booster… it’s easy to forget, but if you’re around rusty things and friends having babies like I am, use your friend’s kid’s birthday as a quick reminder of whether or not it’s been less than five years since you got a Tdap update, since you can get tetanus and whooping cough knocked out in one swoop).
Score, Then Hammer Old Drywall
I suppose a person could potentially reuse the old drywall, but with mine so wrecked from old tile adhesive, the easier approach seemed to be to replace the damaged areas. So, we tore into the old drywall with a hammer (so satisfying!) and then broke down the larger pieces for the trash.
To get a clean edge, I first scored the drywall with one of my favorite heavy duty utility knife and then made deeper cuts until it broke away.
Oh – and be mindful of pipes and other things. I reached a stubborn section and realized there was duct work behind the wall, so I’m really glad I wasn’t too aggressive with the hammer. As you weaken each section, the drywall will start to just fold off in pieces.
Take Out Nails/Screws
My house has nails holding up the drywall (this house was built in the early 80’s, so pretty much a house that had a lot of bare-minimum, “I’m going on a break in 5”-type of quality as it was built — if you remember the backyard sinkhole project, you’re already aware of the types of things these guys got away with!), so I had to pry them all out of the studs after the drywall panels came off. The only ones I left were around the bottom near the tub. These seemed to be where the original drywaller rested the old drywall to nail it in, creating a small gap above the tub and wall (this gap is later covered up by the first row of tile, but its function is to help prevent water from wicking up the drywall from the lip and corners of the tub). So, I planned to use the same nails to help me install the new board and give me something to prop it on.
Another thing I noticed that seemed kind of odd? The builders also used glue on the drywall when it came in contact with the studs, but not on most studs or on studs where it might make the most sense (such as near a pipe, where you might not want to chance the nail going in the wrong place). I haven’t really seen this before, so I even texted a couple of DIY buddies and they all thought it was weird, too. If someone has the answer on that, do tell!
Do Some Research
Here’s where I almost failed: I saw that the drywall I was taking out was the moisture-resistant kind, also commonly known as “greenboard” (called that because it’s covered in color-coded green paper to distinguish it from regular drywall). So, I assumed that to begin my new shower, all I needed to do was replace like for like and put it back in. I even did it and started taping the seams:
Except I also knew about waterproofing materials being a thing I’ve seen other people using in DIY projects, and after buying some of it and reading the instructions, I realized that greenboard is actually outdated (and even no longer up to code) for putting in a shower because it often still has moisture problems. I wound up calling a few friends for advice before ripping out the new greenboard and putting cement backerboard in instead. It was not a fun hiccup, considering that these materials are heavy and cumbersome when you want to hang them! But, at least I caught my own mistake before tiling over it or having to rip it out after waterproofing.
Alrighty… so I’ll leave this post as-is for now, but more posts are on their way! Any of your own tips to share? We’ve still got how-tos on replacing the drywall, waterproofing, tiling, and several videos I haven’t even had time to edit yet but I’ve committed to making, so I’m sure I’ll regret that decision later. And on Friday, I’ll cover a trip I took last month that serendipitously inspired my new tile choice. Stay tuned for all of that… definitely more to come.
The post Tips on How to Remove Old Shower Tile appeared first on The Ugly Duckling House.
Website // Subscribe // Advertise // Twitter // Facebook // Google+
Tips on How to Remove Old Shower Tile published first on http://ift.tt/2qxZz2j
0 notes
Text
Tips on How to Remove Old Shower Tile
As you might have already picked up on previous posts, my Instagram, or if you just have a pretty awesome streak of ESP this week, I’ve decided that my master bathroom is finally going to get my focus this summer. It’s not going to be just my floor that gets some tile help, though — I’m redoing the shower, too!
But before I get into the whole do-it-yourself project of how to tile a new shower (I’ve actually already had some trial and error in the last week I need to share with you, and I’m trying to shoot some video too!), there’s a part of this whole process that I really have a fondness for: DEMO… DEMO… DEMO
However!
Demo isn’t just jump right in, hammers a-swingin’ — if you want to remove an old tiled shower properly and efficiently, you are probably going to need this handy list of tips. Not because I don’t think you aren’t perfectly capable of figuring this out on your own (and a lot of it is common sense, really), but because the temptation to swing a hammer at ugly tile you can’t wait to remove is VERY hard to resist. So, you might be a little premature (like I was) and get all giddy from seeing the tile fall off the wall and ignore some important stuff. These tips will not only help you from damaging the things you don’t want to, but it will prepare yourself a little more than I did to avoid injury.
Affiliate links may be used in this post when linking to products I recommend. Thank you for supporting this site!
How to Demo A Tiled Shower — Effectively and Quickly!
Protect the Tub
In my case, I wanted to keep the tub. So, I laid down some old sheets and taped up the edges with painter’s tape to give the tiles something to land on. The tiles may not seem razor sharp, but if it breaks at a weird angle, it can still chip the tub below. Even if you don’t plan on keeping the tub and want to sell it or something, it’s still better to sell it damage-free. And don’t forget to plug the drain with something!
Start at the Edges
This seems obvious, but outside > in works best. If your shower is as old as mine, you might even have some looser tiles around the tub base and can start there first (and note to self: any areas you find water damage or areas of the tub where water tends to drip should be spots you’re sure to waterproof when you install new tile).
Hammer a Putty Knife at Grout Lines
One of the things I least expected was that using a putty knife blade (more specifically, one of those 6-in-1 painter’s tools) along grout lines and hammering on the end of the handle (sort of like a chisel) before trying to pry at each tile seemed very effective. I tried it mainly out of curiosity at first. My impression was that the tiles were still stuck on pretty well, but I assume the hammering at weak points created enough vibrations to fracture underlying spots of old thinset and grout. I only know that this was more effective than not because I started secretly (aka, unbeknownst to him, but for my own demolishing pride) competing with a very helpful bearded dude who was removing tile on the opposite side of the shower* — I wound up smoking his ass in demo. He swore it was only because I had the better putty knife, and while I can’t deny that I used a better quality tool, after a while he wanted me to whack at the grout lines on his side when mine started coming off in larger chunks.
*And yes, this is how we do date night sometimes, and I really like that we haven’t tried to stab each other with so many weapons tools at our disposal to do so (so far). There were plenty of “this is not how I pictured being in the shower together” jokes made that night.
Wear Protection
You know I’m laughing at myself for yet again having a suggestive tip for DIY, but honestly: if you are regularly doing DIY or woodworking projects and you don’t find yourself thinking “that’s what she said” at least once during each project, you might be doing something wrong. Or don’t have my sense of humor. Or aren’t in the U.S. and haven’t watched The Office (in the British version I’m pretty sure it was “said the actress to the bishop”).
But anyway, back to the important tip: wear ear protection, eye protection, and proper clothing. Hitting anything with a hammer in general tends to be noisy, and tile and grout in particular is very loud. And even if your removal is perfect, tile will chip and send little bits flying, like in parts of the room that might also contain an eye or two. In my case, I wound up with a bloody calf.
…
… (allowing those of you time to scroll past this spot if you don’t like the sight of blood or feet)
It was a small cut, and due to all of the debris falling, it didn’t register that I had been cut until after I was outside about thirty minutes later and felt my leg itching (then looked down and saw that I had been bleeding). It was small and easily dealt with, but still rather surprising! In hindsight, I probably should have worn pants instead of shorts (it’s Georgia summer, though — it’s shorts weather unless something has the potential to be really dangerous). Though now is a pretty good time to remind you guys to be up to date on all of your shots (like a tetanus booster… it’s easy to forget, but if you’re around rusty things and friends having babies like I am, use your friend’s kid’s birthday as a quick reminder of whether or not it’s been less than five years since you got a Tdap update, since you can get tetanus and whooping cough knocked out in one swoop).
Score, Then Hammer Old Drywall
I suppose a person could potentially reuse the old drywall, but with mine so wrecked from old tile adhesive, the easier approach seemed to be to replace the damaged areas. So, we tore into the old drywall with a hammer (so satisfying!) and then broke down the larger pieces for the trash.
To get a clean edge, I first scored the drywall with one of my favorite heavy duty utility knife and then made deeper cuts until it broke away.
Oh – and be mindful of pipes and other things. I reached a stubborn section and realized there was duct work behind the wall, so I’m really glad I wasn’t too aggressive with the hammer. As you weaken each section, the drywall will start to just fold off in pieces.
Take Out Nails/Screws
My house has nails holding up the drywall (this house was built in the early 80’s, so pretty much a house that had a lot of bare-minimum, “I’m going on a break in 5”-type of quality as it was built — if you remember the backyard sinkhole project, you’re already aware of the types of things these guys got away with!), so I had to pry them all out of the studs after the drywall panels came off. The only ones I left were around the bottom near the tub. These seemed to be where the original drywaller rested the old drywall to nail it in, creating a small gap above the tub and wall (this gap is later covered up by the first row of tile, but its function is to help prevent water from wicking up the drywall from the lip and corners of the tub). So, I planned to use the same nails to help me install the new board and give me something to prop it on.
Another thing I noticed that seemed kind of odd? The builders also used glue on the drywall when it came in contact with the studs, but not on most studs or on studs where it might make the most sense (such as near a pipe, where you might not want to chance the nail going in the wrong place). I haven’t really seen this before, so I even texted a couple of DIY buddies and they all thought it was weird, too. If someone has the answer on that, do tell!
Do Some Research
Here’s where I almost failed: I saw that the drywall I was taking out was the moisture-resistant kind, also commonly known as “greenboard” (called that because it’s covered in color-coded green paper to distinguish it from regular drywall). So, I assumed that to begin my new shower, all I needed to do was replace like for like and put it back in. I even did it and started taping the seams:
Except I also knew about waterproofing materials being a thing I’ve seen other people using in DIY projects, and after buying some of it and reading the instructions, I realized that greenboard is actually outdated (and even no longer up to code) for putting in a shower because it often still has moisture problems. I wound up calling a few friends for advice before ripping out the new greenboard and putting cement backerboard in instead. It was not a fun hiccup, considering that these materials are heavy and cumbersome when you want to hang them! But, at least I caught my own mistake before tiling over it or having to rip it out after waterproofing.
Alrighty… so I’ll leave this post as-is for now, but more posts are on their way! Any of your own tips to share? We’ve still got how-tos on replacing the drywall, waterproofing, tiling, and several videos I haven’t even had time to edit yet but I’ve committed to making, so I’m sure I’ll regret that decision later. And on Friday, I’ll cover a trip I took last month that serendipitously inspired my new tile choice. Stay tuned for all of that… definitely more to come.
The post Tips on How to Remove Old Shower Tile appeared first on The Ugly Duckling House.
Website // Subscribe // Advertise // Twitter // Facebook // Google+
via Primary Ideas http://ift.tt/2tqY9eG
0 notes
Text
Tips on How to Remove Old Shower Tile
As you might have already picked up on previous posts, my Instagram, or if you just have a pretty awesome streak of ESP this week, I’ve decided that my master bathroom is finally going to get my focus this summer. It’s not going to be just my floor that gets some tile help, though — I’m redoing the shower, too!
But before I get into the whole do-it-yourself project of how to tile a new shower (I’ve actually already had some trial and error in the last week I need to share with you, and I’m trying to shoot some video too!), there’s a part of this whole process that I really have a fondness for: DEMO… DEMO… DEMO
However!
Demo isn’t just jump right in, hammers a-swingin’ — if you want to remove an old tiled shower properly and efficiently, you are probably going to need this handy list of tips. Not because I don’t think you aren’t perfectly capable of figuring this out on your own (and a lot of it is common sense, really), but because the temptation to swing a hammer at ugly tile you can’t wait to remove is VERY hard to resist. So, you might be a little premature (like I was) and get all giddy from seeing the tile fall off the wall and ignore some important stuff. These tips will not only help you from damaging the things you don’t want to, but it will prepare yourself a little more than I did to avoid injury.
Affiliate links may be used in this post when linking to products I recommend. Thank you for supporting this site!
How to Demo A Tiled Shower — Effectively and Quickly!
Protect the Tub
In my case, I wanted to keep the tub. So, I laid down some old sheets and taped up the edges with painter’s tape to give the tiles something to land on. The tiles may not seem razor sharp, but if it breaks at a weird angle, it can still chip the tub below. Even if you don’t plan on keeping the tub and want to sell it or something, it’s still better to sell it damage-free. And don’t forget to plug the drain with something!
Start at the Edges
This seems obvious, but outside > in works best. If your shower is as old as mine, you might even have some looser tiles around the tub base and can start there first (and note to self: any areas you find water damage or areas of the tub where water tends to drip should be spots you’re sure to waterproof when you install new tile).
Hammer a Putty Knife at Grout Lines
One of the things I least expected was that using a putty knife blade (more specifically, one of those 6-in-1 painter’s tools) along grout lines and hammering on the end of the handle (sort of like a chisel) before trying to pry at each tile seemed very effective. I tried it mainly out of curiosity at first. My impression was that the tiles were still stuck on pretty well, but I assume the hammering at weak points created enough vibrations to fracture underlying spots of old thinset and grout. I only know that this was more effective than not because I started secretly (aka, unbeknownst to him, but for my own demolishing pride) competing with a very helpful bearded dude who was removing tile on the opposite side of the shower* — I wound up smoking his ass in demo. He swore it was only because I had the better putty knife, and while I can’t deny that I used a better quality tool, after a while he wanted me to whack at the grout lines on his side when mine started coming off in larger chunks.
*And yes, this is how we do date night sometimes, and I really like that we haven’t tried to stab each other with so many weapons tools at our disposal to do so (so far). There were plenty of “this is not how I pictured being in the shower together” jokes made that night.
Wear Protection
You know I’m laughing at myself for yet again having a suggestive tip for DIY, but honestly: if you are regularly doing DIY or woodworking projects and you don’t find yourself thinking “that’s what she said” at least once during each project, you might be doing something wrong. Or don’t have my sense of humor. Or aren’t in the U.S. and haven’t watched The Office (in the British version I’m pretty sure it was “said the actress to the bishop”).
But anyway, back to the important tip: wear ear protection, eye protection, and proper clothing. Hitting anything with a hammer in general tends to be noisy, and tile and grout in particular is very loud. And even if your removal is perfect, tile will chip and send little bits flying, like in parts of the room that might also contain an eye or two. In my case, I wound up with a bloody calf.
…
… (allowing those of you time to scroll past this spot if you don’t like the sight of blood or feet)
It was a small cut, and due to all of the debris falling, it didn’t register that I had been cut until after I was outside about thirty minutes later and felt my leg itching (then looked down and saw that I had been bleeding). It was small and easily dealt with, but still rather surprising! In hindsight, I probably should have worn pants instead of shorts (it’s Georgia summer, though — it’s shorts weather unless something has the potential to be really dangerous). Though now is a pretty good time to remind you guys to be up to date on all of your shots (like a tetanus booster… it’s easy to forget, but if you’re around rusty things and friends having babies like I am, use your friend’s kid’s birthday as a quick reminder of whether or not it’s been less than five years since you got a Tdap update, since you can get tetanus and whooping cough knocked out in one swoop).
Score, Then Hammer Old Drywall
I suppose a person could potentially reuse the old drywall, but with mine so wrecked from old tile adhesive, the easier approach seemed to be to replace the damaged areas. So, we tore into the old drywall with a hammer (so satisfying!) and then broke down the larger pieces for the trash.
To get a clean edge, I first scored the drywall with one of my favorite heavy duty utility knife and then made deeper cuts until it broke away.
Oh – and be mindful of pipes and other things. I reached a stubborn section and realized there was duct work behind the wall, so I’m really glad I wasn’t too aggressive with the hammer. As you weaken each section, the drywall will start to just fold off in pieces.
Take Out Nails/Screws
My house has nails holding up the drywall (this house was built in the early 80’s, so pretty much a house that had a lot of bare-minimum, “I’m going on a break in 5”-type of quality as it was built — if you remember the backyard sinkhole project, you’re already aware of the types of things these guys got away with!), so I had to pry them all out of the studs after the drywall panels came off. The only ones I left were around the bottom near the tub. These seemed to be where the original drywaller rested the old drywall to nail it in, creating a small gap above the tub and wall (this gap is later covered up by the first row of tile, but its function is to help prevent water from wicking up the drywall from the lip and corners of the tub). So, I planned to use the same nails to help me install the new board and give me something to prop it on.
Another thing I noticed that seemed kind of odd? The builders also used glue on the drywall when it came in contact with the studs, but not on most studs or on studs where it might make the most sense (such as near a pipe, where you might not want to chance the nail going in the wrong place). I haven’t really seen this before, so I even texted a couple of DIY buddies and they all thought it was weird, too. If someone has the answer on that, do tell!
Do Some Research
Here’s where I almost failed: I saw that the drywall I was taking out was the moisture-resistant kind, also commonly known as “greenboard” (called that because it’s covered in color-coded green paper to distinguish it from regular drywall). So, I assumed that to begin my new shower, all I needed to do was replace like for like and put it back in. I even did it and started taping the seams:
Except I also knew about waterproofing materials being a thing I’ve seen other people using in DIY projects, and after buying some of it and reading the instructions, I realized that greenboard is actually outdated (and even no longer up to code) for putting in a shower because it often still has moisture problems. I wound up calling a few friends for advice before ripping out the new greenboard and putting cement backerboard in instead. It was not a fun hiccup, considering that these materials are heavy and cumbersome when you want to hang them! But, at least I caught my own mistake before tiling over it or having to rip it out after waterproofing.
Alrighty… so I’ll leave this post as-is for now, but more posts are on their way! Any of your own tips to share? We’ve still got how-tos on replacing the drywall, waterproofing, tiling, and several videos I haven’t even had time to edit yet but I’ve committed to making, so I’m sure I’ll regret that decision later. And on Friday, I’ll cover a trip I took last month that serendipitously inspired my new tile choice. Stay tuned for all of that… definitely more to come.
The post Tips on How to Remove Old Shower Tile appeared first on The Ugly Duckling House.
Website // Subscribe // Advertise // Twitter // Facebook // Google+
from mix1 http://ift.tt/2tqY9eG via with this info
0 notes
Text
Tips on How to Remove Old Shower Tile
As you might have already picked up on previous posts, my Instagram, or if you just have a pretty awesome streak of ESP this week, I’ve decided that my master bathroom is finally going to get my focus this summer. It’s not going to be just my floor that gets some tile help, though — I’m redoing the shower, too!
But before I get into the whole do-it-yourself project of how to tile a new shower (I’ve actually already had some trial and error in the last week I need to share with you, and I’m trying to shoot some video too!), there’s a part of this whole process that I really have a fondness for: DEMO… DEMO… DEMO
However!
Demo isn’t just jump right in, hammers a-swingin’ — if you want to remove an old tiled shower properly and efficiently, you are probably going to need this handy list of tips. Not because I don’t think you aren’t perfectly capable of figuring this out on your own (and a lot of it is common sense, really), but because the temptation to swing a hammer at ugly tile you can’t wait to remove is VERY hard to resist. So, you might be a little premature (like I was) and get all giddy from seeing the tile fall off the wall and ignore some important stuff. These tips will not only help you from damaging the things you don’t want to, but it will prepare yourself a little more than I did to avoid injury.
Affiliate links may be used in this post when linking to products I recommend. Thank you for supporting this site!
How to Demo A Tiled Shower — Effectively and Quickly!
Protect the Tub
In my case, I wanted to keep the tub. So, I laid down some old sheets and taped up the edges with painter’s tape to give the tiles something to land on. The tiles may not seem razor sharp, but if it breaks at a weird angle, it can still chip the tub below. Even if you don’t plan on keeping the tub and want to sell it or something, it’s still better to sell it damage-free. And don’t forget to plug the drain with something!
Start at the Edges
This seems obvious, but outside > in works best. If your shower is as old as mine, you might even have some looser tiles around the tub base and can start there first (and note to self: any areas you find water damage or areas of the tub where water tends to drip should be spots you’re sure to waterproof when you install new tile).
Hammer a Putty Knife at Grout Lines
One of the things I least expected was that using a putty knife blade (more specifically, one of those 6-in-1 painter’s tools) along grout lines and hammering on the end of the handle (sort of like a chisel) before trying to pry at each tile seemed very effective. I tried it mainly out of curiosity at first. My impression was that the tiles were still stuck on pretty well, but I assume the hammering at weak points created enough vibrations to fracture underlying spots of old thinset and grout. I only know that this was more effective than not because I started secretly (aka, unbeknownst to him, but for my own demolishing pride) competing with a very helpful bearded dude who was removing tile on the opposite side of the shower* — I wound up smoking his ass in demo. He swore it was only because I had the better putty knife, and while I can’t deny that I used a better quality tool, after a while he wanted me to whack at the grout lines on his side when mine started coming off in larger chunks.
*And yes, this is how we do date night sometimes, and I really like that we haven’t tried to stab each other with so many weapons tools at our disposal to do so (so far). There were plenty of “this is not how I pictured being in the shower together” jokes made that night.
Wear Protection
You know I’m laughing at myself for yet again having a suggestive tip for DIY, but honestly: if you are regularly doing DIY or woodworking projects and you don’t find yourself thinking “that’s what she said” at least once during each project, you might be doing something wrong. Or don’t have my sense of humor. Or aren’t in the U.S. and haven’t watched The Office (in the British version I’m pretty sure it was “said the actress to the bishop”).
But anyway, back to the important tip: wear ear protection, eye protection, and proper clothing. Hitting anything with a hammer in general tends to be noisy, and tile and grout in particular is very loud. And even if your removal is perfect, tile will chip and send little bits flying, like in parts of the room that might also contain an eye or two. In my case, I wound up with a bloody calf.
…
… (allowing those of you time to scroll past this spot if you don’t like the sight of blood or feet)
It was a small cut, and due to all of the debris falling, it didn’t register that I had been cut until after I was outside about thirty minutes later and felt my leg itching (then looked down and saw that I had been bleeding). It was small and easily dealt with, but still rather surprising! In hindsight, I probably should have worn pants instead of shorts (it’s Georgia summer, though — it’s shorts weather unless something has the potential to be really dangerous). Though now is a pretty good time to remind you guys to be up to date on all of your shots (like a tetanus booster… it’s easy to forget, but if you’re around rusty things and friends having babies like I am, use your friend’s kid’s birthday as a quick reminder of whether or not it’s been less than five years since you got a Tdap update, since you can get tetanus and whooping cough knocked out in one swoop).
Score, Then Hammer Old Drywall
I suppose a person could potentially reuse the old drywall, but with mine so wrecked from old tile adhesive, the easier approach seemed to be to replace the damaged areas. So, we tore into the old drywall with a hammer (so satisfying!) and then broke down the larger pieces for the trash.
To get a clean edge, I first scored the drywall with one of my favorite heavy duty utility knife and then made deeper cuts until it broke away.
Oh – and be mindful of pipes and other things. I reached a stubborn section and realized there was duct work behind the wall, so I’m really glad I wasn’t too aggressive with the hammer. As you weaken each section, the drywall will start to just fold off in pieces.
Take Out Nails/Screws
My house has nails holding up the drywall (this house was built in the early 80’s, so pretty much a house that had a lot of bare-minimum, “I’m going on a break in 5”-type of quality as it was built — if you remember the backyard sinkhole project, you’re already aware of the types of things these guys got away with!), so I had to pry them all out of the studs after the drywall panels came off. The only ones I left were around the bottom near the tub. These seemed to be where the original drywaller rested the old drywall to nail it in, creating a small gap above the tub and wall (this gap is later covered up by the first row of tile, but its function is to help prevent water from wicking up the drywall from the lip and corners of the tub). So, I planned to use the same nails to help me install the new board and give me something to prop it on.
Another thing I noticed that seemed kind of odd? The builders also used glue on the drywall when it came in contact with the studs, but not on most studs or on studs where it might make the most sense (such as near a pipe, where you might not want to chance the nail going in the wrong place). I haven’t really seen this before, so I even texted a couple of DIY buddies and they all thought it was weird, too. If someone has the answer on that, do tell!
Do Some Research
Here’s where I almost failed: I saw that the drywall I was taking out was the moisture-resistant kind, also commonly known as “greenboard” (called that because it’s covered in color-coded green paper to distinguish it from regular drywall). So, I assumed that to begin my new shower, all I needed to do was replace like for like and put it back in. I even did it and started taping the seams:
Except I also knew about waterproofing materials being a thing I’ve seen other people using in DIY projects, and after buying some of it and reading the instructions, I realized that greenboard is actually outdated (and even no longer up to code) for putting in a shower because it often still has moisture problems. I wound up calling a few friends for advice before ripping out the new greenboard and putting cement backerboard in instead. It was not a fun hiccup, considering that these materials are heavy and cumbersome when you want to hang them! But, at least I caught my own mistake before tiling over it or having to rip it out after waterproofing.
Alrighty… so I’ll leave this post as-is for now, but more posts are on their way! Any of your own tips to share? We’ve still got how-tos on replacing the drywall, waterproofing, tiling, and several videos I haven’t even had time to edit yet but I’ve committed to making, so I’m sure I’ll regret that decision later. And on Friday, I’ll cover a trip I took last month that serendipitously inspired my new tile choice. Stay tuned for all of that… definitely more to come.
The post Tips on How to Remove Old Shower Tile appeared first on The Ugly Duckling House.
Website // Subscribe // Advertise // Twitter // Facebook // Google+
from car2 http://ift.tt/2tqY9eG via as shown a lot
0 notes
Text
Tips on How to Remove Old Shower Tile
As you might have already picked up on previous posts, my Instagram, or if you just have a pretty awesome streak of ESP this week, I’ve decided that my master bathroom is finally going to get my focus this summer. It’s not going to be just my floor that gets some tile help, though — I’m redoing the shower, too!
But before I get into the whole do-it-yourself project of how to tile a new shower (I’ve actually already had some trial and error in the last week I need to share with you, and I’m trying to shoot some video too!), there’s a part of this whole process that I really have a fondness for: DEMO… DEMO… DEMO
However!
Demo isn’t just jump right in, hammers a-swingin’ — if you want to remove an old tiled shower properly and efficiently, you are probably going to need this handy list of tips. Not because I don’t think you aren’t perfectly capable of figuring this out on your own (and a lot of it is common sense, really), but because the temptation to swing a hammer at ugly tile you can’t wait to remove is VERY hard to resist. So, you might be a little premature (like I was) and get all giddy from seeing the tile fall off the wall and ignore some important stuff. These tips will not only help you from damaging the things you don’t want to, but it will prepare yourself a little more than I did to avoid injury.
Affiliate links may be used in this post when linking to products I recommend. Thank you for supporting this site!
How to Demo A Tiled Shower — Effectively and Quickly!
Protect the Tub
In my case, I wanted to keep the tub. So, I laid down some old sheets and taped up the edges with painter’s tape to give the tiles something to land on. The tiles may not seem razor sharp, but if it breaks at a weird angle, it can still chip the tub below. Even if you don’t plan on keeping the tub and want to sell it or something, it’s still better to sell it damage-free. And don’t forget to plug the drain with something!
Start at the Edges
This seems obvious, but outside > in works best. If your shower is as old as mine, you might even have some looser tiles around the tub base and can start there first (and note to self: any areas you find water damage or areas of the tub where water tends to drip should be spots you’re sure to waterproof when you install new tile).
Hammer a Putty Knife at Grout Lines
One of the things I least expected was that using a putty knife blade (more specifically, one of those 6-in-1 painter’s tools) along grout lines and hammering on the end of the handle (sort of like a chisel) before trying to pry at each tile seemed very effective. I tried it mainly out of curiosity at first. My impression was that the tiles were still stuck on pretty well, but I assume the hammering at weak points created enough vibrations to fracture underlying spots of old thinset and grout. I only know that this was more effective than not because I started secretly (aka, unbeknownst to him, but for my own demolishing pride) competing with a very helpful bearded dude who was removing tile on the opposite side of the shower* — I wound up smoking his ass in demo. He swore it was only because I had the better putty knife, and while I can’t deny that I used a better quality tool, after a while he wanted me to whack at the grout lines on his side when mine started coming off in larger chunks.
*And yes, this is how we do date night sometimes, and I really like that we haven’t tried to stab each other with so many weapons tools at our disposal to do so (so far). There were plenty of “this is not how I pictured being in the shower together” jokes made that night.
Wear Protection
You know I’m laughing at myself for yet again having a suggestive tip for DIY, but honestly: if you are regularly doing DIY or woodworking projects and you don’t find yourself thinking “that’s what she said” at least once during each project, you might be doing something wrong. Or don’t have my sense of humor. Or aren’t in the U.S. and haven’t watched The Office (in the British version I’m pretty sure it was “said the actress to the bishop”).
But anyway, back to the important tip: wear ear protection, eye protection, and proper clothing. Hitting anything with a hammer in general tends to be noisy, and tile and grout in particular is very loud. And even if your removal is perfect, tile will chip and send little bits flying, like in parts of the room that might also contain an eye or two. In my case, I wound up with a bloody calf.
…
… (allowing those of you time to scroll past this spot if you don’t like the sight of blood or feet)
It was a small cut, and due to all of the debris falling, it didn’t register that I had been cut until after I was outside about thirty minutes later and felt my leg itching (then looked down and saw that I had been bleeding). It was small and easily dealt with, but still rather surprising! In hindsight, I probably should have worn pants instead of shorts (it’s Georgia summer, though — it’s shorts weather unless something has the potential to be really dangerous). Though now is a pretty good time to remind you guys to be up to date on all of your shots (like a tetanus booster… it’s easy to forget, but if you’re around rusty things and friends having babies like I am, use your friend’s kid’s birthday as a quick reminder of whether or not it’s been less than five years since you got a Tdap update, since you can get tetanus and whooping cough knocked out in one swoop).
Score, Then Hammer Old Drywall
I suppose a person could potentially reuse the old drywall, but with mine so wrecked from old tile adhesive, the easier approach seemed to be to replace the damaged areas. So, we tore into the old drywall with a hammer (so satisfying!) and then broke down the larger pieces for the trash.
To get a clean edge, I first scored the drywall with one of my favorite heavy duty utility knife and then made deeper cuts until it broke away.
Oh – and be mindful of pipes and other things. I reached a stubborn section and realized there was duct work behind the wall, so I’m really glad I wasn’t too aggressive with the hammer. As you weaken each section, the drywall will start to just fold off in pieces.
Take Out Nails/Screws
My house has nails holding up the drywall (this house was built in the early 80’s, so pretty much a house that had a lot of bare-minimum, “I’m going on a break in 5”-type of quality as it was built — if you remember the backyard sinkhole project, you’re already aware of the types of things these guys got away with!), so I had to pry them all out of the studs after the drywall panels came off. The only ones I left were around the bottom near the tub. These seemed to be where the original drywaller rested the old drywall to nail it in, creating a small gap above the tub and wall (this gap is later covered up by the first row of tile, but its function is to help prevent water from wicking up the drywall from the lip and corners of the tub). So, I planned to use the same nails to help me install the new board and give me something to prop it on.
Another thing I noticed that seemed kind of odd? The builders also used glue on the drywall when it came in contact with the studs, but not on most studs or on studs where it might make the most sense (such as near a pipe, where you might not want to chance the nail going in the wrong place). I haven’t really seen this before, so I even texted a couple of DIY buddies and they all thought it was weird, too. If someone has the answer on that, do tell!
Do Some Research
Here’s where I almost failed: I saw that the drywall I was taking out was the moisture-resistant kind, also commonly known as “greenboard” (called that because it’s covered in color-coded green paper to distinguish it from regular drywall). So, I assumed that to begin my new shower, all I needed to do was replace like for like and put it back in. I even did it and started taping the seams:
Except I also knew about waterproofing materials being a thing I’ve seen other people using in DIY projects, and after buying some of it and reading the instructions, I realized that greenboard is actually outdated (and even no longer up to code) for putting in a shower because it often still has moisture problems. I wound up calling a few friends for advice before ripping out the new greenboard and putting cement backerboard in instead. It was not a fun hiccup, considering that these materials are heavy and cumbersome when you want to hang them! But, at least I caught my own mistake before tiling over it or having to rip it out after waterproofing.
Alrighty… so I’ll leave this post as-is for now, but more posts are on their way! Any of your own tips to share? We’ve still got how-tos on replacing the drywall, waterproofing, tiling, and several videos I haven’t even had time to edit yet but I’ve committed to making, so I’m sure I’ll regret that decision later. And on Friday, I’ll cover a trip I took last month that serendipitously inspired my new tile choice. Stay tuned for all of that… definitely more to come.
The post Tips on How to Remove Old Shower Tile appeared first on The Ugly Duckling House.
Website // Subscribe // Advertise // Twitter // Facebook // Google+
Tips on How to Remove Old Shower Tile posted first on http://ift.tt/2qOPBf9
0 notes
Text
Tips on How to Remove Old Shower Tile
As you might have already picked up on previous posts, my Instagram, or if you just have a pretty awesome streak of ESP this week, I’ve decided that my master bathroom is finally going to get my focus this summer. It’s not going to be just my floor that gets some tile help, though — I’m redoing the shower, too!
But before I get into the whole do-it-yourself project of how to tile a new shower (I’ve actually already had some trial and error in the last week I need to share with you, and I’m trying to shoot some video too!), there’s a part of this whole process that I really have a fondness for: DEMO… DEMO… DEMO
However!
Demo isn’t just jump right in, hammers a-swingin’ — if you want to remove an old tiled shower properly and efficiently, you are probably going to need this handy list of tips. Not because I don’t think you aren’t perfectly capable of figuring this out on your own (and a lot of it is common sense, really), but because the temptation to swing a hammer at ugly tile you can’t wait to remove is VERY hard to resist. So, you might be a little premature (like I was) and get all giddy from seeing the tile fall off the wall and ignore some important stuff. These tips will not only help you from damaging the things you don’t want to, but it will prepare yourself a little more than I did to avoid injury.
Affiliate links may be used in this post when linking to products I recommend. Thank you for supporting this site!
How to Demo A Tiled Shower — Effectively and Quickly!
Protect the Tub
In my case, I wanted to keep the tub. So, I laid down some old sheets and taped up the edges with painter’s tape to give the tiles something to land on. The tiles may not seem razor sharp, but if it breaks at a weird angle, it can still chip the tub below. Even if you don’t plan on keeping the tub and want to sell it or something, it’s still better to sell it damage-free. And don’t forget to plug the drain with something!
Start at the Edges
This seems obvious, but outside > in works best. If your shower is as old as mine, you might even have some looser tiles around the tub base and can start there first (and note to self: any areas you find water damage or areas of the tub where water tends to drip should be spots you’re sure to waterproof when you install new tile).
Hammer a Putty Knife at Grout Lines
One of the things I least expected was that using a putty knife blade (more specifically, one of those 6-in-1 painter’s tools) along grout lines and hammering on the end of the handle (sort of like a chisel) before trying to pry at each tile seemed very effective. I tried it mainly out of curiosity at first. My impression was that the tiles were still stuck on pretty well, but I assume the hammering at weak points created enough vibrations to fracture underlying spots of old thinset and grout. I only know that this was more effective than not because I started secretly (aka, unbeknownst to him, but for my own demolishing pride) competing with a very helpful bearded dude who was removing tile on the opposite side of the shower* — I wound up smoking his ass in demo. He swore it was only because I had the better putty knife, and while I can’t deny that I used a better quality tool, after a while he wanted me to whack at the grout lines on his side when mine started coming off in larger chunks.
*And yes, this is how we do date night sometimes, and I really like that we haven’t tried to stab each other with so many weapons tools at our disposal to do so (so far). There were plenty of “this is not how I pictured being in the shower together” jokes made that night.
Wear Protection
You know I’m laughing at myself for yet again having a suggestive tip for DIY, but honestly: if you are regularly doing DIY or woodworking projects and you don’t find yourself thinking “that’s what she said” at least once during each project, you might be doing something wrong. Or don’t have my sense of humor. Or aren’t in the U.S. and haven’t watched The Office (in the British version I’m pretty sure it was “said the actress to the bishop”).
But anyway, back to the important tip: wear ear protection, eye protection, and proper clothing. Hitting anything with a hammer in general tends to be noisy, and tile and grout in particular is very loud. And even if your removal is perfect, tile will chip and send little bits flying, like in parts of the room that might also contain an eye or two. In my case, I wound up with a bloody calf.
…
… (allowing those of you time to scroll past this spot if you don’t like the sight of blood or feet)
It was a small cut, and due to all of the debris falling, it didn’t register that I had been cut until after I was outside about thirty minutes later and felt my leg itching (then looked down and saw that I had been bleeding). It was small and easily dealt with, but still rather surprising! In hindsight, I probably should have worn pants instead of shorts (it’s Georgia summer, though — it’s shorts weather unless something has the potential to be really dangerous). Though now is a pretty good time to remind you guys to be up to date on all of your shots (like a tetanus booster… it’s easy to forget, but if you’re around rusty things and friends having babies like I am, use your friend’s kid’s birthday as a quick reminder of whether or not it’s been less than five years since you got a Tdap update, since you can get tetanus and whooping cough knocked out in one swoop).
Score, Then Hammer Old Drywall
I suppose a person could potentially reuse the old drywall, but with mine so wrecked from old tile adhesive, the easier approach seemed to be to replace the damaged areas. So, we tore into the old drywall with a hammer (so satisfying!) and then broke down the larger pieces for the trash.
To get a clean edge, I first scored the drywall with one of my favorite heavy duty utility knife and then made deeper cuts until it broke away.
Oh – and be mindful of pipes and other things. I reached a stubborn section and realized there was duct work behind the wall, so I’m really glad I wasn’t too aggressive with the hammer. As you weaken each section, the drywall will start to just fold off in pieces.
Take Out Nails/Screws
My house has nails holding up the drywall (this house was built in the early 80’s, so pretty much a house that had a lot of bare-minimum, “I’m going on a break in 5”-type of quality as it was built — if you remember the backyard sinkhole project, you’re already aware of the types of things these guys got away with!), so I had to pry them all out of the studs after the drywall panels came off. The only ones I left were around the bottom near the tub. These seemed to be where the original drywaller rested the old drywall to nail it in, creating a small gap above the tub and wall (this gap is later covered up by the first row of tile, but its function is to help prevent water from wicking up the drywall from the lip and corners of the tub). So, I planned to use the same nails to help me install the new board and give me something to prop it on.
Another thing I noticed that seemed kind of odd? The builders also used glue on the drywall when it came in contact with the studs, but not on most studs or on studs where it might make the most sense (such as near a pipe, where you might not want to chance the nail going in the wrong place). I haven’t really seen this before, so I even texted a couple of DIY buddies and they all thought it was weird, too. If someone has the answer on that, do tell!
Do Some Research
Here’s where I almost failed: I saw that the drywall I was taking out was the moisture-resistant kind, also commonly known as “greenboard” (called that because it’s covered in color-coded green paper to distinguish it from regular drywall). So, I assumed that to begin my new shower, all I needed to do was replace like for like and put it back in. I even did it and started taping the seams:
Except I also knew about waterproofing materials being a thing I’ve seen other people using in DIY projects, and after buying some of it and reading the instructions, I realized that greenboard is actually outdated (and even no longer up to code) for putting in a shower because it often still has moisture problems. I wound up calling a few friends for advice before ripping out the new greenboard and putting cement backerboard in instead. It was not a fun hiccup, considering that these materials are heavy and cumbersome when you want to hang them! But, at least I caught my own mistake before tiling over it or having to rip it out after waterproofing.
Alrighty… so I’ll leave this post as-is for now, but more posts are on their way! Any of your own tips to share? We’ve still got how-tos on replacing the drywall, waterproofing, tiling, and several videos I haven’t even had time to edit yet but I’ve committed to making, so I’m sure I’ll regret that decision later. And on Friday, I’ll cover a trip I took last month that serendipitously inspired my new tile choice. Stay tuned for all of that… definitely more to come.
The post Tips on How to Remove Old Shower Tile appeared first on The Ugly Duckling House.
Website // Subscribe // Advertise // Twitter // Facebook // Google+
from The Ugly Duckling House https://www.uglyducklinghouse.com/tips-remove-old-shower-tile/
0 notes
Text
Tips on How to Remove Old Shower Tile
As you might have already picked up on previous posts, my Instagram, or if you just have a pretty awesome streak of ESP this week, I’ve decided that my master bathroom is finally going to get my focus this summer. It’s not going to be just my floor that gets some tile help, though — I’m redoing the shower, too!
But before I get into the whole do-it-yourself project of how to tile a new shower (I’ve actually already had some trial and error in the last week I need to share with you, and I’m trying to shoot some video too!), there’s a part of this whole process that I really have a fondness for: DEMO… DEMO… DEMO
However!
Demo isn’t just jump right in, hammers a-swingin’ — if you want to remove an old tiled shower properly and efficiently, you are probably going to need this handy list of tips. Not because I don’t think you aren’t perfectly capable of figuring this out on your own (and a lot of it is common sense, really), but because the temptation to swing a hammer at ugly tile you can’t wait to remove is VERY hard to resist. So, you might be a little premature (like I was) and get all giddy from seeing the tile fall off the wall and ignore some important stuff. These tips will not only help you from damaging the things you don’t want to, but it will prepare yourself a little more than I did to avoid injury.
Affiliate links may be used in this post when linking to products I recommend. Thank you for supporting this site!
How to Demo A Tiled Shower — Effectively and Quickly!
Protect the Tub
In my case, I wanted to keep the tub. So, I laid down some old sheets and taped up the edges with painter’s tape to give the tiles something to land on. The tiles may not seem razor sharp, but if it breaks at a weird angle, it can still chip the tub below. Even if you don’t plan on keeping the tub and want to sell it or something, it’s still better to sell it damage-free. And don’t forget to plug the drain with something!
Start at the Edges
This seems obvious, but outside > in works best. If your shower is as old as mine, you might even have some looser tiles around the tub base and can start there first (and note to self: any areas you find water damage or areas of the tub where water tends to drip should be spots you’re sure to waterproof when you install new tile).
Hammer a Putty Knife at Grout Lines
One of the things I least expected was that using a putty knife blade (more specifically, one of those 6-in-1 painter’s tools) along grout lines and hammering on the end of the handle (sort of like a chisel) before trying to pry at each tile seemed very effective. I tried it mainly out of curiosity at first. My impression was that the tiles were still stuck on pretty well, but I assume the hammering at weak points created enough vibrations to fracture underlying spots of old thinset and grout. I only know that this was more effective than not because I started secretly (aka, unbeknownst to him, but for my own demolishing pride) competing with a very helpful bearded dude who was removing tile on the opposite side of the shower* — I wound up smoking his ass in demo. He swore it was only because I had the better putty knife, and while I can’t deny that I used a better quality tool, after a while he wanted me to whack at the grout lines on his side when mine started coming off in larger chunks.
*And yes, this is how we do date night sometimes, and I really like that we haven’t tried to stab each other with so many weapons tools at our disposal to do so (so far). There were plenty of “this is not how I pictured being in the shower together” jokes made that night.
Wear Protection
You know I’m laughing at myself for yet again having a suggestive tip for DIY, but honestly: if you are regularly doing DIY or woodworking projects and you don’t find yourself thinking “that’s what she said” at least once during each project, you might be doing something wrong. Or don’t have my sense of humor. Or aren’t in the U.S. and haven’t watched The Office (in the British version I’m pretty sure it was “said the actress to the bishop”).
But anyway, back to the important tip: wear ear protection, eye protection, and proper clothing. Hitting anything with a hammer in general tends to be noisy, and tile and grout in particular is very loud. And even if your removal is perfect, tile will chip and send little bits flying, like in parts of the room that might also contain an eye or two. In my case, I wound up with a bloody calf.
…
… (allowing those of you time to scroll past this spot if you don’t like the sight of blood or feet)
It was a small cut, and due to all of the debris falling, it didn’t register that I had been cut until after I was outside about thirty minutes later and felt my leg itching (then looked down and saw that I had been bleeding). It was small and easily dealt with, but still rather surprising! In hindsight, I probably should have worn pants instead of shorts (it’s Georgia summer, though — it’s shorts weather unless something has the potential to be really dangerous). Though now is a pretty good time to remind you guys to be up to date on all of your shots (like a tetanus booster… it’s easy to forget, but if you’re around rusty things and friends having babies like I am, use your friend’s kid’s birthday as a quick reminder of whether or not it’s been less than five years since you got a Tdap update, since you can get tetanus and whooping cough knocked out in one swoop).
Score, Then Hammer Old Drywall
I suppose a person could potentially reuse the old drywall, but with mine so wrecked from old tile adhesive, the easier approach seemed to be to replace the damaged areas. So, we tore into the old drywall with a hammer (so satisfying!) and then broke down the larger pieces for the trash.
To get a clean edge, I first scored the drywall with one of my favorite heavy duty utility knife and then made deeper cuts until it broke away.
Oh – and be mindful of pipes and other things. I reached a stubborn section and realized there was duct work behind the wall, so I’m really glad I wasn’t too aggressive with the hammer. As you weaken each section, the drywall will start to just fold off in pieces.
Take Out Nails/Screws
My house has nails holding up the drywall (this house was built in the early 80’s, so pretty much a house that had a lot of bare-minimum, “I’m going on a break in 5”-type of quality as it was built — if you remember the backyard sinkhole project, you’re already aware of the types of things these guys got away with!), so I had to pry them all out of the studs after the drywall panels came off. The only ones I left were around the bottom near the tub. These seemed to be where the original drywaller rested the old drywall to nail it in, creating a small gap above the tub and wall (this gap is later covered up by the first row of tile, but its function is to help prevent water from wicking up the drywall from the lip and corners of the tub). So, I planned to use the same nails to help me install the new board and give me something to prop it on.
Another thing I noticed that seemed kind of odd? The builders also used glue on the drywall when it came in contact with the studs, but not on most studs or on studs where it might make the most sense (such as near a pipe, where you might not want to chance the nail going in the wrong place). I haven’t really seen this before, so I even texted a couple of DIY buddies and they all thought it was weird, too. If someone has the answer on that, do tell!
Do Some Research
Here’s where I almost failed: I saw that the drywall I was taking out was the moisture-resistant kind, also commonly known as “greenboard” (called that because it’s covered in color-coded green paper to distinguish it from regular drywall). So, I assumed that to begin my new shower, all I needed to do was replace like for like and put it back in. I even did it and started taping the seams:
Except I also knew about waterproofing materials being a thing I’ve seen other people using in DIY projects, and after buying some of it and reading the instructions, I realized that greenboard is actually outdated (and even no longer up to code) for putting in a shower because it often still has moisture problems. I wound up calling a few friends for advice before ripping out the new greenboard and putting cement backerboard in instead. It was not a fun hiccup, considering that these materials are heavy and cumbersome when you want to hang them! But, at least I caught my own mistake before tiling over it or having to rip it out after waterproofing.
Alrighty… so I’ll leave this post as-is for now, but more posts are on their way! Any of your own tips to share? We’ve still got how-tos on replacing the drywall, waterproofing, tiling, and several videos I haven’t even had time to edit yet but I’ve committed to making, so I’m sure I’ll regret that decision later. And on Friday, I’ll cover a trip I took last month that serendipitously inspired my new tile choice. Stay tuned for all of that… definitely more to come.
The post Tips on How to Remove Old Shower Tile appeared first on The Ugly Duckling House.
Website // Subscribe // Advertise // Twitter // Facebook // Google+
Tips on How to Remove Old Shower Tile published first on https://noambouzaglou.wordpress.com/
0 notes
Text
Tips on How to Remove Old Shower Tile
As you might have already picked up on previous posts, my Instagram, or if you just have a pretty awesome streak of ESP this week, I’ve decided that my master bathroom is finally going to get my focus this summer. It’s not going to be just my floor that gets some tile help, though — I’m redoing the shower, too!
But before I get into the whole do-it-yourself project of how to tile a new shower (I’ve actually already had some trial and error in the last week I need to share with you, and I’m trying to shoot some video too!), there’s a part of this whole process that I really have a fondness for: DEMO… DEMO… DEMO
However!
Demo isn’t just jump right in, hammers a-swingin’ — if you want to remove an old tiled shower properly and efficiently, you are probably going to need this handy list of tips. Not because I don’t think you aren’t perfectly capable of figuring this out on your own (and a lot of it is common sense, really), but because the temptation to swing a hammer at ugly tile you can’t wait to remove is VERY hard to resist. So, you might be a little premature (like I was) and get all giddy from seeing the tile fall off the wall and ignore some important stuff. These tips will not only help you from damaging the things you don’t want to, but it will prepare yourself a little more than I did to avoid injury.
Affiliate links may be used in this post when linking to products I recommend. Thank you for supporting this site!
How to Demo A Tiled Shower — Effectively and Quickly!
Protect the Tub
In my case, I wanted to keep the tub. So, I laid down some old sheets and taped up the edges with painter’s tape to give the tiles something to land on. The tiles may not seem razor sharp, but if it breaks at a weird angle, it can still chip the tub below. Even if you don’t plan on keeping the tub and want to sell it or something, it’s still better to sell it damage-free. And don’t forget to plug the drain with something!
Start at the Edges
This seems obvious, but outside > in works best. If your shower is as old as mine, you might even have some looser tiles around the tub base and can start there first (and note to self: any areas you find water damage or areas of the tub where water tends to drip should be spots you’re sure to waterproof when you install new tile).
Hammer a Putty Knife at Grout Lines
One of the things I least expected was that using a putty knife blade (more specifically, one of those 6-in-1 painter’s tools) along grout lines and hammering on the end of the handle (sort of like a chisel) before trying to pry at each tile seemed very effective. I tried it mainly out of curiosity at first. My impression was that the tiles were still stuck on pretty well, but I assume the hammering at weak points created enough vibrations to fracture underlying spots of old thinset and grout. I only know that this was more effective than not because I started secretly (aka, unbeknownst to him, but for my own demolishing pride) competing with a very helpful bearded dude who was removing tile on the opposite side of the shower* — I wound up smoking his ass in demo. He swore it was only because I had the better putty knife, and while I can’t deny that I used a better quality tool, after a while he wanted me to whack at the grout lines on his side when mine started coming off in larger chunks.
*And yes, this is how we do date night sometimes, and I really like that we haven’t tried to stab each other with so many weapons tools at our disposal to do so (so far). There were plenty of “this is not how I pictured being in the shower together” jokes made that night.
Wear Protection
You know I’m laughing at myself for yet again having a suggestive tip for DIY, but honestly: if you are regularly doing DIY or woodworking projects and you don’t find yourself thinking “that’s what she said” at least once during each project, you might be doing something wrong. Or don’t have my sense of humor. Or aren’t in the U.S. and haven’t watched The Office (in the British version I’m pretty sure it was “said the actress to the bishop”).
But anyway, back to the important tip: wear ear protection, eye protection, and proper clothing. Hitting anything with a hammer in general tends to be noisy, and tile and grout in particular is very loud. And even if your removal is perfect, tile will chip and send little bits flying, like in parts of the room that might also contain an eye or two. In my case, I wound up with a bloody calf.
…
… (allowing those of you time to scroll past this spot if you don’t like the sight of blood or feet)
It was a small cut, and due to all of the debris falling, it didn’t register that I had been cut until after I was outside about thirty minutes later and felt my leg itching (then looked down and saw that I had been bleeding). It was small and easily dealt with, but still rather surprising! In hindsight, I probably should have worn pants instead of shorts (it’s Georgia summer, though — it’s shorts weather unless something has the potential to be really dangerous). Though now is a pretty good time to remind you guys to be up to date on all of your shots (like a tetanus booster… it’s easy to forget, but if you’re around rusty things and friends having babies like I am, use your friend’s kid’s birthday as a quick reminder of whether or not it’s been less than five years since you got a Tdap update, since you can get tetanus and whooping cough knocked out in one swoop).
Score, Then Hammer Old Drywall
I suppose a person could potentially reuse the old drywall, but with mine so wrecked from old tile adhesive, the easier approach seemed to be to replace the damaged areas. So, we tore into the old drywall with a hammer (so satisfying!) and then broke down the larger pieces for the trash.
To get a clean edge, I first scored the drywall with one of my favorite heavy duty utility knife and then made deeper cuts until it broke away.
Oh – and be mindful of pipes and other things. I reached a stubborn section and realized there was duct work behind the wall, so I’m really glad I wasn’t too aggressive with the hammer. As you weaken each section, the drywall will start to just fold off in pieces.
Take Out Nails/Screws
My house has nails holding up the drywall (this house was built in the early 80’s, so pretty much a house that had a lot of bare-minimum, “I’m going on a break in 5”-type of quality as it was built — if you remember the backyard sinkhole project, you’re already aware of the types of things these guys got away with!), so I had to pry them all out of the studs after the drywall panels came off. The only ones I left were around the bottom near the tub. These seemed to be where the original drywaller rested the old drywall to nail it in, creating a small gap above the tub and wall (this gap is later covered up by the first row of tile, but its function is to help prevent water from wicking up the drywall from the lip and corners of the tub). So, I planned to use the same nails to help me install the new board and give me something to prop it on.
Another thing I noticed that seemed kind of odd? The builders also used glue on the drywall when it came in contact with the studs, but not on most studs or on studs where it might make the most sense (such as near a pipe, where you might not want to chance the nail going in the wrong place). I haven’t really seen this before, so I even texted a couple of DIY buddies and they all thought it was weird, too. If someone has the answer on that, do tell!
Do Some Research
Here’s where I almost failed: I saw that the drywall I was taking out was the moisture-resistant kind, also commonly known as “greenboard” (called that because it’s covered in color-coded green paper to distinguish it from regular drywall). So, I assumed that to begin my new shower, all I needed to do was replace like for like and put it back in. I even did it and started taping the seams:
Except I also knew about waterproofing materials being a thing I’ve seen other people using in DIY projects, and after buying some of it and reading the instructions, I realized that greenboard is actually outdated (and even no longer up to code) for putting in a shower because it often still has moisture problems. I wound up calling a few friends for advice before ripping out the new greenboard and putting cement backerboard in instead. It was not a fun hiccup, considering that these materials are heavy and cumbersome when you want to hang them! But, at least I caught my own mistake before tiling over it or having to rip it out after waterproofing.
Alrighty… so I’ll leave this post as-is for now, but more posts are on their way! Any of your own tips to share? We’ve still got how-tos on replacing the drywall, waterproofing, tiling, and several videos I haven’t even had time to edit yet but I’ve committed to making, so I’m sure I’ll regret that decision later. And on Friday, I’ll cover a trip I took last month that serendipitously inspired my new tile choice. Stay tuned for all of that… definitely more to come.
The post Tips on How to Remove Old Shower Tile appeared first on The Ugly Duckling House.
Website // Subscribe // Advertise // Twitter // Facebook // Google+
Tips on How to Remove Old Shower Tile published first on http://ift.tt/1kI9W8s
0 notes
Text
Tips on How to Remove Old Shower Tile
As you might have already picked up on previous posts, my Instagram, or if you just have a pretty awesome streak of ESP this week, I’ve decided that my master bathroom is finally going to get my focus this summer. It’s not going to be just my floor that gets some tile help, though — I’m redoing the shower, too!
But before I get into the whole do-it-yourself project of how to tile a new shower (I’ve actually already had some trial and error in the last week I need to share with you, and I’m trying to shoot some video too!), there’s a part of this whole process that I really have a fondness for: DEMO… DEMO… DEMO
However!
Demo isn’t just jump right in, hammers a-swingin’ — if you want to remove an old tiled shower properly and efficiently, you are probably going to need this handy list of tips. Not because I don’t think you aren’t perfectly capable of figuring this out on your own (and a lot of it is common sense, really), but because the temptation to swing a hammer at ugly tile you can’t wait to remove is VERY hard to resist. So, you might be a little premature (like I was) and get all giddy from seeing the tile fall off the wall and ignore some important stuff. These tips will not only help you from damaging the things you don’t want to, but it will prepare yourself a little more than I did to avoid injury.
Affiliate links may be used in this post when linking to products I recommend. Thank you for supporting this site!
How to Demo A Tiled Shower — Effectively and Quickly!
Protect the Tub
In my case, I wanted to keep the tub. So, I laid down some old sheets and taped up the edges with painter’s tape to give the tiles something to land on. The tiles may not seem razor sharp, but if it breaks at a weird angle, it can still chip the tub below. Even if you don’t plan on keeping the tub and want to sell it or something, it’s still better to sell it damage-free. And don’t forget to plug the drain with something!
Start at the Edges
This seems obvious, but outside > in works best. If your shower is as old as mine, you might even have some looser tiles around the tub base and can start there first (and note to self: any areas you find water damage or areas of the tub where water tends to drip should be spots you’re sure to waterproof when you install new tile).
Hammer a Putty Knife at Grout Lines
One of the things I least expected was that using a putty knife blade (more specifically, one of those 6-in-1 painter’s tools) along grout lines and hammering on the end of the handle (sort of like a chisel) before trying to pry at each tile seemed very effective. I tried it mainly out of curiosity at first. My impression was that the tiles were still stuck on pretty well, but I assume the hammering at weak points created enough vibrations to fracture underlying spots of old thinset and grout. I only know that this was more effective than not because I started secretly (aka, unbeknownst to him, but for my own demolishing pride) competing with a very helpful bearded dude who was removing tile on the opposite side of the shower* — I wound up smoking his ass in demo. He swore it was only because I had the better putty knife, and while I can’t deny that I used a better quality tool, after a while he wanted me to whack at the grout lines on his side when mine started coming off in larger chunks.
*And yes, this is how we do date night sometimes, and I really like that we haven’t tried to stab each other with so many weapons tools at our disposal to do so (so far). There were plenty of “this is not how I pictured being in the shower together” jokes made that night.
Wear Protection
You know I’m laughing at myself for yet again having a suggestive tip for DIY, but honestly: if you are regularly doing DIY or woodworking projects and you don’t find yourself thinking “that’s what she said” at least once during each project, you might be doing something wrong. Or don’t have my sense of humor. Or aren’t in the U.S. and haven’t watched The Office (in the British version I’m pretty sure it was “said the actress to the bishop”).
But anyway, back to the important tip: wear ear protection, eye protection, and proper clothing. Hitting anything with a hammer in general tends to be noisy, and tile and grout in particular is very loud. And even if your removal is perfect, tile will chip and send little bits flying, like in parts of the room that might also contain an eye or two. In my case, I wound up with a bloody calf.
…
… (allowing those of you time to scroll past this spot if you don’t like the sight of blood or feet)
It was a small cut, and due to all of the debris falling, it didn’t register that I had been cut until after I was outside about thirty minutes later and felt my leg itching (then looked down and saw that I had been bleeding). It was small and easily dealt with, but still rather surprising! In hindsight, I probably should have worn pants instead of shorts (it’s Georgia summer, though — it’s shorts weather unless something has the potential to be really dangerous). Though now is a pretty good time to remind you guys to be up to date on all of your shots (like a tetanus booster… it’s easy to forget, but if you’re around rusty things and friends having babies like I am, use your friend’s kid’s birthday as a quick reminder of whether or not it’s been less than five years since you got a Tdap update, since you can get tetanus and whooping cough knocked out in one swoop).
Score, Then Hammer Old Drywall
I suppose a person could potentially reuse the old drywall, but with mine so wrecked from old tile adhesive, the easier approach seemed to be to replace the damaged areas. So, we tore into the old drywall with a hammer (so satisfying!) and then broke down the larger pieces for the trash.
To get a clean edge, I first scored the drywall with one of my favorite heavy duty utility knife and then made deeper cuts until it broke away.
Oh – and be mindful of pipes and other things. I reached a stubborn section and realized there was duct work behind the wall, so I’m really glad I wasn’t too aggressive with the hammer. As you weaken each section, the drywall will start to just fold off in pieces.
Take Out Nails/Screws
My house has nails holding up the drywall (this house was built in the early 80’s, so pretty much a house that had a lot of bare-minimum, “I’m going on a break in 5”-type of quality as it was built — if you remember the backyard sinkhole project, you’re already aware of the types of things these guys got away with!), so I had to pry them all out of the studs after the drywall panels came off. The only ones I left were around the bottom near the tub. These seemed to be where the original drywaller rested the old drywall to nail it in, creating a small gap above the tub and wall (this gap is later covered up by the first row of tile, but its function is to help prevent water from wicking up the drywall from the lip and corners of the tub). So, I planned to use the same nails to help me install the new board and give me something to prop it on.
Another thing I noticed that seemed kind of odd? The builders also used glue on the drywall when it came in contact with the studs, but not on most studs or on studs where it might make the most sense (such as near a pipe, where you might not want to chance the nail going in the wrong place). I haven’t really seen this before, so I even texted a couple of DIY buddies and they all thought it was weird, too. If someone has the answer on that, do tell!
Do Some Research
Here’s where I almost failed: I saw that the drywall I was taking out was the moisture-resistant kind, also commonly known as “greenboard” (called that because it’s covered in color-coded green paper to distinguish it from regular drywall). So, I assumed that to begin my new shower, all I needed to do was replace like for like and put it back in. I even did it and started taping the seams:
Except I also knew about waterproofing materials being a thing I’ve seen other people using in DIY projects, and after buying some of it and reading the instructions, I realized that greenboard is actually outdated (and even no longer up to code) for putting in a shower because it often still has moisture problems. I wound up calling a few friends for advice before ripping out the new greenboard and putting cement backerboard in instead. It was not a fun hiccup, considering that these materials are heavy and cumbersome when you want to hang them! But, at least I caught my own mistake before tiling over it or having to rip it out after waterproofing.
Alrighty… so I’ll leave this post as-is for now, but more posts are on their way! Any of your own tips to share? We’ve still got how-tos on replacing the drywall, waterproofing, tiling, and several videos I haven’t even had time to edit yet but I’ve committed to making, so I’m sure I’ll regret that decision later. And on Friday, I’ll cover a trip I took last month that serendipitously inspired my new tile choice. Stay tuned for all of that… definitely more to come.
The post Tips on How to Remove Old Shower Tile appeared first on The Ugly Duckling House.
Website // Subscribe // Advertise // Twitter // Facebook // Google+
Tips on How to Remove Old Shower Tile published first on http://ift.tt/2qxZz2j
0 notes
Last Seen Blogs

onallthingsweb
On All Things Web

reeeeeeeeeeba
idk what this is

woman-that-you-fearr
Saturn Flavoured

eulcgizeme
thoughts of you consume

coolanshgujral
Passionate Blogger