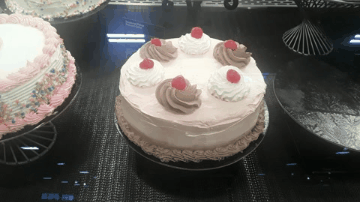
#Neapolitan cake
Photo

Neapolitan Cake
1K notes
·
View notes
Photo
neapolitan cake
220 notes
·
View notes
Text
Castletown Café Episode 26: Ralsei’s Cauldron Cake

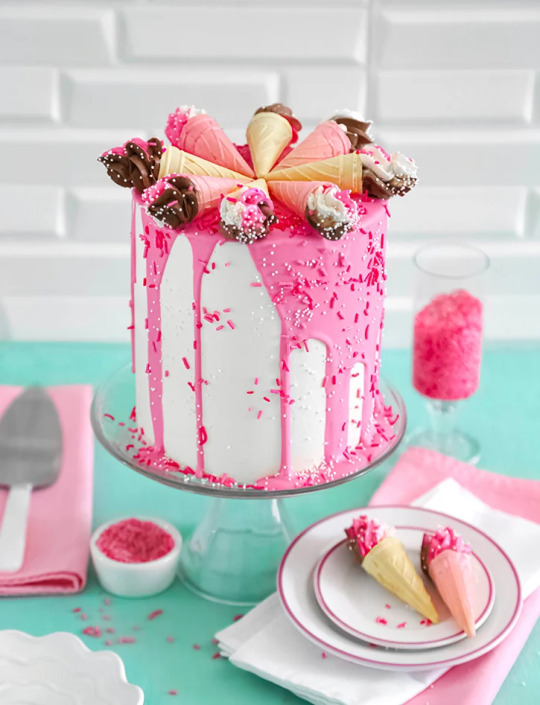
In the beginning of Deltarune Chapter 2, we return to the Dark World located within the school's supply closet. This becomes the main hub where Darkeners from all kinds of Dark Worlds call home after their respective fountains are sealed. After the inhabitants of the Card Kingdom move in and you've explored the town named after your save file, you get to explore Ralsei's castle! Greeting you upon your entrance is a huge cauldron, which Ralsei explains as the cauldron he does all his cooking with. During the cutscene, a cake rockets out of the cauldron, complete with explosion sound effects. As it falls, Susie catches it in her mouth and devours the entire thing, claiming it to be thick on the frosting. But all that frosting makes for a pretty cake!
I recall another cake popping out that Susie also devours on the second interaction with the cauldron, where she says something about it being chocolate-flavored. Unfortunately, I don't see a lot of recordings about later cauldron interactions, so I should replay again sometime to see if this happens or not. The final time, however, Susie asks for a strawberry cake as a room-warming gift (which may or may not happen until after you visit the rooms on the top floor...yep, I need to replay). Ralsei tells her there is a slice of cake in her fridge, and Susie protests that it's "not cauldron-fresh".
As I thought of the different kinds of food that appear in this game, from consumable items to cutscene-related foods, the Caldron cake had been brewing in my mind since last year. Originally I thought it'd be great for October, but I found the flavor to be more appropriate for summer: a Neapolitan cake. Three layers of strawberry, vanilla, and chocolatey goodness with likewise-flavored frosting! Why not, after all, combine the flavors together into one tall, beautiful cake?
But life decided to throw wrenches in this plan. For one, there had been a shortage of buttercream frosting. Said frosting was unavailable in all nearby stores, across all brands, and even online, buttercream was overpriced. I assumed scalpers were snatching the stuff up to sell for a higher price. Even in 2023, we're still feeling the effects of the pandemic, and as such, some ingredients are difficult to get your hands on.
It seems that life was trying to tell me to make my own frosting, as unsurprisingly, the scalpers I tried to buy frosting from didn't place them in a box with cooling packs during the hottest month on Earth ever recorded (this all took place a month prior to the writing of this blog entry). So, of course, the seals burst when travelling under the heat dome that had covered a good portion of the country, though I don't know exactly WHERE the seller was located.
That's when I found recipes for a type of frosting I had never heard of before: ermine frosting. It's like buttercream, but way less sweet. You make a base using flour, sugar, and milk, cook it over the stove until it's thick like pudding, then cool it before whipping unsalted butter and adding your mixture to that plus vanilla and a pinch of salt. So I made two ermine frostings, one vanilla, and one strawberry. I had already purchased some chocolate frosting so I didn't need to make chocolate, but I came up with a recipe for chocolate ermine frosting included in the recipe portion of this blog entry.
Summer may not be the best season to make cakes, given the warm weather. Because many homes in Oregon, especially older ones, don't have air conditioning pre-installed, I needed to keep the cake refrigerated to prevent the frosting from melting and the cake from falling apart, as a precaution. Therefore, spring would be a better season to make this cake, this way, there may be less worry of melting.
I fought a lot of obstacles, and learned a lot as well making this cake. While it is an involved project, especially since you may need or want to make different flavored frostings (which taste way better than the pre-made stuff), the cake itself isn't that tough. While a Neapolitan cake may sound daunting as you're making a cake with three different flavors, all you really need to do is just make a large amount of vanilla batter, divide it into three batches, and add cocoa to one bowl and strawberry reduction to the other.
For the strawberry cake, you first need to make strawberry reduction. You take half a cup of strawberry puree and cook it in a saucepan over medium-low heat to reduce the amount of liquid. After a while, you should end up with 1/4 cup of thick strawberry puree. You don't need to make a reduction for the frosting however, just take another half-cup of unreduced puree.
For the chocolate, combine three tablespoons of unsweetened cocoa powder with three tablespoons of hot water, stir, and let sit for a few minutes before adding it into the cake batter. This lets the cocoa "bloom", adds moisture to the cocoa, and also explains why you add a couple tablespoons of hot water or coffee to a chocolate cake (if you make it from scratch). This gave me the idea to do the same thing if you were to make a chocolate ermine frosting.
Because this is a big project, I found it easiest to divide making the reduction, frosting, cake, and assembly over three days. On Day 1, I thawed about 1 and 1/2 cups of frozen strawberries, pureed them in the blender, and then used half a cup of it in the strawberry frosting. After that, I made the vanilla frosting, and finally, the strawberry reduction.
Day 2 came the cake baking. I followed the recipe by My Cake School, making a vanilla batter, dividing it into three, and adding the strawberry reduction to one batch and the cocoa to the other. While I made the cake during the nighttime so they'd be ready the next morning, I think it's best to store them in the freezer overnight. BUT FIRST! Once your cakes are cool, remove them from the pans and level the tops of your cakes so they're nice and even. Then you can store them in the freezer. This way the cakes will be easier to assemble and decorate the next day.
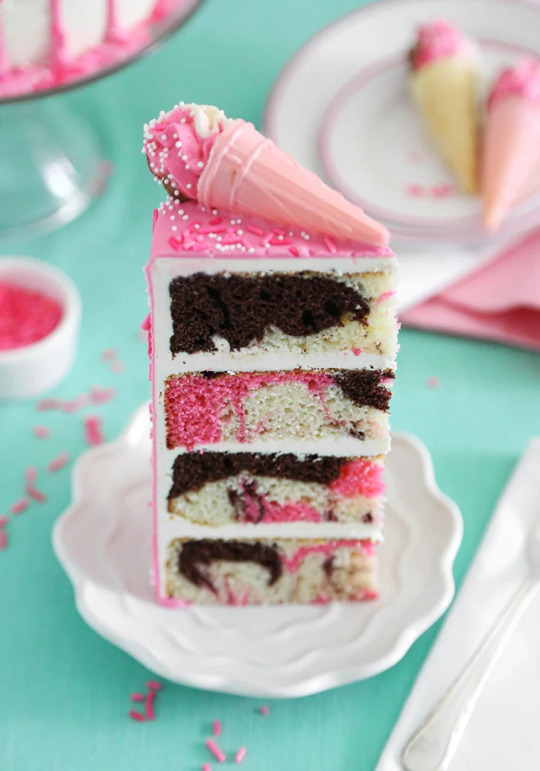
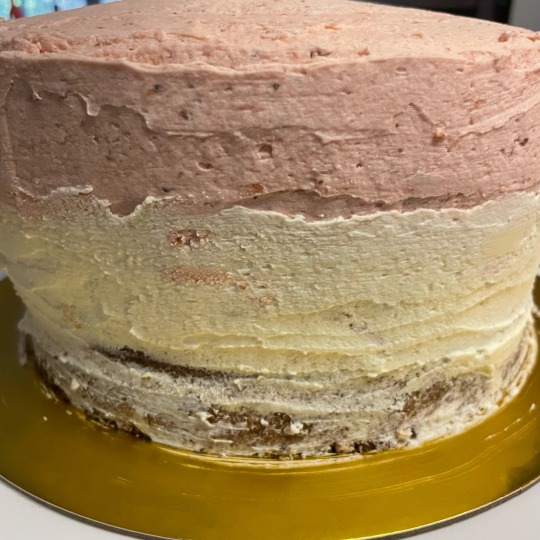
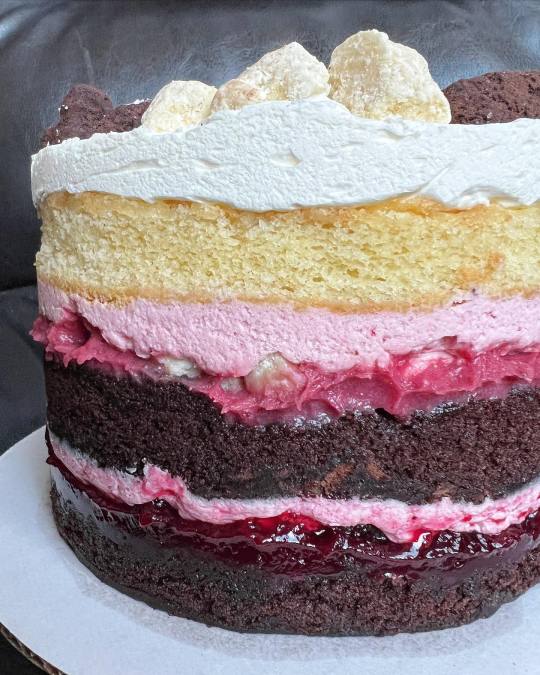
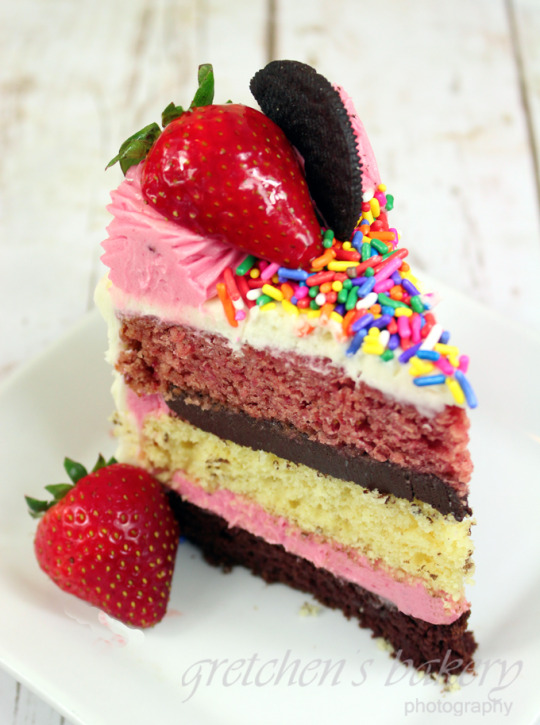
The final day was the day I assembled and decorated the cake. These pictures show the pattern I used for the filling: rings of strawberry, vanilla, and chocolate frosting.
The pattern inside:

As a three-layer cake, it has two layers of delicious frosting filling in between. The chocolate cake is usually the densest, so it often is the bottom layer, which I recommend. You can layer your cake any way you want, I put the vanilla in the middle and the strawberry on top, even though the strawberry cake is probably denser and should go in the middle, though it worked out fine for me.

The cake would get placed in the freezer after each cake was stacked on top of a filling layer. This made it easier for the cake to stick together and for the frosting to be firmer, to make the cake as a whole easier to decorate. I suggest 15 to 20 minutes for each time the cake gets returned to the freezer.
The next step was to seal the cake in a crumb coat, which I used a thin layer of the vanilla ermine frosting for. Professionals use this trick all the time, to keep the cake crumbs sealed inside and to prevent mess when the final layer of frosting is applied. The cake gets frozen again after the crumb coat to give the cake a smoother and more solid surface when decorated.
I then applied strawberry frosting on the top and around the topmost sides, covering the strawberry layer. Vanilla was piped in the middle, with chocolate on the bottom. Between applying the different frostings, I returned the cake to the freezer at 20 minute intervals to prevent the sides from getting too messy and the frosting from mixing.
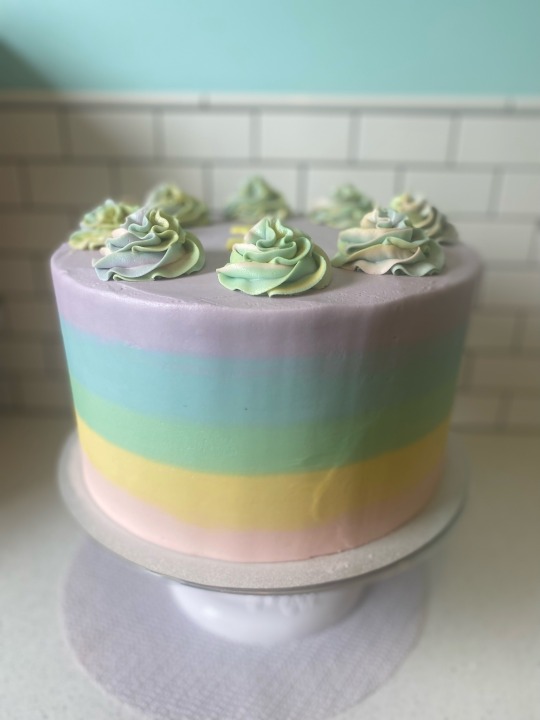
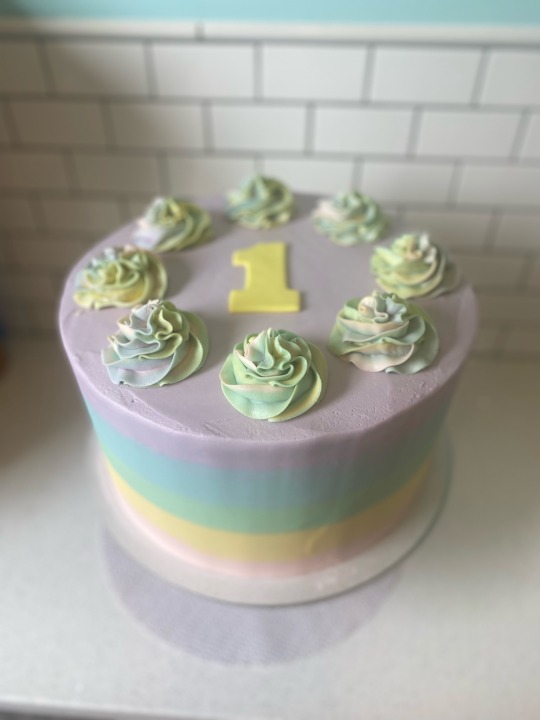
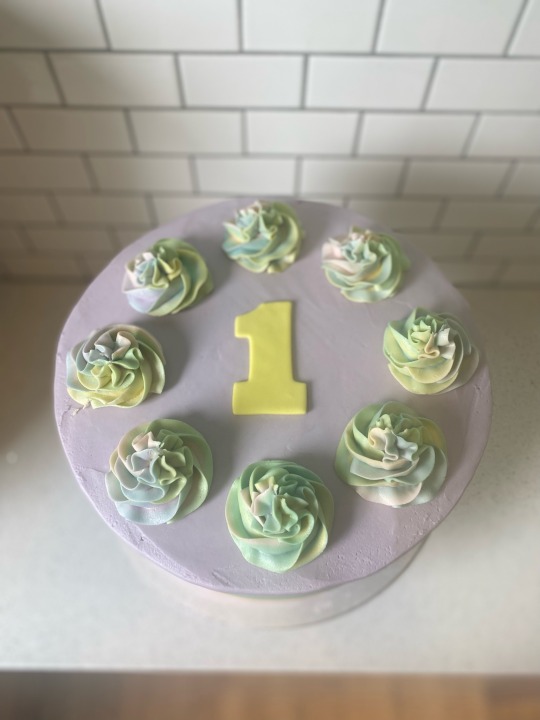
Lastly came the decorative blobs of frosting on top, arranged in an alternating circular pattern of strawberry, vanilla, and chocolate. On the bottom of the cake, a border of chocolate frosting is piped around the circumference. A delicious project like this was worth the time and effort! It is a delightful, edible work of art.
RALSEI'S CAULDRON CAKE:
Strawberry reduction:
About 1 cup (or more) fresh strawberries, or 2 cups frozen
1/2 cup strawberry puree, from either fresh or frozen strawberries (I thawed about 2 cups of frozen strawberries so I'd have 1/2 cup of puree for the reduction, and another 1/2 cup for the frosting)
Note: You'll need about 1 cup of puree because while half will be reduced for the cake batter, the other half goes into the strawberry ermine frosting. You'll have leftover puree that you can use for whatever you want. The reason I'm overestimating is to make sure there's plenty for the cake and for the frosting.
Either wash, dry, hull, and slice enough fresh strawberries for 1 cup of puree, OR thaw about 2 cups of frozen strawberries.
Place fresh or thawed frozen strawberries into a blender or food processor and use the puree setting.
Measure 1/2 cup for the reduction and pour into a saucepan over medium heat. Cook for 10 minutes or until liquid is greatly reduced, leaving you with 1/4 cup of a thick strawberry puree. Have it cool and set aside. If you're doing the cake over multiple days, store the reduction in your refrigerator.
Vanilla ermine frosting (from Nagi on recipetineats):
1 cup granulated sugar
5 tablespoons all-purpose flour
1 cup milk
2 sticks (1 cup) unsalted butter
1 pinch salt
1 & 1/2 teaspoon vanilla
Remove unsalted butter from your refrigerator and set it out to soften. Measure your sugar and flour, and add them to your saucepan.
Turn on your stove to medium heat and give your flour/sugar mixture a good stir with a whisk for about 30 seconds or so.
While whisking, slowly pour in the milk to avoid lumps from forming.
Keep stirring with your whisk as your mixture cooks and thickens. This is to prevent your roux from sticking to the bottom of the pan or burning.
Once your frosting base has reached a pudding-like consistency, it's ready. The thicker it is, the more structure your frosting will have.
Pour your frosting base into a bowl and cover the surface with food wrap to prevent a skin from forming.
After your frosting base has cooled completely (and if you stored it in the fridge overnight, take it out to let it soften for an hour or more so it mixes easily with the butter), beat your softened butter on medium speed for a few minutes. You want the butter to go from a pale yellow to a near-white.
Once your butter has been whipped for a bit, slowly add your frosting base, a spoonful at a time. It should take a minute or two to add the entire base to your butter.
Add salt and vanilla, and keep beating for a few more minutes until your frosting has reached its desired consistency.
Strawberry ermine frosting (from Mimi on eatsdelightful):
1 cup granulated sugar
1/2 cup strawberry puree
1/2 cup milk
1/3 cup flour
2 sticks (1 cup) unsalted butter
1 tsp vanilla extract
1 pinch salt
Measure another 1/2 cup of leftover strawberry puree from making the reduction for the cake, or that more frozen strawberries/hull and slice more fresh strawberries and puree in a blender or food processor if you need more. Set aside.
Once again, set aside another 2 sticks of unsalted butter to soften.
Combine flour and sugar in a saucepan over medium heat and stir with a whisk for about 30 seconds.
While whisking, slowly pour in the milk to avoid lumps, and then the strawberry puree.
Keep stirring your frosting base until thickened, just like with the vanilla frosting base.
Once the consistency has reached that of a thick pudding, pour into a bowl, cover the surface to prevent a skin from forming, and let cool completely.
Once the frosting base has completely cooled, whip unsalted butter on medium speed for a few minutes.
Slowly add in strawberry frosting base to the whipping butter, a spoonful at a time, over the course of a minute or so.
Add salt and vanilla, then keep whipping for a few more minutes until your frosting has reached the desired consistency.
Bonus: Chocolate Ermine Frosting (based off of the strawberry ermine frosting recipe):
3 tablespoons cocoa powder
3 tablespoons hot water
1 cup granulated sugar
1/2 cup milk
1/3 cup flour
2 sticks (1 cup) softened unsalted butter
1 tsp vanilla extract
1 pinch salt
Combine 3 tablespoons of cocoa powder with 3 tablespoons of hot water in a small bowl. Stir together and set aside.
Set aside another 2 sticks of unsalted butter for softening and combine sugar and flour in a saucepan over medium heat, whisking for 30 seconds.
Slowly add in the milk while whisking to avoid lumps, then add in the cocoa mixture. Stir to combine.
Stir constantly while your frosting base cooks and thickens. When it reaches a pudding-like consistency, it's ready.
Pour mixture into a bowl and cover the surface to prevent a skin from forming. Cool completely.
After the frosting base has completely cooled, whip butter for a few minutes on medium speed until light in color and fluffy.
Slowly add the frosting base a spoonful at a time over the course of a minute or longer.
Add salt and vanilla and continue to beat for another few minutes until the frosting has reached the desired consistency.
The cake itself (from Melissa Diamond on My Cake School):
3 cups cake flour, spooned and leveled
2 tsp baking powder
1/2 tsp baking soda
1/2 tsp salt
1 & 1/4 cups buttermilk (or 1 & 1/4 cup milk mixed with 1 tablespoon lemon juice and sat aside for 5 or more minutes if you can't find buttermilk)
1/4 cup vegetable oil
2 tsp vanilla extract
1 & 1/2 sticks (or 3/4 cup) softened unsalted butter
2 cups sugar
4 large, room temperature eggs
3 tablespoons unsweetened cocoa powder
3 tablespoons hot water
1/4 cup strawberry reduction
Get the butter out and let it reach room temperature. After that, set out other cold ingredients such as eggs, buttermilk, and the strawberry reduction. Gather the rest of your ingredients as well, so they're all together.
Preheat your oven to 350 degrees F, and grease and flour three 8x2 cake pans.
Spoon and level 3 cups of cake flour into a sifter, add baking soda, baking powder, and salt. Sift together into a mixing bowl, then stir together for 30 seconds. Finally, set aside your dry ingredients.
Measure and combine buttermilk, vanilla, and vegetable oil in another mixing bowl and set aside.
In yet another mixing bowl, whip softened unsalted butter on medium speed until smooth. Add your sugar, a little at a time, then keep mixing for another few minutes, anywhere from 3 to 5, until your butter and sugar is fully creamed together, light, and fluffy.
Add eggs, but only one at a time as you beat. Once the yolk disappears and is fully incorporated, add in the next egg, beat, etc., etc.
Once all the eggs are in and beaten, reduce the speed to low and alternate between adding the flour mixture and the buttermilk mixture, starting and ending with the flour mixture. Just remember the pattern: flour, mix, buttermilk, mix, flour, mix, buttermilk, mix, flour, mix. Stop immediately once everything's fully incorporated to prevent overmixing.
You've made an enormous batch of vanilla cake batter! Now's the time to divide it up into three flavors. Here's how to divide it evenly: the batter should yield about 7 and 1/2 cups....divide that by three....and you have 2 and 1/2 cups of batter for 3 bowls.
Combine 3 tablespoons of cocoa powder with 3 tablespoons of hot water in a small bowl. Stir and set aside for a few minutes.
This is a good time to add the strawberry reduction to one bowl for the strawberry batter. Just pour in that thickened strawberry puree and carefully fold it in to combine, in order to prevent over-mixing the batter. Once you've got yourself a bowl of pink cake batter without any vanilla swirls remaining, your strawberry batter is ready!
Now, pour in the cocoa mixture into another bowl of cake batter, and gently fold it in, until the batter is completely chocolatey. You remaining vanilla batter will be left as-is.
Now that we have all three flavors ready, we can finally pour them into our prepared cake pans. Give these a good gentle tap on the counter to remove any huge air pockets. If you want, you can wrap the sides of each cake pan (before filling them with batter, of course) with wet baking strips to ensure an even bake, which will hopefully make later leveling much easier.
Stick your cakes in the oven on the same middle rack to ensure they all bake together at the same time, about 25 to 30 minutes, depending on how hot your oven runs. They may not all fit on one rack, so you can just put in two in one 25 to 30-minute interval and bake the remainder in the other. To check when they're done, insert a toothpick in the center of each cake. If they come out clean with just crumbs, they're done!
Let your cakes cool before removing them from the pan.
Once your cakes have cooled, get your cake leveler and level them so that they're even. If you don't have a leveler, a knife may do, however, they may not be as even this way.
If you're assembling and decorating the next day or later, wrap and store cakes in the freezer. Freezing them will make it easier to crumb coat, pipe on filling, frost and decorate.
Take out your frostings and let them soften to room temperature. Get three piping bags fitted with the tips of your choice, and stand them up in glasses to make them easier to fill.
Place your bottom cake layer (the chocolate is usually the densest, so it's best to use that one as the bottom layer) on a round cake board. Set it down on a turntable or small Lazy Susan and pipe in an arrangement of the strawberry, vanilla, and chocolate frostings.
Place your second layer on top and freeze for 10 minutes or so to harden the frosting. Take out, and then pipe on another layer of the three frostings in whatever pattern you'd like. Top with the top cake layer and freeze again.
Remove stacked cakes from the freezer and pipe on a thin layer of vanilla frosting for the crumb coat. Cover the cakes in this thin layer to seal in the crumbs so you have a better surface to decorate your cake with. Freeze for 10 to 15 minutes for a more solid and sealed surface.
You can do whatever layer you want to start decorating with. I began with the top layer and worked downward. Pipe on a thick layer of frosting covering the top of the cake and smooth out with a frosting spatula or scraper, giving it that nice, flat top surface seen by professionals. Because the sides will have those strawberry-vanilla-chocolate stripes coinciding with the cakes, freeze between flavors to prevent your frostings from sticking and blending together. So, as an example, after you've done the top and the sides of the top layer of the cake, stick it in the freezer for about 15 or 20 minutes. Next, pipe on a layer of frosting matching the middle flavor and smooth it out like you did with the top flavor, and freeze again. Lastly, do the same for the bottom, then freeze. What I mean to say is: freeze between the stripes on the sides!

Like this!
22. Now that the stripey sides are done as well as the top of the cake, we get to pipe on the fun blobs. One way to do it is to do big blobs of the three flavors on top in a pattern....or you could do whatever design you want. Don't forget to pipe a border around the very bottom of the cake to make it look nice and neat!

23. Your cake is done! Unless you want to add sprinkles, candles, or even candy. You decorate how YOU want, of course, this is just an idea going off of how I did it.
24. Enjoy your tall triple-layered cake full of three-flavored goodness!

Sources:
Nagi, "My Secret, Less-Sweet Fluffy Vanilla Frosting", RecipeTin Eats, recipetineats.com. Link: https://www.recipetineats.com/fluffy-vanilla-frosting/
Mimi, "Strawberry Ermine Frosting", Eats Delightful, eatsdelightful.com. Link: https://eatsdelightful.com/strawberry-ermine-frosting/
Diamond, Melissa, "Neapolitan Cake", My Cake School, mycakeschool.com. Link: https://www.mycakeschool.com/neapolitan-cake/
#castletown cafe#deltarune chapter 2#deltarune#deltarune food#deltarune inspired recipe#deltarune fanart#ralsei deltarune#deltarune ralsei#susie deltarune#deltarune susie#neapolitan cake#cake#cw food#recipe#my art
25 notes
·
View notes
Text
A birthday cake going out this afternoon. I’ve been up baking/decorating since 3:30am. 😳
35 notes
·
View notes
Text
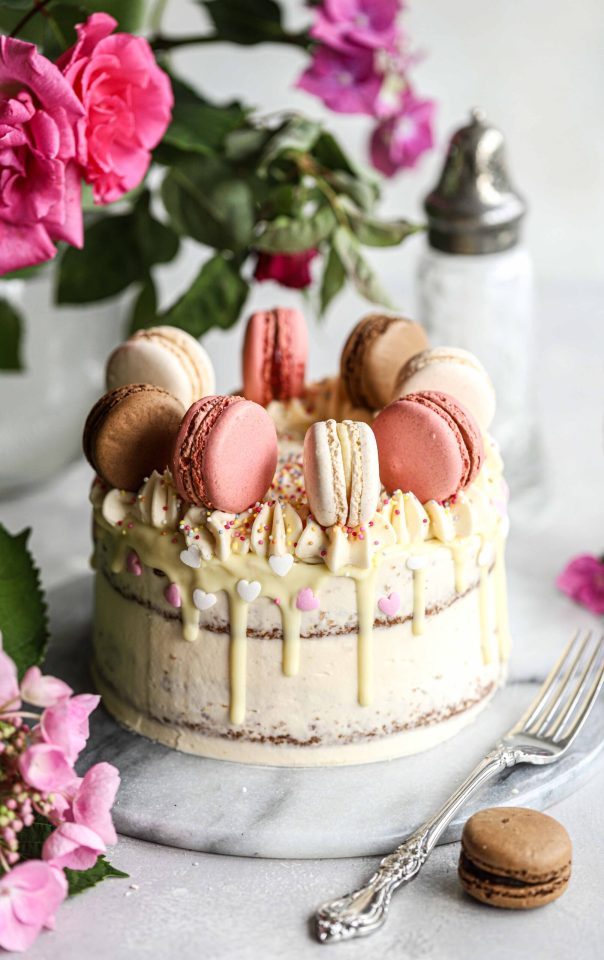
Macaron Birthday Cake
#macaron#birthday cake#cake#food#birthday#baking#macarons#color#pink#neapolitan#strawberry#chocolate#vanilla#valentines day#recipe#passionfruit#fruit#syrup#white chocolate#charleyshealth
322 notes
·
View notes
Text
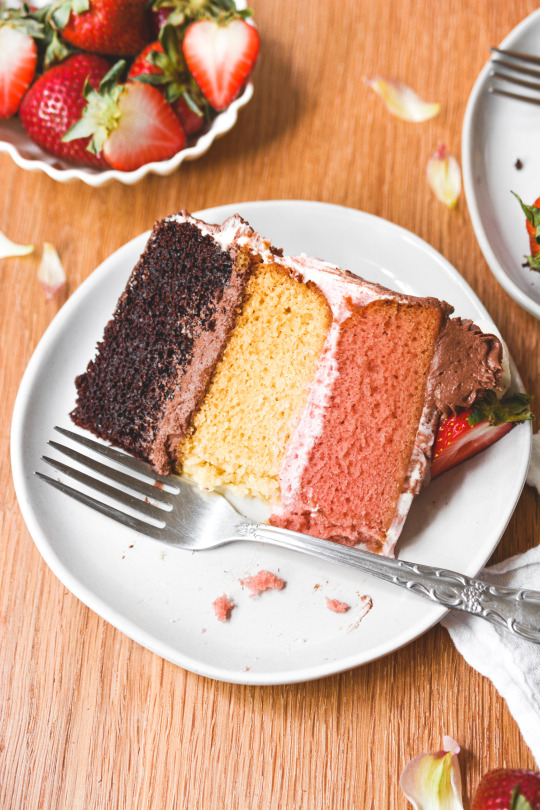
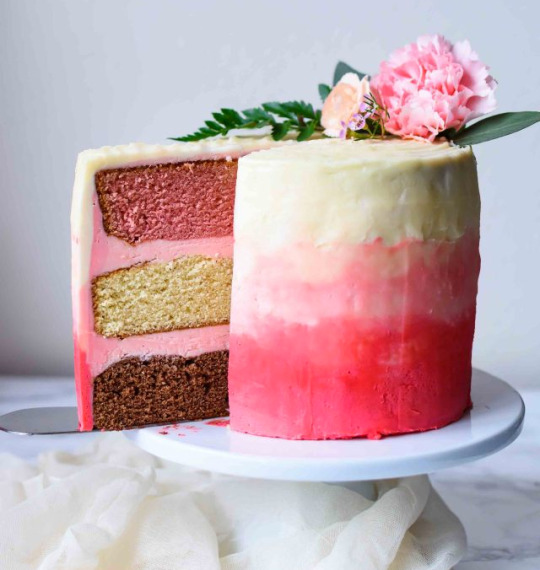
raspberry neapolitan cake (via instagram)
112 notes
·
View notes
Photo
#ombre#neapolitan#pink#pinkcore#Aesthetic#pink aesthetic#pastel aesthetic#pastel#cooking#baking#food#sweet#dessert#delicious#cake
439 notes
·
View notes
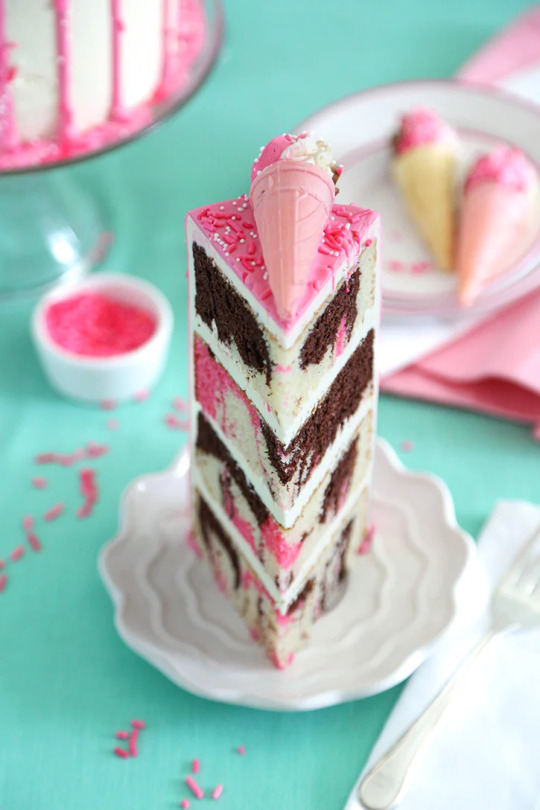
Photo

Neapolitan Cake with Swiss Meringue Buttercream
#food#recipe#dessert#cake#neapolitan#strawberry#chocolate#vanilla#buttercream#frosting#baking#vegetarian
167 notes
·
View notes
Text

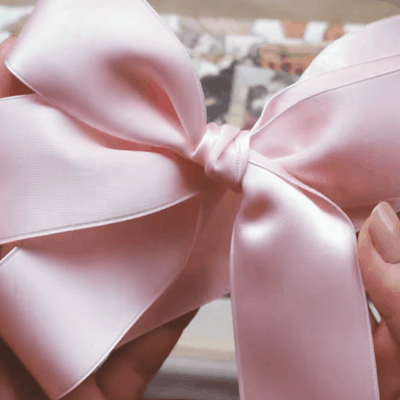
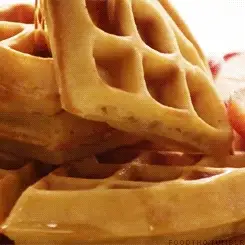


[[ 🍨﹒🎀﹒🧇 || 🎂﹒🎀﹒🎂 || 🧇﹒🎀﹒🍨 ]]
#stim#visual stim#stimboard#sensoryboard#moodboard#aesthetic#tokidoki#maid cafe tokidoki#sweet lolita#ice cream#neapolitan#bow#waffles#shoes#dress#cake#sweets#pretty
34 notes
·
View notes
Text

New year, new OC. Well, to most of you, anyway.
No, I did not forget Karma and Gakushuu’s birthdays (though, I wouldn’t blame you if you thought I did). For Karma, I missed it ‘cause… well, I explained it in my last post; it’s there. So then I thought this was a perfect opportunity to make a brothers post, give him a late b-day piece, especially since if I were to pick one of the birthdays, I prefer January 1st (though, twins (and triplets, too, but, er, we’ll get to that very soon) don’t have to be born on the same day, so he could still be born on Christmas… details, details). And then, because I’ve been mulling over introducing her for a while, I decided to make it into a triplets post and introduce you to my OC Mineko.
She’s made a cameo before though; I don’t know if you remember. It was in a Kuniko piece.
I originally meant to introduce her in a fanfic first, but, uh… dunno when that’ll be written ^^; (I’ll get to it one day, but it’s not seeming anytime soon). Made her a few years ago because I really like seeing people give Gakushuu or Karma a sister, and since I’m obsessed with brothers’ AUs, why not hit two birds with one stone? Though, she only came into proper fruition when I got the fic idea. But yeah, decided to introduce her now, since January 1st is definitely her birthday, regardless of Karma’s (she’s the middle triplet. Gakushuu’s still the baby brother, haha). That was the plan, anyway, considering January 1st was yesterday… Oops.
But yeah, a belated happy birthday to Gakushuu (and Mineko), and a very belated happy birthday to Karma (One year, I’ll be on time for both 😤).
I’ll post some old sketches of her in a few days from now (to pad out some time for my next post; dunno when I’ll get something new out), and I’ll talk a bit more about her then, too, so you have some info on her and she’s not just a blank slate until I get her character sheet done (I am working on those, trust me… just, the art rut paused the process). But yeah, kinda wanna talk about the piece for a bit.
Since I’m dealing with 3, Neapolitan flavors were an easy idea to come to. So they’re having a little sibling outing on their birthday, eating little cakes. Obviously don’t have to explain Karma’s choice of flavor, but I kinda wanna explain Shuu’s. See, when I was a kid, I vividly remember seeing vanilla being referred to as the king of ice cream flavors, but when I looked it up years down the line, I couldn’t really find anything justifying my memory :/ But I’m pairing Shuu with vanilla because of that title my little kid brain may or may not have made up. I mean, why wouldn’t he want the (hypothetical) king of all flavors? And then Mineko gets chocolate by process of elimination. She wouldn’t really have a preference between those three flavors.
#assassination classroom#ansatsu kyoushitsu#asano gakushuu#akabane karma#asano mineko#assassination classroom oc#ansatsu kyoushitsu oc#oc#original character#fanart#digital art#you know especially as a kid if i got a box of neapolitan ice cream in that order i would not have been happy haha#absolutely hated chocolate ice cream and still don’t like it#it sucked whenever i got a bit of chocolate in my vanilla#and i couldn’t imagine chocolate with strawberry#vanilla with strawberry together was and still very much is divine though 👌#though my favorite’s cake batter#and now you know some of my preferences for ice cream/fro-yo haha#don’t know what you can do with that… but have this info anyway eheh#oc art
22 notes
·
View notes
Text

neapolitan cake from @therosewifebakes on ig
14 notes
·
View notes

Text
Boo get Art Dumped


Wahoo!! Okay anyways back to radio silence 👍
#sonic the hedgehog#sonic oc#sonic ocs#sonic original characters#alrighty so names#Peri the Hedgehog#(<-Previously Roxie the Hedgehog)#phoebe the peacock#Parfait the Porcupine#Cordelia Robotnik#Hero the Hedgehog#Randy the Rat#Laiyla the Fox#Cherry the Cat#Angel Cake the Rabbit#Neapolitan ''Nea'' the Porcupine#ive redesigned so many OCs its not even funny
11 notes
·
View notes
Text
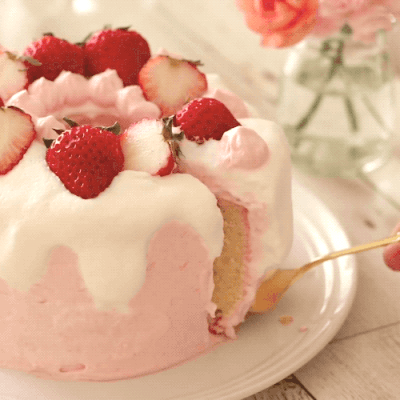
Neapolitan Cake
#sweet#recipes#recipe#food#vegan#veganism#vegetarian#foodporn#food porn#cake#dessert#baking#cake decorating#frosting#icing#strawberry cake#chocolate cake#vanilla cake#strawberry#strawberries#chocolate#vanilla#plantbased#plant based#neapolitan#sprinkles#pink#thinspø
10 notes
·
View notes
Photo
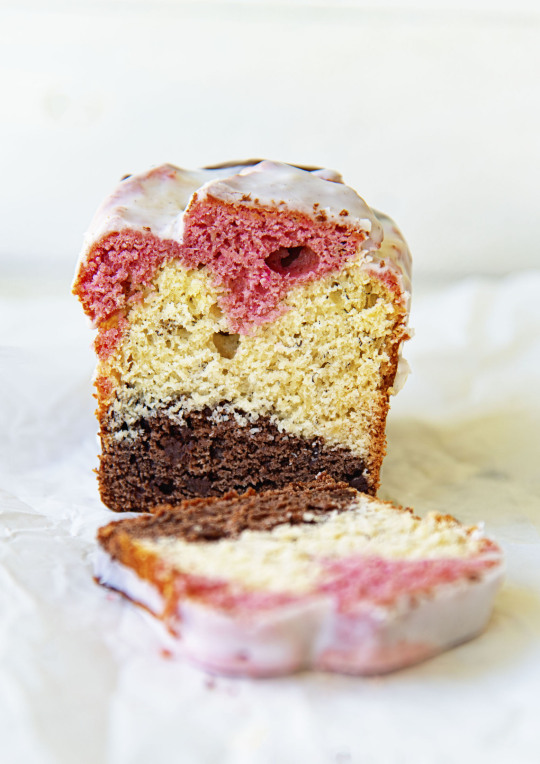
Neapolitan Banana Bread Recipe
#neapolitan#banana bread#banana#bread#baking#recipe#fruit#strawberry#chocolate#vanilla#marble#cake#triple#glaze#mascarpone#color#pink#berries#freeze dried strawberry#sour cream#sweetrecipeas
266 notes
·
View notes
Last Seen Blogs

cccsammy1
SAB

i-love-beyond
I LOVE BEYOND


lthrmarc
Unbetitelt

thegioinuochoadubai
Thế Giới Nước Hoa Dubai