#Ok turns out my art app does have an eraser
Text
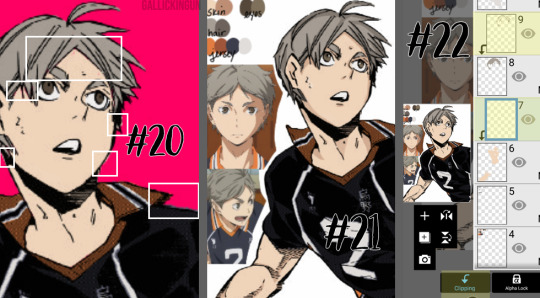
basic manga cap tutorial || ibis paint x

I got a request on how I color my manga caps (you can check them out in #morgan-colors-bnha and #morgan-colors-hq), so I thought I’d do this step by step tutorial that walks you through my process!
I color and draw on my phone (Samsung Galaxy Note10+) using the stylus provided with the phone, however you can use your finger. For manga cap coloring, I use Ibis Paint X, which you can find HERE for the Google Play Store, and HERE for the Apple App Store! It is a FREE app, and actually really helpful for a number of reasons, which I’ll show you down below! It does go without saying - there are a limited number of brushes that you get with the free section, but I haven’t found them to be too limiting, however I’ve only done basic manga cap coloring. You can watch short ads (I haven’t watched any, so I can’t vouch for the obscenity of them) to use the non-free brushes for a short period of time, though.
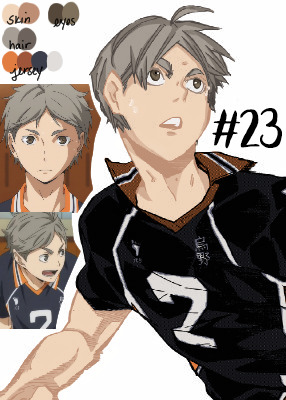
The first part of this tutorial is going to be showing you how I took THIS SUGAWARA manga cap and turned it into the one you see HERE (both as pictured on the header image). The second part of this tutorial, attached at the bottom, is a timelapse video where I show you how to turn THIS BOKUTO manga cap into the one you can find HERE.
Alright - without further ado, let’s get into the tutorial! As always, if you have any questions, please feel free to drop by my ASK BOX! Hopefully this is in depth enough without being too confusing. ❤
I’m doing this in steps so it can be in depth and informative enough, but I know that can become a little confusing, so I’m going to do my best to explain each step. I’ve also highlighted using little yellow boxes where I’m referencing, as pictured below.
To start, here are the ways I usually find manga caps:
1. Google searches, Pinterest searches, etc. Sometimes they’re already transparent, other times they’re not. I’ve found that I’m able to use the non-transparent ones because of the tools that are within Ibis Paint X.
2. Tumblr blogs - there are some blogs that are meant purely for transparent manga caps.
3. Manga scans. I, personally, haven’t used manga scans, but I know others that use them! They usually require some extra clean up, which can take extra expertise. Removing speech bubbles, backgrounds, etc.
Please remember to provide credit if it’s requested from the original poster!

Step #1: Open IP (Ibis Paint - I’m not going to say it every time because WOW that would get repetitive) and click on “My Gallery”.
Step #2: This is your gallery - as you can see, all of my prior caps are here, and this is where you will either open an old cap and keep coloring, or start a new one. In the bottom lefthand side, you see I’ve highlighted the “+” sign. This will bring you to the next screenshot.
Step #3: This is where you can choose if you want to create your own canvas, or create a canvas based off of the imported photo. Since I don’t do many “official” manga cap posts where I create a full image set from them, I usually just click on “Import Picture”, and go from there! However, if you want to create an image canvas, and import the picture once you’ve gotten the canvas open, please see Step #6 for how to import the image once you’ve already created a canvas!

Step #4: This is the screen that should pop up every time you import an image. When you’re doing manga caps especially, you’ll want to hit “Ok”.
Step #5: I believe these are the automatic settings, however if they’re not on your app, these are the settings I use when selecting how to extract the line drawing. Black at 0%, White at 100%, and Middle at 50%. This will remove the background from the manga cap, and only leave the dark line art remaining.
Step #6: This is what the layer should look like once you’ve extracted the line drawing. See highlighted the “+” button - this is how you will add new layers. I chose to add a new layer, which you can see in Step #7. However, if this is where you want to add an image, see the highlighted camera button. This will let you choose an image from your camera roll and import. The “Extract Line Drawing” option will appear each time that you import an image, so don’t worry about triggering it! It will trigger itself!
Step #7: Here is the new layer! I cut out the screenshot from before, but each new layer shows up on top, so I had to use the three little lines on the righthand side to drag it beneath the layer of the Sugawara manga cap layer.
Step #8: I used this new layer to import a photo of Sugawara in his uniform from a quick google search. I actually end up grabbing another one just to make sure I know what the bottom half of his uniform looks like, but I don’t show it just yet. Because the layer is behind, it shows up underneath Suga’s face. I end up erasing the parts that interfere with the cap here in a bit.
Step #9: When you click the brush button down at the bottom, this selection screen comes up. There are a ton of brushes to choose from, but for the base colors, I use “Dip Pen (Hard)” at 100% opacity. I’ve shown it highlighted here!

Step #10: Now we’re going to create our color palette. Sometimes I will find color palettes online And import them, but for the sake of simplicity, I’m going to use this photo of Suga along with another one that I nab later to create the palette. The way you use the “dropper” tool (if you’re familiar with Photoshop) to select the colors from another portion of the image is to press down rather hard, and then this circular selection tool will pop up. You can keep the pressure and drag it to the specific spot you want to pick up a certain color for. I’ve found that it’s best to do this with my finger instead of my stylus. I’m not sure if it’s because the heat of my finger and the change in pressure is easier to pick up, but that’s what works for me!
NOTE: It is important to note that if you have the eraser tool selected instead of the brush tool, you won’t be able to use the color selector. This might come as second nature to some of you, but it STILL makes me screw up from time to time, haha.
Step #11: Using the dropper/color selection tool from Step #10, I create a small color palette, as you can see in the upper lefthand corner of the image in this step. I grab both the lightest and darkest shades from the different things I’ll need to color in for the cap. I picked up the highlights and shadows of Sugawara’s skintone, eyes, hair, and jersey. I just draw in little overlapping circles so I can switch back and forth between the colors
Step #12: I added an additional layer in the very back of this image, and colored it in completely using a blue shade. This will allow me to make sure that I’ve filled in all of the space behind the manga cap. It’s important to note that in order to color the line art in later, you’ll actually need to “overdraw”. We’ll touch on that more later.
Step #13: As I show here, I have a layer where I use the singular skin tone shade and color in behind the manga cap, filling in all the spaces where Sugawara’s skin is showing. I usually use a different layer for each different shade/color just in the event I need to do a bunch of erasing, or if I need to change the layer style later.
Step #14: Here is where I show how I “overdraw”. I’m not sure if you can see it very well here in these screenshots, but the way that these manga caps are drawn, sometimes the line art isn’t “clean”, it looks more shaded/scratchy. So, in order to combat white space, I usually overdraw and then go back in with an eraser. You can see in Step #15 the size brush I usually use - somewhere between 2.0-4.0, but most of the time I use a 3.0 size brush. I’ll go back in with the eraser with a similar size on the easy parts, and then all the way down to the smallest size - 0.3 for really close quarter erasing.
NOTE: It’s important to realize that the smaller the eraser, sometimes the circumference of the eraser can be really light in opacity as well. You can help this with the intensity of the pressure that you use with your stylus/finger, but I’ve found that sometimes using a really small eraser can be counterproductive. There are times where I’d rather “over” erase in which I actually erase into the cap and then redraw using a small brush size. You’ll have to play around with eraser/brush size and such to see what works best for you!
Step #15: Here is the skin all colored in! You’ll notice I colored in his eyes and mouth, which are going to end up being white in the end. I do this because usually it’s easy to forget that you need to color things in white if you’re doing it against a white background. I oscillate between the colored background and the white/transparent one because sometimes it can be tough to look at that bright color all the time. I’ve found that this is more of a tip/trick for me to be able to remember to color in his teeth and eyes and even sometimes the brow or other features! In the end, this just works for me. You don’t have to do this step!
NOTE: As I stated in Step #14, using pressure can change things. The same goes for this specific pen type - the dip pen. I use about size 3.0 most of the time, but I can actually do really detailed work with this size pen (see Suga’s ears, the spaces between his hair, etc.) by using lighter pressure. I do have a stylus, so this is a lot easier for me. The pressure was a little tricky for me to get down in the beginning, but once you realize how soft/hard you need to press down, you can use bigger brushes for even smaller areas. I find that makes it a lot easier for me, since I don’t have to keep changing the brush tool - which you can do using the sliding bar at the bottom of the screen labeled “Thickness”. The thickness of a brush is the circumference it has when you are using the hardest version of pressure you can muster, so keep that in mind!

Step #16: Here is where I do the basic coloring for the skin, hair, and eyes. These colors will be relatively the same as the colors from the palette, because there is not a “gray cast” caused by the line art sketch from the manga cap. This means that the skin color that is showing in the manga cap that I’ve colored is pretty close to the original color from the screencap from the anime/the palette that I’ve got in the upper lefthand corner. I do FLAT coloring for this - aka NO SHADING YET. So I only use the LIGHTEST shade for the hair and skin - the ones farthest to the left on the palettes for each section. I do use the DARKEST shade for the eyes, but that’s because usually the lighter shade is the one you use most sparingly, where as with skin, the darker shades are used for shadows only and aren’t used in excess.
NOTE: As previously stated, I do a separate layer for each different color. At this point there should be six layers, as follows (from the bottom up):
Layer 1: Background Layer (Mine is blue, but for the sake of easy viewing, I made it white.)
Layer 2: “Notes” Layer - this is where I keep my notes, as in the reference photos, color palette, and any other things here and there.
Layers 3-5: These are the colored layers - skin, hair, and eyes.
Layer 6: Manga Cap Line Art

Step #17: Here’s where I’m showing the two different orange tones. This is what I meant in Step #16 - The original orange shade is the lower part of Suga’s collar - as you can see, the line art shading makes the color a lot more muted. I used the color wheel to find something brighter, just for a comparison shot. I still choose to use the traditional palette that I pulled from the anime screencap.
Step #18: Now that I’m ready to color the manga cap pieces that are skewed by shading (i.e. his jersey here), I usually turn the manga cap down in opacity, so I’m able to recognize where I need to fill in! This is where I fill in the blue of the jersey, the orange of the collar and other accents, as well as the off-white shade for the number and the line accents.
Step #19: Using the eraser and smaller brush sizes, I fill in all of the flat colors. No shading yet!
Here comes the time consuming, nuances...
Step #20: I’ve turned back on the colored background layer - sometime between when I started and now, I changed it from blue to pink. If you can zoom in on the image, you’ll see the boxes in white contain “errors”. This is areas where there are “holes” in the coloring, or where I’ve gone outside the lines. I’m going to go back in and clean this all up with the eraser and some more brush work.
NOTE: This is very important, especially if you’re trying to make this a transparent image, or if you’re going to do the extra steps and color in the line work. Any holes, overdrawn, or underdrawn areas will make the final drawing look a little funky.
Step #21: Here is the shading! Honestly, this cap kind of shaded itself, haha. Some manga caps have “built in” shading, as you can see on Sugawara’s arms and neck. I added some shading to his hair and face, trying to use the anime caps as a reference. I’m not very good at shading yet, but I wanted to show it here so you guys could see!
I used the darker shades from the palettes on the eyes, hair, and skin. I didn’t do any shading to the jersey because the manga cap lines already skew it so much, that it didn’t really seem necessary. This can be a really hit-or-miss time, both with areas that you choose to shade, as well as the colors that you use. I would really suggest searching for skin tone palettes if you’re not using the anime screencaps for reference!
Step #22: For my shading, I actually use “clipping” effects. As you can see, the two layers that are highlighted are clipped to the layers beneath. This means that the coloring on the clipped layer will “attach” aka clip itself to the layer beneath and that layer only. So, for the shading of the skin, hair, and eyes, I chose to clip the shaded parts to the base coloring, that way even if I over drew, the colors wouldn’t bleed together.
I did more of what’s called “cell shading” for this manga cap, as well as the Bokuto one that I do in the timelapse video below. What is cell shading? This wiki page explains it pretty well, but basically it’s more “harsh” shading where there’s not necessarily an airbrushed quality to it, it’s more blocky. You can see I only chose to use one color of shading, which makes the contrast much more stark. IP does have several airbrush tools, I’ve used them in my Bakugou manga caps for his gauntlets, and they work really well!
I brought up earlier that it’s important to color your base colors all the way to the edges of the manga cap line art. This clipping effect is why. On Suga’s neck and ears, the darker shade that I used for his skintone goes to the edge and actually underneath the line art of the cap, because it is clipped to the base skintone layer beneath. Had I not made sure to go all the way to the edge of the line art, this would be much more choppy, and there would be white space between Suga’s ear and his hair!
Step #23: Here is the extra step - line art shading! This can be tricky, depending on the complexity of the line art, the shading, etc. Usually, in choosing a shade to color in the line art, I grab the darkest shade for that section, and then grab something even darker. As seen in Step #18, there is that drop down box that is currently listed to “Normal” - this will need to be set to “Screen” for the current line art coloring layer. You’ll also need to “clip” the layer you’re using for the line art color to the manga cap, meaning it will need to be on top of the manga cap layer - and therefore, should be the highest layer in the image.
For this image, I only did line art coloring on Suga’s face, hair, arms, and neck. I was really satisfied with leaving the jersey alone so far as coloring. I did this mostly because of the sketchy quality of the cap, the line art would be really involved and complicated, and it just wasn’t worth it to me (so sorry lol), and I liked how it looked with the darker color outlining it anyway.
Also, I added little details like making the sweat on Suga’s face outlined in white! And yes, I do know that missed Suga’s beauty mark, but we’re going to pretend I didn’t just do that. I love you, Koushi, please forgive me.
And that’s it! I’m sure there are easier ways to do things, or better ways, haha. But this is my beginner tutorial (as in I’m the beginner, lol). I hope that this helped anyone whose doing it for the first time! I stated this before, but if you have any questions, please feel free to hop into my ASK BOX and ask me! I’d love to help anyone out! And I’ll do my best!
See below an additional manga cap coloring - Bokuto Koutarou this time! I thought doing a timelapse video of me actually coloring in the cap would help you guys out!
PLEASE BE AWARE: This video is in 2x speed so it could not be forever long and really boring lol. With that being said, I do spin the screen around several times while coloring in the cap - this could make you nauseous, so please beware of that before you watch!
Here is a link to the time lapse video on YouTube!
A special thanks to @cutesuki--bakugou who helped me a lot while I was coloring my original caps, and also to @writeiolite who nudged me in the direction of finally starting to color manga caps! And a little thanks to @rouge-heichou since I bugged her about a couple of things as well. And then as always, a huge thanks to @candychronicles because she keeps me sane. Also a special mention to @pixxiesdust because she does really cool gifs and has done a wonderful job in the bookclub of trying to share her knowledge with everyone else.
Disclaimer: I’m no artist, this is just for fun! I’m sure my shading and line art can use some work.. but I’m not focusing on that! Instead I’m just going to keep playing around and having a good time ❤
#haikyuu!!#haikyuu manga#haikyuu manga cap#sugawara koushi#bokuto koutarou#manga cap color#manga cap coloring#manga cap tutorial#coloring tutorial#manga cap coloring tutorial#morgan colors hq#morgan colors bnha#morgan does tutorials
159 notes
·
View notes
Note
Hey! I just had a little idea for the Modern AU! Since El likes drawing, how about Byleth gets her a drawing tablet?
Yes!
At first she is confused. Very confused. “I thought you said you were going to get some drawing supplies?”
“El, this is for drawing! Look, you plug it into the computer here. And then you take this pen and hold it close to the pad, and it moves the cursor around like the mouse does.”
“...Ok... But how does it draw?”
“I was getting to that.” Byleth opens up a program she already downloaded. It was a design app, not the expensive subscription-based one but maybe if El gets into this she might consider getting that one. She sets up a blank page and hands El the pen.
“These little buttons along the side all have different functions. That one there is the paintbrush,” she said, pointing to the little brush icon. El’s a little clumsy with the stylus at first, but manages to drag the cursor over to the icon. Without question, she tapped the pen down on the tablet to click the icon before Byleth could explain, and Byleth felt a little rush of pride that her former student was so intuitive.
“So imagine the tablet is that white space. Whatever you draw on there will show up wherever the cursor is.”
Edelgard experiments by drawing a few lines and squiggles. “This is...certainly different,” she comments, “It’s hard to draw when I can’t look down at what my hands are doing.”
“That takes some getting used to,” Byleth assured her, “But look!” She reached for the keyboard and tapped two buttons at the same time, and the last line El had drawn vanished without a trace.
“Wh...what was that? How did you do that without an eraser?”
“‘Command-Z’,” Byleth told her, “I’m not much of a graphic artist, but I do know about that one. It’s basically an ‘undo’ button. Any mistake you made that you don’t like, you can just undo it with that, rather than fight with an eraser or try to fix it with paint.”
“Well, that’s certainly much more forgiving,” El sighed in relief, “That...would make things a lot easier.”
“It gets better! Here, let me show you how to find brushes.”
The first few drawings El does aren’t masterpieces in any respect. They were mostly for her to get used to using the program and the tablet. But she’s hooked almost instantly. Byleth comes home often finding her either drawing, or watching tutorials about drawing or the program itself, learning new tips and techniques to improve her skills.
Not everything is smooth sailing. Byleth was worried El was going to launch the computer monitor off the balcony when she was trying to learn the pen tool.
She starts experimenting with vectors once she does learn, however, and finds she almost likes the simplistic graphic style better than strict realism. She takes inspiration from some of the tattoos she’s gained to cover scars and remember friends. She starts hoarding books on design and form. And font. She still hates all the grammar rules but begins to actually understand why the rules exist after discovering typeface.
It blows her mind when she realizes that she can turn her own handwriting into a font.
She also learns that she can bring photos into the drawing program and change and enhance them there, too. The concept of photography itself was wild to her - the fact that a single moment could be captured in an instant, preserved forever in the purest form of realism. But then to take the realistic quality of a photo and change it! From something as simple as removing a blemish on a face to fully changing the colours and background! Even in this modern age with all this technology, people are still finding ways to alter reality through art and it amazes her.
She gets herself a camera not long after that revelation, and Byleth often accompanies her out on trips through the city. She photographs things no one in their right mind would photograph, and while some find it strange she’s so intent on getting a perfect shot of a pigeon, Byleth finds it endearing. She had grown so used to this world that banal things like pigeons went unnoticed by her. But El saw this world with wonder and amazement in a way she never could before. This world hadn’t hurt her the way her old one had. She wasn’t jaded and bitter about this one, and could still find beauty in everything. Even in pigeons.
Byleth suggests she create a blog to share her art. And she never really expected the small but notable following El gained as a result of that. Yet she was not at all surprised.
#ss/modern!au#fe three houses#au ideas#el isn't a quitter#i can totally see her stubbornly refusing to give up on the tablet#despite it being really hard to learn at first#but then once she's in she's IN#she always wanted to be an artist#but being emperor got in the way of that#now nothing is stopping her#and there are so many ways to BE an artist now#i also hc she'd be big on photography#just because she never wants to forget the people she cares about#drawing is only so reliable#especially if she can't remember already#but a photo perfectly captures someone's likeness#so she doesn't have to strain to remember#she just wishes it existed back in her time#she goes to the palace and photographs the last family portrait of the hresvelgs#and has it as her phone background#also as a print on her desk#it's the best she can do#auralite776#a world without gods
88 notes
·
View notes
Text

I’ve drawn a baby!
#Ok turns out my art app does have an eraser#I’m just a dumbass#pride art#pride#art#digital art#mtf#trans#Funnily enough in her world she’s the most feared#mostly because she’s insanely smart and strong#has connections with three gods and can alienate anyone with a point of her finger#She works with the god of torture#She’s also the only god to earn their god status#but the only thing she wants to do is play games and vibe#unfortunately torture falls under the games category#she also has memory problems#one of her abilities is to delete memories but only for herself#she gets it from her mom#except her mom can delete other ppls memories#anyway the heart is stored here#also if you can’t tell I drew the flag from memory because I didn’t feel like using a ref#Blue lagoon#another fun fact! Her name is pretty similar to one of my fav monster high charas!#it’s just a funky coincidence
2 notes
·
View notes
Text
It’s All Art ~ 82

Dinner conversation turned to what movies to watch. The shear number of choices the kids threw out made the adults’ heads spin. Oscar whistled loudly, which got their attention. “After dinner, you three go pick out what you want to see. We’ll pick out the second movie.”
Bella sneered, “Don’t pick anything boring.”
Oscar sneered back, “You either.”
Toni went wide eyed, “You could pick Ex Machina.”
“No, I couldn’t.” Oscar shook his head at the inappropriate choice.
“We’ve seen it.”
Charlotte rolled her eyes, “Of course you have.”
Nate nodded, “Mom watched so many of your movies that dad was teasing her about having a crush. It all made sense when you got here.”
Toni smiled, “She was doing research.”
Oscar faked a cough, “Stalker.”
The kids went back to trying to decide what movie to pick. When they finished eating they ran off to make their final choice. Oscar and Charlotte cleaned up from dinner and joined the kids on the couch. He picked up the DVD box, “Xanadu?”
Charlotte’s eyes grew wide, “Oh my god, I haven’t seen this in forever!”
Oscar took the box, “Never heard of this.” The girls sat on either side of Oscar and after sliding in the DVD Nate sat on the far side of Charlotte. The movie started with dancers outlined in neon color peeling away from their images on a wall. Oscar laughed, “Doesn’t get more eighties than this.” Only he was very wrong. There was music and dancing and roller skating and music while dancing on roller skates. The best thing was that during the musical number everyone around him would sing along. This was obviously a movie they’d watched numerous times. They all had their parts and pointed to whomever was to sing the next part. As cheesy as the movie was, he couldn’t help love that he’d been invited in to their production.
Charlotte sent the triplets to change into pajamas while she and Oscar made popcorn. In the kitchen she put her arms around him and kissed him, “Sorry, I forgot how dreadful the movie was.”
Oscar laughed, “I’ve never seen anything more 1980s. Made a little more sense when I found out they were daughters of Zeus.” He kissed her, “I love being part of your family. Watching you four was worth the pain.”
She laughed loudly, “I’ll let you pick the next movie.”
Nate was the only one who didn’t make it through the next movie. He was curled on his side tucked under Charlotte’s arm. An arm she could no longer feel, so Oscar carried him to bed. Charlotte shook out her arm and herded the twins to their room. She tucked them in and promised that Oscar would come and kiss them goodnight. They passed each other in the hallway on their way to the other kids’ room.
Charlotte put the popcorn bowl and glasses in the kitchen and headed to the bedroom. She was sitting on the edge of the bed when Oscar came in, “I’m tired.”
“Me too.” He pulled his t-shirt off and handed it to her.
Charlotte took off her shirt and bra before sliding into what smelled like him. She scurried under the sheets with a sigh, “This feels good.”
Oscar didn’t say anything until he’d stripped down to his boxers, joined her under the sheets, and pulled her body tight to his, “This does too.”
“Yes, it does.”
He lifter her chin to bring her mouth the his and enjoyed a slow lazy kiss. He could feel relaxation taking over. They drifted apart and Charlotte laid her head on his shoulder. He stretched out his back to get comfortable and remembered the picture. “Where’s you’re phone?” He spotted it on the nightstand, “Can you hand it to me?”
“Sure.” She watched him scrolling through her Instagram, “What are you looking for?”
He stopped and looked at her, “That picture Mike took of us with my family. I was thinking of that today while we were all out. There it is.” He stopped on the shot of all of them in the kitchen with her holding Mateo. His stomach did a little flip and he smiled. She looked good with a baby. He definitely wanted that. “How do I post a picture?”
“Are you opening your own account?” She already knew the answer and hit the plus sign at the bottom of the app.
“God, no.” He went into her gallery and found the picture of them on the private island. He zoomed in on the one of them looking at the camera while laying in the hammock. “Me and my Greek goddess. #muse #yesitsmepostingonheraccount #perfectday #love”
“Sweet.” She kissed him gently. “They’ll analyze how I’ve changed you.”
“Have you ever.” He laughed. “Starting when I was coming up the elevator with Amy to your studio. I’d had just enough bad dates to decide to focus on work for awhile. I didn’t believe in love at first sight. And was doing a favor for a friend. As soon as I saw you I forgot about the favor, I thought about you every day, and no one’s ever knocked me on my ass the way you did.” He kissed her and made himself pull away, “I never thought that I could love someone as much as I love you or not want to be away from or believed there was someone I was supposed to be with. Forever. So yes, you’ve changed me.” They were silent for long moments. “And I couldn’t imagine someone looking at me the way you are right now. I love you.”
“I love you too.” She moved her hands to his face and kissed him. “That was amazingly romantic.” She unsuccessfully tried to stop a smile, “I was talking about you using social media.”
They started laughing. Oscar tickled her, “You’ll never get me to join anything.”
Through her laughter she mumbled, “Except me.”
Her words stopped him, “Literally and figuratively.”
~*~*~
In the morning they awakened to the smell of coffee. Charlotte wondered which kid was up. She left him to wake up slowly and headed into the kitchen. She was surprised to see her parents. “Wow, you all came back early. I didn’t expect you for hours.”
Her mom kissed her cheek, “We had a lazy breakfast in bed then headed back.”
“Good day?”
“Wonderful.”
Oscar and the triplets joined them on the patio for breakfast. Oscar and Charlotte planned to spend a few hours relaxing at the poor before packing. They’d have an early dinner with the family before heading to airport and back to London. They found lounge chairs where they could see the sea and the pool was only a few steps away. Charlotte pulled her cover-up off and laid down. Oscar pulled his sunglasses down, “The kill me bikini.” She smiled and closed her eyes.
Drinks were delivered before the old one grew warm. When they grew warm they headed to the pool to hang on the infinity edge and watch the waves. They talked, laughed, and held hands between the loungers. Both were ready to go back to London. He had filming and she had an exhibit to get ready for. Still, they knew this would be the last calm for who knew how long. They stayed as long as they dared before dressing and gathering their things.
Heading to the bar to pay their bill they were met by a pair of women. Charlotte would guess them in their early twenties. She’d seen them a few times at the resort. They looked nervous. Charlotte smiled. They were here for Oscar.
He finished signing the bill and turned to where they stood, “Hi, ladies. Beautiful day.”
“Hasn’t been a bad day since we’ve been here. Last night was great.” The brunette stuttered, “I mean, you were great last night.” She glanced at Charlotte and blushed.
Charlotte laughed and Oscar shook his head, “Thank you.” He put his arm around Charlotte and went to take a step.
The other girl spoke up quickly, “Could we get a picture with you before you go? We’re leaving in the morning.”
“Sure.”
Charlotte noticed the girl’s digital camera, “Nice camera.”
The girl held it up, “Thank you. It does a lot more than I know what to do with.”
“You’ll learn.” Then she went on a hunch, “Are you two the ones who’ve been posting pictures to Instagram?” Their wide eyes and dead silence gave them away. Charlotte chuckled, “Are there more?”
The one holding the camera answered, “Umm.”
Her friend took over, “We’re not going to sell them or anything. We both are huge fans. There’s not tons like we’re stalkers or anything.” She looked at Oscar, “We didn’t go looking for you, but if you were there.”
“Can I have them?” The girls and Oscar looked at her. “Let me borrow your memory card. I won’t erase anything. Just run to the villa and copy them. You can talk to him while I’m gone.”
Oscar held up his hands and laughed, “Are you seriously bartering time with me for some pictures of us on vacation?”
Charlotte gasped, “Oh my god! That’s a horrible thing to do.”
“Yes, it is. Not a good precedent.”
She cringed, “I’m sorry. I didn’t think.”
He rolled his eyes, shaking his head, before he looked at the girl with the camera. “Give her the card. I’ll buy you drinks while she’s gone. Promise me you’ll tell no one. Ever.”
Both girls made a cross over their hearts.
Charlotte jumped a little, “I love you.”
“I love you too, crazy person.”
Charlotte was back in under ten minutes. “Thank you. I just downloaded. We’ll look at them on the plane.” She handed the card back and slid her arm around Oscar’s waist. “Say goodbye to your new friends. Packing awaits.”
“Thank you for the conversation, ladies. Enjoy the last of your vacation.”
As soon as they were away from everyone Charlotte squeezed his side, “I’m so so sorry. I didn’t even think that could have other fans taking pictures and offering them up for some time. Such a bad precedent. I won’t do that again.”
Oscar kissed her head, “It’s ok. They were nice. Good ego stroking.”
“We’ve been so relaxed and no fans. I wasn’t thinking about anything other than good pictures of me and my boyfriend.”
“Charlotte, seriously, baby, it’s fine. It is just you and your boyfriend.” He liked being himself and not thinking about celebrity. He was glad she could forget about that too. Inside their villa he pulled her close and kissed her, “Just you and me.”
It didn’t take long to pack. Neither were big on organization when heading back. Shove it in the suitcase and move on. They left their luggage by the door and went up to her parent’s for dinner. Many stories were told and lots of laughter. Her parents had plans to come up for her gallery show, but even so, goodbyes were tearful. The couple promised the triplets they’d come back and that they could come visit.
In the car Oscar wiped away Charlotte’s tears, “You alright?”
She nodded, “I miss mom and dad, but I really miss my brother and sisters. They grow and change so much each time I see them. I wish I got to grow up with them like Matt and I did.” She leaned into him.
He wrapped his arms around her, keeping her safe and warm, wishing he could ease the hurt. “The age difference makes it hard. You and Matt were grown when they were born.” He kissed her head and squeezed her tight, “But instead of you guys fighting like siblings they look up to you so much. If you were sixteen you wouldn’t have time to play with them, too busy being a teenager. Might not be often enough, but they get more of you.”
Looking up, Charlotte smiled, “Thank you.” She stretched up to kiss him, “Do you have any idea how much I love you?”
“I hate to see you hurting.” The ache in his chest was starting to let up now that a smile was replacing the tears.
“Better now.”
By the time they got to the airport he had her laughing at an email Domhnall had sent detailing the crash and burn of what had started out as a good date. It was amazing that so much could go wrong so quickly. They sat at the gate plotting ways tease him. Once seated Charlotte pulled out her laptop to look at the pictures she’d downloaded off the girls’ memory card. There were several good shots of them holding hands and kissing. Thankfully none of them having sex on the beach. She went through the shots she’d taken on Delios and the castle, asking Oscar’s opinion, and considering which she might like to include in the gallery exhibit. When they’d finished looking through the files they found a movie and relaxed for the rest of the flight.
6 notes
·
View notes
Photo

8.17.17 // 11:30am // guide to time management
requested by @hufflepuffwannabe @feminist-fan-girl @meg-is-studying
sooo i'll be the first to admit that i'm not the greatest at time management. however i think this is still worth writing because sometimes the best advice doesn't come from people who have it down (or to whom things come naturally), but rather those who struggle to make something happen. hence, here are some time management tips from one procrastinator to another :)
1. prioritize. ok i'm sure you've all heard this one a billion times. the most important starting step for me is listing out all the things i need to get done and then ranking them based on their priority. admittedly, sometimes i do this in my head but i (and you) should really do it on paper.
2. get pressing things done first. for me, this generally includes things like emails to professors, applications or things that have to do with business. anything that involves another person (especially when its a work email which is only checked from 9-5) should get done asap.
3. schoolwork is generally pretty important. second to emails and important interactions, this should be close to the top of your list. you probably already know that. moving on.
4. if you're in a time crunch, ditch the busy work. though it might make you feel more productive with less effort (say it's coloring and illustrating all 50 us states), you probably won't get much learning out of it in the long run. obviously if you have the time for it, you should still try to do all your assignments. if you don't, pick ones that are going to have more value.
>>>from a purely pragmatic, grade-oriented standpoint, you can prioritize things with higher point values (like essays over small hw assignments). another way you can determine value is the amount of knowledge you would gain from doing the work (if you're more of an idealist).
>>>going back to the coloring example. your teacher is probably not going to grade you on how pretty your illustrations are or how well you colored in the lines. i totally understand having personal standards and wanting these types of "artistic" assignments to look nice, but don't spend a lot of time you don't have making your assignment a work of art. it's not worth it.
5. don't forget non-academic "to-dos". when you make your plans/list of priorities, don't leave these out. if you budget your time so that you finish all your academic work at 1:30 in the morning, that might be ok if you can then go right to sleep. but then you realize ~sh*t~, i forgot to wash my laundry and wash my dishes. maybe some of these things you can push off. but if your laundry is on your bed, you might still need to do that to be able to sleep. that's another 2 hours. here's how to incorporate these kinds of things into your schedule:
>>>make sure they're in your plan: especially laundry. since you have to wait for the cycles and then take the clothes out/put them in the dryer, you can plan to do other things while you wait. this way you're not wasting a bunch of time at 2 in the morning waiting for your clothes to dry (and yes, they will wrinkle if you leave them in the dryer)
>>>use them as study breaks: a lot of these chore type to-dos require you to get up and move around. perfect for breaking up the monotony of sitting at a desk. you can make this a little less boring by blasting music and dancing around your room, but you'll be taking a mental break and you'll feel more productive.
>>> side note on the dishes. you cannot continually put them off. bad things will happen. like mold. don't do it.
6. gather everything you need before you start. getting up to get something is the easiest way to lose focus. it's awful. yes, sometimes studying is unpredictable and you won't always remember to bring everything, but make a list if you have to to minimize this occurrence. what really sucks is when you've walked all the way to the library and then realize you've forgotten something.
>>> things to consider: snacks, drinks, eraser, ear buds, extra paper, pens, pencils, lead, highlighters, reference materials, page flags (most of these things *should* be in a standard pencil case. but sometimes they escape. it's good to double check)
7. keep your phone out of sight. preferably out of reach as well, but that's a little harder if you listen to music or if you're in a public space. if you are still holding/looking at your phone, make sure to turn off notifications (any blinking lights or push notifs) and make sure it won't vibrate or beep. it's hard to resist the pull, so eliminate it.
>>> there are timer/pomodoro type apps you can use to time your study and break time. forest will plant a virtual (or real, if you get the paid version) tree every time you start a period of productivity. if you open any other app before your set time is up, the tree will die. i believe the break time is fixed at 5 min. tide is very similar but there is no "consequence" (virtual or not). i don't think it tracks whether you open other apps. but it does play nice background noise during your productive time. there are a few different options. breaks are also fixed at 5 i think?
8. if you simply cannot do the hard things, try completing a small, simple assignment. i know i said to skip/postpone busy work in time crunches, but if you have time for everything and simply cannot make any progress on the "more important" items, try a small assignment. completing it might give you that boost of confidence/energy you need to jump into that other thing.
>>>warning: do not use busy work to procrastinate. this is very dangerous. while you might feel productive, you're not really getting anything of importance done and your big assignments will suffer for it.
this is all i can think of atm (it is still currently summer break here, even though it's almost over) but i might make a part 2 if i think of more. though i'm not an expert time manager so this might be all i got... idk. hope this was helpful and hmu with any more questions/masterpost suggestions! xoxo, m
#pennyfynotes#pfynguides#tips#masterpost#studyblr#organization#productive#student#colleg#college#university#hufflepuffwannabe#noodledesk#jiyeonstudies#studyfeather#studeebean#stvdybuddies#heyjul#studyquill#emmastudies#obsidianstudy#universi-tea
790 notes
·
View notes
Last Seen Blogs

grayocelot
Play Me Like a Damn Fiddle

wtfjake
LIGHTS
kdramaics
dino

lamperouge-s
Love is Justice

dragolianx
Drago_Loves_To_Vibe