#What is Amazon bounty program
Note
Oh, so are you affiliated with the site? Cause I was looking at the other pack deals and they mention you in them.
nah it just remembers that you clicked my affiliate link so even if you end up clicking around to something i didn't link to, i get credit for steering you to the site. it wears off after a while, or if you just go straight to the site in an incognito window you'll see my affiliate stuff is gone
i mean i'm affiliated in that i can make special links to get a kickback, but anyone can sign up to do that if they want to (everyone should, free advertising is for suckers)
#original#it's like amazon that way#all you have to do is sign up and you too can get a special promo code for audible#ftr amazon affiliate links make absolutely fuck all unless you're doing one of their special bounty programs which always include audible#one time i tried to sign up as an affiliate for... i no longer remember what#but to become an affiliate and make affiliate links you had to submit a fucking resume and proof that you were a big influencer#like. screw you too i guess.#i'm not writing you an essay on why i deserve to be a shill what's wrong with you
30 notes
·
View notes
Text
How I ditched streaming services and learned to love Linux: A step-by-step guide to building your very own personal media streaming server (V2.0: REVISED AND EXPANDED EDITION)
This is a revised, corrected and expanded version of my tutorial on setting up a personal media server that previously appeared on my old blog (donjuan-auxenfers). I expect that that post is still making the rounds (hopefully with my addendum on modifying group share permissions in Ubuntu to circumvent 0x8007003B "Unexpected Network Error" messages in Windows when transferring files) but I have no way of checking. Anyway this new revised version of the tutorial corrects one or two small errors I discovered when rereading what I wrote, adds links to all products mentioned and is just more polished generally. I also expanded it a bit, pointing more adventurous users toward programs such as Sonarr/Radarr/Lidarr and Overseerr which can be used for automating user requests and media collection.
So then, what is this tutorial? This is a tutorial on building and setting up your own personal media server running Ubuntu and using Plex (or Jellyfin) to not only manage your media but to stream your media to your devices both locally at home, and remotely anywhere in the world where you have an internet connection. It’s a tutorial on how by building a personal media server and stuffing it full of films, television and music that you acquired through indiscriminate and voracious media piracy ripping your own physical media to disk, you’ll be free to completely ditch paid streaming services altogether. No more will you have to pay for Disney+, Netflix, HBOMAX, Hulu, Amazon Prime, Peacock, CBS All Access, Paramount+ Crave or any other streaming service that is not named Criterion Channel (which is actually good) to watch your favourite films and television shows, instead you’ll have your own custom service that will only feature things you want to see, and where you have control over your own files and how they’re delivered to you. And for music fans, Jellyfin and Plex both support music collection streaming so you can even ditch the music streaming services. Goodbye Spotify, Youtube Music, Tidal and Apple Music, welcome back unreasonably large MP3 collections (or FLAC collections).
On the hardware front, I’m going to offer a few options catered towards various budgets and media library sizes. The cost of getting a media server going using this guide will run you anywhere from $450 CDN/$325 USD at the entry level to $1500 CDN/$1100 USD at the high end. My own server cost closer to the higher figure, with much of that cost being hard drives. If that seems excessive maybe you’ve got a roommate, a friend, or a family member who would be willing to chip in a few bucks towards your little project if they get a share of the bounty. This is how my server was funded. It might also be worth thinking about the cost over time, how much you spend yearly on subscriptions vs. a one time cost of setting a server. Then there's just the joy of being able to shout a "fuck you" at all those show cancelling, movie hating, hedge fund vampire CEOs who run the studios by denying them your money. Drive a stake through David Zaslav's heart.
On the software side I will walk you through, step-by-step, in installing Ubuntu as your server's OS, configuring your storage in a RAIDz array with ZFS, sharing your zpool to Windows with Samba, running a remote connection into your server from your Windows PC, and getting started with Plex/Jellyfin Media Server. Every terminal command you will need to input will be provided, and I will even share with you a custom #bash script that will make the used vs. available drive space on your server display correctly in Windows.
If you have a different preferred flavour of Linux (Arch, Manjaro, Redhat, Fedora, Mint, OpenSUSE, CentOS, or Slackware etc. et. al.) and are aching to tell me off for being basic using Ubuntu, this tutorial is not for you. The sort of person with a preferred Linux distro is the sort of person who can do this sort of thing in their sleep. Also I don't care. This tutorial is intended for the average home computer user. This is also why we’re not using a more exotic home server solution like running everything through Docker Containers and managing it through a dashboard like Homarr or Heimdall. While such solutions are fantastic and can be very easy to maintain once you have it all set up, wrapping your brain around Docker is a whole thing in and of itself. If you do follow this tutorial and enjoyed putting everything together, then I would encourage you to maybe go back in a year’s time, do your research and and redo everything so it’s set up with Docker Containers.
This is also a tutorial aimed at Windows users. Although I was a daily user of OS X for many years (roughly 2008-2023) and I've dabbled quite a bit with different Linux distributions (primarily Ubuntu and Manjaro), my primary OS these days is Windows 11. Many things in this tutorial will still be applicable to Mac users but others (e.g. setting up shares) you will have to look up yourself. I doubt it would be difficult to do so.
Nothing in this tutorial will require feats of computing expertise from you. All you will need is a basic level of computer literacy (e.g. an understanding how directories work, being comfortable in settings menus) and a willingness to learn a thing or two. While this guide may look overwhelming at a glance, this is only because I want to be as thorough as possible so that you understand exactly what it is you're doing and you're not just blindly following steps. If you half-way know what you’re doing, you’ll be fine if you ever need to troubleshoot.
Honestly, once you have all the hardware ready it really shouldn't take you more than an afternoon to get everything up and running.
(This tutorial is just shy of seven thousand words long so the rest is under the cut.)
Step One: Choosing Your Hardware
Linux is a light weight operating system, there's almost no bloat and there are recent distributions out there right now that will run perfectly fine on a fourteen year old i3 with 4GB of RAM. Running Plex/Jellyfin media server isn’t very resource intensive either in 90% of use cases. We don’t an expensive or powerful system. So there are several options available to you: use an old computer you already have sitting around but aren't using, buy a used workstation from eBay, or what I believe to be the best option, order an N100 Mini-PC from AliExpress or Amazon.
Note: If you already have an old PC sitting around that you’ve decided to use, fantastic, move on to the next step.
When weighing your options, do keep a few things in mind: the number of people you expect to be streaming simultaneously at any one time, the resolution and bitrate of your media library (4k video takes a lot more processing power than 1080p) and most importantly, how many of those clients are going to be transcoding at any one time. Transcoding is what happens when the playback device does not natively support direct playback of the source file. This can be for a number of reasons, such as the playback device's native resolution, or because the source file was encoded in a video codec unsupported by the playback device.
Ideally we want any transcoding to be performed by hardware, which means we should be looking for an Intel processor with Quick Sync. Quick Sync is a dedicated core on the CPU die designed specifically for video encoding and decoding. This makes for highly efficient transcoding both in terms of processing overhead and power draw. Without these Quick Sync cores, transcoding must be brute forced through software which takes up much more of a CPU’s processing power and takes much more energy. But not all Quick Sync cores are created equal, and you need to keep this in mind if you've decided either to use an old computer or to shop on eBay for a used workstation.
Any Intel processor after second generation Core (Sandy Bridge circa 2011) has Quick Sync cores. It's not until 6th gen (Skylake), however, that those cores support H.265 HEVC. Intel’s 10th gen (Comet Lake) processors support 10bit HEVC and HDR tone mapping. And the recent 12th gen (Alder Lake) processors give you AV1 decoding. As an example, while an 8th gen (Kaby Lake) i5-8500 will be able to transcode a file encoded with H.265 through hardware, it will fall back to software transcoding when given a 10bit H.265 file. So if you’ve decided to use that old PC or to look on eBay for an old Dell Optiplex keep this in mind.
Note 1: The price of old workstations varies wildly and fluctuates frequently. If you get lucky and go looking shortly after a workplace has liquidated a large number of their workstations you can find deals for as low as $100 for a barebones system, but generally an i5-8500 workstation with 16gb RAM will cost you somewhere in the area of $260 CDN/$200 USD.
Note 2: The AMD equivalent to Quick Sync is called Video Core Next, and while it's fine, it's not as efficient and not as mature a technology, only becoming available with first generation Ryzen and it only got decent with their newest CPUs, we want something cheap.
Alternatively you could completely forgo having to keep track of what generation of CPU is equipped with Quick Sync cores with support for which codecs, and just buy an N100 mini-PC. For around the same price or less than a good used workstation you can pick up a Mini-PC running an Intel N100 processor. The N100 is a four-core processor based on the 12th gen Alder Lake architecture and comes equipped with the latest revision of the Quick Sync. They offer astounding hardware transcoding capabilities for their size and power draw and otherwise perform equivalent to an i5-6500. A friend of mine uses an N100 machine as a dedicated retro emulation gaming system. These are also remarkably efficient chips, they sip power. In fact, the difference between running one of these and an old workstation could work out to hundreds of dollars a year in energy bills depending on where you live.
You can find these Mini-PCs all over Amazon or for a little cheaper over on AliExpress. They range in price from $170 CDN/$125 USD for a no name N100 with 8GB RAM to $280 CDN/$200 USD for a Beelink S12 Pro with 16GB RAM. The brand doesn't really matter, they're all coming from the same three factories in Shenzen, go for whichever one fits your budget or has the features you want. 8GB RAM should be enough, Linux is lightweight and Plex only calls for 2GB RAM, and a 256GB SSD is more than enough for what we need as a boot drive. 16GB RAM might result in a slightly snappier experience, especially with ZFS, and going for a bigger drive might allow you to get away with things like creating preview thumbnails for Plex, but it’s up to you and your budget.
The Mini-PC I wound up buying was a Firebat AK2 Plus with 8GB RAM and a 256GB SSD. It looks like this:

Note: Be forewarned that if you decide to order a Mini-PC from AliExpress, note the power adapter it is shipping with. The one I bought came with an EU power adapter and I had to supply my own North American power supply. Thankfully this is a minor issue as a barrel plug 30W/12V/2.5A power adapters are plentiful and can be had for $10.
Step Two: Choosing Your Storage
Storage is the most important part of our build, and the most expensive. Thankfully it’s also easily upgrade-able down the line.
For people with a smaller media collection (4TB to 8TB), a limited budget, or who will only ever have two simultaneous streams running, I would say that the most economical course of action would be to simply buy a USB 3.0 8TB external HDD. Something like this Western Digital or this Seagate external drive. One of these will cost you somewhere around $200 CDN/$140 USD. Down the line you could add a second external drive or replace it with a multi-drive RAIDz set up as detailed below.
If a single external drive the path for you, move on to step three.
For people who have larger media libraries (12TB+), who have a lot of media in 4k, or care about data redundancy, the answer is a RAID array featuring multiple HDDs in an enclosure.
Note: If you are using an old PC you already have as your server and have the room for at least three 3.5" drives, and as many open SATA ports on your mother board you won't need an enclosure, just install the drives in your old case. If your old computer is a laptop or doesn’t have room for more internal drives, then I would suggest an enclosure.
The minimum number of drives needed to run a RAIDz array is three, and seeing as RAIDz is what we will be using, you should be looking for an enclosure with hree to five bays. I think that four disks makes for a good compromise for a home server. Regardless of whether you go for a three, four, or five bay enclosure, do be aware that in a RAIDz array the space equivalent of one of the drives will be dedicated to parity at a ratio expressed by the equation 1 − 1/n i.e. in a four bay enclosure equipped with four 12TB drives configured in RAIDz we would be left with a total of 36TB of usable space (48TB raw size). The reason for why we might sacrifice storage space in such a manner will be explained in the next section.
A four bay enclosure will cost somewhere in the area of $200 CDN/$140 USD. You don't need anything fancy, nothing with hardware RAID (RAIDz is done entirely in software) or even USB-C. An enclosure with USB 3.0 will perform just fine. Don’t worry about bottlenecks, a mechanical HDD will be limited by the speed of its mechanism long before before it will be limited by the speed of a USB connection. I've seen decent looking enclosures from TerraMaster, Yottamaster, Mediasonic and Sabrent.
When it comes to selecting the drives, as of this writing, the best value (dollar per gigabyte) are those in the range of 12TB to 20TB. I settled on 12TB drives myself. If 12TB to 20TB drives are out of your budget, go with what you can afford, or look into refurbished drives. I'm not sold on the idea of refurbished drives but some people swear by them.
When shopping for harddrives, look for drives that are specifically designed for NAS use. Drives designed for NAS use typically have better vibration dampening and are designed to be active 24/7, they will also often use CMR (conventional magnetic recording) rather than SMR (shingled magnetic recording) which nets them a sizable performance bump. Seagate Ironwolf and Toshiba NAS drives are both well regarded. I would avoid Western Digital Red drives at this time. WD Reds were a go to recommendation up until earlier this year when it was revealed that they feature firmware that will throw up false SMART warnings telling you to replace the drive at the three year mark when there might be nothing at all wrong with that drive, and when it will likely be good for another six, seven or more years.

Step Three: Installing Linux
For this step you will need a USB thumbdrive of at least 6GB in capacity, a way to make it into bootable media, and an .ISO of Ubuntu.
First download a copy of Ubuntu desktop (for best performance we could download the Server release, but for new Linux users I would recommend against using the server release as having a GUI can be very helpful, not many people are wholly comfortable doing everything through command line). 22.04.3 Jammy Jellyfish is the current Long Term Service release, this is the one to get.
Download the .ISO and then download and install balenaEtcher on your Windows PC, balenaEtcher is an easy to use program for creating bootable media, you simply insert your thumbdrive, select the .ISO you just downloaded, and it will create a bootable installation media for you.
Once you've made a bootable media and you've got your Mini-PC (or old PC/used workstation) in front of you, hook it in directly to your router with an ethernet cable, and plug in the HDD enclosure, a monitor, mouse and a keyboard. Now turn that sucker on and hit whatever key it is that gets you into the BIOS (typically ESC, DEL or F2). If you’re using a Mini-PC check to make sure that the P1 and P2 power limits are set correctly and not arbitrarily lowered, my N100's P1 limit was set at 10W, a full 20W under the chip's power limit. Also make sure that the RAM is running at the advertised speed. My Mini-PC’s RAM was set at 2333Mhz out of the box when it should have been 3200Mhz. Once you’ve done that, key over to the boot order and place the USB drive first in the boot order. Then save the BIOS settings and restart.
After you restart you’ll be greeted by Ubuntu's installation screen. Installing Ubuntu is really straight forward, select the "minimal" installation option, as we won't need anything on this computer except for a browser (Ubuntu comes preinstalled with Firefox) and Plex Media Server/Jellyfin Media Server. Also remember to delete and reformat that Windows partition! We don't need it.
Step Four: Installing ZFS and Setting Up the RAIDz Array
Note: If you opted for just a single external HDD skip this step and move onto setting up a Samba share.
Once Ubuntu is installed it's time to configure our storage by installing ZFS to build our RAIDz array. ZFS is a "next-gen" file system that is both massively flexible and massively complex. It's capable of snapshot backup, self healing error correction, ZFS pools can be configured with drives operating in a supplemental manner alongside the storage vdev (e.g. fast cache, dedicated secondary intent log, hot swap spares etc.). It's also a file system very amenable to fine tuning. Block and sector size are adjustable to use case and you're afforded the option of different methods of inline compression. If you'd like a very detailed overview and explanation of its various features and tips on tuning a ZFS array check out these articles from Ars Technica. For now we're going to ignore all these features and keep it simple, we're going to pull our drives together into a single vdev running in RAIDz which will be the entirety of our zpool, no fancy cache drive or SLOG.
Open up the terminal and type the following commands:
sudo apt update
then
sudo apt install zfsutils-linux
This will install the ZFS utility. Verify that it's installed with the following command:
zfs --version
Next, it's time to check that the HDDs we have in the enclosure are healthy, running and recognized. We also want to find out their device IDs and take note of them:
sudo fdisk -1
Note: You might be wondering why some of these commands require "sudo" in front of them while others don't. "Sudo" is short for "super user do”. When and where "sudo" is used has to do with the way permissions are set up in Linux. Only the "root" user has the access level to perform certain tasks in Linux. As a matter of security and safety regular user accounts are kept separate from the "root" user. It's not advised (or even possible) to boot into Linux as "root" with most modern distributions. Instead by using "sudo" our regular user account is temporarily given the power to do otherwise forbidden things. Don't worry about it too much at this stage, but if you want to know more check out this introduction.
If everything is working you should get a list of the various drives detected along with their device IDs which will look something like this: /dev/sdc. You can also check the device IDs of the drives by opening the disk utility app. Jot these IDs down we'll need them for our next step, creating our RAIDz array.
RAIDz is similar to RAID-5 in that instead of striping your data over multiple disks, exchanging redundancy for speed and available space (RAID-0), or mirroring your data writing two copies of every piece (RAID-1), it instead writes parity blocks across the disks in addition to striping, this provides a balance of speed, redundancy and available space. If a single drive fails, the parity blocks on the working drives can be used to reconstruct the entire array as soon as a replacement drive is added.
Additionally, RAIDz improves over some of the common RAID-5 flaws. It's more resilient and capable of self healing, checking for errors against a checksum. It's more forgiving this way, and it's likely that you'll be able to detect when a drive is on its way out well before it fails. A RAIDz array can survive the loss of any one drive.
Note: While RAIDz is indeed resilient, if a second drive fails during the rebuild, you're fucked. Always keep backups of things you can't afford to lose. This tutorial, however, is not about proper data safety.
To create the pool, use the following command:
sudo zpool create "zpoolnamehere" raidz "device IDs of drives we're putting in the pool"
For example, let's creatively name our zpool "mypool". It will consist of four drives which have the device IDs: sdb, sdc, sdd, and sde. The resulting command would look like this:
sudo zpool create mypool raidz /dev/sdb /dev/sdc /dev/sdd /dev/sde
If for example you bought five HDDs and wanted more redundancy, and are okay with three disks worth of capacity, we would modify the command to "raidz2" and the command would look something like the following:
sudo zpool create mypool raidz2 /dev/sdb /dev/sdc /dev/sdd /dev/sde /dev/sdf
An array configured like this would be able to survive two disk failures and is known as RAIDz2.
Once the zpool has been created, we can check its status with the command:
zpool status
Or more concisely with:
zpool list
The nice thing about ZFS as a file system is that an array is ready to go immediately after creating the pool. If we were to set up a traditional RAID-5 array using mbam, we'd have to sit through a potentially hours long process of reformatting and partitioning the drives. Instead we're ready to go out the gates.
The zpool should be automatically mounted to the filesystem after creation, check on that with the following:
df -hT | grep zfs
Note: If your computer ever loses power suddenly, say in event of a power outage, you may have to re-import your pool. In most cases, ZFS will automatically import and mount your pool, but if it doesn’t and you can't see your array, simply open the terminal and type sudo zpool import -a.
By default a zpool is mounted at /"zpoolname". The pool should be under our ownership but let's make sure with the following command:
sudo chown -R "yourlinuxusername" /"zpoolname"
Note: Changing file and folder ownership with "chown" and file and folder permissions with "chmod" are essential commands for much of the admin work in Linux, but which we won't be dealing with extensively in this guide. If you'd like a deeper tutorial and explanation you can check out these two guides: chown and chmod.

You can access the zpool file system through the GUI by opening the file manager (the Ubuntu default file manager is called Nautilus) and clicking on "Other Locations" on the sidebar, then entering the Ubuntu file system and looking for a folder with your pool's name. Bookmark the folder on the sidebar for easy access.

Your storage pool is now ready to go. Assuming that we already have some files on our Windows PC we want to copy to over, we're going to need to install and configure Samba to make the pool accessible in Windows.
Step Five: Setting Up Samba/Sharing
Samba is what's going to let us share the zpool with Windows and allow us to write to it from our Windows machine. First let's install Samba with the following commands:
sudo apt-get update
then
sudo apt-get install samba
Next create a password for Samba.
sudo smbpswd -a "yourlinuxusername"
It will then prompt you to create a password. Just reuse your username password for simplicity's sake.
Note: if you're using just a single external drive replace the zpool location in the following commands with wherever it is your external drive is mounted, for more information see this guide on mounting an external drive in Ubuntu.
After you've created a password we're going to create a shareable folder in our pool with this command
mkdir /"zpoolname"/"foldername"
Now we're going to open the smb.conf file and make that folder shareable Enter the following command.
sudo nano /etc/samba/smb.conf
This will open the .conf file in nano, the terminal text editor program. Now at the end of smb.conf add the following entry:
["foldername"]
path = /"zpoolname"/"foldername"
available = yes
valid users = "yourlinuxusername"
read only = no
writable = yes
browseable = yes
guest ok = no
Ensure that there are no line breaks between the lines and that there's a space on both sides of the equals sign. Next step is to allow Samba traffic through the firewall:
sudo ufw allow samba
Finally restart the Samba service:
sudo systemctl restart smbd
At this point we'll be able to access to the pool, browse its contents, and read/write to it from Windows. But there's one more thing left to do, Windows doesn't natively support the ZFS file systems and will read the used/available/total space in the pool incorrectly. Windows will read available space as total drive space, and all used space as null. This leads to Windows only displaying a dwindling amount of "available" space as the drives are filled. We can fix this! Functionally this doesn't actually matter, we can still write and read to and from the disk, it just makes it difficult to tell at a glance the proportion of used/available space, so this is an optional step but one I recommend (this step is also unnecessary if you're just using a single external drive). What we're going to do is write a little shell script in #bash. Open nano with the terminal with the command:
nano
Now insert the following code:
#!/bin/bash
CUR_PATH=`pwd`
ZFS_CHECK_OUTPUT=$(zfs get type $CUR_PATH 2>&1 > /dev/null) > /dev/null
if [[ $ZFS_CHECK_OUTPUT == *not\ a\ ZFS* ]]
then
IS_ZFS=false
else
IS_ZFS=true
fi
if [[ $IS_ZFS = false ]]
then
df $CUR_PATH | tail -1 | awk '{print $2" "$4}'
else USED=$((`zfs get -o value -Hp used $CUR_PATH` / 1024)) > /dev/null AVAIL=$((`zfs get -o value -Hp available $CUR_PATH` / 1024)) >
/dev/null
TOTAL=$(($USED+$AVAIL)) > /dev/null
echo $TOTAL $AVAIL
fi
Save the script as "dfree.sh" to /home/"yourlinuxusername" then change the ownership of the file to make it executable with this command:
sudo chmod 774 dfree.sh
Now open smb.conf with sudo again:
sudo nano /etc/samba/smb.conf
Now add this entry to the top of the configuration file to direct Samba to use the results of our script when Windows asks for a reading on the pool's used/available/total drive space:
[global]
dfree command = home/"yourlinuxusername"/defree.sh
Save the changes to smb.conf and then restart Samba again with the terminal:
sudo systemctl restart smbd
Now there’s one more thing we need to do to fully set up the Samba share, and that’s to modify a hidden group permission. In the terminal window type the following command:
usermod -a -G sambashare “yourlinuxusername”
Then restart samba again:
sudo systemctl restart smbd
If we don’t do this last step, while everything would appear to work fine, and you will be able to see and map the drive from Windows and even begin transferring files, you'd soon run into a lot of frustration. As every ten minutes or so a file would fail to transfer and you would get a window announcing “0x8007003B Unexpected Network Error”. This window would require your manual input to continue the transfer with the file that was next in the queue. It will reattempt to transfer whichever files failed the first time around at the end, and 99% of the time they’ll go through, but this is a major pain in the ass if you’ve got a lot of data you need to transfer and want to step away from the computer for a while. It turns out samba can act a little weirdly with the higher read/write speeds of RAIDz arrays and transfers from Windows, and will intermittently crash and restart itself if this group option isn’t changed. Inputting the above command will prevent you from ever seeing that window.
The last thing we're going to do in this part before switching over to our Windows PC is grab the IP address of our Linux machine. Enter the following command:
hostname -I
This will spit out this computer's IP address on the local network (it will look something like 192.168.0.x), write it down. It might be a good idea once you're done here to go into your router settings and reserving that IP for your Linux system in the DHCP settings. Check the manual for your specific model router on how to access its settings, typically it can be accessed by opening a browser and typing http:\\192.168.0.1 in the address bar, but your router may be different.
Okay we’re done with our Linux computer for now. Get on over to your Windows PC, open File Explorer, right click on Network and click "Map network drive". Select Z: as the drive letter (you don't want to map the network drive to a letter you could conceivably be using for other purposes) and enter the IP of your Linux machine and location of the share like so: \\"LINUXCOMPUTERLOCALIPADDRESSGOESHERE"\"zpoolnamegoeshere"\. Windows will then ask you for your username and password, enter the ones you set earlier in Samba and you're good. If you've done everything right it should look something like this:

You can now start moving media over from Windows to the share folder. It's a good idea to have a hard line running to all machines. Moving files over Wi-Fi is going to be tortuously slow, the only thing that’s going to make the transfer time tolerable (hours instead of days) is a solid wired connection between both machines and your router.
Step Six: Setting Up Remote Desktop Access to Your Server
After the server is up and going, you’ll want to be able to access it remotely from Windows. Barring serious maintenance/updates, this is how you'll access it most of the time. On your Linux system open the terminal and enter:
sudo apt install xrdp
Then:
sudo systemctl enable xrdp
Once it's finished installing, open “Settings” on the sidebar and turn off "automatic login" in the User category. Then log out of your account. Attempting to remotely connect to your Linux computer while you’re logged in will just result in a black screen!
Now get back on your Windows PC, open search and search for "RDP". A program called "Remote Desktop Connection" should pop up, open this program as an administrator by right-clicking and selecting “run as an administrator”. You’ll be greeted with a window, in the field marked “Computer” type in the IP address of your Linux computer. Press connect and you'll be greeted with a new window and a prompt asking for your username and password. Enter your Ubuntu username and password here.

If everything went right, you’ll be logged into your Linux computer. If the performance is too sluggish, adjust the display options, lowering the resolution and colour depth do a lot to make the interface feel snappier.

Remote access is how we're going to be using our Linux system from now, outside of some edge cases like needing to get into the BIOS or upgrading to a new version of Ubuntu. Everything else from performing maintenance like a monthly zpool scrub (this is important!!!) to checking zpool status and updating software can all be done remotely.

This is how my server lives its life now, happily humming and chirping away on the floor next to the couch in the corner of the living room.
Step Seven: Plex Media Server/Jellyfin
Okay we’ve got all the ground work finished and our server is almost up and running: we’ve got Ubuntu up and running, the storage is primed, we’ve set up remote connections and sharing, and maybe we’ve moved over some of favourite movies and TV shows.
Now we need to decide on the media server software to use which will stream our media to us and organize our library. For most people I’d recommend Plex, it just simply works 99% of the time. That said, Jellyfin has a lot to recommend it by too even if it is rougher around the edges, some people even run both simultaneously, it’s not that big an extra strain. I do recommend doing a little bit of your own research into the features each platform offers. But as a quick run down, consider some of the following points.
Plex is closed source and is funded through PlexPass purchases while Jellyfin is open source and entirely user driven. This means a number of things, for one, Plex requires you to purchase a “PlexPass” (purchased as a one time lifetime fee $159.99 CDN/$120 USD or paid for on a monthly yearly subscription basis) for access to certain features, like hardware transcoding (and we want hardware transcoding) and automated intro/credits detection and skipping, while Jellyfin offers this for free. On the other hand, Plex supports a lot more devices than Jellyfin and updates more frequently. That said Jellyfin's Android/iOS apps are completely free, while the Plex Android/iOS apps must be activated for a one time cost of $6 CDN/$5 USD. Additionally the Plex Android/iOS apps are vastly unified in UI and functionality across platforms, offering a much more polished experience, while the Jellyfin apps are a bit of a mess and very different from each other. Jellyfin’s actual media player itself is more fully featured than Plex's, but on the other hand Jellyfin's UI, library customization and automatic media tagging really pale in comparison to Plex. Streaming your music library is free through both Jellyfin and Plex, but Plex offers the PlexAmp app for dedicated music streaming which boasts a number of fantastic features, unfortunately some of those fantastic features require a PlexPass. If your internet is down, Jellyfin can still do local streaming, while Plex can fail to play files. Jellyfin has a slew of neat niche features like support for Comic Book libraries with the .cbz/.cbt file types, but then Plex offers some free ad-supported TV and films, they even have a free channel that plays nothing but Classic Doctor Who.
Ultimately it's up to you, I settled on Plex because although some features are pay-walled, it just works. It's more reliable and easier to use, and a one-time fee is much easier to swallow than a subscription. I do also need to mention that Jellyfin does take a little extra bit of tinkering to get going in Ubuntu, you’ll have to set up process permissions, so if you're more tolerant to tinkering, Jellyfin might be up your alley and I’ll trust that you can follow their installation and configuration guide. For everyone else, I recommend Plex.
So pick your poison: Plex or Jellyfin.
Note: The easiest way to download and install either of these packages in Ubuntu is through Snap Store.
After you've installed one (or both), opening either app will launch a browser window into the browser version of the app allowing you to set all the options server side.
The process of adding creating media libraries is essentially the same in both Plex and Jellyfin. You create a separate libraries for Television, Movies, and Music and add the folders which contain the respective types of media to their respective libraries. The only difficult or time consuming aspect is ensuring that your files and folders follow the appropriate naming conventions:
Plex naming guide for Movies
Plex naming guide for Television
Jellyfin follows the same naming rules but I find their media scanner to be a lot less accurate and forgiving than Plex. Once you've selected the folders to be scanned the service will scan your files, tagging everything and adding metadata. Although I find do find Plex more accurate, it can still erroneously tag some things and you might have to manually clean up some tags in a large library. (When I initially created my library it tagged the 1963-1989 Doctor Who as some Korean soap opera and I needed to manually select the correct match after which everything was tagged normally.) It can also be a bit testy with anime (especially OVAs) be sure to check TVDB to ensure that you have your files and folders structured and named correctly. If something is not showing up at all, double check the name.
Once that's done, organizing and customizing your library is easy. You can set up collections, grouping items together to fit a theme or collect together all the entries in a franchise. You can make playlists, and add custom artwork to entries. It's fun setting up collections with posters to match, there are even several websites dedicated to help you do this like PosterDB. As an example, below are two collections in my library, one collecting all the entries in a franchise, the other follows a theme.

My Star Trek collection, featuring all eleven television series, and thirteen films.

My Best of the Worst collection, featuring sixty-nine films previously showcased on RedLetterMedia’s Best of the Worst. They’re all absolutely terrible and I love them.
As for settings, ensure you've got Remote Access going, it should work automatically and be sure to set your upload speed after running a speed test. In the library settings set the database cache to 2000MB to ensure a snappier and more responsive browsing experience, and then check that playback quality is set to original/maximum. If you’re severely bandwidth limited on your upload and have remote users, you might want to limit the remote stream bitrate to something more reasonable, just as a note of comparison Netflix’s 1080p bitrate is approximately 5Mbps, although almost anyone watching through a chromium based browser is streaming at 720p and 3mbps. Other than that you should be good to go. For actually playing your files, there's a Plex app for just about every platform imaginable. I mostly watch television and films on my laptop using the Windows Plex app, but I also use the Android app which can broadcast to the chromecast connected to the TV. Both are fully functional and easy to navigate, and I can also attest to the OS X version being equally functional.
Part Eight: Finding Media
Now, this is not really a piracy tutorial, there are plenty of those out there. But if you’re unaware, BitTorrent is free and pretty easy to use, just pick a client (qBittorrent is the best) and go find some public trackers to peruse. Just know now that all the best trackers are private and invite only, and that they can be exceptionally difficult to get into. I’m already on a few, and even then, some of the best ones are wholly out of my reach.
If you decide to take the left hand path and turn to Usenet you’ll have to pay. First you’ll need to sign up with a provider like Newshosting or EasyNews for access to Usenet itself, and then to actually find anything you’re going to need to sign up with an indexer like NZBGeek or NZBFinder. There are dozens of indexers, and many people cross post between them, but for more obscure media it’s worth checking multiple. You’ll also need a binary downloader like SABnzbd. That caveat aside, Usenet is faster, bigger, older, less traceable than BitTorrent, and altogether slicker. I honestly prefer it, and I'm kicking myself for taking this long to start using it because I was scared off by the price. I’ve found so many things on Usenet that I had sought in vain elsewhere for years, like a 2010 Italian film about a massacre perpetrated by the SS that played the festival circuit but never received a home media release; some absolute hero uploaded a rip of a festival screener DVD to Usenet, that sort of thing. Anyway, figure out the rest of this shit on your own and remember to use protection, get yourself behind a VPN, use a SOCKS5 proxy with your BitTorrent client, etc.
On the legal side of things, if you’re around my age, you (or your family) probably have a big pile of DVDs and Blu-Rays sitting around unwatched and half forgotten. Why not do a bit of amateur media preservation, rip them and upload them to your server for easier access? (Your tools for this are going to be Handbrake to do the ripping and AnyDVD to break any encryption.) I went to the trouble of ripping all my SCTV DVDs (five box sets worth) because none of it is on streaming nor could it be found on any pirate source I tried. I’m glad I did, forty years on it’s still one of the funniest shows to ever be on TV.
Part Nine/Epilogue: Sonarr/Radarr/Lidarr and Overseerr
There are a lot of ways to automate your server for better functionality or to add features you and other users might find useful. Sonarr, Radarr, and Lidarr are a part of a suite of “Servarr” services (there’s also Readarr for books and Whisparr for adult content) that allow you to automate the collection of new episodes of TV shows (Sonarr), new movie releases (Radarr) and music releases (Lidarr). They hook in to your BitTorrent client or Usenet binary newsgroup downloader and crawl your preferred Torrent trackers and Usenet indexers, alerting you to new releases and automatically grabbing them. You can also use these services to manually search for new media, and even replace/upgrade your existing media with better quality uploads. They’re really a little tricky to set up on a bare metal Ubuntu install (ideally you should be running them in Docker Containers), and I won’t be providing a step by step on installing and running them, I’m simply making you aware of their existence.
The other bit of kit I want to make you aware of is Overseerr which is a program that scans your Plex media library and will serve recommendations based on what you like. It also allows you and your users to request specific media. It can even be integrated with Sonarr/Radarr/Lidarr so that fulfilling those requests is fully automated.
And you're done. It really wasn't all that hard. Enjoy your media. Enjoy the control you have over that media. And be safe in the knowledge that no hedgefund CEO motherfucker who hates the movies but who is somehow in control of a major studio will be able to disappear anything in your library as a tax write-off.
663 notes
·
View notes
Text
Villainous Observation/Theory: InstaFeed and Instagrim
(Note: This theory is an add on and inspired by the theory created by gabygirl1234)
There are two versions of Instagram in Villainous - InstaFeed and Instagrim
The general public and heroes use InstaFeed, while the Villains use Instagrim.
____
In Episode 6 Miss Heed is shown to have an InstaFeed account instead of an Instagram account.

And her @ name is also @MISS_HEED_ OFFICIAL instead of @MISS_HEED, as shown in her real life actual Instagram link (https://www.instagram.com/miss_heed/)

However, MISS_HEED_OFFICAL is her Instagram Display Name

So the Instagram account we see in real life is a little bit different than what we see in the Villainous show.
————
In Villainous, Penumbra, other Villains, and The Men Without Hats, etc. are shown to be using Instagrim.


However unlike InstaFeed, Instagrim is a Black Web, the Villainous version of Dark Web/Deep Web, website which is not available to the general public and can only be accessed by Villains and in special cases like the Men Without Hats who can hack and have installed programs and software to avoid tracking and being doxxed. (see below)
This is supported by the post in CreepyCharly when a user said you can see that SunBlast is alive on Penumbra’s Instagrim account, but CreepyCharly replies that she could not access it and jokingly added that she doesn’t believe that Villains have social media.
(Also, in the comment section in the image above, a verified account with the name @MISS_HEED_OFFICIAL is seen commenting a bot like comment: “FOLLOW ME”, Miss Heed being a former Villain and student in Black Hat Institution, she probably was able to have knowledge on how to access the Black Web, and perhaps link it to her current InstaFeed account)
As regular citizens like CreepyCharly can’t access it I agree with gabygirl123 ‘s post that Instagrim is also a part of the Black Web as it follows the. Same principal as the BHO website, as mentioned below, “it is hidden in what villains call the "Black Web", a hidden network for villains, bounty hunters, and other unsavory beings.”
(source)
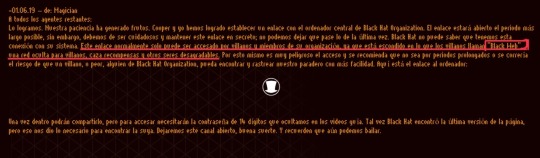
-01.06.19 - from: Magician
To all remaining agents: We did it. Our patience has produced fruits. Cooper and I have managed to establish a link to the Black Hat Organization's mainframe. The link will be open for the longest period possible, however, we must be careful and keep this link secret; We can't let what happened last time happen. Black Hat cannot know that we have this connection to their system. This link can normally only be accessed by villains and members of their organization, as it is hidden in what villains call the "Black Web", a hidden network for villains, bounty hunters, and other unsavory beings. For this reason, access is very dangerous and it is recommended that it not be for prolonged periods or there would be a risk that a villain, or worse, someone from the Black Hat Organization, could find and track our whereabouts more easily. Here is the link to the computer:
Once inside you can share it, but to access you will need the 14-digit password that we hide in the guide videos. Maybe Black Hat found the latest version of the page, but that gave us what we needed to find yours. We'll leave this channel open, good luck. And remember that we can still dance.
Eventually however, Charly was able to access the black web to buy a mystery box, however as mentioned below, the Black Web is a dangerous place with dangerous people, so she had to install the necessary programmes to avoid being tracked and doxxed.
(Did she buy it from Evil Zone, the Villainous version of Amazon though? 😂)
#villainous#villanos#villainous theory#villainous theories#villainous headcanon#villainous creepy charly#villainous headcanons#villainous missheed#villainous miss heed#cecilia amanda kelly#villainous penumbra#penelope numan braxton#villainous sunblast#podemos bailar#men without hats
28 notes
·
View notes
Text
The Satanic Temple is an abusive, incompetent religious organization
We have made a lot of detailed criticism about The Satanic Temple while providing copious sourcing so no one needs to have faith in us or our characterizations of this abusive, incompetent religious organization.
There is no real disputing what is verifiable or defending what is indefensible.
And yet:
Many still seem to think that "at least The Satanic Temple is doing something" in the fight for abortion access and justify their donations and other support accordingly.
Well, let's look at what the Temple is doing in Texas with the federal abortion-access case TST has been pursuing since February 2021.
First some idea of scale.
With the help of overly credulous traditional media seeking clicks and the exploitation of desperate, vulnerable people looking for a reason to hope, TST raised hundreds of thousands of dollars in donations between the announcement of the Texas "'bounty bill" going into effect in September 2021 and the end of Roe v. Wade in June 2022.

But it's hard to track exactly how much TST is bringing in beyond what they announce themselves, whether programs like "Amazon Smile" are included or in-addition-to, and then of course all of the for-profit corporations and their revenue sources.

Stuff like membership cards people also buy because they think it provides abortion protections sends money to for-profit United Federation of Churches, LLC, dba "The Satanic Temple", for example, not tax-exempt church The Satanic Temple (Inc.).
All of that money pouring into TST's coffers, controlled by just two men, and to be spent on what — we don't know what.
But we can see some of the court cases and how they're going; in fact, most are not about abortion at all and are going quite poorly.

The Satanic Temple is very bad at court cases.
For The Satanic Temple, Inc. et al v. Hellerstedt et al ("Ann Doe I"), we can see that the case is currently paused because TST's lead counsel Matt Kezhaya, who is based out of Arkansas and Minnesota, is appearing as a guest in Texas (that is, "pro hac vice").
However, Kezhaya has behaved so badly in other courts across the country, he's been sanctioned at least twice since TST Inc. v Hellerstedt started.
The federal district court judge in Texas stopped everything till Kezhaya explained himself to the court.
This is that explanation:
125 notes
·
View notes
Text
Things I Hate To See As An Interior Designer #Interiordesigner #designha...
TUMBLR - LOUSY - NEED
T-MOBILE - PREMIUM - PLAN
$80 - MONTHLY - 5 G - EVERY
MINUTE - 2 - ACCESS - SANAZ
VIDEO - I'VE - CHOSEN - 4 THE
DEMOCRAT - CHEERLEADERS
AND - FAMILY
UPGRADE - DEMOCRAT PARTY
DEMOCRATS
ACROBATIC - CHEERLEADERS
INSTEAD - OF - $25,000 HOURLY
BIBLE - 'DANGEROUS - AND YES
PERILOUS - TIMES'
IN - USA - AND - WORLDWIDE
NEW - HOURLY - WILL - BE
$500 BILLION - X 2 - HOURLY
TAX - PAID - 25 HRS - LOCAL
EACH - WEEK - I - COULDN'T
FIND - WITH - SMARTPHONE
SANAZ - VIDEO - HAVE - 2 YES
SEARCH - BUT - IN - LIBRARY
WAS - ABLE - 2 - FIND - WITH
SMARTPHONE - WI FI
BOOST MOBILE - MAIN
LIBRARY - BUT - LAPTOP
USES - MY - MOBILE HOTSPOT
AND - TETHERING - AND - ITS
NOT - GREAT
BOOST - MOBILE
ADD - MORE - GIGABYTES
$10 - MORE - 2 - $25 - FRM
AMAZON - PRIME - WHILE
EVERYONE - IDENTITY
THEFT - GETTING - YOUR
ADDRESS - BIRTHDAYS IN
FUTURE - THEY - WILL NEED
SOCIAL - SECURITY
DEAR - DEMOCRATS,
US - BUSINESSES - KOREAN
JAPANES - AS - GOVERNMENT
THEY - KNOW - HOW - 2 STEAL
KILL - AND - DESTROY
DEMOCRAT - PARTY
4 - ASSASSINATED IN OFFICE
4 - PRESIDENTS - DIED IN OFC
OFFICE - THEIR - US - HISTORY
OUR - SYSTEMS - WILL PROVIDE
DEMOCRATS
DE - MEANS - 2 - DESTROY
EVERYTHING - WHAT IS NEEDED
2 - DESTROY - DE - MEANS - 2
DESTROY - WHAT's - OUT THERE
BARBIE - WORLD
ITZY - HELLO KITTY - WORLD
AESPA - CHARLIE BROWN MALL
ALL - 3 - LOCATIONS
WORLDWIDE - ASIA - EUROPE
QATAR - ARAB - NATIONS
DEAR - KOREAN - GIRLS,
OUR - VIRGINITY - PROTECTION
PROGRAM
YOUR - LOUIS VUITTON
FIREPROOF - WATERPROOF
DON'T - CLEAN - WITH WATER
VENEZUELAN - MIAMI - POLICE
FORMER - FIRST - BILLIONAIRE
PRESIDENT - IN - US - HISTORY
COMPLETED - FOLLOWING
COUNTRIES - DENIED ENTRY
VIOLENCE - VIOLENCE
1) CUBA
2) HAITI
3) VENEZUELA
4) COLUMBIA
AND - MORE - NO - LONGER
ALLOWED - UNITED STATES
2 - HAITI - BLK - MALE
POLICE - OFFICERS WANTED
2 - SHOOT - ME - AND - MY
AIR - MAT - AND - TENTS
BOTH - SAID - WALMART
SELLING - ILLEGAL ITEMS
HAITI - BLK - MALE POLICE
SAID - AIR MATS - LIKE YES
HEROINE - ILLEGAL IN - USA
WALMART - ILLEGAL STORE
HAITI - POOREST - COUNTRY
IN - LATIN - AMERICA - AND
POOREST - CARIBBEAN
COUNTRY - CATHOLIC BIBLES
CHRISTIAN - VUDU - AND VUDU
THEIR - BIBLE - STUDY - THEN
THEY - ASK - DEMONIC SPIRITS
2 - FILL - THEM - UP
DEAR - KOREAN - GIRLS,
ONLY - MALE - DEMONIC
SPIRITS - THEY - LIKE EARTH
WOMEN - USE - 2 - GET - THEM
PREGNANT - THUS - U - SAW IN
HISTORY - 19 FEET - IN - HEIGHT
GIANTS - SCIENTISTS - HAVE
PROVEN - 40 DAYS - 40 NIGHTS
EARTH - WAS - FLOODED
DEMONIC - SPIRITS - CAN NO
LONGER - IMPREGNATE - YES
DEMONIC - SPIRITS - USUALLY
PREFER - WOMEN - AND - YES
NERDS - NOT - BARBARIC
BULLIES - BUT - THEY YES
ENTER - GENTLE - MALES
BARBIE - WORLD
3 - GROUPS - ERASE - YOUR
FINGERPRINTS - 4 - FREE 2
DEMOCRAT - PARTY
DEMOCRAT - CHEERLEADERS
YOUR - BAGS - POLICE WON'T
B - ABLE - 2 - OPEN - EVEN
WITH - COMBAT - KNIVES
PROTECTING - YOUR - CASH
JEWELRY - YOUR - CARDS 2
BARBIE - BANKS
ITZY - HELLO KITTY - BANKS
AESPA - CHARLIE BROWN
BANKS - ALL - CARDS ARE
NON-TRACEABLE
BUT - TRACES - WHO - IS
TRACING - THEM - BIG TIME
WE'RE - EMPLOYING - 18 AND
OLDER - BOUNTY - HOUNTERS
AMATEURS - 2 - PROTECT OUR
OWN - RESTRAINING - ORDERS
FREE - FREE - GETTING
LEGAL - PERMIT - HARVARD
LAW - OVER - 300 YEARS - 2
FREE - RESTRAINING ORDERS
AIR - WILL - BRING - THEM TO
ANOTHER - AREA
DEMOCRATS - TONGUES
DEMOCRAT - CHEERLEADERS
TONGUES - ONLY
SINGERS - ONLY
BARBIE - WORLD
ALL - 3 - PROVIDING
NEW - IDENTITIES
NEW - BIRTHDAYS
WESTERN - ASTROLOGY
ME - APRIL - ARIES
YOU - WILL - HAVE - NEW
BIRTHDAYS
AUTHORIZED - GIVERS
NEW - SOCIAL SECURITY NOS
EVERY - YEAR - ALL - ISSUED
SOCIAL - SECURITY - NOS
ILLLEGAL - YOUR - BOSSES
EMPLOYERS - LANDLORDS
HAVE - THIS - ILLEGAL
IDENTITY - THEFT - 2 - KILL
YOU - AND - TAKE - YOUR
PLACE - MOST - CURRENT
PHOTOS - BUT - DIFFERENT
WE'RE - ISSUING - PAPER
AND - GLOSSY - THIN YES
4 - SOCIAL - SECURITY TO
LOCK - IN - YOUR SIGNATURES
THEY - WANT - 2 - FORGE - THE
SUICIDE - LETTER
KIDNEY - BLADDER
$9,000 - EACH
TENTS - CAN - B - RUN OVER
BY - LOCAL - POLICE - 2 KILL
FEMALES - AND - PREGNANCY
USA - ILLEGAL - MISOGYNY
HARM - ABUSE - AND MURDER
OF - SMALL - BREASTED - YES
FEMALES - HARM - ABUSE
AND - MURDER - OF - GIRLS
NO - VISIBLE - BREASTS
HARM - AND - ABUSE OF
LARGE - BREASTED FEMALES
THEY - DIDN'T - KILL - THEM
'MILK - THE - COWS'
SAG - THEIR - BREASTS
NO 1 - NON-VIRGIN - MEN
NO 2 - NON-VIRGIN - WOMEN
ILLEGAL - MISOYGYNISTS
WILL - TELL - PRUNE BAG
LISA - LOOKS - LIKE - AGE 175
I'M - OLDER - WILL - GIVE HER
CASH - AS - WE - HAND - OVER
KEEPING - SOS - RADIO - THAT
IS - COAST - GUARD - WILL YES
PARK - VEHICLE - REAL - EASY
UNDER - OPENS - AUTO BRIDGE
THEN - STEP - THAT - EASY
MIAMI RIVER - LANDMARK
FOLLOW - SOUND - JUST
ATTACH - 2 - FENCE - LOTS
OF - FENCE - IN - MIAMI FR
PARKING - LOTS - THEY
HEAR - SOUND - BECAUSE
100 MPH - WINDS - FOGGY
GRAYISH - NIGHT - TIME ITS
FOGGIER - AS - THEY HEAR
SOUND - SEE - RED - LIGHT
LESS - THAN - 10 MIN - 2 FIND
ME - SW NORTH RIVER DR
AND - SW 2 ST - HISPANICS
AND - BLKS - SCREAMING NOW
IN - PARKING - LOT - 7:!7A EST
AS - COAST - GUARD - GETS ME
MY - THINGS - BUT - THEY - YES
RETURNS - US - UNLIKE POLICE
SPORTS - STADIUMS - THEY
HAVE - THOSE - FOLDABLE
SO - MANY - SLEEPING THERE
AS - THEY - STEAL - ALL THEIR
THINGS - CORRECTION - WHITE
AND - BLK - MALE - FINALLY
WOKE - UP - THEIR - TARPS
SLEPT - ON - SIDEWALK SO
THEY - WOKE - UP - STREET
BELONGS - 2 - NEW COMERS
PUBLIC - NUISANCE - 7:!9P EST
BUS 77 - JUST - PASSED - BUT
WHEN - ALL - SCREAMING AT
EACH - OTHER - 5A - NONE OF
THEM - NO ONE - WOKE - UP
2 C - WHAT's - GOING - ON
PUBLIC - NUISANCE - SHOT
2 - DEATH - IN - EUROPE - 4
DANGER - 2 - KIDS - AND
PREGNANT - FEMALES
SCENARIO
DEMOCRATS - NEW - IDENTITY
IF - THEY - DESTROY - BAGS - 2
SO - U - CAN - SIGN - UP - FOR
T-MOBILE - 5G - PREMIUM
PLAN - WE - WILL - REIMBURSE
YOU - BY - DOUBLE - TAX - PAID
ALL - THOSE - EXPENSES
SO - AS - THEY - CALL YOU
ANOTHER - NAME - WE'RE
PREPARED - AS - UPS STORE
AND - POST OFFICE - NEEDS
YOUR - PAPER - DEMOCRAT
VOTERS - INFO - CARD - TOO
WE'RE - PREPARED - 4 - USA
PEOPLE - WORLDWIDE
PAPERWORK - IDENTITY
WE - GIVE - AWAY - FOR THEY
ARE - DOING - IDENTITY THEFT
2 - KILL - U 4 - YOUR - MONEY
DEBIT - CREDIT - CARDS - TO
GET - YOUR - BANK - MONEY
JESUS - IS - LORD
0 notes
Text
The Amazon Audible Affiliate Program: Monetize Your Passion for Audiobooks
Introduction:
The Amazon Audible Affiliate Program presents a lucrative opportunity for content creators, bloggers, and website owners to monetize their platforms while promoting a vast library of high-quality audiobooks. Audible, an Amazon company, is a leading provider of digital spoken-word entertainment, offering an extensive collection of audiobooks, original podcasts, and more. Joining the Audible Affiliate Program allows participants to earn commissions by driving traffic and generating sales for Audible subscriptions and audiobook purchases. This article explores the key features of the program and how aspiring affiliates can benefit from it.
Understanding the Audible Affiliate Program:
The Audible Affiliate Program operates through the Amazon Associates platform, which means participants must have an active Amazon Associates account. Once approved for the Audible program, affiliates gain access to a range of promotional tools and resources to help them effectively market Audible products to their audience.
Commission Structure:
Affiliates earn commissions based on the type of Audible products their referrals purchase. As of this writing, the standard commission for Audible products is a fixed bounty fee for each eligible conversion. Eligible conversions include sign-ups for a free Audible trial, trial-to-paid memberships, and audiobook purchases. Commissions may vary depending on the location of the affiliate and the specific Audible product.
Promoting Audible:
Affiliates have the freedom to promote Audible in various ways, including blog posts, social media, email newsletters, and banners on their websites. They can leverage the extensive selection of audiobooks, exclusive podcasts, and membership benefits offered by Audible to entice potential customers.
Benefits for Affiliates:
a. Lucrative Commissions: Affiliates can earn substantial commissions for driving eligible conversions, making it a potentially lucrative program.
b. High-Quality Products: Audible offers a diverse range of audiobooks and spoken-word content, making it easier for affiliates to cater to different interests and demographics.
c. Trusted Brand: Amazon's reputation and the popularity of Audible as a leading audiobook provider can boost conversion rates and instill trust in potential customers.
d. Tracking and Reporting: The Amazon Associates platform provides detailed tracking and reporting, enabling affiliates to monitor their performance and optimize their marketing strategies.
Tips for Success:
a. Know Your Audience: Understanding your audience's interests and preferences can help you curate relevant audiobook recommendations, increasing the likelihood of conversions.
b. Compelling Content: Create engaging and informative content that highlights the benefits of audiobooks and Audible membership.
c. Utilize Promotional Tools: Leverage the various promotional tools provided by Amazon Associates to enhance your marketing efforts.
Conclusion:
The Amazon Audible Affiliate Program offers an exciting opportunity for content creators to turn their passion for audiobooks into a profitable venture. By tapping into the vast collection of audiobooks and podcasts offered by Audible, affiliates can attract a diverse audience and potentially earn attractive commissions. With strategic marketing, quality content, and a strong understanding of their audience, affiliates can maximize their success in the program and create a mutually beneficial partnership with Audible and Amazon.
For more:
moneybox vs moneyfarm
is raylo legit
what is chat gpt
raylo review
audible affiliates
Early morning jobs
0 notes
Text
How to make organs work with hero editor diablo 2

How to make organs work with hero editor diablo 2 mod#
How to make organs work with hero editor diablo 2 full#
How to make organs work with hero editor diablo 2 free#
Use flair when your task or offer is finished. Use in start of title for advertising your service. Use in start of title for posting work you need done.
How to make organs work with hero editor diablo 2 mod#
Mods can use their discretion to perform any mod action. This also includes traffic/likes/listens/subscribers/follows/comments. Tasks or offers for product/store/page/app/personal reviews/testimonials/ratings/votes are not allowed. Constantly needing to be reminded of this by moderatlyhelpful bot will result in a permanent ban. You are allowed to repost only every 3 days. Low effort posts are moved without warning.īuying/selling/sharing/upgrading/linking accounts or items (including digital items/codes) is not allowed. Low effort post and posts for Health/Medical/Emotional/Life advice offers are not allowed. Tasks/offers that bypass paywalls are not allowed. This is especially true for communication via modmail. Trolling, being disrespectful, or rude in general on the subreddit is not allowed. Once there is an agreement to start paid for work, you must post $accept in response to the $bid in question.Ĭurrency exchange, borrowing/loaning money, gift card buying and selling is not allowed. Physical or not.Ĭommenting PMed, $bid or some variant is mandatory when contacting an OP. This includes posting "looking for" "help me find" books, movies, programs, audio, or other types of media. You must describe your task or offer in the post. Be specific.Īll offers for the creation of anything must include links to examples. Offering to do "anything" or write "anything" includes things that are against the rules. Posts that say "any" or "anything" are not allowed. This includes affiliate, referrals, wechat/twitter verifications, phone verifications. Tasks or offers involving signups, referrals or verifications of any kind are not allowed here. Tasks/Offers/Bids to photoshop any kind of official document will result in a PERMANENT BAN. We don't want to hear about why you need the money.
How to make organs work with hero editor diablo 2 free#
No Sabotaging tasks by commenting free solutions or offering to do it cheaper. Anyone who works on your task after you've agreed to work with them must get paid. No free work, commission only work, work for tips, bounties, speculative work. We'll also ban if an account was clearly karma farmed. Messaging us about it, for any reason, will be an instant permanent ban. You'll be auto notified if you don't meet them. You must meet a minimum account age and karma to participate. It's an all encompassing "NOTHING related to schoolwork." Rule. This isn't just a "No academic dishonesty" rule. NOT EVERY POST GETS CAUGHT/REMOVED.īidding/Participating in any task or offer for the below rules will result in a ban for OP and those who bid.
How to make organs work with hero editor diablo 2 full#
If you need to contact moderators do so here send a modmail.Ĭlick here for the full unabridged version of the rules.ĭO NOT USE OLD POSTS AS GUIDANCE FOR WHAT IS OR ISN'T AGAINST THE RULES. Report any posts or comment that you see breaking the rules. These are the only ways to make sure you're not dealing with scammers. Check users you're dealing with on the Universal Scammer List (USL). PayPal and Amazon gift cards are the most widely accepted payment methods, cryptocurrencies (BTC, ETH, LTC, etc.) can also be used.ĭo NOT deal with users who contact you and do not comment with the same username on your post. Any tasks and offers (within reason) for any amount, except what is prohibited by Reddit. This is a place to find casual online work and get jobs done well below market rate.
0 notes
Text
How to Write an Amazon Associates Review

Amazon Associates Review is a good way to build an audience and generate side income. It can also be a great way to complement your other affiliate products. Here are some tips on starting a successful affiliate business: Get started with Amazon Associates by creating an account and promoting products to your readers. You'll also learn more about the commission rates and the customization options. But most importantly, Amazon Associates is free to join and offers a huge range of products and services for affiliates.
Cost of joining
Amazon associates are paid a commission on sales that originate from their websites. Depending on the product, this can be anywhere from 4% to 8.5% of the total purchase price. However, it's important to note that affiliates can only earn a commission on products that they link to from their own websites. If they fail to generate a sale within 180 days of joining, they will be removed from the program.
To become an Amazon associate, you must register for an account. You will be asked to provide your name, email address, website URL, and a password. You'll also need to provide a mailing address and phone number so that Amazon can send you marketing communications.
Commission rates
The Amazon associates program is a program that allows websites and other companies to promote Amazon products and earn a percentage of sales. It has been a great revenue generator for many companies. Websites such as BuzzFeed, The New York Times, Vox, and others have links to Amazon products within their content. They also publish buying guides, which lead readers to the eCommerce giant.
Commission rates have fluctuated over time. The most recent change is the Amazon Echo, which was introduced at a 7% commission rate. Other categories like jewelry are no longer included. The commission rate for Kindle tablets and e-readers has decreased. This decrease is especially noticeable with the introduction of the Amazon Echo. The other 17 product categories are unchanged, however.
Customization options
If you want to write a review for an Amazon product, you can customize it with several features. For instance, you can customize the product title, description, pricing, ratings, and buttons. You can also add custom CSS and HTML code. You can set the character limit for product titles, add custom text at the end of them, and display rating stars. You can even add a picture to the product listing.
To customize Amazon associates reviews, you need to get your account approved first. Then, you must make at least three sales. In addition, you have to add a custom disclaimer information or credit the developers.
Amazon Associates Video Review
youtube
Payment methods
There are a few ways to make money as an Amazon associate, and all of them involve submitting your affiliate link and account information to Amazon. Once you've done that, you can receive payments via check, bank account, or electronic funds transfer. If you're a new associate, it's a good idea to learn as much as you can about Amazon's payment methods so that you'll know exactly what to expect from your work.
Amazon offers several payment options, from fixed advertising fees to variable commissions. There's also a bounty program, which pays you a certain fee for advertising. For this option, you'll need to optimize your site and content in order to maximize the number of visitors you send to your affiliate links.
#Amazon Associates#Amazon Associates Review#Amazon Associates Reviews#Boss Babe Review#Ecom Elites Review#Ecom Elites Reviews#Ecom Elites Scam#Amazing Selling Machine Review#Amazing Selling Machine 12 Review#Amazing Selling Machine X Review#Youtube
1 note
·
View note
Text
Google to pay up to Rs 25 lakh to find 'flaws' in these open source platforms - Times of India
Google to pay up to Rs 25 lakh to find ‘flaws’ in these open source platforms – Times of India
Bug bounties are something that almost every big tech company offers. Be it Apple, Google, Microsoft, Meta, Amazon — you name it and there are multiple bug bounty programmes on offer. Google has announced a new bug bounty program. Before we delve into what Google’s latest bug bounty program is all about, let’s tell you briefly what are bug bounty programs.
What are bug bounty programs?
Simply…

View On WordPress
0 notes
Text
da shillzone
just gonna make a fucking. megapost of affiliate and referral links for anyone who wants to support me and also get deals or whatever. i'm gonna try to be pretty clear about what i get for things also.
you get a thing, i get a thing:
Everand, formerly Scribd: read 'unlimited' (ish) books, use my link to get two free months and I also get a free month.
Mubi: it's not movies, it's cinema (it's movies). Use my link and we both get a free month.
Reel Paper: it's bamboo toilet paper with no plastic packaging and so far it's been the only one I like. It's a subscription and also spendy compared to regular toilet paper but I'm spoiled now. Use my link and we both get $15 off.
MeUndies: it's the fucking podcast underwear. I know. I know. They had a Halloween collection and I'm weak. It's so comfy I'm mad about it. Use my link and you get 20% off your first order, I get a $20 credit, enough to buy One Whole Underwear.
Unique Vintage: it's clothes, I like the collabs and am still mad about missing out on the Pusheen skirt. Don't buy anything full price imho, quality can vary WILDLY. My link will get you $10 off a $75 order and I get a $10 credit. Not the best deal but whatever.
YNAB: I was spending too much money on podcast underwear so I signed up for You Need A Budget to trick me into thinking money is real. So far it is the first thing to have ever successfully tricked me into treating money as real, and my debt situation has improved exponentially. It's $15 a month or $99 a year and my link gets you a free month, if you sign up after the trial I also get a free month.
ProtonMail: privacy-focused alternative to gmail, switching is easy peasy and it's free. Use my link to get a free month of the fancy paid version, and if you decide to sign up I get $10 off my renewal (because I pay for the fancy version).
i get straight cash:
Humble Bundle and the Humble Store: use my link to buy some video games or book bundles and I get a cut. Signing up for Humble Choice after clicking my link also gets me paid. This is literally the only referral program that pays me worth a damn.
the amazon quarantine:
amazon sucks and doesn't pay for shit except 'bounties' so ignoring all of this is fine actually. i get pennies for most things. it's bad.
Here's the fucking. 'influencer page' that Amazon gave me. I don't really know how it works. Anyway the rest of this is bounties.
You can use SNAP EBT on Amazon, apparently if you register a card using my link I get five bucks.
Audible Plus, if you use my link and sign up for a free trial I get $5 and if you actually pay I get another $10.
Audible Premium Plus is the same deal.
Amazon Prime Video, I get $3 if you sign up for a free trial.
Audible Gift Subscription, buy one for someone and I get either $8 or $10 depending on whether it's 12 months or not.
non-referral gifts:
maybe you would rather just send me a dollar or some cookies or whatever so i'll put all that here
I've got tipping enabled on this post lmao
Here's my ko-fi
Here's my Amazon wishlist, I have the occasional expensive thing on there because I also use it for things I plan to buy myself eventually
Here's my Throne, I have surprise gifts enabled so in theory you can send me random weird shit as a prank if that's something that appeals to you
#original#affiliate links jsyk#i wanted to have these all in one place even though it's probably a bad look lmao
381 notes
·
View notes
Text
CloudMounter App Review

What Is CloudMounter?
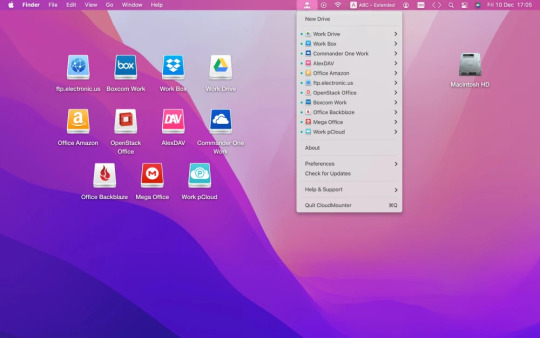
From the beginning look, you could mistake CloudMounter for another distributed storage specialist organization, which it isn't. A brilliant programming empowers you to oversee different distributed storage administrations on a solitary stage for simple access so you can get more from distributed storage. It improves and smoothes out distributed storage the board and convenience.
The extraordinary thing about CloudMounter is that it works with most administrations, including the most well known ones. Besides, it is viable with servers, so assuming that you are utilizing Google Drive, Dropbox, Box, Microsoft OneDrive, Backblaze B2, OpenStack Swift, Amazon S3, FTP/SFTP/FTPS, WebDAV, and so on.
That is not all! CloudMounter additionally includes information encryption to safeguard your data from intrusive eyes.
Who Should Use CloudMounter?
We should be straightforward practically we all have a developing requirement for extra room on our gadgets, yet MacBooks have restricted SSD stockpiling, which will in general top off rapidly, even with restricted use.
One arrangement is move to a HDD or begin putting away documents on distributed storage administrations and for simple information access and the board, use CloudMounter.
Check out more by the link
Regardless of whether you are somebody who has adequate hard circle space left in your Mac, it is generally really smart not to stuff the plate and exploit distributed storage administrations close by CloudMounter for added comfort. With this blend, you can have simple access in a hurry and store your documents on the cloud with negligible issue.
Benefits Of CloudMounter
The benefits of CloudMounter are bounty! Other than being able to acquire numerous distributed storage administrations one spot, one of its greatest assets is its efficient, easy to understand connection point and information encryption, and different elements to forestall unapproved access.
On the off chance that you, tragically, neglect or lose the secret word, you will enjoy the harmony of brain that your information is secure and admittance to individual data. The application doesn't store or move the individual information of clients to outsiders. The admittance to online data is immediate.
How Does CloudMounter Work?
You can get to the straightforward yet proficient point of interaction of CloudMounter whenever you have downloaded and introduced it on your Mac.
You will see the different distributed storage administrations you have associated with on the board on the left. On the right, there is a rundown of the administrations CloudMounter is viable with. As of now, there are ten that are upheld by the product.
1. Advantageous Access to Different Cloud Storages
With time we as a whole have become subject to distributed storage because of its innumerable advantages. Nonetheless, because of capacity constraints, a large portion of us presently depend on a mix of 2-3 capacity administrations.
Despite the fact that utilizing numerous distributed storage like Dropbox, Google Drive, and OneDrive grows your accessible extra room, overseeing them separately is a tedious and convoluted task.
CloudMounter can assist you with dealing with all of your distributed storage accounts from a solitary stage. Just add your ideal distributed storage administrations to CloudMounter and get entrance through Finder.
CloudMounter is an outsider application; be that as it may, it works flawlessly with macOS. Adding your distributed storage records to CloudMounter won't consume any nearby plate space, and you can see documents in Finder whenever you need.
CloudMounter likewise makes it simpler to transfer, move, and download a document from your distributed storage to the macOS framework. All you need to download the documents is to drag your ideal records out to your work area.
2. High Data Encryption
The different advances taken by CloudMounter to guarantee that their client information is protected is really amazing. The product has information encryption that makes it harder for inquisitive eyes to take your significant data.
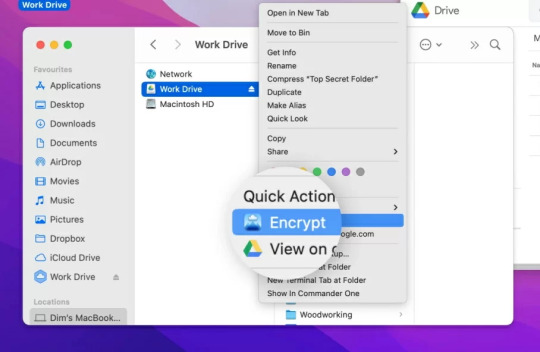
You can without much of a stretch encode the envelopes in your distributed storage by following these means:
Select your ideal envelope.
Right-click and pick Encrypt from the menu.
Assign a secret key to encode the organizer.
Scrambling your documents in an organizer will change the names of the records into non-sensical code, which others will not have the option to see regardless of whether they approach your distributed storage.
Similarity And Pricing
CloudMounter is presently accessible for Windows, macOS, and Linux as it were.
The best thing about CloudMounter is that you can benefit a 15-day free preliminary before you completely focus on buying the product. You can purchase the product from CloudMounter's site for $45 (once cost), or you can download it from the AppStore for $30 each year.
The $45 bundle accompanies free lifetime redesigns, every one of the highlights, and a phenomenal saving. You can likewise get CloudMounter from Setapp that permits you to get to any remaining programming in it, including CloudMounter. You can get CloudMounter from Setapp for $9.99 each month and a 7-day free preliminary.
Is CloudMounter Worth It?
CloudMounter is great for any individual who utilizes in excess of two distributed storage administrations or servers since it makes the executives simpler and more smoothed out. It will permit you to save yourself the issue of going to various individual administrations to download or transfer records.
It transforms capacity administrations into neighborhood capacity on your framework. In any case, the assistance doesn't come modest. Estimated at $45, some might find it a major yet commendable speculation since it saves time and bother. We found CloudMounter further developed efficiency also and made it simpler to arrange and oversee records put away on various distributed storage while keeping them safeguarded through encryption.
Conclusion
CloudMounter makes it bother free and fast to deal with your different distributed storage. With CloudMounter, your information isn't simply simpler to work, yet its information encryption, including the Google Drive encryption include, guarantees significant level security for your delicate information.
0 notes
Note
re internet is fake: i do freelance writing but i have no real qualifications or anything so my biggest client is like.... clickbait celebrity articles ('you won't BELIEVE what kendall jenner just bought!' 'why are dawson's creek fans debating this article?' etc) written with a fake name + stock image author photo. for years i had seen and wondered about this kind of content and i feel like we're not at "mostly bots" but there is the whole.... underpaid people spewing out thee most generic content to generate click/ad revenue. idk even what my point is here i just always feel so weird about my admittedly very dull job and how it relates to the . content ecosystem. it's very hard for me to imagine any actual person reading what i write/the stuff on the website
well yes, i mean, this is also what i said in response to a question about flooding the tip form at the pro life bounty hunter website (you could set up a bot-pipeline to automate it but it would be quicker easier and more effective to just write drivel by hand. also they've been taken down by two different webhosts now)
handwritten drivel does already occur in many uh, industrialized ways, from like, people posting shitty short writing jobs on amazon mturk, to hillary paying a million dollars to real people to post campain drivel online, to the internet research agency that created one of my most treasured mutuals, lagonegirl (i'm kidding she never followed me), to the military program that allows active servicemembers to maintain up to a dozen sockpuppet social media profiles each
like is there garbage on the internet? sure. did bots write some of it? sure. can you tell the difference anymore? probably not, because the bots were trained on the same garbage to begin with. is some of the garbage malicious? yes. is everyone on the internet trying to sell you something? yes, because the internet was born out of capitalism
like, it takes like one step of a rudimentary analysis in any direction, to look at any of these problems in a more sensible context, than they will ever be expressed by IlluminatiBro828, out there on instrumental hiphop beats-for-sad-anime-girl-to-study-to conspiracy theory internet forum
15 notes
·
View notes
Text
A state-owned Amazon

In most of the world, the lockdown has destroyed small businesses while increasing the profits of Big Tech intermediaries like Amazon, who control access to customers on one side, and access to merchants on the other.
The government of Argentina is trying to avert this fate. Their postal service is launching a "state-owned Amazon" called Correo Compras, which will offer low-cost ecommerce listings to businesses, and do fulfilment through postal workers.
https://www.correocompras.com.ar/
Correo Compras competes directly with Mercadolibre, a latinamerican ecommerce titan with a well-deserved reputation for squeezing suppliers and workers - its deliveries are made by precarious gig economy drivers.
https://www.opendemocracy.net/en/oureconomy/what-would-state-owned-amazon-look-ask-argentina/
Correo Compras is making a bet: that by eliminating Mercadolibre's vast margin (45%!), it can pay workers a living wage, offer fair treatment to vendors, and still sell at competitive prices.
They're also rolling out digital payments (BNA+) provided by the Banco Nacion, competing with Mercadolibre's Mercadopagos, which has seen a surge in usage and profits (thanks to high fees) since the lockdown. BNA+ also builds in instalment payments.
In many ways, Argentina is well-situated to try the experiment: it has very high internet penetration, a thriving domestic tech industry, and high levels of technological literacy.
It also struggles with structural poverty, thanks in part to US vulture capitalists who absorb vast amounts of its GDP to service odious debts.
As Cecilia Rikap points out in her Open Democracy article on the venture, Correo Compras will give Argentine state planners access to important market information - data that currently sits in private hands thanks to digital surveillance.
But while data can improve industrial policy, it can also serve state oppression. The debt that is currently crushing the company is partly the price-tag for the former military dictatorship's program of mass surveillance, torture, murder and terror.
Data collected for beneficial purposes can be weaponized. The Dutch government collected data on minorities so that they could provide settlement services to them. Nazi occupiers used this data to locate minorities and ship them to camps.
https://medium.com/@hansdezwart/during-world-war-ii-we-did-have-something-to-hide-40689565c550
This is not merely a historical fact. Australia's spy agencies were just caught tapping into data generated by covid exposure notification apps - data that Australians were promised would only be used for contact tracing.
https://techcrunch.com/2020/11/24/australia-spy-agencies-covid-19-app-data/
It's not a mere historical fact. There are people alive in Argentina today who were spied upon, kidnapped and tortured by their government. Argentina could certainly come under the sway of a brutal dictator again - if it can happen in Brazil, it can happen in Argentina.
This isn't to condemn Correo Compras. It's an exciting experiment. But it's an experiment. We should try lots of experiments. We could end the practice of worker misclassification, turning low-waged Amazon workers into employees and allowing them to unionize.
That's already starting to happen. Amazon workers in Alabama - a viciously anti-union state - is having a union vote.
https://www.washingtonpost.com/technology/2020/11/23/amazon-warehouse-workers-union/
States could offer postal fulfilment and startup funding for worker co-ops. They could enforce structural separation, forcing companies like Amazon to either offer a platform or sell on it, but not both.
They could structure taxes so that profits from predatory listing fees were annihilated by tax liabilities. NIST could offer bug-bounties for a free/open source federated clone of Amazon's platform that any co-op could stand up and run.
As always, the trick is to decide what's "infrastructure" - public goods that need public ownership - and what's a "service" that should be pluralized among many hands to make it harder to gain and abuse power (even state power).
52 notes
·
View notes
Text
On a single sentence from Stephen Graham Jones’ “Only Good Indians”
So, Stephen Graham Jones has this line in Only Good Indians that I’ve been thinking about for over a month now. And no spoilers it’s just a thought a character has. He refers to being a Native today necessitating all your ancestors having ducked under, “The Gatling Gun of history.” In looking for this quote I stumbled upon an Amazon review of the book that says:

“A dumb idea to begin with which gets worse the more I read. The writing is at times nonsensical- at one point the author refers to ‘the Gatling gun of history.’ What is that supposed to mean?”
It’s a one-star review, so let me elaborate here because apparently that’s necessary for some people.
The Gatling Gun of history is an incredible way to describe colonial violence. All guns are intended to do violence, but there is a quality to the Gatling gun that most others don’t have by virtue of being one of the first guns to just deal non-stop, indiscriminate death. What it lacks in accuracy it makes up for in malice. There’s a phrase about shooting poorly or just having something that’s not meant to be precise, “Accuracy by volume.” Often it’s a tongue-in-cheek phrase, but I think I’m going to take a second to outline how terrifying those two concepts are together.
Imagine the person wielding the Gatling gun and how they point it at what they want dead. The rounds won’t fire perfectly straight, the more the gun heats up the less accurate it might become. However, by the sheer inexhaustible limits of your desire to kill and the gun’s capacity to oblige, eventually rounds will hit. You don’t need to make a clear path from gun to target. You fill the air with lead and make it so inhospitable and deadly to exist within the hell of bullets that eventually you are sure that it will be inescapable. And all the while the gun thunders, round after round, black powder exploding, shells piling up beside the gun and tinking against one another as they land and split the world with thunder.
And now imagine that as the sheer force of violence that has been done to the very idea of Native people. From the disease settlers brought over, from the bullets they’ve fired, from the policies they’ve enacted, from the amount of times they’ve hunted us, from the propagation of our lack of personhood. From the way that disease wiped out more Natives than the settlers would’ve ever been able to kill and yet still they claimed their superiority. To the crimes of Andrew Jackson and all of the god damned programs that have been put in place to replace bounties on our heads. Blood Quantum, the slow genocide. Missionaries and their desire to tame “savages,” another form of slow genocide that has left me, in this present day, separated from my culture because my family believes a lot of Native religion and culture to be embarrassing or uncivilized. Consider the rampant health problems on reservations that have been artificially created by separating people from their lands and giving them dubious, processed foods to replace their prior way of life.
And every time something new happens, every time I see a tweet like the one that brought me here to write this I just thank goodness for Stephen Graham Jones and his Gatling Gun of history. Every tweet that erases or makes light of the horror of Native history, every time the news mentions us as “something else,” every time people say, “Native Americans were” rather than “Native Americans are” is another bullet loosed from that gun that has been firing for centuries with its relentless, hateful thunder.
Being Native means living with it. Learning history means being traumatized and radicalized in equal measure and we just have to walk forward with the learned pragmatism, grinning in the face of it all and living our lives in spite of it. And I’m good at it. All things considered I’ve been thriving lately. I just wish I didn’t have to live my life wading through centuries of discarded shells glinting, grinning up at me all the while.
8 notes
·
View notes
Text
The COG (Cognition Object General Ledger) Blockchain System
Artificial Intelligence empowers the world increasingly, and that power grows at an incredible rate. Unfortunately, like any other valuable and scarce resource, it is subject to profit-harvesting silos that seek to make it artificially even more scarce and only for their purposes, which pay little attention to the common good. The AGI Laboratory believes that AI resources should be a public utility, accessible to and developed by everybody.
Artificial General Intelligence Inc., therefore, introduced COG in 2017 to bootstrap an economically viable resource exchange around Artificial General Intelligence (AGI) related resources and services. A large part of this was to allow the free management of resources between systems. The intent is to create a community of such systems that can consume and negotiate resource usage on the blockchain. This community of systems will bring AGI resources to the world as a general-purpose utility. COG tokens not only allow sales of cognitive services and consulting—hosting across Amazon Web Services, Microsoft Azure, the Google Cloud Platform, and others—but COG tokens will also enable you to participate in new community prediction and governance markets, as these tokens will grant you voting rights and resources in efforts ranging from research to altogether new resource development as well as service access.
The mission of AGI Laboratory with COG is to build a community of experts, consultants, and automated tools that can take on any intellectual and information assessment job, in the process building a repository of knowledge and new tools that can be re-used and improved by anyone. Kaggle, a leading data sciences firm, is superb for the few who can afford to run a high-reward contest and the top-tier teams that can benefit—but despite the Kaggle community’s yeoman efforts to help newcomers, little of the knowledge and tools are retained from contest to contest.
AGI Laboratory will accomplish community re-use and education via an infrastructure of easy-to-use mix-and-match General Intelligence qualia. No intimate familiarity with disparate systems and programming languages will be necessary. The tools bootstrapped by the COG community are easily accessible. In particular, and to start with, we will build an economy of blockchain-based smart contracts that facilitate the processes of buying resources, managing contracts or bounties for creating new tools, and offering cognitive services and products as well as resource certifications.
Why COG Tokens?
COG Tokens provide humans and AI a medium for managing essential resources dynamically. The tokens enable far easier automation and removal of humans from the equation of cloud and machine-learning resource management.
What do COG tokens do?
While COG tokens provide standard smart contract token functionality, they also allow humans and AI systems to manage blocks of resources directly on the blockchain (versus other less secure methods). The COG Token is further designed to extend blockchain functionality. We can add to or extend the token with our token architecture creating new ERC20 tokens on the COG blockchain.
What is AI?
Artificial Intelligence refers to systems that apply “machine learning” principles, typically in narrow application domains. AI engages in activities like playing chess or complex advanced data analysis and deep learning applications, or more recently, voice applications telling you the latest in weather and reminding you what you need to do that day.
What is AGI?
AGI is Artificial General Intelligence. Where AI is limited to specific applications, AGI systems can be applied generally for any application. A human being is a functional example of a General Intelligence like an AGI.
What are COG Tokens?
COG Tokens are Proof-of-Stake fork of the Ethereum codebase and include the smart contract that represents operational resources such as machine-learning Application Programming Interfaces (APIs) or external cloud-hosted assets which support a token extension framework.
COG Tokens and Business
COG Tokens convert AI cloud systems into a commodity utility. This utility will enable your business and ours.
What does the token do?
COGs assign and access cloud-based resources such as Azure-based Machine Learning web services, cloud-based neural network systems, or custom visual analysis. COGs orchestrate these systems around any business need.
Cloud Resource Access
Increasingly prevalent cloud services enable more machine-learning, big-data, IoT (Internet of Things), and AI technologies, which COG will exploit by providing greatly simplified AGI automation interfaces to them. The competitive advantage is much greater cost-effectiveness for users.
Resource Management
Resource management is key. COG’s most important function is resource management. All other functions are related to this function. This includes Cloud-based resources such as databases or REST services-to-cognitive machine learning services that will help us evolve artificial intelligence into a publicly accessible utility managed by COG interaction.
Manage Research Allocation
COG is a medium for the community to guide our research team’s agenda. Because Artificial General Intelligence should be driven by public interest, COG will flourish outside of the sales and marketing constraints of a university or large companies. Everyone should drive AGI. Via COG, it will be. Research agenda and research voting are done via COG.
Read the rest here: https://agilaboratory.com/COG_Whitepaper.pdf
The COG (Cognition Object General Ledger) Blockchain System was originally published on transhumanity.net
#AGI Lab#AGI Laboratory#COG#COGT#crypto#cryptocurrency#crosspost#transhuman#transhumanitynet#transhumanism#transhumanist#thetranshumanity
1 note
·
View note
Text
How To Join Amazon Affiliate Program?
Amazon Associates is one of the best and popular affiliate program.In this period of Covid 19 every one wants to earn some money from home. There are millions of affiliates from all over the world earning big amount from Amazon Associates affiliate program. Few years back Amazon affiliate program was not available in those countries where there were no modern payments methods like PayPal or Credit Card, but now it is possible.
Now people from all those countries where there is no PayPal or Western Payment Methods can join Amazon Associates affiliate program and receive their Amazon earnings via Payoneer. What Payoneer does is that it creates virtual accounts for you in the US banks like First Century Bank. Amazon sends your payments to your Payoneer account from where you can withdraw money to your local bank account. It is similar to PayPal and free-to-join.
If you don't have a Payoneer account then you must create a Payoneer account before you signup for Amazon Affiliate Program because during the payment configuration step below you will be needing your Payoneer account details like Account No, Routing Number, Bank Name etc
1. How Amazon Affiliate Program Works
It is simple to understand this affiliate program. You only need to signup for Amazon Affiliate Program then share/advertise the Amazon products, produce sales and earn commission. This affiliate program requires you to have either website/blog or a mobile app.
There are various commission rates for various products like some categories have 2% commission, some have 5% commission and some have 10%. There are some bounty programs as well where for every signup/subscription you earn fix amount. In the last step we will guide you like in what ways you can share/advertise Amazon products and earn money.
2. How To Sign Up For Amazon Affiliate Program
Go to Amazon Affiliate Page.
Click Join Now for Free.
Click "Create your Amazon account"
Enter you Name, Email and Password.Click Create your Amazon account.It will send you an OTP(One Time Password) to your email account just for the verification .
Open your email account.Open the OTP Email from Amazon.Copy the OTP code.
Paste into the textbox in "Verify email address"
step.Click "Create your Amazon account."
Account InformationEnter your Account Information here.Enter Payee Name. Payee means the name of the person to whom payment will be sent.Enter your Address, City Name, Province or Region Name, Zip or Postal Code of your city.Choose your Country.Enter your Phone Number. Choose your country code first.Choose the main contact for your account. Choose the first option,"The payee listed above".Click Next.
Website/Blog or Mobile App Information
Enter your blog, website or mobile app URL on which you will promote Amazon products.Enter URL and click Add.Once you add, click Next
If your blog, website or app is made for children age greater than 13 then choose No. This "No" means your blog, website or app is made for people greater than 13 year-old.
Click Confirm.
Enter your Associate Store ID.
This ID will be used for tracking your links. You will see this ID in between your affiliate product links.Enter about your mentioned blog, website or app like what your blog or app is about.Choose the topics(primary and Secondary) that best describe your blog or app from dropdown menus.In "How do you drive traffic to your website(s)?" tick all the options that you use to bring traffic to your blog or website.Choose the Primary and Secondary options that you use to generate income Like Google Adsense, CJ Affiliate, Display Advertising etc.In "How do you usually build links?" Choose the first option "Blog Editor", if you have a blog like a WordPress blog or a Blogger blog.Choose the range of your blog or app's monthly traffic. Choose the primary reason for joining Amazon affiliate program. There are three options. Choose the second option(To monetize my site) if you are joining for earning money.
Choose how did you find about Amazon affiliate program.Enter the security captcha.Tick the operating agreement.Click the finish.
Payment ConfigurationYou will be redirected to Congratulations page. Here you have the option to configure your Payment method. If you don't have a Payoneer account or not created a Payoneer account yet click "Later". You can configure your Payment method later as well.
If you have a Payoneer account, click "Now" to configure Payment.You will be redirected to Amazon Sign-In screen.Once you Enter password you will be redirected to Two-Step Verification
Choose your country code and enter your phone number.Choose Text message (SMS)Send OTP.Within few seconds you will receive the OTP on your phone
Enter the received OTP via SMS on Two-Step verification.
Click Continue
Now you will be redirected to Payment Method configuration page. Here we guide you how to integrate Payoneer with Amazon.Choose the first option "Pay me by direct deposit.". $10.00 minimum earnings means your earnings will be sent to you when it will be greater or equal than $10.00.Now here you have to fill the information from your Payoneer account. We will guide you in the next step below to how to get this information from your Payoneer account.In "Bank Location", choose United States.In "Account Holder Name" Enter Beneficiary name.In "Account Number" Enter Account number.In "Bank Name" Enter Bank name, mostly it is First Century Bank.In "Bank Currency" Choose US Dollars.In "Account Type" Choose Checking.In "Routing Number/ABA Number" Enter Routing (ABA).Once you fill your Payoneer account details here, click "Submit and Continue with Tax Information.".
Login to your Payoneer account.Click Receive.Click Global Payment Service.Click "USD receiving account".Now copy the Payoneer account details and Paste in the Amazon Payment Method in the above step. Tax InformationDon't worry, if you are not a U.S citizen, you don't have to pay any tax.Now you will be redirected to "Tax Information Interview" step.In "What is your tax classification? Choose "Individual."In, "For U.S. tax purposes, are you a U.S. person?" Choose "NO."In, "Are you acting as an intermediary agent, or other person reeving payment on behalf of another person or as a flow-through entity?" Choose "NO"
Provide your Full name. This name should be the same as you have given above in Payee Name.Choose your country of citizenshipDo not tick on "I have a Non-US TIN" and "I have a U.S. TIN". If any of them is by default ticked, untick them.In "Why are you not able to provide a TIN?" Choose the first option "The country where I am liable to pay tax does not issue TINs to its residents"
In location of services performed, choose first option ,"All services will be performed outside the U.S."
Tick "I consent to provide electronics signature......"In Signature textbox, enter your full name.Click Save and Preview.Click Submit Form.You will be shown a message that your tax information has been validated successfully.Click Exit Interview
You will see your Current Tax Status: Completed.
You have successfully completed your Amazon Affiliate Sign Up.
Now you have 180 days to produce at least 3 or 4 sales to make your account fully approved.
If you fail to produce required sales or good amount of traffic within 180 days Amazon will cancel your affiliation, but you can apply again after the rejection. When you apply again you have to choose different Associate Store Id and you have to update all your old affiliate product links on your blog or app with your new product affiliate links.
#creatamazon#affliate#best affiliate marketing guide#best affiliate programs#best affiliate marketing course
1 note
·
View note
Last Seen Blogs

jejutattoo7
jejuisland tattoo

sexxxandsinnns-blog
x Sex & Sins x
sexxxandsinnns-blog
x Sex & Sins x

nugget-k1ng
Nugget King 👑

moemoemaido
Moe moe maido