#a tutorial by me:
Text
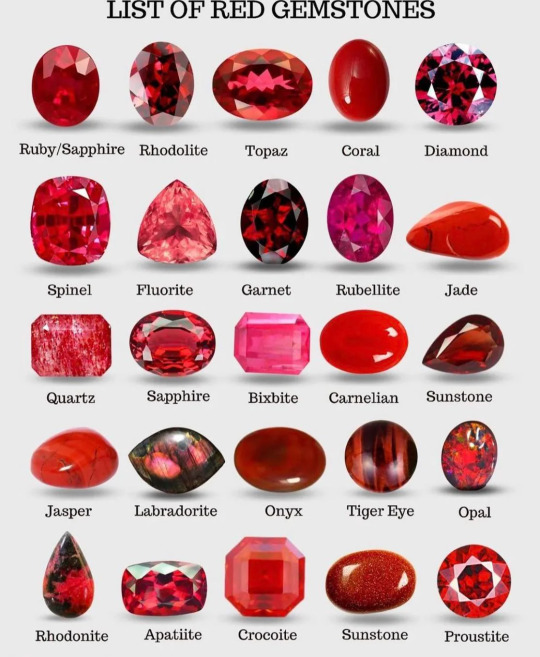
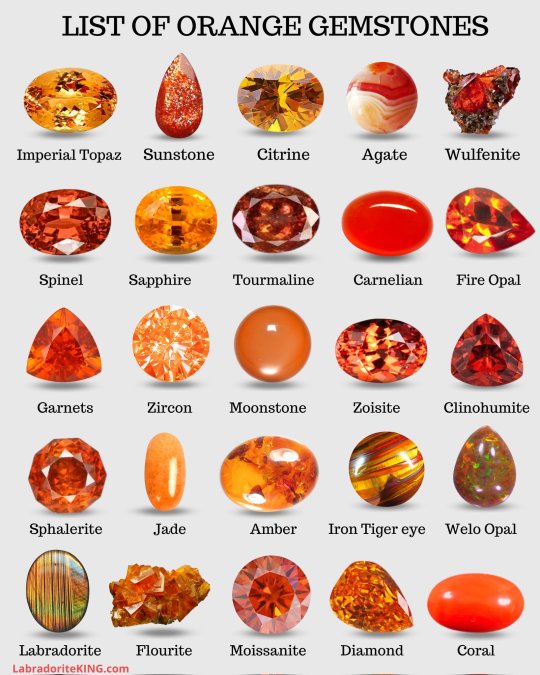
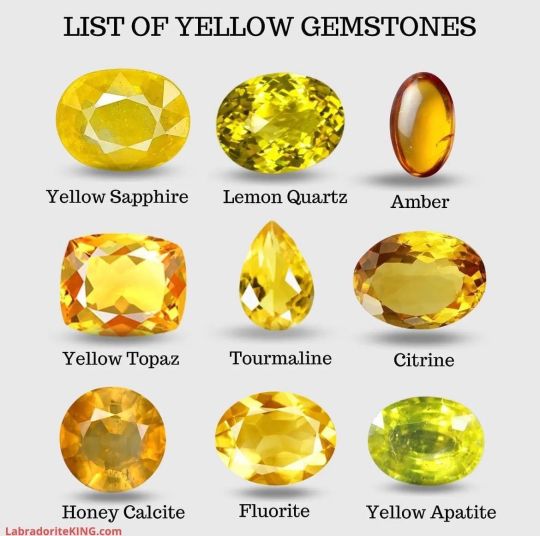
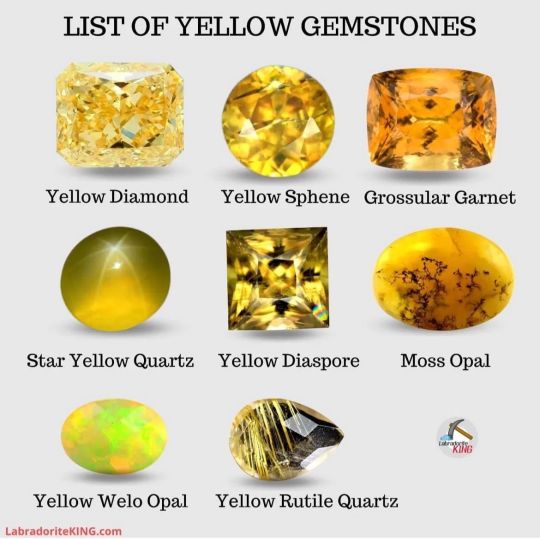

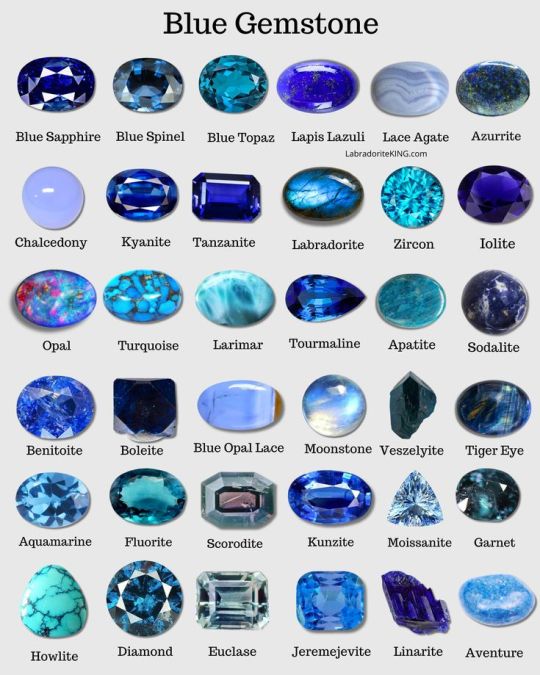
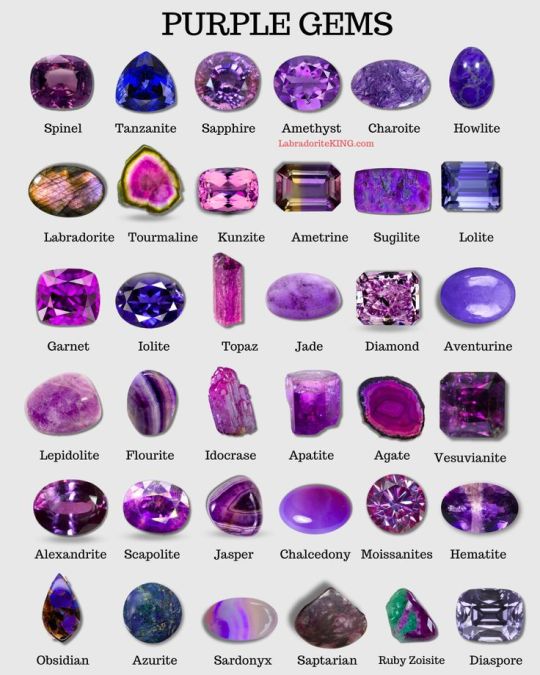
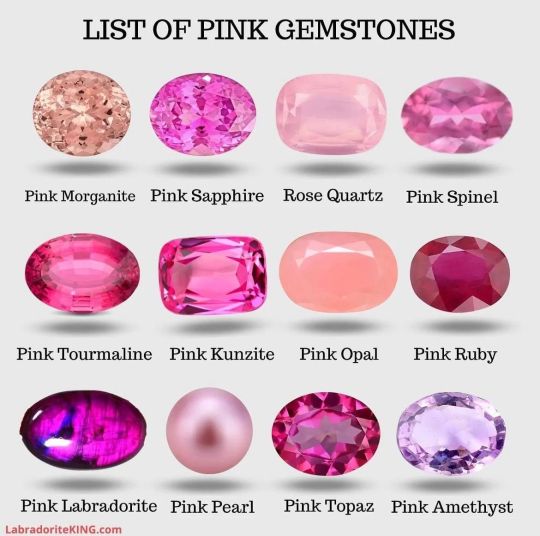
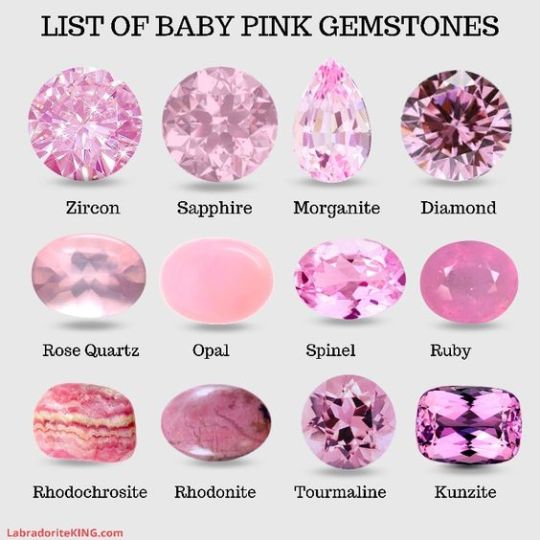
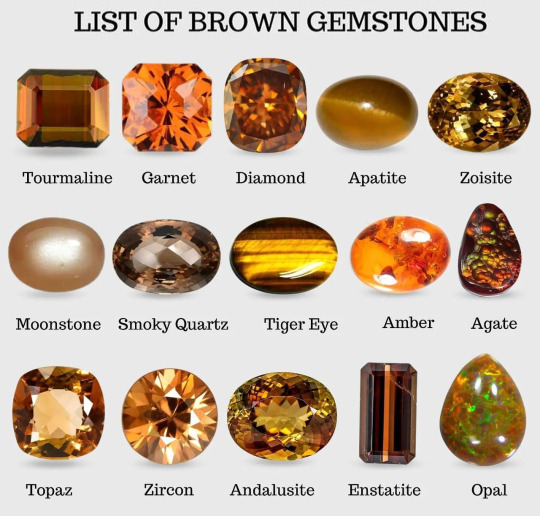


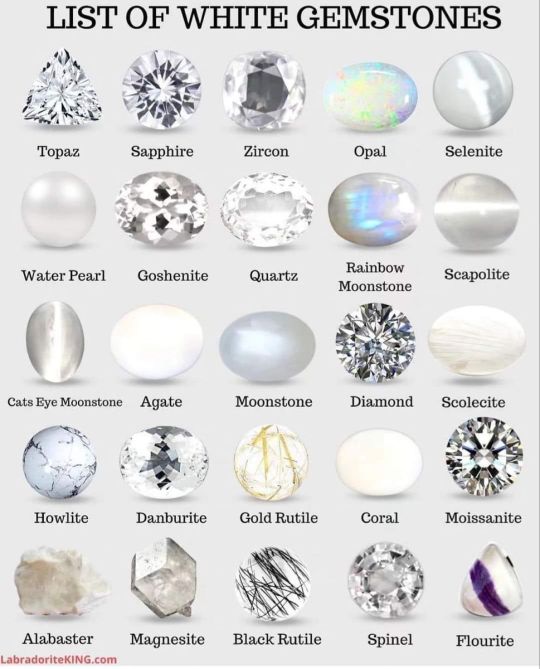
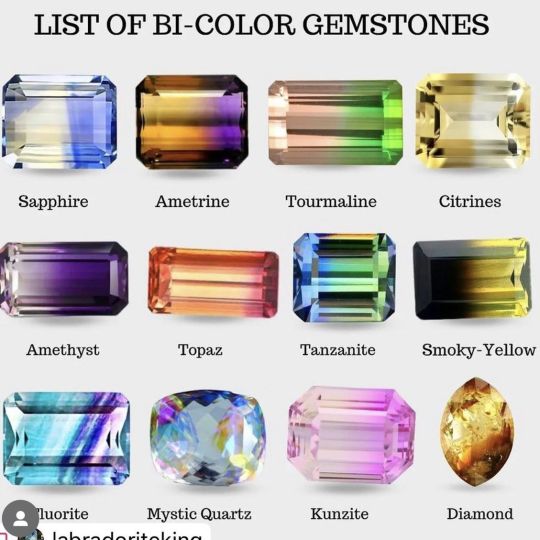
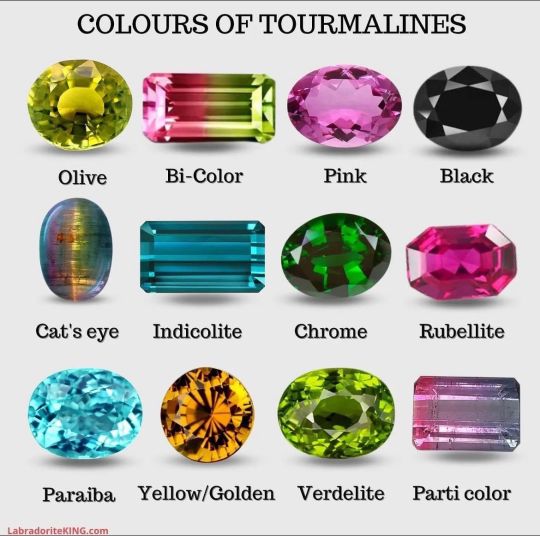
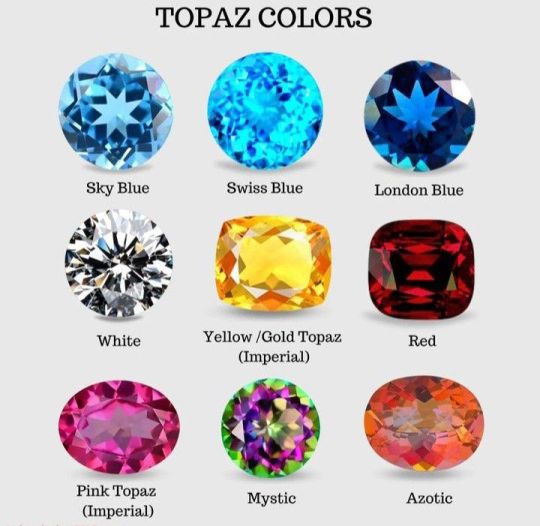

By LabradoriteKing on Pinterest
#Tutorials & References#Gemstones#Jewels#Art Reference#Writing Reference#Gemstones Reference#If the original marker wants me to take this down I will
103K notes
·
View notes
Text

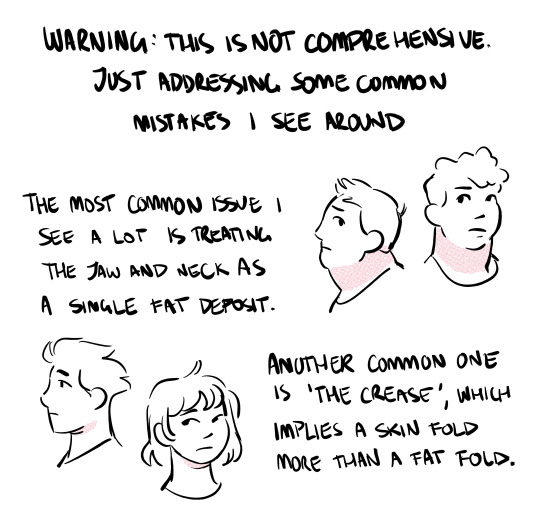


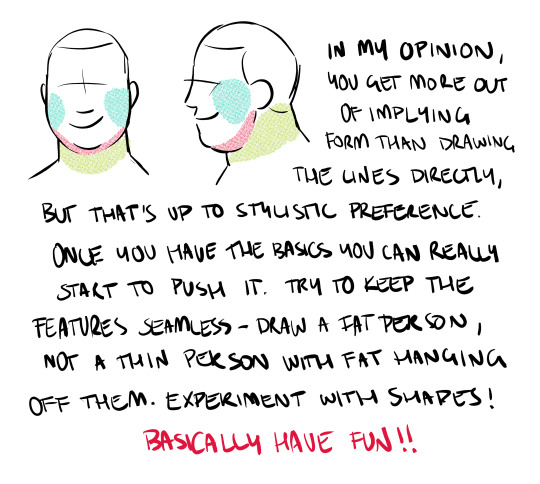
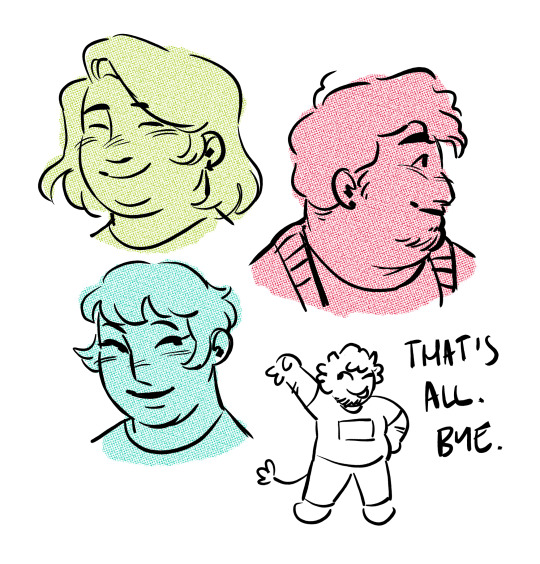
draw more fat characters ok. i love you
31K notes
·
View notes
Text
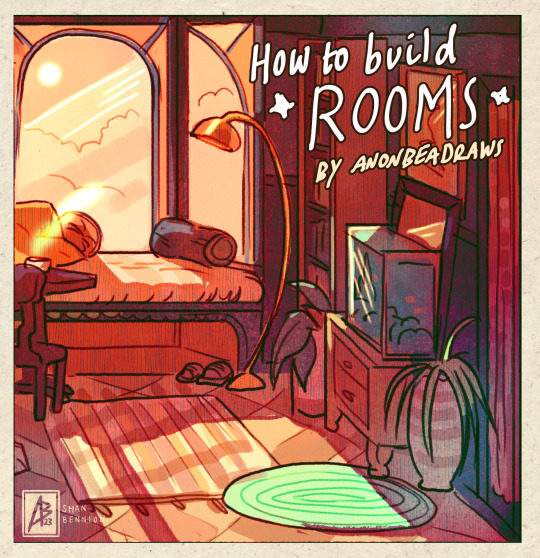


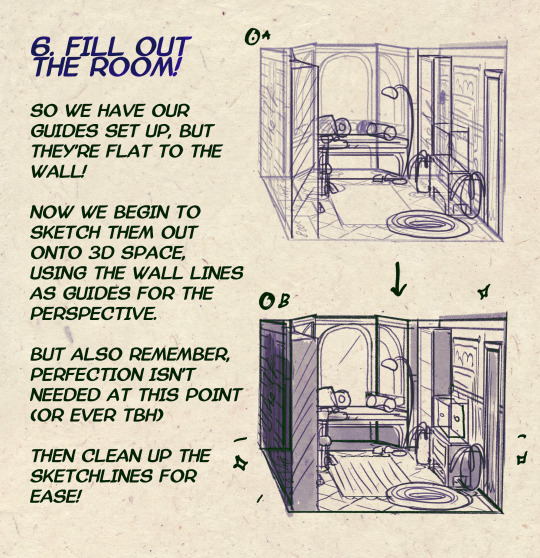

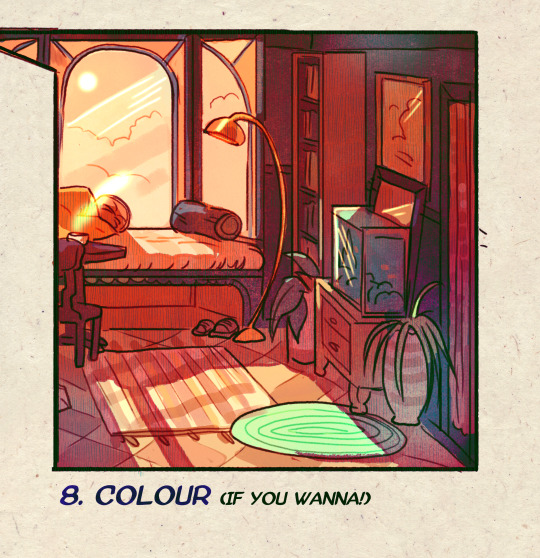
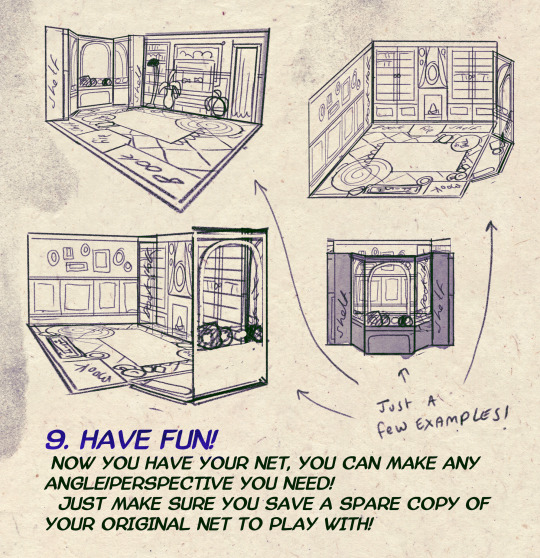
I made a Room Building tutorial! Lemme know if it helps! 🧡
Tip me here| Commission info here!
#anonbeadraws#digital#art tutorial#tutorial#room building#room design#illustration#gif#digital art#digital tutorial#art help#art resource#let me know if it helps!#tried to make it as simple as I could
35K notes
·
View notes
Text
🎮 HEY I WANNA MAKE A GAME! 🎮
Yeah I getcha. I was once like you. Pure and naive. Great news. I AM STILL PURE AND NAIVE, GAME DEV IS FUN! But where to start?
To start, here are a couple of entry level softwares you can use! source: I just made a game called In Stars and Time and people are asking me how to start making vidy gaems. Now, without further ado:
SOFTWARES AND ENGINES FOR PEOPLE WHO DON'T KNOW HOW TO CODE!!!
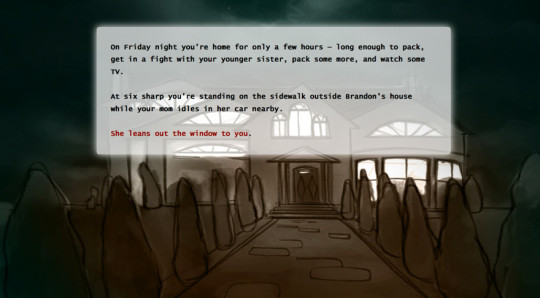
Ren'py (and also a link to it if you click here do it):
THE visual novel software. Comic artists, look no further
✨Pros: It's free! It's simple! It has great documentation! It has a bunch of plugins and UI stuff and assets for you to buy! It can be used even if you have LITERALLY no programming experience! (You'll just need to read the doc a bunch) You can also port your game to a BUNCH of consoles!
✨Cons: None really <3
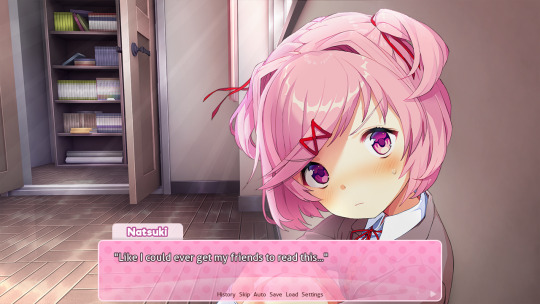
Some games to look at: Doki Doki Literature Club, Bad End Theater, Butterfly Soup
Twine:
Great for text-based games! GREAT FOR WRITERS WHO DONT WANNA DRAW!!!!!!!!! (but you can draw if you want)
✨Pros: It's free! It's simple! It's versatile! It has great documentation! It can be used even if you have LITERALLY no programming experience! (You'll just need to read the doc a bunch)
✨Cons: You can add pictures, but it's a pain.
Some games to look at: The Uncle Who Works For Nintendo, Queers In love At The End of The World, Escape Velocity

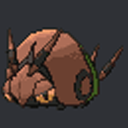
Bitsy:
Little topdown games!
✨Pros: It's free! It's simple! It's (somewhat) intuitive! It has great documentation! It can be used even if you have LITERALLY no programming experience! You can make everything in it, from text to sprites to code! Those games sure are small!
✨Cons: Those games sure are small. This is to make THE simplest game. Barely any animation for your sprites, can barely fit a line of text in there. But honestly, the restrictions are refreshing!
Some games to look at: honestly I haven't played that many bitsy games because i am a fake gamer. The picture above is from Under A Star Called Sun though and that looks so pretty
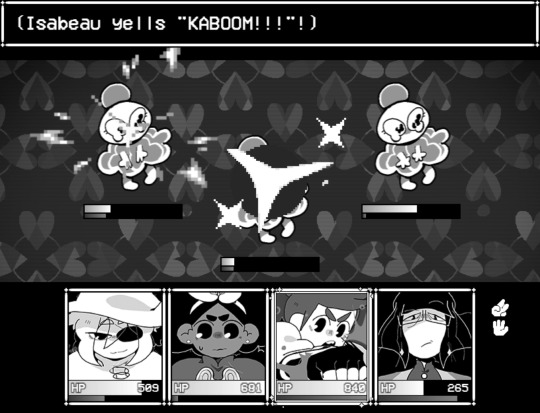
RPGMaker:
To make RPGs! LIKE ME!!!!!
NOTE: I recommend getting the latest version if you can, but all have their pros and cons. You can get a better idea by looking at this post.
✨Pros: Literally everything you need to make an RPG. Has a tutorial inside the software itself that will teach you the basics. Pretty simple to understand, even if you have no coding experience! Also I made a post helping you out with RPGMaker right here!
✨Cons: Some stuff can be hard to figure out. Also, the latest version is expensive. Get it on sale!
Some games to look at: Yume Nikki, Hylics, In Stars and Time (hehe. I made it)
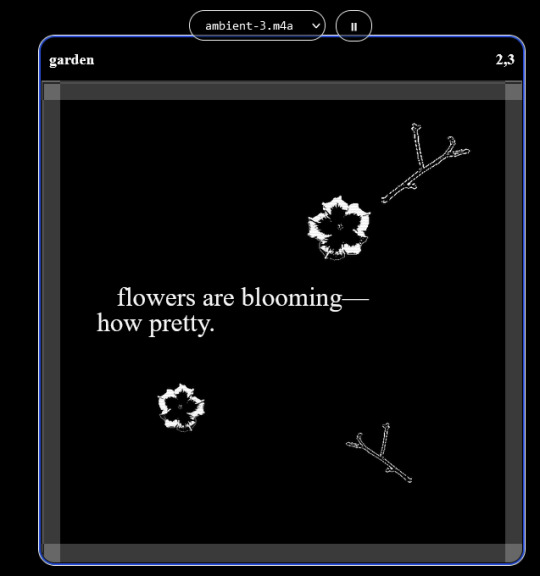
engine.lol:
collage worlds! it is relatively new so I don't know much about it, but it seems fascinating. picture is from Garden!
NOTE: There's a bunch of smaller engines to find out there. Just yesterday I found out there's an Idle Game Maker made by the Cookie Clicker creator. Isn't life wonderful?
✨more advice under the cut. this is Long ok✨
ENGINES I KNOW NOTHING ABOUT AND THEY SEEM HARD BUT ALSO GIVE IT A TRY I GUESS!!!! :
Unity and Unreal: I don't know anything about those! That looks hard to learn! But indie devs use them! It seems expensive! Follow your dreams though! Don't ask me how!
GameMaker: Wuh I just don't know anything about it either! I just know it's now free if your game is non-commercial (aka, you're not selling it), and Undertale was made on it! It seems good! You probably need some coding experience though!!!
Godot: Man I know even less about this one. Heard good things though!
BUNCHA RANDOM ADVICE!!!!
-Make something small first! Try making simple: a character is in a room, and exits the room. The character can look around, decide to take an item with them, can leave, and maybe the door is locked and you have to find the key. Figuring out how to code something like that, whether it is as a fully text-based game or as an RPGMaker map, should be a good start to figure out how your software of choice works!
-After that, if you have an idea, try first to make the simplest version of that idea. For my timeloop RPG, my simplest version was two rooms: first room you can walk in, second room with the King, where a cutscene automatically plays and the battle starts, you immediately die, and loop back to the first room, with the text from this point on reflecting this change. I think I also added a loop counter. This helped me figure out the most important thing: Can This Game Be Made? After that, the rest is just fun stuff.
So if you want to make a dating sim, try and figure out how to add choices, and how to have affection points go up and down depending on your choices! If you want to make a platformer, figure out how to make your character move and jump and how to create a simple level! If you just want to make a kinetic visual novel with no choices, figure out how to add text, and how to add portraits! You'll be surprised at how powerful you'll feel after having figured even those simple things out.
-If you have a programming problem or just get confused, never underestimate the power of asking Google! You most likely won't be the only person asking this question, and you will learn some useful tips! If you are powerful enough, you can even… Ask people??? On forums??? Not me though.
-Yeah I know you probably want to make Your Big Idea RIGHT NOW but please. Make a smaller prototype first. You need to get that experience. Trust me.
-If you are not a womanthing of many skills like me, you might realize you need help. Maybe you need an artist, or a programmer. So! Game jams on itch.io are a great way to get to work and meet other game devs that have different strengths! Or ask around! Maybe your artist friend secretly always wanted to draw for a game. Ask! Collaborate! Have fun!!!
I hope that was useful! If it was. Maybe. You'd like to buy me a coffee. Or maybe you could check out my comics and games. Or just my new critically acclaimed game In Stars and Time. If you want. Ok bye
#reference#gamedev#indie dev#game dev#tutorial#video game#ACTUAL GAME DEVS DO NOT INTERACT!!!1!!!!!#this is for people who are afraid of coding. do not come at me and say 'actually godot is easy if you just--' I JUST WILL NOT.#long post
27K notes
·
View notes
Photo
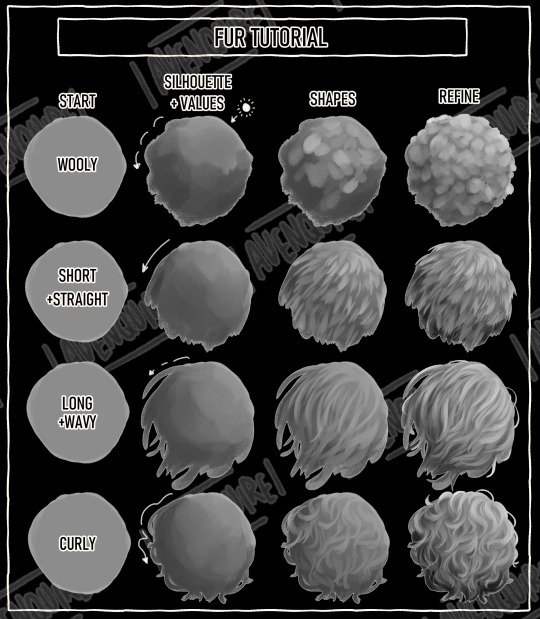

as promised (thumbs up) heres a lil uhhhh simple breakdown of how i general do fur things! can be applied to hair in general and also clouds and grass depending on how you work it (thumbs up pt2) feel free to request other tutorials
#art tutorial#art tips#drawing tips#furry#art#illustration#aventips#as an extra note the textures were referenced from animals people requested from me!! been getting a lot of comments on the curly section#which i get why!! but i was straight up referencing curly haired cows#wasnt sure what else to call it!!
30K notes
·
View notes
Text
one of the weirder more unexplained phenomena on this site are those people you'll sometimes see in fandom tags who make like... stimboards of some completely uncontroversial character and then they have the most bizarre DNIs underneath like. a banner of some cartoon character and "DNI: NAZIS, WAR CRIMINALS, AXE MURDERERS, HOMOPHOBES, POOL TOY FETISHISTS, PEOPLE WHO LIKE CHERRY COKE, ANYONE WHO HAS EVER SHIPPED THE TRAINS FROM THOMAS THE TRAIN ENGINE TOGETHER" and all of these are posited like they're equally bad. but it's only stimboard posts that have these banners. absolutely no one else ever does these
#blood and iron fascist seeing they're prohibited from reblogging a gifset of a hazbin character surrounded by slime tutorials#going ''aw :('' and shuffling sadly away ant with bindle style#posts by me#like what's the deal with that
3K notes
·
View notes
Text
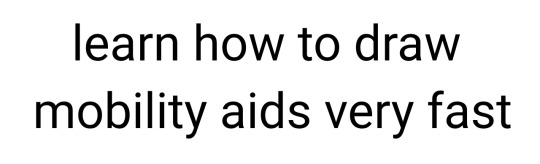


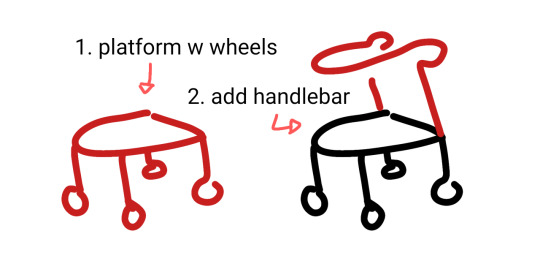
wheelchair, cane + forearm crutches, walker 90% chance if you're hesitant to draw mobility aids you're overthinking it. start somewhere. obviously these are not detailed references.
wheelchairs and walkers should be proportioned like chairs. in most cases canes are held on the opposite side of the painful leg because you want to put weight on the cane instead of the leg (dr house lied to you) but depending on the reason for the cane this can change!
[ image id: a title image that reads "learn how to draw mobility aids very fast" followed by three simplified drawings of different mobility aids broken down into two steps each. the changes made in each step are colored red.
the second image shows a wheelchair, with the steps "1. seat with footrest", showing a simple chair shape, and "2. wheels", which adds two large wheels to the back and two small wheels to the front.
the third image shows both a cane and forearm crutches, with the steps "1. stick", showing a single line of color, and "2. add handle", which shows a hand grip and a forearm rest on two different sticks. and additional label below this step reads "handheld stick height is where the hand rests at the hip" and "forearm stick height is the forearm".
the fourth image shows a walker, with the steps "1. platform with wheels", showing a backless chair shape with a wheel on each leg, and "2. add handlebar", which shows a handle raised above the seat. end id ]
✨ edited to remove italics for screen readers + also pointing out that I missed the handle on the forearm crutches! always use real reference photos when you can, this is just a starting point to help you understand the basics if you're not familiar :3
#are they perfect renditions? no. but first attempts at drawing anything rarely are#and tbf id rather people start drawing them and draw them badly than never draw them at all#art ref#tutorials#mobility aids#wheelchairs#canes#forearm crutches#walkers#sorry if there are typos blame the blindness#patch me through to palaven command
6K notes
·
View notes
Text
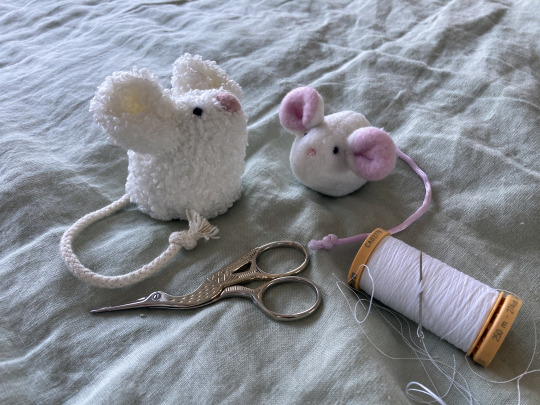

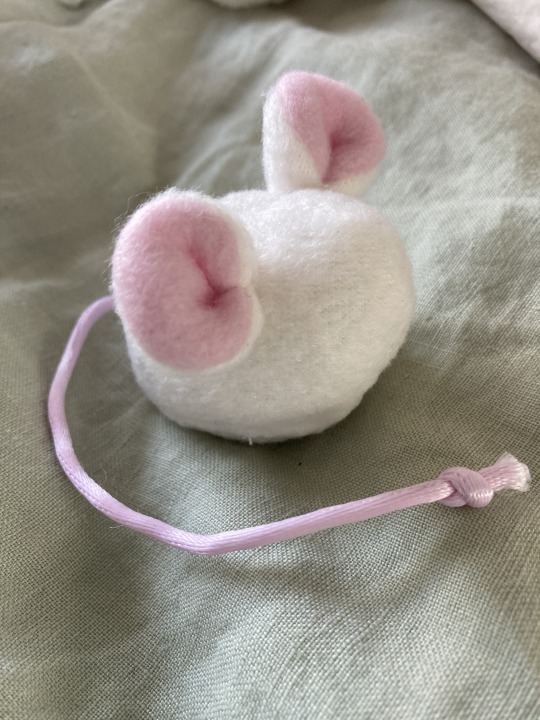
I've been sitting on this pattern and tutorial for a while now! so time to finally share it with you!
I was lamenting that the jellycat pip and sugar mice were long retired and difficult to get your hands on unless you are willing to pay much more than they retailed for each mouse, so i decided to try and eyeball a pattern and make some myself! they're not exact as i only used constructed visual references but they're close! please note that this pattern set is intended for personal use only. Rough tutorial under the cut!
This pattern is for printing onto A4 but you can check your scale with the measurements I've provided or just play around with how big or small you want to try and make them! i didn't really get any wip photos of pip mouse but it's method is largely the same with the nose being the major change, which i will detail in text in the instructions below.
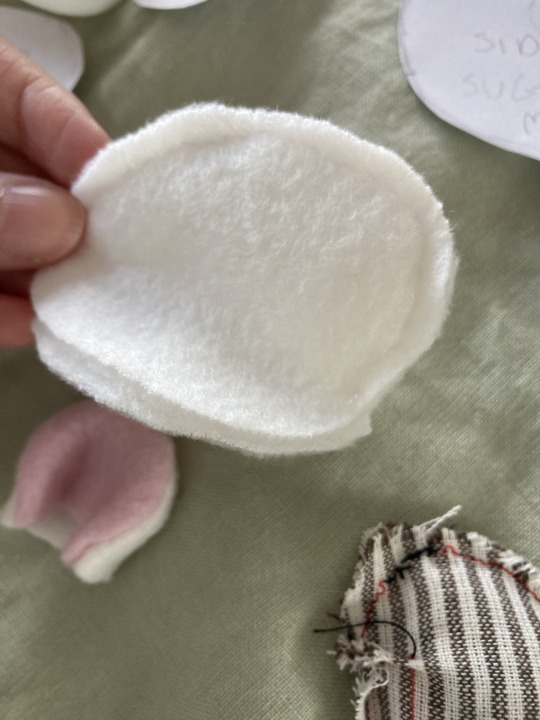
for sugar mouse i would recommend using polar fleece as it will act the right way for the ears to do their squishy marshmallow looking thing. but minky should also work or other similar fabrics! for pip mouse if you can find a similar curly looking fabric with a thin backing that'll be ideal but fleece will also work well, you just wont get the furry texture, you want a fabric with a little bit of stretch to it. i however would not recommend fabrics like felt or non stretch cotton for these guys as it's likely to not take shape the same as there's no give to the fabric.
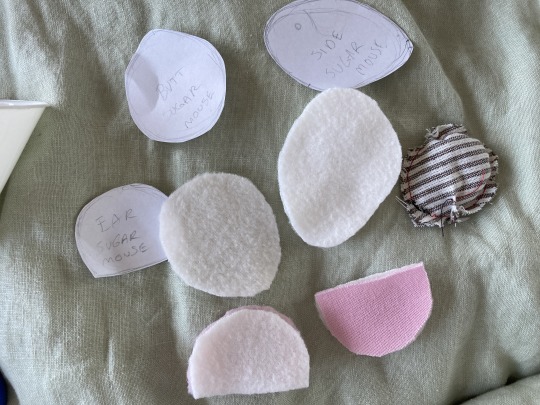
once you have printed out the pattern and cut the pieces in your fabric, you'll want to sew the ears up and turn them inside out, then put them aside for later. just leave them as is for now but here you can see i was playing around with pinching the turned through ear into shape.

Then moving on, sew the back pieces together along the spine and front of face. you then want pull the bottom open ends apart gently and place the open sides flat up against the base piece so that they're aligned, it can be good to pin this in place so it doesn't shift.
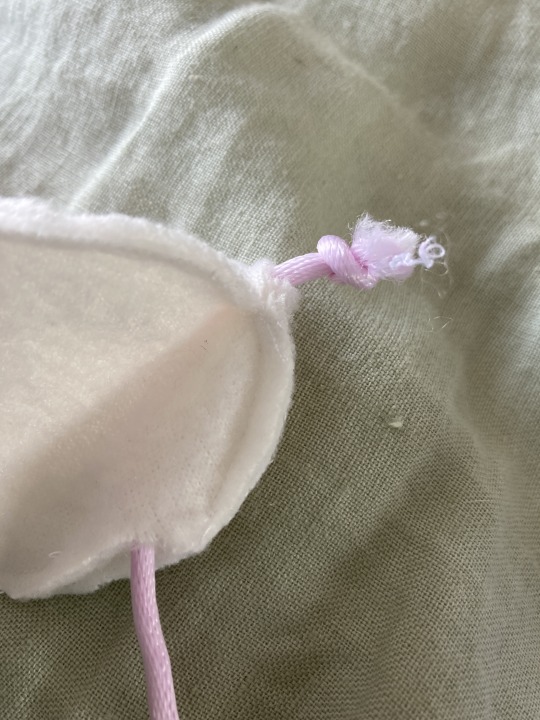
then, get your tail rope, and tie a knot at either end, placing the base of it inbetween the seam at the butt so that it'll sit in the right place, then sew the seam up directly with the tail in place, make sure you sew through the rope to secure it and make sure it doesnt shift. Sew around the bases seam leaving a hole in one side so that you can then turn your mouse through.
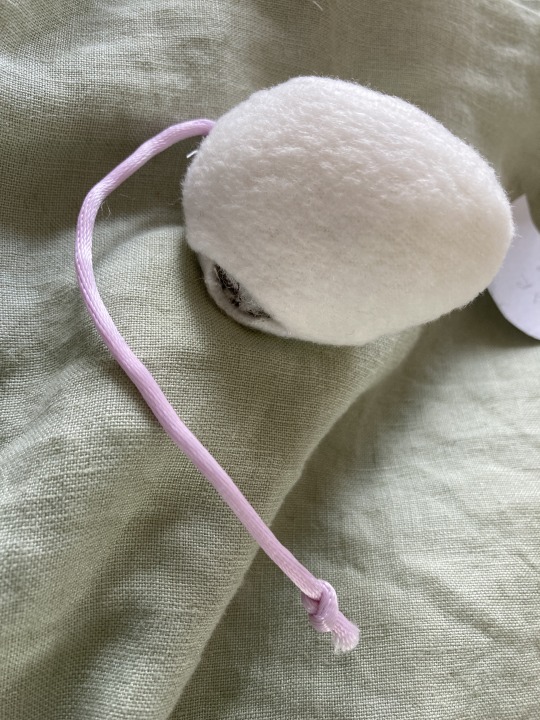
once turned through you will want to stuff your mouse with polyfill quite a bit so it takes shape! i like to put weighted beans in mine for extra effect, you can use dried rice or wheat too, just sew a little circle pouch a bit smaller that the mouses base with scrap fabric and fill and seal! then insert into the turning hole while you stuff. once stuffing is done you can sew the hole up with a ladder stitch. the weight from the beads will allow your mouse to sit up quite well.
next you will want to get those ears you put aside, take each corner and bring the ends together in the middle. then sew them gently together at the ends with one or two stitches in about the same spot. you want them to look 3d so dont sew the ends to the back of the ear, just end to end so they meet in the center.

Then pin the ears in place on the head
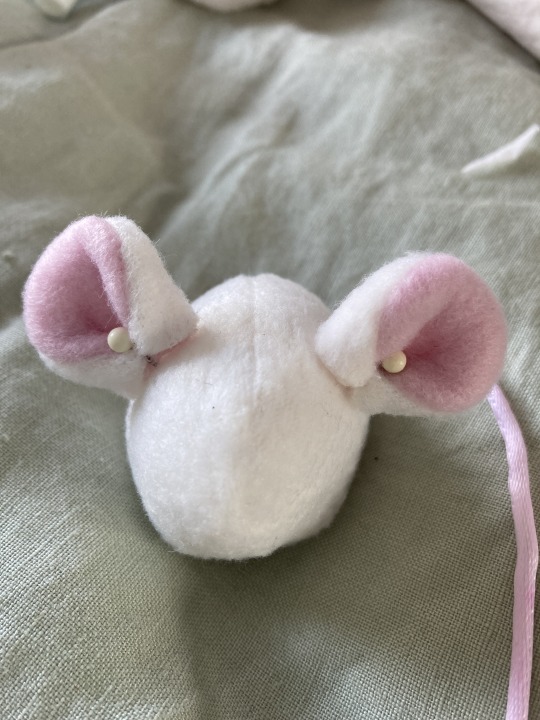
then you need to ladder stitch the ears in place while they're pinned so they dont shift around, go all the way around the outside edge of each.
now you're almost done! next they just need a face! sugar mouse only needs embroidery by way of a french knot for both the eyes and nose (you can find good video tutorials on how to sew a french knot online), pip mouse will also need a french knot for the eyes but has a separate process for it's nose.
(for the pip mouses nose you will need to leave the marked nose hole open and then stitch the nose fabric to the square nose backing in line with the dotted direction on the pattern, (it should look kind of baggy when it's unstuffed) sew it up completley with no hole, then cut a tiny slit in the backing and add polyfill there before closing with a basic stitch, then you ladder stitch the nose directly to the marked nose hole)
in order to hide the embroidery anchor knots i find the best way is to start by going down through the middle of the ears and then coming back up where you want the eye to be, and then going back down and up through the ear for the finishing knot, as it creates a very easy cover for them and looks nice and clean!
then you have yourself a little buddy!

haha they're great to squish!
if you use this pattern i'd love to see your results!
2K notes
·
View notes
Text
Go nuts y’all!
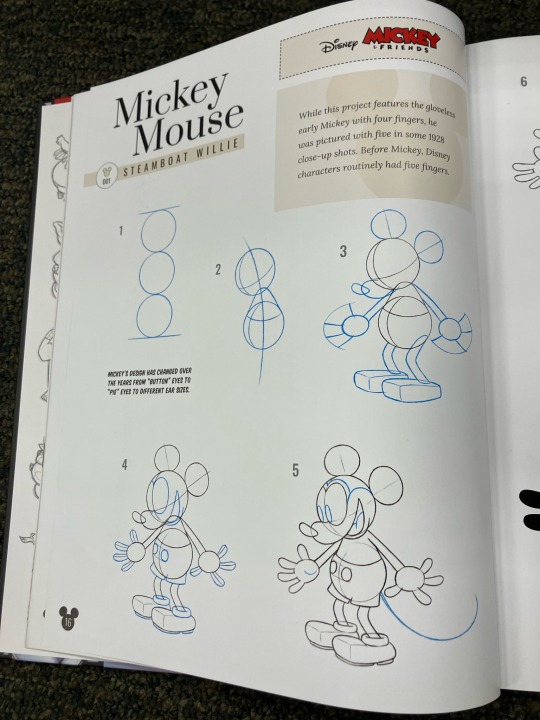
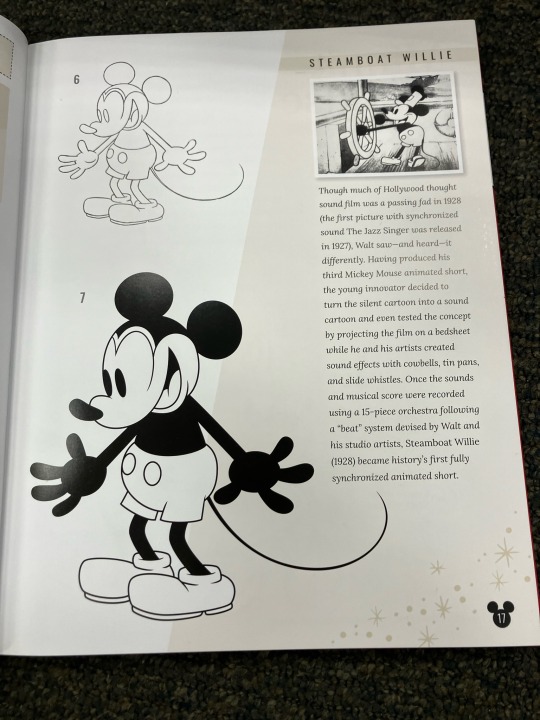
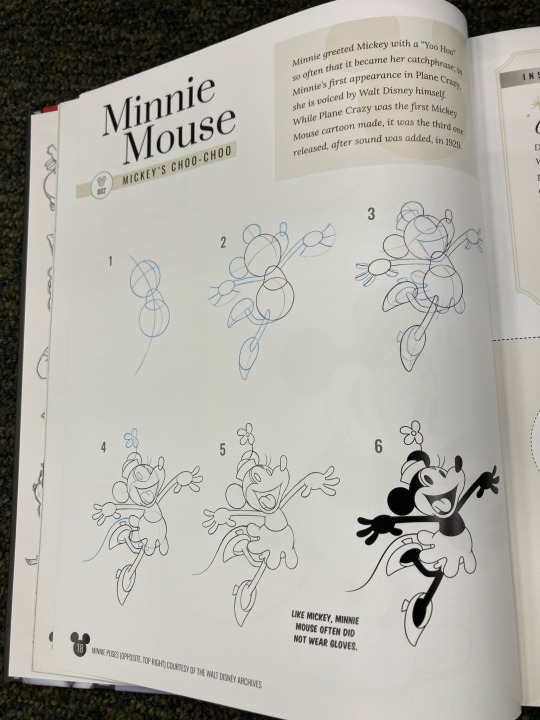
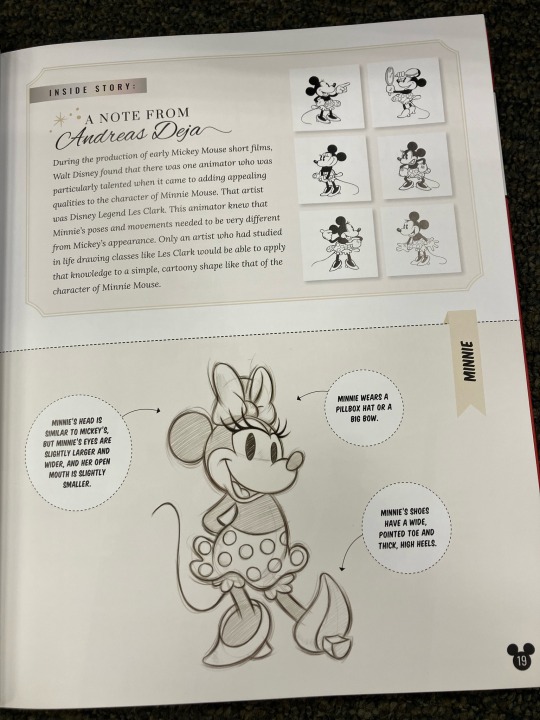
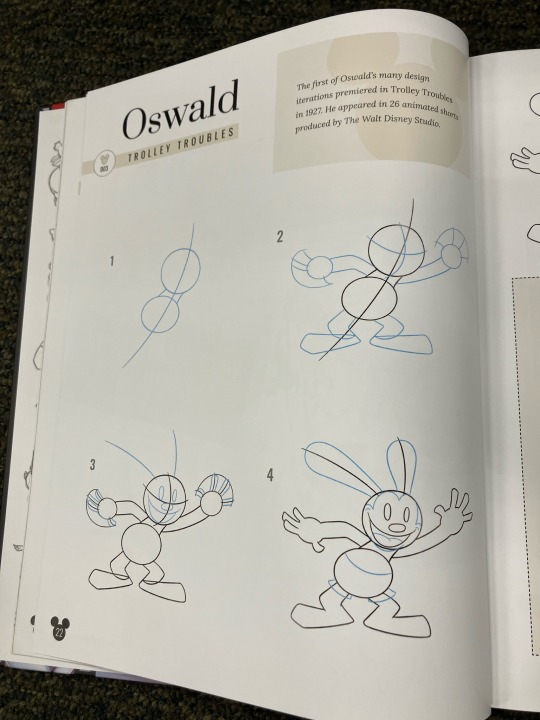

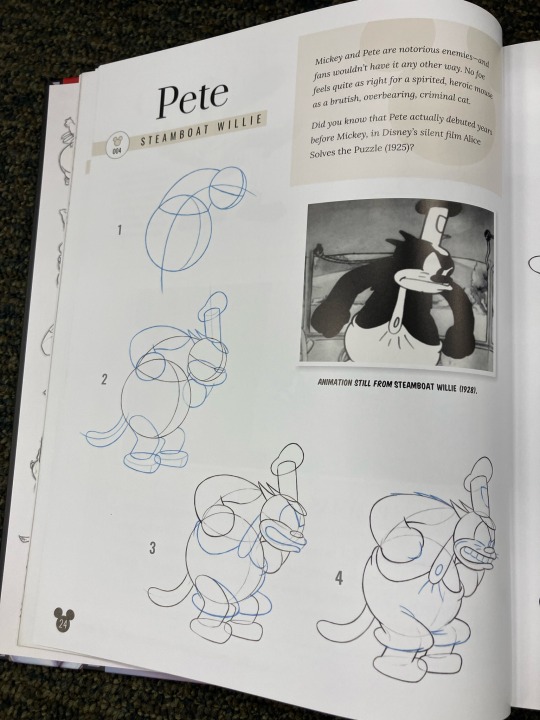
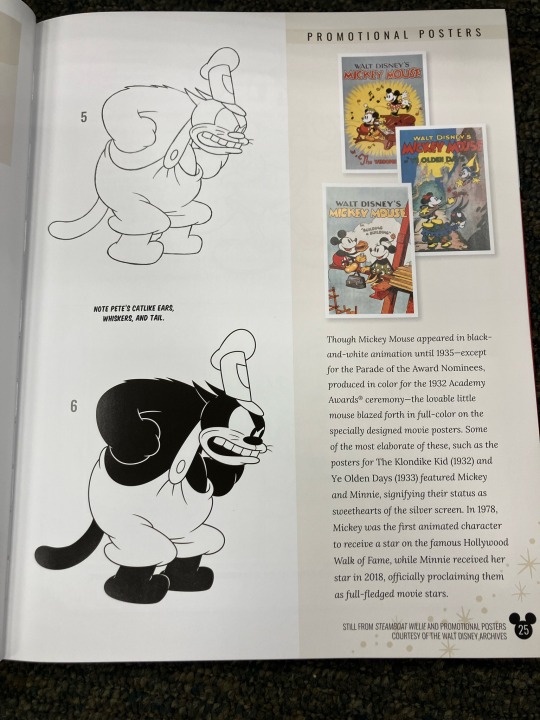
Source: Drawing 100 Years Of Disney Wonder
#Mickey Mouse#Minnie Mouse#Oswald The Lucky Rabbit#Pete The Cat#Peg Leg Pete#Stinky Pete#Public Domain#Disney#Drawing#Drawing Tutorial#Reference#Let me know if you need better snapshots of these pages
2K notes
·
View notes
Text
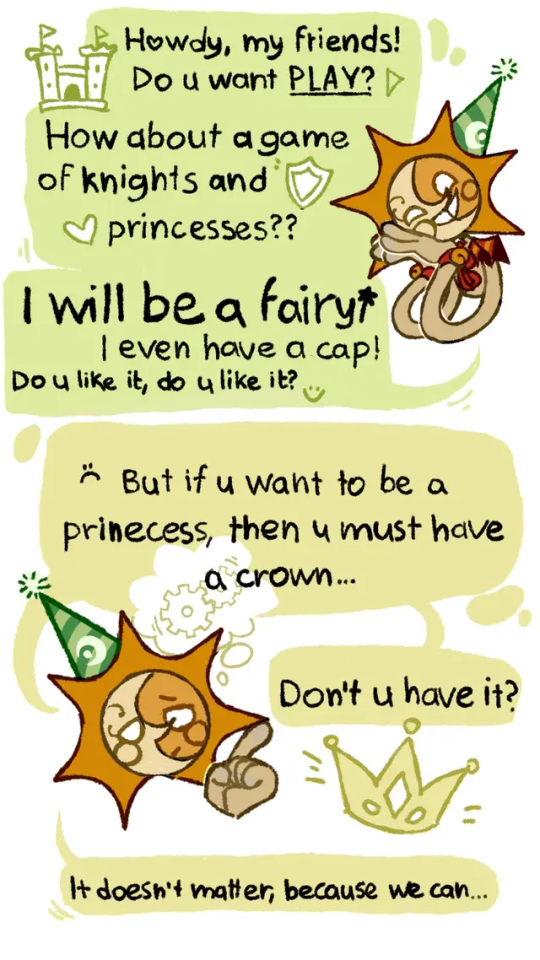
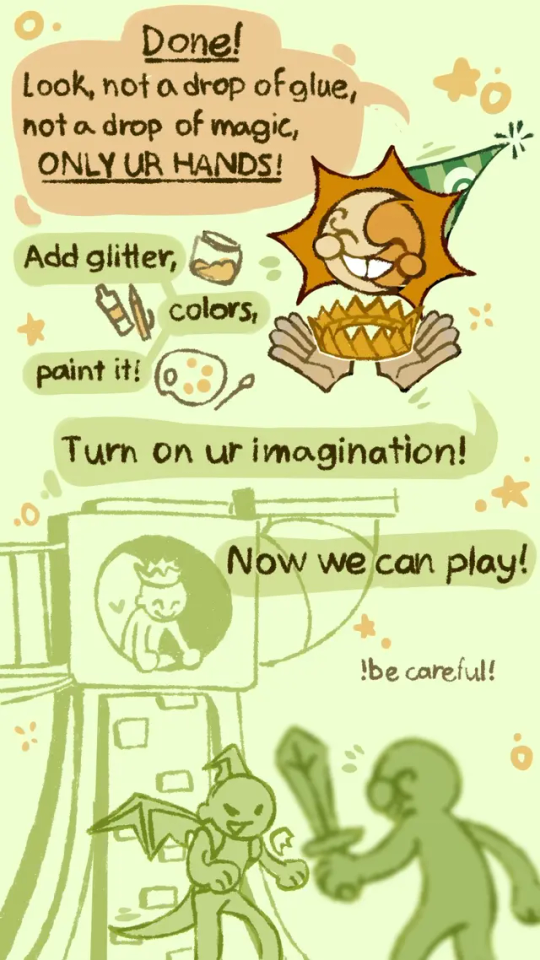
Some old childish shit (I love that and I love Sun so much, someone please treat me like this)
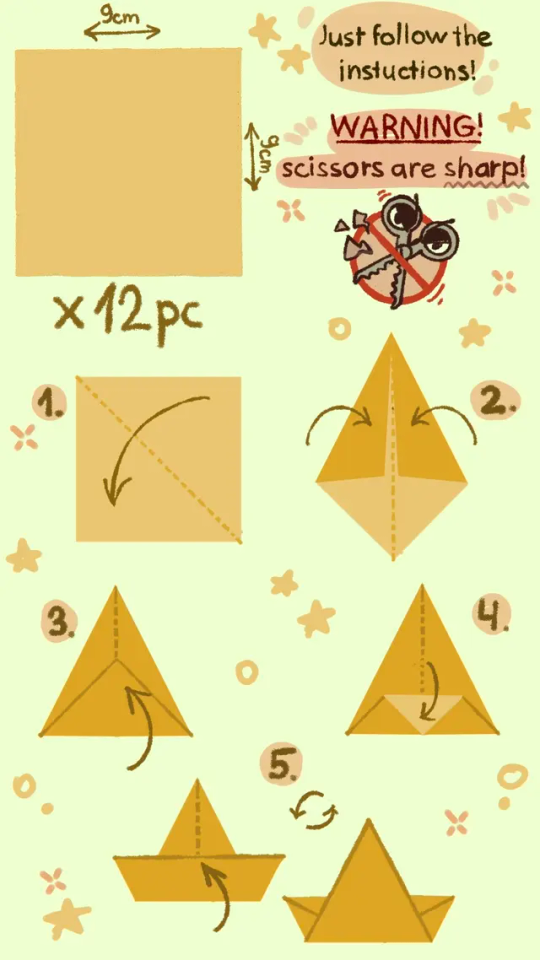
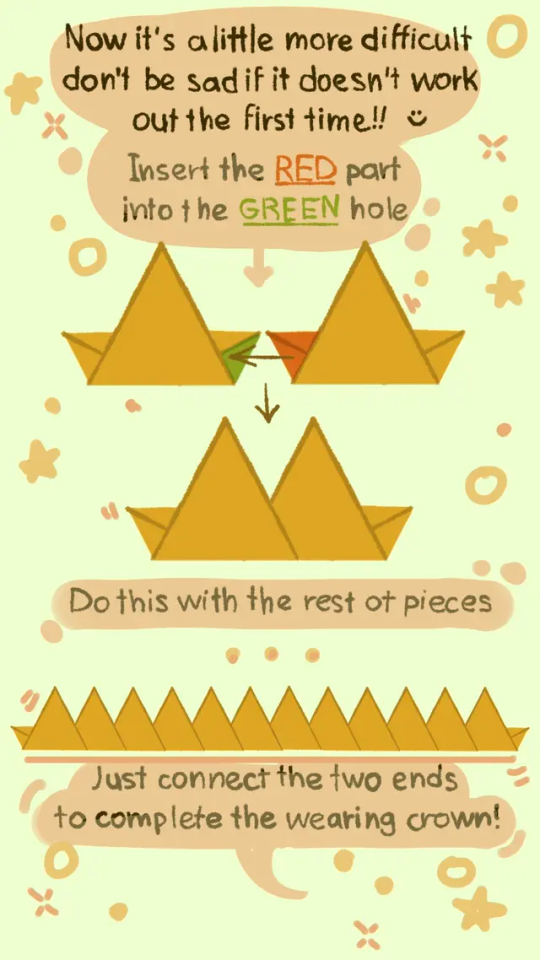
Paper crown tutorial 👑:P
#please treat me like this I'm begging u#hur hur hur hur hur#sundrop#sun#fnaf 9#fnaf 9 security breach#sun fnaf#sun fanart#fanart#tutorial#origami#origami tutorial#crown#paper craft#paper crown#so much tags
2K notes
·
View notes
Text
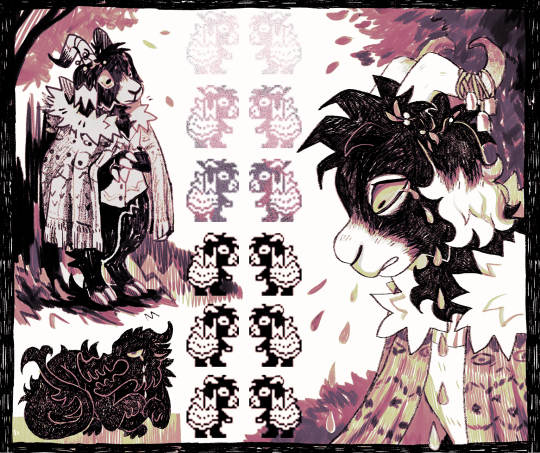
more svanhildr - trying new things, like a brave boy
#my art#anthro#furry#illustration#oc#svanhildr#dysterel#i have so many great brushes i never use for no reason so i'm expanding my horizons and using like 10 brushes instead of 3#and i used the pencil tool for the first time so i could make a sprite of svanhildr#btw don't do pixel art without looking at multiple tutorials first. worst mistake of my life#i think my blobby indeterminate sprite daughter looks great though#also has anyone seen brass eye and if so have you seen when the posh reporter lady is walking to the prison#and she turns to the camera and says something like “i'm going going inside now. like a BAD boy”#anyway it gets me every time and writing brave boy made me remember it
2K notes
·
View notes
Text
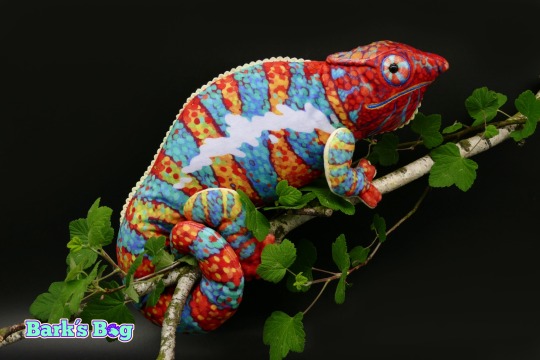
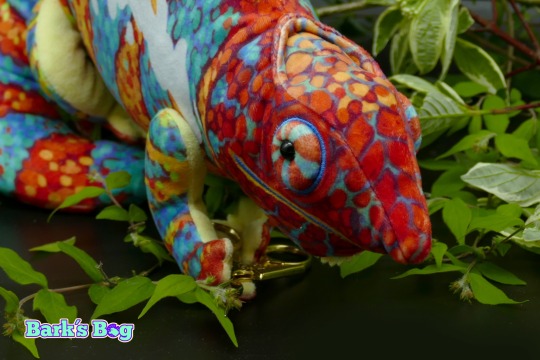

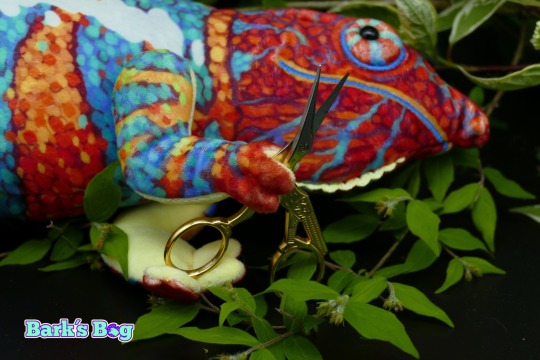
panther chameleon plushies!!!
based on the Amilobe locality of Furcifer pardalis
magnetic little hands for to grab things
soft
funny eyes
doesn´t need high humidty or complex care!
teddy joints for to move their little legs
---
adopt one from my bog
barks-bog.com
#i´m honestly really proud of these#the eyes are quite complex and i didn´t think i could pull them off but i did!!! i will post a quick tutorial later how they are done#also thanks to palaeoplushies for letting me steal her idea of using trim for little spikes#the paint job is one the more complex ones i´ve done and i hope people like it because i would love to do more like this#plush#plushies#plushblr#chameleon#panther chameleon#furcifer pardalis amilobe#handmade
952 notes
·
View notes
Text
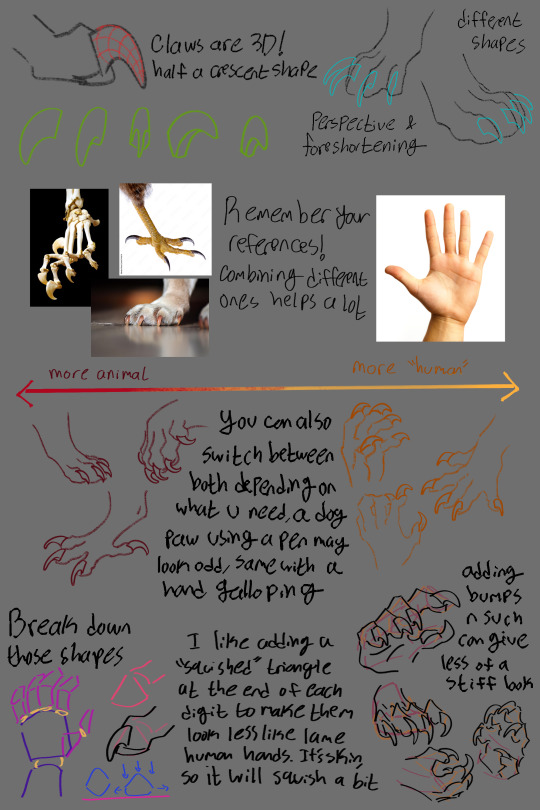
i remade my old talon tutorial with a few extra tips! these are just things i have learned from references, other artists and experimenting myself, so i hope they can be helpful for you!
#art tutorial#i guess#art#dragons#idkkkkk what to tag#anyways :3#you can use both this and my old tut to compliment each other idk#some talons came out a bit wonky looking but thats what i get for drawing on the ipad#if you have any questions or want me to do another tutorial on something else dont be scared to ask!#tutorial
2K notes
·
View notes
Note
Hey! Just wanted to ask, got any tips for highlights in pixelart? Ive got shadows down decently enough that i can at least stand looking at them a week later, but i have struggled with highlights and brighter lights in general. Also, awesome stuff, your space elevator piece got me into trying pixelart and it has been a fascinating journey so far
honestly when i first started i worked a LOT in black/white/values. i also tend to work dark to light, so ill build a piece up from its darkest areas, then finish with the highlights.
here is some of my art edited so you can see the values:
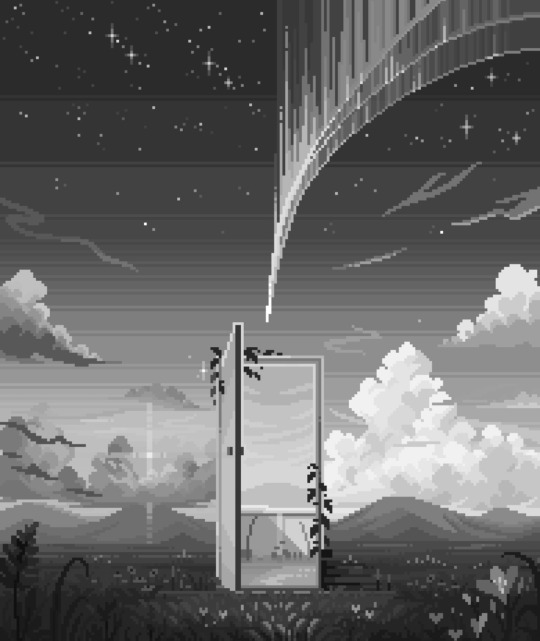
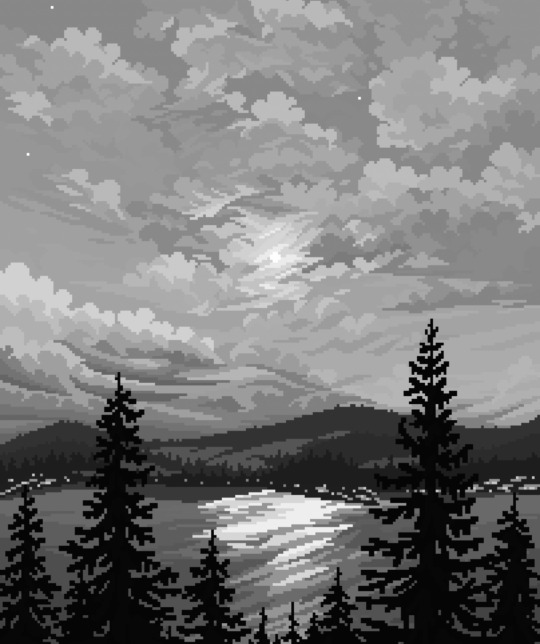
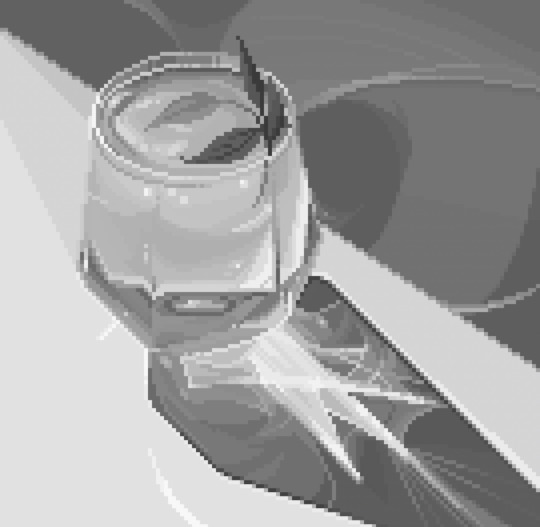
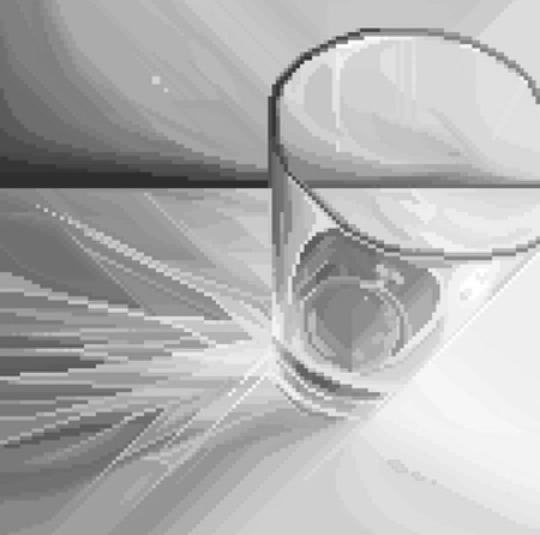
contrasting highlights against shadows will always make them stand out more and be more striking. i usually add a lot of rim lighting to pieces bc it’s like easy mode for focal points so i def recommend looking that up and learning about that!! truly though working in EXTREME values will help you get to more nuanced values so def try to work with a small color palette for a few times and seeing how that changes your understanding. when i first started out a LOT of my art was monochromatic just because i was focusing on values instead of color and i think that helped a lot!! examples of that:

#artist on tumblr#art help#artist help#artist tutorial#pixel art tutorial#values#i hope this helps it’s hard for me to explain my thoughts a lot lol
654 notes
·
View notes
Text
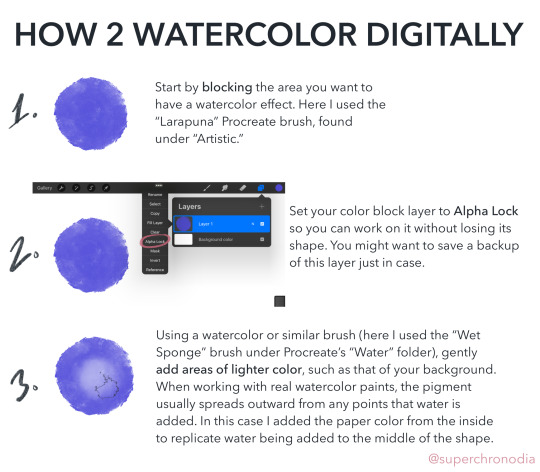
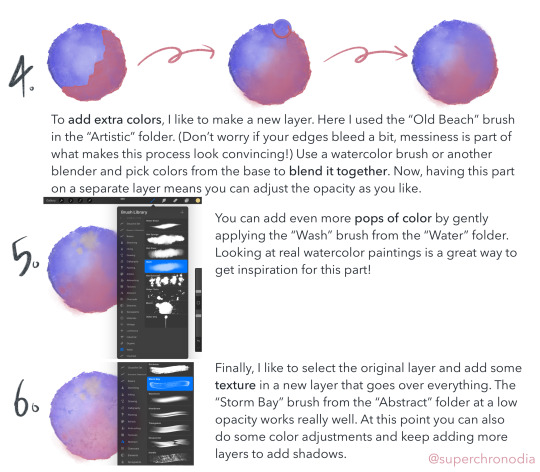
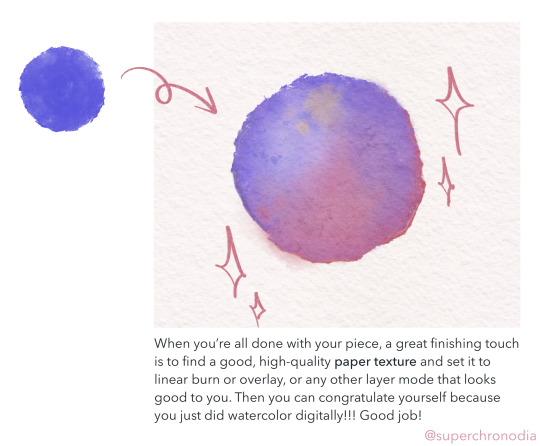
super epic watercolor tutorial
#casey art#art tutorial#digital art tutorial#digital watercolor#procreate tutorial#wahoo I’ve never done anything like this b4#if you use this lmk! or tag me or whatever#there’s a version with alt text on my twitter as well#update 3/12 DON’T copy my tags
10K notes
·
View notes
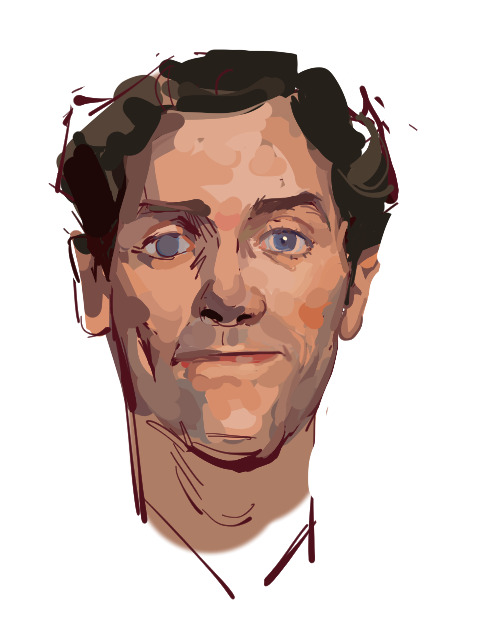
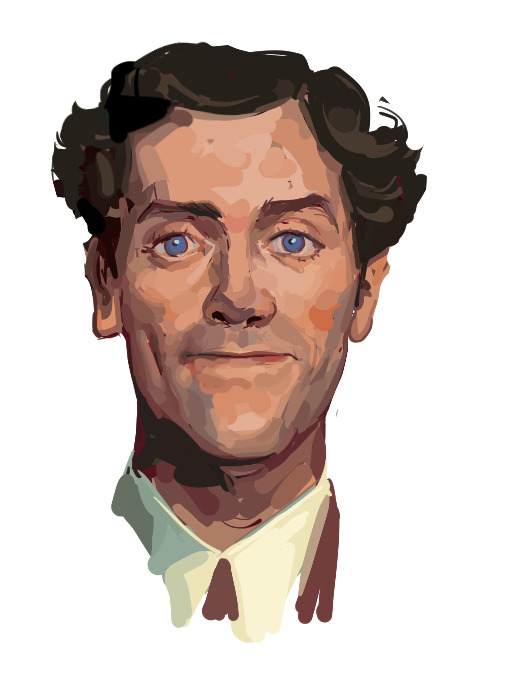
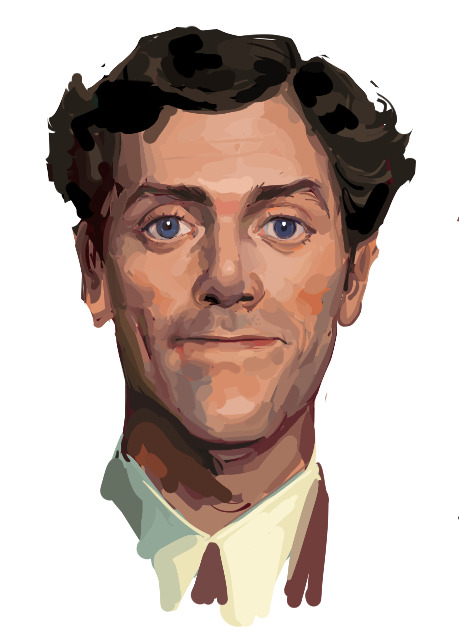
Note
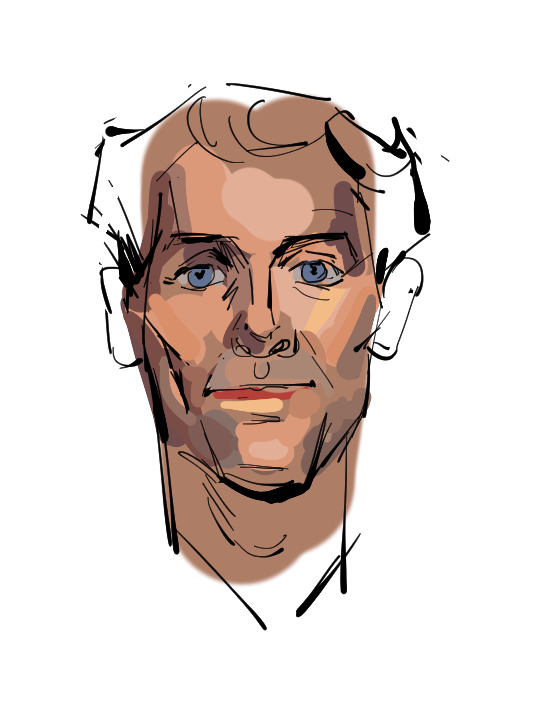
Hii I saw your bertie and jeeves portraits and I was wondering how you made your colors not look "blocky" or patchy even if you layer/use opaque paint? I guess, how do you know what transition colors to use? Sorry, I'm self taught and still learning! Thanks in advance and I love your art 💕
Ah You're lucky i actually have the progress shots of one of those heads. The only real thing i do is have "Average colour" selected on my colour picker tool so after i lay down all the rough blocks i can just select between them and start to create the faux gradient
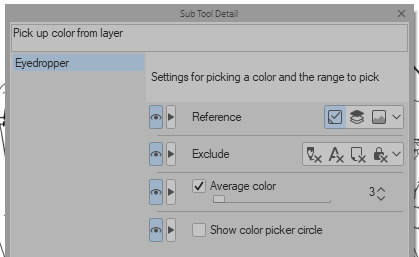

you can also see how i still add colours throughout the process like the red to bertie's cheek but after a point it just becomes refinement. i try not to use small brushes to shape the gradients until im close to the end which is where most of the "blending" happens.
2K notes
·
View notes
Last Seen Blogs
cupidmybeloved
𝐎𝐏𝐇𝐄𝐋𝐈𝐀

shitpostingspinel
Spinel Shitposts
caramelized-beans
Title has been left intentionally blank

zubinflower
zubinflower
aecta28
Untitled