#also adjusted the colours bc they felt a bit too saturated to me
Photo
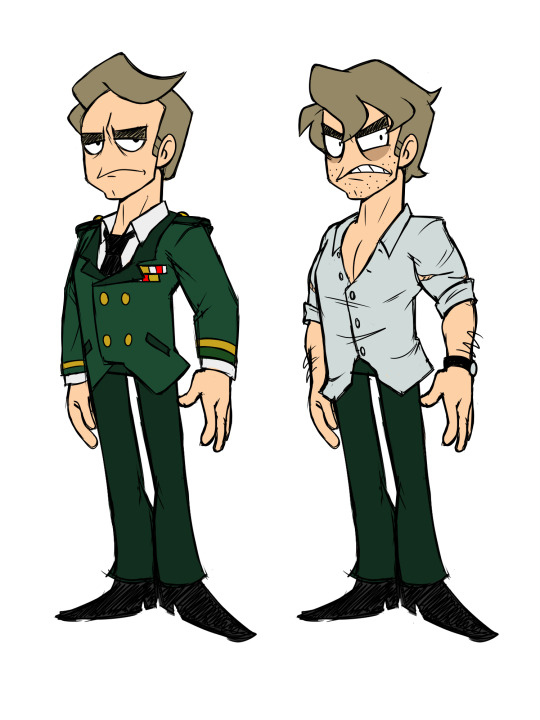
so uhhhh, did a redesign/upgrade for McCoy 👀
can’t remember how most of the movie went, so in my own version of events he’s part of an unspecified bureau/agency researching the effects of the toxic waste/radiation that gave edd/eduardo their superpowers (and using said results for evil bc he is the villain after all lmao)
#eddsworld#ewfm#i hate that i spent time on this but he needed to be fixed#and by fixed i mean channelling my dilf-loving powers into him#also adjusted the colours bc they felt a bit too saturated to me
90 notes
·
View notes
Photo


✨ COLORING GIFS FOR RAINBOW SETS ✨
hello!! so this ask had just been sitting in my inbox for days, and since i finally got some free time (and an incentive) i thought i’d put together a general coloring tutorial - especially for those who are interested in rainbow sets, or just want to get freaky with their gifs, hehe.
photoshop: cc 2021, but tbh this tutorial is compatible with most versions of photoshop
for: beginners / anyone with a basic understanding of adjustment layers and brush tool (optional)
the tutorial will show how you can: (1) enhance colors in a neutral/washed out scene (2) change the overall color of a shot (3) make the colors bolder/stronger (4) convert the dominant color to another color
in other words: i rarely save my psds so this is what we’re stuck with
1.

usually, when i’m making a color set, the first thing i do is open the hues/saturation layer and pull the saturation to a 100. this gives me a pretty good idea of the colour palette i can work with. and since this shot is more on the dark side, i brightened the gif a bit, and then moved saturation to a 100. this is what i get:
now that i know the dominant colour is yellow, i can drag the saturation back to 0 and start working on the actual coloring! i go to curves, and brighten the gif a little. most of the time, the white and black points (the first and the third inkdropper) does wonders in color correcting your gif. buut, marking the white point of for this gif would remove what little yellow we have, so i just did a manual adjustment until i was happy with the result.

(since he’s a poc, i used a brush tool at 35% capacity over his face on the curves layer mask. it’s soft, and barely noticeable, but it stopped him from looking lighter, which would become a problem once we move on to the vibrance layers. basically, the lighter the subject, the more susceptible it is to being affected by color enhancing layers.)
next, i go to the yellow hue/saturation option, and increase yellow saturation to 50. i usually don’t do this much, but the yellows are very very light in this scene, so we’re enhancing the colors wherever we can. i also lowered the intensity of the reds using these settings:

the reason i’m reducing red saturation is because - remember the dominant color on his face was red/yellow? - i don’t want my vibrance layers to end up reddening his skin too much. we already tackled a portion of this when we used the brush tool with curves, but this just ensures that the final product doesn’t have his skin looking too yellowy/funny, hehe. this is my gif after the saturation settings:
honestly, the difference is minimal, but now we have an actual color to work with. now it’s just a matter of enhancing that color. at this point, his skin may also look washed out, but the color will return once we get started with the vibrance/color layers.
now, i open the vibrance layer, and - this is always dependent on the gif, btw - drag the sliders around until the colors are bolder. this is my gif now:

the yellows are much more evident now, and there’s a bit more color in his face - so yay! at this stage there’s really no need for selective coloring - so i’ll just add a brightness layer and another vibrance layer:

and voila!! mans lookin good
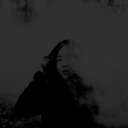
2.

changing the overall color of the gif is a fairly easy process. i think one thing to look out for is if there are people/a lot of skin that would end up being affected by the coloring – unless there’s minimal movement that you can use a brush tool for.
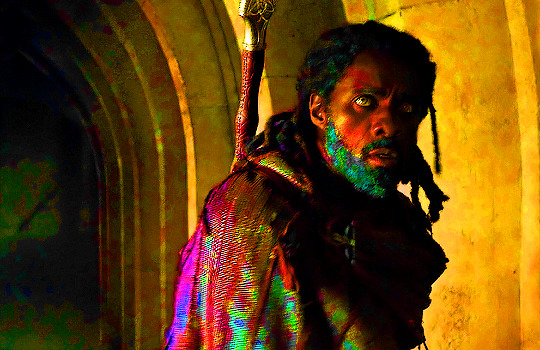
loki is more or less a silhouette in this shot, and all i’d need to do would be increase the contrast between him and the fog, and slap on a color. this can be done one of three ways: selective coloring, color balance, and gradient map. i’ll be using selective coloring here because i felt that worked best and it’s also an adjustment layer i’m most comfortable with.
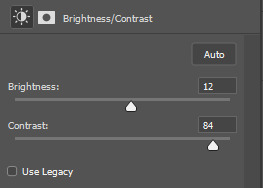
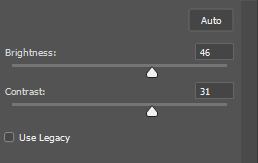
enhancing the contrast comes first, and since the brightness/contrast layer didn’t work as well as i’d hoped, i opened up the exposure layer and put in these settings:

and i get this:
now that loki is much more prominent against the fog, we can move on to the coloring. since i want it to be pink, i’m gonna open the neutral selective coloring, and use these settings:
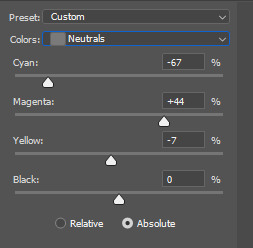
just make sure your selective coloring is on “absolute” because it colors your gif independent of the original gif and makes your colors more strong, whereas ‘relative’ colors your gif relative to the original gif – which doesn’t work all that well for color sets. (read: makes it look ugly)

i got the color, but methinks its still a little too dull, so i’ll add a brightness/contrast layer to make the color pop


and done!!
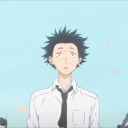
3.

animation gifs are much more easier to color because the colours are easily isolated, which is just chefs kiss when you use selective coloring. for this one, i just want to enhance the blues / reds, and remove the magenta tone so that the colours are more vivid. first, i increase the contrast:
it’s sharpened the colors a bit, and reduced the dullness:
now, because i want to enhance the blues/reds, and reduce the magenta, i’m going to use these settings in my selective coloring layer:
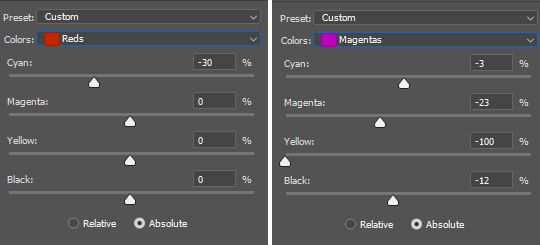
i didn’t want to make the red too bright, since red has an annoying tendency to pixelate, and lowered the magentas just enough so that the three of them still have a bit of color on their face. now the blues:
now that that’s done, all we need is to brighten up the gif. i’ll use curves for this:

i selected my white point (the white inkdropper) from the white part on baymax’s face (which i just realized makes no sense bc his entire face is white) which immediately brightened up the gif and erased the excess magenta.

if you want, you could still make it brighter by selecting your white point a little towards the shadows in baymax’s face - but methinks this gif looks fine by itself ehehe
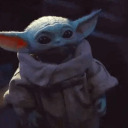
4.
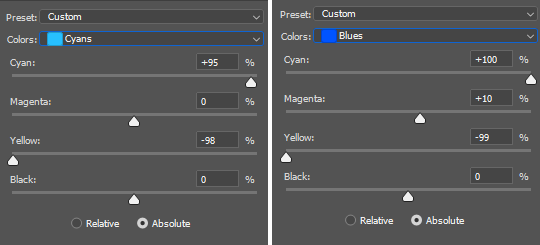
this one will be fairly easy - especially for a shot like this where it’s just blues and black - and will only require selective color and some brightness layers. so, i want to make this a violet gif. the very first thing i’ll do is open up selective coloring and enhance the blues:

idk if this is a thing others do djsajskl i feel like they do, but i do this because i’ve always found it easier to do color convert when the colors are enhanced - so, the more enhanced my blues are, the easier it is to convert to violet. this is what i have now:
now it’s time for violet!!! yee!!!
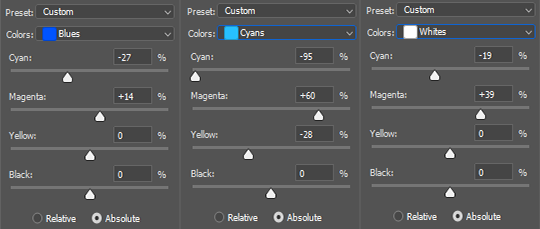
i increased the magenta in the whites because the highlights in the cloud were looking VERY white, and would end up looking very weird once i increased brightness. so this is just for…. consistency

now we can get on with brightening!! i open up the brightness/contrast layer and use these settings:
and another curves layer, where i’ve intense-ified the dark parts (the grey slider is at input: 27) and lightened the rest (the white slider is at input: 220)

(i just feel like it makes the coloring look crispy)
and tada!!!
i hope this helped! i’m still in the learning process when it comes to coloring, but if you have any questions/clarifications, please don’t hesitate to reach out!
#gif tutorial#coloring tutorial#yeahps#completeresources#chaoticresources#usershrimp#usermazy#jokerous#userchaitali#usernums#uservalentina#tuserdi#userholtz#tusersammy#userhella#userjochi#userelm#usersmile#gif help#tutorial
1K notes
·
View notes
Last Seen Blogs
xto3conversionsfinds
Xto3 Conversions Finds
nopressursworld
Take responsibilities and improve yourself.
glowjcink
got that glow

joeylovescocks
Unbetitelt