#also digital retouches - like always
Text
15 Questions
Hey @vayneoc, thanks fpr tagging me! 🖤
Are you named after anyone?
I would really like to be named after the Grand Duchess Anastasia Romanova, but I'm not.
No data on this question available, all I know is my dad thought was a great idea.
When was the last time you cried?
Can't remember, I'm stone cold most of the time. It was probably a year ago a few weaks after my granny died.
Do you have kids?
I am a 34yo kid.
Do you use sarcasm a lot?
I do but try not to because most of people don't seem to understand sarcasm and get offended. Everyone gets so easily offended these days.
Actually I'm an ironic kind and try to do everything with humor.
What sports do you play/have you played?
Not much, too lazy for this. A few months in a vollyeball section at school. A few years of heavy lifting at the gym, could've gotten a candidate master's degree buuuuut, as was mentioned above, too lazy. Then life happened and I ditched it all.
What’s the first thing you notice about other people?
It's how they behave, I'm not a fan of snobs and narrow-minded people. Those who are open, simple, honest and cheerful are my folks.
Eye colour?
Blue.
Scary movies or happy endings?
Scary movies with happy endings, happy movies with scary endings.
It doesn't matter much, the movie must be good in general.
Any special talents?
Can't say for sure. I just do what I do the best way I can.
Where were you born?
Northern Russia, Yamal to be precise.
What are your hobbies?
My work lol.
Okay. Drawing (watercolor and digital), reading, knitting and crocheting (yep, I'm old), collecting figures, lifting weights, etc etc, but what occupies the most of my scarce time is VP (and gaming ofc). I worked as a retoucher for almost 15 years and wanted to be a photographer, so VP is a good opportunity not to lose any skill I got.
Do you have any pets?
Had a few - a red-eared slider, a siamese and a scottish fold, a bunch of guppies, tiger barbs and catfishes. My late dog, of course, poor baby, miss her something awful :(
Don't have time for any pets in the near future unfortunately. Would really like to have a dog someday.
How tall are you?
172cm, 5'6"/5'7"
Favourite subject in school?
English and arts. I liked teachers more, not subjects. We had the best ones we could have.
Dream job?
No need to dream, I have a dream job already. It's the biggest typography in the city and I'm open to print you whatever the hell you desire.
But to be honest I've always dreamed not to work at all, just have a shitton of money and travel the world. I can't afford this in real life and it's not about the money - I don't have any free time. At all. Just work-work-work, like in Rihanna's song.
I also would love to be a tattoo artist, buuuut this is not an option as well.
Don't know who to tag :D How about you folks? @scrinovskaya @kittenchrissy and @katsigian
6 notes
·
View notes
Text
Manga scanning: a practical example
Lately I've been getting a lot of people asking questions about how to scan and subtitle. And it's kinda hit me: there aren't a lot of visible, accessible resources for this, are there? As time winds by, the masters of these arts have moved on and vanished from the internet. So for posterity, I want to talk about my own work process. (Remember to save a backup of this post somewhere if you like it...)
Maybe someone else has already written this up better than me, but it's nice to infodump about the process regardless.
The book I'm scanning is Inazuma Eleven GO: Saikyou Senshu 100-nin Zukan. It was a magazine extra drawn by multiple artists, and to my knowledge it's never been rereleased in tankobon format. Which is a damn shame, because it's full of hilarious gags! Time to bring it back to the world. So, how do we start?
0) Tools and programs
Before anything else, ya gotta have a good, clean scanner. My actual scanning is done with a basic 11x17 flatbed scanner with 1200dpi max. Default OS scanning programs usually suck, so I always download the scanner drivers and programs from the manufacturer's site!!
Other physical requirements are a microwave and some black paper. The digital steps are all done in Photoshop and XNView.
1) Scan the cover
For scan settings, I default to 600dpi PNG. I used to scan things at 200/300dpi, and while this is quicker and more economical, it's not nearly as crisp! It can also cause some weird color banding, due to some scientific phenomenon that still confuses me! Basically, if a scan looks stripey, change the DPI. It's much better to work at higher resolutions and then shrink it down later. I don't have to fret over 100mb+ raw images anymore because I have plenty of external storage! Yippee!!

Before doing anything else, I scan the cover while it's still in the best possible condition. Obviously, opening the book too far will cause creasing near the spine.
Since my edition was a well-loved secondhand copy, there is a LOT of creasing. But I don't feel like spending 3k yen to get a mint copy that I'm just gonna rip apart anyway, so this is where Photoshop comes in!
2) Retouching cover damage
Fortunately, there isn't any color fading to deal with here. The majority of these imperfections were touched up with Content Aware Fill. It's a very powerful tool that assumes what the selected pixels *should* look like based on the surrounding pixels. Use the Lasso or Magic Wand to select the imperfections, and try to avoid selecting pixels you don't want fixed. Content Aware works best on small spots, so you kinda have to break it up by color blocks, but it's still a million times faster and way less depressing. Seriously, cleaning and typesetting let my mind wander too much.
I currently have two Actions shortcuts to make this process even faster:
1) regular Content Aware Fill
2) Expand by 5px > Content Aware Fill > Deselect

When Content Aware fails, this is when I have to go manual. Clone Stamp is my best friend ever. Carefully select a source with the Alt key, line up the dots over the touchup area (toggle Enter for better viewing), and keep brushing! This can be painstaking, but man, I love seeing and comparing the finished result.
Healing Brush is helpful when you have to clone a pattern but the color is different. It'll preserve the source pattern but adjust the lighting to match the surrounding pixels. It's a lot more finicky and will blur colors *too* much sometimes, especially near borders. This tool's really better on photographs, but it still comes in handy.
(I hear that Patch combines the functionality of these two! I wanna try it out next time...)
When Healing Brush can't blend colors well enough, using Clone Stamp in combination with Dodge (lighten) or Burn (darken), with strength adjusted accordingly, is the next best thing. Burn is GREAT on lines that aren't quite black enough! This technique works wonders when touching up gutter shadows especially. I will spend an exorbitant amount of time on retouching if it means I don't have to rip apart my nice books (that being said, it's important to really gauge whether it's worth retouching in the first place! I waste too much of my time on tiny details that nobody else cares about!!)
If being able to see the printer dots bothers you, there's an easy fix: the Surface Blur filter. This is one I've only discovered recently and I'm still playing around with it. On one hand, it gets rid of the tiny white dots and can make scan images look absolutely magnificent. On the other hand, it has some trouble preserving sharp lines and small highlights. Since I don't like altering the original image too much, the scans I post aren't usually blurred -- but it's something you can try out at home!
Hot damn! Look at the difference! Look at my boy Tenma! You'd hardly guess the condition the original is in!
Note that the final version does not have all the creases removed. At this point I had already spent a couple of hours retouching and decided nobody else was gonna care THAT much about the peripheral damage. If you do care that much, feel free to spend *your* time perfecting this.
3) Melt
Now that the cover's scanned... it's time to toss the book in the microwave!
vimeo
(Pictured is a *different* book, but you get the picture.)
No, seriously. Microwaving is the easiest way to warm up the glue enough to tear the pages out. Or more accurately, gently tug on the pages till they separate from the rest of the bunch. I start from the front cover and tease the pages out one by one. On thicker books, I'll alternate between front and back covers.
I set the initial heating count to 30-50 seconds, and sometimes I turn down the power level if I'm feeling apprehensive. Really gotta play it by ear depending on the book’s size and condition. After tearing out a couple dozen pages, the glue gets cool again and the pages start to resist again. Continuing like this results in the paper tearing!! This is when I chuck the book back in for another 10-15 seconds.
It's a little scary at first, but the toner on the pages heats up too! It doesn't bleed and it shouldn't be *too* hot to the touch though. So it's just something I've had to get used to.
This particular book kinda smelled when I heated it up! I blame either the paper quality or, y'know, being secondhand and maybe not being stored in perfect condition. But the stink was fortunately temporary.
Some people prefer ironing the spine (with a towel over it), but IMO that's more precarious and time-consuming. Maybe it works better for the middle pages though...? Worth trying out someday.
You could just slice out the pages with a knife or something, but with melting, it's possible to rebind the pages later! This is another thing I haven't done myself yet, but I'm excited to try it out with a nice archival glue. I'll update with the results eventually.
So, with the "how" out of the way, "why" would you take apart a book in the first place!? It still feels a little sacrilegious. But scanning pages one at a time gets you the best possible results.
It eliminates three major issues:
1) Gutter shadow
As mentioned before, shadows at the "gutter" (the inside spine) naturally happen because the page isn't lying flat there. It looks bad. And it takes a whole lot of work to retouch.
2) Angled pages
The cousin to gutter shadow, angled pages happen when the spine is a leeeetle more open/closed at the bottom/top. So with a spread, you've got the left page at -1 degree and the right page at .5 degree. Both of these pages are going to have things cut off when they're cropped. And it's going to look very weird when you're flipping through pages and have slightly alternating angles. Rotating these pages so that they're at the same angle is a lot more trouble.
It's really hard to keep the spine open exactly the same way for an entire book! The weight of the scan lid can throw off careful positioning anyway!
3) See-through pages
Manga in Japan is CHEAP and is not printed on the best paper possible. If you have the pages all bundled together, you can see large splotches of black or white from the spread that's behind the page being scanned. Leveling the image can fix this, but it comes at the cost of destroying midtones. Which is to say, any gray in the image becomes off-white or almost-black.
I hope you're beginning to understand how much effort and technical detail goes into the scans you enjoy.
4) Scanning
Same scan settings as the cover (600dpi PNG). I always scan in color, even for grayscale images. And I don't trust the auto settings enough to let the machine fiddle with colors and cropping.
You know how scanners have a little arrow at the corner saying "align here"? Don't do that. The ones I've worked with like to shave off a few millimeters from the edge because they assume there's a margin anyway. So I place my documents about 1cm AWAY from the edge just to make sure the whole page is scanned in. This inevitably causes some slight rotation, which will be fixed later.
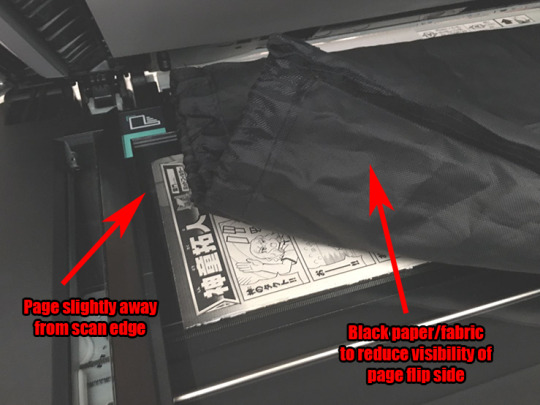
A new technique I've learned to reduce the effects of aforementioned see-through pages: use a black background! The toner blends in with the dark backing. This reduces the luminosity of the whites, but that's something that can easily be fixed via leveling later. I do not have black paper around the house, so I resorted to fabric.
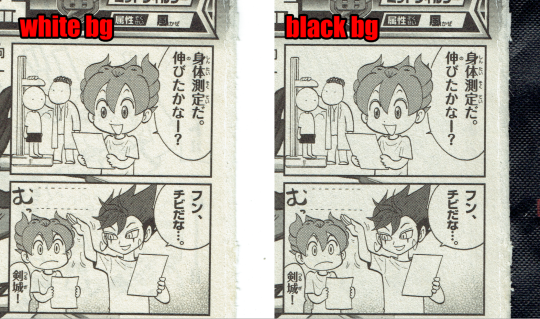
For comparison, here's the first page scanned with both a white and a black background. Note that white is slightly brighter, but there are some weird shadowy lines in the background. If you look really hard, the line goes through the screentone on Tenma's hair! Maybe it's excessive, but these tiny details can be weirdly distracting.
This book doesn't have page numbers, so I had to be extra cautious about missing pages (or accidentally dropping the stack)!
5) Leveling
Typically this step is something I leave for last, but since it significantly reduces file size, that's going to make the next steps easier.
So I've mentioned leveling before. But what is it?
Essentially, Levels make black *blacker* and white *whiter*. This is one very easy step to make pages look SO much better.
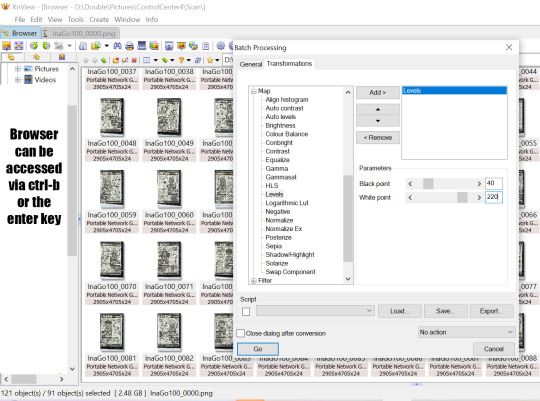
Switching over to XNView now, I'm setting these pages to about 40-220. Usually this would be a bit too heavy -- this could easily erase something light or turn something dark into pure black. But in this instance, the high dpi means individual screentone dots are visible and any grays are pretty well preserved anyway. So let it rip! XNView batch processing can run through all selected pages all at once and save the leveled copies to a new folder.
There's a ton of dust left still. Leveling gets a *lot* of it, but again, the paper quality is not great in the first place so it's kind of unavoidable. Resizing and cleaning the page later will help somewhat.
6) Rotate
This is the one step I do fully manually. I haven't had much luck with auto deskew/crop before, nor have I tried any different methods for it recently. Please tell me if there's a better way of doing this step that won't sacrifice border pixels.
Anyway, since I scanned slightly away from the edges earlier, the resulting digital image is slightly rotated at a random angle! For some ungodly reason, Photoshop doesn't have a shortcut for custom rotation, nor can you really set an action for it. XNView once again comes in clutch here. The basic steps are:
5a) Click and drag to create a bounding box. This will be used as a guideline to check whether the digital image is actually upright.
5b) Shift-O and test out values from -3 to 3. Ctrl-Z and repeat until it's just right.
After a while, you get a hang for approximate values, but "just right" means getting within .05 of a degree!! Even the untrained eye can tell when something's off by a mite.
5c) Adjust the bounding box's borders to the edges. If the box is aligned to one corner and the adjacent corners *aren't* aligned too, that means you have to rotate until all four corners are aligned. Then crop and save and move onto the next one!
7) Align
This is a new step I've never done before! Given the number and size of pages I'm working with here, I had to think and plan out this process in advance for once. Basically, instead of cropping and resizing each individual file, I load them all in at once so that they're perfectly aligned with each other. This is gonna require a lot of Photoshop automation.

First off, I go to File > Scripts > Load Files into Stack. There are four types of pages here: 1 comic on the left, 1 comic on the right, 2 comics on the left, and 2 comics on the right. This process will have to be repeated for each type so that the automation doesn't get confused. Then we check the "Align Source Images" box and let the process run... for a while.
So now I have a single file with one layer for each of the pages, and the comics themselves are all nicely aligned! Yahoo! The edges are mismatched though, so it's time to crop again. There's gonna be some cutoff but that's acceptable in this instance since I just care about the small comics. If I was doing bigger, full-page manga, I'd probably *add* some margin after cropping.

The pages are approximately a 5:8 ratio, so I've decided to crop these down to 2550 x 4080. To make sure that the comics are at the same distance from the margin regardless of page type, I'm using Guides to roughly estimate the comic positions after cropping. I want them to end up at about 70px and 100px from the horizontal and vertical margins respectively. I could also change the size of the canvas instead of cropping if I really wanted to.

Once I'm satisfied with the cropping, I use the Timeline/Animations window to flip through (at about 0.5 seconds) and check that all of the layers look right. There are a couple tears and visible background instances which are quickly fixed with Content Aware Fill and Clone Stamp. Since the background's black, I even had to temporarily change the Photoshop interface color lighter so that I could detect the imperfections better.
Then at last I go to File > Scripts > Export Layers to Files and... wait for a while again. Now we have separate files! And now I have to repeat these steps all over again for the three other page types!

Lastly, it's time to rename the resulting files in order. I actually screwed up on this step. Photoshop exported all the files *backwards*, which gave me file names like "PSexp0025-InaGo01". This is an issue because it makes batch-renaming via XNView a whole lot harder!! Photoshop automatically adds a numbered prefix to all the auto-exported files, and XNView can't remove wildcards from filenames. The result is weirdly staggered out-of-ordered files. It took some careful manual work to fix this, but at long last, we have a whole folder of 90 beautiful pages!
8) Translate (FINALLY)
You see how long it took to get here!? This took at least six hours for 90 pages. After all that work with the raws, finally I can do something with them!
Guess what! If you have a digital edition, you can skip all of these steps! Instant gratification for five bucks! Buy digital editions when you can and give your money directly to the author!!
Anyway, further stages may be discussed in another post once we get around to them. Lassoing translators and typesetters is its own struggle. I hope you learned something new from this post!
33 notes
·
View notes
Note
Pardon if you've gotten this question a million times, but how do you color a traditional sketch digitally? (like in your bomb rush blush drawing which tumblr wont let me link) I've done it via multiply before but the colors are always much much darker and I can't seem to get bright colors
yes!! yes!! im going to put this under a cut so i can talk about my process in detail
so, for starters, the quality of the picture you're taking is important! you want a resolution/focus clear enough that your sketch marks will translate well digitally, with consistent lighting and decent contrast between your marks + the paper
i tend to take pictures in broad daylight, + i'm pretty heavy-handed with my sketches so i don't feel the need to re-outline them
from there i drag it into photoshop n turn the saturation alllll the way down, and play with the levels until i get some more solid lines to work with. (this also works fine with my phone's contrast/adjustment settings. it just takes a bit more playing around)

there's no magic combination of values to get a sketch looking the way you want, but as a general rule of thumb: i pull the white value down until the grain of the paper almost disappears, pull the black value up until my strongest lines are black, and then mess with the middle value until i'm happy with how the details of the sketch look
that's kind of it for image retouching... then i just set it to multiply and go ham with the colors underneath! if i feel like coloring the lineart, i'll add that detail to a screen layer and merge it on top of the multiply layer. it looks wonky before you merge the layers (and the colors will come out a tad darker, cuz it's a multiply layer) but it works i prommy


(^before and after merging)
hope this helped u out! + thanks for givin me the opportunity to yell about it! :]
#thanks for the ask#melon is talking#stuff i made#art tutorial#colored sketches#traditional sketches
30 notes
·
View notes
Text
i'm always worrying about one thing or another about the wedding and i'm going to put the latest thing out here for everyone's opinions if you have any wisdom or insights for a sewing situation
so my dress. across the chest and under the arms it's illusion tulle, fabric that is meant to be essentially invisible. BUT there is also this stitching across the top that at least on my body kind of ruins the illusion?
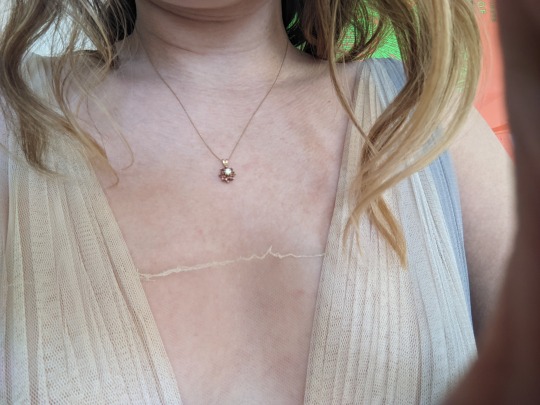
looking at other pictures of the dress (the one below is someone trying on a sample in another color), that stitching appears to be a lot neater and more subtle than mine

and in most pictures i really can't see it at all to the point where i wonder if it's been removed--but maybe it just really is blending into everyone else's body better than mine (or being removed digitally when retouching), since on mine i really think they did a shit job on it

and in fact i KNOW they did a shit job on mine because i found that the thread had literally separated there and with a gentle tug was very eager to unravel, and doesn't it really look like the top part is something that got tangled when sewing and that the whole thing is probably supposed to look like the bottom part?

so i'm like, well, we're like a week out from the wedding so i guess i'm getting out my needle and thread and reinforcing this broken bit, which i attempted to

so now it looks more consistent but i think i essentially got the whole line to be as thick as the part that was too thick to begin with.
what's nagging at me is
what is the purpose of this thread here??? it's tulle! tulle doesn't fray! it's not even on the actual edge of the fabric! other tulle edges, like the hem of my skirt, don't have this.
when i looked more closely at this stitching (this photo below is from one of the arm holes--which you can also see is a much finer line than the chest has) it's literally just on the panel, it's not like attaching the panel to anything, and when i tugged at the edge of this thread it seemed like it would be happy to just start coming out too, to the point where i started to wonder if this wasn't something i was supposed to remove

so my question is
is there any good reason why i shouldn't try to just unravel this thread across the chest?
like, pros:
i think it would look a lot better
if it's there to help prevent long term fraying or something that's not a big deal to me since it's a wedding dress and i'd rather have it look really good for one day and i can decide to mend any damage later
it might always bug me if it's like this in photos forever (and i don't believe in photoshopping stuff like this out)
i already had to mess with it anyway because it wasn't right to begin with
and my messing with it did show that i have essentially identical color thread on hand if i have to try and put it back
since it was already unraveling we can see that the fabric looks just fine without the thread in that spot
it's illusion tulle so you can barely see the fabric to begin with so subtle damage (say, if removing the thread created small holes) would probably not be visible either
it's my dress, i bought it, to some extent i should feel empowered to mess with it, you know?
cons:
surely that's there for a reason, right? right??? will i find out the hard way if i remove it?
if i managed to really fuck it up to the point where i would need professional help, that'd be terrible to have to arrange for so close to the wedding
i am just someone with basic sewing skills at best so maybe i should really stay in my lane and accept it for what it is, flaws and all
that's a really prominent spot to potentially fuck up, even if its prominence is also exactly why it bothers me so much
ugh
(i am social distancing until the wedding and would not consider going into an alteration shop just for considering removing this thread)
6 notes
·
View notes
Text
Week 4: Digital Community and Fandom: Reality TV Case Study.
Reality television is a genre of television programming that features supposedly unscripted situations involving ordinary people rather than professional actors. Instead of having actors play roles, reality TV features real people. The shows are advertised as capturing spontaneous events and emotions, while editing and production control may be evident.
The term “reality TV” isn't a straightforward presentation of reality. It mixes elements of documentary and entertainment, creating a constructed version of "reality” through editing, camera angles, and casting choices (John Fiske, 1991). The “Television Cultural” suggests a set of codes to comprehend the meaning-construction process used by television. This also holds true for reality TV. To communicate certain themes, "reality" is first presented through social codes (behavior, attire), which are next encoded by technical codes (camera work, editing), and lastly altered by ideological codes (individualism, competitiveness). Reality show emphasize the active role of audience – the minimum requirement of reality television. Instead of being passive consumers, viewers analyze and negotiate the created reality in light of their individual experiences and social contexts. According to Fiske, reality TV perpetuates particular social and cultural norms. There may be a lot of rivalry, individuality, and materialism themes. He challenges viewers to exercise critical thinking and consider the messages ingrained in the shows.

Reality television can’t always have positive outcomes when launching the show. Producers have the ability to manipulate scenes, retouch film to tell stories, and even cast characters that are likely to cause conflict. This may misrepresent the truth and give viewers irrational expectations. Another negative aspect of reality TV is some particular shows may raise a severely bad impact on both audience and participants mental health. The constant exposure to conflict, competition, and often superficial values can be stressful and anxiety-provoking for viewers. For example, The Maury Povich Show or the community can recognize as “You are not the father!” reality show are one of the most rejected and controversial show due to the content being hurtful and exploiting guests’ personal issues. Critics contend that the program sensationalizes intimate issues such as infidelity, paternity issues, and romantic conflict. It is possible to view the emphasis on confrontation and public humiliation as exploitative, especially when low-income families are involved.

Reference
Fiske, John. (1991). Living Room Culture: Exploring the Rise of Reality TV. Routledge.
An, T. (2021) LÝ do 2 chương Trình Truyền Hình MỸ đình đám BỊ phản đối nhiều nhất, BÁO LAO ĐỘNG. Available at: https://laodong.vn/giai-tri/ly-do-2-chuong-trinh-truyen-hinh-my-dinh-dam-bi-phan-doi-nhieu-nhat-890090.ldo (Accessed: 24 March 2024).
0 notes
Text
Tin Brain
Solo show by photographer and AI artist Matus Toth
July - August 2023 at Kaffeemitte / Berlin

In July 2023, we are showing TinBrain - an image series generated with Artificial Intelligence. Nine free works by Prague-based photographer and artist Matus Toth.
The debate about machine intelligence affects large parts of society. For labour and for science, there is talk of a quantum leap. The Chat GPT text generator is compared to the invention of printing. And the development is still very dynamic!
AI also affects art and the idea of creativity quite fundamentally. Questions of basic principle arise when, for example, the incomplete 10th and last symphony of Beethoven is finished by a software.
For image creation, Midjourney, DALL-E and the AI applications by Adobe and others are what Chat GPT is for text creation.
Based on the nine works in the exhibition, we ask Matus Toth about his approach to AI. Which programs does he use and what were the prompts for each art work? How does the “new tool” AI affects his style as a fashion photographer? Is there a renaissance of surrealism?
The exhibition is extended by a conversation between Matus Toth and a computer specialist. A nerd from the field of "neural networks" helps Matus Toth - and us - to better understand the tools and production processes. A dialogue about technical, aesthetic and social issues.
We are happy if you visit our exhibition at Kaffeemitte, if you like the artworks by Matus Toth and if you are interested in the theoretical discussion.

Interview:
Matus Toth: I have been a photographer for 20 years, I studied in Prague, and I mainly do fashion photography. I make a living from commercial work like fashion editorials and advertising, but I have always done independent work as well. I'm interested also in documentary photography and digital art. For about a year now, I have been creating images with various AI applications. Making images with AI feels very playful. I guess the image generators have built-in adjusting screws for coincidence. It turns out that with the same prompts, the same image never appears. There are not two times the same picture. This element of surprise is fun, great fun. And working with AI can be inspiring. When thinking about a concept for a shot, my thoughts take completely different paths because I think less about technical limits. Consequently, I've been more and more combining AI elements with photos from my camera, which are commissioned for fashion editorials.
Gregor Hutz: Do you feel that you understand how AI works, how the machine works?
MT: Too little. To understand everything about, say, Midjourney, requires a very different level of know-how. And even people who deal with the programming are surprised themselves and admit that they don't fully understand how machine intelligence "thinks". Often the results make me curious, I would like to know: how are these crazy images created? What processes happen when a stunning atmosphere appears or how can the AI come up with such unpredicted interpretations? But it's not necessarily important for my actual work. AI is more a part of the production process - between idea and final retouching.
GH: Do you talk to computer experts, nerds and software engineers?
MT: Yes, I try to understand what's happening technically. Because the better I understand how A.I. works, the more fun it is. So I keep up with it, even if the next new thing is announced every few weeks and it's a highly complex system.
GH: Are there specific things you would like to understand technically?
MT: For me, a crucial question is: how does AI understand what I want to tell it? Especially when I write complete sentences, I can no longer follow what the AI understands - what do my words mean to the program? How can I explain myself? As humans, we spend our whole lives learning to understand what the other person is trying to say. But the computer understands us in a completely different way. Why does it understand me so well sometimes and sometimes not at all?
GH: Can you give an example of that?
MT: I wanted to portray a woman in the water and I wanted to put some shoes on her head. The AI then portrayed the woman in the water perfectly, but couldn't put the shoes on her head. I tried for hours, but it didn't work. So in the end I had to put the shoes on her head in post-production. Fortunately, Photoshop's AI is also pretty smart now. The program is not as creative as Midjourney, but for fixing things, it's a power tool. In the past, when we wanted to publish an image in different formats, it was always a problem. On set, you might have to move the camera further away and bear in mind that all formats can be cut out of the same shot. But that changes the focus effect etc... With Photoshop AI, I can simply adjust the format by letting the software fill in empty areas. Nevertheless, I still use classic tools such as brush or stamp. That requires some know-how and experience. But if the technical development continues like this, soon we will only write: "Draw skin softer" or "Make pullover fuzz-free" - and the software will implement it.
GH: Please describe your production process.
MT: Most of the pictures I make start with a concept. An idea for a little story, for which I then think of an image. Like a still from a movie. I do research and look for old photographs or images that might fit. In the past, I used a pen, a camera and models. Today I also use prompts to describe my idea to MidJourney. This happens via the Discord software. The prompting is extended when I use the /blend command. I then load existing pictures into the AI and combine them with prompts. I have the impression that the AI then produces somewhat less at random and I get a result more quickly. But the result is not always the most important! Sometimes AI comes up with something completely different from what I wanted. That inspires me and I forget the old concept and come up with a new story. This wow-effect is great fun. Nevertheless, the finished picture is not "just" what AI suggests, but the result of working with various software. Research, prompts, my own photos and detailed post-production - that's more or less the way.
GH: Has working with AI changed your style as a commercial photographer?
MT: In the last 20 years I have seen a lot of technical developments in my field, and each time the style has changed. Not only mine, but the look that defined a certain time is also a consequence of the tools.
GH: The surreal element, the surrealistic tone from AI can be seen in your work and some of your colleagues in advertising and fashion photography. Could it be that there is a renaissance of surrealism?
Salvador Dali: It's about time.
GH: What will be the consequences for you as a photographer and for your industry? For models, make-up artists or set designers? I know a man who just finished his training as a speaker. That is now obsolete. There are zero jobs for him anymore.
MT: In fashion photography, there will hopefully still be productions with humans in the near future. The models are often famous and people want to see the real person. Simple stock photography has a harder time - Midjourney can already replace that quite well. For example, a happy family in the sunset. The client doesn't have to pay buyouts and the picture is practically just as good. At the beginning of this year, there was a lot of hype, and amazing pictures popped up everywhere. But it also shows that the creators are not all equally good. The constant work with the medium and the constant production of images is still a demanding process.
GH: The author Yuval Noah Harari has warned of a tsunami that awaits us. There have already been many layoffs, and the worries go further: all the way to the extinction of humankind as we know it. If artificial intelligence will soon be much more intelligent than humans, will humans extinct?
MT: For me, AI is first of all a tool, just like my camera. Of course, any tool can be misused. And it's already being misused - for example, with emotionalized spam. Or calls are made where the person no longer recognizes that he is talking to an AI. Deep fake is dangerous. And the speed at which technology is advancing is impressive. Every few weeks, the next incredible development...
GH: What do you think about the EU's AI Act, which calls for regulations on the use of AI?
MT: I like technology, but I think there should be rules for AI. The question, of course, is whether the politicians who should be taking care of it are doing the right thing - and doing it fast enough. I'm afraid the legal regulations are not coming behind, it's like with the other digital technologies. Politics can't keep up.
GH: What are your hopes? What are you looking forward to when you think about the future of machine intelligence?
MT: Maybe when we are old, there will be robots that wash our hair and cook our food. But there is still some time to go. And I think it's good when no one has to do monotonous, senseless work anymore. Like following a truck for hundreds of kilometers, or writing boring marketing prose that no one reads. Also for medicine it has great potential. It's ambivalent. Imagine if an AI could answer your questions better than I could do myself. And maybe an AI could also interview me better than you can? In that case, it would be reasonable if the two AI's would just write this interview directly with each other. But what do we do then?


FAZIT:
Machine intelligence is a transformative technology and will have far-reaching implications for all areas of life. What these implications are is not yet decided.
We must address policy and decision-makers. For example, on the question of "post copyright" rules. If the AIs are trained with our images and data, then we should participate financially. Who is allowed to make money with images and texts if the machines have not respected copyright when learning?
Or should the machines themselves be recognised as creators?
In any case, there have to be democratically legitimised rules for dealing with big data sets. Companies like Spawning (https://spawning.ai), help with a disclaimer that prohibits the crawlers from using the content for deep learning. This opt-out option is certainly only an in-between solution, but it asks the right question.
It is much more a social than a technical issue.
Artists approach their topics playfully and do not think with efficiency in mind. This view is important and perhaps art can decisively complement one of the greatest developments of our time. As in the Renaissance, when science and art were closely linked and this union triggered significant changes - right up to the Enlightenment of the 18th century. That is why Matus Toth's exhibition is meant to be an incentive for further image series and interviews.
0 notes
Text

https://www.reddit.com/r/AskPhotography/comments/125114x/how_do_photographers_create_this_saturated_soft/?utm_source=share&utm_medium=android_app&utm_name=androidcss&utm_term=20&utm_content=share_button
This was a surprise to see pop up on my feed - I can tell you exactly how these were made, as I'm the photographer who shot them. Few different techniques going on depending on which image you're talking about so I'll try to go through them.From the start: All the images were shot digitally. Images 1 & 4 I had a 1-stop green resin filter on the camera (in order to get more intensity out of the reds and yellows), the rest were unfiltered.
Lighting:
Image 1: Was flash: Large Westcott umbrella coming from behind camera to balance against the sunlight. From memory might have had an assistant with a bounce on camera right too, just to wrap the light a touch.Image 2 & 5: Mix of daylight and tungsten continuous light. As I remember it, I had a HMI through a 12x12' silk to camera right, a Aputure Lantern at a 45 degree above the model, a ARRI Redhead on a dimmer w/ diffusion that I used more-or-less intensely depending on the shot to add warmth and shape the light on her, and then lots of black polyboards camera left to deepen the shadows.Image 3: All daylight continuous. Aputure Lantern was the key light, think I had a small softbox on his lower body just to raise exposure. Medium softbox as a back/background light (spilling on both). Then black polyboards on right side to deepen shadows.Image 4: Daylight with a bit of bounce camera right
Processing:
This is the biggest element for the "look" you're talking about. There's a lot of adjustments and very specific choices I make that go into the general feeling of them, so it's difficult to talk about them all. Broadly speaking, I like deep shadows, crushed highlights, bold reds and strong contrast. Blues, greens and skin tones I do more on a case-by-case basis. I use Capture One for the initial grading and export (which takes the image about 40% of the way there), then Photoshop to complete the rest of it. Almost all of my adjustments are made using "Curves", "Selective Colour" or "Hue/Saturation" and either masking it across the photo, or using "Colour Range" to apply whatever the adjustment is selectively.
Printing:
Images 1/3/4 are also printed/rescanned/re-edited on. I find straight digital can feel a bit sterile at times, so I'll often print my photographs in order to soften them down and add a bit of texture. Spent years using a cheap printer and simple paper, these days I've got a more expensive one and better papers but I'm unconvinced it's objectively better - Just different. Process goes export digitally > retouch in photoshop > print > rescan > re-edit in photoshop, as the printing process moves around colours and tones, and so requires adjusting back to being "correct".
Mindset:
One more thing that I think is worth talking about, that often isn't mentioned very much in online discussions of photographic practice, is that all these decisions don't come from a place of "trying to achieve a certain look" - They come from a place of taste and opinion that I've built up through thinking about the kind of feeling I want to create, and the sort of story I want to tell. I've always liked the organic nature of paintings, so I started printing in order to take the images from pixels to ink. My processing is often quite chaotic, where I'll have dozens of adjustments (Image 1 had 19 in digital, and then 20 more in the print) that all do subtle different things, which I'll then "paint" across the photo, similar to how a painter might build up tones using layers of paint across areas of the canvas. Almost never do I think about my own "style" - I just think "Does this look right or wrong?", and by the time it looks "right", its invariably fallen in line with everything else I shoot... and that only comes about from making a lot of photographs.Anyway hope this helps and glad you liked the images.
Happy to answer more questions if you've got any too.
0 notes
Text
Photoshop: Select and mask Information
Photoshop: Select and mask -workshop gives you all the needed techniques and tools so you can isolate pretty much any element from the background.
Making good and precise selections and masking elements are one of the most important and hardest techniques in photoshop. This is where a lot of people struggle and always doesn't get the results they would like.
Welcome to the world of masking along with internationally awarded retoucher / digital artist Antti Karppinen
Making selections and masking is definitely one of the most important techniques when retouching images. Usually simple elements are easy to separate from the background but what about transparencies, hair, fur and other fine details. These are the places where the problems usually starts and you don't get the results you need.
In this workshop we will go through all the needed techniques that will help you cut out pretty much any element from the background so you are able to replace that.
With these techniques your retouching process will be faster and you will save time and your nerves and your images will look much more polished.
You will learn:
All the basic tools to make selections
How to use and mask Adjustment -layers
How to make color or contrast based selections
How to use Select and mask -tool
How to mask hair, fur and other transparencies
Powerful tool Blend IF
And various PRO TIPS from a working pro
What You’ll Learn In This Course?
Introduction
What are selections and masking and how to use them.
Basic tools
How to make selections
Different tools for making selections
Modifying selections
Masking adjustment -layers
How to edit only a part of the image by using adjustment layers
Color and contrast based tools for making selections
Magic Wand
Quick Selection Tool
Select Subject
Color Range
Select and Mask -tool
Hair and other transparencies
How to mask hair and other transparencies
Select and Mask -tool
How to get rid of fringing
Masking with Channels
Blend If
Powerful tool Blend If
PRO TIPS
Masking glass
Shifting the mask edge
Blending modes
Isolating shadows
Luminosity masks
About Author
Antti is internationally awarded Digital artist / commercial photographer / educator from Finland. He belongs to a new generation of image artisans, to whom all things are possible.
Main merits include World Photographic Cup (WPC) gold medal in illustrative category and FEP Golden camera also from illustrative category. He has been touring with his workshops all over Europe and his images and tutorials has been published in various blogs and magazines.
More courses from the same author: Antti Karppinen
0 notes
Text
Affordable Photo Background Removal Service
Do you need help removing the background from your images? Background removal services are necessary for any professional photographer, but they can be expensive. Luckily, there is an affordable way to remove backgrounds with CloudRetouch ! We offer you professional background removal services at very affordable prices. Our expert team will be able to remove your background fast and with great quality. We always work according to the highest standards, so you can rest assured that everything is done right!
Don’t forget about our background removal package! You get not only professional image background removal services but also other services like color correction or photo retouching at an affordable price too. This way, you’ll save even more money while getting amazing results for all of your images.
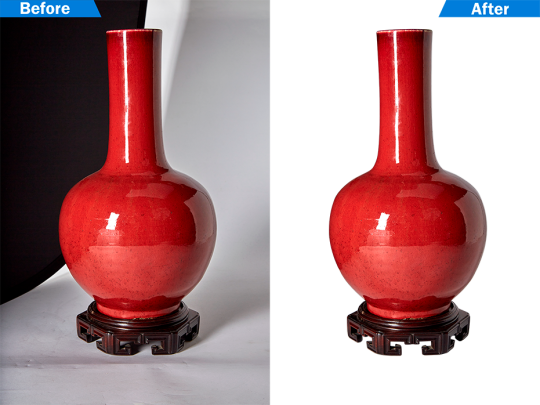
The Best Photo Background Removal Service
Get the best photo background removal service from Photoshop experts. Cloud Retouch offers background removal from images at low prices. Background removal services are increasingly popular among photographers who specialize in making portraits. As people are aware of the fact that “background matters”, it is important to be good at background removal. People who need images edited with blurring or complete removal of backgrounds can rely on Cloud Retouch services.
Removing the background requires you to cut out all the elements that make up the background and replace them with a matching texture from another area of the same picture. Although there’s nothing wrong with using different techniques, you should avoid cutting out huge areas because they may actually lead to a poorer quality image.
Background Removal Service: Cloud Retouch offers professional background removal services at the lowest prices. We are a team of skilled Photoshop experts, and we can remove any background from your photos. Cloud Retouch has done a good job of removing all unwanted elements using only basic tools like Magic Wand, Layer Masks, Pen Tool, etc.
Professional Image Background Removal Service
Professional image background removal services are very important for an online business. If you do not want to hire a professional photographer, then working with the right image editing company is one of your best options. CloudRetouch has been providing high-quality photo background removal services since 2012 and at affordable prices too! They offer many different packages so that clients can get what they need without having to break their bank account. We provide both commercial and personal customers with digital photo post production services like photo editing, background replacement services, removing white backgrounds, etc. for all types of images like real estate, weddings, product shots, etc. Although online shopping photos require different image editing techniques to provide the best result with the least amount of effort, digital photo post production services are our expertise, and we offer affordable packages for your convenience! This is why most business owners look forward to working with online image background removal companies. Our Photo Background Removal Service is the best option for those who want to save money and time by getting professional photo editing services. We offer a wide range of packages that can fit your budget and needs.
0 notes
Text
Top 5 image compressor tools to be used in 2023
Are images taking up too much space on your website or in your system? When the amount of images on your system grows and deletion is not an option, image compression comes to the rescue. Hence the image compressor plays a vital role in this process. The expanded storage space on the system is also running out and cannot keep up with the growing number of high-quality photographs. Thus, compressing is a good method for storing all of your favorite photographs while still making room for other files.
Image compression plays an important role in SEO for image optimization. Compressing a file is perhaps the simplest yet most important aspect of image optimization because it directly ties to the website’s loading time. There are several tools and programs available for compressing photos. In this article learn more about some of the most popular image compressors.
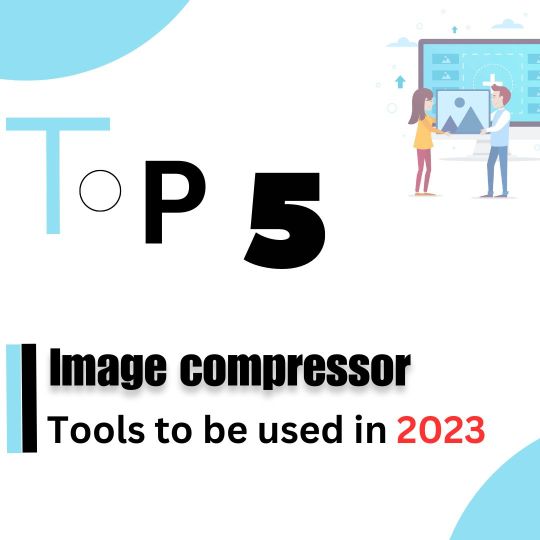
So, let’s get into the journey to know about some of the image compression tools or software:
1. Iamvector Image Compression Tool:
The Iamvector image compression tool significantly decreases image file sizes by up to 70% while keeping acceptable image quality. This function is very valuable for individuals and organizations trying to optimize storage space and increase website performance.
One significant feature of Iamvector is its capacity to handle huge picture files, allowing users to compress files up to 50MB in size. This distinguishes it from other programs and makes it a practical alternative for individuals who work with large image files. The effective compression method not only speeds workflows but also allows for easier image sharing and transmission without losing image quality.
It ensures that the original image format is maintained during the compression process. Whether the image is in JPEG, PNG, GIF, or any other standard format, Iamvector respects the format, making it easy to integrate the compressed images easily into existing workflows and maintain consistency across digital platforms.
2. Adobe Photoshop:
Adobe Photoshop is the best photo-compressing software available. Cropping, retouching, combining, and compressing photographs is a breeze using the world’s best imaging and graphic design tools.
Photoshop is professional and adds new aspects to the art of photography. So you can imagine how thoroughly it covers fundamentals like picture reduction.
One of its most intriguing features is the ability to work with an infinite number of layers and masks. Furthermore, you’re likely to enjoy its user interface. You can choose from many workspace layouts or design your own custom layout of panels and windows.
3. Tiny PNG:
TinyPNG is the greatest tool for compressing images on the fly. It’s perfect for individuals who merely want to access a website and run their photographs via a program quickly. TinyPNG couldn’t be simpler to use. All you have to do is access the site and drag and drop your WebP, JPEG, or PNG files into the upload box.
TinyPNG will compress it in a few sessions and provide a download link that you may use to save the compressed version to your PC. When I tried it with a handful of photographs, it always decreased the file size by at least 60%. Furthermore, we found no change in quality between the compressed and uncompressed versions.
This is most likely owing to TinyPNG’s intelligent lossy compression approach. It removes extraneous metadata from the image and carefully mixes comparable colors using a process called quantization, the results of which are practically unnoticeable.
Click here to know more.
0 notes
Text
5 Common Mistakes to Avoid When Retouching Photos
Retouching photos has become an essential aspect of modern photography. With the advent of digital cameras and photo editing software, it's easier than ever to make adjustments to photographs. However, even experienced photographers can fall victim to common mistakes when retouching their images. In this article, we'll explore five of the most common mistakes when retouching photos and how to avoid them.
Mistake #1: Overusing the "Clone Stamp" tool The Clone Stamp tool is a powerful tool for removing unwanted elements from a photograph. However, it's important to use it sparingly to avoid creating repetitive patterns in the image. When using the Clone Stamp tool, vary the source area regularly and adjust the opacity to achieve a more natural effect.
Mistake #2: Over-sharpening the image Sharpening is a common technique used to enhance the details of an image. However, over-sharpening can lead to an artificial-looking image and create unpleasant artifacts. It's essential to balance the amount of sharpening applied to the image, keeping in mind that the amount needed will depend on the resolution and size of the image.
Mistake #3: Applying too much saturation Increasing the saturation in an image can add vibrancy, but it's essential to be cautious as over-saturation can lead to unnatural images. It's best to apply saturation selectively to specific areas of the image rather than applying it uniformly. Moreover, you can also adjust the hue or luminance slider to achieve more natural-looking colors.
Mistake #4: Overdoing skin smoothing The process of skin-smoothing involves reducing visible imperfections in the skin. However, overly smoothing the skin can result in a plastic-like appearance, with loss of critical details. Instead, use low opacity brushes and feathered edges to ensure that the skin texture is preserved.
Mistake #5: Ignoring the overall composition When retouching an image, it's easy to get caught up in the details and overlook the big picture. The overall composition of an image is just as crucial as the individual elements within it. Pay attention to the balance and visual hierarchy of the image to ensure that it has a pleasing and meaningful composition.
Finally, retouching photos can be a tricky process, but avoiding these common mistakes can help you achieve natural-looking images that look stunning. Remember to use tools sparingly, adjust the settings carefully, and always keep the overall composition in mind to create high-quality photographs that accurately tell your story.
Author: Joseph Simon, 3D Artist @cuttingedger
0 notes
Text
Wedding Photography in the Digital Age: How Technology is Changing the Game
Gone are the days of waiting weeks to see your wedding photos. With the rise of digital photography and social media, wedding photography has evolved in numerous ways. Technology has made it easier for photographers to capture stunning images, and for couples to share and cherish their memories forever. Excited to know how technology is changing the game of wedding photography? Let’s jump in and witness how it can benefit you as a couple.
The Impact of Digital Photography
Digital photography has completely transformed the wedding photography industry. With the ability to take hundreds, if not thousands, of photos without worrying about film costs, photographers can capture every moment of your special day. Digital cameras also have the advantage of being able to adjust settings on the fly, allowing photographers to get the perfect shot in any lighting situation.
Post-Processing and Editing
One of the biggest benefits of digital photography is the ability to edit and manipulate images after the fact. Photographers can now retouch and enhance photos with software like Adobe Photoshop, making your photos even more stunning. However, it's important to choose a photographer who doesn't overdo the editing, as you want your photos to reflect the true beauty of your wedding day.
Social Media Sharing
Social media has changed the way we share and view photos. Instead of waiting for prints to be developed, couples can now share their wedding photos instantly with family and friends. Some photographers even offer same-day edits, allowing couples to see a selection of their wedding photos on the day of their wedding. This means that you can relive your special day as soon as possible, and share your memories with those who couldn't be there in person.
Drone Photography
One of the latest trends that a good pre wedding photographer in Mumbai always swears by is drone photography. Drones allow photographers to capture stunning aerial shots of the wedding venue and surrounding areas, providing a unique perspective that was previously impossible. However, not all venues allow drones, so be sure to check with your photographer and venue beforehand.
Virtual Reality
Virtual reality is still in its early stages, but it has the potential to revolutionize the wedding photography industry. Some photographers are experimenting with 360-degree cameras and VR technology, allowing couples to relive their wedding day in a completely immersive way. Imagine being able to walk around your wedding venue in virtual reality, long after your special day has passed.
Choosing the Right Photographer
With so many advancements in technology, it's important to choose a wedding photographer who not only has the technical skills, but also has an eye for capturing those special moments. Look for a photographer who understands your vision, and who can work with you to create the perfect shots. Don't be afraid to ask for a portfolio of their work, or to meet with them in person to discuss your wedding day.
Best Wedding Photographer in Bangalore
If you're in search of the best wedding photographer in Bangalore, Nitin Arora Photography is the best team. With years of experience in the industry, Nitin Arora Photography specializes in capturing candid, emotional moments that truly tell the story of your wedding day. Whether you're looking for traditional poses or something more unique, Nitin Arora Photography can work with you to create stunning images that you'll treasure forever.
Conclusion
Technology has had a profound impact on the wedding photography industry. From digital cameras to social media sharing, there are numerous benefits to embracing the latest advancements in photography. However, it's important to choose a photographer who not only has the technical skills, but also has an artistic eye and understands your vision for your special day. With Nitin Arora Photography, you can rest assured that your wedding memories will be captured in stunning detail, and that you'll have photos to cherish for a lifetime. So don't hesitate to embrace technology and choose the best wedding photographer to capture your special day.
0 notes
Text
Basic Functions of Kitchen Parts in Your Kitchen Design in the Bay Area
You may already have a beautiful and wonderful kitchen in which you have enjoyed cooking up some of the most nutritious meals for your family. However, like other vital home aspects and parts, kitchens seem to require a touch-up or retouch from time to time to enhance functionality and appeal. The kitchen is composed of standard parts that are crucial in any kitchen remodeling in the Bay Area.
Whether going modular or for normal kitchen remodels, there are always basic parts that drive and guide the whole plan. Below, we study a few of them.
Kitchen Island or Peninsula
Kitchen island or peninsula for extra functionality and appeal. They are a classic way to make kitchens user-friendly, with ample features added thereto. Islands are in the center, usually away from wall-mounted cabinetry.
Storage Cabinetry
With several mini appliances and custom cooking and serving cutlery, cabinetry and ample storage are extremely important. It's possible to expand and magnify the size and storage capacity with proper measurements and design. In most modern kitchen designs in the Bay Area, creating a uniform kitchen design theme is always aspired for.
In a modular kitchen, storage options in cabinets, drawers, and utensil stands, are not only pleasant to look at but also very effective.
Lighting and Fixtures
Lighting in a modern kitchen is vital both for safety and added functionality. Low visibility while handling potentially dangerous things can turn out disastrous. The safest lights and lighting electrical fixtures ensure premium flow of electric light and power at the desired levels.
Ventilation
Ventilation, like all home parts, ensures a sufficient supply of air and natural light flowing in. This is also crucial for potential smoke, fire, or other hazards. Creating well ventilated kitchens also builds upon the safety and sustainability themes.

Cooktops
The best part of choosing the right cooktop is that it makes an instant impact. Whether laminated or plain cooktops are installed, they play a significant role in your kitchen's success. Cooktops are today presented in a range of sustainable designs, like hard wooden cooktops, ceramic, granite, marble, laminates, and solid surfaces (built with solid stone, fabrication, or a concrete finish).
Appliance Sections
Modern appliances like refrigerators, dishwashers and dryers, microwaves, smoke chimneys, gas burners, toasters, food processors, geysers, water purifiers, and much more find primary importance in a kitchen remodel or plan. You can derive the best advice and plan layouts that facilitate functional use, traffic flow, safety, convenience, and productivity at all times. A well-planned and laid-out appliance promotes harmony and ease of doing tasks.
Kitchen Flooring
Kitchen flooring choice matters in a perfectly functional manner. Whether it's potential spills, slippages, stains, and other hazards, color and material choice play a crucial role in transforming the kitchen's use and appeal. Today, there are wooden, marble, granite, tile, linoleum, vinyl, and mixed-color laminates that can change your kitchen's flooring and safety. Besides the added ease of cleaning, they are easy to disinfect and keep dry at all times.
Conclusion: For a successfulkitchen remodeling in the Bay Area, there is digital interior design in the Bay Area to facilitate the functional application of each part with its illustrated use.
For more info:-
interior design bay area
interior design services bay area
interior designer fremont
interior designers bay area
interior designers near me
kitchen design bay area
Source URL:- https://sites.google.com/view/kitchen-remodeling-in-bay-area/home
0 notes
Text
Which format of image is the best?
1. JPEG

JPEG stands for Joint Photographic Experts Group, and it’s extension is widely written as .jpg. This most used image file format is used to store photos all over the world, and is generally a default file format for saving images. In fact, most of the images you find online will download as .jpg files.
JPEG files come in different quality levels like low, medium and high. Low quality JPEGs are more compressed than high quality versions. So, if you need a high quality image, you’ll need to choose a less compressed JPEG option.
Most commonly, JPEG images are great for sharing on social media, via email and on websites. These files are relatively small, so they take up less space on your memory cards and computer storage. Beware, though, that saving images as JPEGs can compromise the quality of that image.
When to Use JPEG Image Format:
Complex images with a lot of different colors, like photographs
To compress highly detailed images
For print
2. PNG

PNG stands for Portable Network Graphics. It’s an important file format that helps a lot in photo editing. You can use PNGs for completely transparent backgrounds or drop shadows (partial transparency) for the great effects.
This image format will not sacrifice the quality and details of the photos, but that means that they are typically larger in size than JPEGs. Thus, PNGs are best for small images like logos.
When to Use PNG Image Format:
Images with transparency
Small images, like logos
Online
To retain the quality of a detailed image, provided that you have storage for a larger file size
3. GIF

GIF stands for Graphics Interchange Format, and it’s quite similar to PNG in terms of its image quality preservation. With GIF image files, you can also create short animations for web.
This image format has a smaller color range, so it’s not suitable for all photos. Like PNG, GIF images can be transparent. But, unlike PNG, GIF doesn’t support partial transparency, which means you can’t use them to preserve shadow effects in your photos.
When to Use GIF Image Format:
For simple images with few colors, like icons
For animated images
4. PSD

PSD stands for Photoshop Document. When you save an image from Adobe Photoshop, the program’s default is to save that photo as a PSD file. You can then use that file to edit the individual layers you created in Photoshop at a later time.
This file format is not suitable for web, nor is it suitable for clients because it isn’t versatile. However, it is one of the best image formats for maintaining the quality of your image over a long period of time.
You should save your edited images as PSDs, especially if you intend to revisit them in Photoshop for additional retouching. You’ll need to make sure that your layers are not merged before you save your PSD file, or you’ll lose some of your editing capabilities.
Because it contains so much information in different layers, the size of your PSD files will be quite large. But, the trade-off is access to the highest quality version of your images for printing.
When to Use PSD Image Format:
To save images you may edit again in the future
To retain the quality and detail of images you want to print
5. TIFF

TIFF stands for Tagged Image File Format, and it is known as the most used file format by photographers and designers. Images stored as TIFF files are best for post-processing, because they are not compressed at all.
With TIFF files, you can create all kinds of digital images. You can use TIFFs with any photo editing software to perfect your photos, and you can re-save TIFFs as any other file format. Although TIFF files take up more space on your devices, they provide you a lot of flexibility.
Many photographers choose to save TIFF files of all of their photographer on an external drive. That way, they can always return to them should they need to retouch or re-save their photos.
When to Use TIFF Image Format:
For images you want to store without losing details
For images you need to print
Welcome to www.onlineimageconverters.com, your number one source for all things online image converters. We're dedicated to providing you with the best image converters, focusing on dependability: customer service, and quality converters.
We're working to turn our passion for image converters into a booming online store. We hope you enjoy our products as much as we enjoy offering them.
Too converter you image visti:
Image Converters
Subscribe And Stay Updated Get updates, offers & the latest
0 notes
Text
An Review Of Pet Photography
Tip #2 It end up being an all-in-one program. Nothing could be worst then to move your images around from software to another increasing the chance of error and a person to complete photo editing. Complete software stomach with a built in browser, proofing tools, a montage designer, a production system, and much more.
Getting the photo more than a card. If you are intending to make use of a "digital photo card" option with your stationery manufacturer, you'll want to provide top resolution digital photo entirely possible that the best reproduction. Generally a 6x4 photo at 300 dpi resolution (or measuring 1800 x 1200 pixels) is adequate.

youtube
If we expose for that white area, we becomes nice detail and properly show all of the lace and bead employment in a custom made wedding dress. Or the fur in a white dog, or all of the subtle pigment concentrations in a white certain person.
Those who are buying a few photo cards will wind up paying even more than per card than those who are buying larger numbers of holiday photo cards. There happens to be piece of your discount for buying a greater amount.
Measuring real light hitting a subject means which we are properly exposing for your light also studio photo as the colors in the photo. It would record colors and so forth exactly as we see them - under those lighting conditions!
I like to keep things simple. I opt you want to do lighting using the easy way. Whenever possible, I use natural lighting, i.e. the sun, v .. artificial light. https://xoaiweddings.com/xu-huong-makeup-co-dau-trong-ngay-cuoi/ get that belly lighting to take photographs with is made available from an overcast sky.
Regardless of the theme you consider hiring the main thing is by utilizing a photo book in which relatively outlined. Since you will generally be limited to the connected with pages down the road . use, sincere is generate an informative and interesting book associated with space possess to by leftover best snaps. But don't worry. Artwork easy as well as will find once completes your book will effectively put itself together and a associated with fun furthermore.
Less is usually more. Thinking about to makeup, that has always been. You want to look natural and accentuate your positives while downplaying any difficulty areas. Make sure so makeup does not look "caked on" (can make retouching more difficult). Makeup (and hair) should "match" your outfits (e.g., daytime casual look as contrasted with. evening elegant look).
1 note
·
View note
Last Seen Blogs
generallyzealous
love with all u have & with all that u are
scarlet-moth
Scarlet Moth

iterael
Though our paths may diverge

etnikbogor
ETNIK 3_ISWARI

dubsarkim
Untitled