#also i wanted to use the new sparkly brushes i downloaded :))
Text

jujutsu doodles 🕴✨🔮
#theyre so cute#also i wanted to use the new sparkly brushes i downloaded :))#jujutsu kaisen gojo#jujutsu kaisen#jujutsu kaisen yuji#jujutsu kaisen sukuna#jujutsu kaisen megumi#jujutsu sorcerer#megumi fushiguro#itadori yuji#yuji itadori#kugisaki nobara#nobara kugisaki#jjk fushiguro#JJK#jujutsu anime#gojo satoru#satoru gojo#gojo sensei#jujutsu kaisen anime#jujutsu kaisen manga#anime#my art#digital art#doodle#why do i ALWAYS MISSPELL JUJUTSU😭
307 notes
·
View notes
Text
Spring Cleaning Tips And Spring Decoration Ideas
Spring Cleaning Tips
Spring is a time of renewal. It is the time of year when people across the country begin shaking off the final dregs of winter, opening their windows, and hanging clothes on the lines to dry. It is the time of year that many people associate with spring cleaning, but only few, associate it with spring decoration ideas
Perhaps we are too tired from all of our cleaning efforts to seek the inspiration to decorate. If this is the case with you, then my hope is that some ideas mentioned below will help bring some serious decoration inspiration your way.
Either way, it's that time again! The yearly spring ritual is upon us. And with Easter only a few more weeks down the road you probably wonder if wasting a whole Saturday or even the whole weekend is worth it.

Found on Etsy
We want everything done instantly, that's the fast paced
world we are living in today. Therefore, you might want to turn to the
Professionals. Professional home cleaners come prepared and they're not going
to waste any time. If you can afford it, hire them!
If you can't hire the professionals here's how to get it
done just like they do. We've got some spring cleaning tips and advice from the
pros that will help you get done in record time.
Spring Cleaning Tips - How to do it
the Right Way?
Have a Plan:
- Spring-cleaning can seem like such a chore. Often you spend all day, or even a few days to get the entire house sparkly clean. And as s a busy mom, you will appreciate some of these cleaning tips that will make the job a little easier and much faster.
A few days Prior Cleaning Day:
- Start out by taking a quick look through your cleaning supplies a few days before the big spring-clean. Make sure you have plenty of paper towels and cleaning rags. If your mop or broom is really worn out, this is a great time to invest in a new one. Check all bottles and containers of cleaning supplies that you like to use and see if you have plenty of them.
There’s nothing worse than having to clean yourself up
during your big spring cleaning to run to the store for a new bottle of Windex.
The Day before Spring Cleaning:
- Get everyone in the family to spend some time with you the day before the big spring cleaning to pick up around the house. You don’t want to spend time picking up toys or washing dishes the next day. Because you don't want to slide your junk from side to side or just clean under and around it. Therefore, removing your clutter first, will make your whole job easier.
On your Cleaning Day:
- Get up early and put on some comfortable clothes that you don’t mind getting dirty. Dress all the way down to your shoes and put your hair up and drink a cup of coffee. Take the following few minutes to gather all your cleaning supplies and get going.
Tackle one room at a time. This works much better than trying to do
10 things at once. It will also give you a great sense of accomplishment to see
each clean room.
Start at the top and work your way down.
Use a broom or a mop with a soft cloth wrapped around it to get any spider webs and dust out of the ceiling corners. Dust the light fixtures. Keep working your way down cleaning counters, windows and windowsills, furniture. Finish by dusting the baseboards and giving the carpets a good vacuuming. Take the time to vacuum under the bed and move furniture to clean the floor under it whenever possible. Or use one of our recommended Robotic Vacuum Cleaner.

Spring Cleaning Safety Tips
Make sure you dress for the job. You want to be comfortable
but functional. The clothes you wear should be loose but not so loose as to
catch on corners, doorknobs, or anything that could spill.
If you're going to be on your knees a lot, look at investing
in some knee pads. The professionals use them, and for good reason. You'll lose
steam and motivation quickly if you start feeling uncomfortable.
Don't forget the gloves! These can keep the germs and
chemicals off your skin. The regular yellow cleaning gloves you see at any
grocery store will work fine.
Spring Cleaning Tips - For Your
Kitchen
As a notorious family gathering place, kitchens often become
cluttered with everything from bills and report cards to shopping lists and
fridge magnets. With spring just around the corner, it's time to say good-bye
to all that clutter and Tupperware has some simple solutions to help you do it!
Compress the Mess:
- If there is just not enough space in your kitchen, then it's time to toss all unnecessary items. Remove objects from kitchen counters that are not essential for everyday cooking (blenders, mixers, juicers, etc.). This will make the room look more spacious and clean and will give you extra room to prepare daily meals.

Fully decorated Kitchen Shelf
Fridge Feng Shui:
- If items in the fridge are preventing the door from closing easily, it's time to take notice. A bonus to cleaning out the fridge is that when racks are sparkling and items are organized, it's much easier to find everything. Are you constantly throwing away spoiled food or leftovers? Avoid letting things get out of control in the future by placing food in Tupperware's FridgeSmart® or Fresh 'N Cool® containers, which maximize shelf life and minimize space.
Kitchen Crackdown:
- If you are prone to experiencing pangs of distress at the thought of uncluttering your kitchen, stick to one simple rule: Clean as you go. Spending 15 minutes a day clearing countertops and discarding leftovers will create a stress-free environment and allow you to keep your kitchen running smoothly. Tupperware has many useful products to help reorganize your kitchen.
Pantry Antics: -
Before you take a trip to the grocery store, take a good look inside your food
pantry-if in doubt, throw it out! It's safe to assume that the expensive jar of
Spanish olives sitting on the shelf for the last five years will never be used
and the cans in the back are only useful for gathering dust. If food is stored
for too long and in the wrong conditions, the freshness, quality and taste will
suffer. Tupperware's Modular Mates®
containers are ideal for organizing cabinets and offer the perfect solution for
storing dry foods such as pasta, cereal, beans, rice and sugar.
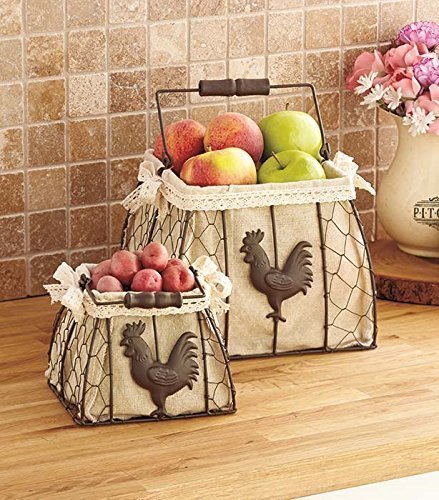
Fruit - Bowels
Have bowls of fruit placed throughout your home. Not only does it add a layer of fresh fruit fragrance to your home, but it is also visually appealing and edible home decor.
Spring Cleaning Your Bathrooms
When you get to the bathrooms, start by spraying some all
purpose or bathroom cleaner on all the appliances, especially anything that may have some build up on it, like the
soap dish in the shower.
Next, pour some Clorox
/ Bleach in each toilet. Allow the cleaner spray to soak in while you get
started on the ceiling, windows and counters.
By the time you get around to the sink, shower and toilet,
all you need to do is wiping them down and give the inside of the toilet a quick
scrub with the brush.
Towels
Yes, I said towels. In your kitchen and your bathrooms you need bright, bold colors that signify spring, birth, and renewal. These little touches can make a huge difference in not only your attitude about cleaning and decorating but also your attitude about cooking.
Shower-Curtain
If you use those in your bathroom, switch it to a spring motive for a nice color pop.

Feng-Shui Shower Curtain
Spring Cleaning & Freshen up Walls
Washing the dirty walls around your house can be a huge
chore. Not only is it a time consuming project, it’s physically exhausting. If
you want to spiff up every nook and cranny, washing walls requires an enormous
amount of reaching, stretching, contorting, and bending to clean off the layers
of dust, dirt, grime, cobwebs, finger smudges, and/or greasy soot that have
accumulated.
Luckily, there are a
few tricks that can make it easier.
Cleaning Solutions
Your choice of cleaners is very important and should be
based on the type of wall that you are cleaning. To avoid ruining the paint job
on your walls, stay away from abrasive cleaners and steel wool. Use a
toothbrush for small stains that need gentle, but abrasive action.
A solution of clear ammonia and water works very well. However,
Ammonia has a terrible odor. Either way it is cheap and has superlative
cleaning capabilities. Nevertheless, if you can’t get past the smell, there are
other options.
Most painted walls can be cleaned with warm water and a
gentle, non-sudsy detergent. Still, you should always test the cleaning solution
that you will be using on an inconspicuous area of the wall. Make sure that the
solution is removing just the dirt, not the paint.
Cleaning Strategy

Download Here
When washing walls, dripping and streaking is inevitable. To
avoid rewashing something that you have already cleaned, you should always
start at the top of the wall and work your way down. Don’t forget to catch
corners, trim, and baseboards as you go.
To get to those hard to reach places, use a sturdy
stepladder or a small portable ladder. Make sure that you choose a ladder that
is both stable and appropriately sized. If you will be working in a stairwell,
use a ladder that is made for uneven surfaces. Try to center the ladder
directly in front of the wall that you will be washing. Over reaching or leaning
too far to one side could cause you to lose your balance.
These final tips can make the job of
washing walls a little easier.
Rid the walls and baseboards of cobwebs and dust
bunnies before you begin washing.If you are using ammonia or another strong-smelling
cleaning solution, make sure the room is well-ventilated. Change your cleaning solution often. When you
are washing walls, the water gets dirty very quickly. To avoid streaking, wipe the walls with a dry
towel after they have been cleaned.
Fragrance
While most people do not realize that the fragrances we use
in our homes is a type of decoration. It makes our noses happy to some degree
but also the potpourri and candles are often decorations in and of themselves.
Put out bowls filled with brightly colored and lightly
scented fragrance balls, dried fruit, and other delights. Gourmet potpourri can
be found in all kinds of gift and fragrance shops and is a rather inexpensive
way to add a fragrant touch to your home decorating as well as the fragrance to
cover up the cleaner smell in your home.
Cleaning Down Bedding

Spring Cleaning Tip: Never wash your Down Bedding! Because washing it will leave you with a flat pillow and feather-bed-covers. Most times washing those will result in clustering of down and the down feathers to break. They will lose their fluffiness and with it the ability to trap body heat.
Appropriately drying a down bed set can be problematic, due to the size of comforters and feather beds. If down is not dried properly, mildew will set in, leaving you with a bad odor and a problem for allergy sufferers.
So if your bed set really needs to be cleaned I advise you to find a dry cleaner that can do this task for you.
Not all Dry-cleaners have equipment large enough for feather beds.
Down bedding purchased within the last 3 or 4 years should
be hung over a line on a warm, sunny, breezy day. Let nature refresh and
rejuvenate them.
Back home in Europe we would every weekend, (if the weather
was nice) hang them across the window sill to air them out. After that you
shake them good up to make the covers and pillows fluffy again.
If this is not possible hang them over a couple of chairs
near an open window. Placing comforters and pillows in a dryer will fluff up,
There are also dry-cleaner Kits for
your dryer available.
If your down comforters, pillows and feather-beds are over 4 or 5 years old, take them to a dry cleaner. Or get one of the previously mentioned kits. That should clean and reconditioned using an all natural method which will fluff up the filling and deodorize it
If you purchased a high quality down comforter, you could
use it all year around. However, if you like I rather store your comforter during
the hot summer nights. You better store the comforter in a cotton bag, and not
a plastic bag.
Take care of your down bedding by having it cleaned by a professional. Luxury quality down comforters, pillows and feather beds deserve the proper care to protect your investment so you can enjoy your down luxuries for life.
Candles

While briefly mentioned above they deserve their own spot
among the top five to say the least. Candles can be depending on their
fragrance soothing, relaxing, and invigorating. For your décor they can also be
inspiring, beautiful, and elegant.
Candles are great no matter what time of the year it is
however, if you select candles in bright spring colors and fragrances you might
be amazed at exactly how uplifting these candles can be.
Cleaning a Sofa & Sofa Cushions
Don't forget sofa cushions and throw pillows. These too can
be cleaned/reconditioned, Some cane have extra filling added. However most of
them would require opening a seam and stitching it back.
I would recommend using a steam cleaner or a small wet-carpet-cleaner
to clean the sofa cushions. And strip the covers of your throw pillows and wash
those with your drapes and curtain.
You can also try to plump up a sagging chair or sofa
cushions by adding and new fill foam.
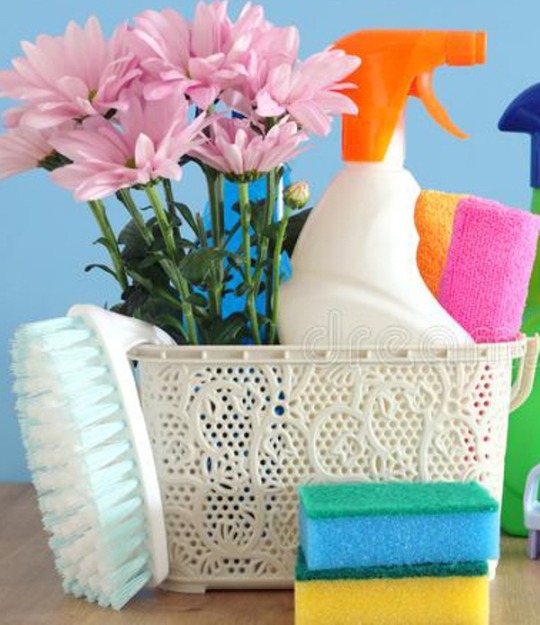
Flowers
Spring is the time of flowers. They are all around us. Use
fresh cut flowers and candles to create beautiful arrangement and centerpieces
throughout your home.

A few blossoming twigs bring the spring indoor
Conclusion
Spring Cleaning is a tough job
Make sure you take some breaks, and drink plenty of water.
When you are done, enjoy a long hot shower or a soak in the tub. Next put on
some clean clothes and put up your feet.
Give yourself a pat on the back for a job well done and get
some rest. You deserve it.
And for those of you, that are in need of springtime home decorating ideas. I hope that my suggestions helped to nudge you into the right direction. And if you hoped for some outstanding suggestions, I suggest that you visit our blog or follow us on Instagram where you will find inspiring ideas for your own spring decorating.
Have any tips or questions to share??? Please leave it in the box below
Read the full article
0 notes
Text
So, I am a frugal lady (read: broke bitch) and I carry this lifestyle choice into my hobbies. I am by no means a master spinner, but I’m in love with the hobby, and I wanted to share some tips I’ve figured out in my journey along the way. These are especially useful for beginner spinners, like myself, who are just starting out and not quite ready to invest in more expensive equipment yet. So, without further ado, here are some inexpensive options for your spinning journey!
1. Buy a drop spindle kit.
I didn’t do this with my first spindle (I bought one from Amazon, and purchased the fiber separately), but I did with some other spindles I own. Why? Because kits come with EVERYTHING you need. You get your spindle, your fiber, and instructions on the most basic kits. I’ve seen kits that include a niddy noddy, a lucet, spindle bowls, etc. It depends on the maker you purchase the kit from. I just found a great kit on Etsy that comes with 4oz of hand-dyed merino, a top and bottom whorl spindle that also doubles as a support spindle, and it comes with a bowl. The whole kit is around $20, which is a great price for what you’re getting - especially if you are a beginner because you get 3 different spindle options to really test out which method is your preferred one! I’ll include the link for this kit, and some other favorite products at the bottom of this post!
2. Use pet brushes for carding and making rolags.
They’re cheaper than hand carders. I actually have two mini pet brushes I purchased from the Dollar Tree, and I use them to make mini rolags that I tuck away in a smaller tupperware in my purse! Just make sure you get one with metal teeth that are similar to carders - they work best! You can also pick up a couple dowels from the hardware store for about 75 cents each to use for rolling the rolag/puni or whatever you call your little fiber bundle!
3. Practice on inexpensive, accessible fibers.
Don’t go spending money on something fancy when you’re still trying to learn - yet another good reason to buy a spindle kit that comes WITH fiber! Once I used all of the wool I had bought, I was itching to try some other fibers. One fun thing you can do is buy a fiber grab bag. One of my favorite stores on Etsy sells grab bags with around 12 oz of fiber for $20. You get all kinds of bits from merino wool, tussah silk, and even some sparklies in there to make art yarn! Something I’ve also experimented with is buying super chunky yarn and carding it and making rolags. Buy a wool blend if you are just starting and wish to do this. I find the 100% acrylic yarns to be a little slippery and tricky, but VERY soft! The key is to find a chunky yarn that is essentially a huge ball of roving. You should be able to draft the fibers out of the yarn very easily, and some chunky yarns aren’t even plied. These skeins usually run around $10 at big box craft stores, but I’ve used coupons on mine and gotten them for $5 a piece. I’ve found that using these giant chunky yarns are a really easy, inexpensive way to practice spinning. Then when you are ready for some lovely hand-dyed yarn, you’ve built up your skillset and you aren’t wasting expensive fibers.
4. Utilize your local library
I’m actually a librarian, so this was something I did from the get-go. Check your library for books on yarn and hand-spinning. My library had quite a few books in-house on yarn making, but the real gold mine of information was in the Ebooks collection. I was able to download a TON of great books to my phone to read while spinning and traveling, without having to carry around a heavy book. I highly recommend checking out Respect the Spindle by Abby Franquemont and The Spinner’s Book of Yarn Designs by Sarah Anderson.
Also, a lot of libraries are investing in tech resources, like 3D printers. I am fortunate that my library has a 3D printer, which allows me to make a lot of spinning tools easily, and at a low price. I’ve made several drop spindles and spools to hold yarn using free designs from Thingiverse! If your library does not have a 3D printer, but you are interested in a 3D-printed spindle, I highly recommend checking out Turtle Made on Etsy! She makes great spindles and they’re budget-friendly!
So, that is about all I have to offer today. I am still learning a lot as a new spinner, and it is such a fun hobby!
Links to all the goodies:
https://www.etsy.com/listing/704805815/complete-beginner-drop-spindle-kit-mini?ga_order=most_relevant&ga_search_type=all&ga_view_type=gallery&ga_search_query=drop+spindle+kit&ref=sr_gallery-1-24
https://www.amazon.com/Respect-Spindle-Infinite-Yarns-Amazing/dp/1596681551
https://www.amazon.com/Spinners-Book-Yarn-Designs-Techniques/dp/1603427384/ref=sr_1_1?keywords=yarn+designs&qid=1569689794&s=books&sr=1-1
https://www.thingiverse.com/search?q=drop+spindle&dwh=805d8f914196ec1
https://www.etsy.com/shop/TurtleMade?ref=simple-shop-header-name&listing_id=521323924
0 notes
Text
@paddyfitz replied to your post “Photomanipping bits and bobs”
I guess watermarks is the big thing with me, especially if there are more than one and they would block the face. Is there anything you can do if you don't have an original clean copy?
I guess I should explain the “original clean copy” thing to people first, as I remember telling you about it privately, but I don’t remember talking about it in public, I don’t think. We’re referring to a thing where--if you’re lucky enough to find a different version of the photo (usually lower in res) that’s either not watermarked or has the watermark in a different place--you can just blow up the lower-res picture/scale it to match the bigger picture and slap it underneath the picture you’re trying to dewatermark. And then erase the watermarks so that the lower-res photo’s clean areas will show through from underneath--usually the quality difference isn’t noticeable if it’s just a narrow area. Let me illustrate it here, in addition to the other stuff I do:
So when you go to, say, Fotofinder, they originally display the images looking like this when you browse their site:

But when you click the little cloud and download the preview image, they give you an image with a watermark that looks like this:

The image with the C is 493x630 px. The image with the “Fotofinder” watermark is 626x800 px. So the bigger image is, obviously, what I want to clean up. So I blow the smaller image up to the bigger image’s size so they match, and then line them up on top of each other in Photoshop:

So, from here, you can see that I could just erase the Fotofinder logo, but then I’d still have to deal with a) the images being of slightly different contrasts, and I still have little bits of the C showing through.

Luckily, it looks like the lighter, less contrasty picture is, in fact, the exact same shade as the lightened area on the watermark! Mostly, anyway. Normally, something like this would necessitate for me to select the watermark and copypaste it as an entire new layer, the Contrast and Levels of which I’d fiddle with (I always use that technique with the Gettyimages bar, for instance--I cut out a copy of the bar, slap it on top of the original and then adjust *that* to match the rest of the image), but here, I just have to colour-match the darker areas. I just deselect the bits of the C out before fiddling with the Levels, like the bit over Reinhold’s Mickey Mouse glove and that bit in the middle of his belly, and keep the rest of the layer selected and apply the Levels fiddlage onto that, like so:

Note that I’ve created a spare, unedited copy of the lowest, poor-res layer at the very start of the project, just in case I’ll have to use elements of it later. I do this with manips all the time, making a spare copy of, say, a headshot before I do any drastic changes to its colouring, so I have several old spare Connie heads I can whip out without having to go back in History (and lose all the other edits I’ve made on the image, if I just want to fix something I fucked up with his nose when the rest of his face turned out fine). Also note that I’m not using an adjustment layer on this, but working on the layer itself (Image > Adjustments > Levels).
But! Buggeration! We’ve still got bits of the C left, but they’re too tiny for me to bother selecting and applying contrast fiddlage onto, and they’re all over areas that haven’t got anything really important going on. So I can go over them with a combination of the Spot Healing Brush Tool (the little band-aid thingy) and the Clone Stamp tool. With this one, I could do it with the Spot Healing Brush alone. Like so:

But my anal-retentive little eye spots two tiny bits in here that are still in need of fixing:

Namely, these two bits on Connie’s sparkly gay cloak. As anyone who’s ever tried to dewatermark anything knows, busy areas like these, especially ones with really clear lines or patterns (the more geometric and straight, the more infuriating--tweed is the worst) are the hardest to reconstruct. If I were *really* dedicated about this image, I would probably be copypasting these areas separately, too, making new layers of them, fixing the contrast and then erasing the bits from around them that don’t match.
But this is a quick one, and I’m lazy, so I’m just going to use a combination of the Clone Brush Tool and--and this is something you may have to resort to sometimes, with the peskiest watermarks--the Smudge Tool. So I take a tiny (5 px) brush and smudge... smudge... smudge...

This is the sort of painstaking, detailed, tiny little fiddly stuff you will sometimes have to resort to. And this is exactly the sort of thing that gives many manips their “paintedy” effect, because with tiny, fiddly detail like this, an airbrush or the Clone Stamp tool aren’t enough and you just have to paint it by hand. This is, IMHO, the best way to work with hair and, like here, with folds of fabric and other fiddly little places where using the Clone Brush would just result in a juddery, stair-like effect. (Also, *loud whisper* sometimes the reconstructed bits might look a bit different to the original, but if you keep it subtle, the chances are that nobody will notice.)
So, here. The final result. Adjusted a bit for contrast--note that this also swallows a number of flaws. Note that you can also use the Dodge, Burn and Sponge tools to deepen shadows or to brighten bits or to desaturate areas if needed.

But, of course, the more complex and obnoxious the watermark is, the crappier the end result will look because sometimes there just won’t be enough “clean” areas left to copy. Sometimes it’s just impossible, and I have given up on certain images, too. But a combination of these cut-out-and-mess-with-the-contrast fiddlages, Spot Healing Brush, Clone Brush and Smudge Tool techniques will go a long way if you’re persistent enough.
Hope this helps!
#photoshop#tutorials#photoshopping#dewatermarking#dewatermark#paddyfitz#i also have a trick for finding the lower-res images with a different watermark from alamy#but i'm not going to reveal those publicly (contact me privately if you need the trick guys)#because i'm worried enough that the image sites will see this post#and start slapping even more obnoxious watermarks onto their images#a la rex or mary evans#even when i have done the occasional graphic designer job#i have outright told them i don't want to use their sites because of their watermarking#because it's so OTT that it's impossible to make out detail in some of the pictures#so you can't really tell if the pic's right for your purposes even if you weren't a filthy thief#which they think all people registering on such sites are#it's humiliating the hoops they make you jump through#so of course that doesn't inspire me into having any more respect towards them#let alone forking out cash for them when sites like alamy make everything much easier#alamy's so nice i have ACTUALLY bought images from them like a good law-abiding citizen#because they don't make you sell your firstborn children to them to even SEE the images#but enough of that i hope this helps
23 notes
·
View notes
Last Seen Blogs

spreens
195.0.3.236

luxcardia
LuxCardia

gloriouscommie
Artsy Fartsy

ilynumbbb
Untitled

pnkgone
moved to pnkfghter